

Page 1
Operating instructions (en)
Answering machine with excellent audio quality
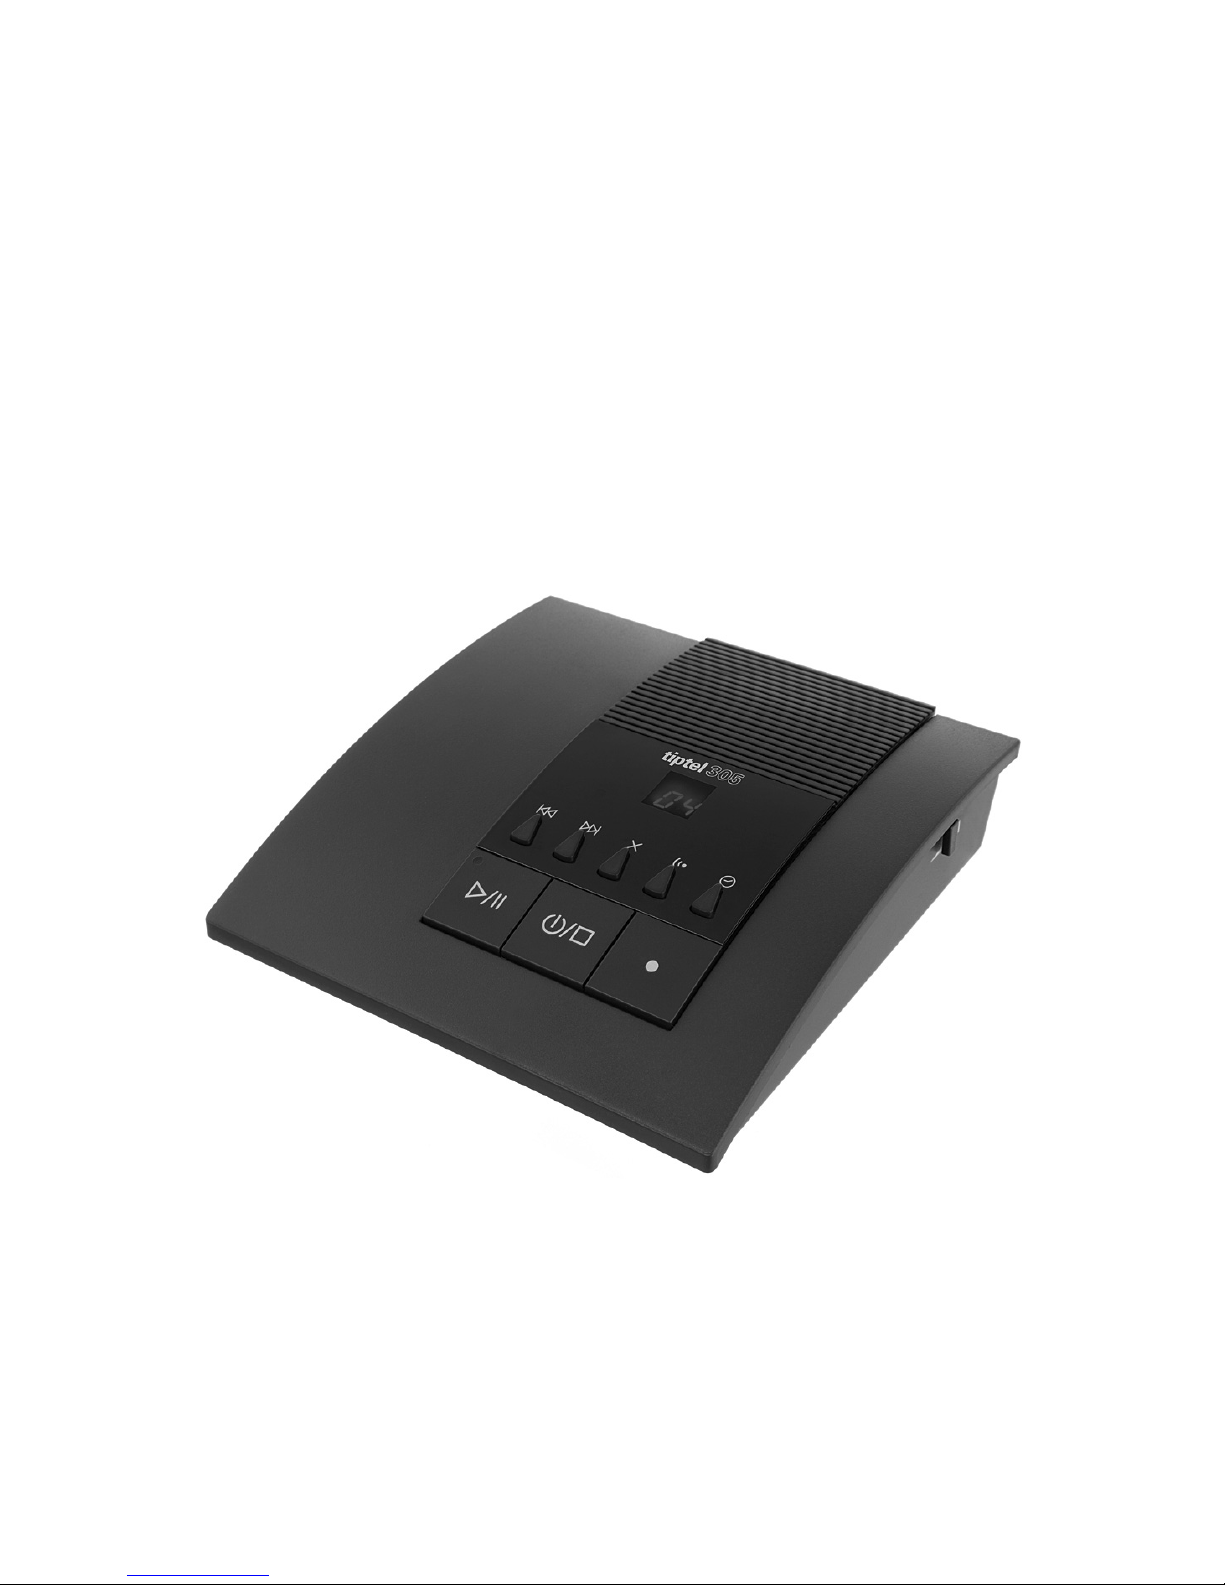
tiptel 305
tiptel
Page 2

Page 3

Contents
3
en
Contents
Contents .............................................................................................. 3
Safety information .............................................................................. 5
Controls ............................................................................................... 6
Assignment of buttons ....................................................................... 7
Getting started .................................................................................... 9
Deliverables ..................................................................................... 9
Setting up ........................................................................................ 9
Connecting ...................................................................................... 9
Settings ............................................................................................... 11
Setting the language ....................................................................... 11
Setting weekday, time and call acceptance ................................... 12
Querying settings ............................................................................ 13
Announcements .................................................................................. 14
General ............................................................................................ 14
Announcement example ................................................................. 14
Recording an announcement ......................................................... 14
Checking the announcement .......................................................... 15
Deleting an announcement ............................................................. 15
Switching on and off ........................................................................... 16
Playing back messages ...................................................................... 17
Playing back messages .................................................................. 17
Pausing playback ............................................................................ 18
Skipping a message ........................................................................ 18
Repeating a message ..................................................................... 18
Deleting individual messages ......................................................... 19
Page 4

Contents
4
en
Deleting all messages ..................................................................... 19
Personal information (dictation) ........................................................ 20
Record a dictation ........................................................................... 20
Remote access ................................................................................... 21
Remote preliminary access ............................................................. 21
Performing the remote access ........................................................ 21
Remote access functions ................................................................ 22
Appendix ............................................................................................. 24
Technical specifications .................................................................. 24
Warranty .......................................................................................... 25
Guarantee ........................................................................................ 25
Declaration of conformity ................................................................ 25
Disposal ........................................................................................... 26
Page 5

Safety information
5
en
Safety information
Please observe the following closely when setting up, connecting and operating the tiptel 305:
Only plug the connection cables into sockets designated for this use.
Lay the connection cables such that they do not pose any risk of acci-
dents. Connected cables must not be subjected to excessive mechanical stress.
Set up the device away from electrical interference.
Only connect accessories that are permitted for this device.
Never open up the device yourself. Do not use sharp or metallic objects
to touch the plug contacts
Only use a soft, damp cloth to clean the device. Do not use chemicals or
abrasive cleaners.
Protect the device from damp, dust, liquids and vapours.
Do not expose the device to direct sunlight.
Do not use the device in potentially explosive atmospheres.
Only use the original power supply unit and the original telephone con-
nection cable.
The wall socket that you use must be located close to this device and
easy to access.
Page 6

Controls
6
en
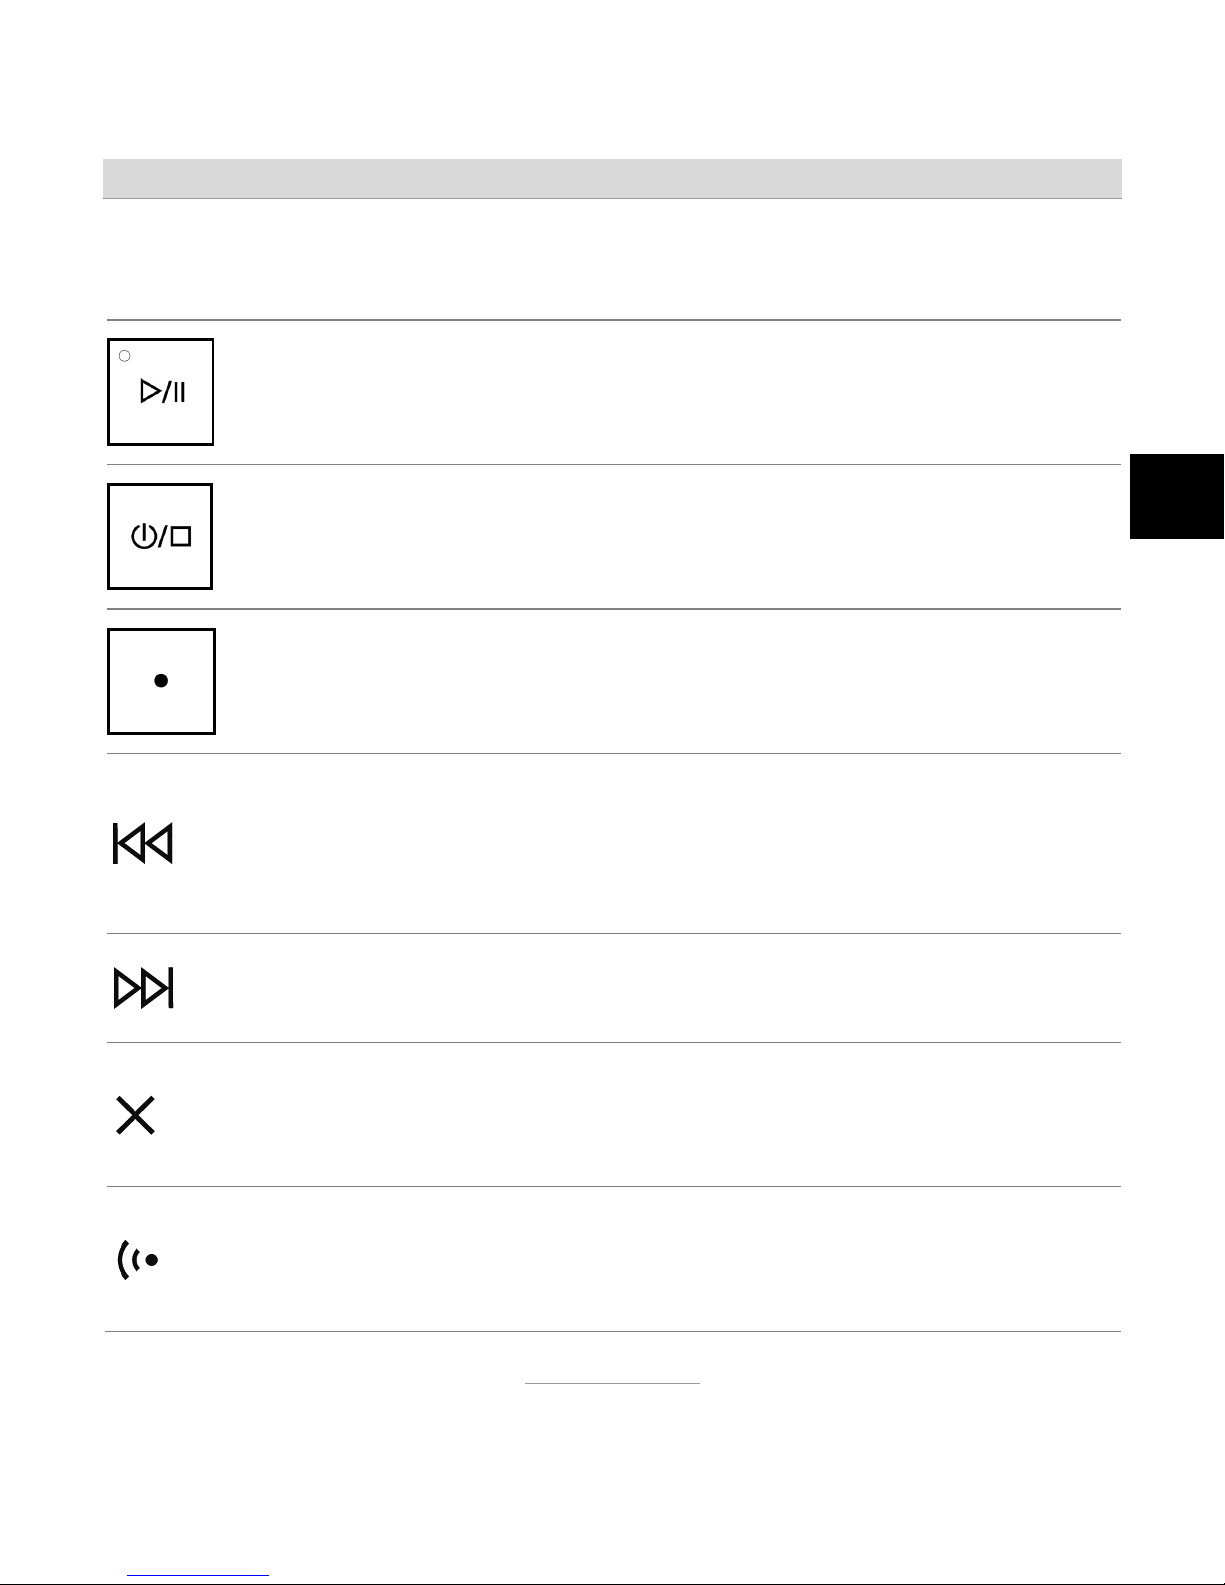
Controls
Page 7
Assignment of buttons
7
en
Assignment of buttons
Playback: Starts and stops the playback of messages. The
integrated red LED flashes when new messages have arrived and
when recording announcements or dictation.
On/Off: Switches the answering machine's functions on or off. Stops
t
he playback of messages.
Dictation: Starts and stops the recording of personal information
(dictation).
Back: Repeats the current message. Skips to the previous message
if pressed twice in quick succession during playback. Is used for
selection in the Setup wizards. If pressed for longer than 1 second in
t
he basic state, it accesses the voice settings.
Next: Skips to the next message during playback. Is used for
selection in the Setup wizards.
Delete: If pressed briefly during the playback of messages, the
current message is deleted. If pressed for longer than 1 second in
t
he basic state, it deletes all messages and dictation.
Announcement: When pressed briefly it starts to play back the
current announcement. If pressed for longer than 1 second in the
basic state, it deletes recordings and dictations.
Page 8

Assignment of buttons
8
en
Time: When pressed briefly, it plays back the weekday and the time
in the language set. When pressed longer than 1 second, it accesses
t
he Setup wizard for weekday, time and call acceptance.
Volume (slider on the side): Adjusts the volume of the integrated
loudspeaker.
Page 9

Getting started
9
en
Getting started
Deliverables
Included in the packaging of your tiptel 305:
tiptel 305
Connector cables
Adapter (not in all countries)
Power supply unit 6V / 500mA / DC
Operating instructions
Setting up
Your tiptel 305 has been manufactured for normal conditions of use. Solvents in furniture lacquers, wood oils and paint preservatives may corrode
the device feet, resulting in potential staining of furniture. Therefore always
use a non-slip underlay, especially with new or recently treated furniture.
Connecting
Before you can use your tiptel 305 you first need to connect all the necessary cables.
1 Fit the small connector of the mains plug into the "POWER" jack and
the plug into a 230 V (240 V in UK) socket outlet.
2 Fit the small connector of the telephone connection cable into the
"LINE" jack and the other connector into the telephone socket.
Page 10

Getting started
10
en
For the UK we supply a 240 V electricity adaptor.
Page 11

Settings
11
en
Settings
The factory setting display alternately shows and to indicate that the
device settings have yet to be configured.
Two Setup wizards are used to set the language and to set the weekday,
time and number of rings before calls are accepted.
The settings are retained if the power fails. The time and date must be
reset after a power failure however.
Setting the language
You can choose German, English, French, Italian or Dutch as the language.
The tiptel 305 then plays back in the language set the weekday, the date
and the time of when messages arrived.
Press the Back button for
about 2 seconds.
The language currently set is shown
on the display.
Keep pressing the Next button
until the required language is
displayed.
All available languages are displayed.
= English
= French
= German
= Italian
= Dutch
Briefly press the Back button. The settings are saved.
Page 12

Settings
12
en
The Setup wizard ends automatically if no button is pressed for about
8 seconds. You must then start it again.
Setting weekday, time and call acceptance
Use this wizard to set the current weekday, the time and the number of
rings after which the device is to pick up and accept calls.
Press the Time button for
about 2 seconds.
The displays shows the weekday set
as to for Monday to Sunday
and the device announces the weekday.
Keep pressing the Next or
Back button briefly until the
current weekday is selected.
The display shows to for
Monday to Sunday and the device
announces the weekday.
Briefly press the Time button. The hour set is displayed and the
device announces it.
Keep pressing the Next or
Back button briefly until the
current hour is selected.
The hour set is displayed and the
device announces it.
Briefly press the Time button. The minute set is displayed and the
device announces it.
Page 13

Settings
13
en
Keep pressing the Next or
Back button briefly until the
current minute is selected.
The minute set is displayed and the
device announces it.
Briefly press the Time button. The device announces the weekday
and time set and then switches to the
display of rings until calls are accepted.
Keep pressing the Next or
Back button briefly until the
required number of rings is
selected.
The display shows the number of
rings set.
= 2 rings
= 6 rings
= 2/6 rings
(setting for remote preliminary access)
Briefly press the Time button. The device saves all the settings and
ends the wizard.
The Setup wizard ends automatically if no button is pressed for about
8 seconds. You must then start it again.
Querying settings
Briefly press the Time button. The display shows . As a check,
t
he device announces the weekday
and time in the language set.
Page 14

Announcements
14
en
Announcements
General
Your tiptel 305 has a factory-set announcement as well as one that can be
changed to your individual requirements. Your custom announcement is
automatically used if one has been recorded.
If you clear your custom announcement, the factory-set one is used automatically.
Individual announcements can be between 3 and 60 seconds long.
Announcement example
Hello, you've reached Jane and Paul Smith in London. Sorry we're not
available right now. Please leave your name and phone number and we will
return your call. Please leave a message after the tone.
Recording an announcement
Press and keep pressed the Announcement button.
Wait until you hear a beep and the
red LED in the "Playback" button
flashes.
Start speaking (speak into the
microphone from a distance of
about 15 cm).
The display shows .
After about 50 seconds, the display starts to flash, indicating that
t
here are about 10 seconds of
announcement time remaining.
Page 15

Announcements
15
en
To stop recording, release the
Announcement button.
Recording is complete and the
announcement plays again for you to
check.
Checking the announcement
Briefly press the Announcement
button.
Y
ou can set the volume by us-
ing the volume control.
The announcement is played back.
The display shows .
To cancel the playback: Press
t
he On/Off button.
The playback is stopped.
Deleting an announcement
Press and keep pressed the Announcement button.
Wait until you hear a beep and the
red LED in the "Playback" button
flashes.
Release the Announcement but-
t
on before 3 seconds elapse.
The individual announcement is
deleted. The factory announcement
is set and played again for you to
check.
Page 16

Switching on and off
16
en
Switching on and off
To switch on: Press the On/Off
button.
The display briefly shows and
t
hen the number of messages is
displayed.
If the red LED in the Playback button
is flashing in addition, the display
pertains to new messages not yet
heard. If this LED is not flashing, the
display pertains to messages already
heard but not yet deleted.
Whilst calls are being answered, the
red LED in the Playback button flashes and is shown on the display.
Use the volume control to set
t
he volume.
Y
ou can listen in to incoming mes-
sages. You can lift the receiver at any
t
ime while the message is recording
t
o speak directly to the person tele-
phoning you.
To switch off: Press "On/Off"
once more.
The display shows . No further
calls are answered.
Page 17

Playing back messages
17
en
Playing back messages
The message memory on your tiptel 305 has a maximum of 20 minutes recording time. A recording can be up to 60 seconds long. The device supports up to 99 recordings. If the message memory is full, the device shows
on the display. No further recordings are then possible. You should
therefore delete messages regularly.
Playing back messages
The red LED in the Playback button flashes when new messages are available that have yet to be heard. When the device is switched on, the display
also shows the number of new messages.
The red LED in the Playback button stops flashing when there are no more
messages to listen to. The display then shows the messages already listened to but not yet deleted.
Press the Playback/Pause but-
t
on.
Y
ou can set the volume by us-
ing the volume control.
Playback of messages starts. The
number of the message is shown on
t
he display.
At the end of a recording, the weekday and time of the recording are
announced.
Playback automatically stops at the
end of recordings.
Page 18

Playing back messages
18
en
Pausing playback
Press the Playback/Pause but-
t
on during playback.
Playback is paused. The display
shows .
To resume, press the Playback/Pause button again.
Playback is resumed.
Skipping a message
Press the Next button during
playback.
The message you are currently
listening to is skipped.
Repeating a message
Press the Back button during
playback.
The message currently being listened
t
o is repeated.
Twice
Press the Back button twice in
quick succession during playback.
Playback jumps to the previous
message.
Page 19

Playing back messages
19
en
Deleting individual messages
Briefly press the Delete button
during playback of a message.
The message is deleted.
Deleting all messages
1 second
In the basic state, press the Delete button longer than 1 second.
The display shows .
All messages are deleted.
Page 20

Personal information (dictation)
20
en
Personal information (dictation)
You can record your personal information via the integrated microphone for
example to leave a message for someone in your home if you go out.
Record a dictation
Press and keep pressed the Dicta-
t
ion button.
After about 1 second, is displayed and the red LED in the Playback/Pause button flashes.
Start the dictation (speak into the
microphone from a distance of
about 15 cm).
Release the Dictation button to
end the recording.
The device sounds two short beeps
and saves the dictation as a new
recording.
The maximum length of a dictation is 120 seconds. After 110 seconds,
starts to flash on the display to indicate that there are only 10 sec-
onds of recording time remaining.
Page 21

Remote Access
21
en
Remote access
You can operate your tiptel 305 remotely from anywhere in the world using
the numeric keys on a touch tone (MFV) telephone. To carry out the remote
access, you require the remote access code (3 digits) - this is on the underside of the device on the "Remote Code" sticker.
Remote preliminary access
If you have selected as call acceptance in the device settings, your tiptel
305 accepts an incoming call after 2 rings when new messages are stored
on the device. If no new messages are stored, the device does not accept
calls until after 6 rings. For the remote access, you then know that there are
no new messages when the device has not accepted your call after the
third ring.
Performing the remote access
Call your tiptel 305 from another
phone.
Y
ou hear the current announcement.
Enter the remote access code
using the telephone keypad.
Re-enter the code if you make a
mistake.
The announcement stops and you
hear a long and a short beep.
Playback starts automatically if there
are new messages.
Start the function required by
entering the relevant digits.
The required function is run.
Page 22

Remote Access
22
en
Put down the receiver to end
remote access.
The tiptel 305 is disconnected and
remote access ended.
When the playback of messages has finished and the device is waiting
for further input for required functions, it must be within 20 seconds
because otherwise the device cuts the connection.
During the playback of messages, the device sounds a beep every
160 seconds - this must be acknowledged within 10 seconds by entered any digit. If it is not acknowledged, the device cuts the connection.
Remote access functions
Functions during the playback of messages
Switch to the next message
Press 6# during playback of the
message.
Playback switches to the next message.
Repeat
Press 5# during playback of the
message.
The message currently being listened
t
o is repeated.
Switch to the previous message
Press 4# during playback of the
message.
Playback switches to the previous
message.
Page 23

Remote Access
23
en
Pause playbac
k
Press 8# during playback of the
message.
Playback is paused. Then press any
button to resume the playback.
Delete the current message
Press 7# during playback of the
message.
The current message is deleted.
Functions outside of message playback
Playback all messages
Press 3# outside of message
playback.
Playback will begin at the first message.
Delete all messages
Press 7# outside of message
playback.
All messages will be deleted.
Page 24

Appendix
24
en
Appendix
Technical specifications
Dimensions (W x H x D)
tiptel 305 160 x 40 x 165 mm
Weight
tiptel 305 270 g
Power supply unit 60 g
Operating voltage
Power supply unit 100–240 V, 50/60 Hz
Power consumption in stand-by Less than 1 W
Ambient temperature 0 – 40 C
Announcements
Number of announcements 1
Length of announcement 3 - 60 seconds
Messages
Message time 20 minutes maximum
Number of messages 99 (maximum
)
Message length per call 1 minute (maximum)
Data retention following power failure > 10 years
Display LCD, 2-digit, 7-segment
Page 25

Appendix
25
en
Warranty
Your point of contact for warranty obligation benefits is the specialist retailer
where you acquired your device. Warranty conditions are based upon the
legal regulations of the country in which the device was purchased. Your
specialist retailer will be glad to provide more information.
Guarantee
Tiptel provides a voluntary guarantee on the device, the conditions of which
are published on http://www.tiptel.com. The guarantee conditions applicable at the time of purchase apply. The original sales slip (receipt, bill) with
serial number is used as proof of purchase. Please keep these documents
in a safe place.
Declaration of conformity
This device is approved for the connection and use within the analogue
public telephone networks in all EC countries – according to the European
Requirements. Due to technical deviations in individual countries, we cannot grant an unlimited guarantee for the successful operation at all types of
telephone accesses.
This device satisfies the requirements of the EU directive on radio and telecommunication terminal equipment and the mutual recognition of their conformity. The CE mark on the device confirms conformity with the above directive.
We hereby declare that the device satisfies all fundamental requirements of
European directives 1999/5/EC and 2002/95/EC. For details on the declaration of conformity please visit http://www.tiptel.com.
Page 26

Appendix
26
en
Disposal
Packaging: Dispose of card and cardboard boxes in the used paper container and throw plastic parts into a recycling container.
Device disposal: Used electrical devices should not be disposed of in the
household waste. Dispose of the device at your local collection points
(scrap or recycling yards). Please contact your local authority for information on disposal sites.
(Rechargeable) batteries: (Rechargeable) batteries may not be disposed
of in the household waste. As a consumer, you have a legal obligation to return (rechargeable) batteries. Please contact your local authorities, or the
specialist retailer from where you purchased the device, for information on
disposal sites.
Page 27

Page 28

Tiptel.com GmbH
Business Solutions
Halskestraße 1
40880 Ratingen
Deutschland
Tel.: 0900 100–84 78 35*
Vanity Tel.: 0900 100–TIPTEL*
Internet: www.tiptel.de
International: www.tiptel.com
*(1,49 Euro/Min. aus dem Festnetz der
Deutschen Telekom, abweichende
Mobilfunkpreise möglich)
Tiptel GmbH
Ricoweg 30/B1
2351 Wiener Neudorf
Österreich
Tel.: 02236 677 464-0
Fax: 02236 677 464-22
E-Mail: office@tiptel.at
Internet: www.tiptel.at
Tiptel AG
Bahnstrasse 46
8105 Regensdorf
Schweiz/Suisse/Svizzera
Tel.: 044 843 13 13
Fax: 044 843 13 23
E-Mail: tiptel@tiptel-online.ch
Internet: www.tiptel-online.ch
Tiptel B.V.
Camerastraat 2
1322 BC Almere
Nederlands
Telefoon: 036 53 666 50
Fax: 036 53 678 81
e-mail: info@tiptel.nl
Internet: www.tiptel.nl
Tiptel NV
Leuvensesteenweg 510 bus 4
1930 Zaventem
Belgique/België
Tel.: 0903 99 333 *
Fax: 02 714 93 34
E-Mail: tech@tiptel.be
Internet: www.tiptel.be
* (1,12 Eur / Min.)
Tiptel s.a.r.l.
23, avenue René Duguay-Trouin
78960 Voisins-Le-Bretonneux
France
Tél.: 01 39 44 63 30
Fax: 01 30 57 00 29
e-mail: support@tiptel.fr
Internet: www.tiptel.fr
(en) 09/2013
 Loading...