

TIPTEL 3022 office, 3011 office Installation Manual
Installation Guide (GB)
ISDN telephone system
tiptel 3022 office
tiptel 3011 office
tiptel


Table of contents
3
Table of contents
Table of contents .............................................................................................. 3
Introduction ....................................................................................................... 7
Important information ....................................................................................... 7
Scope of supply ........................................................................................................ 8
Directions for the operation of the telephone system ............................................... 9
Connection approval................................................................................................. 10
Environmental compatibility ...................................................................................... 10
Function in the case of power failure ........................................................................ 10
Ports .......................................................................................................................... 11
ISDN ports............................................................................................................ 11
Analogue ports..................................................................................................... 11
Network ports....................................................................................................... 12
ADSL port............................................................................................................. 12
Wireless LAN (optional)........................................................................................ 12
RS 232.................................................................................................................. 12
Main features............................................................................................................. 13
Terminal units............................................................................................................ 13
Analogue telephones ........................................................................................... 14
ISDN telephones .................................................................................................. 14
First steps.......................................................................................................... 15
Mounting of the telephone system............................................................................ 16
Required tools...................................................................................................... 16
Order of mounting steps ...................................................................................... 16
Installation of the telephone system .................................................................... 16
Jumper assignment ............................................................................................. 17
Computer setup ................................................................................................ 19
Network configuration ............................................................................................... 19
Necessary web browser settings (all operating systems) ................................... 19
Network configuration in Windows 98 / Windows 98 SE / Windows ME ............. 21
Network configuration in Windows 2000 ............................................................. 23
Network configuration in Windows NT................................................................. 25
Network configuration in Windows XP ................................................................. 27
Configuration............................................................................................................. 29
Configuration via LAN .......................................................................................... 29
Configuration via ISDN......................................................................................... 30
Configuration via RS 232 ..................................................................................... 30
Configuration: Settings..................................................................................... 32
General...................................................................................................................... 32
Settings ..................................................................................................................... 33

Table of contents
4
Date / Time........................................................................................................... 35
Service functions.................................................................................................. 35
Speed dialling ........................................................................................................... 36
Dialling control .......................................................................................................... 37
Blocked phone numbers...................................................................................... 37
Exception phone numbers................................................................................... 37
Emergency phone numbers ..................................................................................... 37
Call data .................................................................................................................... 38
Configuration: ISDN access............................................................................. 39
Settings ..................................................................................................................... 39
Type / Status ........................................................................................................ 39
Layer 2 always active (only point-to-multipoint access) ...................................... 39
Basic number (only point-to-point access) .......................................................... 39
Operator ............................................................................................................... 40
Entry of MSN/DDI for the individual external S0 ports ............................................... 40
Call forwarding external ............................................................................................ 40
Status inquiry for call forwarding external (CFI)................................................... 41
Configuration: Subscriber ................................................................................ 42
Subscriber list............................................................................................................ 42
Creating a subscriber................................................................................................ 42
Selecting a subscriber ......................................................................................... 43
Copying a subscriber........................................................................................... 43
Modifiying a subscriber........................................................................................ 43
Administrator settings ............................................................................................... 43
Authorisations ...................................................................................................... 44
Assignment table: extensions .............................................................................. 45
Assignment table: incoming external calls........................................................... 45
Assignment table: external going MSN................................................................ 45
Further features ......................................................................................................... 46
Team signalling.................................................................................................... 46
Subscriber settings ................................................................................................... 47
Settings ................................................................................................................ 47
Call forwarding ..................................................................................................... 48
Charge account ................................................................................................... 48
System telephone ..................................................................................................... 49
Setting of services ..................................................................................................... 54
ISDN data service................................................................................................. 54
Configuration: Extensions................................................................................ 56
Analogue extensions in general................................................................................ 56
Settings ................................................................................................................ 56
Analogue extensions per port ................................................................................... 56
Settings ................................................................................................................ 56
Configuration: Network .................................................................................... 58

Table of contents
5
Network settings ....................................................................................................... 58
Settings ................................................................................................................ 58
DHCP ........................................................................................................................ 59
Settings ................................................................................................................ 59
List of DHCP clients ............................................................................................. 60
Wireless LAN ............................................................................................................. 60
Status ................................................................................................................... 60
Settings ................................................................................................................ 61
WEP code ............................................................................................................ 61
Allowed MAC addresses ...................................................................................... 61
Configuration: Internet ..................................................................................... 62
Internet dialling-in...................................................................................................... 62
Manual dialling-in ................................................................................................. 62
Dialling-in on demand .......................................................................................... 62
Always online ....................................................................................................... 62
Status window...................................................................................................... 62
Provider ..................................................................................................................... 63
Access data.......................................................................................................... 63
Connection control............................................................................................... 64
TCP/IP-address .................................................................................................... 65
Name server addresses (DNS) ............................................................................ 65
Firewall ...................................................................................................................... 66
Settings ................................................................................................................ 66
DMZ (Demilitarized Zone) .................................................................................... 66
Virtual server (Port Forwarding) ........................................................................... 67
Port filter .................................................................................................................... 67
IP filter .......................................................................................................................68
MAC filter................................................................................................................... 68
Dyn. DNS................................................................................................................... 68
Statistics .................................................................................................................... 69
Internet connections ............................................................................................ 69
Current month ...................................................................................................... 69
General settings ................................................................................................ 70
Reset of the telephone system.................................................................................. 70
In case of any malfunctions ............................................................................. 71
Status LEDs............................................................................................................... 71
Description of possible malfunctions ........................................................................ 72
Analogue terminal cannot be called .................................................................... 72
Analogue terminal without dialling tone............................................................... 72
ISDN terminal cannot be called ........................................................................... 72
ISDN terminal cannot place any external calls .................................................... 72
No incoming external calls possible .................................................................... 73
Technical data ................................................................................................... 74

Table of contents
6
Annex ................................................................................................................. 75
Explanation of terms ................................................................................................. 75
Service....................................................................................................................... 80
Guarantee ................................................................................................................. 80
Maintenance / Cleaning ............................................................................................ 81
CE Sign ..................................................................................................................... 81
Index .................................................................................................................. 82

Introduction
7
Introduction
Congratulations on purchasing the telephone system tiptel 3022 office / 3011 office.
You have chosen a multifunctional 4 in 1 solution for telephony, network, wireless
LAN (optional), and Internet, which
•
enables modern telephony via the high-capacity telephone system,
•
enables high speed Internet access via the integrated DSL router,
•
enables Internet access via the integrated ISDN router even if no DSL access is
available or in case of a DSL connection failure,
•
enables the connection of up to four computers via the 4 port switch,
•
enables wireless communication with your computer via the optional WLAN access point functionality.
Important information
We reserve the right to make changes to this Installation Guide or the hardware described at any time and without prior notice. The current version of this Installation
Guide is also available as pdf-file on the Internet at www.tiptel.com. The texts and illustrations of this Installation Guide have been compiled with the utmost care, however, errors cannot be ruled out completely. The publisher shall not be held liable for
any incorrect information or consequences arising from the same.
© 2004 TIPTEL AG Ratingen. All rights reserved.

Introduction
8
Scope of supply
Before installing this device, please check the completeness of supply, which comprises:
•
1 telephone system tiptel 3022 office respectively tiptel 3011 office
•
1 ISDN access cable
•
1 RS 232 cable for connecting the telephone system with a PC
• 1 Installation Guide
•
1 accessories kit with mounting material
•
1 User's Manual
Optional available as accessory:
•
tiptel WLAN Access Point Module
• Uninterruptible Power Supply (UPS)

Introduction
9
Directions for the operation of the telephone system
•
This ISDN telephone system has been designed for use at ISDN connections
according to Euro ISDN protocol DSS1. Use with other connections will lead to
malfunctions.
•
The integrated DSL router is compatible with DSL modems using PPPoE (pointto-point protocol over Ethernet) or PPTP (point-to-point tunnelling protocol).
•
This ISDN telephone system has been designed and manufactured in accordance with "Information Technology Equipment Safety" standard (EN 60950).
Only devices complying with this or an equivalent directive may be connected to
this ISDN telephone system.
•
Installation work must be carried out by a professional. Installation work on 230 V
mains network must be carried out by a qualified electrician. Installation must be
carried our in compliance with VDE 0100.
•
In case of any malfunction, please disconnect the unit from the line and remove
all ISDN connection cables.
•
The ISDN telephone system may not be installed and operated in the following
environments:
o outdoor
o
in damp or wet rooms (bathroom, shower, swimming pool ...)
o
in surroundings prone to danger of explosion
o
in locations exposed to direct sunlight
o
at ambient temperatures below 0 °C or above 40 °C
o where exposed to strong vibrations
o
in dusty areas
•
In order to avoid any danger of tripping please lay the connecting cables carefully. The connecting cables must not be subjected to excessive pulling or bending or mechanical loading. All connecting cables must be used indoor only.

Introduction
10
Connection approval
Your ISDN telephone system has a "General Connection Approval". So, anyone is
authorized to put the telephone system into operation. It is not necessary to notify
your network operator.
Environmental compatibility
No contact with substances harmful to human health can occur during due and
proper use of this telephone system. The synthetic materials used in this device consist of partially recycled granulate. Our packing does not contain any synthetic materials. Only cardboard and paper from partially recycled material is used.
Function in the case of power failure
If you want to guarantee that your telephone system is also available in case of a
power failure, an uninterruptible power supply (UPS) is available as optional accessory. This ensures that the telephone system will continue to function for several
hours during power failure.
Ports
11
Ports
The telephone system has the following ports:
ISDN ports
•
S
0
1, external:
connection to a point-to-point or point-to-multipoint access according to Euro
ISDN (DSS1)
•
S
0
2 and S0 3, variable (only tiptel 3022 office):
internal: connection to a point-to-multipoint access for ISDN devices according
to Euro ISDN (DSS1)
external: connection to a point-to-point or point-to-multipoint access according
to Euro ISDN (DSS1)
•
S
0
4, internal:
connection to a point-to-multipoint access for ISDN devices according to Euro
ISDN (DSS1)
Note: If you use the telephone system tiptel 3011 office, ports S0 2 and S0 3 are
without function.
Analogue ports
The telephone system has 8 a/b ports for the connection of various analogue devices
as analogue telephones, cordless telephones, answering machines, or fax machines.

Ports
12
Network ports
The telephone system has a 10/100 Ethernet 4-port switch. The connection is made
by using a standard Ethernet cable (CAT 5) with auto negotiation.
Note: When using the optional tiptel WLAN module, one LAN port will be occupied
by this module.
ADSL port
The telephone system has a 10/100 Ethernet port for the connection of your DSL
modem.
Note: The ADSL port is compatible with modems using PPPoE (point-to-point pro-
tocol over Ethernet) or PPTP (point-to-point tunnelling protocol).
Wireless LAN (optional)
You may also install a wireless LAN module within the telephone system enabling
wireless LAN or DSL access.
RS 232
The RS 232 port of your telephone system provides a standard modem. The following settings have to be performed on your PC for the communication interface (for
example for COM 2):
•
data transfer rate (bits per second): 115200
•
data bits: 8
•
parity: none
•
stop bits: 1
•
protocol: none
•
hardware flow control: off

First steps
13
Main features
The telephone system tiptel 3022 office / 3011 office provides many features which
can be adapted to the individual requirements. Some of these features may be enabled / disabled via individual settings at the extensions.
•
1 S
0
external for Euro ISDN point-to-multipoint or point-to-point access (DSS1)
•
2 x S
0
internal/external variable (only tiptel 3022 office)
(S
0
internal as point-to-multipoint access, Euro ISDN protocol DSS1)
(S
0
external for point-to-point or point-to-multipoint access, DSS1)
•
1 S
0
internal as point-to-multipoint access, Euro ISDN protocol DSS1
•
8 a/b ports, symmetrical
•
CLIP signal (calling line identification presentation) available at a/b, e.g. display
of caller’s phone number on the display of your telephone
•
Charge pulse at a/b
•
Status LEDs
•
DSL router
•
ISDN router
• 4 port LAN switch 10/100 Mbps
•
RS 232 interface
•
Configuration via Internet browser
•
New firmware may be downloaded from the Internet and uploaded to your telephone system via your PC for adaptation to future requirements
•
Remote configuration via the Internet or telephone line
•
Dial-in server (ISDN) for accessing the network via ISDN
•
Security passwords for protection against sabotage
Terminal units
It is possible to connect analogue telephones, ISDN telephones, answering machines, fax machines, and PCs to the telephone system tiptel 3022 office / 3011 office. Range and use of features depend on the terminal equipment used. Please also
consult the User's Manuals of the terminal equipment.
Only approved terminal units complying with the standard TBR 21 should be connected to the telephone system.

First steps
14
Analogue telephones
Analogue telephones must comply with the following specifications:
•
DTMF telephones (dual tone multiple frequency):
The dialling information is transmitted via a tone sequence. In addition to the
keys
-
and , also the keys "*" and "#" are available.
Additionally the following feature should be supported by the analogue telephones in
order to ensure full capability of the telephone system:
•
CLIP function (calling line identification presentation):
Telephones able to display the phone number of the calling party.
Note: Pulse dialling telephones are NOT supported.
ISDN telephones
Telephones which can be operated at S0-ports according to Euro ISDN standard
DSS1.
For operation of an ISDN telephone, the relevant internal phone number (MSN) is required. Please consult the User's Manual of the ISDN telephone for the programming
procedure.

First steps
15
First steps
This telephone system has been designed as a plug & play device, i.e. after connecting the terminals, connecting the telephone system to the telephone network and
switching on the power supply, the system is ready for use.
Please note that there is a difference between the configuration of a telephone system e.g. by the administrator and a configuration by individual subscribers. The administrator assigns phone numbers to the subscribers. With this phone number or
with the subscriber’s name and a password, the subscriber can enter his personal
settings via a browser (e.g. programming a call forwarding). The administrator also
takes care of the extensions, at which a call will be signalled, and which external
MSNs will be available.
Your telephone system is supplied with the following factory pre-set parameters (The
following list is not complete and includes only the settings relevant for an initial functional test):
•
The external S
0
is configured for Euro ISDN point-to-multipoint and point-to-point
access (DSS1).
•
S
0
ports 2 and 3 are configured via hardware jumpers on the internal S0. The
subscribers (MSNs) 20 – 21 respectively 30 – 31 are pre-set (only tiptel 3022 office).
•
The internal S
0
is configured for Euro ISDN point-to-multipoint access. The sub-
scribers (MSNs) 40 - 41 are pre-set.
•
The analogue extensions 1 – 8 are assigned to the subscribers 50 - 57.
•
All subscribers have international exchange authorisation.
•
Standard exchange connection with the digit
.
•
Charges are only displayed on ISDN terminals, not on analogue terminals.
•
The pre-set PIN is 0000.
•
The pre-set Ethernet address is 192.168.1.100.
•
The pre-set subnet mask is 255.255.255.0.
•
The DHCP start address is 192.168.1.10.
•
The user name / the password for the web-based configuration is admin/admin.
In order to ensure a complete functionality of the ISDN terminals, an MSN must be
assigned to them. For details on assigning MSNs to the ISDN terminals, please
consult the User's Manuals of your ISDN terminals.

Mounting
16
Mounting of the telephone system
The tiptel 3022 office / 3011 office has been designed for wall mounting. The necessary screw distance is 200 mm.
Required tools
•
percussion drill with 6 mm stone drill adapter
•
screwdrivers in different sizes
•
edge cutter, stripper, possibly crimping tool for Western plug
Order of mounting steps
You should observe the following order of mounting steps:
•
determination of ISDN cabling versions and corresponding wiring
•
wiring of the wall outlets
•
determination of a suitable mounting place
•
wall mounting of the telephone system
•
checking of jumper settings and modification if necessary
• connection of terminal devices
•
connection of the telephone system to network termination and ADSL modem
• connection of the telephone system to 230 V mains network
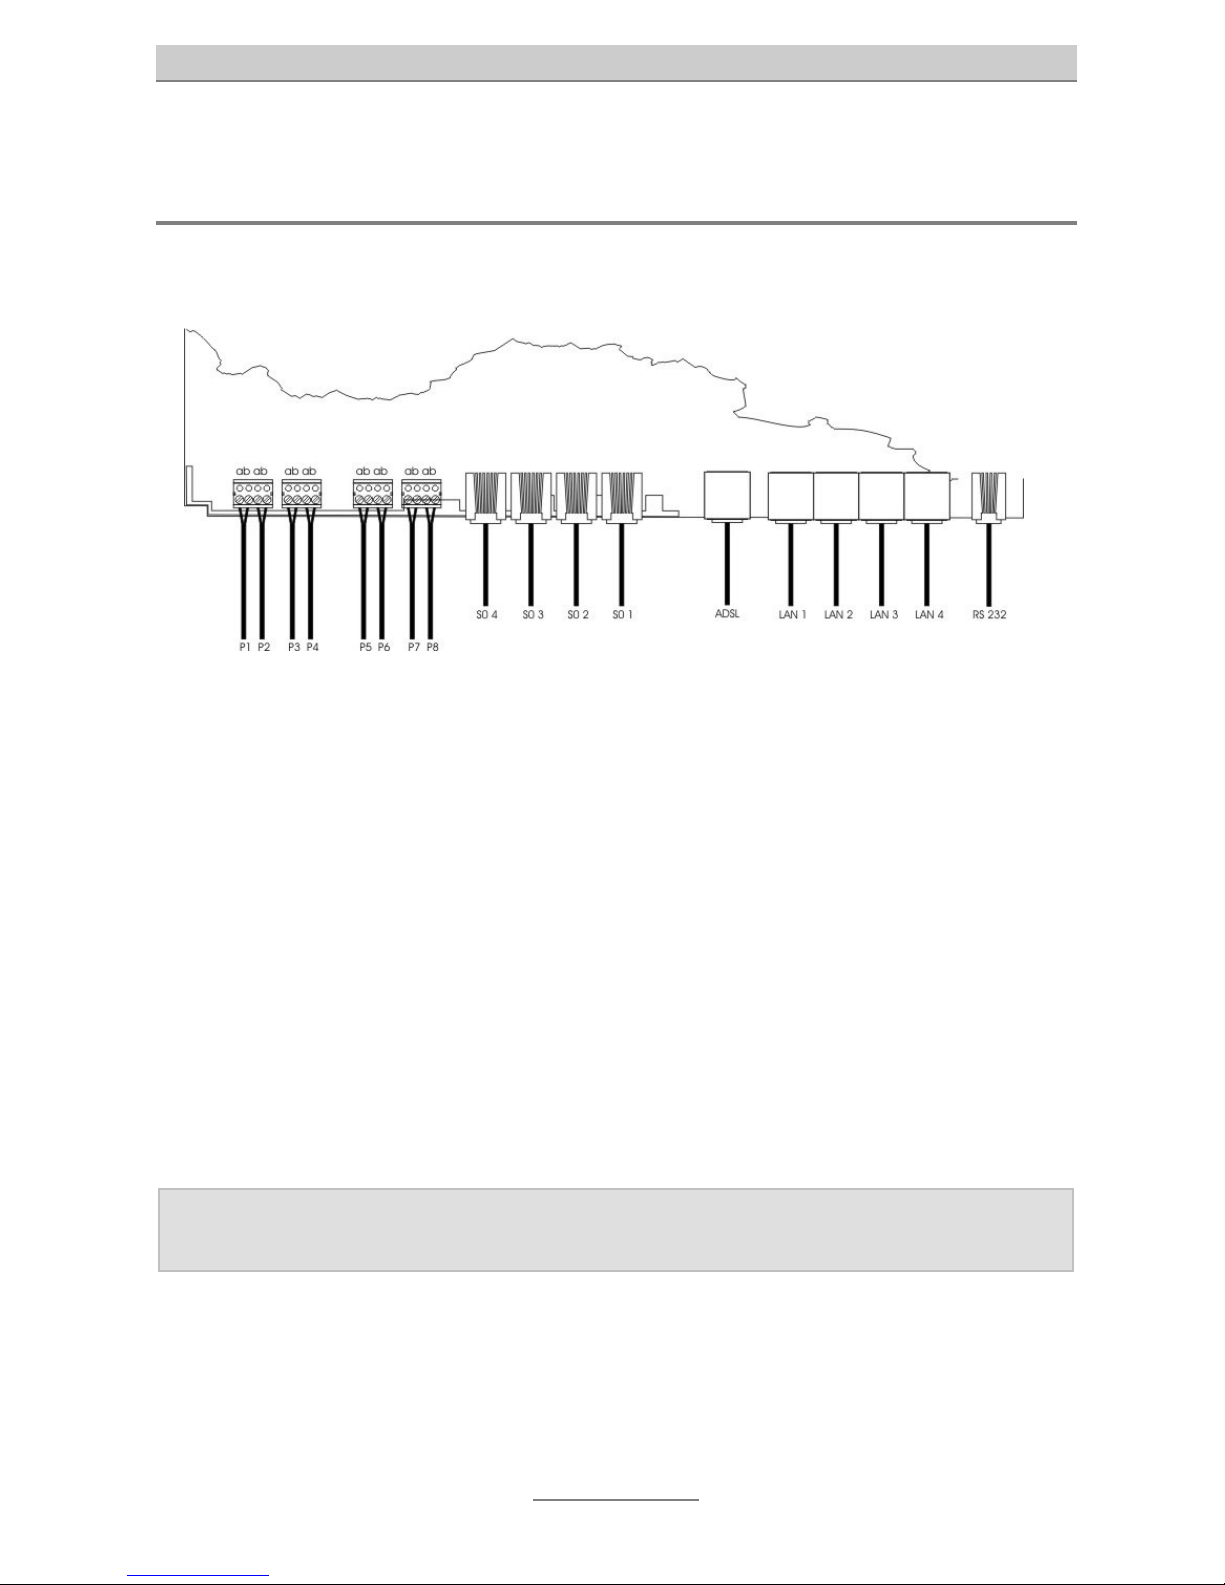
Installation of the telephone system
1. Mount the telephone system in a suitable place.
2. Open the wiring compartment cover.
3. ISDN connection
•
Connect network termination and telephone system (S
0
1) with the enclosed
ISDN connecting cable.
•
If you dispose of a second or third external S
0
port, you have to change the
plugging of S
0
2 and/or S03 from internal to external, plug JP1003 to JP1002

Mounting
17
respectively JP1005 to JP1004 and connect the ports with the relevant network termination.
Jumper assignment
The jumpers for S02 and S03 have no function if a tiptel 3011 office is used.
Function S
0
2 JP1002
ext./int.
JP1003
ext./int.
JPA1002
100 Ohms termination
S02 external jumpered not jumpered depends on wiring
S02 internal not jumpered jumpered depends on wiring
Function S
0
3 JP1004
ext./int.
JP1005
ext./int.
JPA1004
100 Ohms termination
S03 external jumpered not jumpered depends on wiring
S03 internal not jumpered jumpered depends on wiring
Switch the termination resistors via the jumpers JPA1001, JPA1002, JPA1004, and
JPA1006 according to their wiring on or off.
Connect your terminal devices to the ISDN or analogue ports.

Mounting
18
Connect your WAN access (for example DSL modem or cable modem) to the first
Ethernet port (BU201).
4. Network
•
Connect further PCs to the 4 Ethernet ports BU202 (A - D). This switch
works independent of the telephone system. For direct connection to another switch or hub no special connection cable is required. The transmission and reception lines of the Ethernet port will automatically be set correctly (auto negotiation).
5. Close the wiring compartment cover.
6. Connect your telephone system to the mains wall outlet.
7. Program the relevant phone numbers (MSNs) within the ISDN telephones.
•
basic setting S
0
port 2: 20 and 21
•
basic setting S
0
port 3: 30 and 31
•
basic setting S
0
port 4: 40 and 41
8. First test:
•
Extension test:
Pick up the receiver of the telephone connected to S
0
4. => You hear a dial ling tone.
Dial the 1. analogue port (pre-set phone number "50"). => The telephone
rings.
•
LAN test:
Switch the PCs on, which are connected to your telephone system.
=> The LED indicating the physical connection of the corresponding
Ethernet port lights up (see “Status LEDs).
9. Start the configuration. Configuration is performed by using a PC with a web
browser.
Access is available via the following ports:
•
via a LAN connection (recommended)
•
via the RS 232 port by accessing the dial-up network via a standard modem
with the setting "115200,8,n,1 without hardware flow control"
•
via the internal or external S
0
ports by accessing the dial-up network via an
Internet access protocol
•
via the Internet by using the IP address of your DSL connection (IP address
assigned to you by your ISP)

Computer setup
19
Computer setup
Please note that the following information refer to PCs on which one of the following
Microsoft operating systems has been installed: Windows 98, Windows 98SE (second edition), Windows ME, Windows 2000, Windows NT, or Windows XP. But of
course the use of other operating systems – e.g. Apple Macintosh – is also possible
without entailing any problems.
Network configuration
In the factory default setting, the telephone system tiptel 3022 office / tiptel 3011 office acts as DHCP server (Dynamic Host Configuration Protocol) for the connected
computers. In this setting connected computers obtain the necessary IP addresses
automatically.
In case of a newly-installed operating system or a new plug-and-play PC, the necessary PC settings have already been done. In case of PCs which have already been
part of a network and/or have already been configured for Internet access via a DSL,
ISDN, or analogue modem, some of the settings must be undone. These necessary
amendments for the a.m. operating systems are described in detail in the following
chapters.
Note: If any kind of access software has been installed, this has to be uninstalled
first!
If the TCP/IP protocol has been deleted because of installing another
access software, it must be re-installed by means of your Windows CD.
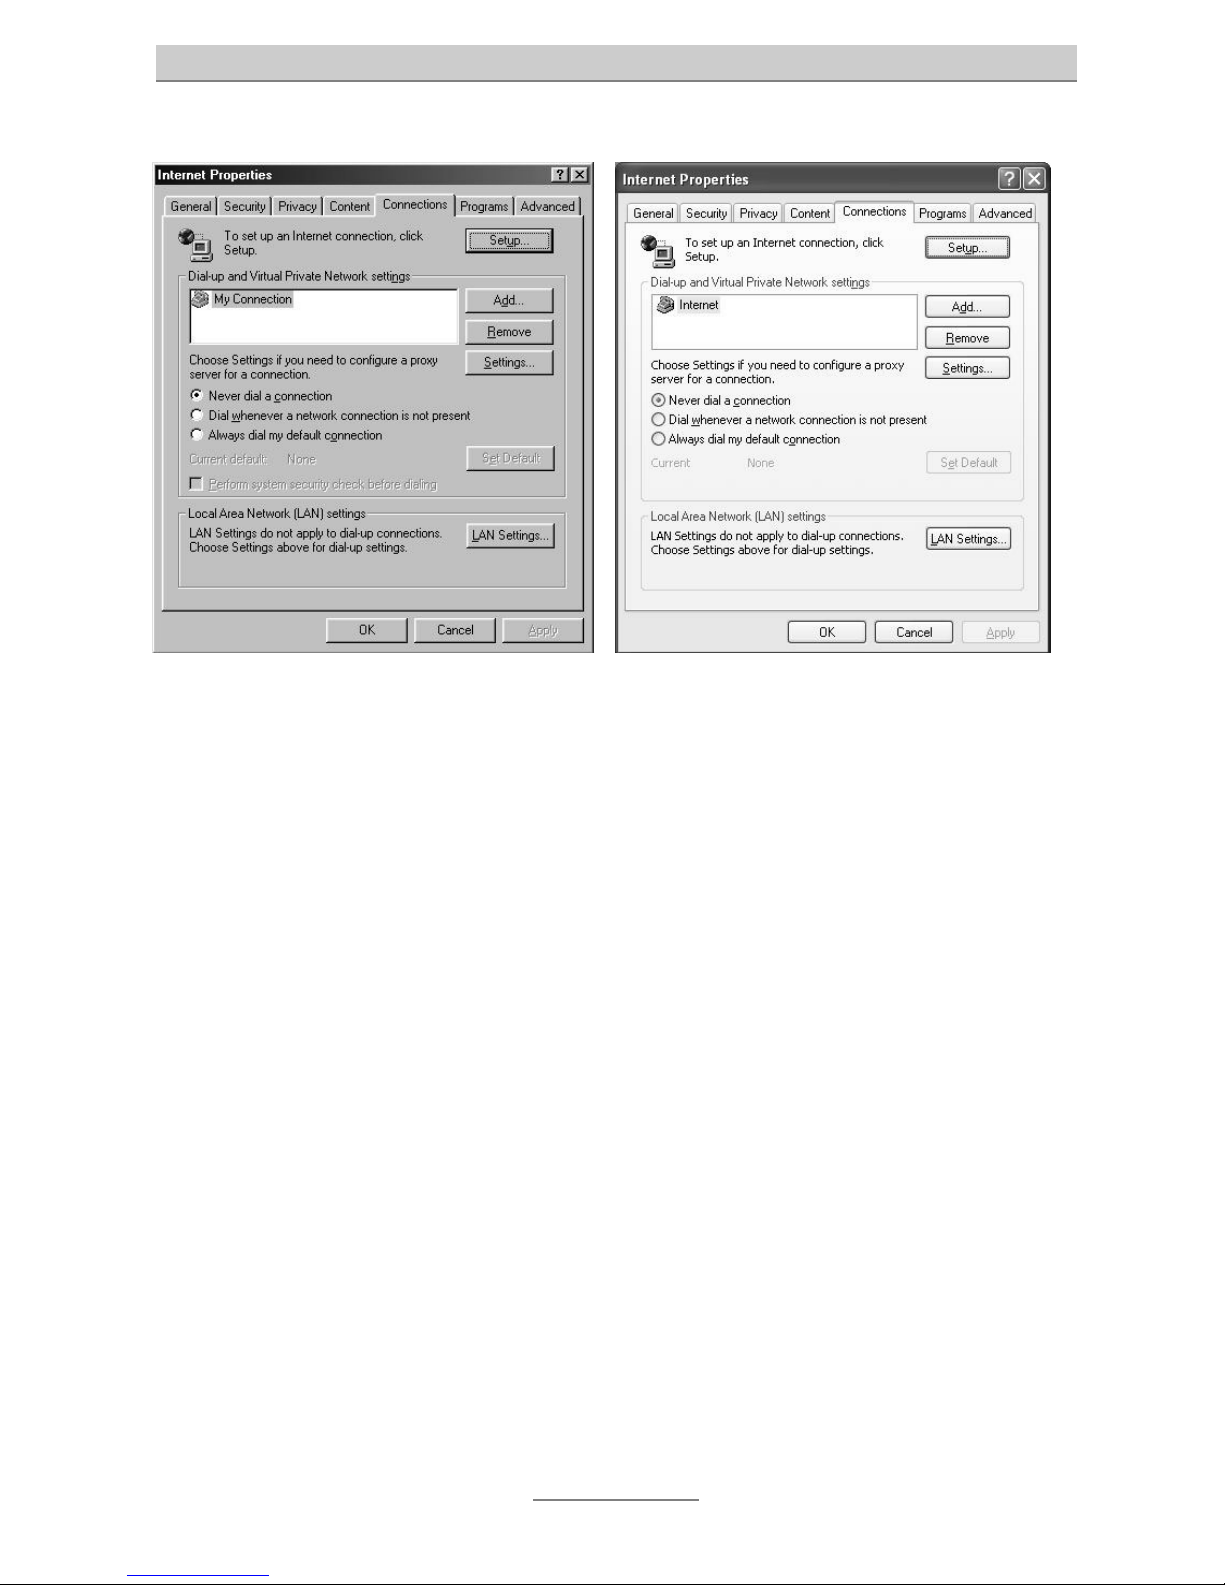
Necessary web browser settings (all operating systems)
If an Internet access has already been programmed on your PC, you have to undo
one web browser setting as a first step.
First click on “tools” in the Internet Explorer, then point to “Internet options...” and
finally click on the “connections” tab. Here you check the option box “never dial a
connection”.
Please proceed accordingly if you use any other browser, and if this setting option is
available. The browser must be configured in a way that no (standard) connection
will automatically be dialled upon starting.
Computer setup
20

Computer setup
21
Network configuration in Windows 98 / Windows 98 SE / Windows ME
Click on "START", point to "settings" and then to "control panel". Double click on the
network icon.
You get to the network configuration window. After double clicking on TCP/IP (and
perhaps the name of the network interface card which shall be used for the connection to your tiptel 3022 / 3011 office) you see the TCP/IP settings (properties of
TCP/IP) for the network interface card used.
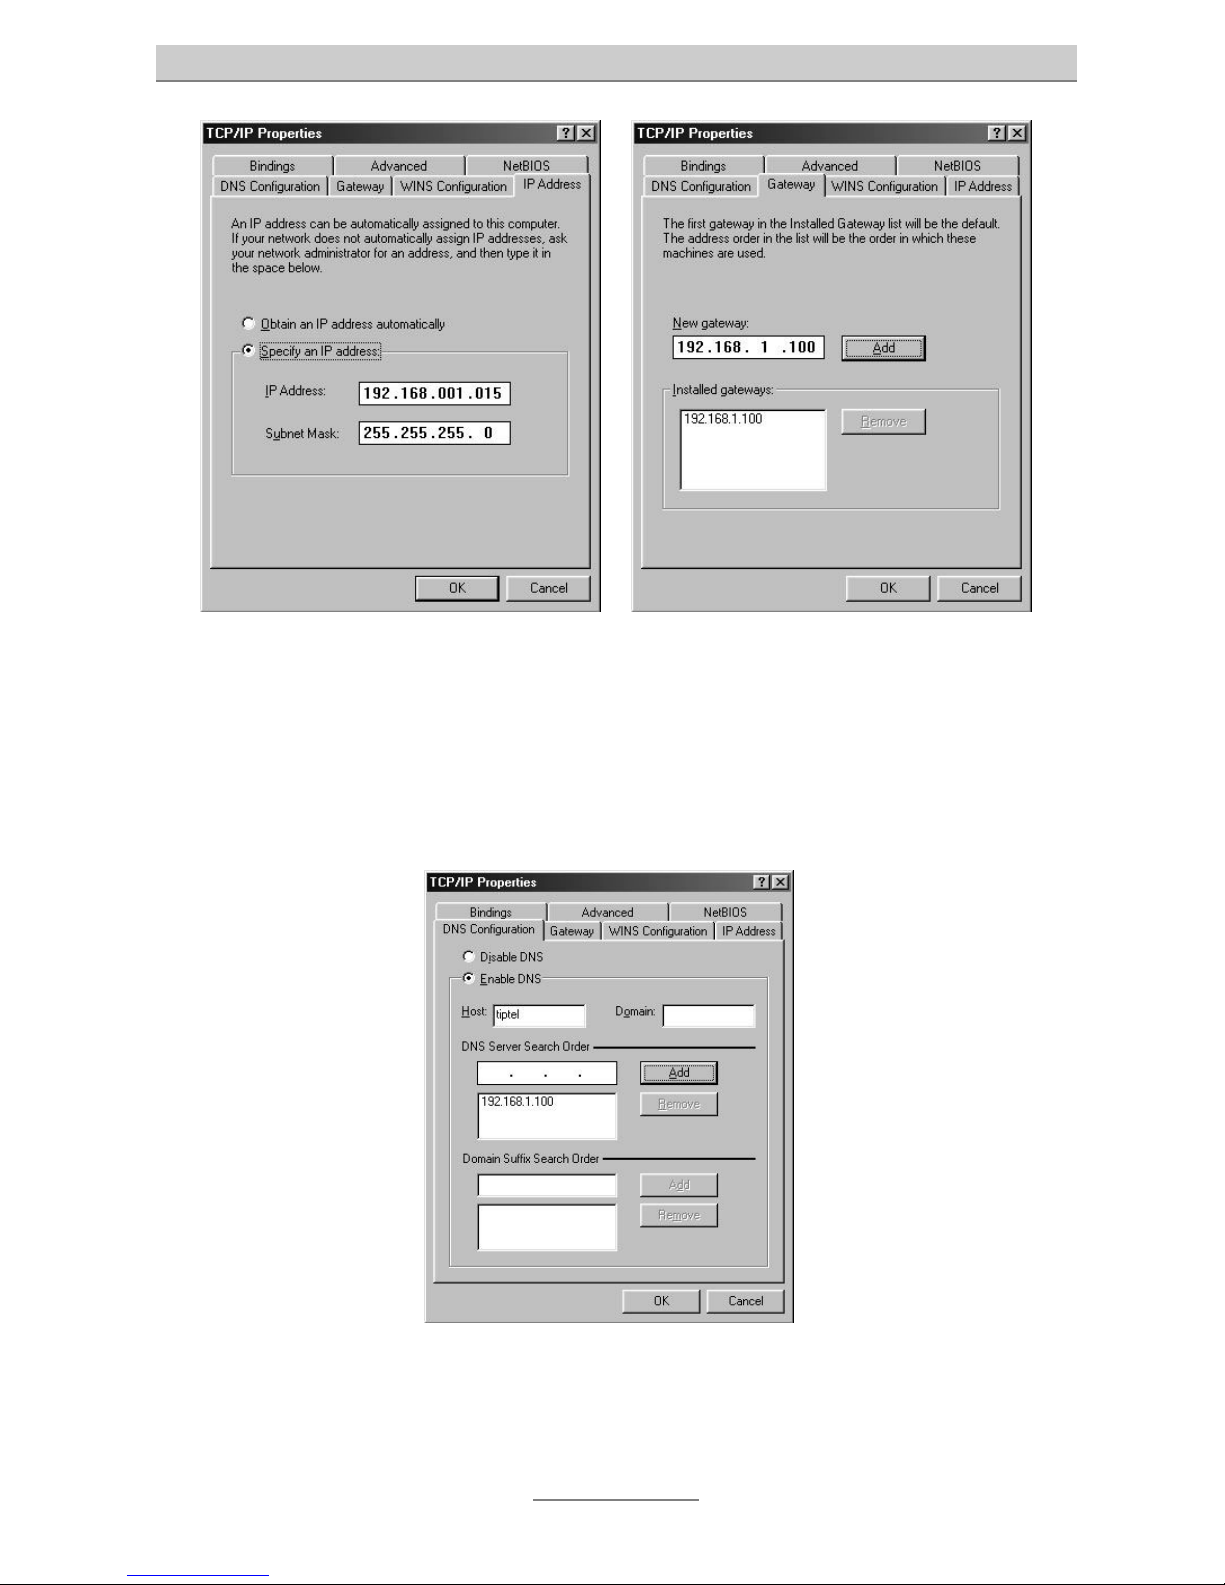
If your PC shall automatically obtain the IP address from your tiptel 3022 / 3011 office, please select “obtain IP address automatically” (if not already selected).
If you wish to manually assign an IP address to your PC, please select “use the following IP address”. Enter the desired IP address in the first line and the corresponding subnet mask in the second line. Please verify that the IP address is within the
same address range as the IP address of your tiptel 3022 / 3011 office and that the
subnet mask is the same as of your tiptel 3022 / 3011 office.
Computer setup
22
Then, click on the tab “gateway” and enter the IP address of your tiptel 3022 / 3011
office in the entry field “new gateway”. Please click on “add” in order to save this entry.
Now, please select the tab “DNS configuration” and enter the IP address of your tiptel 3022 / 3011 office also in the field “DNS server addresses, in order of use”. Click
on “add” for saving this entry. Additionally, please enter the name of your PC (or any
sequence of figures at choice) in the field “host” and confirm your entries with “OK”.
Possibly the computer asks for a restart. Confirm this request with "yes".
The configuration of your Windows 98 / ME PC is completed.

Computer setup
23
Network configuration in Windows 2000
Click on "START", point to "settings" and then to "control panel". Double click on the
icon “network an dial-up connection”. Double click on the LAN connection belonging
to the network interface card chosen for the connection to your tiptel 3022 / 3011 office.
You get to the window “status of LAN connection”. Click on “properties”.
The window “properties of LAN connection” appears.
Computer setup
24
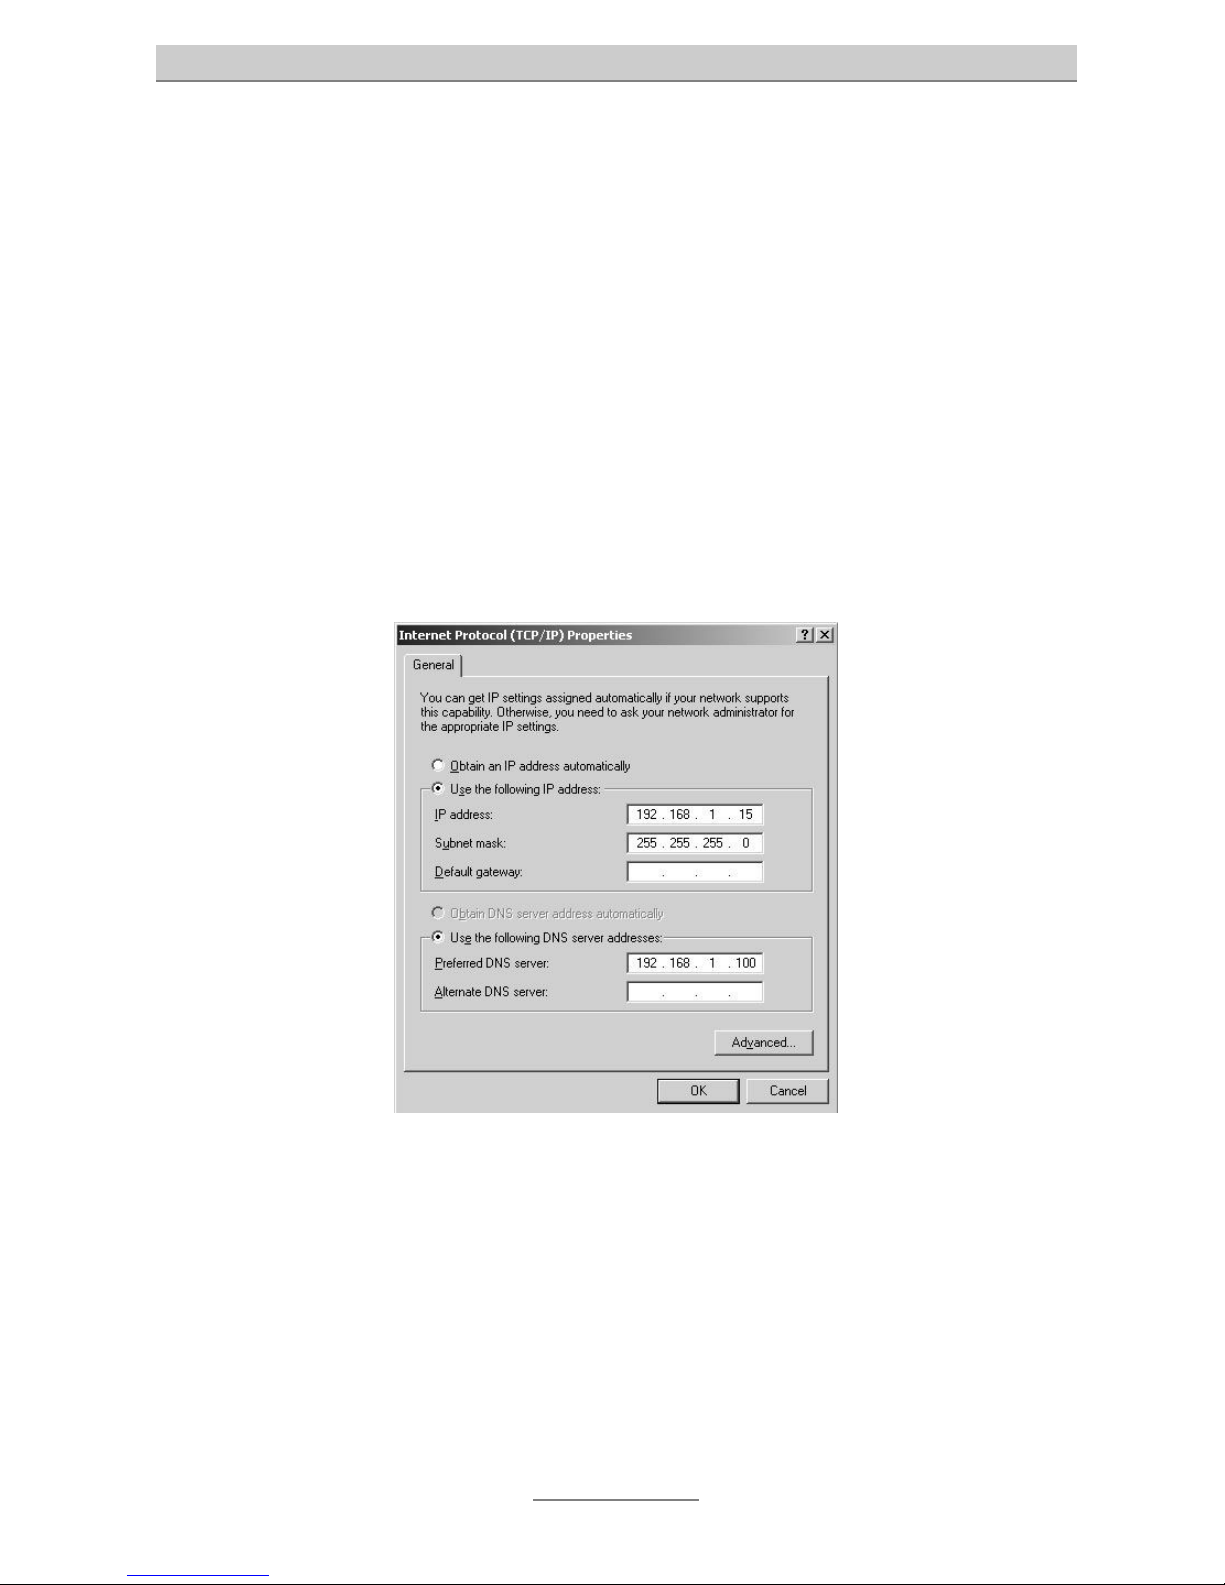
After double clicking on “Internet protocol TCP/IP” you get to the window “properties
of Internet protocol (TCP/IP)” for the used network interface card.
If your PC shall automatically obtain the IP address from your tiptel 3022 / 3011 office, please select “obtain IP address automatically” and “obtain DNS server address
automatically” (if not already selected).
If you wish to manually assign an IP address to your PC, please select “use the following IP address”. Enter the desired IP address in the first line, the corresponding
subnet mask in the second line, and the IP address of your tiptel 3022 / 3011 office in
the third line. Please verify that the IP address of your PC is within the same address
range as the IP address of your tiptel 3022 / 3011 office and that the subnet mask is
the same as of your tiptel 3022 / 3011 office.
Then, check “use the following DNS server addresses” and enter the IP address of
your tiptel 3022 / 3011 office in the first line.
Finally, confirm your entries with “OK”.
Possibly the computer asks for a restart. Confirm this request with "yes".
The configuration of your Windows 2000 PC is completed.
Computer setup
25
Network configuration in Windows NT
Click on "START", point to "settings" and then to "control panel". Double click on the
icon “network and dial-up connections”.
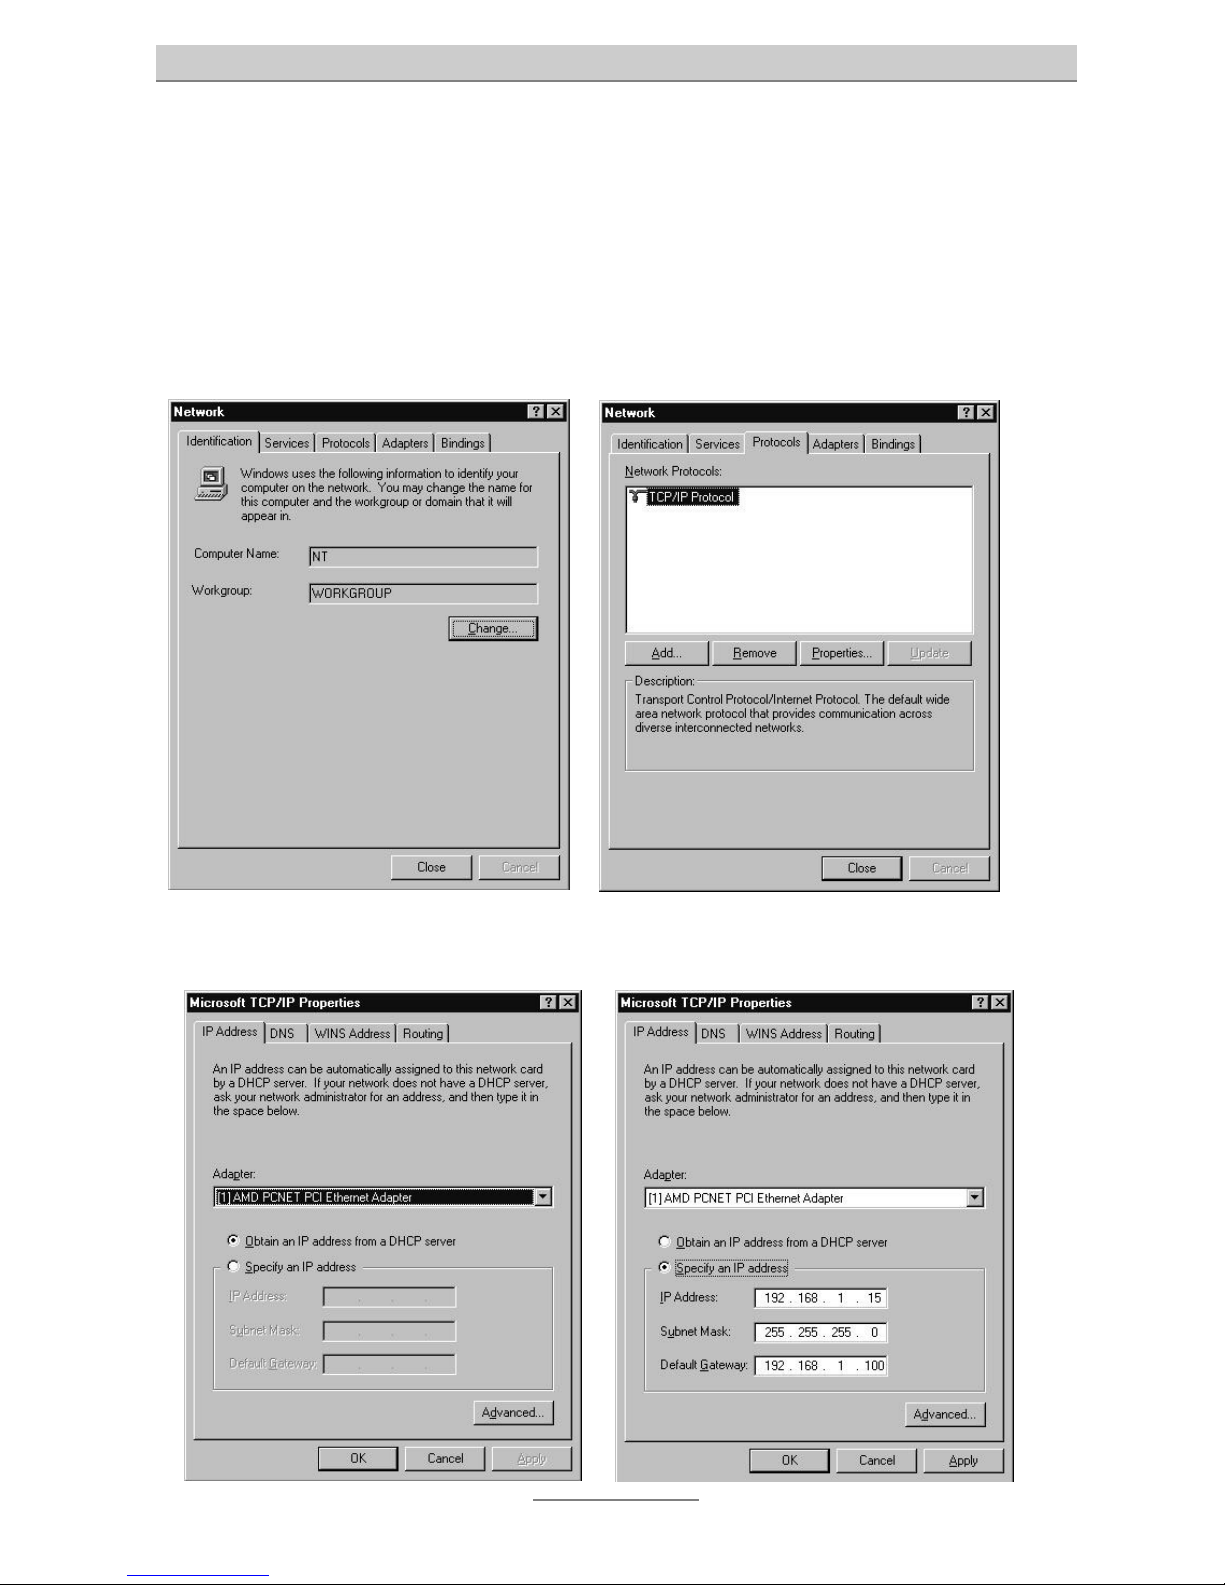
The network window appears. First click on the protocol tab and then double click on
“TCP/IP protocol”.
You get to the box “properties of Microsoft TCP/IP”.

Computer setup
26
If your PC shall automatically obtain the IP address from your tiptel 3022 / 3011 office, please select “obtain IP address from a DHCP server” (if not pre-set).
If you wish to manually assign an IP address to your PC, please select “enter IP address”. Enter the desired IP address in the first line, the corresponding subnet mask
in the second line, and the IP address of your tiptel 3022 / 3011 office in the third line.
Please verify that the IP address of your PC is within the same address range as the
IP address of your tiptel 3022 / 3011 office and that the subnet mask is the same as
of your tiptel 3022 / 3011 office.
Now, select the DNS tab. Click on “add” below the box “DNS server addresses in order of use” and enter the IP address of the tiptel 3022 / 3011 office in the appearing
entry box. Confirm your entry with “add”.
Finally, confirm your settings with “OK”.
Possibly the computer asks for a restart. Confirm this request with "yes".
The configuration of your Windows NT PC is completed.
Computer setup
27
Network configuration in Windows XP
Locate your network neighbourhood icon, select "control panel” from the Windows
XP "new start menu”, select the network connections icon of the control panel, and
this will take you to the next step. The network connection window displays the
connection list that shows all the network connections set up on the PC located on
the right of the window. Right click on the connection you will use and choose
"status”. Now you should be at the local area network connection status window. This
box displays the connection status, duration speed and activity statistics.
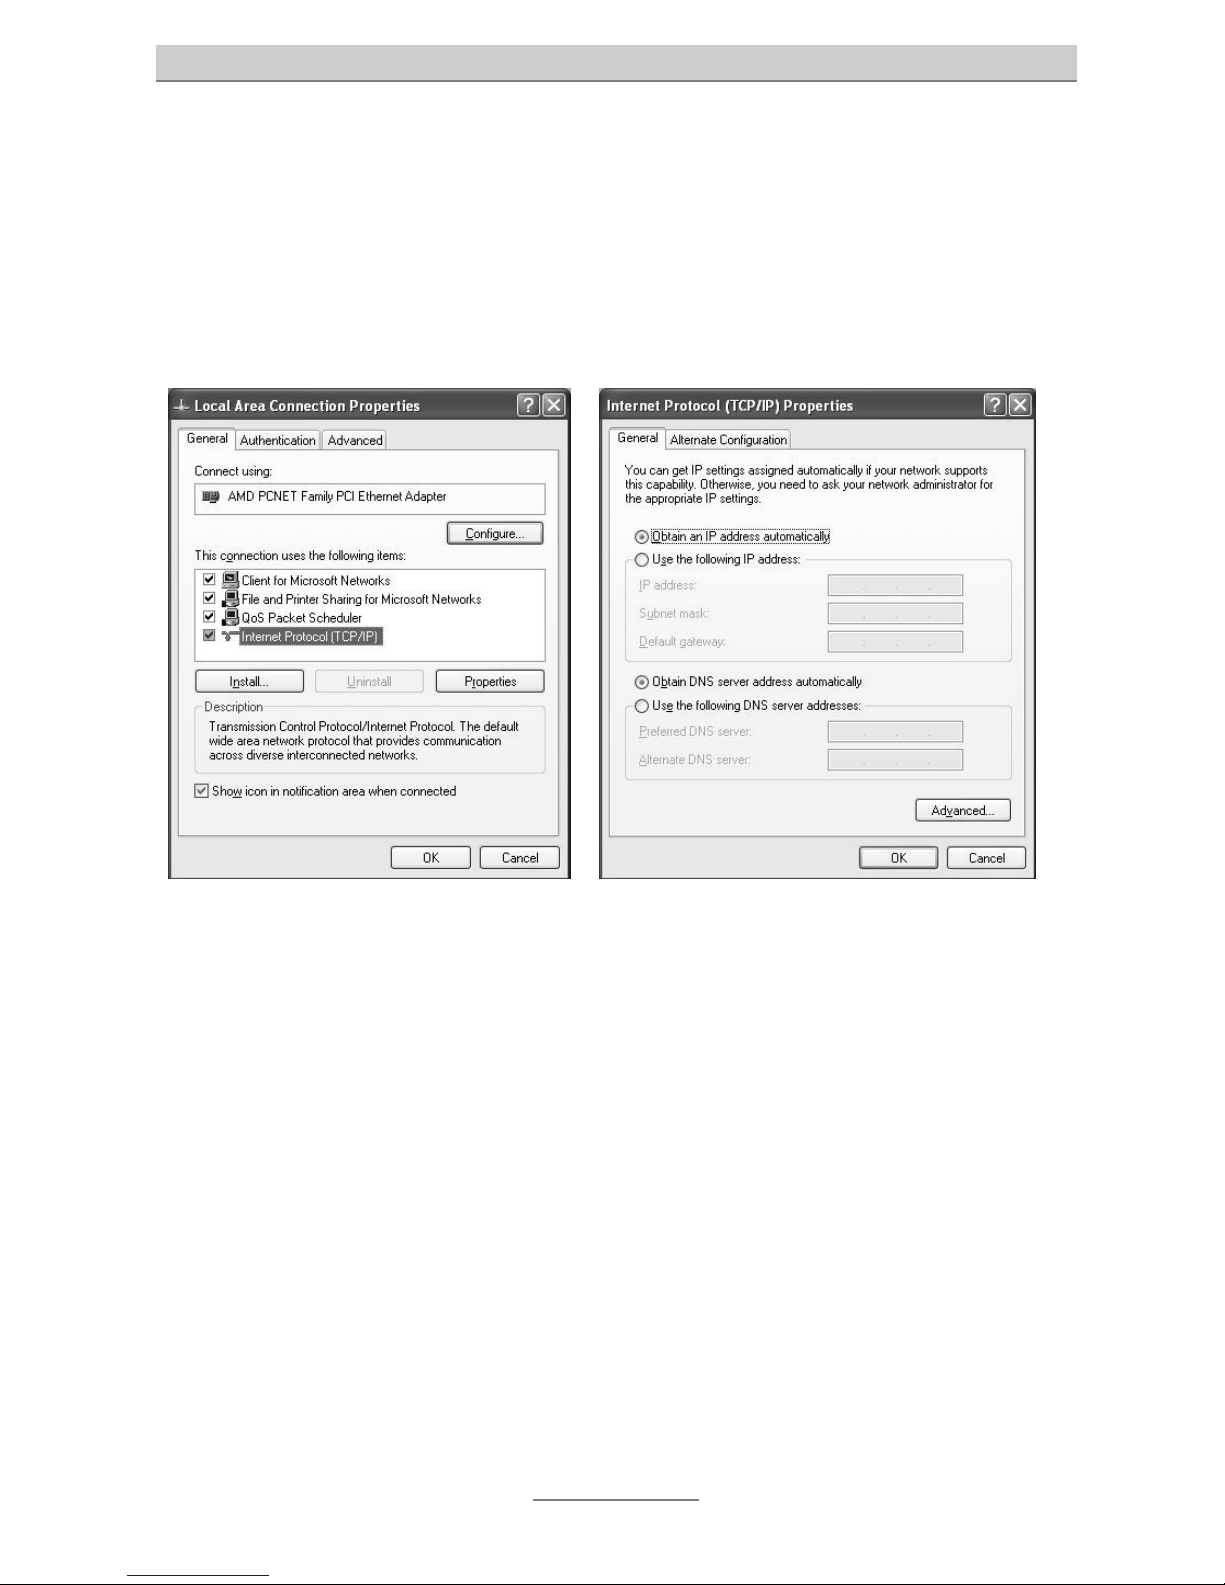
Administrator log and access rights are needed to use this window. Click the
properties button to view details about the connection. The TCP/IP details are
presented on the support tab page. Select "Internet protocol” and click "properties”
to view the configuration information.
Verify that the "obtain an IP address automatically” button and the "obtain DNS server
address automatically” button are selected. Click the "OK” button. This completes the
DHCP configuration of TCP/IP in Windows XP.
If you wish to manually assign an IP address to your PC, please select “use the following IP address”. Enter the desired IP address in the first line, the corresponding
subnet mask in the second line, and the IP address of your tiptel 3022 / 3011 office in
the third line. Please verify that the IP address of your PC is within the same address
range as the IP address of your tiptel 3022 / 3011 office and that the subnet mask is
the same as of your tiptel 3022 / 3011 office.
 Loading...