

Page 1
Operating instructions (UK)
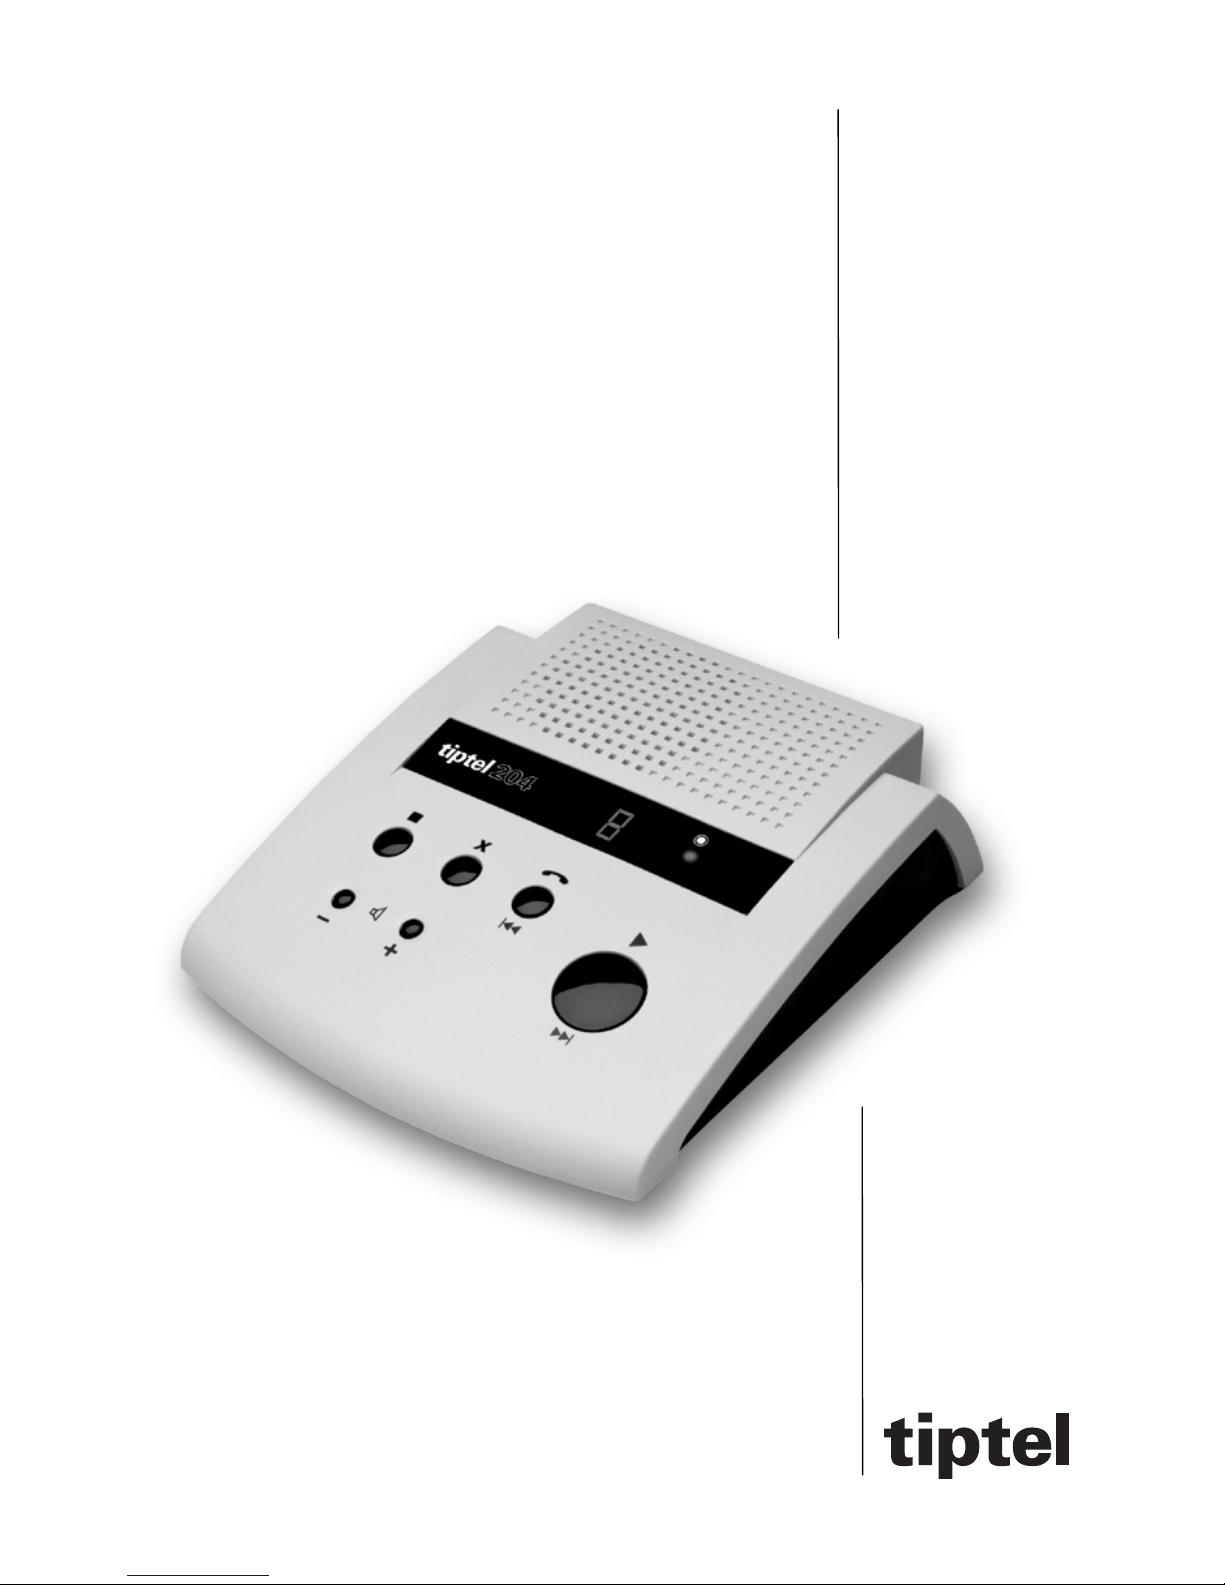
Fully digital
answering machine
tiptel 204
Page 2

Page 3

Content of delivery
3
Content of delivery
The following items come with the delivery:
1 answering machine
1 mains connecting cable with adapter
1 telephone cable
1 copy of the operating instructions
1 packing
The 9 V block battery type 6LR61 for data retention does not belong to the
delivery content of the answering machine!
These operating instructions should provide you with information. Its content is not a
part of a contract. All mentioned data and indications should only be considered to
be normal values. The features and functions described could vary according to
national requirements. Technical modifications reserved.
Important note
Due to existing differences between the national public telecommunications networks
of the individual countries, this approval shall not be considered to be an absolute
guarantee for successful and impeccable operation of this device when being connected to any point of network termination.
Correct and appropriate use
This device has been designed for the exclusive use within homes and offices. Any
other different kind of use contradicts the intended purpose. Unauthorised modifications which are not described within these operating instructions (user guide) are
not permitted.
Approval
The answering machine has been approved to be connected to the public analogue
telecommunications network. Everyone is allowed to connect it via the telephone
plug (TAE) and to put it into operation.
Page 4

Safety information
4
Safety information
• Only use the adapter which comes with the delivery.
• Do not install the device
− near heat sources (such as an electrical fan heater),
− where it is exposed to direct sunlight,
− in dusty rooms or
− on uneven surfaces.
• Connect the device to a shockproof plug.
• Please take care that the cables are laid safely to avoid accidents.
• Install the device in a room with an ambient temperature of between 5 and 35 °C
and an air humidity of between 25 and 85 %.
• Clean the device at regular intervals with a soft slightly moist cloth.
• Do not use abrasive liquids or chemicals to clean the device.
• First, remove the telephone plug and then the adapter from the socket before
you move the device or in case of malfunctions.
• During thunderstorms, it is advisable to remove the AC adapter from the socket.
• Never touch plug contacts with sharp or metallic objects.
• Never open the device on your own.
• Repairs shall only be carried out by correspondingly qualified personnel.
• Please keep these operating instructions for future reference.
• The TIPTEL AG shall not assume liability for any damage caused by
inappropriate handling and use of the answering machine.
Page 5

Table of contents
5
Table of contents
Content of delivery
......................................................................................................
3
Important note ...................................................................................................... 3
Correct and appropriate use ................................................................................ 3
Approval
....................................................................................................................
3
Safety information
.......................................................................................................
4
Table of contents
.........................................................................................................
5
Description
......................................................................................................................
7
General data
.............................................................................................................
7
Illustration of housing and keypad
......................................................................
9
Installation
.......................................................................................................................
10
Insert/exchange battery
.........................................................................................
10
Network connection and initial operation
..........................................................
10
Connection to the telephone line
.........................................................................
11
Settings
.............................................................................................................................
12
Adjustment of time (voice-day-and-time-stamp)
..............................................
12
Time check
...............................................................................................................
12
Time setting
..............................................................................................................
12
Adjustment of volume
.............................................................................................
13
Setting of operating mode
.....................................................................................
13
Announcement-only mode
....................................................................................
14
Answering mode
......................................................................................................
14
Checking the set number of ringing signals
......................................................
14
Modifying the ringing signal mode
......................................................................
15
Automatic reset
........................................................................................................
15
Repeated initial operation or reset
.......................................................................
15
Display of ICMs
........................................................................................................
16
“Memory capacity exhausted” mode
..................................................................
16
Operation
.........................................................................................................................
17
Automatic OGMs
.....................................................................................................
17
Recording of a new OGM
......................................................................................
17
Checking of a recorded OGM
..............................................................................
18
Reset of the standard message
...........................................................................
18
Recording of a note
................................................................................................
18
Receiving of messages
..........................................................................................
19
Replay of incoming messages
.............................................................................
19
Repetition of the current message
......................................................................
20
Skipping back to the previous incoming message
..........................................
20
Page 6

Table of contents
6
Skipping forward to the next incoming message
.............................................
20
Deleting of individual incoming messages
........................................................
20
Deleting all incoming messages
..........................................................................
21
Loudspeaker function
.............................................................................................
21
Switching the device on and off
...........................................................................
22
Remote settings
.......................................................................................................
22
Remote access code
..............................................................................................
22
Activation of remote control
..................................................................................
22
Remote control functions
.......................................................................................
23
Switching the device on/off by remote control
.................................................
23
Message playback
..................................................................................................
24
Repeating of current messages
...........................................................................
24
Skipping back to previous incoming messages
..............................................
25
Skipping forward to following incoming messages
.........................................
25
Playback of all incoming messages
....................................................................
25
Terminating the message playback
....................................................................
25
Deleting individual incoming messages
.............................................................
26
Restoring of incoming messages activated for deletion
.................................
26
Deleting all incoming messages
..........................................................................
26
Guarantee
........................................................................................................................
27
Declaration of conformity
.......................................................................................
28
CE sign
......................................................................................................................
28
Technical support
....................................................................................................
29
Technical data
..........................................................................................................
29
Page 7

Description
7
Description
General data
• fully digital recorder
• saving of automatic outgoing messages (OGMs) and incoming messages (ICMs)
/ notes – total recording capacity of approx. 14 minutes (59 messages/notes)
• 7-segment-LED (message display) for indication of operating status and existing
messages
• indication of day and time (24-hour format)
• setting of either answering and recording mode or of announcement-only mode
(without recording) possible
• 2 pre-recorded outgoing messages available:
− one OGM for the answering and recording mode
− one OGM for the announcement-only mode
• 2 automatic OGMs for individual recording:
− one OGM for the answering and recording mode
− one OGM for the announcement-only mode
• charge saving function
• maximum length of each individually recorded OGM: 2 minutes
• automatic check of a newly recorded OGM after termination of recording
• maximum length of each ICM: 2 minutes voice-guided message recording
• playback of all messages (ICMs and notes)
• fast forward and rewind function during message playback
• repeated playback of the current message
• deleting of individual messages
• deleting of all messages
• electronic volume control in 8 levels with standard settings and saving of previous
settings
• activation of the answering mode (responding time) at choice: after 2 up to 5
ringing tones
• loudspeaker function and call pick-up
• six functional keys:
− answering mode on / off / rewind / responding time (set, check)
− automatic OGM (record, check, stop)
Page 8

Description
8
− playback / note / fast forward
− delete / time (set, check)
− volume control +/ -
• factory pre-set 3-digit security code for remote control via DTMF
• remote control function
− switching on/off
− playback of all messages
− fast forward and rewind function during message playback
− deleting of individual messages
− deleting of all messages
• 9 V battery (does not come with the delivery) for data retention with LED indicator
in case of insufficient battery voltage
Page 9
Description
9
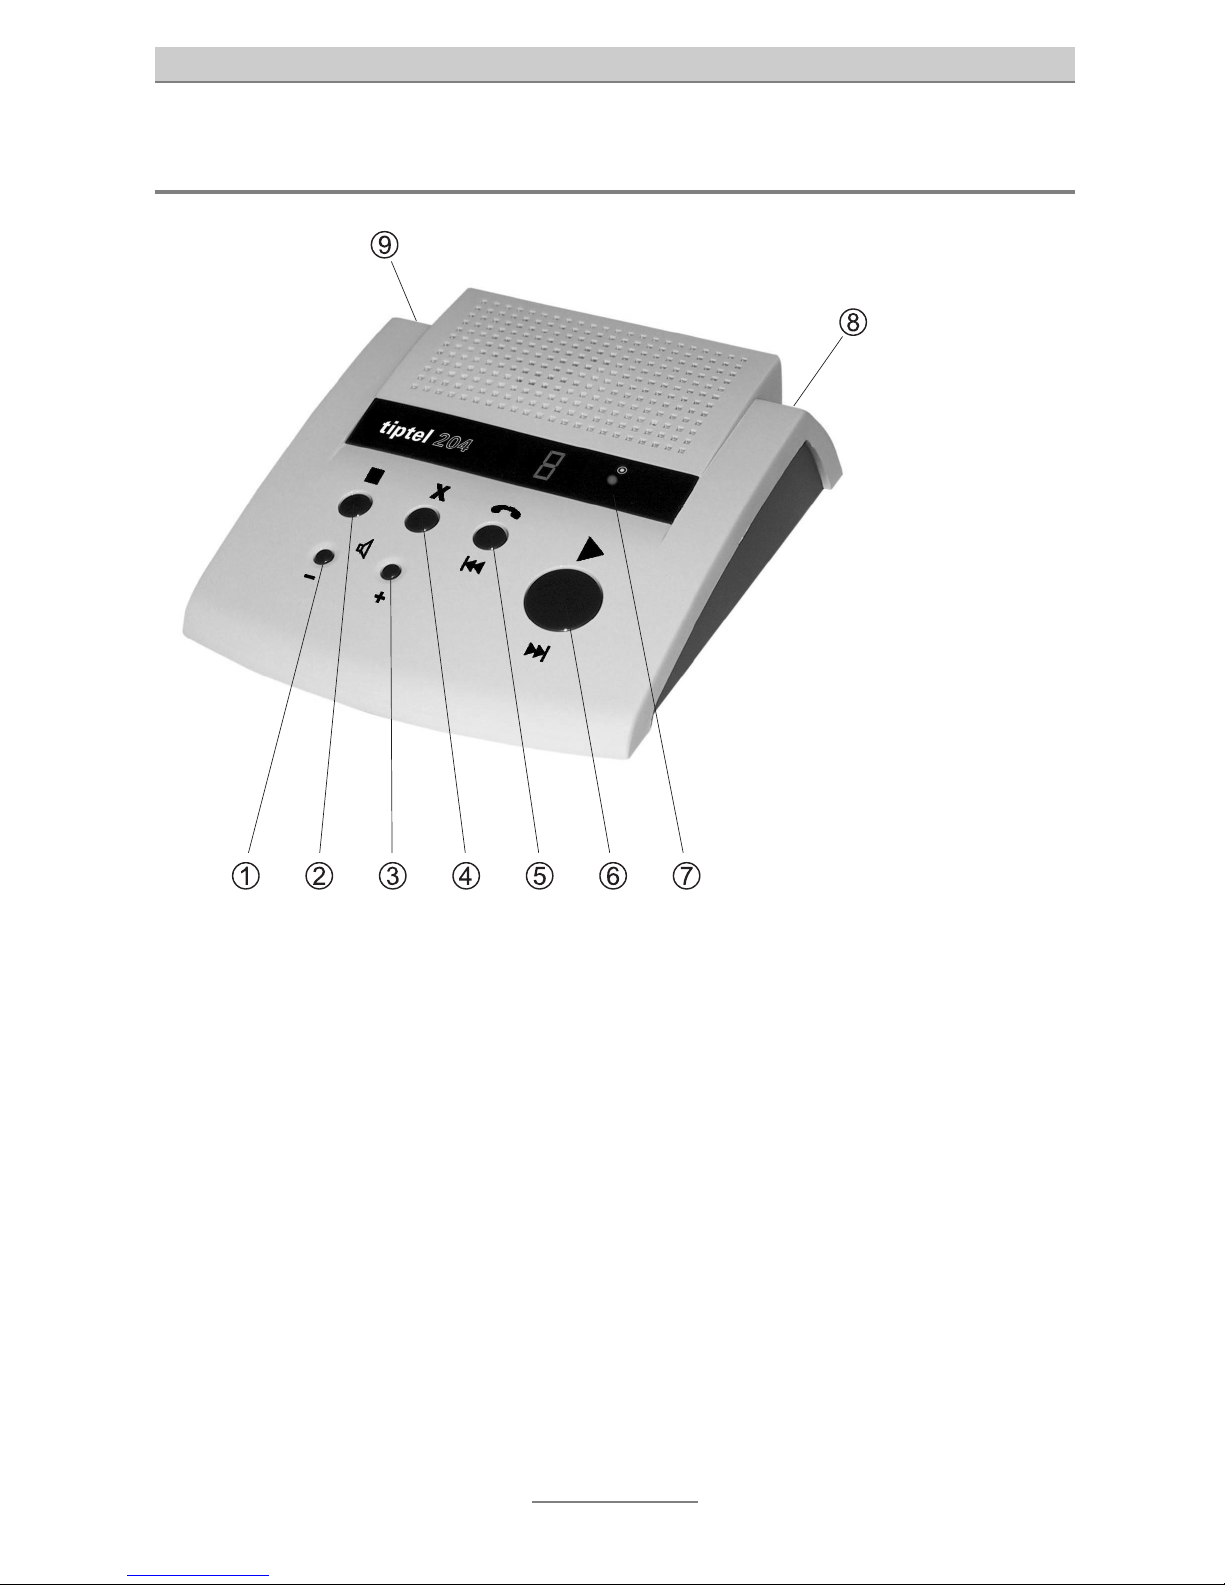
Illustration of housing and keypad
➀ volume –
➁ stop key / checking of message text
➂ volume + / note recording
➃ delete key / date / time
➄ ON/OFF / operating mode key / rewind key
➅ playback key / fast forward key
➆ battery status indicator
➇ receptacle for mains connection
➈ receptacle for telephone network connection
Page 10

Installation
10
Installation
Insert/exchange battery
The battery is not included in the scope of delivery.
In order to avoid a loss of data in case of a possible power shortage, it is recommended to insert the battery when using the device.
If no battery is inserted or if the battery voltage is too low, the battery status indicator
(LED) lights up after the device has been connected to the mains network.
In order to insert the battery, open the cover of the battery compartment at the
bottom cabinet of the housing. Connect a 9 V block battery of type 6LR61 to the
clamps and insert the battery into the battery compartment.
If the battery should be exchanged, open the cover of the battery compartment and
remove the block battery. Disconnect the block battery carefully from the contact
clamps and insert a new battery as described under item 1.
Exchange the 9 V block battery each year in order to guarantee an impeccable
battery function. It is recommended to exchange the battery after a longer
power failure (> 1 h). Do not exchange the battery during a power failure.
A battery exchange should only be carried out when the device is in operation.
Important note: Discharged batteries cannot be disposed of with the normal
household waste. They must be disposed of ecologically (special battery
collecting points).
Network connection and initial operation
1. Connect the connection plug at the rear side of the device and the adapter to
the mains plug.
2. In case of an initial or a repeated operation, the device initialises the memory.
During this time, no key signals and no signals of a picked-up handset are
accepted and the message counter blinks slowly.
3. After the device has been switched on for the first time, the initialisation is
carried out and the device is set according to the following parameters:
Page 11

Installation
11
a) answering mode with pre-recorded
standard message
standard message:
THE PERSON YOU HAVE CALLED IS CURRENTLY NOT
AVAILABLE. BUT YOU MAY LEAVE A MESSAGE AFTER THE BEEP.
b) “announcement-only” mode standard message for the announcement-only mode:
THE PERSON YOU HAVE CALLED IS CURRENTLY NOT
AVAILABLE. PLEASE TRY AGAIN LATER.
c) number of ringing signals 3
d) answering mode ON
e) indication of day / time Saturday, 12:01 (24h format)
g) message indicator message indicator blinks (3s on, 0.5s off), until any key is pressed
h) volume medium level (level 3; 0 is the lowest level)
Connection to the telephone line
1. Insert the telephone plug into the telephone receptacle on the rear side of the
device.
2. Plug the end of the telephone connecting cable into the telephone wall socket
(N coded).
Page 12

Settings
12
Settings
Adjustment of time (voice-day-and-time-stamp)
The time function allows the indication and recording of date and time of all recorded
ICMs or notes. The acoustic day and time indication can also be used as information
of the current time.
Time check
The device is in the stand-by mode.
• Press the key ➃ delete.
• The device indicates the current day and time in the following order:
<day> <hour> <minute>.
Time setting
• In order to set the exact day and time, keep the key ➃ delete pressed. The day
will be announced.
• After the announcement of the day, press the key ➄ on/off or the key ➅ play-
back. Meanwhile, keep the key ➃ delete pressed. The day will be announced.
If the correct day has been found, release the key ➃ delete. The set day will be
announced.
• Now, press the key ➃ delete again and you can hear the announcement of the
hour. Keep the key ➃ delete pressed and operate the key ➄ on/off or the key
➅ playback as long as the requested hour is announced. Afterwards, release
the key ➃ delete and the set hour will be announced.
• Now press the key ➃ delete again. The minutes will be announced. Proceed as
described above until the requested minutes are announced.
• Release the key ➃ delete now and the programmed setting will be announced:
<day> <hour> <minutes>.
Page 13

Settings
13
Adjustment of volume
When the device is switched on, the electronic volume control is set to a medium
level (level 3).
By means of the keys ➀ – and ➂ +, the requested volume can be set or be corrected
during the playback of messages and notes.
The new setting for volume will be saved.
If the volume is set during the stand-by operation, a short signal tone in the corresponding volume can be heard during each setting process.
If the volume is increased, a steadily ascending signal tone will be emitted. If the
volume is reduced, a steadily decreasing signal tone can be heard. The highest and
lowest possible volume setting is indicated by two short signal tones (maximum
volume for maximum setting, medium volume for minimum setting).
The volume setting can be carried out as follows: either
1. keep the volume + or volume – key pressed or
2. press the volume + or volume – key several times.
The keys volume +/- are also active during the waiting time of 8 seconds at the end
of the message playback. However, no signal tones will be emitted during the
volume adjustment.
Setting of operating mode
The answering machine offers three different operating modes which can easily be
selected (refer to table under 3.2.):
• answering mode
• announcement-only mode
• answering machine off.
It is possible to switch between these modes as often as you like without deleting,
modifying or destroying a set OGM/ICM or note.
In the answering mode, you can program after how many ringing signals the answering machine shall pick up or – in case you want to use the remote control function –
you can set the device to the charge saving function. If the answering machine picks
up the call, it provides the caller with your pre-recorded information and asks him, for
Page 14

Settings
14
example, to leave a message for you. Now, the caller may record a message with a
maximum length of 2 minutes. Afterwards, the answering machines switches off
automatically. Incoming messages are indicated by the message counter by the
numbers 1 to 9. If more than 9 messages have been received, the character “U” will
be displayed.
In the announcement-only mode, the answering machine provides the caller with
your pre-recorded information. Afterwards, the answering machines switches off
automatically. The caller cannot leave a message for you.
If the answering machine has been switched off, the device can also be operated via
the remote control. All functions can be activated via the remote control code.
Announcement-only mode
The announcement-only mode is set by pressing the key ➄ on/off until a long
signal tone can be heard and the symbol is displayed in the message indicator.
Release the key ➄ on/off now and the announcement-only mode has been set.
A call will be accepted after 4 ringing signals.
Answering mode
The answering mode is set in the same way. Keep the key ➄ on/off pressed until
the desired number of ringing signals will be announced or displayed in the message
indicator. Release the key ➄ on/off and the answering machine is set to the
answering mode with the desired number of ringing signals being activated.
Checking the set number of ringing signals
You can set the number of incoming ringing signals (from 2 up to 5) or the charge
saving function before the device picks up a call.
In the stand-by mode, press the key ➄ on/off for more than one but less than two
seconds.
The device announces the currently set number of ringing signals and, at the same
time, the corresponding number is displayed in the message counter.
The number of ringing signals and their announcement before the acceptance of a
call are shown in the below table:
Page 15

Settings
15
Number of ringing signals display announcement
2 2 “two”
3 3 “three”
4 4 “four”
5 5 “five”
charge saving mode t two short ringing tones
announcement-only mode one long ringing tone
Modifying the ringing signal mode
1. In the stand-by mode, keep the key ➄ on/off pressed for more than two
seconds.
2. The device indicates the current setting for the number of ringing tones.
3. If you continue to press the key ➄ on/off, the settings will be announced and
indicated in series (see table above). The settings will be indicated in the
following order: 3, 4, 5, charge saving mode, announcement-only mode, 2, 3, ...
4. Release the key ➄ on/off when the desired setting is indicated.
After 2 seconds, the device leaves the setting mode and returns – without further
information – to the stand-by mode.
The setting for call pick-up which was announced last will be saved.
Automatic reset
After each setting process – either local or by remote control – the device automatically returns to the set mode. Exception: if the device is in the “memory capacity
exhausted” mode (only refers to the answering mode).
Repeated initial operation or reset
With the battery being removed, a repeated initial operation is more or less the same
as a reset, that means that the device returns to the factory pre-set condition.
Page 16

Settings
16
Important – please note! In this case all settings, messages and notes will
be deleted.
To carry out a reset, remove the battery from the battery compartment (also refer to
chapter 3) and then, extract the mains plug of the device. Wait for about a minute
and reconnect the device. Now, the device is in the factory pre-set condition.
Display of ICMs
If you received a new message or note, the message indicator blinks and displays
the number of new messages / notes from 1 up to 9. Even during a new call, the
message indicator continues blinking.
If the number of newly received messages is larger than nine, the message indicator
displays the character “U”.
After you have listened to all new messages / notes, they will be marked as old
messages / notes and the message indicator stops blinking. Instead, the total number of all saved messages / notes will be displayed (from 1 to 9, more than 9 “U”).
The message indicator does not blink.
“Memory capacity exhausted” mode
If more than 59 messages/notes have been recorded, the recording capacity is
exhausted and the device switches to the “memory capacity exhausted” mode. In
this case, a fast blinking F is displayed in the message indicator, if the answering
mode has been set. Further calls cannot be accepted by the answering machine.
If messages are deleted in order to increase the available recording capacity to at
least 15 seconds, the device returns to the answering mode.
Page 17

Operation
17
Operation
Automatic OGMs
In your answering machine, two OGMs (OGM 1 and OGM 2) are pre-recorded.
In the answering mode, the text is as follows (OGM1):
THE PERSON YOU HAVE CALLED IS CURRENTLY NOT AVAILABLE. BUT YOU MAY
LEAVE A MESSAGE AFTER THE BEEP.
If the announcement-only mode has been selected, the pre-recorded text is as
follows (OGM 2):
THE PERSON YOU HAVE CALLED IS CURRENTLY NOT AVAILABLE. PLEASE TRY
AGAIN LATER.
Recording of a new OGM
In order to record an individual OGM, please proceed as follows:
• Set the operating mode of the device, that means either the answering mode
(OGM 1) or the announcement-only mode (OGM 2).
• In the stand-by mode, keep the stop key ➁ pressed for more than one second.
A long signal tone can be heard and a blinking “1” appears in the message
indicator.
• Now, you can record your OGM.
• During the recording, the stop key ➁ must be pressed.
• On the message counter, the character “1” blinks, thus indicating the recording of
an OGM.
The recorded OGM depends on the set operating mode. The recorded OGM
is assigned to the set operating mode. The message must be longer than 5
seconds, otherwise, it will not be recorded.
The recording process will be terminated either as soon as the stop key ➁ is
released, or the maximum recording time has been reached or when the memory
capacity is exhausted. The termination of the recording process is indicated by
means of a long signal tone.
Page 18

Operation
18
For verification purpose, the recorded OGM is automatically played back via the
loudspeaker. At the end of the OGM, a long signal tone can be heard.
The control announcement can be interrupted by pressing the stop key ➁ during the
playback. A short signal tone can be heard.
Checking of a recorded OGM
1. In the stand-by mode, press the stop key ➁.
2. The OGM is played back.
3. After the playback of the OGM, a long signal tone can be heard.
Reset of the standard message
If you want to return to the pre-recorded OGM, proceed as follows:
1. In the stand-by mode, press the stop key ➁.
2. The recorded OGM is played back.
3. During the playback, press the key ➃ delete.
4. The playback of the recorded OGM is interrupted, a short
5. signal tone can be heard, followed by the announcement of the standard
message.
Please note that the modification is carried out only in the currently active
operating mode.
Recording of a note
If a note should be recorded as information for another user, please proceed as
follows:
• In the stand-by mode, keep the key ➅ playback pressed until a long signal
tone can be heard.
• After this signal tone, additionally press the key Volume +.
• While you keep both keys pressed, the blinking symbol 5 is displayed in the
message indicator.
• Now, you can record your message/note.
Page 19

Operation
19
• If one of the two keys is released or if the recording capacity is exhausted, the
recording process is terminated. At the same time, a long signal tone can be
heard.
Then, the recording of the message/note has been completed.
The note can have any length unless the maximum recording capacity of about 14
min. is not exceeded.
The playback of notes is realised in the same way as the playback of recorded
messages (explanation will follow in the next paragraphs).
Receiving of messages
A maximum of 59 messages can be received and saved by this answering machine.
The saved messages can be played back as often as you like. Furthermore, it is
possible to delete individual or all messages.
After the complete playback of the automatic OGM in the answering mode, the device sends out a signal tone after which the recording of the ICMs starts immediately.
During the recording, the blinking symbol 5 will be displayed in the message counter.
The recording process will be cancelled if the caller terminates the call, if the message
is shorter than 5 seconds or if a network signal tone of more than 8 seconds in length
is received. The answering machine sends out 4 short signal tones and interrupts the
connection.
If the stop key ➁ is pressed, the device also sends out 4 short signal tones and
interrupts the connection.
The recording process will also be cancelled without 4 short signal tones being sent
out if you pick up the handset in order to answer the call.
Replay of incoming messages
In order to listen to received messages or notes, press the key ➅ playback in the
stand-by mode. All incoming messages and notes will be announced, starting with
the most recent message.
During the message playback, a blinking P is displayed in the message indicator.
Page 20

Operation
20
The answering machine disposes of a voice-day-and-time stamp, that means the day
and the exact time of the message are saved and announced at the end of each
message.
After the playback of the last message, you hear the announcement: “end of
messages”. The message counter starts to count back from 8 to 0 (one step per
second). Afterwards, all messages – except for those that have been selected for
deletion – will automatically be saved.
Repetition of the current message
If you want to listen again to the message which has just been played back, press
the key ➅ playback once during the message playback.
The current message will be repeated.
Skipping back to the previous incoming message
During the message playback, press the key ➅ playback twice.
The playback of the current message will be cancelled and the previous message will
be started anew.
Skipping forward to the next incoming message
During the message playback, press the key ➄ on/off once.
The playback of the current message will be cancelled. The device continues with
the playback of the next message.
Deleting of individual incoming messages
If you want to delete messages, press the key ➃ delete during the playback of the
message to be deleted.
The announcement “message deleted” can be heard and the current message is
activated for deletion. However, the message will only be deleted after all incoming
Page 21

Operation
21
messages have been played back or when the position “end of messages” has been
reached by skipping forward.
After the activation of a message for deletion, the relevant message is skipped and
the playback of the following message is started.
The deletion of the selected message can be cancelled if the stop key ➁ is pressed
immediately or until the announcement “end of messages” has been reached. In this
case, the playback of the messages will be interrupted. The message will not be
deleted.
Deleting all incoming messages
After the announcement “end of messages”, the message counter starts to count
back from 8 to 0.
Press the key ➃ delete. All messages are selected and marked for deletion.
The announcement “message deleted” can be heard, despite of this, the answering
machine continues counting back from 8 to 0 seconds.
If the initialisation time of 8 seconds has expired, all messages are deleted.
Now, the device has capacity available for the recording of new incoming messages.
If, however, you want to stop the deleting of all messages, press the stop key ➁
while the answering machine counts back. The process will then be interrupted and
the command for deletion will be cancelled.
Loudspeaker function
If the volume has been set above the minimum setting level, an incoming call can be
heard by persons present in the room via loudspeaker.
If you want to accept the call, simply pick up the handset of your telephone. The
recording will be interrupted, however, the message received till then will be saved
and indicated as valid message.
Page 22

Operation
22
Switching the device on and off
In order to switch the device on/off, shortly press the key ➄ on/off when the device
is in the stand-by mode. A short signal can be heard and the symbol – is indicated in
the message counter. The answering machine is switched off. If a function is active
and you want to switch the answering machine off, then press the stop key ➁ in
order to return to the stand-by mode. Afterwards, shortly press the key ➄ on/off.
The answering machine will be switched off.
If the answering machine should be switched on again, press the key ➄ on/off
again. A long signal tone can be heard and the answering machine is switched on
and returns to the last active setting.
Remote settings
It is also possible to operate your answering machine via remote control and to
activate or deactivate all functions from a distance. In order to prevent that your
answering machine is operated by unauthorised persons, it is protected by an
access code.
Please note that the remote control of the answering machine can only be
carried out via a DTMF telephone or by means of a DTMF transmitter.
Remote access code
The access code is a fix pre-programmed code; the character star . (Achtung:
dieser Satz erscheint mir schon im deutschen Original unvollständig – bitte
prüfen!!!) Not only the access code but also the 3-digit security code (pre-pro-
grammed during production of the device) cannot be modified by the user. The
security code can be found on the bottom cabinet of your answering machine.
Activation of remote control
1. Call your device. You hear the OGM of the answering machine.
2. Now, enter the access code (DTMF) and the character star . If the correct
access code has been entered, the device terminates the playback of the automatic OGM or the recording of the ICM and sends out two short signal tones as
Page 23

Operation
23
confirmation that the access code has been accepted. The message counter
indicates a blinking $ until the connection is cancelled by the device.
3. After the acceptance of the access code, the device is ready to receive the
3-digit security code. Enter the security code now, the first digit must be entered
within 8 seconds. Please note that the digits have to be entered in that way
(more or less one digit per second) that you can hear the acknowledgement
tone for each entered digit.
4. If the device identifies the third digit of the security code, the validity of this code
is verified. If the wrong code has been entered, the device sends out four short
signal tones and is available for one further attempt. Do not enter the access
code now! If the entered security code is wrong again, you will hear the four
short signal tones twice and the device switches off.
5. If the correct code has been entered, the remote control mode is activated.
Remote control functions
The following remote control functions are available:
playback of all messages
skipping back to the previous message
skipping forward to the following message or repeating the current message
activating a message for deletion / deleting all messages
stop; terminating message playback
restoring of deleted messages
answering machine on/off
Switching the device on/off by remote control
1. The device is switched off and you want to activate the answering machine.
2. Call the answering machine. After eight to ten ringing signals, the answering
machine picks up the call and you hear – depending on the set operating mode
– the corresponding OGM before the device turns off.
3. Enter the access code now and two signal tones can be heard.
4. Afterwards, enter the 3-digit security code. If the security code is accepted (you
can hear the acknowledgement tone after each entered digit), the number of
incoming messages is announced.
5. Now, press the digit
to stop; the message playback will be interrupted.
Page 24

Operation
24
6. Now, enter the digit in order to switch on the device. You hear a long and two
short acknowledgement tones. The answering machine has been activated.
7. The answering machine can be switched off in the same way. After entering the
digit
, only two short acknowledgement tones are sent out. The answering
machine is switched off.
If the capacity of the message memory is exhausted and the announcement-
only mode has not been set, a long signal tone is sent out and you hear the
announcement: “memory capacity exhausted”. Delete messages via the remote
control so that memory capacity is made available to record new ICMs. Otherwise, the device returns to the memory capacity exhausted mode and will not
pick up calls.
Message playback
1. Call your answering machine, enter the access code during the playback of the
automatic OGM and afterwards the security code.
2. If no messages have been received, the announcement “no messages avail-
able” can be heard. Afterwards, 4 short signal tones are sent out and the
connection will be cancelled.
3. If messages have been received, the announcement “You have X message(s)”
can be heard and the ICMs will be played back.
4. The message playback is interrupted every 2.5 minutes.
5. If you want to listen to further messages, press the key
within 8 seconds in
order to continue the message playback.
6. Otherwise, the device sends out 4 short signal tones and cancels the connec-
tion if no command for the continuation of the message playback or for the
realisation of other functions is entered.
7. At the end of the last message, the announcement “end of messages” can be
heard.
8. Further commands have to be entered within 8 seconds.
Repeating of current messages
1. During the message playback, press the digit once.
2. The current message will be repeated.
Page 25

Operation
25
Skipping back to previous incoming messages
1. During the message playback, press the key , then, the playback function
skips back to the previous ICM.
2. Press the key
twice, then, the answering machine skips two messages back,
if the key
is pressed three times, the device skips three message back, when
the key is pressed four times, you skip four messages back and so on.
Skipping forward to following incoming messages
1. During the message playback, press the key twice.
2. The device skips forward to the next message.
3. If the key
is pressed four times, the device skips two messages forward.
Pressing the key
six times, you skip three messages forward and so on.
Playback of all incoming messages
1. After the remote access of your answering machine has been activated, you
hear the announcement “You have X message(s)”. All messages will be
announced in the order of receipt, starting with the most recent message.
2. If you want to listen to the messages again, press the key
after the announce-
ment “end of messages” but within the waiting period of 8 seconds after the last
messages has been played back.
3. The device announces “You have X message(s)” and repeats the playback of all
messages.
4. Messages that have been marked and activated for deletion during the last play-
back will not be played back.
5. The playback can be repeated only twice.
6. After the third playback, the device announces “end of messages”. Afterwards,
4 short signal tones can be heard and the connection will be cancelled.
Terminating the message playback
1. During the message playback or another function, press the key .
2. The device sends out a short signal tone and immediately cancels the connec-
tion.
Page 26

Operation
26
Deleting individual incoming messages
1. During the message playback, press the key in order to activate and mark the
current message for deletion.
2. The device announces “message deleted” and skips the relevant message in
order to playback the next message. The message which is activated for
deletion can be played back once more before it is finally erased.
3. When all messages have been played back or if the remote control is inter-
rupted by entering the
or by replacing the handset, the message selected for
deletion will be erased.
Restoring of incoming messages activated for deletion
1. If you want to restore the messages activated for deletion, simply press the in
order to terminate the message playback.
2. Afterwards, press the key
(restore deleted messages).
3. All messages that have been activated for deletion will not be erased and are
available again.
4. As confirmation, you hear two short signal tones.
Deleting all incoming messages
1. If you have listened to all messages, press the key after the announcement
“end of messages” but within the 8 seconds after the message playback.
2. The device announces “all messages deleted”. Afterwards, 4 short signal tones
can be heard and the connection will be cancelled.
The restoring of messages activated for deletion is not applicable if all messages
have to be deleted after message playback but only if individual messages
should be deleted.
Page 27

Guarantee
27
Guarantee
Your contact for services arising from guarantee obligations is the authorised dealer
where you bought the device.
The TIPTEL AG will grant a guarantee of 2 years from date of hand-over for the
material and for the manufacturing of the telecommunications terminal unit.
Initially, the purchaser shall have only the right of subsequent performance in case of
a defect. Subsequent performance entails either the repair or the supply of an alternative product. Exchanged devices or parts shall become the property of the authorised dealer.
If the subsequent performance fails, the purchaser can either demand a reduction in
the purchase price or withdraw from the contract.
The purchaser shall notify the dealer immediately of any defects found. Proof of the
guarantee entitlement shall be furnished by standard proof of purchase (receipt or
invoice).
The guarantee entitlement shall expire if the purchaser or an unauthorised third party
interferes with the device. Damages caused by inappropriate handling, operation,
storage or by force majeure or other external influences shall not be covered by the
guarantee.
The guarantee does not cover any consumable materials (such as batteries) or
defects that only slightly impair the value or the usability of the device.
Any defects occurred during transportation have to be handled and settled through
the delivery company.
Notes on settlement:
Repairs can only be conducted by the TIPTEL Service. In normal cases, our 48-hour
repair service will let you have a repaired or an exchanged device after 2 working
days (plus time required for postal transport). A repair under guarantee does not
prolong the warranty period – neither for the replaced parts nor for the device itself.
This guarantee is not transferable and shall expire if the device is sold to a third party.
It shall also expire if the device is interfered with by third parties or if the serial
number on the device has been removed or made illegible. You will find a warranty
seal on the device. Please do not damage or remove this seal because otherwise,
your guarantee will expire.
Page 28

Guarantee
28
The General Terms and Conditions of the TIPTEL AG which are part of the contract
for a dealer, shall also apply. In the event of a complaint, the defective product
should be sent to the addresses below along with a description of the defect and the
proof of purchase.
In Germany In Austria In Switzerland
TIPTEL AG Tiptel GmbH Tiptel AG
Service Service Service
Halskestraße 1 Tenschertstraße 8 Bahnstrasse 46
40880 Ratingen 1230 Vienna 8105 Regensdorf
For warranty cases, the return delivery is effected at the expense of the TIPTEL AG.
Declaration of conformity
The TIPTEL AG hereby declares that the device complies with all fundamental requirements of the European directive 1999/5/EG.
Further details on the declaration of conformity can be found in the internet. The relevant address is as follows: www.tiptel.de
CE sign
This device was produced in compliance with the EC directive on radio and telecommunications equipment installations and the reciprocal acceptance of their regulatory
compliance. This is proven by the CE sign on the device.
Page 29

Guarantee
29
Technical support
Should you face any problems or should you have questions on how to handle or
operate the device, please contact your local authorised dealer. Your local dealer will
be your contact partner during the warranty period. The TIPTEL AG has established a
special hotline number for the technical support of the authorised dealers so that
those specialists will get a highly qualified support.
In Germany In Austria In Switzerland
www.tiptel.de www.tiptel.at www.tiptel-online.ch
support@tiptel.de tiptel.service@aon.at service@tiptel-online.ch
8 – 18 h (Mon-Fri) 8 – 17 h (Mon-Thu), Fri to 14 h 8 – 17 h (Mon-Fri)
Telephone 0 18 05 – 84 78 35* Telephone 0900 940 945 Telephone 01 / 843 13 13
Vanity 0 18 05 – TIPTEL* Telefax 01 / 616 78 71 – 21 Telefax 01 / 884 01 84
Telefax 0 18 05 – 84 78 49*
* 0.12 EUR per minute
Should you have any questions related to your telephone connection, please contact
your local network provider.
Technical data
power supply net adapter primary: 230 V, 50 Hz, 28 mA
secondary: 9 V, ~400 mA, 3.6 VA
data back-up block battery 9V alkaline
number of messages 59
recording capacity max. 2 min per message, max. 14 min per note
a total of 14 min for messages and/or notes
length of OGMs max. 2 min each text
number of OGM texts max. 4 (2 pre-recorded and two individual OGMs)
total weight 0.7 kg incl. packing
Page 30

Page 31

Page 32

Halskestr. 1
D – 40880 Ratingen
phone: +49 2102 428 – 189
fax: +49 2102 428 – 180
e-mail: export@tiptel.de (UK) 07/02
Internet: www.tiptel.de EDV 4932826
 Loading...