

Page 1
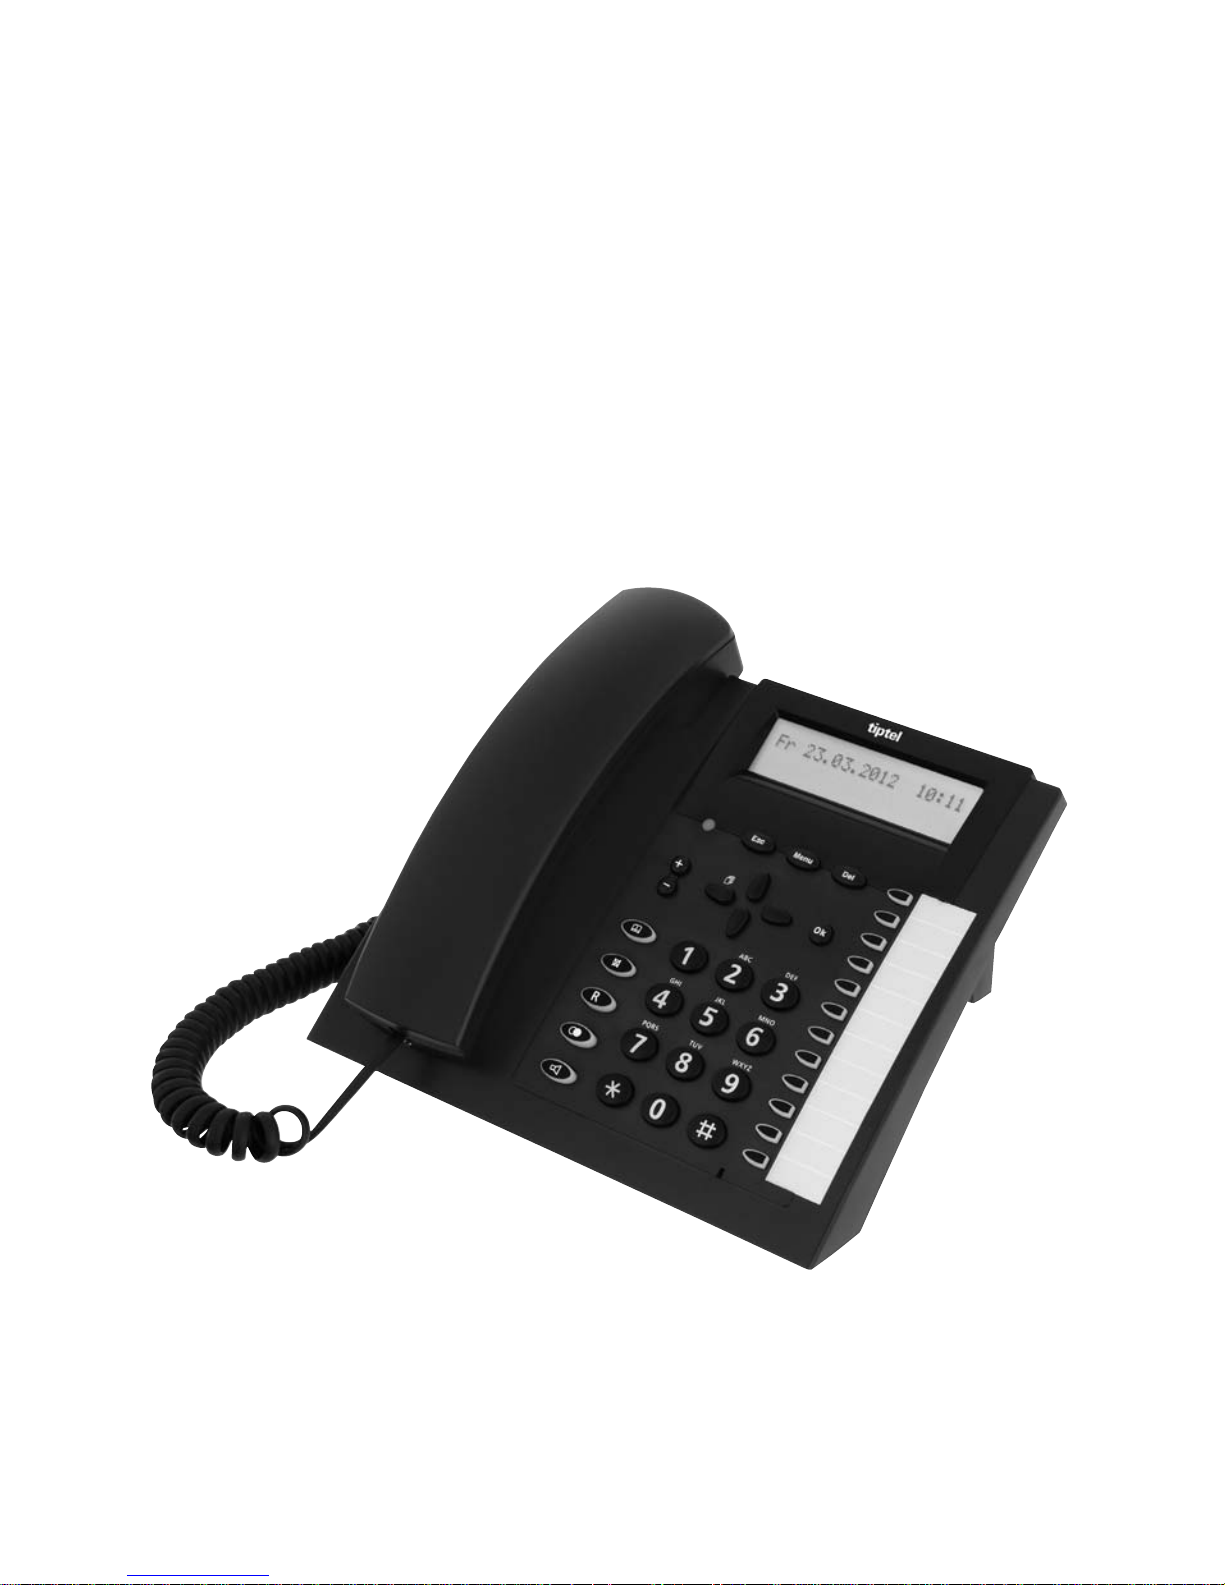
tiptel
User’s Manual (en)
ISDN Comfort Phone
tiptel 2020
in addition with CTI, USB,
and answering machine
tiptel 2030
Page 2

Page 3

3
Table of contents
Illustration
Illustration (upper housing, key pad) . . . . . . . . . . .4
Illustration (underneath) . . . . . . . . . . . . . . . . . . . . .5
Initial operation
Scope of supply . . . . . . . . . . . . . . . . . . . . . . . . . . .6
Mounting . . . . . . . . . . . . . . . . . . . . . . . . . . . . . . .6-7
Connection . . . . . . . . . . . . . . . . . . . . . . . . . . . . . . .8
ISDN connection . . . . . . . . . . . . . . . . . . . . . . . . . .8
Emergency operation . . . . . . . . . . . . . . . . . . . . . . .8
Button functions
Button functions . . . . . . . . . . . . . . . . . . . . . . . . . . .9
Operational hints
Entering the MSNs . . . . . . . . . . . . . . . . . . . . . . . .10
Selecting the outgoing MSN . . . . . . . . . . . . . . . .10
Adjusting the volume . . . . . . . . . . . . . . . . . . . . . .11
Handset volume . . . . . . . . . . . . . . . . . . . . . . . . . .11
Operation overview . . . . . . . . . . . . . . . . . . . . .12-13
Telephone calls
Call counter . . . . . . . . . . . . . . . . . . . . . . . . . . . . .14
Direct manual call . . . . . . . . . . . . . . . . . . . . . . . .14
Off-line call preparation (indirect call) . . . . . . . . .15
Dialling from the electronic telephone book . . . . .15
Redial . . . . . . . . . . . . . . . . . . . . . . . . . . . . . . . . . .16
Automatic call-back on busy (CCBS) . . . . . . . . . .17
Automatic redial . . . . . . . . . . . . . . . . . . . . . . . . . .18
Loudspeaker . . . . . . . . . . . . . . . . . . . . . . . . . . . .18
Hands-free operation . . . . . . . . . . . . . . . . . . . . . .18
Switching between handset and
hands-free operation . . . . . . . . . . . . . . . . . . . . . .19
Headset-operation . . . . . . . . . . . . . . . . . . . . . . . .19
Mute function . . . . . . . . . . . . . . . . . . . . . . . . . . . .20
Conversation recording (only tiptel 2030) . . . . . .20
Call tracing (MCI) . . . . . . . . . . . . . . . . . . . . . . . . .21
Placing a call on hold/additional call . . . . . . . . . .21
Disconnecting a call . . . . . . . . . . . . . . . . . . . . . . .21
2-line operation with hold . . . . . . . . . . . . . . . . . . .22
Three-party conference . . . . . . . . . . . . . . . . . . . .22
Call transfer . . . . . . . . . . . . . . . . . . . . . . . . . . .22-23
Call parking . . . . . . . . . . . . . . . . . . . . . . . . . . . . .23
Call waiting . . . . . . . . . . . . . . . . . . . . . . . . . . . . . .24
Answering a call . . . . . . . . . . . . . . . . . . . . . . . . . .25
Keypad . . . . . . . . . . . . . . . . . . . . . . . . . . . . . . . . .26
Sub-addressing . . . . . . . . . . . . . . . . . . . . . . . . . .26
Call list . . . . . . . . . . . . . . . . . . . . . . . . . . . . . . . . .27
Electronic telephone book
General information on the electronic
telephone book . . . . . . . . . . . . . . . . . . . . . . . . . . .28
Entering data . . . . . . . . . . . . . . . . . . . . . . . . . . . .28
Storing data . . . . . . . . . . . . . . . . . . . . . . . . . . . . .29
Editing data . . . . . . . . . . . . . . . . . . . . . . . . . . . . .30
System settings
Entering the MSNs . . . . . . . . . . . . . . . . . . . . . . . .31
Selecting the outgoing MSN . . . . . . . . . . . . . . . .31
Call number display . . . . . . . . . . . . . . . . . . . . . . .32
Setting the call waiting function . . . . . . . . . . . . . .33
Setting the call transfer function . . . . . . . . . . . . .34
Setting the call diversion (CD) function . . . . . . . .34
Internal ISDN features (only tiptel 2030) . . . . . . .35
Setting time and date . . . . . . . . . . . . . . . . . . . . . .36
Contrast adjustment . . . . . . . . . . . . . . . . . . . . . . .36
Changing the PIN . . . . . . . . . . . . . . . . . . . . . . . . .37
Charge rate . . . . . . . . . . . . . . . . . . . . . . . . . . . . .37
Factory pre-set . . . . . . . . . . . . . . . . . . . . . . . . . . .38
Access to the public exchange . . . . . . . . . . . . . .38
Update via ISDN . . . . . . . . . . . . . . . . . . . . . . .39-40
Update via USB (only tiptel 2030) . . . . . . . . . . . .40
Telephone settings
Ringing tone . . . . . . . . . . . . . . . . . . . . . . . . . . . . .41
Direct dialling (baby call) . . . . . . . . . . . . . . . . . . .42
Call blocking/keypad locks . . . . . . . . . . . . . . .43-44
Appointments
Enter/edit appointments . . . . . . . . . . . . . . . . . . . .45
Time control
Enter/edit time control data . . . . . . . . . . . . . . .46-47
Information
Charges . . . . . . . . . . . . . . . . . . . . . . . . . . . . . . . .48
Memory . . . . . . . . . . . . . . . . . . . . . . . . . . . . . .48-49
Calls . . . . . . . . . . . . . . . . . . . . . . . . . . . . . . . . . . .49
Macro programming
Macro programming . . . . . . . . . . . . . . . . . . . . . . .50
Call forwarding
Call forwarding . . . . . . . . . . . . . . . . . . . . . . . .51-52
Answering machine (only tiptel 2030)
Answering mode . . . . . . . . . . . . . . . . . . . . . . . . .53
Answering machine set-up . . . . . . . . . . . . . . .53-54
Outgoing messages . . . . . . . . . . . . . . . . . . . . . . .55
Incoming messages . . . . . . . . . . . . . . . . . . . . . . .56
Dictate/Call record . . . . . . . . . . . . . . . . . . . . . . . .57
Message transfer . . . . . . . . . . . . . . . . . . . . . . . . .57
Message collection . . . . . . . . . . . . . . . . . . . . . . . .57
Message transfer settings . . . . . . . . . . . . . . . . . .58
Remote control (only tiptel 2030)
Perform remote interrogation . . . . . . . . . . . . . . . .59
Remote control code . . . . . . . . . . . . . . . . . . . . . .59
Message code . . . . . . . . . . . . . . . . . . . . . . . . . . .59
VIP code . . . . . . . . . . . . . . . . . . . . . . . . . . . . . . . .59
Remote activation of the
answering mode . . . . . . . . . . . . . . . . . . . . . . . . . .60
Remote erase during the
remote interrogation process . . . . . . . . . . . . . . . .60
Remote pre-interrogation
free of charge (toll saver) . . . . . . . . . . . . . . . . . . .60
Remote control functions . . . . . . . . . . . . . . . .61-62
Remote control settings . . . . . . . . . . . . . . . . .63-64
PC connection (only tiptel 2030)
PC connection . . . . . . . . . . . . . . . . . . . . . . . . . . .65
Software . . . . . . . . . . . . . . . . . . . . . . . . . . . . . . . .65
TAPI driver . . . . . . . . . . . . . . . . . . . . . . . . . . . . . .65
Installation . . . . . . . . . . . . . . . . . . . . . . . . . . . . . .65
Appendix
Service, Guarantee, CE sign . . . . . . . . . . . . .66-67
Important information
Operation during power failure . . . . . . . . . . . . . .68
Cleaning . . . . . . . . . . . . . . . . . . . . . . . . . . . . . . . .68
Installation . . . . . . . . . . . . . . . . . . . . . . . . . . . . . .68
Possible malfunctions . . . . . . . . . . . . . . . . . . . . .68
Ecological information . . . . . . . . . . . . . . . . . . . . .68
Factory pre-set . . . . . . . . . . . . . . . . . . . . . . . . . . . .69
Troubleshooting . . . . . . . . . . . . . . . . . . . . . . . . . . .70
Technical data . . . . . . . . . . . . . . . . . . . . . . . . . . . . .71
Page 4
4
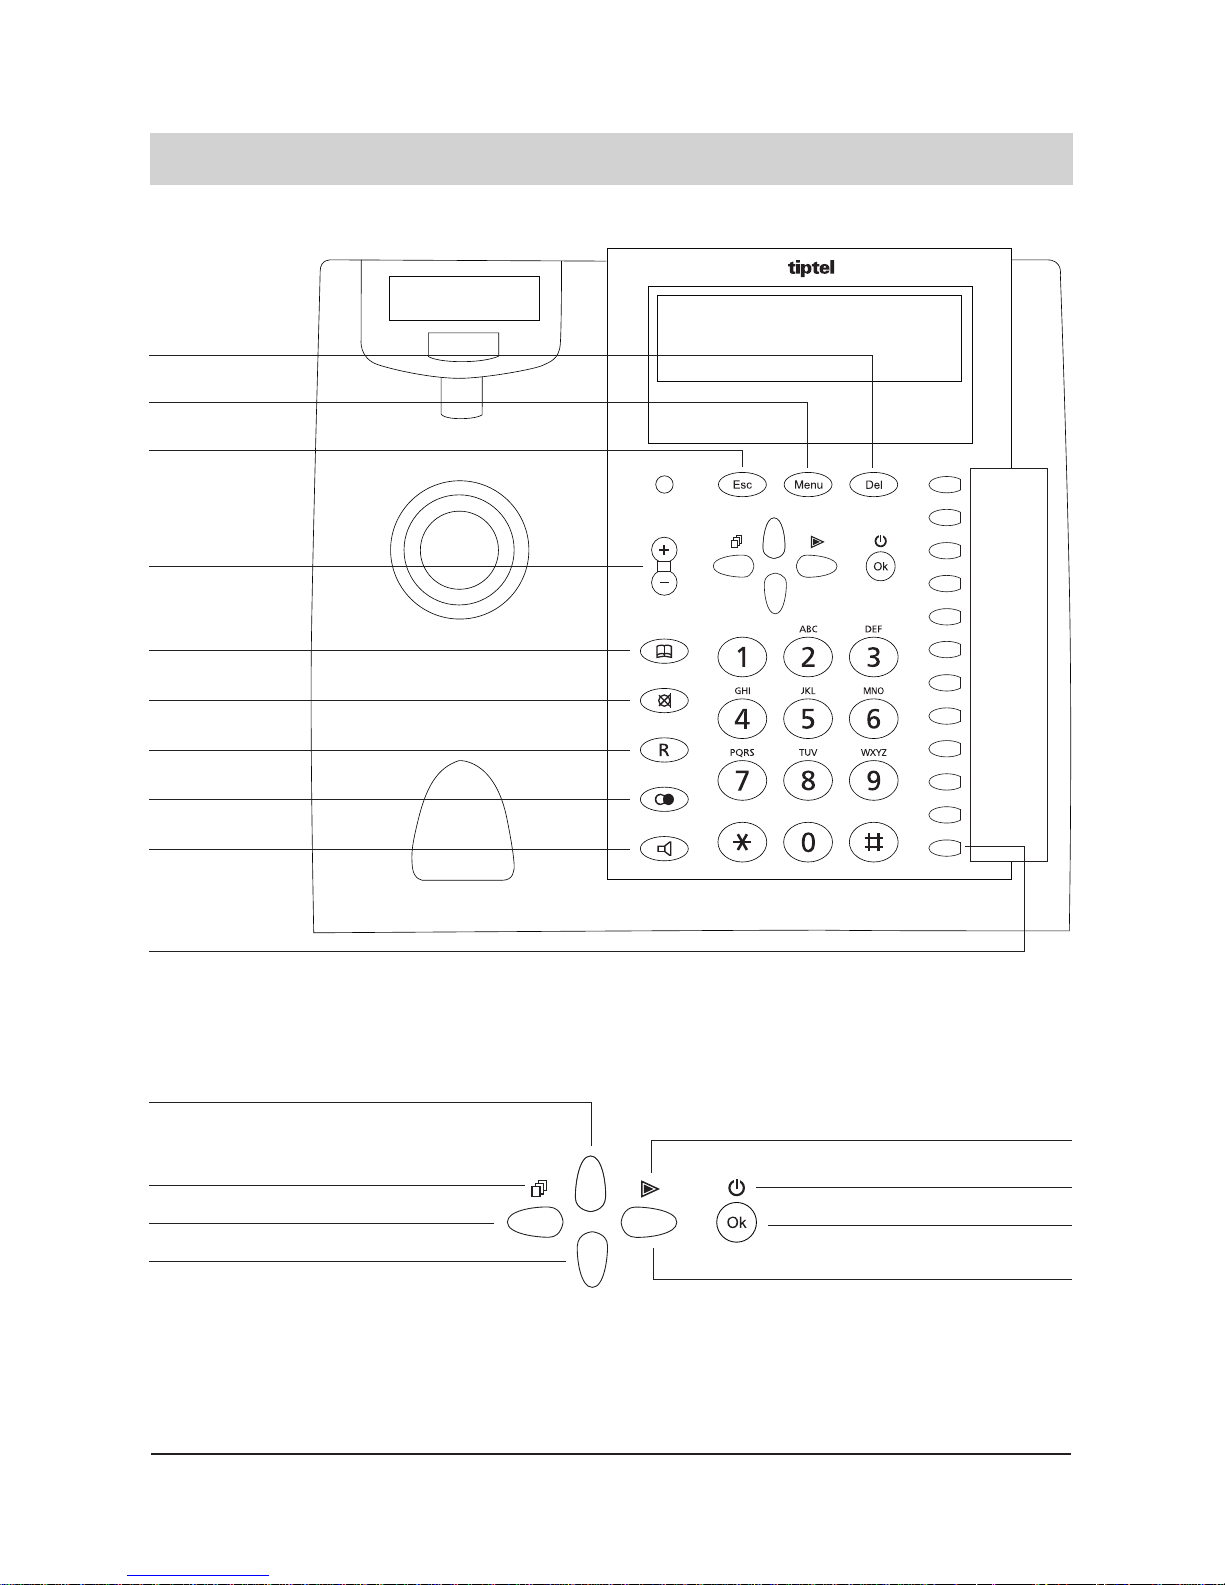
Illustration (upper housing, key pad)
Delete
Telephone book
Mute
Enter
Redial
Cursor key up
Cursor key left
Cursor key down
Cursor key right
Answering machine (only tiptel 2030)
ICM log (only tiptel 2030)
Call list
Loudspeaker/
Hands-free mode
Speed dialling
keys/macro keys
Escape
Main menu
Volume adjustment
2-line operation/hold
Page 5
5
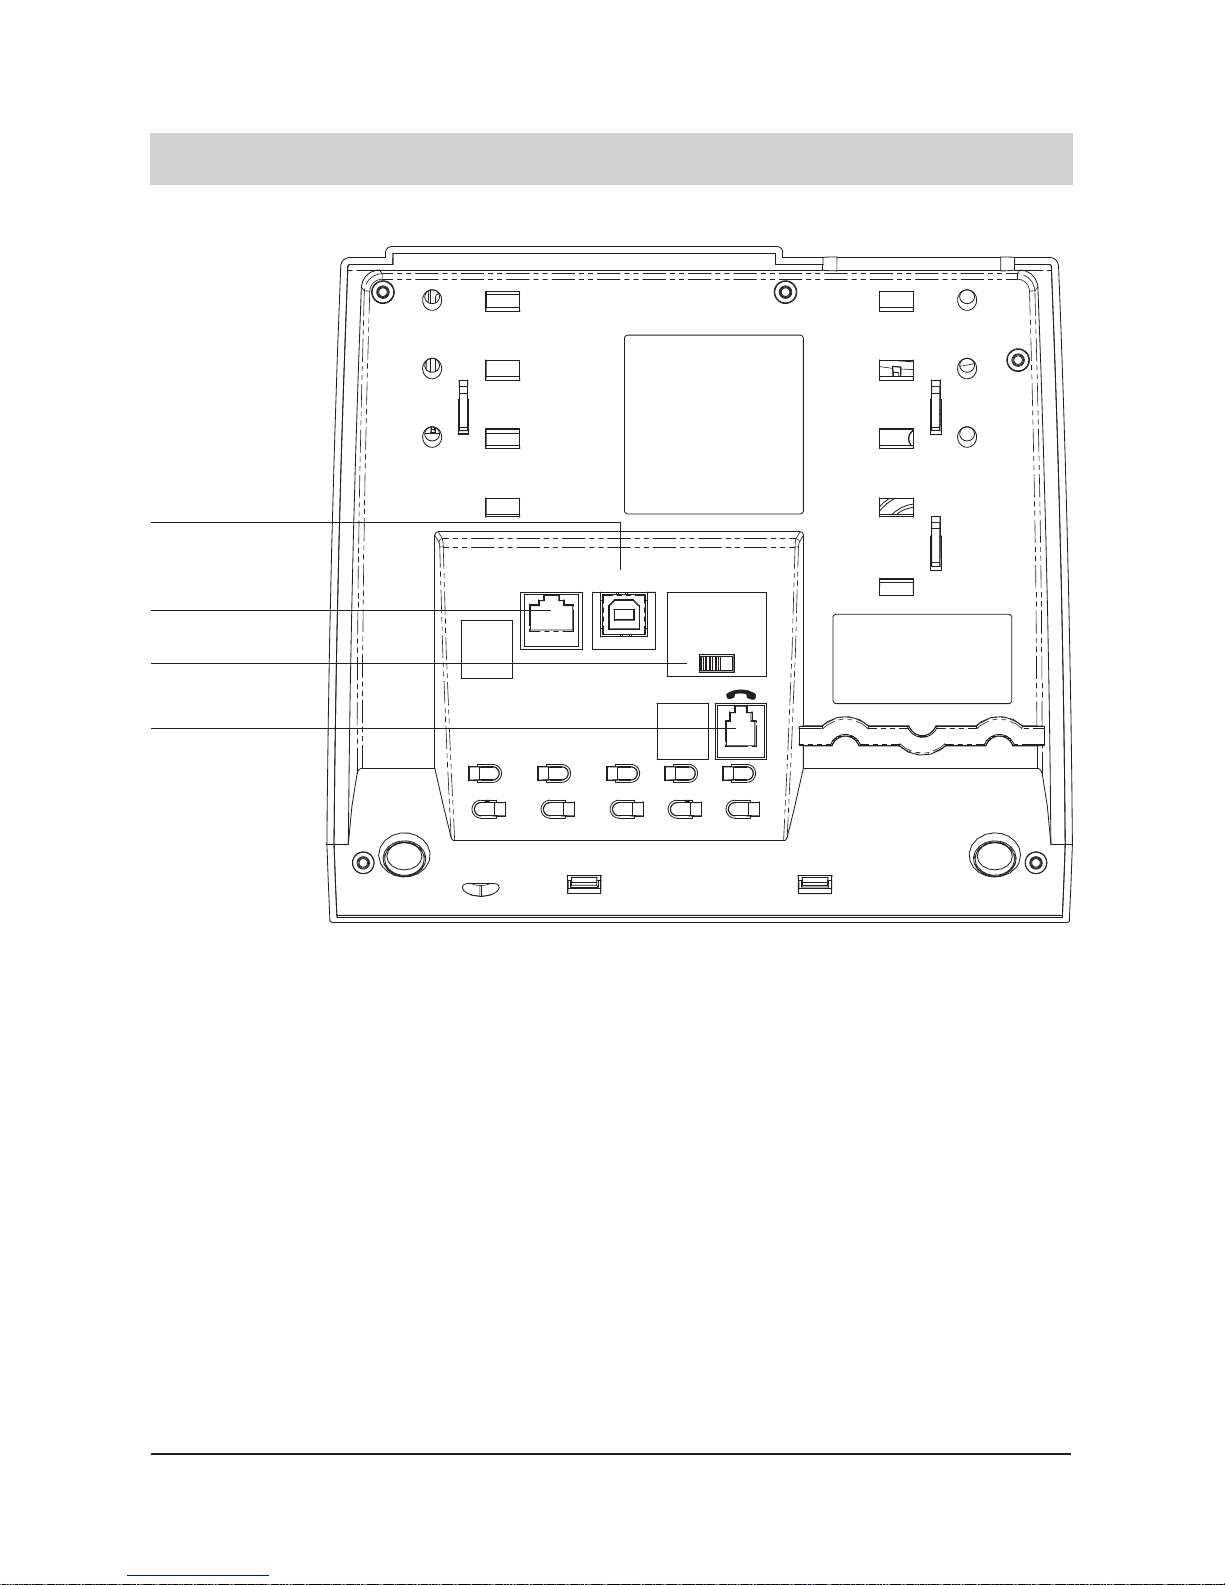
Illustration (underneath)
LINE
USB
I O
Connection handset
Connection USB
Connection ISDN
Emergency power
feeding
Page 6
6
Initial operation
Scope of supply
Your telephone scope of supply comprises:
m a telephone handset m operating instructions
m a supporting stand m an interface cable USB*
m a spiral cable m the Windows software "tiptel 2030" for Windows
®
*
m an ISDN connection cable m the TAPI driver "tiptel phone 1" *
* only tiptel 2030
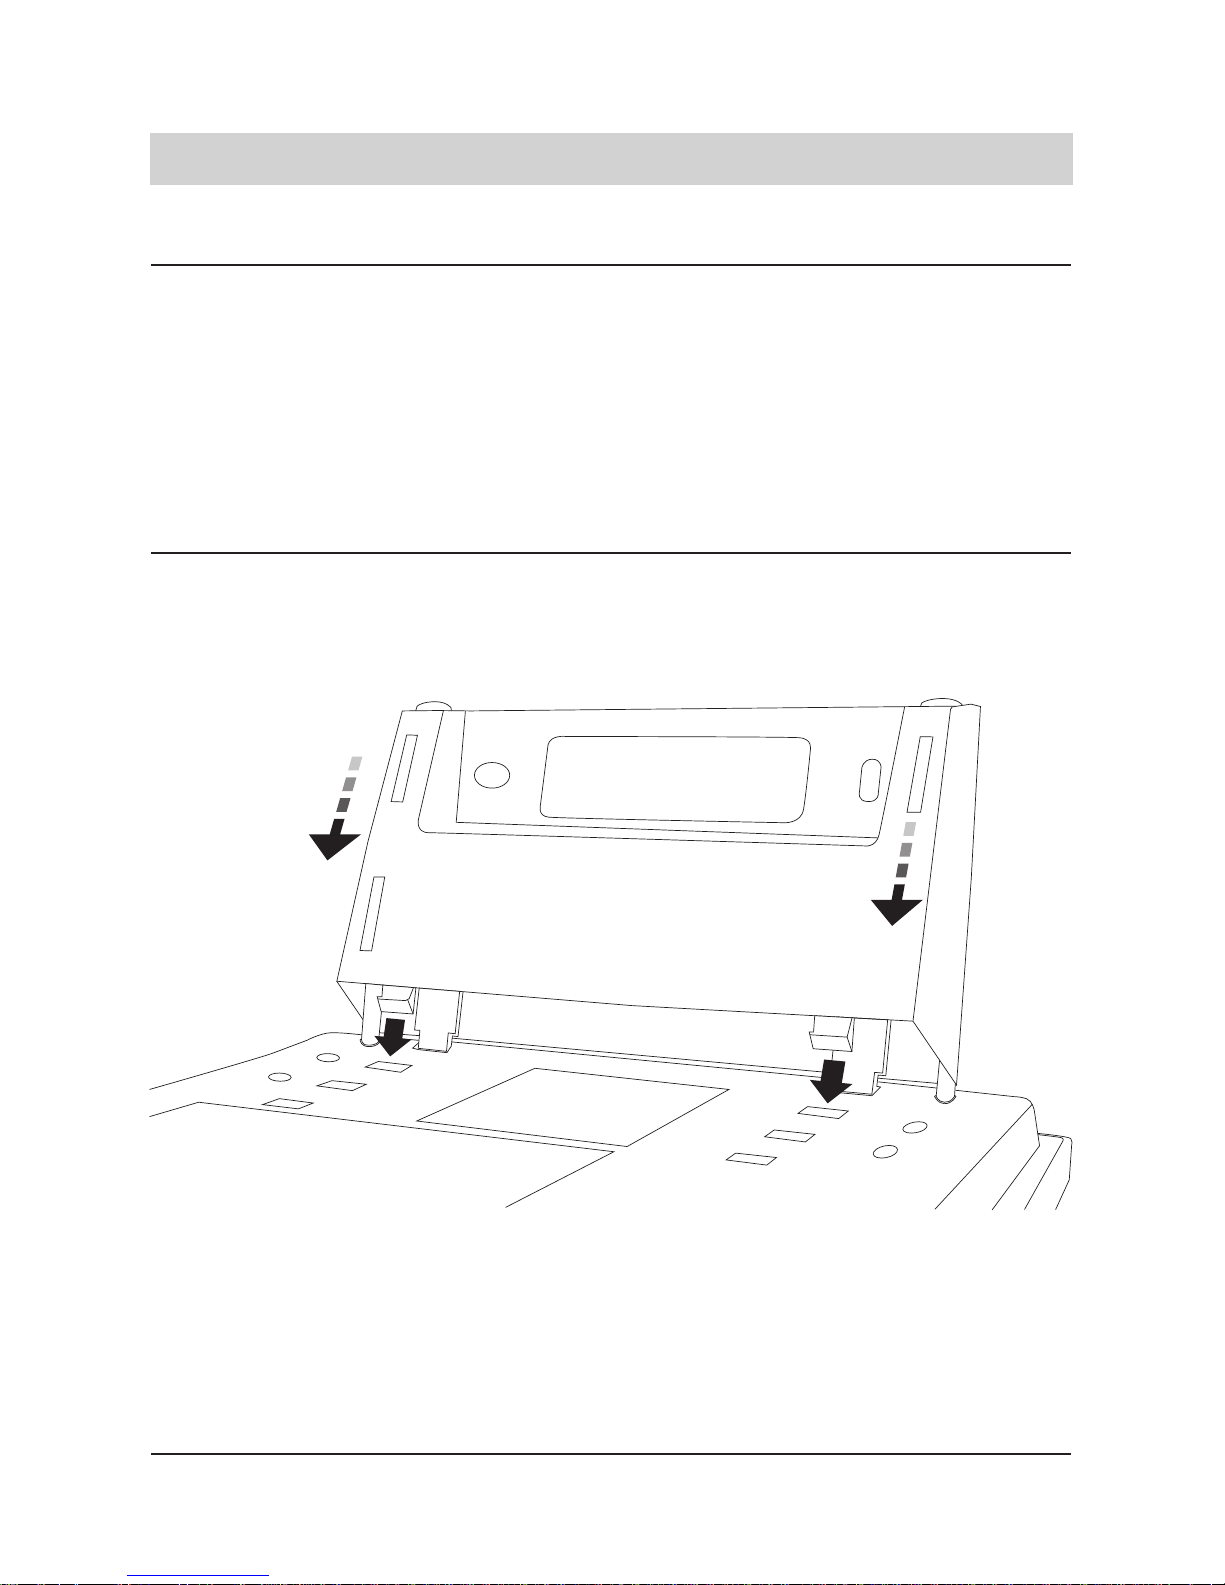
Mounting
To use the phone as a table top unit, please mount the enclosed supporting stand as shown
below.
Page 7

7
Initial operation
For wall mounting mount the supporting stand with two screws to a wall as shown below
(Picture 1).
Then mount the phone as shown to the supporting stand (Picture 2).
Pull out the handset hanger from the handset cradle, take it upside down and re-insert it
(Picture 3).
Page 8

8
Initial operation
Connection
Your tiptel telephone is designed for the connection at Euro ISDN point-to-multipoint connections. Before taking the device into operation, all required connecting cables have to be plugged
in. To do this, turn the device so that the inputs under the telephone are easily accessible:
m Plug the long end of the curled handset cable in the jack. The small end of the cable
has to be plugged in the corresponding receptacle of the handset.
m Plug the telephone connecting cable in the "LINE" jack. Connect the other end of the cable to
the ISDN socket.
m Connect the USB cable to the USB jack (only tiptel 2030)
m For strain relief, press the cables into the provided cable channels.
ISDN connection
The ISDN access provides a wide range of ISDN features which are supported by your telephone.
Not all of these features are offered by your telephone network provider free of charge. You need
to order some of those separately. You will receive several telephone numbers (MSN) for your
ISDN connection. The first MSN (multiple subscriber number) will be registered automatically
after your first telephone call. The provided telephone numbers have to be entered in the MSN
menu in order to be addressable. All further telephone settings or answering machine settings
(only tiptel 2030) can be configured individually for each MSN. As for the operation within
a telephone system, some features might become restricted. Here, please also refer to the
chapters "Access to the public exchange" and "Setting the call transfer function".
Emergency operation
The ISDN access provides power supply for your telephone. The AC adapter of the ISDN NTBA
(network termination basic access) must be connected to the 230 V power supply. In the case of
a power failure, the exchange office provides a remote power feeding for the emergency operation of one terminal as a maximum. If you want to use your tiptel telephone as emergency telephone, you have to set the switch for emergency power feeding to position "I". Please be aware
that the telephone functions are restricted during emergency operation. The following functions
will then not be available:
m LCD display in the idle state m All answering machine functions (only tiptel 2030)
m Telephone configuration features m Hands-free operation / loudspeaker
Page 9
9
Button functions
Use the cursor keys up/down to open the electronic telephone book. When you are in
the data entry mode, you can delete a character or number by the q button and insert
a character or number by the p button.
Use the cursor keys left/right to select functions or menu levels. You can also position
the cursor when you are in the data entry mode.
The Ok button serves to confirm an entry or a selected function. When you press this
key for more than 3 seconds, previously configured call deflections and answering
machine (only tiptel 2030) will be switched on or off.
Pressing the ESC button will interrupt a current function or will take you to the higher
menu level.
The plus/minus key can be used to adjust the volume of the loudspeaker up or down.
Pressing the "mute" button turns the microphone on or off. The status will be indicated
by the key illumination.
The "recall" button allows to use the functions "hold" or "2-line operation with hold".
The "redial" button is used to redial the last telephone number dialled.
The "loudspeaker" button turns the hands-free operation on or off and serves to
connect or disconnect the CO line. The status will be indicated by the key illumination.
Numeric buttons to dial telephone numbers.
Star and rhombus buttons may support special functions for tone dialling.
Use the speed dialling stations to dial the corresponding stored telephone number
directly or assign a specific function via the macro programming control.
The menu key opens the main menu.
The DEL key is used for deleting characters in entry fields.
The "book" key opens the phone register.
In standby mode this key can be used to directly open the call list. This is indicated by
the call list icon above that key.
In standby mode this key can be used to directly open the ICM log. This is indicated
by the answering machine icon above that key.
*only tiptel 2030
Page 10

10
Entering the MSNs
Your ISDN connection and thus your telephone can be addressed via one or more telephone
numbers (MSNs = multiple subscriber numbers). (These numbers are obtainable at your local
telephone network provider.) Up to 6 telephone numbers can be assigned to your telephone.
1. Press the
c
button.
2. Press the n or o button to select
"settings".
3. Press the q button.
4. Press the n or o button to select
"system".
5. Press the q button 3 times.
6. Press the n or o button to select the
desired "MSN" (MSN1 ... MSN6).
7. Press the fbutton.
8. Enter your MSN via the numeric keypad.
9. Press the fbutton.
The main menu will pop up.
Every time you press the button, the display
switches between the available functions.
The display shows "appointments" or
"answering machine" (only tiptel 2030).
The display shows "system".
The display shows "MSN1" and the MSN if it
had been entered.
The display shows the MSN.
The display shows "enter MSN".
The MSN is stored.
1. Press the
c
button.
2. Press the n or o button to select
"settings".
3. Press the q button.
4. Press the n or o button to select
"system".
5. Press the q button 2 times.
6. Press the n or o button to select the
desired "outgoing MSN".
7. Press the fbutton.
8. Enter a number between 1 and 6 via
the numeric keypad to select the MSN.
9. Press the fbutton.
The main menu will pop up.
Every time you press the button, the display
switches between the available functions.
The display shows "appointments" or
"answering machine" (only tiptel 2030).
The display shows "system".
The display shows "MSN".
The display shows "outgoing MSN".
The display shows the current setting.
The setting is stored.
Selecting the outgoing MSN
Here, you define the MSN which is submitted to the exchange office (for your telephone) when
you make outgoing calls. The charges incurring for outgoing calls will be assigned to this specific MSN.
Operational hints
Page 11

11
Operational hints
Adjusting the volume
When executing a function with activated loudspeaker, you can adjust the volume to your needs.
The display shows the selected volume level.
If the volume remains unchanged after 2 seconds, the telephone automatically resumes the
earlier displayed volume.
Handset volume
When making a telephone call (and not using the loudspeaker), you can eiter increase or decrease
the handset volume.
If the volume remains unchanged after 2 seconds, the telephone automatically resumes the
earlier displayed volume.
1. Press the
a
button.
Each actuation will increase/decrease the
volume by one step.
1. Press the
a
button.
Each actuation will increase/decrease the
volume by one step.
Volume
zzzzzzzz
Handset volume
zzz
Page 12
12
1st level
1 Call list
2 Recordings/
Incoming messages*
3 Dictate / information*
4 Resume a parked call
(Place call on hold)
5 Settings
2nd level
1 Answering machine*
2 Appointments
3 Time control
3rd level
1 Outgoing message
2 Answering machine
set-up
3 Remote interrogation
4 Message
transfer
1 Enter time
2 Activate time control
4th level
1 Remote answer mode
2 Remote erase
3 Toll saver
4 Remote interrogation
code
5 VIP code
6 Message code
5th level
Operation overview
All adjustable functions are accessible via the menu. Hereinafter, please find an overview on the different menu levels.
You can access the programming menu by pressing the
c
button. The button q serves to go to the next sub-menu or level.
Confirm your entries by pressing the enter button f. The stop button brings you back to the next higher level. If you press
the stop buttons two times, this will lead you back to the initial state. An alternative to go directly to a specific function is the
entry of numeric codes after having opened the menu. The numeric codes correspond to the menu branch structure. So, if
you want to go to the "appointment function", you can do this via pressing the
c
button -6-2.
Page 13
13
6 Information
7 Call-back list
* only tiptel 2030
4 System
5 Telephone
6 Call transfer
7 Macro
1 Charges
2 Memory
3 Calls
1 ISDN
2 Time / date
3 Contrast
4 PIN
5 Charge rate
6 Access to the public
exchange
7 Factory pre-set
8 Load new software
1 Ringing tone
2 Subscriber dialling
3 Restrictions
1 MSN
2 Outgoing MSN
3 Call number display
4 Call waiting
5 ECT
6 Call diversion
7 ISDN features
1 Number entry
2 Control
1 Menu/register
2 Numeric keypad
3 Dialling restrictions
4 Restricted numbers
list
5 Released number
1 Hold, 2-line
conversation with hold
2 Three-party
conference
3 Call transfer
Page 14
14
Telephone calls
Call counter
The telephone has an integrated call counter displaying the number of incoming telephone calls.
The call counter is erased automatically:
- when you pick up the handset
- when you check the call list
Direct manual call
Pick up the handset and dial the telephone number to initiate the dialling process. After entering
the last digit of the telephone number, all further numbers are sent as dual tone multi-frequency
signals (DTMF). This gives you the option to remote-operate terminal equipment.
After several seconds, the display returns to the initial state.
The charges incurred for the call are added to the charge memory.
Sa 14.07.2012 12:30
2 calls
1. Pick up the handset.
2. Dial the telephone number via the
numeric keypad.
After completion of the call:
3. Replace the handset
The display shows "Please dial".
The numbers are displayed and the device
dials the entered telephone number. As soon
as the target subscriber answers the call, the
call duration and the charging information are
displayed.
Call duration
Charging information
(AOC)
021024280
0:00:02 0.121
Page 15

15
Telephone calls
Off-line call preparation (indirect call)
As for the off-line call preparation, the telephone number is dialled first. Here, you have the
option to check the number and to correct it if necessary.
Remark:
When the electronic telephone book is open, you have the option to enter a name via the numeric keypad (see chapter "Electronic telephone book"). After confirming the new entry by pressing
the
f
button, the corresponding entry is shown. Afterwards, you can continue to browse through
the electronic telephone book.
021024280
Please dial
1. Enter telephone number
2. Pick up the handset
After completion of the call:
3. Replace the handset.
1. Press the
e
button.
2. Press the q or p button.
3. Pick up the handset.
or
3. Press the speed dialling station.
The telephone number is shown in the display. You can erase the last entry by pressing
the
d
button.
The dialled telephone number is called.
The duration of the call and the incurring
charges are displayed as soon as the target
subscriber answers the call.
After some seconds, the display returns to
the initial normal state. The charges incurred
for this call are added to the charge memory.
The display shows the first entry of the electronic telephone book.
You can browse through the electronic telephone book using the arrow buttons until the
desired name is shown in the display.
The device starts dialling the telephone number.
The hands-free mode is activated. The telephone number stored with the speed dialling
station (e. g. the call-by-call number of a telephone carrier) is dialled.
Dialling from the electronic telephone book
Page 16

16
Telephone calls
Redial
The 20 telephone numbers dialled last are stored automatically and can be redialled if desired.
The telephone number dialled last is always positioned as the first entry in the list. If you wish to
call the telephone number dialled last, just pick up the handset and press the w button afterwards.
Mo 09.07.2012 07:24
1: 021024280
1. Press the w button.
2. Press the n or o button.
Dialling from the redial memory
3. Pick up the handset.
Display/erase redial memory
3. Press the fbutton.
4. Press the n or o button.
Erasing:
5. Confirm deleting an entry by
f
button.
6. Press
b
to exit list.
The display shows the redialling memory.
Use the arrow buttons to browse through the
redial memory entries until you found the
telephone number or name that you were
looking for.
The device starts dialling the displayed telephone number.
The entry is selected.
Every time you press the button, the display
switches between:
- telephone number or name
- date/time
- call duration/charges
- erase entry
The entry is erased. The next number of the
redial list is displayed.
The display resumes the normal state.
Page 17

17
Telephone calls
Automatic call-back on busy (CCBS)
Should the desired target subscriber's line be busy, the display shows a selection field for automatic redialling and the automatic call-back function, i. e. the function completion of call to busy
subscriber. This special feature needs to be released by your telephone network provider. This
is not only valid for your installation, but also for the target subscriber's installation. Just replace
the handset if you do not wish to use this function. The corresponding menu line is only shown
in the display if the CCBS feature is available.
subscriber busy
call-back
1. Press the n or o button in order to
select the "call-back" function.
2. Press the fbutton and replace the
handset.
3. Wait for signal tone.
4. Pick up the handset.
Edit call-back list
In the idle state:
1. Press the n or o button in order to
select the "call-back" function.
2. Press the fbutton.
3. Press the n or o button.
4. Press the fbutton.
or
4. Interrupt the transaction by pressing
b
.
Every time you press the button, the display
switches between the available functions.
The display resumes the normal state. The
call-back request is stored in the call-back
list.
As soon as the target subscriber's line is free
again, a signal tone is heard.
After picking up the handset, you hear a ringing tone and the target subscriber's telephone rings.
Every time you press the button, the display
switches between the available functions.
The call-back list is displayed.
These buttons allow to browse through the
call-back list until you found the desired telephone number or name.
The entry is erased from the call-back list.
You have activated different call-back requests (6 as a maximum) and now intend to erase some
of those.
021024280
call-back - delete?
Page 18

18
Telephone calls
Automatic redial
Should the desired target subscriber's line be busy, the display shows a selection field for the
automatic redial or the automatic call-back function (CCBS). Select the automatic redial function
so that your telephone continues to dial the chosen telephone number.
You can stop the automatic redial process:
- by picking up the handset.
- by pressing the
b
button.
- The process is stopped automatically after 10 unsuccessful dialling attempts.
Loudspeaker
When holding a telephone conversation, you can activate the loudspeaker in order to allow other
people in the same room to follow the conversation.
Hands-free operation
The hands-free mode allows you to hold a telephone conversation while the handset is on-hook.
1. Press the n or o button in order to
select the "redial" function.
2. Press the fbutton and replace the
handset.
Every time you press the button, the display
switches between the available functions.
The time interval for the next redialling process is displayed. Every 30 seconds, the telephone automatically dials the telephone number in question.
1. Press the
f button.
2. Press the
f button again.
The loudspeaker is activated.
The loudspeaker is deactivated.
You receive an incoming call:
1. Press the f button.
2. Press the
f again after having
ended the telephone conversation.
You make an outgoing telephone call:
1. Press the f button.
2. Dial the target telephone number.
3. Press the
f again after having
ended the telephone conversation.
The hands-free mode is activated. Now, you
can hold your conversation while the handset
is on-hook.
The hands-free mode is deactivated. The call
is being disconnected.
The hands-free mode is activated.
The device starts dialling.
The hands-free mode is deactivated. The call
is being disconnected.
Page 19

19
Telephone calls
Switching between handset and hands-free operation
You are holding a telephone conversation using the handset and want to switch to the handsfree operation:
1. Press the
f button and keep it
pressed.
2. Replace the handset.
3. Release the
f button
1. Pick up the handset.
The hands-free mode is activated.
The hands-free mode is deactivated and you
can continue holding your telephone conversation via the handset.
Headset-operation
It is possible to connect a headset instead of the handset. This makes telephoning in the office
even more comfortable. Remove the curled cable of the handset from the corresponding
receptacle and replace it by the relevant headset connecting cable. The handset can either be
removed or remain on the telephone.
The function "connection set-up" must have been assigned to one functional key (refer to chapter
macro programming).
You receive an incoming call:
1. Press the key "connection set-up".
2. At the end of the telephone call,
press the key "connection set-up"
anew.
You make an outgoing call:
1. Press the key "connection set-up".
2. Enter the phone number.
3. At the end of the telephone call,
press the key "connection set-up"
anew.
The call is accepted via the headset.
The call is being disconnected.
The headset is switched on.
The telephone starts dialling.
The call is being disconnected.
Page 20

20
Telephone calls
Mute function
When holding a telephone conversation you can make a confidential enquiry in the room without allowing your telephone partner to listen to what is spoken.
Conversation recording (only tiptel 2030)
You have the option to record parts of a telephone conversation.
A conversation recording is stored by the integrated answering machine as it is done for normal
incoming messages. You can playback your recording at any time (see chapter "Play-back incoming messages"). The conversation recording is stopped automatically as soon as the handset is replaced or the recording capacity is exhausted.
1. Press the n or o button in order to
select the "Conversation recording"
function.
2. Press the fbutton
To end the recording:
3. Press the
b
button.
Every time you press the button, the display
switches between the available functions.
The conversation recording is started. The
display shows "recording".
The conversation recording is stopped.
1. Press the m button.
2. Press the
m button again.
The symbol "mute" is displayed. The handset
microphone and the hands-free microphone
are deactivated. You can now make your
enquiry in the room.
The handset and the hands-free microphone
are activated again. You can continue with
the telephone conversation.
Page 21

21
Telephone calls
Call tracing (malicious call identification)
(This feature must be released by your local telephone network provider.)
If you are bothered by an unknown caller and want to identify the calling party, you have the option to do so even when the corresponding telephone number is not being transferred and shown
in the display.
Placing a call on hold / additional call
During a telephone conversation, you have the option to place the call on hold. While a call is
placed on hold, you can make enquiries in the room or make an enquiry call to another subscriber.
The party placed on hold cannot listen to your enquiries. In addition, the "hold" function serves
to initiate the feature 2-line conversation with hold, three-party conference and call transfer.
Disconnecting a call
Proceed as follows to disconnect an existing telephone call in order to resume a connection
placed on hold:
1. Press the n or o button in order to
select the function "malicious call
identification (MCI)".
2. Press the fbutton.
Every time you press the button, the display
switches between the available functions.
The telephone number in question is stored
in the public exchange office and you can
submit a request to your telephone network
provider in order to get information about the
corresponding subscriber's name.
1. Press the r button.
2. Press the
r button again.
The party is placed on hold within the public
exchange office and hears an announcement. Now, you can make your enquiry in the
room or dial the telephone number to make
an enquiry call to another party.
You are being reconnected to the first telephone partner.
1. Press the n or o button to select the
"disconnect" function
2. Press the fbutton.
Every time you press the button, the display
switches between the available functions.
The call is disconnected. The connection
placed on hold is resumed automatically.
Page 22

22
2-line operation with hold
The function "2-line operation with hold" allows you to switch between an active connection and
a call placed on hold.
Three-party conference
(This feature must be released by your local telephone network provider.)
If you intend to establish a call with two parties at the same time, you need to establish an active
call and place one caller on hold.
Call transfer (only for telephone system operation)
You receive an incoming call and want to transfer it to another extension (see also chapter
"Settings/call transfer).
Telephone calls
1. Press the r button.
The active call is placed on hold and the call
placed on hold is activated.
1. Call subscriber 1 and place the call on
hold.
2. Call subscriber 2.
3. Press the n or o button to select the
function "2-line operation with hold".
4. Press the fbutton.
To end the 2-line conversation with hold:
5. Press the n or o button to select the
function "end 2-line operation with
hold".
6. Press the fbutton.
Every time you press the button, the display
switches between the available functions.
Now, you can hold a conference call with both
parties.
Every time you press the button, the display
switches between the available functions.
The conference call is stopped. One of the
called parties is placed on hold and the other
one remains active.
You want to transfer an incoming call:
1. Press the
r button.
2. Dial the telephone number to which
the call shall be transferred.
3. Replace the handset.
The call is being placed on hold. You hear the
dialling tone.
A new connection is being established.
The incoming call is transferred to the dialled
extension number.
Page 23

23
Telephone calls
1. Press the r button.
2. Press the n or o button to select the
function "call transfer".
3. Press the fbutton.
4. Dial desired extension number for call
transfer.
The call is being placed on hold. The connection to the party issuing a call waiting signal is
activated.
Every time you press the button, the display
switches between the available functions.
You hear the dialling tone.
A new connection is being established. The
party issuing the call waiting signal is transferred. You are reconnected to your earlier
telephone partner.
Call transfer (continued)
You are holding a telephone conversation and want to answer and transfer a second incoming
call:
Call parking
(This feature must be released by your local telephone network provider.)
You are holding a telephone conversation with an external party and want to park this call for a
short time in order to
- resume the call at another telephone at the same ISDN access.
- operate the telephone at another ISDN socket within the same ISDN access.
The call parking feature allows you to place an existing call on hold within the exchange office
and to resume it later. Moreover, you have the option to enter a two-digit code number allowing
you to differentiate between different calls placed on hold.
Call parking:
1. Press the n or o button to select the
function "call parking".
2. Press the fbutton.
3. Enter the two-digit code number and
confirm your entry by pressing f.
Resume a parked call
(handset is on-hook):
1. Press the n or o button to select the
function "resume parked call".
2. Press the fbutton.
3. Enter the two-digit code number and
confirm your entry by pressing f.
Every time you press the button, the display
switches between the available functions.
The display shows a request to enter the twodigit code number for call identification.
The call is placed on hold.
Every time you press the button, the display
switches between the available functions.
The display shows a request to enter the twodigit code number for the desired call.
The parked call is resumed and you can continue your telephone conversation.
Page 24

24
You are holding a telephone conversation
and receive another incoming call:
You want to answer the second incoming
call:
1. Press the
r button.
You want to reject the second incoming
call:
1. Press the n or o button to select the
function "reject".
2. Press the fbutton.
You want to transfer the second incoming
call to your answering machine (only tiptel
2030):
1. Press the n or o button to select the
function "transfer to answering
machine".
2. Press the fbutton.
You want to transfer the second incoming
call to another telephone number:
1. Press the n or o button to select the
function "call deflection".
2. Press the fbutton.
3. Press the fbutton.
Your current call is placed on hold. You are
connected to the second party. You now have
the option to switch between these two calls
by pressing the r button (2-line conversation
with hold).
Every time you press the button, the display
switches between the available functions.
The display resumes the normal status.
Every time you press the button, the display
switches between the available functions.
The display resumes the normal status. The
caller hears the outgoing message of your
answering machine and has the option to
leave a message.
Every time you press the button, the display
switches between the available functions.
The pre-programmed telephone number is
displayed. If required, dial a new telephone
number.
The call is being transferred.
Telephone calls
Call waiting
You are holding a telephone conversation while another party is trying to call you. This is indicated by a call waiting signal (two short tones). In addition, the telephone number issuing a call
waiting signal is displayed. Use the arrow buttons to select the desired function or answer the
second call directly by pressing the
r button.
Page 25

25
Telephone calls
Answering a call
You receive an incoming call. Your telephone rings. The display shows the following information:
- Name or
- Telephone number or
- Analog network or
- Number presentation restricted.
Call
02102 428
You want to answer the incoming call:
1. Pick-up the handset.
You want to reject the incoming call:
1. Press the
b
button.
You want to transfer the incoming call
to your answering machine
(only tiptel 2030):
1. Press the n or o button to select the
function "transfer to answering
machine".
2. Press the fbutton.
You want to transfer the incoming call to
another telephone number:
1. Press the n or o button to select the
function "call deflection".
2. Press the fbutton.
3. Press the
b
button.
You are connected to the caller and can start
your telephone conversation.
Your telephone resumes the normal state.
Every time you press the button, the display
switches between the available functions.
The answering machine is activated. The caller hears the recorded outgoing message.
Every time you press the button, the display
switches between the available functions.
The pre-programmed telephone number is
displayed. If required, dial a new telephone
number.
The call is being transferred.
Page 26

26
Telephone calls
Keypad
In some exchange offices, the programming of special features (e. g. call forwarding) is effected
via the "Keypad protocol". The programming is done via the numeric keys and the buttons
*
and #. Here, macro programming is provided to assign the keypad function to a speed dialling
station (see chapter "Macro programming").
The possible keypad functions are given by your telephone network provider.
1. Pick-up the handset.
2. Dial the "keypad" speed dialling
station.
3. Enter the desired programming
sequence.
4. Replace the handset.
The display shows "please dial".
The display indicates keypad programming
by the symbol "K".
The corresponding numbers are displayed.
The exchange office receives the data and
confirms them.
Your telephone resumes the normal state.
Sub-addressing
(This feature must be released by your local telephone network provider.)
In addition to the multiple subscriber number, you have the option to enter sub-addresses. This
can be useful, e. g. if you intend to remote-control your terminals. Use the macro programming
to assign the function "sub-addressing" to a speed dialling station. Entering the sub-address is
only possible via the off-line call preparation or via the electronic telephone book. Your telephone
does not evaluate incoming sub-addresses.
1. Enter the telephone number via the
numeric keypad.
2. Press the "sub-addressing" speed
dialling station.
3. Enter the sub-address via the numeric
keypad.
4. Pick-up the handset.
5. Replace the handset.
The numbers are shown in the display.
The display shows the symbol "S".
The numbers are shown in the display.
The telephone number is dialled together
with the sub-address. Now, the called terminal answers or executes a function.
The telephone resumes the normal state.
Page 27

27
Telephone calls
Call list
The call list provides you with information on the last 20 incoming calls, such as date and time
of the call, called multiple subscriber number and the corresponding telephone number of
the calling party. If the telephone number was transferred and presented and if this number is
stored in the electronic telephone book, the name of the corresponding subscriber is shown
instead of the telephone number. If the calling party's telephone number was not transferred and
presented, only "call" or "number presentation restricted" is seen. Answered calls are marked
with character * in the call list.
Dialling from the call list:
1. Press the i button to select the
function "call list".
2. Press the n or o button to select the
desired subscriber.
3. Pick-up the handset.
Display/erase call list:
1. Press the i button to select the
function "call list".
2. Press the n or o button to select the
desired subscriber.
3. Press the fbutton.
4. Press the n or o button.
5. Press the fbutton.
Call list will be shown on the LCD.
You browse through the call list.
The telephone number is dialled.
Call list will be shown on the LCD.
You browse through the call list.
The display shows the addressed multiple
subscriber number (MSN) and possibly also
the duration of the call.
Every time you press the button, the display
switches between:
Take over telephone number:
The electronic telephone book becomes
editable.
Erase entry:
The selected entry is erased from the list.
Erase call list:
The entire call list is deleted.
The selected function is executed.
Page 28

28
Electronic telephone book
General information on the electronic telephone book
The electronic telephone book manages names and telephone numbers of your telephone partners and thus becomes your personal telephone manager. The electronic telephone book can
store and manage up to 100 entries. You have the option to activate a cost counter and different
filter functions per entry. If the cost counter is active, all incurring charges for the entry in question
are accumulated and can be viewed via the function "electronic telephone book". The filter
function allows a special handling of incoming calls (only possible if the caller's telephone number
is presented). On one hand, you have the option to activate the VIP filter. In this case, your telephone will ring for incoming calls from this specific number even if you have deactivated the
ringing signal earlier. Another option is the call filter, restricting the ringing signal for incoming
calls by a specific telephone number. Then, you can select the call deflection (CD) filter where
incoming calls by a specific telephone number are automatically transferred to a pre-programmed extension number (see chapter "Setting call deflection"). You can easily see whether a
filter function had been activated when browsing through the electronic telephone book. In this
case, "F" is displayed next to the corresponding name. The entries are listed in alphabetical
order. For further use and in order to have a back-up of your data, the entire telephone book can
be loaded on a PC and reloaded afterwards (see chapter "PC software TipKom", only tiptel
2030).
Names are entered via the numeric keypad. The corresponding letter is selected by pressing the
number key in question either one or several times. Wrong entries can be erased by pressing
the q button. A blank can be inserted by pressing the p button. In the text field, you can move
the cursor by pressing the n or o button.
Entering data
Alphabet (number button 2 to 9):
Special characters (button 0, 1, * and #):
Numbers:
Examples:
A = press 2 once
B = press 2 two times
C = press 2 three times
D = press 3 once
E = press 3 two times
F = press 3 three times
G = press 4 once
H = press 4 two times
I = press 4 three times
J = press 5 once
K = press 5 two times
L = press 5 three times
M = press 6 once
N = press 6 two times
O = press 6 three times
P = press 7 once
Q = press 7 two times
R = press 7 three times
S = press 7 four times
T = press 8 once
U = press 8 two times
V = press 8 three times
W = press 9 once
X = press 9 two times
Y = press 9 three times
Z = press 9 four times
ä = press 1 once
ö = press 1 two times
ü = press 1 three times
ß = press 1 four times
/ = press 0 once
( = press 0 two times
) = press 0 three times
_ = press 0 four times
* = press * once
+ = press * two times
- = press * three times
: = press * four times
; = press * five times
# = press # once
, = press # two times
. = press # three times
@ = press # four times
& = press # five times
1 = press 1 five times
2 = press 2 four times
3 = press 3 four times
4 = press 4 four times
5 = press 5 four times
6 = press 6 four times
7 = press 7 five times
8 = press 8 four times
9 = press 9 five times
0 =
1 x button 8
= T
3 x button 4
= I
1 x button 7
= P
1 x button 8
= T
2 x button 3
= E
3 x button 5
= L
Page 29

29
Electronic telephone book
Storing data
An entry in the electronic telephone book consists of the name (= search criterion), the telephone
number and additional settings if required (e. g. filter function, cost counter).
1. Press the
e
button.
2. Press the p button.
3. Press the fbutton.
4. Enter the name via the numeric keypad.
5. Press the fbutton.
6. Enter the telephone number via the
numeric keypad.
7. Press the fbutton.
8. Press the n or o button.
9. Press the fbutton.
10. Press the n or o button.
11. Press the fbutton.
12. Press the fbutton.
The phone register will open.
The display shows "new entry".
The display shows "name".
Your entry is displayed. The character entered
last can be erased by pressing the button.
The name is now entered. The display shows
"number:".
The display shows your entry.
The telephone number entry is complete. The
display shows "cost counter off". If you do not
wish to take out further settings, just press
the
b
button. You are then lead to
the end of the entry options automatically
(continue as of point 10).
Every time you press the button, the display
switches between:
off: The cost counter is deactivated and
erased.
on: The cost counter is activated. The tele-
phone charges relating to the entry in
question are accumulated and updated after each call.
The display shows "filter off".
Every time you press the button, the display
switches between:
Filter off: No active filter.
VIP filter: An incoming call from this number
is indicated by a ringing signal
even if the ringing signal had
been turned off.
Call filter: Incoming calls are not indicated
by a ringing signal.
Call deflection (CD) filter: The caller is
being transferred to the preprogrammed extension (see
chapter "call deflection".
The display shows "store entry?"
The entry is stored.
Page 30

30
Electronic telephone book
Editing data
Entries in the electronic telephone book can be checked, corrected or erased at any time.
1. Press the
e
button.
2. Press the q button.
3. Press the q or p button to select an
entry.
4. Press the fbutton.
For editing:
5. Press the fbutton.
6. Enter your changes,
or
For erasing:
5. Press the n or o button to select the
entry to be erased.
6. Press the fbutton.
The phone register will open.
The first entry of the electronic telephone
book is shown in the display.
Use these buttons to browse through the
electronic telephone book until the desired
entry (name) is displayed.
The display shows "edit entry".
The display shows "name:".
You can now enter your changes. Proceed as
for entering new data.
The display shows "erase entry".
The entry is erased.
Page 31

31
System settings
Entering the MSNs
Your ISDN connection and thus your telephone can be addressed via one or more telephone
numbers (MSNs = multiple subscriber numbers). (These numbers are obtainable at your local
telephone network provider.) Up to 6 telephone numbers can be assigned to your telephone.
1. Press the
c
button.
2. Press the n or o button to select
"settings".
3. Press the q button.
4. Press the n or o button to select
"system".
5. Press the q button 3 times.
6. Press the n or o button to select the
desired "MSN" (MSN1 ... MSN6).
7. Press the fbutton.
8. Enter your MSN via the numeric keypad.
9. Press the fbutton.
The main menu will pop up.
Every time you press the button, the display
switches between the available functions.
The display shows "appointments" or
"answering machine" (only tiptel 2030).
The display shows "system".
The display shows "MSN1" and the MSN if it
had been entered.
The display shows the MSN.
The display shows "enter MSN".
The MSN is stored.
1. Press the
c
button.
2. Press the n or o button to select
"settings".
3. Press the q button.
4. Press the n or o button to select
"system".
5. Press the q button 2 times.
6. Press the n or o button to select the
desired "outgoing MSN".
7. Press the fbutton
8. Enter a number between 1 and 6 via
the numeric keypad to select the MSN.
9. Press the fbutton.
The main menu will pop up.
Every time you press the button, the display
switches between the available functions.
The display shows "appointments" or
"answering machine" (only tiptel 2030).
The display shows "system".
The display shows "MSN".
The display shows "outgoing MSN".
The display shows the current setting.
The setting is stored.
Selecting the outgoing MSN
Here, you define the MSN which is submitted to the exchange office (for your telephone) when
you make outgoing calls. The charges incurring for outgoing calls will be assigned to this specific MSN.
Page 32

32
System settings
Call number display
You have the option to activate or deactivate the call number display for outgoing or incoming
calls. The selected option becomes valid for all entered MSNs.
1. Press the
c
button.
2. Press the n or o button to select
"settings".
3. Press the q button.
4. Press the n or o button to select
"system".
5. Press the q button.
6. Press the q button.
7. Press the n or o button to select
"call number display".
8. Press the fbutton.
9. Press the n or o button.
10. Press the fbutton.
The main menu will pop up.
Every time you press the button, the display
switches between the available functions.
The display shows "appointments" or
"answering machine" (only tiptel 2030).
The display shows "system".
The display shows "ISDN".
The display shows "MSN".
The display shows "call number display".
The display shows the current setting.
Every time you press the button, the display
switches between:
outgoing, incoming: Your telephone number as well as the number of your telephone
partner is transmitted and presented.
outgoing: Your telephone number is transmitted and presented only.
incoming: The calling party's telephone
number is transmitted and presented only.
OFF: Neither your telephone number nor the
calling party's telephone number is transmitted and presented.
The setting is stored.
Page 33

33
System settings
Setting the call waiting function
If you receive an incoming call while already holding a telephone conversation, you can determine, whether a signal (two short tones) shall be given for this call or not (see also chapter "Call
waiting function").
1. Press the
c
button.
2. Press the n or o button to select
"settings".
3. Press the q button.
4. Press the n or o button to select
"system".
5. Press the q button.
6. Press the q button.
7. Press the n or o button to select
"call waiting".
8. Press the fbutton.
9. Press the n or o button.
10. Press the fbutton.
The main menu will pop up.
Every time you press the button, the display
switches between the available functions.
The display shows "appointments" or
"answering machine" (only tiptel 2030).
The display shows "system".
The display shows "ISDN".
The display shows "MSN".
The display shows "call waiting".
The display shows the current setting.
Every time you press the button, the display
switches between:
ON: You will hear a call waiting signal when
receiving an incoming call while holding a telephone conversation.
OFF: Should you receive an incoming call
while holding a telephone conversation, this will not be indicated by a call
waiting signal.
The setting is stored.
Page 34

34
System settings
Setting the call transfer function
The call transfer function offers you the option to transfer an answered call (see also chapter
"Call transfer") to another extension. How this function is being executed technically depends on
your telephone system. This is either done via the ISDN feature ECT (explicit call transfer) or
another function. If you do not wish to support the explicit call transfer (ECT), you can deactivate
this function as follows:
1. Press the
c
button.
2. Press the n or o button to select
"settings".
3. Press the q button.
4. Press the n or o button to select
"system".
5. Press the q button 2 times.
6. Press the n or o button to select
"ECT".
7. Press the fbutton.
8. Press the n or o button.
9. Press the fbutton.
The main menu will pop up.
Every time you press the button, the display
switches between the available functions.
The display shows "appointments" or
"answering machine" (only tiptel 2030).
The display shows "system".
The display shows "MSN".
The display shows "ECT".
The display shows the current setting.
Every time you press the button, the display
switches between:
ON: Call transfer via ECT is activated.
OFF: Call transfer via ECT is deactivated.
The setting is stored.
Setting the call diversion (CD) function
Here, you have the option to transfer an incoming call to another extension without the necessity
to answer this call before. You can pre-program an extension number for this function.
1. Press the
c
button.
2. Press the n or o button to select
"settings".
3. Press the q button.
4. Press the n or o button to select
"system".
5. Press the q button 2 times.
6. Press the n or o button to select
"call diversion".
7. Press the fbutton.
8. Via the numeric keypad, enter a telephone number to which the incoming
call shall be transferred.
9. Press the fbutton.
The main menu will pop up.
Every time you press the button, the display
switches between the available functions.
The display shows "appointments" or
"answering machine" (only tiptel 2030).
The display shows "system".
The display shows "MSN".
The display shows "call diversion".
The display shows "enter target number".
The number is shown in the display.
The setting is stored.
Page 35

35
System settings
Internal ISDN features (only tiptel 2030)
The ISDN features "hold", "2-line operation with hold", "three-party conference" and "call forwarding" are features provided by your exchange office and programmable via the telephone. Here,
you also have the option to have these features executed by your telephone with no need to have
them released by the exchange office. Please be aware that both of the CO lines (B channels) of
your ISDN connection will be needed to have the features executed via your telephone.
1. Press the
c
button.
2. Press the n or o button to select
"settings".
3. Press the q button.
4. Press the n or o button to select
"system".
5. Press the q button 2 times.
6. Press the n or o button to select
"ISDN features".
7. Press the q button.
8. Use the n or o button to select an
ISDN feature.
9. Press the fbutton.
Hold,
2-line operation with hold:
10. Press the n or o button.
Three-party conference:
10. Press the n or o button.
Call forwarding:
10. Press the n or o button.
11. Press the fbutton.
The main menu will pop up.
Every time you press the button, the display
switches between the available functions.
The display shows "appointments" or
"answering machine" (only tiptel 2030).
The display shows "system".
The display shows "ISDN", then "MSN".
The display shows "ISDN features".
The display shows "hold, 2-line operation
with hold".
Select the desired feature.
The following select options for the feature
are displayed.
The display switches between "internal"
(hold, 2-line operation with hold is executed
internally via the telephone) and "external"
(hold, 2-line operation with hold is executed
externally via the exchange office).
The display switches between "internal"
(three-party conference is executed internally
via the telephone) and "external" (three-party
conference is executed externally via the
exchange office).
Remark: Depending on the exchange office,
"hold/2-line operation with hold" may be set to
"internal" for the internal three-party conference.
The display switches between "internal" (call
forwarding is executed internally via the telephone) and "external" (call forwarding is executed externally via the exchange office).
Remark: The individual call forwarding parameters "on no answer" and "on busy" are not
possible if the "internal" option is set.
The setting is stored.
Page 36

36
System settings
Setting time and date
The time and date are automatically set when an outgoing call is made. In addition, you have the
option to set time and date manually.
1. Press the
c
button.
2. Press the n or o button to select
"settings".
3. Press the q button.
4. Press the n or o button to select
"system".
5. Press the q button.
6. Press the n or o button to select
"time/date".
7. Press the fbutton.
8. Enter the time and date via the numeric keypad.
9. Press the fbutton.
The main menu will pop up.
Every time you press the button, the display
switches between the available functions.
The display shows "appointments" or
"answering machine" (only tiptel 2030).
The display shows "system".
The display shows "ISDN".
The display shows "time/date".
The entered time and date is shown in the
display.
The entry is stored.
Contrast adjustment
Here, you can adjust the display contrast.
1. Press the
c
button.
2. Press the n or o button to select
"settings".
3. Press the q button.
4. Press the n or o button to select
"system".
5. Press the q button.
6. Press the n or o button to select
"contrast".
7. Press the fbutton.
8. Press the n or o button.
9. Press the fbutton.
The main menu will pop up.
Every time you press the button, the display
switches between the available functions.
The display shows "appointments" or
"answering machine" (only tiptel 2030).
The display shows "system".
The display shows "ISDN".
The display shows "contrast".
The display shows "contrast" and the contrast
indicator bar.
The contrast is increased or decreased.
The setting is stored.
Page 37

37
System settings
Changing the PIN
You need a PIN (personal identification number) to activate or deactivate call or dialling restrictions (in the factory pre-set, the PIN is 000).
1. Press the
c
button.
2. Press the n or o button to select
"settings".
3. Press the q button.
4. Press the n or o button to select
"system".
5. Press the q button.
6. Press the n or o button to select
"PIN".
7. Press the fbutton.
8. Now, enter your personal identification number via the numeric keypad (10
digits as a maximum).
9. Press the fbutton.
10. Now, enter a new PIN via the numeric
keypad.
11. Press the fbutton.
The main menu will pop up.
Every time you press the button, the display
switches between the available functions.
The display shows "appointments" or
"answering machine" (only tiptel 2030).
The display shows "system".
The display shows "ISDN".
The display shows "PIN".
The display shows "enter PIN".
The entered PIN is shown in the display.
The display shows "enter new PIN".
The entered PIN is shown in the display.
The entry is stored.
Charge rate
The price for a call charge unit (= charge rate) can be determined individually. If you set the charge
rate, your telephone will display the costs incurred for a call directly. The registration of calls and
costs (advice of charge) can only work properly if charging information are transferred by your
exchange office.
1. Press the
c
button.
2. Press the n or o button to select
"settings".
3. Press the q button.
4. Press the n or o button to select
"system".
5. Press the q button.
6. Press the n or o button.
7. Press the fbutton.
8. Now, enter the desired charge rate via
the numeric keypad.
9. Press the fbutton.
The main menu will pop up.
Every time you press the button, the display
switches between the available functions.
The display shows "appointments" or
"answering machine" (only tiptel 2030).
The display shows "system".
The display shows "ISDN".
The display shows "charge rate".
The entered charge rate is shown in the
display.
The entry is stored.
Page 38

38
System settings
Factory pre-set
You can resume the factory pre-set parameters at any time.
1. Press the
c
button.
2. Press the n or o button to select
"settings".
3. Press the q button.
4. Press the n or o button to select
"system".
5. Press the fbutton.
6. Press the n or o button.
7. Press the fbutton.
To resume the factory pre-set:
8. Press the fbutton.
To interrupt:
8. Press the
b
button.
The main menu will pop up.
Every time you press the button, the display
switches between the available functions.
The display shows "appointments" or
"answering machine" (only tiptel 2030).
The display shows "system".
The display shows "ISDN".
The display shows "factory pre-set".
The warning message "ATTENTION! all data
are erased" is shown in the display.
The factory pre-set is resumed.
The function is interrupted (the data are retained).
Access to the public exchange
If the telephone is operated with a telephone system, you may have to dial the line prefix
before the subscriber number for outgoing calls. For some telephone systems, you need to program the line prefix with your telephone so that the prefix is automatically entered in the call list.
1. Press the
c
button.
2. Press the n or o button to select
"settings".
3. Press the q button.
4. Press the n or o button to select
"system".
5. Press the fbutton.
6. Press the n or o button to select
"CO line".
7. Press the q button.
8. Now, enter the line prefix via the
numeric keypad (4 digits as a maximum).
9. Press the fbutton.
The main menu will pop up.
Every time you press the button, the display
switches between the available functions.
The display shows "appointments" or
"answering machine" (only tiptel 2030).
The display shows "system".
The display shows "ISDN".
The display shows "CO line".
The display shows a cursor for entries.
Your entry is displayed.
The entry is stored.
Page 39

39
System settings
1. Press the
c
button.
2. Press the n or o button to select
"settings".
3. Press the q button.
4. Press the n or o button to select
"system".
5. Press the q button.
6. Press n or o in order to
select "Update via ISDN".
7. Press the fbutton.
8. Enter the Tiptel server
number if it is not displayed.
Please note when using the telephone on extensions that
you may need to precede this call
number with a code for the outside
line. Use the cursor buttons to
change the call number if
necessary; to enter the numbers
press the p button; to delete
press the q button.
9. Confirm the correct entry of the
server call number with the
f
button.
10. Confirm this with the fbutton.
The main menu will pop up.
Every time you press the button, the display
switches between the available functions.
The display shows "appointments" or
"answering machine" (only tiptel 2030).
The display shows "system".
The display shows "ISDN".
The display shows "Update via ISDN".
The display shows the "Server number" and
may show the number "02102428438".
You will be asked whether you really want to
start the update.
The display shows "Dial" and the call number
of the Tiptel server.
During the update the display will show "Updating, please wait" and a rotating symbol in the
bottom left corner. After ending the process, the telephone restarts automatically and goes into
standby mode.
If necessary you can update the operating software on the telephone. This is possible via ISDN
line from our update server or via the USB port of the telephone from your local PC (only tiptel
2030). Before using the ISDN update unplug the USB cable.
Update via ISDN
Page 40

Update via USB (only tiptel 2030)
You have the option to load a new operating software on your telephone -if necessary. This software can be downloaded from the tiptel-website http://www.tiptel.com. Please store the file on
your PC and do not forget this storage place!
Afterwards you connect the telephone with your PC via the serial connecting cable and start the
software "tiptel 2030" as usual. Ensure that the correct COM-port has been set in the menu "configuration" and test the correct function of the connection. Then you define whether the settings
shall be stored or not and select "start transfer". In the following window the file must be activated, that was stored right before (it may be necessary to change the index). Upon demand change to the operating modus "load new software" and confirm with "ok".
During the update the display shows a rotating symbol in the left. After finishing the update, your
telephone will automatically restart and resume the initial state. Afterwards you may remove the
connecting cable.
Note:
If the display shows "Loader V1.4" although you do not intend to load a new operating software,
this function had been activated by mistake. Your telephone is no longer operational. Now you
have to load a new operating software and proceed as detailed above. This can only be done
with "tiptel 2030 software".
Should the operating software be damaged - for what reason ever - and you cannot use the setting menu any longer, you have the option to start the loader program directly: Press buttons 2
and 4 at the same time while reconnecting the telephone to the ISDN access. Afterwards you
proceed as described in the above paragraph.
40
System settings
Note:
If, after dialling the number, the display shows "You already have the current version" no
update is required and the device returns to standby mode.If the connection to the server is
broken during the update, the display shows "Update interrupted" and the device returns to the
"Update via ISDN" menu option. Start again at Point 7 (see above). All the settings and incoming
messages are usually maintained after updating. But we recommend backing up all data beforehand using the PC program supplied (only tiptel 2030).
Page 41

41
Ringing tone
The ringing tone can be adjusted individually with regards to volume, melody and speed. You
can assign an individual ringing tone to each entered MSN. If you do not wish to be disturbed by
incoming calls, just deactivate the ringing tone. If you want the volume to increase by each
ringing tone, you can activate the function "incremental volume control".
Telephone settings
1. Press the
c
button.
2. Press the n or o button to select
"settings".
3. Press the q button.
4. Press the n or o button to select
"telephone".
5. Press the q button.
6. Press the q button.
7. Press the n or o button to select the
MSN.
8. Press the fbutton.
9. Now, enter the desired ringing signal
via a two-digit function code (00 ...99).
10. Press the n or o button to select the
desired volume or the incremental
volume control.
11. Press the fbutton.
The main menu will pop up.
Every time you press the button, the display
switches between the available functions.
The display shows "appointments" or
"answering machine" (only tiptel 2030).
The display shows "telephone".
The display shows "ringing tone".
The display shows "MSN 1" and the selected
ringing tone melody.
The MSN is shown in the display.
The ringing signal is being heard for verification of the setting.
The display shows the entry. The new melody
is heard.
The display switches between "ringing tone
OFF", the volume indicator bar and
"incremental volume control ON".
The setting is stored.
Page 42

42
Telephone settings
Direct dialling (baby call)
The function "direct dialling" (or baby call) allows the automatic dialling of a pre-programmed subscriber number by just pressing any key (except for the menu buttons) or by picking up the handset.
1. Press the
c
button.
2. Press the n or o button to select
"settings".
3. Press the q button.
4. Press the n or o button to select
"telephone".
5. Press the q button.
6. Press the n or o button to select
"direct dialling".
7. Press the q button.
8. Press the fbutton.
9. Now, enter the desired subscriber
number for the direct call or erase the
currently stored subscriber number
by pressing the q button.
10. Press the fbutton.
11. Press the n or o button to select
"switch".
12. Press the fbutton.
13. Press the n or o button to activate
or deactivate this function.
14. Press the fbutton.
The main menu will pop up.
Every time you press the button, the display
switches between the available functions.
The display shows "appointments" or
"answering machine" (only tiptel 2030).
The display shows "telephone".
The display shows "ringing tone".
The display shows "direct dialling".
The display shows "enter number"
The display shows your entry.
The entry is stored.
The display shows "switch".
The current setting is displayed.
The display switches between "ON" and
"OFF".
The setting is stored.
Page 43

43
Telephone settings
Call blocking / keypad locks
You have the option to lock different buttons (e. g. the numeric keypad or access to the menu or
electronic telephone book). Locked buttons or dialling restrictions will only get accessible after
entering the PIN.
1. Press the
c
button.
2. Press the n or o button to select
"settings".
3. Press the q button.
4. Press the n or o button to select
"telephone".
5. Press the q button.
6. Press the n or o button to select
"blocking".
7. Press the q button.
8. Press the n or o button.
9. Press the fbutton.
The main menu will pop up.
Every time you press the button, the display
switches between the available functions.
The display shows "appointments" or
"answering machine" (only tiptel 2030).
The display shows "telephone".
The display shows "ringing tone".
The display shows "blocking".
The display shows "menu / register".
Every time you press the button, the display
switches between:
Menu/register: Restricts the entry or operation via the menu or via the electronic telephone book.
Numeric Keypad: As for the functions
"manual dialling" and "speed dialling", the
dialling of telephone numbers via the keypad
is restricted.
Call blocking: Here, you activate or deactivate the call blocking.
Blocked numbers list: Here, you will get an
entry option for telephone numbers that shall
be restricted for dialling. You can enter up to
10 different telephone numbers or parts of
telephone numbers.
Authorised numbers: Here, you will get an
entry option for telephone numbers that shall
be released for dialling. You can enter up to
10 telephone numbers.
Now, you get an entry option for the selected
function.
Page 44

44
Telephone settings
Call restrictions / keypad locks (continued)
Menu / register:
10. Press the n or o button.
11. Press the fbutton.
Numeric keypad:
10. Press the n or o button.
11. Press the fbutton.
Dialling restriction:
10. Press the n or o button.
11. Press the fbutton.
Blocked numbers list:
10. Press the n or o button to select a
storage location.
11. Press the fbutton.
12. Enter the corresponding numbers via
the numeric keypad.
13. Press the fbutton.
Authorised numbers:
10. Press the n or o button to select a
storage location.
11. Press the fbutton.
12. Enter the corresponding numbers via
the numeric keypad.
13. Press the fbutton.
Now, enter further telephone numbers
or exit the menu by pressing the
b
button.
Every time you press the button, the display
switches between:
on: The function is activated.
off: the function is deactivated.
The setting is saved.
Every time you press the button, the display
switches between:
on: The function is activated.
off: the function is deactivated.
The setting is saved.
Every time you press the button, the display
switches between:
on: The function is activated.
off: the function is deactivated.
The setting is saved.
The display shows the content of the selected
storage location.
The cursor position is displayed indicating an
entry option.
Your entry is displayed.
The entry is stored.
The display shows the content of the selected
storage location.
The cursor position is displayed indicating an
entry option.
Your entry is displayed.
The entry is stored.
Page 45

45
Appointments
Enter/edit appointments
The telephone can manage 30 different - one-time or daily recurring - appointments. In addition,
it will remind you of an entered appointment by a signal tone right at the entered start time. The
appointment list allows you to view all entered appointments and to select them for editing. In
order to enter a new appointment, just select the entry "new entry".
1. Press the
c
button.
2. Press the n or o button to select
"settings".
3. Press the q button.
4. Press the n or o button to select
"appointments".
5. Press the fbutton.
6. Press the n or o button to select an
entry.
7. Press the fbutton.
New entry:
8. Enter the appointment via the numeric
keypad.
9. Press the fbutton.
10. Enter further information (one line) via
the numeric keypad.
11. Press the fbutton.
Editing:
8. Press the fbutton
9. Enter your changes.
10. Press the fbutton.
Erasing:
8. Press the n or o button to select
"erase entry".
9. Press the fbutton.
The main menu will pop up.
Every time you press the button, the display
switches between the available functions.
The display shows "answering machine"
(only tiptel 2030).
The display shows "appointments".
The display shows the first existing entry or
"new entry".
The display shows "edit entry" or the entry
field as for "new entry".
As for a one-time appointment which will be
erased after being executed, just enter the
corresponding time and date.
If you do not enter a date, this will indicate
that a daily recurring appointment is meant.
The display shows "enter information".
The display shows the entry.
The appointment is stored.
The display shows "enter appointment:".
The changes are saved.
The appointment is erased.
Page 46

46
Time control
Enter/edit time control data
Via time control you can control call deflection and/or answering machine. A maximum of 10
entries is possible. You can enter the valid day of the week for each entry. In order to make a
new entry, just select the first item "new entry". The entire time control function can be activated
or deactivated via the menu item "time control". If time control data exist, the display indicates
this via the symbol in the normal state.
Remark referring to the illustration: The
f
button is activated on Mondays, Wednesdays,
Thursdays, Fridays Saturdays and Sundays at 12:00 hrs.
Mo - We Th Fr Sa Su
12:00 ON
1. Press the
c
button.
2. Press the n or o button to select
"settings".
3. Press the q button.
4. Press the n or o button to select
"time control".
5. Press the q button.
6. Press the n or o button to select
"enter time".
7. Press the fbutton.
8. Press the n or o button to select an
entry.
9. Press the fbutton.
New entry:
10. Press the n or o to select the desired weekday for the time control.
11. Press the q or p button to activate or
deactivate the function for the selected weekday.
12. Press the fbutton to select the time
settings.
13. Enter the time settings via the numeric keypad.
The main menu will pop up.
Every time you press the button, the display
switches between the available functions.
The display shows "answering machine"
(only tiptel 2030).
The display shows "time control.
The display shows "enter time".
The time display for time control switches
between "enter time" and "activate".
The display shows the first entry or "new
entry".
The display shows "edit entry" or in the case
of "new entry" it shows the entry field.
The selected weekday is displayed.
The display shows the weekday in order to
indicate the activation of the time control and
the symbol "- -" to indicate a deactivation.
The display shows the cursor to indicate an
entry option.
Your entry is shown in the display.
Page 47

47
Time control
14. Press the fbutton to select the time
control switching function.
15. Press the q or p button to activate or
deactivate call deflection and/or answering machine.
16. Press the fbutton.
Editing:
10. Press the fbutton.
11. Now, enter your changes.
12. Press the fbutton.
Erasing:
10. Press the n or o button to select
"delete entry".
11. Press the fbutton.
The display switches between "ON" and
"OFF".
The entry is saved.
The changes are saved.
The entry is erased.
Enter/edit time control data (continued)
Page 48

48
Memory
Here, you have the option to get informed on the current residual memory capacity of your telephone.
Electronic telephone book:
Here, the display will show the currently free memory capacity of the electronic telephone book
in per cent. The erase function will delete the entire electronic telephone book.
Voice memory (only tiptel 2030):
The voice memory covers the memory for outgoing and for incoming messages. The remaining
memory capacity is indicated in per cent. The erase function will delete all recorded incoming
messages (not the outgoing messages).
Information
Charges (This feature needs to be released by your telephone network provider)
The charge counter shows the total of all telephone charges for the corresponding MSN accumulated since the last reset of the charge counter. In addition, you can check the accumulated
charges for the entire connection (even the charges incurred for other terminals at your S
0
bus).
1. Press the
c
button.
2. Press the n or o button to select
"information".
3. Press the q button.
4. Press the fbutton.
5. Press the n or o button to select a
desired MSN.
6. Press the fbutton.
7. Press the fbutton.
or
8. Press the
b
button.
The main menu will pop up.
The display shows "information".
The display shows "charges".
The display shows "Extension" and the incurred telephone charges.
The display switches between the individual
MSNs.
The display shows "erase charges?".
The charge counter is reset to 0. The current
date is taken as the starting date for further
accumulation of charges.
The accumulated charges are not erased.
The earlier display is shown.
Page 49

49
Information
1. Press the
c
button.
2. Press the n or o button to select
"information".
3. Press the q button.
4. Press the n or o button to select
"memory".
5. Press the fbutton.
6. Press the n or o button to select
text memory or voice memory (only
tiptel 2030).
7. Press the fbutton.
8. Press the fbutton.
or
9. Press the
b
button.
The main menu will pop up.
Select the function "information".
The display shows "charges".
The display shows "memory".
The display shows "telephone book" and the
free memory capacity in per cent.
The display switches between the voice
memory and the telephone book.
The display shows "erase memory?".
The memory is being erased.
The memory is not erased. The earlier
display is shown.
Calls
The call counter gives you an impression on the call frequency. It shows the number of incoming
as well as the number of outgoing calls.
1. Press the
c
button.
2. Press the n or o button to select
"information".
3. Press the q button.
4. Press the n or o button to select
"calls".
5. Press the fbutton.
6. Press the n or o button.
7. Press the fbutton.
8. Press the fbutton.
or
9. Press the
b
button.
The main menu will pop up.
The display shows "information".
The display shows "charges".
The display shows "calls".
The display shows "outgoing:" and the number of outgoing calls.
The display switches between "outgoing" and
"incoming".
The display shows "erase memory?".
The memory is being erased. The current
date is taken as the starting date for the new
call counter.
The call counter is not erased. The earlier
display is shown.
Page 50

50
Macro programming
Macro programming
Via the macro programming, you have the option to assign function or telephone numbers to the
14 speed dialling stations of your telephone. This allows you to execute frequently used settings
or functions during a call. Some of the speed dialling stations are already pre-assigned and labelled accordingly.
The following macro functions will either directly be executed by the telephone or the display will
show an entry request:
Target telephone number (dialling, pick-up ...), keypad (change to the keypad mode with entry
option), subaddressing (change to subaddress with entry option), three-party-conference, disconnecting a call, call transfer, call parking, call deflection (CD) and enquiry/switching between
lines, connection set-up (headset operation).
In contrast to this, the following macro functions directly lead to the relevant menu item and thus
shorten the browsing through the menu:
Call list, outgoing MSN (only needed if several MSNs are used, which is not recommended),
phone number display, contrast, appointments, time control, call forwarding, ringing tone, information, direct dialling and macro.
Important:
It is not possible to further operate the telephone while entering menu settings via macro
buttons.
1. Press the
c
button.
2. Press the n or o button to select
"settings".
3. Press the q button.
4. Press the n or o button to select
"macro".
5. Press the fbutton.
6. Press the desired speed dialling station.
7. Press the n or o button to select a
macro function.
For telephone numbers only:
- press the fbutton
- Enter the desired telephone number
via the numeric keypad.
8. Press the fbutton.
The main menu will pop up.
Every time you press the button, the display
switches between the available functions.
The display shows "answering machine"
(only tiptel 2030).
The display shows "macro".
The display shows "select key".
The display shows the corresponding speed
dialling station.
The display shows "enter telephone number"
The telephone number is shown in the display.
The function or telephone number is stored.
Page 51

51
1. Press the
c
button.
2. Press the n or o button to select
"settings".
3. Press the q button.
4. Press the n or o button to select
"call forwarding".
5. Press the fbutton.
6. Press the n or o button to select the
MSN.
7. Press the fbutton.
The main menu will pop up.
Every time you press the button, the display
switches between the available functions.
The display shows "answering machine"
(only tiptel 2030).
The display shows "call forwarding".
The display shows "MSN1" and the activated
call forwarding.
Select the desired MSN.
The display shows "Act. call forwarding".
Call forwarding
The call forwarding function allows you to forward an incoming call for your telephone number to
another extension or subscriber. The call forwarding can be individually pre-set for each MSN.
In the normal state, press the
f
button to activate this function. Whether the call forwarding is
activated or not is indicated via a red LED and in addition to that, the display shows "call forwarding". You can deactivate the call forwarding function by pressing the
f
button again. To
check which kind of call forwarding was programmed in the exchange office, you can use the
menu item "call forwarding".
110 16.07.2012 08:32
Call forwarding
Call forwarding
Page 52

52
Call forwarding
8. Press the n or o button.
9. Press the fbutton.
Enter target telephone number for call for
-
warding:
10. Enter the desired target telephone
number for call forwarding via the
numeric keypad.
11. Press fbutton.
The display switches between the individual
call forwarding options, i. e. unconditional, on
busy, on no reply, answering mode and off:
unconditional: All incoming calls are directly
forwarded to the programmed
target telephone number.
on busy: An incoming call is only forwar-
ded to the programmed target
telephone number if your line is
busy.
on no reply: An incoming call is forwarded
if it is not answered within 15
seconds.
off: There will be no call forwarding.
The answering machine is not
turned on.
The cursor is shown in the display.
The display shows "enter target number"
(only for call forwarding unconditional, on
busy, on no reply).
The display shows your entry.
Call forwarding (continued)
Page 53

53
Answering machine (only tiptel 2030)
Answering mode
The answering mode and the call forwarding function are activated or deactivated (corresponding to the pre-set parameters) by pressing the
f
button. The display shows the call counter,
the counter for incoming messages and the LED positioned above the
f
button is lit. The call
counter is set to 00. In addition, incoming messages are indicated by the blinking LED. A programmed call forwarding function always has priority.
Sa 16.06.2012 15:30
ICM 01 Calls 03
Answering machine set-up
Here, you have the option to set-up the answering machine individually according to your
personal needs.
The following options are set via the menu:
- Selection of the outgoing message
- Call delay
- Ringing signal/call screening
- Length of incoming messages
- Set-up for the answering mode.
1. Press the
c
button.
2. Press the n or o button to select
"settings".
3. Press the fbutton.
4. Press the fbutton.
5. Press the n or o button to select
"answering machine set-up".
6. Press the fbutton.
7. Press the n or o button to select the
MSN to be configured for answer-ing
mode.
8. Press the fbutton.
9. Press the n or o button to select a
function.
10. Press the fbutton.
The main menu will pop up.
Every time you press the button, the display
switches between the available functions.
The display shows "answering machine".
The display shows "OGM".
The display shows "answering machine
set-up".
The display shows "MSN 1".
The display shows the corresponding MSN.
The display shows "select OGM".
The display switches between the available
functions, i e. select OGM, call delay, ringing
signal/call screening, length of recording and
message transfer.
The cursor is displayed for the selected
function.
Page 54

54
Answering machine (only tiptel 2030)
Select outgoing message (OGM):
11. Enter a number between 1 and 7 via
the numeric keypad to specify the
desired OGM.
Call delay:
11. Enter a duration between 1 second and
50 seconds via the numeric keypad.
Call screening:
11. Press the n or o button.
Length of the incoming message (ICM):
11. Enter the allowed length of recording,
i. e. between 1 minute and 9 minutes
via the numeric keypad.
Answering mode:
11. Press the n or o button.
Here, you determine which outgoing message
shall be used.
Here, you define the time after which the
answering machine shall answer an incoming
call.
The display switches between on and off:
on: Ringing signal and loudspeaker
remain activated during the answering
mode.
off: Ringing signal and loudspeaker
remain deactivated during the answering mode.
Here, you define the maximum length of
recording available for the caller to leave a
message.
The display switches between on and off:
on: The pre-set parameters for the ans-
wering mode are activated.
off: The pre-set parameters for the ans-
wering mode are deactivated (see
chapter "Message transfer").
Answering machine set-up (continued)
Page 55

55
Answering machine (only tiptel 2030)
Outgoing messages
Your tiptel 2030 offers you the option to record 6 individual outgoing messages. When using
the additional outgoing message from the factory pre-set you can activate the answer mode
immediately - without the necessity to record an OGM before (plug & answer).
1. Press the
c
button.
2. Press the n or o button to select
"settings".
3. Press the q button.
4. Press the q button.
5. Press the fbutton.
6. Pick-up the handset if you intend to
listen to the outgoing messages or
record an outgoing message via the
handset.
Select other outgoing message:
7. Press the n or o button to select an
outgoing message.
Play-back OGM:
7. Press the p button.
Record OGM:
7. Press the q button and keep it pressed.
8. Release the q button.
Without incoming message recording:
9. Press the
b
button.
With incoming message recording:
9. Press the q button and keep it pressed.
Release the q button.
Erase OGM:
7. Press the fbutton.
8. Press the fbutton.
The main menu will pop up.
Every time you press the button, the display
switches between the available functions.
The display shows "answering machine".
The display shows "OGM".
The display shows "OGM1".
The display switches between the individual
OGMs.
The selected OGM is being played back.
The display shows "record OGM". Now, start
to speak your OGM.
The display shows "record final announcement".
"without recording" is displayed in addition to
"OGM". If you select this outgoing message
now within the menu "answering machine
set-up", the caller will not be able to leave a
message.
Now, speak your final announcement.
The display shows "erase OGM?".
The selected OGM is erased.
Remark:
You either have the option to record your outgoing messages via the handset or via the handsfree microphone. In case of recordings via the handset, the room noise level will be lower.
Page 56

56
Answering machine (only tiptel 2030)
Incoming messages
You can play-back and erase individual messages from the voice memory.
Sa 16.06.12 08:30
ICM 1
1. Press the gbutton.
2. Press the fbutton.
Play-back incoming message:
3. Press the p button
or press the fbutton.
Repeat:
3. Press the q button.
Select other ICM:
3. Press the n or o button to select an
individual incoming message.
Erase Incoming message:
3. Press the fbutton.
4. Press the fbutton.
The recording menu will pop up.
The display shows time and date of the first
new incoming message.
The play-back mode is started and the device
plays back one message after the other.
The last seconds are being repeated.
The recording date and time of the individual
incoming message is displayed.
The display shows "erase ICM?".
The selected incoming message is erased.
You also have the option to erase all existing
incoming messages at once. Here, please
refer to chapter "Information/Memory".
Remark:
The recording quality is very high. When more than 2/3 of the memory capacity is exhausted, a
compression of all existing incoming messages is done automatically. Depending on how you
use the answering machine, a high recording quality or a high recording capacity is achieved.
Page 57

57
Answering machine (only tiptel 2030)
Dictate/Call record
You can use your answering machine to dictate personal information directly. If you speak your
information while the answering mode is on, other persons can retrieve this information via a remote
interrogation function. In this way, your answering machine can serve as an electronic mailbox.
1. Press the
c
button.
2. Press the n or o button to select
"dictate/call record".
3. Press the fbutton.
4. Press the
b
button.
The main menu will pop up.
Every time you press the button, the display
switches between the available functions.
The display shows "recording". Now, start to
speak your information.
The recording is stopped. The LED blinks.
Message transfer
In the answering mode with message transfer on, your tiptel 2030 dials a pre-programmed destination number after an incoming message has been recorded. If the destination number is busy,
the device will redial the number up to four times every 60 seconds. If the called party does not
answer the call within 50 seconds, the dialling procedure is interrupted. If you have dialled "#"
after the target number, this time is reduced to 1 second. When the handset of the programmed
target number is picked up, the following pre-programmed announcement is heard:
"Automatic call, subscriber (own telephone number), X messages, please perform a remote
interrogation. I repeat ...".
If a remote interrogation is not performed within 20 minutes, the answering machine will call the
destination number again as a reminder (two times).
Message collection
If you want to collect several messages before executing the message transfer function, you
simply have to determine the number of incoming messages after which the message transfer
shall start (see chapter "Message transfer settings").
Page 58

58
Answering machine (only tiptel 2030)
Message transfer settings
In the case of a message transfer, recorded incoming messages are transferred to a programmed telephone number. Here, you can make out all settings the device needs to perform a message transfer. Please be aware that you also need to activate the remote interrogation in
order to use this function.
1. Press the
c
button.
2. Press the n or o button to select
"settings".
3. Press the q button.
4. Press the q button.
5. Press the n or o button to select
"message transfer".
6. Press the fbutton.
7. Press the n or o button to select the
MSN.
8. Press the fbutton.
9. Press the n or o button to select a
function.
10. Press the fbutton.
For message transfer:
9. Press the n or o button.
ICM before transfer:
9. Use the numeric keypad to enter a
number between 1 and 9.
Destination number:
9. Enter the telephone number via the
numeric keypad.
The main menu will pop up.
Every time you press the button, the display
switches between the available functions.
The display shows "answering machine".
The display shows "Outgoing message".
The display shows "message transfer".
The display shows "MSN 1".
Select the MSN for which you want to set-up
a message transfer.
The display shows "message transfer off".
The display switches between the functions
message transfer, message collection and
telephone number.
The cursor is displayed for the selected
function.
The display switches between on and off:
on: message transfer on
off: message transfer off.
Here, you define the number of messages to
be collected before a message transfer is
executed
Here, you enter the destination number for
message transfer.
Page 59

59
Remote control (only tiptel 2030)
Perform remote interrogation
1. Call your answering machine and wait until the announcement starts.
2. Switch your telephone to the tone dialling mode (if necessary) or use a regular remote
beeper and hold the acoustic aperture against the microphone of the handset.
3. Dial your remote control code that you set earlier at your tiptel 2030 (1 - 4 numeric digits).
Each of the entered code digits is acknowledged separately by a voice message. After having
entered the code number press
#.
4. If the remote control code is correct, you will hear the voice message "remote interrogation".
Perform the desired remote interrogation function. Each of your entries will by confirmed by a
voice message.
5. If the remote control code is incorrect, the device will switch off (this avoids misuse). If you
pressed a wrong number, press the
* button and enter the remote control code again.
6. Terminate the remote interrogation function by replacing the handset or by pressing the
buttons
* and #.
Remote control code
This is the code used for identification as soon as the device starts the announcement during the
remote interrogation function. Your remote control code can be any number between 1 and 9999.
You have to dial these numbers as soon as the answering machine starts the announcement.
The personal remote control code can be set under the menu "remote control settings" and the
corresponding sub-menu "RC code". If you do not want to perform remote interrogations, you
can erase the remote control code by pressing the q button.
Message code
Using the message code allows you to leave a message even if the device is in the mode "outgoing message without incoming recording". Your message code may by any number between
0 and 9999. The code has to be entered as soon as the answering machine plays back the outgoing message (without incoming recording). If your message code was identified, you can start
to speak your message. The personal message code can be set under the menu "remote
control settings" and the corresponding sub-menu "message code". If you do not want to have a
message code, you can erase the entry by pressing the q button.
VIP code
By the VIP code, you are informed that a privileged caller wants to speak to you personally. Let
the corresponding persons have your VIP code which can be any number between 1 and 9999.
This number is then dialled by privileged callers when they call you and hear the outgoing message. If the entered VIP code is correct your answering machine informs this by a beep which is
heard for about 1 minute. During this time you can answer the call personally. The personal VIP
code can be set under the menu "remote control settings" and the corresponding sub-menu "VIP
code". If you do not want any VIP code, just erase the entry by pressing the q button.
Page 60

60
Remote control (only tiptel 2030)
Remote activation of the answering mode
If you forgot to switch on the answering mode, you can do this remotely. Just call your tiptel 2030.
After about 50 seconds the device picks up and you will hear a signal tone. Now,
please enter your personal remote control code. If the remote control code was identified, the
selected outgoing message is played back for control purposes. The device can now be operated
remotely. The answering machine will activate the answer mode and will answer incoming calls
as soon as you replace the handset or stop the remote control function (
*
button and
#
button).
The remote activation of the answer mode is only possible if you programmed "remote
answering mode = on".
Remote erase during the remote interrogation process
During the remote interrogation, you have the option to erase the currently played back incoming
message remotely. The gained free recording capacity will be available for new incoming
messages immediately. Should you wish to protect your recorded incoming message against an
unwanted erase, you can define this via the settings of the remote control. For this purpose, you
just have to set "remote erase = off".
Remote pre-interrogation free of charge (toll saver)
The remote pre-interrogation function informs you whether new messages have been recorded.
This function does not entail any charges. If new messages have been recorded, the answering
machine picks up after the programmed delay time. In the case that no new incoming messages
have been recorded, the pick-up delay time is increased by 10 seconds. In this way, you have
the option to replace the handset before the answering machine picks-up.
The remote pre-interrogation free of charge is only possible after having set the corresponding
remote control settings to "remote pre-interrogation free of charge".
Page 61

61
Remote control functions
Button Function Remark/operation
1 Room monitoring Room monitoring: The microphone of your telephone
is turned on and you can listen to what is happening in the
surroundings of the device.
2 Remote interrogation The answering machine plays back all new messages that
of new messages have been recorded since your last remote interrogation.
When all messages have been played back, you will hear
the voice message "end of messages".
Remote interrogation The answering machine plays back all messages that have
of all messages been recorded since the answering mode was activated.
4 Next MSN Allows a remote interrogation for further MSNs. Dial the
+ number of the corresponding MSN (1 ... 6). The device
MSN acknowledges the number. All further remote interrogati-
ons will now refer to this MSN.
5 Play-back The play-back is started at the current position.
7 Other OGM Allows you to select another outgoing message. Dial the
desired OGM number (1 - 7). The device acknowledges
OGM the OGM number and plays it back for verification purposes.
8 Stop The current function stops.
9 Change OGM Allows you to record a new OGM during the remote ope-
+ ration. Dial the OGM number (1 - 6). The device acknowOGM ledges the OGM number. Start recording the new OGM via
the mouthpiece of the handset. Should this be an OGM
without incoming recording, press "8" (stop). Should this
be an OGM with incoming recording, press "#". You can
also record a final message if desired. After having spoken
the final message just press "#" again. The device plays
the complete OGM back for verification purposes. You can
now replace the handset. The answering machine will now
play back the new OGM when answering calls.
* Secondary function Pressing this button allows you to access a secondary
on/off function.
* +1 Hands-free mode The hands-free mode is activated.
* +2 Room signal This creates a room signal (beep) via the loudspeaker.
This function corresponds to the VIP function. The room
signal is heard 60 seconds and is stopped automatically
afterwards.
Remote control (only tiptel 2030)
Page 62

62
Remote control (only tiptel 2030)
Remote control functions (continued)
Button Function Remark/operation
* Remaining recording The remaining recording capacity is informed by a voice
capacity message.
*4 Message transfer on/off You can switch the message transfer on or off.
*5 Change telephone Allows to change the target telephone number for the mes-
number sage transfer function. Dial the new destination number.
+ tel. no. The device confirms each number separately. After having
dialled the new target telephone number press #. The
new telephone number is repeated by a corresponding
voice message.
*6 Date/time The current time and date are informed by a voice message.
*7 Erase all incoming The answering machine erases all incoming messages
messages since the answering mode was activated. This function can
be protected against unintentional execution.
*8 Activation of the call You can switch the call forwarding function for the activa-
forwarding function ted MSN on or off (see also button functions 4: next
MSN).The call forwarding function is always active. In
order to deactivate it, you have to call another MSN and
switch to the target MSN during the remote operation.
*9 Change telephone Allows you to change the telephone number for the call for-
number warding function remotely. Dial the new target telephone
+ tel. no. number. The device confirms each number separately.
After having dialled the complete number press #. The
new telephone number is repeated by voice message.
*0 Deactivate answering The device disconnects the line and stops the answering
mode mode. Further incoming calls will not be answered.
*# Stop remote The device disconnects the line but remains in the answe-
interrogation ring mode.
Functions during play-back
1 Slow play-back speed
2 Normal play-back speed
Fast play-back speed
4 Jump to the beginning of the currently played back
message or to the beginning of the earlier message.
6 Jump to the beginning of the following message
5 Repetition of the last few seconds
8 Stop
Page 63

63
Remote control (only tiptel 2030)
Remote control settings
Here, you have the option to set-up the remote interrogation function according to your individual needs.
1. Press the
c
button.
2. Press the n or o button to select
"settings".
3. Press the q button.
4. Press the q button.
5. Press the n or o button to select
"remote interrogation".
6. Press the q button.
7. Press the n or o button to select a
function.
8. Press the fbutton.
Remote control code:
9. Enter the desired remote control
code.
VIP code:
9. Enter the desired VIP code.
Message code:
9. Enter the desired message code.
Remote answer mode:
9. Use the n or o button to turn the
remote answer mode on or off.
The main menu will pop up.
Every time you press the button, the display
switches between the available functions.
The display shows "answering machine".
The display shows "outgoing message".
The display shows "remote interrogation".
The display shows "remote answer mode".
The display switches between RC code, VIP
code, message code, remote answer, remote
erase, toll saver.
The cursor is displayed for the selected function.
Your selection is shown in the display. The
code may have 4 digits as a maximum. The
cursor is displayed for the selected function.
Your selection is shown in the display. The
code may have 4 digits as a maximum. The
cursor is displayed for the selected function.
Your selection is shown in the display. The
code may have 4 digits as a maximum.
Your selection is shown in the display.
on: The answer mode can also be activated
during a remote interrogation, should the
answering machine not be in the answer
mode.
off: The answer mode can only be activated
at the device directly.
Page 64

64
Remote erase:
9. When pressing the n or o button,
the display switches between on and
off.
Remote pre-interrogation free of charge:
9. When pressing the n or o button,
the display switches between on and
off.
10. Press the fbutton.
Your selection is shown in the display.
on: Recorded incoming messages can be
erased during a remote interrogation.
off: Recorded incoming messages cannot
be erased during a remote interrogation.
Your selection is shown in the display.
on: If new messages have been recorded,
the device picks up after the delay programmed within the menu "answering
machine set-up". If no new messages
have been recorded, there will be an
additional delay of 10 seconds before
the answering machine picks up. In
this way, you can replace the handset
and save telephone charges.
off: The device always considers the delay
programmed under "call delay"
The setting is stored.
Remote control (only tiptel 2030)
Remote control settings (continued)
Page 65

65
PC connection (only tiptel 2030)
PC connection
The tiptel 2030 comes with an USB interface to be connected with the pC. Via the USB connection the software tiptel 2030 and the TAPI driver can be used.
Software tiptel 2030
The software "tiptel 2030" from the scope of supply enhances the functional scope of your tiptel
2030, e. g. by the options:
m Loading and saving the call number memory
m Call data management
m Change of settings and others
m Loading a new operating software.
TAPI driver
The scope of supply comprises an installation software for the TAPI driver. This software allows
you to control your telephone via TAPI applications (e. g. Outlook, WinPhone, orgAnize, ACT,
AdressPlus, ProCall).
Installation of driver and software
On the disk, you will find a comprehensive software documentation giving you information on the
handling and the functionality.
Page 66

66
Appendix
Service
You have purchased a modern product by Tiptel which was designed and manufactured in
Ratingen near Düsseldorf. The high-tech manufacturing facilities "Made in Germany" grant a
continuous level of the highest quality. This is even underlined by the certification according to
DIN EN ISO 9001.
Guarantee
Please contact your local dealer or importer for details of guarantee for non EC countries.
Within the European Community the following guarantee regulation applies: Your contact for
services arising from guarantee obligations is the authorised dealer where you bought the
device.
Tiptel.com GmbH will grant a guarantee of 2 years from the date of handover for the material and
for the manufacturing of the telecommunications terminal unit.
Initially, the purchaser shall have only the right of subsequent performance. Subsequent
performance entails either repair or the supply of an alternative product. Exchanged devices or
parts shall become the property of the authorised dealer.
If the subsequent performance fails, the purchaser can either demand a reduction in the purchase
price or withdraw from the contract.
The purchaser shall notify the dealer immediately of any defects found. Proof of the guarantee
entitlement shall be furnished by standard proof of purchase (receipt or invoice).
The guarantee entitlement shall expire if the purchaser or an unauthorised third party interferes
with the device. Damage caused by inappropriate handling, operation, storage or by force
majeure or other external influences shall not be covered by the guarantee.
The guarantee shall not cover any consumable material (e.g. batteries) or defects that only
slightly impair the value or the usability of the device.
Claims for damage caused by transport shall be asserted to the delivery company.
Notes on settlement:
Repairs can only be conducted by the Tiptel Service. A warranty repair does not prolong the warranty period — neither for the replaced parts nor for the device. This guarantee is not transferable and shall expire if the device is sold on to another party. It shall also expire if the
device is interfered with by third parties or if the serial number on the device has been
removed or made illegible. There is a guarantee seal on the tiptel telephone. Please do not
damage or remove this seal because otherwise, your guarantee will expire.
The General Terms and Conditions of Tiptel.com GmbH, which are part of the contract for a
dealer, shall also apply. In the event of a complaint, the defective product shall be sent to the
relevant Tiptel subsidiary, the importer or dealer along with a description of the defect and the
proof of purchase.
Page 67

67
Appendix
CE sign
This device is approved for the connection and use within the analogue public telephone
networks in all EC countries — according to the European Requirements. Due to technical
deviations in individual countries, we cannot grant an unlimited guarantee for the successful
operation at all types of telephone accesses.
Tiptel hereby declares that the device complies with all fundamental requirements of the
European directive 1999/5/EC. This conformity is confirmed by the CE sign on the device.
Further details on the declaration of conformity can be found under the following internet
address:
http://www.tiptel.com
This equipment is marked with the recycling symbol. It means that at the end of life of
the equipment you must dispose of it separately at an appropriate collection point and
not place it in the normal domestic unsorted waste stream. This will benefit the environment for all (European Union only).
Page 68

68
Important information
Operation during power failure
Even in the case of a power failure, the basic telephone functions remain executable (manual
dialling and ringing signal for incoming calls, see chapter "Emergency operation").
Cleaning
Use a soft, slightly moist cloth for the housing surface. Please do not use abrasive liquids or
chemicals to clean the device. The telephone is maintenance-free.
Installation
Please take care that the cables do not lead to any danger of stumbling and avoid folding,
pushing and pressing of the cables.
Some furniture lacquers or furniture cleaning products may attack the rubber at the feet of your tiptel
telephone and thus cause patches. In such cases please use a non-slip pad under the device.
The telephone may not be installed and used in an inappropriate environment. Avoid:
- humid rooms, dusty rooms and rooms with danger of explosions
- temperatures of more than 40°C and less than 0°C
- strong vibrations
- exposure to direct sunlight
Possible malfunctions
Use the information provided in chapter "Troubleshooting" or plug another telephone at the
corresponding telephone wall socket in order to detect whether the malfunction was caused by
your tiptel telephone or not. Never open or connect a defective device. Bring the device to your
local dealer or service centre. Please keep the original packaging carton and material in case
that it will become necessary to return the device. This material will grant optimal protection while
transported. You should make a back-up of all your entries (e. g. by using the software TipKom
on a PC) in order to avoid a loss of data (only tiptel 2030).
Ecological information
During the normal use of the telephone, you will not have any contact to substances damaging
to your health. The synthetic material and plastics used for manufacturing this device exclusively
consist of partially recycled granules. Our packaging materials do not consist of plastics but of
partially recycled cardboard and paper.
Page 69

69
Factory pre-set
Telephone settings
Direct call: . . . . . . . . . . . . . . . . . . . . . . . . . . . . . . . .None
Ringing tone
Melody: . . . . . . . . . . . . . . . . . . . . . . . . . . . . . . . .Triadic (66)
Incremental volume control: . . . . . . . . . . . . . . . . . .Off
Volume . . . . . . . . . . . . . . . . . . . . . . . . . . . . . . . .Medium
Restrictions: . . . . . . . . . . . . . . . . . . . . . . . . . . . . . .None
System settings
MSN: . . . . . . . . . . . . . . . . . . . . . . . . . . . . . . . .None (the first MSN is set by the first
incoming call)
Call number display: . . . . . . . . . . . . . . . . . . . . . . . .On
Call waiting signal: . . . . . . . . . . . . . . . . . . . . . . . . .On
ECT (explicit call transfer): . . . . . . . . . . . . . . . . . . .Off
Telephone number for CD (call deflection): . . . . . .None
Exchange identification code: . . . . . . . . . . . . . . . . .None
PIN: . . . . . . . . . . . . . . . . . . . . . . . . . . . . . . . .000
Charge rate: . . . . . . . . . . . . . . . . . . . . . . . . . . . . . .0.121
Call forwarding function: . . . . . . . . . . . . . . . . . . . . .none
Answering machine (only tiptel 2030)
Outgoing messages: . . . . . . . . . . . . . . . . . . . . . . . .7 (pre-recorded OGM)
Call delay: . . . . . . . . . . . . . . . . . . . . . . . . . . . . . . . .6 seconds
Ringing signal / call screening: . . . . . . . . . . . . . . . .On
Length of recording: . . . . . . . . . . . . . . . . . . . . . . . .2 minutes
Answering mode (pre-set): . . . . . . . . . . . . . . . . . . .On
Remote control (only tiptel 2030)
Remote answering mode: . . . . . . . . . . . . . . . . . . . .Off
Remote erase: . . . . . . . . . . . . . . . . . . . . . . . . . . . . .Off
Remote pre-interrogation: . . . . . . . . . . . . . . . . . . . .Off
Remote control code: . . . . . . . . . . . . . . . . . . . . . . .Not set
VIP code: . . . . . . . . . . . . . . . . . . . . . . . . . . . . . . . .Not set
Message code: . . . . . . . . . . . . . . . . . . . . . . . . . . . .Not set
Message transfer (only tiptel 2030)
Telephone number: . . . . . . . . . . . . . . . . . . . . . . . . .none
Message collection: . . . . . . . . . . . . . . . . . . . . . . . . .1
Message transfer: . . . . . . . . . . . . . . . . . . . . . . . . . .Off
Page 70

70
Problem
No dialling tone after picking
up the handset.
PIN code forgotten.
"Memory capacity exhausted"
is displayed.
Telephone does not ring or
rings only sometimes.
No display at all.
The display shows "Loader
V1.5" (only tiptel 2030)
Possible error source
Connecting cable, handset's
cable, ISDN wall socket
The maximum number of
entries in the electronic telephone book is reached.
Call filter active; do not
disturb function on, not all
MSNs registered. Call forwarding active.
Possibly, your telephone
connection works in the emergency mode.
Operating software erased.
Recommendation
Check all cables, check telephone wall socket by using
another telephone.
Contact our customer service.
Erase electronic telephone
book entries that are no longer
needed.
Read chapters: "Electronic
telephone book", "set ringing
tone", "Entering MSN" and
"Call forwarding".
Check power feeding of your
ISDN NTBA.
Load an operating software
on your telephone using the
PC software. Please bear in
mind:
- In the PC software, deactivate the function "save data/
restore".
- Confirm the instruction
"Please set your tiptel feature
phone to the operating mode
LOAD NEW SOFTWARE by
unplugging and replugging
the SO plug“.
Troubleshooting
Page 71

71
Technical data
Power supply: SO-fed, emergency power supply possible
Display:
Resolution: 2 x 20 characters (alphanumeric)
Contrast: 20 levels
Connecting cables:
Telephone connection cable: Length = 3 m
Data cable USB: Length = 3 m, 9-pin, sub socket strip
Handset cable Length = max. 1.8, curled cable
Answering machine (only tiptel 2030):
Outgoing messages: 6 individual, 1 pre-recorded
Recording capacity: About 50 minutes
Number of incoming messages: Max. 50
Data retention during power failure: unlimited
Telephone/memory:
Electronic telephone book: 100 entries
Call list: 20 entries
Repeated dialling: 20 entries
Appointments: 30 entries
Time control: 10 entries
Data retention during power failure: > 7 days
General data:
Weight: Approx. 900 g
Dimensions (W x H x D): Approx. 220 x 90 x 200 mm
Standard: EURO-ISDN
Ambient temperature: 0° C up to 40° C
Regulations: EN 55022, EN 60950-1:2006, EN 50082
part 1, TBR8, CTR3
Page 72

05/ 12 (en)
EDV 4931431
Tiptel.com GmbH Business Solutions
Halskestraße 1
40880 Ratingen
Germany
Tel.: 0900 100 – 84 78 35*
Vanity Tel.: 0900 100 – TIPTEL*
Internet: www.tiptel.de
International:
Internet: www.tiptel.com
*(1,49 Euro/Min. aus dem Festnetz der Deutschen
Telekom, abweichende Mobilfunkpreise möglich)
Tiptel GmbH
Ricoweg 30/B1
2351 Wiener Neudorf
Austria
Tel.: 02236/677 464-0
Fax: 02236/677 464-22
E-mail: office@tiptel.at
Internet: www.tiptel.at
Tiptel AG
Bahnstrasse 46
8105 Regensdorf
Switzerland
Tel.: 044 - 843 13 13
Fax: 044 - 843 13 23
E-mail: tiptel@tiptel-online.ch
Internet: www.tiptel-online.ch
Tiptel bv
Camerastraat 2
1322 BC Almere
The Netherlands
Tel.: 036 – 53 666 50
Fax: 036 – 53 678 81
E-mail: info@tiptel.nl
Internet: www.tiptel.nl
Tiptel NV/SA
Leuvensesteenweg 510 bus 4
1930 Zaventem
Belgium
Tel.: 0903 99 333
(1,12 Euro / min.)
Fax: 02 714 93 34
E-mail: tech@tiptel.be
Internet: www.tiptel.be
Tiptel sàrl
23, avenue René Duguay-Trouin
78960 Voisins-Le-Bretonneux
France
Tél. : 01 / 39 44 63 30
Fax : 01 / 30 57 00 29
e-mail : support@tiptel.fr
Internet : www.tiptel.fr
 Loading...