

TIPTEL 195 Operating Instructions Manual
Operating instructions (UK)
ISDN feature phone
with integrated fully
digital answering
machine and electronic
telephone book
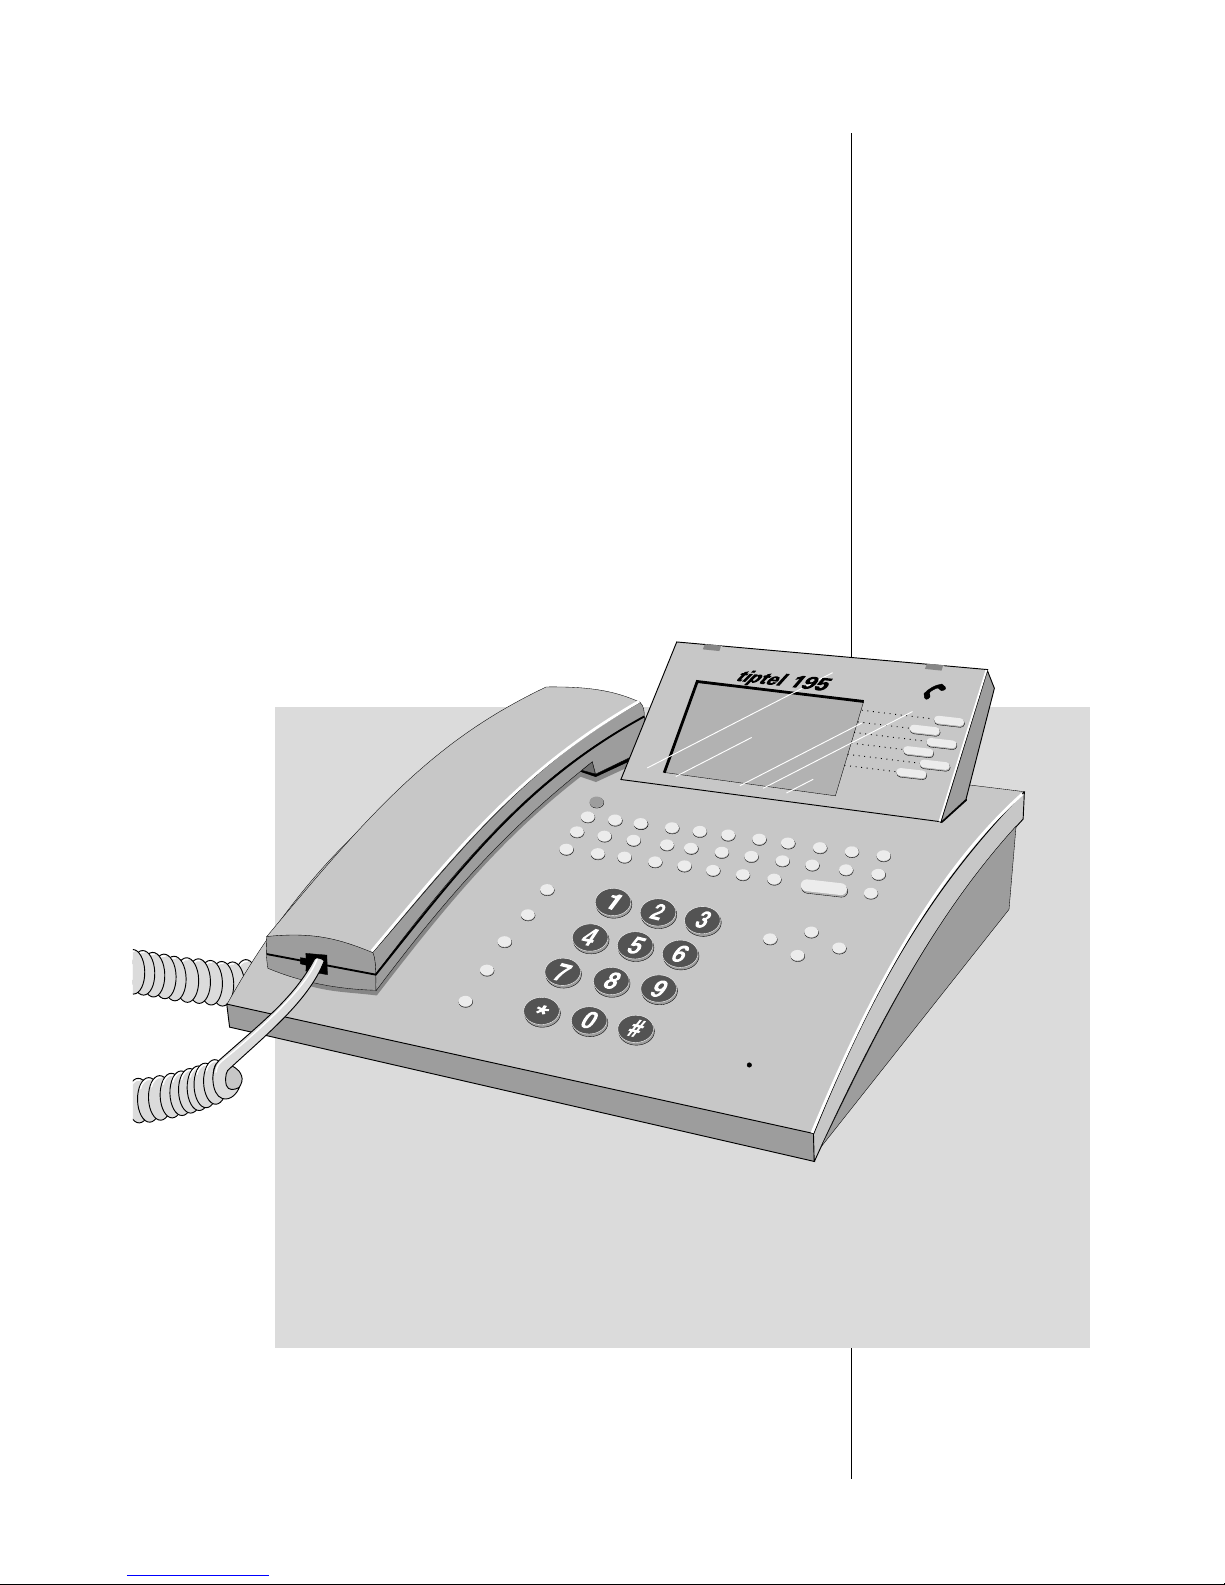
tiptel 195
tiptel

2
Table of contents
Illustrations
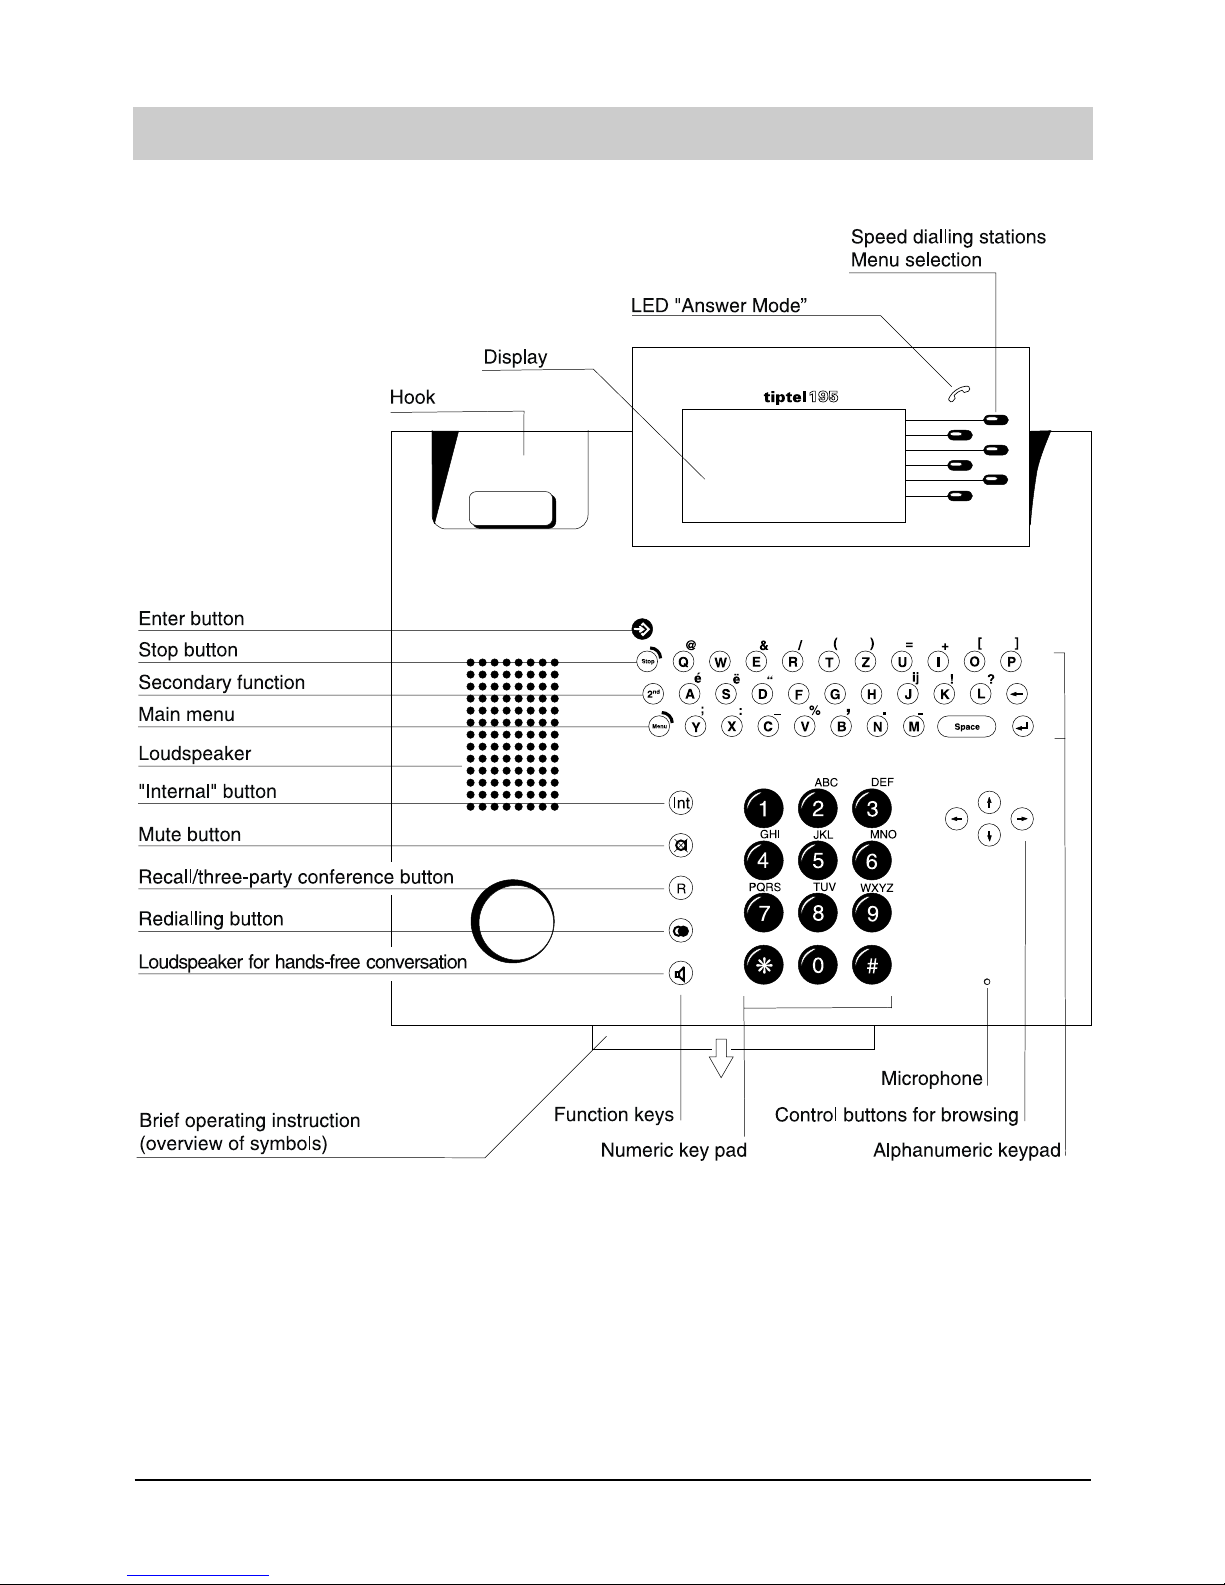
Upper housing . . . . . . . . . . . . . . . . . . . . . .3
Lower housing . . . . . . . . . . . . . . . . . . . . . .4
Initial operation
Scope of supply/special accessories . . . . . .5
Connection . . . . . . . . . . . . . . . . . . . . . . .5-6
Insert/exchange batteries . . . . . . . . . . . . . .7
Emergency operation in the case of a
power failure . . . . . . . . . . . . . . . . . . . . . . . .7
ISDN connection . . . . . . . . . . . . . . . . . . . .8
PC connection/tipcom . . . . . . . . . . . . . . . . .8
Factory pre-set . . . . . . . . . . . . . . . . . . . . . .9
Operational hints
Button functions/ special characters . . . . .10
Special functions . . . . . . . . . . . . . . . . . . . .11
Initial state . . . . . . . . . . . . . . . . . . . . . . . .12
Symbols and short descriptions . . . . . . . .13
Battery check . . . . . . . . . . . . . . . . . . . . . .14
Volume adjustment . . . . . . . . . . . . . . . . . .14
Setting handset's volume . . . . . . . . . . . . .14
User interface / Main menu . . . . . . . . . . . .15
Telephone calls
Call counter . . . . . . . . . . . . . . . . . . . . . . .16
Direct manual call . . . . . . . . . . . . . . . .16-17
Off-line call preparation (indirect call) . . . .17
Sending short messages . . . . . . . . . . . . .18
Dialling from the electronic
telephone book . . . . . . . . . . . . . . . . . . . . .19
Redialling . . . . . . . . . . . . . . . . . . . . . .19-20
Automatic redialling . . . . . . . . . . . . . . . . .21
Loudspeaker . . . . . . . . . . . . . . . . . . . . . .22
Hands-free conversation . . . . . . . . . . . . . .23
Switch between handset and
hands-free mode . . . . . . . . . . . . . . . . . . .23
Mute function . . . . . . . . . . . . . . . . . . . . . .24
Two-way conversation recording . . . . . . . .24
Call tracing . . . . . . . . . . . . . . . . . . . . . . . .25
Placing conversation on hold /interrupting
conversation /terminating a call 2-line . . . .25
Operation with hold/three party conference 26
Call transfer . . . . . . . . . . . . . . . . . . . . . . .27
Call parking /call waiting . . . . . . . . . . .28-29
Call list . . . . . . . . . . . . . . . . . . . . . . . .29-30
Answering incoming calls . . . . . . . . . . .31-32
Keypad / sub-addressing . . . . . . . . . . . . .32
Electronic telephone book
General information . . . . . . . . . . . . . . . . .33
Storing telephone numbers . . . . . . . . . . . .33
Settings . . . . . . . . . . . . . . . . . . . . . . . . . .33
Individual charge counter . . . . . . . . . . . . .34
Filter . . . . . . . . . . . . . . . . . . . . . . . . . . . . .34
Individual outgoing message . . . . . . . . . . .34
Multiple subscriber number (MSN) . . . . . .35
Ringing tone . . . . . . . . . . . . . . . . . . . . . . .35
Enter additional information . . . . . . . . . . .35
Edit entries . . . . . . . . . . . . . . . . . . . . . . . .36
Settings
Time / date . . . . . . . . . . . . . . . . . . . . .36-37
Ringing tone . . . . . . . . . . . . . . . . . . . .37-38
Do not disturb function . . . . . . . . . . . . . . .38
Code lock / direct dialling . . . . . . . . . . . . .39
Setting call waiting . . . . . . . . . . . . . . . . . .40
PABX parameters . . . . . . . . . . . . . . . .40-41
Charging informations . . . . . . . . . . . . . . . .41
SMS settings (short message service) . . .42
Entering the MSN . . . . . . . . . . . . . . . . . . .43
Call forwarding . . . . . . . . . . . . . . . . . .44-45
CLIP . . . . . . . . . . . . . . . . . . . . . . . . . . . . .45
Changing the PIN code . . . . . . . . . . . . . . .46
Headset . . . . . . . . . . . . . . . . . . . . . . . . . .47
Call blocking . . . . . . . . . . . . . . . . . . . .47-49
Call transfer . . . . . . . . . . . . . . . . . . . . . . .49
Call diversion . . . . . . . . . . . . . . . . . . . . . .50
Paging calls
General information on paging calls . . . . .51
Store pager message . . . . . . . . . . . . . . . .51
Outgoing paging calls . . . . . . . . . . . . . . . .52
Appointments
General information on appointments . . . .53
Entering appointments . . . . . . . . . . . . .53-54
Editing appointments . . . . . . . . . . . . . . . .55
Reminder for appointments . . . . . . . . .55-56
General information on time control . . . . .56
Entering time control data . . . . . . . . . .57-58
Editing switching times . . . . . . . . . . . . . . .59
Information
Charge counter . . . . . . . . . . . . . . . . . . . . .60
Charges for the entire connection . . . .60-61
Memory . . . . . . . . . . . . . . . . . . . . . . . . . .61
Calls . . . . . . . . . . . . . . . . . . . . . . . . . . . . .62
LCR
Selection of telecommunication providers .63
Entering the provider data . . . . . . . . . . . . .64
Entering the switching times . . . . . . . . . . .65
Entering the public holidays . . . . . . . . . . .66
Entering the tariff zones . . . . . . . . . . . . . .67
Assigning tariff zones to different providers . .67-68
Answering machine
Outgoing messages (OGM) . . . . . . . . .68-70
Recording/testing/erasing OGMs . . . . .68-70
Answering machine settings . . . . . . . . . . .71
Answering mode settings . . . . . . . . . . .72-73
Playing back/erasing incoming messages . .72-73
Dictate / information . . . . . . . . . . . . . . . . .75
Message transfer . . . . . . . . . . . . . . . . .75-76
Message transfer settings . . . . . . . . . .76-77
Remote control
Performing a remote interrogation . . . . . . .78
Feature functions . . . . . . . . . . . . . . . .78-79
Remote control functions . . . . . . . . . . .79-81
Remote control settings . . . . . . . . . . . .82-83
Miscellaneous
Important information . . . . . . . . . . . . . . . .84
Troubleshooting / warranty . . . . . . . . . . . .85
Index . . . . . . . . . . . . . . . . . . . . . . . . . . . .86
Technical data . . . . . . . . . . . . . . . . . . . . .87
3
Illustration (upper housing, keypad)
4
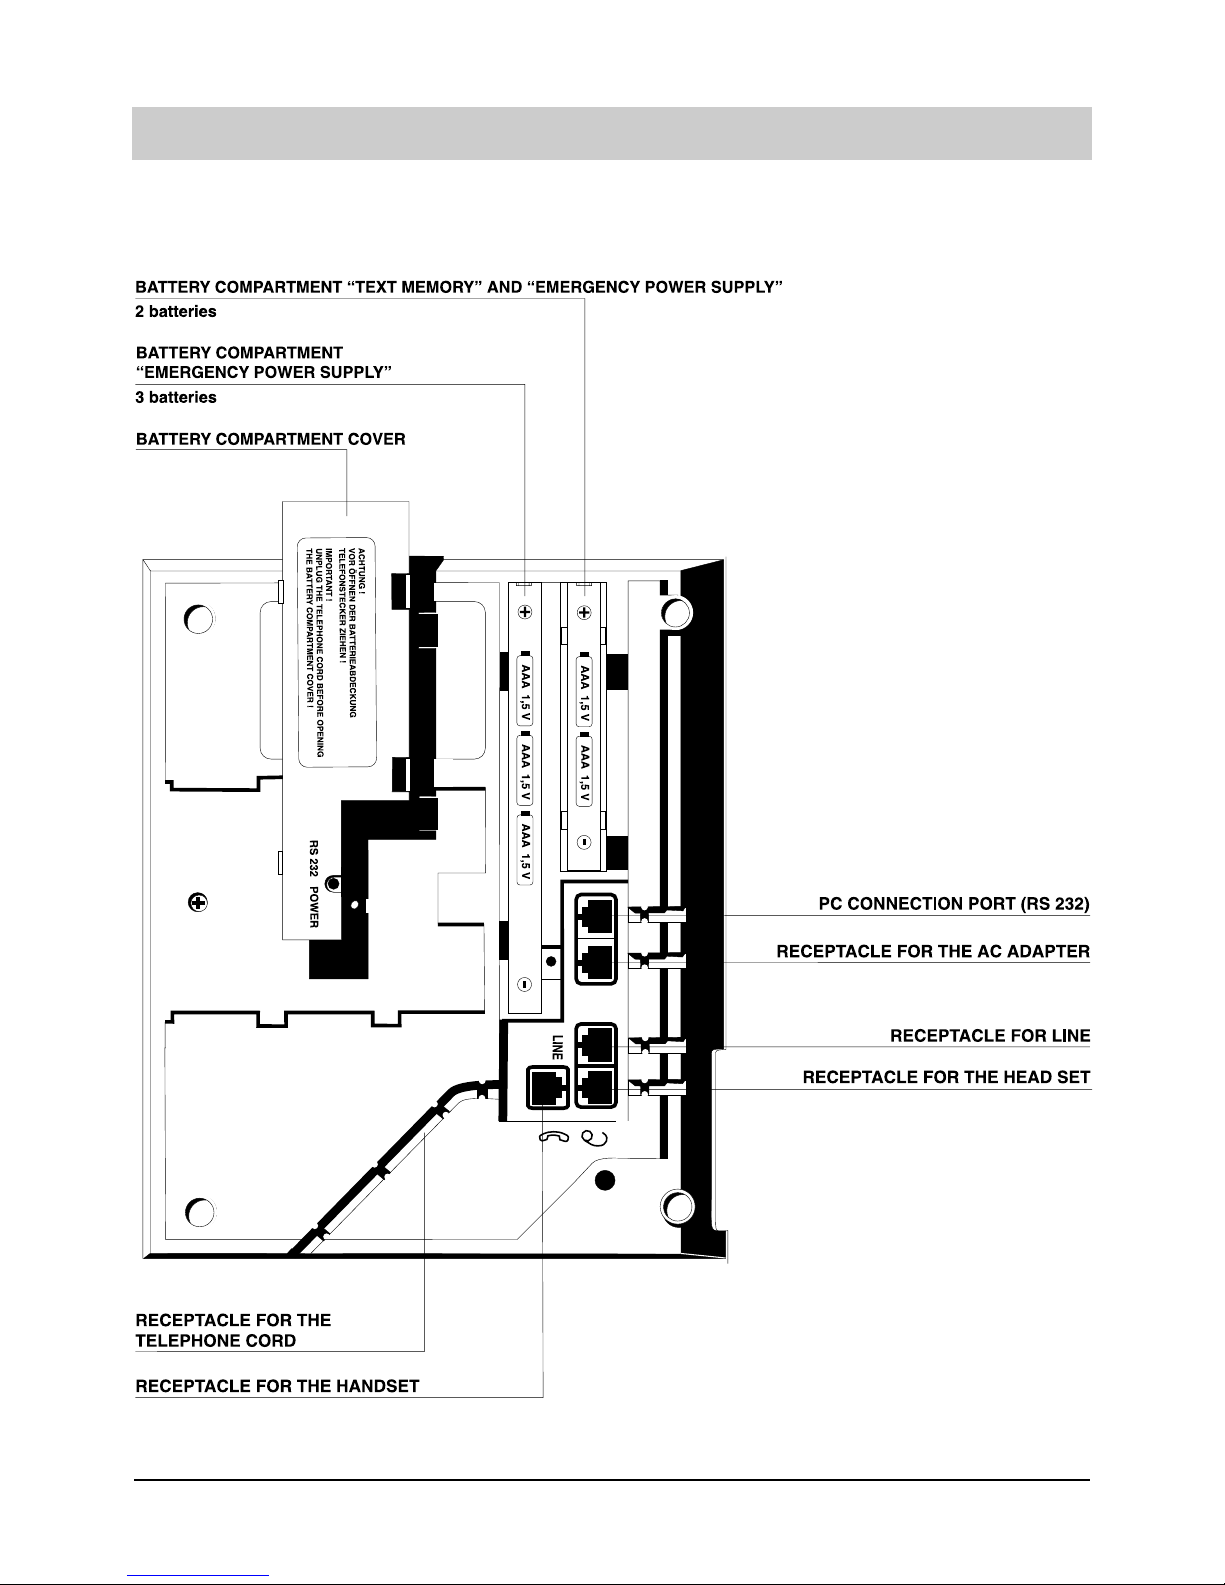
Illustration (lower housing)

5
Initial operation
Scope of supply
The tiptel 195 is supplied complete with:
m a power supply unit
m a telephone cord
m a curled cable
m an ISDN connecting cable
m five batteries
m an operating instruction manual
m an interface cable RS 232
m the software "tipkom"
The following special accessories are available:
m Headset
Your tiptel 195 allows the connection of a headset in the factory pre-set. This accessory (order
number 4876215) enables you to call hands-free.
m Remote beeper (tone pad)
The remote beeper allows you to perform a remote interrogation of your answering machine
by telephones that do not support tone dialling.
Connection
Your tiptel 195 is designated as terminal equipment for the connection at a Euro ISDN point-tomultipoint connection. Before operating the device, all required connecting cables have to be
connected. Turn the device so that the lower housing is easily accessible:
- Plug the long end of the curled handset cord in the jack. The small end of the cord has
to be plugged in the corresponding receptacle of the handset.
- Only use the original tiptel AC adapter supplied (article number 45691760).
- Plug the small plug of the AC adapter into the "POWER" and plug the AC adapter into a 230V
AC power outlet.
- The plugs of the telephone connecting cable have to be plugged in the "LINE" jack and in to
an ISDN telephone wall socket.
6
Initial operation
Connection (continued)
If you want to connect your PC:
Plug the small plug of the interface cable in the RS 232 receptacle and the other end (D-SUB, 9
pins) in a serial port of your PC (COM ...).
If you want to connect a headset:
Plug the small plug of the headset (which is available as special accessory) in the jack.
Use the cable channels for all connecting cables.

7
Initial operation
Insert/exchange batteries
The batteries prevent your tiptel 195 from a loss of data in the case of a power failure. The battery compartment provides a subdivision:
- Two batteries are for the "text memory" supply power for the electronic telephone book, i. e.
telephone numbers, addresses, appointments, time control and settings.
- Three additional batteries in addition to the two "text memory" batteries allow you to hold telephone conversations even in the case of a power failure.
1.Press the two clamps to open the battery compartment
2.Ensure the correct polarity when inserting the batteries (type "AAA" = microcells 1.5V)
3.Close the battery compartment.
4.When pressing the buttons and , the telephone will check the batteries. The battery
symbol in the display informs you about the current battery charge status.
The battery symbol in the display will blink in time when the batteries are nearly discharged and
need to be exchanged. In this case, exchange the batteries as described under point 1 – 4 without unplugging the 230 V AC adapter. As long as the telephone is connected to the power supply, your data will be retained. The content of the text memory will only be lost if the device is
without any power supply for about 1 minute.
Please observe that:
1.Discharged batteries may be subject to leakage and thus damage your telephone. The batteries should be exchanged in time and then disposed of environmentally. We recommend alkaline-manganese batteries.
2.Battery lifecycle:
- If only the two batteries for the text memory are inserted, the data retention period after a
power failure is 5 years.
- If all five batteries are inserted, the telephone emergency operation is possible for about 24
hours. In addition, the text memory will be retained for about 2 weeks.
3.When the display indicates the low battery capacity, all batteries should be exchanged at once.
Emergency operation in the case of a power failure
If the device is operated without power supply, the following functions remain activated:
- manual off-hook dialling (the display is turned off)
- ringing signal for incoming calls.
The tiptel 195 remains fully functional in the event of a power failure only if all 5 batteries have
been inserted.
B
2
nd

8
Initial operation
ISDN connection
Your tiptel 195 supports a variety of ISDN features. Some ISDN features are subject to additional charges and a registration with your local telecommunications company might be necessary
prior to usage. Your local telecommunications company will provide several telephone numbers
under which you can be called. These telephone numbers, i. e. multiple subscriber numbers
(MSN) must be entered in the menu MSN before you can receive incoming calls. All further settings for the telephone as well as for the integrated answering machine can be set individually
for each MSN.
PC connection / tipkom
The software "tipkom for Windows" offers you many sophisticated functions, e. g.
m Loading and saving the text memory
m Loading and saving the voice memory
m Call data management
m Changing the settings
Installation
- Connect your tiptel 195 to any serial PC interface. Should you only have a free 25-pin port,
you can use a corresponding adapter (9-pin <> 25-pin).
- Insert the tipkom floppy disk and start the "SETUP" program. Follow the given instructions.
Further
information
The operation and the scope of functions can be taken from the detailed software documentation on the floppy disk. You just need to start the help function in the program TT195 to access it.
The data records stored in the tiptel 195 memory can be converted and transferred.
System requirements: - 486/DX 66 or higher
- 4 MB RAM
- VGA monitor
- mouse
- sound card (optional)
- Windows ® 95, Windows ® 3.1x
Windows is a registered trademark of the Microsoft Corporation.
Dialling via AT command (hint for PC specialists)
Configuration of the PC-interface: . . . . . . . . . .9600, 8, N, 1 without data flow control
Command: ATD telephone number <CR> . . . . . .Establish connection
ATH <CR> . . . . . . . . . . . . . . . . . . . . .Disconnect connection
ATA <CR> . . . . . . . . . . . . . . . . . . . . .Answer call

9
Factory pre-set
Answering machine
Outgoing message with recording: . . . . . . .7
Delay until pick-up: . . . . . . . . . . . . . . . . . . .6 seconds
Ringing tone/call screening: . . . . . . . . . . . . .on
Recording capacity: . . . . . . . . . . . . . . . . . . .2 minutes
Answering mode (pre-set): . . . . . . . . . . . . . .on
Telephone settings
MSN: . . . . . . . . . . . . . . . . . . . . . . . . . . . . . .none
Access number to public exchange: . . . . . . .none
Prefix: . . . . . . . . . . . . . . . . . . . . . . . . . . . . .none
Headset: . . . . . . . . . . . . . . . . . . . . . . . . . . .off
Remote interrogation
Remote answering mode: . . . . . . . . . . . . . .off
Remote erasing: . . . . . . . . . . . . . . . . . . . . .off
Remote pre-interrogation: . . . . . . . . . . . . . .off
Remote control code: . . . . . . . . . . . . . . . . . .no default value
VIP code: . . . . . . . . . . . . . . . . . . . . . . . . . . .no default value
Message code: . . . . . . . . . . . . . . . . . . . . . .no default value
Message transfer
Destination number: . . . . . . . . . . . . . . . . . .no default value
Paging information: . . . . . . . . . . . . . . . . . . .no default value
Identification: . . . . . . . . . . . . . . . . . . . . . . .first MSN
Collective call: . . . . . . . . . . . . . . . . . . . . . .1
Message transfer: . . . . . . . . . . . . . . . . . . . .off
Time control . . . . . . . . . . . . . . . . . . . . . . .none
Appointments . . . . . . . . . . . . . . . . . . . . . .none
Ringing tone
Melody: . . . . . . . . . . . . . . . . . . . . . . . . . . .3 tone melody
Incremental volume: . . . . . . . . . . . . . . . . . .off
Volume: . . . . . . . . . . . . . . . . . . . . . . . . . . . .medium
PIN . . . . . . . . . . . . . . . . . . . . . . . . . . . . . . .000
Restricted numbers . . . . . . . . . . . . . . . . . .none
Call waiting . . . . . . . . . . . . . . . . . . . . . . . .on
CLIP . . . . . . . . . . . . . . . . . . . . . . . . . . . . . .on
Charge rate . . . . . . . . . . . . . . . . . . . . . . . .0.12
Short message service setting . . . . . . . . .none
Special characters
Initial state: . . . . . . . . . . . . . . . . . . . . . . . . .letters - lower case
2nd à character . . . . . . . . . . . . . . . . . . . . . .letters - upper case
Menu à character: . . . . . . . . . . . . . . . . . . . .special character
2nd à menu . . . . . . . . . . . . . . . . . . . . . . . . .character: special character, capitalised
2nd à space . . . . . . . . . . . . . . . . . . . . . . . . .insert
10
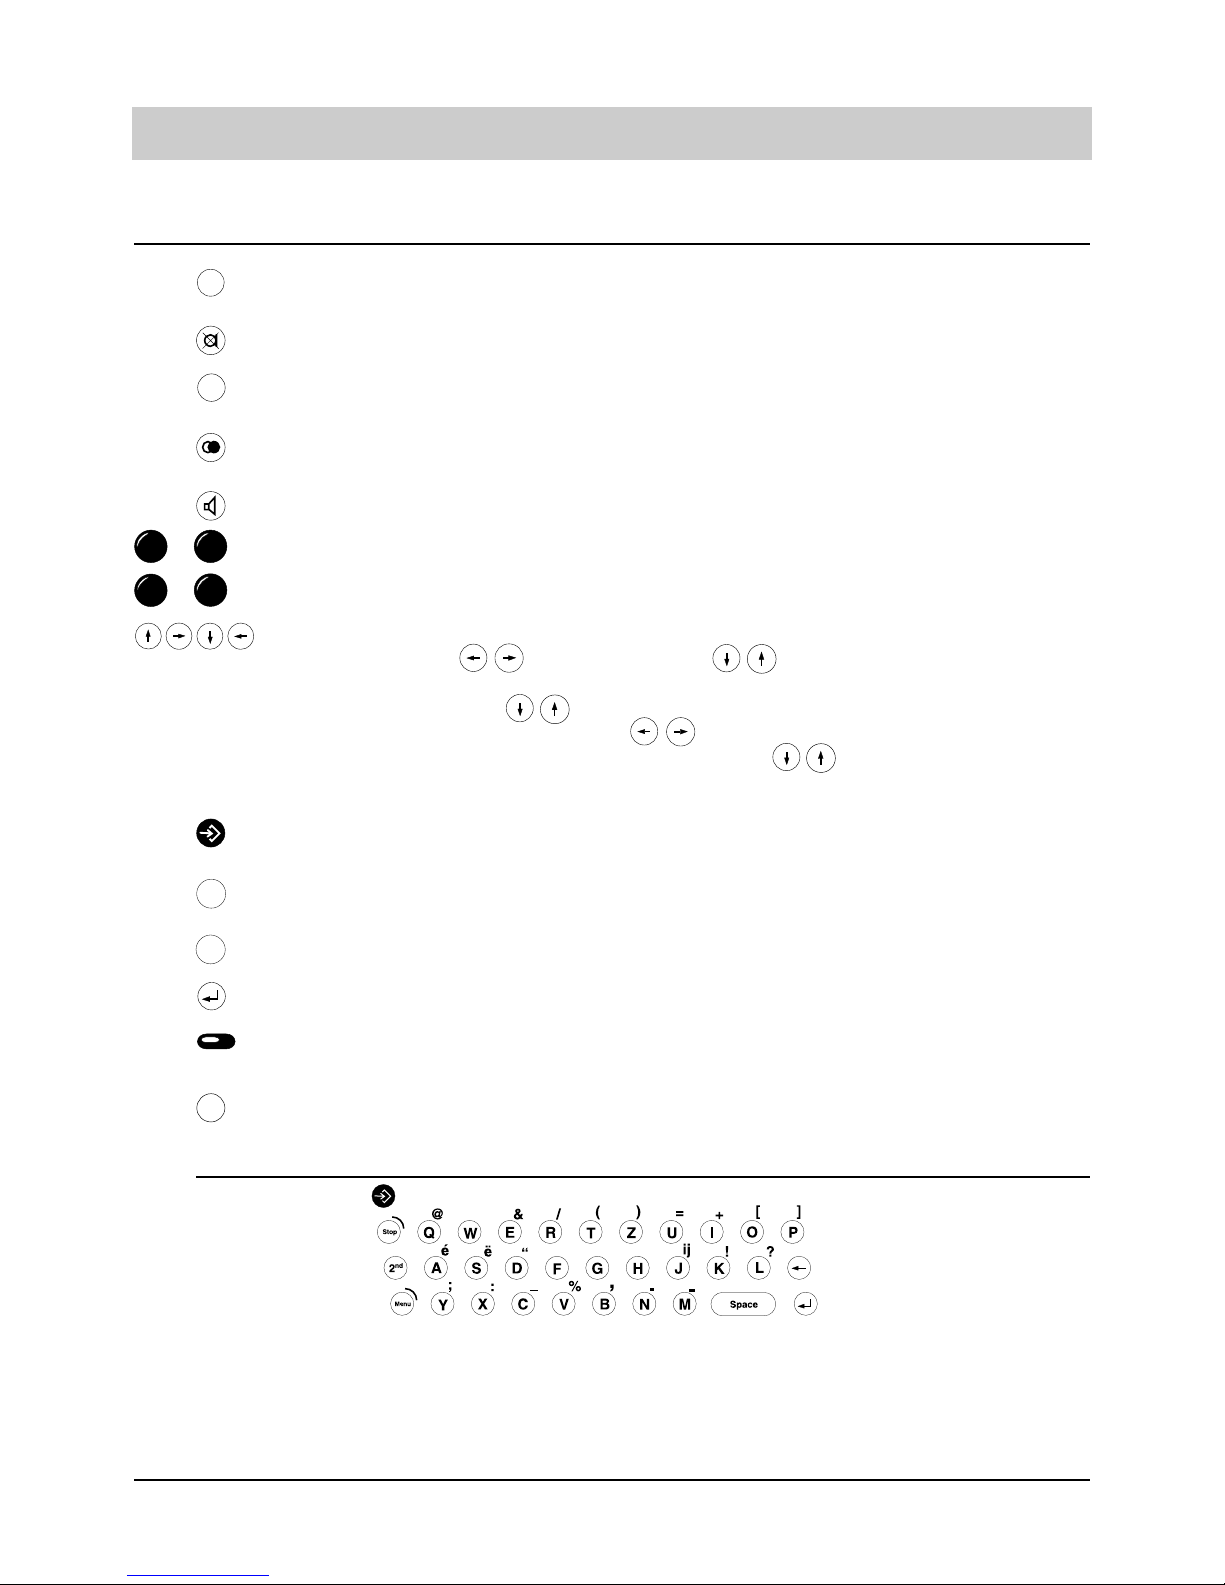
Operational hints
The "internal" button serves to suppress the access to the public exchange within
PABX operation.
The "mute" button switches the microphone on/off.
The "recall" button is used to place a conversation on hold and to have a 2 line operation with hold.
The "redial" button allows access to enables you to hold a conversation a list of the
last dialled 100 telephone numbers.
The "loudspeaker" button enables you to hold a conversation without lifting the handset.
Numeric buttons to enter the telephone numbers.
Star and hatch buttons.
The "arrow" buttons have different functions.
In the initial state: display contrast, access to the telephone book.
In the entry state: The cursor is positioned correspondingly.
In the telephone book: scrolling
When the loudspeakers are active: decrease/increase.
When the ringing tone melodies are played back: switch to the next/earlier
melody.
The "enter" button allows you to add entries to the telephone book and stores the
entries for the telephone book, the time control and appointments,
The "stop" button terminates a running function or brings you back to the main
menu item.
The "menu" button is necessary to access and quit the main menu.
The "enter" button completes the entry and stores the text or number entered.
The six speed dialling stations positioned on the right side of the display serve for
menu selections and to dial the telephone number displayed.
You can access special functions by pressing the "secondary function" button combined with a second button for a specific function.
Int
R
9
0
...
*
#
...
Menu
Stop
2
nd
Button functions

11
Operational hints
Button functions/Special functions
Operation mode Button Function
Text entry , character Capital letters
, character Special characters,
lower case (small letters)
, , character Upper case (capital letters)
, Insert space (on/off
when entering information)
In the initial state , Lock
, Voice time stamp
, Voice indication of remai-
ning recording capacity
, Last call
, speed dialling station 1 Menu "Answer mode"
, speed dialling station 2 Menu "Call forwarding"
, speed dialling station 4 Erase all recordings
, speed dialling station 6 Reconnecting a parked call
, 1 ... 6 Outgoing MSN
for telephone numbers Keypad function on/off
The line is disconnected
after the target number has
been reached
Sub-addressing on
, Wait for end of outgoing
message
Internal dialling
(no exchange line)
3 sec pause
for menu entries Calls a help text after a
wrong entry
2
nd
Menu
2
nd
2
nd
Space
Menu
2
nd
2
nd
2
nd
2
nd
2
nd
G
2
nd
Int
K
W
2
nd
H
S
S
Z
R
2
nd
2nd2
nd
2
nd
12
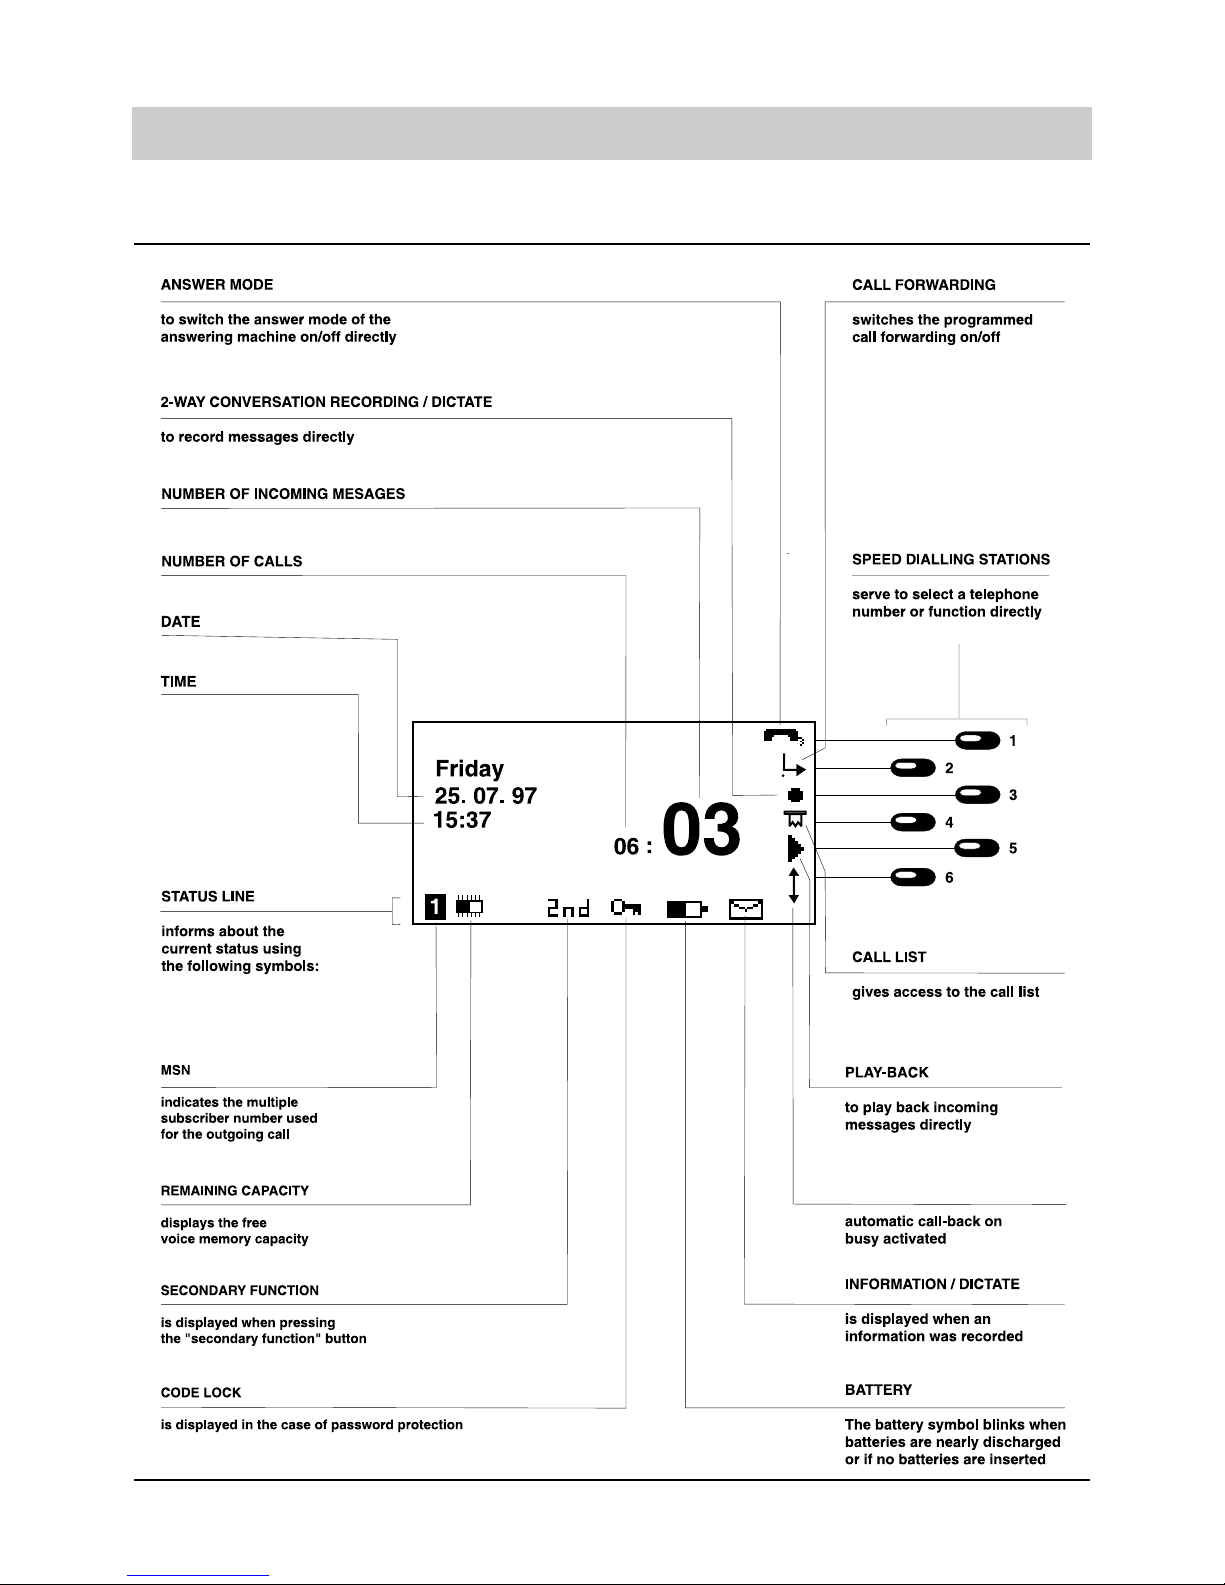
Operational hints
Initial state
13
Operational hints
Recording
Play-back
Erase
Repeat
Forward
Backward
Stop
Loudspeaker active
Hands free active
Send/receive short message
Take over a parked call
Access call list
Call restriction
Information recorded
Telephone locked
Battery capacity symbol
Remaining recording capacity
Menu level (=> 2 levels)
Answer mode on/off
Setting the call forwarding function
Automatic call-back on busy
Message transfer activated
ii
Symbols and short descriptions
14
Operational hints
1. Use the buttons or change
of the volume gradually.
When the handset is picked up
1. Press
or
volume is decreased
volume is increased.
handset volume is decreased
handset volume is increased.
Battery check
The status of the batteries is checked at regular intervals. The current battery status can be
taken from the battery symbol.
Battery symbol filled . . . . . . . . . . . . . . . . . . .Full battery capacity
Battery symbol not filled . . . . . . . . . . . . . . . .Weak battery capacity, batteries to be exchanged
Battery symbol blinks . . . . . . . . . . . . . . . . . .Battery discharged or no batteries inserted.
Loss of data in the case of a power failure.
Volume adjustment
You can set the volume from all functions where the loudspeaker is activated. The selected level
is displayed.
Setting handset volume
The handset volume can be adjusted when holding a conversation.
Vol
15
Operational hints
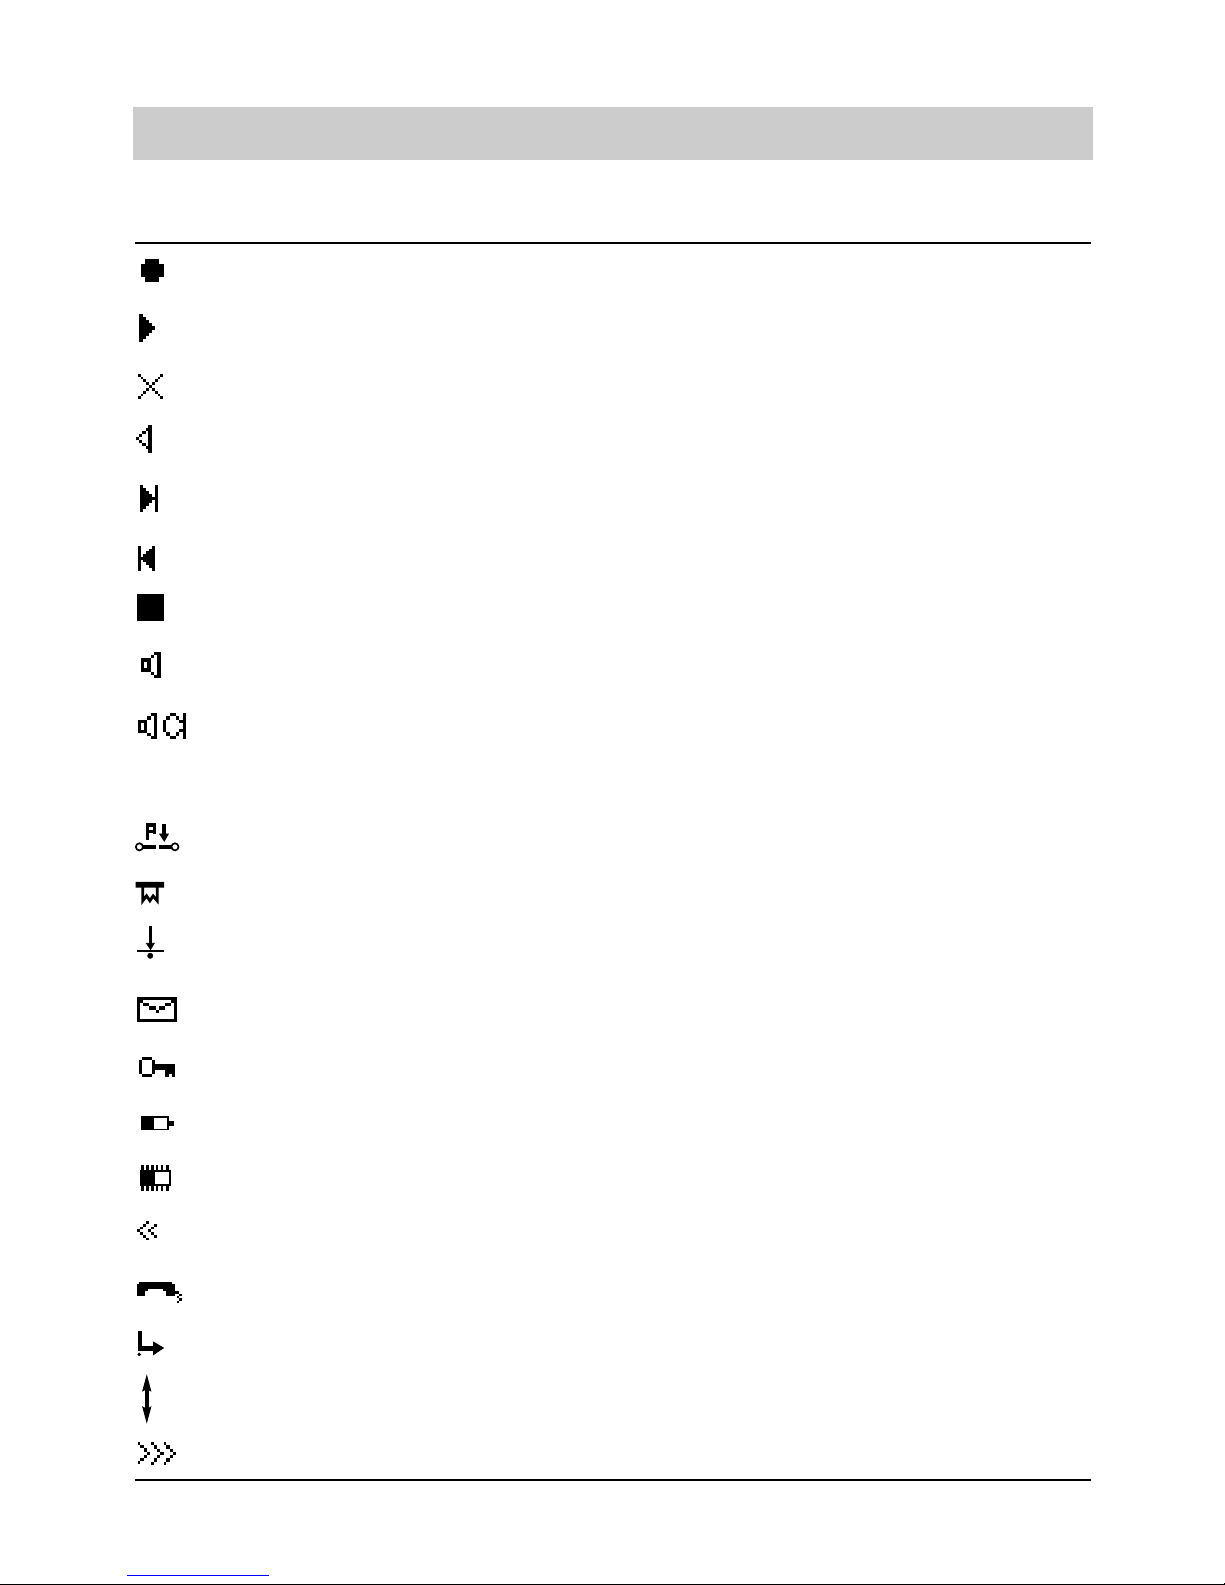
User interface
A structured menu helps you to operate your tiptel 195. Starting from the main menu ( button) you are led to the desired function through further sub menus. In addition, the button combination and allows you to select menus directly via a list of functions.
The following is generally valid:
- In the initial state, the handset is replaced and the display shows date and time.
- The menu button brings you to the main menu. If you press the menu button while you
are positioned in a sub menu, you are brought back to the initial state.
- The speed dialling stations on the right side of the display serve to branch to the next
sub menu – always one level deeper.
- Any time you press the stop button , you go back to the corresponding last function level.
If you press the stop button after having changed some information, it is not stored!
- Pressing the button completes the entry of a number and the changed numbers are stored.
- For a better orientation, the last line of the display shows the current function level (<<...). If
you are on a deep level, this is indicated by a corresponding number.
- Wrong entries are indicated by a "?". A help function is available when pressing , .
Main menu
The main menu is the starting point for any function.
- Press the menu button.
- Select the desired function by pressing the assigned speed dialling station.
Answering machine . . . . . . . .This sub menu serves to set-up the answering machine
Incoming messages . . . . . . .This menu item allows to play back or erase messages
Appointments/time control . .Within this sub menu, you can control and change appointments
as well as time control.
Settings . . . . . . . . . . . . .By this menu, you can program the different desired device
settings according to your personal need.
Information . . . . . . . . . . . . . .gives you information on various statistical functions.
Menu
Stop
Menu
2
nd
Menu
answering machine..................................
messages...................................................
appointm./time ctrl....................................
settings......................................................
information................................................
main menu
2
nd
H

16
Telephone calls
Call counter
Your tiptel 195 provides an integrated call counter informing you of the number of incoming
and outgoing calls – even if the answering machine is switched off.
The call counter is automatically reset when:
- the handset is picked up - when the answer mode is switched on
- when the line is occupied ( button) - when the call list is queried.
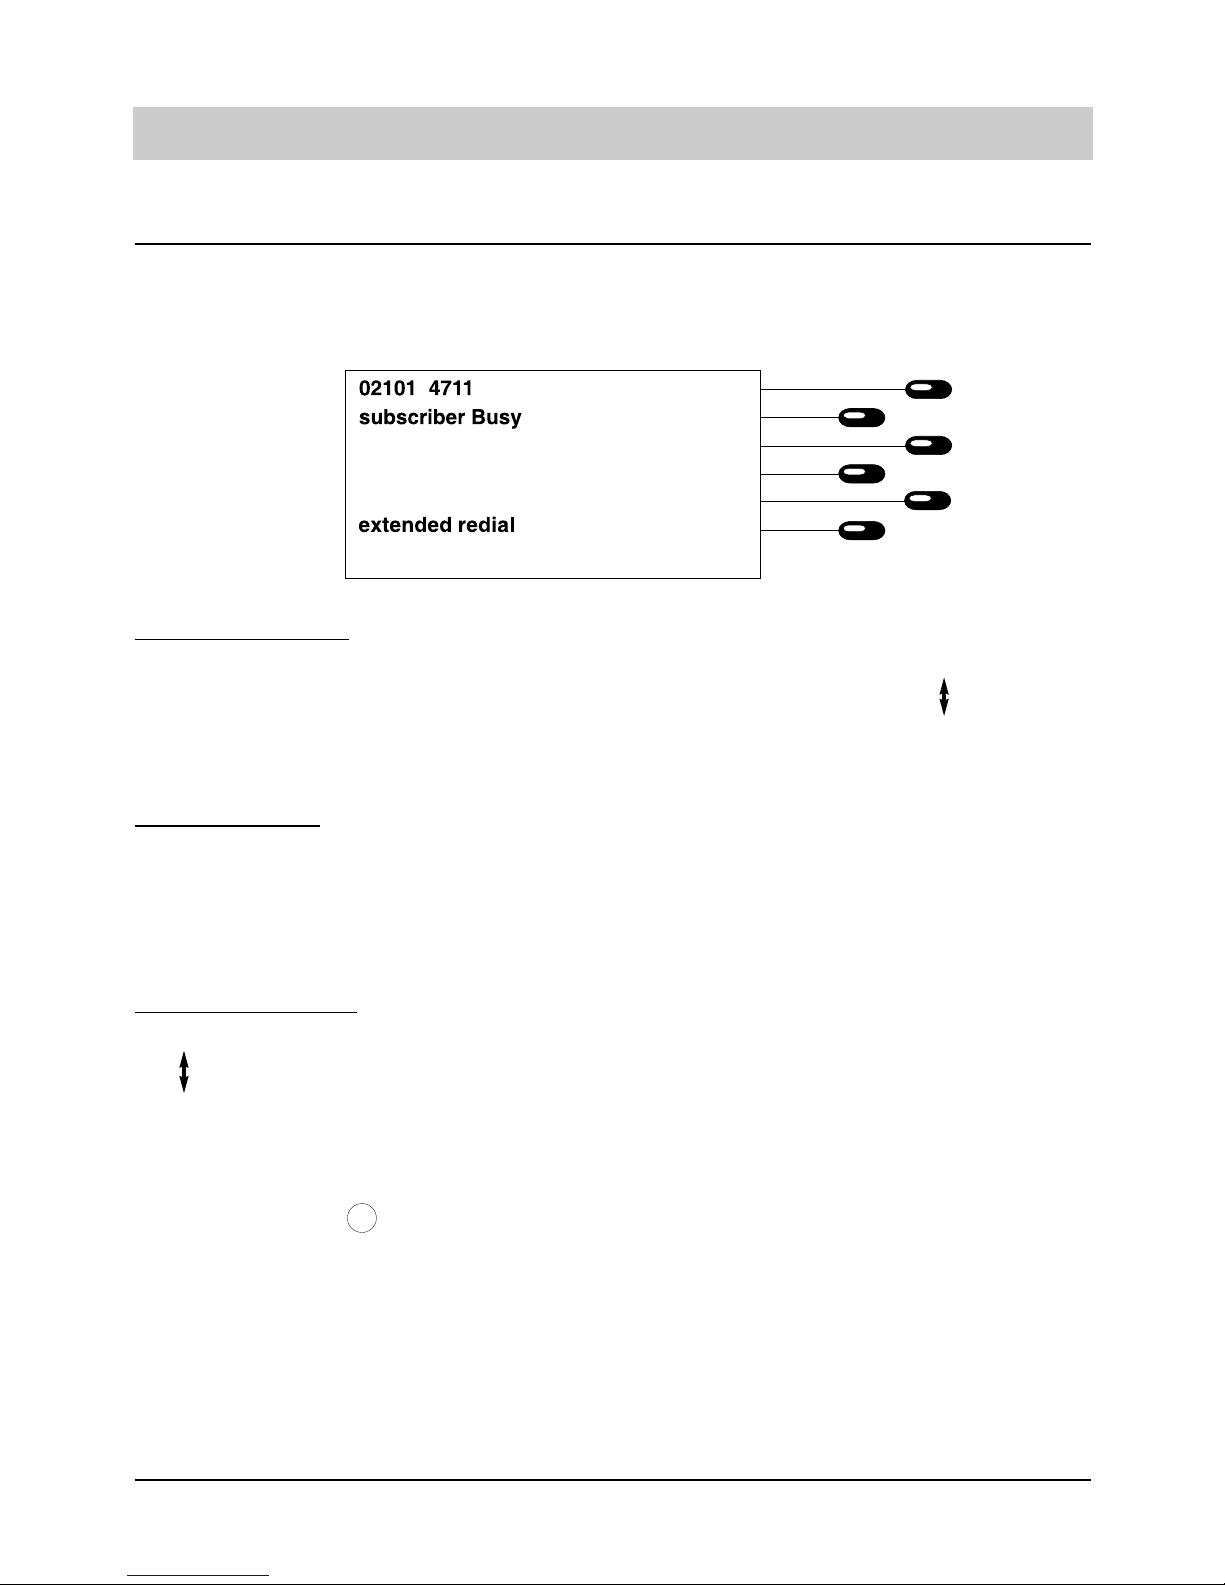
Direct manual call
In the case of a direct manual call, the line is occupied first. Then, you enter the telephone
number while the dialling process is started at the same time. After having entered the last
number of the target telephone number, all further numbers are sent as DTMF signals. By this,
you have the possibility to control terminal equipment remotely.
1. Pick up handset or activate handsfree function by pressing .
2. Dial the telephone number via the
keypad.
After dialling:
3. Pick up the handset or hold a hands
free conversation.
If the hands-free mode is selected, the symbols are displayed.
The numbers are displayed and the telephone starts dialling.
The stop-watch is displayed and shows the
duration of the telephone call. The charging
information is given as soon as they are
received.
02101 4711
0:09:28
1.32
17
Telephone calls
1. Press the speed dialling station next
to the line where CLIP is displayed
The display changes between on and off.
Calling line identification presentation (CLIP)
You can either switch the calling line identification presentation on or off. CLIP is resumed after
replacing the handset.
Off-line call preparation
The off-line call preparation is initiated when dialling any number button starting from the initial
state. You can now dial the target telephone number or open the electronic telephone book by
pressing an arrow button. After having entered the target telephone number you can trigger off
further functions via the speed dialling stations.
After finishing the conversation:
4. Replace handset or terminate the
hands-free mode by pressing the
button .
For a few seconds, the display shows the
data of the last conversation:
1. dialled telephone number or subscriber
2. call duration
3. charges incurred
4. MSN initiating the call.
The incurred charges are added to the charge memory. Afterwards, the device returns to
the initial state. The current data on the call
can be displayed again via the redialling function or the call list.

18
Telephone calls
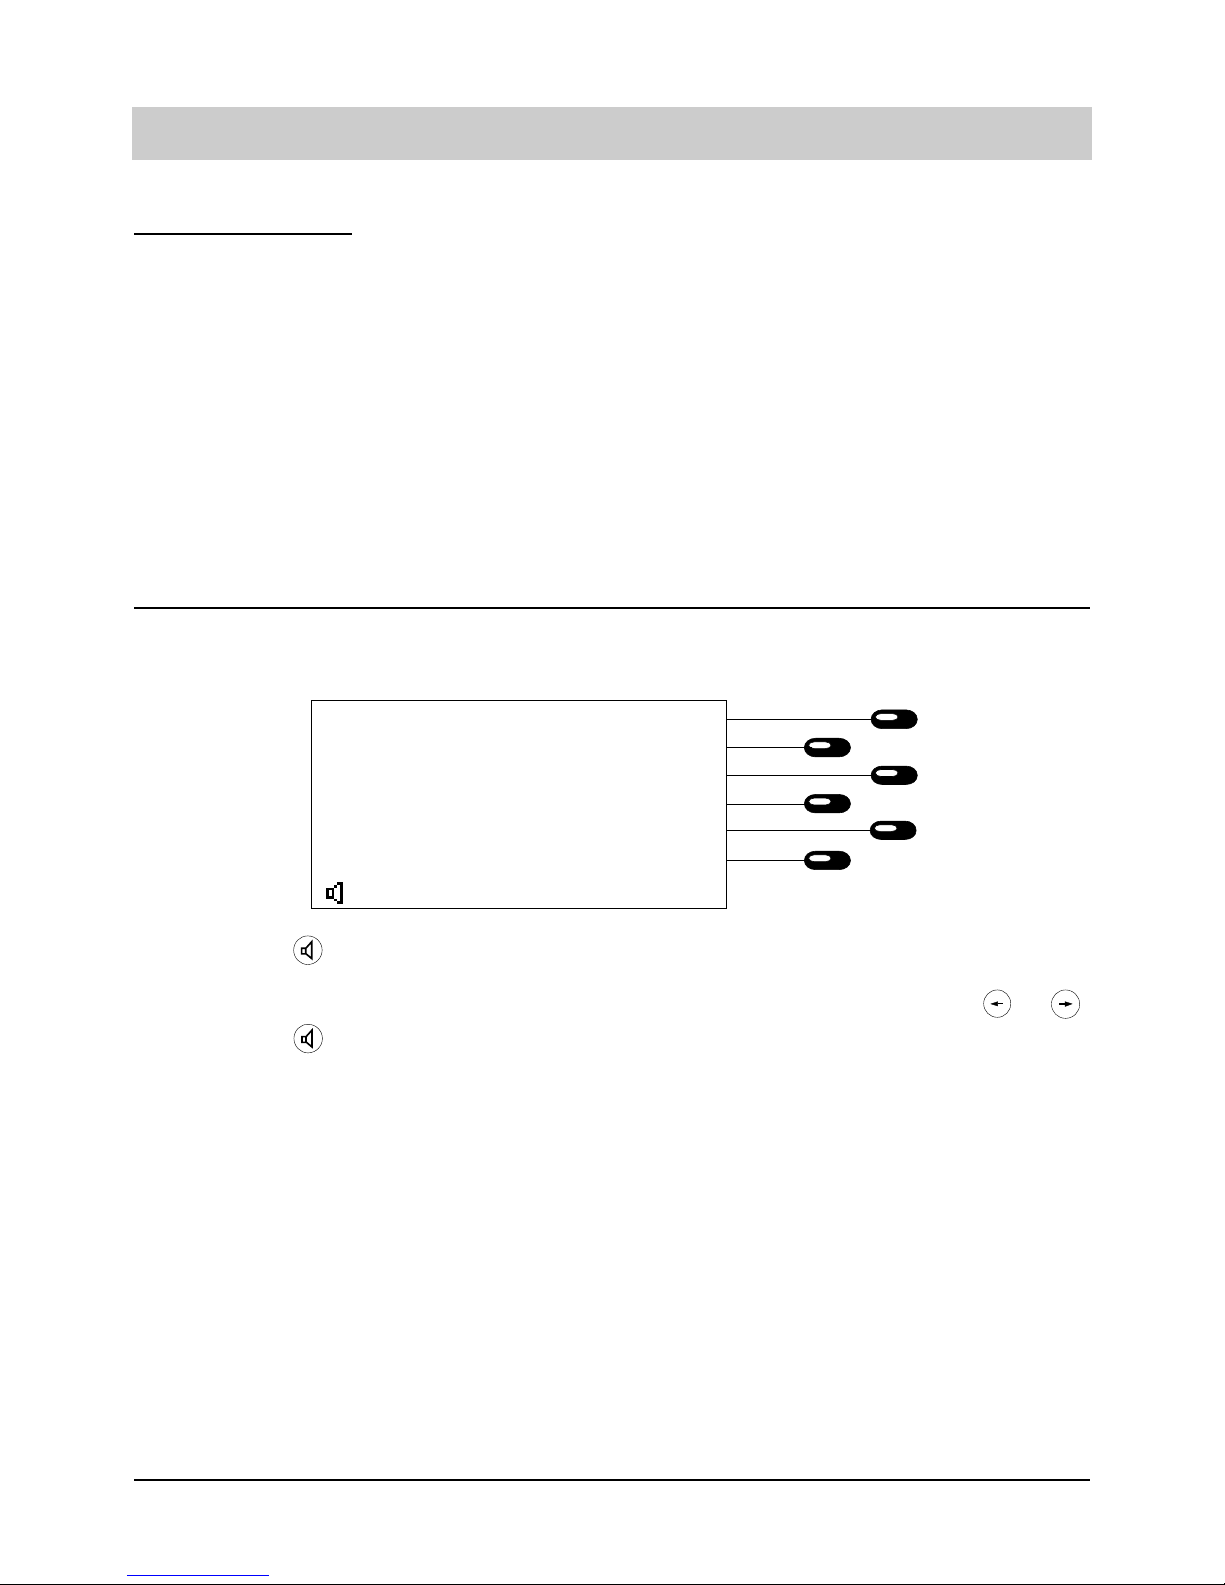
Sending short messages
If the target extension offers the option to receive text messages (to be released by the local telecommunications company), you can send a short message, i. e. a message which is transferred when the target extension is dialled. You can either make your choice from three pre-edited
messages or enter a message exclusively for the call in question.
a) Entering information
1. Press the speed dialling station displayed next to the line "temp. info".
2. Press the stop button to store
the entry.
b) Selecting pre-edited information:
1. Press the speed dialling station displayed next to "SMS".
Start dialling
1. Pick up handset or press button.
A message entry screen is provided. Enter
your text which is restricted to 100 characters
as a maximum. Press after having finished the editing.
The entry is completed and the display switches to the earlier menu.
Each time you press the speed dialling station, the display switches between:
off = No information is sent.
N1 = The pre-edited information number 1
is sent.
N2 = The pre-edited information number 2
is sent.
N3 = The pre-edited information number 3
is sent.
tmp. = If a temporary message was edited,
this message will be sent.
The telephone is activated.
The telephone number is dialled.
Stop
19
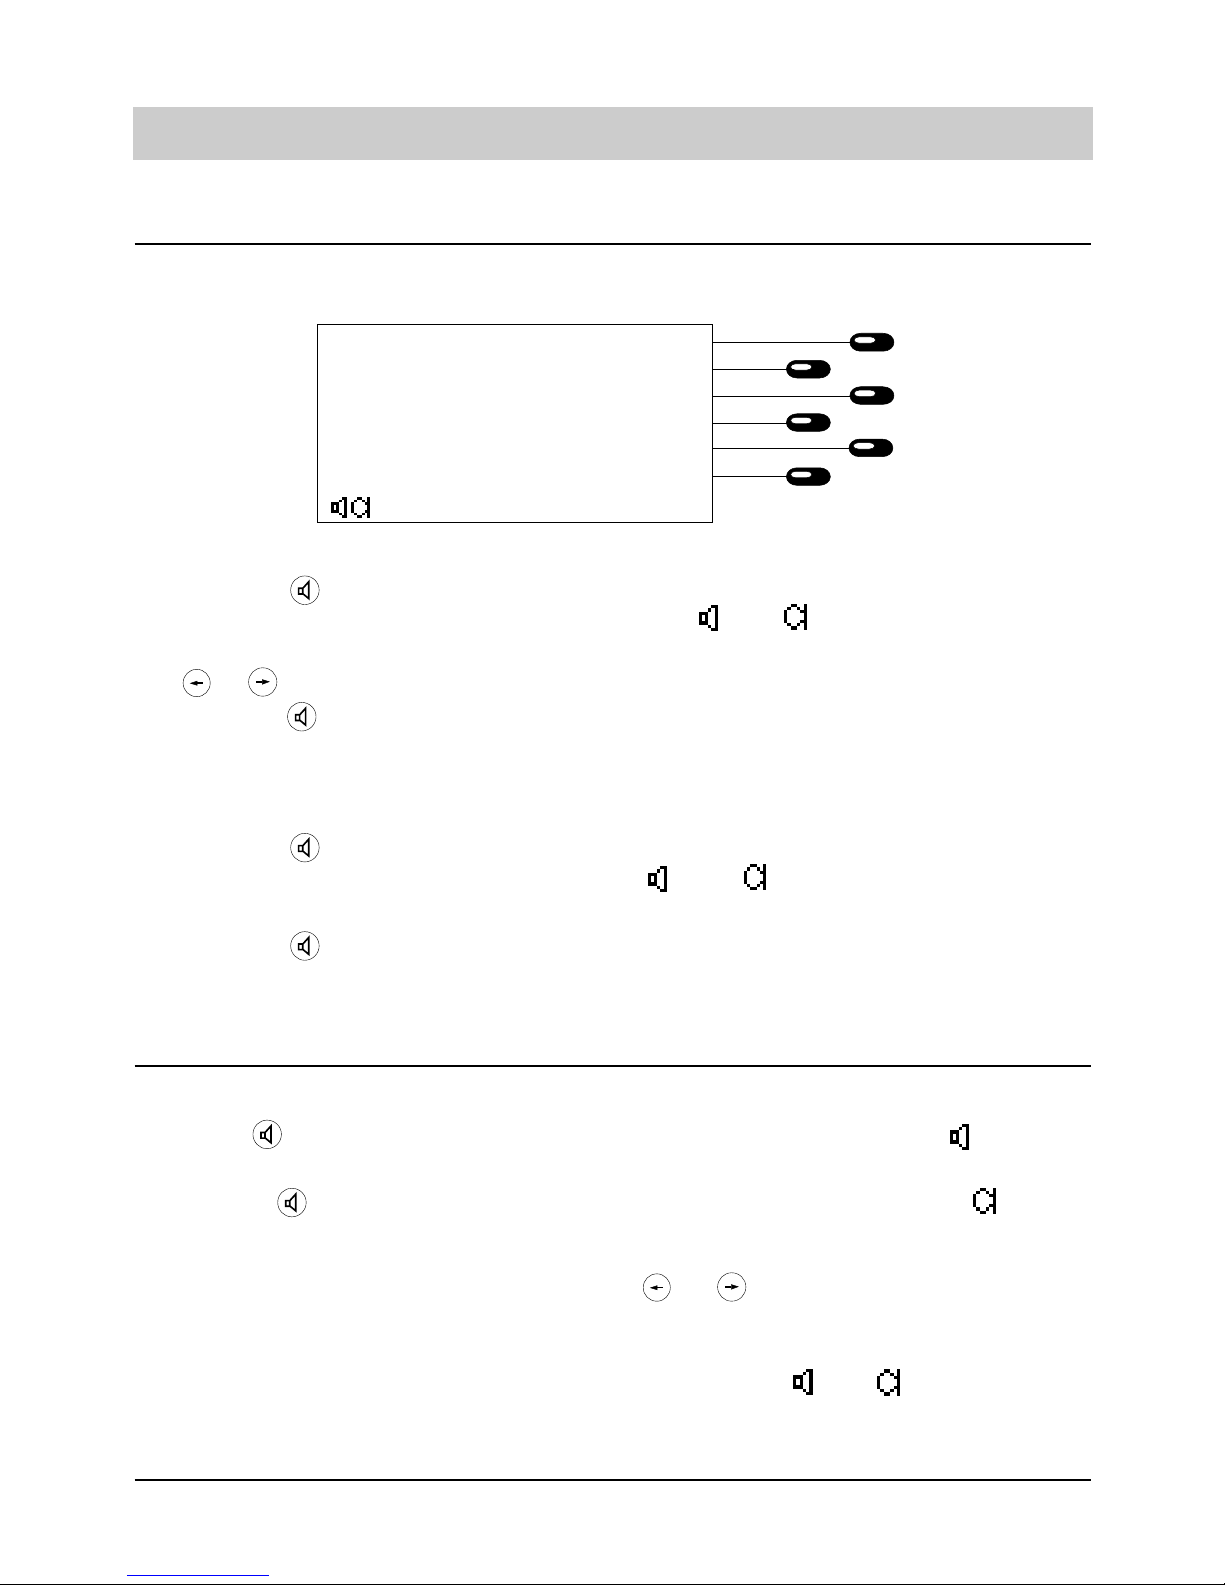
Redialling
The 100 last dialled numbers will automatically be stored including the time and date of the corresponding call. Via the function "Edit redial memory", the call duration and the incurred charges
can be displayed. From the initial state, press the button to initiate the function. Use the
and button to scroll the redial memory. If you do not wish to call a number from the
memory but redial the last dialled number, just pick up the handset and press the button
afterwards.
Note: During a telephone conversation you can check the complete information stored for the
entry in the electronic telephone book by pressing the button.
Telephone calls
1. Enter first character of the desired
entry
or
use or button.
2. Press or button to scroll.
3. Start dialling:
Press the speed dialling station next
to the displayed target entry.
The display shows the entries beginning
with the entered character.
The button brings you to the first entry
of the telephone book. The button brings
you to the last entry of the electronic telephone book.
You can browse through the electronic telephone book to find the desired entry.
The telephone starts dialling the destination
number.
Dialling from the electronic telephone book
Menu
20
Telephone calls
Dialling from the redial memory
1. Press or button.
2. Press the speed dialling station next
to the displayed telephone number or
the name.
Edit redial memory
1. Press the speed dialling station next
to the displayed time/date line.
Copying telephone numbers
1. Press the speed dialling station next
to the line “copy tel. number”.
Erase entry
1. Press the speed dialling station next
to the line "erase entry".
Delete call list
1. Press the speed dialling station next
to the line "erase list".
Using these buttons, you can scroll the redial
memory until the required telephone number
is displayed.
The device starts dialling the selected telephone number.
The display offers a selection. In addition, the
duration of the corresponding calls as well as
the charging information are displayed.
The telephone book entry field is shown in
the display. The telephone number is already
entered. You can now add the name of the
corresponding subscriber and conclude the
entry.
The current entry is erased. The display switches to the earlier status.
All existing entries as well as the entry currently edited will be erased. The display switches to the earlier status.
You have the option to copy a telephone number from the call list to your electronic telephone
book.
21
Telephone calls
Automatic call-back
2. Press the speed dialling station next
to the line "call-back" and replace the
handset. (This line is only displayed
if the service is released.)
Edit call-back list
You have activated several call-back
numbers (6 as a maximum) and now
wish to erase them.
From the initial state
1. Press speed dialling station next to
.
2. Press the speed dialling station next
to the displayed call-back telephone
number you intend to erase.
3. Press the stop button.
The display switches to the initial state. The
automatic call-back symbol is displayed.
As soon as the target extension is no longer
busy, a signal will be heard. A ringing tone is
heard when you pick-up the handset and the
target extension will ring.
The list of active call-back numbers is displayed.
The entry is erased from the list.
The display resumes the initial state.
Automatic redialling
Should the target subscriber number be busy, the selection field for the automatic redialling function or the automatic call-back (CCBS is a service that needs to be released by the exchange
office as well as by your local telecommunications company). If you do not wish to use this function, just replace the handset.
Stop
22
Telephone calls
Automatic redialling
1. Press the speed dialling station next
to the display "redial" and replace
the handset
The automatic redialling can be interrupted:
- when you pick up the handset
- when you press the stop button
- automatically after 10 unsuccessful
attempts.
The time information for the next redialling
process is displayed.
The telephone dials the desired telephone
number automatically every 60 seconds.
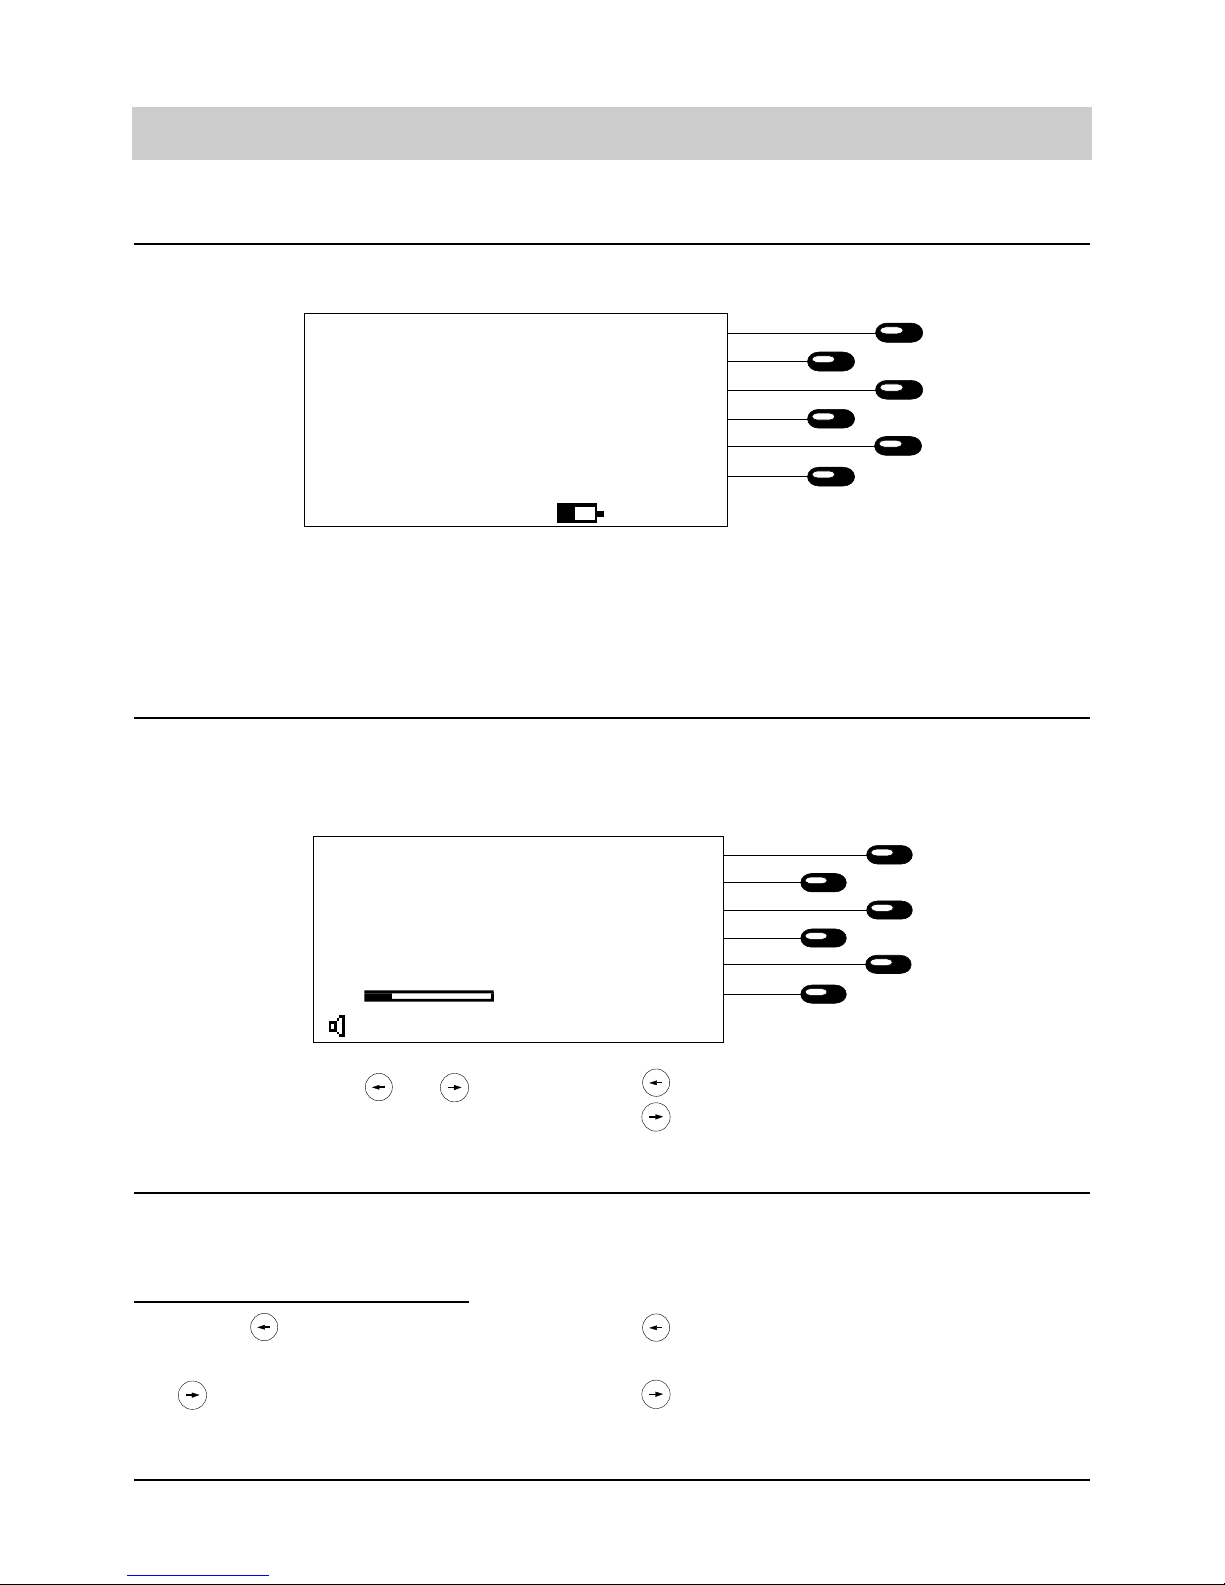
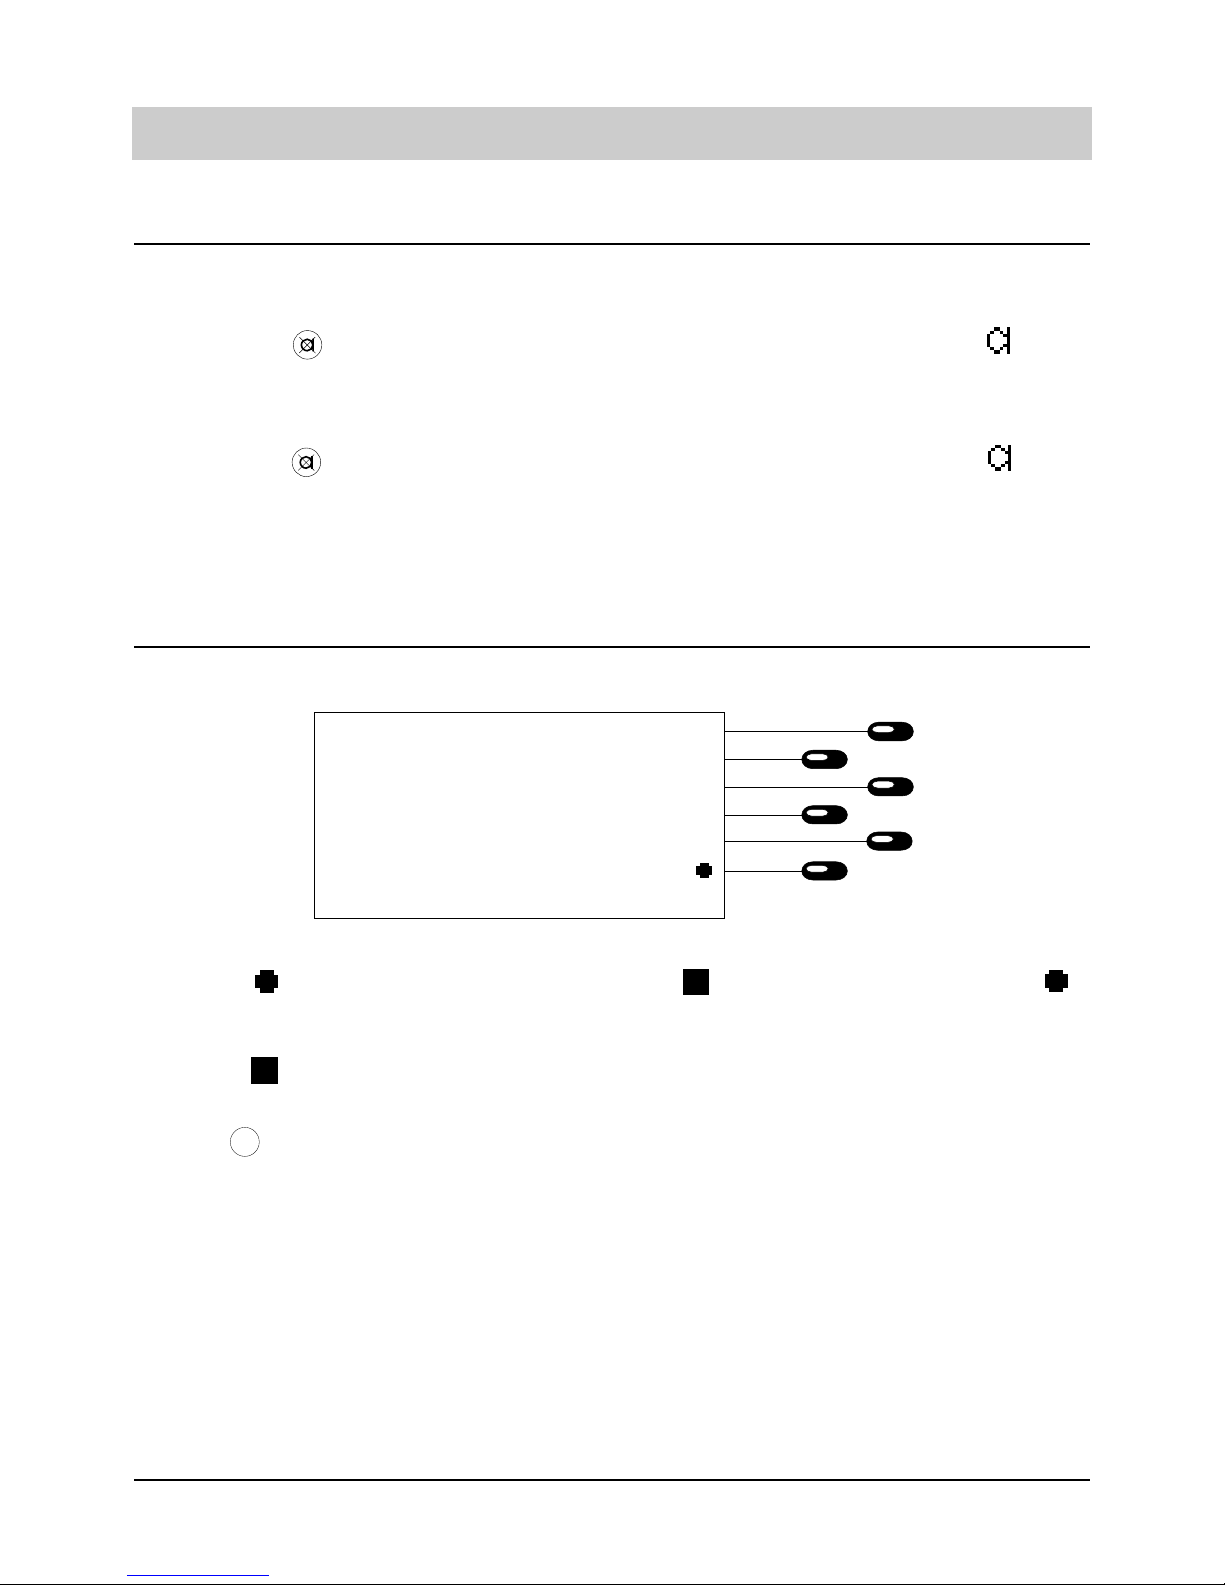
Loudspeaker
You can activate the loudspeaker while holding a telephone conversation. In this way, the entire
telephone conversation can be heard by persons present in the room.
1. Press the button.
2. Press the button again.
The symbol for the loudspeaker is displayed
and the loudspeaker is activated. You can
adjust the volume via the buttons or .
The symbol for the loudspeaker is no longer
displayed and the loudspeaker is deactivated.
0221- 0815
0:03:19
23
Telephone calls
Hands-free conversation
The hands-free mode allows you to hold a telephone conversation without the necessity to pickup the handset.
a) You receive a call:
1. Press the button.
2. Adjust the volume by the buttons
of if desired.
3. Press the button again after
having ended the conversation.
b) You make a call:
1. Press the button.
2. Dial the telephone number.
3. Press the button again after
having ended the conversation.
The hands-free mode is activated. The symbols and are shown on the display.
The displayed volume level shows the current
volume setting.
The hands-free mode is deactivated.
The loudspeaker is activated. The symbols
and are shown on the display.
The dialling is initiated.
The loudspeaker is deactivated.
1. Press button and hold.
2. Replace handset.
3. Release button.
The symbol for the loudspeaker is displayed.
The symbol for the microphone is added
in the display. The hands-free mode is activated. You can adjust the volume by the buttons
or .
Switch between handset and hands-free mode
You are holding a conversation using the handset and want to switch to the hands-free mode:
You are holding a conversation using the hands-free mode and want to switch to the handset.
1. Pick up the handset. The symbols and are no longer dis-
played and the hands-free mode is deactivated.
24
Telephone calls
Mute function
While holding a telephone conversation you can make a confidential inquiry in the room without
being heard by your telephone partner.
1. Press the button.
2. Press the button again.
The symbol for the microphone blinks.
The handset or the hands-free mode microphone are deactivated. You can make your
inquiry in the room.
The symbol for the microphone is displayed again. The handset or the hands-free
mode microphone is reactivated. You can
resume your telephone conversation.
Two-way conversation recording
You have the option to record a telephone conversation.
1. Press the speed dialling station next
to the symbol.
To stop recording:
2. Press the speed dialling station next
to the symbol.
or
the button.
“Conv. rec.” is displayed. The recording symbol is replaced by the stop symbol .
The two-way conversation recording is
ended.
A two-way conversation recording is stored as any other regular recording (e.g. outgoing message) and can be played back at any time (see “Play back/erase incoming messages”).
The recording procedure is automatically stopped as soon as the handset is replaced or the
recording capacity is exhausted.
Please note:
A two-way conversation recording is not possible when you hold a conversation via the handsfree mode.
08765-4321
00:01:12
Stop

25
Telephone calls
Placing conversation on hold/interrupting conversation
You can place a call on hold. While a conversation is on hold you can make an enquiry in the
room or even make an enquiry call. The party placed on hold cannot listen to the enquiry conversation. You can place up to 4 calls on hold. In addition, this function is used for a 2-line operation with hold, three-party conference and call transfer.
a) Hold:
1. Press button.
2. Press button again.
b) Switch to second connection via the
speed dialling stations:
1. Press the speed dialling station next
to the display of the active connection.
2. Press the speed dialling station next
to "further connection".
The call is held in the exchange and the caller listens to an announcement. The display
for this call is shown in reverse. You may now
make an enquiry in the room or dial the target
telephone number to switch to an additional
line (see two-line operation with hold).
The connection with your initial line is re-established.
A selection menu is displayed.
The line is held. You can now enter the target
telephone number to switch to an additional line.
Terminating a call
If you want to disconnect an established line.
1. Press the speed dialling station next
to the display of the line in question.
2. Press the speed dialling station next
to the display "disconnect".
A selection menu is displayed.
The line is disconnected. Replace the handset
now or if you are holding more than one line, continue conversation with one of the active lines.
R
R
Call tracing
(Service has to be activated by your local telecommunications company.)
You receive an "unwanted" call and want to trace the calling party although the calling telephone number was not presented via CLIP.
1. Press the speed dialling station next
to the call displayed (e. g. "analog" or
"unknown".)
2. Press the speed dialling station next
to the display "tracing".
A selection menu is displayed.
The calling telephone number is stored in the
exchange office. The corresponding subscriber information can be obtained by your local
telecommunications company on demand.

26
Telephone calls
Two-line operation with hold
By the function "two-line operation with hold" you have the option to switch between different
calls which were placed on hold.
a) Two-line operation with hold:
1. Press the button
b) Selective two-line operation with hold:
2. Press the speed dialling station next
to the display of the line to be
activated.
3. Press the speed dialling station next
to "2-line operation with hold".
The active connection is placed on hold. The
following connection is activated, e. g. in the
case of 4 lines.
Press "R" button: from line 3 to line 4
Press "R" button: from line 4 to line 1.
A selection menu is displayed.
The active line is placed on hold. The selected connection is switched.
Three-party conference
(This service needs to be activated by your local telecommunications company.)
You want to hold a telephone conversation with two persons at the same time. For this purpose,
you must establish an active line and place an additional line on hold.
1. Press the speed dialling station next
to the display of one of the connections.
2. Press the speed dialling station next
to the display "conference"
A selection menu is displayed.
You can now hold a conversation with the two
parties.
R

27
Telephone calls
Call transfer (only for PABX operation)
You receive an incoming call and want to transfer it to another extension.
a) Transfer:
1. Press button.
2. Dial desired target extension number
and replace the handset.
b) Selective transfer:
You have established several connections and want to transfer the active line
to another extension without disconnecting the existing established connections.
1. Press the speed dialling station next
to the display of the active "line".
2. Press the speed dialling station next
to "transfer".
3. Dial desired target extension number.
Selective transfer of a call on hold
1. Press the speed dialling station next
to the displayed connection on hold.
2. Press the speed dialling station next
to "transfer".
The call is placed on hold. You hear a dialling
tone.
After dialling, the call is transferred to the
target extension.
A selection menu is displayed.
The call is placed on hold. You hear a dialling
tone.
After dialling, the call is transferred to the target extension. You now either hear the dialling tone or a call on hold is activated (if a call
was placed on hold before).
A selection menu is displayed.
The calling party is connected to a party that
has been placed on hold. A further call on
hold is activated (if existing) or you are asked
to disconnect the line.
R
 Loading...