

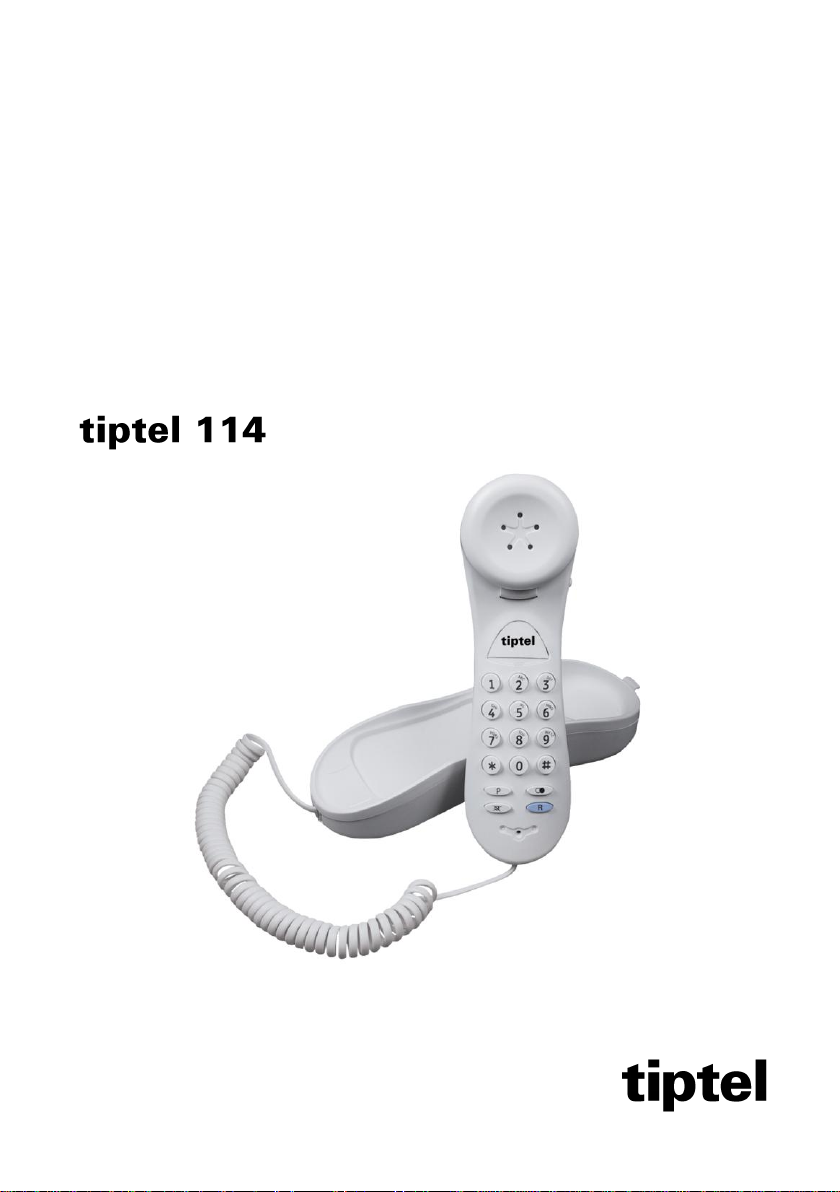
Page 1
Gebruiksaanwijzing (NL/B)
Mode d’emploi (F/B/CH)
User Guide (UK)
Analoge telefoon
Téléphone analogique
Analogue telephone
Page 2

Inhoudsopgave
Inhoudsopgave
Inhoudsopgave ...................................................................................................... 2
Installatie ................................................................................................................. 3
Aansluiten van de telefoonhoorn en de telefoonaansluitkabel ................................... 3
Gebruik van de telefoon op een bureau ................................................................. 3
Wandmontage ......................................................................................................... 3
Bedieningselementen ........................................................................................... 4
In gebruik nemen ................................................................................................... 5
Bellen ............................................................................................................................ 5
Gesprek beëindigen ..................................................................................................... 5
Binnenkomende oproep ............................................................................................... 5
Nummerherhaling ......................................................................................................... 5
Mute-toets ..................................................................................................................... 5
Belsignaal volume ......................................................................................................... 6
Wisselgesprek ............................................................................................................... 6
Flashtijd instellen .......................................................................................................... 6
Technische gegevens ........................................................................................... 7
Hoeveel telefoontoestellen kunt u gebruiken?............................................................. 7
Buitenlijn via centrale .................................................................................................... 7
Pauze invoegen ............................................................................................................ 7
R-toets ........................................................................................................................... 7
Wandmontage............................................................................................................... 7
Bijlage ...................................................................................................................... 8
Service .......................................................................................................................... 8
Garantie ........................................................................................................................ 9
Schoonmaken ............................................................................................................... 9
Toestel correct verwijderen .......................................................................................... 10
Conformiteitsverklaring ................................................................................................. 10
CE-keuring .................................................................................................................... 10
2
Page 3

Installatie
NL
Installatie
Aansluiten van de telefoonhoorn en de
telefoonaansluitkabel
1. Steek één uiteinde van de aansluitkabel in de aansluiting aan de onderkant van
de telefoonhoorn en het andere uiteinde in de aansluiting aan de onderkant van
het toestel.
2. Steek de telefoonaansluitkabel met de kleine steker in de aansluiting “LINE” aan
de onderkant van het toestel en de andere zijde in de telefoonwandcontactdoos.
Gebruik van de telefoon op een bureau
Leidt de telefoonaansluitkabel door de desbetreffende kabelgeleidingen naar de voorkant van het toestel.
Wandmontage
Zie pagina 7 van deze gebruiksaanwijzing.
3
Page 4
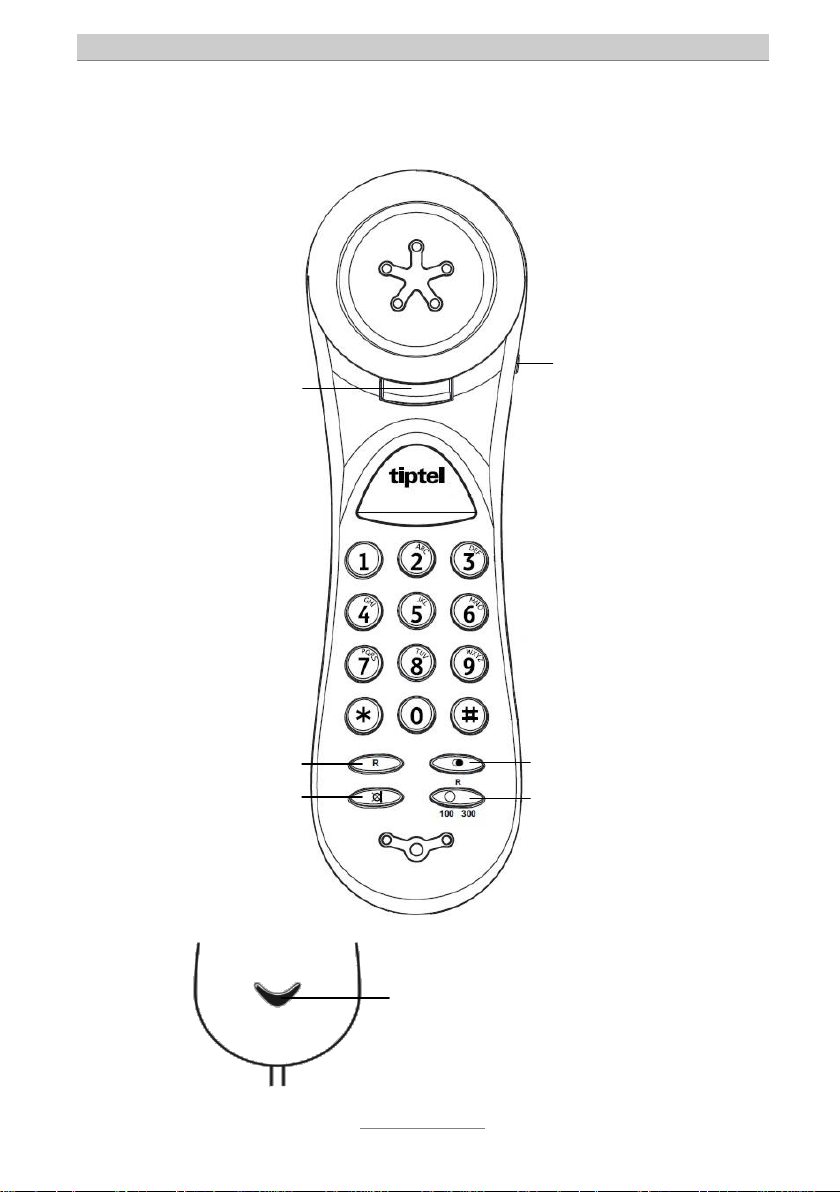
Bedieningselementen
Optische oproepsignalering
Optische weergave bij een
binnenkomende oproep.
Haakcontact
Door het indrukken
van het haakcontact kunt
u eventueel direct
doorgaan met het
volgende gesprek
zonder eerst de hoorn
terug te plaatsen.
Bij wandmontage rust de
hoorn op het haakcontact.
Ruggespraak-toets
Doorverbinden van een
telefoongesprek of
wisselen tussen twee
telefoongesprekken
Mute-toets
Via deze toets schakelt
u de microfoon uit in
de hoorn.
Volume belsignaal
Via deze schakelaar stelt
u het gewenste volume
van het belsignaal in.
Nummerherhaling
Nummerherhaling van
het laatst gekozen
telefoonnummer.
Flash-schakelaar
U kunt hiermee de
Flash-tijd instellen.
Bedieningselementen
4
Page 5
In gebruik nemen
NL
In gebruik nemen
Bellen
1. Neem de hoorn op en wacht tot u de kiestoon hoort.
2. Toets een telefoonnummer in. Het telefoonnummer wordt direct gekozen.
Gesprek beëindigen
1. Plaats de hoorn terug om het gesprek te beëindigen.
Of
Druk het haakcontact in voor een volgend telefoongesprek.
Binnenkomende oproep
1. Wanneer er een oproep binnenkomt, hoort u een belsignaal tevens wordt deze
oproep optisch gesignaleerd.
2. Neem de hoorn op om de oproep aan te nemen.
Nummerherhaling
1. Neem de hoorn op en wacht tot u de kieston hoort.
2. Druk op de nummerherhaling-toets ( )
Het laatst gekozen telefoonnummer wordt nu opnieuw gekozen.
Mute-toets
1. Druk tijdens een gesprek op de mute-toets (
De mircofoon van de hoorn wordt nu uitgeschakeld.
2. Laat de mute-toets (
) weer los om het gesprek voort te zetten.
5
) en houdt de toets ingedrukt.
Page 6

In gebruik nemen
Belsignaal volume
1. Stel de schakelaar aan de zijkant van het toestel in op het door u gewenste volume: hard, zacht of uit.
Wisselgesprek
Let op: Om deze functie te kunnen gebruiken, dient deze dienst door uw net-
werkleverancier te zijn vrijgeschakeld. Hiervoor kunnen kosten in rekening gebracht worden.
Wanneer u een telefoongesprek heeft en een andere persoon probeert u te bellen,
hoort u de aankloptoon voor het wisselgesprek.
1. Druk op de R-toets om het huidige gesprek in de wacht te zetten en de andere
beller te woord te staan.
2. Druk opnieuw op de R-toets om tussen de twee gesprekken te wisselen.
Flashtijd instellen
U kunt de flashtijd instellen op 100 of 300 ms.
1. Schuif de schakelaar naar de gewenste instelling.
Vraag uw netwerkleverancier of telefooncentrale leverancier (indien apparaat wordt
gebruikt in een telefooncentrale) naar de juiste instelling.
6
Page 7

Technische gegevens
NL
Technische gegevens
Hoeveel telefoontoestellen kunt u gebruiken?
Alle telefoontoestellen hebben een belastingsfactor, waarmee wordt bepaald hoeveel
telefoons op een telefoonlijn kunnen worden aangesloten. Uw tiptel 114 heeft een belastingsfactor van 25. De maximum belastingsfactor is afhankelijk van uw aansluiting.
Buitenlijn via centrale
Wanneer u een externe verbinding tot stand wilt brengen, dient u een “0” te kiezen
voor de buitenlijn.
Om de centrale voldoende tijd te geven om een buitenlijn te krijgen kunt u na de toegangscode een kiespauze invoegen.
Een kiespauze duurt 3 seconden.
Pauze invoegen
1. Kies een telefoonnummer en druk op de -toets als een tussentijdse pauze nodig is.
R-toets
De R-toets kan worden gebruikt bij aansluitingen op telefooncentrales, bijvoorbeeld
voor het doorverbinden van een gesprek en bepaalde diensten die via uw netwerkleverancier beschikbaar zijn.
Wandmontage
1. Boor boven elkaar twee gaten in de muur met een onderlinge afstand van
100 mm.
2. Plaats de schroeven. Gebruik hiervoor eventueel pluggen. Laat ongeveer 5 mm
van de schroeven uitsteken waaraan de telefoon kan worden opgehangen.
3. Verwijder de beugel voor de hoorn van het toestel, draai de beugel om en plaats
deze terug. De hoorn kan op de haak worden opgehangen.
7
Page 8

Bijlage
In Nederland
In België
www.tiptel.nl
technischedienst@tiptel.nl
www.tiptel.be
tech@tiptel.be
08.30 tot 17.00 uur (ma-vr)
08.30 – 12.30 en 13.30 – 17.00 (ma-vr)
Telefoon 0900 – BELTIPTEL of
0900 – 23 58 478 (€ 0,50 p/m, max. € 25,00)
Telefax 036 – 53 678 81
Telefoon 0903 / 99333 (1,12 Euro/min)
Telefax 02 714 93 34
Bijlage
Service
U heeft een modern product van TIPTEL gekocht, dat in Ratingen bij Düsseldorf ontwikkeld en geproduceerd is. Onze zeer moderne fabricage garandeert constante kwaliteit. Onze certificering conform DIN EN ISO 9001 bevestigt dit.
Mochten er toch problemen voordoen of heeft u vragen over de bediening van het
toestel, wendt u zich dan a.u.b. tot uw dealer. Deze is in de garantieperiode uw contactpersoon. TIPTEL heeft voor technische ondersteuning van de dealers een telefoonnummer ingesteld, zodat deze u vakkundig kan adviseren.
Wanneer uw dealer u niet verder kan helpen, kunt u zich ook direct tot TIPTEL wenden. Een eerste informatie krijgt u op onze hierna genoemde internetpagina’s in de
rubriek Support onder „FAQ – vaak gestelde vragen“. Bovendien kunt u onze ervaren
medewerkers van de technische ondersteuning ook per e-mail, fax of telefonisch tijdens de aangegeven tijden bereiken.
Met vragen over de telefoonaansluiting dient u zich tot de netwerkleverancier te wenden.
8
Page 9

Bijlage
NL
Garantie
Dit toestel wordt geleverd met een uitgebreide garantie van 12 maanden met uitsluiting van schadevergoeding, wijzigingen of andere eisen. Met betrekking tot deze garantie geven wij gratis vervanging of reparatie van de onderdelen die door productie
of materiaalfouten zijn ontstaan. Voor beschadigingen en storingen die door onjuist
gebruik of transport zijn ontstaan, kunnen wij niet verantwoordelijk worden gesteld. De
storingen of beschadigingen betreffende dit toestel, kunt u melden bij uw dealer. Reparaties kunnen en mogen alleen door de fabrikant worden uitgevoerd. Bij een garantiereparatie is noch voor de vervangen onderdelen noch voor het toestel zelf, sprake
van een verlenging met betrekking tot de garantie. Deze garantie is niet overdraagbaar en vervalt als het toestel wordt doorverkocht. Zij vervalt ook indien reparaties
worden uitgevoerd door derden. Aanvullend zijn hier de algemeen geldende bedrijfsvoorwaarden van TIPTEL van toepassing. Bij schade of storingen dient u het toestel,
via uw dealer, naar ons op te sturen, inclusief een beschrijving van de schade of storing en het aankoopbewijs.
De garantie vervalt wanneer:
de typesticker of de garantiesticker (de garantiezegel op de behuizings-
schroef) verwijderd of beschadigd is;
het geen fabrieksfout is;
de gebruiksaanwijzing niet is geraadpleegd (bedieningsfout)
de aankoopbon niet overlegd kan worden en/of gewijzigd is;
reparaties die door anderen dan Tiptel zijn verricht;
gegevens op de herkomststicker van Tiptel zijn gewijzigd of verwijderd;
het toestel gebruikt wordt in combinatie met apparatuur die niet voldoet aan
de overige wettelijke geldende eisen;
een defect een gevolg is van externe (buiten het toestel gelegen) oorzaken,
bijvoorbeeld blikseminslag, overspanning, wateroverlast of brand.
Schoonmaken
Maak de buitenkant van de behuizing alleen met een zachte, licht bevochtigde doek
of een anti-statische doek schoon. Gebruik geen droge of natte doeken. Gebruik geen
oplos-, poets-, of schuurmiddelen.
9
Page 10

Bijlage
Toestel correct verwijderen
Dit merkteken, dat ook op het toestel staat, duidt erop dat het toestel aan
het einde van zijn gebruiksduur niet met ander huishoudelijk afval verwijderd mag worden. Om mogelijke schade aan het milieu of de menselijke
gezondheid door ongecontroleerde afvalverwijdering te voorkomen, moet
u dit toestel van andere soorten afval scheiden en op een verantwoorde
manier recyclen. Daarmee wordt duurzaam hergebruik van materiaalbronnen bevorderd. Als u het toestel wilt verwijderen, neem dan contact op met het
verkooppunt waar u het toestel hebt gekocht of met de gemeente waar u woont om te
vernemen waar en hoe u dit product milieuvriendelijk kunt laten recyclen. Zakelijke
gebruikers moeten contact opnemen met hun leverancier en de algemene voorwaarden van de koopovereenkomsten nalezen. Vermeng dit product voor verwijdering niet
met ander bedrijfsafval.
Conformiteitsverklaring
Hiermee verklaart TIPTEL, dat het toestel aan alle basiseisen van de Europese richtlijn 1999/5/EG voldoet.
Overige bijzonderheden over de conformiteitsverklaring vindt u onder het volgende
adressen:
http://www.tiptel.nl http://www.tiptel.be
CE-keuring
Dit apparaat voldoet aan de eisen van de EU-richtlijn: richtlijn voor radio en telecommunicatie uitrustingen en de onderlinge erkenning van hun conformiteit. De conformiteit met de hiervoor genoemde richtlijn wordt door de CE-markering op het toestel bevestigd.
10
Page 11

Table des matières
F
Table des matières
Table des matières ................................................................................................ 11
Raccordement ........................................................................................................ 12
Raccordement des câbles au combiné et à la ligne .................................................... 12
Utilisation du téléphone sur un bureau ................................................................... 12
Montage mural ......................................................................................................... 12
Aperçu des fonctions ............................................................................................ 13
Mise en service ...................................................................................................... 14
Appeler .......................................................................................................................... 14
Terminer une communication ....................................................................................... 14
Recevoir un appel ......................................................................................................... 14
Répétition du numéro ................................................................................................... 14
Touche secret ............................................................................................................... 14
Volume de sonnerie ...................................................................................................... 14
Va-et-vient ..................................................................................................................... 15
Réglage de la durée du Flash ...................................................................................... 15
Données techniques ............................................................................................. 16
Combien de téléphones pouvez-vous utiliser? ............................................................ 16
Compatibilité avec les centraux téléphoniques ........................................................... 16
Code d’accès pour ligne externe via un central téléphonique .................................... 16
Introduire une pause ..................................................................................................... 16
VA-ET-VIENT ................................................................................................................ 16
Montage mural .............................................................................................................. 17
Garantie ................................................................................................................... 17
Déclaration de conformité ............................................................................................ 18
Marque CE .................................................................................................................... 18
Service .......................................................................................................................... 19
11
Page 12

Raccordement
Raccordement
Raccordement des câbles au combiné et à la ligne
1. Introduisez l’une des extrémités du cordon spiralé dans le combiné téléphonique
et l’autre extrémité dans la prise correspondante sous le téléphone.
2. Connectez le câble de raccordement avec la petite fiche dans la prise “LINE” se
trouvant sous le téléphone et l’autre côté dans votre prise téléphonique murale.
Utilisation du téléphone sur un bureau
Glissez le câble de raccordement vers l’arrière du téléphone dans la rainure prévue à
cet effet.
Montage mural
Voir page 17 du manuel.
12
Page 13

Aperçu des fonctiones
Signal d’appel visuel
Clignote rouge en cas d’appel.
Contact combiné
En appuyant sur ce
contact, vous pouvez
directement former un
autre numéro sans
devoir reposer le combiné
dans son logement.
Pour le montage mural,
reposez le combiné sur
le contact
Va-et-vient/Recall
Lorsque vous entendez
un signal d’attention
pour un deuxième appel
entrant, appuyez sur cette
touche pour être en
communication avec le
deuxième correspondant.
Utilisez la fonction
Recall pour certaines
fonctions Belgacom
ainsi que pour l’utilisation
derrière un central
téléphonique.
Touche secret
En enfonçant cette
touche, vous pouvez
mener une conversation
avec une autre
personne sans que votre
interlocuteur ne vous
entende. Vous pouvez
cependant entendre
votre interlocuteur.
Réglage du volume
de sonnerie
Via cette touche, vous
pouvez régler le volume
de sonnerie souhaité :
fort, faible ou désactivé.
Répétition du numéro
Répétition du dernier numéro
composé
Touche Flash
Vous pouvez ici régler la durée
du flash
Aperçu des fonctions
Page 14

Mise en service
F
Mise en service
Appeler
1. Décrochez le combiné et attendez la tonalité de composition.
2. Composez un numéro de téléphone. Le numéro est formé.
Terminer une communication
1. Replacez le combiné dans son logement pour terminer une communication.
OU
Appuyez sur le contact combiné avant d’établir une nouvelle communication.
Recevoir un appel
1. Lorsqu’un appel entre, vous entendez le signal de sonnerie et le voyant lumineux
s’allume.
2. Décrochez le combiné pour prendre la communication.
Répétition du numéro
1. Appuyez sur la touche ( )
Le dernier numéro formé est recomposé.
Touche secret
1. Pendant une conversation téléphonique appuyez sur cette touche (
tenez-la enfoncée.
Votre correspondant ne vous entend plus.
2. Relâchez la touche ( ) pour reprendre la conversation.
) et main-
Volume de sonnerie
1. Positionnez le contact sur le niveau de volume souhaité: fort, faible ou désactivé.
14
Page 15

Mise en service
F
Va-et-vient
Attention: Pour utiliser cette fonction, il faut que le service soit disponible chez
votre opérateur. Ce service est payant.
Lorsque vous êtes en communication et qu’une autre personne essaye de vous join-
dre, vous entendez un signal d’attention pour effectuer le va-et-vient.
1. Appuyez sur la touche (R) pour mettre la première communication en attente et
prendre la seconde.
2. Appuyez à nouveau sur la touche (R) pour passer d’un interlocuteur à l’autre.
Réglage de la durée du Flash
Vous pouvez régler la durée du flash sur 100 ou 300 ms.
1. Commutez le bouton switch du flash sur la durée désirée.
Pour connaître la durée appropriée, consultez votre opérateur ou votre installateur
(dans le cas où l’appareil est connecté derrière un central téléphonique)
15
Page 16

Données techniques
Données techniques
Combien de téléphones pouvez-vous utiliser?
Tous les appareils téléphoniques ont un code REN (Ringer Equivalence Number) qui
limite le nombre de téléphones pouvant être raccordés sur une ligne téléphonique.
Votre tiptel 114 a un code REN 1. Le nombre maximum pour le REN est 4. Lorsque le
nombre maximum de 4 REN est dépassé, le téléphone est susceptible de ne plus
sonner. Il n’y a pas de garantie de sonnerie pour d’autres types de téléphones, même si le REN est inférieur à 4.
Compatibilité avec les centraux téléphoniques
Ce produit est destiné pour l’utilisation à l’intérieur de l’UE sur le réseau téléphonique
publique et derrière des centraux adaptés qui supportent le mode DTMF et TBR (timed break recall). Si vous avez un doute, nous vous conseillons de prendre contact
avec votre fournisseur réseau.
Code d’accès pour ligne externe via un central
téléphonique
Lorsque vous voulez établir une communication vers l’extérieur, vous devez former le
“0”.
Lorsque vous appelez un serveur vocal, comme par exemple un système bancaire
automatisé, il est nécessaire d’introduire une pause.
Une pause dure 3 secondes.
Introduire une pause
1. Formez le numéro et appuyez sur la touche ( ) si une pause est nécessaire.
VA-ET-VIENT
La touche (R) est utilisée lorsque l’appareil est raccordé sur certains centraux, par
exemple pour le transfert d’appel et certaines fonctions téléphoniques de Belgacom à
conditions que celles-ci soient activées chez l’opérateur..
16
Page 17

Garantie
F
Montage mural
1. Percez deux trous dans le mur, l’un au-dessus de l’autre à une distance de
100 mm.
2. Placez les chevilles puis insérez les vis en les laissant dépasser d’environ 5 mm,
de sorte que le téléphone puisse y être accroché.
3. Retirez la petite pièce amovible sous le combiné, tournez-la et remettez-la. A
présent le combiné peut être accroché sur téléphone en position murale.
Garantie
Le revendeur ou installateur auprès duquel vous avez fait l’acquisition de ce produit
est votre interlocuteur privilégié pour tout ce qui concerne la garantie.
Ce terminal de télécommunication dispose d’une garantie pièces et main d’oeuvre
d’une durée de 24 mois à compter de la date de facturation.
En cas de défaut de fabrication ou pièce manquante sur le produit, l’acheteur peut
exiger uniquement le remplacement de la pièce défectueuse ou le remplacement du
produit. Les appareils ou pièces échangés deviennent la propriété du revendeur ou
installateur spécialisé. Si le remplacement de la pièce ou du produit n’est pas possible, l’acheteur pourra dans ce cas uniquement exiger une réduction du prix d’achat
ou résilier son contrat.
L’acheteur doit notifier le distributeur spécialisé ou l’installateur directement de tout
défaut constaté. La preuve du droit aux prestations de garantie doit être produite par
des documents d’achat usuels (une quittance ou une facture).
Le droit aux prestations de garantie expire en cas d’ intervention sur l’appareil effec-
tuée par l’acheteur ou par une tierce personne non autorisée. La garantie ne couvre
pas les dommages dus à une utilisation, opération ou stockage non appropriés, ni les
dommages occasionnés suite à des cas de force majeure ou autres influences extérieures.
La garantie ne concerne pas les consommables (ex: batteries), ni les défauts mineurs
qui affectent seulement d’un façon minime la valeur ou le fonctionnement du produit.
Les dégâts occasionnés pendant le transport du produit ne sont pas couverts par la
garantie. Les réclamations relatives aux dégâts survenus pendant le transport doivent
être adressés à l’entreprise de transport.
Informations portant sur le règlement:
17
Page 18

Garantie
Les réparations éventuelles ne doivent être effectuées que par le service technique
de Tiptel. Une réparation sous garantie n’entraîne en aucun cas la prolongation de la
garantie des pièces échangées ou du produit lui-même. Cette garantie n’est pas
transmissible et ne peut pas être assumée par un nouveau propriétaire. Toute intervention effectuée par un personnel non qualifié rendra caduque la garantie. De
même, cette garantie s’éteindra systématiquement si l’identification du produit est
rendue impossible par la détérioration ou la disparition du numéro de série. Le produit
est pourvu d’un sceau de garantie. Veillez à ne pas le détériorer afin de pouvoir bénéficier de la garantie.
Par ailleurs sont également applicables les conditions générales de vente de la société Tiptel, qui sont une partie intégrante du contrat pour votre installateur. En cas de
réclamation, le produit défectueux doit être renvoyé à votre installateur avec une description détaillée du défaut et la preuve d’achat. En cas de besoin, voici les coordonnées postales de la société Tiptel dans les différents pays :
en France en Belgique en Suisse
Tiptel sarl Tiptel NV/SA Tiptel AG
Service Service Service
23, avenue René Duguay-Trouin Leuvensesteenweg 510 bus 4 Bahnstrasse 46
78960 Voisins-le-Bretonneux 1930 Zaventem 8105 Regensdorf
En cas de réparation sous garantie, les frais de transport pour le retour du produit
chez le client seront pris en charge par Tiptel.
Déclaration de conformité
Par la présente, TIPTEL déclare que le produit répond à toutes les exigences fondamentales de la directive européenne 1999/5/EG.
Pour plus d’informations sur la déclaration de conformité, consultez l’adresse internet
suivante: www.tiptel.net
Marque CE
Cet appareil satisfait aux exigences de la directive européenne relative aux équipe-
ments radio et aux équipements terminaux de télécommunications, ainsi qu’aux lois
par lesquelles elle est transposée dans les différentes législations nationales. La conformité à cette directive est confirmée par la présence sur l’appareil de la marque CE.
18
Page 19

Garantie
F
en France
en Belgique
en Suisse
www.tiptel.fr
www.tiptel.be
www.tiptel-online.ch
support@tiptel.fr
support@tiptel.be
service@tiptel-online.ch
9–17 h 30 (lun–je), 9-17 (ve)
8 h 30 – 17 h (lun–ve)
8–17 h (lun–vend)
Tél: 01.39.44.63.30
Tél: 0903-99 333 (1,12 EUR/min)
Tél: 01 / 843 13 13
Fax: 01.30.57.00.29
Fax: 02-714.93.44
Fax 01 / 884 01 84
Service
En cas de problèmes ou si vous avez des questions concernant l’utilisation de votre
produit, nous vous prions de vous adresser à votre installateur qui est votre interlocuteur privilégié pendant la durée de la garantie. La société TIPTEL assure un support technique à votre installateur pour qu’il soit en mesure de vous donner –
de manière qualifiée – tous les conseils et renseignements souhaités.
Pour toutes questions concernant votre raccordement téléphonique, veuillez contacter
votre opérateur.
19
Page 20

Table of contents
Table of contents
Table of contents ................................................................................................... 20
Getting started ....................................................................................................... 21
Connecting the handset and line cords ....................................................................... 21
To use the phone on a desk ................................................................................... 21
To wall mount your phone ....................................................................................... 21
Getting to know your phone ................................................................................ 22
Using the phone ..................................................................................................... 23
Make a call .................................................................................................................... 23
End a call ...................................................................................................................... 23
Receive a call ................................................................................................................ 23
Redial ............................................................................................................................ 23
Secrecy ......................................................................................................................... 23
Ringer volume ............................................................................................................... 23
Call Waiting ................................................................................................................... 24
Setting the flash time .................................................................................................... 24
Technical information ........................................................................................... 25
Switchboard external line access code ........................................................................ 25
To insert a pause .......................................................................................................... 25
Recall ............................................................................................................................ 25
Wall mounting your phone ............................................................................................ 25
Annex....................................................................................................................... 26
Service .......................................................................................................................... 26
Guarantee ..................................................................................................................... 26
Maintenance / Cleaning ................................................................................................ 27
CE Sign ......................................................................................................................... 27
20
Page 21

Getting started
UK
Getting started
Connecting the handset and line cords
1. Plug one end of the handset cord into the handset socket and the other end into
the socket at the end of the base.
2. Plug the telephone line cord into the socket on the bottom of the base. Plug the
other end into the telephone wall socket.
To use the phone on a desk
Thread the telephone line cord through the groove toward the back of the base.
To wall mount your phone
Refer to page 25 of this guide.
21
Page 22

Getting to know your phone
LED
Blinks red when you are receiving
a call.
Hook switch
Press to make another call
without replacing the
handset.
If the phone is mounted on
the wall the handset rests
securely on the base.
Call Waiting*/Recall
When you hear the call
waiting beep, press to
accept the waiting call.
Mute
Press and hold
to mute the line.
Ringer High/Low/Off switch
With this key you can select
the preferred ringer volume.
Redial
Press to redial the last
dialled number.
Flash-switch
You can adjust the flash time
using this switch.
* To use this feature you must
subscribe to a Call Waiting service
from your network provider
Getting to know your phone
22
Page 23

Using the phone
UK
Using the phone
Make a call
1. Lift the handset and wait for the dial tone.
2. Enter the telephone number and it will be dialled.
End a call
1. Replace the handset to end a call.
Or
Press the hook switch to make a follow on call.
Receive a call
1. When you receive a call, the phone will ring and the red Calls light will flash.
2. Pick up the handset to answer the call.
Redial
1. Press ( ). The last number called is automatically redialled.
Secrecy
1. During a call ,press and hold (
Your caller cannot hear you now.
2. Release ( ) to resume your call.
).
Ringer volume
1. Adjust the switch to your preferred volume, High, Low or Off (if you do not want
to be disturbed).
23
Page 24

Using the phone
Call Waiting
Please note: To use this feature you must subscribe to a Call Waiting service
from your network provider.
When you are on a call and another caller is trying to get through, the Call Waiting
beep will sound to alert you.
1. Press (R) to put your current call on hold and accept the waiting call.
2. Press (R) again to alternate between the two calls.
Setting the flash time
You can set the flash time at 100 or 300 ms.
1. Slide the flash switch on the handset to the desired setting.
Please, ask your network provider or PBX installer (in case this device is used
behind a PBX) for the appropriate setting
24
Page 25

Technical information
UK
Technical information
Switchboard external line access code
You may need to enter an access code (e.g. 0) in order to get an outside line.
So that the switchboard has time to pick up an outside line, you may also need to add
a pause after the access code.
A Pause lasts 3.6 seconds.
To insert a pause
1. Begin dialling a number and press ( ) where a pause is required.
Recall
The button (R) is used when connected to certain switchboards, e.g. to transfer calls,
and for some Calling Features or those services available via your network provider.
Wall mounting your phone
1. Drill two holes in the wall 100mm vertically apart.
2. Insert the screws using wall plugs. Leave approx. 5mm of the screw head protruding from the wall to hold the base securely in place.
3. Slide out the handset hook on the base, rotate it 180° and replace it. The handset will rest on the hook when wall mounted.
25
Page 26

Annex
Annex
Service
You have purchased a modern product of TIPTEL AG, which was designed and
manufactured in Ratingen near Düsseldorf. Our high-tech manufacturing facilities
“Made in Germany” grant a continuous level of the highest quality. This is even underlined by our certification according to DIN EN ISO 9001. If, however, problems occur
or you have questions on operating the device, please contact your local dealer.
Guarantee
Please contact your local dealer or importer for details of guarantee for non EC countries. Within the European Community the following guarantee regulation applies:
Your contact for services arising from guarantee obligations is the authorised dealer
where you bought the device. TIPTEL AG will grant a guarantee of 2 years from the
date of handover for the material and for the manufacturing of the telecommunications
terminal unit. Initially, the purchaser shall have only the right of subsequent performance. Subsequent performance entails either repair or the supply of an alternative
product. Exchanged devices or parts shall become the property of the authorised
dealer. If the subsequent performance fails, the purchaser can either demand a reduction in the purchase price or withdraw from the contract. The purchaser shall notify
the dealer immediately of any defects found. Proof of the guarantee entitlement shall
be furnished by standard proof of purchase (receipt or invoice).
The guarantee entitlement shall expire if the purchaser or an unauthorised third party
interferes with the device. Damage caused by inappropriate handling, operation, storage or by force majeure or other external influences shall not be covered by the guarantee. The guarantee shall not cover any consumable material (e.g. batteries) or defects that only slightly impair the value or the usability of the device.
Claims for damage caused by transport shall be asserted to the delivery company.
Notes on settlement:
Repairs can only be conducted by the TIPTEL Service. A warranty repair does not
prolong the warranty period – neither for the replaced parts nor for the device. This
guarantee is not transferable and shall expire if the device is sold on to another party.
It shall also expire if the device is interfered with by third parties or if the serial number
on the device has been removed or made illegible.
26
Page 27

Annex
UK
The General Terms and Conditions of TIPTEL AG, which are part of the contract for a
dealer, shall also apply. In the event of a complaint, the defective product shall be
sent to the relevant TIPTEL subsidiary, the importer or dealer along with a description
of the defect and the proof of purchase.
Maintenance / Cleaning
The telephone is maintenance-free. Clean the housing surface only with a soft,
slightly moist cloth or an antistatic cloth. Never use a dry cloth (electrostatic charge
can lead to defects of the electronic). Do not use any chemicals, cleaning
products or abrasives.
CE Sign
This device is approved for the connection and use within the analogue public telephone networks in all EC countries – according to the European Requirements. Due
to technical deviations in individual countries, we cannot grant an unlimited guarantee
for the successful operation at all types of telephone accesses.
TIPTEL AG hereby declares that the device complies with all fundamental requirements of the European directive 1999/5/EC. This conformity is confirmed by the CE
sign on the device.
Further details on the declaration of conformity can be found under the following
internet address:
http://www.tiptel.com
27
Page 28

Halskestraße 1
D - 40880 Ratingen
Tel.: 0 18 05 – 84 78 35 (0,12 € pro Minute)
Vanity Tel.: 0 18 05 – TIPTEL (0,12 € pro Minute)
Fax: 0 18 05 – 84 78 49*
E-mail: support@tiptel.de
Internet: www.tiptel.de
International:
E-mail: export@tiptel.de
Internet: www.tiptel.com
Tenschertstraße 5
A - 1230 Wien
Tel.: 01 - 616 78 71
Fax: 01 - 616 78 71 - 22
E-mail: office@tiptel.at
Bahnstrasse 46
CH - 8105 Regensdorf
Tel.: 044 - 884 01 80
Fax: 044 - 843 13 23
E-mail: tiptel@tiptel-online.ch
Internet: www.tiptel-online.ch
Camerastraat 2
NL – 1322 BC Almere
Telefoon: 0900 – BELTIPTEL of
0900 – 2358478 (€ 0,50 p/m, max. € 25,00)
Fax: 036 – 53 678 81
E-mail: info@tiptel.nl
Internet: www.tiptel.nl
Leuvensesteenweg 510 bus 4
B – 1930 Zaventem
Telefoon: 0903 99 333 (1,12 Euro / min.)
Fax: 02 714 93 34
E-mail: tech@tiptel.be
Internet: www.tiptel.be
23, avenue René Duguay-Trouin
F – 78960 Voisins-Le-Bretonneux
Tél. : 01 / 39 44 63 30
Fax : 01 / 30 57 00 29
e-mail : support@tiptel.fr
Internet : www.tiptel.fr 04/2009
 Loading...