

Page 1
Operating instructions (en)
Easy-to-use telephone with hands-free
function, message waiting indicator and
headset connector
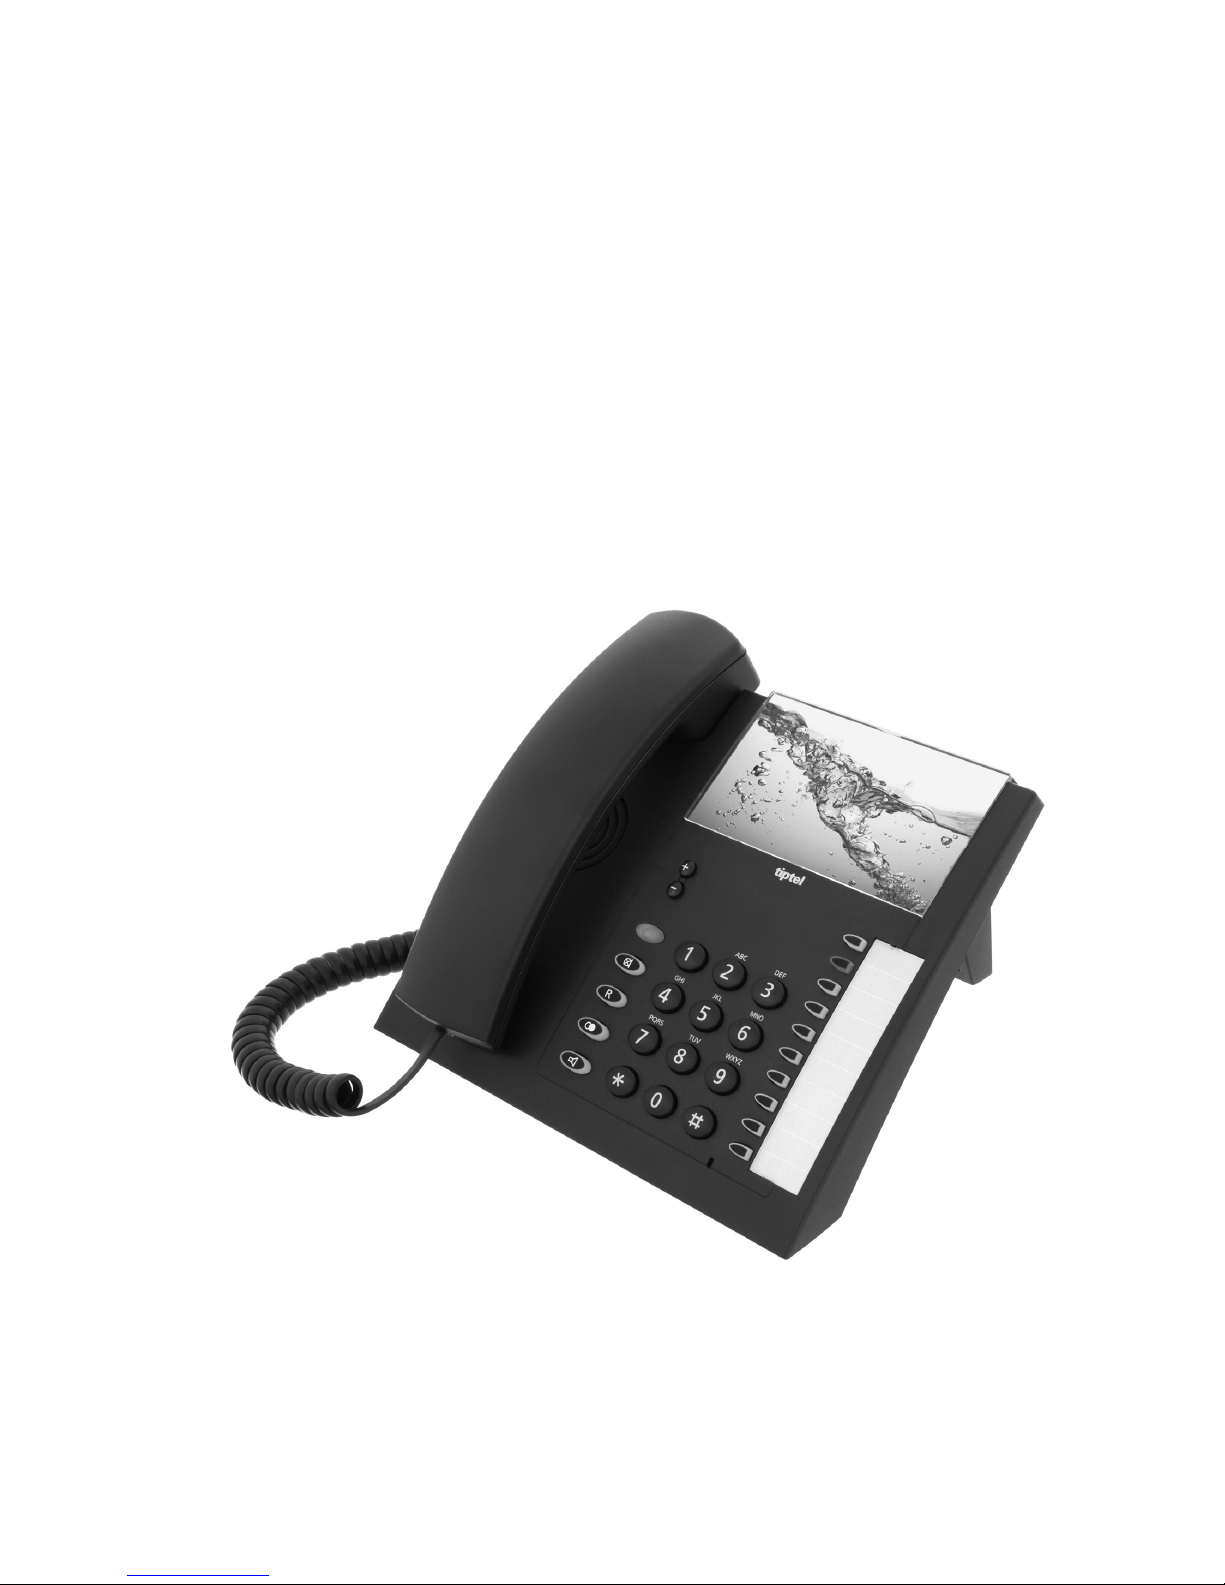
tiptel 1010
tiptel
Page 2

Page 3

Contents
Contents
Contents .......................................................................................................... 3
Safety notices .................................................................................................. 5
Assignment of buttons .................................................................................... 6
Controls ........................................................................................................... 7
Getting started ................................................................................................. 8
Deliverables................................................................................................. 8
Fitting the stand .......................................................................................... 8
Underlay ...................................................................................................... 8
Wall bracket ................................................................................................ 9
Connecting .................................................................................................. 10
MWI switch .................................................................................................. 11
Telephone functions / making calls ............................................................... 12
Making calls ................................................................................................ 12
Hands-free mode ........................................................................................ 12
Transferring calls / flash (R button) ............................................................ 13
Direct dial buttons ........................................................................................... 14
General ........................................................................................................ 14
Programming a direct dial button ............................................................... 14
Dialling with a direct dial button ................................................................. 15
Settings ............................................................................................................ 16
Outside line ................................................................................................. 16
Flash (R button) .......................................................................................... 16
Ring tones ................................................................................................... 17
Call volume ................................................................................................. 17
Setting the volume ...................................................................................... 18
Message waiting indicator (MWI) ................................................................... 19
FSK message waiting indicator .................................................................. 19
MWI with polarity change of the telephone line voltage ............................ 19
MWI using high voltage .............................................................................. 19
MWI with special ring tone .......................................................................... 20
Page 4

Contents
Appendix .......................................................................................................... 21
Service ........................................................................................................ 21
Guarantee ................................................................................................... 21
CE sign ........................................................................................................ 22
Ecological information ................................................................................ 22
Troubleshooting .......................................................................................... 23
Default settings ........................................................................................... 24
Technical specifications .............................................................................. 24
Notes for admins ......................................................................................... 25
Index ................................................................................................................ 26
Page 5

Safety notices
5
Safety notices
Please observe the following very closely when setting up, connecting and using
the telephone:
Only plug the connection cables into sockets designated for this use.
Lay the connection cables such that they do not pose any risk of accidents.
Connected cables must not be subjected to excessive mechanical stress.
Set up the device away from electrical interference.
Only connect accessories that are permitted for this device.
Never open up the device yourself. Do not use sharp or metallic objects to touch
the plug contacts.
Only use a soft, damp cloth to clean the device. Do not use chemicals or abra-
sive cleaners.
Protect the device from damp, dust, liquids and vapours.
Do not expose the device to direct sunlight.
Do not use the device in potentially explosive atmospheres.
Only use the original telephone connector cable.
Page 6
Assignment of buttons
6
Assignment of buttons
Plus/Minus: Changes the volume. The ring tone volume changes when an
incoming call is being indicated. The receiver volume changes during a
t
elephone call. They are used to insert a pause when a telephone number is
being entered. Are used for entering in Settings.
…
Digits: Are used to enter numbers and to dial telephone numbers.
Direct dial button: Here telephone numbers can be stored as direct
destinations.
3 secs
Pressing the direct dial button for three seconds enables you to enter a
t
elephone number.
Mute button: Switches the microphone off during a telephone call.
3 secs
Pressing the Mute button for three seconds enables you to enter an
outside line prefix.
R button: Is used for transferring calls within a telephone system. Initiates
special functions in many networks.
3 secs
Pressing the R button for three seconds enables the flash length to be set.
Redial: Starts redialling the telephone number last dialled.
3 secs
Pressing the Redial button for three seconds enables the ring tones to be
set.
Loudspeaker: Enables/disables the line with the hands-free function/headset
(
connector). Switches to loudspeaker mode during a conversation using
t
he receiver.
3 secs
Pressing the Loudspeaker button for three seconds enables the call
volume to be set.
6 secs
Pressing the 1 button for six seconds enables the times to be set for the
message waiting indicator using a special ring tone.
Page 7
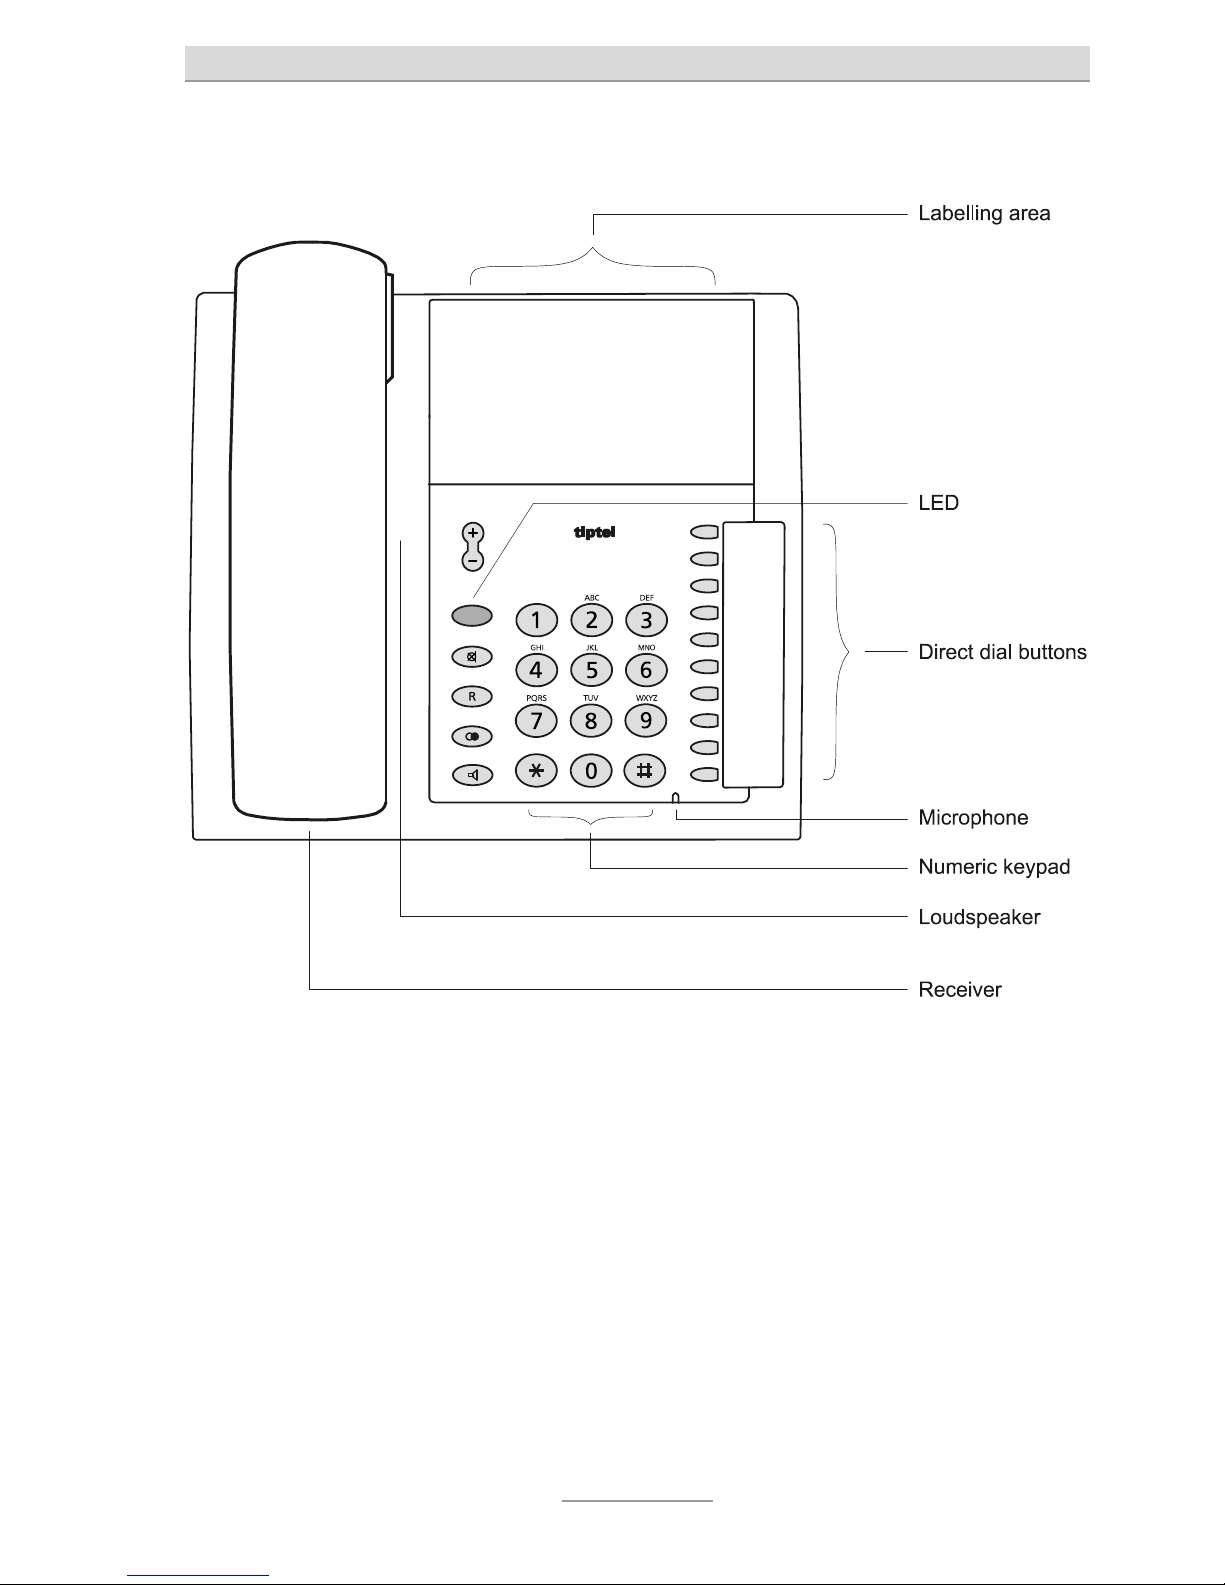
Controls
7
Controls
The panel provided can be used for photos or advertising graphics. Its size is
109 x 63 mm.
Page 8

Getting started
8
Getting started
Deliverables
Included with your telephone:
Telephone including receiver
Spiral cable (receiver cord)
Stand
Telephone connector cable
Operating instructions
Fitting the stand
To use the device as a table-top telephone, fit the stand supplied (as shown). The
stand has three positions, enabling the telephone to lie at different angles. Ensure
the stand audibly clicks into place.
Underlay
Your telephone has been designed for use under normal conditions. Solvents in
furniture lacquers, wood oils and paint preservatives may corrode the device feet,
resulting in potential staining of furniture.
Therefore always use a non-slip underlay, especially with new or recently treated
furniture.
Page 9
Getting started
9
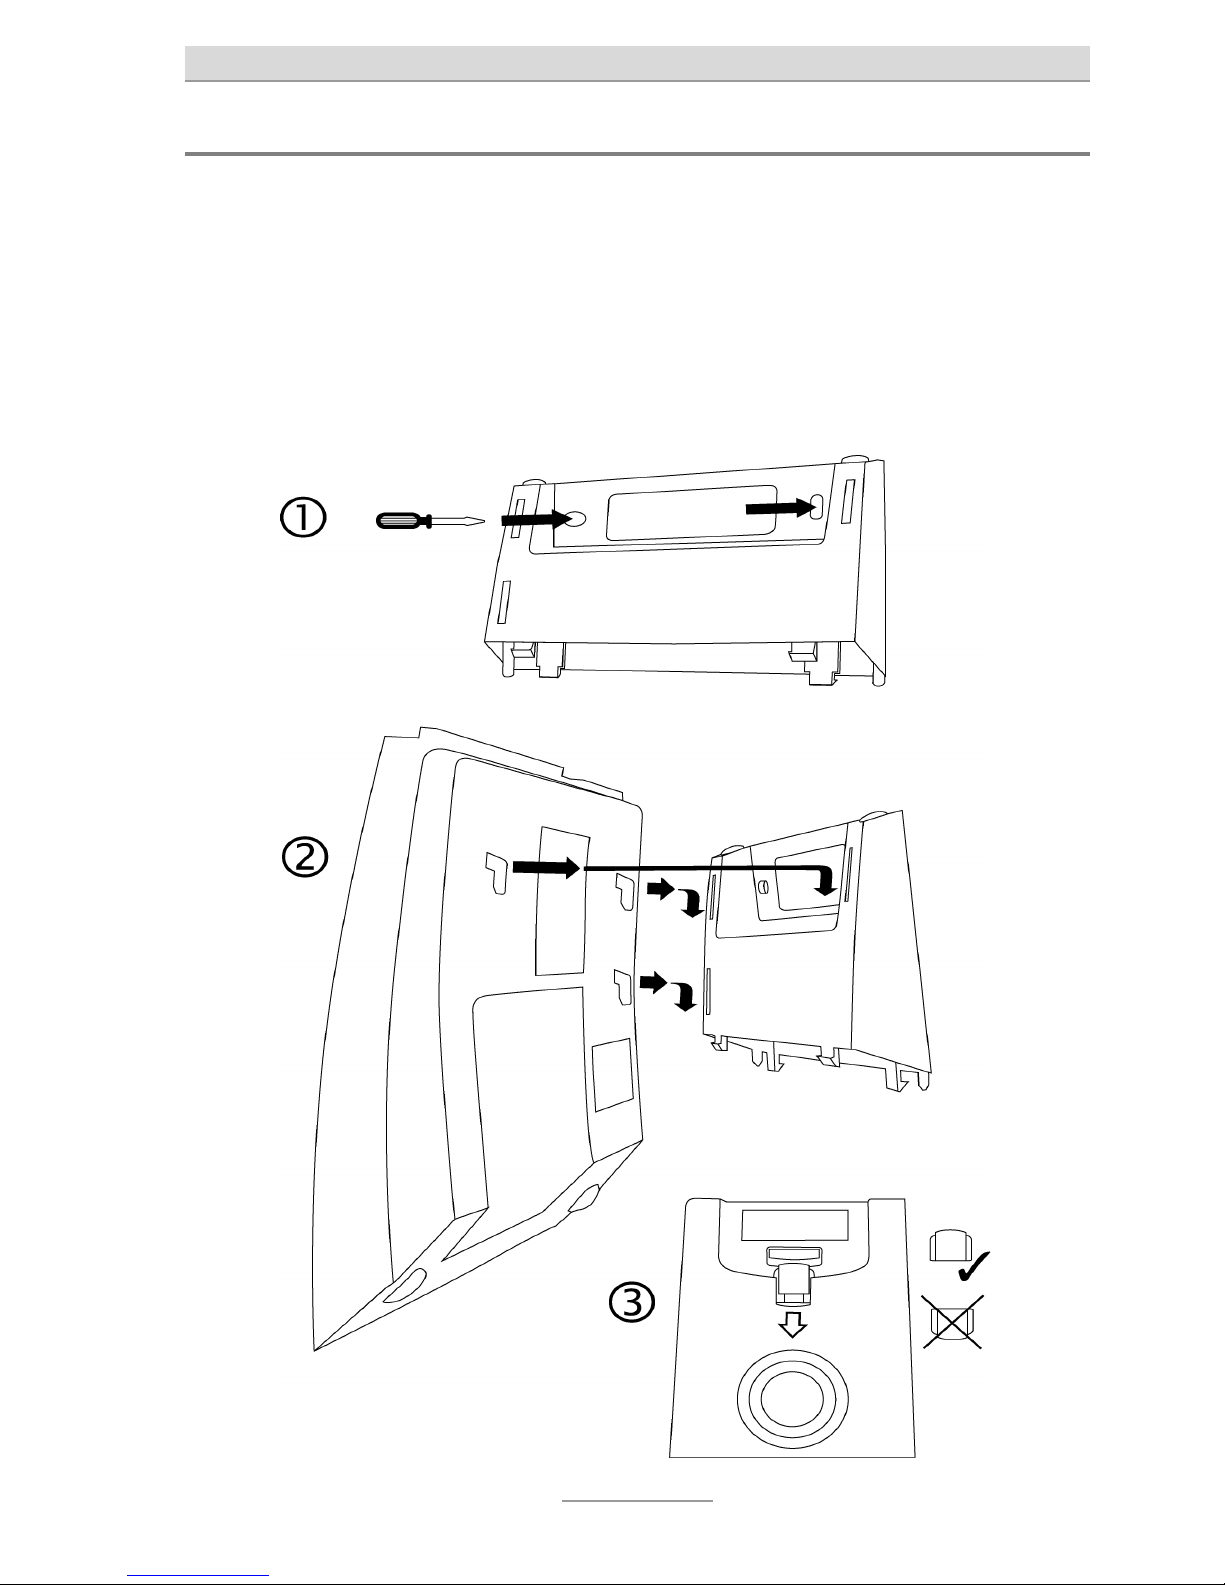
Wall bracket
For wall installation, secure the stand to the wall using the two screws (as shown in
Fig. 1).
Then attach the telephone unit to the stand (Fig. 2).
Pull out the plastic piece in the receiver holder, and put it back in rotated by 180
degrees (Fig. 3).
Page 10

Getting started
10
Connecting
All of the necessary cables must be plugged in before you can start using your telephone.
1 Plug the long end of the spiral cable into the jack with the receiver symbol and
the short end into the telephone receiver.
2 Plug the telephone connector cable with the small connector into the "LINE"
jack and the TAE connector into the telephone socket (slot F).
3 If you wish to use a headset (accessory), simply plug the connector into the
correct socket
.
LINE
PR1
PR2HVSR
MWI switch
Telephone connection
Headset
Receiver
In Austria, slot F corresponds to symbol and slot N to symbol . Use
the TST adaptor supplied instead of the TAE cable.
In Switzerland, a T+T83 A12 socket should be used (into which the T+T connector cable supplied is inserted). Use an A6 to A12 adapter if required.
Page 11

Getting started
11
MWI switch
The MWI switch is used to switch between the different Message Waiting Indicators
of a telecommunication system (see also Page 19, "Message waiting indicator").
The switch must be in position SR when using the phone on a public line.
SR: MWI is enabled with a special ring tone
HV: MWI is enabled with line voltages greater than 70V
PR1: MWI is enabled via the line polarity
PR2: As PR1 but with reversed polarity
Page 12

Telephone functions / making calls
12
Telephone functions / making calls
Making calls
Pick up the receiver and wait for the
dial tone.
…
Use the numeric keypad to enter the
required number.
The numbers pressed are dialled.
To redial the number last dialled,
press Redial.
The number last dialled is dialled.
To enable/disable the loudspeaker,
press Loudspeaker.
The loudspeaker is enabled and others
present can listen in on the conversation.
To enable/disable the microphone,
press the Mute button.
The microphone is disabled, the Mute
button lights up.
Simply put down the receiver to end
a call.
The line is disconnected.
Hands-free mode
Instead of using the telephone receiver, you can establish a connection or receive a
call using hands-free mode.
Press Loudspeaker (same as picking up the receiver).
The Loudspeaker button lights up. You
can hear the dial tone and make your
call.
To switch from hands-free to receiver, simply pick up the receiver.
Y
ou can then continue your conversation
with the receiver.
Keep
pressed
To switch from receiver to handsfree, keep Loudspeaker pressed
and put down the receiver.
Y
ou can then continue your conversation
in hands-free mode.
Page 13

Telephone functions / making calls
13
To end the call, press Loudspeaker
again (same as putting down the
receiver).
The line is disconnected.
When the headset is plugged into the connector, the hands-free function is
not available. Instead the headset is used for the conversation.
Transferring calls / flash (R button)
On most telephone systems, the R button can be used to transfer calls. Refer to the
operating instructions for your system or ask your system administrator.
Accept call, e.g. with the telephone
receiver.
Y
ou can speak to the person at the other
end and say the call is being transferred.
Press the R button.
…
Use the numeric keypad to enter the
required call recipient.
The connection is established.
If the line is busy, you can reconnect to the caller by pressing the R
button.
The R button must be pressed twice on
many telephone systems.
Tell the caller the call is being transferred or simply put down the receiver.
The call is transferred.
This process can vary depending on telephone system. For many functions
initiated with a flash (R button), setting the flash from short to long may also
be required (see also Page 16, "Settings").
Page 14

Direct dial buttons
14
Direct dial buttons
General
Your telephone has ten lit direct dial buttons that can be programmed individually.
The telephone number should always start with the area code (prefix) so that the
appropriate button lights up when an incoming telephone number matches the
number stored.
Programming a direct dial button
3 secs
Press and hold down the required
direct dial button for three seconds.
The button starts to flash and the telephone is in Enter mode.
…
Use the numeric keypad to enter the
t
elephone number.
Use the Plus/Minus buttons to insert a pause of three seconds dura-
t
ion.
A flash can be entered with the R
button.
Press OK to confirm your input.
The button stops flashing and the number is stored.
Pick up the receiver to exit Enter
mode.
The button stops flashing and the number is not stored.
To clear a direct dial button, simply save without entering a telephone num-
ber.
Page 15

Direct dial buttons
15
Dialling with a direct dial button
Press the direct dial button required.
The loudspeaker is enabled and the connection is established. The loudspeaker
can be used for the conversation.
or
Pick up the receiver first.
Then press the direct dial button required.
The connection is established and you
use the receiver for the conversation.
Page 16

Settings
16
Settings
Outside line
Enter your outside line prefix for the public telephone network (e.g. 0). Your telephone then automatically inserts a pause after this prefix to prevent incorrect dial-
ling.
3 secs
With the receiver down, hold down
t
he Mute button for three seconds.
The LED starts to flash.
…
Use the numeric keypad to enter the
outside line prefix.
To save the entry, press the Mute
button again.
The LED stops flashing and the number
is stored.
Pick up the receiver to exit Enter
mode.
The LED stops flashing and the number
is not stored.
To clear the outside line prefix, simply save without entering a number.
Flash (R button)
Select between a short or a long flash. The short flash (approx. 100ms) is usually
used in telecommunication systems to initiate functions. In contrast, the long flash
(approx. 240ms) is used by Deutsche Telekom.
3 secs
With the receiver down, hold down
t
he R button for three seconds.
The LED starts to flash.
Press Plus to enter a long flash and
Minus to enter a short flash.
To save the setting,
press the R button again.
The LED stops flashing and the setting is
stored.
Pick up the receiver to exit the set-
t
ing.
The LED stops flashing and the set-
t
ing is not stored.
Page 17

Settings
17
Ring tones
Choose here one of the sixteen possible ring tones.
3 secs
With the receiver down, hold down
t
he Redial button for three seconds.
The LED starts to flash. The current ring
t
one is played.
Use the Plus/Minus buttons to select one of the 16 ring tones.
To save the setting,
press Redial again.
The LED stops flashing and the setting is
stored.
Pick up the receiver to exit the set-
t
ing.
The LED stops flashing and the setting is
not stored.
Call volume
Set the required call volume. Eight levels are available.
3 secs
With the receiver down, hold down
t
he Loudspeaker button for three
seconds.
The LED starts to flash. The ring tone
currently set is played at the volume currently set.
Use the Plus/Minus buttons to select one of the 8 levels.
To save the setting,
press Redial again.
The LED stops flashing and the setting is
stored.
Pick up the receiver to exit the set-
t
ing.
The LED stops flashing and the setting is
not stored.
Page 18

Settings
18
Setting the volume
The volume can be set when the loudspeaker is enabled. With the receiver picked
up, the receiver volume changes, when an incoming call is being indicated, the volume of the call tone melody changes.
Adjust the volume with the
Plus/Minus buttons.
Page 19

Message waiting indicator (MWI)
19
Message waiting indicator (MWI)
Your telephone supports different types of message waiting indicator. Apart from
FSK (Frequency Shift Keying), the type depends on the MWI switch setting on the
rear of the unit. Information on the MWI type used is available from your system
administrator or network provider.
FSK message waiting indicator
A special, coded signal of the CLIP ID is used to show waiting messages, and is interpreted irrespective of the position of the telephone's MWI switch.
When your network provider or telecommunication system sends an MWI signal,
the LED starts to flash.
To disable the MWI, the relevant signal must be sent by the network provider or telecommunication system.
MWI with polarity change of the telephone line voltage
When the switch is set to PR1 (Polarity Reversal) or PR2, the LED lights up when
the polarity of the telephone line voltage changes. If the LED lights up when it
shouldn't, switch from PR1 to PR2 or vice versa.
To disable the MWI, the telecommunication system must switch the telephone line
voltage back to the original polarity.
MWI using high voltage
When the switch is set to HV (High Voltage), the LED lights when the telephone line
voltage exceeds approx. 70V.
To disable the MWI, the telecommunication system must change the telephone line
voltage back to the original value.
Page 20

Message waiting indicator (MWI)
20
MWI with special ring tone
When the switch is set to SR (Special Ring), the LED flashes when the telecommunication system sends a special ring tone. This special ring tone is made up of three
parts, T1---T2---T3. The times for T1---T2---T3 can be set as required.
T1 (1st call signal frequency = 50Hz, duration = 0 to 990 ms)
T2 (call signal pause with duration = 0 to 990 ms)
T3 (2nd call signal frequency = 50Hz, duration = 0 to 990 ms)
This type of MWI is supported for example by the Siemens HighPath 3550 and 3750
systems. Settings expected for the Siemens system: T1=040, T2=110, T3=040.
Settings expected for NEC telephone systems: T1=150, T2=330, T3=150.
However, we strongly recommend discussing the settings with the technician who
set up the system.
Simply pick up the receiver to disable the MWI.
Setting the T1—T2—T3 times
The three times for the special ring tone are entered all together. For example, enter
digits 153315 as one number for T1=150, T2=330, T3=150. To disable the function,
set all times to "000" (enter 000000).
6 secs
With the receiver down, hold down
t
he 1 button for six seconds.
The LED starts to flash.
…
Enter the required digits one after
t
he other, e.g. 041104 for T1=40,
T2=110, T3=40.
To save the entry, press the 1 but-
t
on again.
The LED stops flashing and the number
is stored.
Pick up the receiver to exit the set-
t
ing.
The LED stops flashing and the number
is not stored.
Page 21

Appendix
21
Appendix
Service
You have purchased a modern product of TIPTEL granting a continuous level of the
highest quality. This is underlined by a certification according to DIN EN ISO 9001.
If, however, problems occur or you have questions on operating the device, please
contact your local dealer.
Guarantee
Please contact your local dealer or importer for details of guarantee for non EC
countries. Within the European Community the following guarantee regulation applies:
Your contact for services arising from guarantee obligations is the authorised dealer
where you bought the device.
TIPTEL will grant a guarantee of 2 years from the date of handover for the material
and for the manufacturing of the telecommunications terminal unit.
Initially, the purchaser shall have only the right of subsequent performance. Subsequent performance entails either repair or the supply of an alternative product. Exchanged devices or parts shall become the property of the authorised dealer.
If the subsequent performance fails, the purchaser can either demand a reduction in
the purchase price or withdraw from the contract.
The purchaser shall notify the dealer immediately of any defects found. Proof of the
guarantee entitlement shall be furnished by standard proof of purchase (receipt or
invoice).
The guarantee entitlement shall expire if the purchaser or an unauthorised third party interferes with the device. Damage caused by inappropriate handling, operation,
storage or by force majeure or other external influences shall not be covered by the
guarantee.
The guarantee shall not cover any consumable material (e.g. batteries) or defects
that only slightly impair the value or the usability of the device. Claims for damage
caused by transport shall be asserted to the delivery company.
Page 22

Appendix
22
Notes on settlement:
Repairs can only be conducted by the TIPTEL Service. A warranty repair does not
prolong the warranty period – neither for the replaced parts nor for the device. This
guarantee is not transferable and shall expire if the device is sold on to another party. It shall also expire if the device is interfered with by third parties or if the serial
number on the device has been removed or made illegible. There is a guarantee
seal on the device. Please do not damage or remove this seal because otherwise,
your guarantee will expire.
The General Terms and Conditions of TIPTEL, which are part of the contract for a
dealer, shall also apply. In the event of a complaint, the defective product shall be
sent to the relevant TIPTEL subsidiary, the importer or dealer along with a description of the defect and the proof of purchase.
CE sign
This device is approved for the connection and use within the analogue public telephone networks in all EC countries – according to the European Requirements. Due
to technical deviations in individual countries, we cannot grant an unlimited guarantee for the successful operation at all types of telephone accesses.
TIPTEL hereby declares that the device complies with all fundamental requirements
of the European directive 1999/5/EC. This conformity is confirmed by the CE sign
on the device.
Further details on the declaration of conformity can be found under the following
internet address: http://www.tiptel.com
Ecological information
During the normal use of the telephone you will not have any contact to substances
damaging to your health. The device is not battery-operated. The plastics used for
manufacturing this device exclusively consist of partially recycled granules. The
packaging materials do not consist of plastics but of partially recycled cardboard
and paper.
If you do not have further use of your TIPTEL device, TIPTEL will take back the device without any charge. The device will be properly taken to pieces for recycling.
Page 23

Appendix
23
Troubleshooting
Power failure
All settings are retained when a power failure occurs in the telephone network,
meaning the settings remain as they were before when power is restored.
Please try first to narrow down the cause of a problem and to rectify it using the following table.
Problem Possible cause Solution/recommendation
No dial tone Connector cable not making
contact.
Check all cables and plug
connections.
No incoming calls being
indicated in the telephone
system.
No call signal connected. Check the programming of the
telecommunication system.
Buzzing or other interference in
the loudspeaker or receiver.
Interference from cordless
telephone, cordless headset,
monitor, etc.
Change the location.
The LED lights up
continuously.
Incorrect MWI switch setting. Move the MWI switch to SR.
Incorrect or no connection
when dialling from telephone
systems.
The outside line prefix for the
public telephone network has
not been entered.
Enter the outside line prefix.
No call number display (direct
dial button lights up) when
there is a match with an
incoming call number.
Your network provider or
telecommunication system
does not support this function
or the function is not enabled.
The caller has suppressed the
sending of the call number or
is ex-directory.
The call is from a telephone
network that does not support
the sending of call numbers.
Ask your network provider or
telecommunication system
manufacturer if the function is
available or if it needs to be
enabled.
Page 24

Appendix
24
Default settings
The following list shows the factory settings for your telephone. All of these defaults
can be changed.
Outside line None
Ring tone Default
Call volume Maximum
Flash Short
T1 000 ms
T2 000 ms
T3 000 ms
Technical specifications
Dimensions (W x H x D) 210 x 130 x 180 mm
Weight 720g
Power consumption in stand-by ≤ 25μA / 25V
Ambient temperature 0 – 40C
Dial mode Tone dialling (MFV)
Flash duration 100ms / 240ms
Direct dial buttons lit 10
Ring tones 16
Hands-free function Half-duplex
Receiver Suitable for use with hearing aid
CLIP (display of the call number) Dual mode DTMF/FSK
Data retention without batteries
Page 25

Appendix
25
Notes for admins
For activating special system features, please contact Tiptel support.
Firmware version (tiptel 1020) for information only
Factory default
Lock settings (e.g. hotel mode): Call list and last dialled numbers will not
be available. One touch memory keys cannot be programmed.
Changing security code
Resetting lost security code
LCD/LED test
Denmark CID
Health care application: Automatic hands free mode
Automatic programming, creating clones of phone via FSK: All settings
(phonebook, speed dialling numbers, …) will be transferred to slave
phone. Time saving configuration of e.g. hotel phones.
Page 26

Index
26
Index
A
Area code (prefix) ............................ 14
Assignment of buttons ....................... 6
C
Call volume ................................ 17, 18
CE sign ............................................. 22
Connecting ....................................... 10
Controls .............................................. 7
D
Default settings ................................ 24
Deliverables ....................................... 8
Dialling with a direct dial button ....... 15
Direct dial buttons ............................ 14
E
Ecological information ..................... 22
F
Flash (R button) ............................... 16
G
Getting started ................................... 8
Guarantee ........................................ 21
H
Hands-free mode ............................. 12
Headset ...................................... 10, 13
L
Loudspeaker mode .......................... 12
M
Making calls ..................................... 12
Message waiting indicator ............... 19
Mute button ...................................... 12
MWI switch ....................................... 11
O
Outside line ...................................... 16
P
Packaging .......................................... 8
Packaging materials ......................... 22
Power failure ..................................... 23
Programming a direct dial button .... 14
R
Receiver volume ............................... 18
Redial ............................................... 12
Ring tones ........................................ 17
S
Safety notices ..................................... 5
Service .............................................. 21
Setting the volume ........................... 18
Settings ............................................ 16
Spiral cable .................................. 8, 10
Stand .................................................. 8
T
Technical specifications ................... 24
Telephone connector cable ......... 8, 10
Telephone receiver ........................... 10
Transferring calls .............................. 13
Troubleshooting ............................... 23
U
Underlay ............................................. 8
W
Wall bracket ........................................ 9
Page 27

Page 28

Tiptel.com GmbH Business Solutions
Halskestraße 1
D - 40880 Ratingen
Tel.: 0900 100 – 84 78 35*
Vanity Tel.: 0900 100 – TIPTEL*
Internet: www.tiptel.de
International:
Internet: www.tiptel.com
Tiptel GmbH
Ricoweg 30/B1
A - 2351 Wiener Neudorf
Tel.: 02236/677 464-0
Fax: 02236/677 464-22
E-mail: office@tiptel.at
Internet: www.tiptel.at
Tiptel AG
Bahnstrasse 46
CH - 8105 Regensdorf
Tel.: 044 - 843 13 13
Fax: 044 - 843 13 23
E-mail: tiptel@tiptel-online.ch
Internet: www.tiptel-online.ch
Tiptel B.V.
Camerastraat 2
NL – 1322 BC Almere
Telefoon: 036 – 53 666 50
Fax: 036 – 53 678 81
E-mail: info@tiptel.nl
Internet: www.tiptel.nl
Tiptel NV
Leuvensesteenweg 510 bus 4
B – 1930 Zaventem
Telefoon: 0903 99 333 (1,12 Euro / min.)
Fax: 02 714 93 34
E-mail: tech@tiptel.be
Internet: www.tiptel.be
Tiptel sarl
23, avenue René Duguay-Trouin
F – 78960 Voisins-Le-Bretonneux
Tél. : 01 / 39 44 63 30
Fax : 01 / 30 57 00 29
e-mail : support@tiptel.fr
Internet : www.tiptel.fr
*(1.49 euros/min. from Deutsche Telekom landlines,
varying mobile network charges possible)
(en) 11/2012
EDV 4932541
 Loading...