

Page 1
INSTRUCTION
MANUAL
www.tinytotsonline.co.uk
OPTIMO COMPLETE
Travel System by Tinytots
Please keep this manual in a safe place for future reference
Scan the code to get this
manual on your mobile
Page 2

Page 3

WELCOME
Dear Parent,
Congratulations on your purchase of the Tinytots ™ Optimo
Complete Travel System.
While designing the Optimo, safety, comfort and usability played a
significant part. As a result this product meets the strictest safety
requirements.
Our research has indicated that in a high percentage of cases where
accidents have occurred, the safety guidelines for use of the
product were not followed. The safety of your child is your highest
priority. Therefore kindly spend some time reading through this
manual very carefully.
We are constantly striving to exceed the latest safety requirements
set by the governing bodies. If you have any questions or concerns,
please do not hesitate to contact us. Our contact information can
be found on our website www.tinytotsonline.co.uk.
Regards,
Tinytots Customer Relations
Page 4

Age
Weight/Height
Car seat
0 - 12 months
Max 13kg/66cm(26in)
Carrycot
0 - 6 months
Max 9kg/78cm(30in)
Child Seat
6 - 36 months
Max 17kg
WARNINGS
• It is dangerous to leave your child unattended in the Tinytots Optimo.
• Do not stand on the axles between the wheels. This is unsafe and could damage
the Tinytots Optimo.
• The child seat attachment is not suitable for children under 6 months.
• Do not add a mattress thicker than 10 mm in the carrycot.
• Do not change the position of the seat when the child is in the seat.
• Keep the Tinytots Optimo away from open flames and other heat sources such as
electrical or gas heaters etc.
• Do not use the Tinytots Optimo if any part is broken, torn or missing.
• Every weight attached to the handlebar will have a negative impact on the
stability of the Tinytots Optimo.
• This product is not suitable for running or skating.
• Ensure that all locking devices are engaged before use.
• Check that the carrycot body or seat unit attachment is correctly installed before
use.
• Never pick up the Tinytots Optimo by the carry handle while your child is lying or
sitting in the carrycot or seat.
• Do not let other children play unattended near the carrycot.
• The carrycot is only suitable for a child who cannot sit up unaided.
• YOUR CHILD’S SAFETY IS YOUR RESPONSIBILITY. Children should be harnessed in
at all times and should never be left unattended.
• The child should be clear of moving parts while making adjustments.
• This vehicle requires regular maintenance by the user. Failure to keep up the
maintenance will shorten the life of your Tinytots Optimo.
DO NOT EXCEED THE MAXIMUM USER CRITERIA DEFINED BELOW OR SERIOUS
INJURY MAY RESULT
1
Page 5

TABLE OF CONTENTS
TABLE OF CONTENTS
TABLE OF CONTENTS
Table of Contents
INSIDE THE BOX ........................................................................................................ 3
ASSEMBLING FOR THE FIRST TIME ............................................................................ 4
FOLDING AND UNFOLDING ....................................................................................... 6
USING THE CHILD SEAT WITH THE OPTIMO FRAME .................................................. 7
INSTALLING THE CARRYCOT ON THE OPTIMO FRAME ............................................. 10
ADJUSTING THE HANDLE AND SEAT RECLINE POSITION .......................................... 13
PUTTING YOUR CHILD IN THE CHILD SEAT............................................................... 14
USING THE CAR SEAT WITH THE OPTIMO FRAME ................................................... 16
INSTALLING THE CAR SEAT INSIDE THE CAR ............................................................ 18
USING THE COSY TOES ............................................................................................ 20
USING THE WINTER BAG AND UMBRELLA............................................................... 21
MAINTENANCE........................................................................................................ 22
ACCESSORIES .......................................................................................................... 23
WARRANTY ............................................................................................................. 24
IMPORTANT WARNINGS ......................................................................................... 26
Page 6

INSIDE THE BOX
CHECK THAT YOU HAVE RECEIVED THE FOLLOWING IN THE BOX
1 chassis with handlebar
2 front swivel wheels
2 large rear wheels
1 aluminium frame (for child seat and carrycot)
1 rear wheel mounting frame with brakes
1 under seat basket
1 bumper bar
1 base carrycot fabric with base plate
1 carrycot mattress
1 carrycot tailored apron
1 child seat fabric with safety belts
1 fabric hood for carrycot/child seat
1 car seat
1 car seat fabric hood
2 car seat adapters
1 changing bag
1 cup holder
1 cosy toes
1 rain cover
1 umbrella and clip
1 user guide
1 Optimo assembly and demonstration DVD
3
Page 7
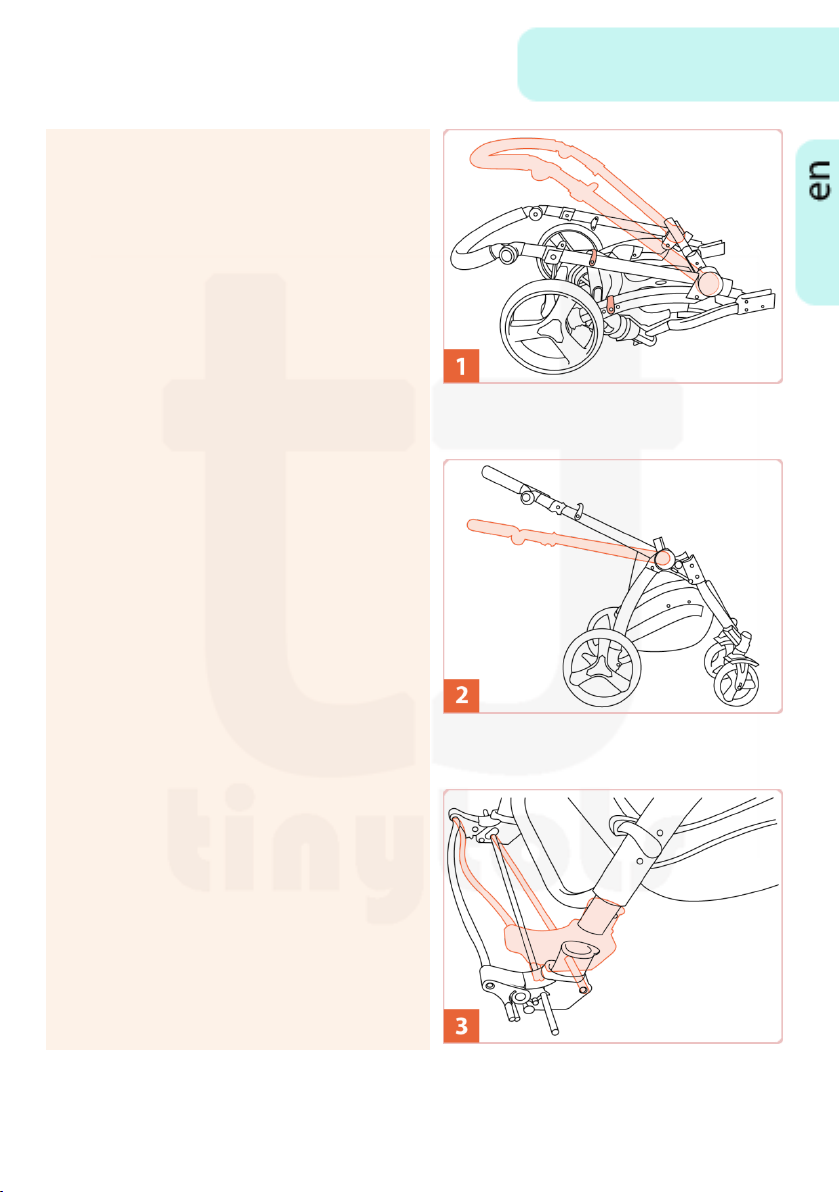
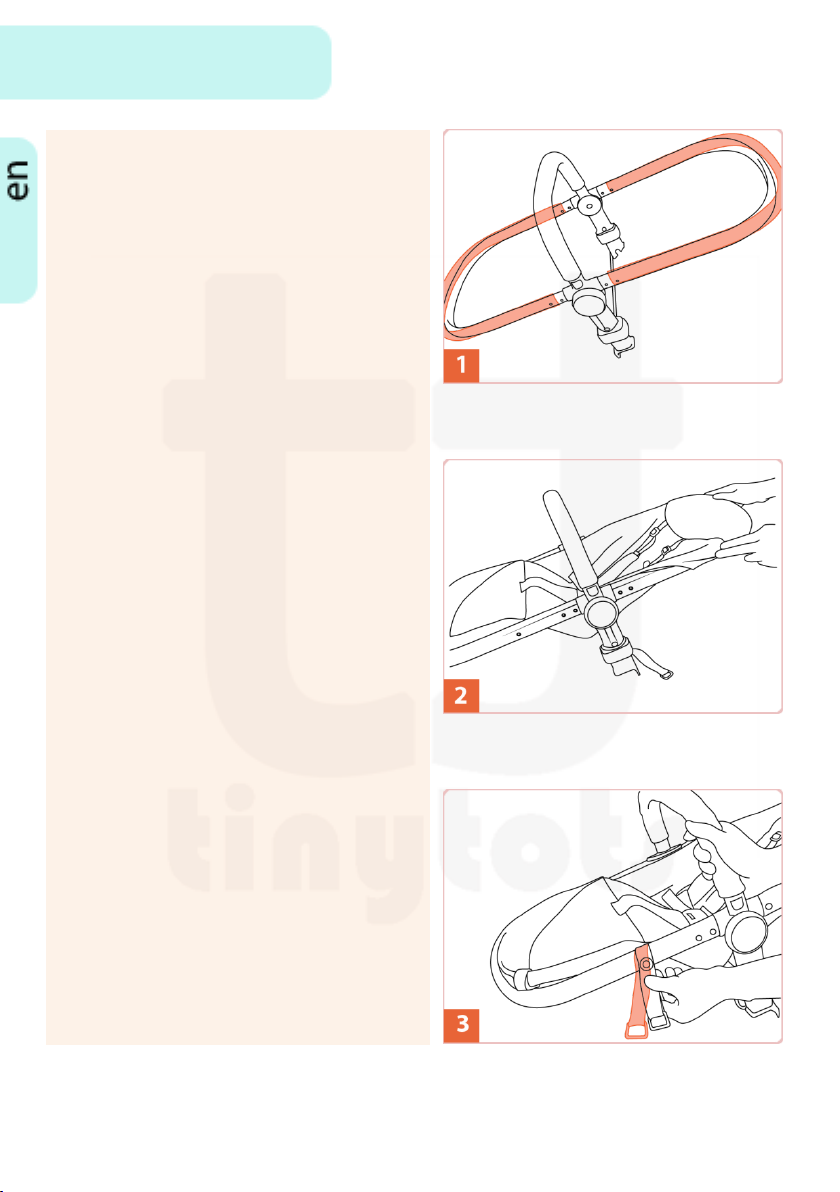
1. If the handle is folded down, press
the big round buttons at both ends
of the handle simultaneously and
adjust the height. Then release the
lock near the right rear wheel.
2. Move the rear handle in an upward
direction until the frame erects
completely and locks.
3. Take the black brakes bracket and
insert the two sides of the brakes
into the metal frame of the Optimo
as shown in the picture. Push until
the spring locks on the Optimo
frame are engaged properly,
holding the brakes bracket into
place.
ASSEMBLING FOR THE FIRST TIME
4
Page 8
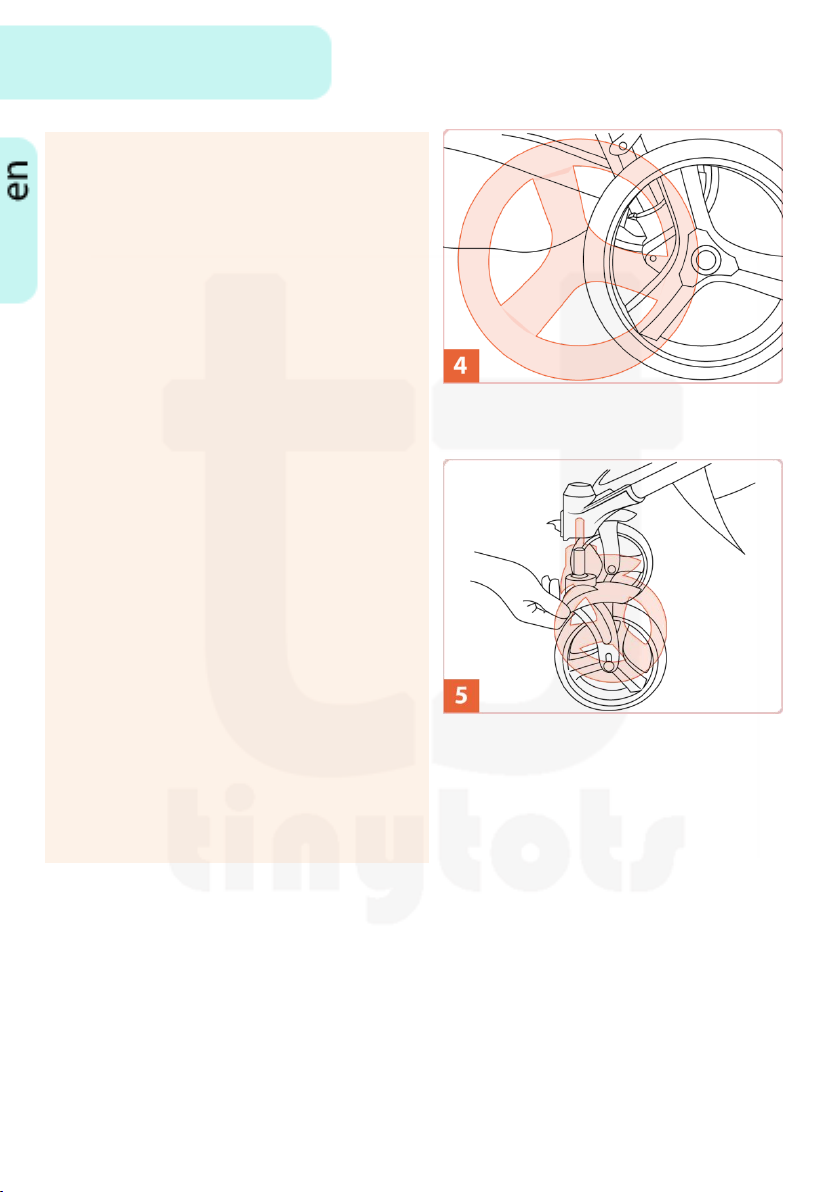
4. Take the bigger rear wheel and
insert it into the side of the brake
frame. Press and hold the button at
the centre of the wheel while
pushing the wheel gently into the
frame. Release the button and
make sure the wheel is securely
attached. Repeat this step for the
other rear wheel.
5. Insert the smaller front wheel into
the hole facing downward at the
front of your Optimo while
pressing the silver button on the
inside of the Optimo frame. When
the wheel is fully in, release the
button to secure the wheel. Repeat
this step for the other front wheel.
Look through the rest of this
manual to assemble and attach the
seat of your choice or the carrycot.
ASSEMBLING FOR THE FIRST TIME
5
Page 9
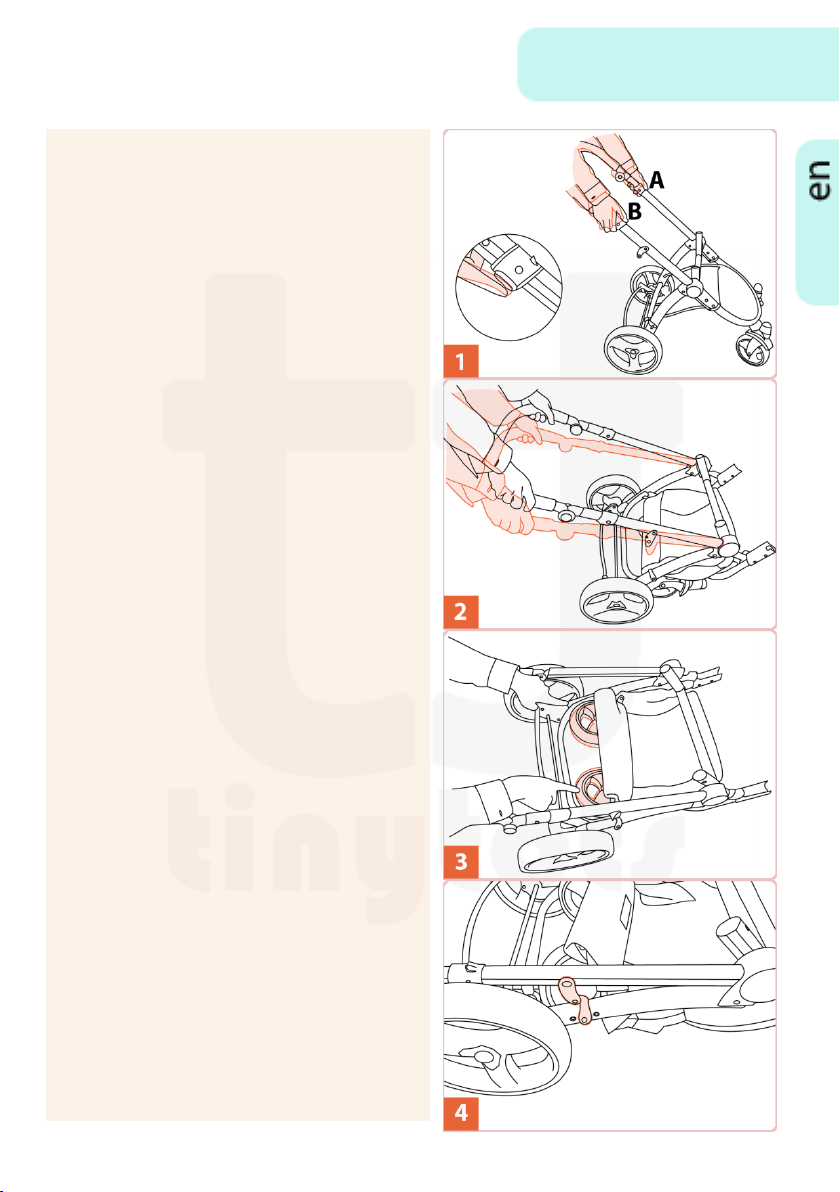
1. To collapse your Optimo, locate
release locks ‘A’ and ‘B’. Press and
keep hold of the button underneath
lock ‘A’ while pulling locks ‘A’ and
‘B’ towards you simultaneously.
2. Apply a little downward force on
the handle bar when the frame is
unlocked.
3. Make sure the front wheels are
facing inwards so it is easier to lock
your Optimo.
4. Press down gently until the lock on
the side of the Optimo is engaged
automatically. To fold the handle
bar, press and keep hold of the two
big buttons on the side of the
handle bar simultaneously and
press the handle bar down. Release
the buttons when the desired
position is reached.
To unfold the Optimo, follow steps
1 and 2 in the previous section
‘ASSEMBLING FOR THE FIRST TIME’.
FOLDING AND UNFOLDING
6
Page 10
1. Attach the bumper bar to the
frame ensuring it locks with a CLICK
on each side.
2. One side of the seat canvas has a
pocket behind it which goes over
the seat frame. Make sure you
cover the side of the frame that
does not have the studs sticking
out, as the side with the studs will
be at the lower part of the seat as
shown in step 3 below.
3. Secure the seat by locking the
holes in the belts over the studs on
the side of the frame. Make sure
the belts on both sides are
attached. Some force will be
required to lock the second belt. It
is normal and ensures the safety
and comfort of your child.
USING THE CHILD SEAT WITH THE
OPTIMO FRAME
7
Page 11
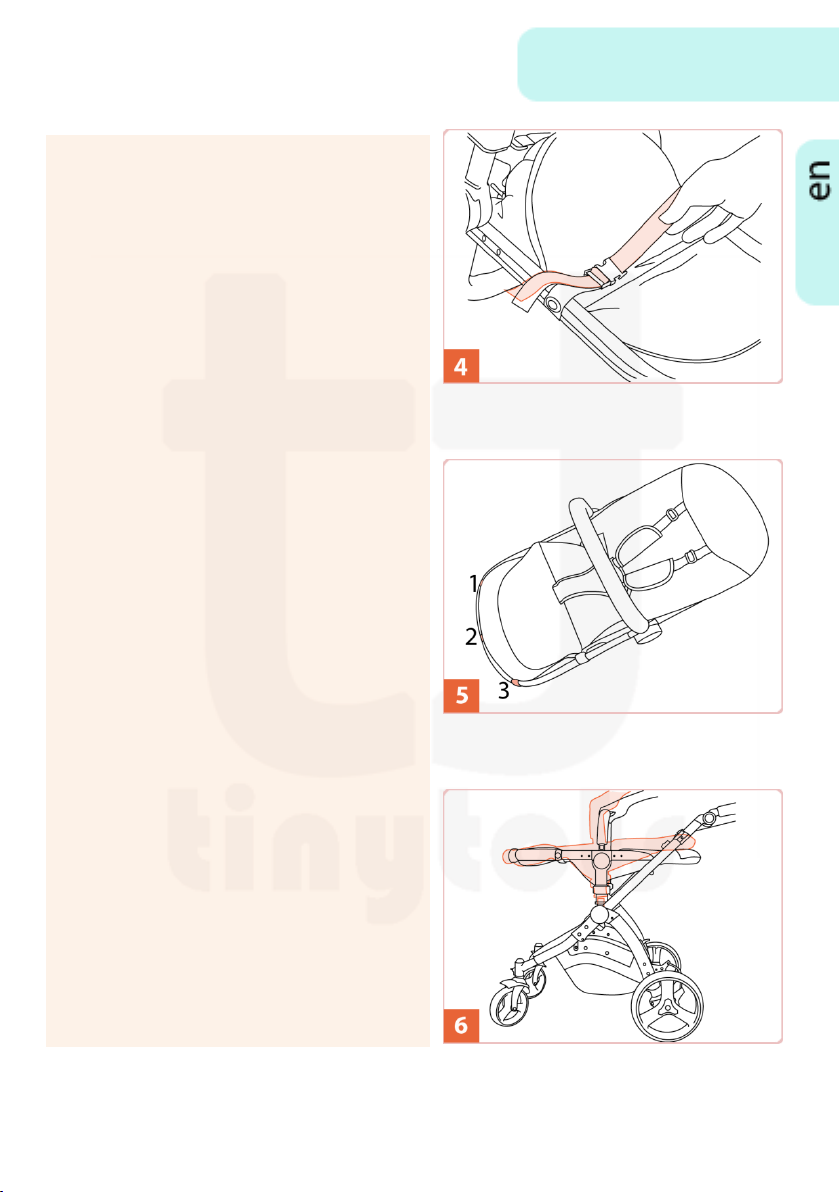
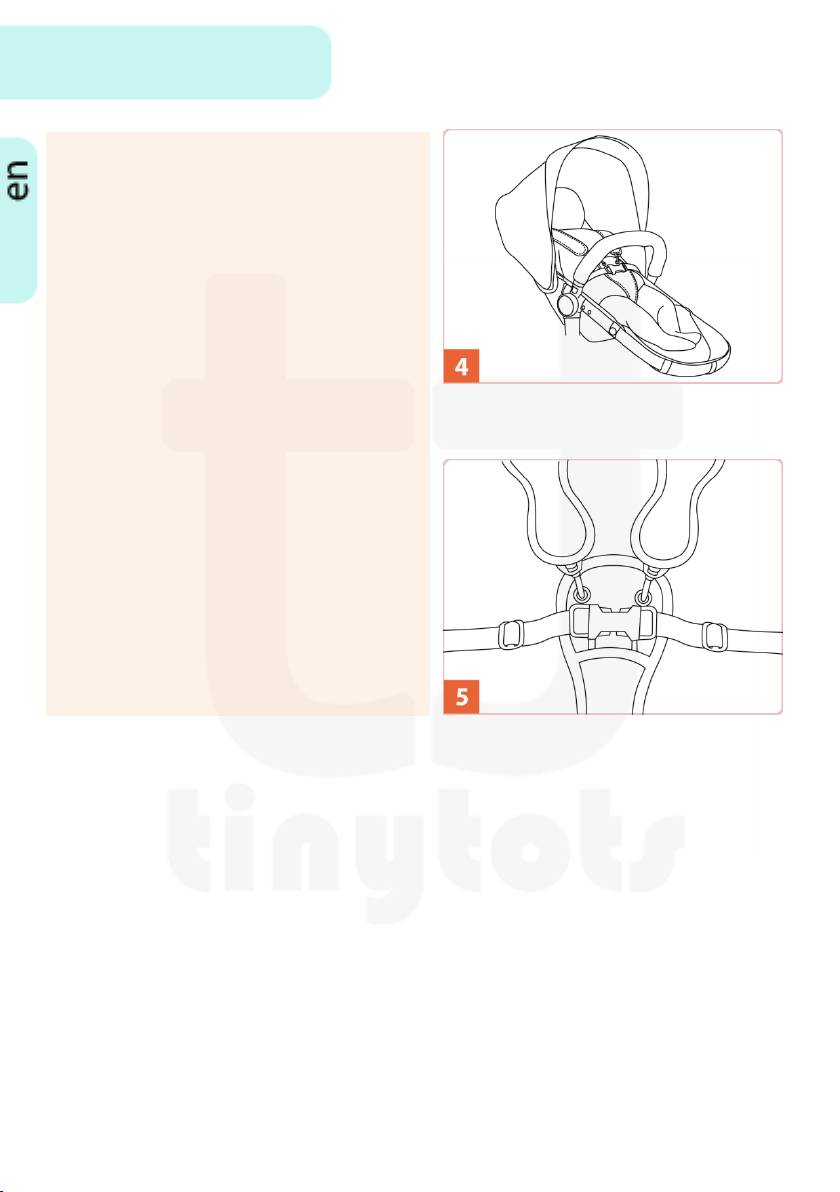
4. Tie the belts at the back of the seat
as shown in the picture so the belts
are neatly tucked away.
5. At the foot side of the seat, locate
the 3 Velcro straps and tie them
around the metal frame to provide
maximum support.
6. To attach the seat, simply place the
holes in the seat frame over the
vertical metal bars in your Optimo
frame and press down on the
bumper bar gently. Make sure both
sides lock with a ‘CLICK’ sound.
USING THE CHILD SEAT WITH THE
OPTIMO FRAME
8
Page 12

7. Attach the fabric sun hood to the
frame by clipping it to the frame on
the left and right side. Your seat is
now ready to use.
8. To release the child seat from the
Optimo frame, press the release
locks on the left and right side of
the seat. You can now lift up the
child seat.
USING THE CHILD SEAT WITH THE
OPTIMO FRAME
9
Page 13

1. Locate the seat frame and put it on
an even surface. Remove the
bumper bar for the next step.
NOTE: Your Optimo will come with the carrycot already attached to the seat
frame. You should use this carrycot from birth until your child starts to sit up
unassisted, usually at 6 months of age. At this age, remove the carrycot and
attach the seat unit. Follow the procedure below to remount the carrycot when
required. Alternatively, you may order an additional mounting frame if you
wish to interchange between the seat and carrycot attachments frequently.
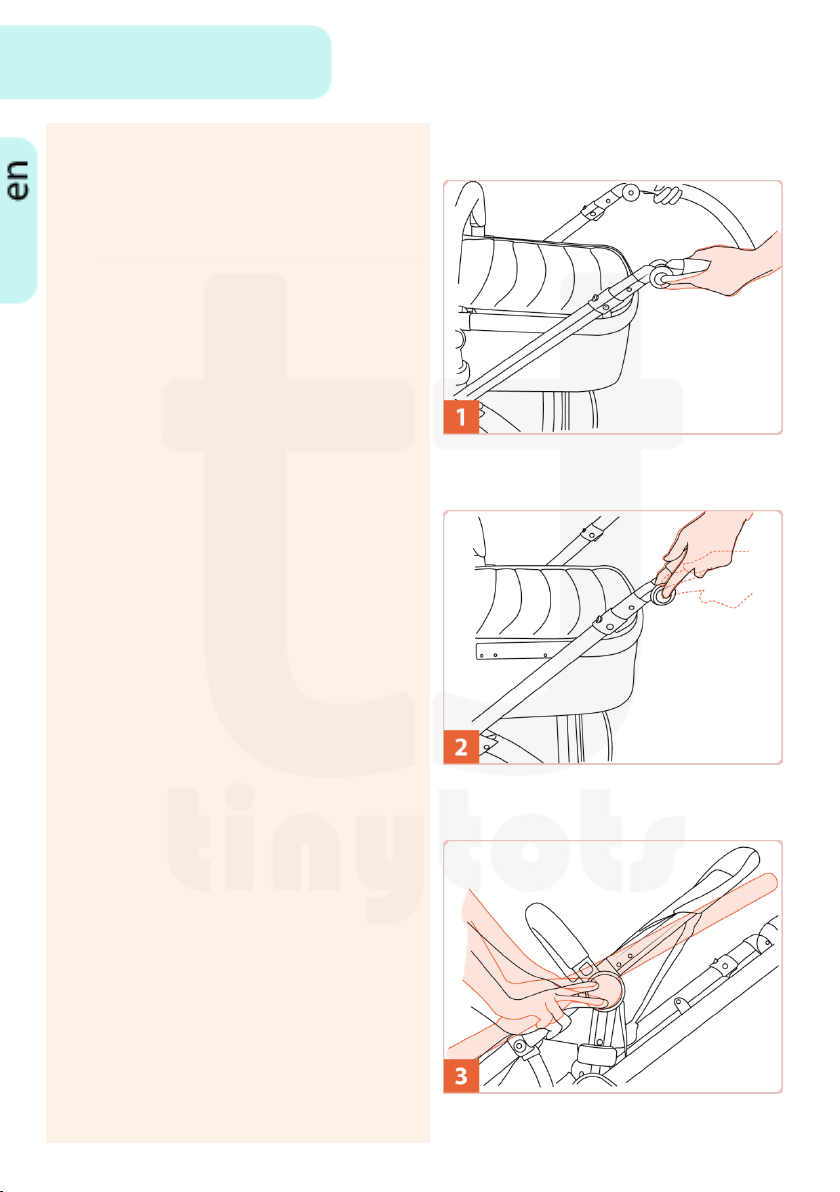
2. Locate the 4 fabric ends at the middle of the soft carrycot (labelled 1,2,3
and 4 in the picture). Find the grooves on the inside of the metal frame
(see picture inset). Now put end 1 into groove a and end 3 into groove c in
an anti-clockwise direction as illustrated by the arrows in the picture above.
INSTALLING THE CARRYCOT ON
THE OPTIMO FRAME
10
Page 14

3. Alternate between pushing the two
fabric ends in an anti-clockwise
direction. When pushing, grab the
top of the fabric about 10cm away
from where the groove starts and
push it into the groove.
4. Once the fabric ends reach the
other side of the frame to where
they started, your carrycot will be
fully attached.
5. Insert the carrycot base and the
carrycot mattress into the carrycot.
INSTALLING THE CARRYCOT ON
THE OPTIMO FRAME
11
Page 15
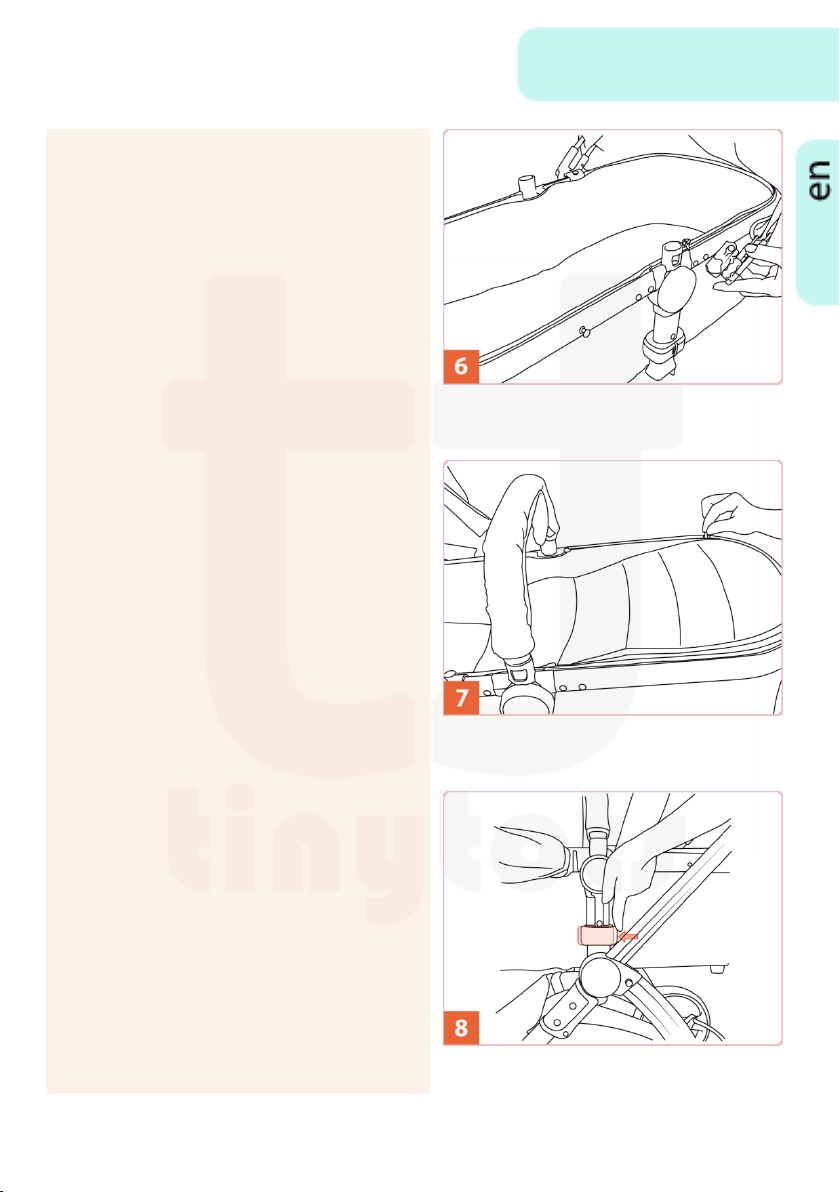
6. Attach the carrycot hood by
clipping it to the frame on the left
and the right side.
7. Attach the carrycot apron. Start
with both the fasteners (zippers)
on the left side of the carrycot.
Insert the left end of the apron
through both zippers. Fasten the
first zipper from left to right (anticlockwise motion). Your apron is
now fixed to the carrycot. Attach
the bumper bar making sure it
locks into place on both ends.
Serious injury can be caused to
your child if the bumper bar is not
properly attached.
8. To remove the carrycot from the
Optimo frame, press the left and
right release button. Then simply
lift up the carrycot.
INSTALLING THE CARRYCOT ON
THE OPTIMO FRAME
12
Page 16
1. Locate the handle release buttons
on each side of the Optimo as
displayed in picture 1.
2. Press in both buttons at the same
time and adjust the handle height
upwards or downwards as
required. Once you are happy with
the height, you can release the
buttons.
3. To adjust the seat recline position,
locate the black recline adjustment
button on each side of the seat.
Press and hold both the buttons
simultaneously and adjust the
recline position. Release the
buttons once the desired recline
position is reached. The seat can
lock at 45, 60, 75 and 90 degrees.
NOTE: When using the carrycot
accessory, ensure the recline
position is set to 90 degrees (fully
flat position).
ADJUSTING THE HANDLE AND
SEAT RECLINE POSITION
13
Page 17

1. Before putting your child into the
Tinytots Optimo, engage the foot
brake.
2. It is recommended to lock the front
wheels as well, especially if the
ground is uneven. To lock the front
wheels, make sure they are
pointing directly backwards and
press down on the button just
above the wheel.
TIP: The front side of the wheel has
the longer mud guard. Ensure this
side is facing to the back when
locking the wheels.
3. Before putting the child into the
seat for the first time, undo the
two hooks to separate the bottom
part of the harness from the top
part.
PUTTING YOUR CHILD IN THE
CHILD SEAT
14
Page 18
4. Put the child into the seat and
engage the safety lock on the
harness. You should hear a ‘CLICK’
sound. This ensures the safety lock
is engaged properly. Clip back the
hooks if they were removed in the
previous step.
5. Adjust the belts of the safety
harness to ensure the child is held
securely. Ensure the child will not
slide out. Do not over-tighten the
belts as the child should be able to
maintain a natural posture.
PUTTING YOUR CHILD IN THE
CHILD SEAT
15
Page 19

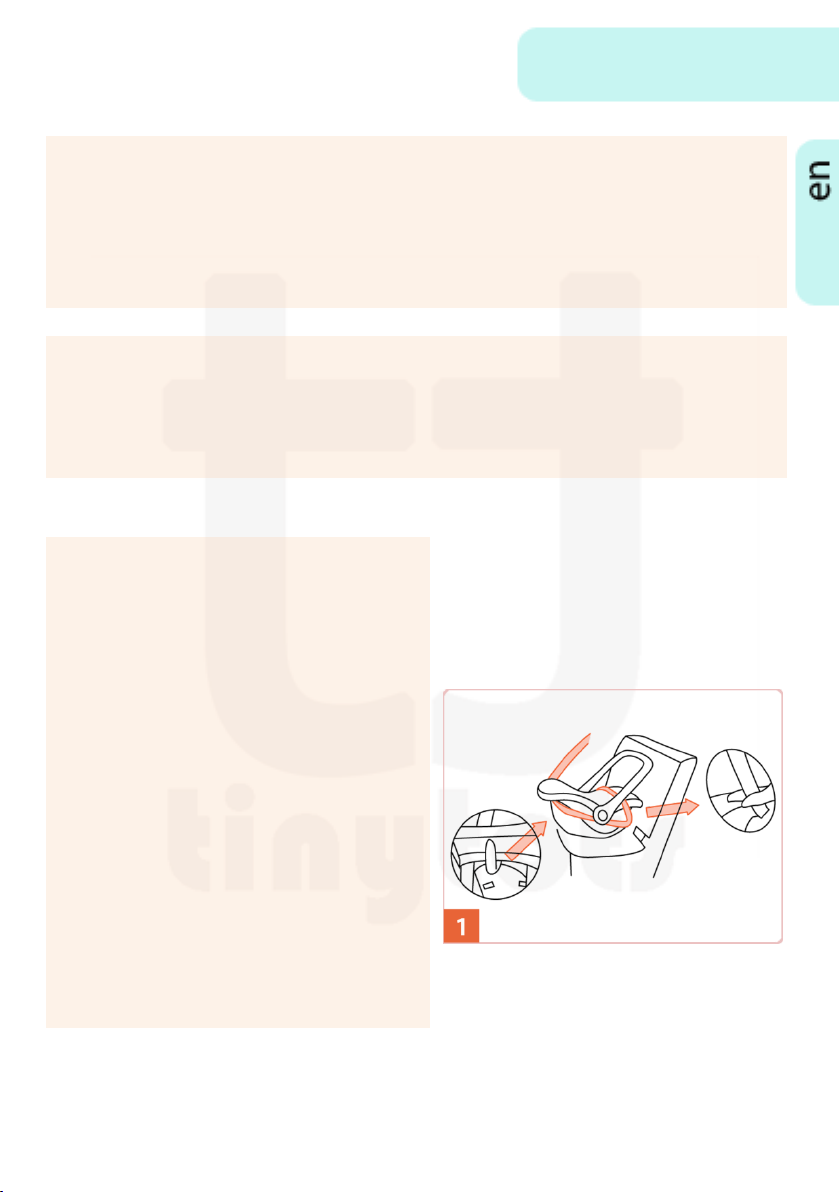
1. Attach the car seat hood to the car
seat. To do this, locate the locking
clips to the left and right side of the
hood and slide them in from the
top into the mounts either side of
the car seat. A firm push is needed
for a proper lock.
2. To install the car seat, locate the
two supplied car seat adapters.
Insert them into each side of the
car seat as displayed in the picture,
ensuring a ‘CLICK’ sound is made
when they lock in place. An
adapter will only fit on one of the
two sides, so do not try to force it
into place.
3. The car seat can be installed as
forward or rear facing. Locate the
two seat mounting points on the
frame, and lower the seat slowly
making sure the mounting points
align with the car seat adapters.
Gently push the car seat down until
a ‘CLICK’ locking sound is heard
from each side.
USING THE CAR SEAT WITH THE
OPTIMO FRAME
16
Page 20
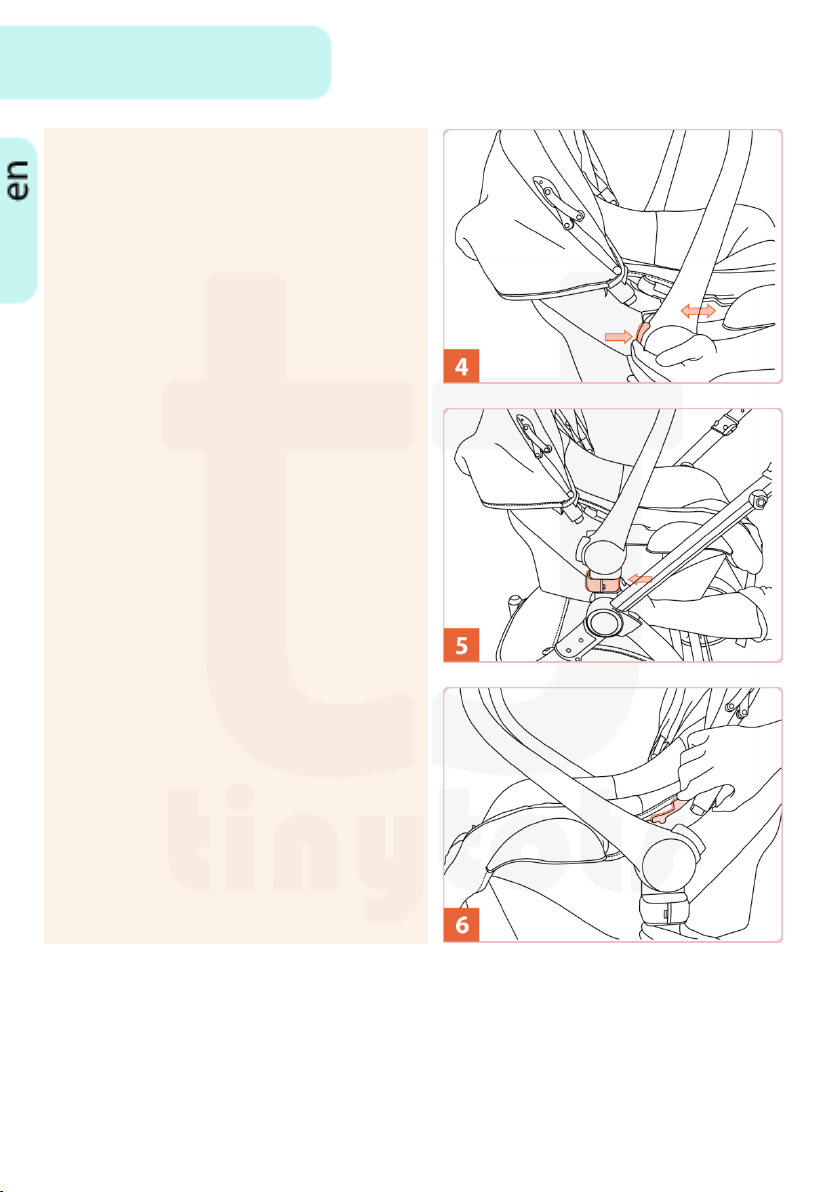
4. You can adjust the carry handle
height by pressing and holding the
red buttons each side of the handle
and releasing once the desired
carry handle position is reached.
5. To release the car seat, locate the
left and right release locks and
push them in the direction
indicated.
6. If you need to release the car seat
adapters for storage or
replacement, press the red buttons
located on each side of the car seat
to release the adapters. These
buttons may be hidden from view
under the car seat fabric.
USING THE CAR SEAT WITH THE
OPTIMO FRAME
17
Page 21
1. Place the car seat facing to the rear
on the vehicle seat. The handle
should be in upright position.
Secure the car seat using the seat
belt as displayed in the drawing.
Make sure the seat belt passes
through the two seat belt clips on
the car seat. The position of these
clips can be seen in the picture. If
your car is fitted with a height
adjustment seat belt, ensure it is
set to the lowest position.
WARNING-EXTREME DANGER: Do not use this rear-facing car seat on front
passenger seat where a passenger side airbag is fitted. Airbag inflates
rapidly and can throw a rear-facing car seat into the seat backrest with great
force, which can cause death or serious injury to the child.
WARNING: Do not place the child in a sleeping bag, blanket or other bulky
wrapping before putting the child in the car seat. The shoulder straps will
not fit snugly and the child may not be safe.
INSTALLING THE CAR SEAT INSIDE
THE CAR
18
Page 22

2. Press the red buckle release button
to unfasten left and right straps of
the seat harness. Lift up the harness
straps and place your child in the
car seat. Pull the harness straps on
each side over the child’s shoulders
and lock the belts into the buckle.
You should hear a ‘CLICK’ sound to
ensure the lock has been engaged
properly.
3. Adjust the length of the bottom belt
to ensure a tight fit of the harness.
Do not over-tighten.
INSTALLING THE CAR SEAT INSIDE
THE CAR
19
Page 23

1. Locate the 3 elastic ties at the
bottom of the cosy toes and secure
them around the seat frame by
locking one side of the tie to the
other. Ensure the ties are locked
securely.
2. Find a further 2 elastic ties towards
the top of the cosy toes (one each
on left and right side). Lock these
ties into the hook on the seat hood
clip.
3. Unfold the flap at the top. Your cosy
toes is now installed.
USING THE COSY TOES
20
Page 24

1. Install the winter bag over the child
seat. To do so, open up all 5 belts of
the 5-point harness on the seat.
Place the winter bag over the seat
and bring through all 5-belts to the
front through the holes in the
winter bag. Padding on the shoulder
belts may need to be removed
temporarily to pass the belts
through the holes. It will simply
slide off and then slide on. Place
your child inside the bag, lock the
harness and zip up the winter bag.
2. The umbrella attaches to the seat
frame of your Optimo. Loosen the
clamp on the umbrella, place it
around the seat frame and tighten
the clamp. Ensure the rubber
protectors sit between the clamp
and the Optimo frame to prevent
scratches to the Optimo frame. You
can adjust the angle of the umbrella
by pressing the adjustment button
and moving the umbrella in the
desired direction.
USING THE WINTER BAG AND
UMBRELLA
21
Page 25

MAINTENANCE
Your Tinytots Optimo needs regular maintenance to ensure the safety and
longevity of the product. Faults caused by improper maintenance of your
Tinytots Optimo will not be covered under the warranty.
You should follow the steps given below regularly to ensure your Tinytots
Optimo is maintained to a high standard.
1. From time to time, clean and lubricate the wheels, safety locks and
sliding parts using a light oil or silicone spray. Do not use heavy oils as
this will attract dust and grit which tend to clog and damage moving
parts.
2. All the fabrics used on your Optimo are shower resistant. Should your
Optimo become wet, do not fold the hood and allow to dry naturally.
Do not dry in front of heating sources like radiators or direct sunlight.
3. A high quality fabric dye is used in the manufacturing of the Optimo.
However exposure to direct sunlight for a long period of time will
cause the fabric colour to fade.
4. Do not wash the fabrics. The Optimo should be wipe cleaned. Light
soiling can be removed with a damp sponge and mild detergent. Do
not use brushes, abrasives or bleach for cleaning as these will damage
and discolour the fabrics.
22
Page 26

NOTE: When installing any shopping clips to the Optimo frame, ensure that
you do not install them on the handle as it may damage the foam on the
handle. Install them on the side of the frame below the handle adjustment
button, and move them over to the foam handle once installed. Shopping
clips less than 16cm long should not be used with the Optimo.
ACCESSORIES
We are regularly developing new accessories for the Tinytots Optimo travel
system as we believe it is a great way to get the most out of your
investment. For an up to date list of available accessories and for pictures
and descriptions, please visit our website www.tinytotsonline.co.uk. At the
time of writing accessories available for the Optimo are as follows:
1. Winter body bag
2. Air wheels
3. Cup holder
4. Extra seat frame
5. Shopping bag clips
6. Cosy toes
7. Changing bag
8. Umbrella
9. Rain cover
23
Page 27

WARRANTY
Warranty
Your product warranty is our quality promise to you. We guarantee that
this product is free from defects in workmanship and manufacturing
materials at the time of purchase. During the production process, your
product was subjected to various quality checks. However, if despite our
best efforts, your product shows signs of material or manufacturing fault
within the warranty period, we will comply with the warranty terms &
conditions. For further details of these conditions, please contact us.
After purchasing your product(s), please keep your proof of purchase in
a safe place. The date of purchase should be clearly visible.
Your Tinytots products are automatically covered from the date of
purchase by a warranty against material or manufacturing defects. This
warranty is offered in addition to and does not affect your statutory
rights.
Note: The use of buggy boards on any Tinytots chassis will invalidate
your warranty.
Warranty Term
Chassis and seat frames – 12 consecutive months
Seat fabrics, carrycot converter fabric, carrycots, wheels, handle bar
foam, bumper bar foam and accessories – 6 months
24
Page 28

WARRANTY
What Your Warranty Does Not Cover
Damage caused by normal wear and tear, accidental damage, improper
use and damage caused by negligence, misuse and by not following the
maintenance instructions.
The warranty is not valid in the following situations:
1. In case of use other than described in the instruction manual
2. If the product is submitted for repair through a retailer / distributor
that is not approved or authorised by us
3. If repairs have been carried out by third parties or a retailer who is
not authorised or approved by us
4. If you have purchased your product over the internet from an
unauthorised stockist, or if it was purchased second hand
5. If your chassis becomes faulty after or during use with a buggy board
25
Page 29

IMPORTANT WARNINGS
Use the Optimo for only one child at a time
The Optimo is suitable for children from birth to 3 years (maximum
weight of 17kg)
The maximum weight allowance for use with a safety car seat is 13kg
It is recommended that you do not use the Optimo with the child seat
until your child is able to sit up unassisted, usually at around 6 months
old
Make sure the Optimo is fully unfolded and locked before placing your
child in it
Keep your child away from all moving parts when folding, unfolding or
adjusting the pushchair, or else serious injury can occur
Always use parking brake when parking the Optimo, even when
stopping only for a short period
Inspect the Optimo for safety frequently
Never use abrasive cleaners or lubricants
Never lift the Optimo or use escalators while your child is sitting in it
Use original accessories and manufacturer provided parts only. Use of
non-original parts or attempts to make changes to the product will
void the warranty
To avoid the risk of suffocation, keep all plastic packaging and
materials out of the reach of children
Read this instruction manual carefully and save it for future reference.
Failure to follow the instructions contained in this manual could result
in serious injury to your child
You are personally responsible for the safety or your child at all times
Always set the parking brake on the pushchair. Never leave the child
unattended
Secure your child in the safety harness at all time
Attaching heavy weights from the handle bar can cause the pushchair
to tip over. Do this at your own risk and hold on to the handle bar at all
times if you choose to do so
Before each use, make sure all locks are secure and nothing is jammed
between the locking parts
Always use all 5 belts of the 5 point harness
26
Page 30

IMPORTANT WARNINGS
Keep small parts away from children as they pose a choking hazard
Running or skating with this product is not recommended
Always make sure the frame, car seat and car seat adapters are all
installed correctly and locked before each use
The Optimo is a valuable piece of equipment and deserves careful
handling. Misuse will put the child in danger and will void your
warranty
Regularly check that the safety harness is correctly fitted and the
webbing is not damaged. If the harness is damaged, a new one should
be fitted before use
Clean the plastic parts of the pushchair with a damp cloth. Do not use
abrasives or bleach
Clean and lubricate the wheels, safety locks and sliding parts using a
light oil or silicon spray. Do not use heavy oils as this will attract dust
and grit which tend to clog and damage moving parts
The car seat must always be secured, even when not in use. An
unsecured seat can injure other passengers in the car in the event of
an emergency stop
If the seat belt of your car is height adjustable, adjust it to the lowest
position
When installing the car seat on the passenger seat, position the car
seat in the rearmost position. The backrest must be in a fully upright
position and the headrest down. When not using the car seat, the
passenger seat (and headrest) may be adjusted as required
Prevent damage to the car seat by not wedging it between or
underneath heavy luggage, adjustable seats or slamming the car door
etc.
Make sure that you properly secure all luggage and other objects likely
to cause injury in the event of an accident
Always cover the car seat when the car is parked in the sun, as plastic
and metal parts can become very hot and the cover may become
discoloured
Always use a car seat, even for short trips, as this is when most
accidents occur
27
Page 31

IMPORTANT WARNINGS
Never hold a baby on your lap while driving. Due to the enormous
forces involved in an accident, it will be impossible to hold onto the
baby
Never use the same seat belt to secure yourself and the child
28
Page 32

All rights reserved by Tinytots UK. The content contained in this document is
copyrighted and owned by Tinytots UK. Copying or reproducing this content is strictly
prohibited and in violation of the international copyright laws. Any party found to be
using or reproducing our content without our written consent will be prosecuted.
www.tinytotsonline.co.uk
 Loading...