

Page 1
TOSR-04-5
TOSR-10B/C
LazyBoneV4
Smartphone Controlled Switch
User Manual
Tinysine Electronics @ 2016
Version 1.0
Page 2

www.tinysine.com/www.tinyosshop.com
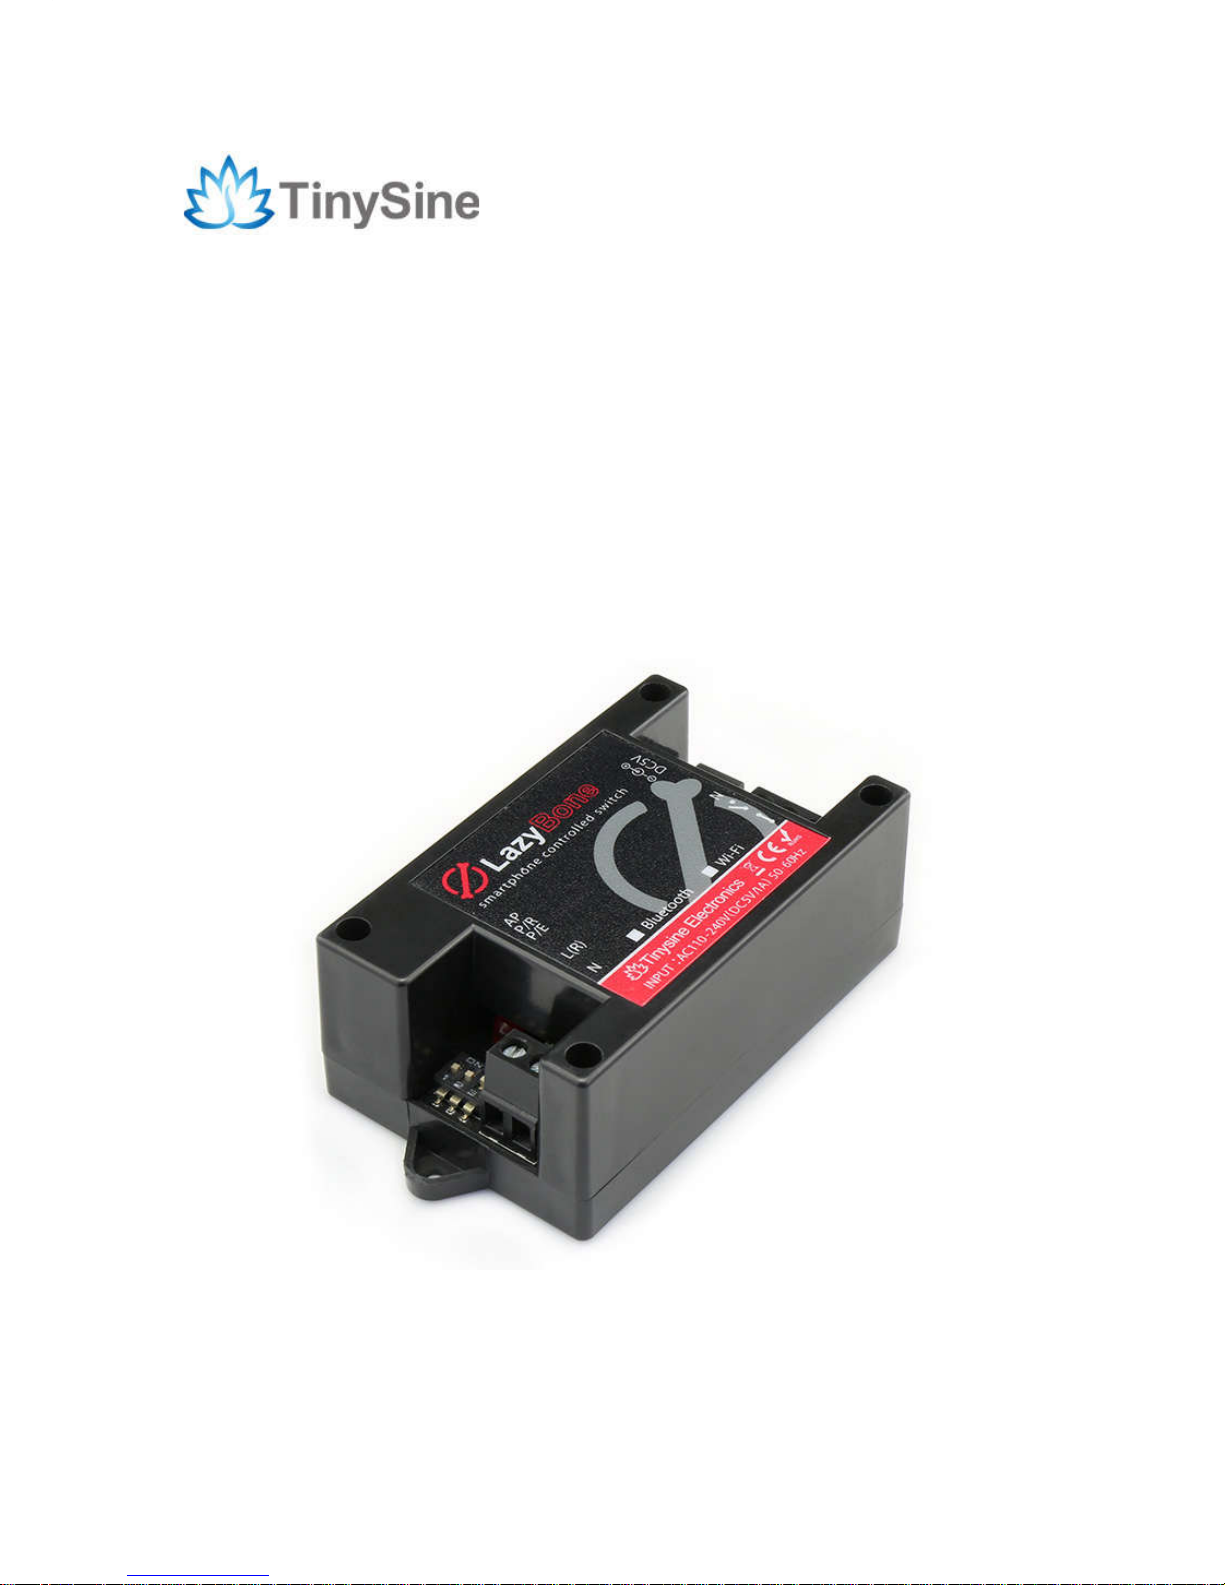
INTRODUCTION
LazyBone is smart switch controlled by our phones via Bluetooth or WiFi, supporting both
Android and iOS. It’s a convenient and easy-to-use product that can be used to control
your home’s electrical equipment, such as light bulbs. By using the momentary mode,
you can even control your garage door! Compared to the previous LazyBone switch, the
LazyBone V4 offers a number of improvements. It's can be set to with password
protection. So, you can use it to control your garage-door or any other devices that need
a password protection.
SPECIFICATIONS
Supply voltage: AC(110~240V)/DC 5V*
Standby Current 30mA/5VDC
Dimension :80x49x31(mm)
Relay switching power: 10A/250VAC
Communication mode: Bluetooth/WiFi
Baud rate: 9600
Control distance: 25m (outdoor with Bluetooth version)
Support Android: above V4.3
Support iPhone: above iPhone5
Support password protection
Default password: 123456
*If you just want to use it as a switch, you need supply the module with DC5V power
IMPORTANT DISCLAIMER
Using this device may require you to connect the civil high AC power (110~240v). Please
leave the device uncharged when you are wiring. Additionally, if something wrong has
happened with the device and you want to check it, please disconnect the power first.
Any incorrect wiring or shorts on the board can potentially cause damage to the controller
itself. Extreme care must be taken when using this device to avoid any damage to your
equipment. In particular, make sure you always disconnect the device from the DC5V
port as well as any other power source when working on the device. Never touch the
power input and output ports without protective measures when the device is working.
Tinysine Electronics, its shareholders, employees, suppliers, distributors and/or resellers
are not liable for any damage or loss of data as a result of the use of this device,
including special, incidental or consequential damages resulting from the use of this
device, or under any legal theory, including lost profits, downtime, good will, damage to or
replacement of equipment or property, and any costs or recovering or reproducing of data
stored on computers connected to this device. Your use of this circuit indicates your
acceptance of these terms.
Page 3
www.tinysine.com/www.tinyosshop.com
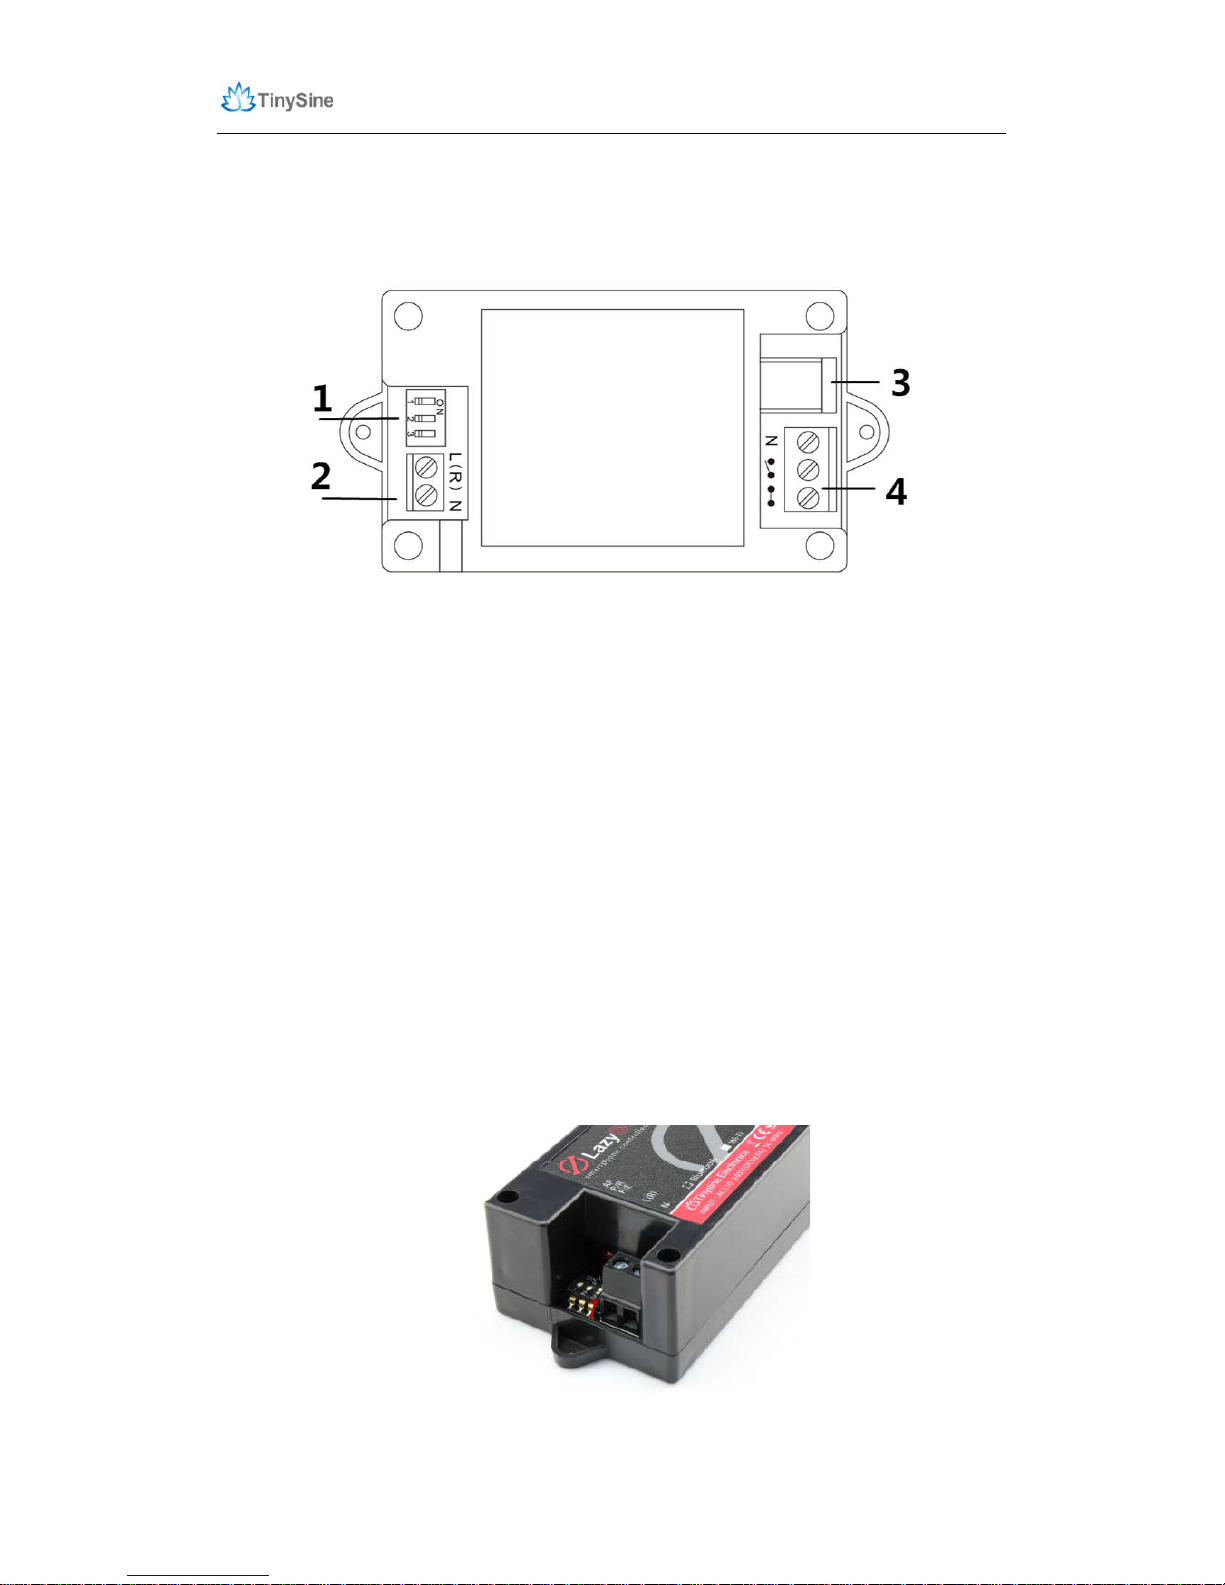
Module Overview
1. Setting Switch
LazyBone V4 has 3 setting switches: AP, P/R, P/E.
AP: WiFi AP mode ON/OFF
This is for WiFi version use only. You can configure the WiFi module or control it
point-to-point in AP mode.
P/R: Password reset.
Power off LazyBone, set the P/R switch to position ON, then re-power LazyBone. Set P/R
back to OFF, wait for 3 seconds, the password will be reset to default password 123456.
P/E: Password enable/disable.
This switch is used to enable/disable LazyBone’s password function. Set to “ON”, enable
the password; set to “OFF”, disable the password, this operation needs you to re-power
the board.
Page 4
www.tinysine.com/www.tinyosshop.com
2. AC Input Port: AC power input. Working voltage AC100~240V.
3. DC Input Port: DC 5V Input.
4. Output Port: Connect your electrical equipment to this port.
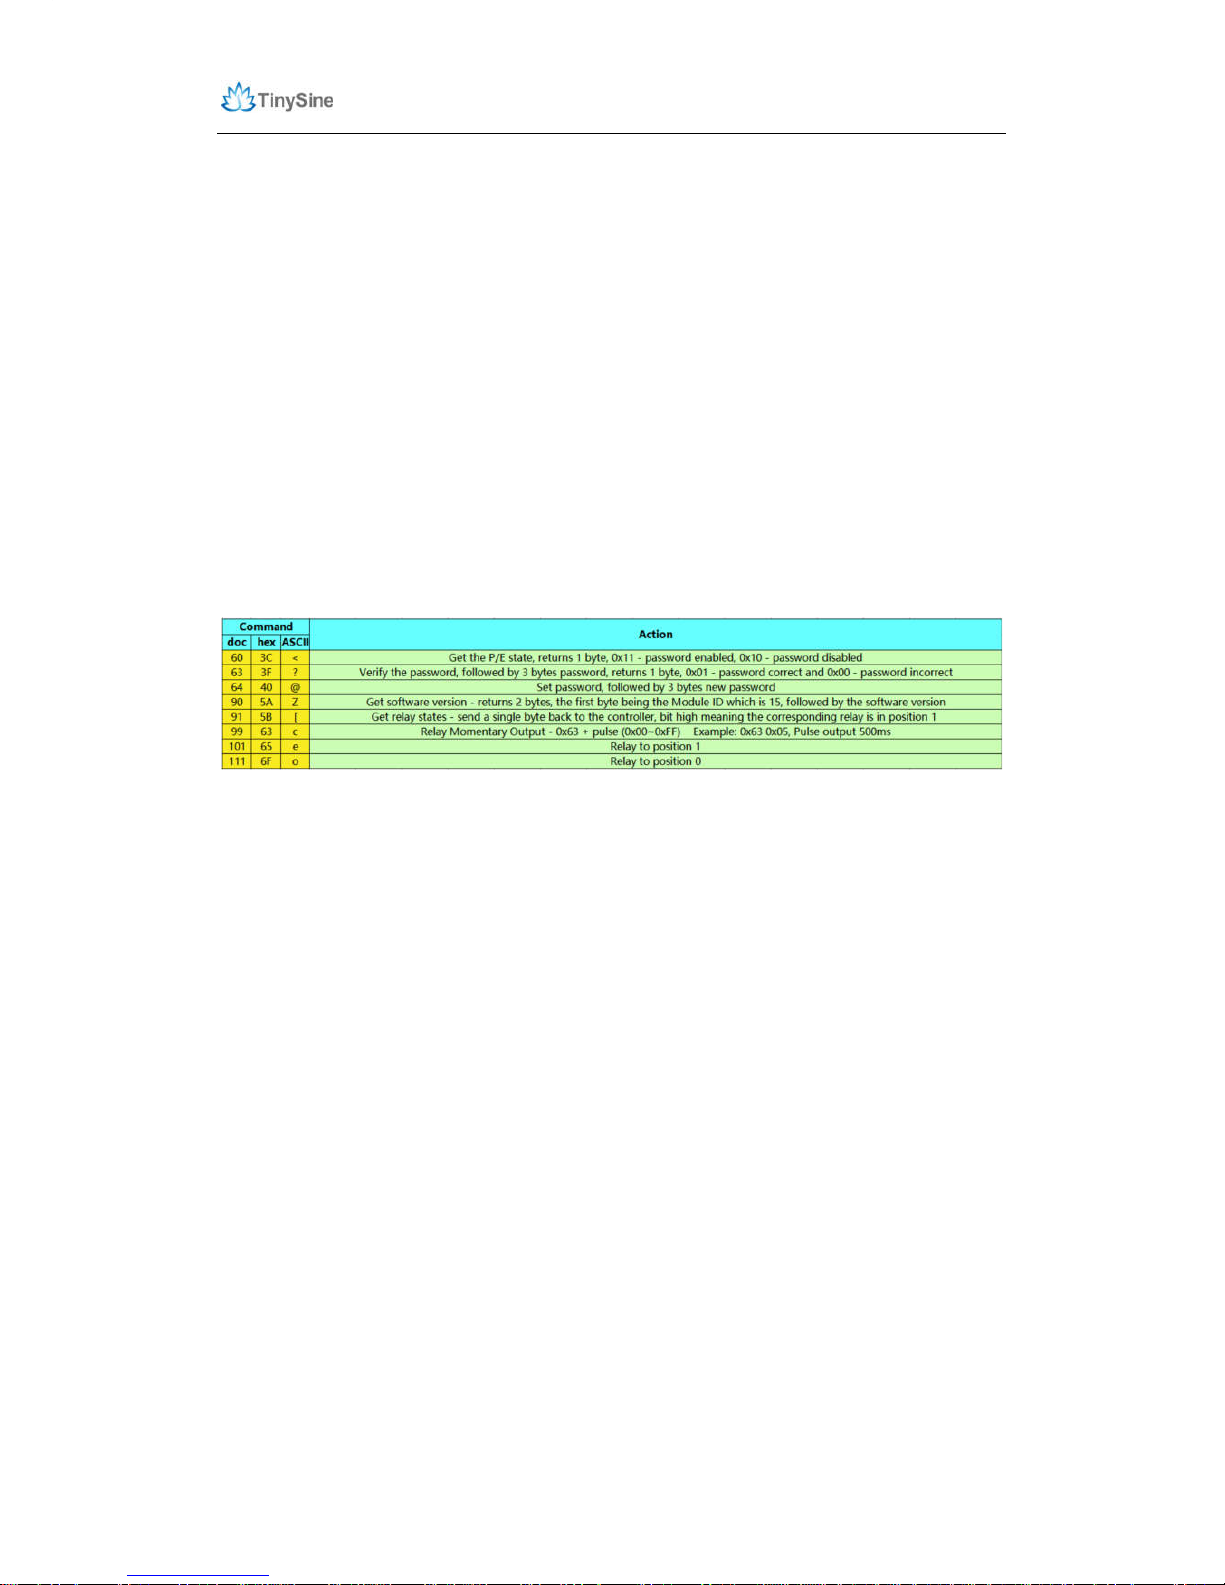
Commands
We have provided a very simple command set for developers to develop their own
application. The LazyBone operates with an easy to use command set as described in
the table below.
Page 5
www.tinysine.com/www.tinyosshop.com
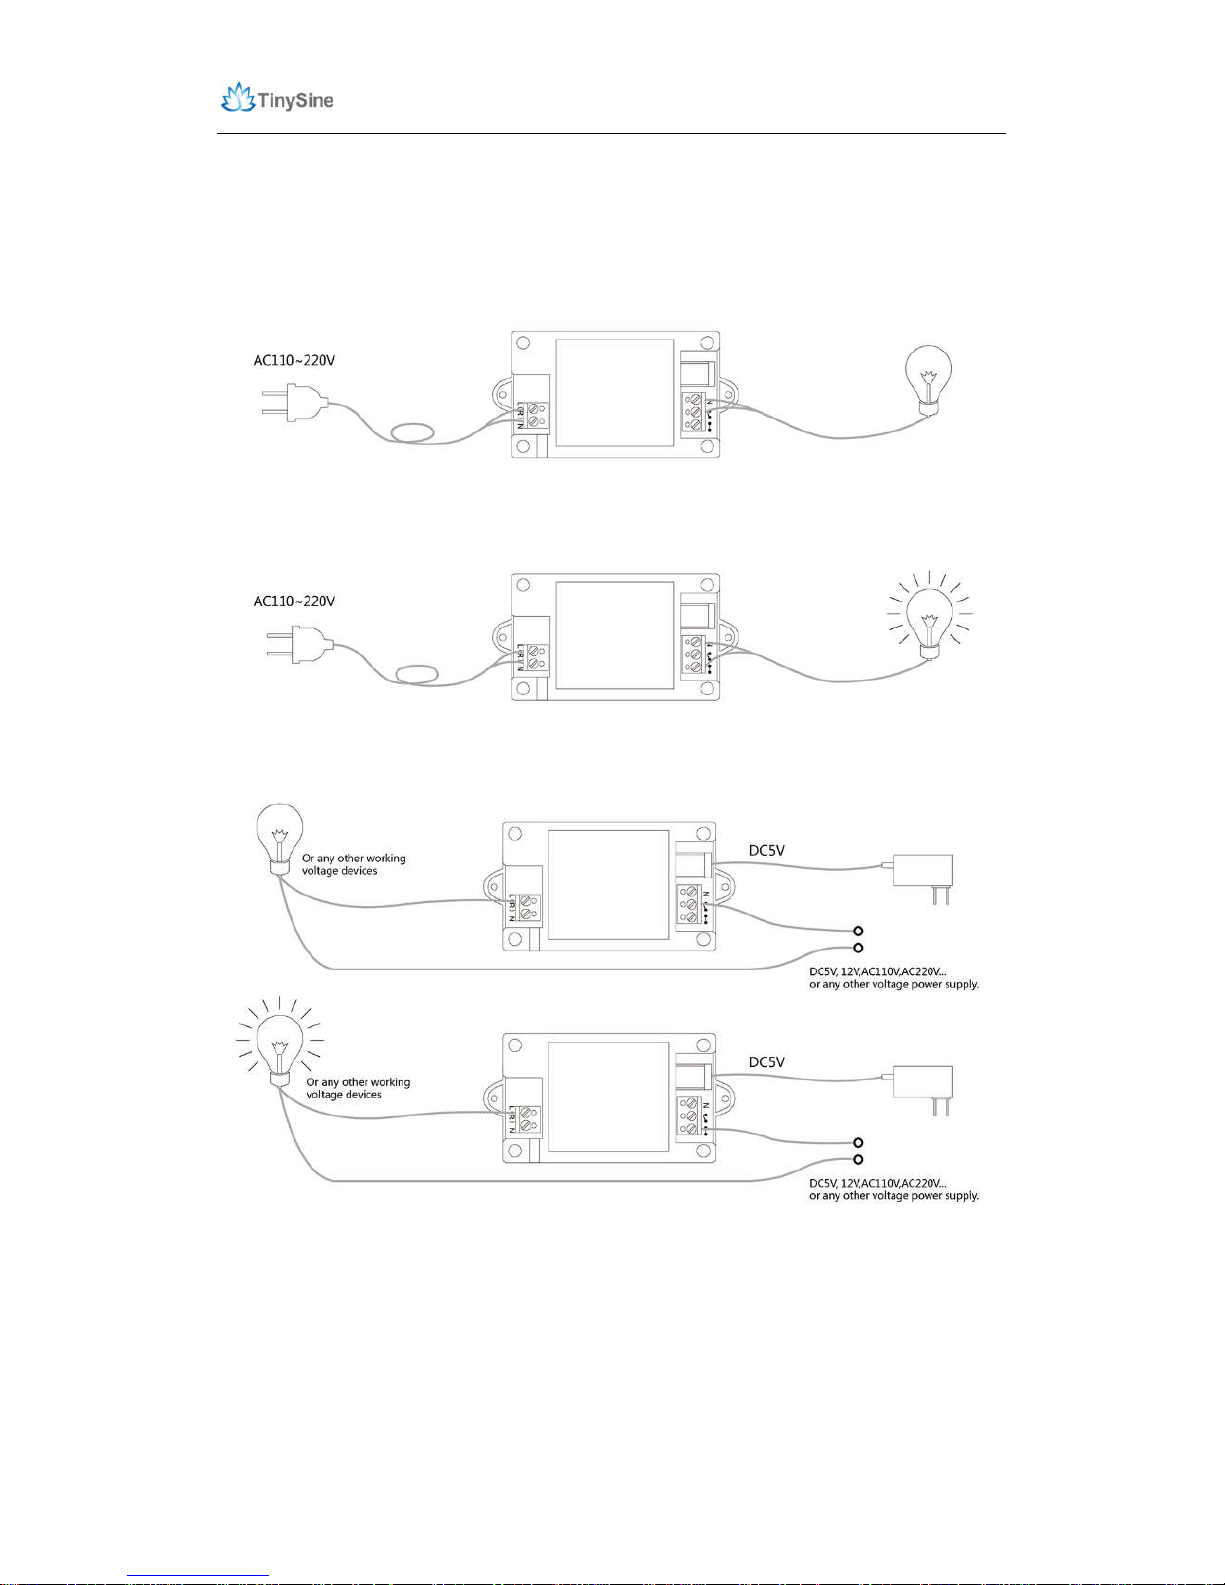
Howto Use
Wiring Diagram:
Self-power mode
Wireless switch mode
Page 6

www.tinysine.com/www.tinyosshop.com
Step 1: Wiring
In this manual, we use self-power mode to demonstrate.
First, you will need a wire that has a two-pin plug and a bulb with two polar ends that has
been leaded like we have shown below.
Connect the wire to LazyBone’s AC input port: connect the live wire to the ‘L’ port and the
zero line to the ‘N’ port.
The output has three ports. The one named “N” is a common port; please wire one polar
end of the bulb to this port. The other two ports have an opened switch and closed switch
logo respectively. The opened switch port is normal OFF, The another one is normal ON.
(Please do this with the wire, bulb and LazyBone powered off to keep you safe!)
Finally, connect the 2 pin plug to AC power, and the red LED light near the AC input port
will lights up. This step works for all versions of LazyBone!
Step 2: Connect LazyBone with your Smartphone
Bluetooth Lazybone
LazyBone V4 (Bluetooth version) uses Bluetooth BLE instead of the traditional Bluetooth
module. LazyBone V4 can be controlled by both Android phones and iOS devices!
1. Connect with phones
(1) Download Android APP (Bluetooth) or iPhone APP(Bluetooth) and install it to your
Page 7

www.tinysine.com/www.tinyosshop.com
phone.
(2) Turn on your phone’s Bluetooth and open the APP.
(3) Click the screen to pop out the menu → Connect device → Scan for devices. Your
phone will search for nearby Bluetooth device automatically. LazyBone usually comes
with a default name: LazyBone-B.
Page 8

www.tinysine.com/www.tinyosshop.com
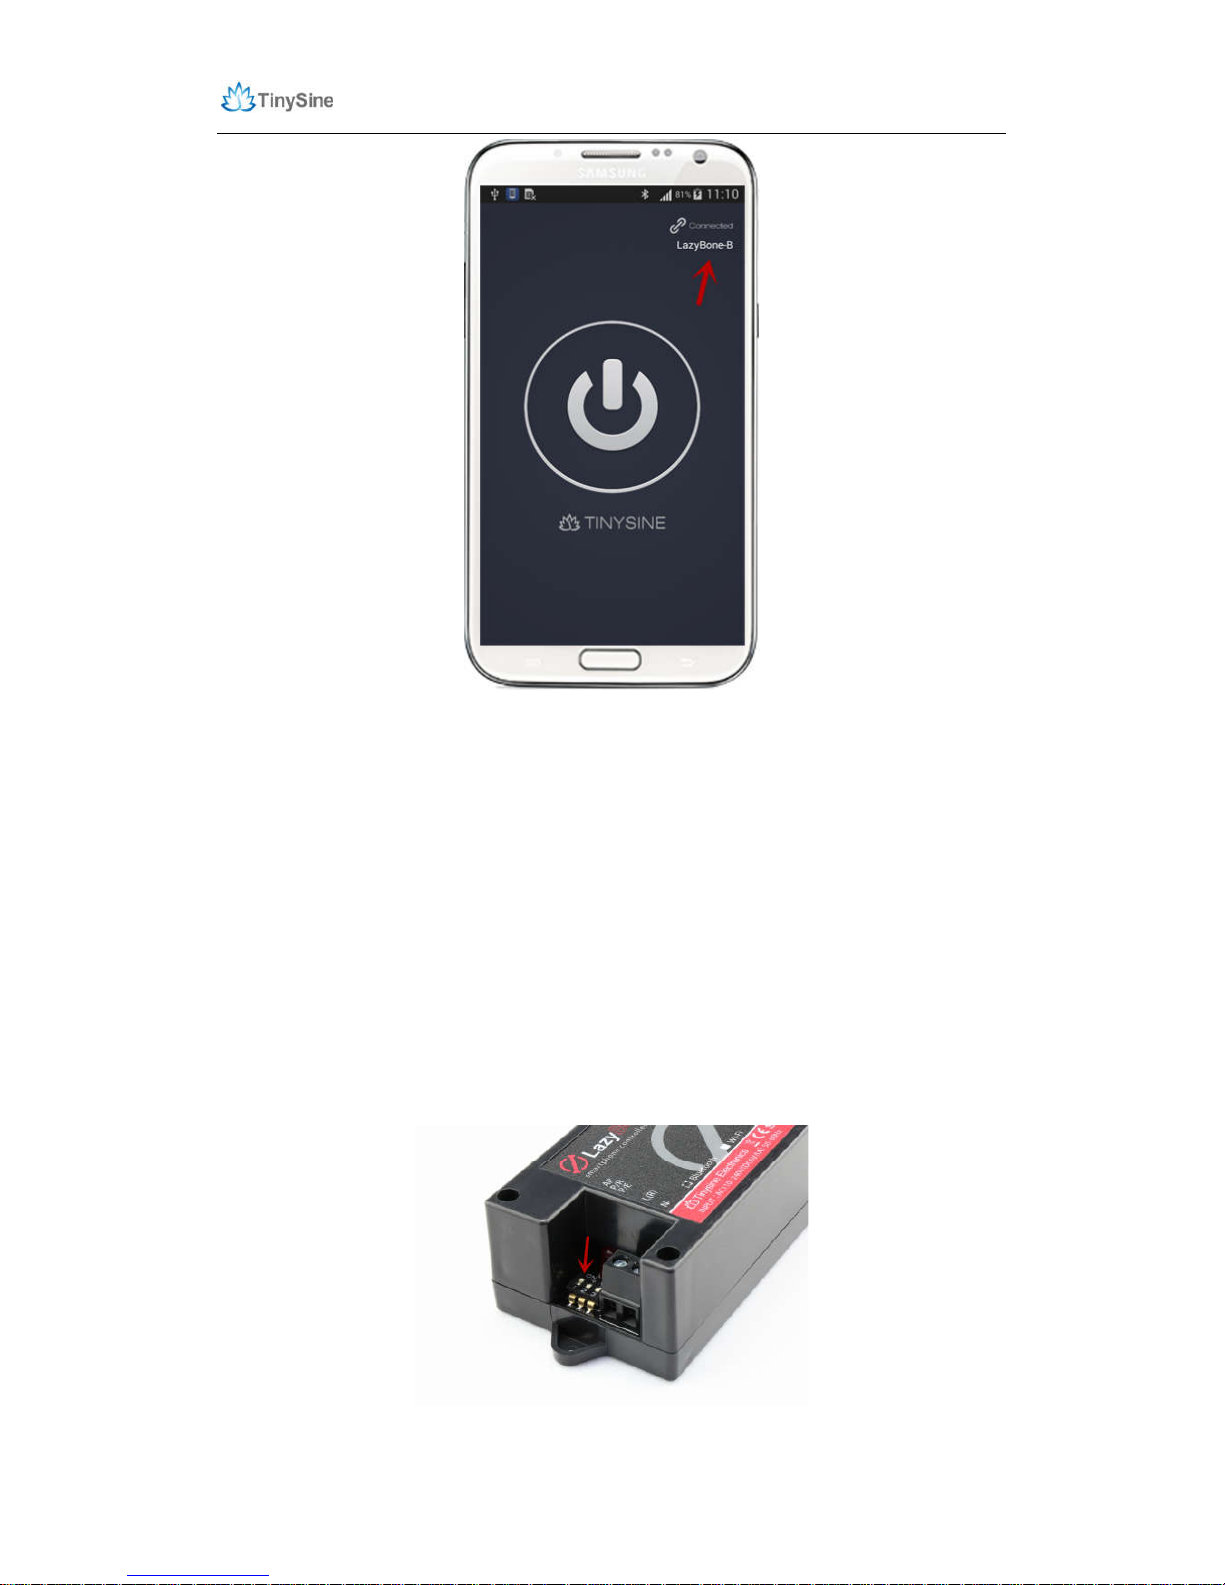
(4) Click “LazyBone-B” to connect it, if your phone has connected to LazyBone
successfully, the interface will show words “Connected: LazyBone-B” at the top.
Page 9
www.tinysine.com/www.tinyosshop.com
Note:
If you have enabled LazyBone V4’s password function, you need to verify the password
before you can control it. Default password is 123456.
WiFi Lazybone
LazyBone V4 (WiFi version) has a WiFiBee WiFi module in it. You need to configure the
WiFi module before you use it.
Here we have two ways to configure your LazyBone:
1. Use the LazyBone APP configure it.
(1) Download Android APP(WiFi Version) or iPhone APP(WiFi Version) and install it to
your phone.
(2) Disconnect LazyBone from power, set AP to position “ON”, then power your LazyBone
again.
Page 10

www.tinysine.com/www.tinyosshop.com
(3) LazyBone will create an AP network automatically. Turn on your phone’s WiFi, you
will find a network named as “WiFly-EZX-XX”, it’s an open network that does not need a
pass phrase or pass key(XX stands for the last two characters of WiFi module’s MAC
address).
(4) Before configure LazyBone, you can control LazyBone point to point to check whether
the connection is good!
(5) Open the APP, click your phone’s screen to pop out the menu → Connect device →
Add new devices, input IP address: 192.168.1.1, port number: 2000. When you see the
words “Connected: xxx”, you will be able to control the LazyBone now!
Page 11

www.tinysine.com/www.tinyosshop.com
Note:
If you have enabled LazyBone’s password, you still need to verify the password at first.
(6) Once you have tested the connection is good, you can start the configuration now.
Exit the app and restart it, click “Configure” then input your wireless network’s settings
step by step, just like SSID, password, and assign a proper IP address.
Page 12

www.tinysine.com/www.tinyosshop.com
Page 13

www.tinysine.com/www.tinyosshop.com
(7) click “Start”, app will send commands to LazyBone automatically. When app shows
“Configuration is complete”, exit the APP and the configuration are finished.
Page 14

www.tinysine.com/www.tinyosshop.com
(7) Power off your LazyBone and set AP back to “OFF”, then re-power the board.
Remember to connect your phone to the network you have set for LazyBone.
Page 15

www.tinysine.com/www.tinyosshop.com
2. Configure with commads directly.
(1) Make sure you have set LazyBone’s AP to position “ON”. And power up your
Lazybone.
(2) Set your computer to obtain IP address automatically and open the network list. You
should see a wireless network named Wifly-EZX-XX, click it to connect.
Page 16

www.tinysine.com/www.tinyosshop.com
NOTE: It may take a while for Windows to connect to the network and assign an IP
address. You can check the IP address of your computer by running the ipconfig
command in the command window. Once connected, this command will show you the IP
address and net mask.
The IP address assigned by Auto IP must be on the subnet 192.168.1.x, otherwise the
LazyBone’s WiFi module will not be accessible.
If your computer has both wireless and wired interface hardware, please disable the
Page 17

www.tinysine.com/www.tinyosshop.com
wired LAN interface hardware before connecting to the AP network, or the computer may
assign an IP address that is not on the same subnet as the WiFi module.
(3) Run Hyper Terminal and create a new connection. Set Host address to 192.168.1.1,
Port number is 2000.
(4) Once connected with a proper IP address, you should get the response *HELLO*.
Input escape sequence $$$ to make the WiFi module enter commands mode, and Hyper
Terminal should returns CMD to you.
Page 18

www.tinysine.com/www.tinyosshop.com
(5) Now you can setup WiFi module’s settings. Input every command on your keyboard,
and click the Enter button after each command to send. The Hyper Terminal should
return AOK.
set wlan phrase <your WPA password>
set wlan ssid <your network ssid>
set wlan join 1
save
If you want a fixed IP address, please use these commands below:
set ip a <your IP address>
set ip dhcp 0
set sys printlvl 0
save
reboot
Page 19

www.tinysine.com/www.tinyosshop.com
Here we set IP address to 192.168.3.185 for demo purposes.
(6) When the configuration has finished, close Hyper Terminal, disconnect LazyBone
from its power, change AP back to “OFF”, and re-power LazyBone again.
2. Connect LazyBone to Android phone/iPhone
(1) Open the app, click Connect Device to Add new devices. Input the configuration
information as we have set before. You can input a name for LazyBone in the first line.
The second line is the module’s IP address, which in our case we write 192.168.3.185,
and the third is the port, which we set to 2000, then click “ok”.
Page 20

www.tinysine.com/www.tinyosshop.com
(2)When you see the words “Connected: LazyBone”, it means our phone has connected
to LazyBone, and you can use LazyBone to turn your bulb on or off!
Page 21

www.tinysine.com/www.tinyosshop.com
Step 3: Control your Bulb
Normal mode
Once your phone has connected to LazyBone, click the button in the middle to activate
the bulb, and the button will become blue at the same time. Click it again to deactivate
the bulb.
Advanced Features:
Rename your device
If you have multi LazyBones, you can rename it for each device. Just click the words
“LazyBone-B” then input a new name for your LazyBone. This name is stored in your
phone, when you search for the same device next time, it will appears with the new name.
Page 22

www.tinysine.com/www.tinyosshop.com
Page 23

www.tinysine.com/www.tinyosshop.com
Pulse output
LazyBone will have a pulse output when you turn on the momentary mode. You can set
the pulse time from 100ms to 20s. In momentary mode, when you click the main main
button. The relay will turn on and hold on a while then release.
Page 24

www.tinysine.com/www.tinyosshop.com
Auto Disconnect
Lazybone can only be controlled by one phone at one time. If you turn on the auto
disconnect, The APP will disconnect the connection after a while no actions. So the other
people can connect and control it.
Change password
If you have enabled LazyBone’s password function, you will find a option in menu named
as “Change Password”. Choose this option to change the default password, the
password can only be 6 digits, and new password will works when you connect with
LazyBone next time.
Page 25

www.tinysine.com/www.tinyosshop.com
Page 26

www.tinysine.com/www.tinyosshop.com
Note:
If you forget the password, just reset it to default settings.
(1)Power off LazyBone, change the second switch named as “P/R” to position ON, then
re-power LazyBone.
(2)Set P/R back to OFF, wait for seconds, the password will be reset to default password
123456.
Page 27

www.tinysine.com/www.tinyosshop.com
Control LazyBone (WiFi version) via internet.
For this feature, please view the APPENDIX-3, where we discuss more details.
We’ve now covered how to use LazyBone to control a bulb, and you can also use it to
control other electrical equipment or your garage-door. We hope LazyBone can bring
convenience and ease to your life. If you have any problems or suggestions, please do
let us know!
NOTICE
1. Make sure your wire is strong enough to bear high voltage and that the electrical
equipment is certified as reliable and secure.
2. Keep your device uncharged when wiring or checking for problems. Never try to touch
the power input and/or output ports when powered, as this can be extremely dangerous!
Take extra precaution if you have to examine the power input or output ports.
3. Keep your device working in a dry environment, and never pour liquid on the device.
This device doesn’t have waterproof performance.
4. Don’t open the shell of the device or leave the circuit board exposed when working.
5. Keep your kids or pets away from this device.
APPENDIX
1.GL5A Relay Datasheet
2.RN171 WiFi Module Datasheet
3.Control WiFi LazyBone via Internet
Contact us
Address:
Tinysine Electronics
10-301,Shen Gang Cheng, Xiang Zhang Road, Hefei, Anhui, China
Page 28

www.tinysine.com/www.tinyosshop.com
Tel:
+86-551-65365921 Ext 801
Fax:
+86-551-65365931
Email: customerservice@tinyosshop.com
 Loading...