


INSTRUCTIONS MANUAL
1. INTRODUCTION
This manual provides instructions for the operation of your new TinyLoc R1+ digital receiver and an explanation of the technique of radio-tracking.
The receiver is very simple to operate by using a menu to select different options in a similar way to a cell
phone.
Thanks to its small size, light weight and ergonomics, the search can be done even with only one hand
The receiver incorporates a small folding antenna on one side although, if necessary, it may be
connected to an outside antenna with more gain.
The receiver includes a light sensor to illuminate the screen when day light is insufficient.
It operates on normal batteries, so that if the batteries become flat while in the field it is not necessary to recharge them for hours.
A frequency search consists of pressing a single button, making manual tuning unnecessary. This
innovation means that the signal sent by the transmitter is received at the ideal frequency.
It offers improved features, with less background noise, more sensitivity and better discrimination.
All this means there is a considerable increase in the operating range.
It covers a wide range of frequencies thus enabling it to work with a higher number of transmitters
and reducing the probability of one interfering with the other (3,790 channels).
It allows to save up to 100 transmitters
Each receiver includes:
A practical belt-mounted pouch
4 alcaline batteries
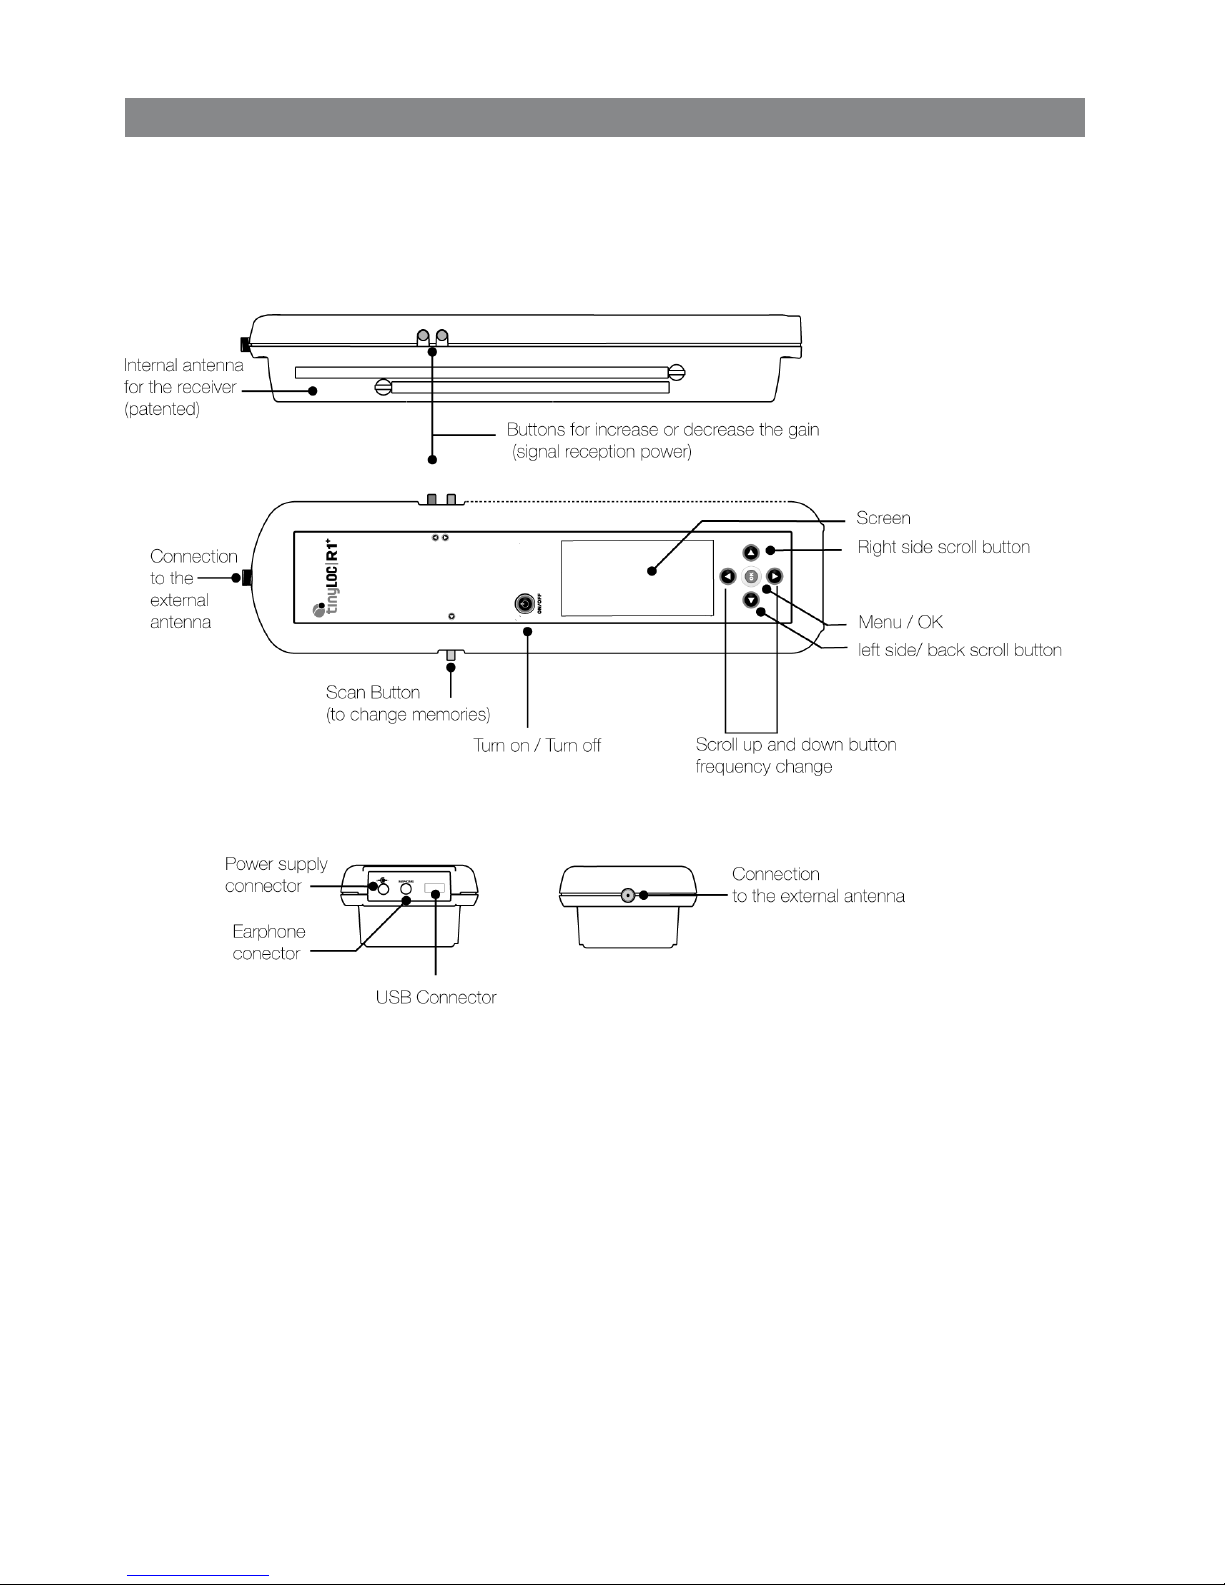
2. PARTS OF THE RECEIVER
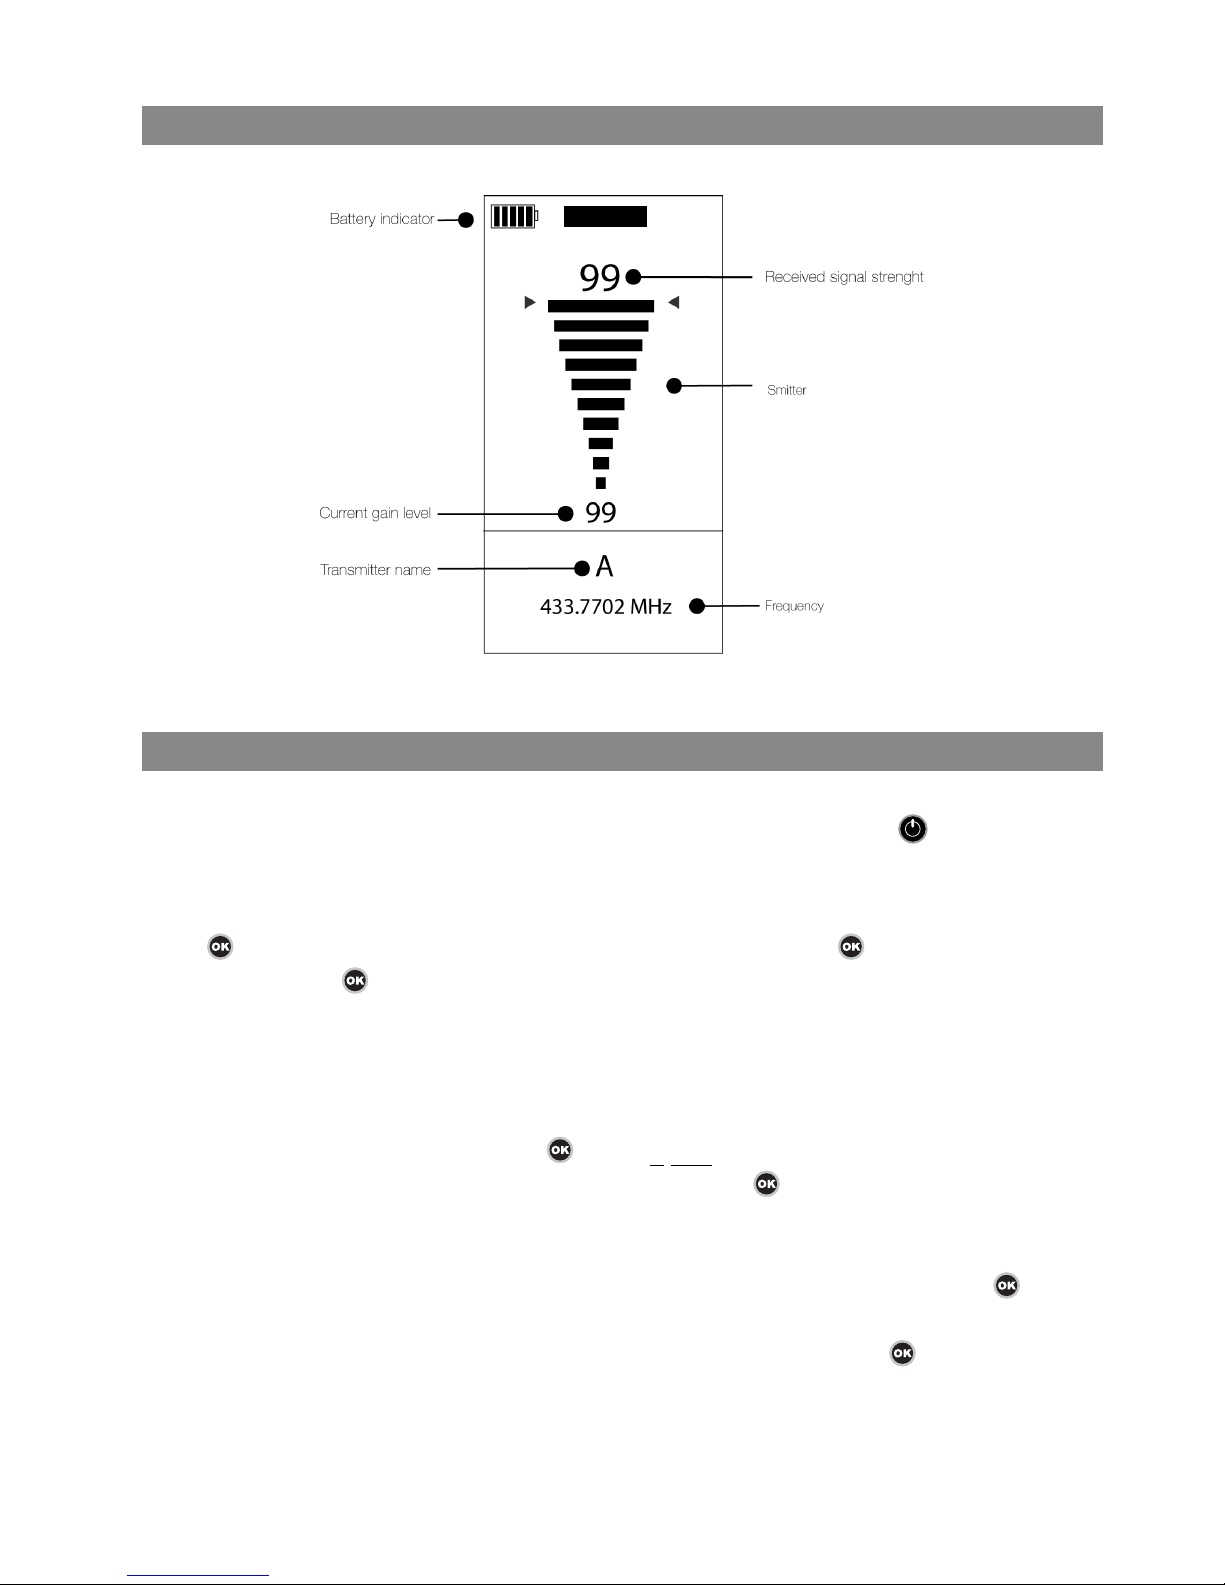
3. SEARCH SCREEN
4. START
For switching
“On”/”Off”
the receiver, press during 3 seconds the button
4.1 STORE A TRAnSMITTER In THE RECEIVER MEMORY
Press , you will find the option “Transmitters”, confirm it pressing , then confirm the option “add” pressing again.
In the following screen we should introduce the transmitter frequency.
The receiver will show by default the first two digits of the frequency (43_._ _MHz). These two
first digits will remain the same.
Use the lateral keys to select the digits corresponding the full frequency which appears in the
transmitter. Confirm each digit pressing (ex: 433.150 MHz).
Once the frequency has been introduced, confirm pressing
and follow the steps as appear
in the screen to calibrate the transmitter.
When the calibration is finished, in the screen will appear
“
TRAnSMITTER AddEd
”
, press to
enter name “. Now you need to introduce the name assigned to the transmitter: Use the keys
to browse through and select every single letter on the screen , pressing to save.
If you need to help other users in their searches and the transmitter is not available for an
automatic calibration, you must introduce manually the frequency.
ANT EXT

5. SEARCH PATTERN
Place the transmitter on the target to be followed and you will be ready to start radio-tracking
searching.
When the transmitter has been recorded in the receiver and calibrated, go to “search” screen. On the bottom of the screen will appear the name and frequency of the transmitter we are searching. Please ensure it
is effectively the transmitter you want to track.
Each signal pulse from the transmitter is received audibly through the loudspeaker and visually on the smitter bar. At more gain more signal will be received. Therefore, begin at the maximum level to receive the first
signals from the transmitter.
When you approximate the target, the level of signal will increase. When the level increases, reduce the
value of the gain. The smitter should be always about half of the scale. Use the visual scale marks below
the screen as a guide. If the signal increases on getting closer to the transmitter, reduce the gain to return it
to half the smitter scale.
The numerical value will be displayed on the top of the screen (values between 0 to 99), it will be updated
when we change the gain and when the signal of the transmitter is received.
This system is very useful to compare the intensity of the signal coming from different direc
tions.

Figure A
5.1 RAdIO TRACKInG
Radiotracking system allows the user to locate the target and to recover it even if the distance is upper few
tens of kilometers. The transmitters can be placed in animals, people, objects to have control over its position. The expansion of the radiation signal is generated along the antenna as shown in the design below.
For maximum signal reception the receiver should be oriented so that the antenna must be to that of the
transmitter. Once the frequency is tuned it is possible to begin radio-tracking.
Turn around 360º to find out which is the correct direction; you will notice a stronger signal level.
Please remember:
• The correct way to use the receiver is to place it
horizontally on the palm of the hand and hold it
with the fingers (Figure A).
• Don´t touch the antenna when holding the unit.
• Make sure the correct antenna has been se-
lected. You would be using the internal antenna
when the option corresponds to the antenna fitted on the receiver. The external antenna is an
optional device that must be installed.
• Keep in mind that the animal (target) is in movement therefore the transmitter position will experience variations depending on that factor.
The correct way to make the search will be as
in Figure B.

Figure B
Figure C
• Increase the gain as much as possible and scan
with the receiver held flat and turning 360º to receive the first signal pulses.
• Start increasing the gain as much as possible and
scan with the receiver held flat and turning 360º to
receive the first signal pulses. If the signal level is
the same in all the directions reduce the gain to half
the smitter bar. If necessary, readjust the gain level
and repeat the scan to verify that the correct direction is being followed. And so on successively until
finding the transmitter.
• The transmitter antenna may be positioned vertically, horizontally or inclined to the receiver antenna. This is why it is important to move the receiver
antenna in all directions: horizontal, vertical and
inclined. (See figure B)
• The R1+ must be behind the users body.(Other-
wise, the radio-tracking mode would not be able to
distinguish between incoming signals from the front
and the back.)
• The range of the receiver is much greater if you
track from hills or other elevated areas. Even something as simple as lifting it above your head may
be enough to add several kilometers to its range.
(See figure C)

6. IMPORTANT INFORMATION
Transmitters do not have their complete frequency printed on the label (for example 433.4560 MHz), but an
abbreviation.
In the example 3,456 MHz: number 3 indicates the last digit of the 433 frequency range. Neither is the last
digit recorded as it varies according to environmental conditions; it is automatically adjusted when executing the function test for automatic calibration. This enables searching with greater precision.
The TinyLoc R1+ receiver covers a larger range of frequencies to work with a greater number of transmitters (3,790) without so much probability of no interference between them. (432.0000 and 434.7900 MHz).
Up to 100 transmitters could be stored in the memory.
Use the same procedure to edit the memory or delete it, if necessary.If the memory is full, a warning message will be displayed.
6.1. TEST (AUTOMATIC CALIBRATIOn Of A TRAnSMITTER fREQUEnCY)
Be aware that the transmitter frequency may suffer variations due to temperature and environmental
changes. Therefore we advise you to make a calibration after long time of no use or change of season
(winter/summer).
The function “Calibration” has been designed
This patented function test automatically and precisely calibrates the unit by scanning a bandwidth of 3 KHz,
on both sides of the central frequency written on the transmitter being tuned, thus ensuring good tuning
even though transmitter has deviated by up to 3 KHz.
It is important during the execution of this function, to be at least 5 metres away from any source of
radiofrequency (other transmitters, mobile telephones, electricity grids, cars, etc.) to prevent interference
problems.
Even if we don´t have the transmitter we can do the adjustment from the searching screen. With the
keys
frequency could be increased/decreased digit by digit (100 Hz by 100 Hz) to the exact
point of maximum reception.
We advise you to make the
“T
EST
”
outdoors with environmental conditions as similar as possible to the
conditions you find when you operate the device to avoid changes on the frequency.
6.2 InTERnAL And EXTERnAL AnTEnnA
To guarantee the usability of the receiver it is absolutely necessary to select the correct antenna. Usually the
receiver works with the internal antenna. If you fit an external antenna (car for example) you must change
the option. To do it, press
(to access the MENU), select the option
“A
nTEnA
”
and confirm pressing
Next screen will show the antenna that is currently working, to change it select “
Y
ES
” and confirm
pressing
.
In the searching screen will appear the selected option which is working: ANT EXT

SPECIFICATIONS
Power source
Receiver sensitivity
Frequency range
Operating temperature
Storage temperature
Index of protection
Weight
Dimensions (antenna not extended)
5 volts (4x LR6 “AA”). Do not use rechargeable batteries.
-146 dBm
UE /AUS/NZ (433.050-434.750 MHz)
Model 410
-15º to 50º C (5º to 122º F)
-20º to 70º C (-4º to 158º F)
IP 20
520 g with batteries
245x66.5x40 mm
Hereby, Tinytronic S.L, declares that this device is in compliance with
the essential requirements and other relevant provisions of Directive 1999/5/CE.
GENERAL CONDITIONS OF SALE AND WARRANTY
See our Declaration of Conformity at: http://www.tinyloc.com/declarationofconformity
6.3. CHAnGInG BATTERIES And EXTERnAL POWER SUPPLY
The receiver is powered by 4 AA 1.5 V batteries (LR6).
The receiver must be turned off when changing the batteries. Remove the 2 screws from the base of the
receiver and raise the cover.
This provides access to the battery compartment. First insert one battery in the correct direction and then
push it so that it slides along the guide to the back of the compartment. Then insert the next battery. Perform the same operation with the two remaining batteries. Make sure they are inserted correctly by following
the diagram showing the direction of each one on the bottom the battery compartment.
Once the batteries are inserted, close the cover.
The receiver will maintain all the configuration it had before changing the batteries (memories, antenna
selection, channel search, etc.).
It is also possible to connect an external power supply to the receiver from the vehicle power outlet using
the special adaptor.
Do not use rechargeable batteries.
NOTE: The receiver incorporates a battery level indicator which will show when to change the batteries.
When the batteries are at the transmitter will not be lost as simply replacing them enables the search to continue, thus avoiding the problem of not being able to use the receiver while the battery is being charged.
 Loading...