

Page 1

T706 User Manual
Using Your Tiny Book
TM
Page 2

This User Manual will guide you through the initial setup and hardware features of
your TINY BOOK.
User Manual Sections:
A. Introducing the Tiny Book
TM
Tiny Book
TM
Do's and Don'ts
B. Getting to know your Tiny Book
TM
Hardware Features and Use
C. Getting Started
Initial Setup
D. Using your Tiny Book
TM
Tiny BookTM Programs and Utilities
Notes and Warnings
NOTE: Extra information that may be useful.
WARNING: Please follow this information carefully for the safe and proper
function of your Tiny Book
TM
.
Page 3
A. Introducing the Tiny BookTM
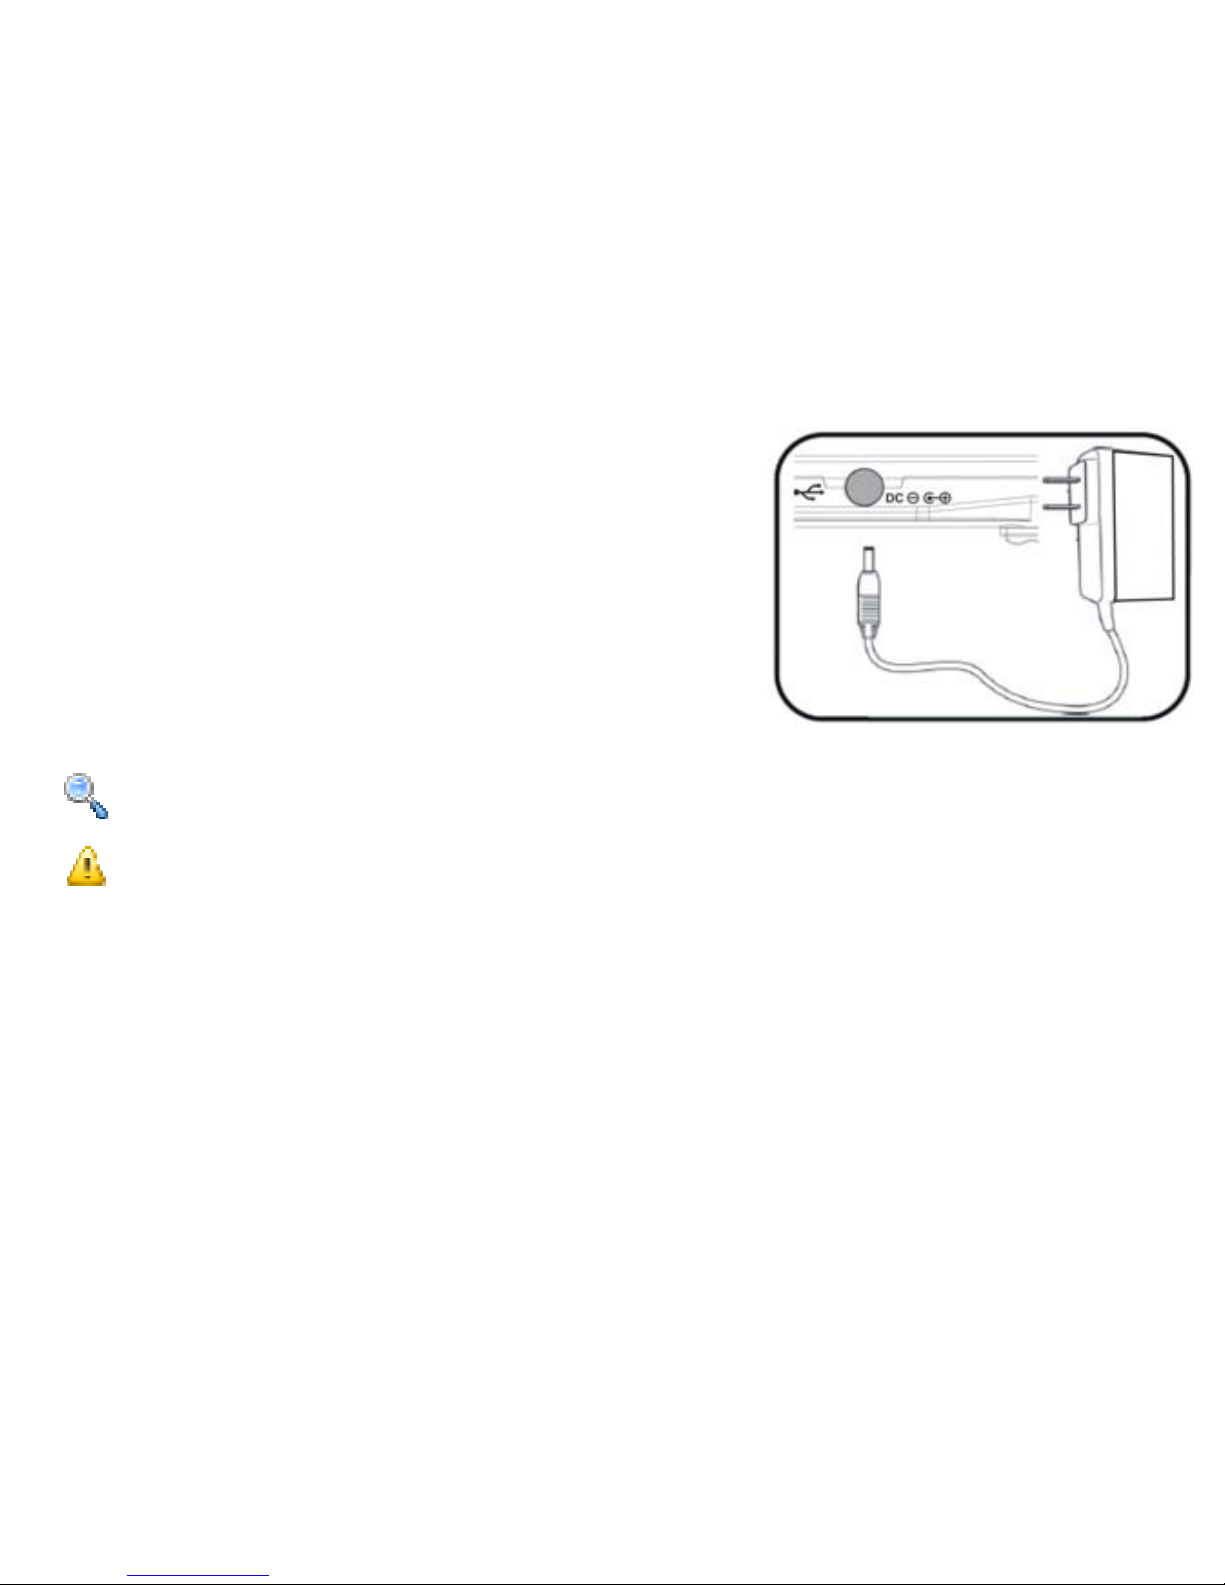
Charging Your Batteries
Before use, please charge your Tiny Book
TM
for 8
hours. This will help extend the lifetime of the
battery.
A fully charged battery pack can power your Tiny
Book
TM
for about 3-4 hours. Running time may vary
depending on use. Video playback, Wi-Fi use, and
similar applications may shorten the available time.
NOTE: The battery charges as long as the AC adapter is plugged in an AC powe
r
source.
WARNING: DO NOT LEAVE YOUR Tiny BookTM TO CHARGE OVERNIGHT OR
LEAVE IT PLUGGED INTO AN AC POWER OUTLET FOR LONG PERIODS OF
TIME TO AVOID OVERHE ATING OF NOTEBOOK.
Safety Precautions
The following safety precautions will increase the lifespan of your Tiny Book
TM
. Follow
all instructions and warnings listed in this guide. Do not attempt to open or take apart
your Tiny Book
TM
. If there are any problems with your Tiny BookTM, refer all servicing to
qualified personnel or contact our service hotline to find information for the nearest
Page 4

service center.
• Do not place the device on unstable surfaces. Always make sure that the device
is operating on an even or balanced area.
• Do not use any chemical liquids on the display panel or the surface of the device.
• Do not expose to dusty or dirty environments.
• Do not press on or apply excessive force to the display panel.
• Do not operate the device on your lap or any part of your body for extended
periods to prevent injury from heat dissipated by the device.
• Do not place or drop anything on the device as this may break the display panel.
• Do not put or force foreign objects into the vents or open holes on the device.
Foreign objects may disrupt the power within the device and cause damage.
• Do not expose or use the device near liquids, water or excessive moisture.
• When there is an electrical storm, avoid using any electrical devices since
electrical current supply could be unstable.
• Do not expose to strong magnetic or electrical fields.
• Do not expose your device to extreme heat.
• Properly shut down the device after using.
• Do not cover the device while it is powered ON. Keep materials away that would
reduce the air circulation within the device.
Page 5

Transp ortation Precautions
When travelling with a Tiny Book
TM
, be sure to turn OFF your device when on the
move. This will prevent damage to the hard disk and to other internal hardware.
NOTE: Be sure to turn OFF your device before closing the display panel. Do not
close the display panel while the device is ON.
Airport Precautions
Contact your airline or your flight attendant if you plan to use your Tiny Book
TM
on the
airplane for any rules or restrictions for electronic device use onboard. There are three
main airport security devices used:
X-ray Machines ( mostly used to check items on a conveyer belt),
Magnetic or Metal detectors ( used on people for security checks), and
Hand Held Magnetic Devices.
NOTE: Make sure to turnoff your Wi-Fi when on the plane as this may disrupt the
airline communication.
WARNI NG: Do not expose your device to magnetic devices as this may damage
your laptop.
Page 6
B. Getting to know your Tiny Book
TM
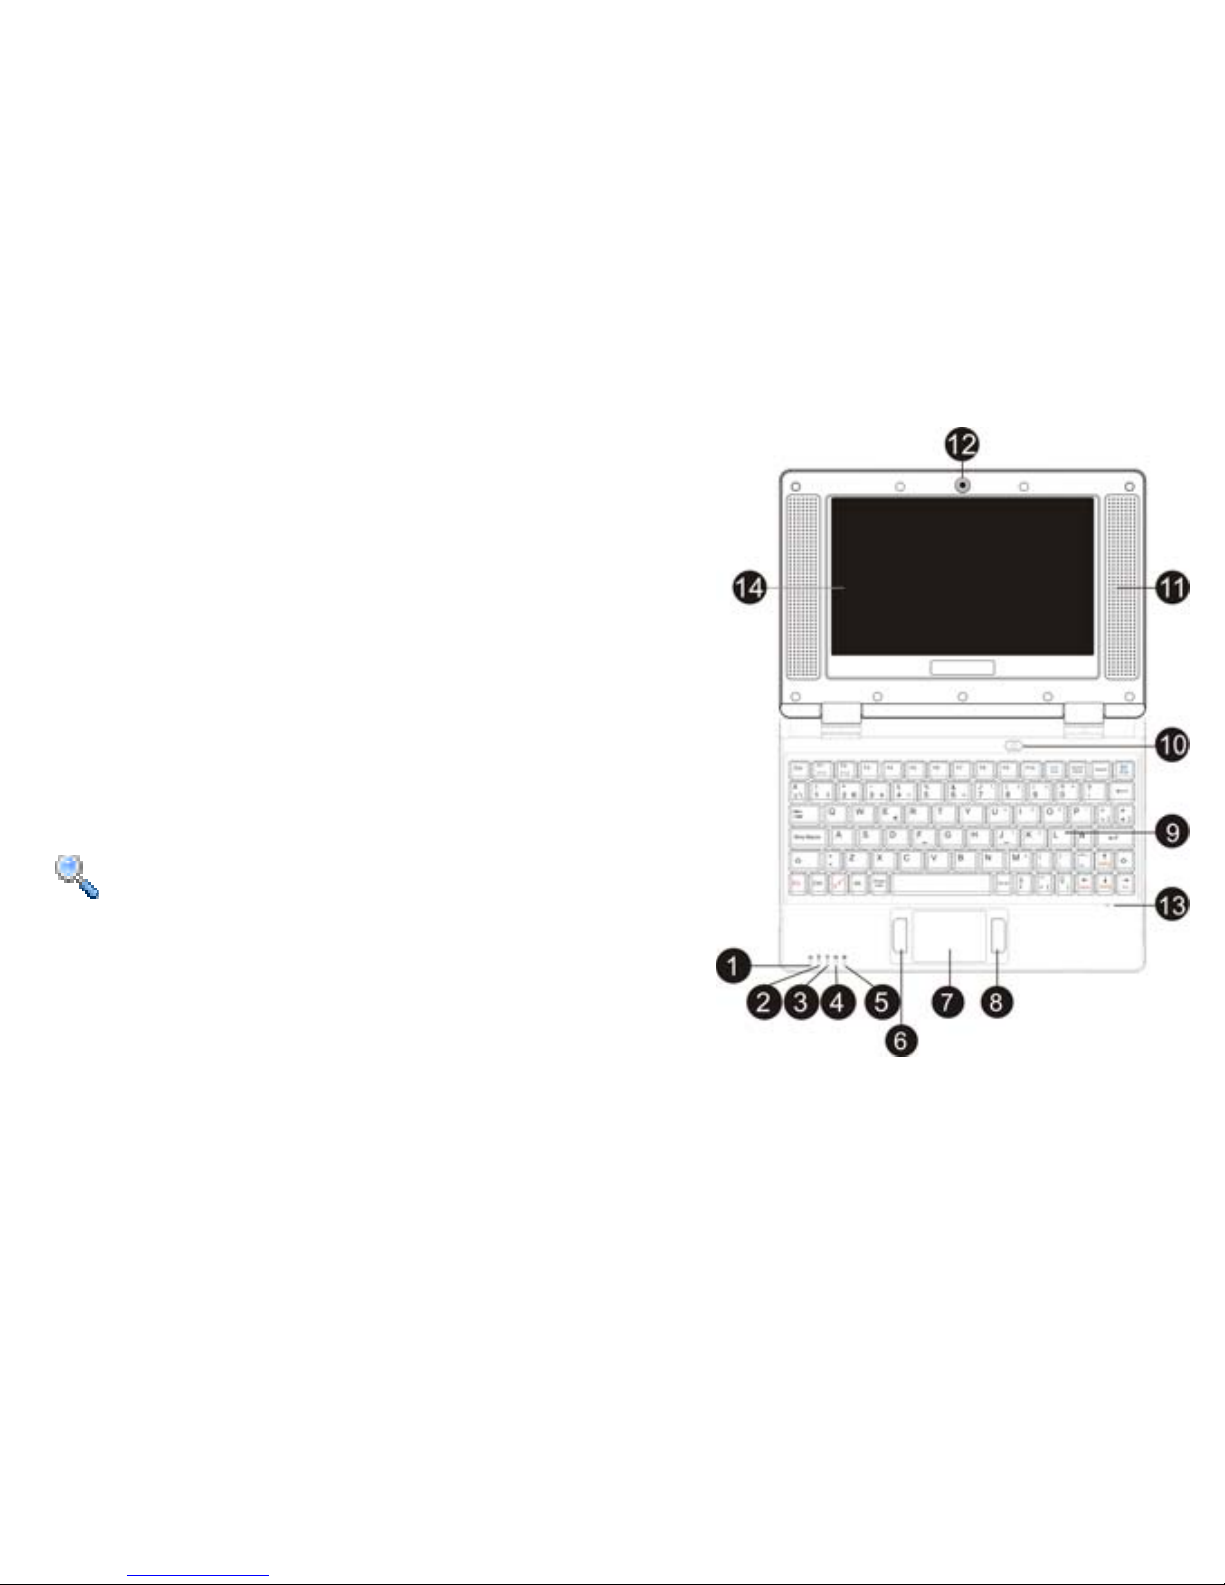
Get to know your Tiny Book
TM
1-5 Status Indicators
(1) Power ON LED (Blue)
(2) Power DC& Charger LED (Red &Green)
(3) Wireless LAN Activity (Blue)
(4) Number Lock (Blue)
(5) Caps Lock (Blue)
6-8 Touchpad and Buttons
The touchpad surface (7) senses finger touch
movement to move the cursor on the screen. The
buttons (6 & 8) allow for click and right-click.
9 Keyboard
Note: Keyboard may differ by location.
10 Power Button
Press the switch once to turn on and hold it to turn
OFF the Tiny Book
TM
.
11 Built-in Speakers
12 Camera (on selected models)
The built-in camera takes pictures or records
video.
Page 7

13 Built-in Microphone
The built-in microphone allow users to talk to
other people via VOIP
(Voice-Over-Internet-Protocol) using MSN, or
record their voice.
14 Display Panel
The Tiny Book
TM
uses a TFT LCD to produce a
clear and sharp picture.
NOTE: Use a soft cloth with water to clean the display panel.Do not use any
liquid chemical to clean the display panel.
Page 8
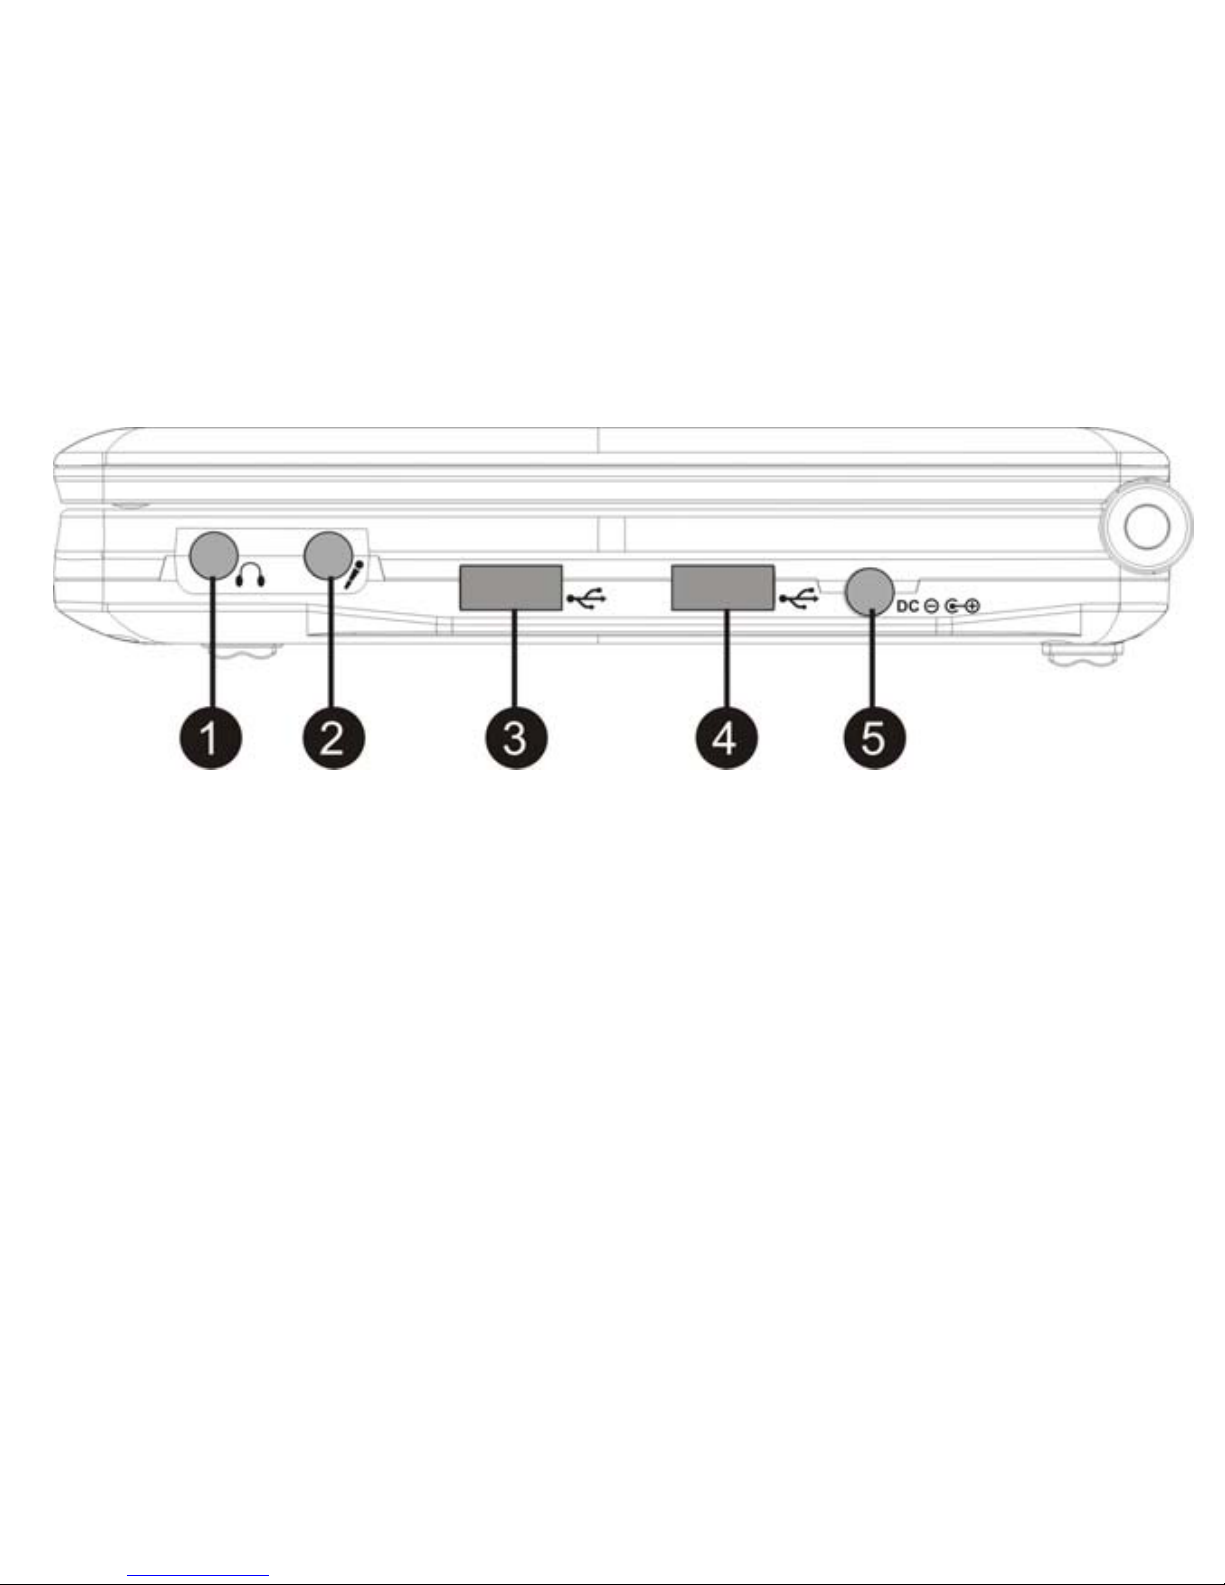
Right Side View
1 Headphone Output Jack
3.5mm stereo headphone jack is used to connect the audio out signal to amplified
speakers or headphones. Using this jack automatically disables the built-in speakers.
2 Microphone Input Jack (Mic In)
3.5mm mono microphone jack is used to connect an external microphone or
other audio devices. Using this jack automatically disables the built-in microphone.
Use this feature for video conferencing, voice narrations, or simple audio recordings.
3-4 USB Port (2.0 Full Speed)
The Universal Serial Bus is compatible with USB 2.0 or USB 1.1 devices。
5 Power (DC) Input
The supplied power adapter converts the AC power supplied to DC power for the Tiny
Page 9
BookTM to use. Power supplied through the use of this jack powers the Ti ny Book
TM
and charges the internal battery pack.
NOTE: Do not use other power adapters, please use the supplied power adapte
r
to prevent damage to the Tiny BookTM.
WARNING: THE ADAPTER MAY BECOME VERY HOT, DO NOT COVER THE
ADAPTER WHEN IN USE AND DO NOT TOUCH WITH BARE SKIN.
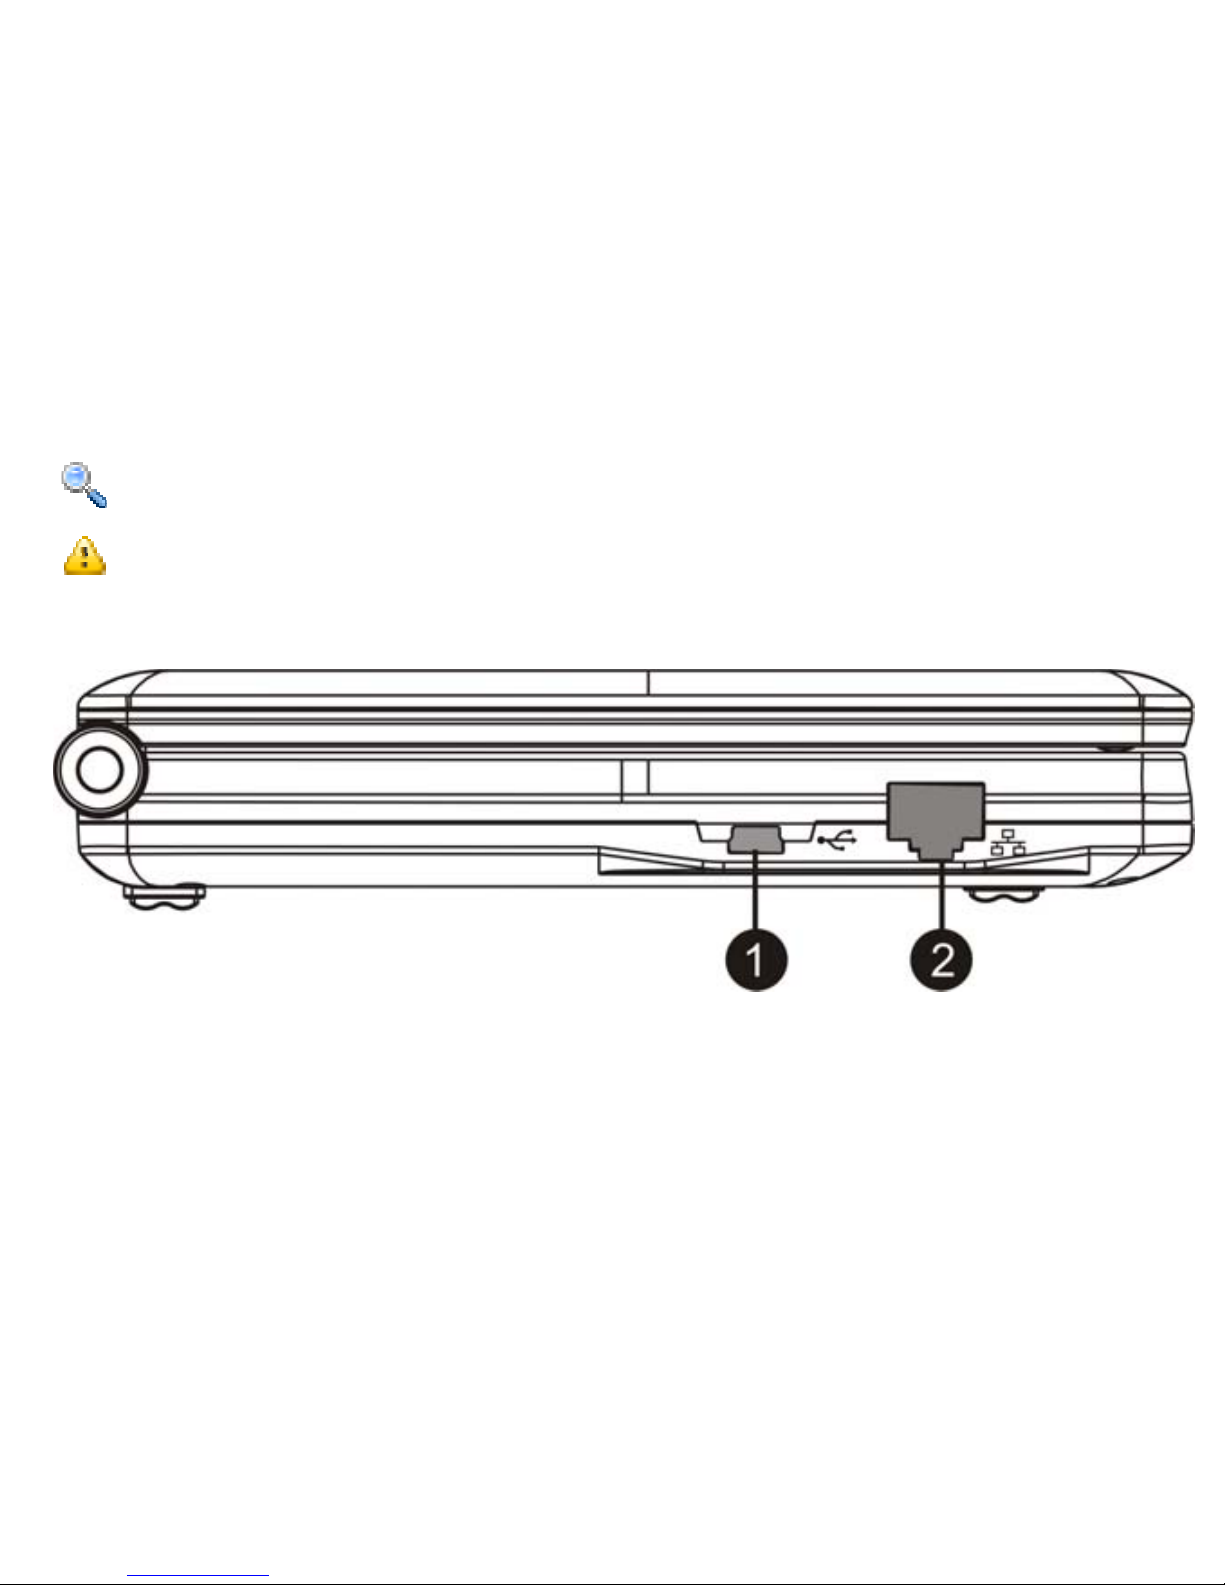
Left Side View
1 Mini USB Sync Connector
The mini USB port can be used to sync your device with your desktop or laptop
computers. Data transfer and application installation on your Tiny Book
TM
are made
easy.
2 LAN Port
Page 10
The LAN port (10/100M Bit) supports
standard Ethernet connection to a local network.
See Chapter 3-1 for connection settings and configurations instructions.
Bottom View
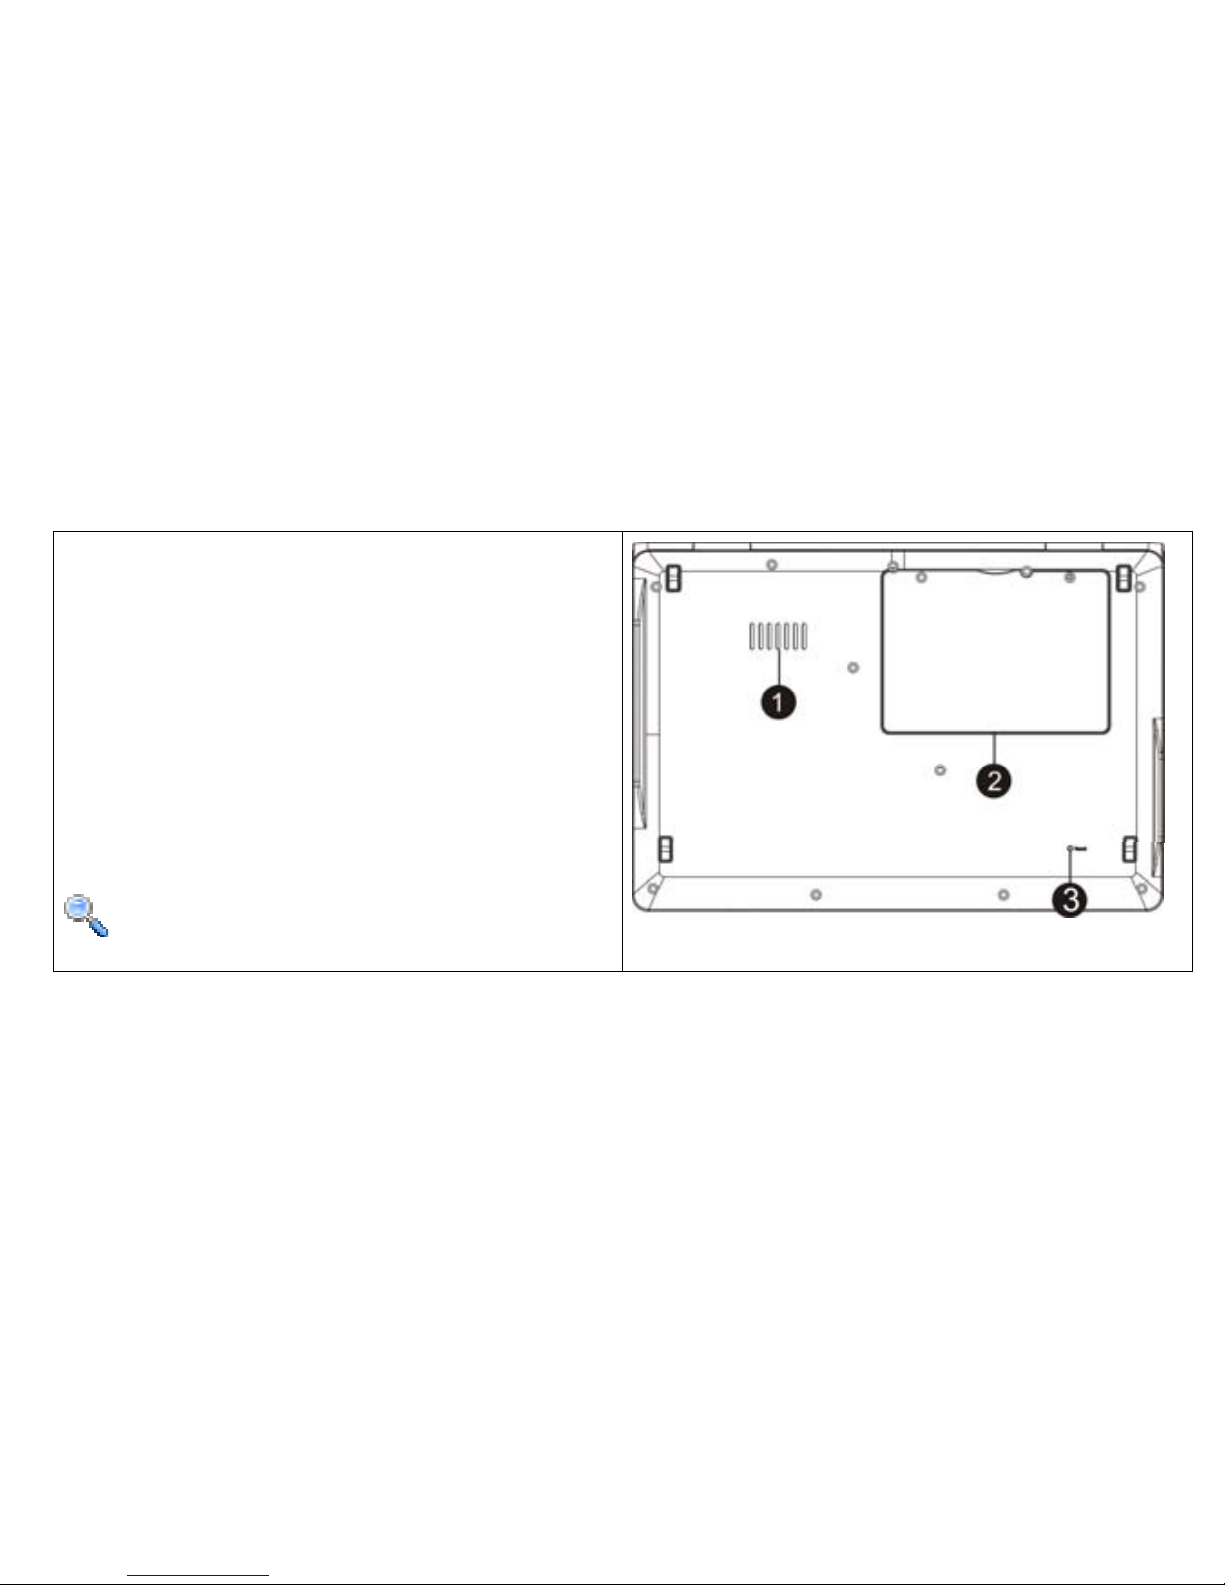
1 Ventilation Openings
These openings allow for cooling excess
heat from the unit.
2 Main Battery Compartment
The Tiny Book
TM
uses a lithium battery.
3 Reset Button
Press the reset button to restart the
computer if it is not responding.
NOTE: This button does not restore
the original factory settings.
Page 11
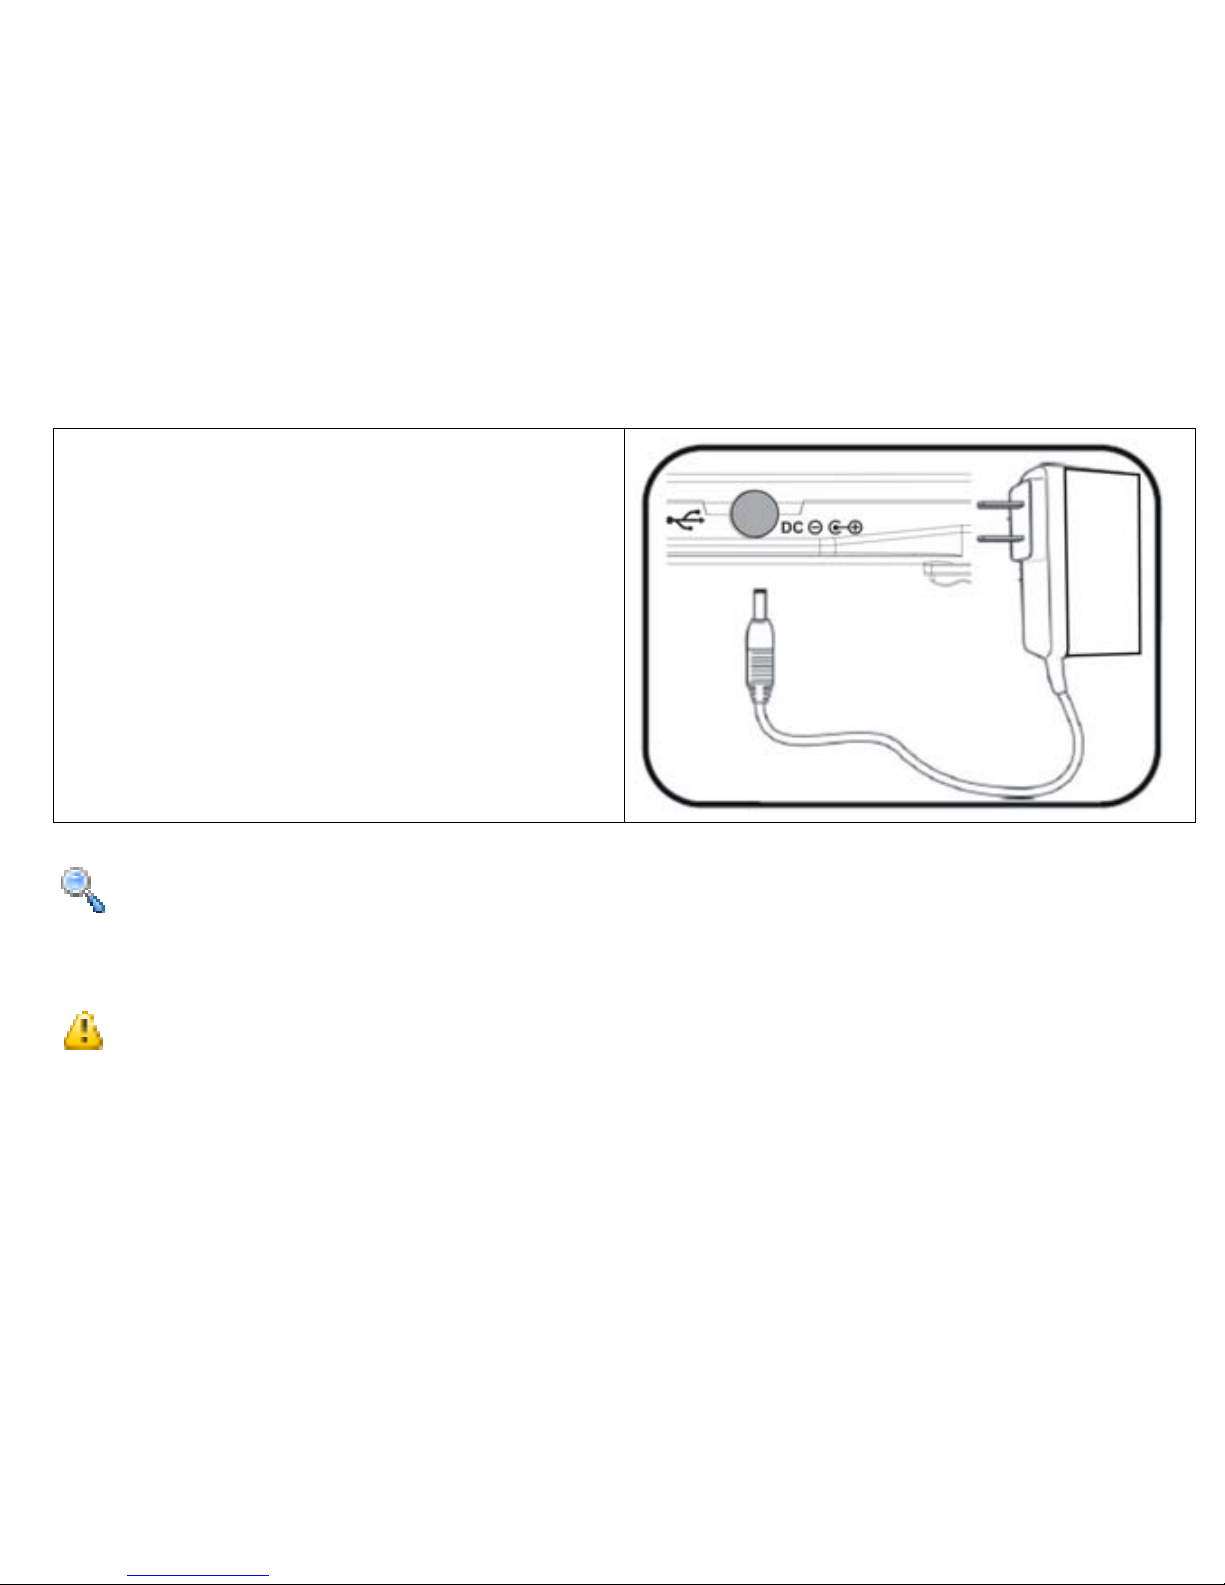
Battery and Power System
Charging and using AC Power
The Tiny Book
TM
comes with an universal
AC-DC adapter for use with either
110V-240V outlets. There are no
switches to adjust and no need to
purchase a power converter when
traveling to different countries. You may
need to purchase a plug converter
separately to convert the adapter plug
when traveling.
NOTE: 1. The Tiny BookTM adapter may have a two or three-prong plug
depending on the country it was purchased in.
2. Damage may be caused if a different adapter is used to power the Tiny Book
TM
.
Always use the adapter that came with the device.
WARNING: THE ADAPTER MAY BECOME VERY HOT DURING USE, DO NOT
COVER THE ADAPTER WHEN IN USE AND DO NOT TOUCH DIRECTLY.
Page 12
Using the Battery Power
The battery pack that comes with the Tiny Book
TM
is secured in the battery
compartment. A fully charged battery will provide 3-4 hours of battery life on your
Tiny Book
TM
.
NOTE: Remember to fully charge the battery before first use and whenever it is
completely drained. This will help extend the battery life of the Tiny Book
TM
.
WARNING: Do not use any other adapter except those provided by your Tiny
Book
TM
retailers. Universal power adapters may have a different voltage and
current output that may permanently damage your Tiny Book
TM
when used.
Emergency Shutdown and Reset
In the event that the operating system cannot work properly or is not responding,
please follow these directions to shut down or reset your Tiny Book
TM
:
SHUTDOWN - Hold the Power button down until the system shuts down
RESET - Press the reset button and the system will reboot (restart).
NOTE: Save your work regularly to avoid data loss in case your system fails to
respond.
WARNING: WHEN Y OU PERFORM AN EMERGENCY SHUTDOWN OR RESET,
ALL UNSAVED DATA WILL BE LOST.
User Interface
The Tiny Book
TM
is designed for ease of use and convenience. All the applications
Page 13
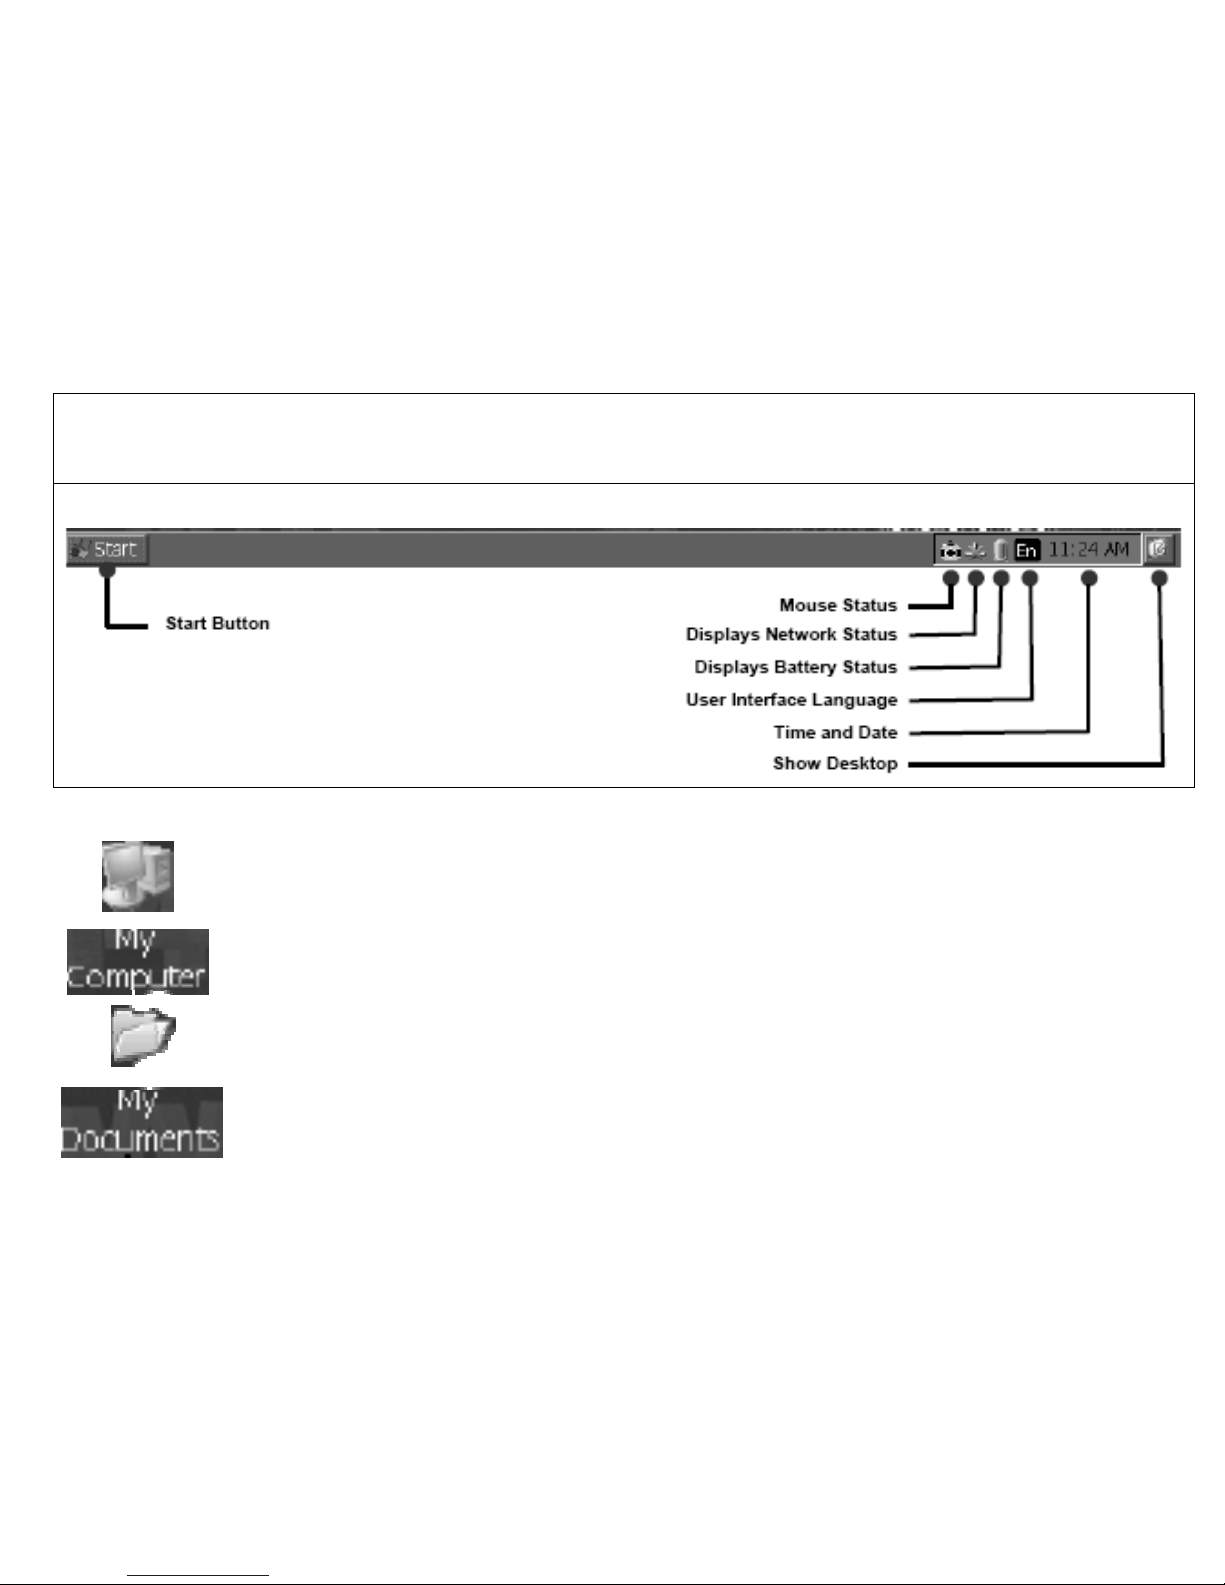
you need are at your fingertips. The simple interface makes it easy to navigate
through your system files and documents.
Status Bar
My Computer displays all the drives and locations.
My Docu ments is a shortcut to all your personal files.
Page 14
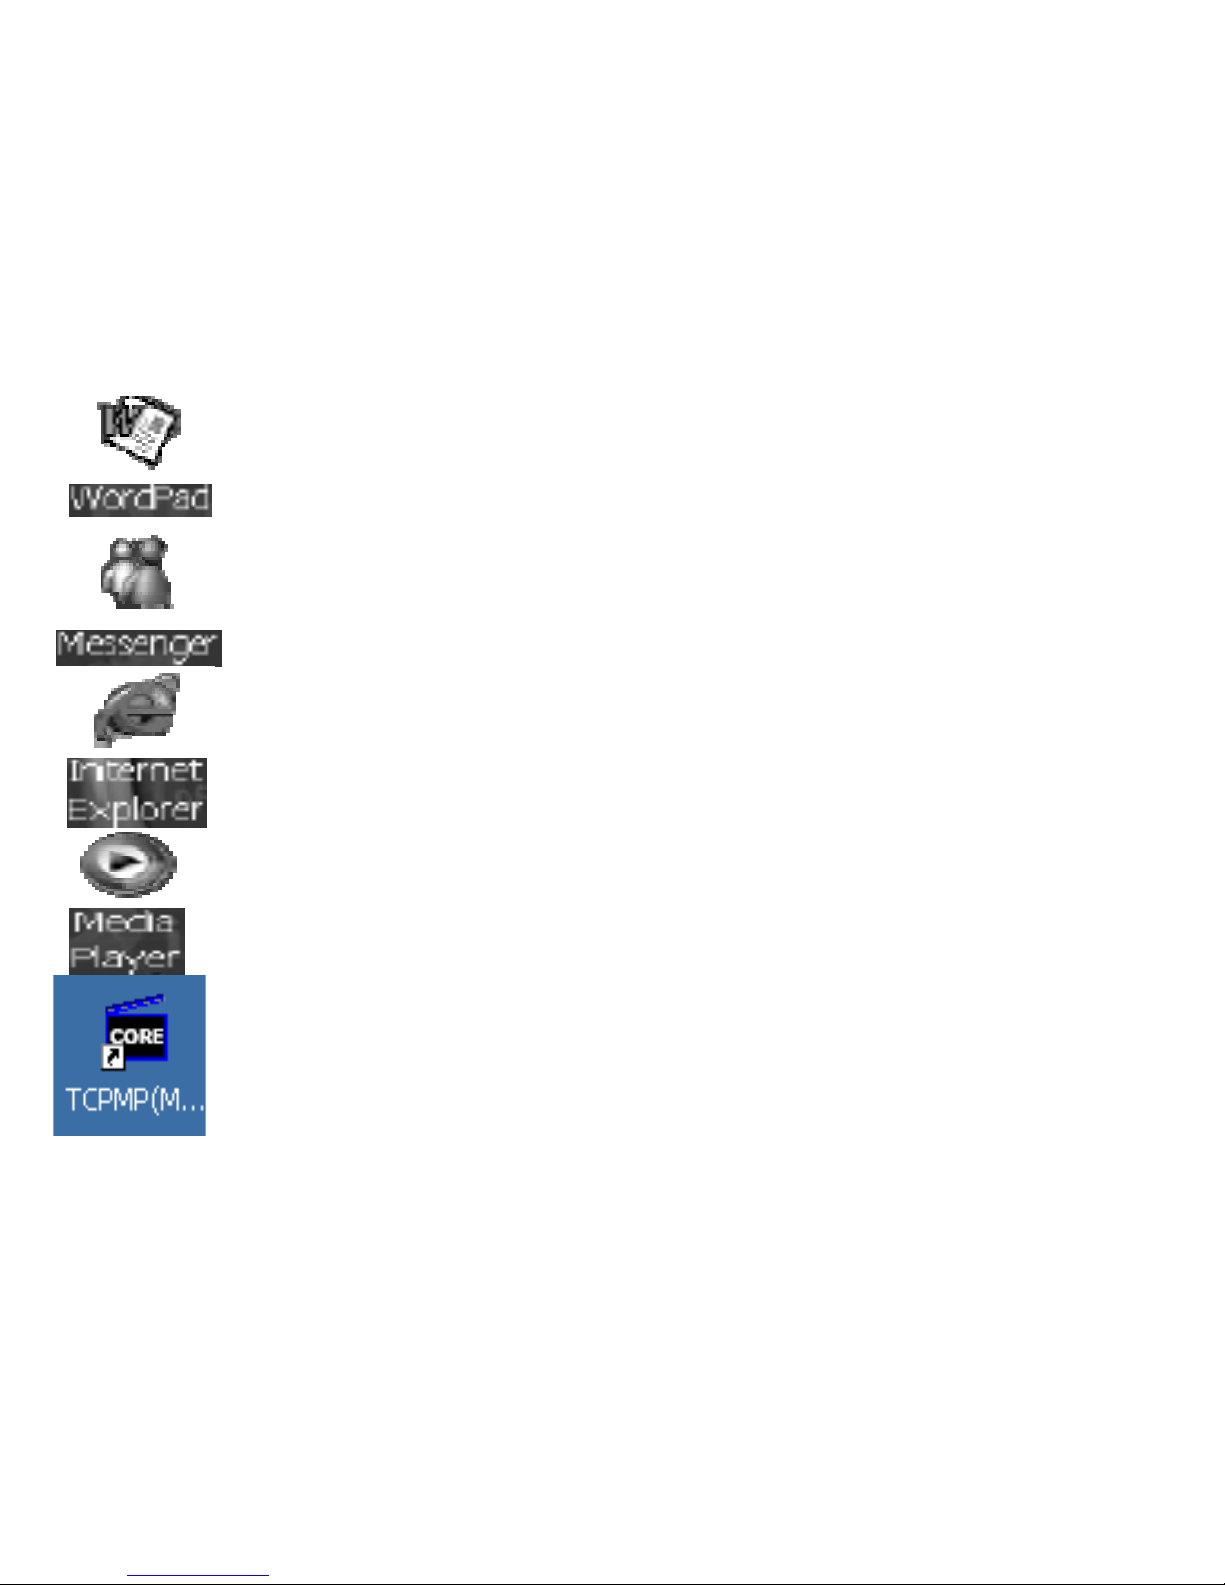
View and Edit simple text documents.
Windows™ CE Messenger V.5 - Chat with your Windows Live
account contacts.
Internet Explorer 6 - Access web pages using this browser.
Media Player 9 - You can play your Music and Video using the Media
Player 9. Plays music (MP3 and WMA) and videos (MP4 and AVI).
TCPMP - You can also play other formats of music and videos using
this media player. Support AVI,MP4,ASF,WMV,FLV video file.
Page 15
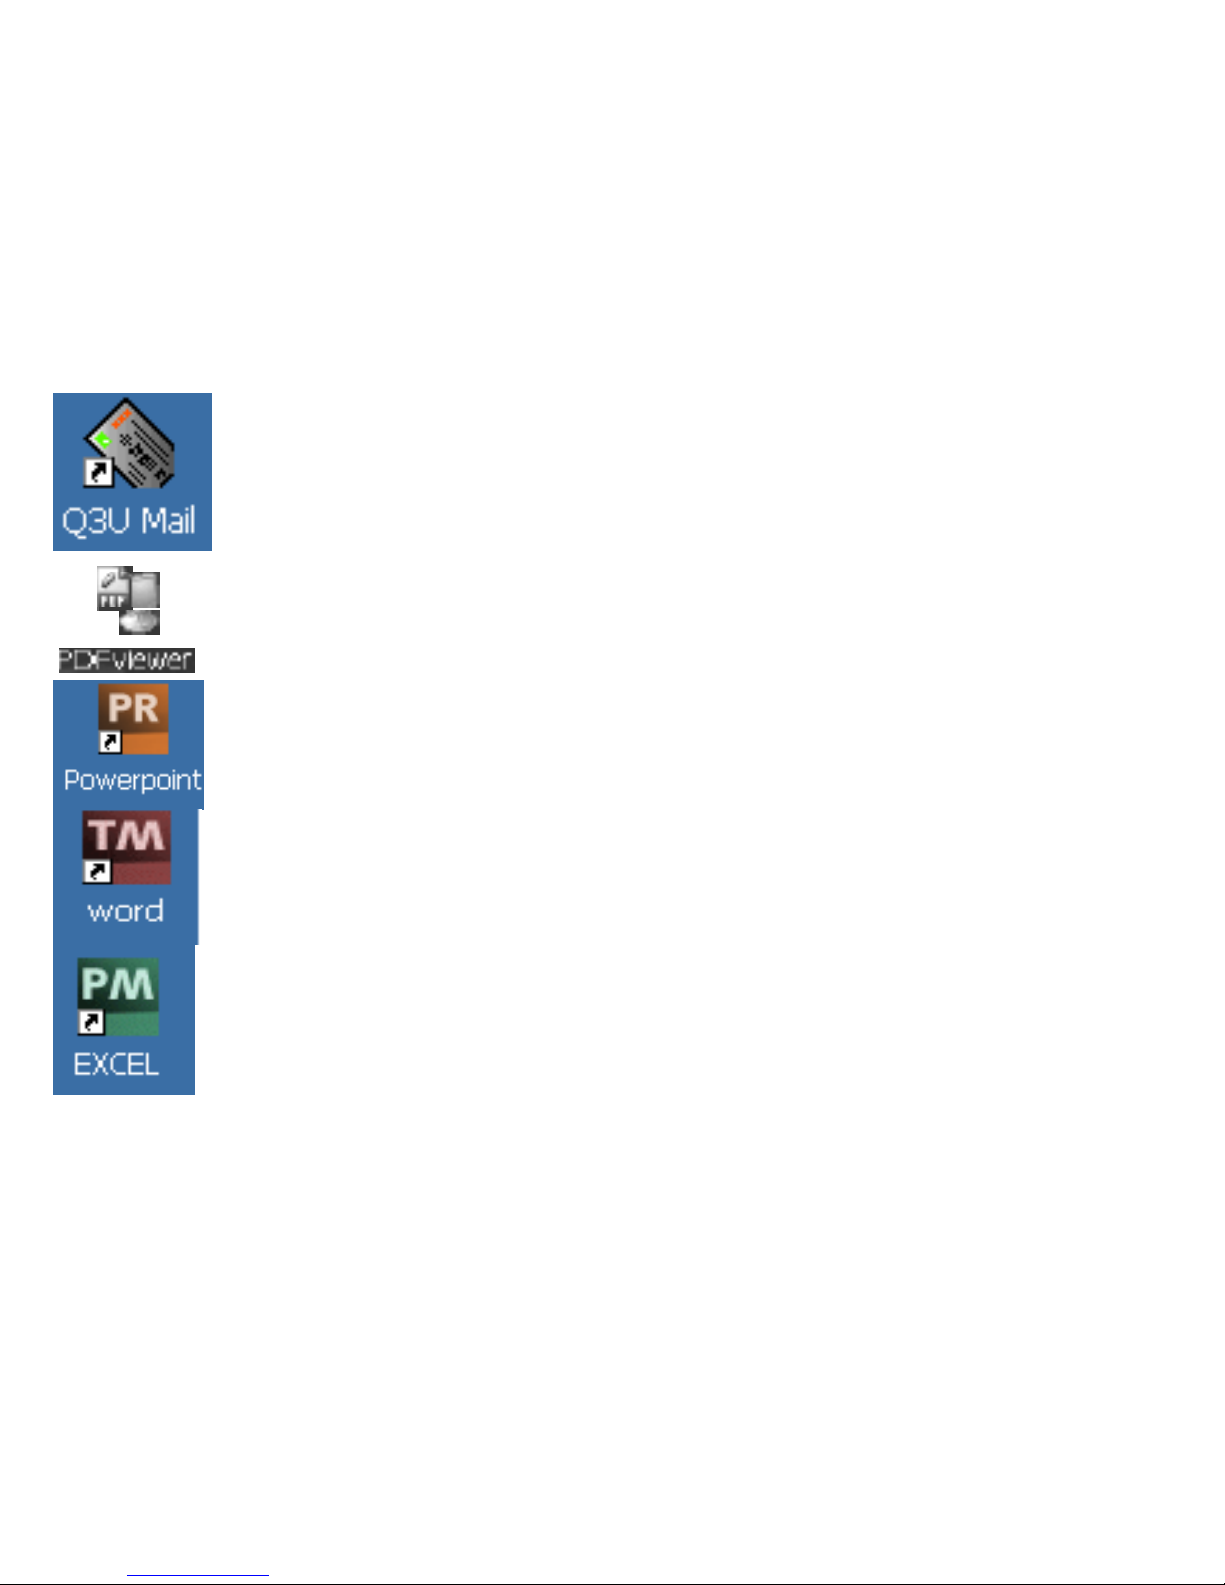
Q3UMail – Mail Client can support POP3 and SMTP.
PDF Viewer - View common PDF documents.
Powerpoint - View Microsoft PowerPoint presentations.
Word - View and edit your Microsoft Word Documents.
Excel - View and edit Microsoft Excel Documents.
Page 16

C. Getting Started
Page 17
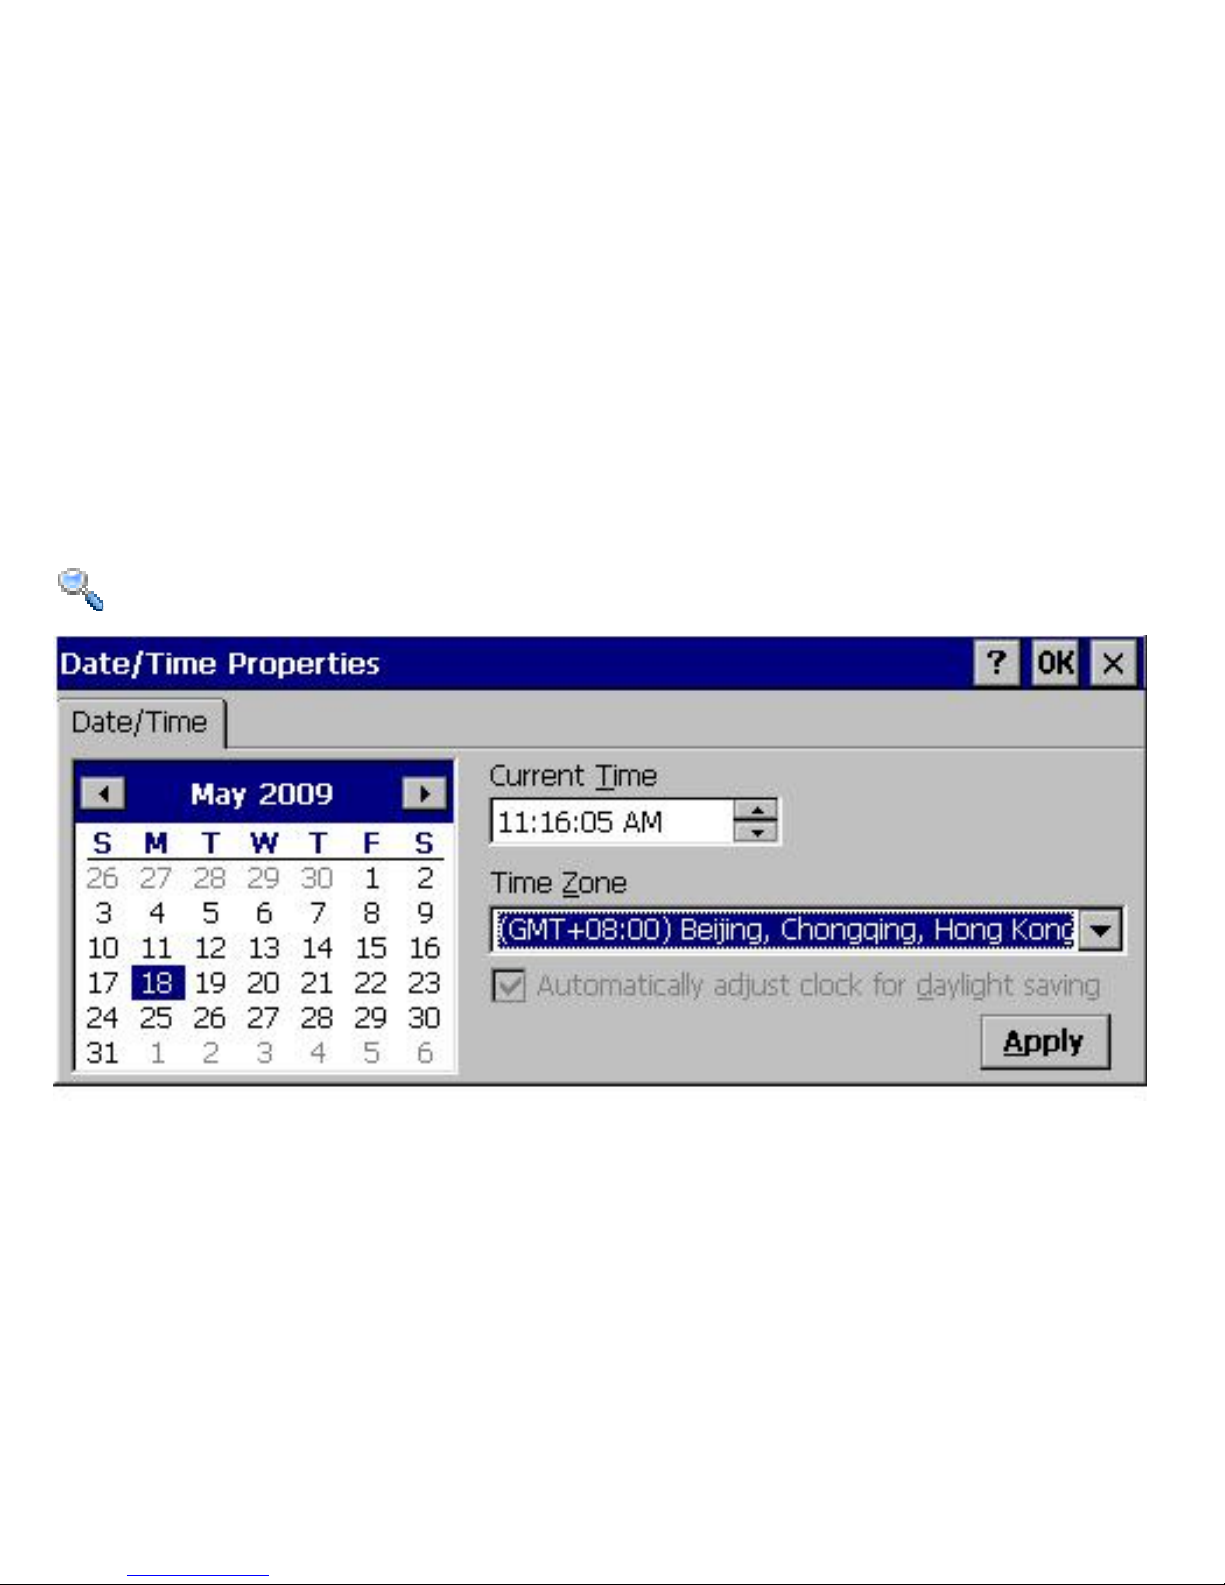
First Run Wizard
Setting the Date and Time
On the bottom of the desktop screen, double click on the time to open the date and
time properties.
NOTE: You can also set the time in the control panel Go to ST AR T > Settings >
Control Panel > Date/Time > Set time and date > OK
Page 18
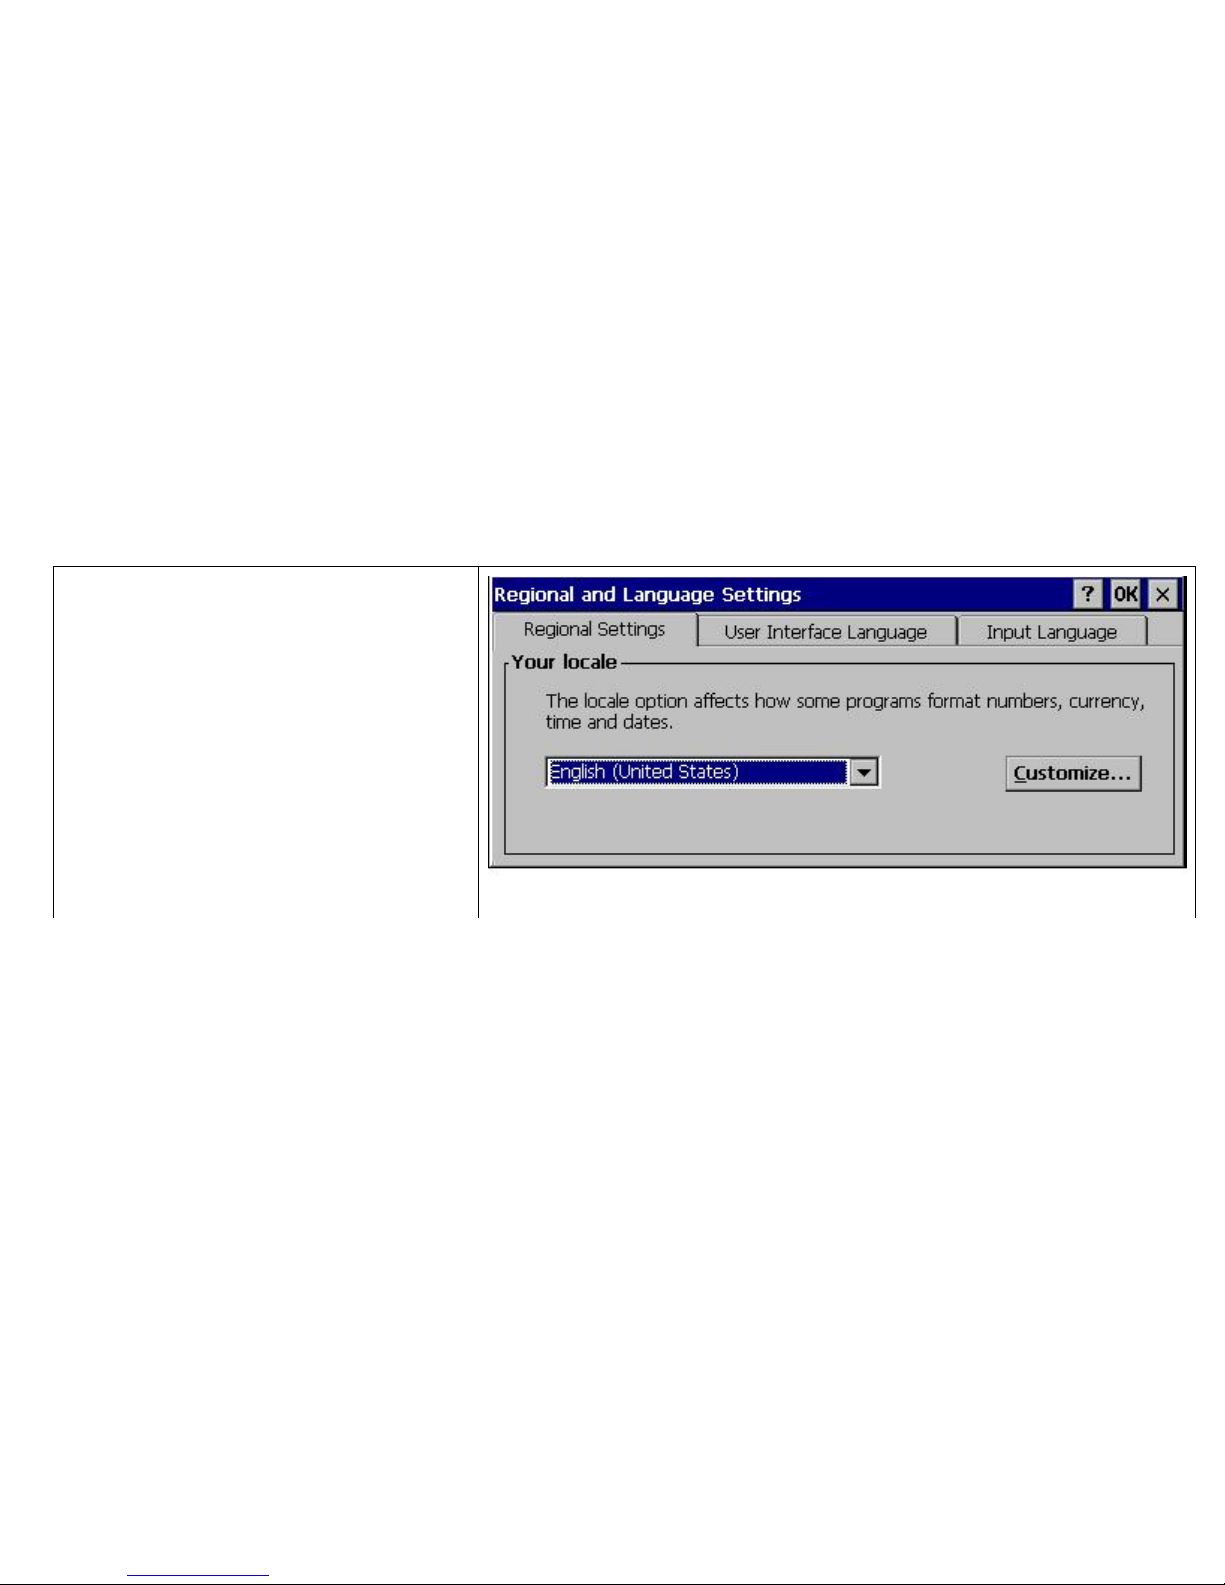
Setting Region and Language
The Tiny Book
TM
has settings for regional formats, interface language, and input
language. These are accessible within the Regional and Language Settings dialog. To
open the dialog, go to: START > Settings > Control Panel > Regional Settings
Regional Settings Tab
Set your regional date,
currency and other settings.
1. Select Your Country
2. Press OK
Page 19
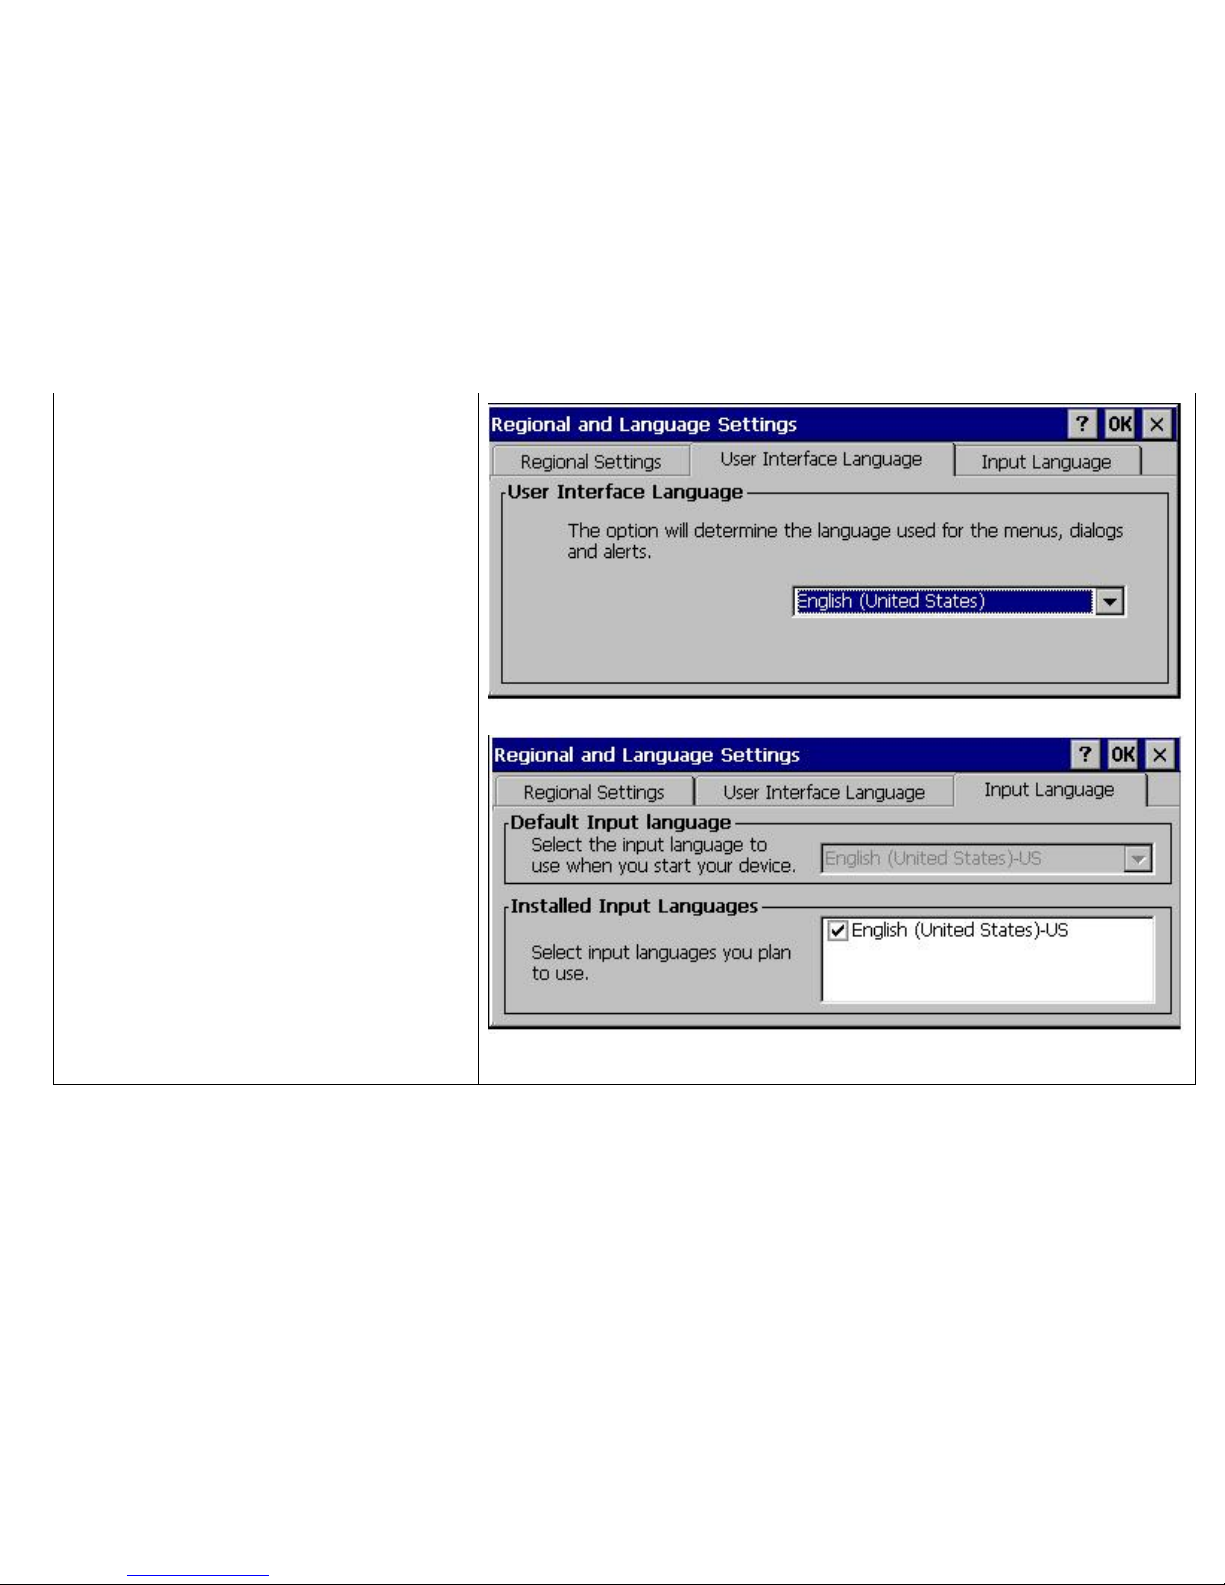
User Interface Language
Tab
Changes the language for the
menus, dialogs and alerts.
The language available may
vary depending on the country
of purchase.
1. Select Your Language
2. Press OK
Input Language Tab
1. Select Your Input
Language
2. Press OK
Page 20
D.
Using your Tiny Book
TM
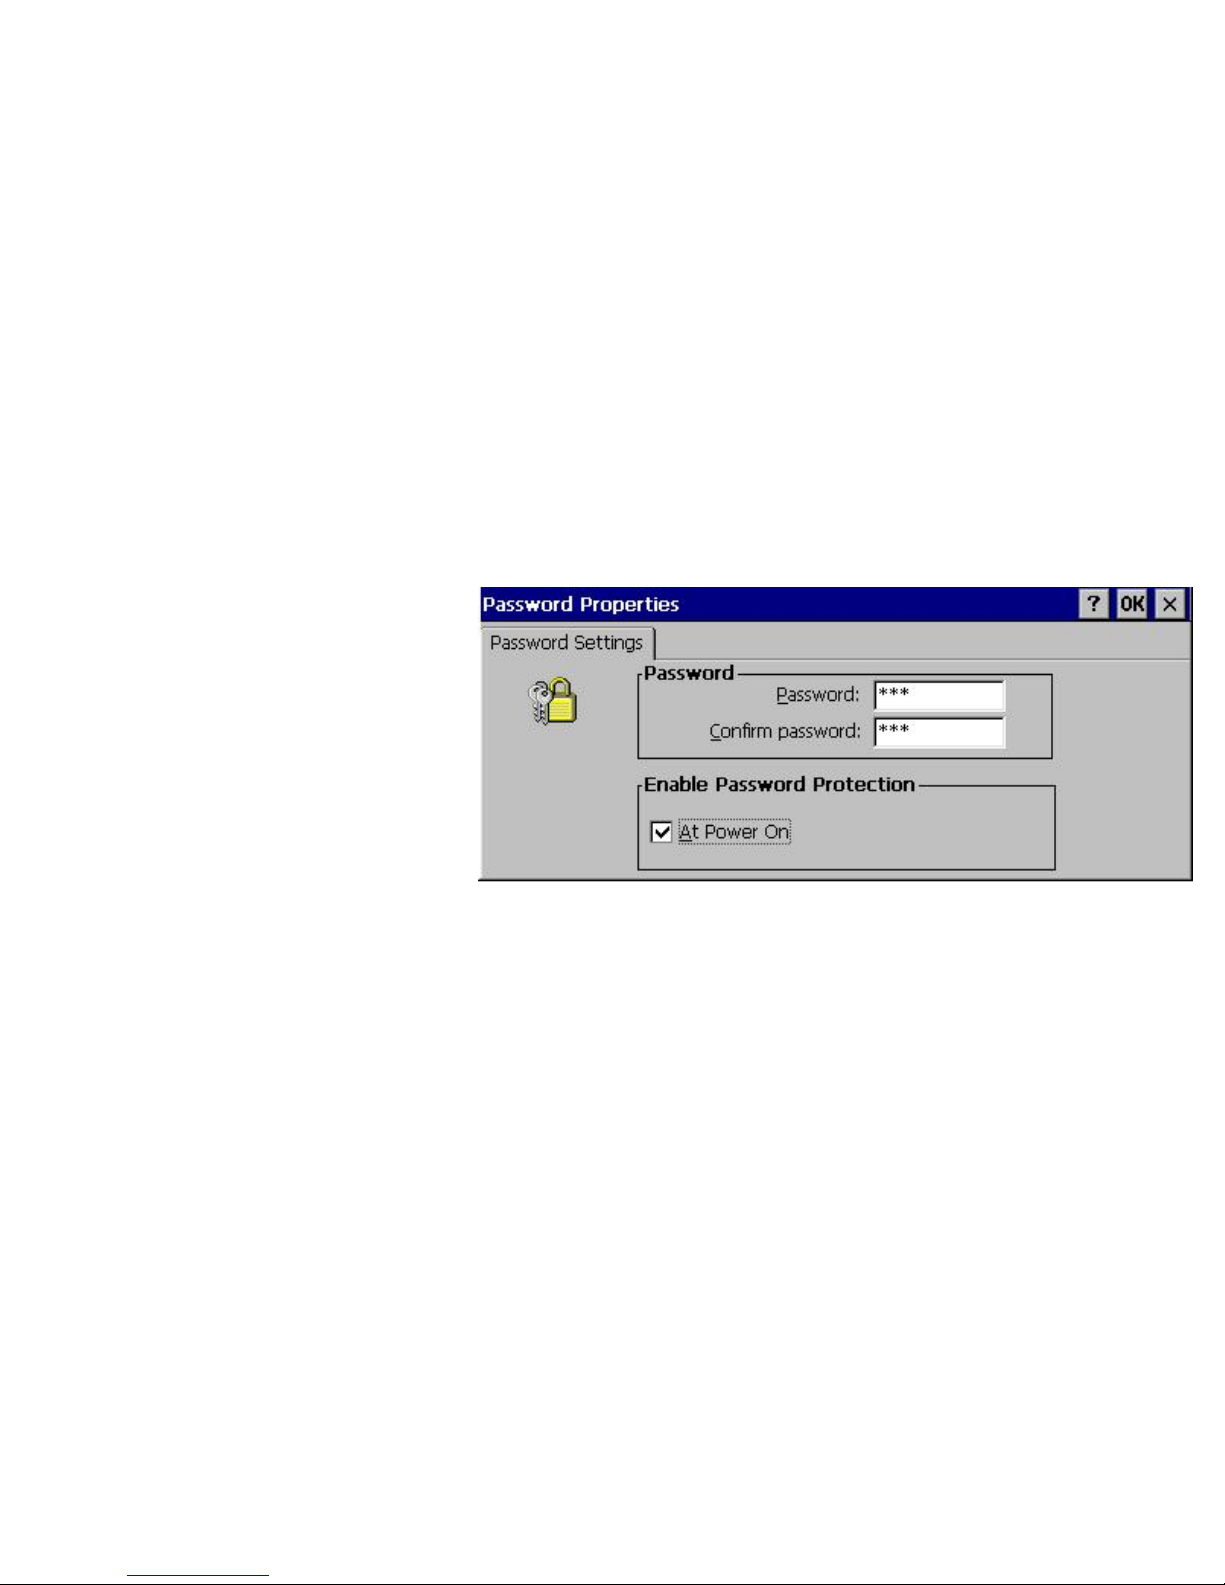
Security
Tiny Book
TM
features system password security. If set, the user will be prompted for a
password at start-up or to turn off the screen saver.
1. Select the Start Menu
2. Settings Menu Option
3. Open the Control Panel
4. Select the Password Icon
5. Enter Your Password
6. Press OK When Done
Owner Properties
You can enter your contact information which can be displayed in the beginning of the
system start up. This may help to recover your Tiny Book
TM
in the event it is lost.
Page 21
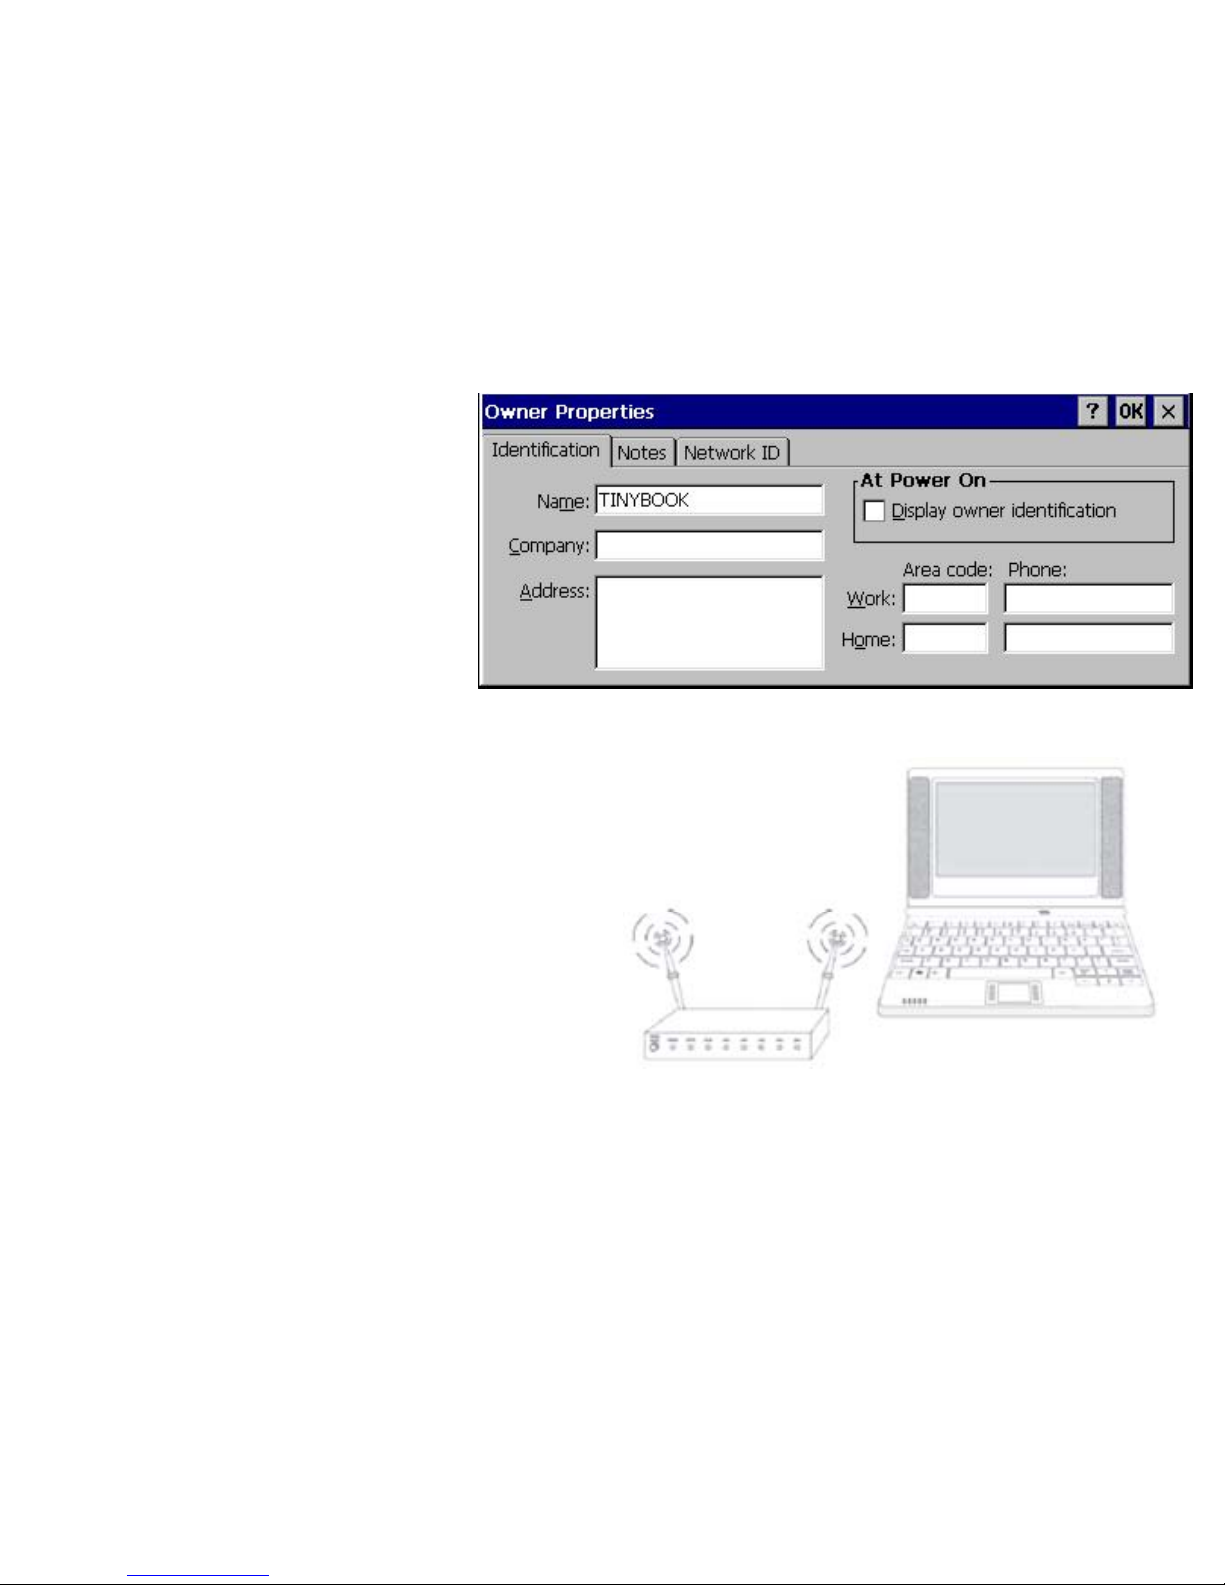
1. Select the Start Menu
2. Settings Menu Option
3. Open the Control Panel
4. Select the Owner Icon
5. Enter Your Information
6. Press OK When Done
Internet
Wi-Fi Connections
The Tiny Book
TM
comes with a built-in
Wi-Fi for wireless connections. You can
access the internet provided that a Wi-Fi
base station is accessible in the area.
When connected via wireless internet, you
will be able to access your emails, browse
the internet and chat with friends using
MSN .
Page 22
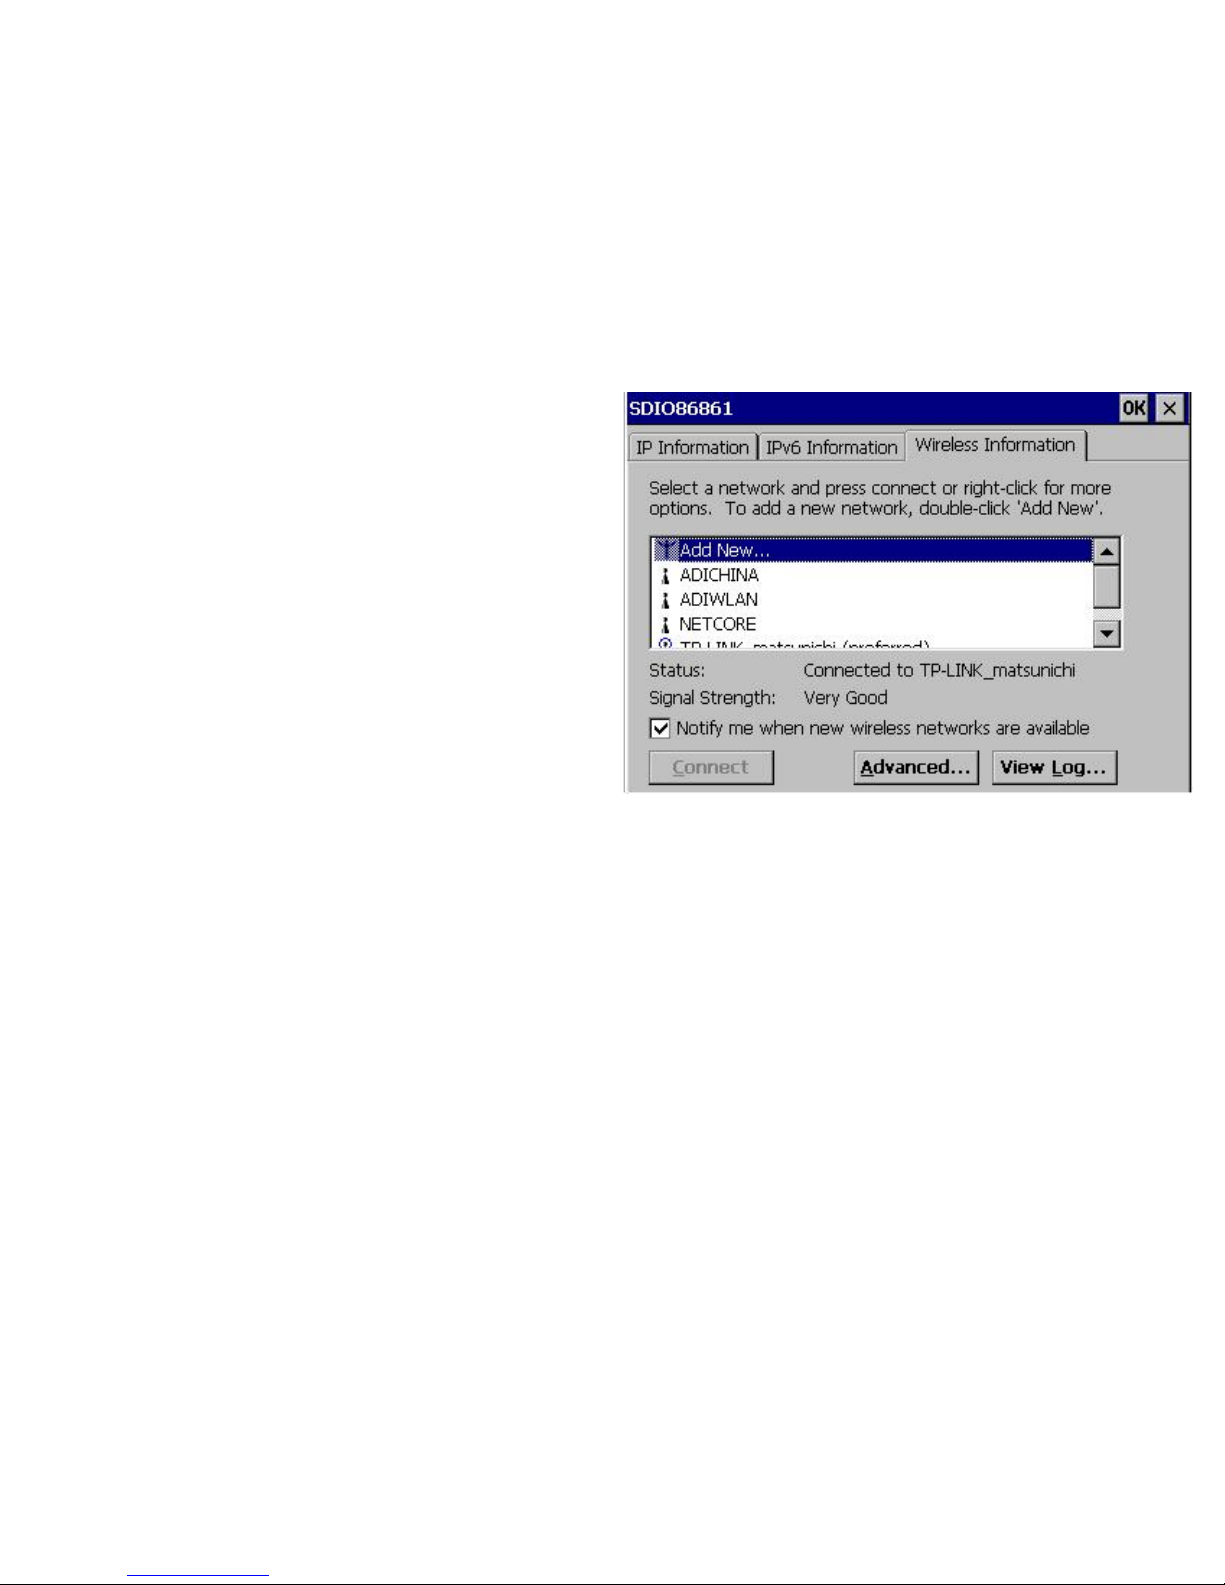
Setting Up a Wireless Network
Connection
1.Select the Network Icon from the
Status Bar at the bottom of the screen.
2.To add a new wireless network, select
the Add New from the Wireless
Information tab Network List.
Page 23
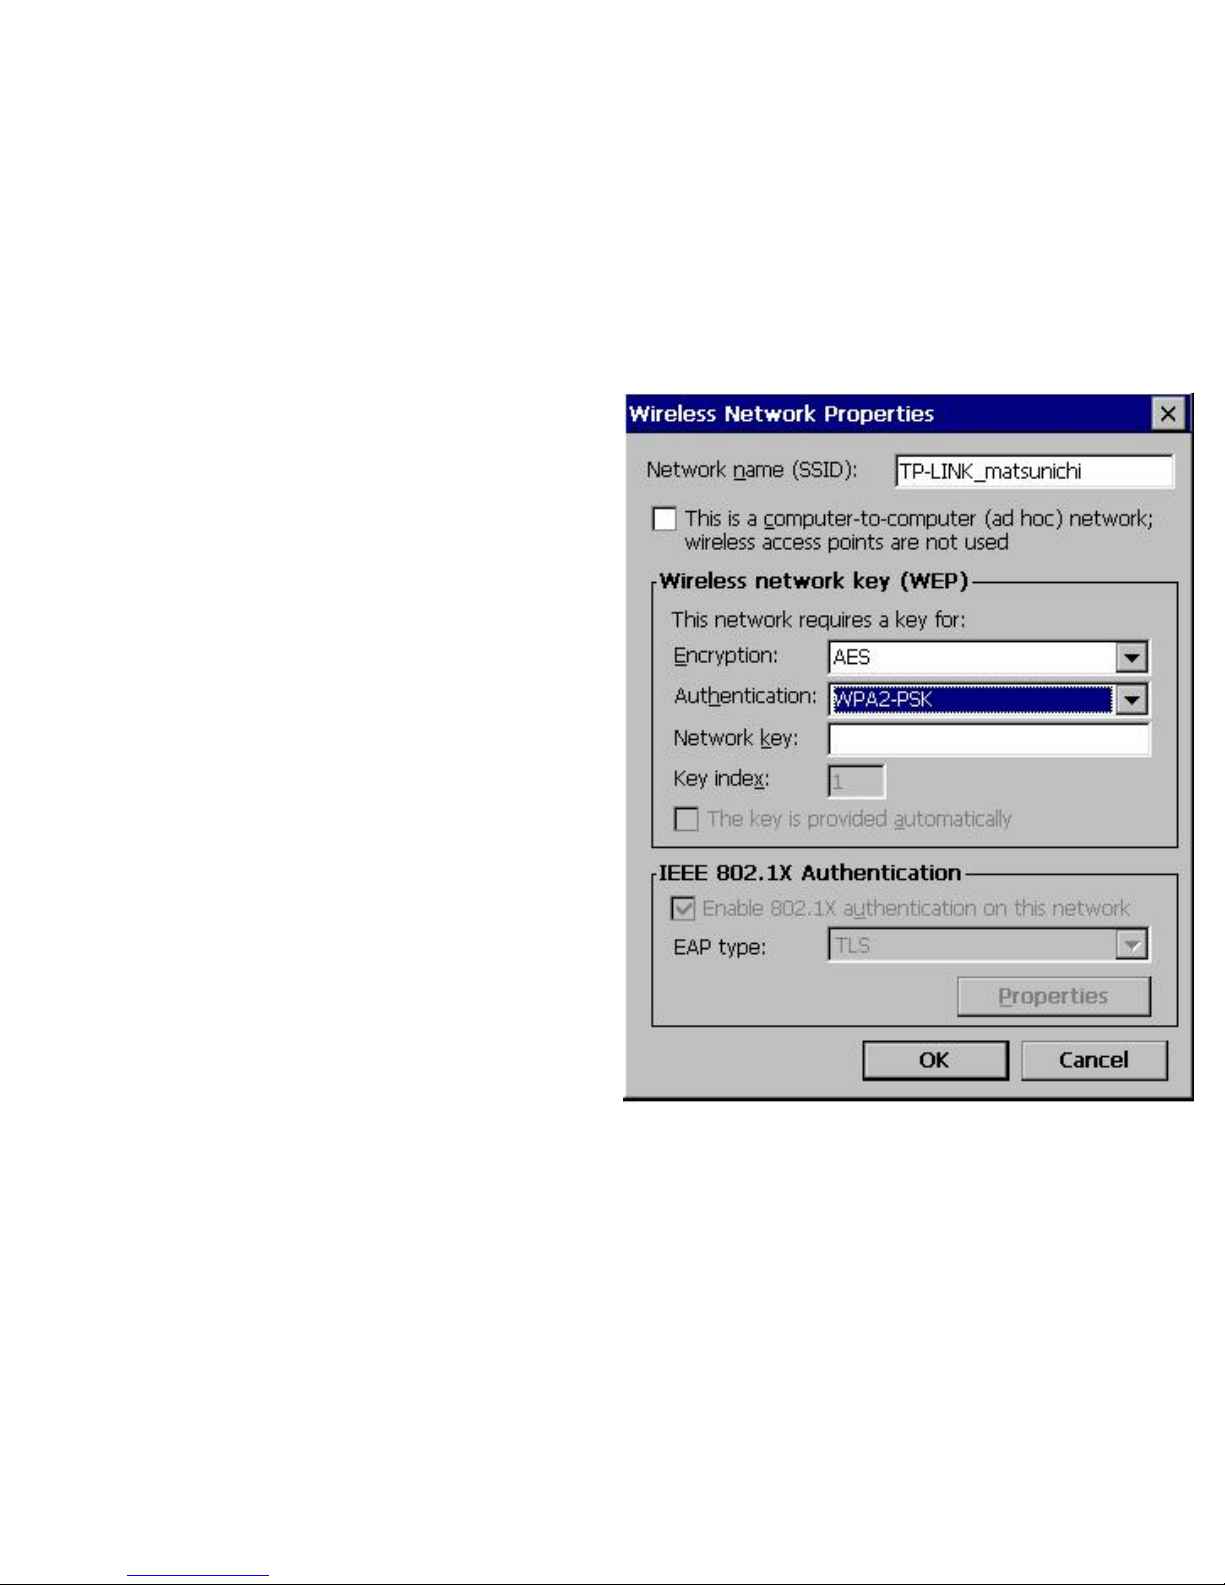
3.Fill in the Network Name (SSID) of the
connection. This needs to match the
name of the access point.
4.When configuring your wireless
network key, you will need the
Encryption type (AES or TKIP) and
Authentication type (Open, Shared,
WPA, WPA2, WPA-PSK or WPA2-PSK).
You may also need the Network Key (like
a password), and a Key Index.
5.EAP has two types which are the TLS
and PEAP. If there is any question of
which type, just try the default to start.
Page 24
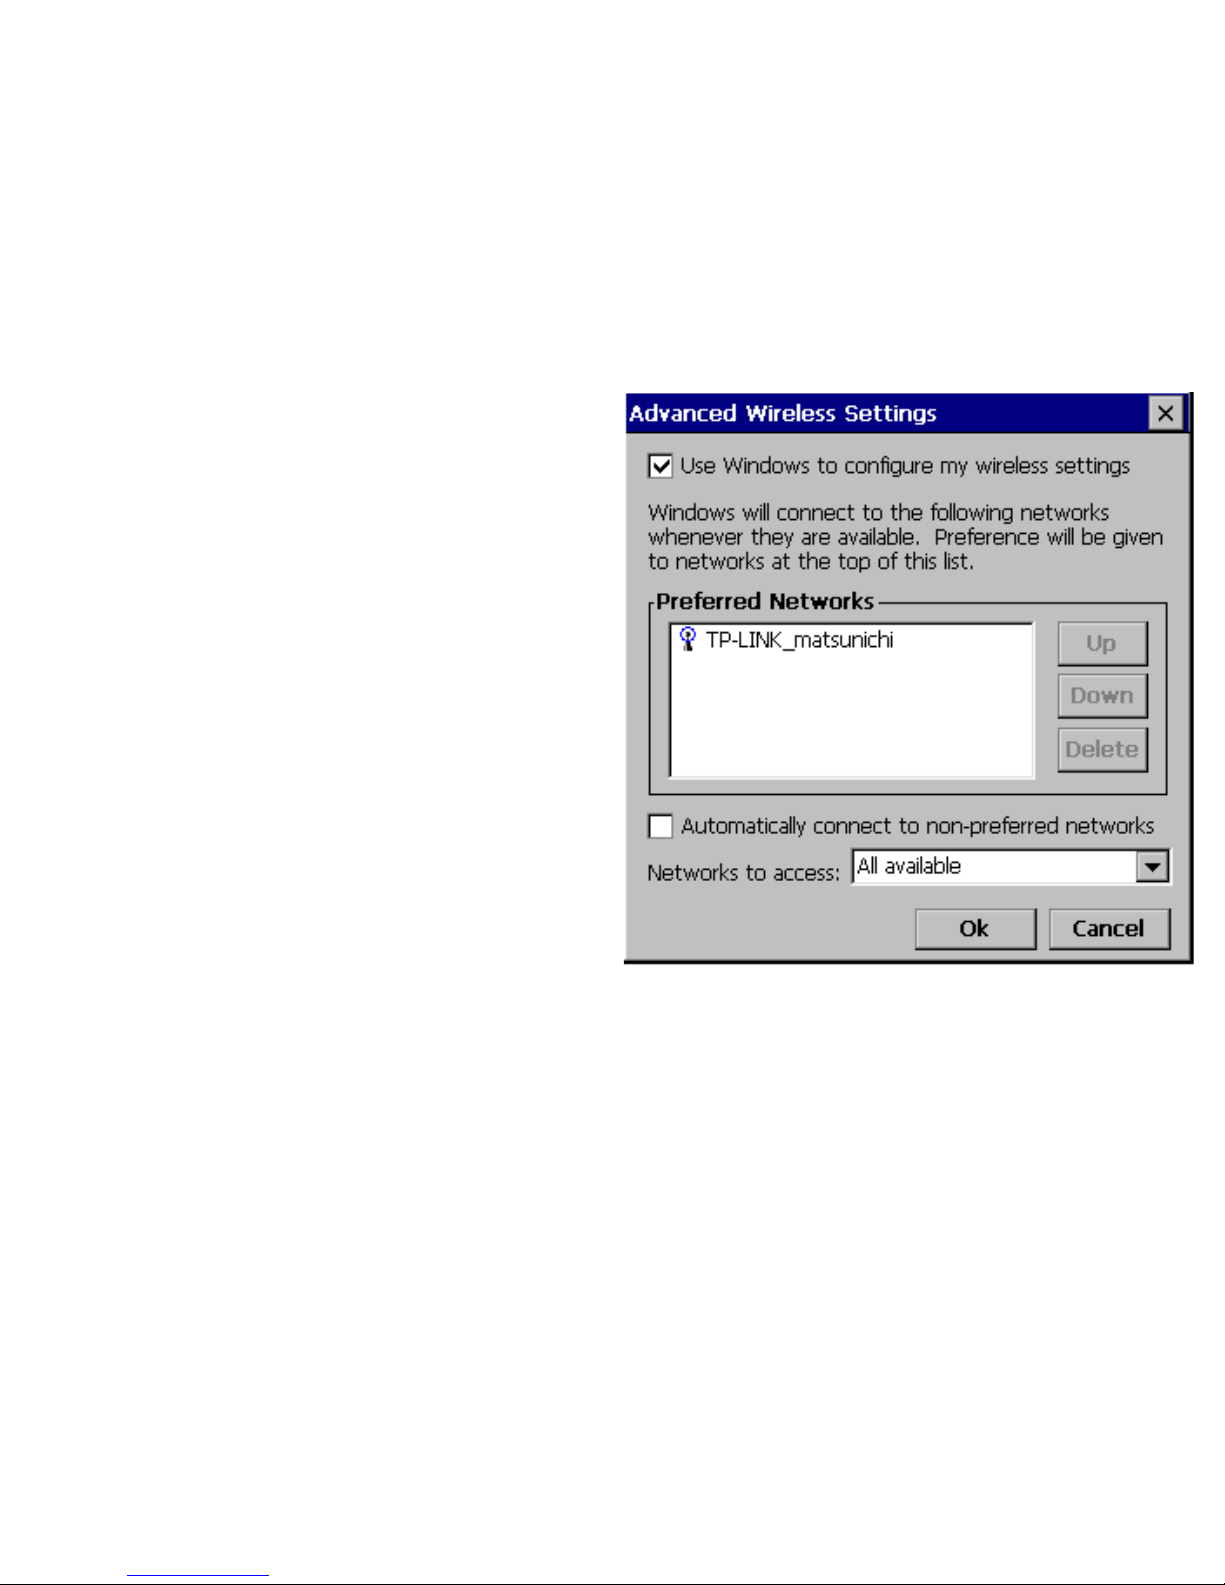
Connecting to a Network
The Wi-Fi will automatically scan the area
for available networks. You can configure
your wireless settings to automatically
connect to known networks. When your
internet connection is in range, a
connection will automatically be made. A
secure connection will require a user name
and password to access the service.
Setting Up a Wired Network Connection
Page 25
Configuration
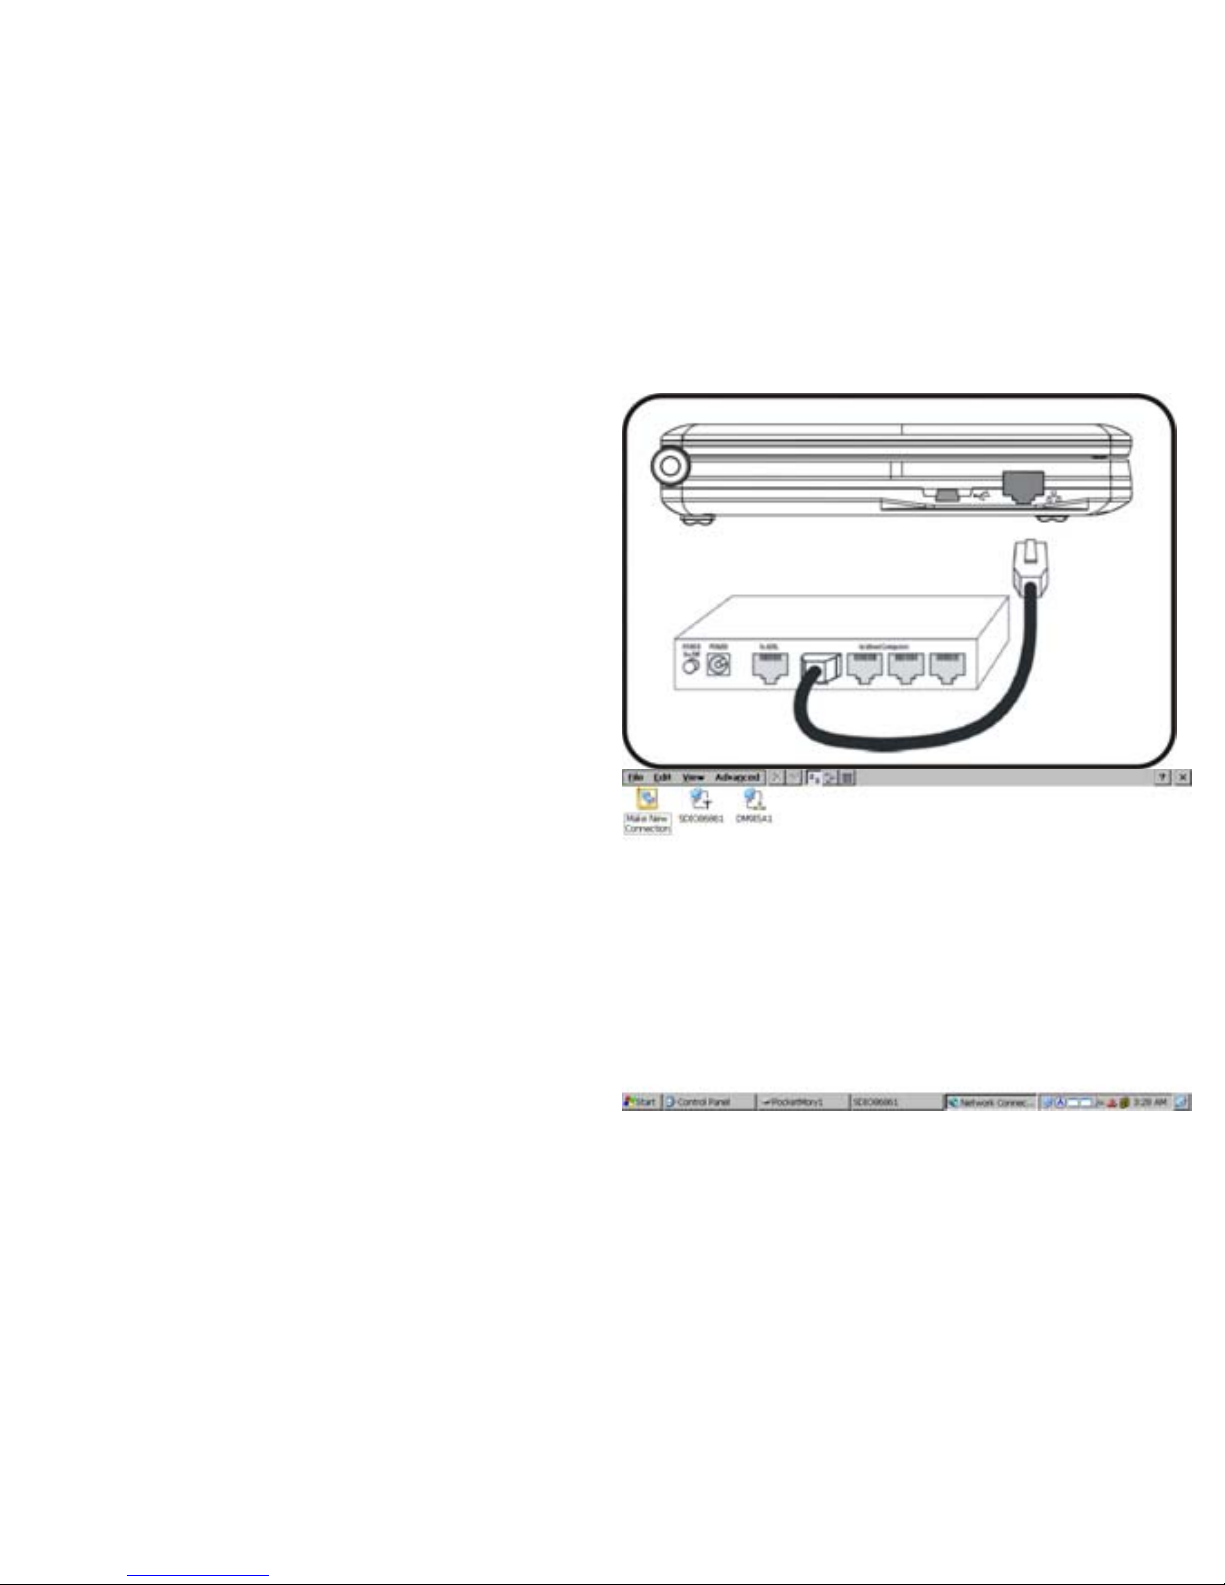
1. Connect your Tiny BookTM to the
network by plugging in a standard
Ethernet (RJ-45) cable into the Network
port on the left side of the case. Be sure
the cable is also connected to your
network on the other end in order to
complete the connection.
Setting Up a Network Connection
Open the Network Connections Window :
1. Open the Start Menu
2. Select the Settings Menu Option
3. Select Network and Dial-up
Connections
4. Select “DM9ISA1“Icon
Page 26
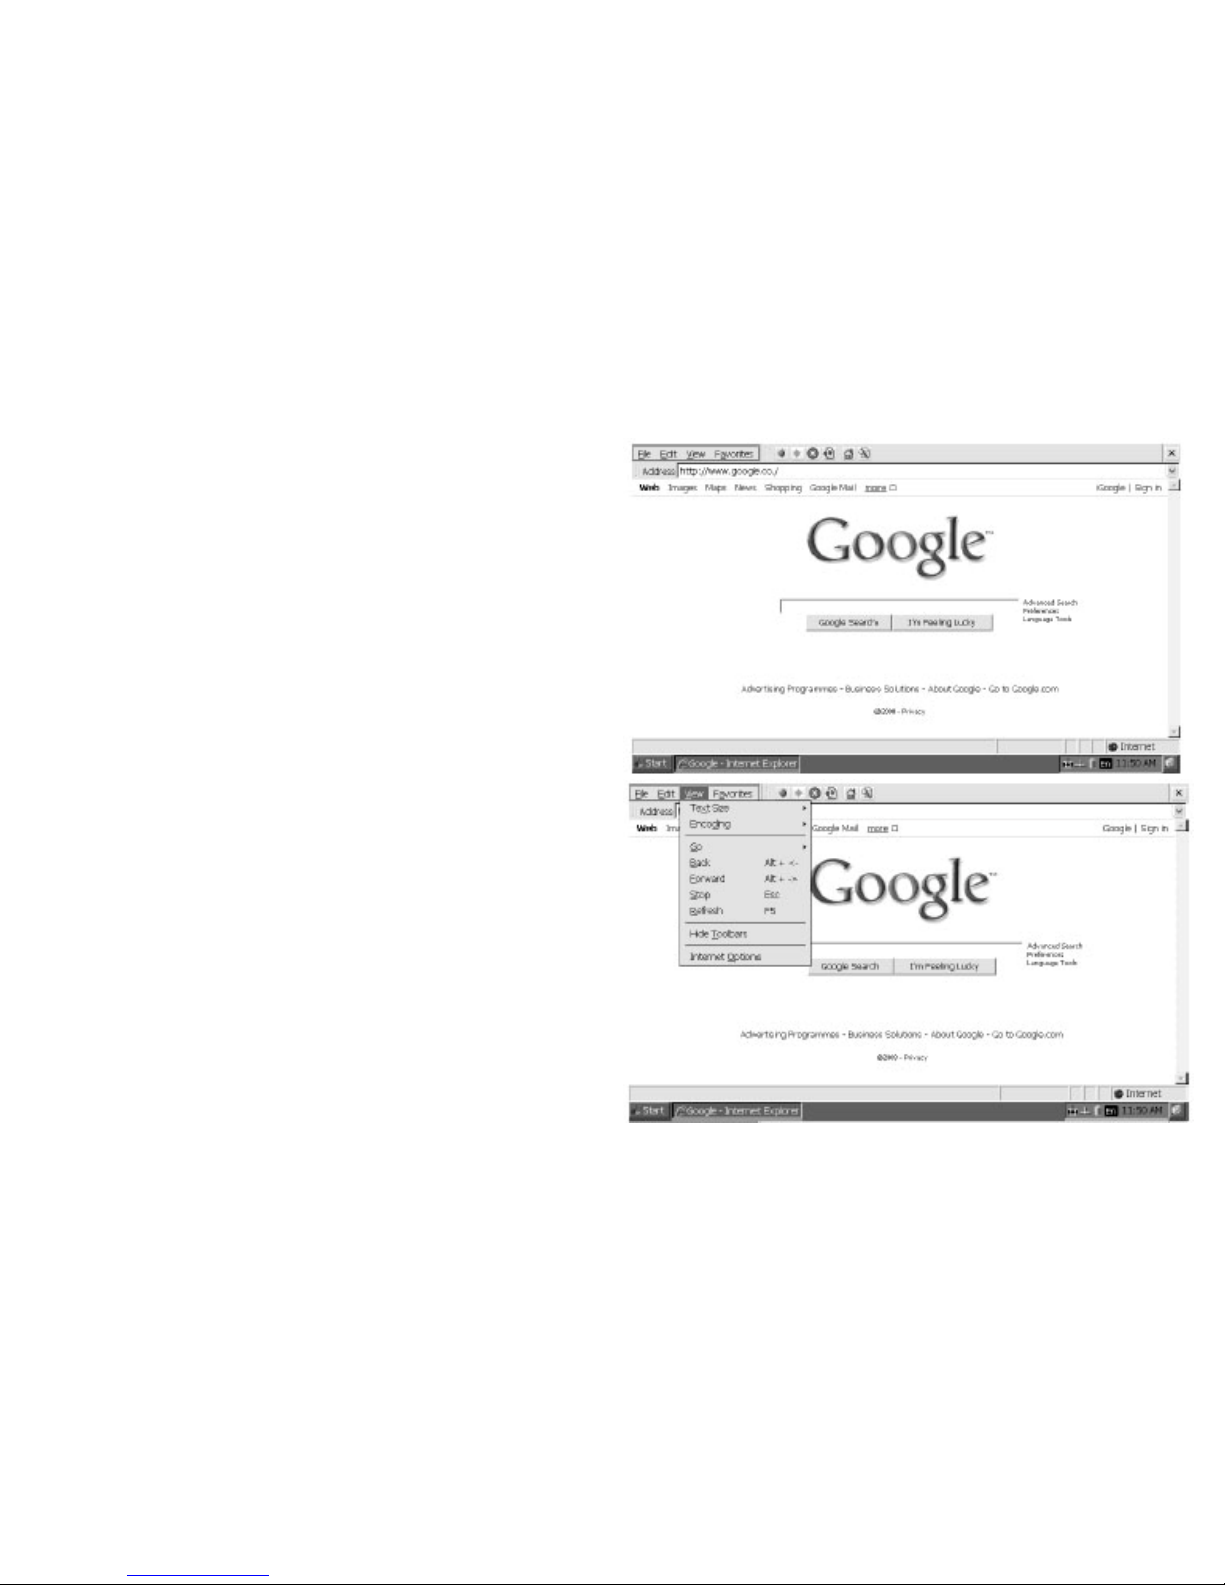
Surfing the Internet
After you have finished the network setup,
launch the Internet Explorer located on the
desktop and you can start surfing the net.
Advanced Settings for Internet Explorer
1. Open Internet Explorer
2. View
3. Internet Options
See the following pages for details of how
to change your Start Page, Search Page,
and User Agent.
Page 27
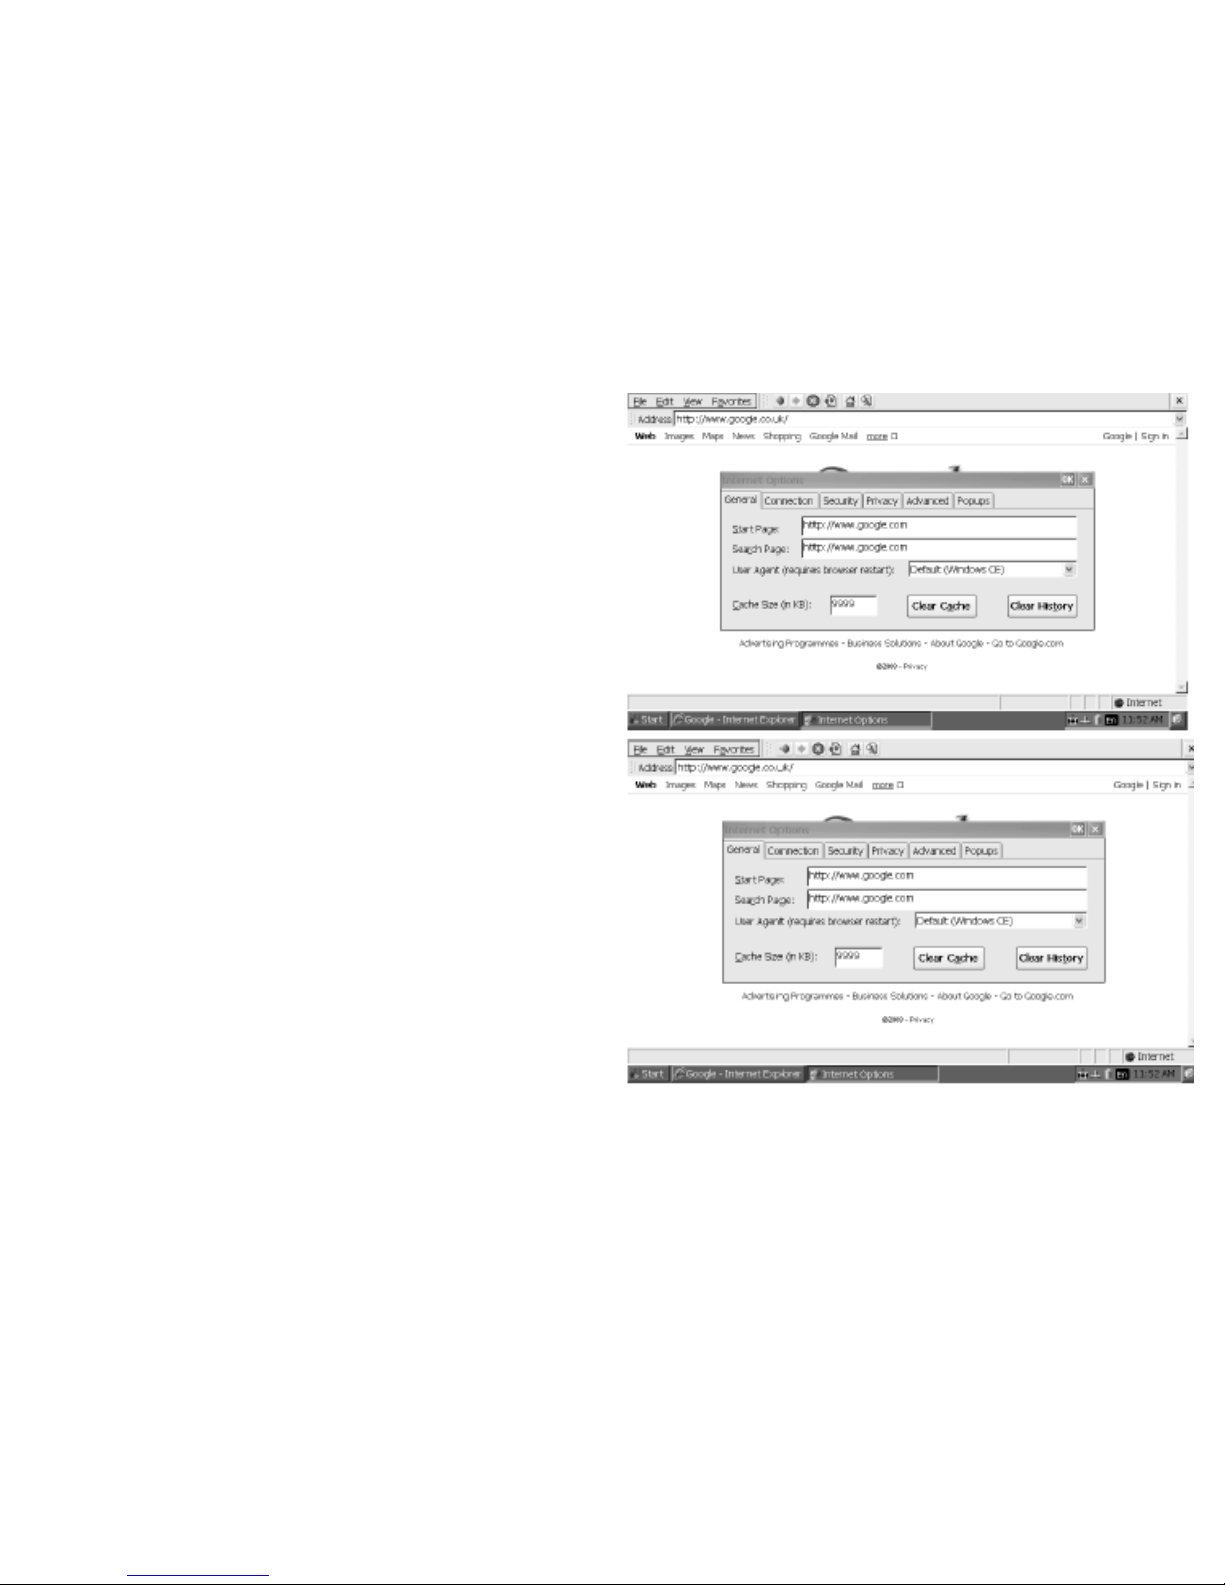
Changing your Homepage
1. Internet Options
2. General tab
3. Change the Start Page by entering a
valid URL (see example).
4. Press OK when finished.
Changing Your Browsing Experience
Your version of IE features three different
browsing modes: Windows CE (default),
Pocket PC, Same as Windows XP.
Using the “Windows CE (Default)” and
“Pocket PC” option will provide you with a
faster connection and shorter loading
times, but the pages may not be the same
as you see on your desktop computer.
Using “Same as Windows XP” option will
load more slowly but the site will appear
similar to a desktop browser.
Page 28
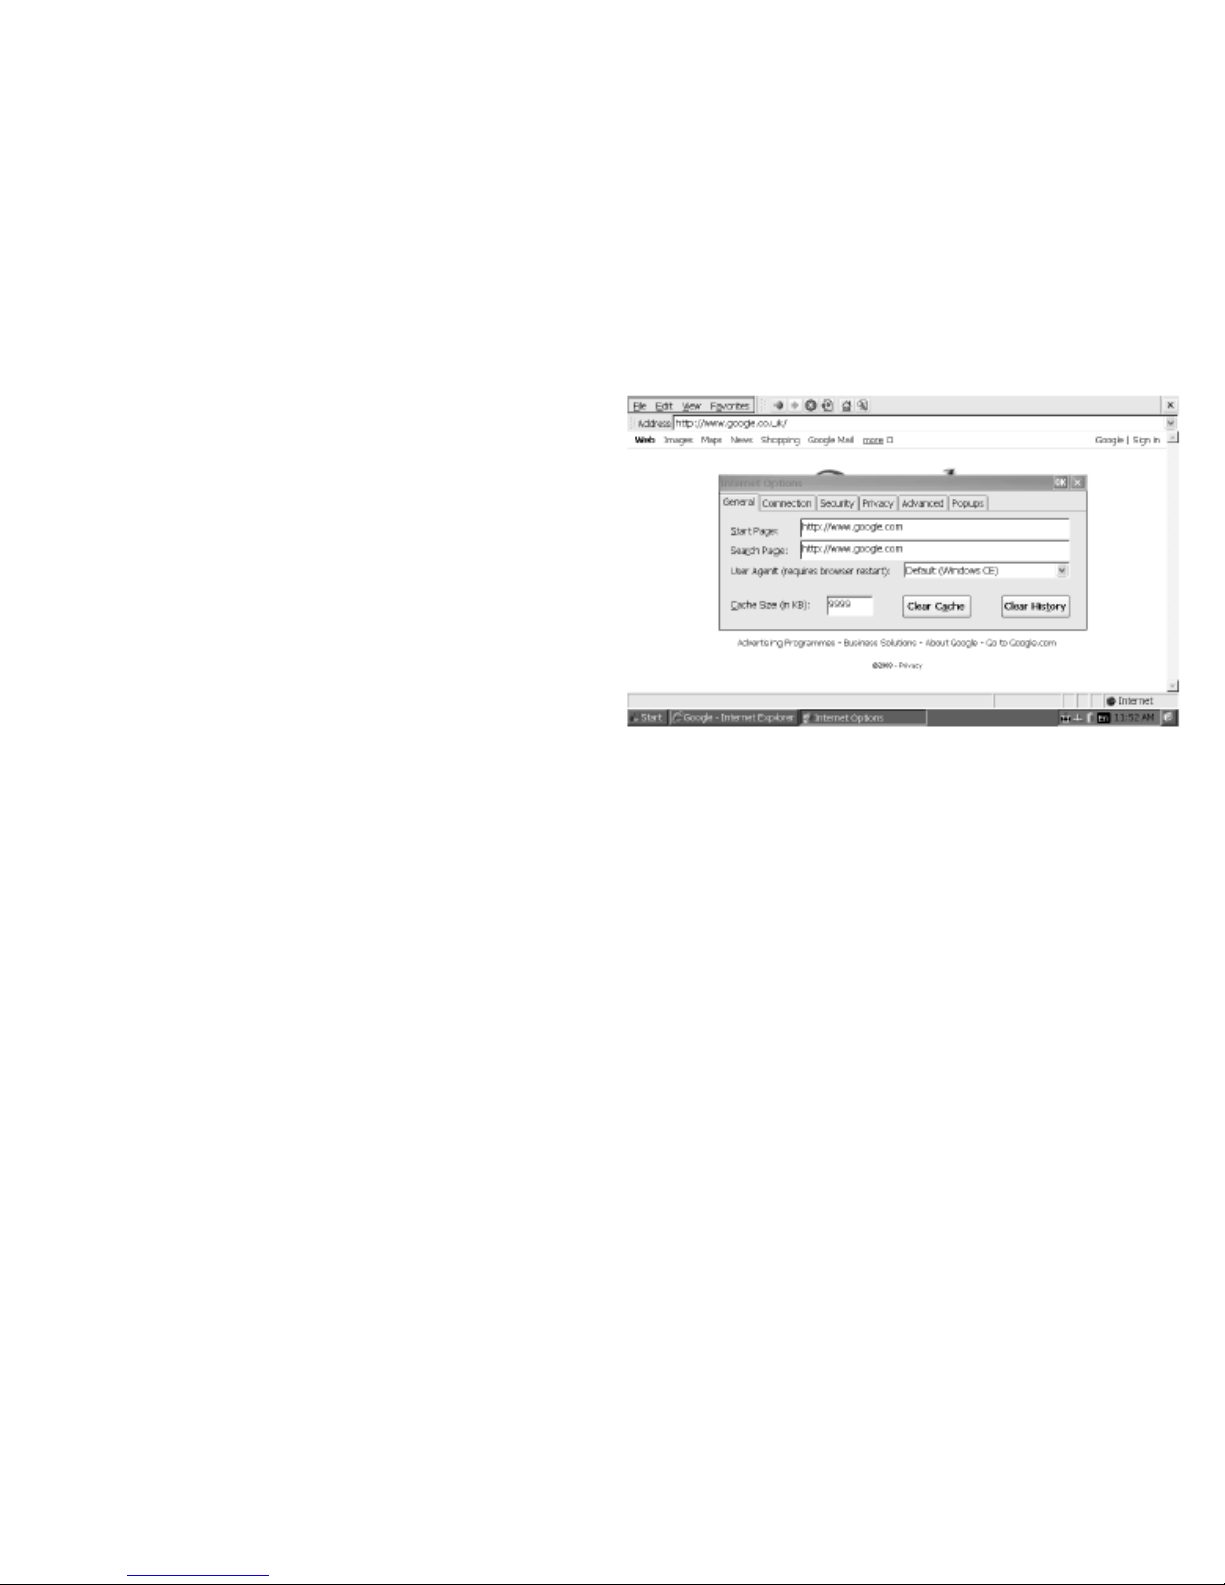
1. Internet Options
2. General tab
3. Select the User Agent from the drop
down selection.
4. Press OK when finished.
5. Restart Internet Explorer to
complete.
Email
Can send and receive POP3,SMTP mail.
MSN Messenger
Stay connected with your family and friends using the MSN Messenger V.5.
Office Applications
Page 29
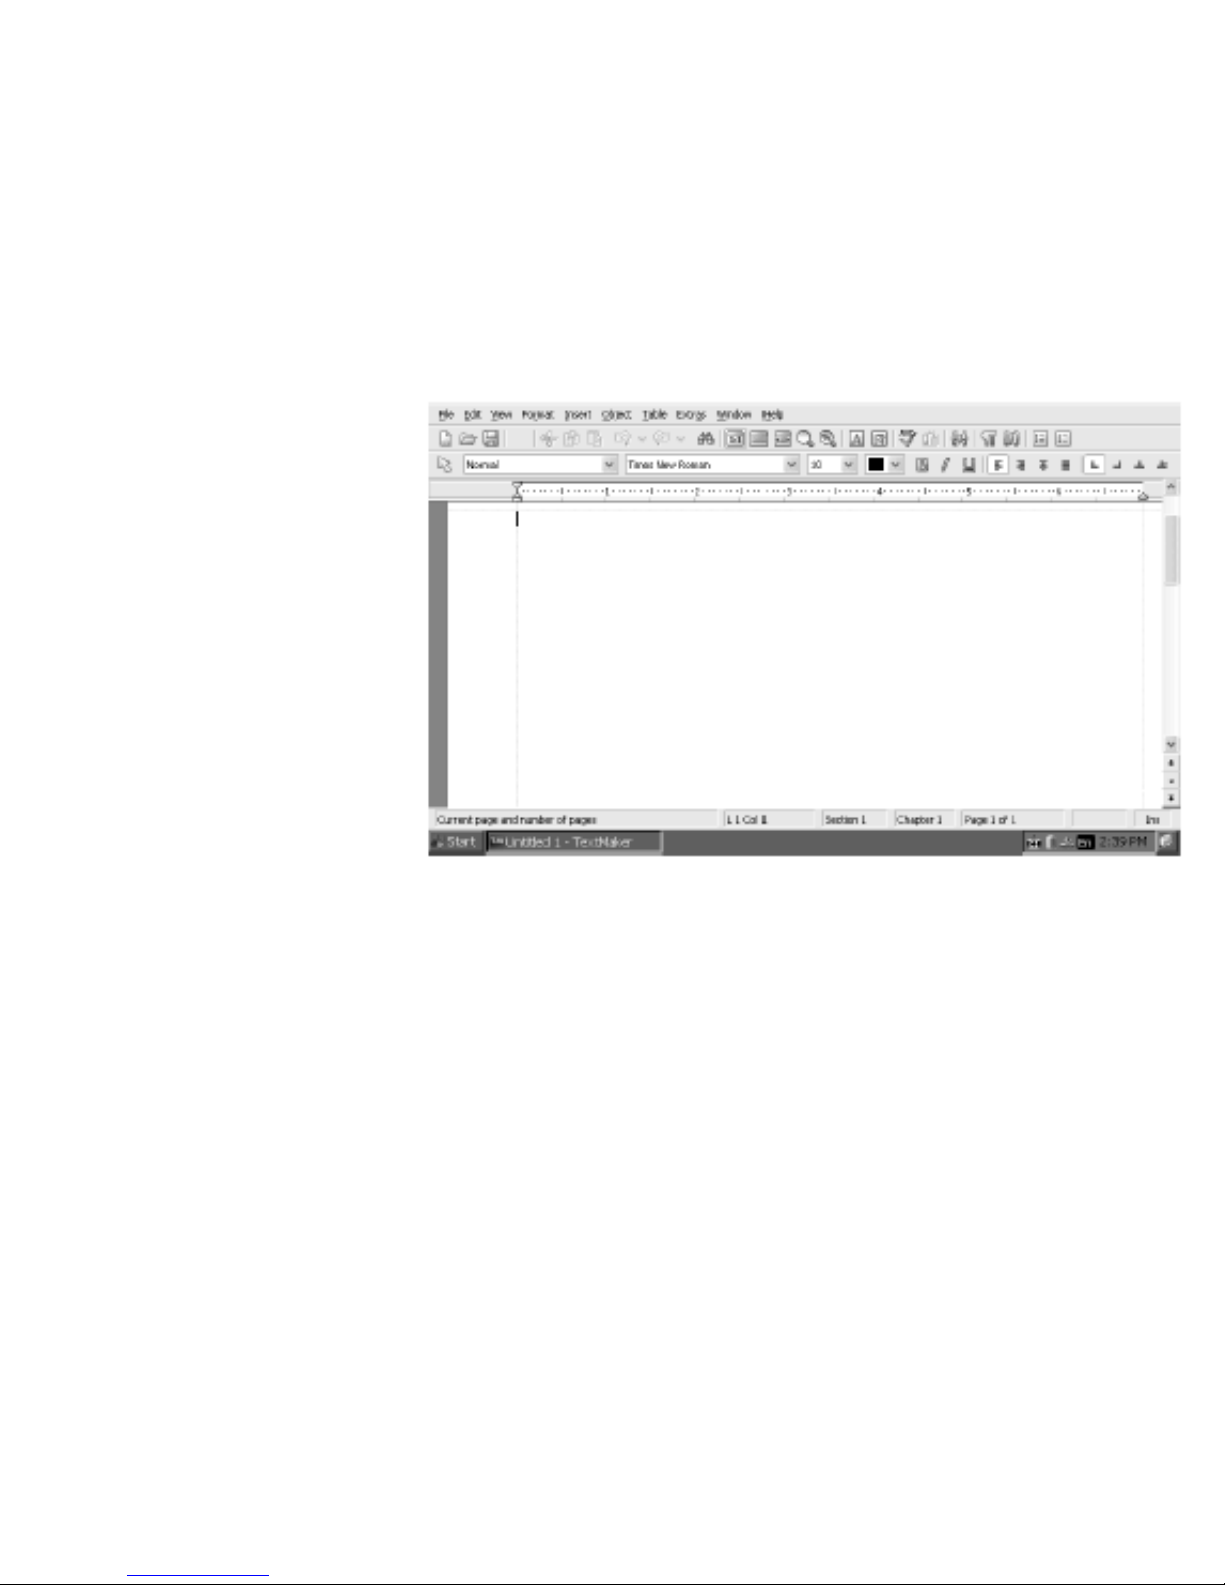
Word
The Document Writer
application allows you to
read and write on any
Microsoft Word Document
2003 and below. All the
common functions are
provided in the Document
Writer . All documents
edited or created in the
Document Writer can be
viewed on any
computer running
Microsoft Office 2003
and below.
Page 30
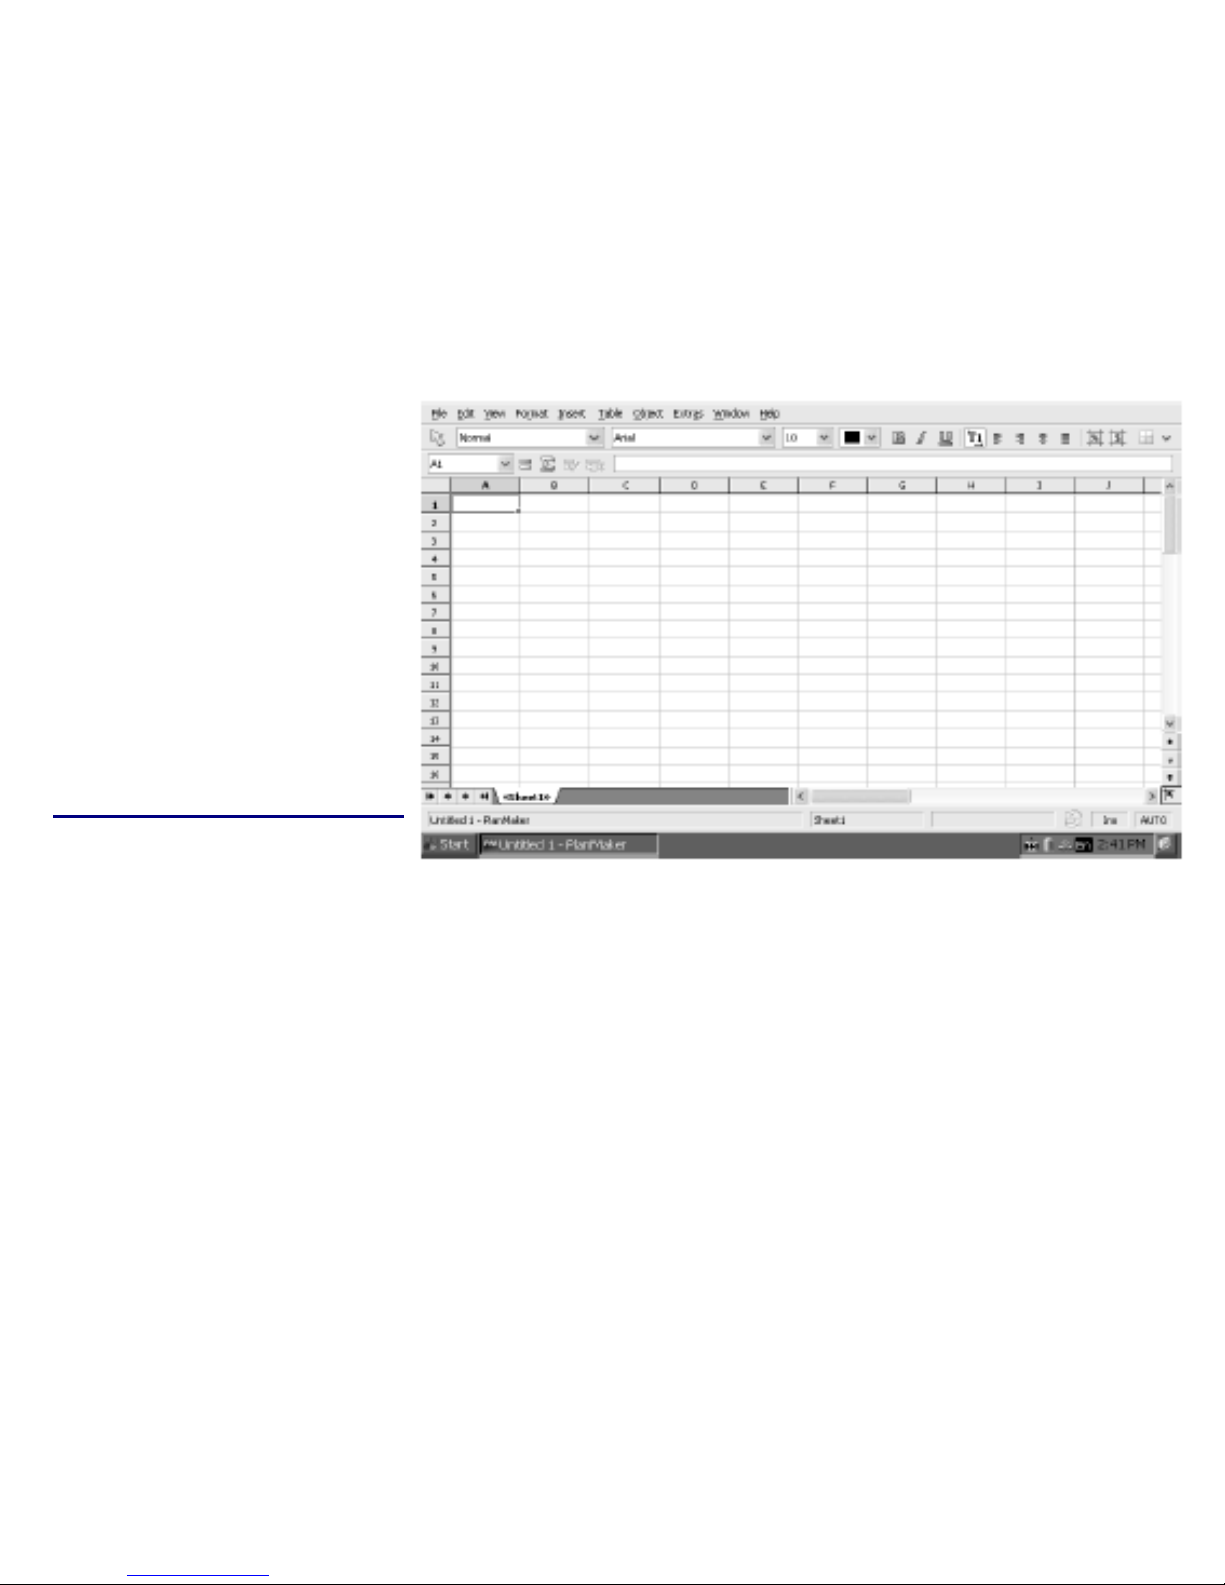
Excel
Read and write any
Microsoft Excel 2003
Document and below. All
the common functions are
available for your spread
sheets. All documents
edited or created can be
viewed on any computer
running Microsoft Office
2003 and below. See
www.softmaker.com
for program details and
support.
PDF Viewer
The TINY BOOK comes with a PowerPoint Presentation Viewer and a PDF Viewer.
Media Applications
Media Player 9
Plays music (MP3 and WMA) and videos (MP4 and AVI).
TCPMP (CORE Media Player)
Page 31

When streaming online videos, (e.g www.ytpocket.com), the Tiny BookTM will
automatically use this player. The TCPMP can also play music and videos files which
are not compatible with media player 9.
FCC WARNING
This device complies with Part 15 of the FCC Rules. Operation is
subject to the following two conditions:
(1) this device may not cause harmful interference, and (2) this device must accept
any interference received, including interference that may cause undesired
operation.
This device must be installed to provide a separation distance of at least 2.5 cm
from all persons and must not be collocated or operating in conjunction with any
other antenna or transmitter.
NOTE 1: This equipment has been tested and found to comply with the limits for a
Class B digital device, pursuant to part 15 of the FCC Rules. These limits are
designed to provide reasonable protection against harmful interference in a
Page 32

residential installation. This equipment generates, uses and can radiate radio
frequency energy and, if not installed and used in accordance with the instructions,
may cause harmful interference to radio communications. However, there is no
guarantee that interference will not occur in a particular installation. If this
equipment does cause harmful interference to radio or television reception, which
can be determined by turning the equipment off and on, the user is encouraged to
try to correct the interference by one or more of the following measures:
- Reorient or relocate the receiving antenna.
- Increase the separation between the equipment and receiver.
-Connect the equipment into an outlet on a circuit different from that to which the
receiver is connected.
-Consult the dealer or an expe rienced radio/TV technician for help.
NOTE 2: The manufacturer is not responsible for and radio or TV interference
caused by unauthorized modifications to this equipment. Such modifications could
void the user’s authority to operate the equipment.
 Loading...