

Page 1
Norsk
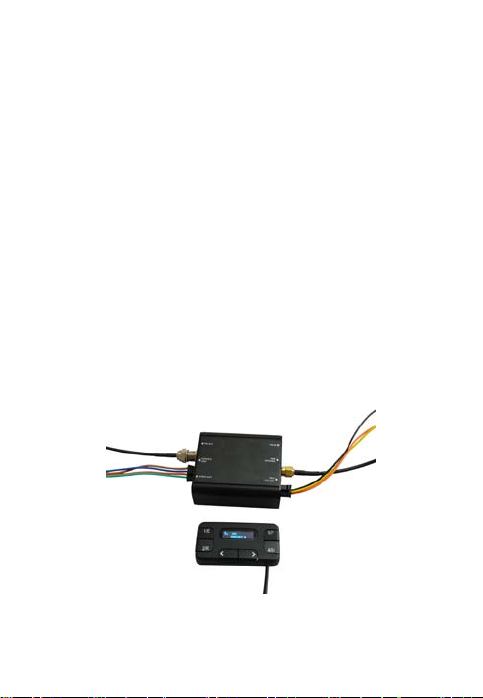
Tiny Audio C11+
DAB+ adapter med display for skjult
montering.
Brukerveiledning
Vennligst les nøye før produktet tas i bruk
1
Page 2

Sikkerhetsinstrukser
• Utsett ikke radioen for regn eller fuktighet.
• Følg lokale trafikkregler.
• Rengjør med tørr klut.
• Ikke blokker ventilasjonsåpningene.
• Ikke bruk radioen nær varmeapparat.
• Bruk tilbehør forsynt av produsenten.
• Ikke oppbevar radioen hvor sterk varme kan
forårsake skade.
2
Page 3
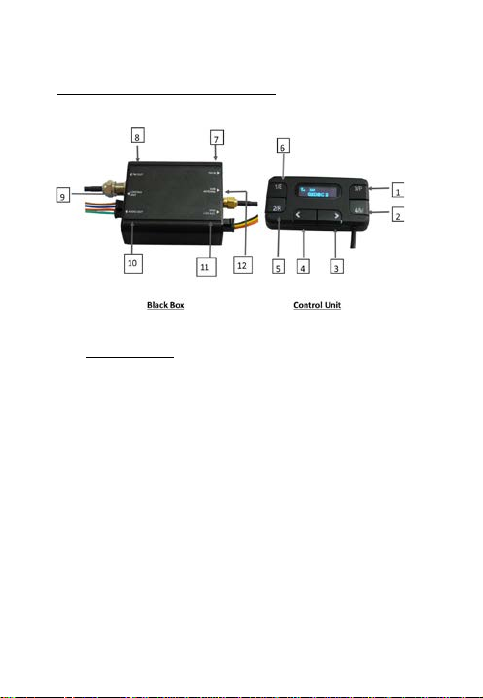
Funksjoner og tilkobling
Funksjoner:
1. Forvalg 3/Forvalg
2. Forvalg 4/Meny
3. Innstilling opp
4. Innstilling ned
5. Forvalg 2/Gjenhent
6. Forvalg 1/Enter
7. FM-antenne INN
8. FM-antenne UT
9. Styreenhetsinngang
10. Lydutgang
11. Strøminntak
12. DAB-antennetilkobling
3
Page 4
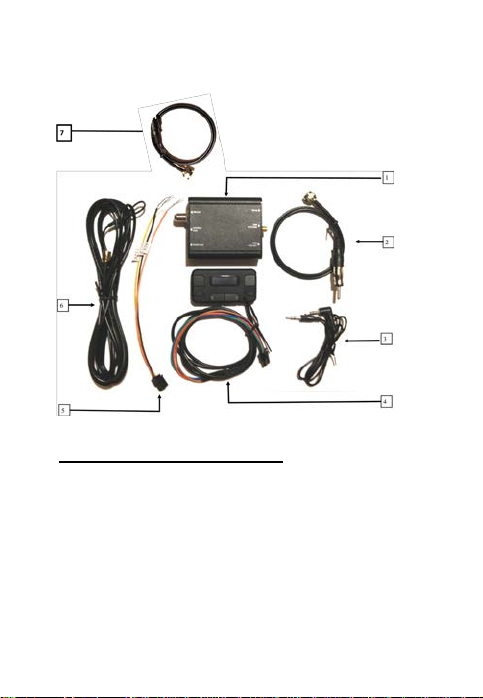
7. FM-senderantenne
Hovedenhet og tilbehør:
1. Svart boks-hovedenhet
2. FM-antennekabel UT
3. 3,5 mm lydkabel
4. Styreenhet og kabel
5. Strømkabel
6. Passiv antenne
4
Page 5

Montering og bruk av Tiny Audio C11+
1. Monter Tiny Audio C11+ inne i
hanskerommet med medfølgende kabler.
2. Plugg strømforsyningskabelen (5) til den
svarte boksens strøminntak, og koble
kabelens andre ende til bilens
strømforsyning, +12V VCC, på korrekt vis,
som angitt på kabeletiketten.
3. Koble vedlagt antenne (6) til den svarte
boksens DAB-antenneinngang.
4. Koble styreenhetskabelen (4) til den svarte
boksens styreenhetsinngang.
5. Demonter eksisterende AM/FM-antenne og
koble den til den svarte boksens FM-inngang.
6. Koble den ene enden av den vedlagte
FM-antennekabelen (2) til den svarte
boksens FM-utgang, og koble den andre
enden til FM-antenneinngangen på
bilradioens hovedenhet.
5
Page 6

7. Du kan også velge linjeutgang til bilradioens
hovedenhet ved å koble vedlagte 3,5mm
lydkabel til den svarte boksens lydutgang, og
den andre enden til linjeinngangen til
bilradioens hovedenhet.
8. Når den svarte boksens strøm er PÅ, vil
OLED-skjermen vise "Tiny Audio C11+". Trykk
og hold 4/M-knappen for menymodus.
9. Ved førstegangsbruk må du søke etter alle
lokale DAB+-stasjoner ved å aktivere
Auto-Søk i menyen ved å trykke og holde
4/M-knappen for å komme til hovedmenyen.
Bruk "<" eller ">"-knappen for å velge
Auto-Søk, og bekreft med 1/E-knappen for å
starte søket. Alle tilgjengelige
DAB+-radiokanaler søkes og lagres til et nytt
Auto-Søk utføres. Ved søk vil en prosentlinje
og et nummer vises på skjermen for å
indikere framdrift og totalt antall
tilgjengelige stasjoner.
10. Når søket er fullført, kan du velge en
DAB+-radiostasjon med "<" eller
">"-knappen.
6
Page 7
Anmerkning: Det er ved normal bruk unødvendig
å utføre et Auto-Søk hver gang du bruker
DAB+-bilradioen, såfremt det ikke foreligger nylig
tillagte DAB+-stasjoner. Da kan det være
nødvendig å utføre et nytt Auto-Søk.
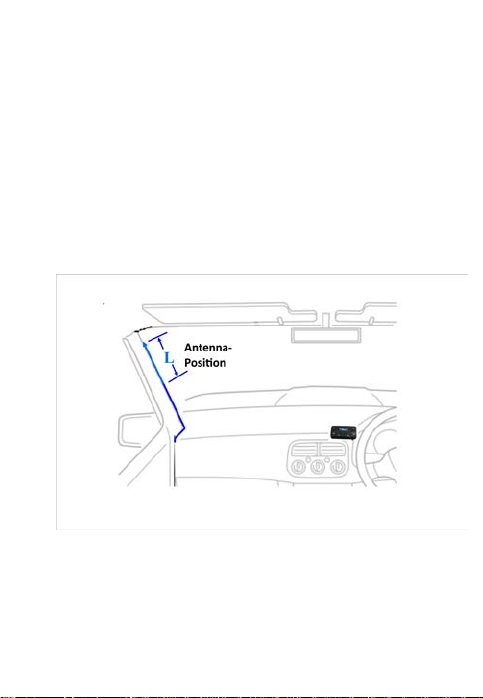
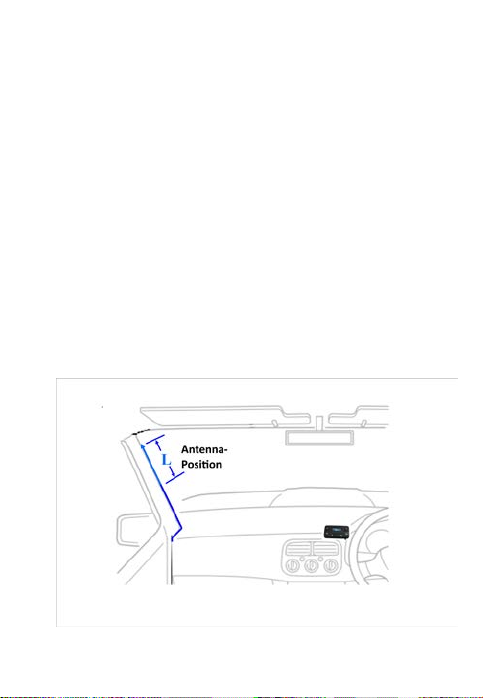
DAB+-antenneinnstallering
1. DAB+-antennen (6) bør monteres på
frontrutens passasjerside i vertikal stilling,
som vist i diagrammet ovenfor. Antennen
kan gjemmes inne i A-stolpen.
7
Page 8

2. Antennen kan festes til A-stolpens metalldel
med dobbeltsidig tape.
3. Før antennen ned langs A-stolpen til
hanskerommet, og videre dit Tiny Audio
C11+ skal monteres. Se til at ingen deler av
antenneledningen hekter seg opp.
Ikke fest DAB-antennen over varmetråder, på
steder hvor den kan forstyrre sjåføren, eller på
steder hvor metall kan forårsake forstyrrelser. For
egen sikkerhet, fest ikke kabler slik at de kan
forstyrre kjøretøysdrift, eller slik at de kan
forstyrre kollisjonsputenes funksjon.
8
Page 9
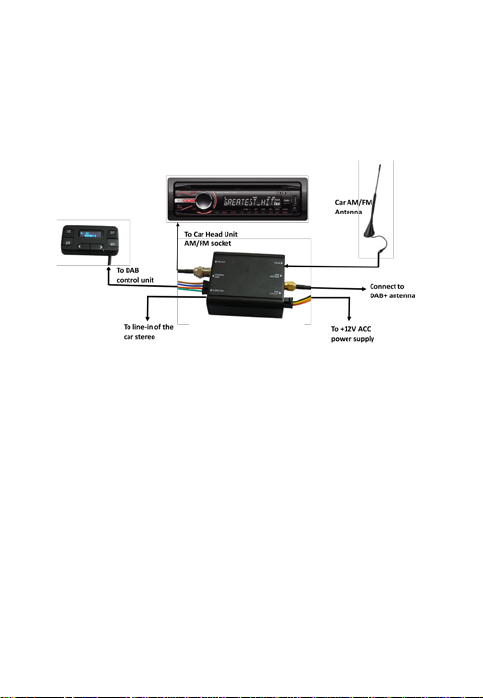
Tiny Audio C11+ Koblingsskjema
Valg av lydutgang – Lyd ut
1. Koble den vedlagte 3,5mm lydkabelen til
lydutgangen på Tiny Audio C11+, og deretter
til Aux-tilkoblingen på bilradioen.
2. Dersom du velger å bruke
lydutgangstilkobling, trenger du ikke å
frakoble eksisterende AM/FM-antenne i
bilen.
9
Page 10

Valg av lydutgang – FM-sending
Velg FM-sending gjennom hovedenhetens
FM-inngang (FM-modulator-modus via antenne):
1. Trykk og hold 4/M-knappen for å komme til
menyen. Bruk “<” eller “>” til å finne
“Sender-frekv.”, og trykk 1/E-knappen for å
velge. Bruk “<” eller “>” for å velge en
FM-sendefrekvens, og trykk 1/E -knappen
igjen for å bekrefte og forlate menyen.
2. Den valgte favoritt FM-frekvensen vises
øverst på skjermen, f.eks. 108,0.
3. Still inn din bils FM-radio til den valgte
frekvensen for sending av lydsignalet fra Tiny
Audio C11+ til bilens stereoanlegg.
10
Page 11

Velge FM-sendefrekvens over luft (utenom
hovedenhetens FM-inngang):
1. Trykk og hold 4/M-knappen for å komme til
menyen. Bruk “<” eller “>” for å finne
“Sender-FM”, og trykk 1/E-knappen for å
velge.
2. Bruk “<” eller “>” for å velge en ledig
FM-sendefrekvens, og trykk 1/E -knappen
igjen for å bekrefte og forlate menyen.
3. Den valgte ledige FM-frekvensen vises øverst
på skjermen, f.eks. 87,50.
4. Still inn bilens FM-radio til den valgte
frekvensen for sending av lydsignalet fra Tiny
Audio C11+ til bilens stereoanlegg.
Bemerkning: I denne modusen trenger du ikke å
tilkoble AM/FM-antenne, men du må bruke den
vedlagte FM-antennen, og koble den til
FM-utgangen på Tiny Audio C11+ for at den skal
kunne fungere som FM-antenne. Denne
antennen kan skjules inne i hanskerommet, men
må være fullt trukket ut.
11
Page 12

DAB+-tjenesteinformasjon
Relevant tjenesteinformasjon kringkastet av
DAB+-stasjonen vil vises med rullende tekst på
Tiny Aduio C11+ sin OLED-skjerm.
Når du lytter til DAB+ vil skjermen vise følgende,
hvis tilgjengelig:
1. Stasjonsnavn
2. DAB+-ikon
3. Signalstyrke
4. FM-frekvens
Forvalgte stasjoner
Forhåndslagre stasjoner:
For å lagre dine favoritt DAB+-stasjoner:
1. Bruk "<" og ">"-knappen for å velge en
DAB+-stasjon du ønsker å lagre.
2. Trykk og hold 3/P-knappen i 3 sekunder for å
åpne Forhåndslagrings-modus.
12
Page 13

3. Trykk deretter på ønsket plassering for
forhåndslagring, 1/E, 2/R, 3/P eller
4/M-knappen.
4. Totalt 4 forvalg kan lagres.
Valg av forhåndslagrede stasjoner:
Trykk på knappen hvor ønsket stasjon er lagret.
Stasjonen vil bli hentet umiddelbart.
Hvilemodus
Tiny Audio C11+ kan settes i hvilemodus for å
stanse enheten, og slå av OLED-skjermen.
1. Trykk og hold 4/M-knappen i 3 sekunder for
å komme til menyen, bruk "<" eller
">"-knappen for å finne Standby, og bekreft
ved å trykke 1/E-knappen.
2. Deretter bruk “<” eller “>”-knappen for å
velge JA for å gå i hvilemodus. Enheten vil
ikke lenger være aktiv, og OLED-skjermen vil
slå seg av.
13
Page 14

3. For å avslutte hvilemodus, trykk og hold
4/M-knappen i 3 sekunder for å komme til
menyen. Bruk "<" eller ">"-knappen for å
finne hvilemodus, og bekreft ved å trykke
1/E-knappen.
4. Bruk deretter “<” or “>”-knappen for å velge
NEI for å avslutte hvilemodus. Enheten
aktiveres, og OLED-skjermen vil slå seg på.
Service following
1. Trykk og hold 4/M-knappen for å gå inn i
menymodus. Bruk " <" eller ">" til å finne
"Tjenesten Følger" og trykk 1/E-knappen for å
velge.
2. Bruk " <" eller " > " til å velge " På" for å
aktivere tjenesten.
3. For å slå av tjenesten følger du trinn 1, og
velger "Av".
4. Når tjenesten er slått på, vil OLED-skjermen
vise " SF ".
14
Page 15

Traffic Announcement
Det er to metoder for å slå på TA-funksjonen.
Den første metoden:
1. Trykk og hold 4/M-knappen I 3 sekunder for
å komme til menyen. Bruk " <" eller ">" til å
finne “Traffic Announcement” og trykk
1/E-knappen for å velge.
2. Bruk " <" eller ">" til å velge " På" for å
aktivere tjenesten.
3. For å slå av tjenesten følger du trinn 1, og
velger "Av".
15
Page 16

Den andre metoden:
1. Trykk og hold 2/R-knappen inntil “TA På”
vises på skjermen. Tjenesten er nå aktivert.
2. Følg trinn 1 for å slå av tjenesten. “TA Av” vil
da vises på skjermen.
Når TA-funksjonen er slått på, vil lokale
trafikkmeldinger bryte inn i sendingen.
Det vil stå TA i displayet når trafikkmeldingen blir
sendt.
Innstillinger
Språkvalg
1. Trykk og hold 4/M-knappen for å komme til
menyen.
2. Bruk "<" eller ">"-knappen for å velge
System og bekreft ved å trykke 1/E-knappen
16
Page 17

3. Bruk deretter "<" eller ">"-knappen igjen for
å finne Språk, og bekreft med 1/E-knappen.
4. Bruk "<" eller ">"-knappen for å finne ønsket
språk. Bekreft med 1/E-knappen.
Tilbakestilling til fabrikkinnstilling
1. Trykk og hold 4/M-knappen for å komme til
menyen.
2. Bruk "<" eller ">"-knappen for å velge
System, og bekreft ved å trykke
1/E-knappen.
3. Bruk deretter "<" eller ">"-knappen for å
velge «Fabrikkoppsett», og bekreft med
1/E-knappen. Bruk "<" eller ">"-knappen
igjen for å velge «JA» eller «NEI», og bekreft
med 1/E-knappen.
17
Page 18

Programvareversjon
1. Trykk og hold 4/M-knappen for å komme til
menyen.
2. Bruk "<" eller ">"-knappen for å velge
System, og bekreft ved å trykke
1/E-knappen.
3. Bruk deretter "<" eller ">"-knappen for å
velge Versjon, og bekreft med 1/E-knappen.
Du vil nå kunne se enhetens
programvareversjon. Trykk «2/R»-knappen
for å forlate menyen.
18
Page 19

Tekniske data
Produktmodell Tiny Audio C11+
Radioformat DAB/DAB+
Frekvensområder DAB-bånd III 174-240MHz,
FM-sender 87,5-108MHz
Strømforsyning +12V, VCC, GND
DAB-antennetype Passiv antenne
Lydutgang 3,5 mm Stereo lydkabel
Dimensjoner Svart boks: 69 x 59 x 26 mm
Styreenhet: 62 x 33 x 13 mm
Nettovekt Svart boks: 97 g
Styreenhet: 35 g
*Informasjon oppgitt i denne brukerhåndboken kan endres uten
forvarsel.
19
Page 20
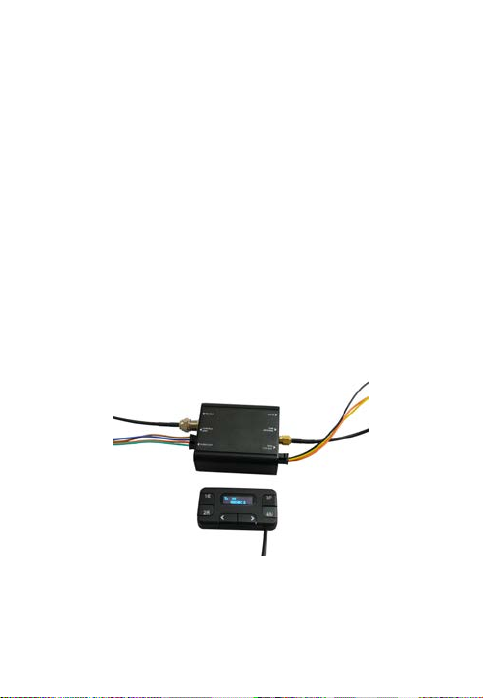
English
Tiny Audio C11+
Digital In-Car DAB+ Digital Radio with
Antenna Bypass FM Modulator
Black Box User Manual
Please read carefully before using this product
20
Page 21

Safety Instructions
• Do not expose this radio to rain or moisture.
• Obey local traffic laws
• Clean with a dry cloth.
• Do not block any ventilation openings.
• Do not use near heater vents.
• Use accessories provided by manufacturer.
• Do not leave your radio where excessive
heat could cause damage.
21
Page 22
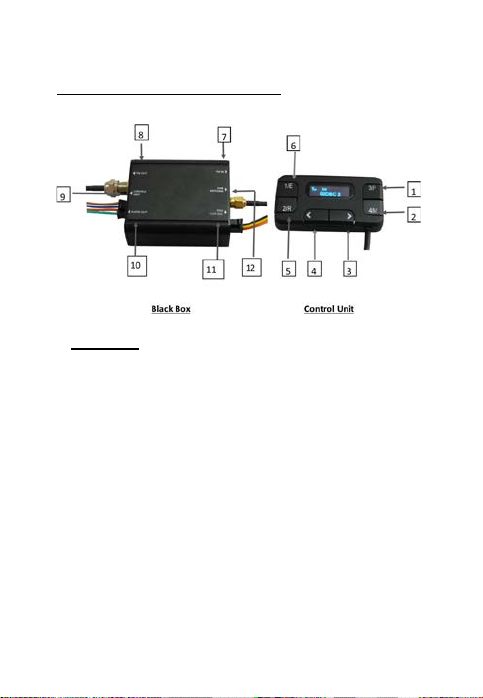
Controls and Connectors
Controls:
1. Preset 3/Preset
2. Preset 4/Menu
3. Tuning Up
4. Tuning Down
5. Preset 2/Recall
6. Preset 1/Enter
7. FM Antenna IN
8. FM Antenna OUT
9. Control Unit Connector
10. Audio Out Jack
11. Power Supply Socket
12. DAB Antenna Connector
22
Page 23
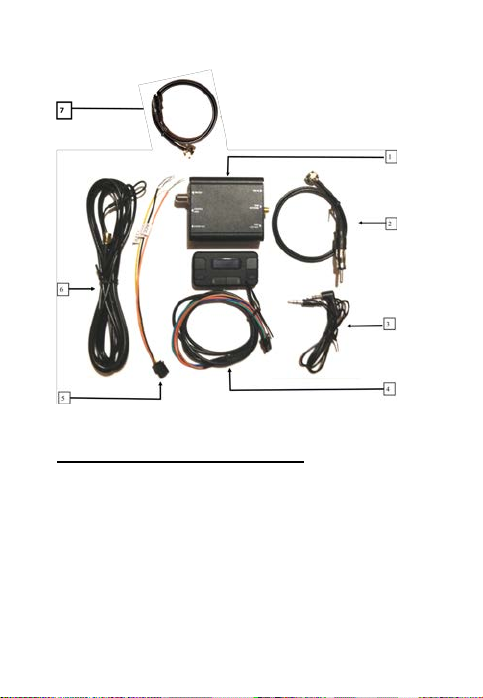
7. FM transmission antenna
Main Unit and Accessories:
1. Main unit Black Box
2. FM Antenna Out Cable
3. Audio Out 3.5mm Cable
4. Control Unit and Cable
5. Power Supply Cable
6. Passive Antenna
23
Page 24

Installation and Operation of the Tiny
Audio C11
+
1. Install the Tiny Audio C11+ inside the glove
box using the provided cables.
2. Insert the power supply cable connector (5)
to the power supply socket in the black box
and connect the other end of the cable to
the +12V VCC car power supply with correct
wiring as indicate in the wire label.
3. Connect the supplied antenna (6) to the
DAB+ antenna socket in the black box.
4. Connect the control unit cable (4) to the
control unit connector in the black box.
5. Disassemble the existing car AM/FM antenna
and insert it into the FM-IN socket in the
black box,
6. Screw one end of the supplied FM antenna
out cable (2) to the FM-Out socket in the
24
Page 25

black box and insert the other end of the
cable to the car stereo head unit FM antenna
socket.
7. You may also choose line out to the car
stereo head unit by connecting the supplied
3.5mm audio cable to the Audio Out socket
in the black box and the other end to the
line-in of the car stereo head unit.
8. When the power of the black box is ON, the
OLED display will show “Tiny Audio C11+”.
Press and hold the 4/M button to enter
menu mode.
9. For first time use, you need to scan all the
local DAB+ channels by activating the Auto
Scan in the menu by press and hold 4/M
button to enter main menu, use “>” or “<”
button to search for Auto Scan and
confirmed by pressing 1/E button to scan. All
available DAB+ radio channels will be
scanned and saved until another Auto Scan is
performed. During scanning, a percentage
bar will be shown on the display to indicate
25
Page 26
the progress and the total number of
channels available will be displayed.
10. Once scanning is complete, you can select
any DAB+ radio channel using “>” or “<”
button.
Note: For normal use, you don’t have to
perform Auto Scan every time you use the car
DAB+ radio unless there are newly added DAB+
channels, in which case you may need to perform
Auto Scan again.
DAB+ Antenna Installation
26
Page 27

1. The DAB+ antenna (6) should be fitted on the
passenger side of the front windscreen with
vertical direction as indicated in the above
diagram. The antenna can be hide inside
the A-pillar.
2. The antenna can be fixed to the metal of
A-pillar by using adhesive tape.
3. Route the antenna lead down the A pillar to
where the Tiny Audio C11+ is to be mounted.
Ensure you do not trap any leads as you go.
Do not attach the DAB antenna above heater
wires, in a location which would obstruct the view
of the driver, or in a location that would receive
interference from metal. For your safety, do not
run cables so that they interfere with operation of
the vehicle, or through a location that would
interfere with the function of the airbags.
27
Page 28
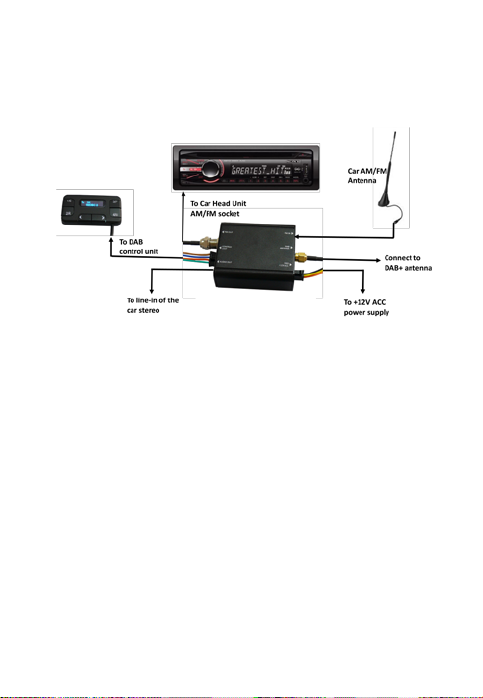
Tiny Audio C11+ Connection
Diagram
Selecting Audio Output – Audio Out
1. Connect the supplied 3.5mm Audio Cable to
the Audio Out connector of the Tiny Audio
C11+ and then connect to the Aux in of the
car stereo.
2. If you choose to use Audio Out connection,
you don’t have to disconnect the existing car
AM/FM antenna.
28
Page 29

Selecting Audio Output – FM
Transmission
Select FM Transmitting through head unit FM
socket (Antenna Bypass FM Modulator Mode):
1. Press and hold the 4/M button to enter
menu mode. Use the “<” or “>” to search
for “Tx FM” and press 1/E button to select.
Use the “>” or “<” to select “No” and exit
menu.
2. Press and hold the 4/M button to enter
menu mode.Use the “<” or “>” to search for
“Tx Freq” and press 1/E button to select.Use
the “<” or “>”to select any favourite FM
transmission frequency and press 1/E button
again to confirm and exit menu.
3. The selected favourite FM frequency will be
shown at the top of the display, e.g. 108.0
4. Tune your car FM radio system to match the
selected FM frequency for transmission of
the audio signal from Tiny Audio C11+ to
29
Page 30

your car stereo audio system.
Select FM Transmitting frequency over the air
(without go through head unit FM socket):
1. Press and hold the 4/M button to
enter menu mode. Use the “<” or “>” to
search for “Tx FM” and press 1/E button to
select. Use the “>” or “<” to select “Yes” and
exit menu.
2. Press and hold the 4/M button to enter
menu mode.Use the “<” or “>” to search for
“Tx Freq” and press 1/E button to select.Use
the “<” or “>”to select any favourite FM
transmission frequency and press 1/E button
again to confirm and exit menu.
3. The selected favourite FM frequency will be
shown at the top of the display, e.g. 87.50
4. Tune your car FM radio system to match the
selected FM frequency for transmission of
the audio signal from Tiny Audio C11+ to
your car stereo audio system.
30
Page 31

Select Fm RDS Transmitting Mode:
1.ress and hold the 1/E button until the
First line is show “RDS MODE” .If the second line
“SN”,Indicate the current RDS MODE has
show
changed to display
“station name”.
2.Repeat step 1, if the second line show
“DLS”,Indicate the current RDS MODE has
changed to display
Remark: In this mode, you don’t have to
disconnect the car AM/FM antenna but you need
to use the supplied FM transmission antenna to
insert into the FM out socket of the Tiny Audio
+ black box to act as FM transmission
C11
antenna. This antenna can be hide inside the
glove box but need to be fully extended.
Selecting Traffic Announcement
We have two method to select the traffic
announcement function.
The first method:
1. Press and hold the 4/M button to enter menu
“Text information”.
31
Page 32

mode. Use the “<” or “>” to search for “Traffic
Announcement” and press 1/E button to select
and exit menu.
2. Then Use the “>” or “<” to select “On” to turn
on the traffic announcement function .
3. To turn off the traffic announcement
function,repeat step 1,and Use the “>” or “<” to
select “Off”.
The second method :
press and hold 2/R button until the screen is show
“TA On” or “TA Off ”. “TA On” indicate turn on
the traffic announcement function,“TA Off”
indicate turn off the traffic announcement
function.
when traffic announcement function is turned
on,if traffic announcement is coming,it will
automatically change to traffic station and
play,the “SF” display will change to “TA”,when the
traffic announcement is end,it will automatically
return to previous station,the “TA”display will
change to “SF” if SF is turned on.
32
Page 33

Selecting Service Following
4. Press and hold the 4/M button to enter
menu mode. Use the “<” or “>” to search for
“Service Follow” and press 1/E button to select
and exit menu.
5. Then Use the “>” or “<” to select “On” to turn
on the service following function .
6. To turn off the service following
function,repeat step 1,and Use the “>” or “<” to
select “Off”.
7. When we turn on the service following
function,the OLED screen will show “SF”,else the
“SF” don’t display.
DAB+ Service Information
Relevant service information data broadcast by
the DAB+ radio station will be displayed with
scrolling text on the OLED display Tiny Audio
C11+.
While listening to DAB+, the display will show the
following if applicable:
33
Page 34

1. Channel Name
2. DAB+ Icon
3. Signal Strength
Preset Stations
Storing Preset Stations:
To program and store your favourite DAB+ preset
stations:
1. Use “>” and “<” button to select your
favourite DAB+ stations for Preset 1
2. Press and hold the 3/P button for 3 seconds
to enter Store Preset Stations mode.
3. Then short press 1/E button to store your
first favourite preset station. Press and hold
2/R button to exit menu.
4. Repeat the above 1,2,3 procedure to store
second, third and fourth favourite preset
stations by pressing 2/R, 3/P and 4/M
button.
5. Total 4 preset stations can be stored.
34
Page 35

Selecting Preset Stations:
To select your favourite DAB+ preset stations:
1. Short press 1/E button to recall the first
preset DAB+ stations.
2. Repeat the same procedure for second, third
and fourth preset stations by pressing 2/R,
3/P and 4/M button
Idle Mode Setting
The Tiny Audio C11+ black box can be set into idle
mode to stop the unit and shut off the OLED
display.
1. Press and hold 4/M button for 3 seconds to
enter menu mode, using “<” or “>” button to
search for Idle Mode and confirm by pressing
1/E button.
2. Then use “<” or “>” button to select YES to
turn the unit into Idle Mode. The unit will
35
Page 36

stop working and OLED display will be shut
off.
3. To cancel Idle Mode, press and hold 4/M
button for 3 seconds to enter menu mode,
using “<” or “>” button to search for Idle
Mode and confirm by pressing 1/E button.
4. Then use “<” or “>” button to select NO to
cancel the Idle Mode. The unit resume to
work and OLED display will be on.
Settings
Language Selection
1. Press and hold the 4/M button to enter
menu
2. Use the “<” or “>” button to select System
and confirm by pressing 1/E button
3. Then use “<” or “>” button again to select
your desired Language and confirm by
pressing 1/E button. Press and hold 2/R
button to exit menu.
36
Page 37

Factory Reset
1. Press and hold the 4/M button to enter
menu
2. Use the “<” or “>” button to select System
and confirm by pressing 1/E button
3. Then use “<” or “>” button to select Factory
Reset and confirm by pressing 1/E button.
Use “>” or “<” button again to select YES or
NO and confirm by pressing 1/E button.
Software Version
1. Press and hold the 4/M button to enter
menu
2. Use the “<” or “>” button to select System
and confirm by pressing 1/E button
37
Page 38

3. Then use “<” or “>” button to select Version
and confirm by pressing 1/E button. You
will then be able to check the software
version of the unit. Press and hold the 2/R
button to exit the menu.
Technical Specifications
Product Model: Tiny Audio C11+
Radio Format DAB/DAB+
Frequency Ranges DAB Band III 174-240MHz,
FM Transmitter 87.5-108MHz
Power Source +12V, VCC, GND
DAB Antenna Passive antenna
Audio Out 3.5mm Stereo Jack
Dimensions Black box: 69 x 59 x 26 mm
Control Unit: 62 x 33 x 13 mm
Net Weight Black Box: 97g
38
Page 39

Control Unit: 35 g
*Information in this user manual is subject to change without
prior notice.
Distributed and developed by TT Micro AS –
+47 22 74 88 40 Made in China
39
 Loading...