

Tiny X8 User Manual
LED
Battery status
keeps on
High power (above 70%)
slow flash
Middle power (30%~10%)
fast flash + buzzer
Low power (less than 10%)
5 channel position
switch indicator
channel REV OFF
channel REV ON
■
1800
1200 × × × ■
1200
1800
6 channel position
switch indicator
channel REV OFF
channel REV ON
■
1800
1200 ■ 1500
1500 ■ 1200
1800
Switch position
Setting status
Channel REV ON
Channel REV OFF (default)
Switch position
Status
Output value
H position
1800
L position
(default)
1200
TINY TX SERIES X8
8-CHANNEL 2.4GHZ DIGITAL RADIO
USER MANUAL 71025E
Thanks for purchasing TINY TX serirs
2.4GHz digital system, RF solution of this product use Texas Instruments
CC2500 and CC2592, wireless protocol is compatible with SFHSS. X8 is a 8-
channel easy to use radio for multirotor, X8 radio will help you simplifies
the setup , make you focus on fly.
<WHAT IN THE PACKET>
● X8 Radio x1
● 3.7V Lipo battery x1
● RX800-PRO micro receiver x1
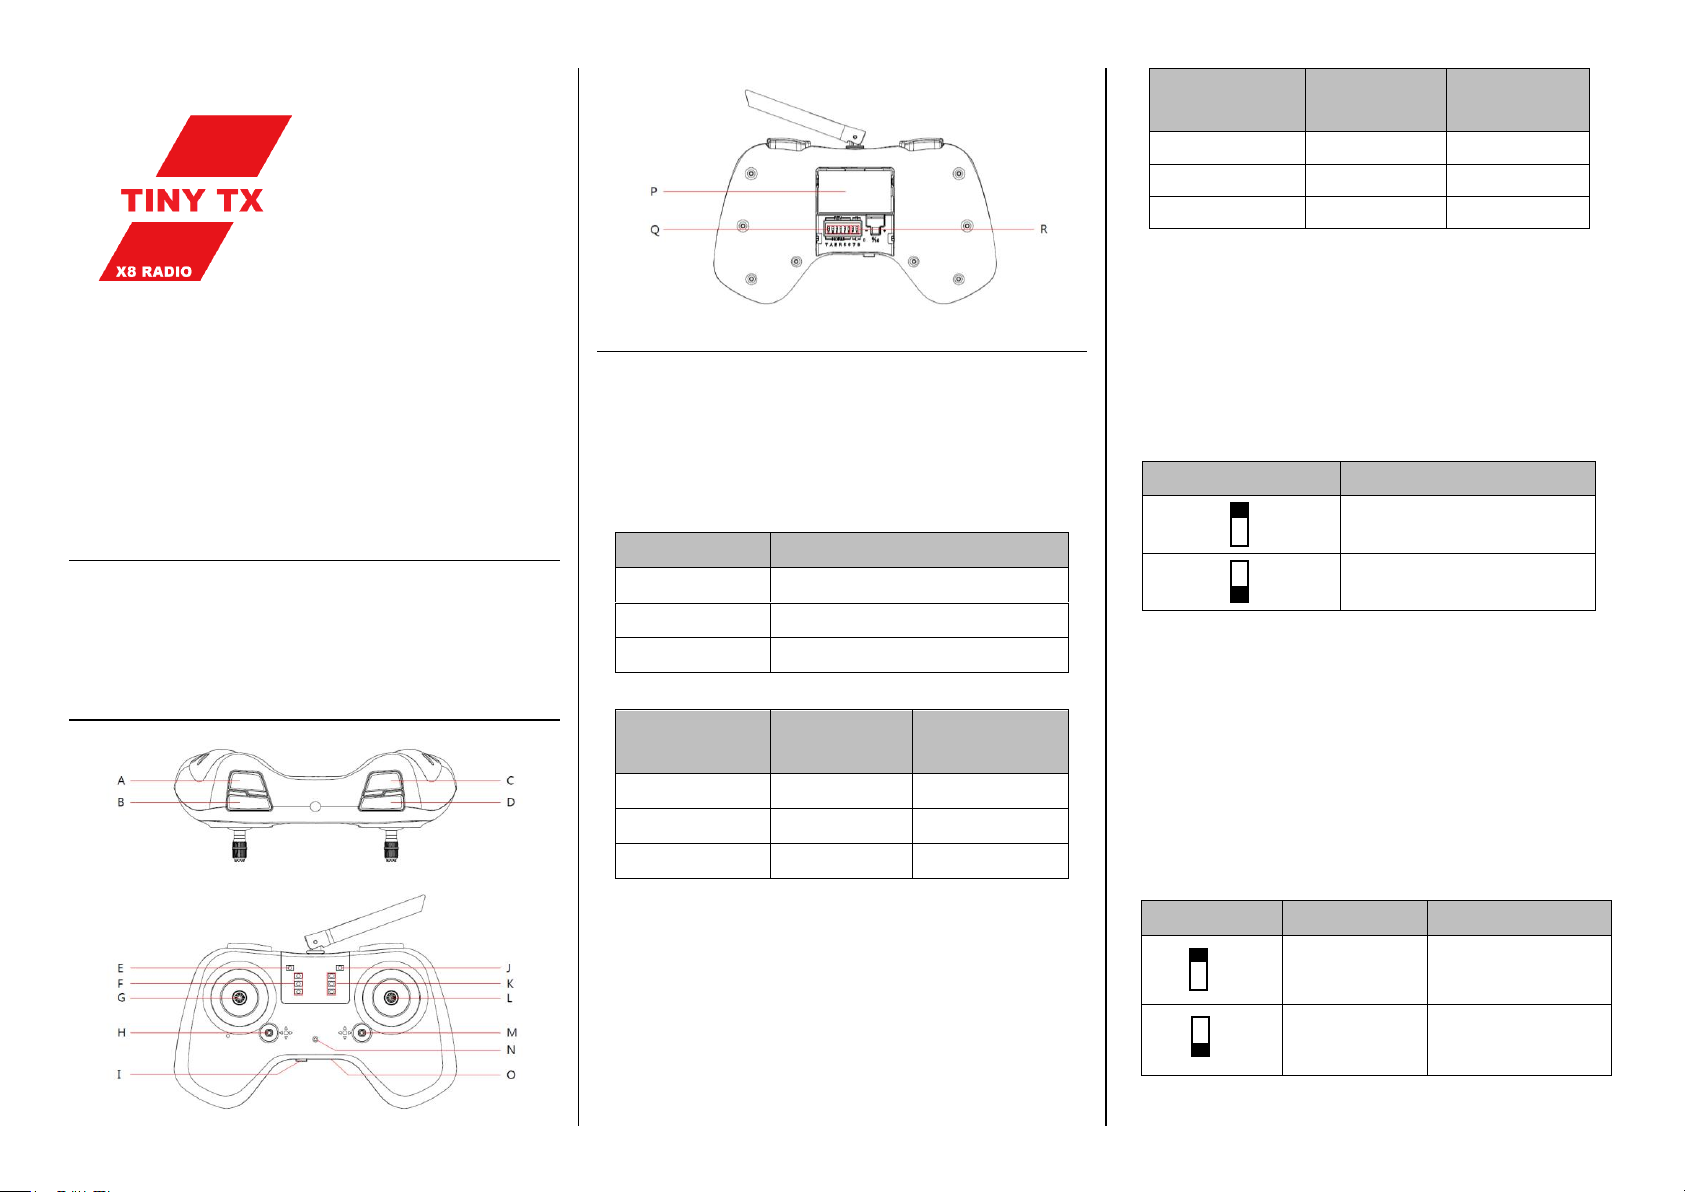
<SCHEMATIC>
< SCHEMATIC DESCRIPTION>
<A>:5 channel downshifting key.
<B>:5 channel upshifting key.
<C>:6 channel downshifting key.
<D>:6 channel upshifting key.
<E>:power indicator:suggest charged battery when middle power
<F>:5 channel position switch indicator.
<L>:Elevator / Aileron stick.
<M>:Elevator / Aileron trim.
<N>:Charing indicator, the indicator on mean charing.
<O>:Micro USB, can charging the battery or update firmware.
<P>:Battery compartment.
<Q>:Channel REV switch.
SW1(T): Throttle channel REV switch.
SW2(A): Aileron channel REV switch.
SW3(E):Elevator channel REV switch.
SW4(R): Rudder channel REV switch.
SW5(5): 5 channel REV switch.
SW6(6): 6 channel REV switch.
<R>:7 & 8 channel switch :
<G>:Throttle / Rudder stick.
<H>:Throttle / Rudder trim.
<I>: Power Switch.
<J>: RF indicator.
<K>:6 channel position switch indicator.

T A E R
5CH
6CH
7CH
8CH
MIN
1050
1100
1100
1100
1200
1200
1200
1200
neutral
-
1500
1500
1500 - 1500 - -
MAX
1950
1900
1900
1900
1800
1800
1800
1800
< neutral CAL.>
LED indicator
Buzzer
SUCCESS
Neutral CAL. pass
Once
ERROR
T/R stick not in
neutral position
Always
ERROR
E/A stick not in
neutral position
Always
ERROE
Both stick not in
neutral position
Always
<range CAL.>
LED indicator
User action
T/R stick range
calibration
E/A stick range
calibration
SW7(7): 7 channel switch.
SW8(8): 8 channel switch.
<CHANNEL DATA >
X8 radio support 8 channel output, channel sequence and rang as blow
<STICK RE-CALIBRATION >
The stick of radio alreay calibration before leave factory, but after long time
use maybe result bias, user can re-calibration the stick as follows: make sure
the radio power OFF, keep throttle / rudder and elevator / aileron stick all
in neutral position, press the red keys as shown below then power on, the
radio will into < stick re-calibration > mode.
After < neutral CAL.> success, radio will run <range CAL.>,please shake stick
to maximum rang.
PC software (KINGKONG UPDATE TOOLS.EXE), firmware use LDAFWX or
LDAFW file extension, all the update flies can download from website:
KINGKONG-RC.COM/TX/X8. User MUST defer the following order :
1. DO NOT connect the radio to USB port, open the PC software.
2. Connect the radio to USB port, if this is first time you connect the
radui to PC, install the driver of radio as follow.
3. Load the LDAFWX or LDAFW firmware.
4. Make sure radio is power off, press and hold the red key as follow,
then power on, the radio will beep 321 and start update firmware.
< stick re-calibration > will first run < neutral CAL.>, the LED indicator and
the sound of buzzer will announce the calibration result. You can refer to
the table below.
<SUPPORT OPENSOURCE FIRMWARE>
TINY TX X8 is opensource in Github, we hope more and more people make good FW for us.
WEBSITE:GITHUB.COM/KINGKONG-RC/TINY-TX-X8
SPECIAL REMARKS: ● Please use opensource FW with great caution, untested FW may
cause rx unstable or make drone lost of control ● Official FW use .LDAFWX extension,
< FIRMWARE UPDATE>
X8 radio support firmware update in WINDOWS 7/8/10, please download
opensource FW use .LDAFW, the PC software will remind you when load the FW.
WELCOM TO KINGKONG-RC.COM
 Loading...