

Tintometr Scuba II Instruction Manual
Scuba II
эксплуатации
Free Chlorine/
Freies Chlor
Total Chlorine/
Gesamtchlor
pH
Stabilizer
Alkalinity/
Alkalität
Fitting the battery/ Batteriewechsel/ Remplacement des piles/ Sostituzione delle batterie/ Cambio de
batería/ Batterijwissel/ Batteriskifte/
Batteribyte/ Batteriskifte/ Pariston
asennus/ Замена батарей
1
4
ZERO
7
10
TEST
2
MODE
15 sec
6
9
15
5
8
2

Technical Data/ Technische Daten/ Données
techniques/ Dati tecnici/ Datos técnicos/ Technische
gegevens/ Tekniske data/ Tekniska data/ Tekniske data/
Tekniset tiedot/ Технические данные:
Cl : 0.1 - 6.0 mg/l Cl
2-3 mg/l ± 0.4; 3-6 mg/l ± 0.5)
pH : 6.5 - 8.4 pH (± 0.2 pH)
CyA : 1 - 50 mg/l Cys (± 10 mg/l),
50 - 160 mg/l Cys (± 20 mg/l)
TA : 0 - 300 mg/l CaCO
Light Source/ Optik/Optique/ Gruppo ottico/
Óptica/ Lens/ Optikk/ Optiikka/ Оптика:
LED: λ = 530 nm
Battery/ Batterie/ Pile/ Batteria/ Batería/ Batterij/
Batteri/ Batterier/ Batteri/ Paristot/ Батарея:
2 x AAA (1.5 V), LR03
Auto-Off/ Arrêt automatique/ Spegnimento-automatico/ Automatisk sluk/ Automattinen sammutus/
Батарея:
300 sec
Ambient Conditions/ Umgebungsbedingungen/
Conditions ambiantes/ Conditioni ambientali/
Condiciones-ambientales/ Omgevings-condities/
omgivelses-betingelser/ Miljöför-hållanden/ Ympäristötiedot Lämpötila/ Окружающие условия:
T = 5-40°C
Waterproof/ Wasserdicht/ Étanchéité à l‘eau/
Impermeambile/ Resistente al agua/ Waterdicht/
Kapslingsklasse/ Vattentät/ Vanntett/ Vesitiiviys/
Водонепроницаемость:
Analog IP68, 1 h @ 0.1 m
Conformity/ Konformität/ Conformité/ Conformi-
tà/ Conformidad/ Conformieit/ Overensstemmelse/
Märkning/ Konformitet/ Vaatmustenmukasisuus/
Соответствие нормам:
CE
(0-1 mg/l ± 0.1; 1-2 mg/l ± 0.2;
2
(± 50 mg/l)
3
3

Operation
• Fitting the battery (2 x AAA (1.5 V), LR03)
Change the batteries with this display
indication.
when opening/ closing the battery chamber lid!
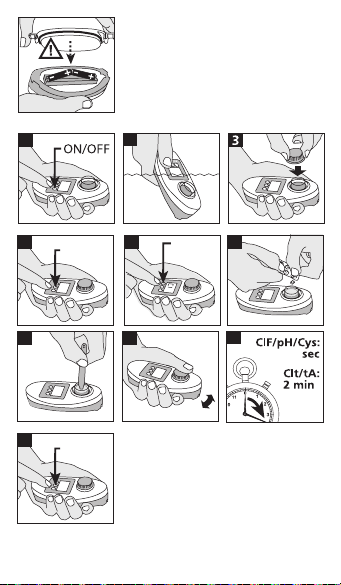
Switch the unit on using the ON/OFF key.
The display shows: “0”. Make one Zero for all the
methods:
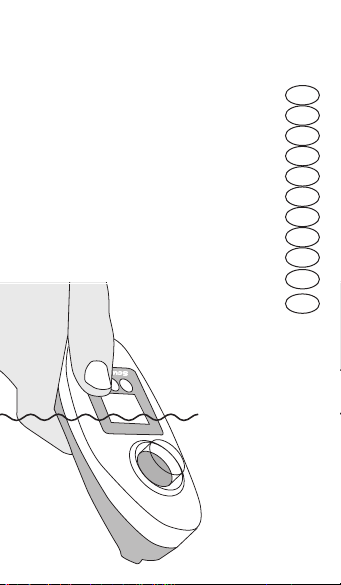
Swirl the instrument several times under the
water surface allowing the sample chamber
to completely fill. Take the instrument out of the
water.
Close the blue lid tightly.
Press the ZERO/TEST key. “000” flashes for
approx. 8 seconds. The display shows “0.0.0”.
Select the test required using the MODE key:
Cl (free Chlorine/ total Chlorine) → pH → TA →
CyA → Cl ... (Scroll).
6
Open the blue lid and add the appropriate tablet
straight from the foil.
Method appropriate tablet
Cl : Free chlorine DPD No.1
Cl : Total chlorine DPD No.1 + DPD No.3
pH : pH Value PHENOL RED PHOTOMETER
CyA : Stabilizer CyA-Test
TA : Alkalinity-M ALKA-M-PHOTOMETER
{ Crush the tablet using a clean stirring rod.
Stir until the tablet is dissolved.
| Close the lid and swirl the instrument gently
for approx. 15 seconds.
} Afterwards keep the instrument steady and wait
for 15 seconds when testing ClF/pH/CyA and
2 minutes when testing Clt and TA.
4
Check position of the O-Ring
GB
Press the “Zero/Test“-key. The “---“ symbol flashes
for approx. 6 seconds. The result appears in the display.
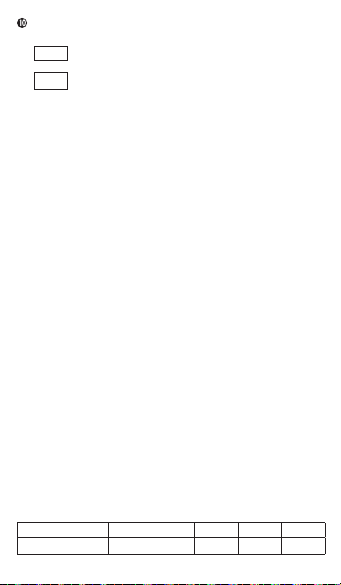
LOW
measuring range
HIGH
Repeat Test
Press the “Zero/Test“-key
Change Method
Press the “Mode“-key to scroll down.
New zero:
Press the “Zero/Test“-key for 2 sec.
•
1. Keep the instrument in a clean condition.
2. No solvent, abrasive materials or brushes should be
used to clean the instrument. Clean the sample chamber
using a soft tissue.
3. Dry the instrument when not in use, store under ambient
environmental conditions.
4. Remove battery if instrument is being stored for an
extended period.
• Trouble shooting
1. Use only blister tablets with black printing.
2. Do not touch the tablets. This can cause
contamination and give pour results.
3. Close the blue lid on top of the sample chamber tightly
before zeroing/reading.
4. Always ensure that the sample chamber, the lid
and the stirring rod are thoroughly rinsed when
changing from one test to the other.
Warranty
The waterproof Scuba ll is warranted to be free from
manufacturing defects for two years.
Conversion Table
1 mg/l CaCO
Result below the lowest limit of the
Measuring range exceeded
Maintenance
mmol/l KS4.3 °dh °e °f
0.02 0.056 0.07 0.10
3
5

Inbetriebnahme
• Batteriewechsel (2 x AAA (1.5 V), LR03)
Batterie wechseln, wenn das Symbol im Display
erscheint.
fachdeckels auf den O-Ring achten!
Gerät mit der Taste ON/OFF einschalten. In
der Anzeige erscheint: “0”. Nullabgleich für alle
Methoden machen:
Die Probenkammer unterhalb der Wasser oberfläche durch Eintauchen des Gerätes
vollständig füllen. Dabei das Gerät leicht hin-
und herschwenken. Das Gerät aus dem Wasser
nehmen.
Die Probenkammer mit dem blauen Deckel
verschließen.
Die Taste ZERO/TEST drücken. “000” blinkt ca. 8
Sekunden. Danach erscheint in der Anzeige
“0.0.0”.
Analyse mit der Taste MODE wählen: Cl (freies Chlor/
Gesamtchlor) → pH → TA → CyA → Cl ... (Scroll).
6
Den blauen Deckel abnehmen und die ent sprechende Tablette zugeben.
Methode entsprechende Tablette
Cl : Freies Chlor DPD No.1
Cl : Gesamtchlor DPD No.1 + DPD No.3
pH : pH-Wert PHENOL RED PHOTOMETER
CyA : Stabilizer CyA-Test
TA : Alkalinität-M ALKA-M-PHOTOMETER
{Tablette mit dem Rührstab zerdrücken und durch
Umrühren vollständig auflösen.
| Die Probenkammer mit dem blauen Deckel wie der verschließen. Das Gerät für ca. 15 Sekunden
hin- und herschwenken, nicht schütteln.
} Danach das Gerät ruhig halten und bis zum Test
von ClF/pH/CyA: 15 sec bzw. bis zu Test von
Clt/TA: 2 min warten.
6
Beim Öffnen/ Schließen des Batterie-
DE

Taste “Zero/Test“ drücken. Ein Strichsymbol
“---“ blinkt ca. 6 Sekunden. In der Anzeige
erscheint das Ergebnis.
LOW
HIGH Messbereich überschritten
Test wiederholen
Drücken der Taste “Zero/Test“
Andere Methode
Drücken der Mode Taste und scrollen.
Neuer Nullabgleich
Drücken der Taste “Zero/Test“ für 2 sec
•
1. Gerät sauber halten.
2. Keine Lösungsmittel, agressiven Scheuermittel
oder Bürste zur Reinigung verwenden. Messschacht
nur mit weichem Tuch auswischen.
3. Lassen Sie das Gerät nach Gebrauch trocknen
und bewahren Sie es angemessen auf.
4. Batterie bei längerem Nichtgebrauch aus dem Gerät
nehmen.
• Vermeidung von Fehlern bei Messungen
1. Für die Analysen sind nur Reagenztabletten mit
schwarzer Beschriftung zu verwenden.
2. Die Reagenztabletten müssen direkt aus der Folie
in die Wasserprobe gegeben werden, ohne sie mit
den Fingern zu berühren.
3. Nullabgleich und Test müssen mit vollständig
geschlossenem Deckel erfolgen.
4. Probenkammer, Deckel und Rührstab nach jedem
Test gründlich spülen.
Garantie
Ab Verkaufsdatum beläuft sich die Gewährleistung für das
wasserdichte Scuba II auf einen Zeitraum von 2 Jahren.
Umrechnungstabelle
1 mg/l CaCO
Messbereich unterschritten
Wartung
mmol/l KS4.3 °dh °e °f
3
0.02 0.056 0.07 0.10
7

Instruction pour l‘utilisateur
• Remplacement des piles (2 x AAA (1.5 V), LR03)
Remplacer les piles lorsque le symbole
afférent apparaît à l‘afficheur.
au joint torique en ouvrant et en fermant le
couvercle du compartiment à piles!
Mettre en marche l‘appareil en actionnant
la touche ON/OFF. Le message suivant apparaît à
l‘afficheur: “0”. Effectuer la compensation à zéro
pour toutes les méthodes:
Remplir totalement la chambre à échantillon en
immergeant l‘appareil sous la surface de l‘eau. Ce
faisant, agiter l‘appareil en un léger mouvement
de va-et-vient. Sortir l‘appareil de l‘eau.
Fermer la chambre à échantillon en utilisant le
couvercle bleu.
Appuyer sur la TOUCHE ZÉRO/TEST. „000“ clignote
pendant 8 secondes env. Ensuite, l‘afficheur
indique „0.0.0“.
Sélectionner l‘analyse avec la touche MODE : Cl (chlore
libre/chlore total)→ pH → TA → CyA → Cl ... (Scroll).
6
Enlever le couvercle bleu et ajouter la pastille
correspondante.
Méthode Pastille à utiliser
Cl : Chlore libre DPD No.1
Cl : Chlore total DPD No.1 + DPD No.3
pH : Valeur de pH PHENOL RED PHOTOMETER
CyA : Stabilizer CyA-Test
TA : Alkalinité-M ALKA-M-PHOTOMETER
{Écraser la pastille à l‘aide d‘un bâtonnet à mélanger
et la dissoudre totalement.
| Refermer la chambre à échantillon en utilisant le cou vercle bleu. Bouger l‘appareil en un mouvement va e-vient pendant 15 secondes environ, ne pas l‘agiter.
} Ensuite, tenir l‘appareil tranquillement attendre
jusqu‘au test de ClF/pH/CyA: 15 sec ou, jusqu‘au test
de CLt/TA: 2 minutes.
8
FR
Faire attention

Appuyer sur la touche „Zéro/Test“. Le symbole en
traits “---“ clignote pendant 6 secondes env. Le
résultat s‘affiche à l‘écran d‘affichage.
LOW valeur en-deçà de la plage de mesure
HIGH valeur au-dessus de la plage de mesure
Répéter le test
Appuyer sur la touche „Zéro/Test“.
Autre méthode
Appuyer sur le touche Mode et faire défiler.
Nouvelle compensation à zéro
Appuyer sur la touche „Zéro/Test“ pendant 2 sec.
Maintenance
•
1. Maintenir l‘appareil en état de propreté.
2. Pour le nettoyage, n‘utiliser ni solvants, ni agents à
récurer agressifs, ni brosses. Essuyer le compartiment de
mesure en utilisant seulement un torchon doux.
3. Laisser sécher l‘appareil après l‘utilisation et le stocker
dans des conditions convenables.
4. Sortir les piles de l‘appareil si ce dernier n‘est pas
utilisé pendant une durée prolongée.
• Éviter les erreurs lors des mesures
1. Pour les analyses, utiliser exclusivement des pastilles
de réactif portant une inscription noire.
2. Les pastilles de réactif doivent être transférées
directement du film de conditionnement dans
l‘échantillon d‘eau, sans les toucher avec les doigts.
3. La compensation à zéro et le test doivent être
effectués lorsque le couvercle est complètement
fermé.
4. Rincer abondamment la chambre à échantillon,
couvercle et le bâtonnet à mélanger après chaque test.
Garantie
La durée de garantie s‘étend sur une période de 2
ans à compter de la date d‘achat pour le Scuba II.
Tableau de conversion Alkalinité-M
1 mg/l CaCO
mmol/l KS4.3 °dh °e °f
0.02 0.056 0.07 0.10
3
9
le
Istruzioni per l‘utente
Sostituzione delle batterie (2 x AAA (1.5 V), LR03)
•
Sostituire la batteria quando appare il simbolo
sul display. Dopo l’apertura/chiusura del tappo
dello scomparto batteria, verificare il posizi onamento dell’O-Ring!
Accendere lo strumento con il tasto ON/OFF. Nel display
appare: “0”. Procedere con la taratura a zero per
tutti i metodi:
Riempire la camera di campionamento al di sotto
della superficie dell’acqua, immergendo comple tamente lo strumento. Far oscillare delicatamente lo
strumento. Togliere lo strumento dall’acqua.
Chiudere la camera di campionamento con il tappo blu.
Premere il tasto ZERO/TEST. “000” lampeggia per
ca. 8 secondi. Dopodiché sul display appare “0.0.0”.
Selezionare il tipo di analisi con il tasto MODE:
Cl (Cloro libero / Cloro totale) → pH → TA → CyA → Cl ...
(Scroll).
6
Rimuovere il tappo blu ed introdurre la pastiglia
corrispondente.
Metodo Pastiglia da utilizzare
Cl : Cloro libero DPD No.1
Cl : Cloro totale DPD No.1 + DPD No.3
pH : Valore pH PHENOL RED PHOTOMETER
CyA : Stabilizer CyA-Test
TA : Alcalinità-M ALKA-M-PHOTOMETER
{Pressare la pastiglia con la bacchetta e far sciogliere
mescolando.
| Richiudere la camera di campionamento con
il tappo blu. Far oscillare l’apparecchio per ca. 15
secondi, senza agitare.
} Quindi far riposare lo strumento e attendere fino al
test di ClF/pH/CyA: 15 sec e Clt/TA: 2 min.
Premere il tasto “Zero/Test“. Il simbolo del trattino
“---“ lampeggia per ca. 6 secondi. Sul display
appare il risultato.
10
IT

LOW Intervallo di misurazione troppo ridotto
HIGH Intervallo di misurazione superato
Ripetere il test
Premere il tasto “Zero/Test“
Altro metodo
Premere il tasto Mode e scorrere.
Nuova taratura a zero
Tenere premuto il tasto “Zero/Test“ per 2 sec.
Manutenzione
•
1. Mantenere pulito lo strumento.
2. Non utilizzare solventi, prodotti abrasivi aggressivi
né spazzole. Sul pozzetto passare semplicemente
un panno morbido.
3. Lasciar asciugare lo strumento dopo l’uso e
conservarlo in modo idoneo.
4. Qualora lo strumento non venga utilizzato
per un lungo periodo, rimuovere la batteria.
• Come evitare errori di misurazione
1. Per le analisi, utilizzare esclusivamente pastiglie
reagenti con scritta nera.
2. Le pastiglie reagenti devono essere introdotte nel
campione di acqua direttamente dalla pellicola,
senza toccarle con le dita.
3. La taratura a zero ed il test devono avvenire con il
tappo completamente chiuso.
4. Risciacquare a fondo la camera di campionamento,
il tappo e la bacchetta dopo ogni test.
Garanzia
La garanzia dell’Scuba II ha una durata di 2 anni a
partire dalla data di acquisto.
Tabella equivalenze Alcanità-M
1 mg/l CaCO
mmol/l KS4.3 °dh °e °f
0.02 0.056 0.07 0.10
3
11
Indicaciones para el usuario
• Cambio de batería (2 x AAA (1.5 V), LR03)
Cambiar de batería, cuando aparezca el
símbolo en la pantalla.
tapa del compartimento de la batería prestar
atención a la junta tórica!
Encender el dispositivo con la tecla ON/OFF. En
la pantalla aparece: “0”. realizar el ajuste a cero
para todos los métodos:
Llenar completamente la cámara de muestras
de bajo de la superficie del agua sumergiendo el
instrumento. Al hacerlo, balancear ligeramente
el dispositivo hacia adelante y hacia atrás. Retirar
el dispositivo del agua.
Cerrar la cámara de muestras con la tapa azul.
Presionar la tecla ZERO/TEST. “000” parpadea aprox. 8
segundos. Luego aparece en la pantalla “0.0.0”.
Elegir el análisis con la tecla MODE: Cl (cloro libre/cloro
total) → pH → TA → CyA → Cl ... (desplazando)..
6
Quitar la tapa azul y agregar la tableta adecuada.
Método tableta a utilizar
Cl : Cloro libre DPD No.1
Cl : Cloro total DPD No.1 + DPD No.3
pH : Valor pH PHENOL RED PHOTOMETER
CyA : Estabilizante CyA-Test
Alcalinidad-M
TA :
{Triturar la tableta con la varilla agitadora y disolverla
completamente removiéndola.
| Volver a cerrar la cámara de muestras con la tapa
azul. Balancear el dispositivo hacia adelante y
hacia atrás durante aprox. 15 segundos, sin agitar.
} A continuación, mantener firme el dispositivo y hasta
la prueba de ClF/pH/CyA: esperar mínimo 15 seg. o
hasta la prueba de Clt/TA: 2 min.
Presionar la tecla “Zero/Test“.
12
ALKA-M-PHOTOMETER
¡Al abrir o cerrar la
ES

Un símbolo de barras“---“ parpadeará aprox. 6
segundos. En la pantalla aparecerá el resultado.
LOW Rango de medición demasiado bajo
HIGH Rango de medición sobrepasado
Repetir la prueba
Presione la tecla “Zero/Test“
Otro método
Presione la tecla Mode y desplace.
Nuevo ajuste a cero
Presione la tecla “Zero/Test“ durante 2 seg.
Antenimiento
•
1. Mantener limpio el instrumento.
2. Para la limpieza del instrumento no utilizar disolventes,
ni abrasivos agresivos o cepillos. Limpie la
cámara de medición solamente con un paño suave.
3. Después de la utilización deje secar el instrumento
y guárdelo en un ambiente adecuado.
4. En caso de no utilizarlo por largo tiempo, retire
la batería del instrumento.
• Prevención de errores al realizar mediciones
1. Para los análisis se deberán utilizar solamente las
tabletas reactivas con el rótulo negro.
2. Las tabletas reactivas deberán ser echadas en la
muestra de agua directamente del folio, sin
tocarlas con los dedos.
3. El equilibrio a cero y el ensayo se deberán realizar con la
tapa completamente cerrada.
4. Enjuagar muy bien después de cada ensayo la cámara
de muestras, la tapa y la varilla agitadora.
Garantía
A partir de la fecha de venta la garantía para el
Scuba II ascenderá a 2 años.
Tabla de reducción Alcalinidad-M
1 mg/l CaCO
mmol/l KS4.3 °dh °e °f
0.02 0.056 0.07 0.10
3
13

Aanwijzingen voor de gebruiker
• Batterijwissel (2 x AAA (1.5 V), LR03)
Batterij verwisselen, zodra het symbool in
het display verschijnt. Bij het openen/ sluiten
van het batterijvakdeksel op de O-ring letten!
Apparaat met de knop ON/OFF inschakelen. In
het display verschijnt: “0”. Nulafstelling voor alle
methodes uitvoeren:
De monsterkamer geheel met water vullen,
door de monsterkamer geheel onder water te
dompelen. Daarbij het apparaat lichtjes heen en
weer zwenken. Het apparaat uit het water nemen.
De monsterkamer met het blauwe deksel afsluiten.
De knop ZERO/TEST indrukken. “000” knippert
gedurende ca. 8 seconden. Daarna verschijnt in
het display “0.0.0”.
Analyse met de knop MODE selecteren: Cl (vrije chloor/
totale chloor) → pH → TA → CyA → Cl ... (Scroll).
6
Het blauwe deksel verwijderen en de benodigde tablet
toevoegen.
Methode te gebruiken tablet
Cl : Vrije chloor DPD No.1
Cl : Totale chloor DPD No.1 + DPD No.3
pH : pH-waarde PHENOL RED PHOTOMETER
CyA : Stabilizer CyA-Test
TA : Alkaliniteit-M ALKA-M-PHOTOMETER
{Tablet met het roerstaafje fijndrukken en door
omroeren geheel oplossen.
|De monsterkamer weer met het blauwe deksel
afsluiten. Het apparaat gedurende 15 seconden heen
en weer zwenken, niet schudden.
} Vervolgens het apparaat stil houden en tot aan de
test van ClF/pH/CyA: 15 sec. resp. tot aan de tekst
Clt/TA: 2 min wachten.
Knop “Zero/Test“ indrukken. Gedurende ca.
14
NL
 Loading...