

Page 1
Tintag
Rechargeable Tracking Device
Tintag Team
http://thetintag.com/
2015
Page 2

CONTENTS
Contents
1. What it does 1
2. The Device 2
3. Getting Started 3
4. Operation 8
5. Charger 9
6. Precautions 10
Page 3

LIST OF FIGURES
List of Figures
1 TheTinTagDeviceandtheRechargingModule ............................. 2
2 TinTagLEDsandButton......................................... 2
3 DownloadingtheMobileApp....................................... 3
4 LauncinghTintagApplication....................................... 3
5 Proceeding to Adding Tintags to Your Mobile App ........................... 4
6 Adding Name and Photo to Tintag .................................... 4
7 Selecting one Tintag in the Mobile App (Picture showing app and corresponding Tintag) ....... 5
8 SelectingtheDesiredTintaginyourlist ................................. 5
9 Find Your Tintag via Buzzer ....................................... 6
10 FindYourTintagviaLEDs ........................................ 6
11 MonitorDistancefromTintag ...................................... 7
12 MapofLastTintagLocations ...................................... 7
13 ButtononTintag ............................................. 8
14 DisconnectfromTintag.......................................... 8
15 TheTintagPlacedontheRechargingModule.............................. 9
Page 4

1. What it does
Tintag is a rechargeable tracking device for your lost items. It helps you find your keys, bags, pets, you name it, so
that you never lose them again. TinTag connects via Bluetooth to an app running on your phone.The state of the
art technology,coupled with its original design, including a high-performance communication unit and antenna design
lead to a range of up to 50 meters (detection from 100 meters and connection from 50). Furthermore, the wireless
charging unit in the package and the high-capacity rechargeable battery eliminate the need for the upsetting action
of replacing batteries.
Basic TinTag functionalities:
− helps you find the objects to which it is attached and which you’ve lost through a phone application;
− alerts you through a selectable buzzer or flash of a LED when the object it is attached to gets further than a
distance limit you specify in the mobile application;
− helps you find phone running the application through an acoustic notification when pressing a button on the
device;
− allows the monitoring of an unlimited number of devices through the same application;
− saves the history of locations where the item was last seen;
− application running on Android and iOS;
− durable waterproof casing available in several colours;
− small and discrete, easy to attach to tracked items (26mm x 39.2 mm).
Supported devices:
− iPhone 4S, 5, 5s, 5c, 6, 6 Plus
− iPad 3rd Generation and later
− iPad Mini and later
– all with iOS 7 and upwards
− Android phones with Android 4.3 and upwards, with Bluetooth Low Energy
– Samsung Galaxy S3, S4, Note 3, Google Nexus 4, 5 and many more...
1
Page 5
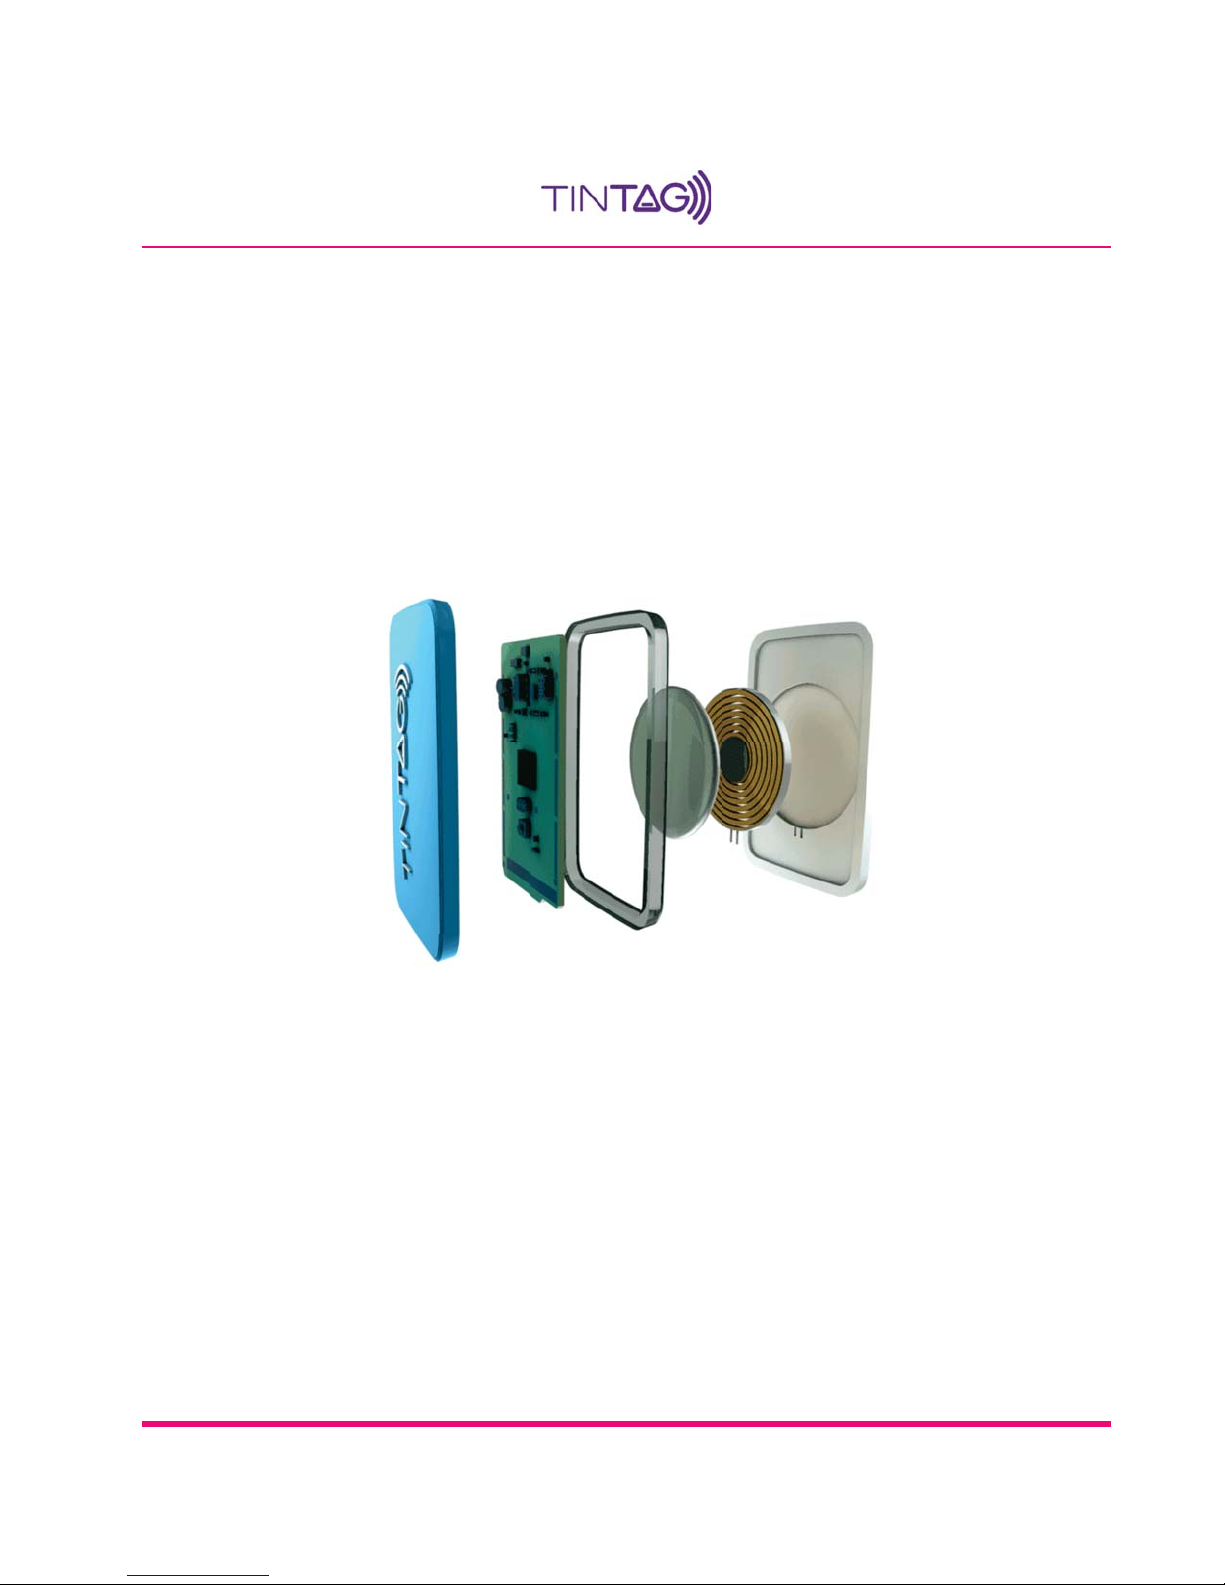
2. The Device
Figure 1: The TinTag Device and the Recharging Module
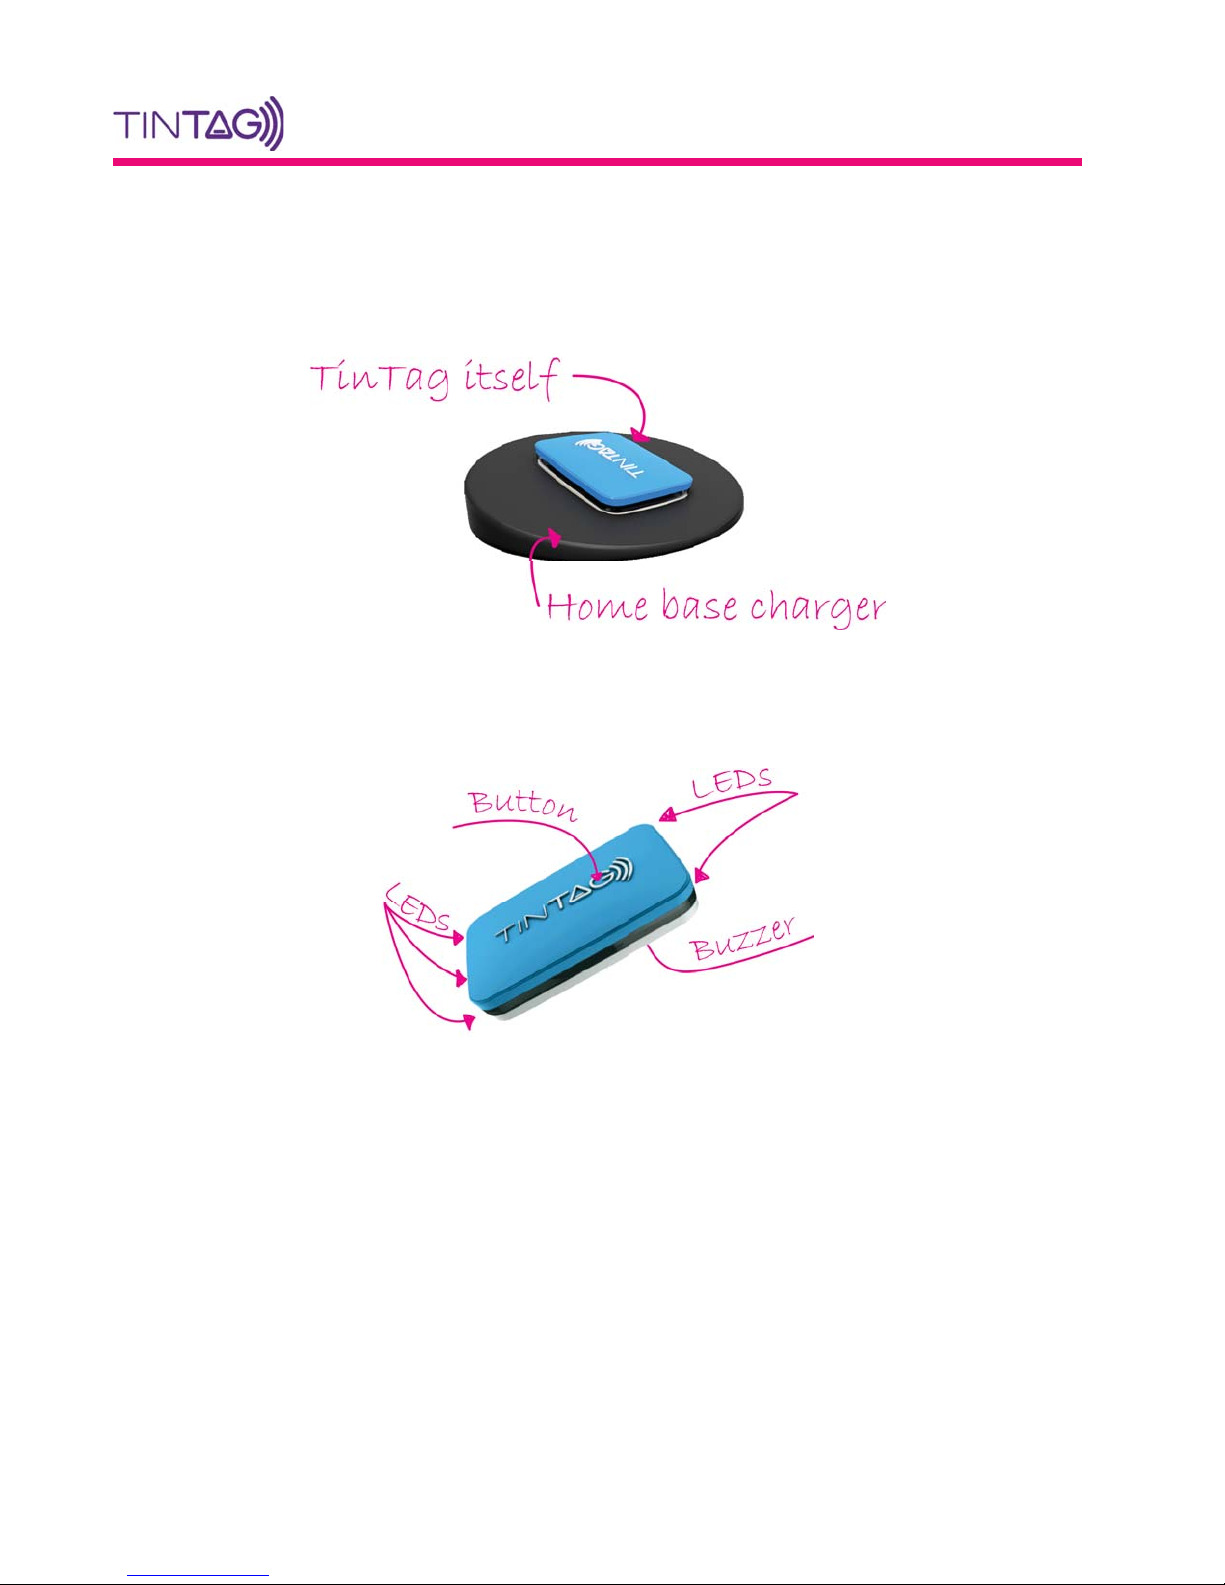
The TinTag functionalities are achieved through the use of four LEDs, a buzzer, and one button.
Figure 2: TinTag LEDs and Button
2
Page 6

3. Getting Started
This section introduces the steps required for operating a device.
Step 1. Download Mobile Application
Download the appropriate application depending on your phone, Android-based or iPhone, from App Store or Google
Play.
Figure 3: Downloading the Mobile App
Step 2. Launch the TinTag App
Tap the TinTag icon on your phone to launch application.
Figure 4: Launcingh Tintag Application
3
Page 7

Step 3. Add a New Tintag
Swipe Down to add a new Tintag for connecting to the phone app.
Figure 5: Proceeding to Adding Tintags to Your Mobile App
Step 4. Add a Name and Photo to Your Tintag
When starting the application, you will be asked to add a name and a picture for the Tintag you will connect to.
Figure 6: Adding Name and Photo to Tintag
4
Page 8

Step 5. Detect Your Tintag
Wait until all the Tintags in the vicinity are detected and select one of them. You will note that the colour of the
icons is different for the devices, being the same as the casing of each one of them. When selected in the phone app,
the corresponding Tintag will start the buzzer and will flash the LEDs for a short period of time, so that you know
which one is it.
Figure 7: Selecting one Tintag in the Mobile App (Picture showing app and corresponding Tintag)
Step 6. Select Your Tintag from the Added Devices List
Select the Tintag you want to connect depending an name and photo in the list showing all the added devices.
Figure 8: Selecting the Desired Tintag in your list
5
Page 9

Step 7. Find Your Tintag via Buzzer
When the Tintag is in range and connected, you can start a buzzer alert from the mobile app. If the phone is out of
Tintag’s range, than the buzzer button is not visible, meaning that the devices are disconnected.
Figure 9: Find Your Tintag via Buzzer
Step 8. Find Your Tintag via LEDs
When the Tintag is in range and connected, you can flash the LEDs from the mobile app so that you can find it. If
the phone is out of Tintag’s range, than the LED button is not visible, meaning that the devices are disconnected.
Figure 10: Find Your Tintag via LEDs
6
Page 10

Step 9. Alert Depending on Distance
This feature in the app enables you to monitor a Tintagged item within a preferred distance and to be notified when
it gets further than the limits you set.
Figure 11: Monitor Distance from Tintag
Information
The preferred distance for alerting can be set to be one meter, more than 5 to 10 meters, more than 10 to 20 or
more than 20 to 30 meters.
Step 10. History of Tintag Locations
The application keeps track of the locations where your item to which it is attached was last seen so that you can
easily remember where you’ve left it. You can also cycle through all the locations where the Tintag was detected.
Figure 12: Map of Last Tintag Locations
7
Page 11

Step 11. Find Your Phone Using a Connected Tintag
If you have lost your phone, and it is in range of an associated Tintag you can start an acoustic notification on
your phone by pressing the button on the device. You can walk around the locations where your phone running the
application might be. If you are getting close to it, as you press the button, it will signal its presence through the
sound alarm.
Figure 13: Button on Tintag
Step 12. Leaving Tintag Detail Area
You can leave the detail area of a Tintag you are connected to by tapping the x on the upper left corner of the
window. This way you can easily go through all the Tintags associated to your phone.
4. Operation
The Tintag is ready to go when you get it out of its package. You will be able to connect to it as soon as you install
the mobile app. When first connecting to it, it will flash the four LEDs in the corners and it will start the buzzer
for a short period of time. This is particularly useful when you have multiple Tintags you want to connect to. After
adding it in the mobile app, it will always connect to the mobile application if within range. When the devices are
out of reach, they will automatically disconnect. However, when within range, they will automatically reconnect.
You will be able to flash the LEDs and start the buzzer from your application only if the Tintag is within range
and connected. This is also the case of the Tintag button, it will start the alert on the phone only if the application
is running and the devices are connected.
Figure 14: Disconnect from Tintag
8
Page 12

Warning
The mobile app continuously displays the battery level so you will know each time the battery needs recharging.
The Tintag needs battery recharging when the battery level is shown to be 0%.
Attention!
The operating temperature range lies between -20
Cand60C.
5. Charger
Warning
When your mobile application shows a battery level of 0% the battery needs recharging. Be careful, the Tintag
will keep operating only for a limited amount of time if you don’t recharge the battery.
The Tintag can be placed in any position on the home base charger, with the logo facing upwards. When placed
on the charger and when initiating the charging procedure, all the four LEDs in the corners will flash for a short period
of time. Then, the LED in the lower-right will toggle slowly during the charging period. During all this time you can
monitor the battery level from your mobile app. When the battery is full, a green LED will also toggle, to inform you
that you can replace the Tintag from the home base charger. The home base charger can be connected to any USB
port of a device.
Figure 15: The Tintag Placed on the Recharging Module
Information
The lower-right LED on your Tintag will signal that charging is taking place and a green LED will let you know
the battery is fully charged.
9
Page 13

Warning
Do not place any other device than the Tintag on the home base charger. This can damage the charger itself or
these objects.
6. Precautions
The Tintag is a tough device and will withstand a great deal of bad treatment. However, you must remember that
the casing is made of plastic and it is not indestructible. Below is a list of precautions you should take into account.
Warning
Place the Tintag carefully in the charger. Make sure that there are no objects between the two.
Do not place the Tintag close to open fire and do not dispose in fire.
This is an electronic device, so a degradation of communication capabilities is expected when operating in harsh
environments, where interferences are present.
When you notice unexpected behaviour of the mobile app, you should restart it.
Keep in mind the fact that the connection to your Tintag can be established only is it is within the range of your
mobile phone.
10
Page 14

Note:
This equipment has been tested and found to comply with the limits for a Class B digital device,
pursuant to Part 15 of the FCC Rules. These limits are designed to provide reasonable protection
against harmful interference in a residential installation. This equipment generates, uses, and can
radiate radio frequency energy, and if not installed and used in accordance with the instructions,
may cause harmful interference to radio communications. However, there is no guarantee that
interference will not occur in a particular installation. If this equipment does cause harmful
interference to radio or television reception, which can be determined by turning the equipment
off and on, the user is encouraged to try to correct the interference by one or more of the following
measures:
– Reorient or relocate the receiving antenna.
– Increase the separation between the equipment and receiver.
– Connect the equipment into an outlet on a circuit different from that to which the receiver is
connected.
– Consult the dealer or an experienced radio/TV technician for help.
You are cautioned that changes or modifications not expressly approved by the party responsible
for compliance could void your authority to operate the equipment.
This device complies with Part 15 of the FCC Rules. Operation is subject to the following two
conditions:
(1) this device may not cause harmful interference, and
(2) this device must accept any interference received, including interference that may cause
undesired operation.
This device complies with Industry Canada’s licence-exempt RSSs. Operation is subject to the
following two conditions:
(1) This device may not cause interference; and
(2) This device must accept any interference, including interference that may cause undesired
operation of the device.
 Loading...