


Your smart light
NALO 404068 | 404069 | 404070
BEDIENUNGSANLEITUNG ab Seite 2
MODE D‘EMPLOI à partir de la page 28
INSTRUCTION MANUAL from page 52
INHALT
Allgemeines ....................................... .........02
Auf einen Blick / Lieferumfang .... ...........02
Einleitung...................................... ...........03
Zeichenerklärung ......................... ...........03
Sicherheitssymbole ...................... ...........04
Bestimmungsgemäßer Gebrauch ...... .........04
Sicherheitshinweise ........................... .........05
tint-Fernbedienung ............................ .........08
Inbetriebnahme .................................. .........09
Batterien einlegen ........................ ...........09
Wandhalterung für Fernbedienung.........09
Deckenspots montieren .......................... 11
Allgemeines
Bedienung ........................................ ...........12
Grundfunktionen .......................... ...........12
Szenen .......................................... ...........13
Gruppenfunktionen ...................... ...........14
Reset .............................................. .........19
Smart Home Ready ............................ .........21
Reinigung ........................................... .........22
Fehlersuchtabelle .............................. .........23
Technische Daten .............................. .........25
Konformitätserklärung ..................... .........26
Entsorgen ........................................... .........27
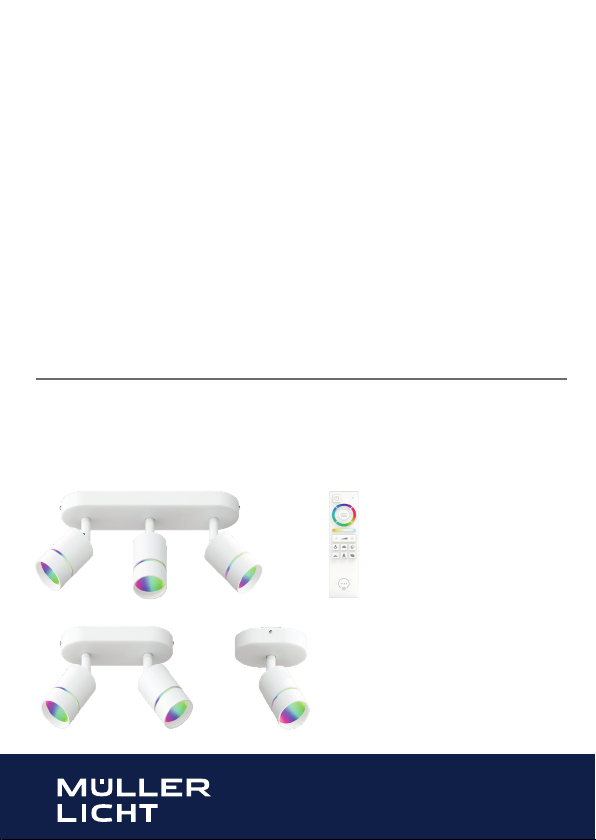
Auf einen Blick
Lieferumfang
• Leuchte NALO,
white+color
• tint-Fernbedienung mit
Wandhalterung und
Montagematerial
• 2 Batterien
LR03 (AAA) / 1,5 V
• Bedienungsanleitung
• Montagematerial
tint Deckenspots NALO
ANLEITUNG
2

Sehr geehrte Kundin, sehr geehrter Kunde!
Diese Bedienungsanleitung enthält wichtige Informationen zur
Inbetriebnahme und Verwendung.
Lesen Sie die Bedienungsanleitung, insbesondere die Sicherheitshinweise, sorgfältig durch, bevor Sie das Produkt montieren. Die
Nichtbeachtung dieser Bedienungsanleitung kann zu schweren Verletzungen und zu Schäden an den Produkten führen.
Bewahren Sie die Bedienungsanleitung für die weitere Nutzung auf.
Wenn Sie das tint Produkt an Dritte weitergeben, geben Sie unbedingt
diese Bedienungsanleitung mit.
Sie können diese Anleitung auch im Internet unter
www.mueller-licht.de/tint als pdf Datei herunterladen.
Zeichenerklärung
Die folgenden Symbole und Signalwörter werden in dieser Bedienungsanleitung, auf dem tint-Produkt oder auf der Verpackung verwendet.
WARNUNG!
Dieses Signalsymbol/-wort bezeichnet eine Gefährdung mit einem mittleren Risikograd, die, wenn sie nicht vermieden wird, den Tod oder eine
schwere Verletzung zur Folge haben kann.
VORSICHT!
Dieses Signalsymbol/-wort bezeichnet eine Gefährdung mit einem niedrigen Risikograd, die, wenn sie nicht vermieden wird, eine geringfügige
oder mäßige Verletzung zur Folge haben kann.
tint Deckenspots NALO
3
ANLEITUNG

HINWEIS!
Dieses Signalwort warnt vor möglichen Sachschäden.
Dieses Symbol gibt Ihnen nützliche Zusatzinformationen zur
Handhabung oder zum Betrieb. Bitte aufmerksam lesen.
Sicherheitssymbole
Dieses Produkt keiner Feuchtigkeit oder Nässe aussetzen,
Schutzklasse IP20
Nicht dimmbar über konventionelle Dimmer
D
E
L
Lichtquelle und Betriebsgerät des umgebenden Produktes
D
e
v
r
r
i
sind für den Benutzer nicht ersetzbar. Austausch nur durch
autorisierte Stellen!
Bestimmungsgemäßer Gebrauch
Deckenspots dienen zu Beleuchtungszwecken und können nach der
Verbindung mit der dazugehörigen tint Fernbedienung gesteuert und/oder
in ein Smart Home System mit Zigbee-Funkstandard eingebunden werden.
Mit der tint Fernbedienung können bis zu 50 tint-Produkte gesteuert werden. Die Spots dürfen nur an Wänden/Decken mit der zulässigen Tragkraft
montiert werden. Für eine gewerbliche Nutzung ist der Artikel ungeeignet.
tint Deckenspots NALO
ANLEITUNG
4

Sicherheitshinweise
HINWEIS!
• Dieser Artikel kann von Kindern ab 8 Jahren und darüber sowie von
Personen mit verringerten physischen, sensorischen oder mentalen
Fähigkeiten oder Mangel an Erfahrung und Wissen benutzt werden,
wenn sie beaufsichtigt oder bezüglich des sicheren Gebrauchs des
Artikels unterwiesen wurden und die daraus resultierenden Gefahren verstehen.
• Die LEDs in dieser Leuchte sind nicht austauschbar.
WARNUNG!
GEFAHR für Kinder
• Kinder dürfen nicht mit dem Artikel spielen.
• Halten Sie Kinder von Verpackungsmaterial fern. Bei Verschlucken
besteht Erstickungsgefahr.
• Bewahren Sie die Batterien und die tint-Fernbedienung für Kleinkinder unerreichbar auf. Sollte eine Batterie verschluckt worden sein
oder sich in irgendeinem Körperteil befinden, muss sofort medizinische Hilfe in Anspruch genommen werden.
• Batterien können bei Verschlucken lebensgefährlich sein.
• Wenn das Batteriefach nicht sicher schließt, achten Sie darauf, dass
Sie das Produkt nicht mehr benutzen und von Kindern fernhalten.
tint Deckenspots NALO
5
ANLEITUNG

GEFAHR durch elektrischen Stromschlag
• Stellen Sie vor der Benutzung sicher, dass die vorhandene Netzspannung mit der benötigten Betriebsspannung des Artikels übereinstimmt
(siehe „Technische Daten“).
• Schalten Sie vor der Montage die Netzleitung spannungsfrei: den
Sicherungsautomaten ausschalten bzw. die Sicherung herausdrehen
und gegen Wiedereinschalten sichern!
• Achten Sie beim Einlegen der Batterien auf die richtige Polarität.
• Tauschen Sie immer alle Batterien gleichzeitig aus. Verwenden Sie
keine unterschiedlichen Typen oder gebrauchte und neue Batterien
miteinander.
• Verwenden Sie den Artikel nicht, wenn er beschädigt ist.
• Vermeiden Sie den Kontakt des Artikels mit Wasser oder anderen
Flüssigkeiten.
• Die Leuchte kann über die mitgelieferte tint-Fernbedienung oder
anderweitige Steuergeräte auf Zigbee Basis eingestellt werden. Ein
konventioneller Dimmer darf nicht verwendet werden.
GEFAHR von Brand/Verbrennung und/oder Explosion
• Explosionsgefahr bei unsachgemäßem Auswechseln der Batterie.
Ersetzen Sie die Batterien nur durch denselben oder einen gleichwertigen Batterietyp. Beachten Sie die „Technischen Daten“.
• Batterien dürfen nicht geladen, mit anderen Mitteln reaktiviert, auseinandergenommen, ins Feuer geworfen oder kurzgeschlossen werden.
Ansonsten besteht erhöhte Explosions- und Auslaufgefahr, außerdem
können Gase entweichen!
tint Deckenspots NALO
ANLEITUNG
6

• Vermeiden Sie Kontakt der Batterieflüssigkeit mit Haut, Augen und
Schleimhäuten.
Bei Kontakt spülen Sie die betroffenen Stellen sofort mit reichlich
klarem Wasser und suchen Sie umgehend einen Arzt auf.
• Achten Sie beim Einlegen der Batterien auf die richtige Polarität.
• Tauschen Sie immer alle Batterien gleichzeitig aus.
• Verwenden Sie keine unterschiedlichen Typen oder gebrauchte und
neue Batterien miteinander.
VORSICHT!
VORSICHT vor Sachschäden
• Nehmen Sie die Batterien aus der tint-Fernbedienung heraus,
wenn diese verbraucht sind oder wenn Sie den Artikel länger nicht
benutzen. So vermeiden Sie Schäden, die durch Auslaufen entstehen
können.
• Setzen Sie die Batterien keinen extremen Bedingungen aus, indem
Sie diese z. B. auf Heizkörpern oder unter direkter Sonneneinstrahlung lagern. Erhöhte Auslaufgefahr!
• Reinigen Sie Batterie- und Gerätekontakte bei Bedarf vor dem
Einlegen.
tint Deckenspots NALO
7
ANLEITUNG

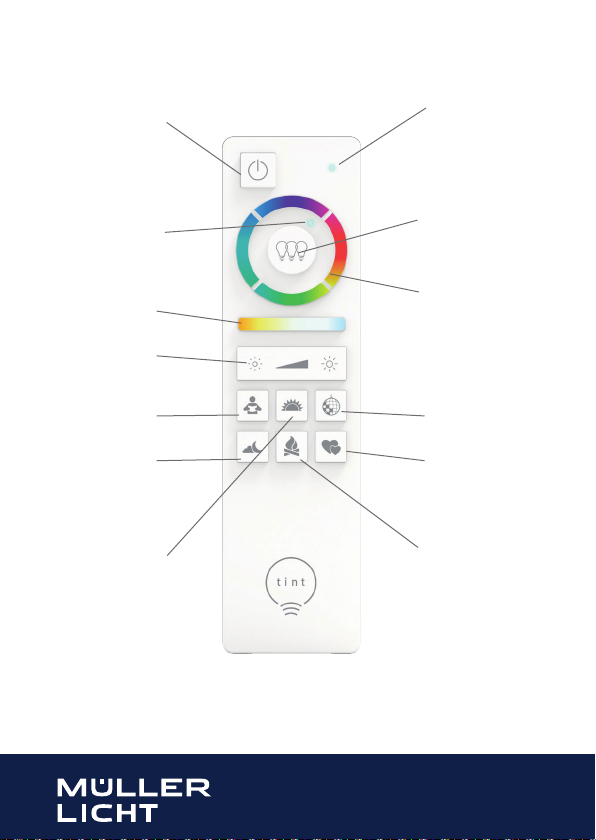
tint-Fernbedienung
Standby-Taste
Resonanzanzeige
Gruppenanzeige
„3 Leuchtdioden“
Weißsteuerung
Helligkeitssteuerung
Szenen-Taste
„Arbeitslicht“
Szenen-Taste
„Nachtlicht“
Szenen-Taste
„Sonnenuntergang“
Gruppentaste
Farbsteuerung
Szenen-Taste
„Party“
Szenen-Taste
„Romantik“
Szenen-Taste
„Lagerfeuer“
tint Deckenspots NALO
ANLEITUNG
8

Reset-Taste
Batteriefach für
2 Batterien LR03
(AAA)
Inbetriebnahme
Batterien einlegen
1. Öffnen Sie das Batteriefach auf der Rückseite der
tint-Fernbedienung.
2. Legen Sie 2 Batterien des Typs LR03 (AAA) / 1,5 V so ein, wie auf dem
Boden des Batteriefachs abgebildet.
Beachten Sie die richtige Polarität der Batterien (+/-).
3. Schieben Sie die Batteriefach-Abdeckung wieder zu.
Wandhalterung für Fernbedienung nutzen (optional)
Die zum Lieferumfang gehörende Wandhalterung können Sie für die
sichere Lagerung der tint-Fernbedienung nutzen. Ein Magnet in der
Halterung hält dabei die tint-Fernbedienung sicher auf der Halterung.
Die Halterung kann mit Klebestreifen oder mit Schrauben und ggf. Dübeln auf ihrem Untergrund montiert werden.
tint Deckenspots NALO
9
ANLEITUNG

Wandhalterung aufkleben
1. Ziehen Sie die Schutzfolie von den beiden Klebepads.
2. Drücken Sie die Halterung mit etwas Kraft auf den sauberen, trockenen
und staubfreien Untergrund.
Wandhalterung anschrauben
Je nach Untergrund können Sie die Wandhalterung auch mit Schrauben
und ggf. Dübeln an eine Wand schrauben.
VORSICHT!
Vergewissern Sie sich, dass sich keine Rohre oder Leitungen an der Bohrstelle befinden.
1. Trennen Sie die beiden Hälften der Halterung, indem Sie mit einem
kleinen Schraubendreher eine Hälfte nach oben hebeln (Abb. 1)
2. Nutzen Sie die Rückseite der Halterung als Schablone, um die Bohrstellen zu markieren.
3. Bohren Sie die Löcher und stecken Sie (falls erforderlich) Dübel in die
Löcher (Abb. 2)
4. Schrauben Sie die Rückseite der Halterung an die Wand.
Setzen Sie das Halterungs-Oberteil auf das angeschraubte Unterteil (Abb. 3)
5.
Abb. 1 Abb. 2 Abb. 3
tint Deckenspots NALO
ANLEITUNG
10

Leuchte montieren
Siehe Abbildungen auf Seite 76
1. Schalten Sie vor der Montage die Netzleitung spannungsfrei: den
Sicherungsautomaten ausschalten bzw. die Sicherung herausdrehen und gegen Wiedereinschalten sichern!
2. Markieren Sie mit Hilfe der Wandhalterung die zu bohrenden Löcher
an der Decke. Achten Sie unbedingt darauf, dass keine Kabel und
Rohre im Bohrbereich verlaufen!
Bohren Sie an den markierten Stellen und setzen Sie die Dübel ein.
Befestigen Sie nun die Halterung mit den dazugehörigen Schrauben.
3. Verbinden Sie das Anschlusskabel mit der Lüsterklemme. Achten
Sie auf einen sicheren Halt der Kabel.
4. Installieren Sie die Leuchte, wie in der Abbildung gezeigt.
5. Schalten Sie nun die Sicherung wieder ein.
Bedienung
Die Leuchte ist bereits mit der mitgelieferten Fernbedienung verbunden und kann
direkt gesteuert werden. Weitere tint-Lampen und -Leuchten müssen zuvor in die
Fernbedienung eingebunden werden (siehe Kap. „Gruppenfunktionen - Neues tintProdukt einbinden“).
Es handelt sich bei der tint-Fernbedienung um eine Funkfernbedienung.
• Sie müssen mit der tint-Fernbedienung nicht auf die Leuchte „zielen“,um sie zu
bedienen.
• Die tint-Fernbedienung durchdringt auch feste Materialien wie z.B. Wände,
Türen und Fenster.
• Die maximale Reichweite beträgt (abhängig von den Hindernissen zwischen tintFernbedienung und Leuchte) ca. 30 Meter im Freifeld.
• Jeder Tastendruck wird durch ein Aufleuchten der Resonanzanzeige bestätigt.
tint Deckenspots NALO
11
ANLEITUNG
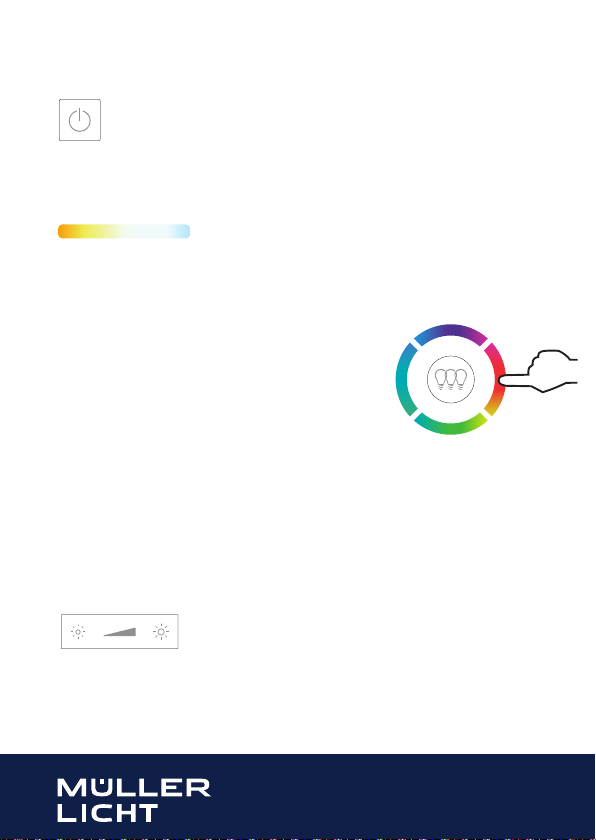
Grundfunktionen
Ein- /Ausschalten
Drücken Sie die Standby-Taste, um die Leuchten ein- und wieder auszuschalten. Die Memory-Funktion merkt sich den letzten „Beleuchtungszustand“ und startet damit beim nächsten Einschalten automatisch.
Weißton einstellen
Durch kurzes Drücken wählen Sie fest hinterlegte Weißton-Einstellungen: warmweiß,
neutralweiß und kaltweiß.
Durch langes Drücken stellen Sie den gewünschten Weißton stufenlos selbst ein und
kommen bis in den Super-Warmweiß Bereich.
Farben einstellen
Drücken Sie auf eine der vier Farbtasten ( Abb. 4) um
die gewünschte Farbe zu wählen:
Kurzes Drücken: Die Farbe verändert sich in die
gewünschte Richtung der
Farbskala.
Langes Drücken: Die Farbe springt auf einen fest
hinterlegten Farbwert.
Abb. 4
Helligkeit einstellen
Durch kurzes Drücken stellen Sie fest hinterlegte Helligkeitsstufen ein:
100%, 80%, 50%, 20%, 10% und 5%.
Durch langes Drücken stellen Sie die gewünschte Helligkeitsstufe stufenlos selbst ein.
tint Deckenspots NALO
ANLEITUNG
12
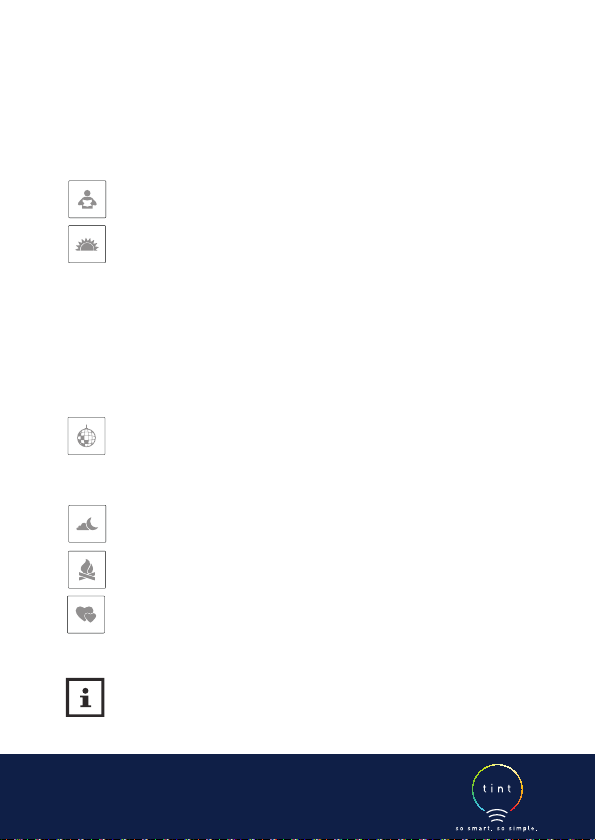
Szenen
Unter Szenen versteht man fest vordefinierte Lichteinstellungen. Eine
Szene wird durch einen kurzen Druck auf die jeweilige Taste aktiviert.
Die oberen drei Szenen-Tasten sind doppelt belegt. Durch langen Tastendruck kann hier jeweils der 2. Modus aktiviert werden. Hinweis: diese
Funktion steht nicht bei allen tint-Produkten zur Verfügung.
Szene „Arbeitslicht“: 100% neutrale, helle Beleuchtung.
Langer Tastendruck: 100% kaltweiße, helle Beleuchtung
Szene „Sonnenuntergang“: Startet bei warmweißem Licht (50%)
und dimmt dann nach 15 Minuten weiter herunter. Nach weiteren 10 Minuten schaltet sich das Licht aus.
Langer Tastendruck: Timerfunktion. Die letzte Einstellung wird
gespeichert (signalisiert durch 2x Blinken des Leuchtmittels).
Die Lampe leuchtet für 6 Stunden und schaltet sich dann für 18
Stunden ab. Am nächsten Tag schaltet sie sich zur selben Zeit
erneut für 6 Stunden ein. Zum Deaktivieren erneut lange auf die
Taste drücken (Lampe blinkt einmal auf).
Szene „Party“: Ein bunter und sich ständig ändernder Farbwechsel wird gestartet.
Langer Tastendruck: Ein langsamer, sich ständig ändernder
Farbwechsel wird gestartet.
Szene „Nachtlicht“: Auf 5% gedimmtes, warmweißes Licht.
Szene „Lagerfeuer“: Simuliert ein Lagerfeuer in warmen Farbtönen bei einem Wechsel von orange, rot und weiß.
Szene „Romantik“: Ein beständiger Wechsel der Farben rot,
rosa und violett.
Wenn Sie ein tint-Produkt „white“ verwenden, das lediglich weißes
Licht bietet, stehen die Farblicht-Funktionen nicht zur Verfügung.
Das Produkt schaltet sich ggf. ab.
tint Deckenspots NALO
13
ANLEITUNG

Gruppenfunktionen
Eine Gruppe wählen
Wenn Sie mehrere tint-Produkte eingesetzt haben, sind diese zu Beginn
in der ersten Gruppe zusammengefasst. Dadurch können Sie mit einem
Tastendruck mehrere tint-Produkte gleichzeitig bedienen. Das ist z.B. praktisch, wenn Sie in einem Raum mehrere „Beleuchtungssituationen“ haben.
Beispiel:
• Ein Arbeitsplatz, der hell beleuchtet sein soll.
• Eine Sitzecke, die mittelhell beleuchtet sein soll.
• Ein weiterer Bereich, der ein besonderes Licht haben soll.
Beachten Sie:
• Was eine Gruppe letztlich ist, bestimmen Sie selbst. Sie können z.B.
auch tint-Produkte eines Zimmers oder einer Etage zusammenfassen.
• Eine Gruppe kann erweitert oder verkleinert werden und es können
auch tint-Produkte von einer Gruppe zu einer anderen Gruppe verscho
ben werden.
• Ein einzelnes tint-Produkt kann ebenfalls eine Gruppe darstellen.
• Mit der tint-Fernbedienung können Sie maximal 4 Gruppen steuern,
wobei die vierte Gruppe die Zusammenfassung der anderen drei Grup
pen darstellt.
-
-
tint Deckenspots NALO
ANLEITUNG
14

• Machen Sie sich vorher Gedanken, welche tint-Produkte zu einer Gruppe zusammengefasst werden sollen und versuchen Sie Gruppen logisch
und nachvollziehbar aufzubauen. Dadurch können Sie beim späteren
Gebrauch die jeweilige Gruppe über die Gruppentaste ohne langes
Ausprobieren schnell ansprechen.
Umgang mit der Gruppentaste
• Beim erstmaligen Drücken wird über die Leuchtdioden oberhalb der
Gruppentaste angezeigt, in welcher Gruppe Sie sich befinden.
• Durch erneutes Drücken der Gruppentaste springen Sie eine Gruppe
weiter.
• Sie befinden sich in der nachstehenden Gruppe, wenn folgende Leuchte
oberhalb der Gruppentaste leuchtet:
° Leuchtdiode 1 für die erste Gruppe
° Leuchtdiode 2 für die zweite Gruppe
° Leuchtdiode 3 für die dritte Gruppe
° Leuchtdioden 1, 2 und 3 für alle Gruppen
Neues tint-Produkt einbinden
• Achten Sie beim Kauf neuer Produkte auf dessen technische Spezifikationen.
Wir empfehlen tint-Produkte der Firma Müller-Licht. Bei der Verwendung von Produkten anderer Hersteller ist nicht sichergestellt, dass
alle Funktionen unterstützt werden bzw. einwandfrei funktionieren.
• Mit einer tint-Fernbedienung können bis zu 50 tint-Lampen
und -Leuchten gesteuert werden.
Binden Sie jedes tint-Produkt einzeln und nacheinander ein und schalten Sie andere tint-Produkte während des Verbindens spannungslos.
tint Deckenspots NALO
15
ANLEITUNG

1. Schalten Sie das tint-Produkt ein.
2. Das neue tint-Produkt signalisiert durch kurzes An- und Abschwellen
der Helligkeit und ggf. einen Farbwechsel, dass es sich im Kopplungs
modus befindet. Sollte dieser Vorgang nicht stattfinden, schalten Sie
das tint-Produkt 5x ein und wieder aus. (siehe Kap. „Reset des tintProduktes“).
3. Drücken Sie wiederholt die Gruppentaste, bis alle Leuchtdioden ober
-
halb der Gruppentaste leuchten.
4. Halten Sie die tint-Fernbedienung ganz nah (< 5 cm) an das neue
tint-Produkt.
5. Halten Sie die Gruppentaste so lange gedrückt, bis das tint-Produkt
anfängt zu blinken.
Die Resonanzanzeige blinkt zunächst gleichmäßig rot, danach fängt sie
an schneller zu blinken. Dies zeigt an, dass die tint-Fernbedienung ein
Signal gefunden hat.
Halten Sie die Gruppentaste weiterhin gedrückt, bis das neue tint-Pro
dukt 3x blinkt und dadurch anzeigt, dass es mit der tint-Fernbedienung
verbunden wurde.
Oberhalb der Gruppentaste leuchtet jetzt nur noch die linke
Leuchtdiode (= Gruppe 1).
Falls gewünscht können Sie durch wiederholtes Drücken der Gruppentas-
6.
te eine andere Gruppe auswählen (mittlere Leuchtdiode = Gruppe 2 etc.).
Nach ca. 10 Sekunden wird das neue tint-Produkt zu der ausgewähl-
ten Gruppe hinzugefügt und die Resonanzanzeige hört auf zu blinken.
Warten Sie diese Zeit ab und drücken Sie in dieser Zeit keine Taste.
Danach ist der Vorgang abgeschlossen und Sie können die erweiterte
Gruppe wie gewohnt bedienen.
tint Deckenspots NALO
ANLEITUNG
16

tint-Produkt aus einer Gruppe entfernen
1. Schalten Sie ggf. das tint-Produkt mit der tint-Fernbedienung aus
(Standby).
2. Wählen Sie über die Gruppentaste die Gruppe aus, die Sie ändern
möchten.
3. Halten Sie die Gruppentaste ca. 5 Sekunden gedrückt.
Die Resonanzanzeige blinkt rot/grün.
4. Wählen Sie durch wiederholtes Drücken der Gruppentaste das ge
wünschte tint-Produkt aus. Durch An- und Abschwellen der Helligkeit
signalisiert das tint-Produkt, dass es ausgewählt wurde.
5. Halten Sie ca. 5 Sekunden die Standby-Taste gedrückt.
Das tint-Produkt signalisiert anschließend durch ein Aufblinken und
anschließendes Abdimmen, dass es aus der Gruppe entfernt wurde
und der Vorgang ist abgeschlossen.
Ein tint-Produkt aus einer Gruppe in eine andere Gruppe einbinden
1. Schalten Sie ggf. das tint-Produkt mit der tint-Fernbedienung aus
(Standby).
2. Wählen Sie über die Gruppentaste die Gruppe aus, die Sie ändern
möchten. (Möchten Sie z.B. aus der Gruppe 2 ein Leuchtmittel zur
Gruppe 1 hinzufügen, drücken Sie so oft die Gruppentaste, bis die
mittlere Leuchte oberhalb der Gruppentaste leuchtet.)
3. Halten Sie die Gruppentaste ca. 5 Sekunden gedrückt.
Die Resonanzanzeige blinkt rot/grün.
4. Wählen Sie durch wiederholtes Drücken der Gruppentaste das ge
wünschte tint-Produkt aus. Durch An- und Abschwellen der Helligkeit
-
tint Deckenspots NALO
17
ANLEITUNG

signalisiert das tint-Produkt, dass es ausgewählt wurde. Die Leuchtmittel blinken in der Reihenfolge, wie sie in der tint-Fernbedienung
hinterlegt wurden.
5. Halten Sie erneut die Gruppentaste für ca. 5 Sekunden gedrückt, um
das ausgewählte tint-Produkt in einer neuen Gruppe zu hinterlegen.
Die Gruppenanzeige für Gruppe 1 leuchtet.
6. Wählen Sie (falls erforderlich) mit der Gruppentaste die Gruppe aus,
zu der Sie das tint-Produkt hinzufügen möchten.
Nach ca. 10 Sekunden wird das tint-Produkt zu der ausgewählten
Gruppe hinzugefügt und die Resonanzanzeige hört auf zu blinken.
Warten Sie diese Zeit ab und drücken Sie in dieser Zeit keine Taste.
Danach ist der Vorgang abgeschlossen und Sie können die erweiterte
Gruppe wie gewohnt bedienen.
Reset
Zurücksetzen auf 100% Licht
Die
tint-Produkte
lung warmweiß und 100% Helligkeit zurückgesetzt werden. Das kann
z. B. dann erforderlich sein, wenn Sie die Leuchte zuvor gedimmt
haben und die Batterien der Fernbedienung leer sind. Diese Funktion
darf auch im Regelfall verwendet werden, wenn Sie die tint-Fernbedienung gerade nicht griffbereit haben.
1. Schalten Sie über den Lichtschalter das jeweilige tint-Produkt 3x aus
und wieder ein (Intervall: je 1 Sekunde ein, 3 Sekunden aus).
2. Das tint-Produkt startet nun in der Grundeinstellung warmweiß,
100%.
können ganz bequem per Lichtschalter auf die Einstel-
tint Deckenspots NALO
ANLEITUNG
18
Reset des tint-Produktes/Kopplungsmodus
Ein Reset des tint-Produktes ist nur im Ausnahmefall erforderlich, z.B.
wenn die Fernbedienung zurückgesetzt werden musste, oder wenn Sie
das tint-Produkt in ein Smart Home Gateway einbinden möchten.
1. Schalten Sie die Leuchte 5x ein und aus (Intervall: je 1 Sekunde ein, 3
Sekunden aus).
2. Schalten Sie die Leuchte wieder ein. Es startet nun ein Farbdurchlauf.
Der gewünschte Reset ist erfolgt. Warten Sie ca. 10 Sekunden, dann
können Sie das tint-Produkt wie gewohnt in Ihre Fernbedienung oder
anderweitige Zigbee-Systeme einbinden.
Reset der tint-Fernbedienung
Ein Reset ist nur im Ausnahmefall erforderlich, z.B. wenn das die Leuchte
auch nach dem Entfernen und Wiedereinlegen der Batterien nicht mehr
auf die tint-Fernbedienung reagiert.
Bei einem Reset gehen alle vordefinierten Gruppeneinstellungen
verloren und Sie müssen danach tint-Fernbedienung und auch die
Leuchte wieder miteinander verbinden.
1. Ziehen Sie den Batteriefachdeckel ab.
2. Drücken Sie mit einem spitzen Gegenstand oder mithilfe der Batterie
fachabdeckung für 3 Sekunden auf die Reset-Taste auf der Rückseite.
Die Kontroll-LED blinkt ca. 30 s. Drücken Sie in dieser Zeit keine
Tasten.
-
tint Deckenspots NALO
19
ANLEITUNG

3. Gehen Sie danach vor, wie im Abschnitt „Reset des tint-Produkts“ und
nachfolgend wie im Abschnitt „Gruppenfunktionen - Neues tint-Produkt
einbinden“ beschrieben.
Jedes tint Produkt wird dabei einzeln und nacheinander eingebunden.
Gehören z.B. drei Leuchten zu der Gruppe, müssen Sie den Vorgang „Neu-
es tint-Produkt einbinden“ 3x wiederholen.
Smart Home Ready:
Die tint-Produkte von MÜLLER-LICHT sind steuerbar über den aktuellsten
Zigbee Funkstandard 3.0 und kompatibel mit zahlreichen Lichtsteuerungssystemen wie zum Beispiel Philips Hue* (ohne Hue Entertainment
und ohne HomeKit-Integration), Samsung SmartThings, dem Sprachassistenten von Amazon (über Amazon Echo Plus oder andere Echo Geräte
mit integriertem Zigbee Smart Home Hub)**, und vielen weiteren.
Weitere Informationen über die Zigbee Allianz erhalten Sie unter
www.zigbee.org.
Zum Einbinden in ein Smart Home-Gateway/eine App muss
die Leuchte zurücksetzt sein, siehe „Reset des tint-Produkts“.
Die Verbindung zur tint-Fernbedienung wird dadurch zunächst
gelöscht.
*Einschränkungen bei einzelnen Diensten möglich, aktuelle
Infos unter www.mueller-licht.de/tint/kompatibilitaet
**Sofern dieser Service in Ihrem Land verfügbar ist.
tint Deckenspots NALO
ANLEITUNG
20

Einbinden in ein Zigbee-Gateway:
- Starten Sie in der zugehörigen App den Suchvorgang.
- Schalten Sie erst jetzt das tint-Produkt (im Kopplungsmodus) ein, auch
wenn dies in der App ggf. anders angegeben wird.
- Das tint-Produkt wird innerhalb weniger Sekunden von der App gefunden und blinkt zur Bestätigung kurz auf. Der Suchlauf dauert je nach App
noch einige Sekunden, anschließend wird das tint-Produkt in der App als
neues Gerät angezeigt und kann beliebig benannt werden.
Für jedes tint-Produkt muss ein eigener Verbindungsvorgang durchgeführt werden. Um Probleme zu vermeiden, sollten Sie alle anderen
tint-Produkte stromlos schalten, während Sie ein neues tint-Produkt mit
der App verknüpfen.
In einige Zigbee-Gateways lässt sich auch die tint-Fernbedienung
einbin den, sodass tint-Produkt und Fernbedienung parallel
verwendet werden können. Eine Anleitung und weitere Informationen erhalten Sie unter www.mueller-licht.de/tint
Reinigung
Schalten Sie die Leuchte aus und ziehen Sie den Netzstecker und/oder
schalten Sie die Raumsicherung am Sicherungskasten aus.
Reinigen Sie die Leuchte und die Fernbedienung nur mit einem trockenen Tuch. Bewahren Sie sie bei Nichtgebrauch an einem trockenen, vor
Kindern geschützten Ort auf.
tint Deckenspots NALO
21
ANLEITUNG

Fehlersuchtabelle
Problem Mögliche Ursache
Keine Funktion. Die Batterien in der tint-Fernbe-
„Falsches“ tint-Produkt leuchtet. Wählen Sie über die Gruppentas-
Das Licht schaltet sich plötzlich
aus.
Sie haben ein neues tint-Produkt
eingebunden und bei Verwendung
einer Farblicht-Funktion schaltet
sich dieses tint-Produkt aus.
Sie wollen ein weiteres tintProdukt einbinden, jedoch blinkt
das bereits
eingebundene tint-Produkt .
dienung sind leer und müssen
gewechselt werden.
Die tint-Produkte selbst sind ausgeschaltet oder die Netzstecker
sind nicht eingesteckt.
Sie haben über die Gruppentaste
eine falsche bzw. gar keine Gruppe ausgewählt. Wählen Sie die
richtige Gruppe aus oder wählen
Sie über die Gruppentaste durch
wiederholtes Drücken „Alle Gruppen“ aus (alle Leuchten oberhalb
der Gruppentaste leuchten).
te die richtige Gruppe aus oder
stellen Sie über die Gruppentaste
„Alle Gruppen“ ein.
Sie haben die Szene „Sonnenuntergang“ gewählt. Kein Fehler.
Das neue tint-Produkt bietet lediglich weißes Licht. Kein Fehler.
Schalten Sie das bereits verbundene tint-Produkt aus oder
entfernen Sie sich vom bereits
verbundenen Produkt etwas.
tint Deckenspots NALO
ANLEITUNG
22
Problem Mögliche Ursache
Das tint-Produkt hat sich in die
falsche Gruppe eingebunden.
Stellen Sie sicher, in welcher
Gruppe sich das tint-Produkt
befindet. Gehen Sie vor wie in
„tint-Produkt aus einer Gruppe
in eine andere Gruppe einbinden“
beschrieben.
Das tint-Produkt lässt sich nicht
in ein fremdes System einbinden.
Bitte prüfen Sie, ob sich das
tint-Produkt im Kopplungsmodus
befindet.
Das tint-Produkt reagiert nicht in
der Gruppeneinstellung „Alle“.
Bitte entkoppeln Sie das Produkt
aus der tint-Fernbedienung und
verbinden Sie es erneut.
Das tint-Produkt lässt sich nicht
hinzufügen.
Das tint-Produkt ist bereits
einer Fernbedienung oder einem
Gateway zugeteilt. Bitte entfernen
Sie es aus dem bestehenden
Netzwerk
Verringern Sie die Entfernung zur
Fernbedienung
Schalten Sie naheliegende Zigbee
Geräte spannungslos
Die Standby-Taste muss mehrfach
gedrückt werden.
Wenn die tint-Produkte vorher
über den Lichtschalter ausgeschaltet wurden, muss sich die
tint-Fernbedienung neu synchronisieren.
Sie haben Teile des Systems über
einen Lichtschalter abgeschaltet.
Die tint-Fernbedienung synchronisiert sich neu.
tint Deckenspots NALO
23
ANLEITUNG

Problem Mögliche Ursache
In welcher Gruppe befindet sich
mein tint-Produkt gerade?
Durch einfaches Ein- und Ausschalten der Gruppen können Sie
feststellen, in welcher Gruppe
sich Ihr gewünschtes tint-Produkt
befindet.
Antworten auf weitere häufig gestellte Fragen finden Sie unter
www.mueller-licht.de/tint
Technische Daten
Frequenzband des drahtlosen RF-Modus: 2405-2480,0 MHz
Maximale Sendeleistung: <20 mW
Funkreichweite (Freifeld): 30 m
Fernbedienung: 3 V (2x AAA/LR03)
Umgebungsbedingungen:
Temperatur (Betrieb): -20°C...40°C
Temperatur (Aufbewahrung): -25°C...60°C
Relative Luftfeuchtigkeit: 5–95% (keine Kondensation)
tint Deckenspots NALO
ANLEITUNG
24

NALO Spots 3x NALO Spots 2x NALO Spot 1x
Art.
Leistung gesamt
Leistung Lichtquelle
Lichtstrom verbaute Licht-
404068 404069 404070
20 W 14 W 7 W
3 x 5,2 W 2 x 5,2 W 1 x 5,2 W
3 x 600 lm 2 x 600 lm 1 x 600 lm
quelle
Farbtemperatur
Lebensdauer
Schutzklasse
Stand-By-Verbrauch (Psb)
Stand-By-Verbrauch (Pnet)
Netzspannung
Netzfrequenz
Abmessungen (LxHxB)
320 x 165 x 90 mm 200 x 165 x 90 mm 130 x 165 x 90 mm
1800-6500 K + RGB
20.000 h
I, IP20
0,40 W
0,45 W
220-240 V
50 Hz
Diese Leuchte enthält eine Lichtquelle der Energieeffizienzklasse F.
Konformitätserklärung
Hiermit erklärt Müller-Licht International GmbH, dass der Funkanlagentyp „Müller-Licht tint“ der Richtlinie 2014/53/EU entspricht.
Der vollständige Text der EU-Konformitätserklärung ist unter der folgenden
Internetadresse verfügbar: www.mueller-licht.de/tint
tint Deckenspots NALO
25
ANLEITUNG
Entsorgen
Altgeräte dürfen nicht im normalen Hausmüll entsorgt werden. Entspre-
chend Richtlinie 2012/19/EU ist das Gerät am Ende seiner Lebensdauer
einer geordneten Entsorgung zuzuführen. Dabei werden im Gerät enthaltene
Wertstoffe der Wiederverwertung zugeführt und die Belastung der Umwelt
vermieden.
Geben Sie das Altgerät kostenlos an einer Sammelstelle für Elektroschrott oder
einem Wertstoffhof ab.
Entnehmen Sie vor der Entsorgung die Batterie aus dem Gerät und entsor
-
gen Sie diese separat.
Batterien und Akkus gehören nicht in den Hausmüll. Jeder Verbraucher ist
gesetzlich verpflichtet, Batterien und Akkus bei einer Sammelstelle seiner Gemeinde, seines Stadtteils oder im Handel abzugeben.
Alle Batterien und Akkus können dadurch einer umweltschonenden Entsorgung
zugeführt werden. Batterien und Akkus, die Schadstoffe enthalten, sind durch
dieses Zeichen und durch chemische Symbole gekennzeichnet (Pb für Blei).
Entsorgen Sie auch die Verpackungsmaterialien umweltgerecht, indem Sie
diese sortenrein in die bereitgestellten Sammelbehälter geben.
Allgemeines Recyclingsymbol. Weiterführende Informationen finden Sie
unter: www.mueller-licht.de/recycle/
tint Deckenspots NALO
ANLEITUNG
26

tint Deckenspots NALO
27
ANLEITUNG

CONTENU
Généralités ......................................... .........28
En bref / Volume de livraison ....... ...........28
Introduction .................................. ...........29
Légende ........................................ ...........29
Symboles de sécurité ................... ...........30
Utilisation conforme ........................... .........30
Consignes de sécurité ........................ .........31
Télécommande tint ............................ .........34
Mise en service ................................... .........35
Insérer les piles ............................ ...........35
Support mural pour télécommande ...... 35
Monter le projecteur de plafond ............ 37
Généralités
Utilisation ......................................... ...........38
Fonctions de base ........................ ...........39
Scènes .......................................... ...........40
Fonctions du groupe .................... ...........40
Réinitialisation................................ .........45
Smart Home Ready ............................ .........46
Nettoyage ........................................... .........48
Tableau de recherche d’erreurs ......... .........48
Caractéristiques techniques .............. .........50
Déclaration de conformité ................. .........51
Élimination ...................................................51
En bref
Volume de livraison
• Projecteur de plafond à LED tint
• Télécommande
tint avec support
mural et matériel de
montage
• 2 piles LR03
(AAA)/1,5 V
• Mode d‘emploi
• Matériel de
montage
tint Projecteur de plafond NALO
MODE D‘EMPLOI
28
Chère cliente, cher client !
Ce mode d’emploi contient des informations importantes
concernant la mise en service et l‘utilisation.
Avant d’installer le Projecteur de plafond, veuillez lire soigneusement le mode d’emploi, en particulier les consignes de sécurité. Le
non-respect de ce mode d’emploi peut entraîner de graves blessures et
endommager le produit.
Conservez le mode d’emploi afin de pouvoir vous y référer ultérieurement. Si le Projecteur de plafond est transmise à des tiers, joignez-leur
impérativement ce mode d’emploi.
Vous pouvez aussi télécharger ce mode d’emploi en tant que fichier pdf
sur Internet à l’adresse www.mueller-licht.de/tint.
Légende
Les symboles et remarques suivants sont utilisés dans ce mode
d’emploi, sur le produit ou sur l‘emballage.
AVERTISSEMENT !
Ce symbole/mot de signalisation désigne un danger de degré moyen
qui, s’il n’est pas écarté, peut conduire à des blessures graves voire
mortelles.
ATTENTION !
Ce symbole/mot de signalisation désigne un danger de degré faible qui,
s’il n’est pas écarté, peut conduire à des blessures mineures à modérées.
tint Projecteur de plafond NALO
29
MODE D‘EMPLOI
AVIS !
Ce mot de signalisation met en garde concernant d‘éventuels dommages matériels.
Ce symbole fournit des informations complémentaires utiles
concernant la manipulation ou l’utilisation. Veuillez lire ce document avec attention.
Consignes de sécurité
Ne pas exposer ce produit à l‘humidité ou à l’eau
Régulation impossible par le variateur conventionnel
D
E
L
La source lumineuse et le module de commande du produit envi-
D
e
v
r
r
i
ronnant ne peuvent pas être remplacés par l‘utilisateur. Remplacement possible uniquement par des entreprises autorisées !
Utilisation conforme
Ce Projecteur de plafond est utilisé à des fins d’éclairage et peut,
après raccordement, être commandé avec la télécommande associée
et/ou être intégré dans un Smart Home System avec la norme radio Zigbee.
La télécommande permet de commander jusqu’à 50 produits tint.
Le Projecteur de plafond doit uniquement être monté sur des murs/plafonds
avec une capacité de charge autorisée. L‘article ne convient pas pour un
usage industriel.
tint Projecteur de plafond NALO
MODE D‘EMPLOI
30
Consignes de sécurité
AVIS !
• Le présent article peut être utilisé par des enfants à partir de 8 ans,
ainsi que par des personnes présentant des capacités physiques,
sensorielles ou mentales diminuées, ou un manque d’expérience et
de connaissances si elles sont sous surveillance ou ont été informées sur l’utilisation sûre de l‘article et les dangers qui en résultent.
AVERTISSEMENT !
DANGER pour les enfants
• Les enfants ne peuvent pas jouer avec l‘article.
• Gardez le matériau d‘emballage hors de portée des enfants. Risque
• Conservez donc les piles et la télécommande tint hors de portée des
• Les piles peuvent être mortelles en cas d‘ingestion.
• Si le compartiment de piles ne se ferme pas correctement, veillez à
d‘étouffement en cas d‘ingestion.
petits enfants. En cas d‘ingestion de la pile ou d‘insertion dans le
corps, faire immédiatement appel à une assistance médicale.
ne plus utiliser le produit et à le tenir à l‘écart des enfants.
tint Projecteur de plafond NALO
31
MODE D‘EMPLOI

DANGER lié au courant électrique
• Avant utilisation, vérifiez que la tension secteur disponible correspond
à la tension de service requise par l‘article (voir « Caractéristiques
techniques »).
• Avant le montage, mettez le câble réseau hors tension : arrêter le
coupecircuit ou dévisser le fusible et protéger contre toute remise en
service.
• Lors de l’insertion des piles, veillez à la bonne polarité.
• Remplacez toujours toutes les piles en même temps. N’utilisez pas
des types différents et ne mélangez pas des piles neuves et usagées.
• N‘utilisez pas l‘article s‘il est endommagé.
• Évitez le contact de l‘article avec de l‘eau ou d‘autres liquides.
• Le produit peut être réglées au moyen de la télécommande tint livrée
ou d‘autres appareils de commande utilisant Zigbee. Ne pas utiliser de
variateur conventionnel.
DANGER d‘incendie/de brûlure et/ou d‘explosion
• Risque d‘explosion en cas de changement non conforme de la pile.
Remplacez uniquement les piles par des piles du même type ou d‘un
type comparable. Respectez les « Caractéristiques techniques ».
• Les piles ne peuvent pas être chargées, réactivées avec d‘autres moyens, démantelées, jetées dans le feu ou être mises en court-circuit.
Sans quoi, risque accru d‘explosion et d‘écoulement, des gaz peuvent
en outre s‘échapper !
tint Projecteur de plafond NALO
MODE D‘EMPLOI
32

• Évitez tout contact du fluide de la pile avec la peau, les yeux et les
muqueuses.
• En cas de contact, rincez immédiatement et abondamment les zones
concernées à l‘eau claire et consultez tout de suite un médecin.
• Lors de l’insertion des piles, veillez à la bonne polarité.
• Remplacez toujours toutes les piles en même temps.
• N’utilisez pas des types différents et ne mélangez pas des piles
neuves et usagées.
ATTENTION !
ATTENTION aux dommages matériels
• Retirez les piles de la télécommande tint si celle-ci est usée ou si
vous n‘utilisez plus l‘article. Vous évitez ainsi des dommages susceptibles de survenir par écoulement.
• N‘exposez pas les piles à des conditions extrêmes, en entreposant
celles-ci par exemple sur des radiateurs ou sous le rayonnement
direct du soleil. Risque accru d‘écoulement !
• Si nécessaire, nettoyez les contacts des piles et de l‘appareil avant
leur insertion.
tint Projecteur de plafond NALO
33
MODE D‘EMPLOI

Télécommande tint
Touche de mise
en veille
Affichage de la
résonance
Affichage
du groupe
(3 voyants
lumineux)
Commande du
blanc
Commande de
la luminosité
Touche de la
scène « Éclairage
de travail »
Touche de la
scène « Éclairage
de nuit »
Touche de la scène
« Coucher du
soleil »
Touche du
groupe
Commande
de la couleur
Touche de la
scène « Fête »
Touche de la
scène
« Romantique »
Touche de la
scène
« Feu de camp »
tint Projecteur de plafond NALO
MODE D‘EMPLOI
34

Compartiment pour
2 piles LR03 (AAA)
Touche de
remise à zéro
Mise en service
Insérer les piles
1. Ouvrez le compartiment pour piles au dos de la
télécommande tint.
2. Insérez les 2 piles de type LR03 (AAA)/1,5 V
comme l‘indique l‘illustration figurant sur le fond
du compartiment pour piles.
Respectez la polarité correcte des piles (+/-).
3. Repoussez le cache du compartiment pour piles.
Utiliser le support mural pour la télécommande (en option)
Vous pouvez utiliser le support mural fourni pour ranger la télécommande
tint en toute sécurité. Un aimant intégré au support maintient la télécommande tint bien en place sur le support.
tint Projecteur de plafond NALO
35
MODE D‘EMPLOI

Le support peut être monté avec des bandes adhésives ou des vis, et au
besoin des chevilles sur son socle.
Collage du support mural
1. Tirez sur le film de protection des deux patins adhésifs.
2. Appuyez sur le support en faisant légèrement pression sur le socle
propre, sec et exempt de poussières.
Vissage du support mural
Selon le socle, vous pouvez également visser le support mural sur un
mur au moyen de vis et, si nécessaire, de chevilles. Les vis et chevilles
sont fournies.
Assurez-vous que l’emplacement prévu ne comporte ni tuyaux, ni con-
duites.
1. Séparez les deux moitiés du support en soulevant une moitié vers le
haut à l’aide d‘un petit tournevis (fig. 1)
2. Utilisez l‘arrière du support comme gabarit pour marquer les trous de
perçage.
3. Percez les trous et insérez-y les chevilles (si nécessaire) (fig. 2).
4. Vissez l‘arrière du support au mur.
5. Placez la partie supérieure du support sur la partie inférieure vissée (fig.
3).Le support peut à présent être utilisé
ATTENTION !
.
tint Projecteur de plafond NALO
MODE D‘EMPLOI
36

Fig. 1 Fig. 2 Fig. 3
Monter le Projecteur de plafond
Voir illustrations page 76
1. Avant le montage, mettez le câble réseau hors tension : arrêter le coupecircuit ou dévisser le fusible et protéger contre toute remise en service.
2. Marquez avec le support mural les trous à percer au plafond.
Veillez absolument à ce que les câbles et tuyaux ne passent pas dans la
zone de perçage.
Percez aux endroits indiqués et insérez les chevilles. Fixez maintenant le
support avec les vis associées.
3. Raccordez le câble de raccordement à la barrette de connexion. Veillez à
un arrêt sûr des câbles.
4. Installez le Projecteur de plafond comme indiqué dans l‘illustration.
5. Réactivez maintenant le fusible.
tint Projecteur de plafond NALO
37
MODE D‘EMPLOI

Utilisation
Le Projecteur de plafond tint est déjà relié à la télécommande
fournie
et peut être commandé directement. D’autres lampes et éclairages
tint doivent être raccordés au préalable dans la télécommande (voir le chap.
« Raccordement d‘un nouveau produit tint »).
La télécommande tint est une télécommande radio.
• Vous n’avez pas besoin de « viser » le Projecteur de plafond avec la télécommande tint pour le commander.
• La télécommande tint pénètre également au travers de matériaux durs, tels
que murs, portes et fenêtres.
• La porté maximale est d‘env. 30 mètres en champ libre (en fonction des obsta
cles situés entre la télécommande tint et le Projecteur de plafond).
• Chaque pression sur le bouton est confirmée par l‘allumage de l‘affichage de
la résonance.
Fonctions de base
Activation/désactivation
Appuyez sur la touche de veille pour activer et redésactiver les
produits. La fonction Mémoire mémorise le dernier « état de
l‘éclairage » et démarre automatiquement à l’activation suivante.
Régler le ton de blanc
Par une pression courte, sélectionnez des paramètres de ton de
blanc définis : blanc super-chaud, blanc neutre et blanc froid.
Par une pression longue, réglez vous-même le ton de blanc souhaité
en continu jusque.
-
tint Projecteur de plafond NALO
MODE D‘EMPLOI
38

Régler les couleurs
Appuyez sur l‘une des quatre clés de couleur (fig.
4) pour sélectionner la couleur souhaitée :
fig. 4
Pression courte : La couleur change dans la direction
souhaitée dans la gamme de couleurs.
Pression longue : La couleur passe à une valeur colorimétrique
définie.
Réglage de la luminosité
Par une pression courte, réglez des niveaux de luminosité définis : 100 %, 80 %,
50 %, 20 %, 10 % et 5 %.
Par une pression longue, réglez vous-même le niveau de luminosité souhaité.
Scènes
Les scènes désignent les réglages d’éclairage prédéfinis.
Une scène est activée par une courte pression sur la touche correspondante.
Les trois boutons de scène supérieurs sont affectés deux fois. Une pression
longue sur le bouton active le deuxième mode. Remarque : cette fonction n’est
pas disponible avec tous les produits de tint.
Scène « Éclairage de travail » : Éclairage clair 100 % neutre.
Appui long sur le bouton : 100% blanc froid, éclairage lumineux
Scène « Coucher de soleil » : Commence par une lumière blanche
chaude (50 %), puis s’atténue après 15 minutes. Après 10 minutes
supplémentaires, la lampe s‘arrête.
Appui long sur le bouton : Fonction de minuterie. Le dernier réglage
est sauvegardé (signalé par le clignotement 2x de la lampe). La lampe
s‘allume pendant 6 heures et s‘éteint ensuite pendant 18 heures. Le
lendemain, il se remet en marche pendant 6 heures à la même heure.
Pour désactiver, appuyez à nouveau sur le bouton et maintenez-le
enfoncé (le témoin clignote une fois).
tint Projecteur de plafond NALO
39
MODE D‘EMPLOI

Scène « Fête » : Un changement de couleurs vives et en constante
évolution débute.
Touche longue : un changement de couleur lent et constant est
lancé.
Scène « Éclairage de nuit » : Lumière blanche chaude tamisée
à 5 %.
Scène « Feu de camp » : Simule un feu de camp dans des tons
chauds alternant entre l‘orange, le rouge et le blanc.
Scène « Romantique » : Alternance constante des couleurs rouge,
rose et violette.
Si vous utilisez un produit de tint „white“ qui ne fournit que de la
lumière blanche, les fonctions d‘éclairage couleur ne sont pas disponibles. Le produit s‘arrête.
Fonctions du groupe
Sélectionner un groupe
Si vous avez installé plusieurs produits tint, elles sont regroupées au départ
dans le premier groupe. Ainsi, d’une pression sur un bouton, vous pouvez
commander plusieurs produits tint simultanément. Ce dispositif est pratique, par exemple, si plusieurs « situations d’éclairage » cohabitent au sein
d‘un même espace.
Exemple :
• Un lieu de travail qui doit bénéficier d‘un éclairage clair.
• Un coin détente qui doit bénéficier d‘un éclairage moyennement clair.
• Un autre espace devant bénéficier d’un éclairage particulier.
tint Projecteur de plafond NALO
MODE D‘EMPLOI
40

Attention :
• Vous décidez vous-même de ce qu‘est finalement un groupe. Vous
pouvez, par exemple, regrouper aussi les produits tint d‘une pièce ou
d‘un étage.
• Un groupe peut être élargi ou réduit, et les produits tint peuvent égale
-
ment être déplacées d‘un groupe à l‘autre.
• Une seule produit tint peut aussi constituer un groupe.
• La télécommande tint permet de contrôler jusqu’à 4 groupes, le quatri
ème groupe représentant l’ensemble des trois autres.
• Au préalable, réfléchissez aux produits qui doivent être regroupées et
essayez de constituer des groupes de façon logique et compréhensible.
Cela vous permet d‘accéder ensuite rapidement au groupe correspon
dant au moyen de la touche de groupe sans avoir à effectuer de longs
tests.
Utilisation de la touche du groupe
• À la première pression sur la touche, les voyants situés au-dessus de la
touche du groupe indiquent le groupe dans lequel vous vous trouvez.
• Appuyez à nouveau sur la touche du groupe pour passer au groupe
suivant.
• Vous vous trouvez dans le groupe suivant lorsque le voyant suivant audessus de la touche du groupe est allumé :
° Voyant 1 pour le premier groupe
° Voyant 2 pour le deuxième groupe
° Voyant 3 pour le troisième groupe
° Voyants 1, 2 et 3 pour tous les groupes
-
tint Projecteur de plafond NALO
41
MODE D‘EMPLOI
Raccordement d‘un nouveau produit tint
• Au moment d’acheter de nouveaux produits, faites attention à leurs
caractéristiques techniques.
Nous recommandons d’opter pour les produits tint de la société MüllerLicht. Si vous utilisez des produits d‘autres fabricants, rien ne garantit
que toutes les fonctions seront prises en charge ou fonctionneront
correctement.
• Jusqu‘à 50 lampes et lumières peuvent être contrôlées avec une télé
commande tint.
Attachez chaque produit tint un à la fois et éteignez les autres
produits lors de la connexion.
1. Débranchez la prise secteur, retirez l‘ancienne ampoule et tournez la
nouvelle ampoule tint dans sa douille.
2. Branchez la/les prise(s) secteur et réglez les interrupteurs de lampe
correspondants sur I ou ON.
Le nouveau produit tint indique q‘il est en mode de couplage en aug
mentant et en diminuant brièvement la luminosité et, s’il y a lieu, en
changeant de couleur. Si cela ne se produit pas, allumez et éteignez le
produit 5 fois de suite. (voir le chap. « Réinitialisation du produit tint »).
3. Appuyez de manière répétée sur la touche du groupe jusqu‘à ce que
tous les voyants situés au-dessus de la touche du groupe s‘allument.
4. Maintenez la télécommande tint tout près (< 5 cm) de la nouvelle am
poule.
5. Maintenez la touche du groupe enfoncée jusqu‘à ce que l’ampoule
commence à clignoter.
L‘affichage de résonance commence par clignoter en rouge de façon
uniforme, puis se met à clignoter plus rapidement. Cela indique que la
télécommande tint a capté un signal.
-
-
-
tint Projecteur de plafond NALO
MODE D‘EMPLOI
42

Continuer à tenir la touche du groupe enfoncée jusqu’à ce que la
nouvelle ampoule clignote 3x pour indiquer qu’elle a été raccordée à la
télécommande tint.
Au-dessus de la touche du groupe, seul le voyant de gauche continue
d’être allumé (= groupe 1).
6. Si vous le souhaitez, vous pouvez sélectionner un autre groupe en appu
yant plusieurs fois sur la touche du groupe (voyant du milieu = groupe 2,
etc.).
Après environ 10 secondes, la nouvelle le nouveau produit est ajoutée
au groupe sélectionné et l‘affichage de résonance cesse de clignoter.
Patientez pendant ce délai et n‘appuyez sur aucune touche.
Le processus est alors terminé et vous pouvez utiliser le groupe étendu
comme à l’accoutumée.
Suppression d’une ampoule d’un groupe
1. Éteignez au besoin le produit au moyen de la télécommande tint (veille).
2. Au moyen de la touche du groupe, sélectionnez le groupe que vous
souhaitez modifier.
3. Maintenez la touche du groupe enfoncée pendant env. 5 secondes.
L‘affichage de résonance clignote en rouge/vert.
4. Par des pressions répétées sur la touche du groupe sélectionnez le
produit souhaitée. Le nouveau produit indique qu‘il a été sélectionnée
en augmentant et en diminuant brièvement la luminosité.
5. Maintenez la touche de veille enfoncée pendant env. 5 secondes.
Le produit indiquera alors qu‘il a été éliminée du groupe en clignotant,
puis en se tamisant, et le processus prend fin.
tint Projecteur de plafond NALO
43
MODE D‘EMPLOI

Raccordement d‘un produit tint d’un groupe avec un autre groupe
1. Éteignez au besoin les le produit au moyen de la télécommande tint
(veille).
2. Au moyen de la touche du groupe, sélectionnez le groupe que vous
souhaitez modifier. (Par exemple, si vous souhaitez ajouter un produit
du groupe 2 au groupe 1, appuyez de manière répétée sur la touche du
groupe jusqu‘à ce que le voyant du milieu au-dessus de la touche du
groupe s‘allume.)
3. Maintenez la touche du groupe enfoncée pendant env. 5 secondes.
L‘affichage de résonance clignote en rouge/vert.
4. Par des pressions répétées sur la touche du groupe sélectionnez le
produit souhaitée. Le nouveau produit indique qu‘il a été sélectionnée
en augmentant et en diminuant brièvement la luminosité. Les produits
clignotent dans l‘ordre dans lequel ils sont définies sur la télécomman
de tint.
5. Maintenez à nouveau la touche du groupe enfoncée pendant env. 5
secondes pour définir le produit sélectionné dans un nouveau groupe.
L‘affichage du groupe 1 s’allume.
6. Si nécessaire, utilisez la touche du groupe pour sélectionner le groupe
auquel vous souhaitez ajouter le produit.
Après environ 10 secondes, le produit est ajoutée au groupe sélectionné et
l‘affichage de résonance cesse de clignoter. Patientez pendant ce délai et
n‘appuyez sur aucune touche.
Le processus est alors terminé et vous pouvez utiliser le groupe étendu
comme à l’accoutumée.
-
Réinitialisation à une luminosité de 100 %
Le produit tint peut être réinitialisé très facilement avec l‘interrupteur sur
le réglage blanc chaud et à une luminosité de 100 %. Cela peut s’avérer
tint Projecteur de plafond NALO
MODE D‘EMPLOI
44

nécessaire, par ex. lorsque vous avez tamisé le produit au préalable et que les
piles de la télécommande sont vides. En règle générale, cette fonction peut
également être utilisée si la télécommande tint n’est pas à portée de main.
1. Éteignez le 3 fois (intervalle: allumer pendant 1 seconde, éteindre pendant
3 secondes) et rallumez-la au moyen de l‘interrupteur.
2. Le produit commence à présent avec le réglage par défaut, à savoir blanc
chaud, 100 %.
Réinitialisation du produit tint / mode de couplage
Une réinitialisation de du produit tint n‘est nécessaire que dans des cas exceptionnels, par exemple, si la télécommande a dû être réinitialisée ou si vous
souhaitez raccorder le produit dans un Smart Home Gateway.
1. Activez et désactivez le produit tint 5 fois (intervalle: allumer pendant 1
seconde, éteindre pendant 3 secondes).
2. Réactivez le produit tint. Un changement de couleur débute à présent.
La réinitialisation souhaitée a eu lieu. Attendez 10 se condes et vous pouvez connecter le produit tint à votre télécommande tint et/ou à d‘autres
systèmes Zigbee comme d‘habitude.
Réinitialisation de la télécommande tint
Une réinitialisation n‘est nécessaire que dans des cas exceptionnels, par exemple, si les ampoules ne répondent pas à la télécommande tint même après
remplacement des piles.
Lors d‘une réinitialisation, tous les paramètres de groupe prédéfinis
sont perdus et vous devez ensuite reconnecter la télécommande tint
et les produits tint.
1. Retirez le couvercle du compartiment à piles.
2. Au moyen d’un objet pointu ou du couvercle du compartiment à piles,
appuyez sur la touche de réinitialisation à l‘arrière.
tint Projecteur de plafond NALO
45
MODE D‘EMPLOI
3. Procédez comme le décrit la section « Réinitialisation de l‘ampoule tint
», puis selon la description présente dans la section « Raccordement
d‘une nouvelle ampoule ».
Chaque produit tint est intégrée individuellement l‘une après l‘autre. Si par
exemple trois ampoules appartiennent au groupe, vous devez répéter le
processus « Raccordement d‘un nouveau produit » 3 fois.
Smart Home Ready :
Les produits tint de MÜLLER-LICHT peuvent être commandés au moyen
de la dernière norme radio Zigbee 3.0 et sont compatibles avec de nombreux
systèmes de commande de l‘éclairage, par exemple Philips Hue* (sans Hue
Entertainment et sans intégration de HomeKit), Samsung SmartThings,
l‘assistant linguistique d‘Amazon (via Amazon Echo Plus ou d‘autres appareils Echo avec Zigbee Smart Home Hub intégré)**, etc.
* Restrictions sur les services individuels possibles, informations actualisées
sur www.mueller-licht.de/tint/kompatibilitaet
** Si ce service est disponible dans votre pays.
Pour plus d’informations sur Zigbee Alliance, consultez le site www.zigbee.org.
Pour l‘intégration dans une passerelle Smart Home/application, le
produit tint doit être réinitialisé, voir « Réinitialisation du produit
tint ».
Le raccordement à une télécommande tint est d’abord supprimé.
tint Projecteur de plafond NALO
MODE D‘EMPLOI
46
Intégration dans une passerelle Zigbee :
• Lancez la recherche dans l’application correspondante.
• Démarrez maintenant le produit tint (en mode couplage), même en cas
de spécification contraire dans l’application.
• Le produit tint est trouvé par l’application en quelques secondes et clig-
note brièvement pour confirmation. La recherche dure encore quelques
secondes en fonction de l’application, puis le produit tint est affiché
dans l’application comme nouvel appareil et peut être désigné au choix.
Pour chaque produit tint, un raccordement individuel peut être effectué. Pour
éviter les problèmes, vous devez mettre hors tension tous les autres produits
tint pendant que vous associez un nouveau produit tint à l’application.
Dans certaines passerelles Zigbee, il est également possible
d’intégrer la
et la télécommande puissent être utilisées en parallèle. Pour obtenir des
instructions et un supplément d’informations, consultez la page
www.mueller-licht.de/tint
Nettoyage
Arrêtez le produit tint et éteindre le fusible.
Nettoyez le Projecteur de plafond et la télécommande avec un chiffon sec.
Conservez le Projecteur de plafond et la télécommande au sec et hors de
portée des enfants si elle n’est pas utilisée.
télécommande tint afin que l‘application pour smartphone
tint Projecteur de plafond NALO
47
MODE D‘EMPLOI

Tableau de recherche des erreurs
Problème Cause possible
Sans fonction. Les piles de la télécommande tint sont
Les « mauvais » produits tint
s‘allument.
La lumière s‘éteint subitement. Vous avez sélectionné la scène « Cou
Vous avez intégré une nouvelle ampoule
et celle-ci s’éteint lorsque vous utilisez
une fonction d‘éclairage couleur.
Vous voulez intégrer un nouveau
produit. Cependant, celle qui est déjà
intégrée clignote.
Le produit a été intégré au mauvais
groupe.
Impossible d‘intégrer le produit à un
groupe tiers.
Le produit ne réagit pas avec le réglage
de groupe « Tous ».
déchargées et doivent être remplacées.
Les produits tint sont désactivées ou la
prise secteur n’est pas branchée.
Au moyen de la touche du groupe, vous
avez sélectionné le mauvais groupe ou
vous n‘avez sélectionné aucun groupe.
Sélectionnez le groupe qui convient
ou appuyez de manière répétée sur la
touche du groupe pour sélectionner
« Tous les groupes » (toutes les lampes
situées au-dessus de la touche du
groupe s‘allument).
Au moyen de la touche du groupe,
sélectionnez le groupe qui convient ou
définissez « Tous les groupes ».
-
cher du soleil ». Aucune erreur.
La nouvelle ampoule propose unique
ment de la lumière blanche. Aucune
erreur.
Éteignez le nouveau produit déjà con
necté ou éloignez-vous quelque peu du
produit déjà connecté.
Vérifiez le groupe dans lequel le produit
se trouve. Procédez comme le décrit la
section « Raccordement de du produit
d’un groupe avec un autre groupe ».
Veuillez vérifier si l‘ampoule est en
mode de couplage.
Veuillez découpler le produit de la télé
-
commande tint et le reconnecter.
tint Projecteur de plafond NALO
MODE D‘EMPLOI
48

Problème Cause possible
Impossible d’ajouter le produit. Le produit est déjà attribuée à une
La touche de veille doit être actionnée
plusieurs fois.
télécommande ou à une passerelle.
Veuillez la retirer du réseau existant.
Rapprochez la télécommande.
Mettez les appareils Zigbee situés
à proximité hors tension.
Si les produits ont été auparavant
éteintes au moyen de l’interrupteur, la
télécommande tint doit se resynchro
niser.
Vous avez arrêté certaines parties du
système au moyen d‘un interrupteur. La
télécommande tint se resynchronise.
-
Dans quel groupe se trouve mon
produit ?
Simplement en activant et en désactivant les groupes, vous pouvez
déterminer le groupe dans lequel se
trouve votre produit.
Réponses aux autres questions fréquemment posées, voir
www.mueller-licht.de/tint
Données techniques :
Bande de fréquence du module RF sans fil : 2405-2480,0 MHz
Puissance de transmission maximale : <20 mW
Portée de radio (champ libre) : 30 m
Télécommande : 3 V (2x AAA/LR03)
Conditions ambiantes :
Température (service) : -20 °C...40 °C
Température (conservation) : -25 °C...60 °C
Humidité ambiante relative : 5–95 % (pas de condensation)
tint Projecteur de plafond NALO
49
MODE D‘EMPLOI

NALO Spots 3x NALO Spots 2x NALO Spot 1x
Art.
Puissance totale
Sortie de la source lumineuse
Flux lumineux
Température de couleur
Cycles de commutation
Classe de protection
Consommation en mode veille (Psb)
Consommation en mode veille (Pnet)
Tension secteur
Fréquence du réseau
Dimensions (mm)
404068 404069 404070
20 W 14 W 7 W
3 x 5,2 W 2 x 5,2 W 1 x 5,2 W
3 x 600 lm 2 x 600 lm 1 x 600 lm
1800-6500 K + RGB
20.000 h
I, IP20
0,40 W
0,45 W
220-240 V
50 Hz
320 x 165 x 90 mm 200 x 165 x 90 mm 130 x 165 x 90 mm
Ce produit contient une source lumineuse de classe d’efficacité énergétique F.
tint Projecteur de plafond NALO
MODE D‘EMPLOI
50
Déclaration de conformité
La société Müller-Licht International GmbH déclare par la
présente que le type d‘installation radio « Müller-Licht tint » est
conforme à la directive 2014/53/UE.
Le texte complet de la déclaration de conformité UE est disponible à
l’adresse Internet suivante : www.mueller-licht.de/tint
Élimination
Les appareils usagés ne peuvent pas être éliminés avec les ordures mé-
nagères. Selon la directive 2012/19/UE, l‘appareil en fin de durée de vie doit
être soumis à une élimination contrôlée. Les matériaux contenus dans l‘appareil
sont soumis à un recyclage et l‘environnement n‘est pas pollué.
Déposez l‘ancien appareil sans frais auprès d‘un point de collecte pour déchets
électroniques ou d‘un centre de recyclage.
Avant d‘éliminer l‘appareil, retirez-en la pile et éliminez celle-ci séparé
ment. Les piles et piles rechargeables ne peuvent pas être éliminées en
tant qu‘ordures ménagères. Chaque consommateur est tenu de déposer les piles
et piles rechargeables auprès d‘un point de collecte de sa municipalité, de son
quartier ou dans le commerce.
Toutes les piles et piles rechargeables peuvent ainsi être éliminées de façon
non polluante. Les piles et piles rechargeables qui contiennent des substances
nocives sont identifiées par ce signe et par des symboles chimiques (Pb pour le
plomb).
Éliminez également les matériaux d‘emballage de façon conforme à
l‘environnement en les déposant par type dans les conteneurs mis à
disposition.
Symbole de recyclage général. Vous trouverez des informations complé
mentaires à l’adresse :www.mueller-licht.de/recycle/
-
-
tint Projecteur de plafond NALO
51
MODE D‘EMPLOI

CONTENT
General information ........................... .........52
At a glance .................................... ...........52
Included with the item ................. ...........52
Explanation of symbols ................ ...........53
Safety Instructions ....................... ...........54
Proper use .......................................... .........54
Safety Notes ....................................... .........55
tint remote control ............................. .........58
Setup .................................................. .........59
Inserting the batteries ................. ...........59
Mounting the wall bracket ........... ...........60
Installing the ceiling spots ........... ...........61
General information
Operation .......................................... ...........62
Basic functions ............................. ...........62
Scenes ............................................ .........63
Group function .............................. ...........64
Reset .............................................. .........68
Smart Home Ready ............................ .........69
Cleaning ............................................. .........71
Troubleshooting ................................. .........71
Technical data .................................... .........73
Declaration of Conformity .................. .........74
Dispose ............................................... .........74
At a glance
Included with the item
• tint ceiling spots,
white+color
• tint remote control
with wall bracket and
installation material
• Installation material
• 2 batteries
LR03 (AAA) / 1.5 V
• Operating manual
tint ceiling spots NALO
INSTRUCTION MANUAL
52

Dear customers!
This user manual contains important information on start-up
and use. Before using the tint product, please read through the
user manual carefully. This particularly applies for the safety
notes. Failure to follow this user manual may result in severe injury or
damage the bulbs. Store the user manual for future use. If you pass the
tint product on to third parties, please be absolutely sure to include this
user manual.
You can also download the manual: www.mueller-licht.de/tint.
Explanation of symbols
The following symbols and signal words are used in this user manual, on
the product or on the packaging.
WARNING!
This signal symbol/word designates a hazard with moderate degree of
risk which may lead to death or severe injury if not avoided.
This signal symbol/word designates a hazard with low degree of risk
which may severe a moderate injury if not avoided.
ATTENTION!
NOTICE!
This signal word warns against potential damages to property.
tint ceiling spots NALO
53
INSTRUCTION MANUAL

This symbol gives useful additional information for handling or
operation. Please read carefully.
Safety Instructions
Do not expose this lamp to moisture
Not dimmable by conventional dimmers
D
E
L
The light source and control gear of the surrounding product
D
e
v
r
r
i
cannot be replaced by the user. Only authorised agencies may
replace them!
Proper use
This ceiling spot light is used for lighting purposes and, after connecting
to the corresponding remote control, can be controlled and/or integrated
in a Smart Home System with the Zigbee radio standard.
Up to 50 tint products can be controlled with the remote control.
The ceiling spots must only be mounted on walls/ceilings with the
permissible load capacity. The item is unsuitable for commercial use.
tint ceiling spots NALO
INSTRUCTION MANUAL
54

Safety Notes
NOTICE!
• This product may be used by children ages eight and over as well as
persons with impaired physical, sensory or mental capacities or those lacking experience and knowledge if they are supervised or have
been instructed in how to safely use the light and have understood
the risks associated with using it.
WARNING!
DANGER for children
• Children are not allowed to play with the item
• Do not let children play with the packaging. Children may get caught
in it when playing and suffocate.
• Keep the batteries and the tint remote control out of reach for
children. If a battery has been swallowed or is in any part of the body,
medical help must be sought immediately
• Batteries can be life-threatening if swallowed.
• If the battery compartment does not close safely, make sure you stop
using the product and keep it away from children.
tint ceiling spots NALO
55
INSTRUCTION MANUAL

DANGER of electric shock
• Before use, make sure that the existing power voltage matches the
required operating voltage of the item (see „Technical data“)
• Before installing, de-energise the mains wiring: Switch off the circuit
breaker, or remove the fuse and secure to prevent reactivation.
• When inserting the batteries, pay attention to the right polarity.
• Do not use different types and do not use a used battery and a new
battery with each other.
• Do not use the item if it is damaged.
• Avoid contact of the item with water or other liquids.
• The product can be adjusted via the included tint control or other control units on a Zigbee basis. A conventional dimmer must not be used.
DANGER of fire/combustion and/or explosion
• Risk of explosion if the battery is improperly replaced. Replace the
batteries only with the same or equivalent type of battery. Note the
„Technical data.“
• Batteries must not be charged, reactivated, taken apart, thrown into
the fire or short-circuited. Otherwise, there is an increased risk of
explosion and phase-out, and gases can also escape!
• Avoid contact of battery fluid with skin, eyes and mucous membranes.
• In case of eye contact, rinse the affected areas immediately with plenty
of clear water and see a doctor immediately.
tint ceiling spots NALO
INSTRUCTION MANUAL
56

• When inserting the batteries, pay attention to the right polarity
• Always replace all batteries at the same time.
• Do not use different types and do not use a used battery and a new
battery with each other.
ATTENTION!
CAUTION against damage to property
• Remove the batteries from the remote control when they are drained
or if you are not using the item for a long time. In this way, you avoid
damage that can result from leakage.
• Do not expose the batteries to extreme conditions, e.g. by storing
them on radiators or in direct sunlight. Increased risk of leakage!
• If necessary, clean the battery and device contacts before inserting
them.
tint ceiling spots NALO
57
INSTRUCTION MANUAL
tint remote control
Standby button
Feedback display
Group display
(3 LEDs)
White control
Brightness
control
“Working light”
scene button
“Night
lights” scene
button
“Sunset”
scene button »
Group button
Color control
“Party”
scene button
“Romantic”
scene button
“Campfire”
scene button
tint ceiling spots NALO
INSTRUCTION MANUAL
58

Battery compartment
Reset button
for 2 batteries LR03
(AAA)
Setup
Inserting the batteries
1. Open the battery compartment at the rear of the tint remote control.
2. Insert 2 LR03 (AAA) / 1.5V batteries as shown on the bottom of the
battery compartment. Ensure the correct polarity of the batteries (+/-).
3. Close the battery compartment cover again.
Using the wall bracket (optional)
You can use the wall bracket (supplied) to store the tint remote control
safely. A magnet in the bracket will hold the tint remote control safely in
the bracket.
tint ceiling spots NALO
59
INSTRUCTION MANUAL
Mounting the wall bracket
1. Remove the protective film from both sticky pads.
2. Press the bracket with some force against a clean, dry and dust-free
surface.
Screwing in the wall bracket
Depending on the surface, the wall bracket can be attached to the wall
with screws and wall plugs if required. Screws and wall plugs are included with the bracket.
ATTENTION!
Make sure there are no pipes or wires in the wall where you intend to drill.
1. Separate the two halves of the bracket. (fig. 1)
2. Use the rear of the bracket as a stencil to mark where you will drill.
3. Drill the holes and insert the wall plugs (if needed) in the holes. (fig. 2)
4. Screw the rear of the bracket onto the wall.
5. Place the upper part of the bracket on the screwed lower part. (fig. 3)
The bracket can now be used.
tint ceiling spots NALO
INSTRUCTION MANUAL
60
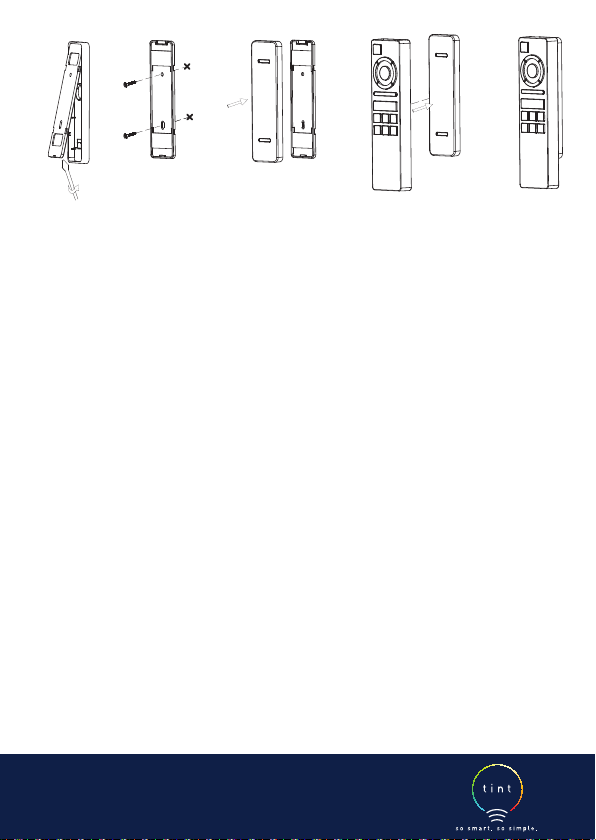
fig. 1 fig. 2 fig. 3
Installing the ceiling spots
See illustrations on page 76
1. Before installing, de-energise the mains wiring: Switch off the circuit breaker, or remove the fuse and secure to prevent reactivation.
2. Use the wall bracket to mark the holes to be drilled in the ceiling.
Make sure not to drill any cables or pipes in the area.
Drill at the marked points and insert the dowels. Now fasten the bracket
with the corresponding screws.
3. Connect the connection cable to the terminal strip. Make sure that the
cables are secure.
4. Install the ceiling spots as shown in the illustration.
5. Reactivate the breaker.
tint ceiling spots NALO
61
INSTRUCTION MANUAL
Operation
The tint ceiling spots is already connected to the supplied remote control and
can be controlled directly. Further tint lamps and lights must first be integrated in
the remote control (see chapter „Operation - Adding a new tint product“).
The tint remote control is a radio remote control.
• You do not need to “aim” at the tint products with the tint remote control to
operate them.
• The tint remote control will also penetrate solid materials such as walls, doors
and windows.
• The maximum range (depending on the obstacles between the tint remote
control and the tint products) is approx. 30 metres in the open air.
• Each button press will be confirmed by the feedback display lighting up.
Basic functions
Switching on/off
Press the standby button to switch the tint product on
and off again. The memory function will store the last
“illumination state” and will start again automatically the
next time the tint product is switched on.
Set white tone
Short-press to select permanently stored white tone settings:
warm white, neutral white and cold white.
Long-press to set the desired white tone from a continuous scale
that reaches the super-warm white range.
tint ceiling spots NALO
INSTRUCTION MANUAL
62
Set colors
Press one of the four colour keys (fig. 4)
to select the
fig. 4
desired color:
Short press: The color will switch in the desired
direction on the color scale.
Long press: The color will jump to a permanently
stored color value.
Set brightness
Short-press to select permanently stored brightness levels: 100%,
80%, 50%, 20%, 10% and 5%.
Long-press to set the desired brightness on a continuous scale.
Szenen
Scenes are permanently predefined light settings. A scene is
activated by briefly pressing the respective key.
The upper three scene keys are assigned twice. The 2nd mode can
be activated here by a long keystroke. Note: this function is not
available with all tint products.
“Working light” scene: 100% neutral, bright light
Long keystroke: 100% cool white, bright illumination.
tint ceiling spots NALO
63
INSTRUCTION MANUAL

“Sunset” scene: Starts at warm-white light (50%) and
then dims further after 15 minutes. After another 10
minutes, the light switches off.
Long key press: Timer function. The last setting is saved
(signaled by 2x flashing of the lamp). The lamp lights up
for 6 hours and then switches off for 18 hours. The next
day it turns on again at the same time for 6 hours. To
deactivate, press the button again for a long time (lamp
flashes once).
“Party” scene: Starts a bright and constantly changing
sequence of colors.
Long key press: A slow, constantly changing color
change is started.
“Night light” scene: Warm-white light dimmed to 5%.
“Campfire” scene: Simulates a campfire in warm color
tones, changing between orange, red and white.
“Romantic” scene: A constant cycle between the colors
red, pink
and purple.
If you are using a „tint white“ product that only emits
white light, the colored light features will not be available. The tint product
will be switched off.
Group functions
This is a group
The ceiling spots is in the first group to begin with. It is possible to control
several bulbs or other tint products with only one button. This is useful if you
have more than one ‘lighting situation’ in a room, for example.
tint ceiling spots NALO
INSTRUCTION MANUAL
64
Example:
• A workplace that needs to be brightly lit.
• A seating area that needs medium brightness.
• Another area that needs different lighting.
Please note:
• You define yourself what a group actually is. You could group together
the tint products in a room or on a floor, for example.
• A group can be expanded or made smaller and tint products can be
moved from one group to another.
• An individual tint product could also be a group all on its own.
• You can use the tint remote control to control a maximum of 4 groups,
whereby the fourth group is a combination of the other three groups.
• Think beforehand about which tint products you want to group together
and try to make the groups logical and comprehensible. This means
you will be able to use the groups later using the group button quickly
and without having to waste time testing them.
tint ceiling spots NALO
65
INSTRUCTION MANUAL

Using the group button
• The first time the group button is pressed, the LEDs above it will show
which group you are in.
• Pressing it again will advance you one group.
• You are in the next group when the following LED above the group button
lights up:
° LED 1 for the first group
° LED 2 for the second group
° LED 3 for the third group
° LED 1, 2 and 3 for all groups
Adding a new tint product
• Take note of the technical specifications when purchasing new tint products. We recommend tint tint bulbs and luminaires from Müller-Licht.
When using products made by other manufacturers, it is not guaranteed
that all features will be supported or will work as intended.
Integrate each product in the remote control one at a time and turn
off the others during the connection.
1. Plug the new tint product in at the mains and set the corresponding
light switch to I or ON.
The new tint product will signal that it is in coupling mode by briefly
increasing and decreasing its brightness and changing color if appli
cable. If this does not occur, switch the product off and on again 5 times
(see „Resetting the tint product“)
2
.
Press the group button repeatedly until all the LEDs above the group button
light up.
-
tint ceiling spots NALO
INSTRUCTION MANUAL
66

3. Hold the tint remote control very close (< 5 cm) to the new tint product (or to
its radio controller).
4. Hold down the group button until the tint product begins to blink.
The feedback display will first blink red evenly; then, it will begin to blink more
quickly.
This means that the tint remote control has found a signal.
Continue to hold down the group button until the new light flashes 3 times to
indicate that it has been connected to the tint remote control.Keep holding
down the group button until the tint product blinks again one time, which
shows that it has been assigned to default group (=group 1).
5. If desired, you can select a different group by repeatedly pressing the group
button (middle LED = group 2 etc.).
After approx. 10 seconds, the new tint product will be added to the selected
group and the feedback display will stop blinking. Wait this long, not pressing
any buttons during this time.
The procedure will then end and you can use the extended group as normal.
Remove a tint product from the tint remote control
1.
Switch the tint product off (to standby) with the tint remote control if necessary.
2. Select the group you would like to change using the group button.
3. Hold down the group button for approx. 5 seconds.
The feedback display will blink red/green.
4. Select the desired tint product by pressing the group button repeatedly. The
tint product will signal that it has been selected by increasing and decreasing
its brightness. The tint product will blink in the order in which they are stored
in the tint remote control.
tint ceiling spots NALO
67
INSTRUCTION MANUAL

5. Hold down the standby button for approx. 5 seconds. The tint product will then
signal that it has been removed from the tint remote control by flashing and
then dimming.
Shift a tint product from one group into another group
1.
Switch the tint product off (to standby) with the tint remote control if necessary.
2. Select the group you would like to change using the group button. (If you would
like to add a tint product from group 2 to group 1, for example, press the group
button repeatedly until the middle LED above the group button lights up).
3. Hold down the group button for approx. 5 seconds. The feedback display will
blink red/green.
4. Select the desired tint product by pressing the group button repeatedly. The
tint product will signal that it has been selected by increasing and decreasing
its brightness. The tint products will blink in the order in which they are stored
in the tint remote control.
5. Hold down the group button again until the selected tint product starts to blink
again.
The group display for group 1 will also light up.
6. Using the group button, select (if necessary) the group to which you would like
to add the tint product while the feedback display still is blinking red/green.
The selected bulb will be assigned to default group (=group 1) if group button
is not pressed at all. After approx. 10 seconds, the tint product will be added to
the selected group and the feedback display will stop blinking. Wait this long,
not pressing any buttons during this time.
The procedure will then end and you can use the extended group as normal.
tint ceiling spots NALO
INSTRUCTION MANUAL
68

Reset
Reset to 100% light
The tint light bulbs and luminaires can be easily reset by light switch to the
basic setting of warm white and 100% brightness. This may be necessary, for
example, if you have dimmed the tint products before and the remote control‘s
batteries are empty. This feature may also be used in the normal case if you do
not have the tint remote control on hand.
1. Use the light switch to switch the tint product off and on again 3 times
(interval: 1 second on, 3 seconds off).
2. The tint product will now start in its basic setting, warm white, 100%.
Resetting the tint product
Resetting the tint product is only required in exceptional cases,
such as when the remote control has had to be reset.
Note: All settings (such as the link to the remote control) are
reset. The tint product is then returned to coupling mode.
1. Switch the tint product on and off 5 times (follow the instruc-
tions of the respective product)
2. Switch the tint product on again. It will now begin to cycle
through its colors. The reset has occurred as desired and you
can now use the tint product as normal using your remote control or other Zigbee system.
tint ceiling spots NALO
69
INSTRUCTION MANUAL

Resetting the tint remote control
A reset is only necessary in exceptional cases, for example if the tint
products do not respond to the tint remote control even after removing
and reinserting the batteries.
NOTICE!
Resetting the remote control will delete all pre-defined group
settings and you will have to connect the tint remote control and
the tint products again afterwards.
1. Remove the battery compartment cover.
2. Use a pointed object to press the reset button on the back of the
remote control for three seconds, until the control LED starts
flashing. Wait until it stopped flashing again.
3. Then, proceed as described in the section “Resetting the tint
tint product” and then as described in the section “Adding a new
tint product”. Each tint product will then have to be connected
individually one after the other. If, for example, three tint products belong to one group, you must repeat the steps in “Adding
a new tint product” 3 times.
Incorporating in a Zigbee gateway
Generally, a tint product can only be connected with a remote control or with a Smart Home System. In some Smart Home systems
with Zigbee, the tint remote control can also be incorporated so
that the tint products can then be controlled via remote control
or a Smart Home app or voice controller at the same time. For
instructions and additional information, go to
www.mueller-licht.de/tint
tint ceiling spots NALO
INSTRUCTION MANUAL
70

Troubleshooting
Problem Possible causes
Tint product is not working. The batteries in the tint remote con-
The wrong tint product lights up. Use the group button to select the
The light switches off suddenly. You have selected the “Sunset”
You have added a new tint product
and this bulb switches off when you
select a colored light function.
You want to add a new tint product,
but the ones that are already added
are blinking.
The tint product has been added to
the wrong group.
I cannot add a tint product to a new
system.
trol are dead and must be replaced.
The tint product itself is switched off
or the mains plug is not plugged in.
You have selected the wrong group,
or have not selected a group, using
the group button. Select the right
group or select “All groups” by pres
sing the group button repeatedly (all
LEDs above the group button will
light up).
right group or use the group button
to select “All groups”.
scene. Not an error.
The new tint product can only light
up in white. Not an error.
Switch off the tint product that are
already added or remove them from
the product that has already been
connected.
Find out for sure which group the
tint product is in. Proceed as descri
bed in “Add a tint product from one
group into another group”.
Please check whether the tint product is in coupling mode.
-
-
tint ceiling spots NALO
71
INSTRUCTION MANUAL

Problem Possible causes
I cannot add the tint product. The tint product is already assigned
to a remote control or a gateway.
Please remove it from the existing
network
Bring it closer to the remote control
Switch off any nearby Zigbee devices
I have to press the standby button
several times.
If the tint product has previously
been switched off using the light
switch, the tint remote control will
have to resynchronise.
You have switched off parts of the
system using a light switch. The tint
remote control is resynchronising.
Which group is my tint product in at
the moment?
Simply switching the groups on and
off again will tell you which group
your tint product is in.
Answers to other frequently asked questions, see www.mueller-licht.de/tint
Technical data
Frequency band of wireless RF mode: 2405-2480.0 MHz
Maximum transmission power: <20 mW
Radio range (free field): 30 m
Remote control: 3V (2x AAA/LR03)
Environmental conditions:
Temperature (operation): -20 ° C ... 40 ° C
Temperature (storage): -25 ° C ... 60 ° C
Relative humidity: 5-95% (no condensation)
tint ceiling spots NALO
INSTRUCTION MANUAL
72

NALO Spots 3x NALO Spots 2x NALO Spot 1x
Art.
Total output
Power light source
Luminous flux
Color temperature
Lifetime
Protection class
Stand-by consumption
(Psb)
Stand-by consumption (Pnet)
Mains voltage
Mains frequency
Lamp Size (mm)
404068 404069 404070
20 W 14 W 7 W
3 x 5,2 W 2 x 5,2 W 1 x 5,2 W
3 x 600 lm 2 x 600 lm 1 x 600 lm
1800-6500 K + RGB
20.000 h
I, IP20
0,40 W
0,45 W
220-240 V
50 Hz
320 x 165 x 90 mm 200 x 165 x 90 mm 130 x 165 x 90 mm
This product contains a light source of energy efficiency class F.
Declaration of Conformity
Hereby Müller-Licht International GmbH declares that the
radio equipment type „Müller-Licht tint“ complies with the
directive 2014/53 / EU.
The full text of the EU Declaration of Conformity is available
at the following Internet address: www.mueller-licht.de/tint
tint ceiling spots NALO
73
INSTRUCTION MANUAL
CLEANING AND DISPOSAL
www.hey-tint.com
Entdecken
Sie die Welt
von tint.
Cleaning
Clean the remote control only with a dry cloth. If not in use,
keep it in a dry place protected from children.
Dispose
Old appliances must not be disposed of with normal household waste. In accordance with Directive 2012/19/EU, the
device must be disposed of properly at the end of its service
life. The recyclable materials contained in the device are
recycled and pollution of the environment is avoided. Return
the old device free of charge to a collection point for electrical waste or a recycling yard.
Before disposal, remove the battery from the device and
dispose of it separately.
Batteries and rechargeable batteries should not be disposed of with household waste. Every consumer is legally
obliged to hand over batteries and rechargeable batteries
to a collection point in his/her municipality, district or to a
retailer.
All batteries and rechargeable batteries can thus be disposed of in an environmentally friendly manner. Batteries
and rechargeable batteries containing harmful substances
are marked with this symbol and chemical symbols (Pb for
lead).
Dispose of the packaging materials in an environmentally
friendly manner by placing them in the collection containers
provided.
General recycling symbol. Further information can be found
under: www.mueller-licht.de/recycle/
tint ceiling spots NALO
INSTRUCTION MANUAL
74

Entdecken
Sie die Welt
von tint.
www.hey-tint.com
tint ceiling spots NALO
75
INSTRUCTION MANUAL

Deckenspots montieren | Monter le Projecteur de plafond | Installing the ceiling spots
A
404068
B
C
tint Deckenspots NALO
ANLEITUNG
76
404069 404070
tint Deckenspots NALO
77
ANLEITUNG
MÜLLER-LICHT International GmbH
www.hey-tint.com
Nachdruck, auch auszugsweise, nur mit schriftlicher Genehmigung des Urhebers. • Irrtum und Änderung vorbehalten.
Reproduction, en tout ou en partie, uniquement avec la permission écrite de l‘auteur. • Sauf erreur ou omission.
Full or partial reproduction subject to prior written approval. • Errors and changes are excepted.
404068_404069_404070_Deckenspots_tint_BDA_006
Goebelstr. 61/63
D-28865 Lilienthal
Tel. 00800 44003311
tint ceiling spots NALO
INSTRUCTION MANUAL
78
 Loading...