

Page 1
User Guide
www.tinlizzie18.com
Page 2

Apprentice Plus User Guide | 3
Table of Contents
Welcome 5
Warranty 6
Diagram showing the sides of the machine 7
Attaching the Handlebars 8
Your Rocker Arm Cover 9
Your Rear Handlebars 9
Your Thread Stand 10
Connecting Your Apprentice Plus to Your Carriage Assembly 11
General Operation of the LCD Key Pad 12
What is the Tension Release Lever? 14
Adjusting the Height of the Hopping Foot 15
Adjusting the Stroke of the Hopping Foot 15
Routine Cleaning and Oiling 16
Bobbin Winder and Bobbins 17
Threading Overview 19
Threading your Apprentice Plus 19
How Do I Change the Needle? 21
How Do I Make Adjustments to Make the Perfect Stitch? 22
Tension, Tension, Tension 23
Trouble Shooting Checklist
Check Spring Replacement / Tension Knob 25
Machine will not sew. I cannot turn the hand wheel 27
Timing your Machine 28
Adjusting the Bobbin Winder Lever 30
Adjusting the Tension Assemble Thread Guides for Proper Fill 30
Adjusting Bobbin Winder for Contact with the Upper Shaft 31
© 2017 Printed in the United States
First Print October 2017
Page 3

4 | Apprentice Plus User Guide Apprentice Plus User Guide | 5
Dear Apprentice Plus owner,
Thank you for your purchase of the Apprentice Plus Long Arm Quilting System by
TinLizzie18… Your Aordable Long Arm Quilters. Appentice Plus by TinLizzie18 oers you
the ultimate marriage of aordability and functionality, and comes with a one-year complete
warranty. We will always stand behind our products and any warranty issues will be xed
at no charge. Warranty on parts is ve years and covers the sewing machine head, motor,
electronics and frame.
At TinLizzie18, we view our customers as family, making great strides together to build a
community of quilters. Having been in the sewing industry for over 60 years, TinLizzie’s
experience runs deep. Our customers can expect nothing less than the best. We pride
ourselves on customer service and continuing education to better your understanding of the
mechanics, and also to unleash your artistic quilting abilities.
As we continue our long arm quilting journey together, please know that we are here, ready
to assist you with any questions you may have, from quilting tips, ongoing education, and
service assistance. Do not hesitate to call (888-QUILT-18) or email us ([email protected]).
The TinLizzie18 website (www.tinlizzie18.com), contains information about long arm quilting,
our company history, a lineup of educational videos and webinars and a listing of quilt shows
coming to an area near you.
The TinLizzie18 long arm quilting system is large enough for the professional, yet aordable
enough for the everyday quilter. No other machine oers you more for less. Happy quilting!
Sincerely,
The TinLizzie18 Team
Small enough to know you personally, yet
large enough to service all of your long arm quilting needs.
Page 4
6 | Apprentice Plus User Guide Apprentice Plus User Guide | 7
Warranty
We believe that we have designed and are manufacturing the best long arm quilting machine available.
As you unpack your machine, be sure to keep the box and packing materials designed to
protect the machine during shipping. Should it become necessary for you to return the
machine for warranty work, please call us for specic instructions for packing and shipping
your machine.
• Your Apprentice Plus has a full labor warranty for one year from the day you receive your machine.
We guarantee the machine parts for ve years.
• The machine must be cleaned and oiled regularly according to the instructions in this manual. Failure
to properly maintain the machine will void this warranty.
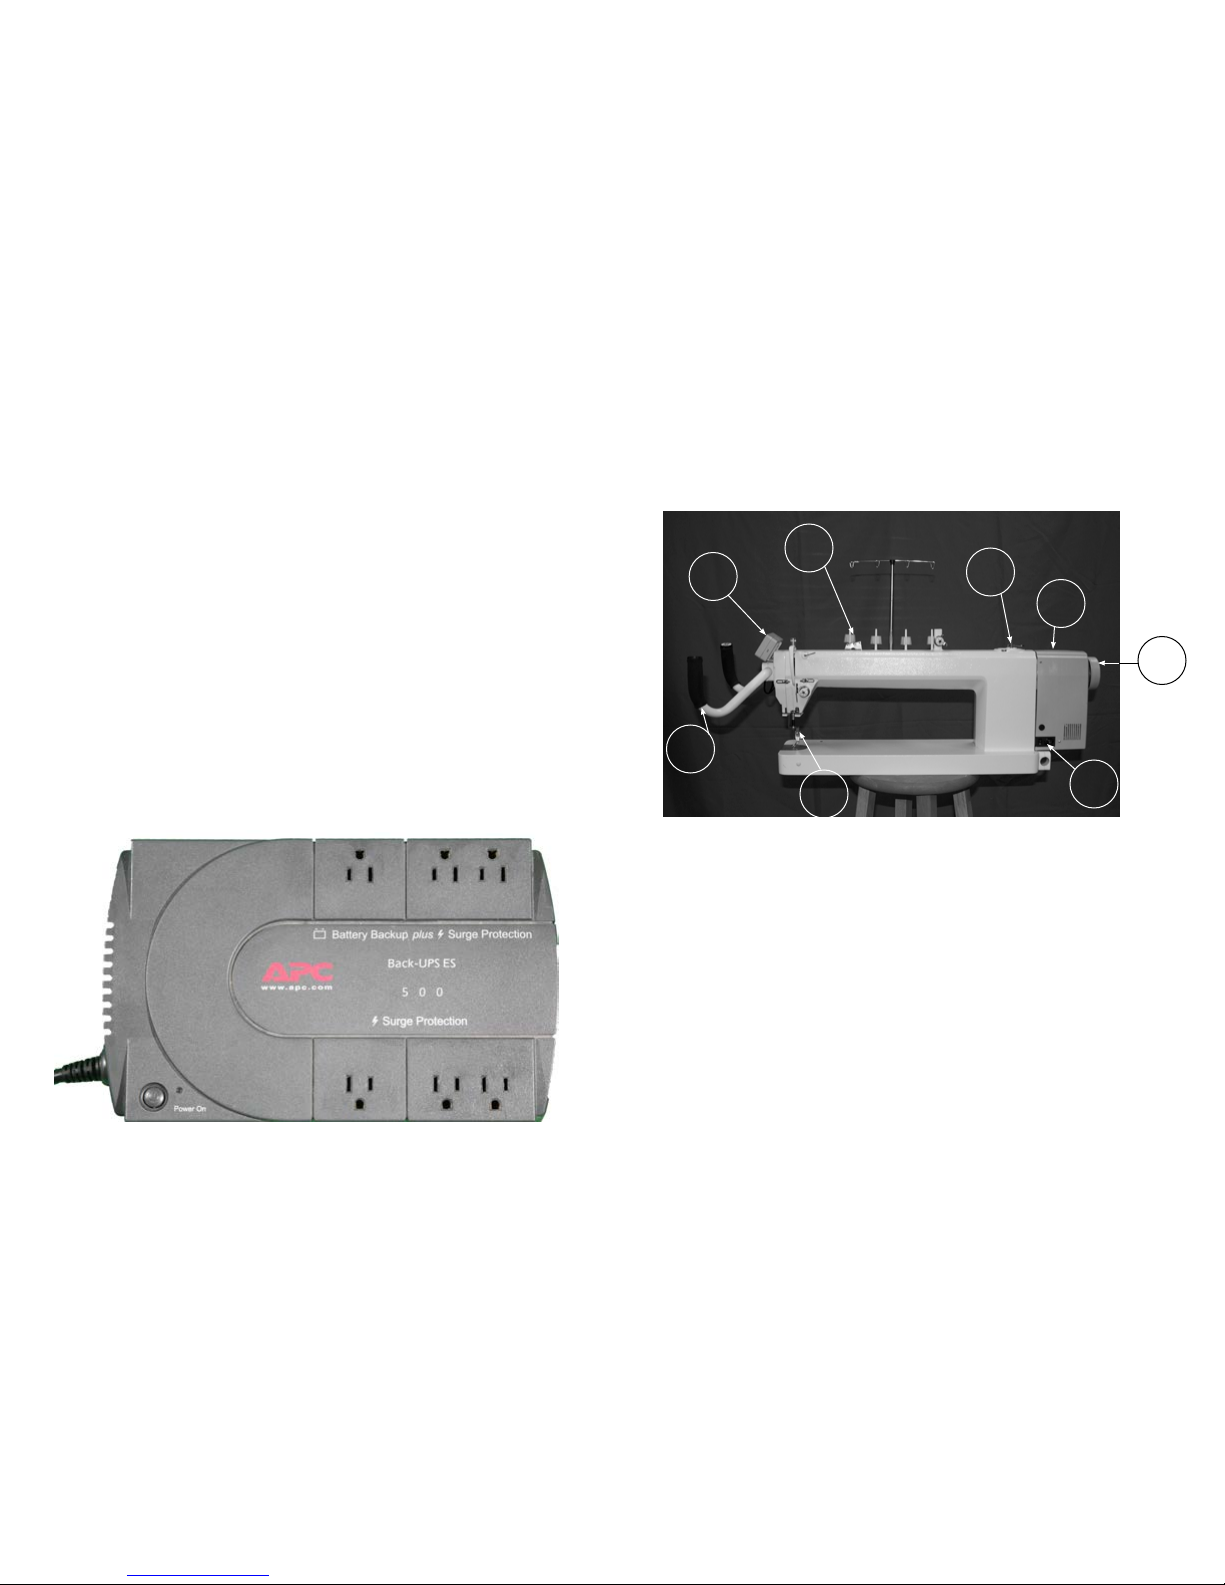
• Your Apprentice Plus must be plugged into a surge protected electrical outlet. We highly recommend
using an Uninterrupted Power Supply (UPS) also known as a Battery Backup. This helps to ensure
that you are getting a regulated 110 volts into your machine. See photo below of UPS Battery
Backup.
• Should we mutually decide that your machine cannot be repaired using normal communications we
will arrange for machine to be returned to the factory.
Be sure to register your warranty on the TinLizzie18 website.
Should You Have a Problem
Please contact your selling dealership as they are also your servicing dealership. If your dealership is
unable to fulll your needs, please visit www.Tinlizzie18.com and choose Service and Support.
Diagram Showing the Sides of the Machine
Front
Back
1. Handlebars
2. Control Screen
3. Thread Stand (left side of machine)
4. Bobbin Winder
5. Motor Cover
6. Hand Wheel
7. On/off Switch (power plug in)
8. Needle
1
2
3
4
5
6
7
8
Page 5
8 | Apprentice Plus User Guide Apprentice Plus User Guide | 9
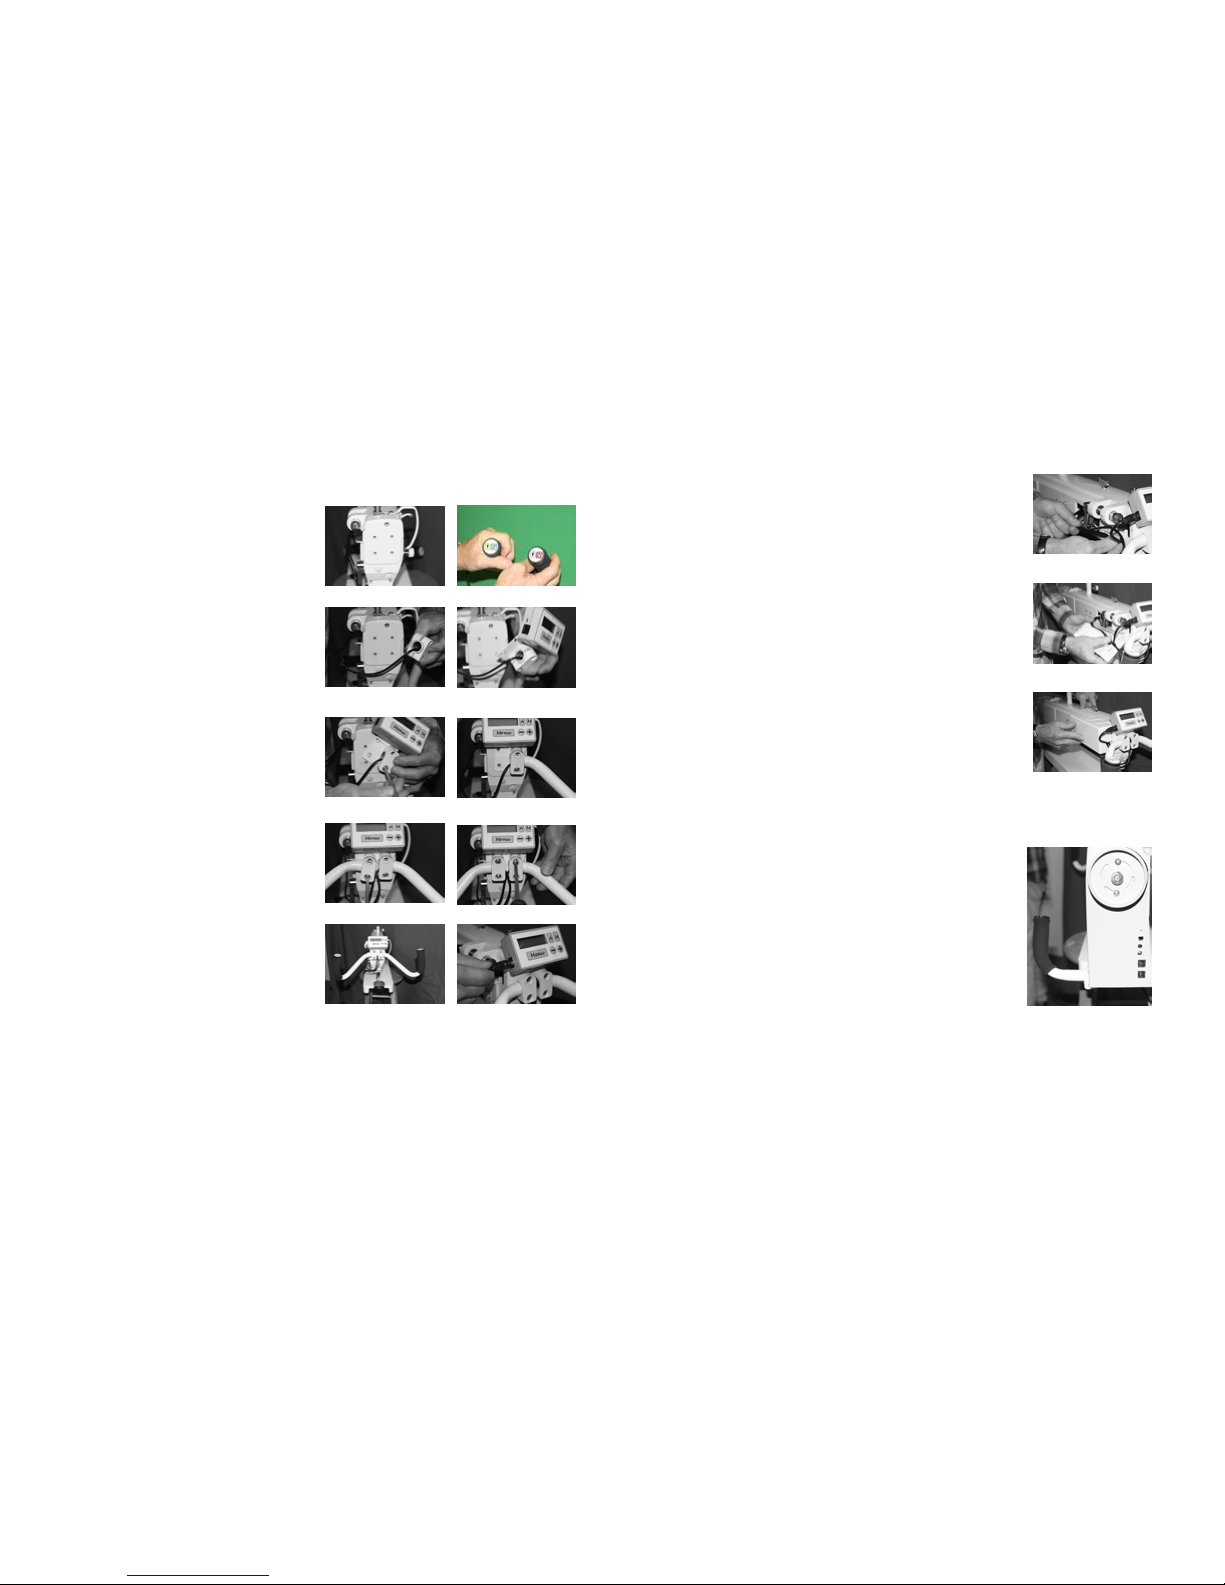
Attaching the Handlebar and Control Box to the Front
Your Apprentice Plus comes with two handlebars (a right and left) along with the main control box which
attach to the front of the Apprentice Plus. There are four screws and four clamps to hold these in place.
Step 1: Locate your set of handlebars and the
control box.
Step 2: Remove the four screws and clamps located
on the front of the machine above the needle. Figure
1 shows the front of the machine without the screws
and clamps.
Note: The front and rear handlebars are set up for left
and right. The right handlebar has red and white buttons
while the left handlebar has blue and yellow buttons.
See gure 2
Step 3: Place two clamps around the right handlebar
as seen in gure 3
Step 4: Place the main control box with bracket
behind the handlebar. See gure 4
Step 5: Using one of the four screws, attach the
bottom screw in the right handlebar and secure to
machine front nger tight, making sure that the main
control box bracket is lined up with the four screw
holes. See gures 5 and 6
Step 6: Place the brackets around the left handlebar
and attach the lower screw to the main control box
bracket to the machine. Finger tight for now. See
gure 7
Step 7: Attach remaining two screws to secure
the handlebars and main control box to the font of
the machine. See gure 8. Figure 9 shows the
handlebars and main control box in place.
Step: 8 Check that all your screws holding the
handlebars and main control box in place are tight.
Step 9: Use the remaining unconnected cable
coming from the side of the machine to connect the
main control box to the machine electronics. See
gure 10
Figure 1
Figure 2
Figure 3
Your Rocker Arm Cover
The Apprentice Plus machine ships without the
rocker arm cover attached to the machine.
Step 1: Remove the four screws from the casting
so that you can install the rocker arm cover.
Step 2: Dress the cords so that they are in a group
ready to be placed in the rocker arm cover. See
gure 11
Step 3: Line up the cords in the base of the rocker
arm cover thru the provided opening in the front of
the cover. See gure 12
Step 4: Secure the rocker arm cover to the
machine using the four screws you removed from
the machine. See gure 13
Figure 11
Figure 12
Figure 13
Figure 4
Figure 5
Figure 6
Figure 7
Figure 8
Figure 9
Figure 10
Your Rear Handlebars
Step 1: Using the same style clamps but from
the back of your machine you will attach your rear
handlebars.
Step 2: Take the left handlebar (blue and yellow
buttons) and attach to the left side of the machine
when standing in the back.
Step 3: Take the right handlebar (red and white
buttons) and attach to the right side of the machine
when standing in the back.
Step 4: Set handles for your comfort and tighten in
place.
Page 6
10 | Apprentice Plus User Guide Apprentice Plus User Guide | 11
Your Thread Stand
Your Apprentice Plus comes with a four spool thread stand. This thread stand is connected to the side
of your machine and can hold bobbin thread you are using to wind onto your bobbins and the top thread
you are using to quilt. You can also have a second spool of thread on the stand if you are using two
dierent threads on your quilt. This 4 spool thread stand has a telescoping thread holder which needs to
be all the way up when you are quilting to help the thread come o the spool evenly and smoothly.
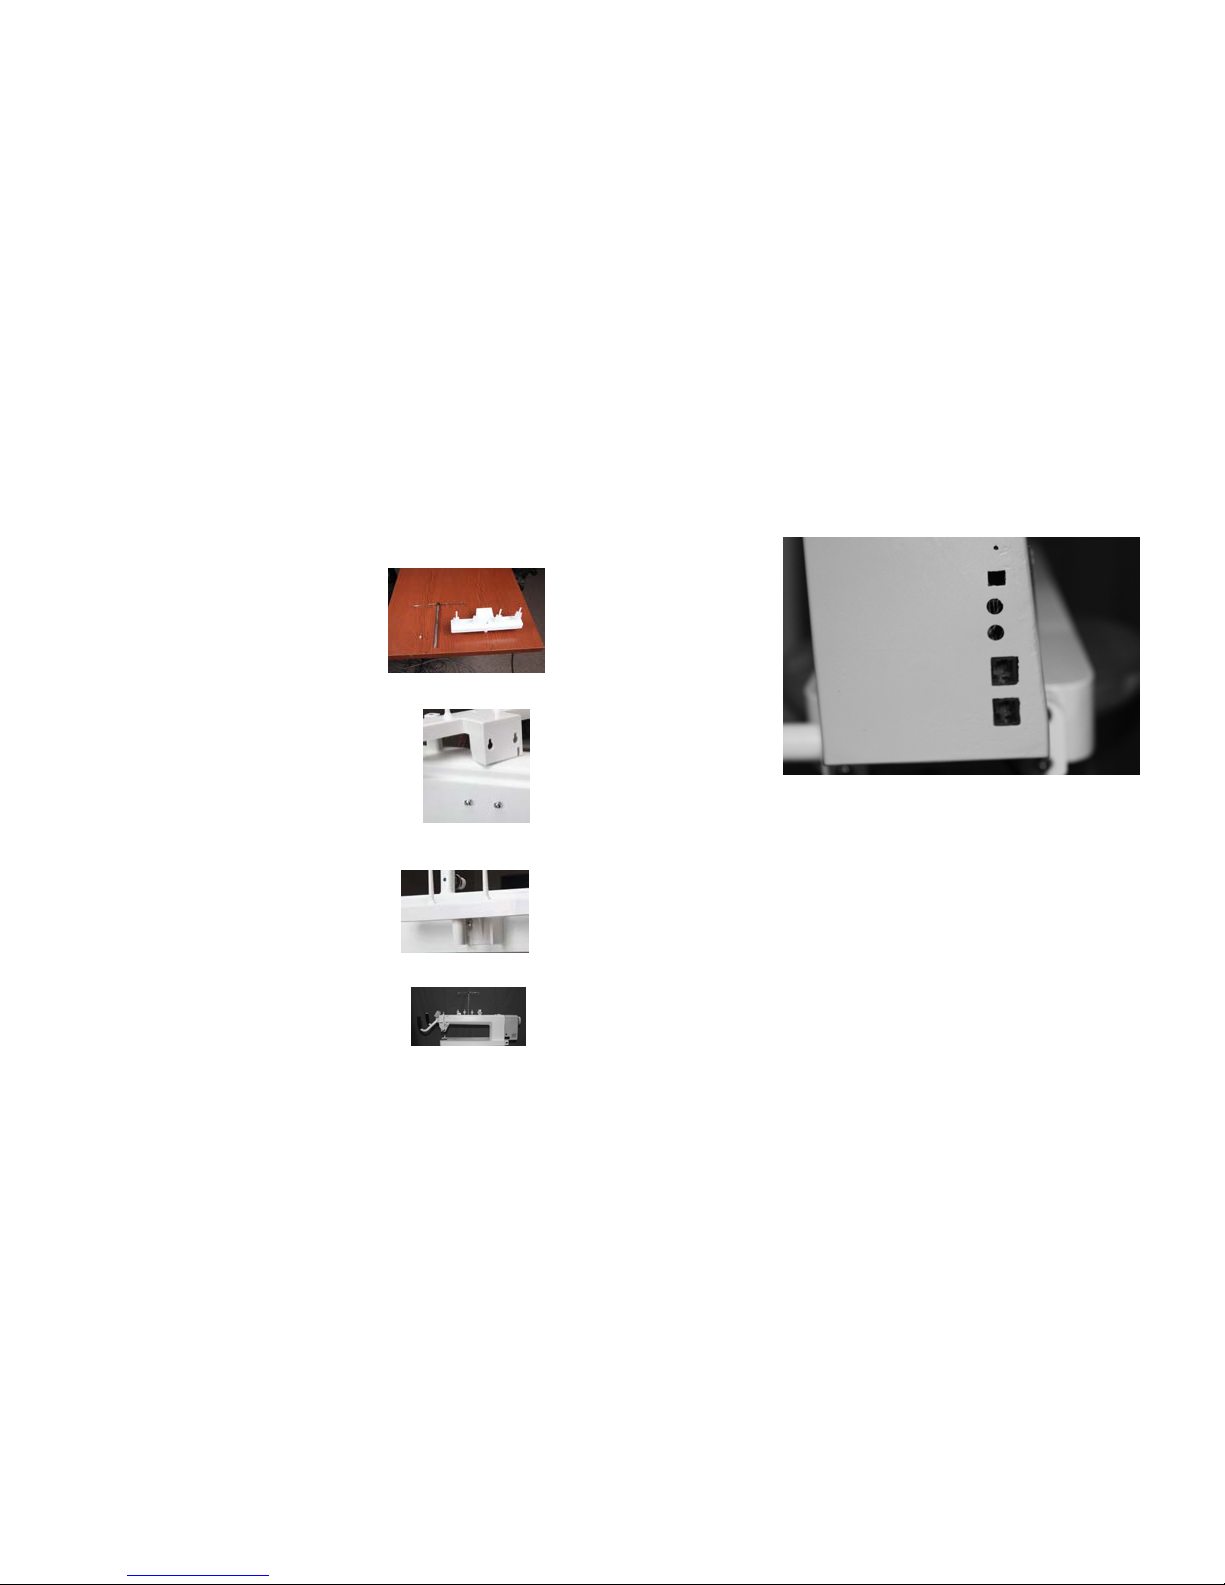
Step 1: If the telescoping thread tree is not on the thread
stand then you will need to attach it.
Step 2: Slide the telescoping thread tree into the hole
provided between the tread holders.
Step 3: Using the supplied screw with washer insert from
the bottom side to secure the telescoping thread tree in
place.
Step 4: On the left side of your machine ( the left side of
the machine is the side with the motor) you will see two
screws not holding anything on yet. See gure 15
Step 5: Loosen these two screws. You don’t need to take
them out but they do need to be loose so that you can
slide the thread stand over them.
Step 6: On the thread stand you will see two holes on the
underside which can be placed over the two screws and
then drop into place. See gure 16
Step 7: Once you have the thread stand in place over the
two screws tighten the screws to hold the thread stand in
place. See gure 16
Remember to pull the telescoping thread tree to the full up
position to use. See gure 17
Figure 14
Figure 15
Figure 16
Figure 17
Connecting your Apprentice Plus to your Carriage Assembly
Your Carriage Assembly will need the encoder assemblies attached to the carriage before placing your
machine on the carriage. Using the Apprentice Plus encoder assembly instructions attach your encoder
assembly to the carriage.
Step 1: Locate the encoders and cables on the carriage. Check them for damage prior to
placing the machine onto the carriage. See gure 18
Note: If your encoder assemblies are not installed on your carriage, use the Apprentice Plus install
instructions and install the encoder assembly before loading your machine on the carriage.
Step 2: Place the machine on the upper carriage. Center the machine as much as possible to
get the full range of the quilting area.
Step 3: Locate the upper carriage encoder cable and connect it to the second connection
point on the side of the power box.
Step 4: Locate the lower carriage encoder cable and connect it to the third connection point
on the side of the power box.
Figure 18
Upper Encoder
Lower Encoder
Left Rear Handle Bar
Right Rear Handle Bar
Laser Light port
Page 7
12 | Apprentice Plus User Guide Apprentice Plus User Guide | 13
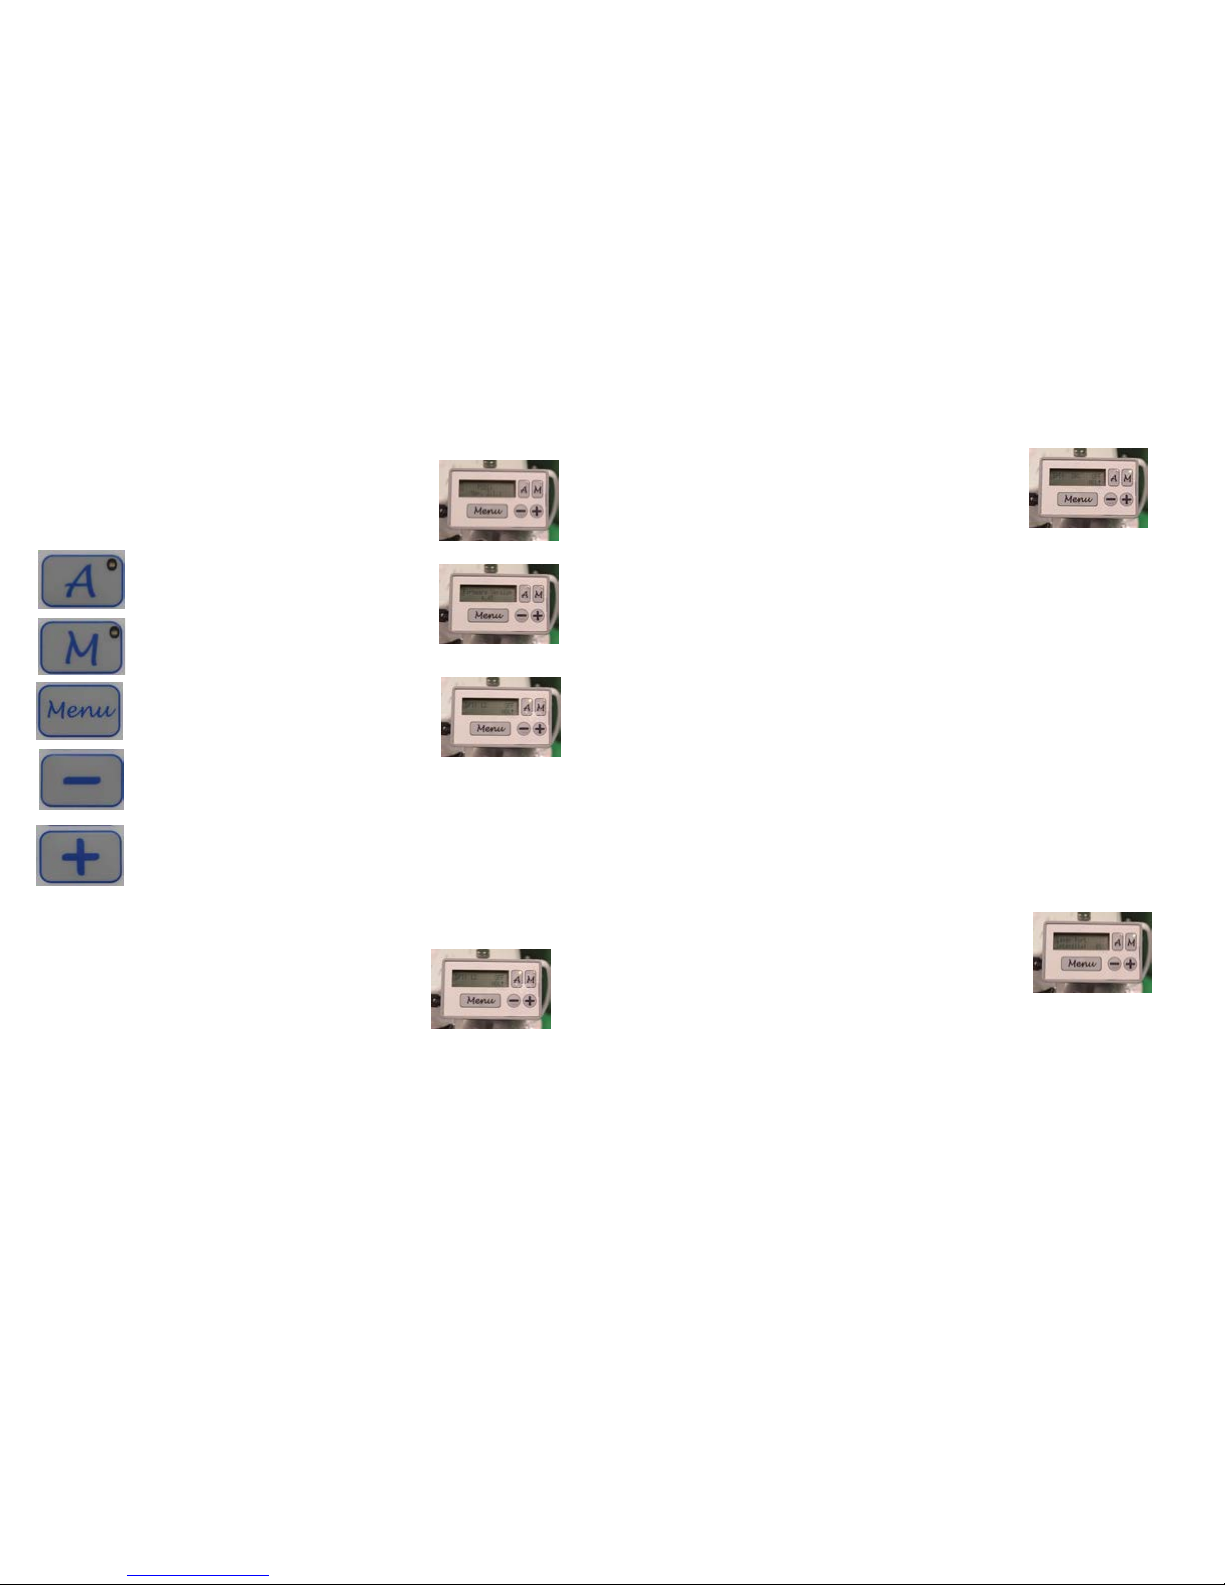
General Operation of the LCD Key Pad
When you turn on your Apprentice Plus, during start up you will see
some screens ash by if you watch the display, which show you the
version among other things. Once you see the screen in Figure 19,
you are ready to use the machine.
The control keys are as follows:
Auto Stitch (Stitch Regulation)
At this point, if you want to change the stitches per inch (SPI), you can
press and release the (-) key to decrease the number of stitches, or you
can press and release the (+) key to increase the number of stitches.
Note: If you press and hold the (-) or (+) keys, you will see the numbers
decrease or increase more quickly than if you just press and release the (-) or
(+) keys.
Once you are happy with the SPI, you can press and release the Start/
Stop key and the LCD will change. You can see on the LCD that next
to the stitch, you see the word ON. This means the quilter is ready to
quilt and as you move the quilter it will stitch.
Figure 19
Auto Stitch
Pressing this button activates the stitch regulation
with stop feature
Manual Stitch
Pressing this button activates the manual stitch
Decrease Button
Lowers stitches per inch, speed or change menu
options
Menu Button
Opens the menu
Increase Button
Increases stitches per inch, speed or change
menu options
Manual Stitch
If you choose Manual, you will be in the manual stitch mode of the
machine. Figure 20 shows the LCD screen for Manual. You will
notice you have the OFF just like in Auto, but you have numbers
with percentages at the bottom rather than just numbers. As with
Auto, the (start/stop) key will turn the machine on and you will be
ready to stitch. Unlike Auto, once you hit the (start/stop) key, the
machine will be sewing.
As with Auto, you can use the (-) or (+) keys to decrease or
increase the speed of the machine. Manual does not have a
default to turn o once it has been turned on. If you stop moving,
thread will build up until it runs out of thread or your thread
breaks. It will keep running until you press the (start/stop) key.
Figure 20
White Lights
By pressing the + key you can increase the intensity of the light
from 0% to 100%.
By pressing the - key you can decrease the intensity of the light
from 100% to 0%.
The lights change by 20% with each push of the + or - keys.
Black Lights
The black lights are either on or o. Pressing the + key turns
them on and pressing the - key turns them o.
Laser Port
The laser port is also either on or o. Pressing the + key turns the
port on and pressing the - key turns the port o.
Figure 21
Page 8
14 | Apprentice Plus User Guide Apprentice Plus User Guide | 15
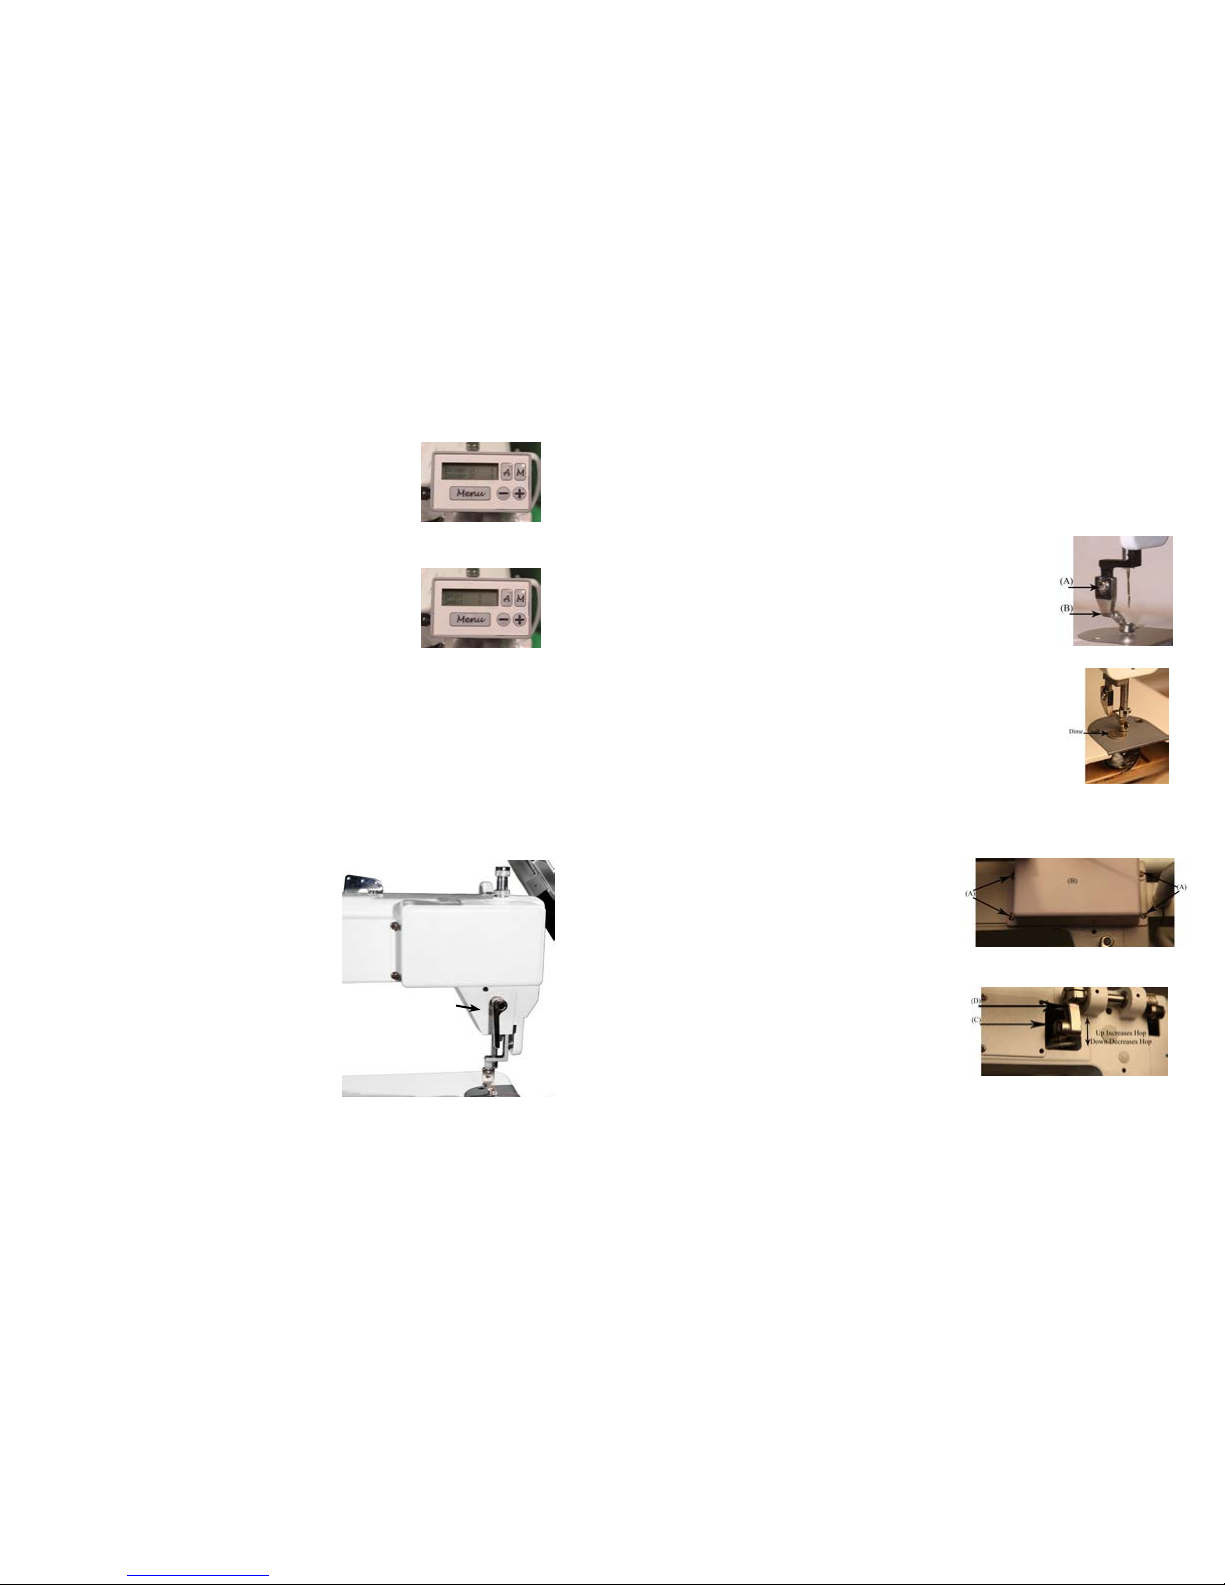
What is the Tension Release Lever?
The tension release lever raises the hopping foot
and releases the tension on the thread. See gure
24
You can watch the tension disc plates open as you
lift the lever.
NEVER start sewing with the lever up. There will be
no tension on the thread which will result in stitches
on the bottom being bad with huge loops and other
wrong looking stitches.
Tension Release Lever
Figure 24
Encoders
Encoders show two sets of numbers. When you are on this
display, you will see the numbers change as you move the
machine and the encoders send a signal to the machine.
Encoder 1 is for the top encoder port.
Encoder 2 is for the bottom encoder port.
Motor/Index
Here you will see two sets of numbers as well.
Motor —if the motor is turning the numbers will change.
Index—shows the needle up sensor reading. The needle position
sensor numbers will change.
Figure 23
Figure 22
Adjusting the Height of the Hopping Foot
There are many reason to adjust the height of the hopping foot. You could be using a thicker batting,
quilting a quilt with thicker seams, or just need a little more clearance. You don’t want the foot to be too
high as that can cause strain on the thread, create agging of the fabric while stitching, or may be too
high if you put a ruler next to it for measuring.
To adjust the height of the hopping foot, use these steps.
Step 1: Lower the needle into the fabric to get the hopping
foot to its lowest position (close to a seam is a good place since
you can then tell how high you need to be to clear the seam).
Step 2: Loosen screw (A) on the side of the hopping foot (B).
See gure 25
Step 3: Move the foot up or down to adjust for your project.
Step 4: While holding the hopping foot where you want it
tighten the screw back down.
Factory setting for this is, with needle down a dime should be
able to pass below the foot and touch the foot as it passes
under. See gure 26
Adjusting the Stroke of the Hopping Foot
Factory setting is in the down position. The reason for
less stroke is for better ability when working with rulers.
Adjustment of stroke is for going over thicker seams.
Step 1: Remove the four (4) screws (A) holding the
cover (B) in place on the front left side of machine.
See gure 27
Step 2: Using a wrench, loosen the bolt (C) on the link
adjusting crank (D) and slide up to increase the stroke
or down to decrease the stroke. See gure 28
Step 3: Use your wrench to tighten the bolt (C)
Step 4: For your safety, replace the cover (B) prior to
use, using the four (4) screws (A)
Figure 28
Figure 27
Figure 26
Figure 25
Page 9
16 | Apprentice Plus User Guide Apprentice Plus User Guide | 17
Routine Cleaning and Oiling
Routine cleaning and oiling is very important to the longevity of your quilting machine. Brush out the
fuzz from around the hook and foot. Change your needle regularly to avoid thread breakage, tension
problems and needle breakage. A worn needle can mean skipped stitches, shredded thread and a
weakening of the needle itself. These things can lead to stitch quality issues.
Lint has a tendency to build up in the bobbin case. A tiny amount of lint can cause poor stitches. Check
the bobbin case each time you change the bobbin to keep it clean. We suggest using a soft bristle brush
to wipe out the bobbin case and the bobbin area. Canned air only blows the lint around. By using a soft
bristle brush, you collect the dust on the brush. Occasionally, place a drop of machine oil on a cotton
swab to wipe out the bobbin case.
Keep your table clean of dust and oil. Clean the bars and carriage deck regularly for smooth movement.
Oiling is extremely important to the longevity of your quilting machine. Failure to oil your machine
regularly can void your warranty.
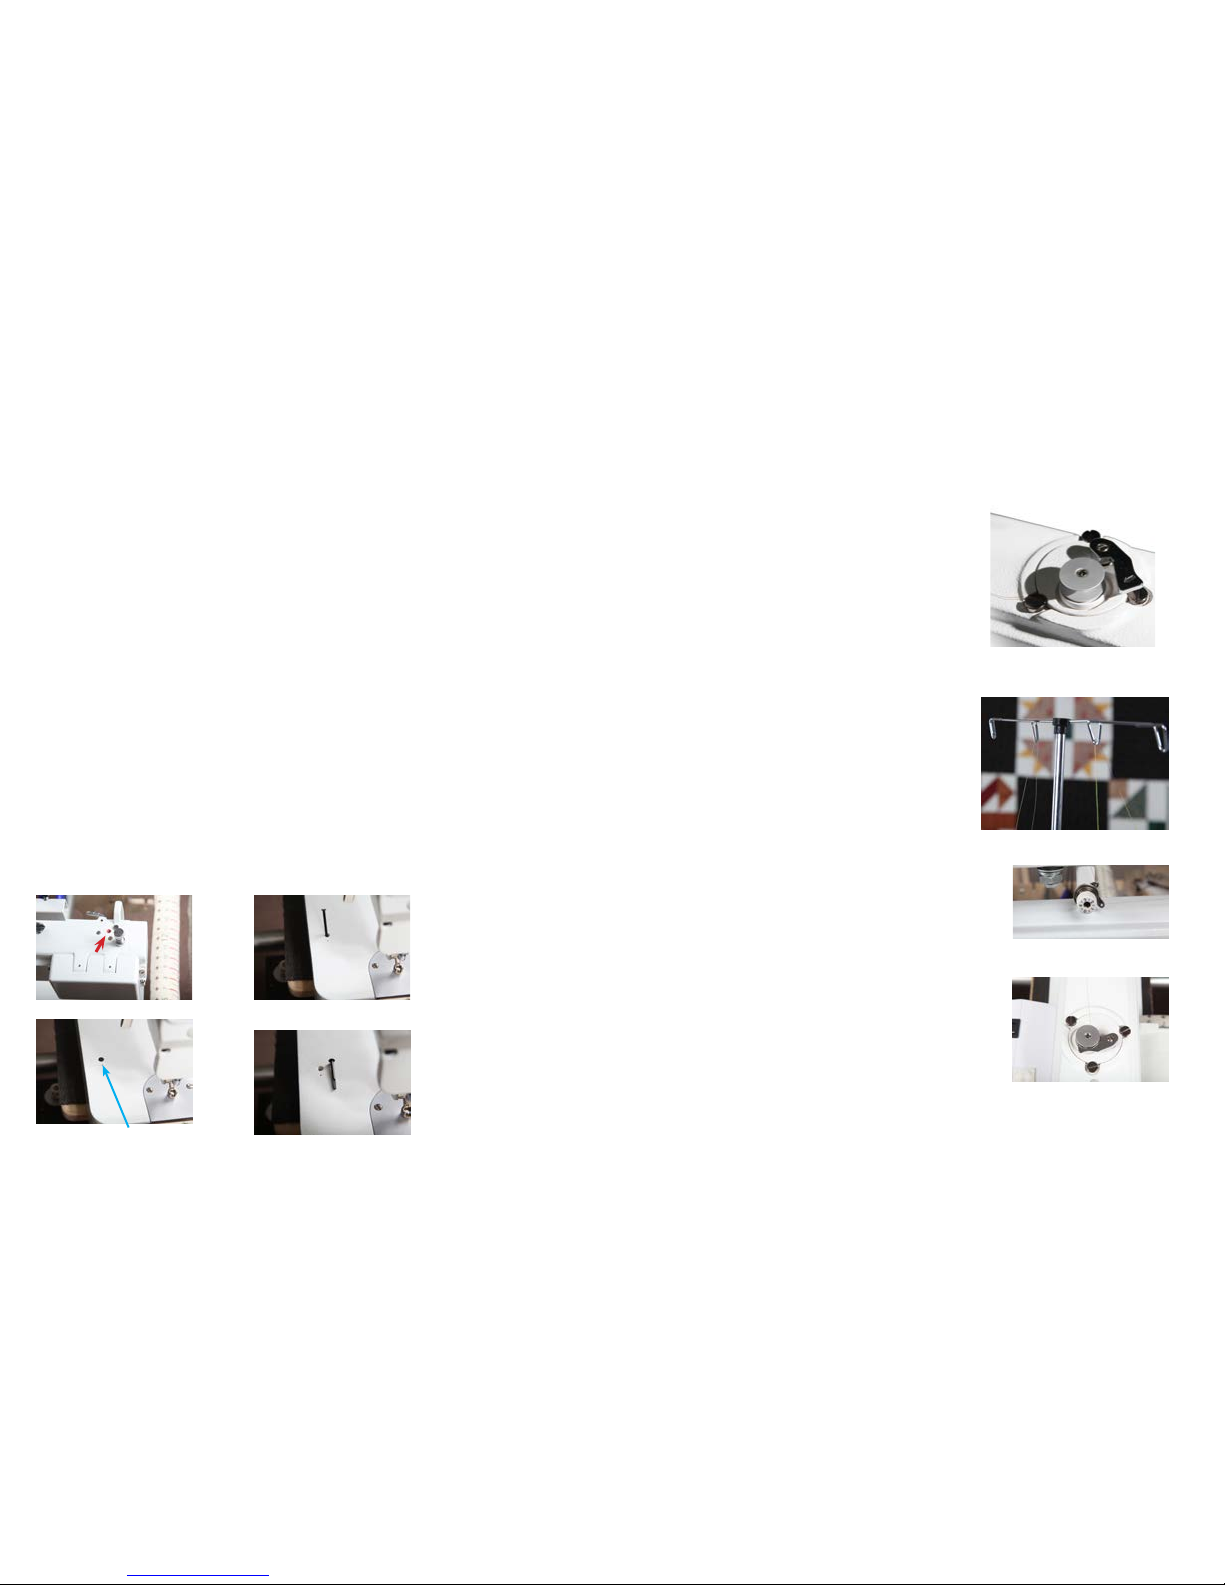
The one oiling spot (marked with red arrow below) is marked with red paint on your machine. An oil
bottle is included with your machine. The one oiling spot (marked with a blue arrow below) contains a dip
stick. Remove the dip stick by lifting it up with a ngernail or screw driver. Place drops of oil in this same
hole if you nd no oil on the dip stick.
Recommended oiling:
After every nished quilt, place three to four drops of oil at the location with a red spot toward the front
(needle side) of the machine. This is located on the top of the machine. See gure 29 The other
location is the oil dip stick found just behind the needle. At this time make sure oil is present on the
dip stick. If not, add three to four drops of oil where you pulled the dip stick out. Run the machine to
lubricate. Use a clear, high grade sewing machine oil.
Note: The machine pictured here is before complete assembly from factory; your machine has more components
attached.
Oil spot on top
Oil reservoir location
Oil dip stick lifted
Oil dip stick out
Figure 32
Figure 31
Figure 30
Figure 29
Bobbin Winder and Bobbins
A bobbin winder is included with your machine. The thread on a properly wound bobbin should be snug
and have even layers of thread. A sloppy or mushy wound bobbin will result in poor stitch quality.
How do I wind a Bobbin?
Step 1: Insert an empty bobbin on the bobbin winder
spindle. See gure 33
Step 2: Place a cone of thread on the holder.
Step 3: Bring the thread up through the guide over the
cone of thread. See gure 34
Step 4: Insert the thread through the top guide hole, then
around the tension disk and through the bottom thread
guide. See gure 35
Step 5: Wrap the thread around the bobbin clockwise
three or four times.
Step 6: Push trip mechanism forward until it snaps into
position. See gure 36
Use step 7 if you plan to quilt while your bobbin is winding.
Use step 8 if you are winding bobbins without quilting.
Step 7: Bobbin winder will start winding the bobbin once
you press the start/stop key. You can quilt while your
bobbin is winding. Once it is full, it will stop.
Step 8: If you wind your bobbin when not quilting, ensure
that you do not have thread in the needle to prevent jams.
Also remove the bobbin and bobbin case to prevent
damage. Select the constant stitch mode, then press
and release the start/stop button. Once the bobbin is full,
press and release the start/stop button again to stop the
machine.
Note: The needle will continue to move up and down
while you are lling the bobbin.
The bobbin will ll until the trip mechanism is pushed out by
the thread. It will then disengage the wheel. The bobbin
should ll to just below the rim. Having the bobbin too full
will cause tension problems.
Figure 35
Figure 34
Figure 33
Figure 36
Page 10
18 | Apprentice Plus User Guide Apprentice Plus User Guide | 19
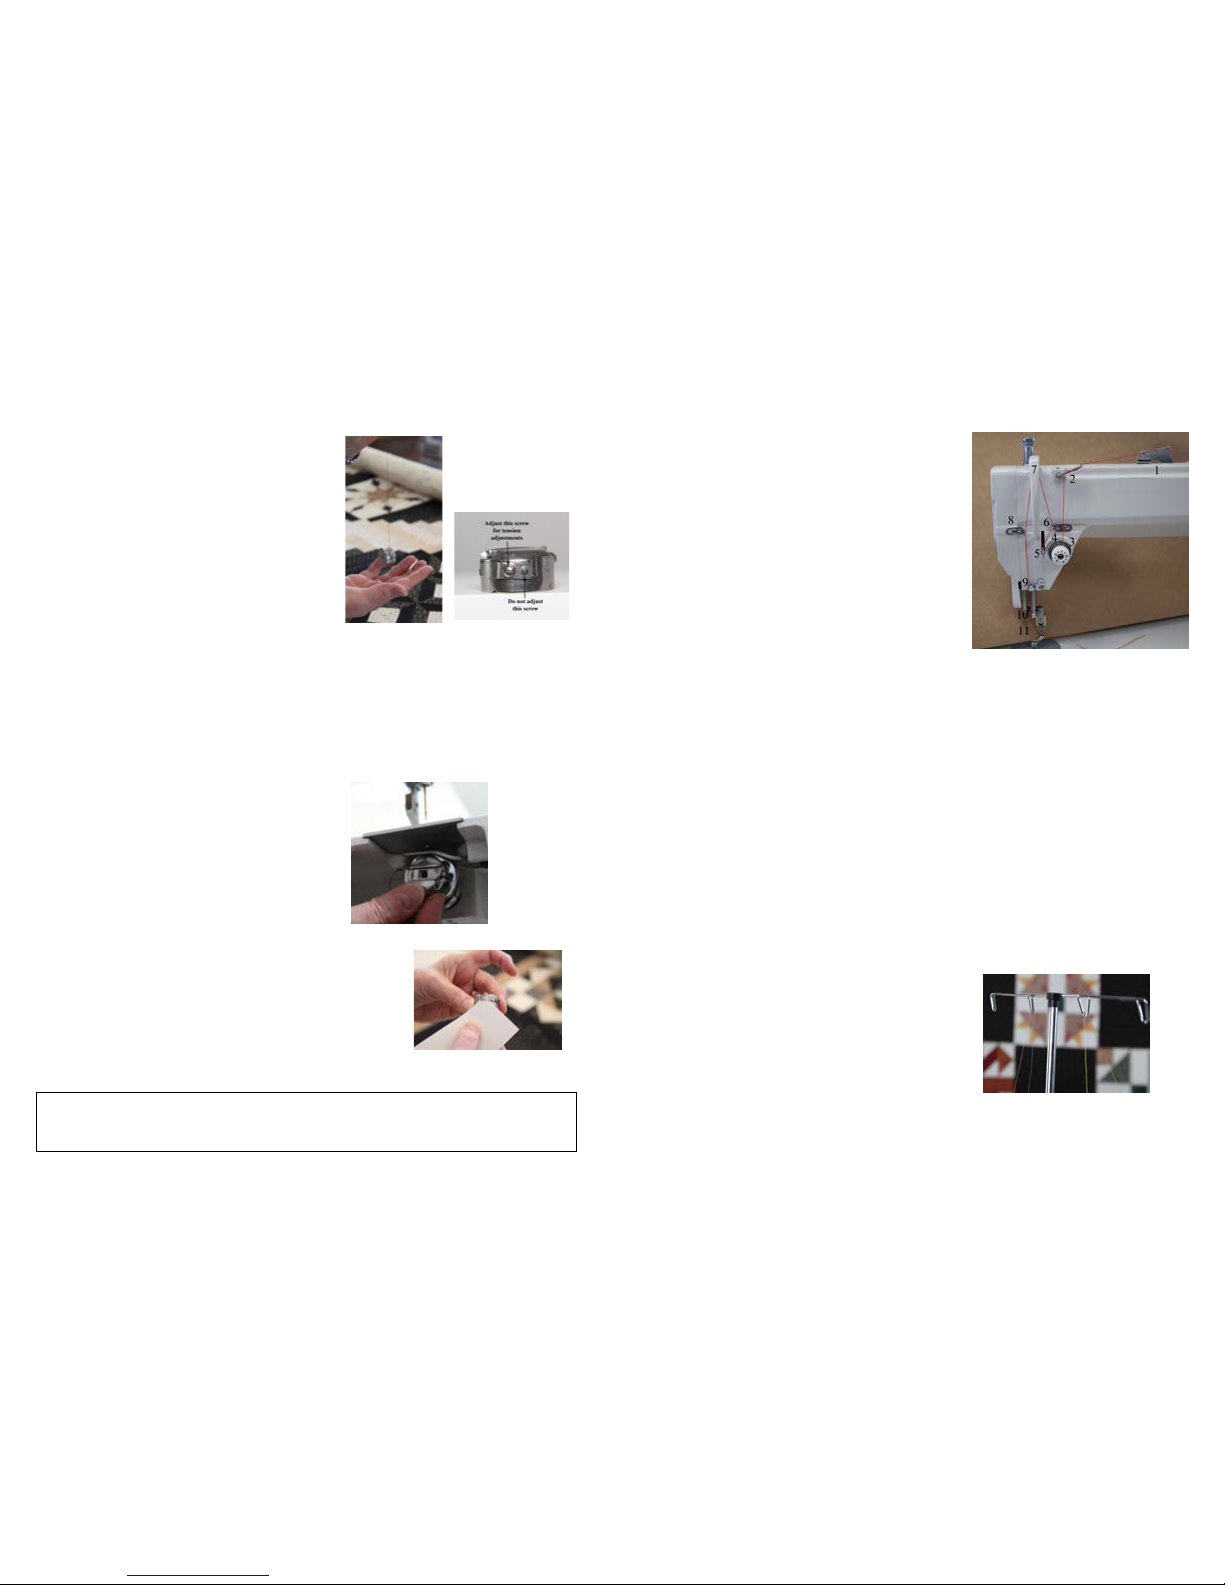
Check the tension of the bobbin by holding the loaded
bobbin case in one hand. With one hand under the
bobbin case, hold the tail of thread and watch as the
thread ows out of the bobbin case. A slight bounce
should cause the bobbin case to slide down the thread.
If the thread slides out of the case as you pick it up, it
needs more tension. If it barely moves down the thread or
doesn’t move at all, it needs less tension. See gure 37
To adjust the tension: See gure 38
Use a small screwdriver to turn the largest set screw
on the bobbin case to adjust tension. Make very small
adjustments. Be very careful not to remove the screw as
it is very small and dicult to nd if lost. Remember, righty
(clockwise) tighty, lefty (counter clockwise) loosey.
To place the bobbin into the machine:
Step 1: Insert the bobbin into the bobbin case. It does
not matter which way you put the bobbin in, but once you
have it one way just keep doing it that way.
Step 2: Holding the bobbin case, pull the thread through
the slot.
Step 3: Draw the thread down and under the spring,
making sure the thread is in the highest position of the
bobbin case.
Step 4: Place the bobbin case in the machine. Always
listen for the pop as it engages in the machine. See
gure 39
We suggest using a soft bristle brush to wipe out the
bobbin case and the bobbin area. Canned air only blows
the lint around. By using the soft bristle brush you collect
the dust on the brush. Use a business or index card to
clean under the tension spring on the bobbin case. See
gure 40
Each day before you start quilting, unthread your machine
past the take up lever and remove the bobbin case. Place
a small drop of oil in the bobbin hook area before you
begin quilting. This will clean out the fuzz and lint. Place a
drop of oil in the bobbin hook area. Turn your machine on
to run at the slowest setting.
TIP: Lint has a tendency to build up in the bobbin case, especially with cotton threads. A tiny
amount of lint can cause a huge headache! Check the bobbin case each time you change a
bobbin to keep it clean.
Figure 40
Figure 39
Figure 38Figure 37
Threading Overview
This is a diagram of the front side of your Apprentice Plus.
This is the side that faces the fabric. The back of your
machine has the electrical outlet and stitch regulator
connectors.
The numbers have been assigned in threading order.
See gure 41
1. Upper Thread Guide
2. Three Hole Thread Guide
3. Tension Assembly Disc
4. Check Spring
5. Silver Angle Bracket
6. Thread Guide
7. Take Up Lever
Threading Your Apprentice Plus
Your Apprentice Plus is capable of sewing with many types of threads. One thing to keep in mind is
this machine is an industrial machine, so very light threads will be harder to use than more traditional
machine quilting threads. Use of the other threads is alright, as long as you adjust the tension and
slow down. These machines are tested with Superior King Tut thread, which has a long staple and is a
machine quilting thread. When we are at quilt shows we use King Tut on top with Sone on the bottom.
The reason for this is two threads of equal size will ride on top of each other and ght to interlock.
When using a smaller thread in the bobbin, you can get more thread on the bobbin and the threads will
interlock faster and with less ghting since the smaller thread will nestle right down into the twist of the
larger thread, creating a better locking of the stitches.
Lets get started threading the machine:
Step 1: Place a cone of thread on the thread
holder.
Step 2: Pull the thread through the eyelet above
the cone of thread. Make sure to use the eyelet
directly above the cone of thread. See gure 42
8. Thread Guide
9. Thread Guide
10. Thread Eyelet Above the Needle
11. Needle
Figure 41
Figure 42
Page 11
20 | Apprentice Plus User Guide Apprentice Plus User Guide | 21
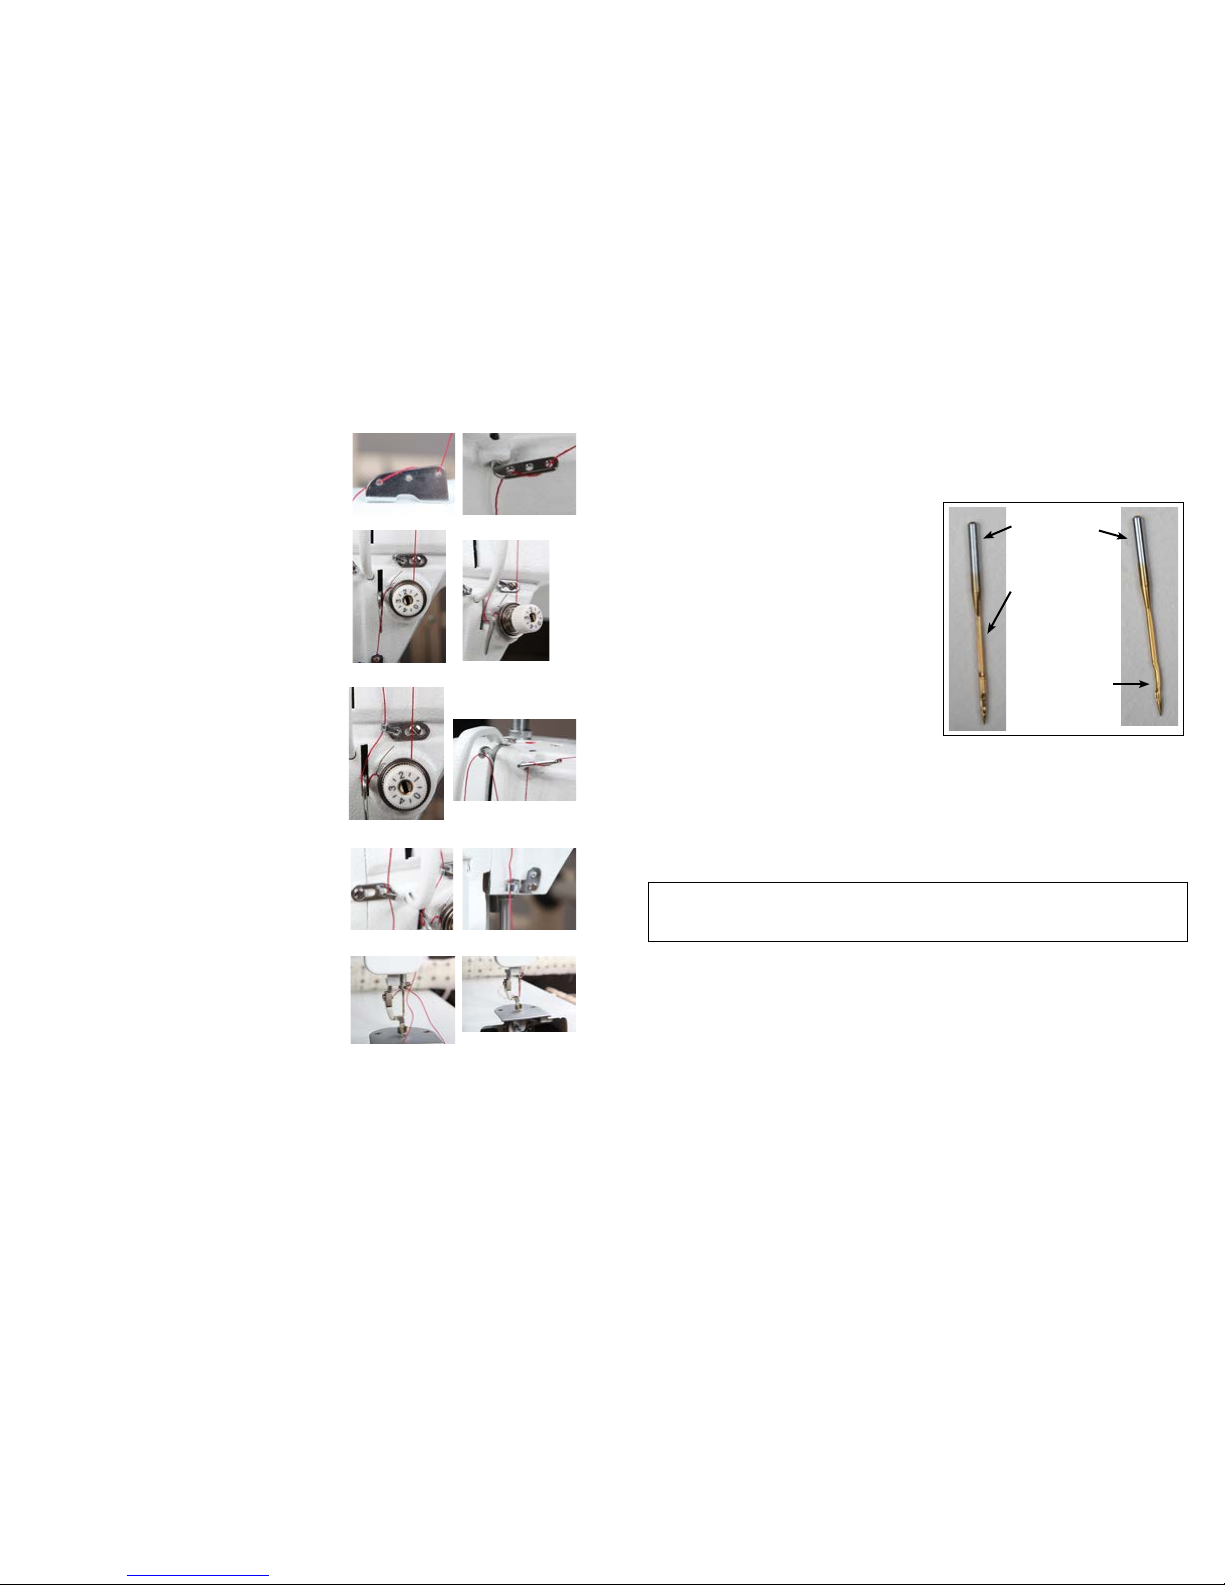
Step 3: Thread the upper thread guide as show in gure
43 (if you use all three holes, it will add drag/tension to the
thread).
Step 4: Weave the thread as shown on the three hole
thread guide. (if you use all three holes it will add drag/
tension to the thread). See gure 44
Step 5: Take the thread between the two tension discs from
back to front all the way around. See gure 45 (Release
the tension on the tension disc using the tension release
lever. This will help to ensure your thread gets between the
disc easier.)
Step 6: While holding the thread up over the top of the
tension, hook the check spring. The tension spring should
come down as you pull thread.
Step 7: Thread now needs to run under the silver angle
bracket. See gure 46
Step 8: Now bring the thread up to the thread guide 6
above the tension assembly. You will be able to slide the
thread into this thread guide. See gure 47
Step 9: The thread will now be threaded through the take
up lever from the back towards the front. See gure 48
Step 10: Now bring the thread down the front of the
machine, snapping the thread into thread guide 8 and
thread guide 9 on the way down to the needle. See gures
49 and 50
Step 11: The thread will now go into the thread eyelet
above the needle. See gure 51 This is a hole, and
you will need to thread this spot. (TIP: Use a dental oss
threader to thread the guide above the needle. The
threader will also help thread the needle.)
Step 12: Thread the needle from the front to the back of
the needle. See gure 52
Figure 50Figure 49
Figure 48
Figure 47
Figure 46
Figure 45
Figure 44
Figure 43
Figure 52
Figure 51
How Do I Change the Needle?
A 134RSAN needle (size 18) will be installed on your Apprentice Plus from the factory. When it is time to
replace the needle, you can easily install one. Be sure the power switch is o. Remove the bobbin case.
To remove the needle, use the smaller screwdriver
included with your machine.
Step 1: Loosen the screw just above the thread
guide on the needle bar; the needle should fall out as
you loosen the screw.
Look closely at the needle. Your home sewing
machine needle shank (top of the needle) has a
at side. The top of the long arm machine needle
is round. On the point end of the needle there is a
scarf, or notch, in one side. The scarf must face
the back of your machine. The long groove at
the eye of the needle faces you as you insert the
needle.
Why does the scarf go to the back of the machine?
When the needle goes down through the fabric into the bobbin case, the hook comes around behind the
needle to pick up the thread. The scarf has to be there to provide a way for the hook to get between the
needle and the thread in order to pick up the thread.
Step 2: Place the new needle up in the slot, making sure the needle is up in the needle bar as far up as
it will go. Make sure the scarf is facing the back of your machine. Tighten the screw on the needle bar
while holding the needle up.
TIP: Use the old needle to hold the new needle in place while you tighten the screw. By placing
the point of the old needle into the eye of the new needle, you can see how straight you are
placing the scarf of the needle.
Before you turn your machine on, go to the back of the machine and turn the hand wheel a complete
turn, making sure the needle goes down in the center of the throat plate and the hook in the bobbin
area rotates with the needle smoothly. Put the needle down as far as possible. In the bobbin area, you
should be able to see the eye of the needle. When the hook rotates, it picks up the thread at the back
of the needle, then the top thread pulls the bobbin thread up to create a stitch. The scarf must face the
back of your machine.
Top of needle is
round, not at like on
your home sewing
maching needles.
Long groove goes to
the front. This is a path
for the thread to follow.
Back of needle has a
scarf. This is where the
hook passes and picks
up the top thread to
create the stitch.
Figure 53
Page 12

22 | Apprentice Plus User Guide Apprentice Plus User Guide | 23
How Do I Make Adjustments to Make the Perfect Stitch?
Understanding how your long arm machine makes a stitch will help you make the proper adjustments to
make the perfect stitch. The technique all long arm machines use to make a stitch is basically opposite
of the home sewing machine. The home sewing machine is designed to press together two layers of
fabric and sew while the fabric is held in place by the presser foot. Long arm machines are designed
to press and sew multiple layers together while the machine head is moving. The dierence is, there is
practically no needle deection on a standard sewing machine, and a large amount of needle deection
on the long arm. The higher the tension, the more the needle will deect. Another cause for the needle
to deect on a standard machine is the type of fabric being sewn. A tightly woven fabric tends to force
the needle in dierent directions as it penetrates the fabric. This type of deection depends greatly on
the type of needle and type of point you use, such as a ball point or sharp point.
What is needle deection? What causes it? And how is needle deection related to the
stitches on my quilt?
On a long arm quilting machine, a stitch is mechanically created the same way as a home sewing
machine, except the quilter is the feeddog moving the machine head over the fabric. The hopping foot
presses the fabric together tighter and more quickly than a home sewing machine presser foot because
the fabric must be able to slide between the foot and the needle plate as the machine is sewing. This
means that the machine is moving while the needle is in the fabric. The worst thing for a needle is to be
in the fabric while the machine is moving which bends the needle, creating needle deection.
Good stitches will interlock in the batting between the quilt top and backing. In real life, this goal is rarely
achieved. For this reason, you need to be aware that you will have “pokies” if you use dierent colors of
thread on top and in the bobbin. Pokies are where you can see tiny dots of the contrasting thread where
the bobbin catches the top thread. If there is slightly more tension on the top than on the bottom, you
will see the pokies on the top side of the quilt. If the greater tension is on the bobbin, you will see the
pokies on the back of the quilt. If the pokies are objectionable to you, use the same color thread on both
top and bottom.
TIP: A general rule of thumb is...if the stitch looks bad on the top, it is the bottom tension. If the
stitch looks bad on the bottom, it is the upper tension. The upper and lower threads play tug of
war with each other.
Tension, Tension, Tension
This probably causes more problems than anything else. You need correct tension on the top and
bottom threads, but you must also have correct tension on the quilt held between the bars. You should
be able to gently rock the belly bar where the backing fabric is attached. This allows enough movement
of your quilt layers for the needle to penetrate and make good stitches.
Before you start making adjustments to your machine, ask yourself, “What changed?” If your machine
was stitching great and all of a sudden it has loopies on the back or puckers, “What changed?” Did you
just change the bobbin? Did you just lift the take up bar? Did you lower the take up bar after nishing
your last quilt? Did you recently change the needle? Did you just roll the quilt?
If the take up bar with the quilted portion of your quilt is too high, it will result in poor stitch quality. You
need a ngertip space between the quilt and the machine bed. Higher will result in poor stitch quality.
Lower and the quilt will create a drag on your machine’s movement.
Look at your bobbin. A sloppy wound bobbin will not create a good stitch. Make sure that the threads
on the bobbin are snug and evenly wound. Check to see if there is a piece of lint in the bobbin case.
Tension Troubleshooting Checklist
• Is the side tension lever down?
• Have I oiled my machine regularly?
• Is the quilt too tight on the frame?
• Is the thread coming o the cone freely?
• Has your thread jumped out of the tension discs?
• Check your threading. Has anything been missed, or has the thread ipped itself around something,
increasing your tension?
• Is the hopping foot too high or too low?
• Is your take up bar too high? Did you lower the take up bar after your last quilt?
• Do you need to change your needle?
• Is your needle in properly?
Top Thread Breaking
• Check to see that your thread is coming o the spool freely, and the thread guide is centered over the
spool and has not developed any burrs or catches.
• Check to see if the thread has looped itself around the spool pin.
• Check to see if the needle is in correctly, with the scarf facing the back of the machine.
• Have you recently changed the needle? Is it as high as it will go in the needle bar?
The Stitch Regulator does not keep up with me
Just like driving your car, you need to make controlled starts and stops, practice being consistent in your
movements.
Eyelashes
Eyelashes on the back of the quilt can be caused by too little top tension. Turn the thread tension disk
clockwise ¼ turn. Make small adjustments. Repeat until stitch quality is good. Remember the upper
and lower thread play tug of war with each other.
Loose Top Stitch
• Is the tension lever handle down? It lowers the hopping foot and applies the tension disk.
• Is the bobbin thread inserted in the slot of the bobbin case?
• Adjust the tension disk small turns clockwise. Repeat until stitch quality is good.
Page 13
24 | Apprentice Plus User Guide Apprentice Plus User Guide | 25
Quilt Top Puckers
Is your backing fabric stretched too tight? While the backing fabric needs to lie at and without wrinkles,
stretching it too tight can make the quilt top pucker. After stitching and releasing the backing fabric, the
top will pucker.
The top tension is too tight. Adjust the tension disc small turns counter clockwise. Repeat until stitch
quality is good.
Stitches are Skipped
Skipped stitches leave needle holes without thread while large and small stitches in regulated mode
means the encoders are not picking up the signal of your movements because of lint or thread stopping
or slowing the reading.
First, check to see that your machine is threaded correctly. Look at the check spring. Does the thread
lay in the check spring? When properly threaded, the check spring will move up and down as the
machine is stitching, and the thread is owing freely.
Check the needle. Be sure it is all the way up into the shaft and the scarf is toward the back. If it has
been used for some time, replace the needle. A blunt needle will make a popping sound as it penetrates
the quilt sandwich.
Machine Drags Making it Dicult to Move
Check to make sure the quilt on the take up bar is not dragging on the bed of the machine. A ngertip
distance between the take up bar and the bed of the machine is all that is necessary. Elevating the take
up bar too high can cause loopies on the back. Look for lint or thread that might be snagging as you
move the machine.
Dicult to Control the Movement of the Machine
Check for lint or other debris on the track and bars. Sometimes the smallest pieces of thread create the
biggest headaches.
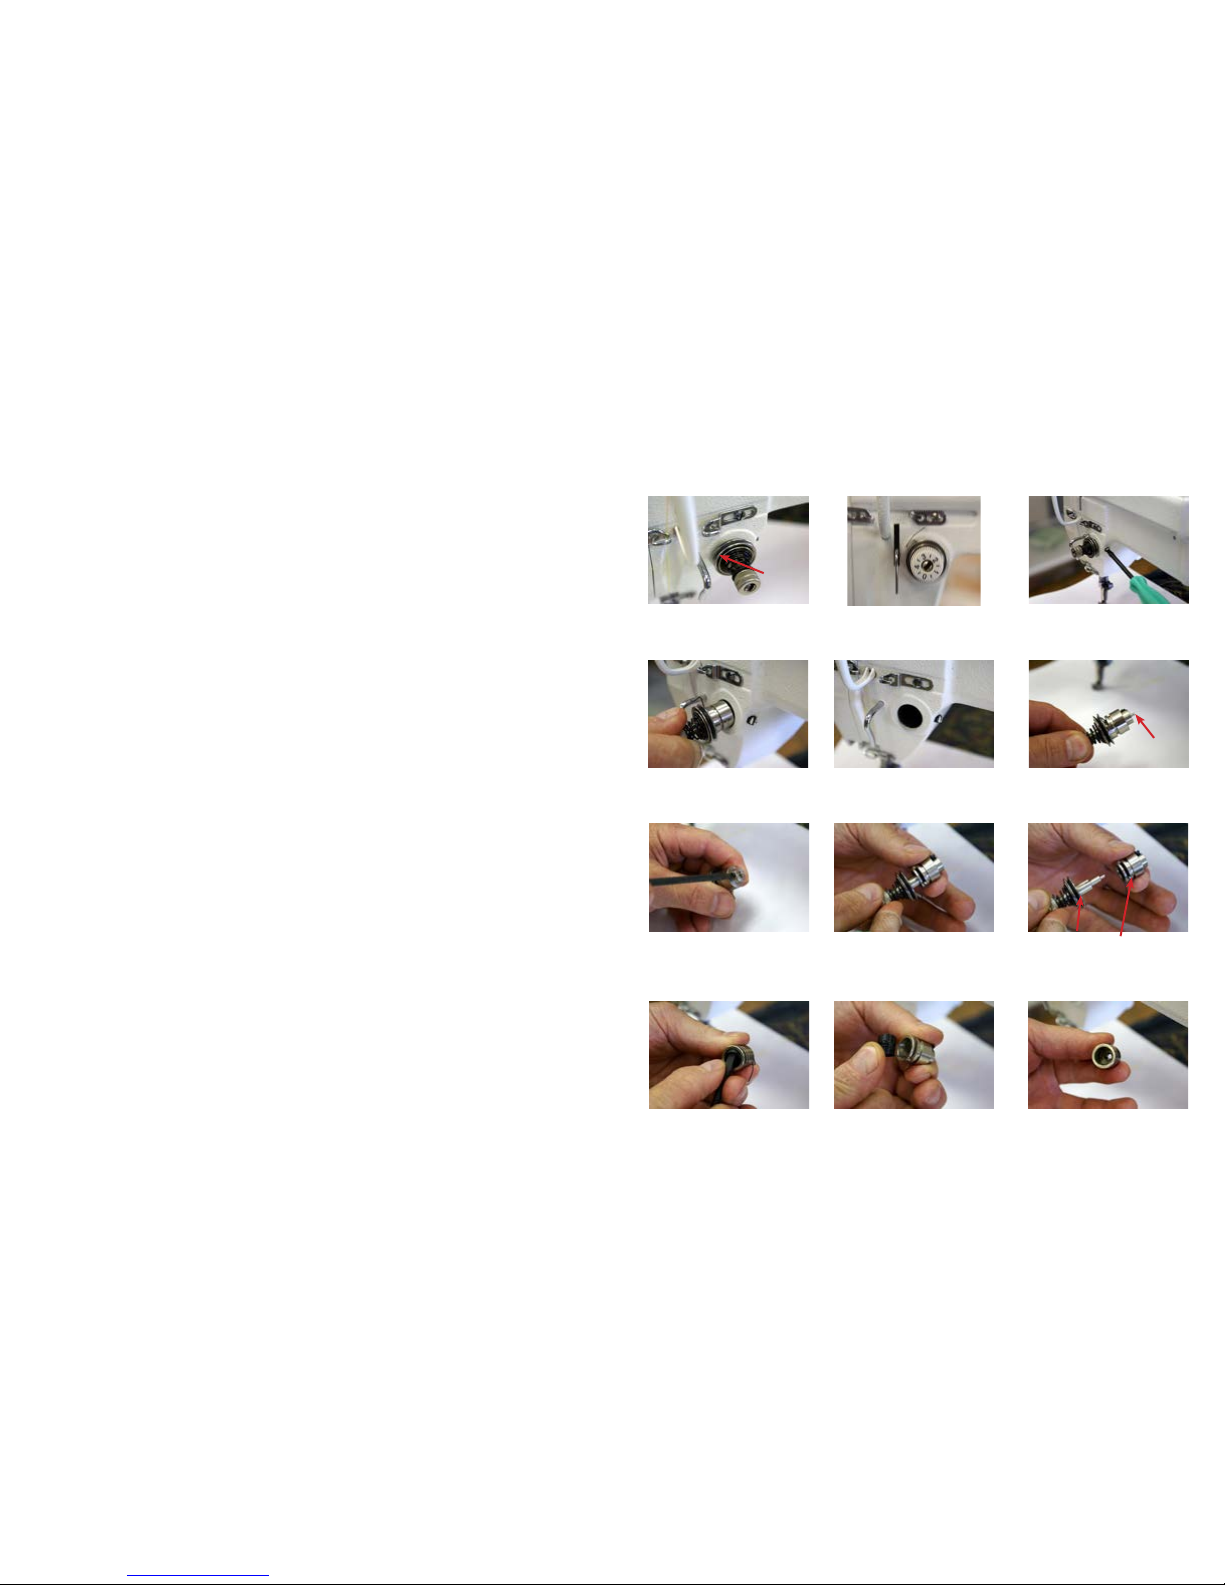
Check Spring Replacement/Tension Knob
From time to time you may need to replace the check spring. We will use a series of photos to help you.
Tension Assembly with broken
spring. (old tension knob)
Screw on inside of machine. Loosen
only. DO NOT REMOVE
Remove assembly from machine.
Be careful of release pin.
Machine with tension assembly
removed.
Tension assembly out of machine.
DO NOT LOSE PIN
PIN
Broken
Spring
Loosen screw only.
DO NOT REMOVE
Remove tension assembly from
barrel.
Tension assembly and barrel.
Remove spring. Spring removal. Spring removed.
Tension Assembly with good
spring. (new tension knob)
Figure 54
Figure 56
Figure 55
Figure 59Figure 58Figure 57
Figure 63 Figure 64 Figure 65
Figure 62Figure 61Figure 60
Page 14
26 | Apprentice Plus User Guide Apprentice Plus User Guide | 27
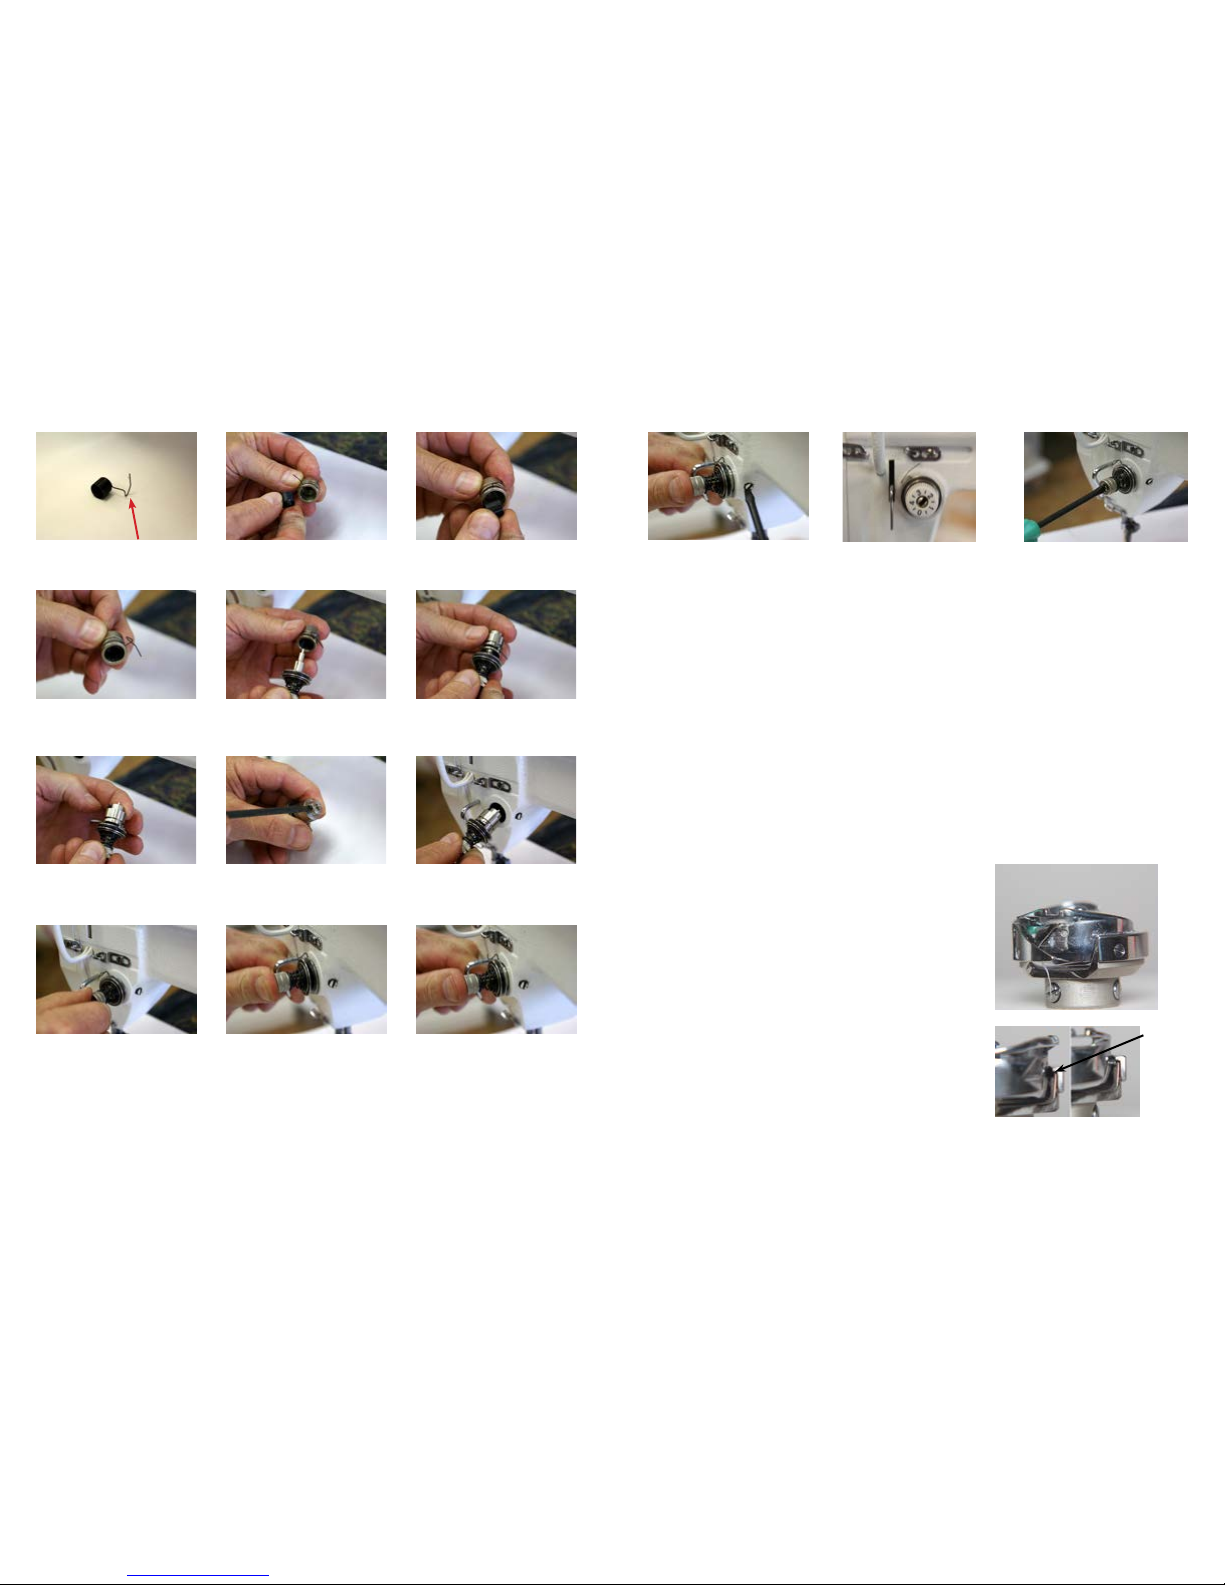
New spring, This tail is what was
broken.
Insert the new spring. Twist while inserting the new spring.
New spring in place.
Insert the tension assembly back into
the barrel. REMEMBER DO NOT
LOSE THE PIN
Insure that you are all the way in.
Give the tension assembly a twist
until you feel resistance on the check
spring.
Tighten screw. Make sure the pin is
still there.
Place the assembly back into your
machine.
Once in, ensure that your check
spring is at 11:00.
Press in and notice the tension disk
opens.
Release and the disk will close; this
is the proper place for your tension
assembly.
Figure 74Figure 73
Figure 72
Figure 71Figure 70Figure 69
Figure 68Figure 67Figure 66
Figure 77Figure 76Figure 75
Tighten screw on your machine. Tension assembly back in
place with new check spring
at 11:00.
For ne adjustment of check spring
insert screwdriver. Turn clockwise for
more tension.
Machine will not sew. I cannot turn the hand wheel.
No matter how hard you try to keep the bobbin area free of loose threads
and lint, we will sometimes get a jam. Most jams start with the needle
down as the jam is due to something getting into the bobbin race. The
bobbin race is a part of the bobbin hook which keep the hook rotating smoothly with no wandering as it rotates. Don’t panic. This can be
cleared. It just takes a little work.
Step 1: Turn the power o.
Step 2: Remove the belt guard so you can get a good grip on
the hand wheel. See page 11 for instructions.
Normal sew rotation if you are standing at the back of the
machine looking at the hand wheel is counter clockwise. If you
turn the machine counter clockwise you will force whatever is
jamming the machine deeper into the bobbin race.
Step 3: Rotate the hand wheel clockwise to back the jam out
of the bobbin race. (This may take some eort to get it worked
free.)
Step 4: Normally when you get it backed up, it will fall out and
you will be able to make a full rotation with the hand wheel.
Once it feels free, take the needle plate o the machine and give
the bobbin area a good cleaning. Prior to putting the needle
plate back on, rotate the hand wheel counter clockwise (normal
machine rotation).
While rotating the hand wheel by hand, ensure that you have
free movement of the machine. If everything is working well, you
can put the needle plate back on and put the belt guard back
on. You will be ready to start quilting again.
Figure 81 shows thread caught.
Figure 82 show the race.
The Race
is this
small
space
here on
the hook
assembly.
Figure 79 Figure 80Figure 78
Figure 82
Figure 81
Page 15
28 | Apprentice Plus User Guide Apprentice Plus User Guide | 29
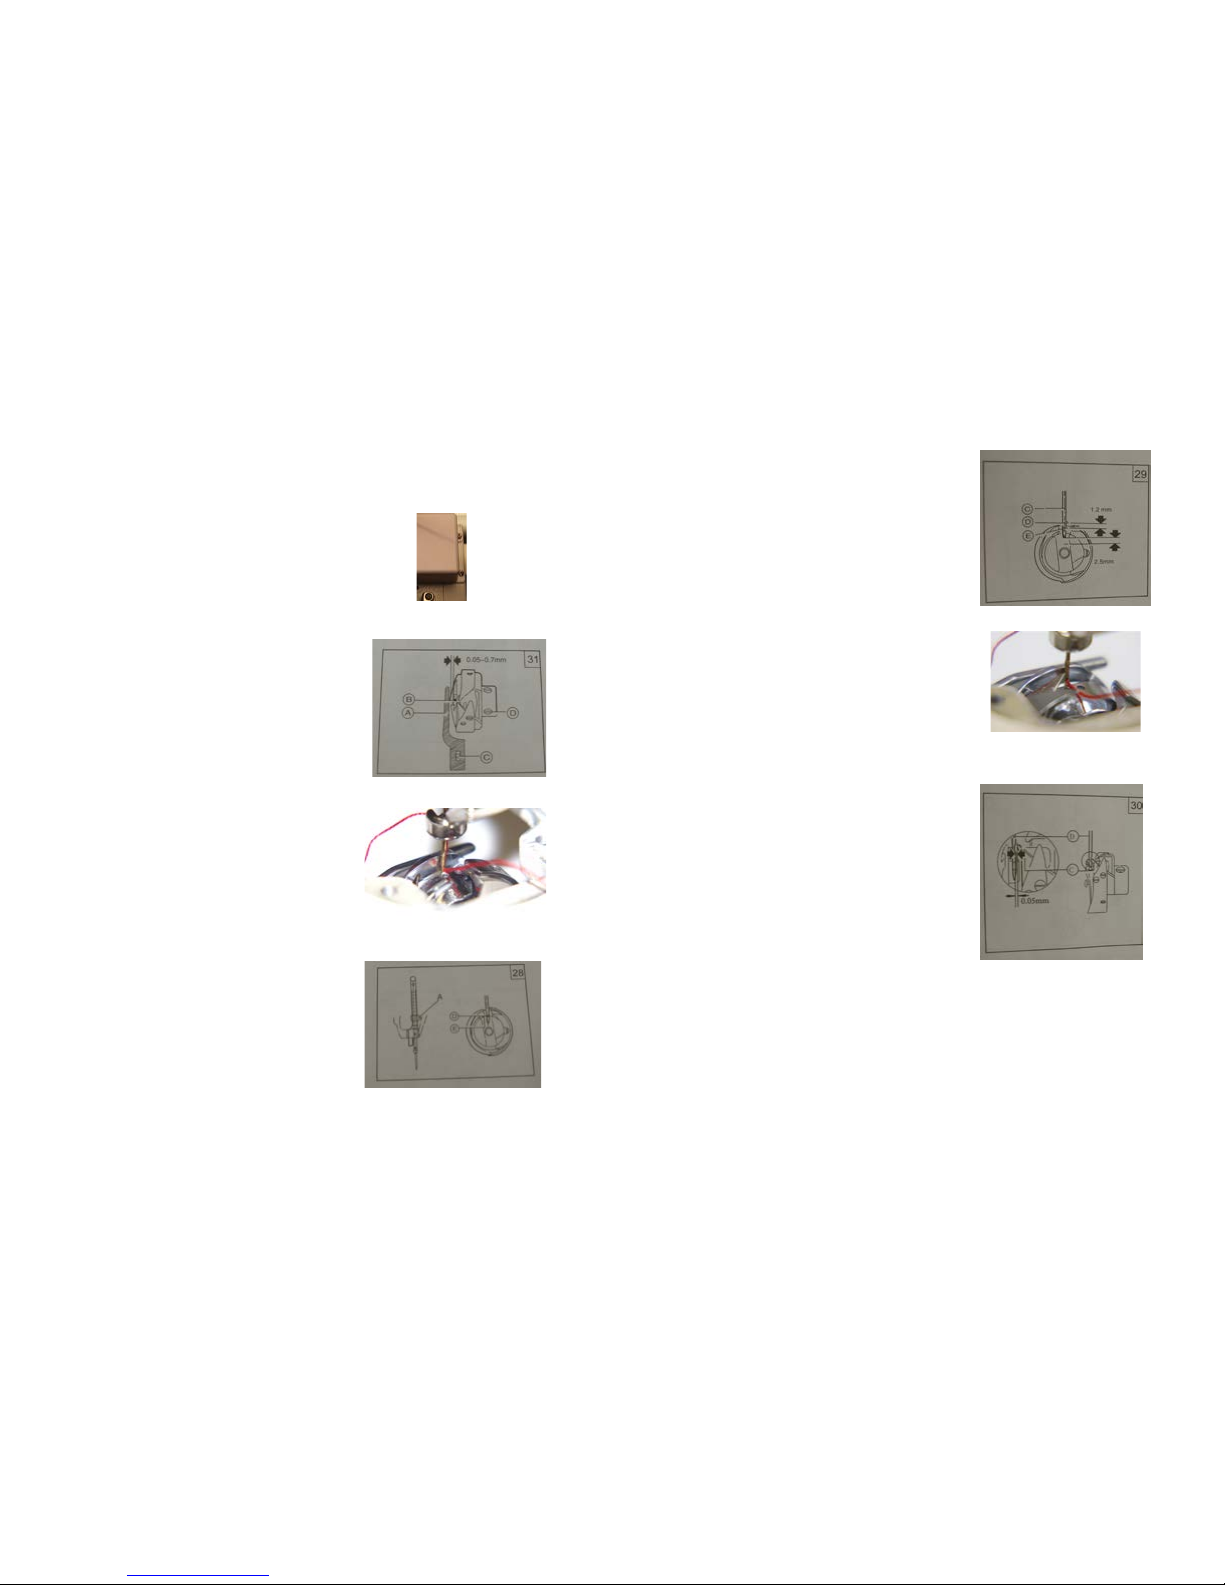
Timing Between Needle and Rotating Hook
Follow these steps to help get the proper timing on your machine.
Step 1: Remove the two needle plate screws from
your machine and set the needle plate to the side.
Step 2: Remove the two screws on the protection
cover at attach it to the face plate of the machine.
See gure 83
Step 3: Remove the three screws holding the face
plate to the machine. Remove the face plate and set
this part aside.
Step 4: Check the protection ange of the position
bracket (A). This should be engaged in the notch (B)
of the bobbin case holder. (D) in the drawing shows
the set screw to adjust hook timing. See gure 84
Step 5: Turn the hand wheel to locate the needle to
its lowest position. Note: Correct needle position is
when you can see a small portion of the eye of the
needle. See gure 85
Step 6: If the needle is not stopping in the correct
position, you will need to proceed to the next step. If
it is in the correct position, move to step 9.
Step 7: Loosen needle bar connecting screw (A).
This will allow you to raise and lower the needle bar
for correct location. Note: Check all photos before
making any adjustments See gure 86
Step 8: Once you have the needle in the correct
location, tighten needle bar connecting screw (A) to
prevent the needle bar from moving out of position.
Adjusting rotating hook point timing with needle.
Step 9: Turn the hand wheel counter clockwise to
locate needle to its lowest position.
Step 10: At lowest position, turn the hand wheel to
raise the needle 2.5 mm (1/8”) See gure 86
Step 11: Hook point should be just above eye of the
needle. See gure 88
Figure 86
Figure 85
Figure 84
Figure 83
Step 12: If the hook point is in the correct
position then move to step 18. If the hook point
is past this point or not yet reached this position
then you will need to follow the next few steps
to adjust the hook so that when the hook point
reaches this position it is just above the eye of the
needle. Proceed to the next step.
Step 13: See gure 84 for position of the three
screws (D). Loosen the three screws holding the
hook assembly to the shaft. (Note you will have to
rotate the hand wheel to get to all three screws.)
Step 14: With the hook loose, reposition the
needle to the lowest position. Rotate the hand
wheel counter clockwise to bring the needle up
2.5mm (1/8”) See gure 87
Step 15: Now rotate the hook so that the point
of the hook is just at the edge of the needle. See
gure 88
Step 16: Lock one screw holding the hook into
this position.
Step 17: Rock the hand wheel back and forth to
ensure that you have the hook in the right position
to pass the back of the needle just above the eye
of the needle.
Step 18: When adjusting the rotating hook point
timing also note that clearance between notch
bottom of needle (D) and hook point (C) must be
maintained. HOOK CAN NOT RUB AGAINST
NEEDLE.
Step 19: Once you feel like everything is in the
right place tighten all screws you loosened.
Step 20: Return all covers and screws back into
place on your machine.
Figure 87
Figure 88
Figure 89
Page 16
30 | Apprentice Plus User Guide Apprentice Plus User Guide | 31
Adjusting the Bobbin Winder Lever
(amount of ll on the bobbin)
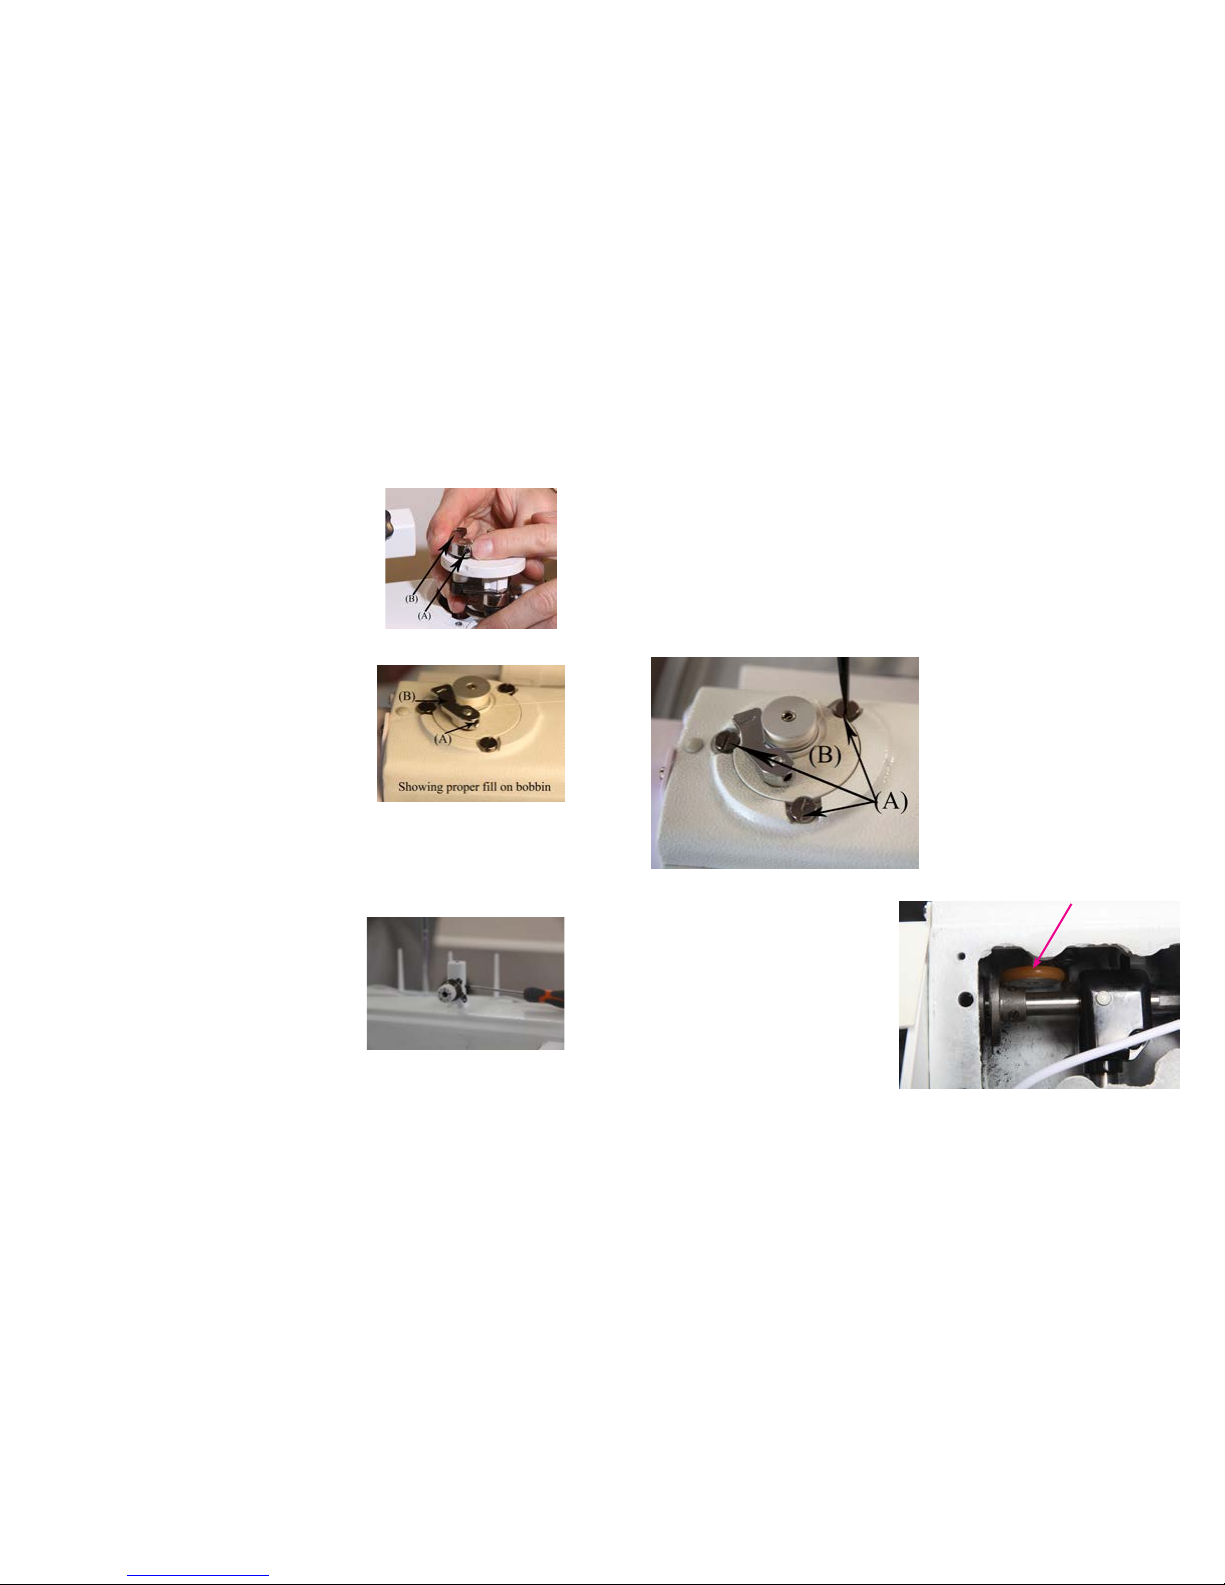
Step 1: Using your allen wrench, loosen the set screw (A)
holding the bobbin winder lever (B) in place. See gures 90
and 91 Note: You do not need to pull the bobbin winder out
to adjust this setting.
Step 2: Move the bobbin winder lever in for less ll and out
for more ll.
Step 3: Tighten set screw (A) to prevent bobbin winder lever
(B) from moving.
Adjusting the Tension Assembly Thread Guides for Proper Fill
Step 1: Loosen the set screw (D) so that you can adjust the
tension assembly thread guides (E). Adjust tension assembly
thread guides (E) up and down until bobbin lls evenly top to
bottom. See gure 92
Step 2: Tighten the set screw.
Figure 92
Figure 91
Figure 90
D
E
Adjusting Bobbin Winder and Contact with the Shaft
Step 1: Loosen the three (3) screws (A) holding the bobbin winder in place but do not remove them.
See gure 93
Step 2: Twist the bobbin winder (B) to the right for more contact with the inner shaft or move left for less
contact.
Note: When twisting the bobbin winder (B) you need to stand on the side of the machine with the access panel.
Step 3: The bobbin winder disk with the friction ring needs to contact the disk on the upper shaft when
engaged. See gure 94
Step 4: Once done moving the bobbin winder, retighten the screws to hold the bobbin winder in place.
Turning the bobbin winder to the right
will move the friction wheel closer.
Turning the bobbin winder to the left
will move the friction wheel away.
Friction Ring
Figure 94
Figure 93
 Loading...