

Tim Sistem rittium 7 Owner's Manual
RITTIUM 7 pellet stove
Owner’s manual
INSTALATION, OPERATING AND MAINTENANCE INSTRUCTION
Available in ceramic and metal sheet version.
* * * ceramic top plate version
EN 14785:2006


1.
1.1
2.
3.
4.
5.
6.
6.1
6.2
7.
7.1
7.2
8.
8.1
8.2
8.3
8.3.1
8.3.2
8.3.3
8.3.4
8.4
8.5
8.6
8.7
8.8
8.9
9.
10.
11.
12.
CONTENTS
About pellet . . . . . . . . . . . . . . . . . . . . . . . . . . . . . . . . . . . . . . .
Quality of pellet . . . . . . . . . . . . . . . . . . . . . . . . . . . . . . . . . . . .
REMARKS BEFORE OPERATING THE STOVE . . . . . . . . . .
TECHNICAL SPECIFICATIONS . . . . . . . . . . . . . . . . . . . . . . .
BASIC FEATURES OF THE STOVE . . . . . . . . . . . . . . . . . . .
INSTALATION OF THE STOVE . . . . . . . . . . . . . . . . . . . . . . .
DISPLAY AND REMOTE CONTROL . . . . . . . . . . . . . . . . . . .
Symbols of basic elements of the stove . . . . . . . . . . . . . . . . .
Remote control . . . . . . . . . . . . . . . . . . . . . . . . . . . . . . . . . . . .
USE OF THE STOVE . . . . . . . . . . . . . . . . . . . . . . . . . . . . . . .
Turning on and turning off the stove . . . . . . . . . . . . . . . . . . .
Temperature and mode settings . . . . . . . . . . . . . . . . . . . . . . .
SETTINGS . . . . . . . . . . . . . . . . . . . . . . . . . . . . . . . . . . . . . . .
Blower settings (optional) . . . . . . . . . . . . . . . . . . . . . . . . . . . .
Clock settings . . . . . . . . . . . . . . . . . . . . . . . . . . . . . . . . . . . . .
Timer settings . . . . . . . . . . . . . . . . . . . . . . . . . . . . . . . . . . . . .
How to turn the timer on . . . . . . . . . . . . . . . . . . . . . . . . . . . . .
Daily programmer . . . . . . . . . . . . . . . . . . . . . . . . . . . . . . . . . .
Weekly programmer. . . . . . . . . . . . . . . . . . . . . . . . . . . . . . . . .
Weekend programmer . . . . . . . . . . . . . . . . . . . . . . . . . . . . . . .
Language settings . . . . . . . . . . . . . . . . . . . . . . . . . . . . . . . . . .
STAND-BY mode. . . . . . . . . . . . . . . . . . . . . . . . . . . . . . . . . . .
Sound-alerts . . . . . . . . . . . . . . . . . . . . . . . . . . . . . . . . . . . . . . .
Initial pellet loading . . . . . . . . . . . . . . . . . . . . . . . . . . . . . . . . .
Operation. . . . . . . . . . . . . . . . . . . . . . . . . . . . . . . . . . . . . . . . . .
Technical settings . . . . . . . . . . . . . . . . . . . . . . . . . . . . . . . . . .
OPERATION INFO . . . . . . . . . . . . . . . . . . . . . . . . . . . . . . . . .
POTENTIAL ERRORS IN OPERATION . . . . . . . . . . . . . . . . . .
CLEANING AND MAINTAINANCE. . . . . . . . . . . . . . . . . . . . . .
WARRANTY . . . . . . . . . . . . . . . . . . . . . . . . . . . . . . . . . . . . . . .
ENCLOSURE. . . . . . . . . . . . . . . . . . . . . . . . . . . . . . . . . . . . . . .
4
4
5
6
7
8
10
10
11
13
13
14
15
15
16
17
17
18
20
23
25
26
27
27
28
29
30
31
35
36
3

1. ABOUT PELLET
Pellet is an energy fuel with high energy efficiency, which is produced in special
technological process of milling, drying and pressing of various materials of biological
origin. As raw materials for its production can be used wood from forestry waste,
firewood, sawdust and other wood waste (wood pellets); the straw of wheat and
soybeans, corn and sunflower husks (agro pellets).
Nowadays, when the accent has been put on environmental protection and
sustainable development, fuels produced from biomass are increasingly gaining in
importance.
Using pellets as a fuel material has multiple advantages either for the
environment or, at the first place, for a customer itself:
•
Using one ton of pellets, for the same heating quantity, replaces 500 liters
of heating oil, or 450 kg of propane-butane, or 600 cubic feet of natural
gas, or 4800 kilowatt-hours of electricity;
It significantly reduces emission of harmful gases, such as: carbon
dioxide, sulfur dioxide and mercury, and the burning leaves only 0.5 - 1%
of ash;
Wood pellet is made of 100% natural materials and contains no added
binders, chemicals or additives;
Compared with other fuels or using electricity, the use of pellets is much
more cost-effective;
Pellet takes up far less space than coal and firewood.
• • • 1.1 Quality of pellet
The quality of pellets is of great importance for the stove. If the pellet is
substandard and inadequate in size, it can bring to a poor performance of the stove.
Here are some advices on how to choose and store pellets:
•
•
•
•
•
• • •
diameter of the pellets should be 6 mm and length about 30 mm;
use only wood pellets;
pellet should be cylindrical;
good quality pellet should quickly sink when thrown into a glass of water;
pellet is not adequate when in a bag of pellets you find a lot of dust or friable;
a pack of pellets should be hermetically sealed, because pellets absorbed
humidity;
humidity must be less than 10%;
pellets are supposed to be stored in dry, well ventilated room, out of the reach
of flammable elements or devices which during operation create a high
temperature
4

2. REMARKS BEFORE OPERATING THE STOVE
Always follow the references given in this chapter. The manufacturer doesn’t
take a responsibility for consequences in opposite cases. Not respecting the
instructions of use and maintenance, you lose your right to a warranty.
•
•
•
•
•
• • • • •
before operating the stove, please read this manual;
stove is used exclusively for heating;
keep the stove away from flammable materials;
keep the stove in dry places;
keep the children or pets away from the stove, because some parts emits
high temperatures and they can cause burns;
do not touch the parts that emit a high temperature, such as smoke drain,
glass, fire door, the side;
for heating use only a pellet which was originally made of wood;
stove should be cleaned only when it is cold (the stove is completely cooled
after 30 minutes after turning off the stove);
stove should be cleaned only when it is disconnected from the power source
on the main switch (Chapter: basic parts of the stove);
in the room where stove is placed, it is necessary to ensure a permanent
supply of fresh air;
stove must be installed in accordance with these manual (Section: stove
installation)
Stove and its packaging are made of materials that can be recycled. Stove,
which is not in use any more, should be put away in an adequate place or else you
should call the service for waste disposal. You must act according to a regulation in
force in the country where the stove is placed.
For any defect you need to call a qualified technician. All defects must be
removed by an authorized service technician. In case that an unauthorized person
repairs a stove, you will automatically lose a warranty and any further repairs by an
authorized service will be charged.
NOTE: Each stove before packing requires the operation and safety control;
therefore it’s possible to find some burning remains in the firebox. It is also
possible to find a small amount of pellets in the store.
During the first firing can occur some paint burning, therefore it’s
recommended to ventilate the room well after.
5

Power
kW
6 kW
8 kW
10 kW
Dimension (W x L x H)
mm
523 x 603 x 1041
Weight
kg
127
Fuel (dimension)
wood pellet (6 mm L30 mm)
Smoke drain
mm
80
Draft
Pa
12±2
Capacity of a storage
kg
19
Voltage V 230 ± 15%
Frequency
Hz
50
Electrical power during the operation
W
55 - 160 *
Electrical power during the initialization
W
400 - 450 **
Maximal efficiency
%
87,6
Minimal power
kW
2,87
Nominal use of pellet
kg
1,5
1,9
2,4
Minimal use of pellet
kg
0,8
CO emission reduced on 13%
%
0,0133
Maximal exhaust gas temperature
o
C
148
Dust content
mg/m
3
45,4
Operating temperature
o
C
5 - 60
Storage temperature
o
C
-10 - 60
Max. relative humidity (with no condensation)
%
95
* depending of which fan is on, as well as the motor reducer
** lighter and emissions fan is on (400W), while an motor reducer is occasionally getting on
3. TECHNICAL CHARACTERISTICS
Table 1. contains the technical characteristics
Table 1.
6

4. BASIC FEATURES OF THE STOVE
Image 2. Basic features
1. Firebox doors
2. Door handle
3. Door glass
4. Ashtray door
5. Ashtray
6. Combustion pot
7. Front lateral
8. Rear lateral
9. Upper cover
10. Display with commands
11. Storage cover
12. Storage
13. Upper ceramic plate
14. Back side
15. Smoke drain
16. Primary air
17. Main switch
18. Communication port (RS232)
19. Socket
20. Safety thermostat
7

5. INSTALATION OF THE STOVE
With a stove you will get the user’s manual, remote control and power cable.
These accessories , included with the stove are presented on an Image 3.
Image 3. Included accessories
Before you start installation of the stove , you must read carefully instructions for use
and maintenance, get to know well a regional regulations and legislation, in order to
apply them. You must provide enough air in the room where the stove is placed in
order to provide an optimal combustion.
Place the stove as close as possible to a smoke drain, where is also a power
connection. The stove should be away from any possible obstacles, like presented in
Image 4.
Image 4.
Optimal distance
8

Stove should be set 300 mm away from the obstacle on its sides, 300 mm from
the back side, while the front side should be at least 800mm away from obstacles. Do
not place any objects on the stove, because they could be damaged by a high
temperatures that the stove emits.
Under the stove can be set some sheet metal or a thicker glass of, minimal
dimensions 700 x 800 mm, in a way that the front part is longer than the stove itself.
The stove stands on adjustable feet which must be set so that the stove is
stable. Feet are being adjusted by simple unscrewing or twisting.
It is necessary and sufficient to provide sufficient air supplies to the chimney so
that the stove could to function smoothly. The easiest way to check whether the
chimney is working well is to get close to a smoke drain a lighter or a candle flame. If
the flame is vertical as it was before, away from the chimney, then you should check
whether the chimney needs to be cleaned, or is there some other problem in
between. If the flame sways toward the mouth of the chimney, there is quite sufficient
air movement. All irregularities in the functioning of the chimney must be removed
before initializing the stove.
When connecting the stove with smoke drain and flue tubes, check carefully if
all connections are well sealed, so that gases do not to enter the room where the
stove is located. Flue pipe must not be too drawn into the chimney.
With the stove you get and the power cord. Stove is connected to the power
source voltage of 230V and 50Hz. Stove must be connected only to the required
socket. Image 5 shows how the stove is connected to a power source. Before
plugging in the cable, check if the main switch is set to the position 0.Note that the
power cord is not damaged. Cable must be disconnected from the heat source. First,
turn the cable into the stove to the required space and then into a power socket.
Image 5. Connecting the stove to power source
9
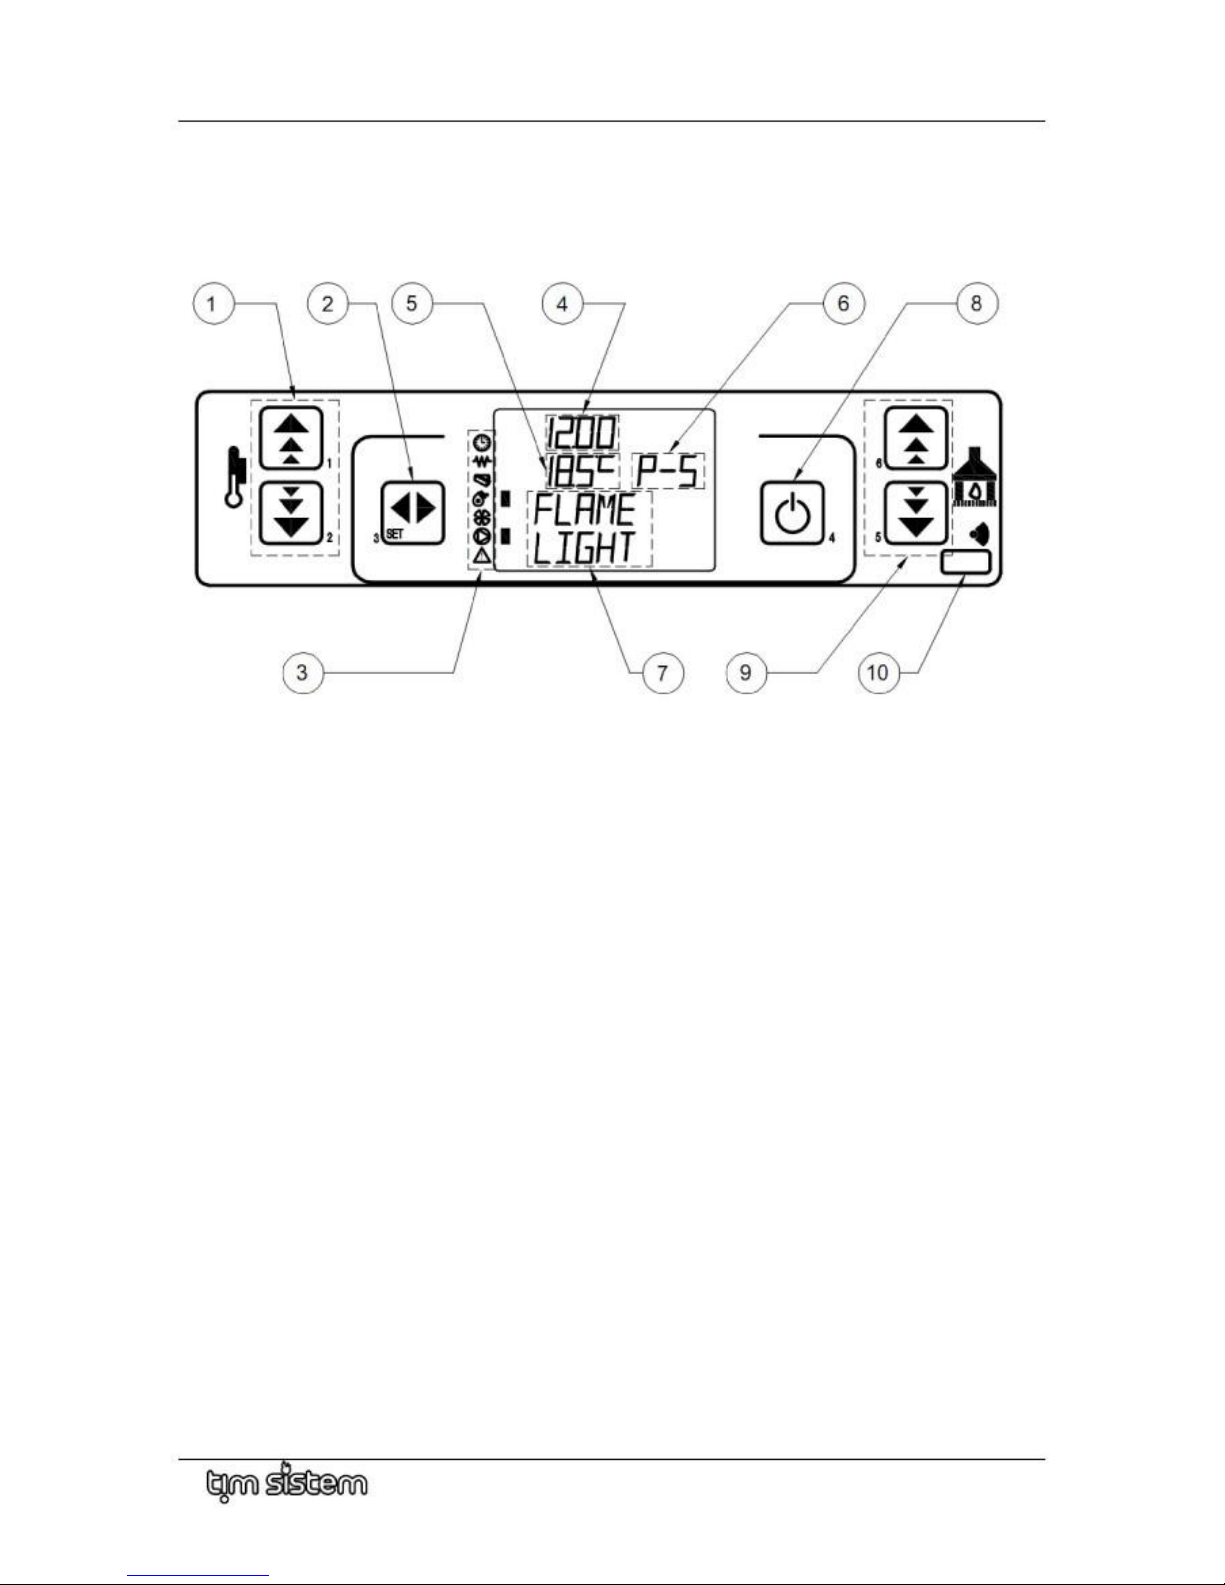
6. DISPLAY AND A REMOTE CONTROL
On display there are 6 keys which are being used for managing different functions
of the stove. In the middle, there is a display where is being shown a basic information
about the stove operation.
Image 6. Represents a display
1. Temperature setting keys
2. Main menu entering keys
3. Indicators of the stove parts
4. Time display
5. Room temperature display
6. Modes of operation
7. Current status information
8. On/Off switch, exit key
9. Mode settings keys
10. Sensor of remote control
6.1. Symbols of the basic elements of stove
Next to each symbol, there is the indicator light showing which of the element is
currently on. Beside of the symbols for the pellet, the indicator will be periodically
turned on and off depending on whether the engine for the insertion of pellets is on or
off. Description of symbols is given in Table 2
10
Timer indicator (turning the on and off according to a selected program)
Heater indicator for burning the pellet
Engine for pellet insertion indicator
Emissions fan indicator
Blower indicator
Water pump indicator (this symbol is an optional and it has its
function with a stove for a floor heating)
Warning indicator (the stove operate in incorrect way)
Table 2. Symbols on the display
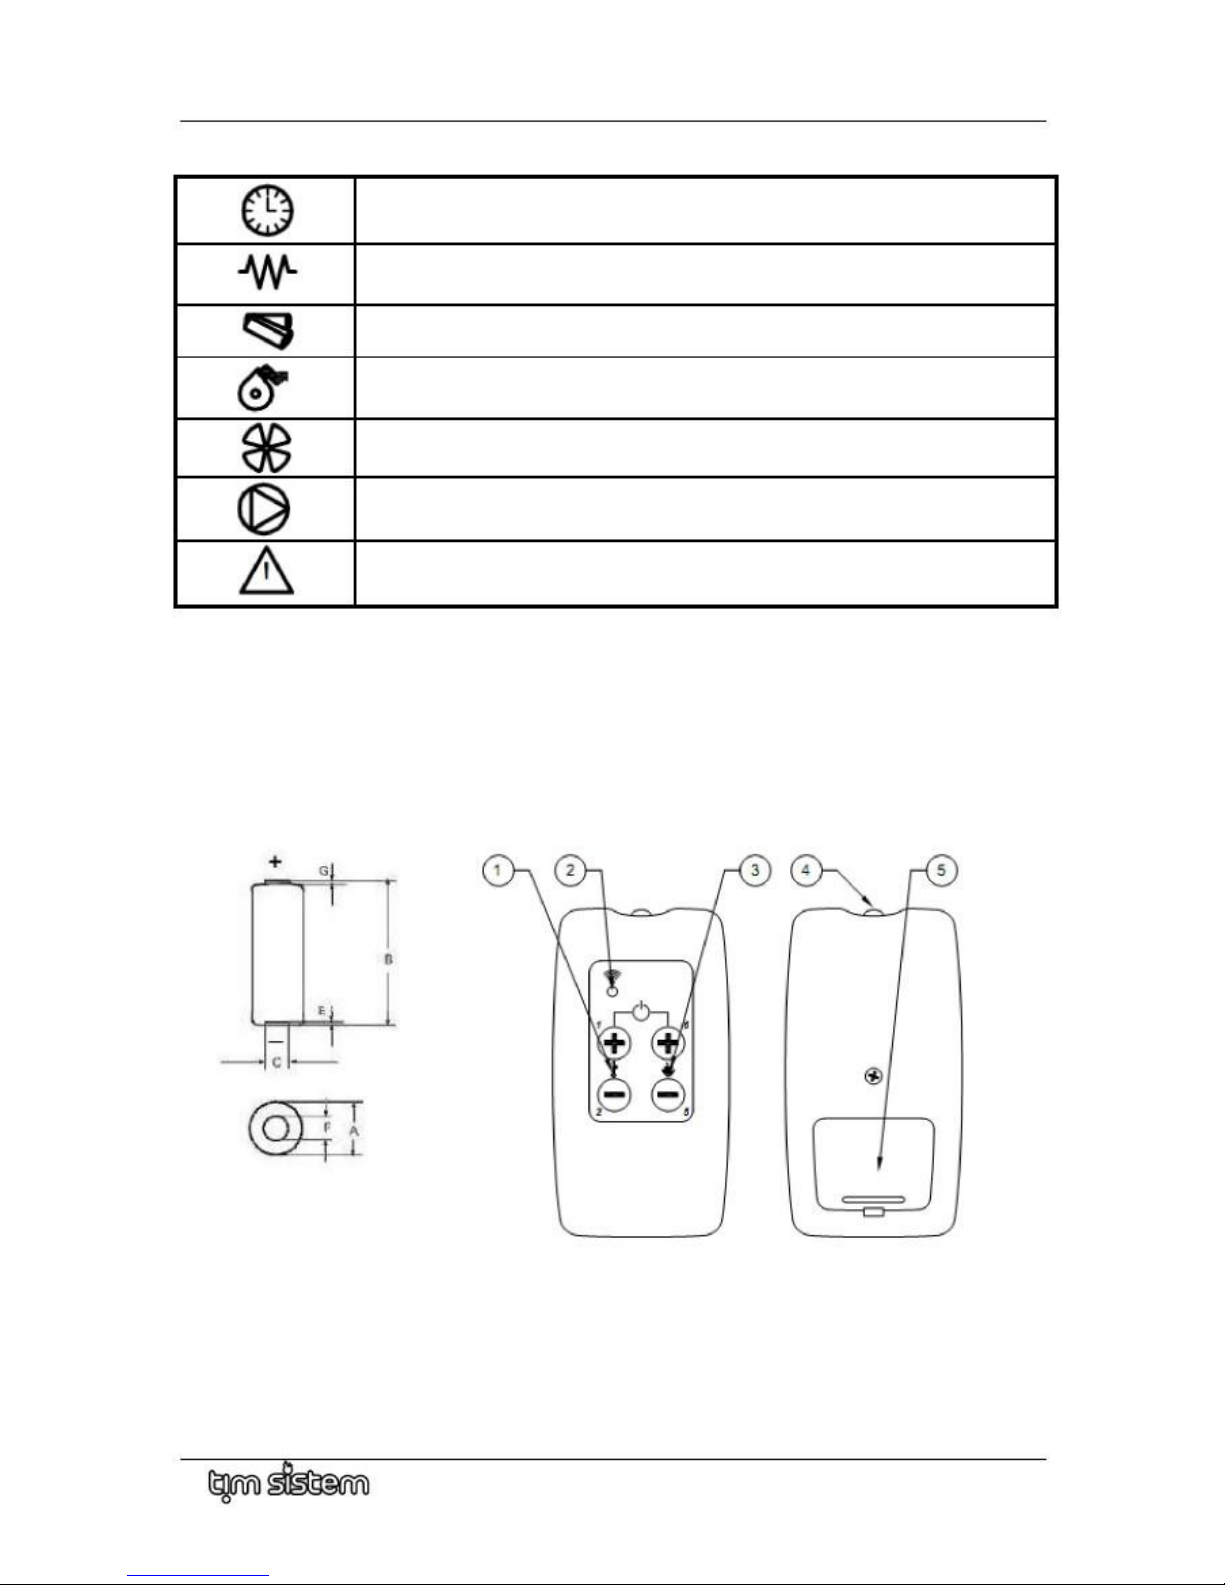
6.2. Remote control
With a remote control, a battery will not be delivered. In order to use the remote
control, you need do buy a battery of 12V, P23GA type. Image 7 represents a remote
control and a battery.
Image 7. Battery and a remote control (1 – temperature setting buttons, 2 – remote
control indicator, 3 – mode keys, 4 - transmitter, 5 -cover)
Take off the cover and set the battery according to the symbols indicated in the
bottom of the remote. Symbol + goes with a + on the battery.
11

Pressing the buttons 1 and 6 at the same time turns stove ON and OF. Pressing
the buttons 1 and 2 is being set a wanted temperature. Buttons 5 i 6 are there for
mode settings. Settings of temperature and mode are described accurately in the
chapter “USE OF THE STOVE”.
12
 Loading...