

Page 1

User Manual for Fast Flicks Digital Camera
FFaasstt FFlliicckkss DDiiggiittaall CCaam
UUsseerr M
The package contains of below items :
Fast Flicks Camera 1 unit
Program CD 1 pcs
USB cable, 5 feet, transparent 1 pcs
TV cable, 4 feet, black color 1 pcs
User manual 1 pcs
Alkaline Batteries (3Ax3) are not included
Mode Resolution File Extension File Size
Maannuuaall
meerraa
VGA 640x480 JPEG ~120KB(Fine)/~60KB(Norm)
QVGA 320x240 JPEG ~80KB(Econ)
2X(Digital) 320X240 JPEG ~45KB
Movie 160 x 120 MOV up to 980KB, 25~30s
Page 1 of 19
Page 2

User Manual for Fast Flicks Digital Camera
Electromagnetic Compatibility Notice
This device complies with Part 15 of the FCC rules. Operation is subject to the following
two conditions : (1) This device may not cause harmful interference, and (2) This device
must accept any interference received, including interference that may cause undesired
operation.
Warning : Changes or modifications to this unit not expressly approved by the party
responsible for compliance could void the user’s authority to operate the equipment.
This equipment has been tested and found to co mply with the limits for a Class B digital
device, pursuant to Part 15 of the FCC rules. These limits are designed to provide
reasonable protection against harmful interference in a residential installation. This
equipment generates, uses, and can radiate radio frequency energy, and if not installed
and used in accordance with the instructions, may cause harmful interference to radio
communications. However, there is no guarantee that interference will not occur in a
particular installation.
If the unit does cause harmful interference to radio or television reception, which can be
determined by turning the equipment off and on, the user is encouraged to try to correct
the interference by one or more of the following measures:
• Re-orient or relocate the receiving antenna.
• Increase the separation between the equipment and receiver.
• Connect the equipment into an outlet on a circuit different from that to which the
receiver is connected.
• Consult the dealer or any experienced TV/radio technician for help.
Page 2 of 19
Page 3
User Manual for Fast Flicks Digital Camera
Battery Used for the Camera
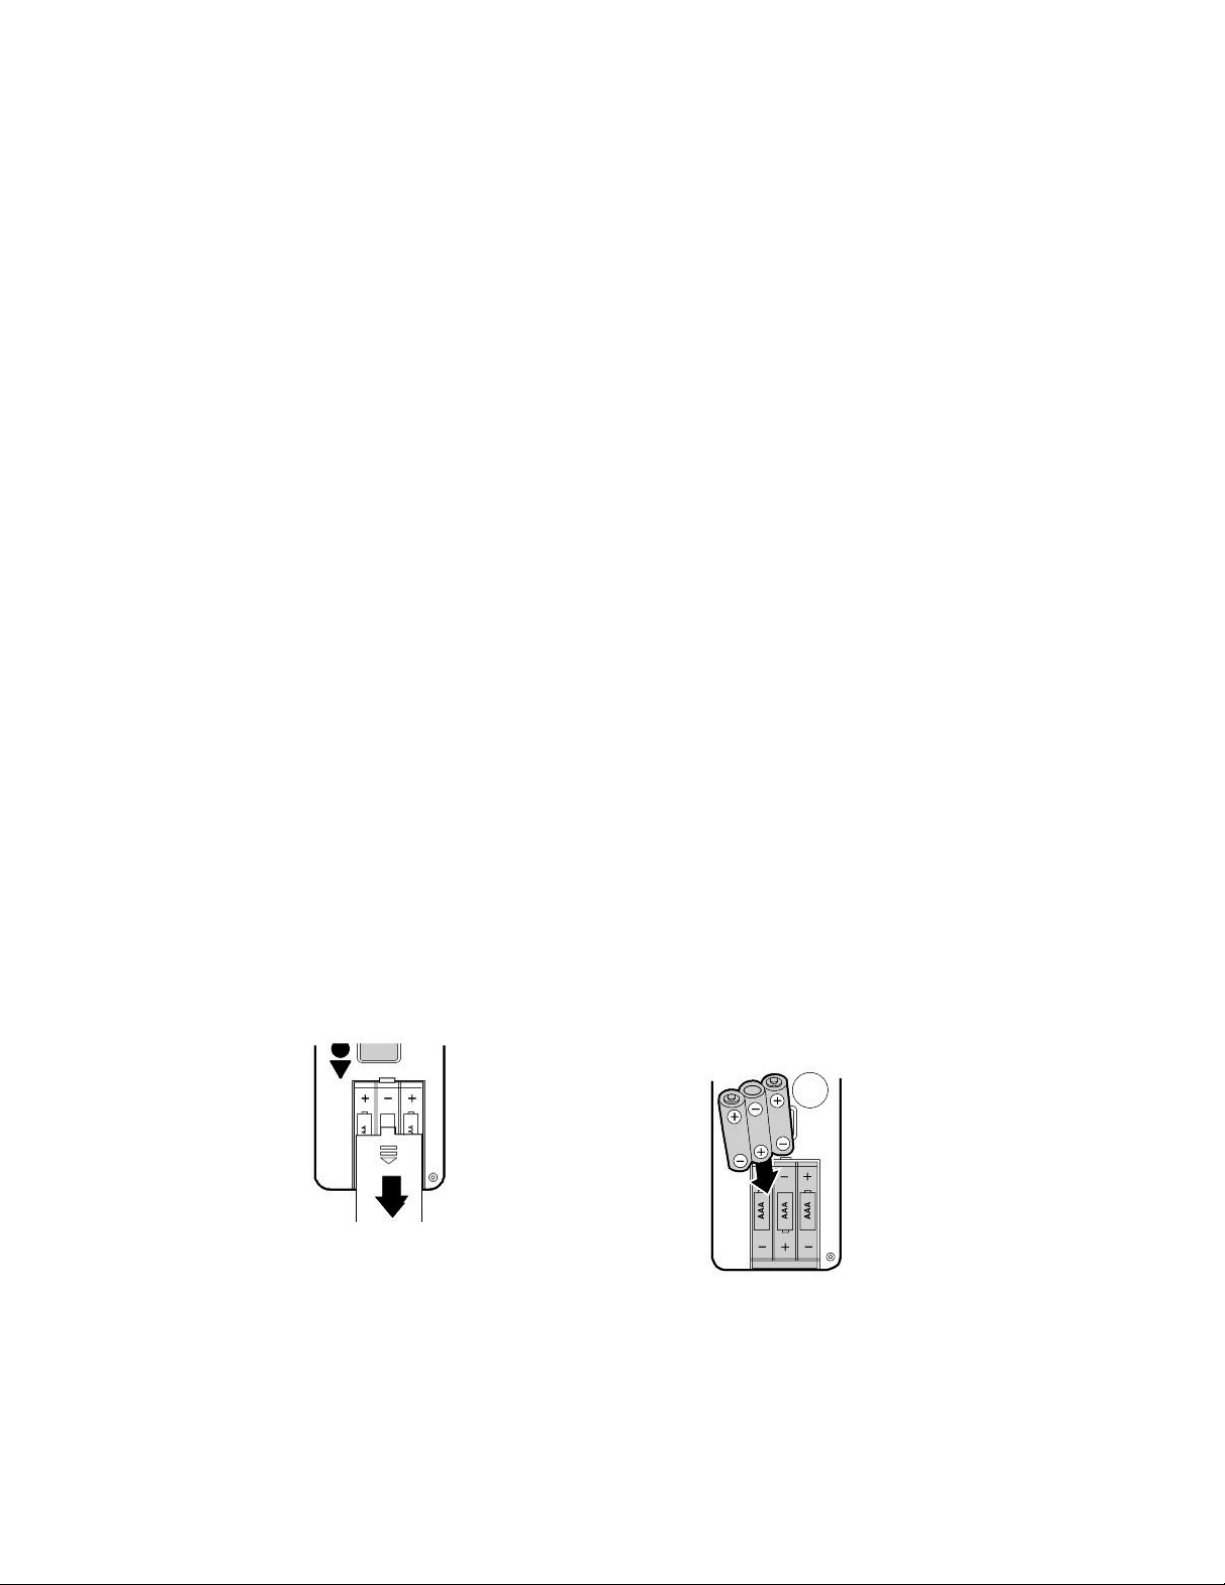
l To power up the unit, the 3x3A batteries (not an old one, with power) should be put in
the battery compartment.
l Then slide the Power switch (top side) to On. Press the Power button. The LED is on.
The LCD will turn on immediately.
l Important : All memory will be erased and the TV settings reset to default once Power
turned off.
l Make sure it is power up by the battery before you connect it to the PC with the USB
cable.
- In TV mode, recommend to change new batteries by the time battery low is
detected.
- When connected to USB, the unit will not go to standby mode. You can take
photo or movie with USB cable connected to the PC in order to save battery
power.
- You cannot take photo with the USB connected to the MAC unit.
- Battery life : Just for record mode, new alkaline batteries (eg. Energizer)
Low Battery detection started : ~ 2 hrs (Power On mode)
Replace the batteries within 30 minutes after low battery detection on.
Sleeping mode : ~ 600 hrs
The first segment of the battery icon will blink if battery power is too low.
Please change to new alkaline batteries (3A size) as soon as possible. Always upload the
images to the computer by the time battery low icon is prompted.
Take off the battery door. Place the 3 x AAA alkaline batteries.
1. Slide the Switch from off to on .
2. Press the Standby button to turn on the LCD.
Page 3 of 19
Page 4
User Manual for Fast Flicks Digital Camera
3. ‘0’ is seen on the LCD means no photo is taken.
4. Go to standby mode by pressing the Standby button.
5. Or turn the switch to Off. This will save battery power but the internal memory is
erased and the TV settings will be reset to default.
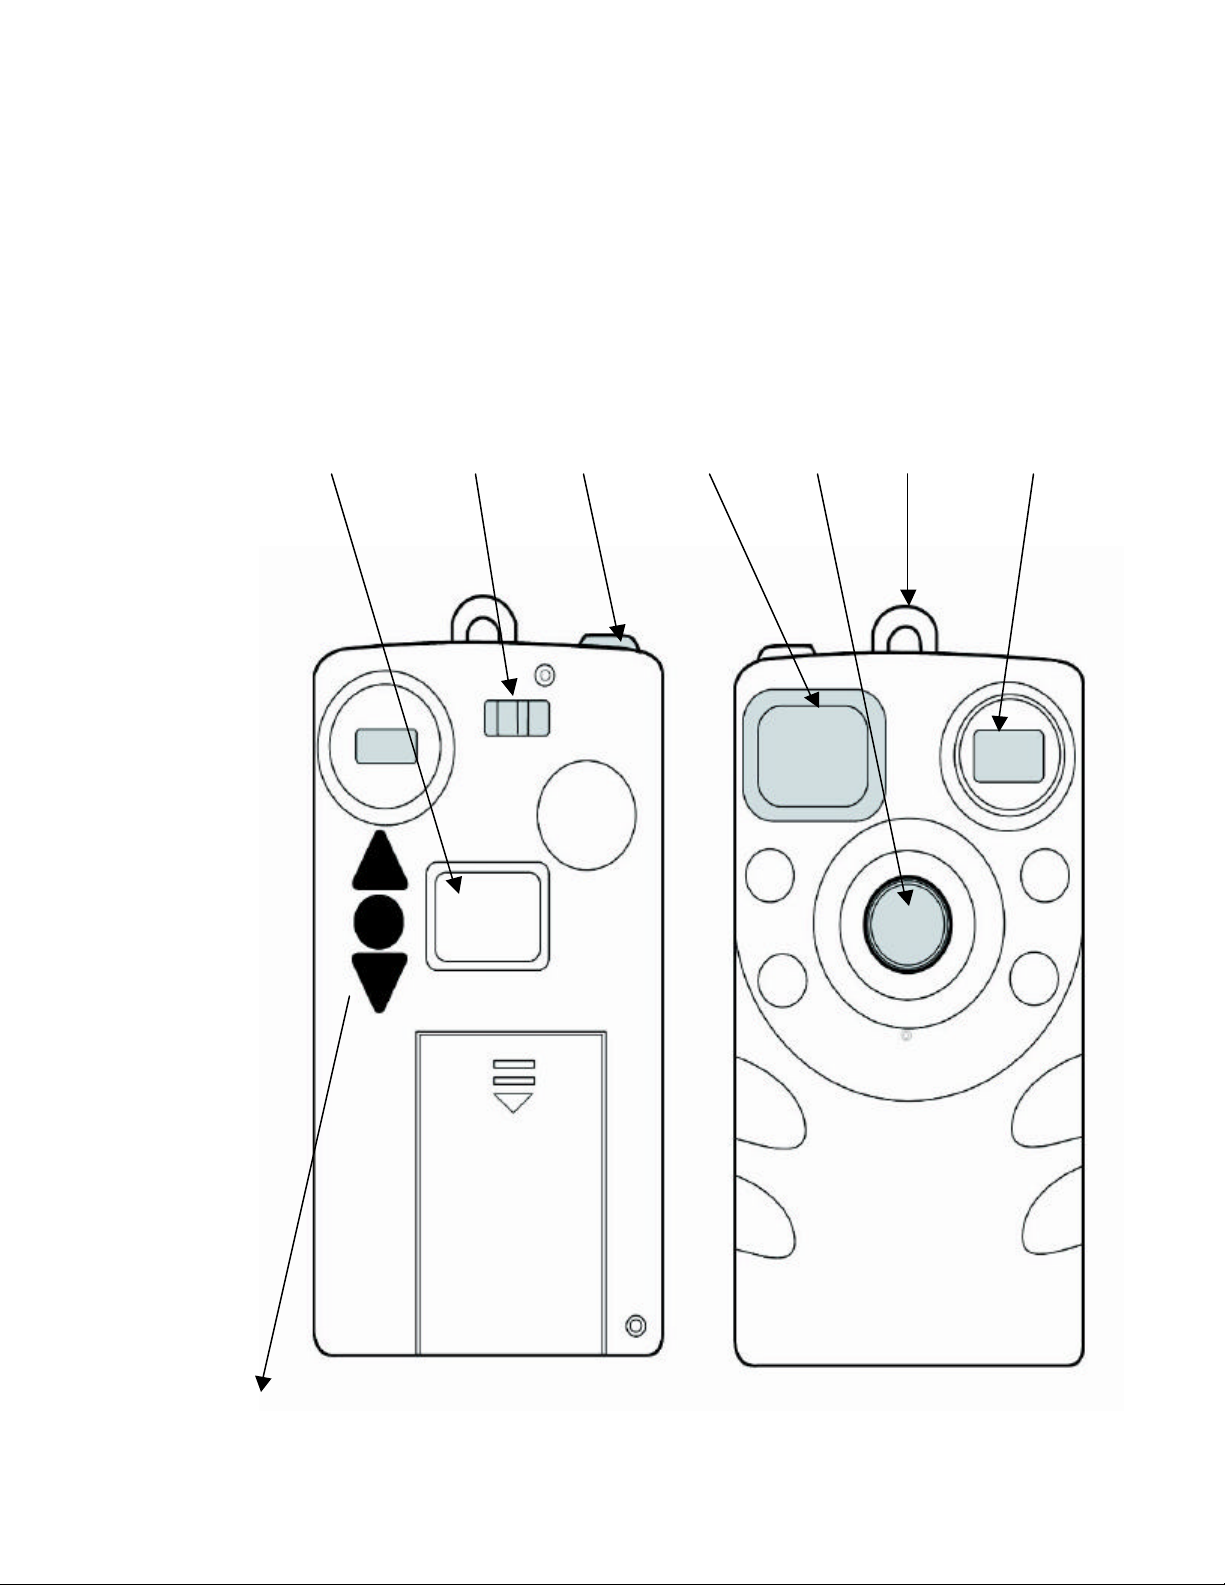
Nomenclature :
Main Power
Status LCD On/Off Shutter Mirror Lens Hook View Finder
Buttons (top to bottom) : Power/Standby, Select/Timer , Mode/Scroll.
Page 4 of 19
Page 5
User Manual for Fast Flicks Digital Camera
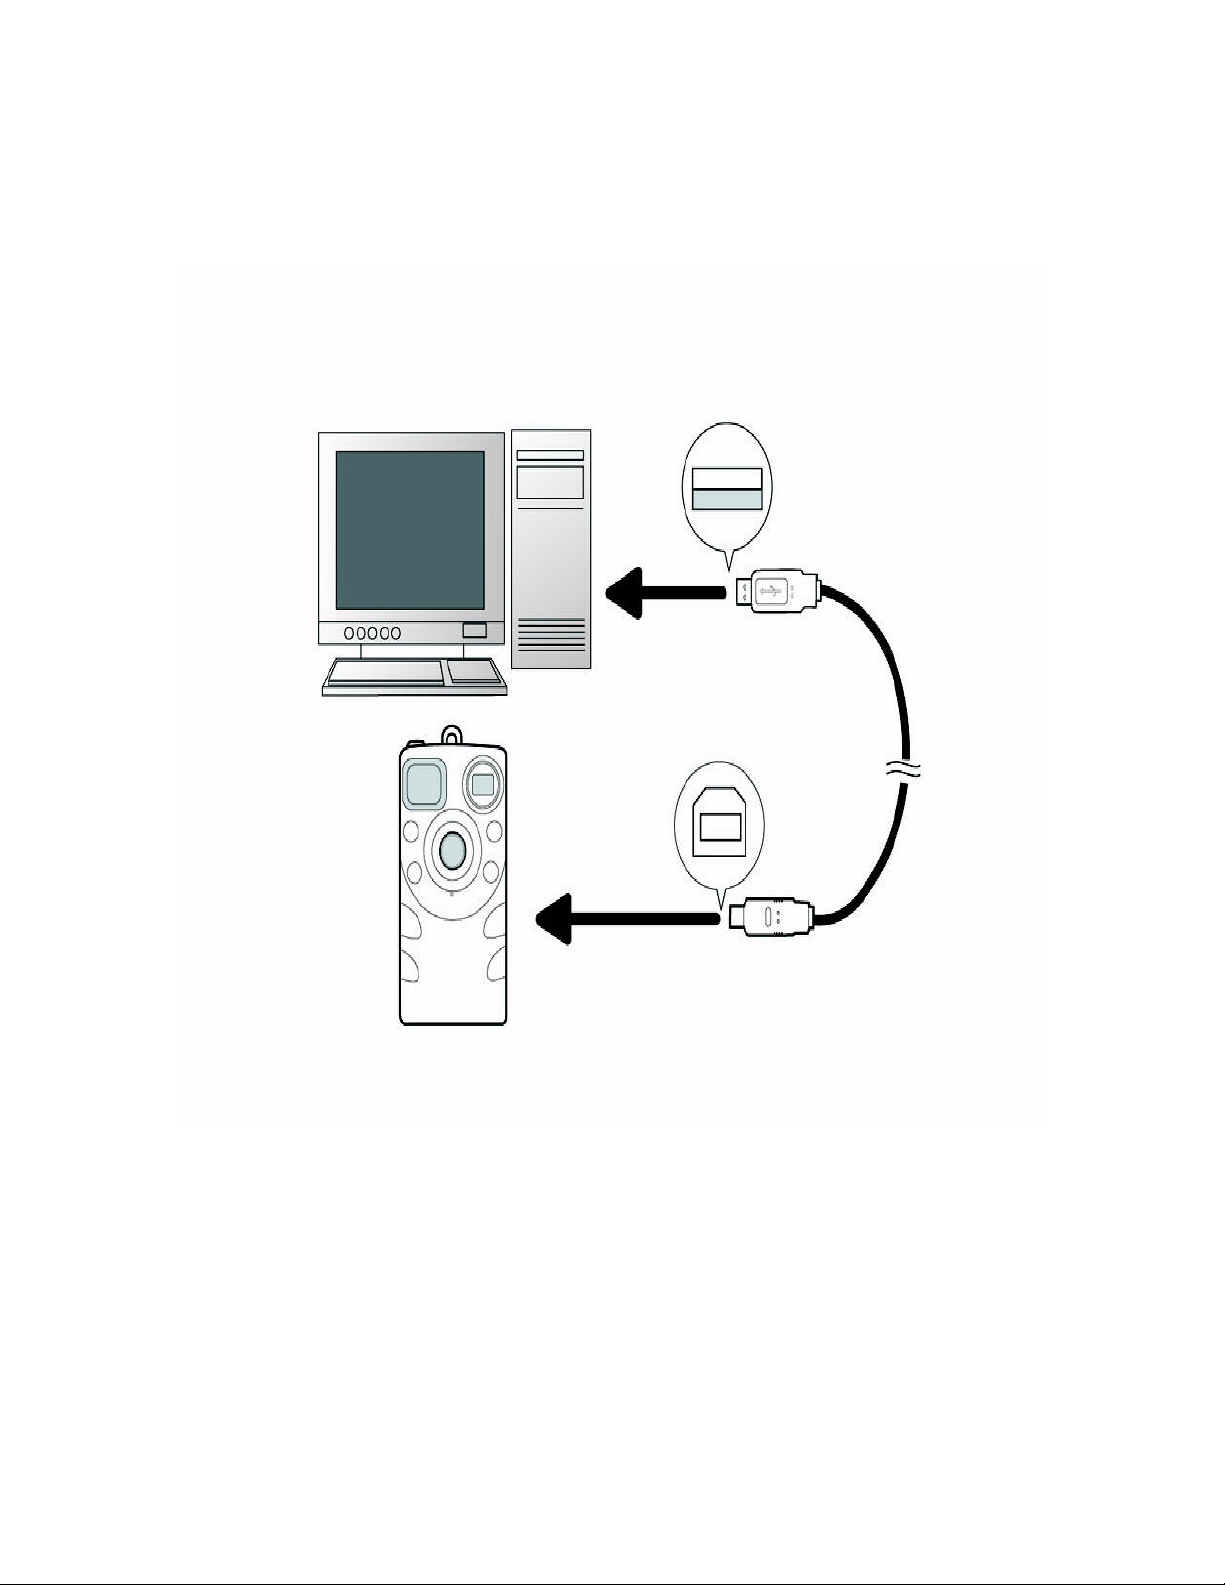
Connect the PC/Mac to the camera unit by USB cable.
1. First, the PC/Mac is installed with the Camera driver (install the CD-ROM will
put the driver to your PC).
2. Then power on the camera unit. You can see the status LCD is on.
3. After connecting the USB cable, ‘PC’ is seen on the right corner of the LCD.
Page 5 of 19
Page 6
User Manual for Fast Flicks Digital Camera
MAIN MENU
TV Mode : Change the camera internal settings
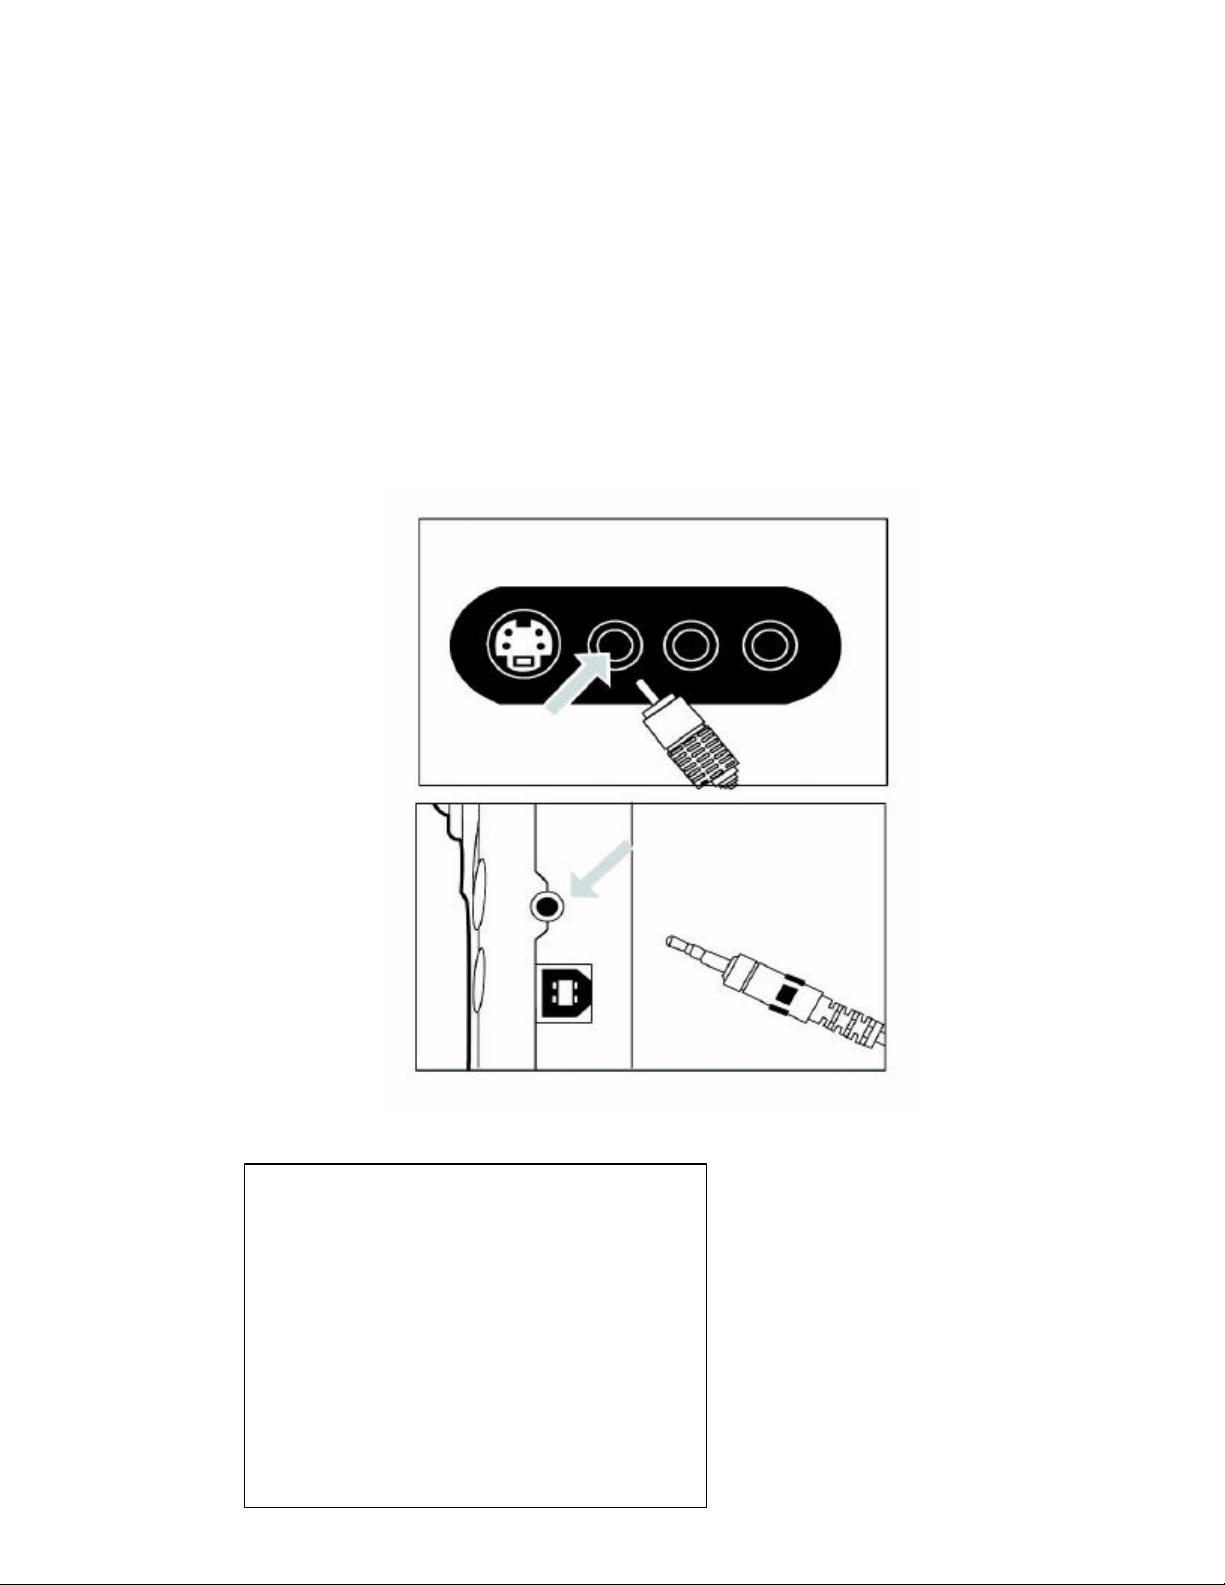
You can change some settings of the camera by connecting the video cable to the TV set
which has the video input.
Power up the unit after connecting the stereo jack of the camera to the RCA jack of TV (this
is the Video input socket).
You can see the menu as below on the TV screen.
REVIEW
SLIDE SHOW
DELETE ALL
INFO
QUALITY FINE
LANG ENGLISH
TIMEOUT NONE
RESTORE DEFAULTS
SAVE
Page 6 of 19
Page 7
User Manual for Fast Flicks Digital Camera
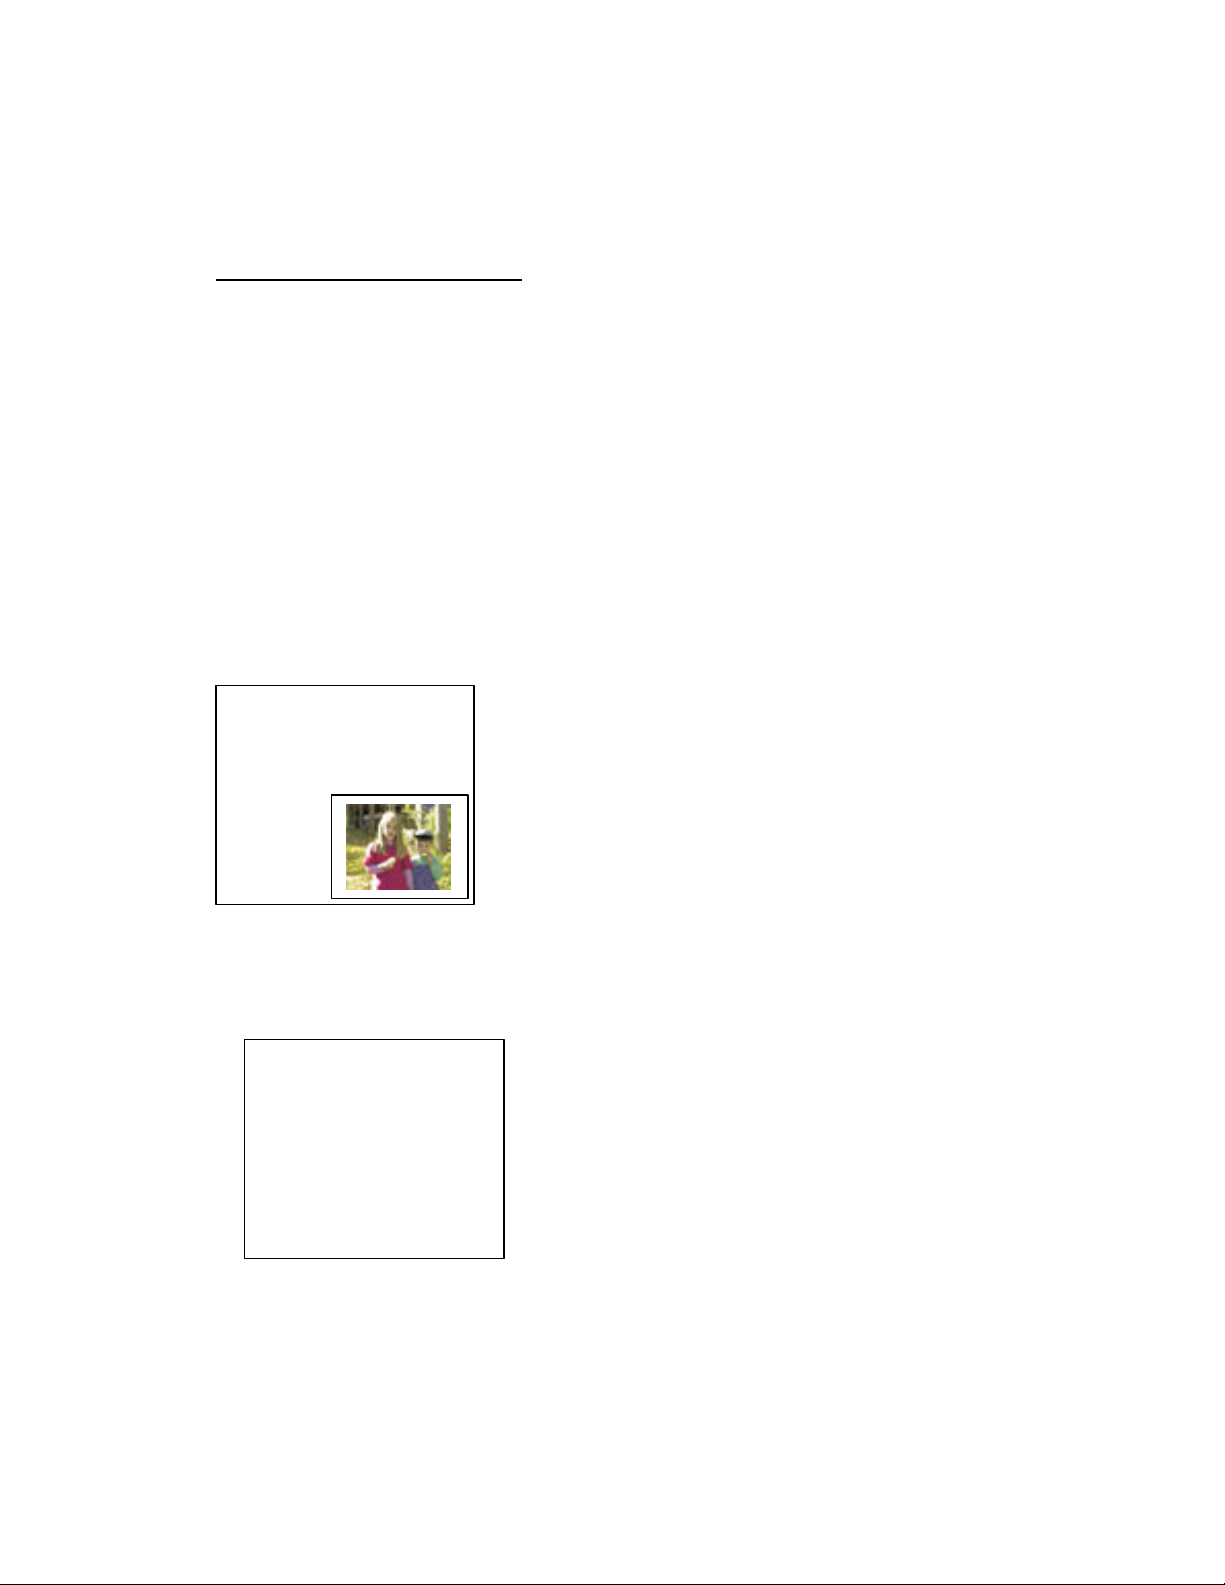
FILE INFO
REVIEW – Reviewing Pictures
Press Shutter button to choose the 1st picture to display on TV screen
Press the Mode button to display the 2nd picture. It can continue this step to see all the
pictures taken by the camera.
Until the last picture is seen, it will show ‘Done’. Press Mode button again it will go to the 1st
picture and continue to review the pictures stored.
If press the Shutter button after ‘Done’ is shown, it will escape to the main menu screen.
The sequence is starting from the last image file number.
If a movie file is shown, you will see the first frame and the word "MOVIE."
If you press the Shutter button when the picture is displayed. It will display :
DELETE
|>DONE
34 KB
Press the Shutter button to choose delete function.
Then it will show as below :
CONTINUE FILE
DELETE ?
OK
|> CANCEL
Press Mode button to choos e OK.
Press Shutter button to confirm.
The picture is then deleted in a second.
After that, it will display the next photo.
Page 7 of 19
Page 8

User Manual for Fast Flicks Digital Camera
MAIN MENU
SLIDE SHOW – Display stored pictures one by one
Press Mode button to choose SLIDE SHOW. Press Shutter button to confirm.
The 1st photo is uploaded to the screen in 3 to 5 seconds. It will display the photo for 5s.
The next photo is automatically uploaded and repeat the process until all the pictures are
displayed.
‘Done’ is displayed in the end of the slide show. Press Shutter button to Main Menu.
The sequence is starting from the first image file number.
DELETE ALL – Delete all the pictures stored
Press Mode button to choose DELETE ALL Press Shutter button to confirm.
You can see the screen as below :
Press Mode button to choose OK. Press Shutter button to confirm.
The main menu is shown as below :
R
|> INFO
QUALITY HIGH
LANG ENGLISH
TIMEOUT NONE
RESOTRE DEFAULTS
SAVE
CONTINUE DELETE OF ALL IMAGES?
OK
|> CANCEL
R
E
V
I
E
W
R
S
S
S
D
D
D
E
V
I
E
W
E
V
I
E
W
L
L
E
E
I
D
E
S
H
O
W
I
D
E
L
I
D
E
L
E
T
L
E
T
E
L
E
T
S
H
O
W
S
H
O
W
E
E
A
L
L
A
L
L
E
A
L
L
Page 8 of 19
Page 9

User Manual for Fast Flicks Digital Camera
INFO
The REVIEW, SLIDE SHOW & DELETE ALL are changed to shadow color and the function is
disabled. Because there is no photo in the memory to do these functions.
INFO – Information of internal memory
Press Mode button to choose INFO. Press Shutter button to confirm.
You can see the screen as below : the numeric values are just for reference.
BATTERY FULL
VERSION X.XXX
MEMORY
USED 23KB
FREE 6077KB
SIZE 6100KB
|> DONE
Press Shutter button to confirm Done. It will go back to main menu.
BATTERY FULL means the battery voltage is >3.5V.
VERY LOW means the battery voltage is <3.5V
VERSION It is the firmware code number.
MEMORY Total memory SIZE = USED + FREE
FORMAT – Select the Fine, Normal and Economy, Zoom x2, Movie
Press Mode button to choose FORMAT. It is preset to be FINE quality mode.
Press Shutter button to confirm change. The word ‘FINE’ is changed to green color.
FORMAT FINE
Press the Mode button once, it will show NORMAL. Press Shutter button to confirm. It will
change to black color word : FORMAT NORMAL.
Repeat above step by pressing Shutter and then Mode button. It will show :
FORMAT ECONOMY.
Press Shutter button to confirm if you want to use Economy mode to save memory.
Page 9 of 19
Page 10

User Manual for Fast Flicks Digital Camera
Repeat above step by pressing Shutter and then Mode button. It will show :
FORMAT Zoom x2.
Press Shutter button to confirm if you want to use 2X mode to save memory.
Repeat above step by pressing Shutter and then Mode button. It will show :
FORMAT Movie.
Press Shutter button to confirm if you want to use Movie mode to save memory.
LANG – Select English, Spanish, Deutch, French or Japanese
Press Mode button to choose LANG. It is preset as ENGLISH.
Press Shutter button to confirm change of languages.
Press Mode button once, the other language is shown.
Press the Shutter button to confirm. Select SAVE to update the language.
TIMEOUT (STANDBY) – Select the auto off time
Press Mode button to choose TIMEOUT.
Press Shutter button to confirm change of timeout.
Press Mode button to toggle between 5 different values of auto off time :
90 SEC, 60 SEC, 30 SEC. 15 SEC, NONE.
Press Shutter button to confirm after selection. NONE means no timeout. The camera will not
auto off.
It is recommended to use timeout (default as 60s) to save battery life.
RESTORE DEFAULTS – Reset to the ex-factory settings
Press Mode button to choose RESTORE DEFAULTS.
Press Shutter button to confirm reset to the ex-factory settings.
Actually, 4 settings are pr eset as below.
FORMAT FINE
LANG ENGLISH
TIMEOUT 60 SEC
TV SYSTEM NTSC
Page 10 of 19
Page 11
User Manual for Fast Flicks Digital Camera
SAVE – Save the settings you have changed.
If you have changed the settings in the TV screen, you need to select the ‘SAVE’ function and
press the Shutter button to confir m.
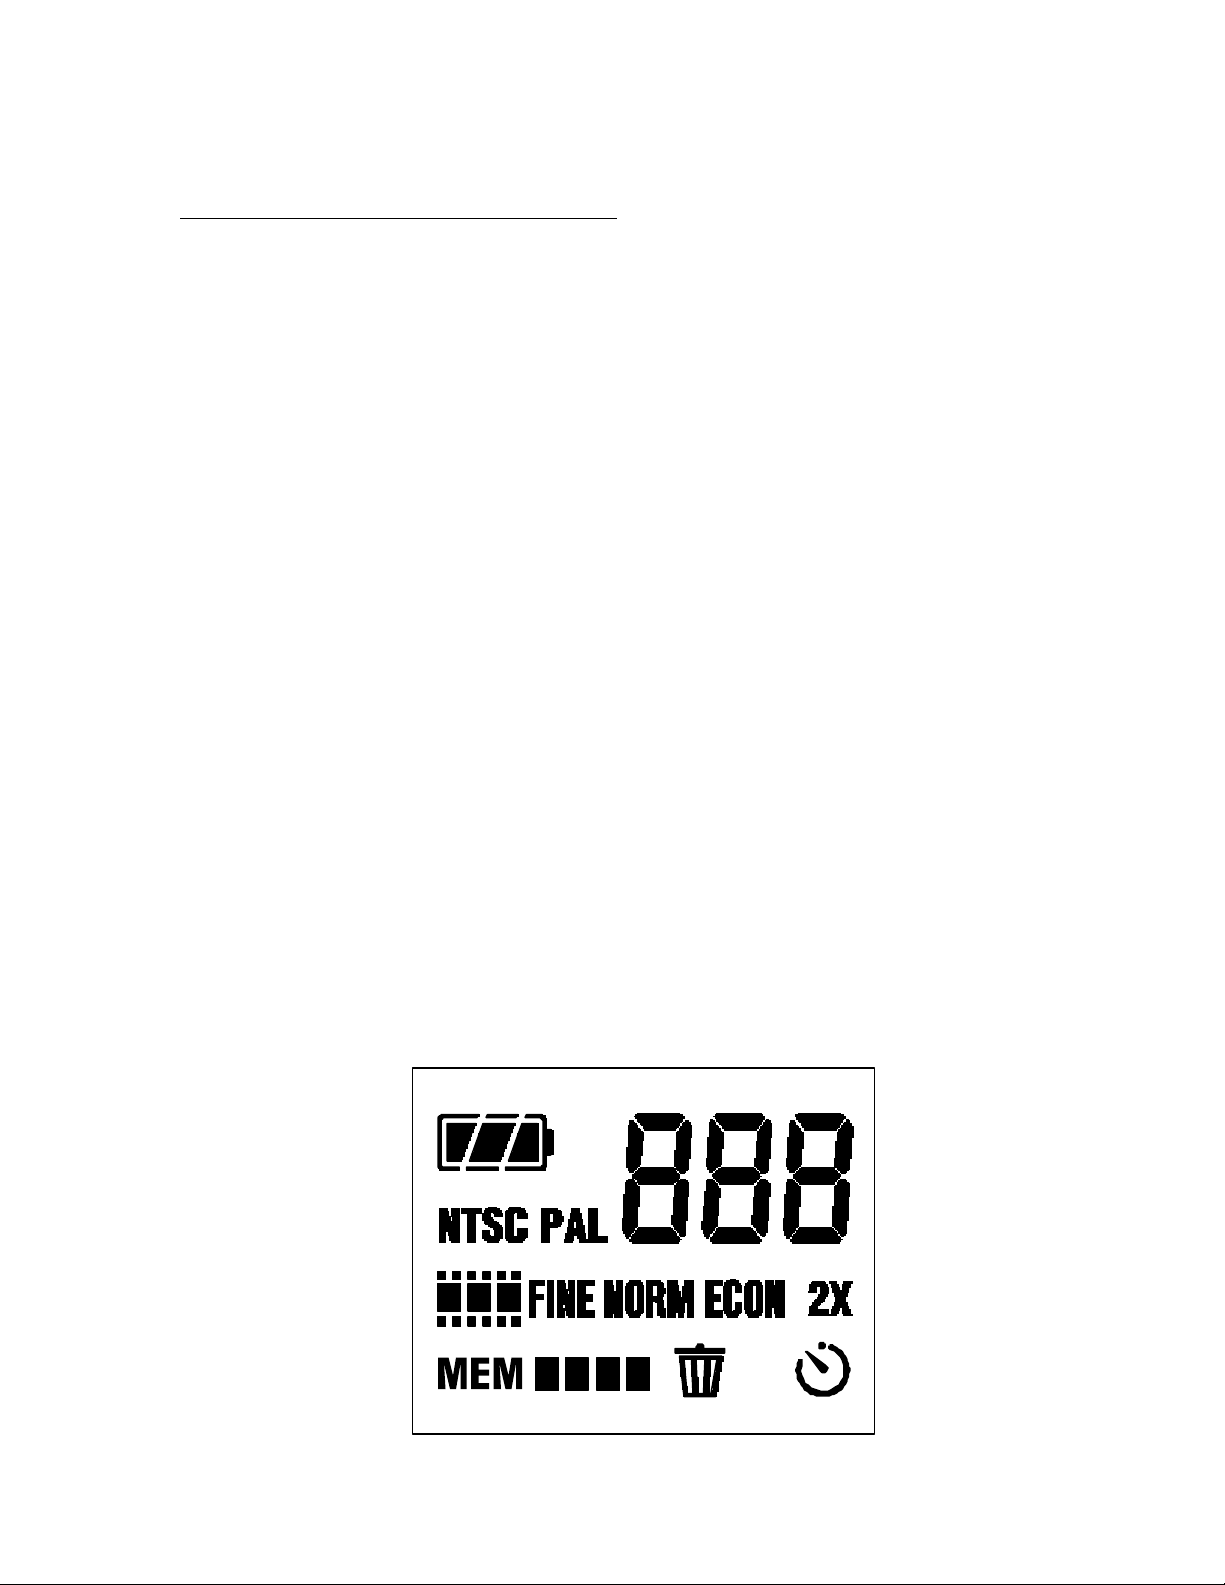
Status LCD display
Icons in the status LCD :
Battery icon : 2 Levels of power input
3-digit 7 segment display : Count Up from 0 to 999. (if over 999, it will show 999)
NTSC, PAL : TV system selection
Movie icon : Show movie mode.
FINE , NORM, ECON : Photo Quality
2X : Zoom function for TV mode.
MEM icon : It will blink if the memory is full.
Memory blocks : Total 4 blocks to show the approximate memory size left.
Rubbish bin icon : It will blink if you select it to erase all the memories.
Timer icon : It will be on if you press the Select button in the Record mode.
Messages shown on the 7-segment display :
FEA Camera mode selection : FINE,NORM,ECON,2X, Movie
bSY Busy signal. The unit is doing task. Wait until it disappears.
PC It is seen if you connect the unit to the PC with the USB cord.
Page 11 of 19
Page 12
User Manual for Fast Flicks Digital Camera
If press Mode
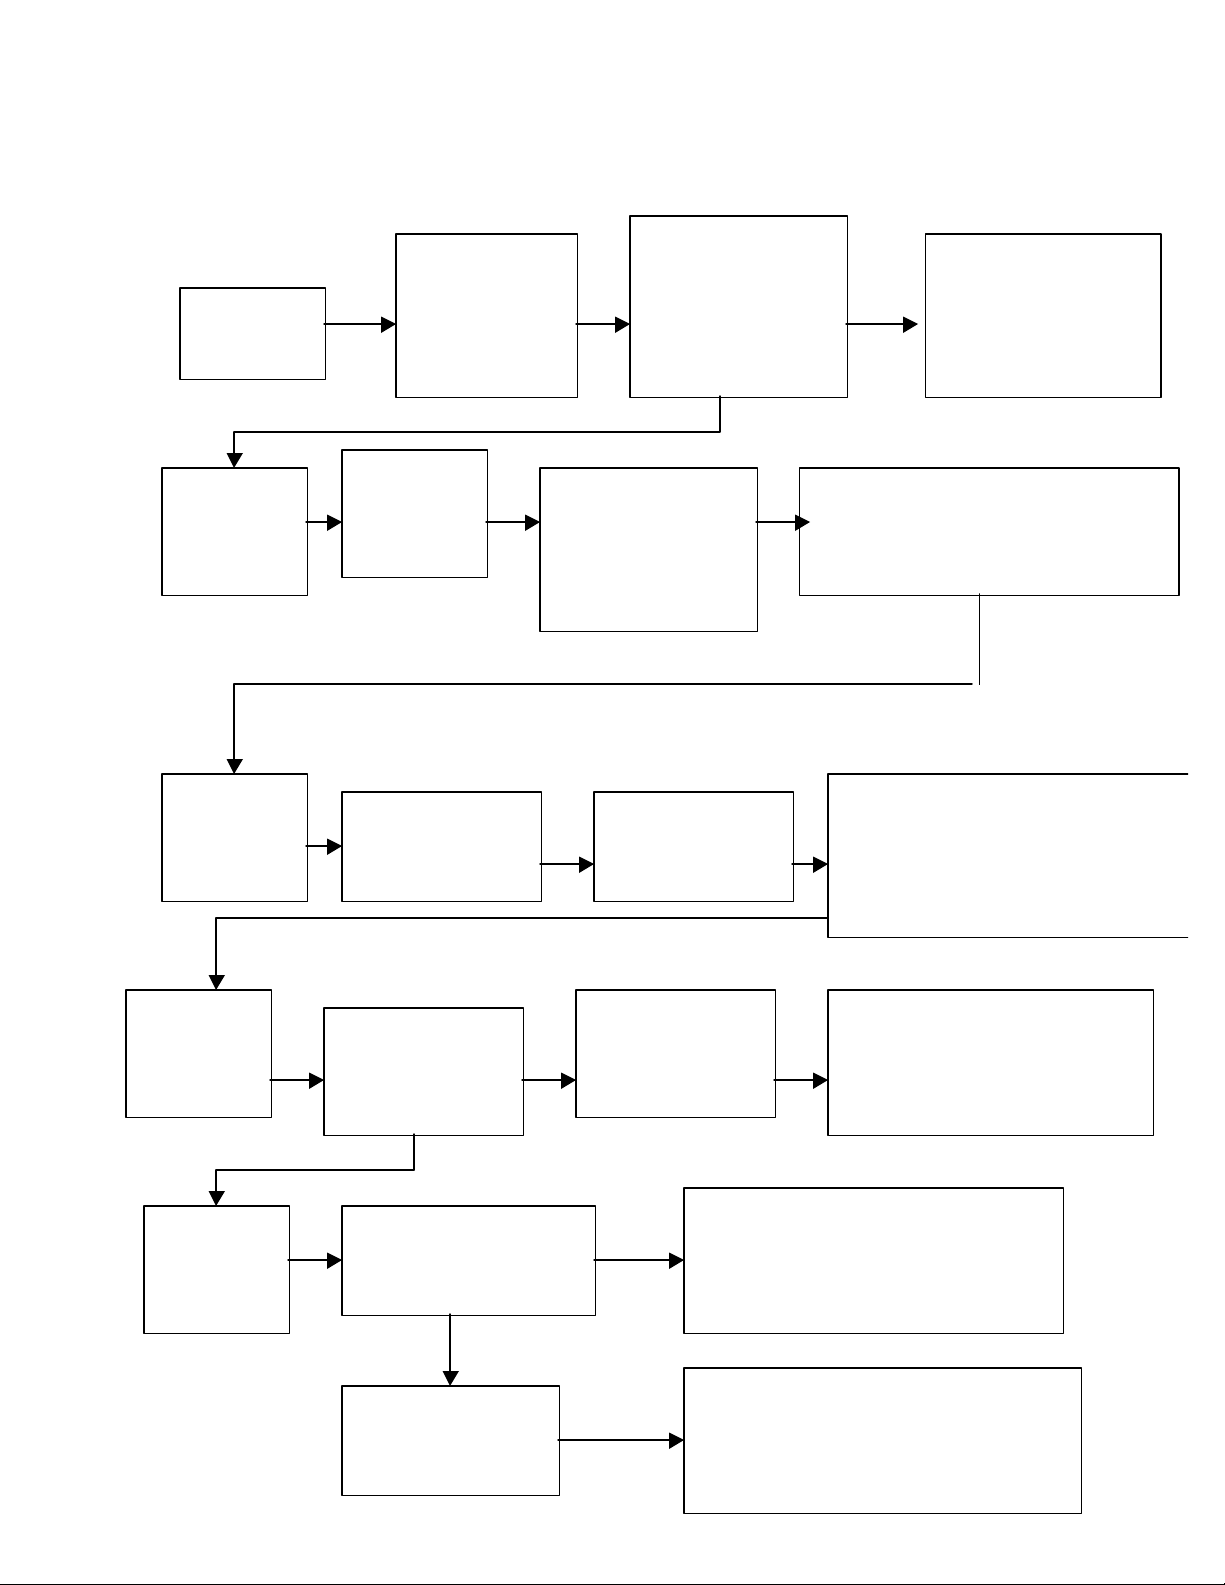
Status LCD flow chart :
Turn slide
switch to On
Press Mode
button once
If select item
‘a’ : Press
Mode button
Press
Power/Standby
button to turn on
the LCD.
‘FEA’
(feature) is
displayed in
the counter .
Display ‘NTSC’ in
the LCD left corner
LCD displays full
segments. Ready to
operate.
Press Select button to
change the quality :
FINE,NORM,ECON,
Zoom x2, Movie.
Press Select button
to ‘PAL’
Press Shutter button to
take a photo. ‘bSY’
(busy) is displayed for
several seconds.
a. If selected, press Mode button to other
setting, it will save the quality option.
b. Or wait for timeout (5s), it will save the
quality option.
a. Press Mode button to other setting, it
saves the PAL system
b. Or wait for timeout (5s), it saves the
PAL system.
c. Or press the power button to standby
mode, it will save the PAL.
If select item
‘a’ : Press
Mode button
button
Display Rubbish
Bin in the LCD right
bottom corner
It will go back to operating
mode (counter is ready)
Press Select button.
The Timer icon is on.
Press Select button
to do deletion of all
stored images
Page 12 of 19
bSY is displayed. Waiting until
it goes back to operating mode
(counter is 0). It takes some
seconds.
a. Press Shutter button to take photo. Or
b. Press Power button to st andby mode.
Press Shutter button to take photo.
The timer is triggered. LED is blinking,
beeper is beeping. The photo is taken after
10s.
Page 13
User Manual for Fast Flicks Digital Camera
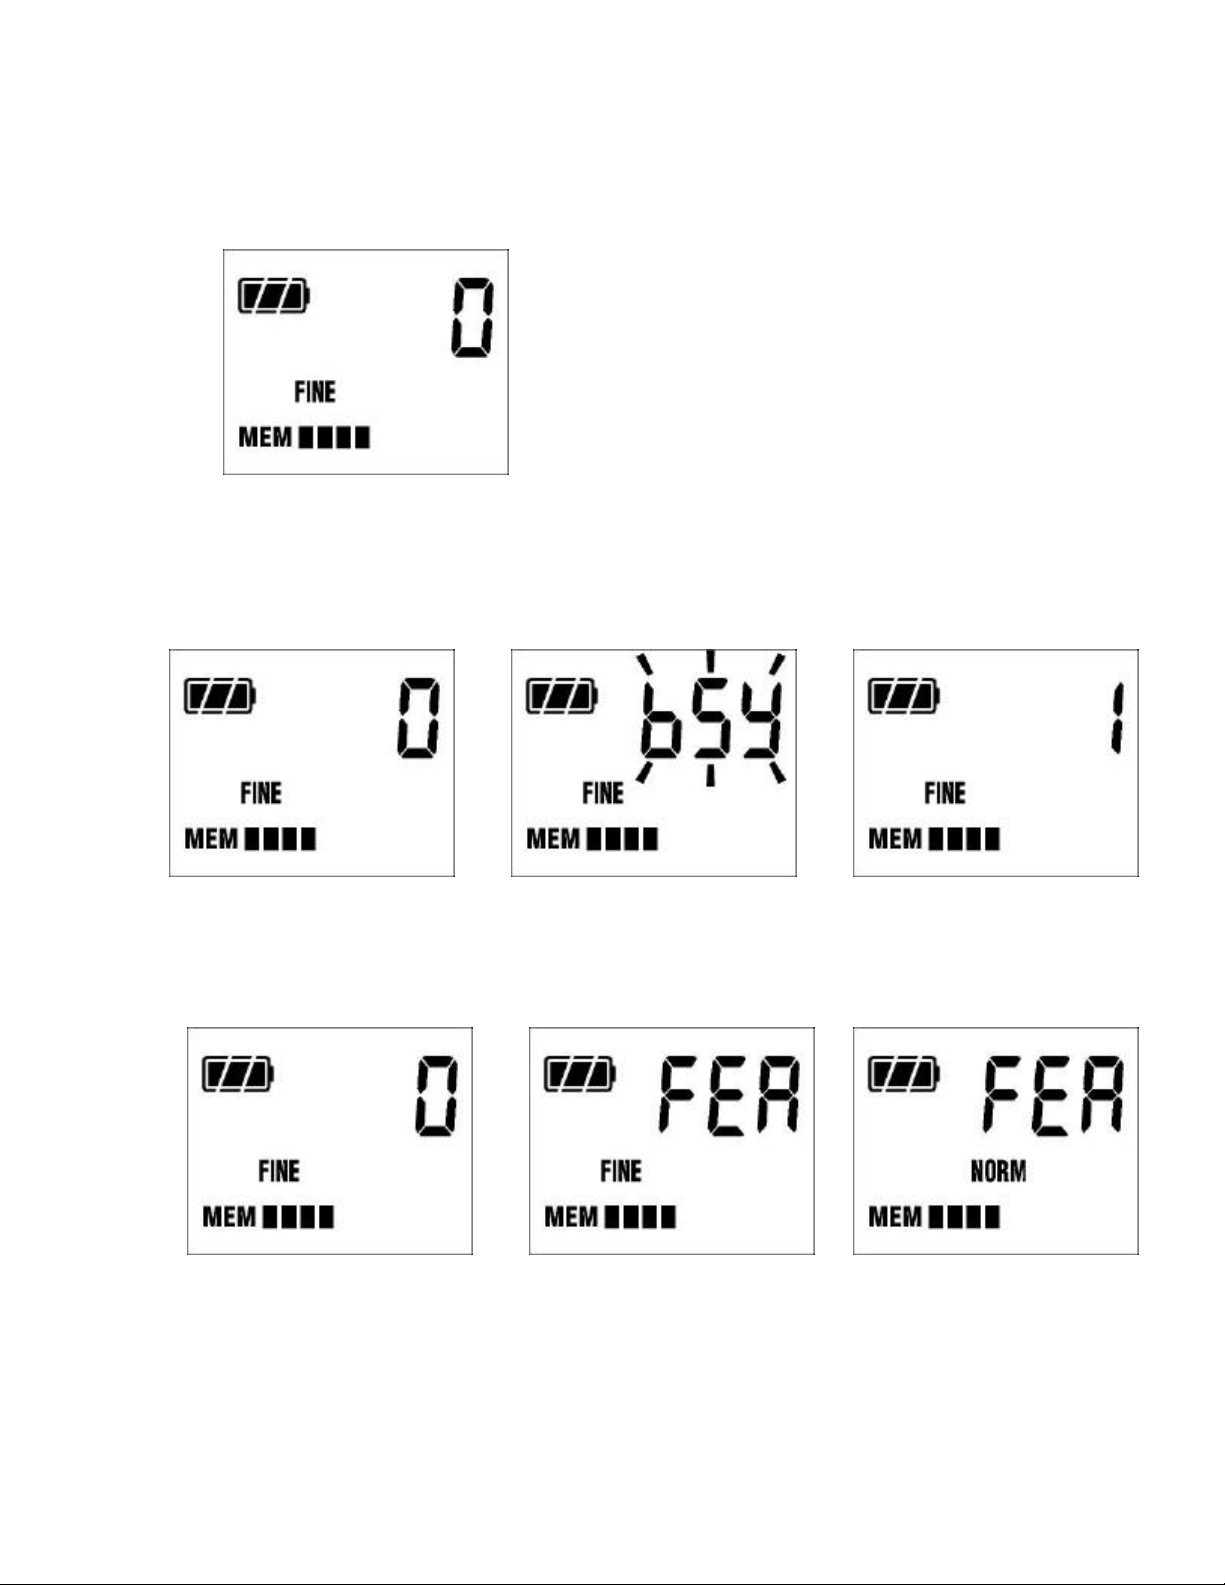
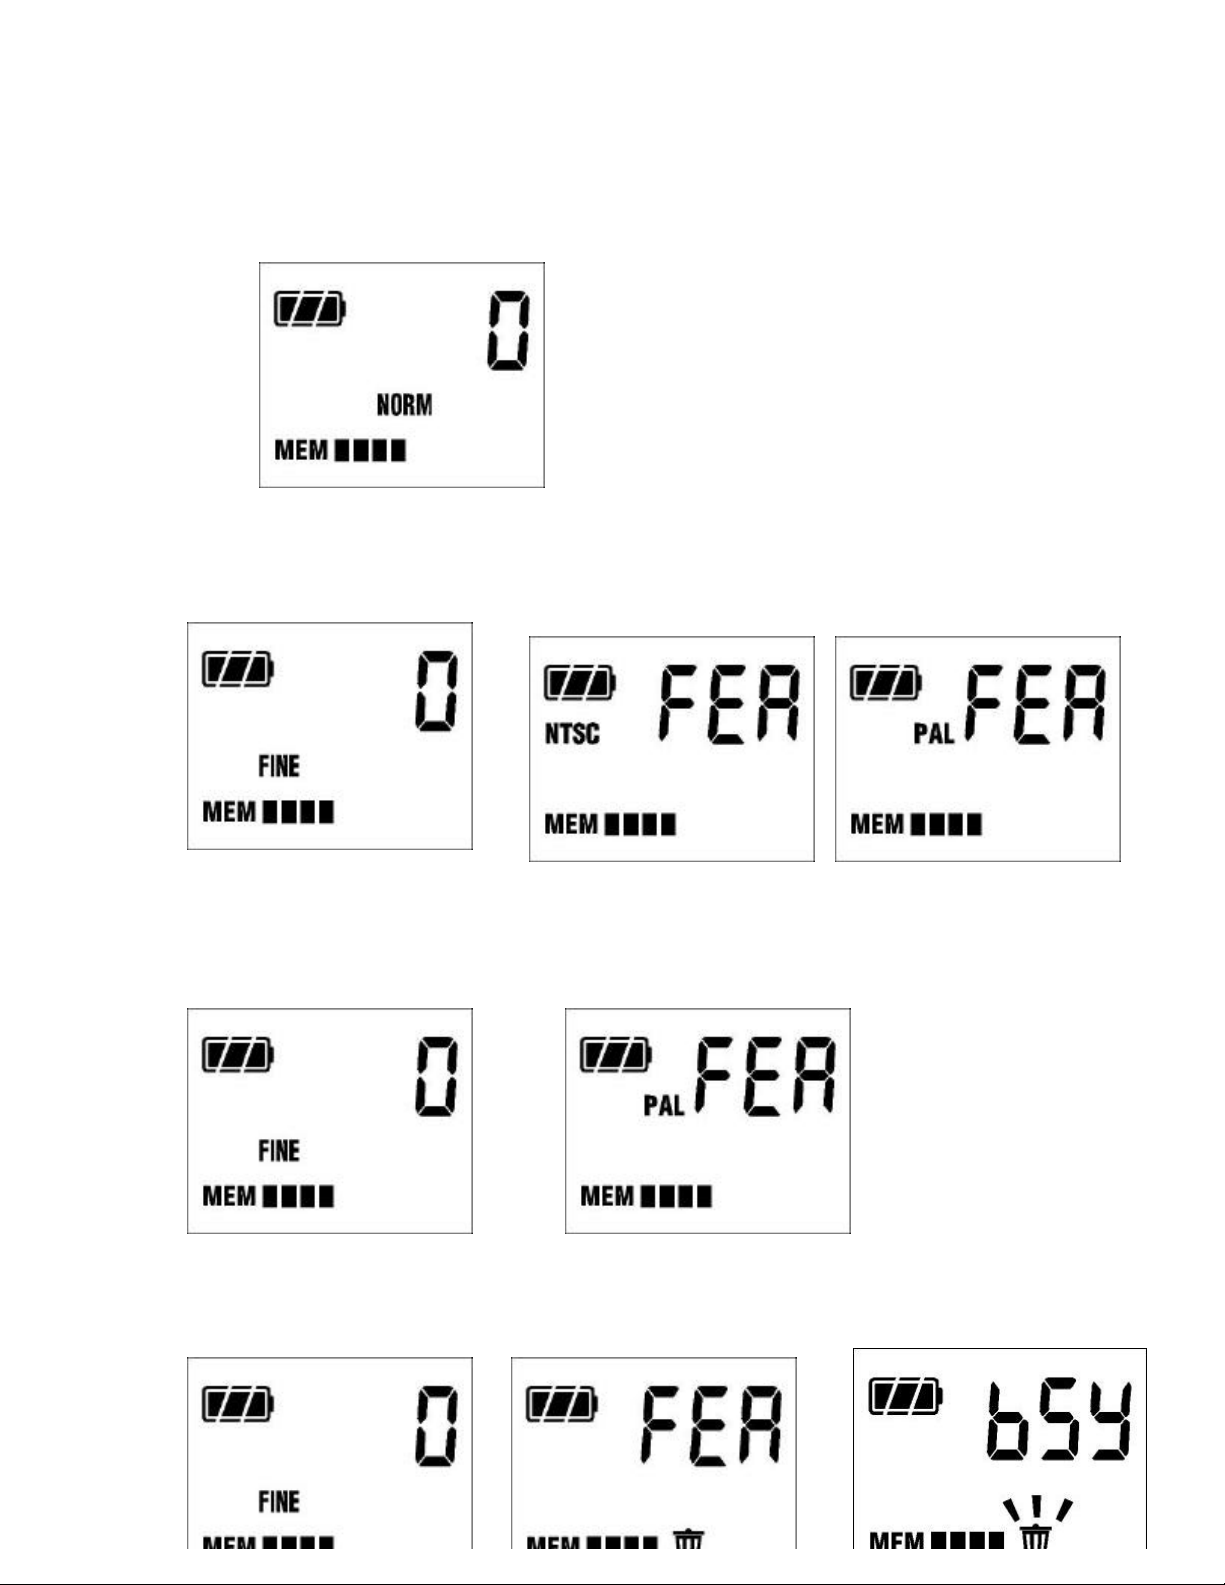
1. Operating mode : Ready to take a photo.
Just put in the batteries, turn the slide switch from off to on and press the Power button
once. The LCD displays as below.
2. Take a photo
As the unit is turned on, press the shutter and it will take a photo. You can see the film
counter is increased from 0 to 1.
3. Change Picture quality
If you press the Mode button once, you see FEA, press the Select button once, it changes
from Fine to Norm (Normal).
Page 13 of 19
Page 14
User Manual for Fast Flicks Digital Camera
Then wait for about 5s, it will go back to operating mode but the picture quality is
changed to NORM (Normal). This is similar for changing to Econ, Zoom x2 and Movie
modes.
4. Change TV system
Press the Mode button two times, it will see the NTSC icon, press the Select button and
PAL is found.
Wait for 5s, or press Mode button 2 times or press Power button 2 times, it will save the
PAL system
Checking the TV system : Press Mode button 2 times, you can see PAL is set.
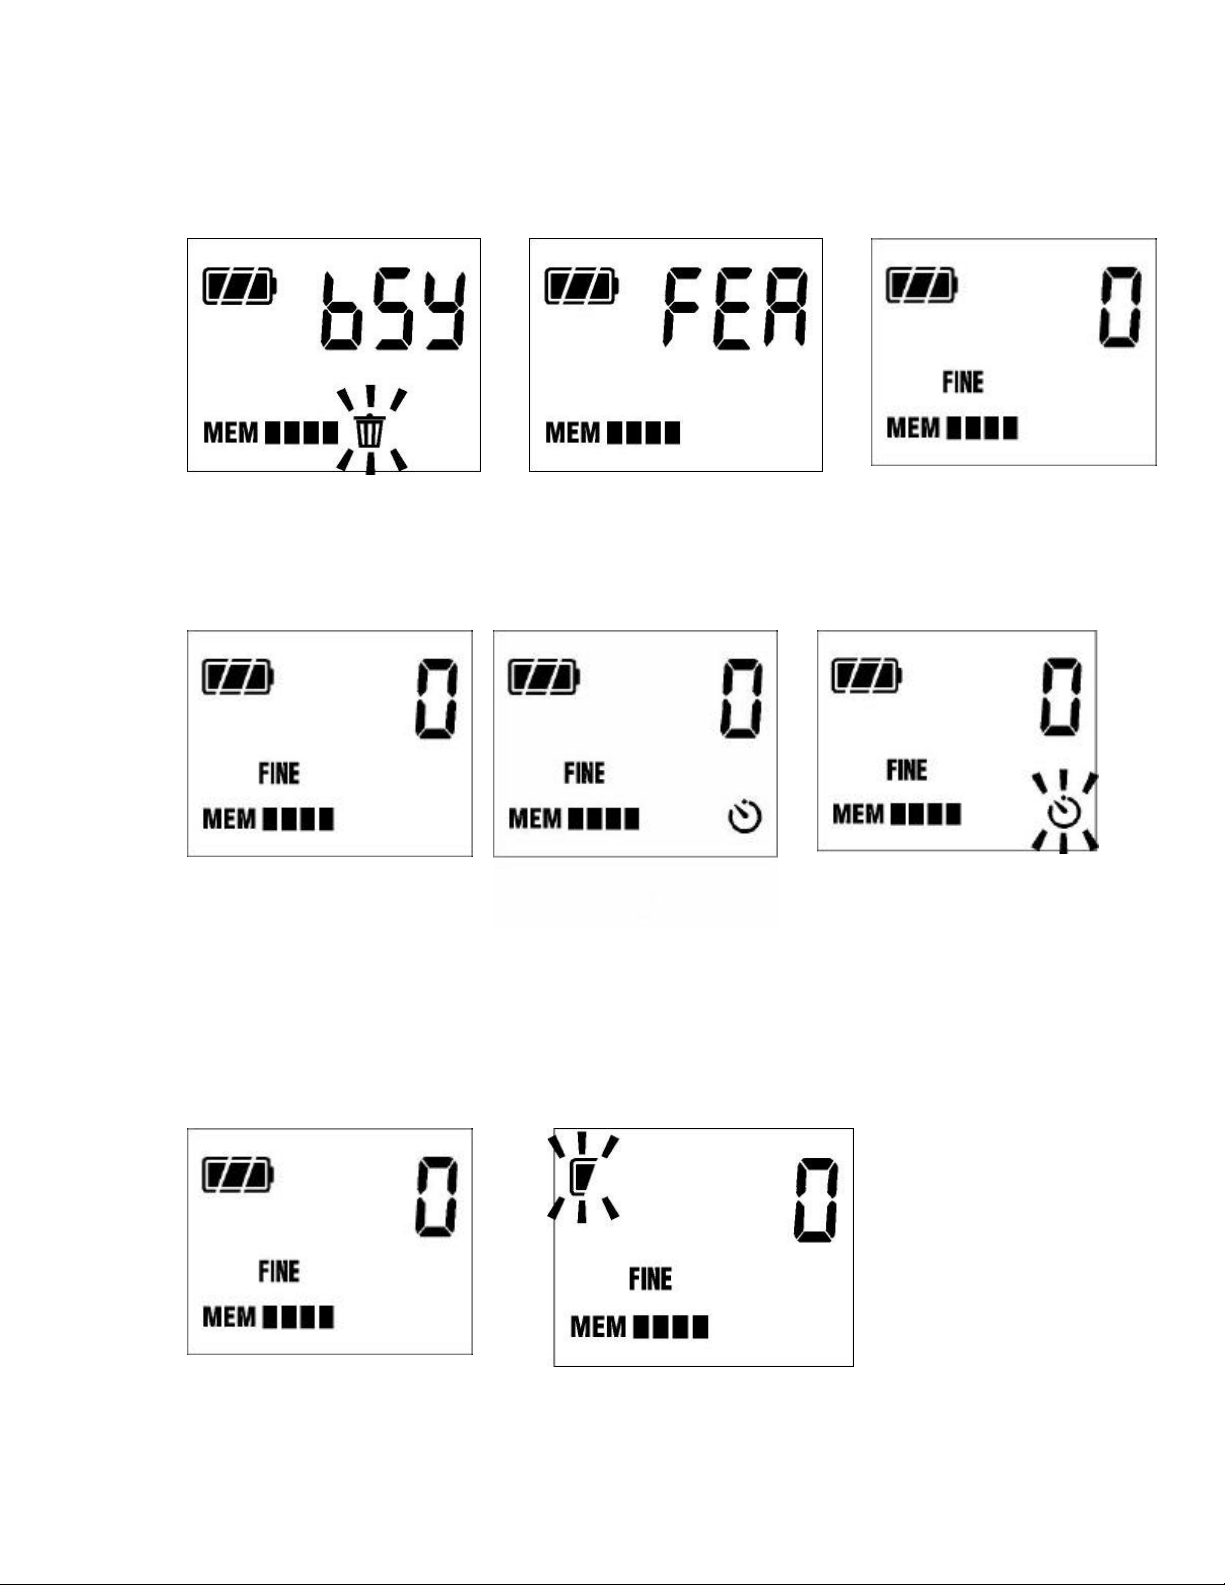
5. Delete All the photos.
Press Mode button 3 times, you see the Rubbish bin icon, press the Select button to do
Page 14 of 19
Page 15
User Manual for Fast Flicks Digital Camera
delete all function. The Rubbish bin icon is blinking. After 10s, it will show 0.
6. Self Timer mode :
Press the Select button, you see the Timer icon, press the Shutter button, the Timer icon
will blink and a photo is taken after 10s. The beeper is ‘Do,Do..’ and the LED is blinking.
Battery Low Detection
When the battery power is detected as Low, the last segment of the battery icon is
blinking.
Page 15 of 19
Page 16

User Manual for Fast Flicks Digital Camera
Remarks :
ZOOM (2X)
The photo taken by 2X mode is the middle part of the VGA total size. This is used for TV mode.
You can see a 2X image on the TV screen.
Green LED indication :
Blinking Busy or self timer is started (beeper sound ‘do,do’ is heard)
On Ready to take a photo, or taking a movie.
TV SYSTEM : PAL OR NTSC
NTSC system is the preset TV system for this camera. You can change this to PAL system.
Press Mode button 2 times, the NTSC icon is seen. Press the Select button one time it will
toggle to PAL. Press the Mode button until you see the film counter.
When you insert the TV cable jack to the camera, the TV system icon will be displayed.
Self Timer
In the operating mode, press the Select/Timer button to select Timer mode. The timer icon is
displayed in the status LCD right bottom corner.
Press the shutter button to take a photo and trigger the camera’s timer. After 10 seconds, the
image is captured. The LED is blinking and the buzzer sound is beeping during the
countdown time. You would better to use a tripod to fix the camera.
Recording a Movie
You can select the Movie mode in the Quality selection mode. Press the Mode button once,
press the Select button 4 times, you can see the Movie icon on. Press Mode button until you
see the film counter. Now the Movie mode is set.
Press the shutter and hold, you can hear beep beep sound. Now the movie is being taken and
saving to the internal memory. It will stop after say 30s. You can stop at any time before it is
automatically stopped.
The file size is about 980KB for the maximum movie play back time. The time is vary from
about 25s to 30s related to the image information.
Page 16 of 19
Page 17

User Manual for Fast Flicks Digital Camera
HHoosstt SSooffttwwaarree
Install the Fast Flicks Digital Camera driver to PC
Insert the CD ROM to the CD ROM drive of the PC. It will do driver installation after
completion of Arcsoft programs installation. Reset the PC is required. Open the Windows
Explorer and you can find the driver in the folder of ‘My Computer’ . You can right click the
mouse button to send the driver to the desktop as a short cut.
Connect the camera with the USB cord. Power on the camera unit. Click on the driver icon on
the desktop. The image files are read by the PC. You can select all images first. Then click
the right button of the mouse. Select Copy. Goto another folder in the hard drive. Press
Control V to paste the images to this folder. Then you can edit the images by the Arcsoft
program PhotoStudio or other similar programs.
- If the USB cord is not connected and the driver is clicked, it will try to search for the
COM port. Please wait until it comes back. Click Confirm to exit.
- You must put in the battery in order to power on the unit and connect to the PC.
Install the My Camera driver to MAC
Insert the CD-ROM to the CD-ROM drive of the MAC unit. Click on the CD -ROM icon on
the desktop. There is a Driver folder. Click on it and you can find the driver My Camera.
Click on it to do installation.
After installation, you can find the My Camera icon on the desktop. Plug in the camera which
some images taken and then click on this icon. It will open the dialog panel with the image
files. Click on it or select all images. It will ask you to save the image one by one. You can
select another folder instead of the My Camera folder. A window box is shown to help you.
Install the Quicktime 4.0
TM
In the CD-ROM, there is the Quicktime folder. Double click on the Qt.exe file, it will do
installation of Quicktime 4.0 TM if you have no such program. Follow the instructions and agree
the licence document. When the Svi_xxxx.mov file is clicked, it will automatically open the
Quicktime Player and you can see the first frame of the movie file. Click the Play icon to start.
Page 17 of 19
Page 18
User Manual for Fast Flicks Digital Camera
20. Operating conditions
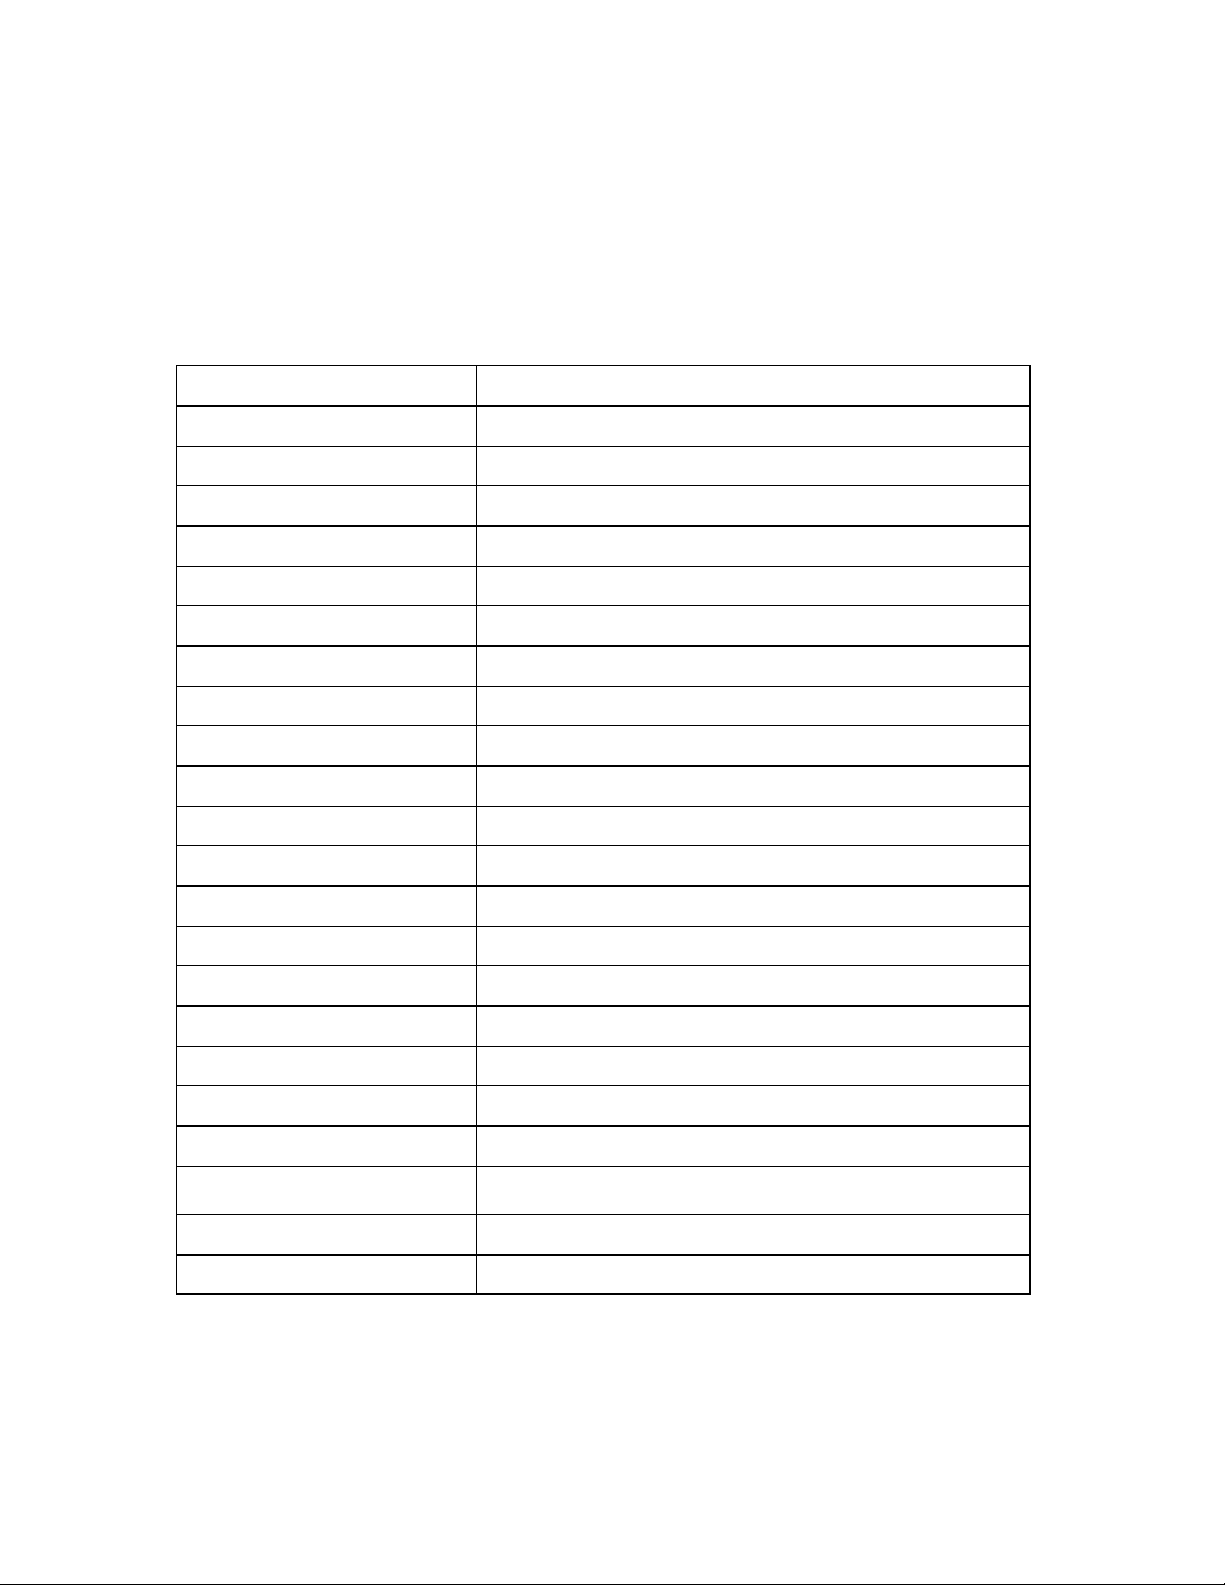
PRODUCT SPECIFICATIONS
Hardware :
1. Resolution 640x480 (VGA), 320x240 (QVGA),
2. Lens Plastic, two elements, F/3, 35mm(Equiv)
3. Memory Internal 8MB SDRAM (~6MB for photo storage)
4. Number of Pictures >50 Fine, >80 Normal, Economy
>100 2X
5. View Finder Yes. Also a mirror in the front cabinet.
6. Status LCD Yes.
7. Buzzer Yes.
8. LED One Green LED
9. Power Switch Yes.
10. Picture Retention By the main battery power.
11. Battery Power Alkaline AAA battery x 3 ( 4.5V)
12. Auto -Off
13. Upload speed <0.5 second per photo
14. TV video out NTSC or PAL selectable
15. White Balance Auto white balance & exposure
16. File format JPEG
17. Focusing range 0.6m to 10m (fixed focus lens)
18. Erase mode Delete all. (Delete any one by TV/PC mode)
19. Low Battery Detect Yes. Two levels.
21. Dimension 120x63x32mm (HWD)
15s/30s/60s/90s/none
0 ~ 40 deg C.
22. Net Weight 100g w/o battery
Page 18 of 19
Page 19
User Manual for Fast Flicks Digital Camera
Software : For both PC and Mac computer
1. Quicktime 4.0 Play the movie files
2. Photo Printer
3. Photo Fantasy
4. Photo Studio
5. Camera Driver
Print the photo in simple steps
Role play program
Photo editing program
USB hot plug driver
System Requirements :
1. Pentium 166MHz or higher.
2. Operation System : PC Win98,98SE, 2000, NT. MAC OS 8.6, 9.0.
3. 64MB SDRAM minimum.
4. 300MB hard disk capacity.
5. With functionable USB port
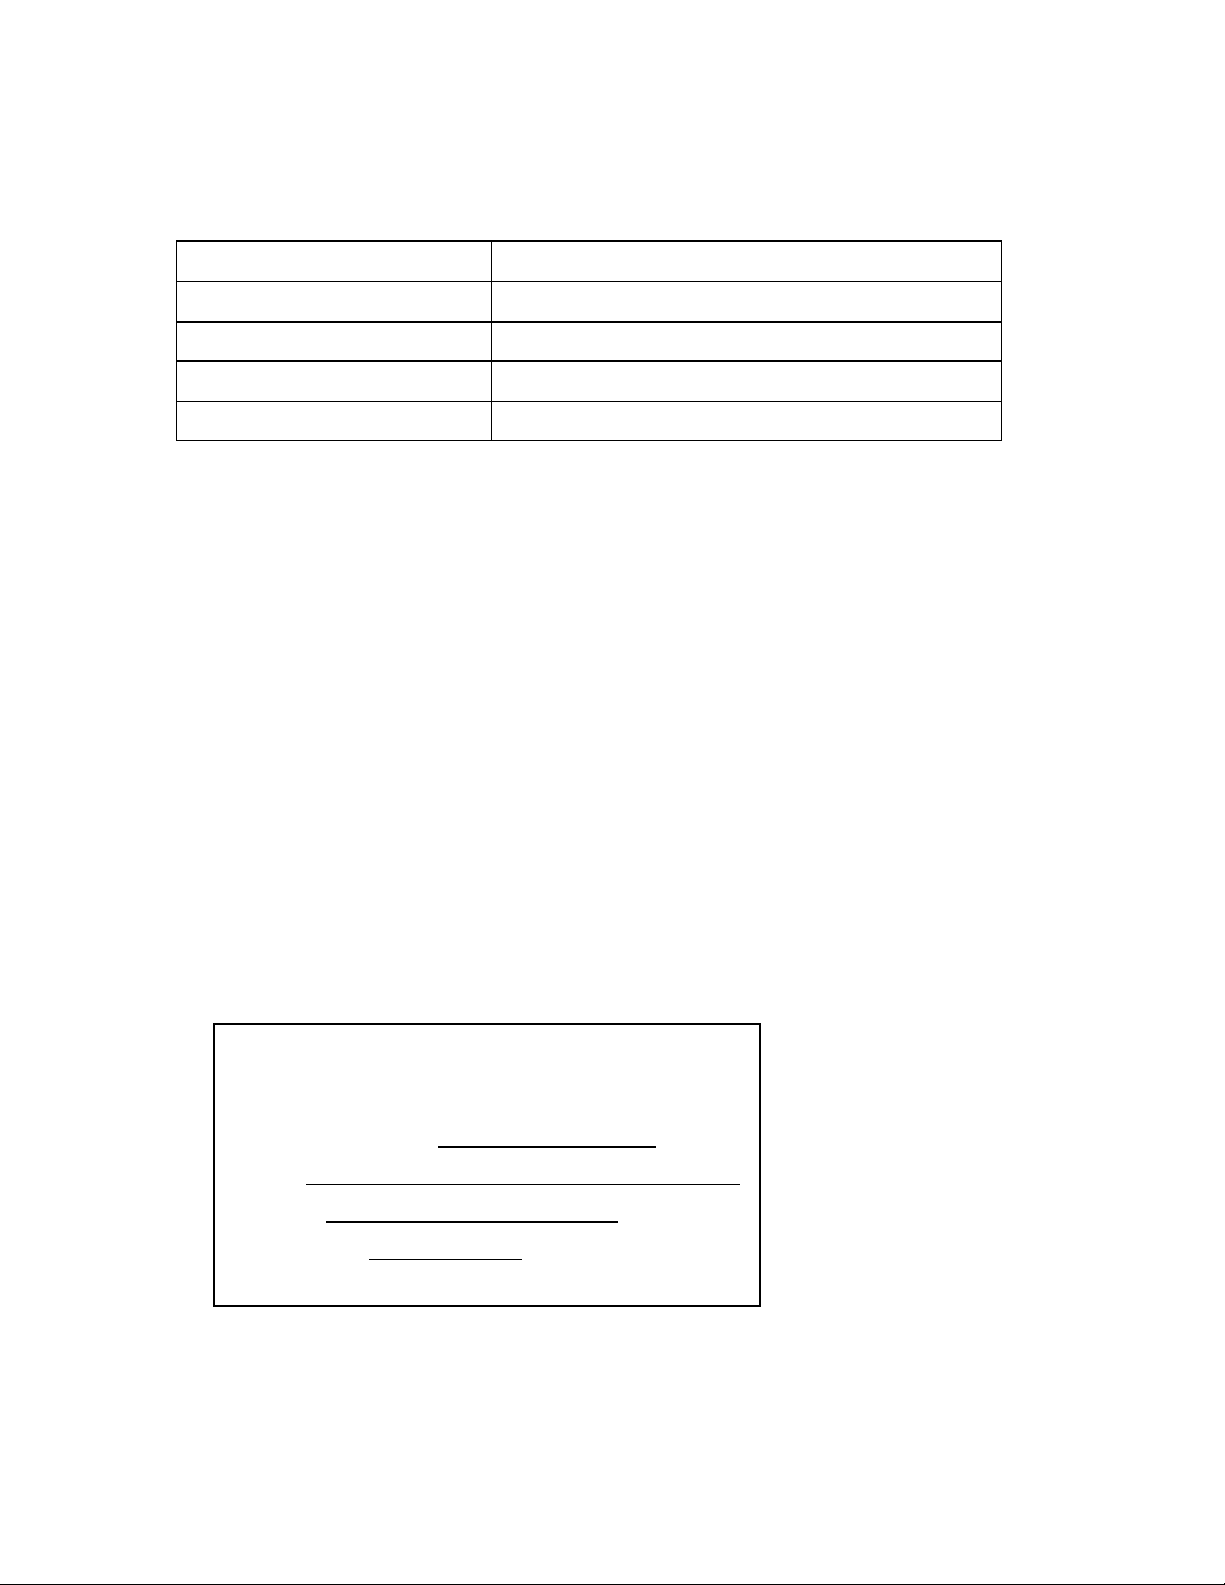
Responsible Party in USA :
Legal Company Name : Timlex International Ltd.
Address : 8851 Bald Eagle Drive, Blaine, Wa, USA. 98230.
Phone, Fax : 1-360-371-5008, 1-360-371-8509
Contact Person : Edward Pearson
Page 19 of 19
 Loading...