Timken Industrial Bearing Maintenance Manual
Industrial Bearing Maintenance Manual
WARNING
Failure to observe the following warnings could
create a risk of serious injury.
Proper maintenance and handling practices are critical.
Always follow installation instructions and
maintain proper lubrication.
Never spin a bearing with compressed air.
The rolling elements may be forcefully expelled.
CAUTION
Failure to observe the following cautions could
create a risk of serious injury.
Do not attempt to disassemble unitized bearings.
Remove oil or rust inhibitor from parts before heating
If a hammer and bar are used for installation or removal
of a part, use a mild steel bar (e.g. 1010 or 1020 grade).
Mild steel bars are less likely to cause release of high speed
fragments from the hammer, bar or the bering.
to avoid fire or fumes.
NOTE
This manual is not intended to substitue for the specific
recommendations of your equipment supplier.
Every reasonable effort has been made to ensure the accuracy
of the information contained in this catalog, but no liability is
accepted for errors, omissions or for any other reason.

INDEX
TIMKEN - WHERE YOU TURN..................................5
A
GENERAL BEARING HANDLING AND INSPECTION...............9
B
INTERNAL CLEARANCES ....................................19
C
SHAFT AND HOUSING REQUIREMENTS .......................31
D
SHAFT AND HOUSING TOLERANCES ABMA STANDARD 7.......37
E
TAPERED ROLLER BEARINGS.................................55
F
SPHERICAL ROLLER BEARINGS...............................89
G
CYLINDRICAL ROLLER BEARINGS............................101
H
THRUST BEARINGS ........................................109
I
BALL BEARINGS ...........................................117
J
MAINTENANCE TOOLS . . . . . . . . . . . . . . . . . . . . . . . . . . . . . . . . . . . . . 143
K
LUBRICATION AND SEALS . . . . . . . . . . . . . . . . . . . . . . . . . . . . . . . . . . 147
L
INDUSTRIAL BEARING MAINTENANCE MANUAL
3

INDUSTRIAL BEARING MAINTENANCE MANUAL
4

T
I
M
K
E
N
A
-
W
H
E
R
E
Y
O
U
T
U
R
N
A
A
TIMKEN - WHERE YOU TURN

A
K
E
N
-
W
H
E
R
E
Y
O
U
T
U
R
N
T
M
I
A
TIMKEN - WHERE YOU TURN
TIMKEN - WHERE YOU TURN
A
Maintenance professionals around the world turn to Timken to help
improve the performance and extend the life of their equipment.
The information in this manual will help you follow proper industrial
maintenance practices to get the most out of your Timken
products and the equipment in which they operate. You will find
practical information describing how to install, adjust, lubricate
and maintain all of the primary types of anti-friction bearings. We
have also included additional information on maintenance tools
and proper lubrication.
ENGINEERING EXPERTISE
Timken has more than a century of experience developing bearings
and related products that reduce friction, improve efficiency and
minimize customer maintenance. Our advancements in bearing
design, quality and materials create a customer advantage we
call “power density.” This means we are increasing bearing loadcarrying capability, enabling a smaller bearing to carry the same
load for the same predicted life as a previously larger one. Power
density gives equipment designers greater flexibility and leads to
lower total system cost.
CUSTOMER SERVICE AND SUPPORT
Practices such as bearing mounting, adjustment and proper
lubrication are very specific to an application. While we are not
able to encompass every practice for every application in this
manual, additional Timken publications and resources are available
to assist with specialized tasks for a wide range of applications.
In addition, our Timken sales representatives are available to help
you address unique bearing-related application problems. Backed
by a global team of experts that include metallurgists, lubrication
specialists, scientists, service engineers and customer service
representatives, they comprise an unmatched technical resource
for our customers.
A COMPLETE LINE OF FRICTION MANAGEMENT
PRODUCTS AND SERVICES
Our friction management knowledge is being applied to a broader
array of products and services than ever before. We have a total
system approach to our engineering philosophy and our product
and service offering, which impacts uptime, maintenance costs
and your bottom line. Turn to us today for one of the world’s most
complete friction management offerings, including:
Condition Monitoring
•
Lubrication
•
Maintenance Tools
•
Remanufacture and Repair
•
Seals
•
Training
•
INDUSTRIAL BEARING MAINTENANCE MANUAL
7

A
TIMKEN - WHERE YOU TURN
INDUSTRIAL BEARING MAINTENANCE MANUAL
8

G
E
N
B
E
R
A
L
B
E
A
R
I
N
G
H
A
N
D
L
I
N
G
B
GENERAL BEARING
HANDLING AND INSPECTION
General Bearing Handling And Inspection ................11
Bearing Storage ........................................11
Removing Bearings From Equipment .....................12
Damaged Bearings .....................................14
Installation .............................................14
Lubrication .............................................17
A
N
B
N
I
O
T
C
E
P
S
I
N
D

B
E
R
A
N
I
G
H
A
N
D
L
I
N
G
A
N
D
N
O
I
T
C
E
P
S
N
I
E
N
E
G
A
R
L
B
B

GENERAL BEARING HANDLING AND INSPECTION
GENERAL BEARING
HANDLING AND INSPECTION
Bearings are a vital component in major industrial equipment.
Bearing problems can result in costly downtime, equipment
damage and breakdowns. In addition, large industrial bearings
represent a significant capital investment.
To attain reliable operation with high equipment performance and
the lowest possible maintenance costs, it is essential to follow
proper handling practices. This includes bearing storage, removal,
cleaning, inspection and installation.
BEARING STORAGE
Bearings with special anti-corrosion coatings are available, but
most bearings are not manufactured from corrosion resistant
materials. When handling and storing bearings, care must be
taken to ensure that they will not rust or corrode. Even a small
amount of moisture or chemical left on an unprotected bearing
by a glove or hand can result in a small etched area, which may
initiate bearing fatigue.
B
The useful life of any bearing depends to a great extent on the care
and maintenance it receives. This is especially true in industrial
applications, where operating conditions tend to be harsh, loads
are heavy, and contamination from dirt and scale are common.
Details about specific handling and inspection processes for
different types of bearings are included in those sections of this
manual. This section addresses general processes and practices
that apply to all anti-friction bearing designs.
New and remanufactured Timken bearings are shipped with a
protective coating, are typically covered in a protective paper
or other wrapping, and are shipped in a carton or crate. When
receiving a new or remanufactured bearing, do not remove it from
its packaging until ready to install in the application.
Do not store bearings directly on concrete floors, where water
can condense and collect on the bearing. Store the bearings on a
pallet or shelf, in an area where the bearings will not be subjected
to high humidity or sudden and severe temperature changes that
may result in condensation forming.
Always put oiled paper or, if not available, plastic sheets between
rollers and cup races of tapered roller bearings.
INDUSTRIAL BEARING MAINTENANCE MANUAL
11
GENERAL BEARING HANDLING AND INSPECTION
REMOVING BEARINGS FROM EQUIPMENT
B
Each type of bearing design has a unique removal process.
Regardless of the bearing type, the bearing must be removed with
extreme care. If done incorrectly, you can damage the bearings,
shafts or housings, requiring expensive repairs.
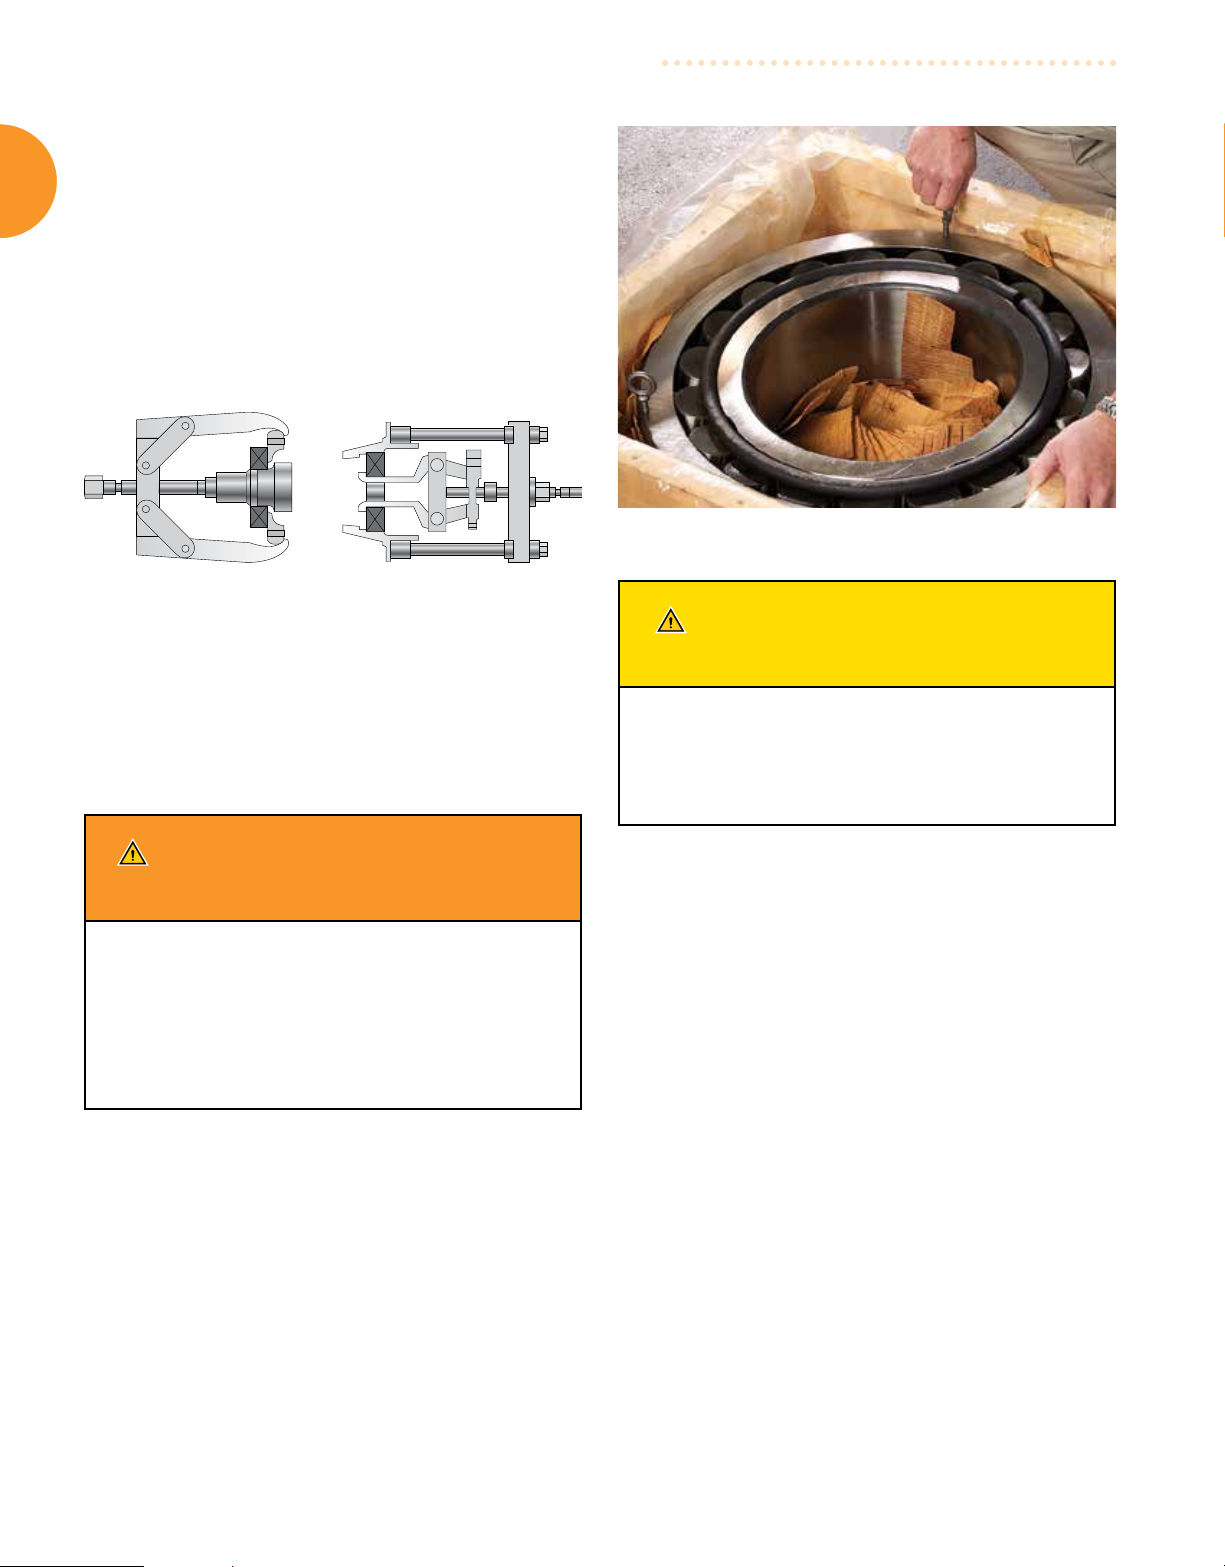
For smaller bearings, there are a variety of pullers available to
assist with bearing removal (Fig. 1). Information concerning special
pullers or other removal devices can be obtained by contacting
your Timken representative.
Fig. 1. Pullers for bearing removal.
For bearings installed with a tight or press fit, or that have
become locked in place on a shaft and cannot be removed with a
mechanical puller, the inner ring of the bearing can be heated to
ease removal. Heat lamps or other heating devices can be used.
If a torch is used, it will change the properties of the bearing steel
and the bearing must be discarded.
Fig. 2. Eyebolts can be inserted into lifting holes.
CAUTION Failure to observe the following
cautions could create a risk of injury.
If the bearing is to be reused or returned for repair,
do not use heat from a torch.
Extreme heat from a torch can alter the bearing hardness and
metallurgical structure, resulting in irreparable damage.
WARNING Failure to observe the following
warnings could create a risk of serious bodily harm.
Tensile stresses can be very high in tightly fitted bearing
components. Attempting to remove such components by cutting
the cone (inner race) may result in a sudden shattering of the
component causing fragments of metal to be forcefully expelled.
Always use properly guarded presses or bearing pullers to
remove bearings from shafts, and always use suitable personal
protective equipment, including safety glasses.
Lifting large bearings
Large bearings can be lifted and moved using a variety of slings,
hooks, chains and mechanical devices. Some large bearings are
manufactured with tapped holes in the face of inner rings or outer
rings. Eyebolts or other points of attachment can be inserted in
these lifting holes (Fig. 2).
Many large bearings have threaded lifting holes in the cage ring
that can be used to lift the inner ring assembly.
A clean, heavy duty nylon sling provides one of the best means
of handling large bearing components because it eliminates the
possibility of burring or scratching.
Regardless of what method is used to lift the bearings, use care
to avoid damaging any of the bearing surfaces. Be especially
cautious when lifting or moving bearings that are equipped with a
cage. The cage is typically the most deformable component of the
bearing and is more susceptible to damage.
Cleaning
After removing a bearing from a piece of equipment, thoroughly
clean it to remove all scale, water, lubricant, debris and any other
contaminants. Bearings must be cleaned thoroughly to allow for
proper bearing inspection.
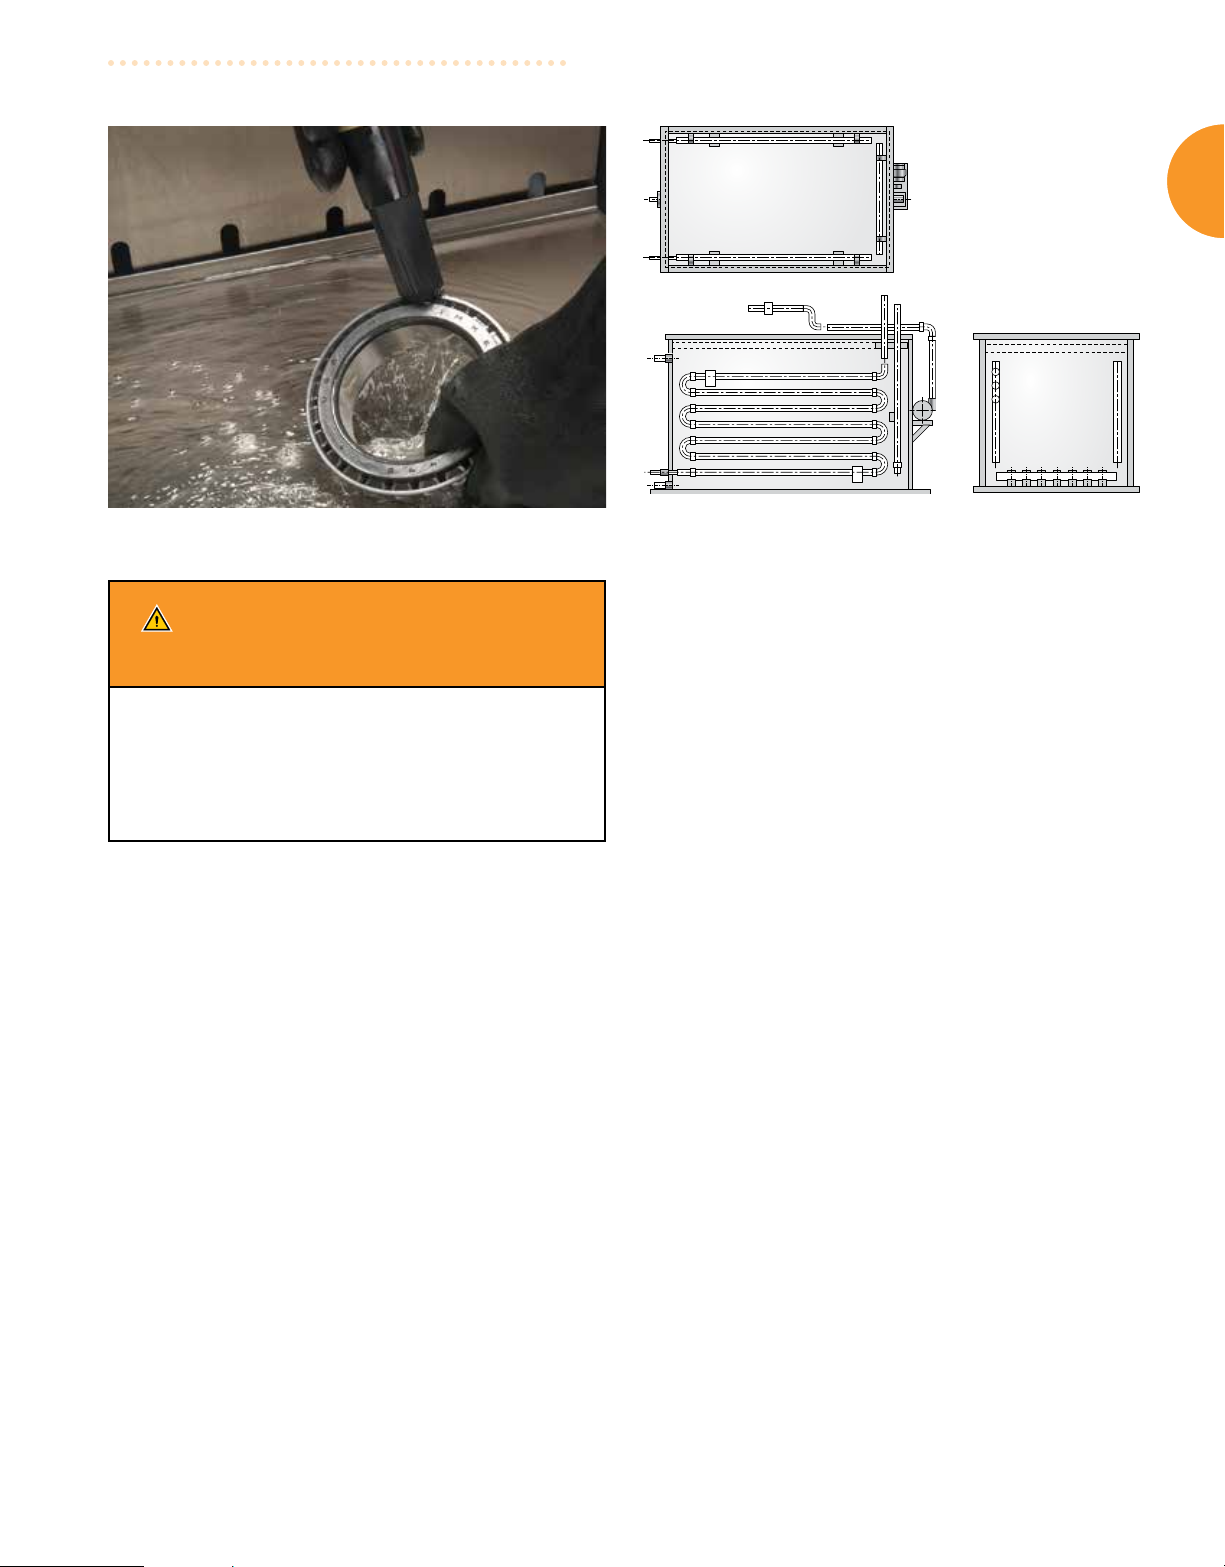
Smaller bearings can be cleaned in a wash tank that circulates a
cleaning solution such as kerosene, mineral spirits or a commercial
solvent through the bearing (Fig. 3). Use the cleaning solution
to remove all lubricant and contamination, making sure that the
internal rolling elements are completely clean.
INDUSTRIAL BEARING MAINTENANCE MANUAL
12
GENERAL BEARING HANDLING AND INSPECTION
B
Fig. 3. Smaller bearings can be cleaned in a wash tank.
WARNING Failure to observe the following
warnings could create a risk of serious bodily harm.
Proper maintenance and handling practices are critical.
Failure to follow installation instructions and to maintain
proper lubrication can result in equipment failure.
Never spin a bearing with compressed air.
The rolling elements may be forcefully expelled.
Alkali cleaners, such as trisodium phosphate (TSP) mixed two
or three ounces per gallon of hot water, may also be used. Hot
cleaning solutions are often used as a final cleaning or rinse after
the initial cleaning.
For large bearings, or to clean large numbers of bearings, special
cleaning equipment such as a large tank containing appropriate
cleaning solution is required. Tanks are typically heated with
electrical coils, and a pump is used to agitate the cleaning solution
(Fig. 4). Final cleaning is done by suspending the bearing and using
a hose to flush away any contamination.
To reduce bearing contamination from other sources, all parts of the
housing, shaft and gears should also be thoroughly cleaned. After
the bearing has been cleaned, it can be dried with compressed air,
taking care not to let the bearing spin.
Fig. 4. Tanks are heated with electric coils and a pump is used to
agitate the cleaning solution.
Inspection
When a piece of equipment is taken out of service for routine
inspection or maintenance, take the opportunity to also inspect
and measure the bearings to ensure that they are still within
tolerance specifications for the application. In some applications,
the expected bearing life may be the limiting factor in the equipment
maintenance schedule.
The schedule for equipment tear downs for bearing inspection will
vary depending on operating conditions. Consult your equipment
maker for the appropriate inspection schedule.
Between equipment tear downs where full bearing inspections are
conducted, you should conduct routine inspections to ensure that
bearings are operating normally and have proper lubrication. To
reduce the need for these inspections, and to more closely monitor
bearing and equipment health, Timken condition monitoring
systems are available that sense the vibration and temperature
in bearings.
The inspection area must be clean and free from dirt and debris to
avoid contaminating the bearing. Even a small piece of debris that
enters a bearing can create a point of high stress that could lead
to spalling and early fatigue.
After cleaning, the bearing should be carefully inspected for
damage and wear. If the bearing is not going to be returned to
service immediately, it should be covered with a coating of light oil
to protect against rust and corrosion.
INDUSTRIAL BEARING MAINTENANCE MANUAL
13
GENERAL BEARING HANDLING AND INSPECTION
B
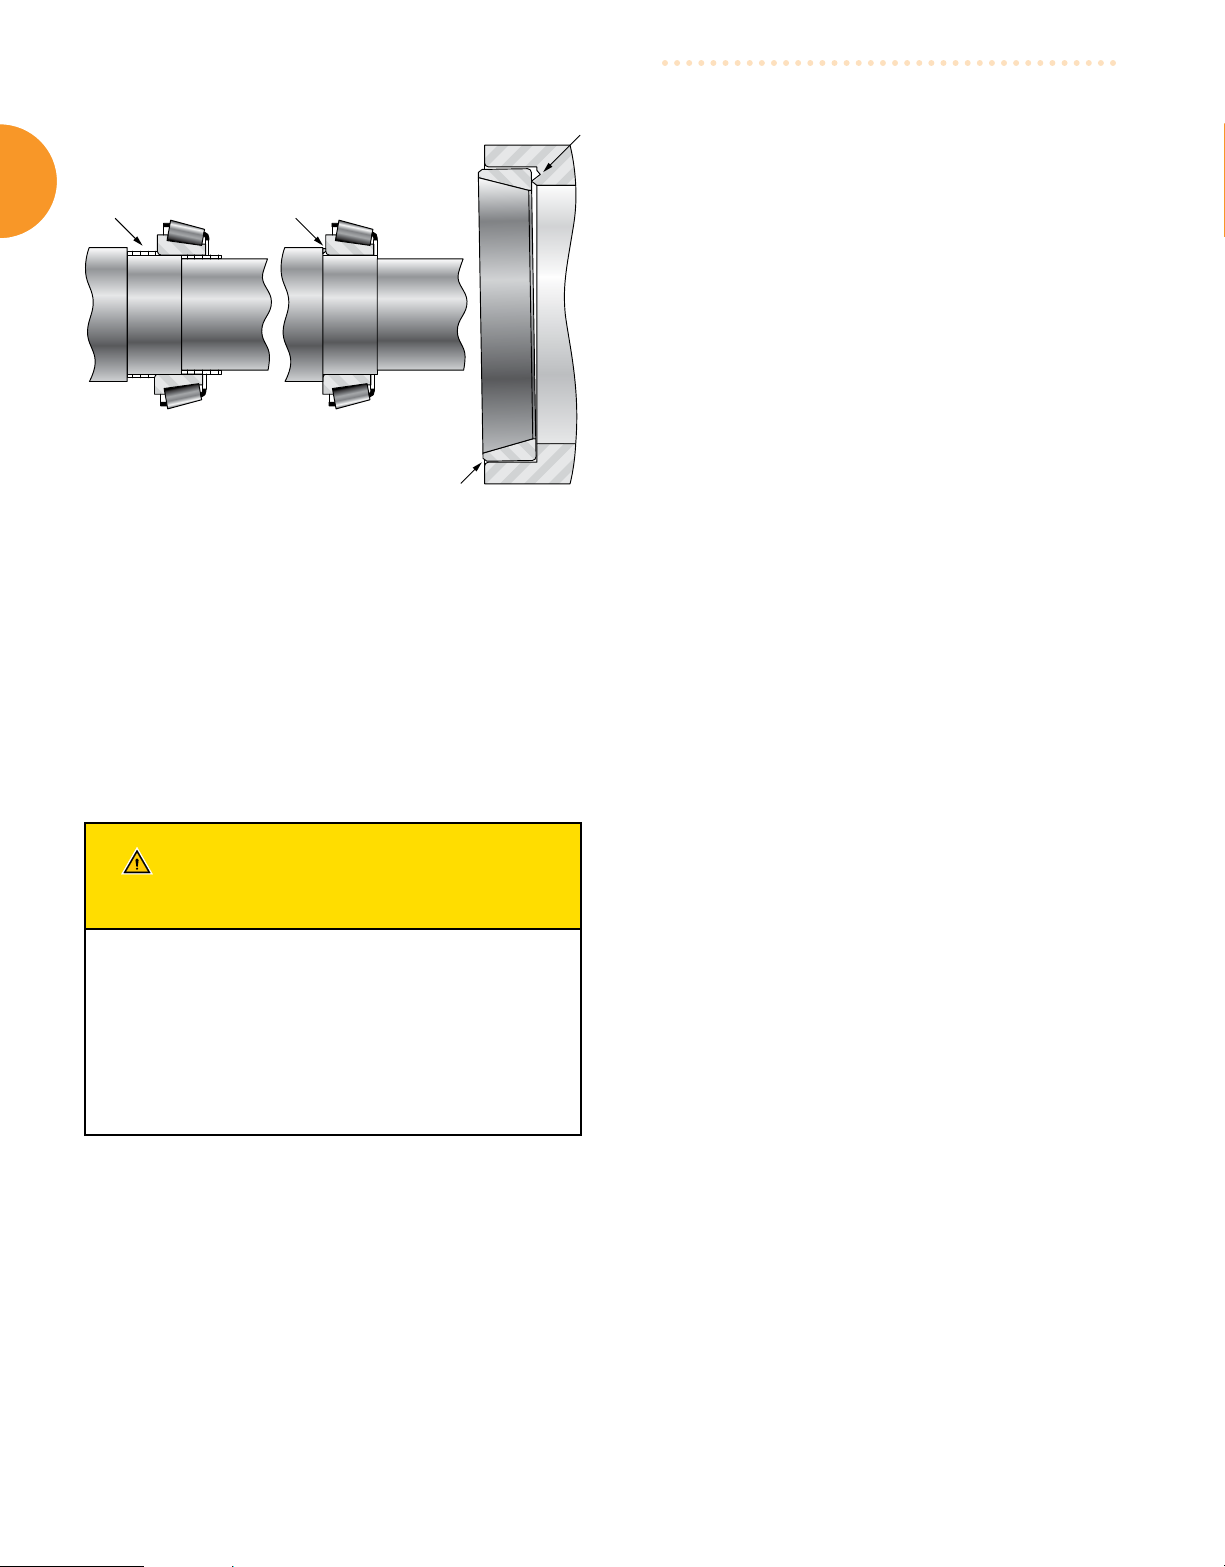
Chips on the bearing
seat are trapped
between face of bearing
and shoulder
Fig. 5. It is important to check for burrs on the
inner and outer ring seats and backing surfaces.
In addition to examining the bearing, a full inspection should
include the housing and shaft. Check for burrs or metal chips
on the inner and outer ring seats and backing surfaces (Fig. 5).
Burrs or chips can be removed by scraping or filing the damaged
surfaces.
Inspect the shaft for proper size, roundness, burrs or other damage.
A 12-point check of the shaft with a micrometer is suggested
(see page 33). If there is evidence of shaft or housing wear, it
should be checked against original equipment manufacturer’s
specifications.
Burrs on shoulder or
bearing seat
valuable clues that can help analyze and identify possible causes,
leading to corrective actions that will help ensure longer bearing
life in the replacement bearing.
There are several Timken resources available to assist you in
analyzing bearing damage, including online resources at timken.
com and publications with photos representing common types
of bearing damage. Contact your Timken representative for more
information.
Bearing repair
Small areas of damage on bearing races, and on the contact
surface of the rolling elements, can sometimes be repaired by
grinding out the loose metal. Any raised or rough areas should be
smoothed flat with grinding and polishing tools.
Light rust or corrosion should be removed with emery paper
(240 – 320 # grit). As much of the damage should be removed as
possible to prevent it from contaminating the bearing when it is
returned to service.
For more complex bearing repairs, Timken offers remanufacture
and repair services.
INSTALLATION
Do not remove the bearing from its packaging until you are ready to
mount it. The packaging provides protection from contamination.
CAUTION Failure to observe the following
cautions could create a risk of injury.
Do not attempt to disassemble unitized bearings.
Remove oil or rust inhibitor from parts before heating
to avoid fire or fumes.
If a hammer and bar are used for installation or removal of a
part, use a mild steel bar (e.g. 1010 or 1020 grade). Mild steel
bars are less likely to cause release of high speed fragments
from the hammer, bar or the bearing.
DAMAGED BEARINGS
Despite taking proper precautions, bearings may become damaged
either through improper storage and handling or through normal
wear in use. Bearings that have been damaged or are no longer
within specifications may still be returned to service after repair or
refurbishment. Some bearings can be refurbished more than once.
Eventually all bearings will sustain sufficient wear or damage and
will have to be replaced.
If a bearing is damaged or worn beyond repair sooner than
expected, do not discard it. The nature of the damage can provide
When installing a new bearing, do not remove the lubricant or
preservative applied by the manufacturer. The preservatives
used on almost all bearings are fully compatible with commonly
used oils and other lubricants. Leaving it in place will protect the
bearing from fingerprints and corrosion.
Bearings should be installed in a clean environment, free from
dust, debris, moisture and other contaminants. When installing a
bearing in the field, make an effort to ensure a clean work area.
Use protective screens around the work area, and provide a clean
resting surface for the bearing and other components until they
can be installed.
Before beginning the installation, plan your work. Be certain that
you have the correct replacement bearing and necessary additional
components. Also determine what tools will be required, including
adjustment tools if appropriate, and have them on hand. Finally,
if the bearing needs to be lubricated as part of the installation
process, have the appropriate lubricants and tools available.
Planning your work will enable you to perform the installation
more quickly with few delays, shortening the amount of time the
bearing is out of the equipment and exposed to contamination and
possible handling damage.
INDUSTRIAL BEARING MAINTENANCE MANUAL
14
GENERAL BEARING HANDLING AND INSPECTION
B
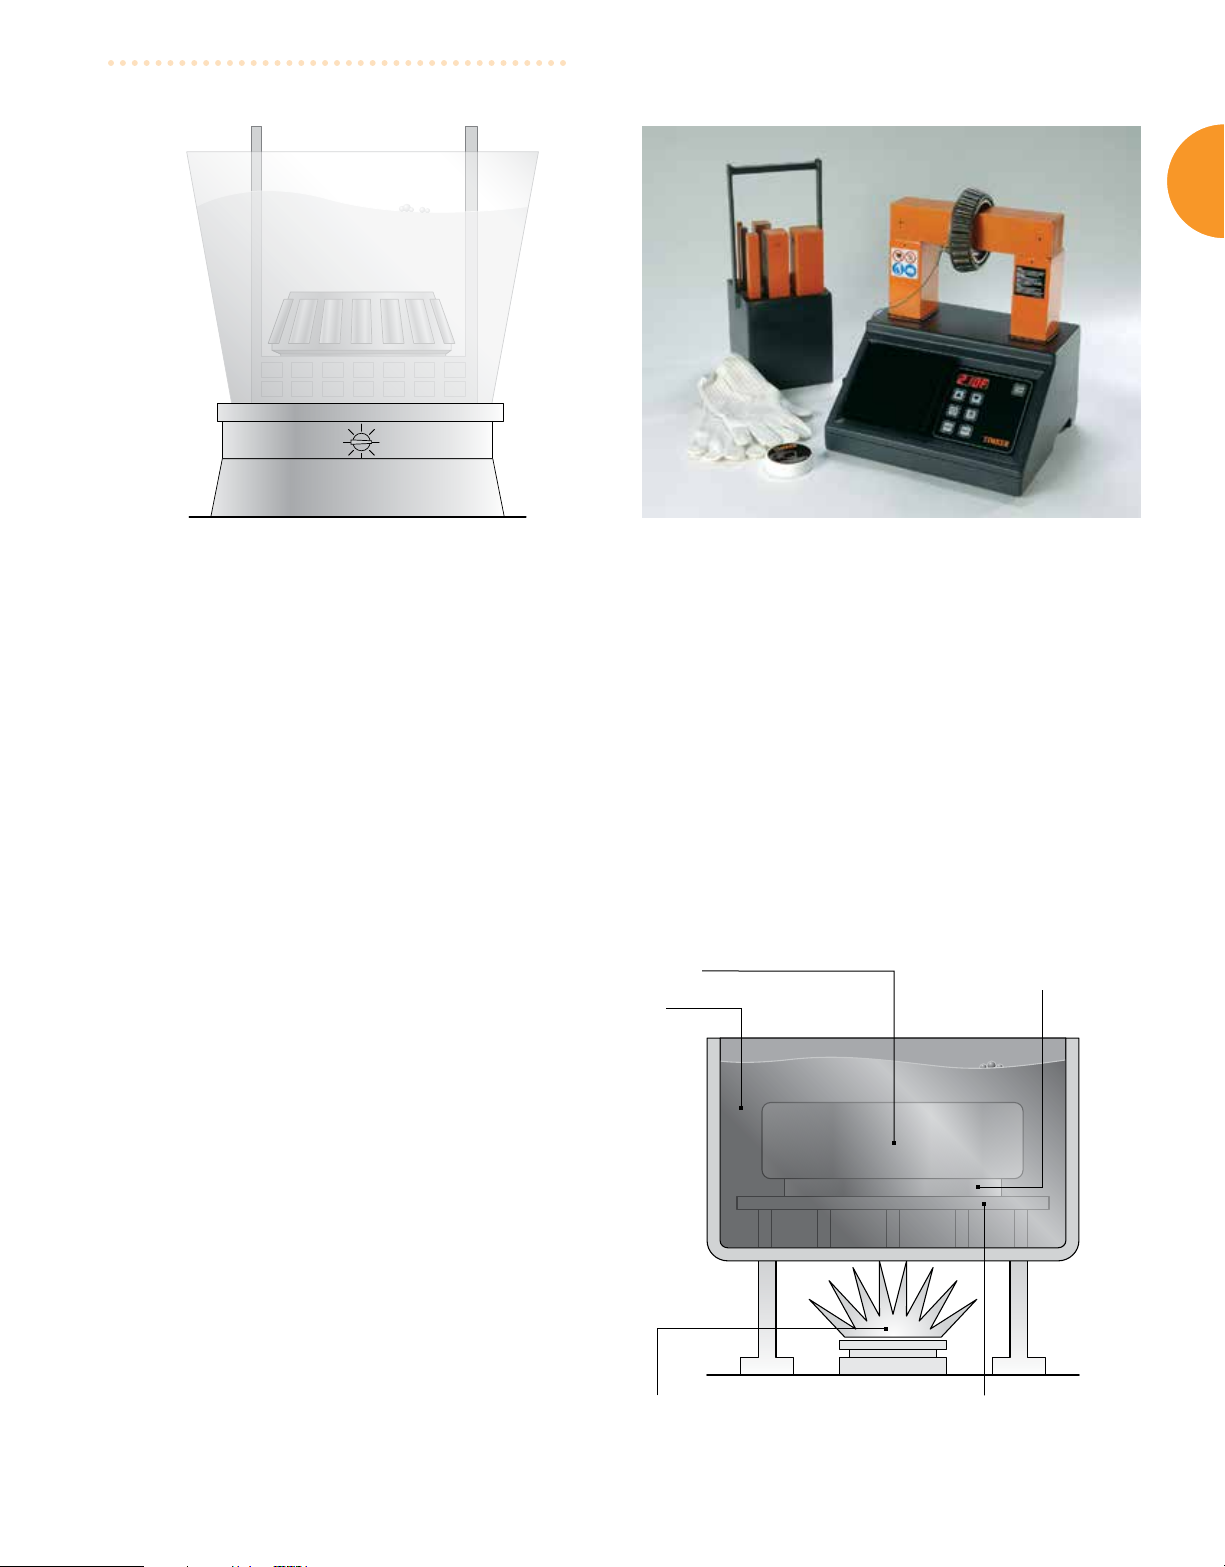
Fig. 6. Bearings can be heated in a pan or metal container filled
with oil.
Thoroughly clean all machine components near where the bearing
will be installed, giving special attention to the mounting surfaces
and housings. Housings should be cleaned, including blowing
out the oil holes. If the equipment has blind holes where air is
ineffective, use a magnetic rod to remove metal chips that might
have become lodged there during machining or maintenance.
Shaft surfaces that will support and contact the bearing must be
clean and free from nicks or burrs. Shaft shoulders and spacer
rings contacting the bearing should be square with the shaft axis.
The shaft fillet must be small enough to clear the radius of the
bearing.
Do not install bearings in a damaged or worn housing, or on a
damaged or worn shaft. Inner and outer ring seat damage should
be repaired by using properly fitted sleeves. Shafts can be built
up by metal spray and machined to the correct size. If there is not
a press fit on the shaft, a weld overlay and re-grind process is
recommended to bring the shaft back to specification.
Heating bearings
Fig. 7. Induction heater.
A heat lamp can also be used to heat rings, and the temperature
regulated by adjusting the distance from the light to the ring.
The fastest method of safely heating bearings is an induction
heater (Fig. 7). Induction heaters work very quickly. Take care
to avoid heating the bearing to temperatures higher than 120ºC
(250ºF).
For larger bearings, you may need to use an oil bath to heat the
bearing (Fig. 8). Maximum temperature of the oil bath should
not exceed 120ºC (250ºF). The bearing should be positioned in
the center of the tank, and allowed to heat long enough to fully
expand. Do not allow the bearing to come in direct contact with
the heat source.
Bearing
Oil
Bearing support
block
In applications that require a tight fit of the inner ring on the shaft,
it can be easier to install the bearing if it is first heated to expand
slightly. For applications that require a tight fit of the outer ring in
a housing, it may also be possible to heat the housing to expand it,
allowing the bearing to install more easily.
Small bearings can be heated using several methods. They can be
heated in a pan or metal container filled with oil (Fig. 6). A screen
or platform should be used to keep the bearing from resting on the
bottom of the pan where heat is applied.
Flame burner
Fig. 8. Oil bath.
Bearing held from bottom by
screen/platform
INDUSTRIAL BEARING MAINTENANCE MANUAL
15

B
GENERAL BEARING HANDLING AND INSPECTION
TEMPERATURE GUIDELINES FOR HEATING OR COOLING
CAUTION Failure to observe the following
cautions could create a risk of injury.
If the bearing is to be reused or returned for repair,
do not use heat from a torch.
Extreme heat from a torch can alter the bearing hardness and
metallurgical structure, resulting in irreparable damage.
Keep the bearings away from any localized high-heat source
that may raise the bearing temperature too high, resulting in race
hardness reduction.
When heating bearings, be sure that they have enough time to
fully heat. Bearings typically require 20 to 30 minutes of soak time
per inch of inner-ring cross section to fully heat in an oil tank.
While the bearing is still warm, remove it from the heater or tank
and place it on the shaft. Slide the bearing up the shaft until it
squarely contacts the shaft shoulder. Then install the locknut/
washer or clamping plate to prevent the bearing from backing off
the shoulder while cooling. As the bearing cools, the locknut or
clamping plate should be tightened.
ROLLING ELEMENT BEARINGS FOR INSTALLATION
These maximum and minimum temperatures, as well as maximum
time-at-temperature limits, have been established to prevent
metallurgical transformation of steel components, and potential,
detrimental physical changes in seals or non-metallic components.
During the manufacturing process, bearing rings and rolling
elements are heat treated to define the strength, hardness and
dimensional stability for proper operation. Heating or cooling
bearings or bearing components beyond these limits may affect
performance.
These suggestions are merely guidelines and, as new data is
developed, the values as shown may change. These guidelines do
not cover all Timken
NOTE: Always use protective safety equipment and clothing when
handling parts that have been heated or cooled.
Never heat a bearing with a torch, as localized heating will irreparably
damage bearing components.
Never rapidly heat or freeze a bearing or bearing component.
Only use approved equipment, methods and controls to achieve
desired temperature.
Always follow OEM instructions to ensure bearings and rings are
properly positioned after heating or cooling.
®
products.
Thermal growth of components can be calculated using the
formula:
d x ΔT x α = Thermal Growth
Where:
d = bearing bore diameter
ΔT = maximum bearing temperature after heating minus
ambient temperature
α = coefficient of linear expansion: 11 x 10
for ferrous metal shaft and housing materials
-6
/ ºC (6.1 x 10⁻⁶/ ºF)
Sample calculation
Example:
For a bearing with a 3-1/2 in. bore heated from an ambient
temperature of 70° F to 200° F, the thermal growth of the bearing
bore diameter can be calculated as follows:
Thermal Growth = 3.500” x (200° - 70°) x 6.1x10
For a bearing with a 90 mm bore heated from an ambient
temperature of 21° C to 93° C:
Thermal Growth = 90 mm x (93° - 21°) x 11x10
-6
= 0.0028 in.
-6
= 0.071 mm
Heating
Standard class bearings or rings (with metallic cages and without seals):
Include Class 2, 4, 7, K, N, ABEC-1 and ABEC-3
•
93°C (200°F) - 24 Hours
•
121°C (250°F) - 8 Hours
•
Precision bearings or rings (with non-metallic cages and polymer or elastomer seals):
Special considerations may apply for phenolic cages or spe-
•
cial fluorocarbon lip seals.
Include Class 3, 0, 00, 000, C, B, A, AA, ABEC 5 and 7
•
Precision and superprecision class bearings and rings (any)
66°C (150°F) - 24 Hours
•
INDUSTRIAL BEARING MAINTENANCE MANUAL
16

Cooling (Freezing)
GENERAL BEARING HANDLING AND INSPECTION
Freezing standard class bearings and rings
54°C (-65°F) - 1 Hour
•
Freezing precision class outer rings or cups
-29°C (-20°F) - 2 Hours
•
Note: This temperature can be obtained by commercial freezer/
refrigeration equipment.
Cone bore temperature reading in degrees
Thermometer Temperature Reading in Degrees
Cone Bore
mm
in.
25.4 0.012 0.020 0.027 482.6 0.231 0.375 0.520
1 0.0005 0.0008 0.0011 19 0.0091 0.0148 0.0205
50.8 0.025 0.040 0.055 508 0.243 0.396 0.548
2 0.0010 0.0016 0.0022 20 0.0096 0.0156 0.0216
76.2 0.036 0.058 0.081 533.4 0.256 0.416 0.576
3 0.0014 0.0023 0.0032 21 0.0101 0.0164 0.0227
101.6 0.048 0.078 0.109 558.8 0.269 0.436 0.604
4 0.0019 0.0031 0.0043 22 0.0106 0.0172 0.0238
127 0.061 0.099 0.137 584.2 0.279 0.454 0.629
5 0.0024 0.0039 0.0054 23 0.011 0.0179 0.0248
152.4 0.073 0.119 0.165 609.6 0.292 0.475 0.657
6 0.0029 0.0047 0.0065 24 0.0115 0.0187 0.0259
177.8 0.086 0.139 0.193 635 0.304 0.495 0.685
7 0.0034 0.0055 0.0076 25 0.012 0.0195 0.027
203.2 0.096 0.157 0.218 660.4 0.317 0.515 0.713
8 0.0038 0.0062 0.0086 26 0.0125 0.0203 0.0281
228.6 0.109 0.177 0.246 685.8 0.330 0.535 0.741
9 0.0043 0.0070 0.0097 27 0.013 0.0211 0.0292
254 0.121 0.198 0.274 711.2 0.340 0.553 0.767
10 0.0048 0.0078 0.0108 28 0.0134 0.0218 0.0302
279.4 0.134 0.218 0.302 736.6 0.353 0.574 0.795
11 0.0053 0.0086 0.0119 29 0.0139 0.0226 0.0313
304.8 0.147 0.238 0.330 762 0.365 0.594 0.823
12 0.0058 0.0094 0.013 30 0.0144 0.0234 0.0324
330 0.157 0.256 0.355 787.4 0.378 0.614 0.85
13 0.0062 0.0101 0.014 31 0.0149 0.0242 0.0335
355.6 0.170 0.276 0.383 812.8 0.391 0.635 0.878
14 0.0067 0.0109 0.0151 32 0.0154 0.025 0.0346
381 0.182 0.297 0.411 838.2 0.401 0.652 0.904
15 0.0072 0.0117 0.0162 33 0.0158 0.0257 0.0356
406.4 0.195 0.317 0.439 863.6 0.414 0.673 0.932
16 0.0077 0.0125 0.0173 34 0.0163 0.0265 0.0367
431.8 0.208 0.337 0.467 889 0.426 0.693 0.960
17 0.0082 0.0133 0.0184 35 0.0168 0.0273 0.0378
457.2 0.218 0.355 0.492 914.4 0.439 0.713 0.988
18 0.0086 0.014 0.0194 36 0.0173 0.0281 0.0389
65º C
150º F
mm
in.
90º C
200º F
mm
in.
120º C
250º F
mm
in.
Cone Bore
mm
in.
Thermometer Temperature Reading in Degrees
65º C
150º F
mm
in.
90º C
200º F
mm
in.
120º C
250º F
mm
in.
B
INDUSTRIAL BEARING MAINTENANCE MANUAL
17
GENERAL BEARING HANDLING AND INSPECTION
B
Pressing on bearings
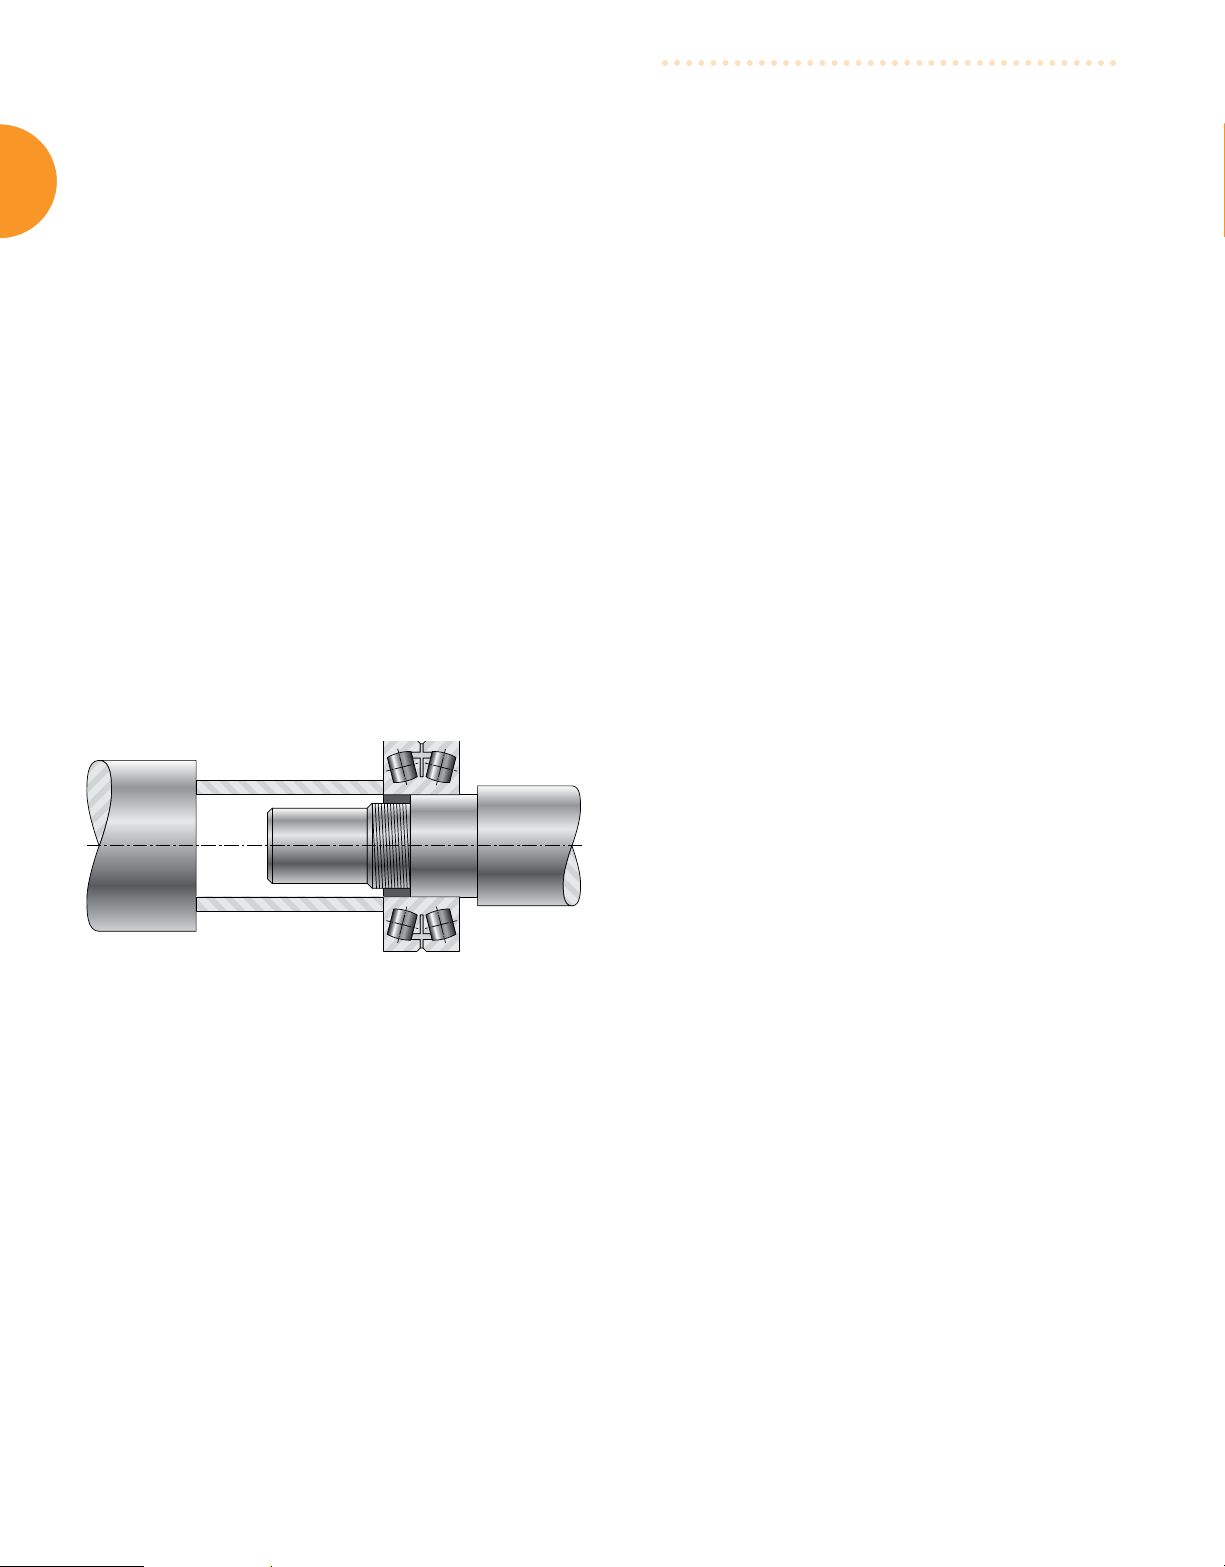
Smaller bearings may be pressed onto the shaft or into a housing
with an arbor press and mounting tube. Between the press ram
and the bearing, use a tube of soft steel with an inside diameter
slightly larger than the shaft. The outside diameter of the tube
should not exceed the maximum shoulder height for the bearings.
The tube should be square at both ends, thoroughly clean inside
and out, and long enough to clear the end of the shaft after the
bearing is mounted.
Inspect the shaft and housing for proper size, roundness,
•
burrs or other damage. A 12-point check of the shaft with a
micrometer is suggested (see page 33).
Coat the shaft with light machine oil or assembly paste to
•
reduce the force needed to press the bearing on the shaft.
Use a tube or pipe with an inner diameter (I.D.) that is slightly
•
larger than the outer diameter (O.D.) of the shaft. The O.D.
of the tube or pipe should be small enough that it does not
contact the rolling elements or cage of the bearing.
Position the tube on the inner ring and apply steady pressure
•
with sufficient force to smoothly press the ring into place, and
firmly against the shoulder or backing surface (Fig. 9).
Adjusting bearing clearance
The space between the rolling elements and the races of an antifriction bearing is known as the bearing clearance, referred to in
tapered roller bearings as the lateral, lateral clearance or end play.
In other types of anti-friction bearings such as spherical, cylindrical,
or ball bearings, the radial internal clearance or RIC, is specified.
Clearance is desirable in applications where allowance must be
provided for thermal growth of components, to accommodate for
slight misalignment or other application requirements.
Bearings may also have zero clearance, with the contact surfaces
of the rolling elements brought into contact with the races in lineto-line contact.
Finally, bearings may have the rolling elements and races brought
into contact with a defined initial force, a condition known as
preload. This enables precise control over the internal geometry
of the mating parts, and is desirable where runout must be held
within critical limits, such as high precision applications.
Bearings with separable races, such as tapered roller bearings,
allow the clearance (preload) to be “adjusted” to meet application
requirements. Other types of bearings are manufactured with a
known clearance or preload, but the clearance can be slightly
reduced through an interference fit on the inner or outer race.
Fig. 9. Positioning the tube on the inner ring.
Never attempt to make a press fit on a shaft by applying pressure
to the outer ring of an assembled bearing. However, because
they have a separable outer ring, the outer ring of tapered roller
bearings can be pressed into a housing. See page 61.
For specific information regarding bearing installation in your
equipment, contact the equipment manufacturer.
For information about adjusting various types of bearings, see the
section of this manual for each bearing design.
LUBRICATION
See the Lubrication Section of this manual beginning on page 155.
INDUSTRIAL BEARING MAINTENANCE MANUAL
18

I
N
T
E
R
N
A
L
C
C
L
E
A
R
A
N
C
E
S
C
C
INTERNAL CLEARANCES
Tapered Roller Bearings. . . . . . . . . . . . . . . . . . . . . . . . . . . . . . . . . 21
Radial Ball Bearings ....................................22
Spherical Roller Bearings ...............................25
Cylindrical Roller Bearings ..............................27

C
N
I
T
E
R
N
A
L
C
L
E
A
R
A
N
C
E
S
C
INTERNAL CLEARANCES
TAPERED ROLLER BEARINGS
INTERNAL CLEARANCES
In tapered roller bearings, internal clearance is usually defined
as a specific amount of either end play or preload. Establishing
this clearance, or setting, at the time of assembly is an inherent
advantage of tapered roller bearings. They can be set to provide
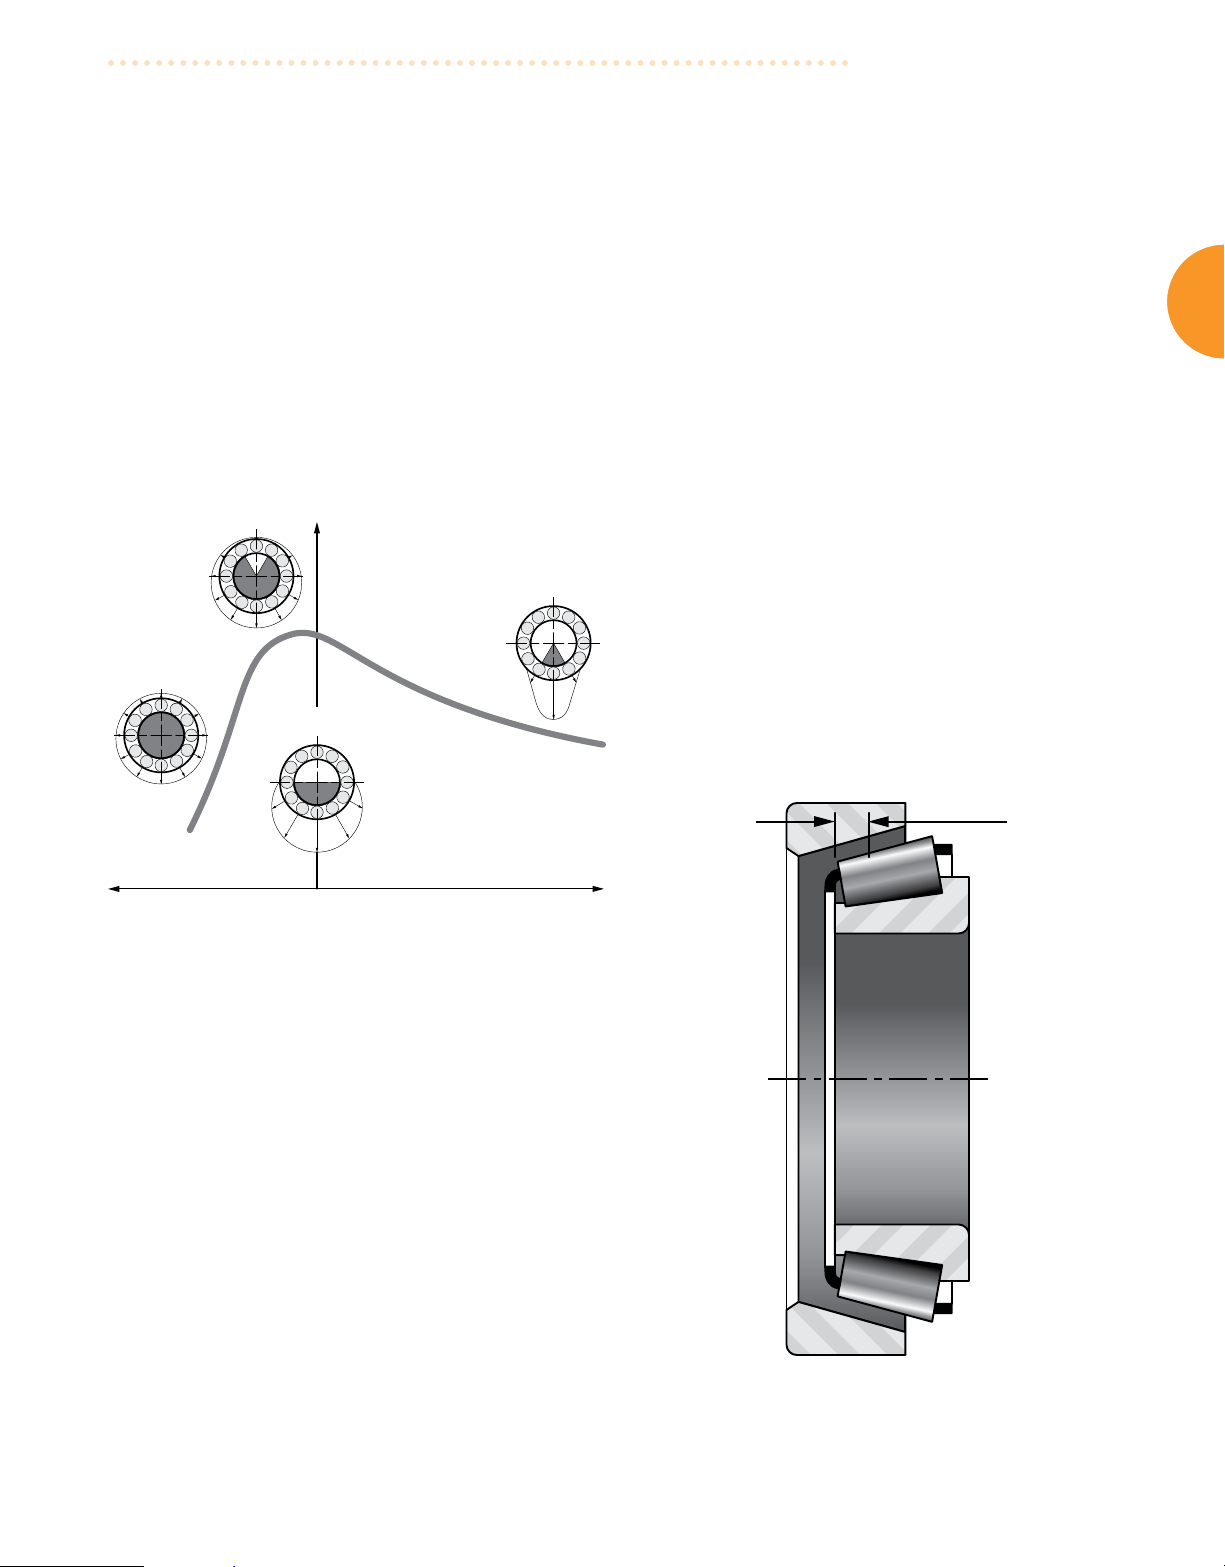
optimum performance in almost any application. Fig. 10 gives
an example of the relationship between fatigue life and bearing
setting. Unlike some types of anti-friction bearings, tapered roller
bearings do not rely strictly on housing or shaft fits to obtain a
certain bearing setting. One race can be moved axially relative to
the other to obtain the desired bearing setting.
L10 life
Light preload
Heavy preload
Zero Clearance
Large end play
Bearing setting obtained during initial assembly and adjustment is
the cold or ambient bearing setting and is established before the
equipment is subjected to service.
C
Bearing setting during operation is known as the operating bearing
setting and is a result of changes in the ambient bearing setting
due to thermal expansion and deflections encountered during
service.
The ambient bearing setting necessary to produce the optimum
operating bearing setting varies with the application. Application
experience, or testing, generally permits the determination of
optimum settings. Frequently, however, the exact relationship
of ambient to operating bearing setting is an unknown and an
educated estimate has to be made. To determine a suggested
ambient bearing setting for a specific application, consult with
your Timken representative.
Generally, the ideal operating bearing setting is near zero to
maximize bearing life. Most bearings are set with end play at
assembly to reach the desired near zero setting at operating
temperature when mounted.
Axial end play
Preload End play
0
Bearing operating setting
Fig. 10. Relationship between fatigue life and bearing setting.
At assembly, the conditions of bearing setting are defined as:
End play – An axial clearance between rollers and races pro-
•
ducing a measurable axial shaft movement when a small axial
force is applied - first in one direction, then in the other, while
oscillating or rotating the shaft (Fig. 11).
Preload – An axial interference between rollers and races
•
such that there is no measurable axial shaft movement when
a small axial force is applied - in both directions, while oscillating or rotating the shaft.
Line-to-line – A zero setting condition; the transitional point
•
between end play and preload.
Fig. 11. Axial force is applied in both directions while rotating
the shaft.
INDUSTRIAL BEARING MAINTENANCE MANUAL
21
INTERNAL CLEARANCES
RADIAL BALL BEARINGS
In the manufacture of ball bearings, it is standard practice to
assemble rings and balls with a specified internal clearance. This
characteristic is necessary to absorb the effect of press fitting the
bearing rings at mounting.
C
Internal clearances sometimes are used to compensate for
thermal expansion of bearings, shafts and housings or to provide
a contact angle in the bearing after mounting. Internal clearance
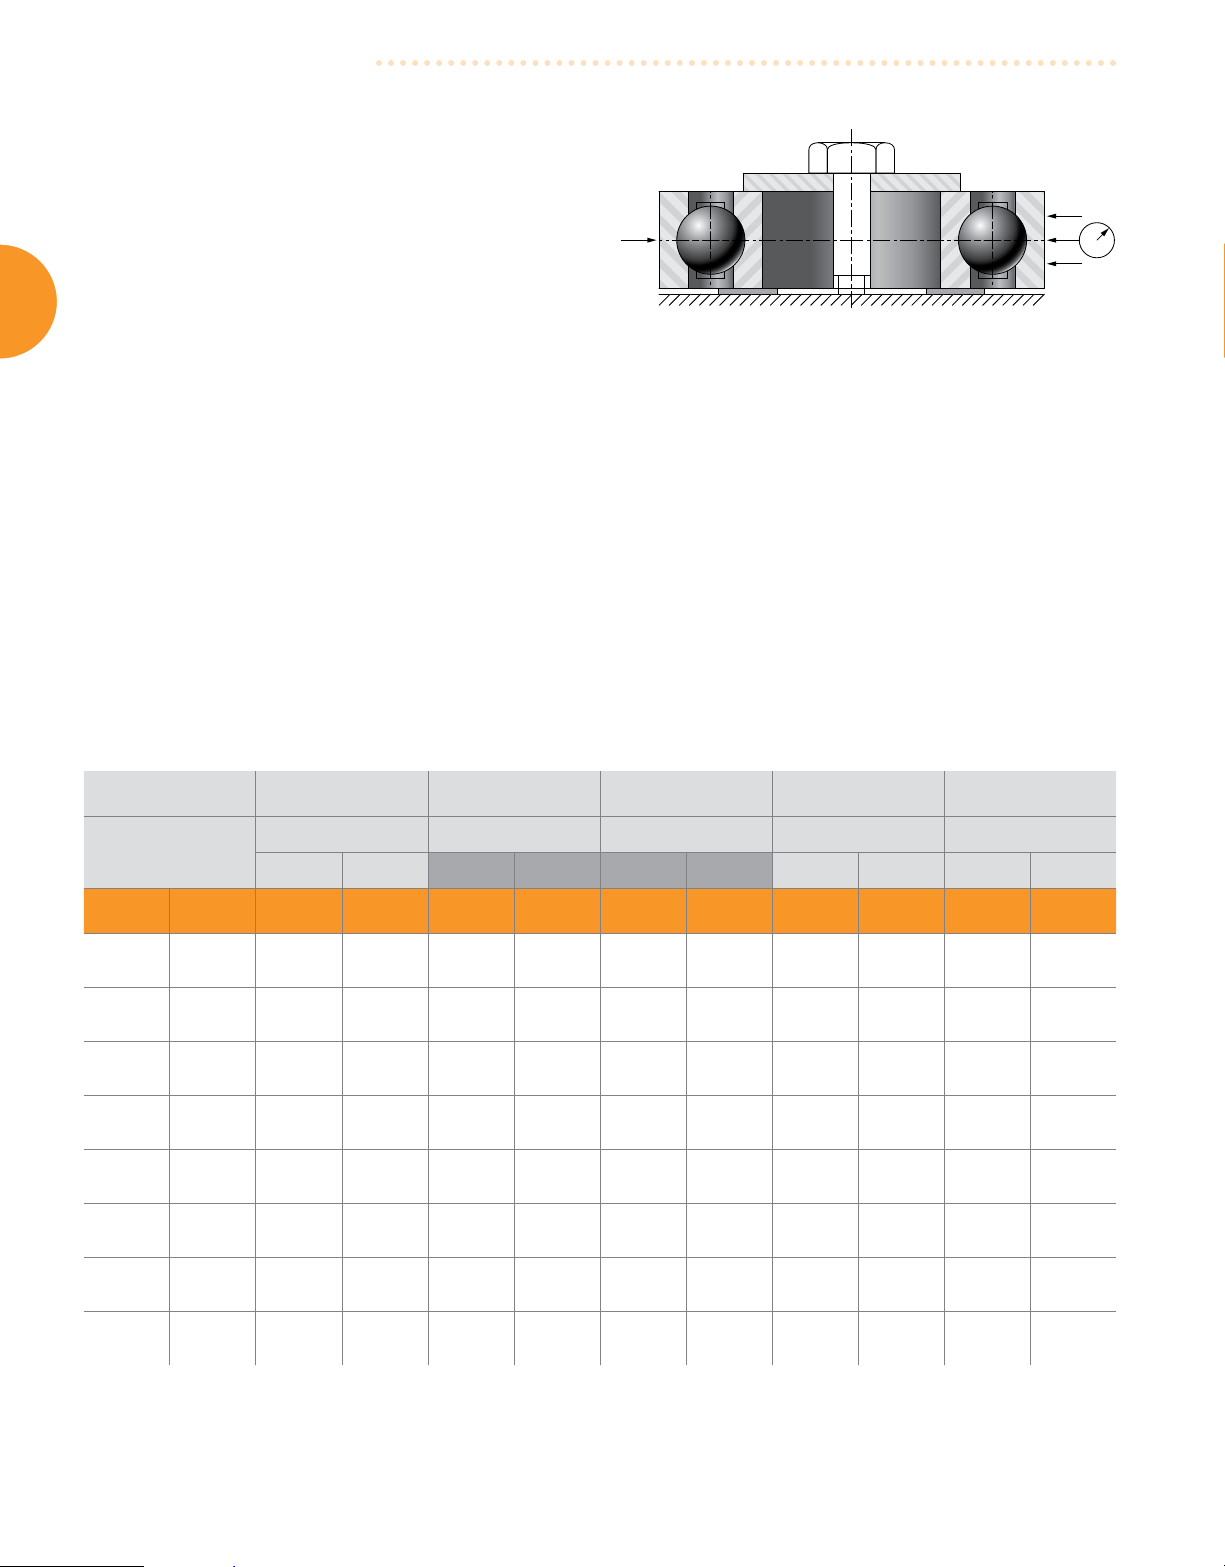
Fig. 12. RIC can be measured mechanically by moving the outer ring
horizontally.
can be measured either by gaging radially or axially.
Radial measurement is accepted as the more significant
characteristic because it is more directly related to shaft and
housing fits. It also is the method prescribed by the American
Bearing Manufacturers Association (ABMA).
the average inner ring raceway diameter minus twice the ball
diameter.
RIC can be measured mechanically by moving the outer ring
horizontally as pictured in Fig. 12. The total movement of the
outer ring when the balls are properly seated in the raceways
Radial internal clearance
The radial internal clearance (RIC) of a radial contact ball bearing
can be defined as the average outer ring raceway diameter minus
determines the radial internal clearance. Several readings should
be taken using different circumferential orientations of the rings in
order to get a comprehensive average reading.
Limits for radial internal clearance of single-row, radial contact ball bearings under no load
(Applies to bearings of ABEC-1, ABEC-3, ABEC-5, ABEC-7, and ABEC-9 Tolerances)
Timken® Prefix
(ABMA designation)
Basic Bore Diameter
mm
over incl.
H (C2) R (C0) P (C3) J (C4) JJ (C5)
Acceptance Limits Acceptance Limits Acceptance Limits Acceptance Limits Acceptance Limits
Max. Min. Max. Min. Max. Min. Max. Min. Max. Min.
mm
in.
mm
in.
mm
in.
mm
in.
mm
in.
mm
in.
mm
in.
mm
in.
mm
in.
mm
in.
2.5 10
10 18
18 24
24 30
30 40
40 50
50 65
65 80
INDUSTRIAL BEARING MAINTENANCE MANUAL
22
0.007
0.0003
0.009
0.00035
0.010
0.0004
0.011
0.00045
0.011
0.00045
0.011
0.00045
0.015
0.0006
0.015
0.0006
0.000
0.0000
0.000
0.0000
0.000
0.0000
0.001
0.0001
0.001
0.0001
0.001
0.0001
0.001
0.0001
0.001
0.0001
0.013
0.0005
0.018
0.0007
0.020
0.0008
0.020
0.0008
0.020
0.0008
0.023
0.0009
0.028
0.0011
0.030
0.0012
0.002
0.0001
0.003
0.0001
0.005
0.0002
0.005
0.0002
0.006
0.0002
0.006
0.00025
0.008
0.00035
0.010
0.0004
0.023
0.0009
0.025
0.001
0.028
0.0011
0.028
0.0011
0.033
0.0013
0.036
0.0014
0.043
0.0017
0.051
0.0020
0.008
0.0003
0.011
0.0004
0.013
0.0005
0.013
0.0005
0.015
0.0006
0.018
0.0007
0.023
0.0009
0.025
0.0010
0.029
0.0011
0.033
0.0013
0.036
0.0014
0.041
0.0016
0.046
0.0018
0.051
0.0020
0.061
0.0024
0.071
0.0028
0.014
0.0006
0.018
0.0007
0.020
0.0008
0.023
0.0009
0.028
0.0011
0.030
0.0012
0.038
0.0015
0.046
0.0018
0.037
0.0015
0.045
0.0018
0.048
0.0019
0.053
0.0021
0.064
0.0025
0.073
0.0029
0.090
0.0035
0.105
0.0041
Continued on next page.
0.020
0.0008
0.025
0.0010
0.028
0.0011
0.030
0.0012
0.040
0.0016
0.045
0.0018
0.055
0.0022
0.065
0.0026

INTERNAL CLEARANCES
Timken® Prefix
(ABMA designation)
Basic Bore Diameter
mm
over incl.
80 100
100 120
120 140
140 160
160 180
180 200
200 240
240 280
H (C2) R (C0) P (C3) J (C4) JJ (C5)
Acceptance Limits Acceptance Limits Acceptance Limits Acceptance Limits Acceptance Limits
Max. Min. Max. Min. Max. Min. Max. Min. Max. Min.
mm
in.
0.018
0.0007
0.020
0.0008
0.023
0.0009
0.023
0.0009
0.025
0.0010
0.030
0.0012
0.036
0.0014
0.041
0.0016
mm
in.
0.001
0.0001
0.002
0.0001
0.002
0.0001
0.002
0.0001
0.002
0.0001
0.002
0.0001
0.003
0.0001
0.003
0.0001
mm
in.
0.036
0.0014
0.041
0.0016
0.048
0.0019
0.053
0.0021
0.061
0.0024
0.071
0.0028
0.081
0.0032
0.097
0.0038
mm
in.
0.012
0.00045
0.015
0.0006
0.018
0.0007
0.018
0.0007
0.020
0.0008
0.025
0.0010
0.030
0.0012
0.033
0.0013
mm
in.
0.058
0.0023
0.066
0.0026
0.081
0.0032
0.091
0.0036
0.102
0.0040
0.117
0.0046
0.137
0.0054
0.157
0.0062
mm
in.
0.030
0.0012
0.036
0.0014
0.041
0.0016
0.046
0.0018
0.053
0.0021
0.063
0.0025
0.074
0.0029
0.086
0.0034
mm
in.
0.084
0.0033
0.097
0.0038
0.114
0.0045
0.130
0.0051
0.147
0.0058
0.163
0.0064
0.193
0.0076
0.224
0.0088
mm
in.
0.053
0.0021
0.061
0.0024
0.071
0.0028
0.081
0.0032
0.091
0.0036
0.107
0.0042
0.127
0.0050
0.147
0.0058
mm
in.
0.120
0.0047
0.140
0.0055
0.160
0.0063
0.180
0.0071
0.200
0.0079
0.230
0.0091
0.267
0.0105
0.310
0.0122
0.075
0.0030
0.090
0.0035
0.105
0.0041
0.120
0.0047
0.135
0.0053
0.150
0.0059
0.183
0.0072
0.213
0.0084
mm
in.
C
280 320
320 370
370 430
430 500
500 570
570 640
640 710
710 800
800 1060
0.048
0.0019
0.053
0.0021
0.064
0.0025
0.074
0.0029
0.081
0.0032
0.091
0.0036
0.114
0.0045
0.140
0.0055
0.211
0.0083
0.005
0.0002
0.005
0.0002
0.008
0.0003
0.010
0.0004
0.010
0.0004
0.013
0.0005
0.020
0.0008
0.020
0.0008
0.028
0.0011
0.114
0.0045
0.127
0.0050
0.147
0.0058
0.170
0.0067
0.193
0.0076
0.216
0.0085
0.239
0.0094
0.269
0.0106
0.353
0.0139
0.041
0.0016
0.046
0.0018
0.056
0.0022
0.066
0.0026
0.074
0.0029
0.085
0.0033
0.107
0.0042
0.130
0.0051
0.201
0.0079
: Standard fits for Timken radial ball bearings. P(C3) for bearing O.D. greater than 52 mm.
0.180
0.0071
0.208
0.0082
0.241
0.0095
0.279
0.0110
0.318
0.0125
0.356
0.0140
0.394
0.0155
0.445
0.0175
0.587
0.0231
0.104
0.0041
0.117
0.0046
0.137
0.0054
0.160
0.0063
0.183
0.0072
0.206
0.0081
0.229
0.0090
0.259
0.0102
0.345
0.0136
0.257
0.0101
0.295
0.0116
0.340
0.0134
0.396
0.0156
0.450
0.0177
0.505
0.0199
0.564
0.0222
0.630
0.0248
0.833
0.0328
0.170
0.0067
0.198
0.0078
0.231
0.0091
0.269
0.0106
0.307
0.0121
0.345
0.0136
0.384
0.0151
0.434
0.0171
0.577
0.0227
0.353
0.0139
0.409
0.0161
0.475
0.0187
0.551
0.0217
0.630
0.0248
0.706
0.0278
0.780
0.0307
0.879
0.0346
1.148
0.0452
0.246
0.0097
0.284
0.0112
0.330
0.013
0.386
0.0152
0.439
0.0173
0.495
0.0195
0.554
0.0218
0.620
0.0244
0.823
0.0324
INDUSTRIAL BEARING MAINTENANCE MANUAL
23
INTERNAL CLEARANCES
C
Timken Bearing
Number Prefix
H C2
R C0
P C3
J C4
ISO/ABMA Symbol Description
Snug fit; slight internal clearance;
sometimes used to achieve a minimum
of radial or axial play in an assembly.
Example: H204K
Medium fit; internal clearance generally
satisfactory with recommended shaft
and housing fits. Example: RMM204K.
Loose fit; considerable internal
clearance required for applications
involving press fits on both inner and
outer rings, extra interference fits, or
temperature differentials. Example:
Extra loose fit; large amount of internal
clearance for applications involving
large interference fits or temperature
P204K.
differentials. Example: J204K.
End Play
End play is an alternate method of measuring internal clearance
and is rarely used except for certain special applications. End play
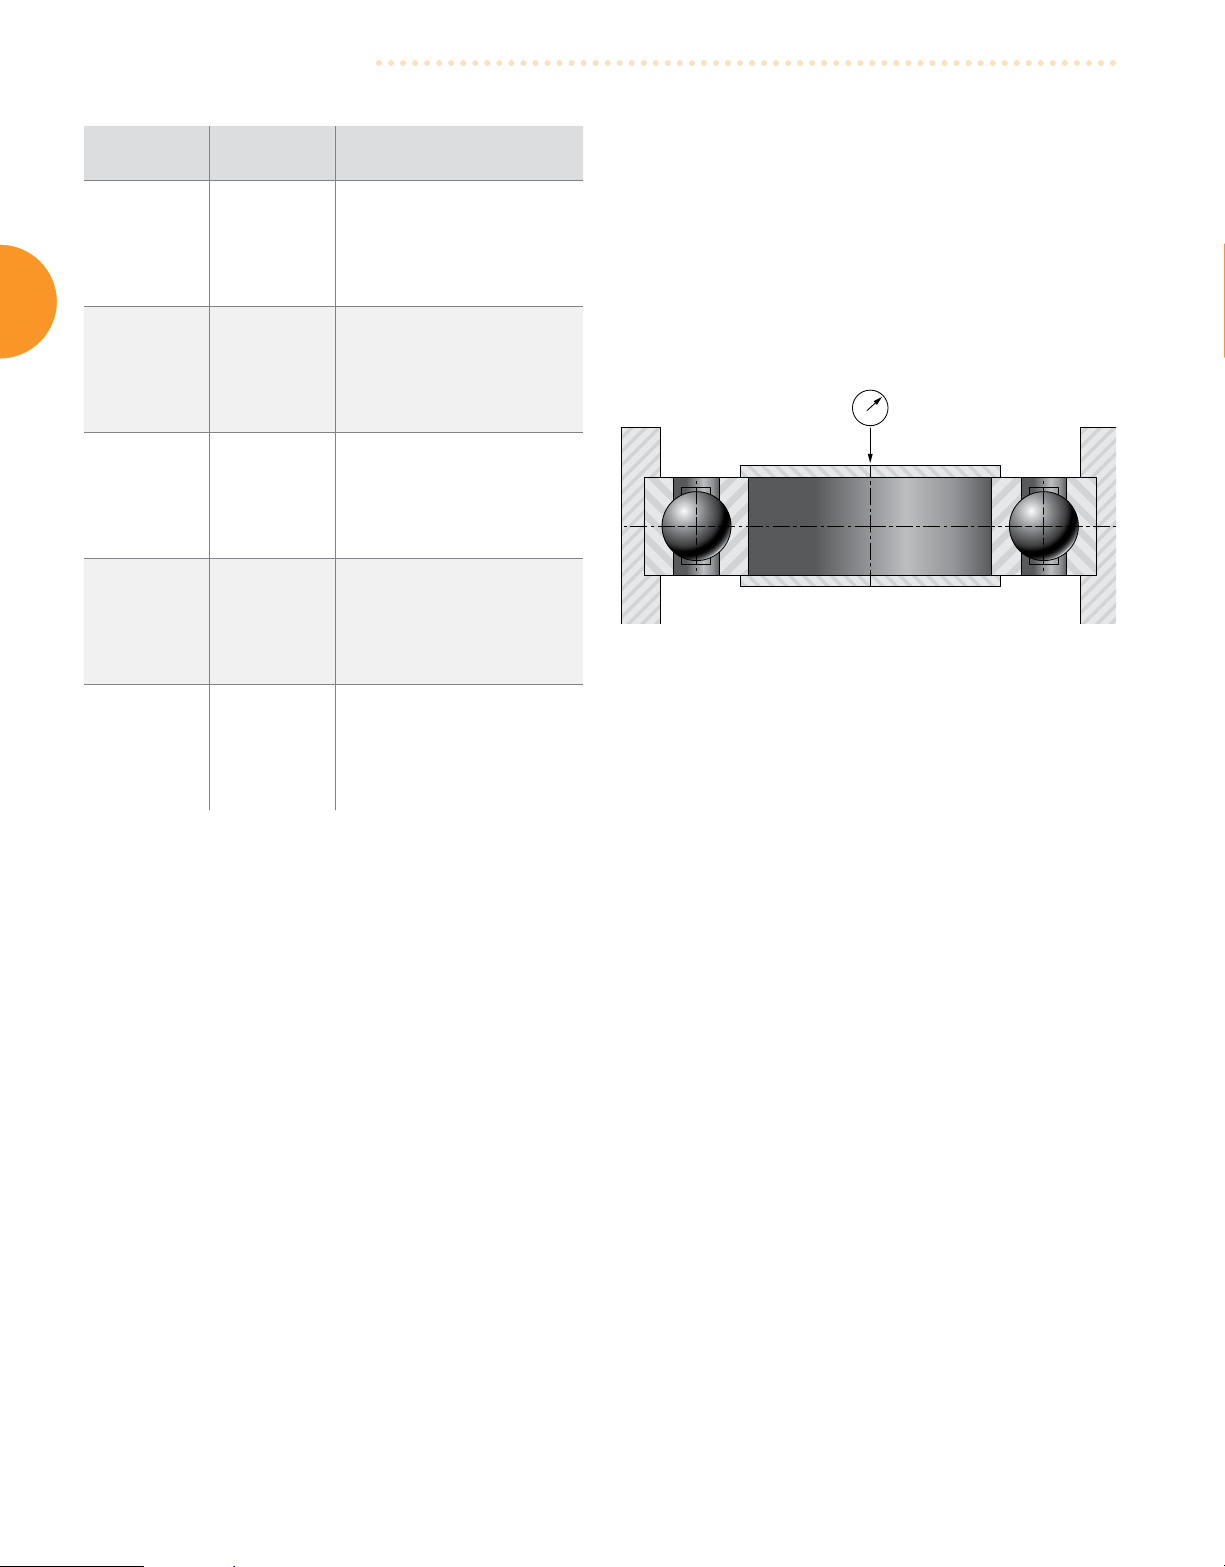
is determined by mounting the bearing, as shown in Fig. 13, with
one of its rings clamped to prevent axial movement. A reversing
measuring load is applied to the unclamped ring so the resulting
movement of that ring is parallel to the bearing axis. End play is
the total movement of the unclamped ring when the load is applied
first in one direction and then in the other.
Fig. 13. End play is determined by mounting the bearing with one of
its rings clamped.
Extra-extra loose fit; extra large amount
JJ C5
of internal clearance for applications
with large temperature differential and
interference fits on both rings.
Table 1. Radial clearance designations correlate with ISO/ABMA
symbols.
INDUSTRIAL BEARING MAINTENANCE MANUAL
24
INTERNAL CLEARANCES
SPHERICAL ROLLER BEARINGS
RIC is the radial internal clearance or radial play within a bearing.
The bearing’s RIC allows a tight fit, with sufficient internal
clearance after installation for normal operating conditions.
Spherical roller bearings with tapered bore (K) require a slightly
greater interference fit on the shaft than a cylindrical bore bearing.
The effect of this greater interference fit is a reduction of RIC. For
tapered bore bearings, it is critical to select the RIC that allows for
this reduction.
Example #1 - Calculating RIC Reduction Using a Spherical Roller
Bearing with Tapered Bore
Given bearing number 22328K C3 (140 mm bore with a C3 clearance)
is to be mounted on a tapered shaft. Using a set of feeler gauges,
RIC is found to be –
RIC = 0.178 mm (0.007 in.)
Suggested Reduction of RIC Due to Installation = 0.064 to 0.089 mm
(0.0025 in. to 0.0035 in.), found in chart on page 26.
Calculate the clearance after mounting –
0.178 mm - 0.077 mm = 0.101 mm or
Therefore, the locking nut should be tightened until RIC reaches
0.101 mm (0.004 in.).
It should also be noted that the value obtained by reading the
Suggested RIC after Installation directly from the table on page 97
is 0.075 mm (0.0030 in.). This differs from the value calculated in the
above example. The value taken directly from the table is provided
as a minimum value. It is not suggested to use a calculated value
that falls below this minimum.
Several factors influence RIC reduction. Inner rings pressed onto
solid steel shafts expand approximately 80 percent of the interference
fit. Outer rings pressed into steel or cast iron housings reduce RIC by
about 60 percent of the interference fit. For RIC reduction on hollow
shafts or non-steel materials, consult a Timken representative.
®
Timken
brand bearings are supplied with normal RIC, unless
specified otherwise. The desired RIC code must be added to the
bearing number, following all other suffixes.
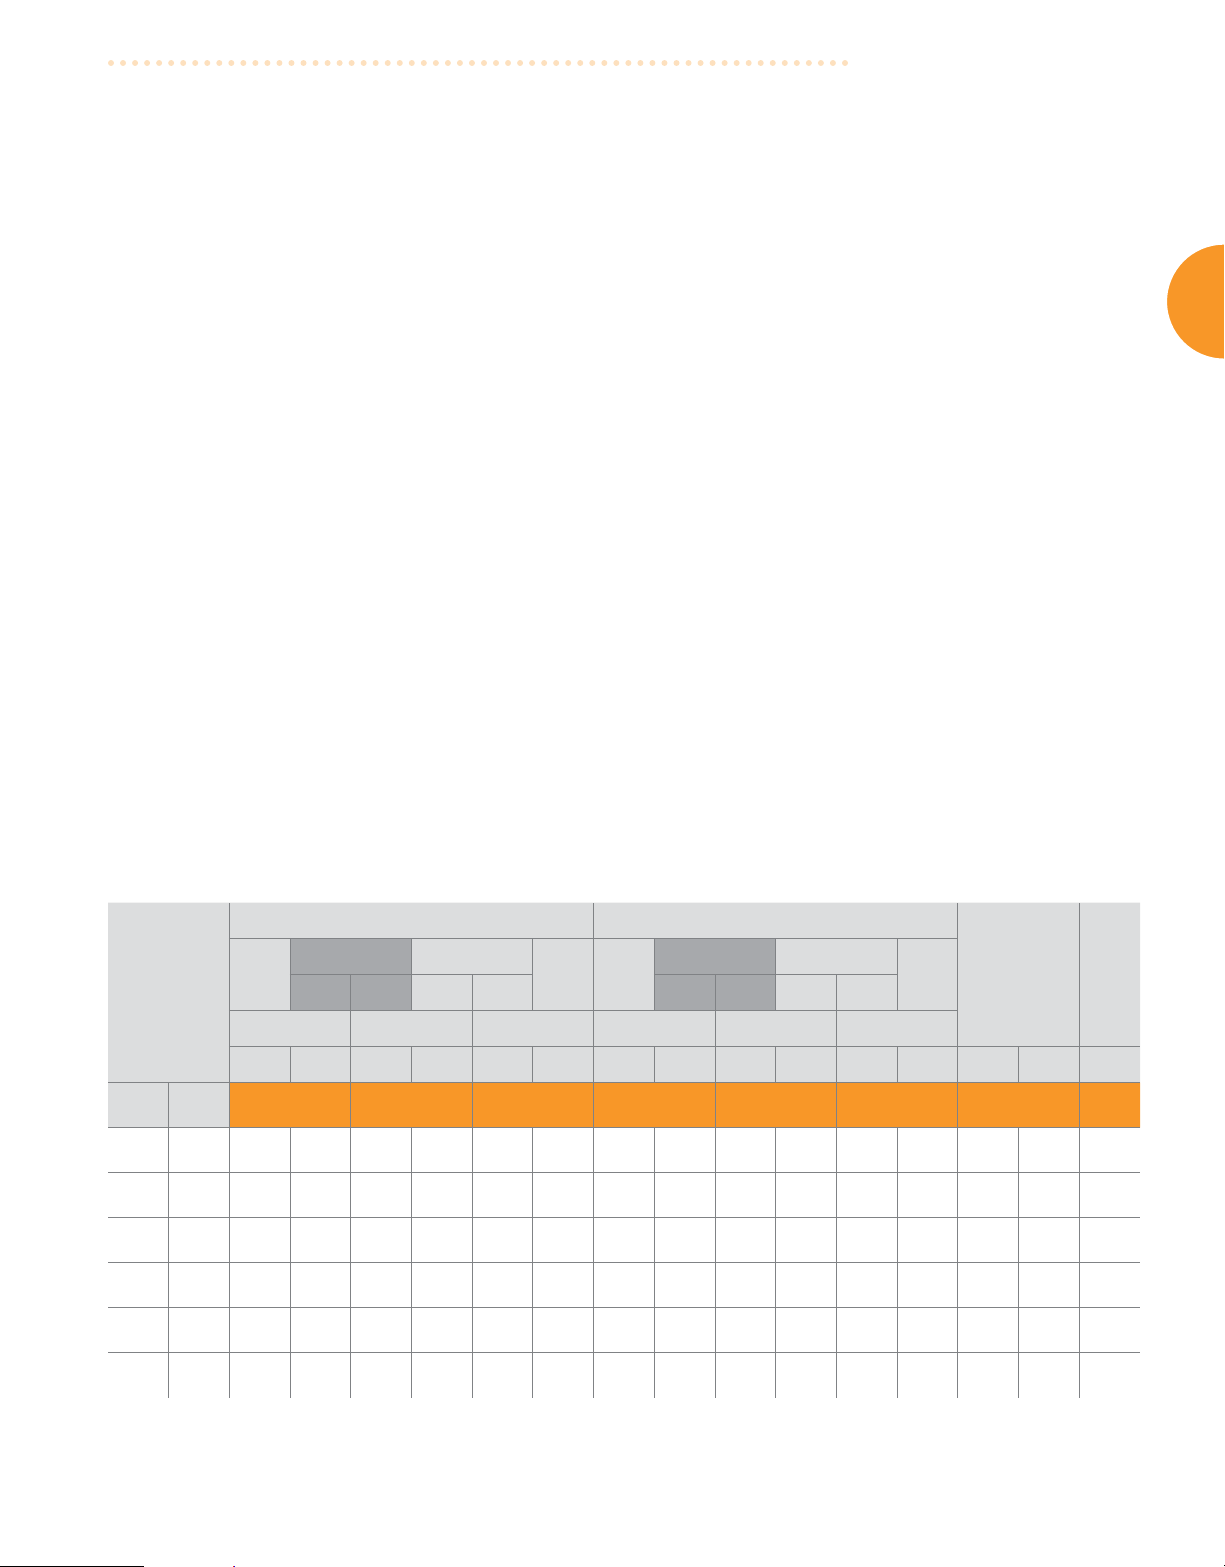
Minimum/maximum values for each RIC are shown in the two
adjacent columns directly beneath the selected RIC. For example,
the minimum values shown for C5 are also the maximum values for
C4; minimum values for C4 are also the maximum values for C3; etc.
C
0.007 in. - 0.003 in. = 0.004 in.
NOTE: For this example, the value of 0.077 mm (0.003 in.) was
obtained by taking the mid-range value of the upper and lower
limits found in the table on page 26.
Radial internal clearance limits - radial spherical roller bearings
Cylindrical Bore Tapered Bore
Normal CO C4 Normal CO C4
Bore
(Nominal)
mm
Min. Max. Min. Max. Min. Max. Min. Max. Min. Max. Min. Max. Min. Max. Min.
Over Incl.
24 30
30 40
40 50
50 65
65 80
80 100
(1)
For bearings with normal initial clearance.
0.015
0.0006
0.015
0.0006
0.020
0.0008
0.020
0.0008
0.030
0.0012
0.035
0.0014
Min. Max. Min. Max. Min. Max. Min. Max.
C2 C3 C5 C2 C3 C5
mm
in.
0.025
0.0010
0.030
0.0012
0.035
0.0014
0.040
0.0016
0.050
0.0020
0.060
0.0024
0.040
0.0016
0.045
0.0018
0.055
0.0022
0.065
0.0026
0.080
0.0031
0.100
0.0039
mm
0.075
0.0030
0.080
0.0031
0.100
0.0039
0.120
0.0047
0.145
0.0057
0.180
0.0071
mm
in.
0.095
0.0037
0.100
0.0039
0.125
0.0049
0.150
0.0059
0.180
0.0071
0.225
0.0089
in.
0.055
0.0022
0.060
0.0024
0.075
0.0030
0.090
0.0035
0.110
0.0043
0.135
0.0053
0.020
0.0008
0.025
0.0010
0.030
0.0012
0.040
0.0016
0.050
0.0020
0.055
0.0022
mm
in.
0.0012
0.0014
0.0018
0.0022
0.0028
0.0030
0.030
0.035
0.045
0.055
0.070
0.080
0.040
0.0016
0.050
0.0020
0.060
0.0024
0.075
0.0030
0.095
0.0037
0.110
0.0043
mm
(1)
Suggested
Reduction of RIC
Due to Installation
0.075
0.0030
0.085
0.0033
0.100
0.0039
0.120
0.0047
0.150
0.0059
0.180
0.0071
mm
in.
0.095
0.0037
0.105
0.0041
0.130
0.0051
0.160
0.0063
0.200
0.0079
0.230
0.0091
in.
0.055
0.0022
0.065
0.0026
0.080
0.0031
0.095
0.0037
0.120
0.0047
0.140
0.0055
mm
in.
0.015
0.0006
0.020
0.0008
0.025
0.0010
0.030
0.0012
0.038
0.0015
0.046
0.0018
0.020
0.0008
0.025
0.0010
0.030
0.0012
0.038
0.0015
0.051
0.0020
0.064
0.0025
Continued on next page.
Suggested RIC
after Installation
mm
in.
0.015
0.0006
0.015
0.0006
0.020
0.0008
0.025
0.0010
0.025
0.0010
0.036
0.0014
INDUSTRIAL BEARING MAINTENANCE MANUAL
25
INTERNAL CLEARANCES
C
Bore
(Nominal)
mm
Over Incl.
100 120
120 140
140 160
160 180
180 200
200 225
225 250
250 280
280 315
315 355
355 400
400 450
450 500
500 560
560 630
630 710
710 800
800 900
900 1000
Cylindrical Bore Tapered Bore
Normal CO C4 Normal CO C4
Min. Max. Min. Max. Min. Max. Min. Max.
C2 C3 C5 C2 C3 C5
Min. Max. Min. Max. Min. Max. Min. Max. Min. Max. Min. Max. Min. Max. Min.
0.040
0.0016
0.050
0.0020
0.060
0.0024
0.065
0.0026
0.070
0.0028
0.080
0.0031
0.090
0.0035
0.100
0.0039
0.110
0.0043
0.120
0.0047
0.130
0.0051
0.140
0.0055
0.140
0.0055
0.150
0.0059
0.170
0.0067
0.190
0.0075
0.210
0.0083
0.230
0.0091
0.260
0.0102
mm
in.
0.075
0.0030
0.095
0.0037
0.110
0.0043
0.120
0.0047
0.130
0.0051
0.140
0.0055
0.150
0.0059
0.170
0.0067
0.190
0.0075
0.200
0.0079
0.220
0.0087
0.240
0.0094
0.260
0.0102
0.280
0.0110
0.310
0.0122
0.350
0.0138
0.390
0.0154
0.430
0.0169
0.480
0.0189
0.120
0.0047
0.145
0.0057
0.170
0.0067
0.180
0.0071
0.200
0.0079
0.220
0.0087
0.240
0.0094
0.260
0.0102
0.280
0.0110
0.310
0.0122
0.340
0.0134
0.370
0.0146
0.410
0.0161
0.440
0.0173
0.480
0.0189
0.530
0.0209
0.580
0.0228
0.650
0.0256
0.710
0.0280
mm
0.210
0.0083
0.240
0.0094
0.280
0.0110
0.310
0.0122
0.340
0.0134
0.380
0.0150
0.420
0.0165
0.460
0.0181
0.500
0.0197
0.550
0.0217
0.600
0.0236
0.660
0.0260
0.720
0.0283
0.780
0.0307
0.850
0.0335
0.920
0.0362
1.010
0.0398
1.120
0.0441
1.220
0.0480
mm
in.
0.260
0.0102
0.300
0.0118
0.350
0.0138
0.390
0.0154
0.430
0.0169
0.470
0.0185
0.520
0.0205
0.570
0.0224
0.630
0.0248
0.690
0.0272
0.750
0.0295
0.820
0.0323
0.900
0.0354
1.000
0.0394
1.100
0.0433
1.190
0.0469
1.300
0.0512
1.440
0.0567
1.57
0.0618
in.
0.160
0.0063
0.190
0.0075
0.220
0.0087
0.240
0.0094
0.260
0.0102
0.290
0.0114
0.320
0.0126
0.350
0.0138
0.370
0.0146
0.410
0.0161
0.450
0.0177
0.500
0.0197
0.550
0.0217
0.600
0.0236
0.650
0.0256
0.700
0.0276
0.770
0.0303
0.860
0.0339
0.930
0.0366
0.065
0.0026
0.080
0.0031
0.090
0.0035
0.100
0.0039
0.110
0.0043
0.120
0.0047
0.140
0.0055
0.150
0.0059
0.170
0.0067
0.190
0.0075
0.210
0.0083
0.230
0.0091
0.260
0.0102
0.290
0.0114
0.320
0.0126
0.350
0.0138
0.390
0.0154
0.440
0.0173
0.490
0.0193
mm
0.135
0.0053
0.160
0.0063
0.180
0.0071
0.200
0.0079
0.220
0.0087
0.250
0.0098
0.270
0.0106
0.300
0.0118
0.330
0.0130
0.360
0.0142
0.400
0.0157
0.440
0.0173
0.490
0.0193
0.540
0.0213
0.600
0.0236
0.670
0.0264
0.750
0.0295
0.840
0.0331
0.930
0.0366
mm
in.
0.170
0.0067
0.200
0.0079
0.230
0.0091
0.260
0.0102
0.290
0.0114
0.320
0.0126
0.350
0.0138
0.390
0.0154
0.430
0.0169
0.470
0.0185
0.520
0.0205
0.570
0.0224
0.630
0.0248
0.680
0.0268
0.760
0.0299
0.850
0.0335
0.960
0.0378
1.070
0.0421
1.190
0.0469
in.
0.100
0.0039
0.120
0.0047
0.130
0.0051
0.140
0.0055
0.160
0.0063
0.180
0.0071
0.200
0.0079
0.220
0.0087
0.240
0.0094
0.270
0.0106
0.300
0.0118
0.330
0.0130
0.370
0.0146
0.410
0.0161
0.460
0.0181
0.510
0.0201
0.570
0.0224
0.640
0.0252
0.710
0.0280
0.220
0.0087
0.260
0.0102
0.300
0.0118
0.340
0.0134
0.370
0.0146
0.410
0.0161
0.450
0.0177
0.490
0.0193
0.540
0.0213
0.590
0.0232
0.650
0.0256
0.720
0.0283
0.790
0.0311
0.870
0.0343
0.980
0.0386
1.090
0.0429
1.220
0.0480
1.370
0.0539
1.520
0.0598
mm
in.
0.280
0.0110
0.330
0.0130
0.380
0.0150
0.430
0.0169
0.470
0.0185
0.520
0.0205
0.570
0.0224
0.620
0.0244
0.680
0.0268
0.740
0.0291
0.820
0.0323
0.910
0.0358
1.000
0.0394
1.100
0.0433
1.230
0.0484
1.360
0.0535
1.500
0.0591
1.690
0.0665
1.860
0.0732
Suggested
Reduction of RIC
Due to Installation
mm
in.
0.051
0.0020
0.064
0.0025
0.076
0.0030
0.076
0.0030
0.089
0.0035
0.102
0.0040
0.114
0.0045
0.114
0.0045
0.127
0.0050
0.140
0.055
0.152
0.0060
0.165
0.0065
0.178
0.0070
0.203
0.0080
0.229
0.0090
0.254
0.0100
0.279
0.0110
0.305
0.0120
0.356
0.0140
0.071
0.0028
0.089
0.0035
0.102
0.0040
0.114
0.0045
0.127
0.0050
0.140
0.0055
0.152
0.0060
0.165
0.0065
0.178
0.0070
0.190
0.0075
0.203
0.0080
0.216
0.0085
0.229
0.0090
0.254
0.0100
0.279
0.0110
0.305
0.0120
0.356
0.0140
0.381
0.0150
0.432
0.0170
0.051
0.0020
0.056
0.0022
0.056
0.0022
0.061
0.0024
0.071
0.0028
0.076
0.0030
0.089
0.0035
0.102
0.0040
0.102
0.0040
0.114
0.0045
0.127
0.0050
0.152
0.0060
0.165
0.0065
0.178
0.0070
0.203
0.0080
0.203
0.0080
0.229
0.0090
0.252
0.0100
0.279
0.0110
(1)
Suggested RIC
after Installation
mm
in.
(1)
For bearings with normal initial clearance.
: For bearings with normal initial clearance.
Min./Max. values for each RIC are shown in the two adjacent columns directly beneath the selected RIC. Each
single column represents a boundary between adjacent RIC’s. For example, the minimum values shown for C5
are also the maximum values for C4; minimum values for C4 are also the maximum values for C3; etc.
* Special clearances can be provided (C6, C7, etc.)
INDUSTRIAL BEARING MAINTENANCE MANUAL
26

INTERNAL CLEARANCES
CYLINDRICAL ROLLER BEARINGS
Cylindrical roller bearings are available with RIC designations
per either of the following tables: “Timken ‘R’ Clearance” or “ISO/
ABMA ‘C’ Clearance.” Non-standard values are also available by
special request. Standard radial internal clearance values are
listed in the following tables based on bore size. The clearance
ISO/ABMA radial internal clearance limits
Bore
mm
in.
Over Incl.
0
0
10
0.3937
24
0.9449
30
1.1811
0.3937
0.9449
1.1811
1.5748
10
24
30
40
C2 C0 C3 C4 C5
Max. Min. Max. Min. Max. Min. Max. Min. Max. Min.
0.025
0.0010
0.025
0.0010
0.025
0.0010
0.030
0.0012
mm
in.
0.000
0.0000
0.000
0.0000
0.000
0.0000
0.005
0.0002
0.045
0.0018
0.045
0.0018
0.045
0.0018
0.050
0.0020
mm
in.
0.020
0.0008
0.020
0.0008
0.020
0.0008
0.025
0.0010
required for a given application depends on the desired operating
precision, rotational speed of the bearing, and the fitting practice
used. Most applications use a normal, or C0, clearance. Typically,
a larger clearance reduces the operating zone of the bearing,
increases the maximum roller load, and reduces the bearing’s
expected life.
0.060
0.0024
0.060
0.0024
0.060
0.0024
0.070
0.0028
mm
in.
0.035
0.0014
0.035
0.0014
0.035
0.0014
0.045
0.0018
0.075
0.0030
0.075
0.0030
0.075
0.0030
0.085
0.0033
mm
in.
0.050
0.0020
0.050
0.0020
0.050
0.0020
0.060
0.0024
-
-
0.090
0.0035
0.095
0.0037
0.105
0.0041
mm
in.
-
-
0.065
0.0026
0.070
0.0028
0.080
0.0031
C
40
1.5748
50
1.9685
65
2.5591
80
3.1496
100
3.9370
120
4.7244
140
5.5118
160
6.2992
50
1.9685
65
2.5591
80
3.1496
100
3.9370
120
4.7244
140
5.5118
160
6.2992
180
7.0866
0.035
0.0014
0.040
0.0016
0.045
0.0018
0.050
0.0020
0.055
0.0022
0.060
0.0024
0.070
0.0028
0.075
0.0030
0.005
0.0002
0.010
0.0004
0.010
0.0004
0.015
0.0006
0.015
0.0006
0.015
0.0006
0.020
0.0008
0.025
0.0010
0.060
0.0024
0.070
0.0028
0.075
0.0030
0.085
0.0033
0.090
0.0035
0.105
0.0041
0.120
0.0047
0.125
0.0049
0.030
0.0012
0.040
0.0016
0.040
0.0016
0.050
0.0020
0.050
0.0020
0.060
0.0024
0.070
0.0028
0.075
0.0030
These values indicate the expected range of mounted RIC following suggested push up values.
Timken suggests that customers consult with our engineers to evaluate unique applications or
requirements for special operating conditions.
0.080
0.0031
0.090
0.0035
0.100
0.0039
0.110
0.0043
0.125
0.0049
0.145
0.0057
0.165
0.0065
0.170
0.0067
0.050
0.0020
0.060
0.0024
0.065
0.0026
0.075
0.0030
0.085
0.0033
0.100
0.0039
0.115
0.0045
0.120
0.0047
0.100
0.0039
0.110
0.0043
0.125
0.0049
0.140
0.0055
0.165
0.0065
0.190
0.0075
0.215
0.0085
0.220
0.0087
0.070
0.0028
0.080
0.0031
0.090
0.0035
0.105
0.0041
0.125
0.0049
0.145
0.0057
0.165
0.0065
0.170
0.0067
0.125
0.0049
0.140
0.0055
0.165
0.0065
0.190
0.0075
0.220
0.0087
0.245
0.0096
0.275
0.0108
0.300
0.0118
Continued on next page.
0.095
0.0037
0.110
0.0043
0.130
0.0051
0.155
0.0061
0.180
0.0071
0.200
0.0079
0.225
0.0089
0.250
0.0098
INDUSTRIAL BEARING MAINTENANCE MANUAL
27

INTERNAL CLEARANCES
Bore
mm
in.
Over Incl.
C2 C0 C3 C4 C5
Max. Min. Max. Min. Max. Min. Max. Min. Max. Min.
mm
in.
mm
in.
mm
in.
mm
in.
mm
in.
C
180
7.0866
200
7.8740
225
8.8583
250
9.8425
280
11.0236
315
12.4016
355
13.9764
400
15.7480
450
17.7165
500
19.6850
560
22.0472
200
7.8740
225
8.8583
250
9.8425
280
11.0236
315
12.4016
355
13.9764
400
15.7480
450
17.7165
500
19.6850
560
22.0472
630
24.8031
0.090
0.0035
0.105
0.0041
0.110
0.0043
0.125
0.0049
0.130
0.0051
0.145
0.0057
0.190
0.0075
0.210
0.0083
0.220
0.0087
0.240
0.00945
0.260
0.01024
0.035
0.0014
0.045
0.0018
0.045
0.0018
0.055
0.0022
0.055
0.0022
0.065
0.0026
0.100
0.0039
0.110
0.0043
0.110
0.0043
0.120
0.00472
0.140
0.00551
0.145
0.0057
0.165
0.0065
0.175
0.0069
0.195
0.0077
0.205
0.0081
0.225
0.0089
0.280
0.0110
0.310
0.0122
0.330
0.0130
0.360
0.01417
0.380
0.01496
0.090
0.0035
0.105
0.0041
0.110
0.0043
0.125
0.0049
0.130
0.0051
0.145
0.0057
0.190
0.0075
0.210
0.0083
0.220
0.0087
0.240
0.00945
0.260
0.01024
0.195
0.0077
0.220
0.0087
0.235
0.0093
0.260
0.0102
0.275
0.0108
0.305
0.0120
0.370
0.0146
0.410
0.0161
0.440
0.0173
0.480
0.0189
0.500
0.01969
0.140
0.0055
0.160
0.0063
0.170
0.0067
0.190
0.0075
0.200
0.0079
0.225
0.0089
0.280
0.0110
0.310
0.0122
0.330
0.0130
0.360
0.01417
0.380
0.01496
0.250
0.0098
0.280
0.0110
0.300
0.0118
0.330
0.0130
0.350
0.0138
0.385
0.0152
0.460
0.0181
0.510
0.0201
0.550
0.0217
0.600
0.02362
0.620
0.02441
0.195
0.0077
0.220
0.0087
0.235
0.0093
0.260
0.0102
0.275
0.0108
0.305
0.0120
0.370
0.0146
0.410
0.0161
0.440
0.0173
0.480
0.0189
0.500
0.01969
0.330
0.0130
0.365
0.0144
0.395
0.0156
0.440
0.0173
0.485
0.0191
0.535
0.0211
0.600
0.0236
0.665
0.0262
0.735
0.0289
0.810
0.03189
0.900
0.03543
0.275
0.0108
0.305
0.0120
0.330
0.0130
0.370
0.0146
0.410
0.0161
0.455
0.0179
0.510
0.0201
0.565
0.0222
0.625
0.0246
0.690
0.02717
0.780
0.03071
630
24.8031
710
27.9528
800
31.4961
900
35.4331
710
27.9528
800
31.4961
900
35.4331
1000
39.3701
0.285
0.01122
0.310
0.0122
0.350
0.01378
0.390
0.01535
0.145
0.00571
0.150
0.00591
0.180
0.00709
0.200
0.00787
0.425
0.01673
0.470
0.0185
0.520
0.02047
0.580
0.02283
0.285
0.01122
0.310
0.0122
0.350
0.01378
0.390
0.01535
These values indicate the expected range of mounted RIC following suggested push up values.
Timken suggests that customers consult with our engineers to evaluate unique applications or
requirements for special operating conditions.
0.565
0.02224
0.630
0.0248
0.690
0.02717
0.770
0.03031
0.425
0.01673
0.470
0.0185
0.520
0.02047
0.580
0.02283
0.705
0.02776
0.790
0.0311
0.860
0.03386
0.960
0.0378
0.565
0.02224
0.630
0.0248
0.690
0.02717
0.770
0.03031
1.005
0.03957
1.135
0.04469
1.265
0.0498
1.405
0.05531
0.865
0.03406
0.975
0.03839
1.095
0.04311
1.215
0.04783
INDUSTRIAL BEARING MAINTENANCE MANUAL
28

INTERNAL CLEARANCES
Min./Max. values for each RIC are shown in the two adjacent
columns directly beneath the selected RIC. Each single column
represents a boundary between adjacent RIC’s. For example, the
minimum values for R4 are also the maximum values for R3; etc.
The desired RIC code (R1, R2, etc.) must be added to the bearing
number, following all other suffixes.
minimum values shown for R5 are also the maximum values for R4;
Timken radial internal clearance limits
R2 R4
Bore
(Nominal)
Over Incl. Min. Max. Min. Max. Min. Max.
80
3.1496
100
3.9370
120
4.7244
140
5.5118
160
6.2992
180
7.0866
200
7.8740
220
8.6614
260
10.2362
300
11.8110
350
13.7795
400
15.7480
450
17.7165
500
19.6850
560
22.0472
630
24.8031
710
27.9528
mm
in.
100
3.9370
120
4.7244
140
5.5118
160
6.2992
180
7.0866
200
7.8740
220
8.6614
260
10.2362
300
11.8110
350
13.7795
400
15.7480
450
17.7165
500
19.6850
560
22.0472
630
24.8031
710
27.9528
800
31.4961
0.013
0.0005
0.013
0.0005
0.023
0.0009
0.025
0.0010
0.028
0.0011
0.036
0.0014
0.041
0.0016
0.056
0.0022
0.061
0.0024
0.081
0.0032
0.107
0.0042
0.14
0.0055
0.152
0.0060
0.165
0.0065
0.178
0.0070
0.190
0.0075
0.216
0.0085
mm
Min. Max. Min. Max.
R1 R3 R5
in.
0.041
0.0016
0.046
0.0018
0.056
0.0022
0.066
0.0026
0.069
0.0027
0.081
0.0032
0.086
0.0034
0.102
0.0040
0.107
0.0042
0.127
0.0050
0.165
0.0065
0.203
0.0080
0.216
0.0085
0.229
0.0090
0.254
0.0100
0.279
0.0110
0.330
0.0130
0.081
0.0032
0.091
0.0036
0.104
0.0041
0.124
0.0049
0.132
0.0052
0.152
0.0060
0.157
0.0062
0.173
0.0068
0.178
0.0070
0.198
0.0078
0.236
0.0093
0.279
0.0110
0.292
0.0115
0.305
0.0120
0.356
0.0140
0.381
0.0150
0.457
0.0180
mm
in.
0.130
0.0051
0.152
0.0060
0.170
0.0067
0.196
0.0077
0.208
0.0082
0.234
0.0092
0.239
0.0094
0.254
0.0100
0.259
0.0102
0.279
0.0110
0.318
0.0125
0.361
0.0142
0.381
0.0150
0.406
0.0160
0.483
0.0190
0.508
0.0200
0.584
0.0230
0.196
0.0077
0.226
0.0089
0.256
0.0101
0.284
0.0112
0.300
0.0118
0.330
0.0130
0.335
0.0132
0.351
0.0138
0.356
0.0140
0.376
0.0148
0.414
0.0163
0.457
0.0180
0.508
0.0200
0.533
0.0210
0.610
0.0240
0.635
0.0250
0.711
0.0280
mm
C
in.
0.272
0.0107
0.310
0.0122
0.353
0.0139
0.384
0.0151
0.401
0.0158
0.437
0.0172
0.4420
0.0174
0.455
0.018
0.462
0.0182
0.483
0.0190
0.521
0.0205
0.564
0.0222
0.645
0.0254
0.671
0.0264
0.747
0.0294
0.772
0.0304
0.848
0.0334
INDUSTRIAL BEARING MAINTENANCE MANUAL
29

C
INTERNAL CLEARANCES
INDUSTRIAL BEARING MAINTENANCE MANUAL
30
 Loading...