

Page 1
Digital Heart Rate Monitor
digital heart rate monitor user guide
©2008 Timex Group, USA, Inc.TIMEX, TRIATHLON and NIGHT-MODE are registered trademarks of Timex Group USA,
Inc. INDIGLO is a registered trademark of Indiglo Corporation in the US and other countries. IRONMAN is a registered
trademark of World Triathlon Corporation. HEART ZONES is a registered trademark of Sally Edwards. The ANT and
ANT+Sport logos are trademarks of Dynastream Innovations Inc.
W-248 843-095000 NA
English page 1
Français page 69
Español página 145
W248_NA_CVR.qxd 8/5/08 10:07 AM Page CV1
Page 2

Table of Contents
Overview . . . . . . . . . . . . . . . . . . . . . . . . . . . . . . . . . . . . . . . . . . . . . . . .1
New Features . . . . . . . . . . . . . . . . . . . . . . . . . . . . . . . . . . . . . . . . . .1
A Fit Heart . . . . . . . . . . . . . . . . . . . . . . . . . . . . . . . . . . . . . . . . . . . .2
Watch Buttons . . . . . . . . . . . . . . . . . . . . . . . . . . . . . . . . . . . . . . . . .3
INDIGLO
®
night-light with Night-Mode®feature . . . . . . . . . . . . . . . .4
Display Icons . . . . . . . . . . . . . . . . . . . . . . . . . . . . . . . . . . . . . . . . . .4
Resources . . . . . . . . . . . . . . . . . . . . . . . . . . . . . . . . . . . . . . . . . . . .5
Determining Your Optimal Heart Rate Zone . . . . . . . . . . . . . . . . . . . .7
Heart Rate Monitor Setup and Use . . . . . . . . . . . . . . . . . . . . . . . . . . . .8
To Prepare Your Heart Rate Monitor for First Use . . . . . . . . . . . . . . .9
To Use Your Heart Rate Monitor . . . . . . . . . . . . . . . . . . . . . . . . . . .10
NO HRM DATA Message . . . . . . . . . . . . . . . . . . . . . . . . . . . . . . . . .11
Time of Day . . . . . . . . . . . . . . . . . . . . . . . . . . . . . . . . . . . . . . . . . . . . .12
To Set or Adjust Time, Date, and Audibles . . . . . . . . . . . . . . . . . . .13
To Switch Time Zones . . . . . . . . . . . . . . . . . . . . . . . . . . . . . . . . . .15
Heart Rate Data When Using Time of Day Mode . . . . . . . . . . . . . . .16
Time of Day Notes & Tips . . . . . . . . . . . . . . . . . . . . . . . . . . . . . . . .16
Time of Day Example . . . . . . . . . . . . . . . . . . . . . . . . . . . . . . . . . . .17
W248_NA_EN.qxp 8/5/08 10:07 AM Page i
Page 3

Review . . . . . . . . . . . . . . . . . . . . . . . . . . . . . . . . . . . . . . . . . . . . . . . . .37
About Review Mode . . . . . . . . . . . . . . . . . . . . . . . . . . . . . . . . . . . .37
To Review Workout Data . . . . . . . . . . . . . . . . . . . . . . . . . . . . . . . .38
Review Mode Data . . . . . . . . . . . . . . . . . . . . . . . . . . . . . . . . . . . . .39
HRM Setup . . . . . . . . . . . . . . . . . . . . . . . . . . . . . . . . . . . . . . . . . . . . . .41
Device Pairing . . . . . . . . . . . . . . . . . . . . . . . . . . . . . . . . . . . . . . . .41
Selecting a Target Heart Rate Zone . . . . . . . . . . . . . . . . . . . . . . . .43
To Set a Manual Target Heart Rate Zone . . . . . . . . . . . . . . . . . . . .44
To Enter Your Personal Data . . . . . . . . . . . . . . . . . . . . . . . . . . . . . .45
HRM Setup Notes & Tips . . . . . . . . . . . . . . . . . . . . . . . . . . . . . . . .47
Alarm 1, 2, or 3 . . . . . . . . . . . . . . . . . . . . . . . . . . . . . . . . . . . . . . . . . .48
To Set the Alarm . . . . . . . . . . . . . . . . . . . . . . . . . . . . . . . . . . . . . . .49
Alarm Mode Notes & Tips . . . . . . . . . . . . . . . . . . . . . . . . . . . . . . . .50
Sync . . . . . . . . . . . . . . . . . . . . . . . . . . . . . . . . . . . . . . . . . . . . . . . . . . .51
To Sync the watch with a PC . . . . . . . . . . . . . . . . . . . . . . . . . . . . .52
Sync Error Messages . . . . . . . . . . . . . . . . . . . . . . . . . . . . . . . . . . .53
Care & Maintenance . . . . . . . . . . . . . . . . . . . . . . . . . . . . . . . . . . . . . .54
Watch Battery Replacement . . . . . . . . . . . . . . . . . . . . . . . . . . . . . .54
INDIGLO
®
night-light . . . . . . . . . . . . . . . . . . . . . . . . . . . . . . . . . . . .54
Water Resistance . . . . . . . . . . . . . . . . . . . . . . . . . . . . . . . . . . . . . .54
Heart Rate Sensor Strap Maintenance . . . . . . . . . . . . . . . . . . . . . .55
Transmitter Battery Life and Replacement . . . . . . . . . . . . . . . . . . .55
Battery Replacement . . . . . . . . . . . . . . . . . . . . . . . . . . . . . . . . . . .55
Chrono . . . . . . . . . . . . . . . . . . . . . . . . . . . . . . . . . . . . . . . . . . . . . . . . .18
Chrono Terminology . . . . . . . . . . . . . . . . . . . . . . . . . . . . . . . . . . . .18
To Operate the Chrono . . . . . . . . . . . . . . . . . . . . . . . . . . . . . . . . . .19
Heart Rate Data When Using Chrono Mode . . . . . . . . . . . . . . . . . .20
Chronograph Display Format . . . . . . . . . . . . . . . . . . . . . . . . . . . . .21
Chrono Mode Notes & Tips . . . . . . . . . . . . . . . . . . . . . . . . . . . . . . .21
Chrono Mode Example . . . . . . . . . . . . . . . . . . . . . . . . . . . . . . . . . .22
Interval . . . . . . . . . . . . . . . . . . . . . . . . . . . . . . . . . . . . . . . . . . . . . . . .23
Interval Terminology . . . . . . . . . . . . . . . . . . . . . . . . . . . . . . . . . . . .23
To Set or Adjust Intervals . . . . . . . . . . . . . . . . . . . . . . . . . . . . . . . .24
To Operate the Interval Timer . . . . . . . . . . . . . . . . . . . . . . . . . . . . .26
Heart Rate Data When Using Interval Mode . . . . . . . . . . . . . . . . . .26
Interval Mode Notes & Tips . . . . . . . . . . . . . . . . . . . . . . . . . . . . . .27
Interval Mode Example . . . . . . . . . . . . . . . . . . . . . . . . . . . . . . . . . .29
Timer . . . . . . . . . . . . . . . . . . . . . . . . . . . . . . . . . . . . . . . . . . . . . . . . . .30
To Set the Timer . . . . . . . . . . . . . . . . . . . . . . . . . . . . . . . . . . . . . . .30
To Operate the Timer . . . . . . . . . . . . . . . . . . . . . . . . . . . . . . . . . . .31
Timer Mode Notes & Tips . . . . . . . . . . . . . . . . . . . . . . . . . . . . . . . .33
Timer Mode Example . . . . . . . . . . . . . . . . . . . . . . . . . . . . . . . . . . .34
Recovery . . . . . . . . . . . . . . . . . . . . . . . . . . . . . . . . . . . . . . . . . . . . . . .34
About Recovery Heart Rate . . . . . . . . . . . . . . . . . . . . . . . . . . . . . .34
To Manually Determine a Recovery Heart Rate . . . . . . . . . . . . . . . .35
W248_NA_EN.qxp 8/5/08 10:07 AM Page ii
Page 4

Warranty & Service . . . . . . . . . . . . . . . . . . . . . . . . . . . . . . . . . . . . . . .57
Declaration of Conformity . . . . . . . . . . . . . . . . . . . . . . . . . . . . . . . . . .62
1
Overview
Congratulations!
The Ironman®Triathlon®Digital Heart Rate Monitor is like hiring a
personal trainer.This high-tech tool is designed for demanding athletes
like you to measure how you track against your workout goals and offers
you the ability to track, store, and analyze key indicators of your personal
fitness level for up to 50 laps.
You will find your Heart Rate Monitor is a user-friendly fitness tool. But,
like any new device, you should take the time to familiarize yourself with
its components to optimize its usefulness.
So, check out the features and functions of your Heart Rate Monitor to
develop a basic understanding of this fitness tool. But most of all, enjoy
your new partner on the road to increased fitness!
New Features
The Ironman®Triathlon®Digital Heart Rate Monitor features a 10-workout
memory that gathers elapsed time and heart rate data when you run its
chronograph or interval timer. What makes this interval timer unique is
that each of the linked segments can be set for both heart rate zone and
duration, so your workout can incorporate time-and-effort training
guidance - just like having a coach on your wrist.
In addition to standard heart rate monitor features, your Ironman
®
W248_NA_EN.qxp 8/5/08 10:07 AM Page iv
Page 5
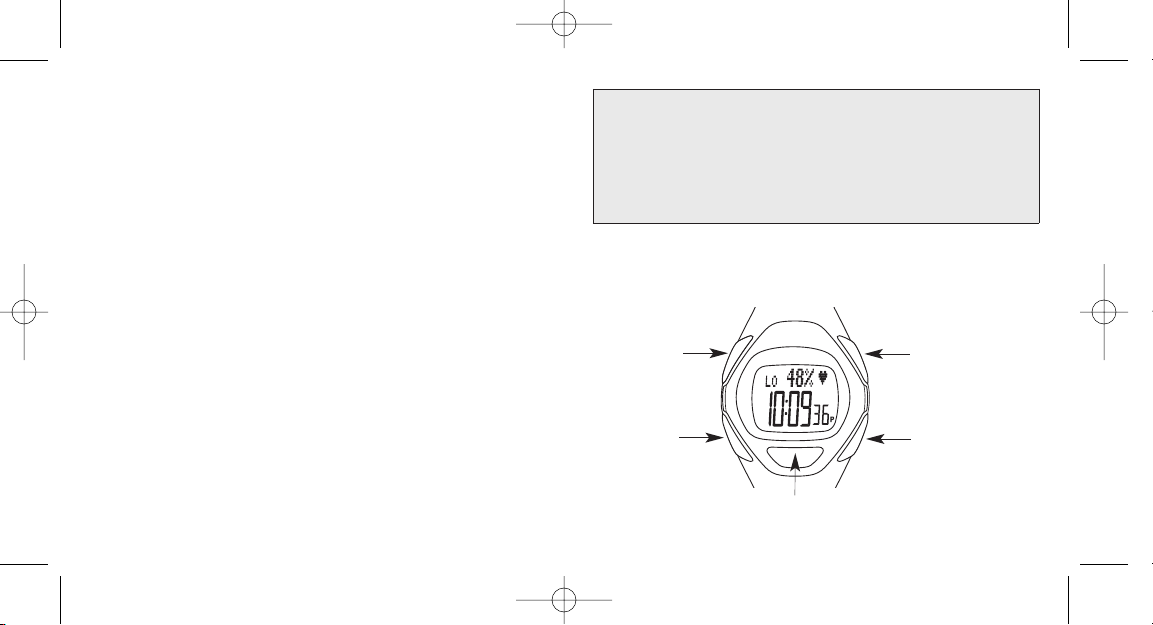
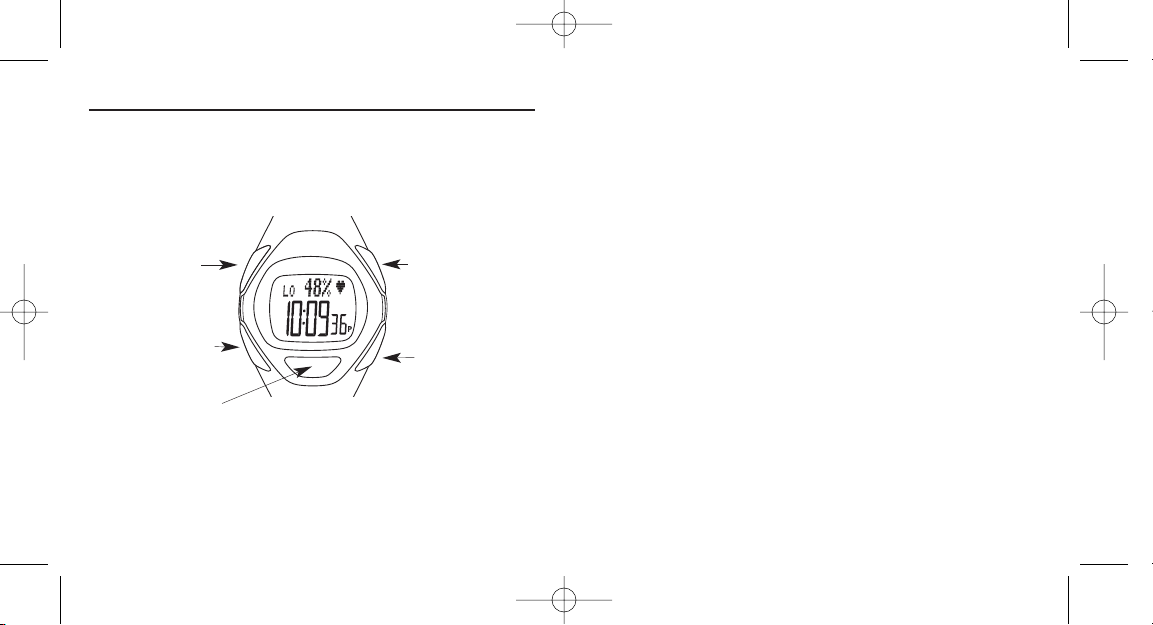
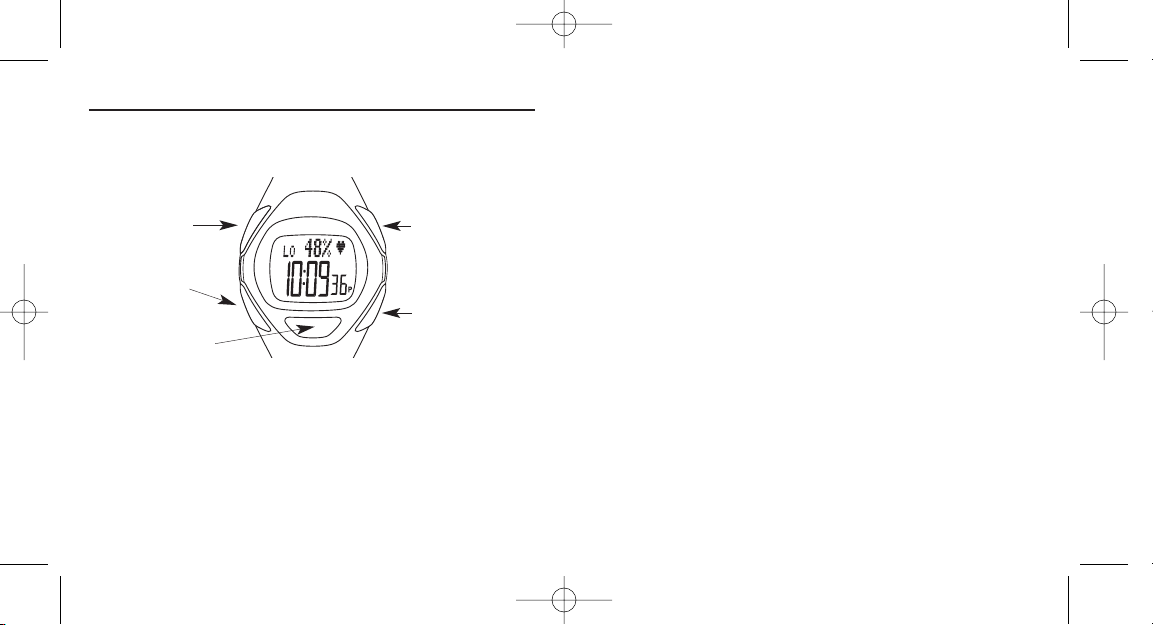
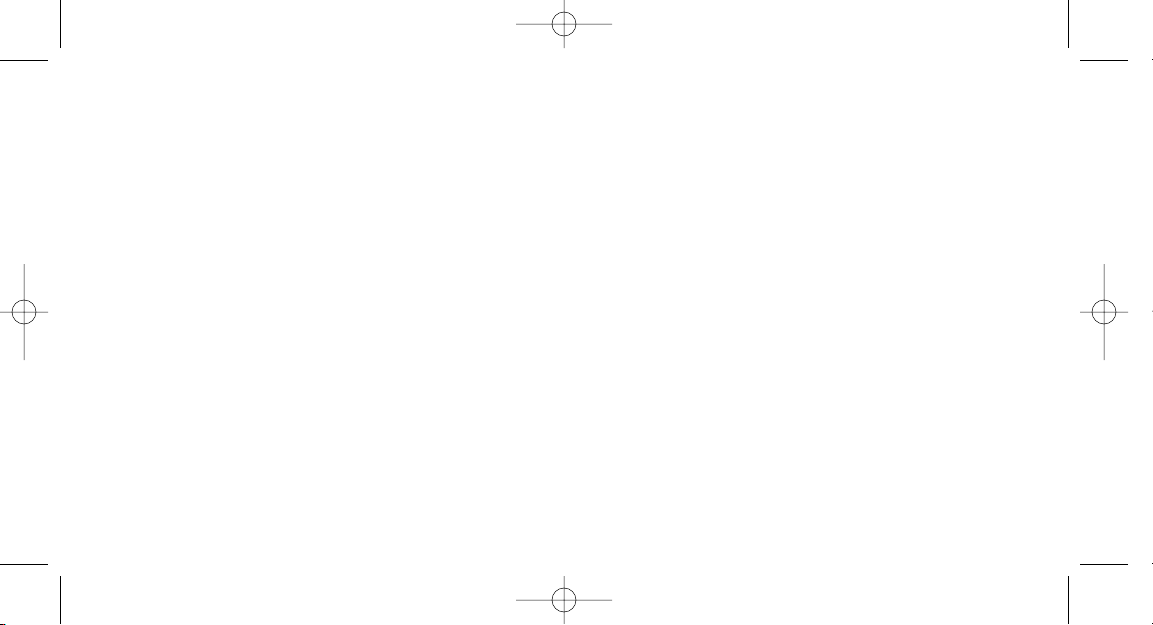
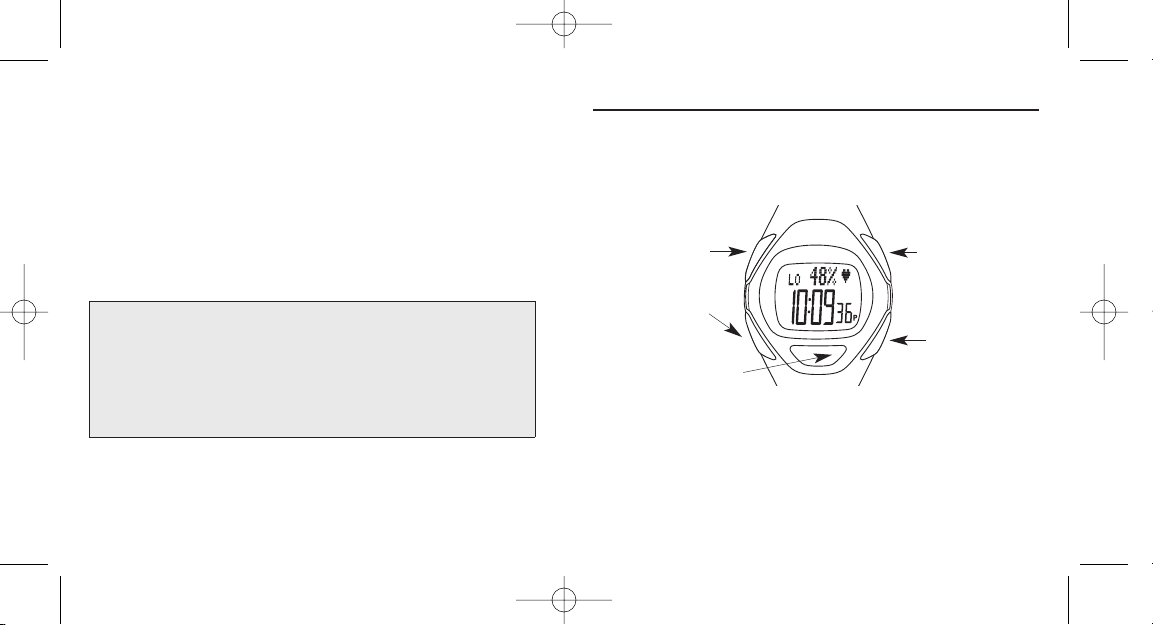
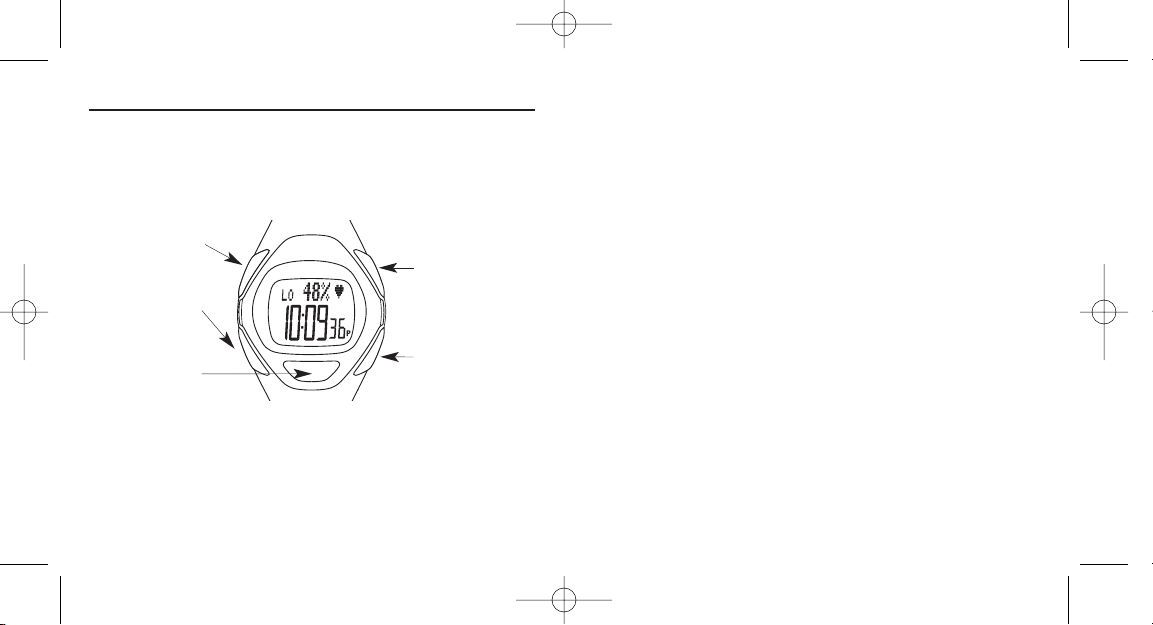
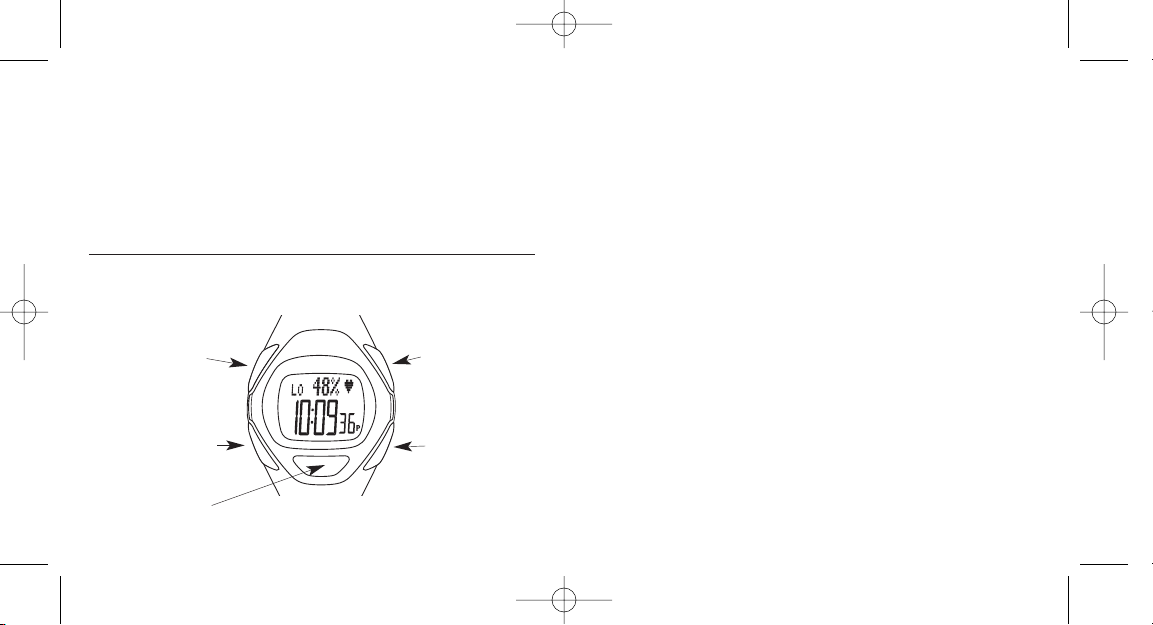
Watch Buttons
32
START/SPLIT
STOP/RESET/SET
HEART RATE
MODE
INDIGLO
®
BUTTON
Triathlon®Digital Heart Rate Monitor allows you to lock one or more of
your workouts to reduce accidental deletion.
The watch also has an optional two-way wireless communication link.
With two-way communication, you can upload data from the watch to
PC/Mac or download settings from a PC/Mac to the watch. The link radio
provides seamless digital wireless communication, reliable connections,
and data transmissions between the watch and other ANT+Sport devices.
A Fit Heart
Recent fitness findings indicate that anyone can get fit and stay fit without
being overzealous. It can be as simple as:
O Exercising 3 to 4 times per week.
O Exercising for 30 to 45 minutes during each exercise session.
O Exercising at the appropriate heart rate.
Heart rate represents the effects of exercise on all parts of the body.
Selecting the appropriate heart rate zone conditions the heart, lungs, and
muscles to perform at optimal levels to get and keep your body in shape.
Your Heart Rate Monitor can show you when you are in the exercise zone
you choose and signal you when you are not. It can help keep your body
exercising at an intensity level that can help you achieve your desired
fitness objectives without over- or under-exercising.
WARNING:
This is not a medical device and is not recommended for use by persons
with serious heart conditions. Consult your physician before beginning any
exercise program.
Interference with the radio signal, poor contact between your skin and the Digital
Heart Rate Sensor, or other factors may prevent accurate transmission of heart rate
data.
W248_NA_EN.qxp 8/5/08 10:07 AM Page 2
Page 6

54
a The alarm clock icon indicates you have set the alarm to alert you at
a designated time.
q The speaker icon appears when you have set the watch to alert you
when you go above or below your specified heart rate zone during a
workout.
5 The antenna icon appears when the watch is synchronized with the
Heart Rate Sensor.
l The lock icon appears when you have locked a workout so it does not
get overwritten by another workout.
e The hourglass with heart icon appears when the watch is timing a
recovery.
k The crescent moon icon appears when you enable the INDIGLO
®
Night-Light with Night-Mode® feature.
Resources
Print Resources
In addition to this manual, your Heart Rate Monitor includes these
valuable resources:
O Heart Zones
®
Tools for Success (U.S. customers only): Information
concerning how to use your Heart Rate Monitor in conjunction with the
Heart Zones®Training System fitness program, meant to help you to
increase the strength and endurance of your heart.
NOTE: The specific use for these buttons varies by mode. Refer to each
mode for more information on how to use the watch buttons.
INDIGLO®night-light with Night-Mode®feature
In any watch mode, pressing the INDIGLO®button activates the INDIGLO
®
night-light and illuminates the watch while holding the button. Press and
hold the INDIGLO®button until you hear a beep to activate the NightMode® feature.
When the Night-Mode®feature is active, pressing any watch button will
light the watch face for a period of three to six seconds. The Night-Mode
®
feature will remain active for seven to eight hours after activation. To
deactivate before the eight hour time frame has elapsed, press and hold
the INDIGLO®button until you hear a beep.
Display Icons
g The heart icon indicates that the Heart Rate Sensor is operating.
W The stopwatch icon indicates that the watch is timing your workout in
Chrono Mode.
H The hourglass icon indicates that the watch is timing your workout in
Interval or Timer Mode.
J The repeat icon indicates you have set the timer to repeat at the end
of a countdown cycle in Interval or Timer Mode.
W248_NA_EN.qxp 8/5/08 10:07 AM Page 4
Page 7
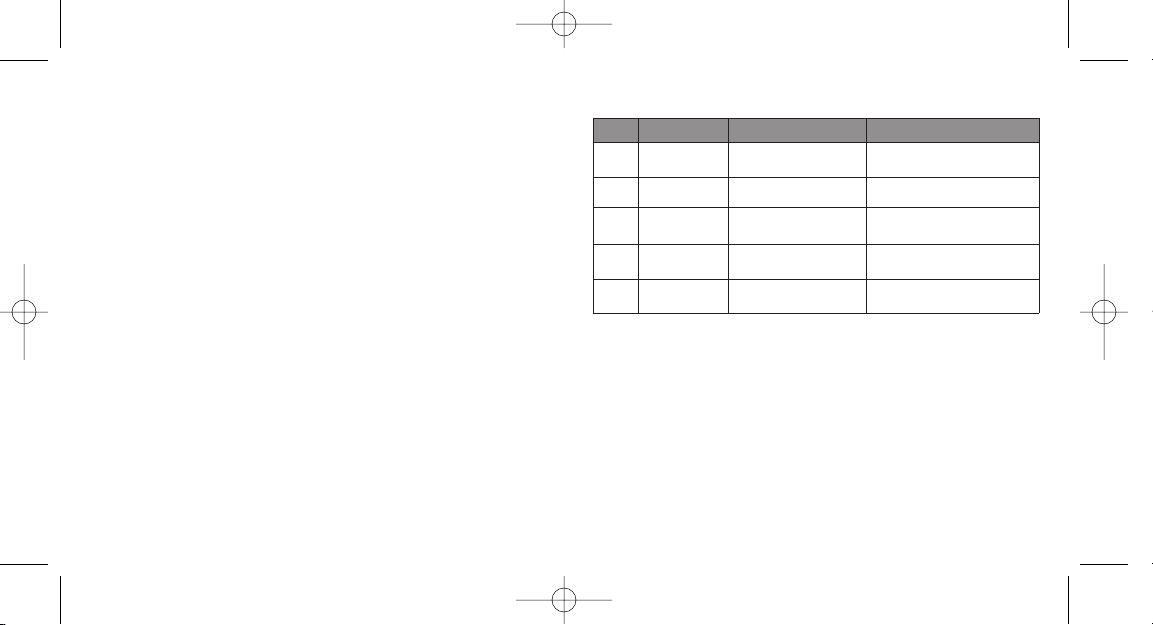
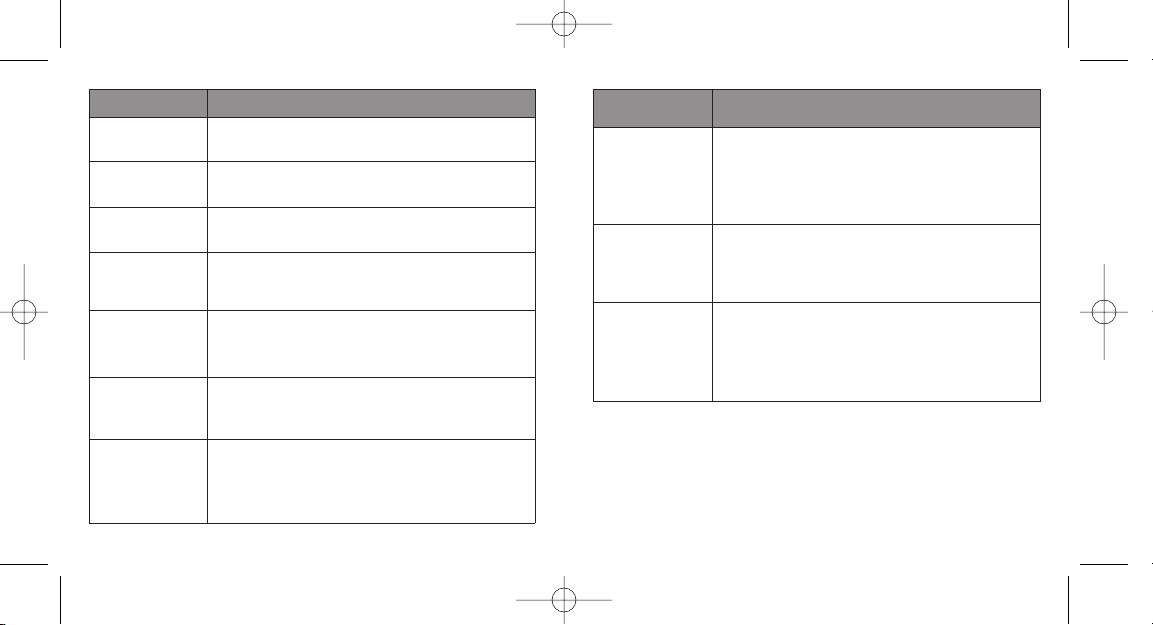
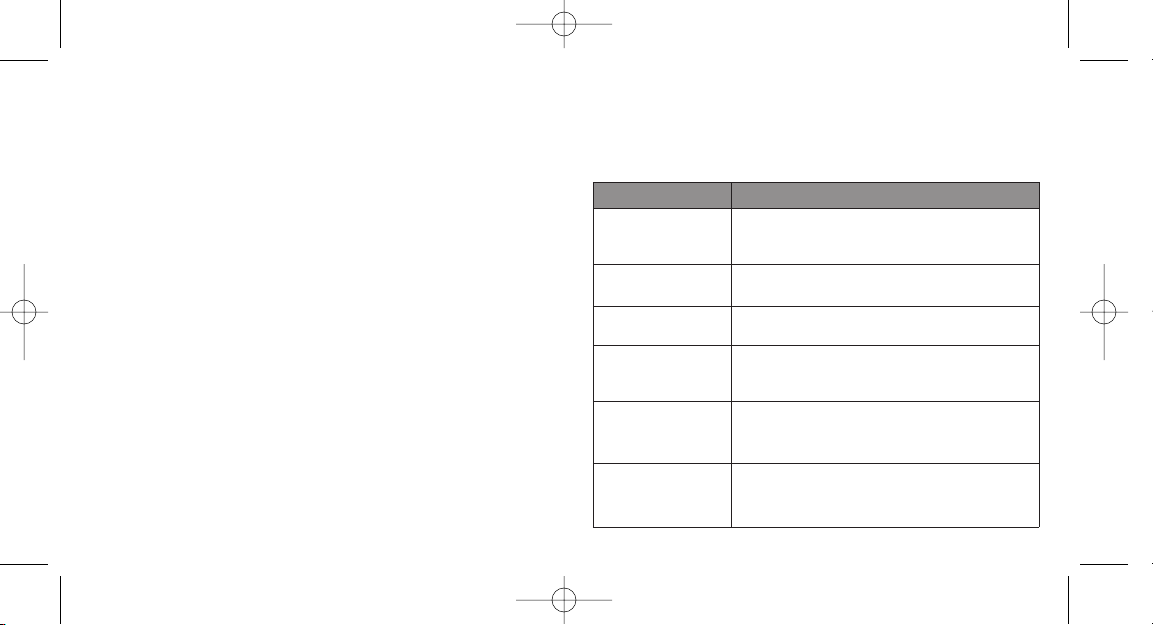
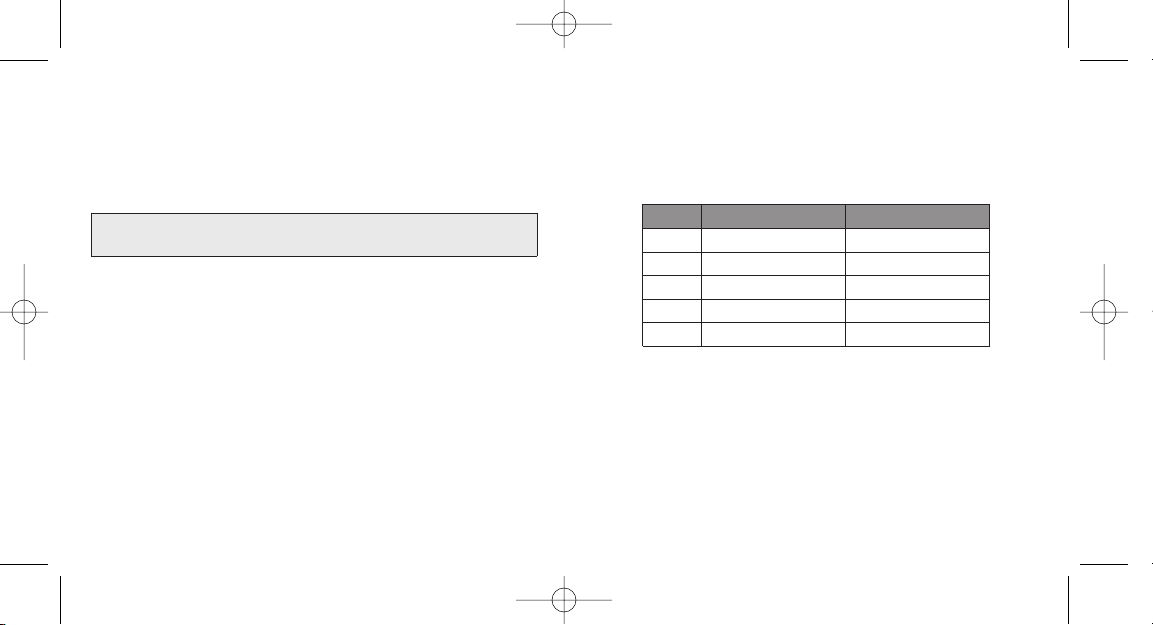
Determining Your Optimal Heart Rate Zone
There are five basic heart rate target zones described in the table above.
Simply select a zone that matches your percent of maximum (%) heart rate
based on the fitness goal you want to achieve during a particular exercise.
Before you can set your zone, you first need to determine your maximum
heart rate. You can use many methods to estimate your maximum heart
rate.
The booklet
Heart Zones®Tools For Success
included in your Heart Rate
Monitor packaging (U.S. customers only) provides excellent procedures
and Timex recommends you use one of these methodologies.
You might consider using the government recommended age-based method.
7
Web Resources
Timex websites offer beneficial information to help you optimize your
Heart Rate Monitor.
O Register your product at www.timextrainer.com.
O Visit www.timextrainer.com for more on Timex
®
Health & Fitness
products, Timex®sports watches, and training information.
6
Zone % Goal Benefit
1 50% to 60% Light exercise
Maintain a healthy heart and
get fit
2 60% to 70% Weight management Lose weight and burn fat
3 70% to 80% Aerobic base building
Increase stamina and aerobic
endurance
4 80% to 90% Optimal conditioning
Sustain excellent fitness
condition
5 90% to 100% Elite athletic training
Achieve superb athletic
condition
W248_NA_EN.qxp 8/5/08 10:07 AM Page 6
Page 8
To Prepare Your Heart Rate Monitor for First Use
Once you have determined your fitness goals and maximum heart rate,
Timex recommends you pair the watch with your Heart Rate Sensor, set
the time, and set other important data in HRM Setup Mode before using
your Heart Rate Monitor.
Note: For best results, Timex recommends that you wash your heart rate
sensor in warm soapy water to remove any manufacturing oils before
using for the first time.
O Pairing the watch and Heart Rate Sensor: Timex recommends that
you pair the Heart Rate Sensor and watch to minimize the possibility of
picking up a signal from another person’s Heart Rate Sensor. To
accurately pair the watch with the Heart Rate Sensor, go immediately
to HRM Setup Mode prior to stopping at or using any other mode. For
more information on pairing, see pages 40 to 41.
O Setting the Time of Day: The Heart Rate Monitor uses the time set on
the watch to record data. To ensure you are recording data at the
correct time, set the watch for your local time in Time of Day Mode.
For more information on Time of Day Mode refer to pages 12 to 17.
O Entering Your Personal Data: Before using your watch it is important
to enter your weight and maximum heart rate in HRM Setup Mode.
This will allow you to tailor your Heart Rate Monitor to your personal
parameters. For information on HRM Setup Mode, refer to pages 44
to 46.
9
Begin with the number 220 and then subtract your age. For instance, a
35 year old would begin with 220 and subtract 35 (the person’s age),
which gives an estimated maximum heart rate of 185. Once you know
your maximum heart rate, you can enter it in HRM Setup Mode and the
watch will automatically setup your zones as described in the table on the
previous page.
Heart Rate Monitor Setup and Use
Chrono and Interval Timer Modes collect heart rate data and record
detailed statistics for a workout. The Heart Rate Monitor can store
information for up to 10 workouts.
NOTE: The watch will collect heart rate data without the Chrono or Interval
Timer running. This information will not be available in Review Mode, but
can be transferred from the watch to a PC/Mac (Timex®Data Xchanger
USB device is required). If you have an optional USB device, you can
upload workout data to a PC/Mac for storage and viewing. When the watch
can store less than five hours, or only three more sessions, of heart rate
data, the watch will display the MEMORY LOW message. When the watch
has reached its storage capacity limits, the display will read MEMORY
FULL.
When the watch is not used with a PC/Mac these messages will be
skipped. Unless you lock a workout, you will automatically over-write an
older workout when you have reached your 10-workout limit.
8
W248_NA_EN.qxp 8/5/08 10:07 AM Page 8
Page 9
11
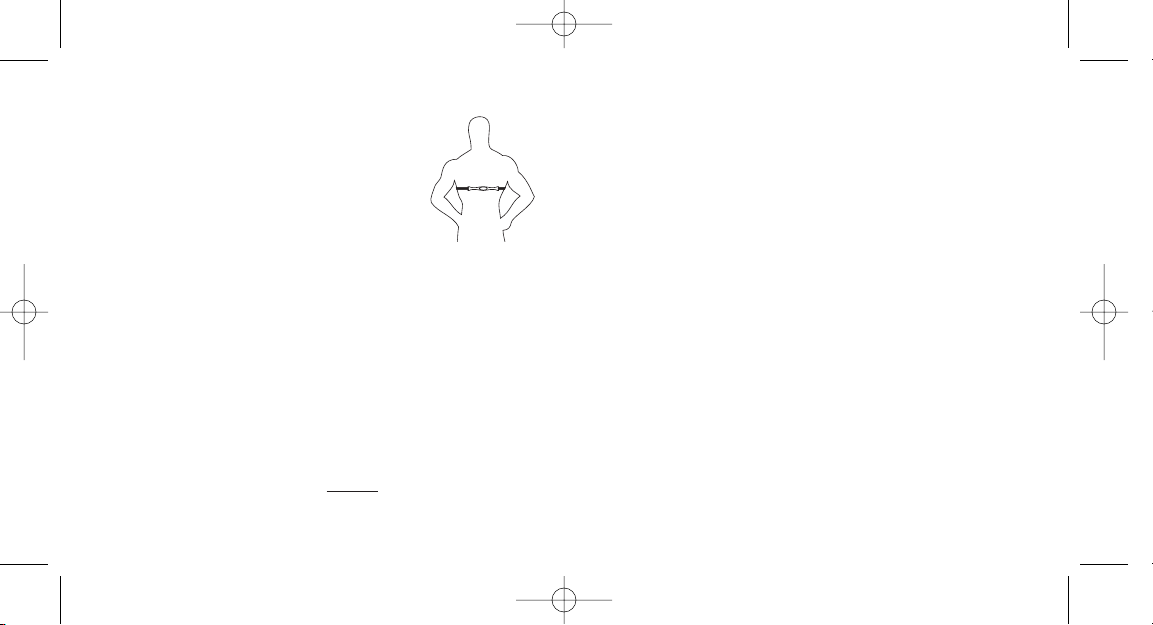
To Use Your Heart Rate Monitor
1. Wet the Heart Rate Sensor pads.
2. Center the Sensor on your chest with the Timex
®
logo facing up and out and fasten it firmly, just
below your sternum.
3. Press the MODE button until your desired mode
appears. You can view heart rate information in Time
of Day, Chrono, Interval Timer, or Timer Modes.
4. Press the HEART RATE button on your watch. The antenna icon will
appear on the display indicating the watch is searching for a signal
from the Heart Rate Sensor.When the watch begins receiving a signal,
a pulsing heart icon will appear on the display. In certain modes, the
watch will automatically search for a Heart Rate Sensor when you
enter the mode.
NOTE: The watch automatically records your heart rate and other
statistical data about your workout (available in Review Mode) when
you use Chrono and Interval Timer Modes.
5. Press the START/SPLIT button and begin your workout.
6. If the watch is set to alert you when you go above or below your
chosen target heart rate zone press and hold
HEART RATE to turn the
audible alert off. Otherwise it will continue beeping until you return to
your target zone. When you are turning the audible alert off, you will
10
see the message HOLD FOR ALERT OFF. Conversely, when turning the
audible alert on, you will see the message HOLD FOR ALERT ON.
7. When you have finished your workout, press the STOP/RESET/SET
button to stop recording data for the workout if you are using Chrono
or Interval Timer Modes.
8. Remove the Heart Rate Sensor from your chest and the watch will stop
recording further heart rate data in approximately one minute.
9. Press MODE until you see Review Mode. This Mode includes heart rate
and other statistical data about your workout. See pages 36 to 39 for
more information about Review Mode.
NO HRM DATA Message
If the watch is not receiving heart rate information, you may receive the
message NO HRM DATA on the watch display. Try the following:
O Shorten the distance between the watch and the Heart Rate Sensor.
O Adjust the position of the Heart Rate Sensor and elastic chest strap.
O Make sure the Heart Rate Sensor pads are wet or use conductive gel.
O Check the battery in the Heart Rate Sensor and replace it if necessary.
O Move away from other heart rate monitors or other sources of radio or
electrical interference.
W248_NA_EN.qxp 8/5/08 10:07 AM Page 10
Page 10
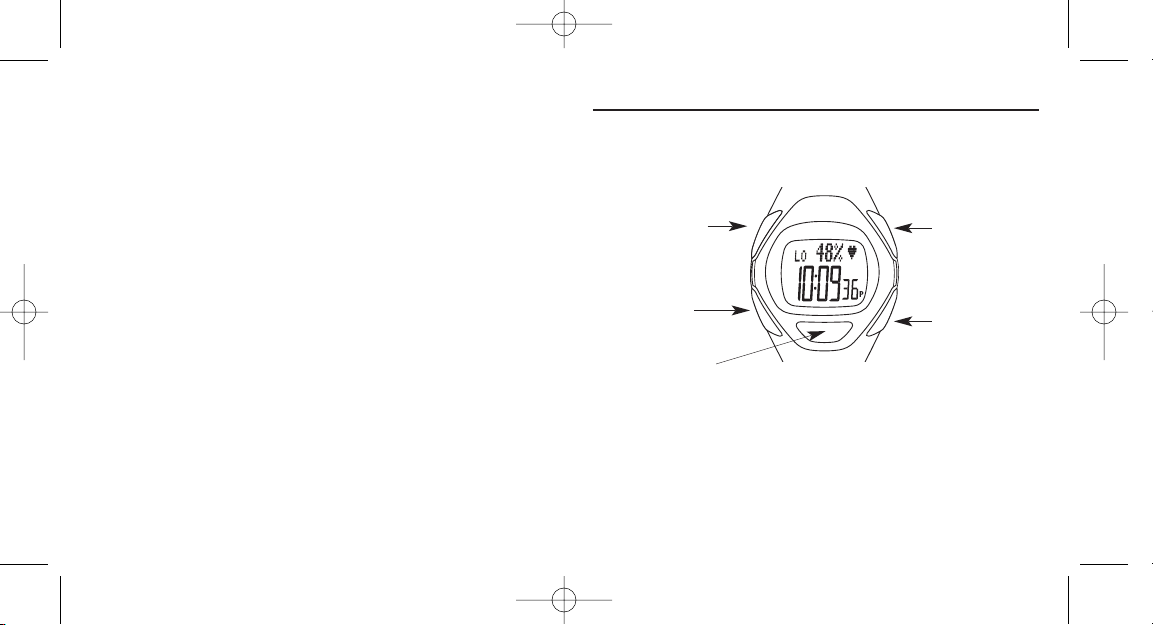
To Set or Adjust Time, Date, and Audibles
1. Press MODE until Time of Day Mode appears, showing the current
time.
2. Press and hold STOP/RESET/SET until the words HOLD TO SET briefly
appear on the display followed by SET then SET TIME with the number
1 or 2 flashing in the lower right corner.
3. PRESS START/SPLIT (+) or HEART RATE (-) to toggle between the
primary (1) and secondary (2) time zones.
4. Press MODE (NEXT) to begin setting the time for the chosen time zone.
The time will appear on the display with the hour value flashing.
5. Make the desired adjustment as indicated in the tables on the next two
pages.
6. Press MODE (NEXT) to move to the next setting option.
7. Press STOP/RESET/SET (DONE) to save your changes and exit the
setting process.
For this watch, you can make the Time of Day adjustments described in
the tables that appear on the next two pages.
NOTE: To quickly change the value being set, press and hold START/SPLIT
(+) or HEART Rate (-).
12 13
Time of Day
Your watch can act as an ordinary timepiece, displaying the time, date,
and day for two different time zones using a 12- or 24-hour format.
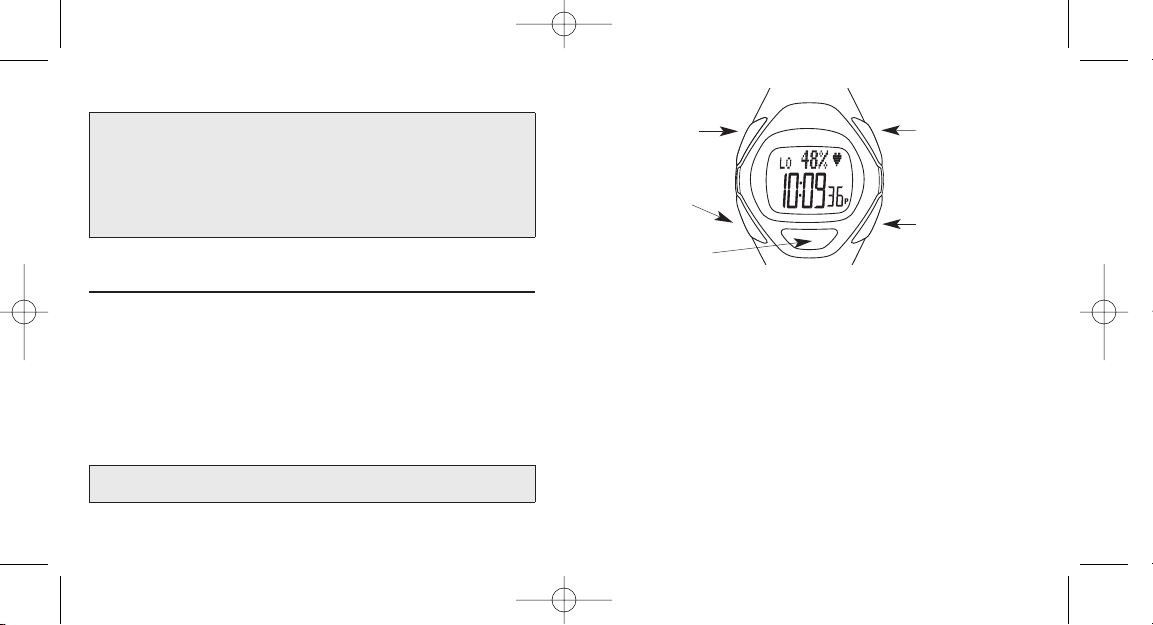
START/SPLIT
Press to peak at or switch
time zones or increase or
toggle a setting item.
STOP/RESET/SET
Press to start or
complete the setting
process.
HEART RATE
Press to activate the Heart
Rate Monitor, decrease or
toggle the setting item, or
switch display views.
MODE
Press to move to the next
mode, setting option, digit,
or group.
INDIGLO®®BUTTON
Press to light the watch,
activate/de-activate the
Night- Mode
®
feature.
W248_NA_EN.qxp 8/5/08 10:07 AM Page 12
Page 11
To Switch Time Zones
The watch can track two time zones (T1 and T2). To look at the second
zone in Time of Day Mode, press START/SPLIT. T1 or T2 will flash in the
lower right corner indicating the alternate time zone. You can switch from
T1 to T2 or T2 to T1 by using these steps:
1514
Setting Group Adjustment
Appearance of the
Month and Day
Press START/SPLIT (+) or HEART RATE (-) to toggle between
the appearance options for the month and the day. The
options include: Month Day (MM-DD) or Day Month
(DD.MM). For example, March 15 can appear as 3-15 (MMDD) or 15.3 (DD.MM).
Hourly Chime
Press START/SPLIT or HEART RATE to toggle between turning
the chime on and off. When turned on, the watch will emit a
beep every hour on the hour.
Button Beep
Press START/SPLIT or HEART RATE to toggle between turning
the button beep on and off. When you turn the button beep
on, the watch will emit a beep every time you press a button
other than the INDIGLO
®
button.
Setting Group Adjustment
Hour
Press START/SPLIT (+) to increase the hour value or
HEART RATE (-) to decrease the hour value.
Minute
Press START/SPLIT (+) to increase the minute value or
HEART RATE (-) to decrease the minute value.
Second
Press START/SPLIT (+) or HEART RATE (-) to reset the
seconds to zero.
Month
Press START/SPLIT (+) to move forward through the months
or HEART RATE (-) to move backward through the months.
Day of the Month
Press START/SPLIT (+) to move forward through the days of
the month or HEART RATE (-) to move backward through the
days of the month.
Year
Press START/SPLIT (+) to increase the year value or HEART
RATE (-) to decrease the year value.
12- or 24-Hour
Format
Press START/SPLIT (+) or HEART RATE (-) to toggle between
the 12- and 24-hour formats. In the 12-hour format the AM
and PM time indicators will also appear to the right of the
seconds on the time display.
W248_NA_EN.qxp 8/5/08 10:07 AM Page 14
Page 12
O While setting the watch, if you do not press any buttons on the watch
for a period of 2 to 3 minutes, the watch will automatically save
whatever changes you have made and exit the setting process.
O During a Leap Year, the watch will automatically move from February
28 to February 29. For other years, the watch will move from February
28 to March 1.
O Alarms are triggered by the time set in Time of Day Mode.
Time of Day Example
1716
1. Press and hold START/SPLIT until T1 or T2 appears and flashes.
2. Continue to hold until the time switches and the watch beeps.
Heart Rate Data When Using Time of Day Mode
When using the watch with the Heart Rate Sensor, you can change the
Time of Day Mode display by pressing the HEART RATE button. Choose
from:
1. Heart Rate over Time of Day;
2. Time of Day over Heart Rate
3. Heart Rate only; or
4. Time of Day with Day/Month/Date.
NOTE: While you can see current heart rate information in Time of Day
Mode, the watch is not collecting any data that you can view in Review
Mode.
Time of Day Notes & Tips
O You can return to Time of Day Mode from any other mode on the watch
by pressing MODE until the time of day appears.
O The watch does not automatically adjust for Daylight Savings Time.
When switching between Standard Time and Daylight Savings Time,
you must manually adjust the hour value.
O At any time during the setting process, you can save your changes and
return to the main time display by pressing STOP/RESET/SET.
Assume that you live in San Francisco and work with a client in New York. Like all
busy people, it is imperative you keep track of time, so you set T1 to your local time.
But it is also important to have a quick reminder of your client’s time, so you set T2
to New York time. With both time zones available,you can quickly check your client’s
time or even switch your watch to display T2 when you travel to New York.
W248_NA_EN.qxp 8/5/08 10:07 AM Page 16
Page 13
O Taking a lap or split: When you take a lap or split, the
chronograph records the time for the current segment and
automatically begins timing a new one.
To Operate the Chrono
1. Press MODE until CHRONO appears.
2. Press and hold STOP/RESET/SET to save chrono data (if necessary)
and reset the chrono.
3. Press START/SPLIT to begin timing.
4. Press START/SPLIT again to take a lap or split. The watch will display
the lap or split number and average heart rate (for the lap or split) if
receiving data from the Heart Rate Sensor.
5. Press MODE to immediately display new lap or split information OR
wait a few seconds and the watch will automatically begin to display
data for a new lap or split.
6. Press STOP/RESET/SET to stop timing when you want to take a break
or you reach the end of your workout.
NOTE: The recovery heart rate timer will begin automatically (for 30
seconds or 1-, 2-, 5-, or 10-minutes, as user-specified) after pressing
STOP/RESET/SET if the watch is receiving data from the Heart Rate
Sensor. For more information about recovery heart rate, see pages
33 to 35.
19
Chrono
Chrono Mode operates as the main workout data center for your watch. It
can record elapsed time for up to 100 hours. It can also record information
for up to 50 laps.
Chrono Terminology
O Chronograph: The chronograph records timed segments for the
duration of your workout.
O Lap: Lap time records the time or duration of individual segments of
your workout.
O Split: Split time records the total elapsed time since the beginning of
your current workout.
18
START/SPLIT
Press to begin timing, take
a lap or split, or continue
timing after a pause.
STOP/RESET/SET
Press to stop or pause the
chrono, save chrono data
and clear the chrono,
or change chrono format
HEART RATE
Press to switch
display views.
MODE
Press to move to the next
mode or quickly display
a new lap or split.
INDIGLO®®BUTTON
Press to light the watch,
activate/de-activate the
Night- Mode
®
feature.
W248_NA_EN.qxp 8/5/08 10:07 AM Page 18
Page 14
21
7. Press START/SPLIT to continue timing OR press and hold
STOP/RESET/SET to clear the chronograph display and set it back to
zero. This also saves chrono data in the watch database.
NOTE: If all workouts are locked you will see the message WORKOUTS
LOCKED - UNLOCK IN REVIEW. In this instance, the watch cannot save
any data for a workout.
Heart Rate Data When Using Chrono Mode
When you operate the watch in Chrono Mode with the Heart Rate Sensor,
you will accumulate heart rate related data in Review Mode, including:
1. Amount of time your heart rate stays within your target heart rate zone
(shown as IN ZONE in Review Mode);
2. The average heart rate for the complete time the Heart Rate Sensor
was operating and the chronograph was running (shown as AVERAGE
in Review Mode);
3. The average heart rate for each recorded lap (shown as LAP DATA in
Review Mode); and
4. Peak and minimum heart rates for the complete time the Heart Rate
Sensor was operating and the chronograph was running (shown as
PEAK and MINIMUM in Review Mode)
20
Chronograph Display Format
You can set the Chronograph to show either the lap or split time on the
lower display line.
1. Stop and reset the Chronograph.
2. Press and release the STOP/RESET/SET button. You will see FORMAT
on the display, followed by SET, and then the current format setting.
3. Press START/SPLIT (+) to select the format you would like.
4. Press STOP/RESET/SET (DONE) to save your setting and return to the
Chrono.
Note that although the format setting implies that Chrono time values are
shown in both the upper and lower display lines, when using the Chrono
without the heart rate sensor, the upper display line is reserved for the lap
number, so only the lower line of timing information is shown. However,
when using the Chrono with the heart rate sensor, it is possible to see
both lap and split timing information at the same time if desired.
Chrono Mode Notes & Tips
O Press MODE to switch to Time of Day Mode while running the
chronograph. The stopwatch icon (W) will appear to indicate the
chronograph is still operating.
O When the chronograph is running along with the Heart Rate Sensor you
W248_NA_EN.qxp 8/5/08 10:07 AM Page 20
Page 15
Interval
Interval Timer Mode offers a flexible five-interval countdown timer that can
be set to repeat up to 99 times. This mode is useful when your workout
includes distinct segments such as using a run/walk method in which you
run for a specified period of time and then walk for a specified period of
time.
Interval Terminology
O Interval Training: You can use interval training to help you vary the
intensity level within one workout, ultimately helping you work out
longer and harder.
O Interval: Intervals relate your exercise to specific periods of time. For
instance, you can run for ten minutes, walk for two, run for twenty
23
can change the Chrono Mode display by pressing HEART RATE. Choose
from:
1. Heart Rate over Lap/Split Time;
2. Lap/Split Time over Heart Rate;
3. Lap Time over Split Time;
4. Lap # over Lap or Split time; or
5. Heart Rate only.
Chrono Mode Example
22
START/SPLIT
Press to begin timing,
continue timing after a pause,
or increase or toggle a setting
item.
STOP/RESET/SET
Press to start or complete
the setting process, pause
or stop the interval timer,
or clear and save data.
HEART RATE
Press to switch display
views or decrease or
toggle a setting item.
MODE
Press to move to the next
mode, digit, or setting
option or group.
INDIGLO®®BUTTON
Press to light the watch,
activate/de-activate the
Night- Mode
®
feature.
Twice a week, you run in the hills behind your house and you use the chronograph
to time your workout. You have divided the run into four segments: 1) from your
house to the beginning of the hill, 2) from the bottom of the hill to the top of the hill,
3) from the top of the hill back down, and finally 4) from the end of the hill back
home. At each of these landmarks,you press the START button to begin timing a new
lap. After five weeks of storing the same workout,you are able to track your progress
over time to see whether or not your time is improving for each of the lap segments.
W248_NA_EN.qxp 8/5/08 10:07 AM Page 22
Page 16
25
minutes, and then walk for five – this would represent four training
intervals.
O Repetitions (Reps): The number of times you choose to perform an
interval group. In the example above, if you choose to run the interval
group three times, you will go through your series of ten, two, twenty,
and five minute timings three times in sequence. This would represent
3 reps.
To Set or Adjust Intervals
You can set the watch to set and store up to five intervals labeled INT 1
through INT 5.
1. Press MODE until Interval Mode appears, showing the most recent
interval settings.
2. Press STOP/RESET/SET until the words INT TIMER SET briefly appear
on the display followed by SET followed by the current setting for
Interval 1 and INT with the number 1 flashing at the top of the display.
3. PRESS START/SPLIT (+) or HEART RATE (-) to choose which of the five
interval groups to set.
4. Press MODE (NEXT) to begin setting the time for the chosen interval.
The current interval time will appear on the display with the hour value
flashing.
5. Make the desired adjustment as indicated in the table on the next
page.
6. Press MODE (NEXT) to move to the next setting option.
24
7. Press STOP/RESET/SET (DONE) to save your changes and exit the
setting process.
You can make the interval adjustments described in the table below.
Setting Group Adjustment
Interval Number
Press START/SPLIT (+) to increase the interval number or
HEART RATE (-) to decrease the interval number.
Hour
Press START/SPLIT (+) to increase the hour value or
HEART RATE (-) to decrease the hour value.
Minute
Press START/SPLIT (+) to increase the minute value or
HEART RATE (-) to decrease the minute value.
Seconds
Press START/SPLIT (+) to increase the seconds value or
HEART RATE (-) to decrease the seconds value.
Heart Rate Zone
Press START/SPLIT (+) or HEART RATE (-) to choose
either the preset ZONE 1 to 5, the MANUAL zone, or
NONE.
Number of Repetitions
Press START/SPLIT (+) to increase the the number of
repetitions (# OF REPS) or HEART RATE (-) to decrease
the number of repetitions for all intervals.
W248_NA_EN.qxp 8/5/08 10:07 AM Page 24
Page 17

2726
3. The average heart rate for each recorded interval (shown with interval
times in Review Mode); and
4. Peak and minimum heart rates for the complete time the Heart Rate
Sensor was operating and the interval timer was running (shown as
PEAK and MINIMUM in Review Mode).
Interval Mode Notes & Tips
O When the watch accumulates information concerning time in target
heart rate zones, the information is an aggregate for the time in all
zones, not the time in zone for each individual interval.
O If all workouts are locked in Review Mode you will see the message
WORKOUTS LOCKED - UNLOCK IN REVIEW. In this instance, the watch
cannot save any data for a workout.
O With the interval timer running along with the Heart Rate Sensor you
can change the Interval Mode display by pressing HEART RATE. Choose
from:
1. Heart Rate over Interval Time (per interval);
2. Interval Time (per interval) over Heart Rate;
3. Heart Rate only; or
4. Interval Time over Interval Number/Repetition Number.
O If an interval is set to 00:00:00, the watch will automatically skip over
NOTE: To quickly change the value being set, press and hold START/SPLIT
(+) or HEART Rate (-).
To Operate the Interval Timer
1. Press MODE until INTERVAL appears.
2. Press and hold STOP/RESET/SET to clear interval data from a previous
interval workout (if necessary).
3. Press START/SPLIT to begin timing countdown for the Interval Timer
(i.e., 10, 9, 8...).
4. Press STOP/RESET/SET to stop timing when you want to take a break
or you reach the end of your workout before the intervals have
completed timing.
5. Press START/SPLIT to continue the countdown OR press and hold
STOP/RESET/SET to save and then clear the current interval workout.
Heart Rate Data When Using Interval Mode
When you operate the watch in Interval Mode with the Heart Rate Sensor,
you will accumulate heart-related data in Review Mode, including:
1. Amount of time your heart rate stays within your target heart rate zone
(shown as IN ZONE in Review Mode);
2. The average heart rate for the complete time the Heart Rate Sensor
was operating and the interval timer was running (shown as AVERAGE
in Review Mode);
W248_NA_EN.qxp 8/5/08 10:07 AM Page 26
Page 18

Interval Mode Example
2928
that interval. For example if INT 3 is set to 00:00:00 then the watch
will move from INT 2 directly to INT 4.
O When you set target heart rate zones in Interval Mode, they override
those set in HRM Setup Mode. For example, if you have set the watch
to ZONE 2 in HRM Setup Mode but set INT 3 to ZONE 3, the watch will
record heart rate data for ZONE 3 and not ZONE 2 while in Interval
Mode. This is particularly important if you set the watch to alert you if
you go above or below your target heart rate zone.
O The repeat setting applies to the entire group of settings; you cannot
have the Interval Timer repeat twice for INT 1 and only once for INT 2.
For cross training purposes, you decide to add a one-hour spin session to your
workout routine. You decide to use Interval Mode to help you track both time and
heart rate for your workout. You set the following intervals for your workout:
You use INT 1 as a warmup. INT 2 and INT 3 represent the core of your workout
at an increasing heart rate goal, striving for 5 minutes of high intensity aerobic
workout. Finally, INT 4 is a cool down between repetitions and at the end of the
workout. In addition, you set the repetitions to 2, which allows you to repeat this
workout sequence twice for a strong one-hour interval workout routine.
Interval Time Heart Rate Zone
INT 1 00:05:00 NONE
INT 2 00:18:00 ZONE 3
INT 3 00:05:00 ZONE 5
INT 4 00:05:00 ZONE 1
W248_NA_EN.qxp 8/5/08 10:07 AM Page 28
Page 19
30 31
2. Press STOP/RESET/SET until TIMER SET then SET briefly appear on the
display followed by the timer with the hours value flashing.
3. Press START/SPLIT (+) to increase or toggle the values or HEART RATE
(-) to decrease or toggle the value. This applies for hours, minutes,
seconds, end action, and halfway alert.
NOTE: The end action setting allows you to choose how the timer
operates at the completion of a timing countdown. Options include
STOP, REPEAT, or CHRONO. If you choose CHRONO, the watch
automatically switches to Chrono Mode at the end of the countdown
(if the chronograph is off and reset to zero) and begins operating the
chronograph.
NOTE: To quickly change the value being set, press and hold
START/SPLIT (+) or HEART Rate (-).
4. Press MODE (NEXT) to move to the next value for hours, minutes,
seconds, end action, and halfway alert.
5. Press STOP/RESET/SET (DONE) to save your changes and exit the
setting process.
To Operate the Timer
1. Press and hold STOP/RESET/SET to clear data from any previous use
of the timer (if necessary). You cannot start another countdown without
resetting the timer.
Timer
Timer Mode allows you to set a fixed time from which the watch counts
down to zero (i.e., 10, 9, 8, ...). In addition you can set the watch to repeat,
stop or switch to Chrono Mode at the end of the countdown (if the
chronograph is off and cleared) and alert you when you are halfway
through a timing sequence.
NOTE: You can press any button in Timer Mode to silence the alert that
sounds when the timer reaches zero.
To Set the Timer
1. Press MODE until TIMER appears.
START/SPLIT
Press to begin timing,
continue timing after a
pause, or increase or
toggle a setting item.
STOP/RESET/SET
Press to start or complete
the setting process, pause
or stop the timer, or clear
data.
HEART RATE
Press to switch display
views or decrease or
toggle a setting item.
MODE
Press to move to the
next mode, digit, setting
option, or group.
INDIGLO
®®
BUTTON
Press to light the watch,
activate/de-activate the
Night- Mode
®
feature.
W248_NA_EN.qxp 8/5/08 10:07 AM Page 30
Page 20

32 33
Timer Mode Notes & Tips
O You can press MODE within Timer Mode to switch the display to
another mode without disrupting the operation of the timer.The
hourglass H will continue to display to indicate the timer is operating.
O When you use the halfway alert the watch will beep when you have
reached the halfway point of the set countdown time.
O With the timer running along with the Heart Rate Sensor, you can
change the Timer Mode display by pressing HEART RATE. Choose from:
1. Heart Rate/Countdown Time;
2. Countdown Time/Heart Rate;
3. Heart Rate only; or
4. Countdown Time (and a repeat number if set to REPEAT).
2. Press START/SPLIT to start the timer countdown. The hourglass icon
H
will appear on the display.
3. Pause the countdown by pressing STOP/RESET/SET.
4. Resume the countdown by pressing START/SPLIT again or reset the
timer by pressing and holding STOP/RESET/SET again until the words
HOLD TO RESET briefly appear on the display followed by the original
countdown time.
5. When the timer reaches the halfway point (if HALFWAY ALERT is set) a
brief chime will sound.
6. When the timer reaches zero, an alert will sound. Press any button to
silence the alert.
7. The timer will stop after the alert if set to STOP; or
The timer will begin another countdown if set to REPEAT and continue
until you press STOP/RESET/SET. The display will show REP and a
number (for example, REP 2). REP indicates the timer is repeating and
the number indicates how many times the timer has cycled through
the repeat countdown. You will also see the repeating hourglass
icon
I, indicating the timer is set to repeat.; or
The timer will switch to Chrono Mode if the chronograph is off and
cleared. You will see the stopwatch icon W indicating the timer will
switch modes at the end of the countdown and the hourglass icon H
indicating the timer is operating.
W248_NA_EN.qxp 8/5/08 10:07 AM Page 32
Page 21
NOTE: While running the chronograph, the recovery heart rate timer will
begin automatically after pressing STOP/RESET/SET if the watch is
receiving data from the Heart Rate Sensor.Without a current heart rate or
if the starting heart rate is lower than the ending heart rate, the display
will read NO REC at the end of the recovery countdown. The results of
automatic recovery can be viewed in Review Mode.
To Manually Determine a Recovery Heart Rate
You can also manually initiate a recovery heart rate at any time.
NOTE: When you initiate a manual recovery, this information is not stored
for viewing in Review Mode.
1. Press MODE until RECOVERY appears.
2. Press STOP/RESET/SET to clear the last heart rate recovery reading, if
35
Timer Mode Example
Recovery
About Recovery Heart Rate
Heart rate recovery provides an indicator of fitness and training level. As
you become more fit, your heart rate should return more quickly to a lower
heart rate value at the end of your workout, indicating a higher level of
cardiovascular fitness.
Your recovery rate represents the change in your heart rate over a period of
time. You can set your Heart Rate Monitor to record the change in your heart
rate for a 30-second or a 1-, 2-, 5-, or 10-minute period.
34
START/SPLIT
Press to start or restart
the recovery timer.
STOP/RESET/SET
Press to choose from a
30-second or a 1-, 2-, 5-
or 10-minute recovery
time or to stop or reset
the recovery timer.
MODE
Press to move to the
next mode.
INDIGLO®®BUTTON
Press to light the watch,
activate/de-activate the
Night- Mode
®
feature.
HEART RATE
Press to turn the HRM on
(if off) or press and hold
to turn Out of Zone alerts
on or off.
A smaller recovery might indicate a need to take a break from training due to
fatigue, illness, or other factors.
As part of your overall health plan, you decide to take a 30-minute walk during
your lunch hour two times a week. To help keep track of time so you do not return
late from your lunch hour, you set the timer to 15 minutes and then set the end
action to CHRONO. After 15 minutes the watch beeps telling you to begin walking
back to your office. The watch moves to Chrono Mode and begins timing.This
helps you determine how much time it takes to return to your office.
W248_NA_EN.qxp 8/5/08 10:07 AM Page 34
Page 22
6. You can continue to initiate a specified recovery period by repeating
steps 2 through 4.
Review
Review Mode allows you to recall overall information recorded in Chrono
and Interval Modes for stored workouts. You can review your last 10 stored
workouts. You can also lock a workout to ensure the workout does not get
dropped out of the review queue once you go beyond 10 workouts.
About Review Mode
O Review Mode collects and stores the data gathered while the
chronograph or interval timer were running. You can use this mode to
view important measures of your progress during your workouts.
37
necessary. You will see the message HOLD TO RESET followed by the
currently set recovery time.
3. Press STOP/RESET/SET to toggle among a 30-second or a 1-, 2, 5-, or
10-minute recovery time, if desired.
NOTE: This setting controls the duration of both the automatic and
manual recovery heart rate.
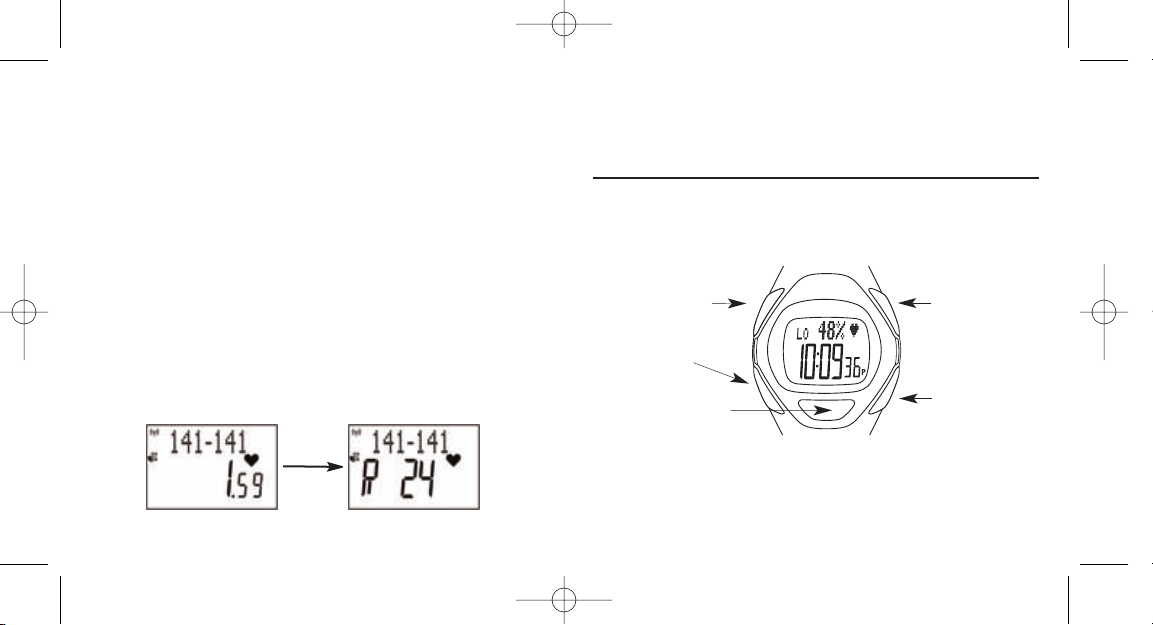
4. Press START/SPLIT. The top line of the watch display will show the
heart rate at the beginning of the recovery period as well as your
current heart rate. The bottom line will show the 30-second or 1-, 2,
5-, or 10-minute recovery countdown.
NOTE: The watch cannot record a recovery unless it is receiving a
current heart rate from the Heart Rate Sensor.Without a current heart
rate or if the starting heart rate is lower than the ending heart rate, the
display will read NO REC at the end of the recovery countdown.
5. After the specified recovery countdown period, the watch will beep
indicating the end of the recovery period. The watch will capture your
heart rate a second time, subtract the second value from the first value
and display the difference as the recovery.
36
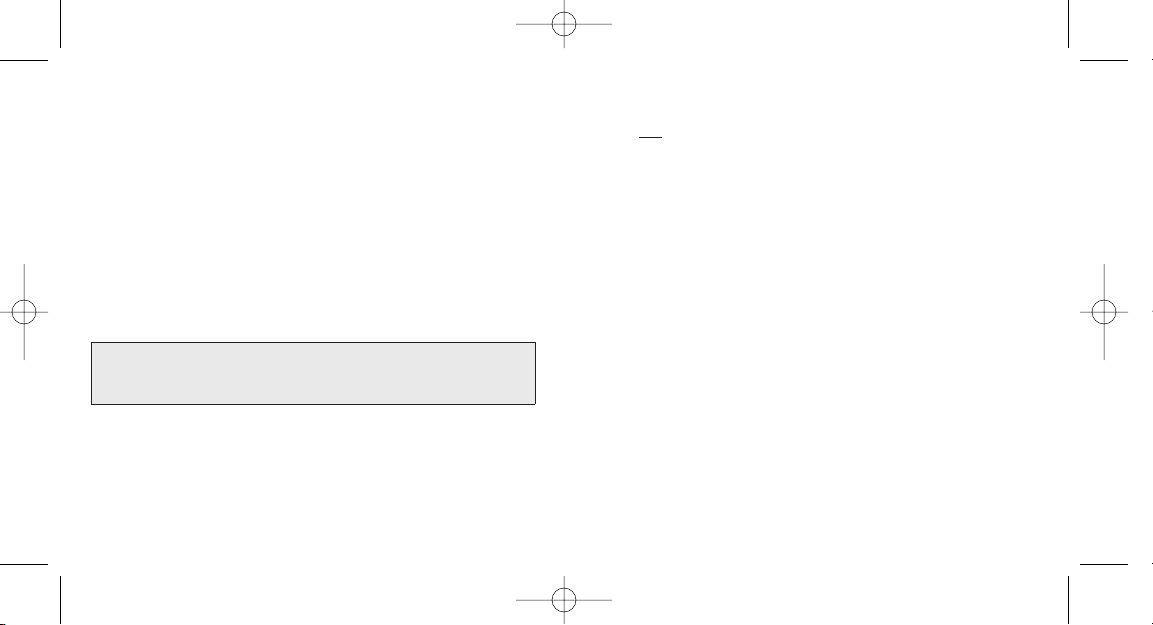
START/SPLIT
Press to select a workout for
review or scroll through workout
data for a selected workout.
HEART RATE
Press to lock or unlock
a workout or scroll
through workout data
for a selected workout
MODE
Press to move to the
next mode.
INDIGLO
®®
BUTTON
Press to light the watch,
activate/de-activate the
Night- Mode
®
feature.
STOP/RESET/SET
Press to initiate the
review for a selected
workout.
W248_NA_EN.qxp 8/5/08 10:07 AM Page 36
Page 23
3. Press HEART RATE to lock or unlock a workout. When you lock a
workout, the lock icon l will appear next to the workout. This workout
will not be automatically deleted as new ones come in.
4. Press STOP/RESET/SET to access review data for a selected workout.
5. Press START/SPLIT or HEART RATE to scroll through workout data.
6. Press STOP/RESET/SET to return to the main Review menu to choose
another workout to review.
Review Mode Data
Review Mode includes data stored for workouts recorded in Chrono or
Interval Timer Mode as indicated in the following list.
NOTE: If the Heart Rate Monitor is not used the only data you will see is
total time and lap or interval data.
O Total Time: The amount of time the chronograph or interval timer was
running during your workout in Chrono or Interval Timer Modes.
O Time in Zone: The amount of time during a workout when your heart
rate is between the lower and upper target zone limits you set. For an
interval workout you may set each interval to a different target zone,
so Review Mode will show the sum of the time in zone for the various
zones for each interval.
O Average Heart Rate: The average heart rate achieved during a
workout.
3938
O
Without the Heart Rate Sensor, you will see total time and Lap or
Interval Recall in Review Mode, along with your last recorded recovery
heart rate.
O If no interval has completed its countdown the watch will display NO
INTS DONE. This will only occur while the interval timer is running and
before the watch has finished timing a full interval cycle.
O If you did not record separate laps during a chronograph workout, the
watch will display NO LAPS STORED when you get to the lap recall
segment of Review Mode. This will only occur when the chronograph is
running and the watch has not finished timing during the first lap of a
workout.
To Review Workout Data
1. Press MODE until REVIEW appears.
2. Press START/SPLIT to scroll through stored workouts. Stored workouts
are labeled by the date and time of the workout.
NOTE: Workouts recorded in Chrono Mode are marked with the
stopwatch icon
W and workouts recorded in Interval Mode are marked
with the hourglass icon H.
If the Chrono or Interval Timer are running when you enter Review Mode you can
only see current workout information. You cannot review any stored workouts until
the Chrono and Interval Timer are stopped and reset.
W248_NA_EN.qxp 8/5/08 10:07 AM Page 38
Page 24

HRM Setup
HRM Setup Mode allows you to select and set key pieces of personal data
that will be tracked by your Heart Rate Monitor.You can also pair the
watch to your Heart Rate Sensor.
Device Pairing
Pairing is required to ensure that your watch does not receive data
transmitted by someone else’s chest strap.
Note: Pairing should be performed before your very first use, and after a
battery change for either the Heart Rate Sensor or the watch. It does not
need to be performed before each workout.
To pair your watch to your chest strap, use the following procedure:
41
O
Peak Heart Rate: The highest recorded heart rate during a
workout.
O Minimum Heart Rate: The lowest recorded heart rate during a
workout.
O Total Calories: The number of calories burned during a workout.This
number is dependent on the weight you entered when you set your
Heart Rate Monitor, your heart rate during a workout, and the time you
spent in the workout.
O Average Lap: The average time for all laps recorded in a workout.
O Best Lap: The shortest lap recorded during a workout.
O Lap or Interval Recall: The amount of time and average heart rate for
each segment of your workout. Chrono workouts include lap data and
Interval workouts include interval data. If the Interval workout is set to
Repeat, the watch will also display the interval repeat number.
O Recovery Heart Rate: The result of the most recent automatic
recovery heart rate calculation when running the chronograph or
interval timer. Manual recovery calculations are not stored.
40
START/SPLIT
Press to select a target heart
rate zone or increase or
toggle a setting item.
STOP/RESET/SET
Press to start or
complete the setting
process.
HEART RATE
Press to initiate the
pairing process or
decrease or toggle
the setting item.
MODE
Press to move to the next
mode, digit, or setting group.
INDIGLO®®BUTTON
Press to light the watch,
activate/de-activate the
Night- Mode
®
feature.
W248_NA_EN.qxp 8/5/08 10:07 AM Page 40
Page 25
Selecting a Target Heart Rate Zone
You can choose one of the preset target heart rate zones or set the
manual target heart rate zone for a more customized target heart rate
zone. The preset heart rate zones described in the table below correspond
to your maximum heart rate (MHR) value.
To choose a target heart rate zone:
1. Determine the zone you want to use by reviewing the table on
page 7.
2. Press MODE until HRM Setup Mode appears.
3. Press START/SPLIT to cycle through the target heart rate zones
(labeled ZONE 1 to ZONE 5 or MANUAL).
4. For preset heart rate zones, press MODE to save your selected target
heart rate zone and exit HRM Setup Mode. For the manual heart rate
43
1. Remove the chest strap from your body, and let it sit for at least five
minutes to ensure it is completely shut down.
2. Find a location far away from any other Heart Rate Monitor chest
straps that may be transmitting.
3. On the watch, repeatedly press the MODE button until HRM Setup
appears in the top line of the display.
4. Press and hold the HEART RATE button. The message HOLD TO PAIR
should appear for about two seconds, followed by the instructions
WEAR STRAP, then PRESS MODE TO PAIR WATCH WITH STRAP.
5. Press the MODE button. A message saying WAIT FOR BEEP should
appear.The watch is now searching for a chest strap with which to
pair.
6. Now pick up your chest strap and hold it firmly with your thumbs
touching the sensor pads that normally contact your chest. Rub your
thumbs back and forth across the sensor pads a few times. This
contact should be enough to start the strap transmitting.
7. If the pairing operation completes successfully, PAIRING DONE will
appear on the display and a confirmation tone will sound. If for some
reason the pairing fails, repeat the above steps immediately beginning
with step 4.
42
Zone Lower Limit Upper Limit
1 50% 60%
2 60% 70%
3 70% 80%
4 80% 90%
5 90% 100%
To properly pair the watch with the Heart Rate Sensor, you must go directly to HRM
Setup Mode without stopping at any other mode first.
W248_NA_EN.qxp 8/5/08 10:07 AM Page 42
Page 26

45
zone, you will need to take some additional steps described in the next
section.
When you leave HRM Setup Mode, the watch will use the target heart rate
zone you have selected as the basis for all HRM-based calculations. This
does not apply to workouts already saved before selecting a target heart
rate zone.
To Set a Manual Target Heart Rate Zone
The manual target heart rate zone allows you to customize your lower and
upper target heart rate zone limits. You might use the manual target heart
rate zone when the 10% range in the preset heart rate zones is either too
large or too small a range for your exercise goals.
NOTE: The difference between the lower and upper limits for the manual
heart rate range must be at least five beats per minute.
To set the manual target heart rate zone:
1. Press MODE until HRM Setup Mode appears.
2. Press START/SPLIT until MANUAL appears.
3. Press STOP/RESET/SET to enter the setting process. You will see the
word MANUAL flashing on the display.
4. Press MODE (NEXT) to begin setting the upper and lower target heart
rate zones.
5. You will first see HI LIMIT: HR on the display and a three number heart
44
rate value (i.e., 140). Press START/SPLIT (+) to increase the flashing
value, HEART RATE (-) to decrease the flashing value, or MODE (NEXT)
to move to the next part of the value.
6. When you have finished setting the three number value for the upper
end of the heart rate, press MODE (NEXT) to move the the low end of
the heart rate value. You will see LO LIMIT: HR. Press START/SPLIT (+)
to increase the flashing value, HEART RATE (-) to decrease the value or
MODE (NEXT) to move to the next part of the three number value.
7. When you have finished setting the upper and lower target heart rate
zone limits, you can press STOP/RESET/SET (DONE) to save your
settings and exit the setting process or you can continue to set or
adjust other heart rate statistical data.
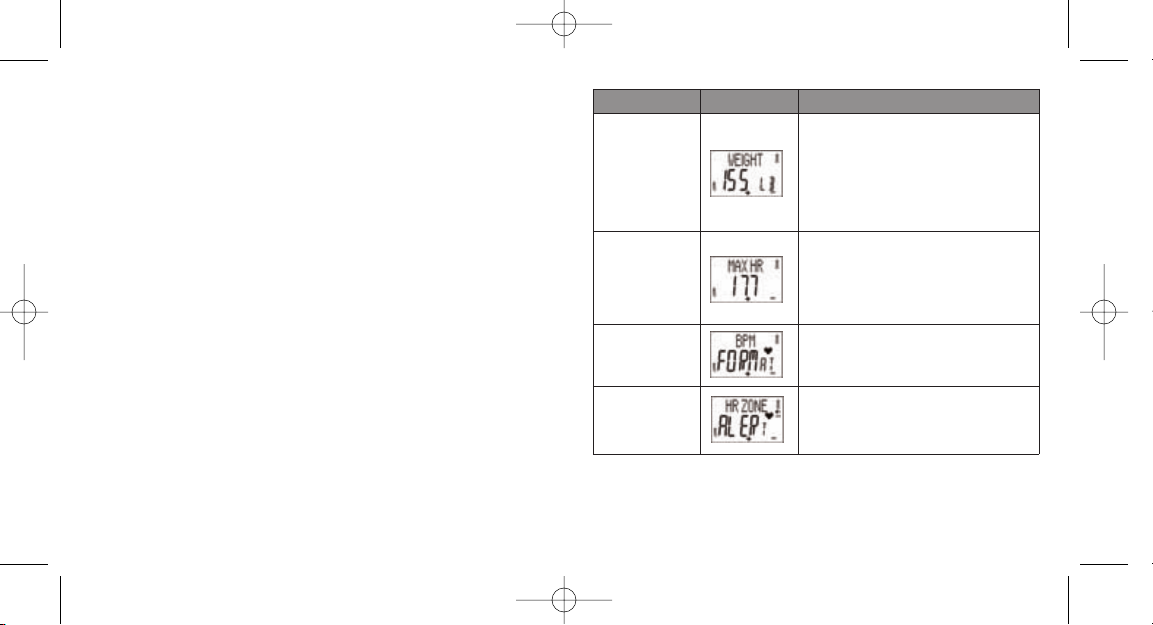
To Enter Your Personal Data
In addition to selecting a target heart rate zone, it is important that you set
your weight, maximum heart rate, heart rate display, and heart rate zone
alert. Accurate information used by these options helps tailor your Heart
Rate Monitor to your specific fitness needs.
1. Press MODE until HRM Setup Mode appears.
2. Press STOP/RESET/SET to enter the setting process. You will see your
selected target heart rate zone flashing on the display.
3. Press MODE (NEXT) to begin setting your personal data and settings.
W248_NA_EN.qxp 8/5/08 10:07 AM Page 44
Page 27
47
4. Make the desired adjustment by pressing START/SPLIT (+) or HEART
RATE (-). In some setting groups pressing START/SPLIT (+) will
increase a value and pressing HEART RATE (-) will decrease a value.At
other times pressing START/SPLIT (+) or HEART RATE (-) will toggle
between two options or cycle through a setting group.
5. Press MODE (NEXT) to move to the next digit or setting group you want
to set.
6. Press STOP/RESET/SET to save your changes and exit the setting
process.
7. Press MODE to exit HRM Setup.
For this Heart Rate Monitor you can make the adjustments described in
the table on the next page.
46
HRM Setup Notes & Tips
O At any time during the setting process, you can save your changes and
return to the main heart rate display by pressing STOP/RESET/SET
(DONE).
Setting Group Display Description
Weight
You can enter your current weight and
choose whether your weight appears in
pounds (lbs) or kilograms (kg) This number
is used to help calculate how many calories
you burn during your activity.Your recorded
weight cannot go below 22 lbs (10 kg) or
above 550 lbs (250 kg).
Maximum Heart
Rate
Your maximum heart rate value is used as a
reference for displaying your heart rate in
terms of percent of maximum (%). This
number cannot be below 80 or above 240
beats per minute (BPM).
BPM Format
You can choose whether your heart rate will
display as beats per minute (BPM) or
percent of maximum (% OF MAX).
Heart Rate Zone
Alert
You can choose whether or not to have the
watch alert you when you go above or
below your selected target heart rate zone.
W248_NA_EN.qxp 8/5/08 10:07 AM Page 46
Page 28
When the watch reaches the scheduled time, the alarm tone sounds and
the INDIGLO®night light flashes for a period of 20 seconds. To help you
identify which alarm has sounded, each alarm has a unique melody.
To Set the Alarm
1. Press MODE until Alarm Mode 1, 2, or 3 appears.
2. Press STOP/RESET/SET until ALARM SET and then SET briefly appear
on the display followed by time with the hour value flashing.
3. Press START/SPLIT (+) to increase the hour value or HEART RATE (-) to
decrease the hour value.
NOTE: To quickly change the value being set, press and hold
START/SPLIT (+) or HEART Rate (-).
4. Press MODE (NEXT) to move to the minute value.
5. Press START/SPLIT (+) to increase the minute value or HEART RATE (-)
to decrease the minute value.
6. Press MODE (NEXT) to move to the AM/PM value (if you have set the
watch to 12-hour format).
7. Press START/SPLIT (+) or HEART RATE (-) to toggle between AM and PM.
8. Press MODE (NEXT) to move to the alarm type value.
9. Press START/SPLIT (+) or HEART RATE (-) to move among the alarm
types. Alarm types include:
48 49
O
While setting the watch, if you do not press any buttons on the watch
for a period of 2 to 3 minutes, the watch will automatically save
whatever changes you have made and exit the setting process.
O If a setting falls either above or below the limits for setting heart rate
or weight the watch will automatically correct the setting to match
watch limits. Auto correction may lead to unpredictable results. Check
your watch settings.
Alarm 1, 2, or 3
You can use your watch as an alarm clock for up to three separate alarms,
accessed as separate modes. You can set an alarm to sound at the same
time every day, or only weekdays, weekends, or even only one day a
week.
START/SPLIT
Press to increase or toggle
the setting value or turn
an the alarm ON or OFF.
STOP/RESET/SET
Press to start or
complete the setting
process.
HEART RATE
Press to decrease or
toggle the setting value.
MODE
Press to move to the next
mode, digit, or setting group.
INDIGLO®®BUTTON
Press to light the watch,
activate/de-activate the
Night- Mode
®
feature.
W248_NA_EN.qxp 8/5/08 10:07 AM Page 48
Page 29
Sync
This mode allows you to transfer your workout data to Timex® Trainer
software when used with the optional Timex® Data Xchanger USB device.
NOTE: Once you have initiated the sync process, you can press any button
to cancel. You will see the message SYNC CANCEL. The watch will beep,
the receiver will shut down, and the watch will return to the SYNC READY
state.
51
O
DAILY will sound every day at a specified time;
O WEEKDAYS will sound Monday through Friday at same selected time;
O WEEKENDS will sound Saturday and Sunday at the same selected
time; or
O Once a week alarm (i.e., MON, TUES, WED...) will sound on a specified
day at a specified time.
10. Press STOP/RESET/SET (DONE) to save your changes and exit the
setting process.
Alarm Mode Notes & Tips
O To turn an alarm ON or OFF without entering the setting state, press
START/SPLIT while in Alarm Mode.
O If you change any alarm settings, you automatically turn the alarm on.
O When you set the alarm, the alarm clock icon a appears on the
display in Time of Day Mode.
O While the alarm sounds, you can silence it by pressing any button.
O The once a week alarm (i.e., MON, TUES, WED...) is especially useful
for reminding you about appointments.
O If you do not silence the alarm before the alert finishes, a backup
alarm will sound after 5 minutes.
50
START/SPLIT
Press to cancel the search
for or sync with a PC once
the sync process has begun.
STOP/RESET/SET
Press to cancel the
search for or sync with
a PC once the sync
process has begun.
HEART RATE
Press to enable the
receiver and start
searching for a PC.
MODE
Press to move to
the next mode.
INDIGLO®®BUTTON
Press to light the watch,
activate/de-activate the
Night- Mode
®
feature.
W248_NA_EN.qxp 8/5/08 10:07 AM Page 50
Page 30

Sync Error Messages
If an error is encountered during the communication process, the watch
will generate an alert and briefly display an error message, before
returning to the READY state. Following is a list of the error messages and
some suggestions for remedies:
HARDWARE ERROR: This message appears if there is an internal error
with the watch’s radio transceiver. Contact Timex Customer Service.
SYNC ERROR: This message indicates that a communication error was
encountered. This is usually caused by interference from a wireless
device such as a cordless phone, wireless keyboard or mouse, or
Bluetooth accessory.
LINK TO PC BUSY: This message will appear if the PC is already in
communication with another Timex watch. If this message appears
regularly and you are certain that there are no other Timex watches
within 20 feet of your PC, contact Timex Customer Service.
NO PC FOUND: If the watch is unable to establish a link to your PC
within 30 seconds, it will display this message. Check to make sure
that the device agent software is running and that the Timex Data
Xchanger USB is plugged into a working USB port. You may also try
removing the Data Xchanger and plugging it in again before retrying
the sync process.
5352
To Sync the watch with a PC
1. Make sure the Data Xchanger USB device is plugged into a USB port
on your computer and the Timex Trainer®device agent desktop
software is running.
2. Press MODE until Sync Mode appears.
3. You will see the message SYNC READY indicating the watch is ready to
initiate communication with a PC.
4. Press HEART RATE to begin the sync process.
5. The watch will suspend and reset all other watch activity and begin
searching for a PC. You will see the message SEARCHING FOR PC.
6. Plug the USB device into a computer and open the device agent
software.
7. When the link is established with a PC, the watch will display the
device message SYNCING WATCH until the sync process is finished at
which time the watch will display the message SYNCING DONE. The
watch will sound an alert and return to the SYNC READY state.
W248_NA_EN.qxp 8/5/08 10:07 AM Page 52
Page 31

55
Care & Maintenance
Watch Battery Replacement
When the battery of the watch is running low, the display or INDIGLO
®
night-light will dim. This watch uses a CR2032 lithium battery.
To avoid the possibility of permanently damaging the watch, TIMEX
STRONGLY RECOMMENDS TAKING YOUR HEART RATE MONITOR WATCH TO
A LOCAL RETAILER OR JEWELER TO HAVE THE BATTERY REPLACED.
INDIGLO® night-light
Press the INDIGLO®button to activate the night light. This patented (U.S.
Patent Numbers 4,527,096 and 4,775,964) electroluminescent technology
illuminates the watch display at night and in low light conditions.
Water Resistance
O Your 100 Meter Water Resistant watch withstands water pressure to
140 p.s.i. (equals immersion to 328 feet below sea level).
O The watch is only water-resistant as long as the lens, pushbuttons, and
case remain intact.
O Timex recommends rinsing your wrist monitor with fresh water after
exposure to salt water.
54
WARNING: TO MAINTAIN WATER-RESISTANCE, DO NOT PRESS ANY
BUTTONS UNDER WATER.
Heart Rate Sensor Strap Maintenance
Rinse Heart Rate Sensor and strap in fresh water to avoid build up of
materials that can interfere with the measurement of your heart rate.
Transmitter Battery Life and Replacement
Battery life of the transmitter should exceed two years, based upon using
it an hour a day. Greater usage will shorten the battery life. Replace
transmitter battery when any of the following occur:
• The watch no longer receives heart rate information from the chest
transmitter when properly worn on the chest.
• Error messages (COMM ERR, SIGNAL LOST) appear with increased
frequency on the display.
Battery Replacement
NOTE: You’ll need to have a device (such as a watch) capable of displaying
heart rate information to verify that the new battery has been inserted
correctly. Use a coin to open the battery compartment cover (back of
sensor).
• Insert new battery (CR2032 or equivalent) with “+” facing you.
W248_NA_EN.qxp 8/5/08 10:07 AM Page 54
Page 32

Warranty & Service
Timex International Warranty (U.S. Limited Warranty)
Your Timex®Heart Rate Monitor is warranted against manufacturing
defects by Timex for a period of ONE YEAR from the original purchase
date. Timex Group USA, Inc. and its worldwide affiliates will honor this
International Warranty.
Please note that Timex®may, at its option, repair your Heart Rate Monitor
by installing new or thoroughly reconditioned and inspected components
or replace it with an identical or similar model.
IMPORTANT: PLEASE NOTE THAT THIS WARRANTY DOES NOT COVER
DEFECTS OR DAMAGES TO YOUR HEART RATE MONITOR:
1. after the warranty period expires;
2. if the Heart Rate Monitor was not originally purchased from an
authorized Timex retailer;
3. from repair services not performed by Timex;
4. from accidents, tampering or abuse; and
5. lens or crystal, strap or band, Heart Rate Monitor case, attachments or
battery. Timex may charge you for replacing any of these parts.
THIS WARRANTY AND THE REMEDIES CONTAINED HEREIN ARE EXCLUSIVE
AND IN LIEU OF ALL OTHER WARRANTIES, EXPRESS OR IMPLIED,
57
• Push the reset button next to the battery by using a toothpick or
straightened paper clip.
• Reinstall battery cover.
• Perform quick test of the unit:
1. Move away from sources of electrical or radio interference.
2. Liberally moisten the Heart Rate Sensor pads and put the chest strap
around your chest, securely against your skin.
3. Activate the heart rate monitor function on the watch.
4. Within a few seconds, the heart symbol on the watch display should
begin flashing, indicating that the sensor is active. This confirms that
the battery was installed correctly. NOTE: A heart rate value does not
need to appear on the display during this test.
IF FLASHING HEART DOES NOT APPEAR ON WATCH:
• Press the reset switch in the battery compartment again and replace
the battery cover.
• Reinstall the battery, and repeat test procedure above.
Water Resistance
The Heart Rate Sensor withstands water pressure to 140 p.s.i. WARNING:
The Heart Rate Sensor will not display heart rate when operated under
water.
56
W248_NA_EN.qxp 8/5/08 10:07 AM Page 56
Page 33

Portugal, call 351 212 946 017. For France, call 33 3 81 63 42 00. For
Germany, call 49 7 231 494140. For the Middle East and Africa, call 9714-310850. For other areas, please contact your local Timex retailer or
Timex distributor for warranty information. In Canada, the U.S. and in
certain other locations, participating Timex retailers can provide you with a
postage-paid, pre-addressed Heart Rate Monitor Repair Mailer for your
convenience in obtaining factory service.
Service
If your Timex®Heart Rate Monitor should ever need servicing, send it to
Timex as set forth in the Timex International Warranty or addressed to:
HOTLINE WATCH SERVICE, P.O. Box 2740, Little Rock, AR 72203
For service questions, call 1-800-328-2677.
For your convenience in obtaining factory service, participating Timex
retailers can provide you with a pre-addressed Heart Rate Monitor Repair
Mailer.
See the Timex International Warranty for specific instructions on the care
and service of your Timex®Heart Rate Monitor.
Should you need a replacement strap or band, call 1-800-328-2677.
59
INCLUDING ANY IMPLIED WARRANTY OF MERCHANTABILITY OR FITNESS
FOR PARTICULAR PURPOSE.
TIMEX IS NOT LIABLE FOR ANY SPECIAL, INCIDENTAL OR CONSEQUENTIAL
DAMAGES. Some countries and states do not allow limitations on implied
warranties and do not allow exclusions or limitations on damages, so
these limitations may not apply to you. This warranty gives you specific
legal rights and you may also have other rights which vary from country to
country and state to state.
To obtain warranty service, please return your Heart Rate Monitor to
Timex, one of its affiliates or the Timex retailer where the Heart Rate
Monitor was purchased, together with a completed original Repair Coupon
or, in the U.S. and Canada only, the completed original Repair Coupon or a
written statement identifying your name, address, telephone number and
date and place of purchase. Please include the following with your Heart
Rate Monitor to cover postage and handling (this is not a repair charge): a
US$ 8.00 check or money order in the U.S.; a CAN$7.00 cheque or money
order in Canada; and a UK£2.50 cheque or money order in the U.K. In
other countries, Timex will charge you for postage and handling. NEVER
INCLUDE ANY ARTICLE OF PERSONAL VALUE IN YOUR SHIPMENT.
For the U.S., please call 1-800-328-2677 for additional warranty
information. For Canada, call 1-800-263-0981. For Brazil, call +55 (11)
5572 9733. For Mexico, call 01-800-01-060-00. For Central America, the
Caribbean, Bermuda and the Bahamas, call (501) 370-5775 (U.S.). For
Asia, call 852-2815-0091. For the U.K., call 44 208 687 9620. For
58
W248_NA_EN.qxp 8/5/08 10:07 AM Page 58
Page 34

Warning: Changes or modifications to this unit not expressly approved by
the party responsible for compliance could void the user's authority to
operate the equipment.
NOTE: This equipment has been tested and found to comply with the limits
for a Class B digital device, pursuant to Part 15 of the FCC Rules. These
limits are designed to provide reasonable protection against harmful
interference in a residential installation. This equipment generates, uses,
and can radiate radio frequency energy and, if not installed and used in
accordance with the instructions, may cause harmful interference to radio
communications. However, there is no guarantee that interference will not
occur in a particular installation. If this equipment does cause harmful
interference to radio or television reception, which can be determined by
turning the equipment off and on, the user is encouraged to try to correct
the interference by one or more of the following measures:
— Reorient or relocate the receiving antenna.
— Increase the separation between the equipment and receiver.
— Connect the equipment into an outlet on a circuit different from that to
which the receiver is connected.
— Consult the dealer or an experienced radio TV technician for help.
This Class [B] digital apparatus complies with Canadian ICES-003. Cet
appareil numérique de la classe [B] est conforme à la norme NMB-003 du
Canada
60 61
THIS IS YOUR REPAIR COUPON.KEEP IT IN A SAFE PLACE.
FCC Notice (U.S.) / IC Notice (Canada):
This device complies with Part 15 of the FCC Rules. Operation is subject to
the following two conditions: (1) this device may not cause harmful
interference, and (2) this device must accept any interference received,
including interference that may cause undesired operation.
TIMEX INTERNATIONAL WARRANTY REPAIR COUPON
Original Purchase Date:
(attach a copy of sales receipt, if available)
Purchased By:
(name, address, telephone number)
Place of Purchase:
(name and address)
Reason for Return:
W248_NA_EN.qxp 8/5/08 10:07 AM Page 60
Page 35

Supplemental Information: The product herewith complies with the requirements of the
Radio & Telecommunications Terminal Equipment Directive 1999/05/EC, the Low Voltage
Directive 73/23/EEC, and the EMC Directive 89/336/EEC and carries the 7 marking
accordingly.
Agent:
Brian J. Hudson
Director, New Products Engineering
Date: 03 July, 2008, Middlebury, Connecticut, U.S.A.
63
Declaration of Conformity
Manufacturers Name: Timex Group USA, Inc.
Manufacturers Address: 555 Christian Road
Middlebury, CT 06762
United States of America
declares that the product:
Product Name: Timex Ironman
®
Race Trainer Digital Heart Rate Monitor
Model Numbers: M843, M844, M501, M502
conforms to the following specifications:
R&TTE: 1999/05/EC
Standards: ETSI EN 300 330-1 - V1.3.1 (EMC) & (ERM)
ETSI EN 300 330-2 - V1.1.1 (EMC) & (ERM)
LVD: 73/23/EEC
Standards: CENELEC EN 60950-1
EMC: 89/336/EEC
Standards: CENELEC EN 55022:1998
CENELEC EN 55024-1998
EN 61000-4-2 - ESD
EN 61000-4-3 - RF Radiated Immunity
EN 61000-4-8 - Magnetics
62
W248_NA_EN.qxp 8/5/08 10:07 AM Page 62
Page 36

64
Table des matières
Vue d’ensemble . . . . . . . . . . . . . . . . . . . . . . . . . . . . . . . . . . . . . . . . . .69
Nouvelles fonctions . . . . . . . . . . . . . . . . . . . . . . . . . . . . . . . . . . . .69
Un cœur en bonne santé . . . . . . . . . . . . . . . . . . . . . . . . . . . . . . . .70
Boutons de la montre . . . . . . . . . . . . . . . . . . . . . . . . . . . . . . . . . . .72
Veilleuse INDIGLO
®
avec la fonction Night-Mode®(mode Nuit) . . . .72
Icônes d’affichage . . . . . . . . . . . . . . . . . . . . . . . . . . . . . . . . . . . . .73
Ressources . . . . . . . . . . . . . . . . . . . . . . . . . . . . . . . . . . . . . . . . . .74
Déterminez votre zone optimale de fréquence cardiaque . . . . . . . .75
Réglage et utilisation du cardiofréquencemètre . . . . . . . . . . . . . . . .76
Préparer votre cardiofréquencemètre pour
une première utilisation . . . . . . . . . . . . . . . . . . . . . . . . . . . . . . .77
Utilisation de votre cardiofréquencemètre . . . . . . . . . . . . . . . . . . .79
Message NO HRM DATA (pas de données CFM) . . . . . . . . . . . . . . .81
Time of Day (Heure du jour) . . . . . . . . . . . . . . . . . . . . . . . . . . . . . . . .82
Pour régler l’heure, la date et les alertes sonores . . . . . . . . . . . . . .83
Pour changer de fuseau horaire . . . . . . . . . . . . . . . . . . . . . . . . . . .85
Données de fréquence cardiaque en mode Heure du jour . . . . . . .86
Remarques et conseils pratiques pour l’Heure du jour . . . . . . . . . .86
Exemple de réglage de l’Heure du jour . . . . . . . . . . . . . . . . . . . . . .87
W248_NA_FC.qxp 8/5/08 10:08 AM Page 64
Page 37

Recovery (Récupération) . . . . . . . . . . . . . . . . . . . . . . . . . . . . . . . . . .106
À propos de la vitesse de récupération cardiaque . . . . . . . . . . . .106
Déterminer manuellement une vitesse de récupération cardiaque 108
Review (Mode Récapitulatif) . . . . . . . . . . . . . . . . . . . . . . . . . . . . . . .110
À propos du mode Review (Récapitulatif) . . . . . . . . . . . . . . . . . . .111
Pour récapituler les données de la séance d’exercices . . . . . . . . .112
Données en mode Review (Récapitulatif) . . . . . . . . . . . . . . . . . . .113
HRM Setup (Configuration CFM) . . . . . . . . . . . . . . . . . . . . . . . . . . . .115
Association des appareils . . . . . . . . . . . . . . . . . . . . . . . . . . . . . . .115
Pour régler une zone cible de fréquence cardiaque . . . . . . . . . . .117
Pour régler une zone cible de fréquence cardiaque manuelle . . . .118
Pour saisir vos données personnelles . . . . . . . . . . . . . . . . . . . . . .120
Remarques et conseils pratiques pour le CFM . . . . . . . . . . . . . .123
Alarme 1, 2 ou 3 . . . . . . . . . . . . . . . . . . . . . . . . . . . . . . . . . . . . . . . .124
Pour régler l’alarme . . . . . . . . . . . . . . . . . . . . . . . . . . . . . . . . . . .125
Remarques et conseils pratiques pour le Mode Alarme . . . . . . . .126
Synchro . . . . . . . . . . . . . . . . . . . . . . . . . . . . . . . . . . . . . . . . . . . . . . .127
Pour synchroniser la montre avec un PC. . . . . . . . . . . . . . . . . . . .128
Messages d’erreur pour la synchro . . . . . . . . . . . . . . . . . . . . . . .129
Chrono . . . . . . . . . . . . . . . . . . . . . . . . . . . . . . . . . . . . . . . . . . . . . . . . .88
Terminologie du Chrono . . . . . . . . . . . . . . . . . . . . . . . . . . . . . . . . .88
Utilisation du Chrono . . . . . . . . . . . . . . . . . . . . . . . . . . . . . . . . . . .89
Données de fréquence cardiaque en mode Chrono . . . . . . . . . . . .90
Format de l’affichage du chronographe . . . . . . . . . . . . . . . . . . . . .91
Remarques et conseils pratiques pour le mode Chrono . . . . . . . . .92
Exemple d’utilisation du mode Chrono . . . . . . . . . . . . . . . . . . . . . .93
Interval Timer (Minuterie par intervalles) . . . . . . . . . . . . . . . . . . . . .94
Terminologie de l’intervalle . . . . . . . . . . . . . . . . . . . . . . . . . . . . . .94
Réglage des intervalles . . . . . . . . . . . . . . . . . . . . . . . . . . . . . . . . .95
Pour régler la minuterie par intervalles . . . . . . . . . . . . . . . . . . . . . .98
Données de fréquence cardiaque en mode Minuterie
par intervalles . . . . . . . . . . . . . . . . . . . . . . . . . . . . . . . . . . . . . .98
Remarques et conseils pratiques pour le mode Intervalle . . . . . . . .99
Exemple d’utilisation du mode Minuterie par intervalles . . . . . . .101
Timer (Minuterie) . . . . . . . . . . . . . . . . . . . . . . . . . . . . . . . . . . . . . . . .102
Pour régler la minuterie . . . . . . . . . . . . . . . . . . . . . . . . . . . . . . . .103
Pour utiliser la minuterie . . . . . . . . . . . . . . . . . . . . . . . . . . . . . . .104
Remarques et conseils pratiques pour le mode Minuterie . . . . . .105
Exemple d’utilisation du mode Minuterie . . . . . . . . . . . . . . . . . . .106
W248_NA_FC.qxp 8/5/08 10:08 AM Page 66
Page 38

Soin et entretien . . . . . . . . . . . . . . . . . . . . . . . . . . . . . . . . . . . . . . . .130
Changement de la pile de montre . . . . . . . . . . . . . . . . . . . . . . . .130
Veilleuse INDIGLO® . . . . . . . . . . . . . . . . . . . . . . . . . . . . . . . . . . . .130
Étanchéité . . . . . . . . . . . . . . . . . . . . . . . . . . . . . . . . . . . . . . . . . .130
Entretien de la sangle de l’émetteur du cardiofréquencemètre . . .131
Durée de vie et changement de la pile de l’émetteur . . . . . . . . . .131
Changement de la pile . . . . . . . . . . . . . . . . . . . . . . . . . . . . . . . . .131
Étanchéité . . . . . . . . . . . . . . . . . . . . . . . . . . . . . . . . . . . . . . . . . .131
Garantie et réparation . . . . . . . . . . . . . . . . . . . . . . . . . . . . . . . . . . . .133
Garantie . . . . . . . . . . . . . . . . . . . . . . . . . . . . . . . . . . . . . . . . . . .133
Réparation . . . . . . . . . . . . . . . . . . . . . . . . . . . . . . . . . . . . . . . . . .135
69
Vue d’ensemble
Félicitations !
En achetant le cardiofréquencemètre numérique Ironman®Triathlon®, vous
avez embauché votre nouvel entraîneur personnel. Cet outil technologique
haut de gamme est conçu pour des athlètes exigeants tel que vousmême pour mesurer la réalisation de vos objectifs d’activité et vous offre
la possibilité de suivre, d’enregistrer et d’analyser les indicateurs
essentiels de votre propre niveau de forme jusqu’à 50 tours.
Vous trouverez que votre cardiofréquencemètre est un outil convivial pour
votre mise en forme. Mais, comme pour tout nouvel appareil, vous devrez
prendre le temps de vous familiariser avec ses fonctions afin d’optimiser
son utilisation.
Alors, découvrez les caractéristiques et les fonctions de votre
cardiofréquencemètre pour acquérir une compréhension générale de cet
outil de la forme. Mais avant tout, profitez pleinement de votre nouveau
partenaire pour une mise en forme toujours plus performante !
Nouvelles fonctions
Le cardiofréquencemètre numérique Ironman®Triathlon®propose une
mémoire de 10 activités qui enregistre le temps écoulé et les données de
fréquence cardiaque quand vous utilisez son chronomètre ou sa minuterie
par intervalles. Cette minuterie par intervalles est unique, car chaque
segment lié peut être réglé pour la zone de fréquence cardiaque et pour
W248_NA_FC.qxp 8/5/08 10:08 AM Page 68
Page 39

prépare le cœur, les poumons et les muscles à travailler à un niveau
optimal pour obtenir et garder un corps en forme.
Votre cardiofréquencemètre numérique peut vous signaler quand vous
vous trouvez dans la zone d’effort choisie et quand vous n’y êtes pas. Il
peut vous aider à maintenir votre effort physique au niveau d’intensité
devant vous permettre de réaliser l’objectif de forme fixé, sans sousentraînement ni surentraînement.
7170
la durée. Ainsi, votre séance d’exercices peut incorporer un guide
d’entraînement intégrant le temps et l’effort. C’est comme avoir un
entraîneur à son poignet.
En plus des fonctions de base d’un cardiofréquencemètre classique, votre
cardiofréquencemètre numérique Ironman®Triathlon®vous permet de
bloquer une ou plusieurs de vos activités pour réduire le risque d’une
annulation accidentelle.
La montre a également en option une liaison de communication
bidirectionnelle sans fil. Avec une communication bidirectionnelle, vous
pouvez transférer des données de votre montre vers un PC ou un Mac ou
bien télécharger des réglages d’un PC ou d’un Mac vers votre montre. La
liaison radio fournit une communication numérique sans fil continue, des
connections fiables et des transmissions de données entre la montre et
d’autres appareils ANT+Sport.
Un cœur en bonne santé
Des études récentes ont démontré que tout le monde peut être en forme
et le rester sans excès de zèle. Cela peut être aussi simple que :
O Faire des exercices 3 à 4 fois par semaine.
O Faire 30 à 45 minutes d’exercices pendant chaque séance.
O Faire des exercices à une fréquence cardiaque appropriée.
La fréquence cardiaque représente les effets de l’effort sur tout
l’organisme. Choisir la zone de fréquence cardiaque la plus appropriée
ATTENTION :
Ceci n’est pas un appareil médical et son emploi est déconseillé aux
personnes souffrant de troubles cardiaques graves. Consulter votre médecin
avant d’entamer un programme d’exercice physique.
Le brouillage du signal radio, un mauvais contact entre la peau et l’émetteur du
cardiofréquencemètre numérique et d’autres facteurs peuvent entraver la
transmission des données de fréquences cardiaques.
W248_NA_FC.qxp 8/5/08 10:08 AM Page 70
Page 40

7372
bouton INDIGLO®jusqu’à ce que vous entendiez un bip.
Lorsque la fonction Night-Mode®est activée, le cadran de la montre
s’éclaire pendant trois à six secondes en pressant sur n’importe quel
bouton. La fonction Night-Mode®reste active pendant sept à huit heures
après son activation. Pour la désactiver avant que les huit heures ne soient
écoulées, appuyez et maintenez enfoncé le bouton INDIGLO®jusqu’à ce
que vous entendiez un bip.
Icônes d’affichage
g L’icône du cœur indique que l’émetteur du cardiofréquencemètre est
en marche.
W L’icône du chronographe indique que la montre chronomètre votre
séance d’exercices dans le mode Chrono.
H L’icône du sablier indique que la montre chronomètre votre séance
d’exercices dans les modes Minuterie ou Minuterie par intervalles.
J L’icône de répétition indique que vous avez réglé la minuterie pour se
répéter à la fin du compte à rebours dans les modes Minuterie ou
Minuterie par intervalles.
a L’icône du réveil indique que vous avez réglé l’alarme pour vous
alerter au moment que vous avez choisi.
q L’icône du haut-parleur s’affiche quand vous avez réglé la montre
pour vous alerter quand vous allez au-dessus ou bien en-dessous
Boutons de la montre
REMARQUE : La spécificité des boutons varie selon le mode. Reportezvous à chaque mode pour plus d’informations sur l’utilisation des boutons
de la montre.
Veilleuse INDIGLO®avec la fonction Night-Mode®(mode Nuit)
Appuyez sur le bouton INDIGLO®pour allumer la veilleuse INDIGLO®et
éclairer le cadran de la montre dans n’importe quel mode de la montre.
Pour activer la fonction Night-Mode® , pressez et maintenez enfoncé le
START/SPLIT
(DÉMARRER/TEMPS
INTERMÉDIAIRE)
STOP/RESET/SET
(STOP/REMISE À
ZÉRO/RÉGLAGE)
HEART RATE
(FRÉQUENCE
CARDIAQUE)
MODE
BOUTON
INDIGLO
®
W248_NA_FC.qxp 8/5/08 10:08 AM Page 72
Page 41

Ressources sur le Web
Les sites Internet de Timex vous proposent des informations pertinentes
pour vous aider à optimiser l’utilisation de votre cardiofréquencemètre.
O Enregistrez votre produit sur www.timextrainer.com.
O Visitez www.timextrainer.com pour plus d’informations sur les
produits de la santé et de la forme de Timex®, les montres de sport de
Timex®et sur l’entraînement.
Déterminez votre zone optimale de fréquence cardiaque
Il y a cinq zones cibles de base de fréquence cardiaque décrites dans le
tableau ci-dessus. Choisissez simplement une zone qui corresponde à
75
de votre zone de fréquence cardiaque durant une séance d’exercices.
5 L’icône d’antenne s’affiche quand la montre est synchronisée avec
votre cardiofréquencemètre.
l L’icône du cadenas s’affiche quand vous avez bloqué une séance
d’exercices pour qu’elle ne soit pas remplacée par une autre séance
d’exercices.
e L’icône du sablier avec un cœur s’affiche quand la montre
chronomètre une récupération.
k L’icône du croissant de lune s’affiche quand la fonction Night-Mode
®
de la veilleuse INDIGLO®est activée.
Ressources
Ressources imprimées
En plus de ce manuel, votre cardiofréquencemètre comprend la
documentation suivante :
O Heart Zones
®
Tools for Success (Les zones de fréquence
cardiaque - Les outils du succès) (clients aux É.-U. uniquement) :
Des informations sur l’emploi du cardiofréquencemètre en association
avec le programme de forme Heart Zones® Training System (Les zones
de fréquence cardiaque - Système d’entraînement), conçu pour vous
aider à accroître la force et la résistance de votre cœur.
74
Zone % Objectif Avantage
1 50 % à 60 % Exercice modéré
Maintenir un cœur en bonne
santé et être en forme
2 60 % à 70 % Contrôle du poids
Perdre du poids et brûler les
graisses
3 70 % à 80 %
Établissement d’une
base cardiorespiratoire
Accroître l’endurance et la
capacité cardiorespiratoire
4 80 % à 90 % État de santé optimal
Maintenir une excellente
condition physique
5 90 % à 100 %
Entraînement athlétique
de haut niveau
Obtenir une superbe condition
athlétique
W248_NA_FC.qxp 8/5/08 10:08 AM Page 74
Page 42

séance d’exercices. Le cardiofréquencemètre peut stocker des
informations jusqu’à 10 séances d’exercices.
REMARQUE : La montre recueille des données de la fréquence cardiaque
sans que le chronographe ou la minuterie par intervalles ne soient activés.
Ces informations ne sont pas disponibles en mode Récapitulatif, mais elles
peuvent être transférées sur votre PC/Mac (le Data Xchanger à USB de
Timex® est nécessaire). Si vous avez ce périphérique USB, vous pouvez
transférer et consulter les données de vos activités sur un PC/Mac.
Lorsque la montre ne peut enregistrer que cinq heures ou seulement trois
séances supplémentaires de données de la fréquence cardiaque, le
message MEMORY LOW (MÉMOIRE BASSE) s’affiche. Quand la montre a
atteint les limites de sa capacité de stockage, MEMORY FULL (MÉMOIRE
PLEINE) s’affiche.
Ces messages sont supprimés lorsque la montre n’est pas utilisée avec un
PC/Mac. Lorsque vous avez atteint la limite des 10 séances d’exercices,
vous enregistrez une nouvelle séance sur une séance plus ancienne, sauf
si vous l’avez bloquée.
Préparer votre cardiofréquencemètre pour une première
utilisation
Une fois que vous avez déterminé votre but de forme et votre fréquence
cardiaque maximale, Timex vous recommande d’associer votre montre et
l’émetteur du cardiofréquencemètre, de régler l’heure et d’autres données
importantes dans le mode HRM Setup (Configuration CFM) avant de l’utiliser.
77
votre pourcentage (%) maximum de fréquence cardiaque basé sur
l’objectif que vous souhaitez atteindre durant un exercice particulier.
Avant de régler votre zone, vous devez d’abord déterminer votre fréquence
cardiaque maximale. Il existe plusieurs méthodes pour l’évaluer.
La brochure
Heart Zones®Tools For Success (Les zones de fréquence
cardiaque - Les outils du succès)
comprise dans l’emballage de votre
cardiofréquencemètre (pour les clients aux É.-U. uniquement) en propose
d’excellentes et Timex vous conseille d’utiliser une de celles qui y sont
décrites.
Vous pouvez envisager de recourir à la méthode basée sur l’âge
recommandée par le gouvernement.
Partez du chiffre 220 puis soustrayez-en votre âge. Par exemple, une
personne de 35 ans commence avec 220 et soustrait 35 (son âge), ce qui
lui donne une estimation de sa fréquence cardiaque maximale de 185.
Une fois que vous connaissez votre fréquence cardiaque maximale, vous
pouvez l’enregistrer dans le mode HRM Setup (Configuration CFM) et la
montre réglera automatiquement vos zones comme elles sont décrites
dans le tableau de la page précédente.
Réglage et utilisation du
cardiofréquencemètre
Les modes Chrono et Minuterie par intervalles recueillent les données de
la fréquence cardiaque et enregistrent les statistiques détaillées d’une
76
W248_NA_FC.qxp 8/5/08 10:08 AM Page 76
Page 43

79
Remarque : Pour de meilleurs résultats, Timex vous recommande de laver
l’émetteur de votre cardiofréquencemètre dans de l’eau savonneuse chaude
pour enlever les traces d’huile de fabrication avant la première utilisation.
O Associer la montre et l’émetteur du cardiofréquencemètre : Timex
vous recommande d’associer la montre et l’émetteur du cardiofréquencemètre pour minimiser les risques d’interférence avec ceux
d’une autre personne. Pour associer la montre et l’émetteur du
cardiofréquencemètre de façon appropriée, allez directement dans le
mode HRM Setup (Configuration CFM) avant de vous arrêter dans un
autre mode ou d’en utiliser un. Pour plus d’informations sur cette
opération, voir pages 115 à 117.
O Régler l’heure du jour : Le cardiofréquencemètre utilise l’heure pour
enregistrer des données. Réglez la montre sur votre heure locale dans
le mode Time of Day (Heure du jour) pour vous assurer d’enregistrer
les données à la bonne heure. Pour plus d’informations sur le mode
Heure du jour reportez-vous aux pages 82 à 87.
O Saisir vos données personnelles : Avant d’utiliser votre montre, il est
important de saisir votre poids et votre fréquence cardiaque maximale
dans le mode HRM Setup (Configuration CFM). Cela vous permettra
d’adapter votre cardiofréquencemètre à vos paramètres personnels.
Pour plus d’informations sur le mode Confirmation CFM, reportez-vous
aux pages 120 à 123.
78
Utilisation de votre cardiofréquencemètre
1. Humectez les coussinets de l’émetteur du
cardiofréquencemètre.
2. Centrez l’émetteur sur votre poitrine avec le logo
de Timex®tourné vers le haut et vers l’extérieur et
attachez-le fermement juste en dessous de votre
sternum.
3. Appuyez sur le bouton MODE jusqu’à ce que le
mode souhaité s’affiche. Vous pouvez voir les données de fréquence
cardiaque dans les modes Time of Day (Heure du jour), Chrono, Timer
(Minuterie) ou Interval Timer (Minuterie par intervalles).
4. Appuyez sur le bouton HEART RATE (FRÉQUENCE CARDIAQUE) de votre
montre. L’icône d’antenne s’affiche indiquant que la montre cherche
un signal de l’émetteur du cardiofréquencemètre. Quand la montre
commence à recevoir un signal, l’icône d’un cœur qui bat s’affiche.
Lorsque vous entrez dans certains modes, la montre recherche
automatiquement l’émetteur du cardiofréquencemètre.
REMARQUE : La montre enregistre automatiquement votre fréquence
cardiaque et d’autres données statistiques sur votre séance
d’exercices (disponible en mode Review [Récapitulatif]) lorsque vous
utilisez les modes Chrono et Interval Timer (Minuterie par intervalles).
5. Appuyez sur START/SPLIT en commençant la séance d’exercices.
W248_NA_FC.qxp 8/5/08 10:08 AM Page 78
Page 44

Message NO HRM DATA (pas de données CFM)
Si la montre ne reçoit pas d’information de fréquence cardiaque, le message
NO HRM DATA (PAS DE DONNÉES CFM) s’affiche. Essayez ce qui suit :
O Réduisez la distance entre la montre et l’émetteur du
cardiofréquencemètre.
O Ajustez la position de l’émetteur du cardiofréquencemètre et la sangle
élastique de poitrine.
O Assurez-vous que les coussinets de l’émetteur du
cardiofréquencemètre sont mouillés ou utilisez un gel conducteur.
O Vérifiez les piles de l’émetteur du cardiofréquencemètre et
remplacez-les si nécessaire.
O Éloignez-vous d’autres cardiofréquencemètres, de sources de radio ou
d’interférences électriques.
80 81
6. Si la montre est réglée pour vous alerter quand vous allez au-dessus
ou en-dessous de votre zone cible de fréquence cardiaque choisie,
appuyez et maintenez enfoncé HEART RATE pour éteindre l’alarme.
Autrement, elle continuera de sonner jusqu’à ce que vous retourniez à
votre zone cible. Lorsque vous désactivez l’alarme, le message HOLD
FOR ALERT OFF (TENIR L’ALARME DÉSACTIVÉE) s’affiche. Inversement,
lorsque vous activez l’alarme, le message HOLD FOR ALERT ON (TENIR
L’ALARME ACTIVÉE) s’affiche.
7. Lorsque vous avez fini votre séance d’exercices, appuyez sur
STOP/RESET/SET pour arrêter d’enregistrer les données de votre
séance si vous utilisez les Modes Chrono et Minuterie par intervalles.
8. Dès que vous enlevez l’émetteur du cardiofréquencemètre de votre
poitrine, la montre arrête d’enregistrer les données de la fréquence
cardiaque en une minute environ.
9. Appuyez sur MODE jusqu’à voir le mode Review (Récapitulatif). Ce
mode comprend des données sur la fréquence cardiaque et d’autres
données statistiques sur votre séance d’exercices. Voir pages 110 à
114 pour plus d’informations sur le mode Récapitulatif.
W248_NA_FC.qxp 8/5/08 10:08 AM Page 80
Page 45

Pour régler l’heure, la date et les alertes sonores
1. Appuyer sur MODE jusqu’à ce que le mode Time of Day (Heure du jour)
affiche l’heure courante.
2. Appuyer et maintenir enfoncé STOP/RESET/SET jusqu’à ce que les
mots HOLD TO SET (TENIR POUR RÉGLAGE) s’affichent brièvement
suivis par SET TIME (RÉGLAGE DE L’HEURE) avec le numéro 1 ou 2
clignotants dans le coin inférieur droit.
3. Appuyer sur START/SPLIT (+) ou HEART RATE (-) pour sélectionner le
fuseau horaire principal (1) ou secondaire (2).
4. Appuyer sur MODE (NEXT) pour commencer de régler l’heure pour le
fuseau horaire choisi. L’heure s’affiche avec la valeur de l’heure
clignotante.
5. Faire les réglages souhaités comme indiqués dans les tableaux des
deux prochaines pages.
6. Appuyer sur MODE (NEXT) pour se déplacer sur le réglage de l’option
suivante.
7. Appuyer sur STOP/RESET/SET (DONE) pour enregistrer vos
modifications et sortir du processus de réglage.
Pour cette montre, vous pouvez régler l’heure du jour selon les réglages
décrits dans les tableaux des deux prochaines pages.
REMARQUE : Pour changer rapidement la valeur réglée, appuyer et
maintenir enfoncé START/SPLIT (+) ou HEART RATE (-).
83
Time of Day (Heure du jour)
La montre fonctionne comme une montre ordinaire pour afficher l’heure, la
date et le jour dans deux fuseaux horaires différents, aux formats 12 ou
24 heures.
82
START/SPLIT
Appuyer pour consulter
brièvement ou changer de zone,
augmenter ou alterner les
réglages d’un élément.
STOP/RESET/SET
Appuyer pour démarrer
ou pour achever le
processus de réglage.
HEART RATE
Appuyer pour activer le
cardiofréquencemétre,
pour diminuer, pour
alterner les réglages d’un
élément à un autre ou
pour changer l’affichage.
MODE
Appuyer pour changer de
mode, de chiffre, de réglage
d’option ou de groupe.
BOUTON INDIGLO
®®
Appuyer pour éclairer la
montre, activer ou désactiver
la fonction Night-Mode
®
(mode
Nuit).
W248_NA_FC.qxp 8/5/08 10:08 AM Page 82
Page 46

Pour changer de fuseau horaire
La montre peut gérer deux fuseaux horaires (T1 et T2). Pour afficher le
deuxième fuseau horaire dans le mode Time of Day (Heure du jour),
appuyer sur START/SPLIT. T1 ou T2 clignote dans le coin inférieur droit
indiquant l’autre fuseau horaire. Vous pouvez passer de T1 à T2 ou de T2 à
T1 en faisant les étapes suivantes :
8584
Groupe de
réglages
Mode opératoire
Affichage du mois
et du jour
Appuyer sur START/SPLIT (+) ou HEART RATE (-) pour
alterner entre les affichages du mois et du jour. Ces options
comprennent : Format de la date MM-JJ (mois/jour) ou
JJ.MM (jour/mois). Par exemple, le 15 mars s’affiche 3.15
(MM.JJ) ou 15.3 (JJ.MM).
Carillon horaire
Appuyer sur START/SPLIT ou HEART RATE pour alterner entre
l’activation et la désactivation du carillon. Lorsque cette
fonction est activée, la montre bipe toutes les heures.
Bip des boutons
Appuyer sur START/SPLIT ou HEART RATE pour alterner entre
l’activation ou la désactivation du bip. La montre émet un bip
lorsqu’il est activé chaque fois que vous appuyez sur un
bouton autre que INDIGLO
®
.
Groupe de
réglages
Mode opératoire
Heure
Appuyer sur START/SPLIT (+) pour augmenter la valeur de
l’heure ou HEART RATE (-) pour la diminuer.
Minute
Appuyer sur START/SPLIT (+) pour augmenter la valeur des
minutes ou HEART RATE (-) pour la diminuer.
Seconde
Appuyer sur START/SPLIT (+) ou HEART RATE (-) pour
remettre les secondes à zéro.
Mois
Appuyer sur START/SPLIT (+) pour avancer dans les mois ou
HEART RATE (-) pour reculer.
Jour du mois
Appuyer sur START/SPLIT (+) pour avancer dans les jours du
mois ou HEART RATE (-) pour reculer.
Année
Appuyer sur START/SPLIT (+) pour augmenter la valeur de
l’année ou HEART RATE (-) pour la diminuer.
Format 12 ou 24
heures
Appuyer sur START/SPLIT (+) ou HEART RATE (-) pour
alterner entre les formats 12 et 24 heures. Dans le format
12 heures, les indicateurs de temps AM (matin) et PM
(après-midi) s’affichent sur la droite des secondes.
W248_NA_FC.qxp 8/5/08 10:08 AM Page 84
Page 47

O Lors du processus de réglage, vous pouvez à tout moment
sauvegarder vos modifications et retourner à l’affichage principal de
l’heure en appuyant sur STOP/RESET/SET.
O Si durant le réglage de la montre, vous n’appuyez sur aucun bouton
pendant 2 ou 3 minutes, la montre enregistrera automatiquement les
dernières modifications que vous avez faites et quittera le processus
de réglage.
O La montre passe automatiquement du 28 février au 29 février pendant
les années bissextiles. Pour les autres années, la montre passe du 28
février au 1er mars.
O Les alarmes se déclenchent en fonction de l’heure réglée en mode
Heure du jour.
Exemple de réglage de l’Heure du jour
87
1. Appuyer et maintenir enfoncé START/SPLIT jusqu’ à ce que T1 ou T2
s’affiche et clignote.
2. Continuer de maintenir le bouton enfoncé jusqu’au changement de
fuseau horaire et jusqu’à ce que la montre bipe.
Données de fréquence cardiaque en mode Heure du jour
Vous pouvez changer l’affichage du mode Heure du jour en appuyant sur
HEART RATE lorsque vous utilisez la montre avec l’émetteur du
cardiofréquencemètre. Vous pouvez choisir entre :
1. Fréquence cardiaque sur Heure du jour
2. Heure du jour sur fréquence cardiaque
3. Fréquence cardiaque uniquement
4. Heure du jour avec jour/mois/date.
REMARQUE : Lorsque les informations de la fréquence cardiaque en cours
s’affichent en mode Time of Day (Heure du jour), la montre n’enregistre
aucune données que vous pourrez consulter en mode Récapitulatif.
Remarques et conseils pratiques pour l’Heure du jour
O Vous pouvez revenir au mode Time of Day (Heure du jour) depuis tout
autre mode en tenant MODE enfoncé jusqu’à afficher l’heure du jour.
O La montre ne passe pas automatiquement à l’heure d’été. Pour
alterner entre l’heure d’été et l’heure d’hiver, vous devez régler la
montre manuellement.
86
Supposez que vous vivez à San Francisco et travaillez avec un client à New York.
Comme toute personne très occupée, il est impératif que vous sachiez toujours
l’heure qu’il est et vous réglez T1 sur votre heure locale. Mais il est aussi important
de pouvoir vous rappeler rapidement l’heure qu’il est chez votre client, c’est
pourquoi vous réglez T2 sur l’heure de New York. Ces deux fuseaux horaires étant
réglés, vous pouvez rapidement consulter l’heure qu’il est chez votre client ou
changer d’affichage pour visualiser T2 lorsque vous vous rendez à New York.
W248_NA_FC.qxp 8/5/08 10:08 AM Page 86
Page 48

89
Chrono
Le mode Chrono fait office de centre de traitement principal des données
d’exercices pour votre montre. Il peut enregistrer jusqu’à 100 heures de
durée écoulée. Il peut également enregistrer des informations jusqu’à 50
tours.
Terminologie du Chrono
O Chronographe : Le chronographe enregistre des segments de temps
pendant la durée de votre activité.
O Tour : Le temps au tour enregistre le temps ou la durée de chaque
segment de votre séance d’exercices.
O Temps intermédiaire : Le temps intermédiaire (Split) enregistre la
88
durée totale écoulée depuis le début de l’activité en cours.
O Prendre un temps au tour ou un temps intermédiaire : Quand vous
prenez un temps au tour ou un temps intermédiaire, le chronographe
enregistre un temps et commence à chronométrer automatiquement
un nouveau tour.
Utilisation du Chrono
1. Appuyer sur MODE jusqu’à afficher CHRONO.
2. Appuyer et maintenir enfoncé STOP/RESET/SET pour sauvegarder les
données (si nécessaire) et remettre le chrono à zéro.
3. Appuyer sur START/SPLIT pour démarrer le chronométrage.
4. Appuyer de nouveau sur START/SPLIT pour enregistrer un temps au
tour ou un temps intermédiaire. La montre affiche le nombre de tours
ou de tours intermédiaires et la fréquence cardiaque moyenne (pour le
tour ou l’intermédiaire) si elle reçoit des données de l’émetteur du
cardiofréquencemètre.
5. Appuyer sur MODE pour afficher immédiatement les données du
nouveau tour ou intermédiaire OU attendre quelques secondes et la
montre passera automatiquement à l’affichage des données du
nouveau tour ou intermédiaire.
6. Appuyer sur STOP/RESET/SET pour arrêter le chronométrage lorsque
vous souhaitez vous reposer ou que vous avez terminé l’activité.
STOP/RESET/SET
Appuyer pour arrêter,
marquer une pause du
chrono, enregistrer les
données du chrono et
remettre le chrono à zéro
ou changer le format du
chrono.
HEART RATE
Appuyer pour changer
l’affichage.
BOUTON INDIGLO
®®
Appuyer pour éclairer la montre,
activer ou désactiver la fonction
Night-Mode
®
(mode Nuit).
MODE
Appuyer pour changer de mode
ou pour afficher rapidement un
nouveau tour ou un tour
intermédiaire.
START/SPLIT
Appuyer pour commencer de
chronométrer, prendre un tour ou
un tour intermédiaire ou continuer
de chronométrer après une pause.
W248_NA_FC.qxp 8/5/08 10:08 AM Page 88
Page 49

2. La fréquence cardiaque moyenne pour tout le temps où l’émetteur du
cardiofréquencemètre et le chronographe sont en marche (présenté
comme AVERAGE [MOYENNE] dans le mode Récapitulatif).
3. La fréquence cardiaque moyenne pour chaque tour enregistré (LAP
DATA [DONNÉES DU TOUR] apparaît dans le mode Récapitulatif).
4. Les fréquences cardiaques de pointe et minimale pour tout le temps
où l’émetteur du cardiofréquencemètre et le chronographe sont en
marche (présenté comme PEAK [DE POINTE] et MINIMUM dans le
mode Récapitulatif).
Format de l’affichage du chronographe
Vous pouvez régler le chronographe pour montrer le temps au tour ou
intermédiaire sur la ligne la plus basse de l’affichage.
1. Arrêter et remettre le chronographe à zéro.
2. Appuyer puis relâcher le bouton STOP/RESET/SET. FORMAT s’affiche,
suivi de SET et du format en cours.
3. Appuyer sur START/SPLIT (+) pour sélectionner le format que vous
désirez.
4. Appuyer sur STOP/RESET/SET (DONE) pour enregistrer vos
modifications et retourner au mode Chrono.
Notez que même si le format de réglage implique que les valeurs du
chrono s’affichent sur les lignes supérieure et inférieure, lorsque le chrono
91
REMARQUE : Le chronométrage de la fréquence cardiaque de
récupération commence automatiquement (pour 30 secondes,
1, 2, 5 ou 10 minutes, selon votre choix) après avoir appuyé sur
STOP/RESET/SET si la montre a bien reçu les données de l’émetteur
du cardiofréquencemètre. Pour plus d’informations sur la vitesse de
récupération cardiaque, voir les page 106 à 109.
7. Appuyer sur START/SPLIT pour reprendre le chronométrage OU tenir
enfoncé STOP/RESET/SET pour effacer l’affichage et remettre le
chronographe à zéro. Cette opération enregistre aussi les données
dans la mémoire de la montre.
REMARQUE : Si toutes les séances d’exercices sont bloquées, le
message WORKOUTS LOCKED - UNLOCK IN REVIEW (SÉANCES
D’EXERCICES BLOQUÉES - DÉBLOQUER EN MODE RÉCAPITULATIF)
s’affiche. Dans cette situation, la montre ne peut pas sauvegarder les
données de la séance d’exercices.
Données de fréquence cardiaque en mode Chrono
Lorsque vous utilisez la montre dans le mode Chrono avec l’émetteur du
cardiofréquencemètre, vous ajoutez les données de la fréquence
cardiaque dans le mode Review (Récapitulatif), comprenant :
1. Le temps que votre fréquence cardiaque reste dans votre zone cible de
fréquence cardiaque (présenté comme IN ZONE [DANS LA ZONE] dans
le mode Récapitulatif).
90
W248_NA_FC.qxp 8/5/08 10:08 AM Page 90
Page 50

93
fonctionne sans l’émetteur du cardiofréquencemètre, la ligne du haut est
réservée au nombre de tours, ainsi seule la ligne inférieure affiche les
informations du chronométrage. Cependant, en utilisant le mode Chrono
avec l’émetteur du cardiofréquencemètre, il est possible de voir les deux
affichages en même temps si vous le souhaitez.
Remarques et conseils pratiques pour le mode Chrono
O Appuyer sur MODE pour passer au mode Heure du jour pendant que le
chronographe fonctionne. L’icône du chronographe (W) s’affiche pour
indiquer qu’il est toujours en marche.
O Lorsque le chronographe est en marche en même temps que
l’émetteur du cardiofréquencemètre, vous pouvez changer l’affichage
du mode Chrono en appuyant sur HEART RATE.Vous pouvez choisir
entre :
1. Fréquence cardiaque sur temps au tour ou temps intermédiaire
2. Temps au tour ou temps intermédiaire sur fréquence cardiaque
3. Temps au tour sur temps intermédiaire
4. Nombre de tour sur temps au tour ou temps intermédiaire ou
5. Fréquence cardiaque uniquement.
92
Exemple d’utilisation du mode Chrono
Deux fois par semaine, vous courez sur les collines derrière votre maison et vous
utilisez votre chronographe pour chronométrer votre activité. Vous avez divisé votre
course en quatre segments : 1) de votre maison au pied de la colline, 2) du pied de
la colline à son sommet, 3) du haut vers le bas de la colline et pour finir 4) du pied
de la colline jusqu’à votre maison. À chaque nouveau terrain, vous appuyez sur le
bouton START pour commencer de chronométrer un nouveau tour. Après cinq
semaines d’enregistrement de la même activité, vous serez capable de suivre vos
progrès durant cette période et de voir si votre temps s’est amélioré ou pas pour
chaque segment.
W248_NA_FC.qxp 8/5/08 10:08 AM Page 92
Page 51

9594
O
Intervalle : Les intervalles associent vos exercices à des durées
particulières. Par exemple, vous pouvez courir dix minutes, marcher
deux minutes, courir vingt minutes, puis marcher cinq minutes – ceci
correspondrait à quatre intervalles d’exercices.
O Répétitions (Reps) : Le nombre de fois que vous souhaitez effectuer
un groupe d’intervalles. Dans l’exemple ci-dessus, si vous choisissez
de répéter trois fois le groupe d’intervalles, vous effectuerez vos séries
de dix, deux, vingt et cinq minutes trois fois de suite. Ceci
correspondrait à trois répétitions.
Réglage des intervalles
Vous pouvez utiliser la montre pour régler et stocker jusqu’à cinq
intervalles intitulés INT 1 à INT 5.
1. Appuyer sur MODE jusqu’à ce que les réglages les plus récents du
mode Intervalle s’affichent.
2. Appuyer sur STOP/RESET/SET jusqu’à ce que les mots INT TIMER SET
(RÉGLAGE DE LA MINUTERIE D’INTERVALLES) s’affichent brièvement
suivi par SET (RÉGLAGE) puis par réglage en cours pour l’intervalle 1
avec INT 1 clignotant en haut de l’affichage.
3. Appuyer sur START/SPLIT (+) ou HEART RATE (-) pour choisir parmi les
cinq intervalles celui que vous souhaitez régler.
4. Appuyer sur MODE (NEXT) pour commencer de régler le temps pour
l’intervalle choisi. L’intervalle en cours s’affiche avec la valeur de
Interval Timer (Minuterie par intervalles)
Le mode Minuterie par intervalles permet d’avoir un compte à rebours
souple à cinq intervalles qui peut être réglé pour se répéter jusqu’à 99
fois. Ce mode est très utile quand votre séance d’exercices comprend des
segments spécifiques comme lorsque vous utiliser la méthode
course/marche où vous courez et marchez pendant des périodes
particulières.
Terminologie de l’intervalle
O Intervalle d’entraînement : Vous pouvez utiliser cette fonction pour
vous aider à modifier le degré d’intensité d’un exercice au cours d’une
séance d’exercices, ce qui vous permettra, au bout du compte, de
travailler plus intensément et plus longtemps.
STOP/RESET/SET
Appuyer pour démarrer
ou pour achever le
processus de réglage,
arrêter ou marquer une
pause pour la minuterie
par intervalles, remettre à
zéro et sauvegarder les
données.
HEART RATE
Appuyer pour changer
d’affichage, pour
diminuer ou alterner
entre les réglages d’un
élément.
MODE
Appuyer pour changer de mode,
de chiffre, de réglage d’option
ou de groupe.
BOUTON INDIGLO
®®
Appuyer pour éclairer la montre,
activer ou désactiver la fonction
Night-Mode
®
(mode Nuit).
START/SPLIT
Appuyer pour commencer de
chronométrer, continuer de
chronométrer après une pause,
augmenter ou alterner entre les
réglages d’un élément.
W248_NA_FC.qxp 8/5/08 10:08 AM Page 94
Page 52

REMARQUE : Pour changer rapidement la valeur réglée, appuyer et
maintenir enfoncé START/SPLIT (+) ou HEART RATE (-).
9796
l’heure clignotante.
5. Faire les réglages souhaités comme indiqués dans le tableau de la
page suivante.
6. Appuyer sur MODE (NEXT) pour se déplacer vers le réglage de l’option
suivante.
7. Appuyer sur STOP/RESET/SET (DONE) pour enregistrer vos
modifications et sortir du processus de réglage.
Vous pouvez faire les réglages de l’intervalle décrits dans le tableau
ci-après.
Groupe de réglages Mode opératoire
Nombre d’intervalles
Appuyer sur START/SPLIT (+) pour augmenter le nombre
des intervalles ou HEART RATE (-) pour le diminuer.
Heure
Appuyer sur START/SPLIT (+) pour augmenter la valeur
de l’heure ou HEART RATE (-) pour la diminuer.
Minute
Appuyer sur START/SPLIT (+) pour augmenter la valeur
des minutes ou HEART RATE (-) pour la diminuer.
Secondes
Appuyer sur START/SPLIT (+) pour augmenter la valeur
des secondes ou HEART RATE (-) pour la diminuer.
Zone de fréquence
cardiaque
Appuyer sur START/SPLIT (+) ou sur HEART RATE (-) pour
choisir entre les ZONES de 1 à 5 préprogrammées, la
zone MANUAL (MANUELLE) ou NONE (AUCUNE).
Nombre de Répétitions
Appuyer sur START/SPLIT (+) pour augmenter le nombre
de répétitions ou HEART RATE (-) pour le diminuer.
W248_NA_FC.qxp 8/5/08 10:08 AM Page 96
Page 53

98 99
cardiofréquencemètre et la minuterie par intervalles sont en marche
(présenté comme AVERAGE [MOYENNE] dans le mode Récapitulatif).
3. La fréquence cardiaque moyenne pour chaque intervalle enregistré
(apparaît dans les temps de l’intervalle du mode Récapitulatif).
4. Les fréquences cardiaques de pointe et minimale pour tout le temps
où l’émetteur du cardiofréquencemètre et la minuterie par intervalles
sont en marche (présentés comme PEAK [DE POINTE] et MINIMUM
dans le mode Récapitulatif).
Remarques et conseils pratiques pour le mode Intervalle
O Quand la montre accumule des données concernant le temps dans les
zones cibles de fréquence cardiaque, l’information représente la
somme totale de temps dans toutes les zones et non pas le temps
dans chaque zone pour chaque intervalle.
O Si toutes les séances d’exercices sont bloquées dans le mode
Récapitulatif, le message WORKOUTS LOCKED - UNLOCK IN REVIEW
(SÉANCES D’EXERCICES BLOQUÉES - DÉBLOQUER EN MODE
RÉCAPITULATIF) s’affiche. Dans cette situation, la montre ne peut pas
sauvegarder les données de la séance d’exercices.
O Lorsque la minuterie par intervalles est en marche en même temps
que l’émetteur du cardiofréquencemètre, vous pouvez changer
l’affichage du mode Intervalle, en appuyant sur HEART RATE
(FRÉQUENCE CARDIAQUE). Vous pouvez choisir entre :
Pour régler la minuterie par intervalles
1. Appuyer sur MODE jusqu’à afficher INTERVAL (INTERVALLE).
2. Appuyer et maintenir enfoncé STOP/RESET/SET pour effacer les
données de l’intervalle précédent (si nécessaire).
3. Appuyer sur START/SPLIT pour démarrer le compte à rebours de la
minuterie d’intervalle (exemple : 10, 9, 8,…)
4. Appuyer sur STOP/RESET/SET pour arrêter le chronométrage avant le
moment prévu lorsque vous souhaitez vous reposer ou que vous avez
terminé l’activité.
5. Appuyer sur START/SPLIT pour reprendre le compte à rebours OU tenir
enfoncé STOP/RESET/SET pour sauvegarder et ensuite effacer
l’intervalle de la séance d’exercices en cours.
Données de fréquence cardiaque en mode Minuterie par
intervalles
Lorsque vous utilisez la montre dans le mode Intervalle avec l’émetteur du
cardiofréquencemètre, vous ajoutez les données liées au cœur dans le
mode Review (Récapitulatif), comprenant :
1. Le temps que votre fréquence cardiaque reste dans votre zone cible
(présenté comme IN ZONE [DANS LA ZONE] dans le mode
Récapitulatif).
2. La fréquence cardiaque moyenne pour tout le temps où l’émetteur du
W248_NA_FC.qxp 8/5/08 10:08 AM Page 98
Page 54

100 101
Exemple d’utilisation du mode Minuterie par intervalles
1. Fréquence cardiaque sur temps de l’intervalle
2. Temps de l’intervalle sur fréquence cardiaque
3. Fréquence cardiaque uniquement ou
4. Temps de l’intervalle sur nombre d’intervalles/nombre de
répétitions.
O Si un intervalle est réglé sur 00:00:00, la montre l’ignorera
automatiquement. Par exemple, si INT 3 est réglé sur 00:00:00, alors
la montre passera directement de INT 2 à INT 4.
O Lorsque vous réglez des zones cibles de fréquence cardiaque dans le
mode Intervalle, elles annulent celles réglées dans le mode HRM Setup
(Configuration CFM). Par exemple, si vous avez réglé la montre à ZONE
2 dans le mode HRM Setup (Configuration CFM) et que vous avez réglé
INT 3 à ZONE 3, la montre enregistrera les données de la fréquence
cardiaque pour la ZONE 3, mais pas celle de la ZONE 2 dans le mode
Intervalle. Ceci est particulièrement important si vous avez réglé la
montre pour vous alerter quand vous allez au-dessus ou en-dessous
de votre zone cible de fréquence cardiaque.
O Les réglages de répétitions s’appliquent sur le groupe entier de
réglages. Vous ne pouvez pas régler la minuterie par intervalles pour
se répéter deux fois pour INT 1 et une fois pour INT 2.
À des fins de cross-training, vous ajoutez à votre entraînement actuel un cours de
« spin » d’une heure par semaine. Vous décidez d’utiliser le mode Minuterie par
intervalles pour vous aider à mesurer la durée et la fréquence cardiaque pendant
cette heure de cours. Vous réglez les intervalles suivants pour votre activité :
Vous utilisez INT 1 comme un échauffement. INT 2 et INT 3 représentent le centre
de votre activité avec un objectif de fréquence cardiaque qui augmente, un effort
soutenu de cinq minutes avec des d’exercices d’aérobie de haute intensité.
Finalement, INT 4 est un ralentissement entre les répétitions et à la fin de l’activité.
Pour compléter, vous réglez les répétitions à 2, ce qui vous permet de répéter la
séquence d’activité deux fois pour une heure intense d’exercices à intervalles.
Intervalle Heure Zone de la Fréquence cardiaque
INT 1 00:05:00 NONE (AUCUNE)
INT 2 00:18:00 ZONE 3
INT 3 00:05:00 ZONE 5
INT 4 00:05:00 ZONE 1
W248_NA_FC.qxp 8/5/08 10:08 AM Page 100
Page 55

Pour régler la minuterie
1. Appuyer sur MODE jusqu’à afficher TIMER (MINUTERIE).
2. Appuyer sur STOP/RESET/SET jusqu’à ce que TIMER SET (RÉGLAGE DE
LA MINUTERIE), puis SET (RÉGLAGE) s’affichent brièvement suivi par la
minuterie avec la valeur des heures qui clignote.
3. Appuyer sur START/SPLIT (+) pour augmenter ou alterner les valeurs
ou sur HEART RATE (-) pour les diminuer ou les alterner. Ceci
s’applique aux heures, aux minutes, aux secondes, à l’action finale et à
l’alerte à mi-parcours.
REMARQUE : Le réglage de l’action finale vous permet de choisir ce
que la minuterie fera à la fin du compte à rebours. Les options
comprennent STOP, REPEAT (RÉPÉTER) ou CHRONO. Si vous choisissez
CHRONO, la montre passera automatiquement en mode Chrono à la fin
du compte à rebours (si le chronographe est arrêté ou s’il est remis à
zéro) et commence à mettre en marche le chronographe.
REMARQUE : Pour changer rapidement la valeur réglée, appuyer et
maintenir enfoncé START/SPLIT (+) ou HEART RATE (-).
4. Appuyer sur MODE (NEXT) pour changer la valeur suivante des heures,
des minutes, des secondes, de la fin de l’action et de l’alerte à miparcours.
5. Appuyer sur STOP/RESET/SET (DONE) pour enregistrer vos
modifications et sortir du processus de réglage.
103
Timer (Minuterie)
Le mode Minuterie permet de choisir une durée fixée à partir de laquelle
la montre compte à rebours jusqu’à zéro (exemple : 10, 9, 8, ...). De plus,
vous pouvez régler la montre pour se répéter, s’arrêter ou passer en mode
Chrono à la fin d’un compte à rebours (si le chronographe est arrêté et à
zéro) et vous alerter quand vous êtes au milieu de la minuterie d’une
séquence.
REMARQUE : Vous pouvez appuyer sur n’importe quel bouton en mode
Minuterie pour couper l’alarme qui se déclenche quand la minuterie atteint
zéro.
102
STOP/RESET/SET
Appuyer pour démarrer
ou pour achever le
processus de réglage,
arrêter ou marquer une
pause dans la minuterie,
remettre à zéro et
sauvegarder les
données.
HEART RATE
Appuyer pour changer
d’affichage, pour
diminuer ou alterner
entre les réglages d’un
élément.
BOUTON INDIGLO
®®
Appuyer pour éclairer la montre,
activer ou désactiver la fonction
Night Mode
®
(mode Nuit).
MODE
Appuyer pour changer de
mode, de chiffre, de réglage
d’option ou de groupe.
START/SPLIT
Appuyer pour commencer de
chronométrer, continuer de
chronométrer après une pause,
augmenter ou alterner entre les
réglages d’un élément.
W248_NA_FC.qxp 8/5/08 10:08 AM Page 102
Page 56

nombre de fois où le compte à rebours a été effectué. L’icône de
répétition I s’affiche également pour indiquer que la minuterie est
réglée pour se répéter ou
La minuterie passe en mode Chrono si le chronographe est arrêté ou s’il
a été remis à zéro. L’icône du chronographe W s’affiche indiquant que la
minuterie change de mode à la fin du compte à rebours et l’icône du
sablier H apparaît pour montrer que la minuterie est en marche.
Remarques et conseils pratiques pour le mode Minuterie
O Vous pouvez appuyer sur MODE depuis le mode Minuterie pour afficher
un autre mode sans perturber le fonctionnement de la minuterie. Le
sablier H reste affiché pour indiquer que la minuterie est en marche.
O Lorsque vous utilisez l’alerte de mi-parcours, la montre bipe quand
vous avez atteint la moitié du compte à rebours.
O Lorsque le chronographe est en marche en même temps que
l’émetteur du cardiofréquencemètre, vous pouvez changer l’affichage
du mode Timer (Minuterie), en appuyant sur HEART RATE. Vous pouvez
choisir entre :
1. Fréquence cardiaque sur compte à rebours
2. Compte à rebours sur fréquence cardiaque
3. Fréquence cardiaque uniquement ou
4. Compte à rebours (et un nombre de répétitions s’il est réglé sur
REPEAT [RÉPÉTER]).
105
Pour utiliser la minuterie
1. Appuyer et maintenir enfoncé STOP/RESET/SET pour effacer les
données de la précédente utilisation de la minuterie (si nécessaire).
Vous ne pouvez pas commencer un autre chronométrage sans
remettre à zéro la minuterie.
2. Appuyer sur START/SPLIT pour démarrer le compte à rebours. L’icône
du sablier H s’affiche.
3. Arrêter le compte à rebours en appuyant sur STOP/RESET/SET.
4. Reprendre le compte à rebours en appuyant sur START/SPLIT à
nouveau ou réinitialiser la minuterie en appuyant et en maintenant
encore enfoncé STOP/RESET/SET jusqu’à ce que les mots HOLD TO
RESET (TENIR POUR REMETTRE À ZÉRO) s’affichent brièvement suivis
par la durée initiale du compte à rebours.
5. Quand la minuterie atteint le point de mi-parcours (si HALFWAY ALERT
[ALERTE À MI-PARCOURS] est réglée), un bref carillon se déclenche.
6. Lorsque la minuterie arrive à zéro, une alerte sonore se produit.
Appuyer sur n’importe quel bouton pour couper l’alarme.
7. La minuterie s’arrête après l’alerte si elle est réglée sur STOP ou
La minuterie démarre un nouveau compte à rebours si elle est réglée
sur REPEAT (RÉPÉTER) et continue jusqu’à ce que vous appuyiez sur
STOP/RESET/SET. REP et un nombre s’affichent (par exemple, REP 2).
REP signifie que la minuterie se répète et le nombre correspond au
104
W248_NA_FC.qxp 8/5/08 10:08 AM Page 104
Page 57

REMARQUE : Pendant que le chronographe fonctionne, la minuterie de
récupération commence automatiquement après avoir appuyé sur
STOP/RESET/SET, si la montre reçoit les données de l’émetteur du
cardiofréquencemètre. Sans une fréquence cardiaque en cours ou si la
fréquence de départ est inférieure à la fréquence d’arrivée NO REC (PAS
D’ENREGISTREMENT) s’affiche à la fin du compte à rebours. Le résultat de
la récupération automatique peut se consulter en mode Récapitulatif.
107106
Exemple d’utilisation du mode Minuterie
Recovery (Récupération)
À propos de la vitesse de récupération cardiaque
La vitesse de récupération cardiaque est un indicateur de votre niveau de
forme et d’entraînement. Plus vous êtes en forme, plus votre fréquence
cardiaque retournera rapidement à un rythme plus bas à la fin de votre
séance d’exercices, indiquant une meilleure santé cardiovasculaire.
Votre vitesse de récupération représente le changement dans votre fréquence
cardiaque tout au long d’une période. Vous pouvez régler votre
cardiofréquencemètre pour qu’il enregistre les modifications de votre
fréquence cardiaque pour une de ces périodes : 30 secondes, 1, 2, 5 ou 10
minutes.
Dans le cadre d’un programme global de mise en forme, vous vous êtes fixé
l’objectif de marcher 30 minutes à l’heure du déjeuner, deux jours par semaine.
Pour vous assurer de retourner au travail à l’heure, vous réglez la minuterie à 15
minutes et vous la réglez la fin de l’action sur CHRONO. Au bout de 15 minutes, la
montre émet un bip vous avertissant de faire demi-tour et de revenir au bureau. La
montre passe en mode Chrono et commence à chronométrer. Ceci vous aide à
déterminer combien de temps il vous faut pour retourner au bureau.
Une vitesse de récupération plus lente peut indiquer le besoin de faire une pause
dans votre entraînement à cause de la fatigue, d’une maladie ou d’autres facteurs.
START/SPLIT
Appuyer pour démarrer ou
redémarrer un chronométrage
de récupération.
STOP/RESET/SET
Appuyer pour choisir entre
un temps de récupération
de 30 secondes, 1, 2, 5 ou
10 minutes, pour arrêter
ou pour remettre à zéro la
minuterie de récupération.
MODE
Appuyer pour passer au mode
suivant
HEART RATE
Appuyer pour activer le
CFM (si éteint) ou appuyer
et maintenir enfoncé pour
activer ou désactiver les
alertes de zones.
BOUTON INDIGLO
®®
Appuyer pour éclairer la montre,
activer ou désactiver la fonction
Night Mode
®
(mode Nuit).
W248_NA_FC.qxp 8/5/08 10:08 AM Page 106
Page 58

cardiaque en cours ou si la fréquence de départ est inférieure à la
fréquence d’arrivée, NO REC (PAS D’ENREGISTREMENT) s’affiche à la
fin du compte à rebours.
5. La montre émet un bip indiquant la fin de la période choisie de compte
à rebours de récupération. La montre enregistre votre fréquence
cardiaque une seconde fois, soustrait la deuxième valeur de la
première et affiche la différence comme valeur de la récupération.
6. Vous pouvez continuer d’initialiser des périodes spécifiques de
récupération en répétant les étapes 2 à 4.
109
Déterminer manuellement une vitesse
de récupération cardiaque
Vous pouvez également initialiser manuellement le calcul d’une vitesse de
récupération cardiaque à n’importe quel moment.
REMARQUE : Quand vous initialisez manuellement le calcul d’une vitesse
de récupération, les informations ne sont pas stockées pour être
consultées en mode Récapitulatif.
1. Appuyer sur MODE jusqu’à afficher RECOVERY (RÉCUPÉRATION).
2. Appuyer sur STOP/RESET/SET pour effacer les données de la vitesse
de récupération cardiaque précédente, si nécessaire. Le message
HOLD TO RESET (TENIR POUR REMISE À ZÉRO) s’affiche, suivi par le
réglage du temps de récupération en cours s’affiche.
3. Appuyer sur STOP/RESET/SET pour alterner entre les temps de
récupération de 30 secondes, 1, 2, 5 ou 10 minutes, si souhaité.
REMARQUE : Ce réglage contrôle la durée des vitesses cardiaques de
récupération automatique et manuelle.
4. Appuyer sur START/SPLIT. La fréquence cardiaque au début de la
période de récupération s’affiche sur la ligne du haut tout comme votre
fréquence cardiaque en cours. Le compte à rebours de récupération de
30 secondes, 1, 2, 5 ou 10 minutes s’affiche sur la ligne du bas.
REMARQUE : La montre ne peut pas enregistrer une récupération
sans recevoir de l’émetteur du cardiofréquencemètre des données
valides de la fréquence cardiaque en cours. Sans une fréquence
108
W248_NA_FC.qxp 8/5/08 10:08 AM Page 108
Page 59

À propos du mode Review (Récapitulatif)
O Le mode Récapitulatif recueille et stocke les données pendant que le
chronographe ou la minuterie d’intervalles est en marche. Vous pouvez
utiliser ce mode pour mesurer d’importants progrès durant vos
séances d’exercices.
O Sans l’émetteur du cardiofréquencemètre, le temps total et le rappel
du temps au tour ou de l’intervalle s’affichent dans le mode
Récapitulatif avec la dernière vitesse de récupération cardiaque
enregistrée.
O Si aucun intervalle n’a terminé son compte à rebours NO INTS DONE
(PAS D’INTERVALLE FAIT) s’affiche. Cela se produit uniquement quand
la minuterie par intervalles est en marche et que la montre n’a pas fini
de chronométrer un cycle complet d’intervalles.
O Si vous n’avez pas enregistré les différents tours durant une séance
d’exercices, la montre affiche NO LAPS STORED (PAS DE TOUR
ENREGISTRÉ) quand vous consultez le segment du rappel du tour dans
le mode Récapitulatif. Cela se produit uniquement quand le
chronographe est en marche et que la montre n’a pas fini de
chronométrer pendant le premier tour de votre séance d’exercices.
111
Review (Mode Récapitulatif)
Le mode Récapitulatif vous permet d’examiner des données générales sur
des séances d’exercices enregistrées par les modes Chrono et Intervalle.
Vous pouvez consulter vos 10 dernières séances d’exercices. Vous pouvez
aussi bloquer une séance d’exercices pour éviter qu’elle ne soit pas
éliminée de la fin du récapitulatif une fois que vous avez dépassé 10
séances stockées.
110
START/SPLIT
Appuyer pour sélectionner le
récapitulatif d’une séance
d’exercices ou pour faire défiler
les données d’une activité
sélectionnée.
HEART RATE
Appuyer pour bloquer
ou débloquer une
séance d’exercices ou
pour faire défiler les
données d’une
activité sélectionnée.
MODE
Appuyer pour passer
au mode suivant
BOUTON INDIGLO
®®
Appuyer pour éclairer la
montre, activer ou désactiver
la fonction Night-Mode
®
(mode Nuit).
STOP/RESET/SET
Appuyer pour
initialiser la
récapitulation d’une
séance de travail
choisie.
W248_NA_FC.qxp 8/5/08 10:08 AM Page 110
Page 60

113
Pour récapituler les données de la séance d’exercices
1. Appuyer sur MODE jusqu’à afficher REVIEW (RÉCAPITULATIF).
2. Appuyer sur START/SPLIT pour faire défiler les séances d’exercices
enregistrées. Les séances d’exercices enregistrées indiquent la date et
l’heure de la séance d’exercices.
REMARQUE : Les séances d’exercices enregistrées dans le mode
Chrono sont signalées par l’icône du chronographe W et celles
enregistrées en mode Intervalle par l’icône du sablier H.
3. Appuyer sur HEART RATE pour bloquer ou débloquer une séance
d’exercices. Quand vous bloquez une séance d’exercices, l’icône du
cadenas
l s’affiche à côté d’elle. Cette séance d’exercices ne sera
pas automatiquement supprimée quand une nouvelle arrivera.
4. Appuyer sur STOP/RESET/SET pour accéder aux données d’une séance
d’exercices sélectionnée.
5. Appuyer sur START/SPLIT (+) ou sur HEART RATE (-) pour faire défiler
les données de la séance d’exercices.
6. Appuyer sur STOP/RESET/SET pour retourner au menu principal du
mode Récapitulatif pour consulter une autre séance.
112
Données en mode Review (Récapitulatif)
Le mode Récapitulatif comprend les données des séances d’exercices
enregistrées en mode Chrono ou en mode Minuterie d’intervalles comme
indiqué dans la liste qui suit.
REMARQUE : Si le cardiofréquencemètre n’est pas utilisé, les seules
données disponibles sont celles du temps total, du temps au tour ou
d’intervalle.
O Total Time (Temps total) : Le temps pendant lequel le chronographe
ou la minuterie par intervalles fonctionne durant une séance
d’exercices dans les modes Chrono ou Interval Timer (Minuterie par
intervalles).
O Time in Zone (Temps dans la zone) : Le temps durant une séance
d’exercices pendant lequel votre fréquence cardiaque est entre la
limite la plus haute et la limite la plus basse de la zone cible que vous
avez réglée. Pour une séance d’exercices avec intervalles, vous pouvez
régler chaque intervalle sur une zone cible différente, ainsi le mode
Récapitulatif affiche la somme du temps dans la zone pour les
différentes zones cibles de chaque intervalle.
O Average Heart Rate (Fréquence cardiaque moyenne) : La
fréquence cardiaque moyenne réalisée pendant une séance
d’exercices.
O Peak Heart Rate (Fréquence cardiaque maximale) : La plus haute
fréquence cardiaque enregistrée durant l’activité.
Si le chronographe ou la minuterie par intervalles est en marche quand vous entrez
dans le mode Récapitulatif, vous ne pouvez voir que les informations de l’activité en
cours. Vous ne pouvez pas consulter de séances d’exercices enregistrées tant que
le chrono et la minuterie par intervalles ne sont pas arrêtés et remis à zéro.
W248_NA_FC.qxp 8/5/08 10:08 AM Page 112
Page 61

115
O
Minimum Heart Rate (Fréquence cardiaque minimale) : La plus
basse fréquence cardiaque enregistrée durant une activité.
O Total Calories (Total des calories) : Le nombre de calories brûlées
pendant une séance d’exercices. Ce nombre dépend du poids que
vous avez entré quand vous avez réglé votre cardiofréquencemètre,
de votre fréquence cardiaque durant une activité et du temps écoulé.
O Average Lap (Moyenne au tour) : Le temps moyen pour tous les
tours enregistrés pendant une séance d’exercices.
O Best Lap (Meilleur tour) : Le temps le plus court enregistré pendant
une séance d’exercices.
O Lap or Interval Recall (Rappel du tour ou de l’intervalle) : Le
temps et la moyenne de la fréquence cardiaque pour chaque segment
de votre séance d’exercices. Les séances dans le mode Chrono
comprennent les données au tour et les séances dans le mode
Intervalle comprennent les données d’intervalle. Si l’intervalle d’une
séance d’exercices est réglé pour se répéter, la montre affiche
également le nombre d’intervalles répétés.
O Recovery Heart Rate (Vitesse de récupération cardiaque) : Le
résultat du calcul le plus récent de la vitesse de récupération
cardiaque lorsque le chronographe ou la minuterie par intervalles
fonctionne. Les calculs manuels de récupération ne sont pas stockés.
114
HRM Setup (Configuration CFM)
Le mode Configuration CFM vous permet de sélectionner et de régler vos
données personnelles de statistiques essentielles qui seront enregistrées
par votre cardiofréquencemètre. Vous pouvez aussi associer la montre à
l’émetteur de votre cardiofréquencemètre.
Association des appareils
L’opération d’association est nécessaire pour s’assurer que votre montre
ne reçoive pas les données transmises par la sangle de poitrine de
quelqu’un d’autre.
START/SPLIT
Appuyer pour sélectionner
une zone cible de fréquence
cardiaque, ou alterner les
réglages d’un élément.
STOP/RESET/SET
Appuyer pour
démarrer ou pour
achever le processus
de réglage.
HEART RATE
Appuyer pour
initialiser le
processus
d’association,
diminuer ou alterner
entre les réglages
d’éléments.
MODE
Appuyer pour changer de
mode, de chiffre ou de
réglage de groupe.
BOUTON INDIGLO
®®
Appuyer pour éclairer la montre,
activer ou désactiver la fonction
Night-Mode
®
(mode Nuit).
W248_NA_FC.qxp 8/5/08 10:08 AM Page 114
Page 62

5. Appuyer sur le bouton MODE. Le message WAIT FOR BEEP (ATTENDRE
LE BIP) devrait s’afficher. La montre cherche une sangle de poitrine
avec laquelle elle va s’associer.
6. Ensuite, prendre votre sangle de poitrine et la tenir fermement avec les
pouces contre les coussinets de l’émetteur qui sont normalement en
contact avec votre poitrine. Frotter plusieurs fois les pouces d’avant en
arrière sur les coussinets de l’émetteur. Ce contact devrait être
suffisant pour que la sangle commence à transmettre.
7. Si l’opération d’association est réussie, PAIRING DONE (ASSOCIATION
FAITE) s’affiche et une sonnerie de confirmation se fait entendre. Si
pour une raison ou une autre, l’opération échoue, répéter
immédiatement les étapes décrites ci-dessus en commençant au
numéro 4.
Pour régler une zone cible de fréquence cardiaque
Vous pouvez choisir une zone cible de fréquence cardiaque programmée
ou régler une zone cible de fréquence cardiaque manuelle pour une zone
cible de fréquence cardiaque personnalisée. Les zones de fréquence
cardiaque préprogrammées décrites dans le tableau ci-dessous
correspondent à votre valeur de fréquence cardiaque maximale.
116 117
Note: L’opération d'association doit être effectuée avant votre toute première
utilisation, et après tout changement de pile du cardiofréquencemètre
ou de la montre. Il n’est pas nécessaire de le faire avant chaque séance
d’exercices.
Pour associer votre montre à votre sangle de poitrine, utilisez la procédure
suivante :
1. Enlever la sangle de poitrine de votre corps et la laisser sans la
manipuler pendant au moins cinq minutes pour être certain qu’elle soit
complètement éteinte.
2. Trouver un endroit éloigné d’autres sangles de poitrine de
cardiofréquencemètre qui pourraient être en train de transmettre.
3. Sur la montre, appuyer plusieurs fois sur le bouton MODE jusqu’à
afficher HRM SETUP (CONFIGURATION CFM) sur la ligne du haut.
4. Appuyer et tenir enfoncé le bouton HEART RATE. Le message HOLD TO
PAIR (TENIR POUR ASSOCIER) devrait s’afficher pendant 2 secondes
suivi par les instructions WEAR STRAP (METTRE LA SANGLE), puis
PRESS MODE TO PAIR WATCH WITH STRAP (APPUYER SUR MODE
POUR ASSOCIER LA MONTRE ET LA SANGLE).
Pour associer correctement la montre et l’émetteur du cardiofréquencemètre, allez
directement sur le mode HRM Setup (Configuration CFM) sans vous arrêter ou
utiliser un autre mode.
W248_NA_FC.qxp 8/5/08 10:08 AM Page 116
Page 63

pour tous ses calculs statistiques basés sur le CFM. Cela ne s’applique
pas aux séances d’exercices déjà sauvegardées avant de choisir une zone
cible de fréquence cardiaque.
Pour régler une zone cible de fréquence cardiaque manuelle
La zone cible de fréquence cardiaque manuelle vous permet de
personnaliser les limites supérieure et inférieure de votre zone cible de
fréquence cardiaque. Vous devez utiliser la zone cible de fréquence
cardiaque manuelle lorsque la zone cible de fréquence cardiaque
préprogrammée de 10 % est trop grande ou trop petite pour vos objectifs
d’exercices.
REMARQUE : La différence entre les limites supérieure et inférieure de
votre zone de fréquence cardiaque manuelle doit être d’au-moins cinq
battements par minute.
Pour régler une zone cible de fréquence cardiaque manuelle :
1. Appuyer sur MODE jusqu’à afficher HRM Setup (configuration CFM).
2. Appuyer sur START/SPLIT jusqu’à ce que MANUAL (MANUEL) s’affiche.
3. Appuyer ensuite sur STOP/RESET/SET pour commencer le réglage. Le
mot MANUAL (MANUEL) s’affiche en clignotant.
4. Appuyer sur MODE (NEXT) pour commencer à régler les zones cibles
supérieures et inférieures de fréquence cardiaque.
119
Pour choisir une zone cible de fréquence cardiaque :
1. Déterminer la zone que vous souhaitez utiliser en consultant le tableau
de la page 75.
2. Appuyer sur MODE jusqu’à afficher HRM Setup (configuration CFM).
3. Appuyer sur START/SPLIT pour passer successivement à chaque zone
cible de fréquence cardiaque (intitulées ZONE 1 à ZONE 5 ou
MANUAL).
4. Pour les zones de fréquence cardiaque préprogrammées, appuyer sur
MODE pour enregistrer votre zone cible de fréquence cardiaque choisie
et sortir du mode HRM Setup (Configuration CFM). Pour une zone de
fréquence cardiaque manuelle, vous devez ajouter quelques étapes
supplémentaires décrites dans la section suivante.
Après avoir quitté le mode HRM Setup (Configuration CFM), la montre
utilise la zone cible de fréquence cardiaque sélectionnée comme base
118
Zone Limite inférieure Limite supérieure
1 50 % 60 %
2 60 % 70 %
3 70 % 80 %
4 80 % 90 %
5 90 % 100 %
W248_NA_FC.qxp 8/5/08 10:08 AM Page 118
Page 64

1. Appuyer sur MODE jusqu’à afficher HRM Setup (configuration CFM).
2. Appuyer ensuite sur STOP/RESET/SET pour commencer le réglage. La
zone cible de fréquence cardiaque sélectionnée s’affiche et clignote.
3. Appuyer sur MODE (NEXT) pour commencer d’entrer vos données
personnelles et vos réglages.
4. Faire les modifications souhaitées en appuyant sur START/SPLIT (+) ou
HEART RATE (-). Pour certains réglages, appuyer sur START/SPLIT (+)
pour augmenter la valeur et appuyer sur HEART RATE (-) pour la
diminuer. Pour d’autres, appuyer sur START/SPLIT (+) ou HEART RATE
(-) pour alterner entre deux options ou passer successivement d’un
groupe de réglages à un autre.
5. Appuyer sur MODE (NEXT) pour se déplacer vers le chiffre ou le groupe
de réglages suivant que vous souhaitez modifier.
6. Appuyer sur STOP/RESET/SET pour enregistrer vos modifications et
sortir du processus de réglage.
7. Appuyer sur MODE pour quitter HRM Setup (Configuration CFM).
Pour ce cardiofréquencemètre vous pouvez faire les réglages décrits dans
le tableau de la page suivante.
121120
5. HI LIMIT : HR (LIMITE SUPÉRIEURE : FC) s’affiche d’abord, puis une
valeur de fréquence cardiaque à trois chiffres (exemple : 140). Appuyer
sur START/SPLIT (+) pour augmenter la valeur qui clignote, sur HEART
RATE (-) pour la diminuer ou sur MODE (NEXT) pour se déplacer vers la
valeur suivante.
6. Lorsque vous avez terminé de régler les trois chiffres de la valeur de la
limite supérieure de la fréquence cardiaque, appuyer sur MODE (NEXT)
pour vous déplacer sur la valeur de la limite inférieure de la fréquence
cardiaque. LO LIMIT : HR (LIMITE INFÉRIEURE : FC) s’affiche. Appuyer
sur START/SPLIT (+) pour augmenter la valeur qui clignote, sur HEART
RATE (-) pour la diminuer ou sur MODE (NEXT) pour se déplacer vers le
chiffre suivant de la valeur à trois chiffres.
7. Lorsque vous avez terminé de régler les limites supérieure et inférieure
des zones cibles de fréquence cardiaque, vous pouvez appuyer sur
STOP/RESET/SET (DONE) pour enregistrer vos réglages et sortir du
processus ou vous pouvez continuer de régler ou de modifier d’autres
données statistiques de fréquence cardiaque (voir ci-dessous).
Pour saisir vos données personnelles
En plus de sélectionner une zone cible de fréquence cardiaque, il est
important de saisir votre poids, votre fréquence cardiaque maximale,
l’affichage de la fréquence cardiaque et une alerte de zone de fréquence
cardiaque. L’exactitude de ces informations utilisées par ces options aide
votre cardiofréquencemètre à s’adapter à vos besoins.
W248_NA_FC.qxp 8/5/08 10:08 AM Page 120
Page 65

123122
Remarques et conseils pratiques pour le CFM
O Lors du processus de réglage, vous pouvez à tout moment
sauvegarder vos modifications et retourner à l’affichage principal de la
fréquence cardiaque en appuyant sur STOP/RESET/SET (DONE).
O Si durant le réglage de la montre, vous n’appuyez sur aucun bouton
pendant 2 ou 3 minutes, la montre enregistrera automatiquement les
dernières modifications que vous avez faites et quittera le processus
de réglage.
O Si un réglage passe au-dessus ou en-dessous des limites réglées de
votre fréquence cardiaque ou de votre poids, la montre corrige
automatiquement le réglage pour correspondre aux limites de la
montre. Cette correction automatique peut avoir des résultats difficiles
à prévoir.Vérifier les réglages de la montre.
Groupe de
réglages
Affichage Description
Poids
Vous pouvez entrer votre poids actuel de
sorte qu’il apparaisse en livres (lbs) ou en
kilogrammes (kg). Ce nombre permet de
calculer combien de calories vous brûlez
pendant votre activité. Le poids enregistré
ne peut être inférieur à 22 lbs (10 kg) ou
supérieur à 550 lbs (250 kg).
Fréquence
cardiaque
maximale
La valeur de votre fréquence cardiaque
maximale sert de référence pour afficher
votre fréquence cardiaque en termes de
pourcentage du maximum (%). Ce nombre
ne peut être inférieur à 80 ou supérieur à
240 battements par minute (BPM).
Format BPM
Vous pouvez choisir entre l’affichage de
votre fréquence cardiaque en battements
par minute (BPM) ou en pourcentage du
maximum (% OF MAX).
Zone alerte de la
Fréquence
cardiaque
Vous avez également le choix d’activer ou
non une alerte indiquant que vous allez audessus ou en-dessous de votre zone cible
de fréquence cardiaque sélectionnée.
W248_NA_FC.qxp 8/5/08 10:08 AM Page 122
Page 66

Lorsque la montre arrive à l’heure programmée, l’alarme sonore se
déclenche et la veilleuse INDIGLO®clignote pendant 20 secondes. Pour
vous aider à identifier l’alarme qui a sonné, chaque alarme à une mélodie
unique.
Pour régler l’alarme
1. Appuyer sur MODE jusqu’à ce que le mode Alarme 1, 2 ou 3 s’affiche.
2. Appuyer sur STOP/RESET/SET jusqu’à ce que ALARM SET (RÉGLAGE
DE L’ALARME) et SET (RÉGLAGE) s’affichent brièvement suivis par
l’heure avec la valeur des heures qui clignote.
3. Appuyer sur START/SPLIT (+) pour augmenter la valeur de l’heure ou
sur HEART RATE (-) pour la diminuer.
REMARQUE : Pour changer rapidement la valeur réglée, appuyer et
maintenir enfoncé START/SPLIT (+) ou HEART RATE.
4. Appuyer sur MODE (NEXT) pour se déplacer vers la valeur des minutes.
5. Appuyer sur START/SPLIT (+) pour augmenter la valeur des minutes ou
HEART RATE (-) pour la diminuer.
6. Appuyer sur MODE (NEXT) pour aller sur la valeur AM/PM
(matin/après-midi) (si vous avez réglé la montre au format 12 heures).
7. Appuyer sur START/SPLIT (+) ou sur HEART RATE (-) pour alterner
entre AM (matin) et PM (après-midi).
125
Alarme 1, 2 ou 3
Vous pouvez utiliser votre montre comme un réveil avec trois alarmes
différentes qui fonctionnent sur différents modes. Vous pouvez régler une
alarme pour qu’elle se déclenche à la même heure chaque jour ou
uniquement les jours de semaine, le week-end ou même une seule fois
dans la semaine.
124
START/SPLIT
Appuyer pour augmenter ou
alterner entre les valeurs
réglées ou ACTIVER ou
DÉSACTIVER l’alarme.
STOP/RESET/SET
Appuyer pour démarrer
ou pour achever le
processus de réglage.
HEART RATE
Appuyer pour diminuer
ou pour alterner entre
les valeurs réglées.
MODE
Appuyer pour changer
de mode, de chiffre ou de
réglage de groupe.
BOUTON INDIGLO
®®
Appuyer pour éclairer la
montre, activer ou
désactiver la fonction NightMode
®
(mode Nuit).
W248_NA_FC.qxp 8/5/08 10:08 AM Page 124
Page 67

O Lorsque l’alarme retentit, vous pouvez l’éteindre en appuyant sur
n’importe quel bouton de la montre.
O L’alarme une fois par semaine (exemple : MON, TUE, WED... [LUN,
MAR, MER...]) est particulièrement utile pour vous rappeler un
rendez-vous.
O Si vous ne coupez pas l’alarme avant la fin de l’alerte, une alarme de
rappel se déclenchera au bout de 5 minutes.
Synchro
Ce mode vous permet de transférer vos données de séance d’exercices
sur le logiciel Timex® Trainer quand vous utilisez le Data Xchanger à USB
de Timex® .
127
8. Appuyer sur MODE (NEXT) pour se déplacer vers la valeur du type de
l’alarme.
9. Appuyer sur START/SPLIT (+) ou sur HEART RATE (-) pour se déplacer
dans les types d’alarmes. Les types d’alarmes sont :
O DAILY (QUOTIDIENNE) sonne tous les jours à une heure spécifique
O WEEKDAYS (JOURS DE LA SEMAINE) sonne du lundi au vendredi à la
même heure
O WEEKENDS (FIN DE SEMAINE) sonne le samedi et le dimanche à la
même heure ou
O L’alarme une fois par semaine (exemple : MON, TUE, WED... [LUN,
MAR, MER...]) sonne un jour spécifique à une heure déterminée.
10. Appuyer sur STOP/RESET/SET (DONE) pour enregistrer vos
modifications et sortir du processus de réglage.
Remarques et conseils pratiques pour le Mode Alarme
O Pour ACTIVER ou DÉSACTIVER une alarme sans accéder au mode de
réglage, appuyer sur START/SPLIT en mode Alarme.
O Notez que lorsque vous modifiez les réglages d’une alarme, celle-ci est
automatiquement activée.
O Lorsque vous réglez l’alarme, l’icône du réveil a s’affiche dans le
mode Heure du jour.
126
START/SPLIT
Appuyer pour annuler la
recherche pour une
synchronisation avec un PC une
fois que le processus a
commencé.
STOP/RESET/SET
Appuyer pour annuler
la recherche pour une
synchronisation avec
un PC une fois que le
processus a
commencé.
HEART RATE
Appuyer pour
permettre au
récepteur de
commencer à
chercher un PC.
MODE
Appuyer pour passer
au mode suivant.
BOUTON INDIGLO
®®
Appuyer pour éclairer la
montre, activer ou
désactiver la fonction
Night-Mode
®
(mode Nuit).
W248_NA_FC.qxp 8/5/08 10:08 AM Page 126
Page 68

Messages d’erreur pour la synchro
Si une erreur se passe durant le processus de communication, la montre
crée une alerte et affiche brièvement un message d’erreur avant de
retourner à l’état READY (PRÊT). Vous trouverez ci-dessous une liste
d’erreurs et quelques suggestions pour y remédier.
HARDWARE ERROR (ERREUR AU NIVEAU DU MATERIEL) : Ce
message apparaît s’il y a un problème interne au niveau de l’émetteurrécepteur radio de la montre. Contactez le Service clientèle de Timex.
SYNC ERROR (ERREUR DE SYNCHRONISATION) : Ce message
indique qu’il y a un problème au niveau de la communication. Ceci est
dû le plus souvent à une interférence avec un appareil sans fil tel
qu’un téléphone, un clavier, une souris ou un accessoire bluetooth.
LINK TO PC BUSY (LIEN VERS LE PC OCCUPÉ) : Ce message s’affiche
si le PC est déjà connecté à une autre montre Timex. Si vous avez ce
message régulièrement et que vous êtes certain qu’il n’y a pas
d’autres montres Timex à moins de 6 m de votre PC, contactez le
Service clientèle de Timex.
NO PC FOUND (PAS DE PC TROUVÉ) : Ce message s’affiche si la
montre ne peut pas établir de communication avec votre PC dans les
30 secondes. Assurez-vous que le logiciel fonctionne et que le Data
Xchanger est branché à votre ordinateur par un port USB qui marche.
Vous pouvez aussi essayer d’enlever le Data Xchanger et de le
rebrancher à nouveau avant de tester le processus de synchronisation.
128 129
REMARQUE : Une fois que vous avez initialisé le processus de
synchronisation, vous pouvez appuyer sur n’importe quel bouton pour
l’annuler. SYNC CANCEL (ANNULATION SYNCHRO) s’affiche. La montre
bipe, le récepteur s’arrête et la montre retourne à l’étape SYNC READY
(SYNCHRONISATION PRÊTE).
Pour synchroniser la montre avec un PC
1. S’assurer que le périphérique USB Data Xchanger est branché à votre
ordinateur et que le logiciel Timex Trainer®fonctionne.
2. Appuyer sur MODE jusqu’à afficher le mode Sync (Synchro).
3. Le message SYNC READY (SYNCHRO PRÊTE) s’affiche indiquant que la
montre est prête à initialiser une transmission avec un PC.
4. Appuyer sur HEART RATE pour commencer le processus.
5. La montre arrête et remet à zéro toutes ses activités et commence à
chercher le PC. Le message SEARCHING FOR PC (RECHERCHE DU PC)
s’affiche.
6. Brancher le périphérique USB à l’ordinateur et ouvrir le logiciel.
7. Quand le lien est établi avec le PC, la montre affiche SYNCING WATCH
(SYNCHRONISATION DE LA MONTRE) jusqu’à ce que le processus de
synchronisation soit terminé et que SYNCING DONE
(SYNCHRONISATION FAITE) s’affiche sur la montre. Une alarme sonore
se déclenche et la montre retourne à l’état SYNC READY
(SYNCHRONISATION PRÊTE).
W248_NA_FC.qxp 8/5/08 10:08 AM Page 128
Page 69

ATTENTION : POUR PRÉSERVER L’ÉTANCHÉITÉ, NE PAS ENFONCER LES
BOUTONS SOUS L’EAU.
Entretien de la sangle de l’émetteur du
cardiofréquencemètre
Rincer à l’eau claire le cardiofréquencemètre et la sangle de poitrine pour
éviter l’accumulation de matières susceptible d’entraver la mesure de
fréquence cardiaque.
Durée de vie et changement de la pile de l’émetteur
La durée de vie de la pile de l’émetteur devrait dépasser deux ans, en se
basant sur une utilisation d’une heure par jour. Un usage plus intense
raccourcira la durée de service de la pile. Changez la pile de l’émetteur
dans l’un quelconque des cas suivants :
• La montre ne reçoit plus de données de fréquence cardiaque alors que
l’émetteur est porté correctement sur la poitrine.
• Des messages d’erreur (COMM ERR, SIGNAL LOST) (ERREUR DE
COMM, SIGNAL PERDU ) s’affichent de plus en plus fréquemment.
Changement de la pile
REMARQUE : Vous devez disposer d’un appareil (une montre, par
exemple) capable d’afficher les données de fréquence cardiaque pour
vérifier que la batterie neuve est posée correctement. À l’aide d’une pièce
131
Soin et entretien
Changement de la pile de montre
Quand la tension de la pile de la montre baisse, l’affichage ou la veilleuse
INDIGLO®faiblit. Cette montre utilise une pile au lithium CR2032.
Pour écarter le risque de dommage permanent de la montre, TIMEX
CONSEILLE FORTEMENT DE FAIRE CHANGER LA PILE PAR UN DÉTAILLANT
OU UN BIJOUTIER.
Veilleuse INDIGLO
®
Appuyer sur le bouton INDIGLO®pour activer la veilleuse. Une technologie
électroluminescente brevetée (brevets américains n° 4.527.096 et
4.775.964) permet d’éclairer la face entière de la montre la nuit et dans
des conditions de faible éclairage.
Étanchéité
O Votre montre étanche à 100 mètres résiste à une pression de 140
p.s.i. soit 965 kPa (équivalent à une immersion de 328 pieds ou 100
mètres sous le niveau de la mer).
O La montre est étanche aussi longtemps que le verre, les boutons et le
boîtier sont intacts.
O Timex recommande de rincer la montre à l’eau douce après tout
contact avec l’eau de mer.
130
W248_NA_FC.qxp 8/5/08 10:08 AM Page 130
Page 70

Étanchéité
Le cardiofréquencemètre résiste à une pression de 140 p.s.i. soit 965 kPa.
ATTENTION : Le cardiofréquencemètre n’affiche pas de fréquence
cardiaque lorsqu’il est utilisé sous l’eau.
Garantie et réparation
Garantie internationale Timex (Garantie limitée États-Unis)
Votre cardiofréquencemètre TIMEX®est garanti contre les défauts de
fabrication par Timex pour une période d’UN AN, à compter de la date
d’achat. Timex Group USA Inc ainsi que ses filiales du monde entier
honoreront cette garantie internationale.
Timex®se réserve le droit de réparer votre cardiofréquencemètre en y
installant des composants neufs ou révisés ou bien de le remplacer par un
modèle identique ou similaire.
IMPORTANT : CETTE GARANTIE NE COUVRE PAS LES DÉFAUTS OU
DOMMAGES DE VOTRE CARDIOFRÉQUENCEMÈTRE :
1. après l’expiration de la période de garantie ;
2. si le cardiofréquencemètre n’a pas été acheté chez un revendeur
Timex agréé ;
3. si la réparation n’a pas été faite par Timex ;
4. s’il s’agit d’un accident, falsification ou abus ;
133
de monnaie, ouvrir le couvercle du logement de la pile (au dos de
l’émetteur).
• Introduire une pile neuve (CR2032 ou équivalent) avec le “ + ” vers
vous.
• Enfoncer le bouton de réinitialisation à côté de la pile avec un curedent ou un trombone déplié.
• Remettre le couvercle en place.
• Effectuer un essai rapide de l’appareil :
1. S’éloigner des sources de brouillage électrique ou radio.
2. Humecter généreusement les coussinets du cardiofréquencemètre et
poser la sangle sur la poitrine, bien appuyée contre la peau.
3. Activer la fonction de contrôle de fréquence cardiaque sur la montre.
4. Au bout de quelques secondes, le symbole du cœur doit commencer à
clignoter sur l’écran pour indiquer que l’émetteur est activé. Ceci
confirme que la pile est correctement installée. REMARQUE : La valeur
de la fréquence cardiaque ne doit pas nécessairement s’afficher
durant cet essai.
SI LE CŒUR CLIGNOTANT NE S’AFFICHE PAS SUR LA MONTRE :
• Appuyer de nouveau sur le bouton de réinitialisation dans le logement
de la pile et remettre le couvercle en place.
• Remettre la pile en place et répéter la procédure de l’essai ci-dessus.
132
W248_NA_FC.qxp 8/5/08 10:08 AM Page 132
Page 71

frais d’envoi et de manutention. N’INCLUEZ JAMAIS D’ARTICLES DE
VALEUR PERSONNELLE DANS VOTRE ENVOI.
Aux É.-U. veuillez composer le 1-800-328-2677 pour plus de
renseignements sur la garantie. Au Canada, composer le 1-800-263-0981.
Au Brésil, composer le +55 (11) 5572 9733. Au Mexique, composer le
01-800-01-060-00. Pour l’Amérique centrale, les Caraïbes, les Bermudes
et les Bahamas, composer le (501) 370-5775 (É.-U.). En Asie, composer le
852-2815-0091. Au R.U., composer le 44 208 687 9620. Au Portugal,
composer le 351 212 946 017. En France, composer le 33 3 81 63 42 00.
En Allemagne, composer le 49 7 231 494140.Au Moyen-Orient et en
Afrique, composer le 971-4-310850. Dans les autres régions, veuillez
contacter votre détaillant ou distributeur Timex pour des renseignements
sur la garantie. Au Canada, aux É.-U. et en certains autres endroits, les
détaillants Timex participants peuvent vous faire parvenir un emballage
pré-adressé et pré-affranchi pour vous faciliter l’envoi du
cardiofréquencemètre à l’atelier de réparation.
Réparation
Si votre cardiofréquencemètre Timex®doit être réparé, envoyez-le à Timex
conformément aux dispositions de la Garantie internationale Timex ou
adressez-le à :
HOTLINE WATCH SERVICE, P.O. Box 2740, Little Rock, AR 72203 USA.
Pour toute question concernant les réparations, appelez le
1-800-328-2677.
135
5. s’il s’agit du verre ou cristal, du bracelet ou brassard, du boîtier, des
accessoires ou de la pile. Le remplacement de ces pièces peut vous
être facturé par Timex.
CETTE GARANTIE AINSI QUE LES RECOURS PRÉVUS DANS LES PRÉSENTES
SONT EXCLUSIFS ET REMPLACENT TOUTE AUTRE GARANTIE EXPRESSE OU
IMPLICITE, Y COMPRIS TOUTE GARANTIE IMPLICITE DE QUALITÉ
MARCHANDE ET D’ADAPTATION À UN USAGE PARTICULIER.
TIMEX N’EST RESPONSABLE D’AUCUN DOMMAGE PARTICULIER,
ACCESSOIRE OU INDIRECT. Certains pays ou états n’autorisent pas les
limitations de garanties implicites et n’autorisent pas les exclusions ou
limitations pour des dommages, auquel cas lesdites limitations pourraient
ne pas vous concerner. Les modalités de la présente garantie vous
donnent des droits légaux précis et vous pouvez également vous prévaloir
d’autres droits qui varient d’un pays ou d’un états à un autre.
Pour faire jouer votre garantie, veuillez retourner votre
cardiofréquencemètre à Timex, à une de ses filiales ou au détaillant Timex
où le cardiofréquencemètre a été acheté, avec le bon de réparation
original, ou, pour les États-Unis et le Canada seulement, le bon de
réparation original dûment rempli ou une feuille mentionnant vos nom,
adresse, N° de téléphone, date et lieu de l’achat.Veuillez inclure la somme
suivante avec votre cardiofréquencemètre pour couvrir les frais d’envoi et
de manutention (ce ne sont pas des frais de réparation) : un chèque ou
mandat de 8,00 $ US. aux États-Unis, de 7,00 $ CAN au Canada et de
2,50 £ au Royaume-Uni. Dans les autres pays, Timex vous facturera les
134
W248_NA_FC.qxp 8/5/08 10:08 AM Page 134
Page 72

CECI EST VOTRE COUPON DE RÉPARATION.
CONSERVEZ-LE DANS UN ENDROIT SÛR.
137
Pour vous faciliter l’envoi du produit à l’atelier de réparation, les détaillants
Timex participants peuvent vous faire parvenir un emballage pré-adressé
pour la réparation du cardiofréquencemètre.
Reportez-vous aux instructions particulières d’entretien et de réparation de
la Garantie internationale de votre cardiofréquencemètre Timex®.
Si vous souhaitez remplacer le bracelet, appelez le 1-800-328-2677.
136
GARANTIE INTERNATIONALE TIMEX COUPON DE RÉPARATION
Date d’achat initiale :
(Joindre si possible une copie du reçu)
Acheté par :
(Nom, adresse et numéro de téléphone)
Lieu d’achat :
(Nom et adresse)
Raison du renvoi :
W248_NA_FC.qxp 8/5/08 10:08 AM Page 136
Page 73

— Réorienter ou déplacer l’antenne de réception.
— Augmenter la distance séparant l’équipement et le récepteur.
— Brancher l’équipement sur une prise d’un circuit différent de celui sur
lequel est branché le récepteur.
— Consulter le revendeur ou un réparateur de radio et télévision
expérimenté.
Cet appareil numérique de la classe B est conforme à la norme NMB-003
du Canada.
139
Avis FCC (États-Unis) / Avis IC (Canada) :
Cet appareil est conforme à la Partie 15 des règles de la FCC. L’utilisation
est sujette aux deux conditions suivantes : (1) ce dispositif ne doit pas
causer de brouillage nuisible et (2) ce dispositif doit accepter tout
brouillage reçu, y compris tout brouillage susceptible de causer un
fonctionnement indésirable.
Avertissement : Les changements ou modifications non expressément
autorisés par la partie responsable de la conformité réglementaire peuvent
entraîner l’annulation du droit d’utilisation de ce matériel.
REMARQUE : Cet équipement a été vérifié et déclaré conforme aux limites
fixées pour un appareil numérique de classe B, en vertu de la Partie 15 du
règlement de la FCC. Ces limites servent à assurer une protection
raisonnable contre le brouillage préjudiciable dans une installation
résidentielle. Cet équipement produit, utilise et peut rayonner de l’énergie
radiofréquence et, s’il n’est pas utilisé conformément aux instructions,
peut causer un brouillage préjudiciable aux communications radio. Il n’est
toutefois pas garanti qu’aucun brouillage ne se produira pour une
installation particulière. Si cet équipement cause un brouillage
préjudiciable à la réception radio ou télévisuelle, ce qui peut être
déterminé en éteignant l’équipement et en le rallumant, l’utilisateur est
invité à tenter d’éliminer le brouillage par l’une ou plusieurs des méthodes
suivantes :
138
W248_NA_FC.qxp 8/5/08 10:08 AM Page 138
Page 74

Índice de contenidos
Descripción general . . . . . . . . . . . . . . . . . . . . . . . . . . . . . . . . . . . . .145
Nuevas características . . . . . . . . . . . . . . . . . . . . . . . . . . . . . . . . .145
Un corazón en forma . . . . . . . . . . . . . . . . . . . . . . . . . . . . . . . . . .146
Botones del reloj . . . . . . . . . . . . . . . . . . . . . . . . . . . . . . . . . . . . .148
Luz nocturna INDIGLO
®
con función Night-Mode® . . . . . . . . . . . .149
Símbolos en la pantalla . . . . . . . . . . . . . . . . . . . . . . . . . . . . . . . .149
Recursos . . . . . . . . . . . . . . . . . . . . . . . . . . . . . . . . . . . . . . . . . . .151
Establecer su zona óptima de ritmo cardíaco . . . . . . . . . . . . . . . .152
Programación y uso del monitor de ritmo cardíaco . . . . . . . . . . . .153
Preparación del monitor de ritmo cardíaco para su primer uso . .154
Para usar su monitor de ritmo cardíaco . . . . . . . . . . . . . . . . . . .155
Mensaje NO HRM DATA . . . . . . . . . . . . . . . . . . . . . . . . . . . . . . . .157
Hora del Día . . . . . . . . . . . . . . . . . . . . . . . . . . . . . . . . . . . . . . . . . . . .158
Para programar o ajustar la hora, fecha y señales audibles . . . . .159
Para cambiar las zonas horarias . . . . . . . . . . . . . . . . . . . . . . . . .161
Datos sobre ritmo cardíaco al usar el modo Hora del Día . . . . . . .162
Sugerencias y notas para la Hora del Día . . . . . . . . . . . . . . . . . . .162
Ejemplo de Hora del Día . . . . . . . . . . . . . . . . . . . . . . . . . . . . . . . .163
W248_NA_SL.qxp 8/5/08 10:18 AM Page 140
Page 75

Revisión . . . . . . . . . . . . . . . . . . . . . . . . . . . . . . . . . . . . . . . . . . . . . . .185
Sobre el modo Revisión . . . . . . . . . . . . . . . . . . . . . . . . . . . . . . . .185
Para revisar los datos de un ejercicio . . . . . . . . . . . . . . . . . . . . . .186
Datos sobre el modo Revisión . . . . . . . . . . . . . . . . . . . . . . . . . . .187
Programación del monitor de ritmo cardíaco . . . . . . . . . . . . . . . . .190
Acoplamiento de dispositivos . . . . . . . . . . . . . . . . . . . . . . . . . . . .190
Selección de una meta de zona de ritmo cardíaco . . . . . . . . . . .192
Para establecer manualmente una meta de zona
de ritmo cardíaco . . . . . . . . . . . . . . . . . . . . . . . . . . . . . . . . . .193
Para introducir sus datos personales . . . . . . . . . . . . . . . . . . . . . .195
Sugerencias y trucos del modo Programación del monitor
de ritmo cardíaco . . . . . . . . . . . . . . . . . . . . . . . . . . . . . . . . . . .198
Alarma 1, 2 o 3 . . . . . . . . . . . . . . . . . . . . . . . . . . . . . . . . . . . . . . . . .199
Para programar la alarma . . . . . . . . . . . . . . . . . . . . . . . . . . . . . .200
Sugerencias y trucos del modo Alarma . . . . . . . . . . . . . . . . . . . .201
Modo Sincronización . . . . . . . . . . . . . . . . . . . . . . . . . . . . . . . . . . . . .202
Para sincronizar el reloj con un PC . . . . . . . . . . . . . . . . . . . . . . . .203
Mensajes de error durante la sincronización . . . . . . . . . . . . . . . .204
Cronógrafo . . . . . . . . . . . . . . . . . . . . . . . . . . . . . . . . . . . . . . . . . . . . .164
Terminología del cronógrafo . . . . . . . . . . . . . . . . . . . . . . . . . . . . .164
Para operar el cronógrafo . . . . . . . . . . . . . . . . . . . . . . . . . . . . . . .165
Datos de ritmo cardíaco utilizando el modo Cronógrafo . . . . . . . .166
Formato de la pantalla del cronógrafo . . . . . . . . . . . . . . . . . . . . .167
Sugerencias y trucos del modo Cronógrafo . . . . . . . . . . . . . . . . .168
Ejemplo del modo Cronógrafo . . . . . . . . . . . . . . . . . . . . . . . . . . .168
Intervalo . . . . . . . . . . . . . . . . . . . . . . . . . . . . . . . . . . . . . . . . . . . . . .169
Terminología de intervalos . . . . . . . . . . . . . . . . . . . . . . . . . . . . . .169
Para programar o ajustar intervalos . . . . . . . . . . . . . . . . . . . . . . .170
Para operar el temporizador de intervalos . . . . . . . . . . . . . . . . . .173
Datos de ritmo cardíaco utilizando el modo Intervalo . . . . . . . . . .173
Sugerencias y trucos del modo Intervalo . . . . . . . . . . . . . . . . . . .174
Ejemplo del modo Intervalo . . . . . . . . . . . . . . . . . . . . . . . . . . . . .176
Temporizador . . . . . . . . . . . . . . . . . . . . . . . . . . . . . . . . . . . . . . . . . . .177
Para ajustar el temporizador . . . . . . . . . . . . . . . . . . . . . . . . . . . .177
Para operar el temporizador . . . . . . . . . . . . . . . . . . . . . . . . . . . . .179
Sugerencias y trucos del modo Temporizador . . . . . . . . . . . . . . .180
Ejemplo del modo Temporizador . . . . . . . . . . . . . . . . . . . . . . . . . .181
Recuperación . . . . . . . . . . . . . . . . . . . . . . . . . . . . . . . . . . . . . . . . . . .181
Acerca del ritmo cardíaco de recuperación . . . . . . . . . . . . . . . . .181
Para determinar manualmente un ritmo cardíaco
de recuperación . . . . . . . . . . . . . . . . . . . . . . . . . . . . . . . . . . . .183
W248_NA_SL.qxp 8/5/08 10:18 AM Page 142
Page 76

145
Descripción general
¡Enhorabuena!
El monitor digital de ritmo cardíaco Ironman®Triathlon®es como contratar
a un entrenador personal. Esta herramienta de alta tecnología está
diseñada para que atletas exigentes como usted puedan medir su
progreso en relación con sus metas de ejercicio, y le ofrece la capacidad
de realizar el seguimiento, guardar y analizar los indicadores clave de su
condición física personal para hasta 50 vueltas.
Comprobará que su monitor de ritmo cardíaco es una herramienta para
su condición física fácil de utilizar. Pero, como con cualquier dispositivo
nuevo, usted debe dedicarle tiempo para familiarizarse con sus
componentes y sacarle el máximo partido.
Por lo tanto, explore las características y funciones del monitor de ritmo
cardíaco para comprender las funciones básicas de esta herramienta para
su condición física. Pero sobre todo, ¡disfrute de su nuevo compañero
para estar más en forma!
Nuevas características
El monitor digital de ritmo cardíaco Ironman®Triathlon®tiene una
memoria de 10 tiempos de vuelta que almacena datos sobre el tiempo
transcurrido y su frecuencia cardíaca cuando usted utiliza su cronógrafo o
temporizador de intervalos. Lo que hace que este temporizador de
Cuidado y mantenimiento . . . . . . . . . . . . . . . . . . . . . . . . . . . . . . . . .205
Reemplazo de la pila del reloj . . . . . . . . . . . . . . . . . . . . . . . . . . .205
Luz nocturna INDIGLO
®
. . . . . . . . . . . . . . . . . . . . . . . . . . . . . . . .205
Resistencia al agua . . . . . . . . . . . . . . . . . . . . . . . . . . . . . . . . . . .205
Mantenimiento de la banda del sensor de ritmo cardíaco . . . . . . .206
Vida útil de la pila del transmisor y reemplazo . . . . . . . . . . . . . . .206
Reemplazo de la pila . . . . . . . . . . . . . . . . . . . . . . . . . . . . . . . . . .206
Garantía y servicio de reparación . . . . . . . . . . . . . . . . . . . . . . . . . .208
Garantía . . . . . . . . . . . . . . . . . . . . . . . . . . . . . . . . . . . . . . . . . . .208
Servicio de reparación . . . . . . . . . . . . . . . . . . . . . . . . . . . . . . . . .21`1
W248_NA_SL.qxp 8/5/08 10:18 AM Page 144
Page 77

147146
O
Hacer ejercicio al ritmo cardíaco apropiado.
El ritmo cardíaco representa el efecto del ejercicio en todas las partes del
cuerpo. La selección de la zona apropiada de ritmo cardíaco condiciona al
corazón, pulmones y músculos a ejercitarse a niveles óptimos para
obtener y mantener un cuerpo en forma.
Su monitor de ritmo cardíaco puede mostrarle cuándo usted se halla en la
zona de ejercicio seleccionada o cuándo no lo está. Puede ayudarle a
mantener el ejercicio a un nivel de intensidad que le permita lograr las
metas de condición física deseadas, sin ejercitar demasiado o demasiado
poco.
ADVERTENCIA:
Éste no es un aparato médico y no se recomienda que lo utilicen personas con
afecciones cardíacas graves. Siempre consulte con un doctor antes de iniciar
cualquier programa de ejercicios.
La transmisión adecuada de los datos sobre el ritmo cardíaco puede verse
entorpecida por las interferencias de señales de radio, contacto insuficiente entre
su piel y el sensor digital de ritmo cardíaco, u otros factores.
intervalos sea diferente a todos los demás es que cada uno de los
segmentos vinculados se puede ajustar para el ritmo cardíaco y la
duración, de manera que su ejercicio pueda incorporar una guía de
entrenamiento basada en tiempo y esfuerzo - justo como su tuviera un
entrenador personal en su muñeca.
Además de las características estándar de un monitor de ritmo cardíaco,
su monitor digital de ritmo cardíaco Ironman®Triathlon®le permite
bloquear uno o más ejercicios para reducir la posibilidad de que se borren
accidentalmente.
El reloj también tiene un enlace opcional para comunicación inalámbrica
de dos vías. Con la comunicación inalámbrica de dos vías, usted puede
introducir en su PC/Mac datos provenientes de su reloj, o puede descargar
parámetros programados de su PC/Mac para introducirlos en su reloj. La
radio del enlace posibilita una comunicación digital inalámbrica sin ningún
problema, conexiones fiables, y la transmisión de datos entre el reloj y
otros dispositivos deportivos ANT+.
Un corazón en forma
Hallazgos recientes sobre el estado físico indican que cualquier persona
puede ponerse y permanecer en forma sin realizar excesos. Puede ser tan
sencillo como:
O Hacer ejercicio de 3 a 4 veces por semana.
O Hacer ejercicio de 30 a 45 minutos durante cada sesión.
W248_NA_SL.qxp 8/5/08 10:18 AM Page 146
Page 78

149148
Luz nocturna INDIGLO®con función Night-Mode
®
En cualquier modo del reloj, al pulsar el botón INDIGLO®se activa la luz
nocturna INDIGLO®y se ilumina la esfera del reloj mientras se pulsa el
botón. Mantenga presionado el botón INDIGLO®hasta oír un pitido para
activar la función Night-Mode®.
Cuando la función Night-Mode®está activada, al pulsar cualquier botón la
esfera del reloj se iluminará durante tres a seis segundos. La función
Night-Mode®permanecerá activa durante siete a ocho horas tras su
activación. Para desactivarla antes de que haya transcurrido el periodo de
tiempo de ocho horas, mantenga pulsado el botón INDIGLO®hasta oír un
pitido.
Símbolos en la pantalla
g El símbolo del corazón indica que el sensor de ritmo cardíaco está
funcionando.
W El símbolo del cronómetro indica que el reloj está midiendo su
ejercicio en modo Cronógrafo.
H El símbolo del reloj de arena indica que el reloj está midiendo su
ejercicio en modo Temporizador o Intervalo.
J El símbolo de repetición indica que usted ha programado el
temporizador para volver a empezar al final de un ciclo de cuenta
atrás en el modo Temporizador o Intervalo.
Botones del reloj
NOTA: El uso específico de estos botones varía según el modo. Consulte
cada modo para obtener más información sobre cómo usar los botones
del reloj.
START/SPLIT
STOP/RESET/SET
HEART RATE
MODE
BOTÓN
INDIGLO
®
W248_NA_SL.qxp 8/5/08 10:18 AM Page 148
Page 79

151150
Recursos
Recursos impresos
Además de este manual, su monitor de ritmo cardíaco incluye estos
valiosos recursos:
O Heart Zones
®
Tools for Success (Recursos para triunfar en zonas
de ritmo cardíaco, sólo para clientes en EE.UU.): Información para
usar su monitor de ritmo cardíaco junto con el programa de
condicionamiento físico Heart Zones®Training System (Sistema de
entrenamiento en zonas cardíacas), diseñado para ayudarle a
aumentar la fortaleza y resistencia de su corazón.
Recursos en Internet
Los sitios web de Timex ofrecen información útil para ayudarle a optimizar
su monitor de ritmo cardíaco.
O Registre su producto en www.timextrainer.com.
O Visite www.timextrainer.com para ver más productos Timex
®
para
una buena salud y forma física, relojes deportivos Timex®,e
información sobre entrenamiento.
a El símbolo del reloj de alarma indica que usted ha programado la
alarma para avisarle en un momento determinado.
q El símbolo del altavoz aparece cuando usted ha programado el reloj
para que le alerte cuando usted esté por encima o por debajo de su
zona especificada de ritmo cardíaco durante un ejercicio.
5 El símbolo de la antena aparece cuando el reloj está sincronizado con
el sensor de ritmo cardíaco.
l El símbolo del candado aparece cuando usted ha bloqueado un
ejercicio para no borrarlo al guardar otro ejercicio.
e El símbolo del reloj de arena con el corazón aparece cuando el reloj
está cronometrando una recuperación.
k La media luna aparece cuando usted activa la luz nocturna INDIGLO
®
con la función Night-Mode®.
W248_NA_SL.qxp 8/5/08 10:18 AM Page 150
Page 80

153152
procedimientos excelentes y Timex le recomienda que use una de estas
metodologías.
Quizá usted desee utilizar el método según la edad, recomendado oficialmente.
Comience con el número 220 y luego reste su edad. Por ejemplo, una
mujer de 35 años empezaría con 220 y restaría 35 (su edad), lo que le
daría un ritmo cardíaco estimado de 185. Una vez conocido el ritmo
cardíaco máximo, se pueden introducir en el modo Programación del
monitor y el reloj automáticamente ajusta sus zonas, como se describe en
la tabla de la página anterior.
Programación y uso del monitor
de ritmo cardíaco
Los modos cronógrafo y temporizador de intervalos recogen los datos
sobre el ritmo cardíaco y guardan estadísticas detalladas sobre un
ejercicio. El monitor de ritmo cardíaco puede almacenar información para
hasta 10 ejercicios.
NOTA: El reloj recogerá datos sobre el ritmo cardíaco sin que el cronógrafo
o el temporizador de intervalos estén funcionando. Esta información no
estará disponible en el modo Revisión, pero se puede enviar desde el reloj
al PC/Mac (se requiere un dispositivo USB Timex®Data Xchanger). Si usted
tiene un dispositivo USB opcional, puede pasar los datos sobre su ejercicio
a un PC/Mac para guardarlos y verlos. Cuando el reloj puede guardar
menos de cinco horas, o sólo tres sesiones más, de datos sobre el ritmo
Establecer su zona óptima de ritmo cardíaco
Hay cinco zonas básicas de ritmo cardíaco previsto, según se describe en
la tabla anterior. Simplemente seleccione una zona que corresponda a su
porcentaje de ritmo cardíaco máximo (%) según la meta física que desee
alcanzar durante un ejercicio específico.
Antes de programar su zona, primero necesita determinar su ritmo
cardíaco máximo. Puede usar muchos métodos para calcular el ritmo
cardíaco máximo.
El folleto
Heart Zones®Tools For Success
(Recursos para triunfar en zonas
de ritmo cardíaco) incluido en la caja de monitor personal de ritmo
cardíaco (solamente para clientes en los Estados Unidos) proporciona
Zona % Objetivo Beneficio
1 50% al 60% Ejercicio ligero
Mantenga un corazón sano y
póngase en forma
2 60% al 70% Control del peso Pierda peso y queme grasas
3 70% al 80%
Constitución de una
base aeróbica
Aumente su nivel de energía y
su resistencia aeróbica
4 80% al 90% Preparación óptima
Mantenga una excelente
condición física
5 90% al 100%
Entrenamiento atlético
de élite
Consiga una magnífica
condición atlética
W248_NA_SL.qxp 8/5/08 10:18 AM Page 152
Page 81

155154
O
Ajuste de la Hora del Día: El monitor de ritmo cardíaco utiliza el
tiempo ajustado en el reloj para grabar datos. Para asegurarse de que
usted está grabando datos con la hora correcta, ajuste el reloj en su
hora local en el modo Hora del Día. Para más información sobre el
modo Hora del Día consultar las páginas 158 a 160.
O Introducción de sus datos personales: Antes de utilizar su reloj es
importante que introduzca su peso y ritmo cardíaco máximo en el
modo Programación. Esto le ayudará ajustar su monitor de ritmo
cardíaco a sus parámetros personales. Para información sobre el modo
Programación, consultar las páginas 195 a 197.
Para usar su monitor de ritmo cardíaco
1. Moje las almohadillas del sensor de ritmo cardíaco.
2. Centre el sensor sobre el pecho con el logotipo de
Timex®que se vea de frente, y ajústelo con firmeza
exactamente debajo del esternón.
3. Pulse el botón MODE hasta que aparezca el modo
deseado. En los modos Hora del Día, Cronógrafo,
Temporizador de Intervalos o Temporizador, usted
puede ver información sobre su ritmo cardíaco.
4. Presione el botón HEART RATE del reloj. Aparecerá el símbolo de la
antena en pantalla, que indica que el reloj está buscando la señal del
sensor de ritmo cardíaco. Cuando el reloj empieza a recibir la señal, el
símbolo de un corazón palpitando aparecerá en pantalla. En ciertos
cardíaco, el reloj indicará el mensaje MEMORY LOW. Cuando el reloj haya
alcanzado sus límites de capacidad de almacenamiento, la pantalla
mostrará MEMORY FULL.
Cuando el reloj no se usa con un PC/Mac estos mensajes se omiten. A no
ser que usted bloquee un ejercicio, automáticamente grabará encima de
ejercicios anteriores una vez que haya alcanzado el límite de 10 ejercicios.
Preparación del monitor de ritmo cardíaco para su primer uso
Una vez haya establecido cuáles son sus metas de ejercicio y su ritmo
cardíaco, Timex le recomienda que acople su reloj con el sensor de ritmo
cardíaco, ajuste el tiempo y realice los ajustes de otros datos importantes
en el modo Programación del monitor de ritmo cardíaco antes de empezar
a utilizarlo.
Nota: Para obtener los mejores resultados, Timex recomienda que lave su
sensor de ritmo cardíaco utilizando agua con jabón para limpiar cualquier
residuo de aceite de fabricación antes de utilizarlo por primera vez.
O Acoplamiento del reloj con el sensor de ritmo cardíaco: Timex le
recomienda que acople el sensor de ritmo cardíaco y el reloj para
reducir al mínimo la posibilidad de que su sensor capte la señal del
ritmo cardíaco de otra persona. Para acoplar con precisión el reloj y el
sensor de ritmo cardíaco, vaya inmediatamente al modo Programación
del monitor antes de detenerse en o utilizar cualquier otro modo. Para
más información sobre el acoplamiento, ver las páginas 190 a 192.
W248_NA_SL.qxp 8/5/08 10:18 AM Page 154
Page 82

157156
Mensaje NO HRM DATA
Si el reloj no recibe información del ritmo cardíaco, puede que usted
reciba el mensaje NO HRM DATA en la pantalla del reloj. Intente lo
siguiente:
O Acorte la distancia entre el reloj y el sensor cardíaco.
O Ajuste la colocación del sensor cardíaco y la banda elástica del pecho.
O Asegúrese que las almohadillas del sensor cardíaco estén húmedas o
use un gel conductivo.
O Revise la pila del sensor cardíaco y cámbiela si es necesario.
O Aléjese de otros monitores de ritmo cardíaco u otras fuentes de
interferencia de radio o eléctrica.
modos, el reloj buscará automáticamente un sensor de ritmo cardíaco
cuando usted introduzca el modo.
NOTA: El reloj registra automáticamente el ritmo cardíaco y otros datos
estadísticos acerca de su actividad (disponibles en modo Revisión)
cuando funciona en modo Cronógrafo o Temporizador de Intervalos.
5. Pulse el botón START/SPLIT cuando comience su ejercicio.
6. Si el reloj está programado para avisarle cuando pasa por encima
o por debajo de la zona de ritmo cardíaco seleccionada mantenga
pulsado el botón HEART RATE para apagar la alerta sonora. Si no,
continuará sonando hasta que regrese a la zona deseada. Cuando
anule la alarma sonora, verá el mensaje HOLD FOR ALERT OFF.
A la inversa, cuando active la alarma, verá el mensaje HOLD FOR
ALERT ON.
7. Cuando haya terminado su ejercicio, pulse el botón STOP/RESET/SET
para dejar de grabar datos del ejercicio si está usted utilizando los
modos Cronógrafo o Temporizador de Intervalos.
8. Retire el sensor de ritmo cardíaco de su pecho y el reloj dejará de
grabar más datos del ritmo cardíaco en aproximadamente un minuto.
9. Pulse MODE hasta que vea el modo Revisión. Este modo incluye el
ritmo cardíaco y otros datos estadísticos acerca de sus ejercicios.
Vea las páginas 185 a 187 para más información acerca del
modo Revisión.
W248_NA_SL.qxp 8/5/08 10:18 AM Page 156
Page 83

159158
Para programar o ajustar la hora, fecha y señales audibles
1. Pulse MODE hasta que el modo Hora del Día aparezca y muestre la
hora actual.
2. Mantenga pulsado STOP/RESET/SET hasta que aparezcan brevemente
las palabras HOLD TO SET en pantalla seguidas por SET TIME con el
número 1 o 2 destellando en la esquina inferior derecha.
3. Pulse START/SPLIT (+) o HEART RATE (-) para cambiar entre la zona
horaria primaria (1) o secundaria (2).
4. Pulse MODE (NEXT) para programar la hora de la zona horaria
escogida. En la pantalla aparecerá la hora con el valor de las horas
destellando.
5. Haga los ajustes que desee como se indica en las tablas de las dos
páginas siguientes.
6. Pulse MODE (NEXT) para pasar a la siguiente opción de programación.
7. Pulse STOP/RESET/SET (DONE) para guardar los cambios y salir del
proceso de programación.
Para este reloj, puede hacer los ajustes de Hora del Día descritos en las
tablas que aparecen en las siguientes dos páginas.
NOTA: Para cambiar rápidamente el valor que se está programando,
mantenga pulsado START/SPLIT (+) o HEART RATE (-).
Hora del Día
Su reloj puede funcionar como un reloj convencional para mostrar la hora,
fecha y día para dos diferentes zonas horarias, usando un formato de 12 o
24 horas.
START/SPLIT
Pulse para ver o cambiar las
zonas horarias o para aumentar
o cambiar la programación.
STOP/RESET/SET
Pulse para empezar o
completar el proceso de
programación.
HEART RATE
Pulse para activar el
monitor de ritmo
cardíaco, bajar o cambiar
ajustes, o cambiar lo que
se ve en pantalla.
MODE
Pulse para ir al siguiente
modo, opción de programación, dígito, o grupo.
BOTÓN INDIGLO
®®
Pulse para iluminar el reloj,
activar/desactivar la
función NIGHT-MODE
®
.
W248_NA_SL.qxp 8/5/08 10:19 AM Page 158
Page 84

161160
Para cambiar las zonas horarias
El reloj puede seguir dos zonas horarias (T1 y T2). Para ver la segunda
zona en el modo Hora del Día, pulse START/SPLIT. Destellará T1 o T2 en la
esquina inferior derecha, lo que indica la zona horaria alternativa. Puede
cambiar de T1 a T2 o de T2 a T1 siguiendo estos pasos:
Grupo de
programación
Ajuste
Presentación del
mes y día
Presione START/SPLIT (+) o HEART RATE (-) para alternar las
opciones de presentación del mes y día. Estas opciones
incluyen: Mes Día (MM-DD) o Día Mes (DD.MM). Por
ejemplo, 15 de marzo puede aparecer como 3-15 (MM-DD)
o 15.3 (DD.MM).
Señal acústica
cada hora
Presione START/SPLIT o HEART RATE para alternar entre
señal acústica activada o desactivada. Cuando está activada,
el reloj emitirá un pitido cada hora a la hora en punto.
Pitido de los
botones
Presione START/SPLIT o HEART RATE para alternar entre
pitido de los botones activado o desactivado. Cuando el
pitido de los botones está activo, su reloj emitirá un sonido
cada vez que oprima un botón que no sea el de INDIGLO
®
.
Grupo de
programación
Ajuste
Hora
Pulse START/SPLIT (+) para aumentar el valor de horas o
HEART RATE (-) para disminuirlo.
Minuto
Pulse START/SPLIT (+) para aumentar el valor de minutos o
HEART RATE (-) para disminuirlo.
Segundero
Pulse START/SPLIT (+) o HEART RATE (-) para llevar los
segundos a cero.
Mes
Presione START/SPLIT (+) para adelantar los meses o HEART
RATE (-) para atrasarlos.
Día del Mes
Pulse START/SPLIT (+) para adelantar los días del mes o
HEART RATE (-) para atrasarlos.
Año
Pulse START/SPLIT (+) para aumentar el valor de año o
HEART RATE (-) para disminuirlo.
Hora con formato
de 12 o 24 horas
Presione START/SPLIT (+) o HEART RATE (-) para alternar
entre los formatos de 12 y 24 horas. En el formato de 12
horas los indicadores AM y PM aparecerán también a la
derecha de los segundos en la pantalla de hora.
W248_NA_SL.qxp 8/5/08 10:19 AM Page 160
Page 85

163162
O
En cualquier momento durante el proceso de programación puede
guardar sus cambios y volver a la pantalla principal de hora
presionando STOP/RESET/SET.
O Mientras se programa el reloj, si no se presiona ningún botón en 2 a 3
minutos, éste guardará automáticamente cualquier cambio que usted
haya hecho y terminará el proceso de programación.
O Durante un año bisiesto, el reloj cambiará automáticamente del 28 de
febrero al 29 de febrero. Para otros años, el reloj cambiará del 28 de
febrero al 1 de marzo.
O Las alarmas son activadas por la hora ajustada en el modo Hora
del Día.
Ejemplo de Hora del Día
Suponga que usted vive en San Francisco y trabaja con un cliente en Nueva York.
Como toda persona ocupada, es imperativo que lleve cuenta de la hora, así que
ajuste T1 a su hora local. Pero también es importante tener en cuenta la hora de su
cliente, por lo tanto ajuste T2 a la hora de Nueva York. Con ambas zonas horarias
disponibles, usted puede comprobar rápidamente la hora de su cliente o incluso
cambiar su monitor para mostrar T2 cuando usted viaje a Nueva York.
1. Mantenga pulsado START/SPLIT hasta que T1 o T2 aparezca y destelle.
2. Siga manteniendo pulsado el botón hasta que la hora cambie y el reloj
emita un pitido.
Datos sobre ritmo cardíaco al usar el modo Hora del Día
Al usar el reloj con el sensor de ritmo cardíaco, usted puede cambiar la
pantalla del modo Hora del Día pulsando el botón HEART RATE. Podrá
elegir entre:
1. Ritmo Cardíaco por encima de la Hora del Día
2. Hora del Día por encima del Ritmo Cardíaco
3. Solamente Ritmo Cardíaco; o
4. Hora del Día con Día/Mes/Fecha;
NOTA: Mientras que usted puede ver la información actual sobre el ritmo
cardíaco en el modo Hora del Día, el reloj no está recogiendo ninguno de
los datos que usted puede ver en el modo Revisión.
Sugerencias y notas para la Hora del Día
O Usted puede regresar al modo Hora del Día desde cualquier otro modo
del reloj pulsando MODE hasta que aparezca la hora en pantalla.
O El reloj no cambia automáticamente la hora en verano. Cuando se
cambia entre la hora estándar y la hora de verano, se debe ajustar la
hora manualmente.
W248_NA_SL.qxp 8/5/08 10:19 AM Page 162
Page 86

165164
O
Registrar el tiempo de una vuelta o el tiempo de intervalo: Cuando
usted toma la medida de una vuelta o un intervalo, el cronógrafo
registra el tiempo del segmento actual y automáticamente empieza a
cronometrar el siguiente.
Para operar el cronógrafo:
1. Pulse MODE hasta que CHRONO aparezca.
2. Mantenga pulsado STOP/RESET/SET para guardar los datos del
cronógrafo (si fuera necesario) y reiniciar el cronógrafo.
3. Pulse START/SPLIT para iniciar el cronometraje.
4. Pulse START/SPLIT de nuevo para tomar un tiempo de vuelta/intervalo.
El reloj mostrará el número de vuelta o intervalo y el ritmo cardíaco
promedio durante ese tiempo (de vuelta o intervalo) si se están
recibiendo los datos del sensor de ritmo cardíaco.
5. Pulse MODE para mostrar inmediatamente la información de la nueva
vuelta o intervalo O espere unos pocos segundos y el reloj comenzará
a mostrar automáticamente la información de la nueva vuelta o
intervalo.
6. Pulse STOP/RESET/SET para detener el cronometraje cuando quiera
tomar un descanso o haya llegado al final de su actividad.
NOTA: El temporizador de ritmo cardíaco de recuperación comenzará
automáticamente (durante 30 segundos o 1, 2, 5 o 10 minutos, según
Cronógrafo
El modo Cronógrafo funciona como la central principal de datos de
ejercicios de su reloj. Puede grabar el tiempo transcurrido hasta 100
horas. También puede grabar información de hasta 50 vueltas.
Terminología del cronógrafo
O Cronógrafo: El cronógrafo registra segmentos de tiempo durante toda
su sesión de ejercicio.
O Vuelta: El tiempo de vuelta registra el tiempo o duración de segmentos
individuales de su ejercicio.
O Intervalo: El tiempo de intervalo registra el total del tiempo
transcurrido desde el comienzo de su actual ejercicio.
STOP/RESET/SET
Pulse para detener o
pausar el cronógrafo,
guardar datos del
cronógrafo y borrar datos
del cronógrafo, o
cambiar el formato del
cronógrafo.
HEART RATE
Pulsar cambiar entre
vistas de pantalla
MODE
Pulse para ir al siguiente
modo, o mostrar de inmediato
una nueva vuelta o intervalo.
BOTÓN INDIGLO
®®
Pulse para iluminar el reloj,
activar/desactivar la función
NIGHT-MODE
®
.
START/SPLIT
Pulse para comenzar a medir el
tiempo, medir una vuelta o
intervalo, o continuar midiendo el
tiempo después de una pausa.
W248_NA_SL.qxp 8/5/08 10:19 AM Page 164
Page 87

167166
4. El ritmo cardíaco máximo y mínimo durante todo el tiempo que el
sensor de ritmo cardíaco estuvo funcionando y el cronógrafo estuvo
cronometrando (aparecen como PEAK y MINIMUM en el modo
Revisión);
Formato de la pantalla del cronógrafo
Usted puede ajustar el cronógrafo para que muestre el tiempo de vuelta o
el de intervalo en la línea inferior de la pantalla.
1. Parar o reiniciar el cronógrafo
2. Pulse y suelte el botón STOP/RESET/SET. Usted verá FORMAT en la
pantalla, seguido por SET, y después el ajuste de formato actual.
3. Pulse START/SPLIT (+) para seleccionar el formato que desee.
4. Pulse STOP/RESET/SET (DONE) para guardar su ajuste y volver al
cronógrafo.
Tenga en cuenta que aunque el ajuste de formato implica que los valores
del tiempo del cronógrafo aparecen en las líneas superiores e inferiores de
la pantalla, al utilizar el cronógrafo sin el sensor de ritmo cardíaco, la línea
superior de la pantalla se reserva para la cantidad de vueltas, así que sólo
se muestra la línea inferior con información sobre el tiempo. De todas
formas, al utilizar el cronógrafo con el sensor de ritmo cardíaco, es posible
ver a la vez la información de tiempo para vueltas e intervalos si se desea.
lo haya dispuesto el usuario) después de pulsar STOP/RESET/SET si el
reloj recibe datos del sensor de ritmo cardíaco. Para información
adicional acerca del ritmo cardíaco de recuperación, vea las
páginas 188 a 189.
7. Pulse START/SPLIT para reanudar el cronometraje O mantenga pulsado
STOP/RESET/SET para regresar a la pantalla del cronógrafo y ponerlo
en cero. Esto también guarda los datos del cronógrafo en la base de
datos del reloj.
NOTA: Si todos los ejercicios están bloqueados usted verá el mensaje
WORKOUTS LOCKED - UNLOCK IN REVIEW. En este caso, el reloj no
puede guardar datos de ningún ejercicio.
Datos de ritmo cardíaco utilizando el modo Cronógrafo
Cuando hace funcionar el reloj en modo Cronógrafo con el sensor de ritmo
cardíaco, acumulará datos cardíacos en el modo Revisión, que incluyen:
1. Cantidad de tiempo que su ritmo cardíaco permanece en la zona de
ritmo cardíaco seleccionada (aparece como IN ZONE en el modo
Revisión);
2. El ritmo cardíaco promedio durante todo el tiempo que el sensor de
ritmo cardíaco estuvo funcionando y el cronógrafo estuvo
cronometrando (aparece como AVERAGE en el modo Revisión);
3. El ritmo cardíaco promedio para cada vuelta registrada (aparece como
LAP DATA en modo Revisión); y
W248_NA_SL.qxp 8/5/08 10:19 AM Page 166
Page 88

169168
Intervalo
El modo Temporizador de Intervalos ofrece una cuenta atrás flexible de
cinco intervalos que se puede programar para que se repita hasta 99
veces. Este modo es útil cuando su ejercicio incluye segmentos distintos,
como por ejemplo el uso de un método correr/andar en el cual usted corre
durante un periodo específico de tiempo y después anda por un periodo
específico de tiempo.
Terminología de intervalos
O Entrenamiento en intervalos: Usted puede utilizar el entrenamiento
en intervalos como ayuda para variar el nivel de intensidad dentro de
STOP/RESET/SET
Pulse para empezar o
completar el proceso de
programación, pausar o
detener el temporizador
de intervalos, o borrar y
guardar datos.
HEART RATE
Pulse para cambiar
entre modos de
pantalla o para
disminuir o cambiar la
programación.
MODE
Pulse para ir al siguiente
modo, dígito, grupo u opción
de programación.
BOTÓN INDIGLO
®®
Pulse para iluminar el reloj,
activar/desactivar la función
NIGHT-MODE
®
.
START/SPLIT
Pulse para empezar a cronometrar,
continuar cronometrando después
de una pausa o cambiar una
programación.
Sugerencias y trucos del modo Cronógrafo
O Pulse MODE para cambiar al modo Hora del Día mientras funciona el
cronógrafo. El símbolo del cronómetro (W) aparecerá para indicar que
el cronógrafo todavía funciona.
O Con el cronógrafo funcionando junto con el sensor de ritmo cardíaco
usted puede cambiar la pantalla del modo Cronógrafo si pulsa HEART
RATE. Podrá elegir entre:
1. Ritmo Cardíaco por encima de Tiempo de Vuelta/Intervalo;
2. Tiempo de Vuelta/Intervalo por encima de Ritmo Cardíaco;
3. Tiempo de Vuelta por encima de Tiempo de Intervalo;
4. Número de Vueltas por encima de Tiempo de Vuelta o de Intervalo; o
5. Solamente Ritmo Cardíaco.
Ejemplo del modo Cronógrafo
Dos veces a la semana, usted corre por las colinas detrás de su casa y usa el
cronógrafo para cronometrar su ejercicio. Usted ha dividido su circuito en cuatro
segmentos: 1) desde su casa al principio de la colina, 2) desde la parte de abajo de
la colina hasta la cima de la colina. 3) desde la cima de la colina hasta abajo, y
finalmente 4) desde el final de la colina hasta su casa. En cada uno de estos puntos,
usted pulsa el botón START para empezar a cronometrar una nueva vuelta.Después
de cinco semanas de guardar el mismo ejercicio, usted podrá ver sus progresos a
medida que avanza el tiempo, y comprobar si su marca de tiempo está mejorando
para cada uno de los segmentos.
W248_NA_SL.qxp 8/5/08 10:19 AM Page 168
Page 89

171170
4. Pulse MODE (NEXT) para empezar a programar el tiempo del intervalo
seleccionado. En la pantalla aparecerá el tiempo del intervalo actual
con el valor de las horas destellando.
5. Realice el ajuste deseado tal y como se indica en la tabla de la página
siguiente.
6. Pulse MODE (NEXT) para pasar a la siguiente opción de programación.
7. Pulse STOP/RESET/SET (DONE) para guardar los cambios y salir del
proceso de programación.
Usted puede hacer los ajustes de intervalo que se describen en la tabla a
continuación.
un mismo ejercicio, lo que en última instancia le ayuda a ejercitarse
por más tiempo y con mayor exigencia.
O Intervalo: Los intervalos relacionan su ejercicio con períodos
específicos de tiempo. Por ejemplo, usted puede correr por diez
minutos, andar por dos, correr por veinte minutos, y luego andar por
cinco – lo cual representaría cuatro intervalos de entrenamiento.
O Repeticiones (Reps): El número de veces que usted elije para realizar
un grupo de intervalos. En el ejemplo anterior, si usted elije recorrer el
grupo de intervalos tres veces, usted pasará por sus series de
cronometrajes de diez, dos, veinte y cinco minutos tres veces en
secuencia. Esto representaría 3 repeticiones.
Para programar o ajustar intervalos
Usted puede usar el reloj para programar y conservar hasta cinco
intervalos marcados como INT 1 hasta INT 5.
1. Pulse MODE hasta que aparezca el modo Intervalo, mostrando las
programaciones de intervalo más recientes.
2. Pulse STOP/RESET/SET hasta que las palabras INT TIMER SET
aparezcan brevemente en pantalla seguidas por SET y a continuación
el ajuste actual para el Intervalo e INT con el número destellará en la
parte superior de la pantalla.
3. Pulse START/SPLIT (+) O HEART RATE (-) para escoger cuál de los
cinco grupos de intervalo desea programar.
W248_NA_SL.qxp 8/5/08 10:19 AM Page 170
Page 90

173172
Para operar el temporizador de intervalos
1. Pulse MODE hasta que INTERVAL aparezca.
2. Mantenga pulsado STOP/RESET/SET para borrar los datos del ejercicio
anterior con intervalos (si fuera necesario).
3. Pulse START/SPLIT para empezar a cronometrar la cuenta atrás para el
temporizador de intervalos (por ejemplo 10, 9, 8...).
4. Pulse STOP/RESET/SET para detener el cronometraje cuando quiera
tomar un descanso o haya llegado al final de su actividad antes de que
los intervalos hayan terminado de cronometrarse.
5. Pulse START/SPLIT para continuar la cuenta atrás O mantenga pulsado
STOP/RESET/SET para guardar y luego borrar el ejercicio actual con
intervalos.
Datos de ritmo cardíaco utilizando el modo Intervalo
Cuando hace funcionar el reloj en modo Intervalo con el sensor de ritmo
cardíaco, acumulará datos sobre el ritmo cardíaco en el modo Revisión,
que incluyen:
1. Cantidad de tiempo que su ritmo cardíaco permanece en la zona de ritmo
cardíaco seleccionada (aparece como IN ZONE en el modo Revisión);
2. El ritmo cardíaco promedio durante todo el tiempo que el sensor de
ritmo cardíaco estuvo funcionando y el temporizador de intervalos
estuvo midiendo (aparece como AVERAGE en el modo Revisión);
NOTA: Para cambiar rápidamente el valor que se está programando,
mantenga pulsado START/SPLIT (+) o HEART RATE (-).
Grupo de
programación
Ajuste
Número de intervalos
Pulse START/SPLIT (+) para aumentar el valor de minutos
o HEART RATE (-) para disminuirlo.
Hora
Pulse START/SPLIT (+) para aumentar el valor de horas o
HEART RATE (-) para disminuirlo.
Minuto
Pulse START/SPLIT (+) para aumentar el valor de minutos
o HEART RATE (-) para disminuirlo.
Segundero
Pulse START/SPLIT (+) para aumentar el valor de
segundos o HEART RATE (-) para disminuirlo.
Zona de ritmo cardíaco
Pulse START/SPLIT (+) o HEART RATE (-) para escoger
entre las zonas preseleccionadas, de ZONE 1 a 5, la zona
MANUAL, o NONE (ninguna).
Número de
repeticiones
Pulse START/SPLIT (+) para aumentar el número de
repeticiones (# OF REPS) o HEART RATE (-) para
disminuirlo para todos los intervalos.
W248_NA_SL.qxp 8/5/08 10:19 AM Page 172
Page 91

175174
O
Si un intervalo se programa en 00:00:00, el reloj automáticamente
omitirá dicho intervalo. Por ejemplo si INT 3 se ajusta en 00:00:00,
entonces el reloj pasará directamente a INT 2 desde INT 4.
O Cuando usted programa zonas de ritmo cardíaco deseadas en el modo
Intervalo, éstas anulan las que se programaron en el modo
Programación del monitor de ritmo cardíaco. Por ejemplo, si usted ha
ajustado el reloj en ZONE 2 en el modo Programación del monitor de
ritmo cardíaco pero ha ajustado INT 3 en ZONE 3, el reloj registrará los
datos de ritmo cardíaco para la ZONE 3 y no para la ZONE 2 mientras
esté en modo Intervalo. Esto es especialmente importante si usted ha
programado el reloj para que le alerte si usted pasa por encima o por
debajo de la zona de ritmo cardíaco deseada.
O El ajuste repetido afecta a todo el grupo de ajustes; usted no puede
hacer que el temporizador de intervalos repita dos veces en INT 1 y
una sola vez en INT 2.
3. El ritmo cardíaco promedio para cada intervalo registrado (aparece
como tiempos de intervalo en modo Revisión); y
4. El ritmo cardíaco máximo y mínimo durante todo el tiempo que el
sensor de ritmo cardíaco estuvo funcionando y el cronógrafo estuvo
cronometrando (aparecen como PEAK y MINIMUM en el modo Revisión).
Sugerencias y trucos del modo Intervalo
O Cuando el reloj acumula información sobre el tiempo en las zonas de
ritmo cardíaco deseadas, la información es la suma del tiempo en
todas las zonas, no el tiempo dentro de la zona para cada intervalo
individual.
O Si todos los ejercicios están bloqueados en el modo Revisión usted
verá el mensaje WORKOUTS LOCKED - UNLOCK IN REVIEW. En este
caso, el reloj no puede guardar datos de ningún ejercicio.
O Con el temporizador funcionando junto con el sensor de ritmo cardíaco
usted puede cambiar la pantalla del modo Intervalo si pulsa HEART
RATE. Podrá elegir entre:
1. Ritmo Cardíaco por encima de Tiempo de Intervalo (por intervalo);
2. Tiempo de Intervalo (por intervalo) por encima de Ritmo Cardíaco;
3. Solamente Ritmo Cardíaco; o
4. Tiempo de Intervalo por encima de Número de Intervalos/Número
de Repeticiones.
W248_NA_SL.qxp 8/5/08 10:19 AM Page 174
Page 92

177176
Temporizador
El modo Temporizador le permite establecer un tiempo fijo desde el cual el
reloj realiza la cuenta atrás hasta cero (es decir, 10, 9, 8, ...). Además
usted puede programar el reloj para que repita, se detenga o cambie al
modo Cronógrafo al final de la cuenta atrás (si el cronógrafo está apagado
y sin datos) y para que le alerte cuando usted esté a mitad de una
secuencia cronometrada.
NOTA: Usted puede pulsar cualquier botón en el modo Temporizador para
silenciar la alarma que suena cuando el temporizador llega a cero.
Para ajustar el temporizador
1. Pulse MODE hasta que TIMER aparezca.
STOP/RESET/SET
Pulse para empezar o
completar el proceso de
programación, pausar o
detener el temporizador
de intervalos, o borrar
datos.
HEART RATE
Pulse para cambiar entre
modos de pantalla o para
disminuir o cambiar la
programación.
MODE
Pulse para ir al siguiente
modo, dígito, opción de
programación, o grupo.
BOTÓN INDIGLO
®®
Pulse para iluminar el reloj,
activar/desactivar la
función NIGHT-MODE
®
.
START/SPLIT
Pulse para empezar a cronometrar,
continuar cronometrando después
de una pausa, o aumentar o
cambiar una programación.
Ejemplo del modo Intervalo
Para fines de entrenamiento general, usted decide añadir una hora de bicicleta
estática a su ejercicio usual una vez por semana. Usted decide el uso del modo
Intervalo como ayuda para registrar a la vez el tiempo y el ritmo cardíaco de su
sesión. Usted programa los siguientes intervalos para su ejercicio:
Usted usa INT 1 para calentar. INT 2 e INT 3 representan la parte central de su
ejercicio a una meta de ritmo cardíaco cada vez más alta, con el objetivo de
conseguir un ejercicio anaeróbico de alta intensidad. Finalmente, INT 4 es el
periodo de enfriamiento entre repeticiones y al final del ejercicio. Además, usted
realiza la programación para que haya 2 repeticiones, lo que le permite repetir esta
secuencia de ejercicios dos veces para una rutina de actividad intensiva durante
una hora.
Intervalo Hora Zona de ritmo cardíaco
INT 1 00:05:00 NONE
INT 2 00:18:00 ZONE 3
INT 3 00:05:00 ZONE 5
INT 4 00:05:00 ZONE 1
W248_NA_SL.qxp 8/5/08 10:19 AM Page 176
Page 93

179178
Para operar el temporizador
1. Mantenga pulsado STOP/RESET/SET para borrar los datos de cualquier
uso anterior del temporizador (si fuera necesario). Usted no puede
empezar otra cuenta atrás sin reiniciar el temporizador.
2. Pulse START/SPLIT para iniciar la cuenta atrás del temporizador. El
símbolo del reloj de arena H aparecerá en la pantalla.
3. Pause la cuenta atrás pulsando STOP/RESET/SET.
4. Retome la cuenta atrás pulsando START/SPLIT nuevamente o reinicie
el temporizador manteniendo pulsado STOP/RESET/SET otra vez hasta
que las palabras HOLD TO RESET aparezcan brevemente en la pantalla
seguidas del tiempo original de la cuenta atrás.
5. Cuando el temporizador llega a la mitad (si se ha programado
HALFWAY ALERT) suena una breve señal acústica.
6. Cuando el temporizador llegue a cero, sonará una alerta. Pulse
cualquier botón para silenciar la alarma.
7. El temporizador se detendrá después de la alerta si se programa en
STOP (parar); o
El temporizador comenzará otra cuenta atrás si se programa en
REPEAT (repetir) y continuará hasta que usted pulse STOP/RESET/SET.
La pantalla mostrará REP y un número (por ejemplo, REP 2). REP indica
que el temporizador está repitiendo y el número indica cuántas veces
el temporizador ha efectuado un ciclo en la cuenta atrás repetitiva.
2. Pulse STOP/RESET/SET hasta que TIMER SET y después SET
aparezcan brevemente en la pantalla, seguidos por el temporizador
con el valor de hora que destella.
3. Pulse START/SPLIT (+) para aumentar los valores o HEART RATE (-)
para disminuir o cambiar el valor. Esto sirve para horas, minutos,
segundos, para terminar la acción y para la alerta de mitad de tiempo.
NOTA: El ajuste para terminar la acción le permite escoger cómo opera
el temporizador al final de una cuenta atrás. Las opciones incluyen
STOP (parar), REPEAT (repetir), o CHRONO (cronógrafo). Si usted
selecciona CHRONO, el reloj automáticamente cambiara a modo
Cronógrafo al final de la cuenta atrás (si el cronógrafo está apagado y
puesto a cero) y empezará a hacer funcionar el cronógrafo.
NOTA: Para cambiar rápidamente el valor que se está programando,
mantenga pulsado START/SPLIT (+) o HEART RATE (-).
4. Pulse MODE (NEXT) para pasar al siguiente valor de horas, minutos,
segundos, para terminar la acción y para la alerta de mitad de tiempo.
5. Pulse STOP/RESET/SET (DONE) para guardar los cambios y salir del
proceso de programación.
W248_NA_SL.qxp 8/5/08 10:19 AM Page 178
Page 94

181180
4. Cuenta Atrás (si se ha programado un número de repetición en
REPEAT).
Ejemplo del modo Temporizador
Recuperación
Acerca del ritmo cardíaco de recuperación
La recuperación del ritmo cardíaco es un indicador de la condición física y
del nivel de entrenamiento. A medida que mejore su condición física, su
ritmo cardíaco volverá más rápidamente a una frecuencia baja al final de
la actividad, indicando un mejor nivel de buena forma cardiovascular.
Su tasa de recuperación representa el cambio en el ritmo cardíaco durante
un tiempo determinado. Usted puede programar su monitor de ritmo cardíaco
para que registre los cambios en su ritmo cardíaco durante un periodo de 30
segundos o 1, 2, 5 o 10 minutos.
Como parte de su plan general de salud, usted decide realizar una paseo de 30
minutos durante su hora del almuerzo dos veces por semana. Como ayuda para
controlar el tiempo y no volver tarde después de su hora del almuerzo, usted
programa su temporizador a 15 minutos y luego programa la acción final en modo
Cronógrafo. Después de 15 minutos el reloj suena para indicarle que debe empezar
a caminar de vuelta a su oficina. El reloj se coloca en modo Cronógrafo y empieza
a cronometrar. Esto le ayuda a determinar cuánto tiempo se tarda en volver a su
oficina.
Usted también verá el símbolo del reloj de arena con repetición I,
que indica que el temporizador está programado para repetir; o
El temporizador cambiará a modo Cronógrafo si el cronógrafo está
apagado y sin datos. Usted verá el símbolo del cronómetro W que
indica que el temporizador cambiará de modo al final de la cuenta
atrás y el símbolo del reloj de arena H que indica que el temporizador
está funcionando.
Sugerencias y trucos del modo Temporizador
O Puede pulsar MODE dentro del modo Temporizador para cambiar la
pantalla a otro modo sin interrumpir el funcionamiento del
temporizador. El símbolo del reloj de arena H seguirá visible para
indicar que el temporizador está funcionando.
O Cuando usted utilice la alerta de a mitad de tiempo el reloj emitirá un
pitido cuando usted haya llegado a la mitad del tiempo de cuenta atrás
programado.
O Con el temporizador funcionando junto con el sensor de ritmo
cardíaco, usted puede cambiar la pantalla del modo Temporizador si
pulsa HEART RATE. Podrá elegir entre:
1. Ritmo Cardíaco/Cuenta Atrás;
2. Cuenta Atrás/Ritmo Cardíaco;
3. Solamente Ritmo Cardíaco; o
W248_NA_SL.qxp 8/5/08 10:19 AM Page 180
Page 95

183182
Para determinar manualmente un ritmo cardíaco de
recuperación
Usted puede iniciar manualmente un ritmo cardíaco de recuperación en
cualquier momento.
NOTA: Cuando usted inicia una recuperación manual, esta información no
se guarda para poderla ver en el modo Revisión.
1. Pulse MODE hasta que RECOVERY aparezca.
2. Pulse STOP/RESET/SET para borrar la última lectura de recuperación
del ritmo cardíaco, si fuera necesario. Usted verá el mensaje HOLD TO
RESET seguido del tiempo de recuperación programado actualmente.
3. Pulse STOP/RESET/SET para cambiar entre un tiempo de recuperación
de 30 segundos o 1, 2, 5 o 10 minutos, si lo desea.
NOTA: Este ajuste controla la duración del ritmo cardíaco de
recuperación tanto automática como manual.
4. Pulse START/SPLIT. La línea superior de la pantalla del reloj mostrará
el ritmo cardíaco al comienzo del periodo de recuperación además del
ritmo cardíaco actual. La línea inferior mostrará la cuenta atrás de
recuperación de 30 segundos o 1, 2, 5 o 10 minutos.
NOTA: El reloj no puede registrar una recuperación a menos que esté
recibiendo un ritmo cardíaco actual del sensor de ritmo cardíaco. Sin
el ritmo cardíaco actual o si el ritmo cardíaco inicial es inferior al ritmo
cardíaco final, la pantalla indicará NO REC al final de la cuenta atrás de
recuperación.
NOTA: Mientras funciona el cronógrafo, el temporizador de recuperación
del ritmo cardíaco comenzará automáticamente después de pulsar
STOP/RESET/SET si el reloj recibe datos del sensor de ritmo cardíaco. Sin
el ritmo cardíaco actual o si el ritmo cardíaco inicial es inferior al ritmo
cardíaco final, la pantalla indicará NO REC al final de la cuenta atrás de
recuperación. Los resultados de recuperación automática se pueden ver
en el modo Revisión.
Una recuperación más lenta puede indicar también que necesita disminuir el
entrenamiento debido a cansancio, enfermedad u otros factores.
START/SPLIT
Pulse para iniciar o
reiniciar el temporizador
de recuperación.
STOP/RESET/SET
Pulse para seleccionar
entre un tiempo de
recuperación de 30
segundos o de 1, 2, 5 o
10 minutos o para
detener o reiniciar el
temporizador de
recuperación.
MODE
Pulsar para avanzar al
siguiente modo.
BOTÓN INDIGLO
®®
Pulse para iluminar el
reloj, activar/desactivar la
función NIGHT-MODE
®
.
HEART RATE
Pulse para activar el
monitor de ritmo cardíaco
(si estuviera apagado) o
manténgalo pulsado para
conectar o desconectar
las alertas Fuera de Zona.
W248_NA_SL.qxp 8/5/08 10:19 AM Page 182
Page 96

185184
Revisión
El modo Revisión le permite volver a ver información general grabada en
los modos Cronógrafo e Intervalo relativos a ejercicios guardados en
memoria. Usted puede revisar hasta sus 10 últimos ejercicios guardados
en memoria. Usted también puede bloquear un ejercicio para asegurarse
de que dicho ejercicio no desaparece de la lista de revisión una vez usted
haya finalizado 10 ejercicios.
Sobre el modo Revisión
O El modo Revisión recoge y almacena datos captados mientras el
cronógrafo o el temporizador de intervalos estaban funcionando. Usted
puede utilizar este modo para ver medidas importantes de su progreso
durante sus ejercicios.
START/SPLIT
Pulse para seleccionar un
ejercicio para revisarlo o para
desplazarse por los datos
de un ejercicio seleccionado.
HEART RATE
Pulse para bloquear o
desbloquear un
ejercicio o desplazarse
por los datos de un
ejercicio seleccionado.
MODE
Pulsar para avanzar al
siguiente modo.
BOTÓN INDIGLO
®®
Pulse para iluminar el reloj,
activar/desactivar la función
NIGHT-MODE
®
.
STOP/RESET/SET
Pulse para iniciar la
revisión de un ejercicio
seleccionado.
5. Al finalizar el periodo especificado para la cuenta atrás de
recuperación, el reloj emitirá un pitido para indicar el final del periodo
de recuperación. El reloj captará su ritmo cardíaco una segunda vez,
restará el segundo valor del primero y presentará la diferencia en
pantalla como la recuperación.
6. Usted puede continuar e iniciar un periodo específico de recuperación
repitiendo los pasos 2 al 4.
W248_NA_SL.qxp 8/5/08 10:19 AM Page 184
Page 97

187186
NOTA: Los ejercicios registrados en el modo Cronógrafo se identifican
con el símbolo del cronómetro W y los ejercicios registrados en el
modo Intervalo se identifican con el símbolo del reloj de arena H.
3. Pulse HEART RATE para bloquear o desbloquear un ejercicio. Cuando
usted bloquea un ejercicio, el icono de bloqueo I aparecerá junto al
ejercicio. Este ejercicio no se borrará automáticamente a medida que
se vayan registrando nuevos ejercicios.
4. Pulse STOP/RESET/SET para acceder a la revisión de datos para un
ejercicio seleccionado.
5. Pulse START/SPLIT o HEART RATE para desplazarse por los datos de la
actividad.
6. Pulse STOP/RESET/SET para volver al menú principal de Revisión y
escoger otro ejercicio para revisarlo.
Datos sobre el modo Revisión
El modo Revisión incluye los datos almacenados sobre ejercicios
registrados en modo Cronógrafo o Temporizador de Intervalos, como se
indica en la siguiente lista.
NOTA: Si no se utiliza el monitor de ritmo cardíaco, los únicos datos que
usted verá serán el tiempo total y datos sobre vueltas o intervalos.
O Tiempo total: La cantidad de tiempo que el cronógrafo o el
temporizador de intervalos estuvieron funcionando durante su ejercicio
en los modos Cronógrafo o Temporizador de Intervalos.
O Sin el sensor de ritmo cardíaco, usted verá el tiempo total y recuperará
la vuelta o intervalo en el modo Revisión, junto con el último ritmo
cardíaco de recuperación registrado.
O Si ningún intervalo ha completado su cuenta atrás el reloj indicará NO
INTS DONE. Esto sólo se producirá mientras el temporizador de
intervalos esté funcionando y antes de que el reloj haya terminado de
cronometrar un ciclo completo de intervalo.
O Si usted no grabó vueltas por separado durante un ejercicio con el
cronógrafo, la pantalla mostrará NO LAPS STORED al llegar a la parte
de revisión de vueltas del modo Revisión. Esto sólo se producirá
mientras el cronógrafo esté funcionando y el reloj no haya terminado
de cronometrar durante la primera vuelta de un ejercicio.
Para revisar los datos de un ejercicio
1. Pulse MODE hasta que REVIEW aparezca.
2. Pulse START/SPLIT para desplazarse entre los ejercicios guardados en
memoria. Los ejercicios guardados están marcados con la fecha y la
hora del ejercicio.
Si el cronógrafo o el temporizador de intervalos están funcionando cuando usted
entra en el modo Revisión usted sólo podrá ver la información del ejercicio actual.
Usted no puede revisar ninguno de los ejercicios seleccionados hasta que el
cronógrafo y el temporizador de intervalos están parados y a cero.
W248_NA_SL.qxp 8/5/08 10:19 AM Page 186
Page 98

189188
con intervalos incluyen datos sobre intervalos. Si el ejercicio con
intervalos se programa para que se repita, el reloj también mostrará la
cantidad de repetición de intervalos.
O Ritmo cardíaco de recuperación: El resultado del cálculo más
reciente del ritmo cardíaco de recuperación automática mientras
funcionan el cronógrafo o el temporizador de intervalos. Los cálculos
de recuperación manual no se guardan.
O Tiempo en zonas: La cantidad de tiempo durante una actividad
durante la cual el ritmo cardíaco se encuentra entre los límites de la
zona superior e inferior que usted programó. Para un ejercicio con
intervalos usted puede programar cada intervalo a una zona deseada
distinta, así que el modo Revisión mostrará la suma del tiempo en
cada zona para las distintas zonas de dicho intervalo.
O Ritmo cardíaco promedio: El ritmo cardíaco promedio alcanzado
durante una actividad.
O Ritmo cardíaco máximo: El ritmo cardíaco más rápido registrado
durante una actividad.
O Ritmo cardíaco mínimo: El ritmo cardíaco más bajo registrado
durante una actividad.
O Total de calorías: El número de calorías consumidas durante una
actividad. Este número depende del peso que introdujo cuando
programó su monitor de ritmo cardíaco, su ritmo cardíaco durante un
ejercicio, y el tiempo en que efectuó dicha actividad.
O Vuelta promedio: El tiempo promedio para todas las vueltas
registradas de un ejercicio.
O Mejor vuelta: La vuelta más corta registrada durante un ejercicio.
O Revisión de vuelta o intervalo: La cantidad de tiempo y el ritmo
cardíaco promedio durante el último segmento de su ejercicio. Los
ejercicios con cronógrafo incluyen datos sobre vueltas y los ejercicios
W248_NA_SL.qxp 8/5/08 10:19 AM Page 188
Page 99

191190
Nota: El acoplamiento debe realizarse antes de empezar a utilizarlo por
vez primera, y después del cambio de pila tanto para el reloj como para el
sensor de ritmo cardíaco. No se requiere realizarlo antes de cada
actividad.
Para acoplar su reloj con su banda para el pecho, siga estos pasos:
1. Sáquese la banda para el pecho y déjela en algún lugar durante al
menos cinco minutos para garantizar que esté completamente apagada.
2. Encuentre un lugar alejado de cualquier otra banda para el pecho de
un monitor de ritmo cardíaco que pudiera estar transmitiendo.
3. Pulse repetidamente el botón MODE del reloj hasta que aparezca HRM
SETUP en la línea superior de la pantalla.
4. Mantenga pulsado el botón HEART RATE. El mensaje HOLD TO PAIR
(espera para el acoplamiento) debería aparecer durante unos dos
segundos, seguido por las instrucciones WEAR STRAP (colóquese la
banda), y luego PRESS MODE TO PAIR WATCH WITH STRAP (pulse
MODE para acoplar el reloj con la banda).
5. Pulse el botón MODE. Aparecerá un mensaje que dirá WAIT FOR BEEP
(espere a oír un pitido) El reloj está ahora buscando una banda para el
pecho con la que acoplarse.
Para acoplar adecuadamente el reloj con el sensor de ritmo cardíaco, usted debe ir
directamente al modo Programación del monitor de ritmo cardíaco sin detenerse
antes en ningún otro modo.
Programación del monitor
de ritmo cardíaco
El modo de Programación del monitor de ritmo cardíaco le permite
seleccionar datos estadísticos clave que desee controlar con su monitor
de ritmo cardíaco. Usted también puede acoplar el reloj con su sensor de
ritmo cardíaco.
Acoplamiento de dispositivos
Se requiere un acoplamiento para garantizar que su reloj no capta los
datos transmitidos por la banda para el pecho de otra persona.
STOP/RESET/SET
Pulse para empezar o
completar el proceso de
programación.
HEART RATE
Pulse para iniciar el
proceso de
acoplamiento o para
disminuir o cambiar
el parámetro
programado.
MODE
Pulse para avanzar al siguiente
modo, dígito o grupo de
programación.
BOTÓN INDIGLO
®®
Pulse para iluminar el reloj,
activar/desactivar la
función NIGHT-MODE
®
.
START/SPLIT
Pulse para seleccionar una zona de
ritmo cardíaco deseada o para
aumentar o cambiar una
programación.
W248_NA_SL.qxp 8/5/08 10:19 AM Page 190
Page 100

193192
Para escoger una zona de ritmo cardíaco deseada:
1. Determine la zona que desea usar revisando la tabla de la página 152.
2. Pulse MODE hasta que aparezca HRM SETUP Mode (programación del
monitor).
3. Pulse START/SPLIT para moverse entre las zonas deseadas de ritmo
cardíaco (marcadas de ZONE 1 a ZONE 5 o MANUAL).
4. Para las zonas de ritmo cardíaco preestablecidas, pulse MODE para
guardar su selección de zona de ritmo cardiaco deseada y salir del
modo Programación del monitor. Para una zona de ritmo cardíaco
manual, usted necesitará llevar a cabo unos pasos adicionales tal y
como se describen en la siguiente sección.
Cuando salga del modo Programación del monitor de ritmo cardíaco, el
reloj usará la zona que usted haya seleccionado como base para todos los
cálculos basados en el ritmo cardíaco. Esto no se refiere a ejercicios que
ya hayan sido guardados en memoria antes de seleccionar una zona de
ritmo cardíaco deseado.
Para establecer manualmente una meta de zona
de ritmo cardíaco
La zona de ritmo cardíaco deseado establecida manualmente le permite
personalizar sus límites inferior y superior para zonas de ritmo cardíaco.
Usted puede usar la selección manual de la zona de ritmo cardíaco deseado
6. Sujete ahora su banda para el pecho firmemente, con los pulgares
tocando las almohadillas del sensor que normalmente estarían en
contacto con su pecho. Frote sus pulgares por las almohadillas unas
pocas veces. Este contacto debería ser suficiente para que la banda
empiece a transmitir.
7. Si el acoplamiento se realiza con éxito, el mensaje PAIRING DONE
(acoplamiento finalizado) aparecerá en pantalla y se escuchará un tono
de confirmación. Si por alguna razón fallara el acoplamiento, repetir
inmediatamente los pasos anteriores, empezando por el paso 4.
Selección de una meta de zona de ritmo cardíaco
Usted puede escoger entre una de las zonas de ritmo cardíaco
preestablecidas o puede programar manualmente una zona de ritmo
cardíaco para marcarse una meta personalizada. Las zonas
preestablecidas de ritmo cardíaco deseado descritas en la siguiente tabla
corresponden a su valor de ritmo cardíaco máximo (MHR).
Zona Límite inferior Límite superior
1 50% 60%
2 60% 70%
3 70% 80%
4 80% 90%
5 90% 100%
W248_NA_SL.qxp 8/5/08 10:19 AM Page 192
 Loading...