

Page 1
W217_AS_Cvr_W217_AS_Cvr 3/9/10 11:09 AM Page cvr1
W217 AS 111-095012
Page 2

W217_AS_Cvr_W217_AS_Cvr 3/9/10 11:09 AM Page cvr3
English page 2
日本語 ページ 28
Pусский страница 80
中文 页码 54
Page 3
W217_AS_EN_analoglayout_4 3/9/10 10:59 AM Page ENi
TIMEX®WATCHES
Congratulations on purchasing your TIMEX®watch.
Please read these instructions carefully to
understand how to operate your Timex timepiece.
Your watch may not have all of the features
described in this booklet.
For more information, please visit:
www.timex.com
Page 4

W217_AS_EN_analoglayout_4 3/9/10 10:59 AM Page ENii
TABLE OF CONTENTS
2 How to Start Your Watch
3 Water and Shock Resistance
4 Indiglo
5 Date Models
7 Day/Date Models
8 Easy Set Alarm
12 Perpetual Calendar
15 Elapsed Time Ring
17 Tachymeter Ring
18 Compass Ring
19 How to Adjust Bracelet
21 Bracelet Link Removal
22 Battery
23 Warranty
ENGLISH
®
Night-Light
Page 5

W217_AS_EN_analoglayout_4 3/9/10 10:59 AM Page 2
ENGLISH
HOW TO START YOUR WATCH
To start your watch remove the plastic guard from
under the crown, then press the crown in against
the case. The second hand will begin advancing in
one-second intervals.
Some deep-depth water-resistant watches require
the setting crown to be screwed in to secure
water-resistance. If your watch case has a protrusion
with screw threads, the crown must be screwed in
after setting the watch.
To screw in, push the crown firmly against the
threaded protrusion and hold in while turning the
crown clockwise. Continue to screw in the crown
until it is tight. You will need to unscrew the crown
(counter-clockwise) before pulling it out the next time
you want to set your watch.
2
ENGLISH
WATER AND SHOCK RESISTANCE
If your watch is water-resistant, meter marking
(WR_M) is indicated.
Water-Resistance Depth p.s.i.a. * Water pressure
30m/98ft 60
50m/164ft 86
100m/328ft 160
200m/656ft 284
*pounds per square inch absolute
WARNING: TO MAINTAIN WATER-RESISTANCE,
DO NOT PRESS ANY BUTTONS OR PULL OUT
THE CROWN UNDER WATER UNLESS YOUR
WATCH IS INDICATED AS 200 METER WATERRESISTANT.
Below Surface
3
Page 6

W217_AS_EN_analoglayout_4 3/9/10 10:59 AM Page 4
ENGLISH
1. Watch is water-resistant only as long as crystal,
crown and case remain intact.
2. Watch is not a diver watch and should not be
used for diving.
3. Rinse watch with fresh water after exposure to
salt water.
4. Shock-resistance will be indicated on the watch
face or caseback. Watches are designed to pass
ISO test for shock-resistance. However, care
should be taken to avoid damaging the crystal.
INDIGLO®NIGHT-LIGHT
Press button or crown to activate light.
Electroluminescent technology used in the INDIGLO
night-light illuminates entire watch face at night and in
low light conditions.
4
ENGLISH
DATE MODELS
TO SET TIME:
1) PULL crown all the
way out and turn to
correct time.
2) Push crown in to
restart. For screw-in
setting crown, push
crown in while turning
CLOCKWISE to tighten.
Watches with date: Note correct time of day
®
(A.M or P.M.) for proper date function.
TO SET DAY:
1) PULL crown to “middle” position and turn
CLOCKWISE until correct day appears. If day does
not change, pull crown to “out” position and turn
CLOCKWISE or COUNTERCLOCKWISE through
necessary number of 24 hour periods until
correct day appears.
5
DATE
CB A
CROWN
POSITION
Page 7
W217_AS_EN_analoglayout_4 3/9/10 10:59 AM Page 6
ENGLISH
TO SET “QUICK DATE®” FEATURE:
3-Position Crown:
1) Pull crown to “Middle” position and turn CLOCKWISE or COUNTERCLOCKWISE until correct date
appears.
2-Position Crown:
1) Pull crown to “OUT” position and turn CLOCKWISE
until date changes. Repeat until correct date
appears. Adjust date when month has less than
31 days. Push crown in when finished.
Caution: Wearing or storing the watch with the crown
in the "middle" position will cause damage to the movement. Always return the crown to the normal position,
or if you wish to save the battery life while storing the
watch, leave the crown in the "out" position.
The date function advances the date between the
hours of 10 PM and 2 AM. Avoid setting the date
during this timeframe. If you attempt to set the date
during this time period, rotate the crown at a very
slow rate to avoid damaging the watch.
6
ENGLISH
DAY / DATE MODELS
TO SET THE TIME:
1) PULL the crown out
to the “C” position.
2) TURN the crown
either way to the
correct time.
3) PUSH in the crown to
the “A” position.
TO SET THE DATE:
1) PULL the crown out to the “B” position.
2) TURN the crown either way to the correct date.
3) PUSH in the crown to the “A” position.
TO SET THE DAY:
1) PULL the crown out to the “C” position.
2) TURN the crown either way for full 24 hour cycle
to set day.
3) PUSH the crown in to the “A” position.
7
DAY/DATE
CROWN
POSITION
CBA
Page 8
W217_AS_EN_analoglayout_4 3/9/10 10:59 AM Page 8
ENGLISH
EASY SET ALARM
MINUTE MARKER
TIMEKEEPING / INDIGLO®
D E F
ALARM CROWN
PULL CROWN “OUT” TO ACTIVATE
THE ALARM
®
NIGHT-LIGHT
8
NIGHT-LIGHT CROWN.
PUSH CROWN TO ACTIVATE
THE INDIGLO NIGHT-LIGHT
A B C POSITION
POSITION
HOUR MARKER
ALARM SET
TURNING RING
EASY SET ALARM
WITH DATE & INDIGLO
1) From the “A” position, PUSH the TIMEKEEPING
CROWN in (towards the watch case) to activate
the INDIGLO
dial.
®
Night-Light and illuminate the watch
ENGLISH
EASY SET ALARM DATE & TIME SETTINGS
TO SET THE DATE:
1) With the TIMEKEEPING CROWN in the “B” position
TURN the TIMEKEEPING CROWN or TURNING RING
in either direction to set the date.
TO SET THE TIME:
1) With the TIMEKEEPING CROWN in the “C” position
TURN the TIMEKEEPING CROWN or TURNING RING
in either direction to set the time.
EASY SET ALARM SETTINGS
1) Your easy set alarm watch is equipped with two
types of alarms:
2) 12-Hour Alarm: rings OR vibrates twice per day at
the desired hour and minute as long as the alarm
is activated. (Alarm crown must be in “E” position.)
3) Hourly Alarm: rings OR vibrates every hour at the
desired minute if activated. (Alarm crown must be
in “F” position.)
9
Page 9

W217_AS_EN_analoglayout_4 3/9/10 10:59 AM Page 10
ENGLISH
TO SET THE 12-HOUR ALARM:
1) With the ALARM CROWN in the “D” position,
TURN the ALARM CROWN or TURNING RING in
either direction to set the hour and minute alarm
markers. To activate the alarm to ring or vibrate at
the desired time, PULL the ALARM CROWN out to
the “E” position. A single beep sound and flash,
OR a vibration will indicate that the 12-Hour
Alarm is activated.
2) The alarm will sound and the dial will flash OR
vibrate at the desired time (hour and minute) and
will repeat every twelve hours unless the alarm is
deactivated.
NOTE: Alarm is deactivated when the ALARM
CROWN is in the “D” position.
If the alarm is not deactivated it will automatically
stop ringing after 20 beeps and flashes OR stop
vibrating, and will resume in 12 hours at the
indicated time.
10
ENGLISH
TO SET THE HOURLY ALARM:
1) With the ALARM CROWN in the “D” position, TURN
the ALARM CROWN or TURNING RING in either
direction to set the minute alarm marker.
2) To activate the alarm to ring or vibrate at the
desired minute, PULL the ALARM CROWN out to
the “F” position. Three beeps sound and flash
OR a vibration indicates the Hourly Alarm is
activated.
3) The alarm will sound and the dial will flash OR
vibrate at the desired minute and will repeat
every hour on the specified minute unless the
alarm is deactivated.
NOTE: Alarm is deactivated when the ALARM
CROWN is in the “D” position.
If the alarm is not deactivated it will automatically
stop ringing after 20 beeps and flashes OR stop
vibrating, and will resume again in one hour at
the indicated minute.
11
Page 10

W217_AS_EN_analoglayout_4 3/9/10 10:59 AM Page 12
ENGLISH
PERPETUAL CALENDAR
Your Perpetual Calendar watch accurately keeps
track of how many days are in each month. It also
adjusts for leap years. The date on your watch
(including the month and year) was preset at the
factory to Eastern Standard Time, Greenwich Mean
Time or Hong Kong Standard Time (depending on
where you purchased your watch). You only need to
adjust the time.
MIDDLE OUT
I
WED 14
I
CHECK DATE
(FACTORY USE ONLY)
12
WED 14
SET TIME
DAY, DATE
I
I
ENGLISH
TO SET TIME
To set time, simply pull crown all the way out and
turn. Day and date change automatically when time
is adjusted past midnight; there is no additional step
for setting day or date. Push crown in when done.
After setting, if date changes at noon, time needs to
be adjusted ahead or back 12 hours.
If crown is accidentally put in MIDDLE position and
turned, date display will change temporarily, but date
setting is unaffected. Simply pull crown all the way
out and set time. Proper date display will resume.
7-YEAR BATTERY LIFE* WITH
FREE LIFETIME REPLACEMENT**
If the battery needs to be changed, we recommend
that only TIMEX replace it. Your watch will need to be
recalibrated to correct time and date after changing
the battery. To return your watch to Timex use a prepaid shipper. To obtain a pre-paid shipper please call
1-800-448-4639 or visit the retailer where you
purchased your watch or go to www.TIMEX.com.
Please include the following with your watch to cover
13
Page 11

W217_AS_EN_analoglayout_4 3/9/10 10:59 AM Page 14
ENGLISH
postage and handling (this is not a repair charge);
a U.S.$8.00 check or money order in the U.S.; a
CAN$7.00 cheque or money order in Canada;
In other countries Timex will charge you for postage
and handling.
** Shipping & handling charges apply. *With
normal usage.
NEVER INCLUDE A SPECIAL WATCHBAND
OR ANY OTHER ARTICLE OF PERSONAL
VALUE IN YOUR SHIPMENT.
14
ENGLISH
ELAPSED TIME RING
If your watch is equipped with a rotatable outer ring
on the face, with numbers corresponding to minutes,
you can use this Elapsed Time Ring to time an activity
from the start, or to mark the ending time for the
duration of an activity.
TO TIME AN ACTIVITY FROM THE START:
Set the Start/Stop triangle at the time (hour or
minute) when you start the activity (As shown on the
left in the illustration shown below). At completion,
you can see how long the activity took.
15
Page 12

W217_AS_EN_analoglayout_4 3/9/10 10:59 AM Page 16
ENGLISH
TO MEASURE THE TIME REMAINING:
Set the triangle to the hour or minute position when
you wish to complete the activity, and check the
watch periodically for progress towards that goal.
In the illustration shown on the previous page on the
right you can stop when the minute hand reaches
the 20 minutes past the hour position.
16
ENGLISH
TACHYMETER RING
The tachymeter feature can be used to measure
speed in miles per hour (MPH), nautical miles per
hour (knots) or kilometers per hour (KPH) using the
sweep second hand and the scale on the wall above
the watch face. You need to know the actual distance
you are covering in miles or km.
Start the chronograph with the second hand at zero
(the twelve o’clock position). Within the first minute,
the second hand will point to the rate for a one-mile
(or one kilometer) course: if it takes 45 seconds, the
hand will point to 80 at that position – 80 MPH or
80 KPH.
If within the first minute, a distance greater than one
mile or kilometer is covered, multiply the tachymeter
number by the distance to get the actual rate: if you
went 1.2 miles in 45 seconds, multiply the 80 by
1.2 – 96 MPH.
17
Page 13
W217_AS_EN_analoglayout_4 3/9/10 10:59 AM Page 18
ENGLISH
COMPASS RING
If your watch is equipped
with a movable ring around
the dial marked at the
letters “N”, “E”, “W”, “S”
(for the four compass
directions) or compass
degrees, you can use this feature
to find an approximate compass
directional reading.
1) Lay the watch on a flat surface,
or hold it so that the face is
parallel to the ground.
2) Locate the sun and point the
hour hand at the sun.
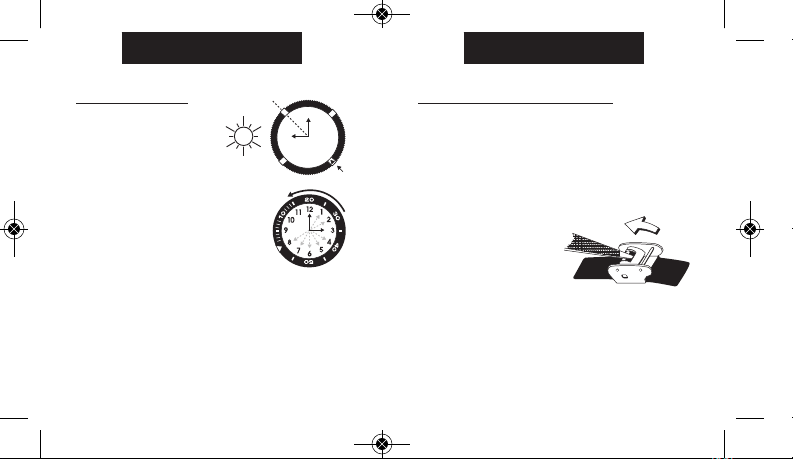
3) In the A.M., rotate the ring until the “S” (south)
marker is halfway between the hour hand and
12:00 (after the hour hand or within the shortest
distance between the hour hand and 12:00).
4) In the P.M., rotate the ring until “S” is before the
hour hand and halfway between the hour hand
and 12:00.
18
S
12
1
11
10
9
8
E
5
7
6
ENGLISH
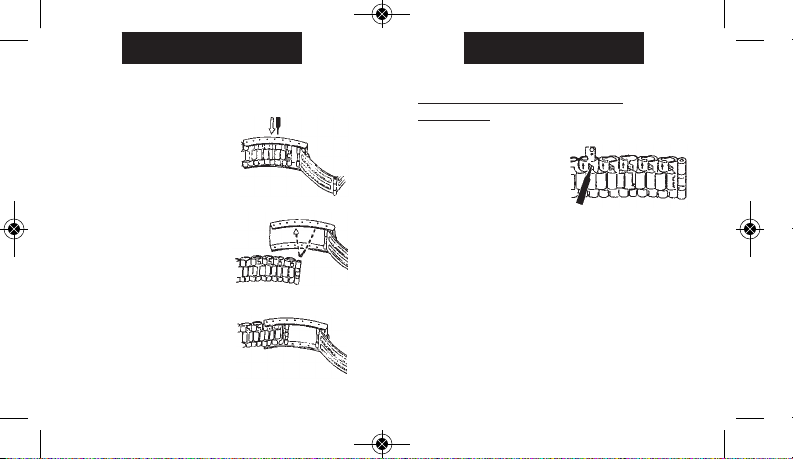
HOW TO ADJUST BRACELET
W
2
3
4
N
(Variations of the following bracelet sections apply to
all watch models).
SLIDING CLASP BRACELET
1 Open locking plate.
2. Move clasp to desired bracelet length.
3. Exert pressure while holding locking plate and
slide clasp back and
forth until it engages
in grooves on underside of bracelet.
4. Press locking plate
down until it snaps
closed. Clasp can be
damaged if excessive
force is used.
19
Page 14

W217_AS_EN_analoglayout_4 3/9/10 10:59 AM Page 20
ENGLISH
FOLDOVER CLASP
BRACELET
1. Find spring bar that
connects bracelet
to clasp.
2. Using a pointed tool, push
in spring bar and gently
twist bracelet to disengage.
3. Determine wrist size, then
insert spring bar in correct
bottom hole.
4. Push down on spring bar,
align with top hole and
release to lock in place.
20
Fig. 1
Fig. 2
Fig. 3
ENGLISH
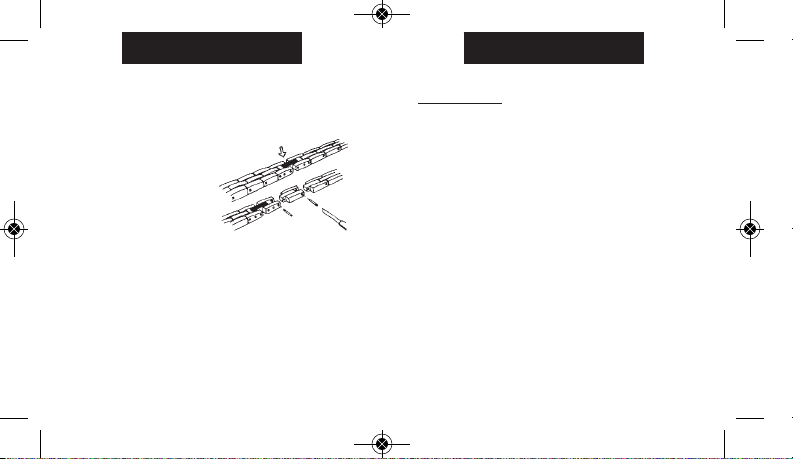
BRACELET LINK REMOVAL
REMOVING LINKS:
1. Place bracelet upright
and insert pointed tool
in opening of link.
2. Push pin forcefully in
direction of arrow until
link is detached (pins
are designed to be difficult to remove).
3. Repeat until desired number of links are removed.
RE-ASSEMBLY:
1. Rejoin bracelet parts.
2. Push pin back into link
in opposite direction of
arrow.
3. Press pin down securely
into bracelet until it is
flush.
21
Page 15
W217_AS_EN_analoglayout_4 3/9/10 10:59 AM Page 22
ENGLISH
BATTERY
Timex strongly recommends that a retailer or jeweler
replace battery. If applicable, push reset button when
replacing battery. Battery type is indicated on
caseback. Battery life estimates are based on certain
assumptions regarding usage; battery life may vary
depending on actual usage.
DO NOT DISPOSE OF BATTERY IN FIRE. DO NOT
RECHARGE. KEEP LOOSE BATTERIES AWAY
FROM CHILDREN.
22
ENGLISH
TIMEX INTERNATIONAL WARRANTY
Your TIMEX®watch is warranted against manufacturing
defects by Timex Group USA, Inc. for a period of ONE YEAR
from the original purchase date. Timex and its worldwide
affiliates will honor this International Warranty.
Please note that Timex may, at its option, repair your
watch by installing new or thoroughly reconditioned and
inspected components or replace it with an identical or
similar model. IMPORTANT — PLEASE NOTE THAT THIS
WARRANTY DOES NOT COVER DEFECTS OR DAMAGES TO
YOUR WATCH:
1) after the warranty period expires;
2) if the watch was not originally purchased from an
authorized Timex retailer;
3) from repair services not performed by Timex;
4) from accidents, tampering or abuse; and
5) lens or crystal, strap or band, watch case, attach-
ments or battery. Timex may charge you for replacing
any of these parts.
THIS WARRANTY AND THE REMEDIES CONTAINED HEREIN
ARE EXCLUSIVE AND IN LIEU OF ALL OTHER WARRANTIES,
EXPRESS OR IMPLIED, INCLUDING ANY IMPLIED WARRANTY
OF MERCHANTABILITY OR FITNESS FOR PARTICULAR PURPOSE. TIMEX IS NOT LIABLE FOR ANY SPECIAL, INCIDENTAL
23
Page 16

W217_AS_EN_analoglayout_4 3/9/10 10:59 AM Page 24
ENGLISH
OR CONSEQUENTIAL DAMAGES. Some countries and states
do not allow limitations on implied warranties and do not
allow exclusions or limitations on damages, so these
limitations may not apply to you. This warranty gives you
specific legal rights and you may also have other rights,
which vary from country to country and state to state.
To obtain warranty service, please return your watch to
Timex, one of its affiliates or the Timex retailer where the
watch was purchased, together with a completed original
Watch Repair Coupon or, in the U.S. and Canada only, the
completed original Watch Repair Coupon or a written
statement identifying your name, address, telephone
number and date and place of purchase. Please include
the following with your watch to cover postage and
handling (this is not a repair charge): a US$ 8.00 check or
money order in the U.S.; a CAN$7.00 cheque or money
order in Canada; and a UK£2.50 cheque or money order in
the U.K. In other countries, Timex will charge you for
postage and handling. NEVER INCLUDE A SPECIAL WATCHBAND OR ANY OTHER ARTICLE OF PERSONAL VALUE IN
YOUR SHIPMENT.
For additional warranty information please call one of the
numbers listed below:
Asia +852 27407311; Brazil +55 11 3068 3500; U.S. +1 800
448 4639; Canada 1 800 263 0981; the Caribbean,
24
ENGLISH
Bermuda and the Bahamas +1 501 370 5775 (U.S.); France
+33 3 81 63 42 00; Germany/Austria +49 662 88921 30;
Mexico and Central America 01 800 01 06000 (U.S.);
Portugal +351 212 555 460; UK, Middle East and Africa +44
20 8687 9620
For other areas, please contact your local Timex retailer or
Timex distributor for warranty information. In Canada, the
U.S. and in certain other locations, participating Timex
retailers can provide you with a postage-paid, preaddressed Watch Repair Mailer for your convenience in
obtaining factory service.
©2010 Timex Group USA, Inc. TIMEX and QUICKDATE are
registered trademarks of Timex Group USA, Inc. INDIGLO is
a registered trademark of Indiglo Corporation in the US
and other countries.
25
Page 17

W217_JA_analoglayout_4 3/9/10 11:26 AM Page JAii
TIMEX®社製の腕時計をお買い上げいただきありがと
うございます。
Timex 腕時計をご使用の際は、取り扱い説明書をよく
お読みください。
お買い上げのモデルによっては、ここに記載されてい
るすべての機能が備わっていない場合があります。
TIMEX®腕時計
詳細については下記のサイトをご覧ください:
www.timex.com
Page 18

W217_JA_analoglayout_4 3/9/10 11:26 AM Page JAiv
目次
28 腕時計のスタート
29 耐水性と耐衝撃性
30 INDIGLO
31 日付のモデル
33 曜日/日付のモデル
34 イージーセットアラーム
38 永久カレンダー
41 経過タイムリング
43 タキメーターリング
44 コンパスリング
45 ブレスレットの調整
47 ブレスレットのリンクの取りはずし
48 電池
49 国際保証書
日本語
®
ナイトライト
Page 19

W217_JA_analoglayout_4 3/9/10 11:26 AM Page 28
日本語
腕時計のスタート
腕時計をスタートさせるには、リューズの下からプラ
スチックのガードをはずした後で、リューズをケース
に向かって押し込みます。秒針が 1 秒ごとに動き始め
ます。
耐水性の高い腕時計によっては、耐水性を確保するた
めにリューズをネジで止める必要があるものもありま
す。お買い上げの腕時計のケースに、ネジ山の突起が
ある場合は、腕時計を設定後、リューズをネジで止め
る必要があります。
リューズをネジで止めるには、リューズをネジ山があ
る突起に向かってしっかりと押し、リューズを時計回
りに回している間押し続けます。リューズがきっちり
と締まるまでネジを回します。次回、腕時計を設定す
る際には、リューズを引き出す前に、リューズを反時
計回りに回してネジをゆるめる必要があります。
28
日本語
耐水性と耐衝撃性
お買い上げの腕時計に耐水性がある場合は、メートル
のマーク(WR_M) が表記されています。
耐水性深度 p.s.i.a. * 水面下水圧
30m/98ft 60
50m/164ft 86
100m/328ft 160
200m/656ft 284
ポンド/平方インチの絶対値
警告:耐水性を維持するため、お買い上げの腕時計に
200 メートルの耐水性があると表記されている場合以
外は、水面下でボタンを押したり、リューズを引き出
したりしないでください。
29
Page 20

リューズの位置
W217_JA_analoglayout_4 3/9/10 11:26 AM Page 30
日本語
1. 腕時計はクリスタル、リューズ、ケースがそっくり
そのままの状態の場合にのみ耐水性があります。
2. 腕時計はダイバーウオッチではありません。ダイ
ビングには使用しないでください。
3. 腕時計に塩水がかかった場合は、真水ですすいで
ください。
4. 耐衝撃性は腕時計の文字盤、またはケースバック
に表記されています。腕時計は ISO の耐衝撃性の
テストに合格するように設計されていますが、ク
リスタルを損傷しないよう注意してください。
INDIGLO®ナイトライト
ボタンまたはリューズを押してライトを作動させます。
®
ナイトライトに使用されているエレクトロル
INDIGLO
ミネッセント技術によって、夜間や暗い場所で腕時計の
文字盤全体が明るくなります。
30
日本語
日付のモデル
時間の設定
1) リューズをもっとも外
側まで引いて回し、正
しい時間に合わせま
す。
2) リューズを押してリス
タートします。ネジ止
め式のリューズは、リ
ューズを時計回りに回
して締めながら押し込みます。
日付つき腕時計:正確な日付機能を作動させるため、
正しい時間(A.M またはP.M.)に合わせてください。
曜日の設定:
1) リューズを「中間」の位置まで引いて、正しい曜
日が表れるまで時計回りに回します。もし曜日が
変わらない場合は、リューズを「外側」の位置ま
で引いて、時計回りまたは反時計回りに回して、
正しい曜日が表れるまで 24 時間ごとの必要な
回数を進めます。
31
CB A
Page 21

リューズの位置
W217_JA_analoglayout_4 3/9/10 11:26 AM Page 32
日本語
“QUICK DATE®” 機能の設定:
3 つの位置があるリューズ:
1) リューズを「中間」の位置まで引いて、正しい曜
日が表れるまで、時計回りまたは反時計回りに回
します。
2つの位置があるリューズ:
1) リューズを「外側」の位置まで引いて、曜日が変
わるまで時計回りに回します。正しい曜日が表れ
るまで繰り返します。日数が 31 日未満の月は日付
を調整してください。終了したら、リューズを
押し戻します。
注意: リューズを「中間」の位置にしたまま腕時計を
つけたり、保管したりすると、腕時計の動きを損傷する
ことがあります。リューズは必ずもとの位置に戻してく
ださい。腕時計を保管する間、電池を節約したい場合
は、リューズを「外側」の位置にしてください。
日付は10 PM と 2 AM. の間に変わります。この時間帯
に日付の設定をしないでください。もしこの時間帯に
日付を設定しなければならない場合は、腕時計を損傷
しないよう、リューズをなるべくゆっくりと回してく
ださい。
32
日本語
曜日/日付のモデル
時間の設定:
1) リューズを “C” の位
置まで引き出します。
2) リューズをいずれかの
方向に回して、正しい
時間に合わせます。
3) リューズを
日付の設定
1) リューズを “B” の位置まで引き出します。
2) リューズをいずれかの方向に回して、正しい日付
3) リューズを “A” の位置まで押し戻します。
曜日の設定:
1) リューズを “C” の位置まで引き出します。
2) リューズをいずれかの方向に回して、 24 時間サイ
3) リューズを “A” の位置まで押し戻します。
“A” の位
置まで押し戻します。
に合わせます。
クルで曜日を設定します。
33
曜日/日付
CB A
Page 22

W217_JA_analoglayout_4 3/9/10 11:26 AM Page 34
日本語
イージーセットアラーム
34
タイムキーピング/ INDIGLO®
ナイトラ イトのリュ ーズ
リューズを押してINDIGLO
ナイトラ イトを 作 動さ せ ま す
ABC
DEF
®
ナイ
時刻のマーカー
イージーセットアラーム
日付 & INDIGLO
1) “A” の位置から、タイムキーピングのリューズを押
して(腕時計ケースに向かって)、INDIGLO
トライトを作動させ、腕時計の文字盤を明るくし
ます。
®
ナイトライトつき
日本語
イージーセットアラームの日付と時間の設定
日付の設定:
1) タイムキーピングのリューズを “B” の位置にして、
タイムキーピングのリューズ、またはターニング
リングをいずれかの方向に回して日付を設定します。
時間の設定:
1) タイムキーピングのリューズを “C” の位置にして、
タイムキーピングのリューズ、またはターニング
リングをいずれかの方向に回して時間を設定します。
イージーセットアラームの設定
1) イージーセットアラームつきの腕時計には、2 種類
のアラームがあります:
2) 12 時間アラーム:アラームが作動している間、一
日に2 回、指定した時刻と分に鳴るか、または振動
します(アラームのリューズを “E” の位置にする
必要があります)。
3) 時間チャイム:作動中は 1 時間ごとに指定した分
に鳴るか、または振動します(アラームのリュー
ズを “F” の位置にする必要があります)。
35
Page 23

W217_JA_analoglayout_4 3/9/10 11:26 AM Page 36
日本語
12 時間アラームの設定:
1) アラームのリューズを “D” の位置にして、アラー
ムのリューズまたはターニングリングをいずれか
の方向に回して、アラームマーカーの時刻と分を
設定します。指定の時間にアラームが鳴るか、ま
たは振動するように作動させるには、アラームの
リューズを “E” の位置まで引き出します。ビープ
音が一度鳴って点滅、または一度振動して、12 時
間アラームが作動したことを示します。
2) 指定の時間(時刻と分)になると、アラームが鳴
って文字盤が点滅するか、または振動します。ア
ラームは解除するまで、12 時間ごとに繰り返しま
す。
注意: アラームのリューズが “D” の位置にあると、ア
ラームは解除されます。
アラームを解除しないと、20 のビープ音と点滅の後、
または振動の後で自動的に止まりますが、12 時間後の
指定した時間にまた作動します。
36
日本語
時間チャイムの設定:
1) アラームのリューズを “D” の位置にして、アラー
ムのリューズまたはターニングリングをいずれか
の方向に回してアラームマーカーの分を設定しま
す。
2) アラームが指定の分に鳴るか、または振動する
ようにするには、アラームのリューズを“F”の
位置まで引き出します。ビープ音が 3 度鳴って点
滅、または一度振動して時間チャイムが作動した
ことを示します。
3) 指定した分になると、アラームが鳴って文字盤が
点滅するか、または振動し、アラームを解除する
まで、1 時間ごとに繰り返します。
注意: アラームのリューズが “D” の位置にあると、
アラームは解除されます。
アラームを解除しないと、20 のビープ音と点滅の
後、または振動の後で自動的に止まりますが、1 時
間後の指定した分にまた作動します。
37
Page 24

W217_JA_analoglayout_4 3/9/10 11:26 AM Page 38
日本語
永久カレンダー
お買い上げの永久カレンダーつき腕時計は、それぞれ
の月の日数を正確に維持します。うるう年も調整しま
す。お客様の腕時計の日付(月と年を含む)は、工場
で東部標準時間、グリニッジ標準時間、または香港標
準時間(腕時計をお買い上げの場所によって)にプリ
セットしてあります。お客様は時間のみを調整してく
ださい。
38
WED 14
時間、曜日
日付の設定
I
I
中間 外側
I
WED 14
I
日付の確認
(工場使用のみ)
日本語
時間の設定
時間を設定するには、リューズをもっとも外側まで引
き出して回します。曜日と日付は、真夜中を過ぎて時
間を設定すると自動的に変わります。曜日と日付の設
定は必要ありません。終了したらリューズを押し戻し
ます。
設定の後で、もし日付が正午に変わったら、時間を 12
時間前か後ろに進めて調整する必要があります。
もし間違ってリューズを「中間」の位置にして回す
と、日付の表示が一時的に変わりますが、日付の設定
には影響ありません。リューズをもっとも「外側」ま
で引き出し、時間を設定します。正しい日付の表示が
戻ります。
39
Page 25

W217_JA_analoglayout_4 3/9/10 11:26 AM Page 40
日本語
7 年間寿命の電池*
とライフタイムの無料交換**
腕時計の電池の交換が必要な場合は、TIMEX で交換す
るようにお勧めします。お客様の腕時計は、電池の交
換後、正しい時間と日付に合わせるよう再調整する必
要があります。腕時計を Timex に返送する場合は、郵
送料支払い済みの封筒(pre-paid shipper)をご利用く
ださい。郵送料支払い済みの封筒をご希望の方は
1-800-448-4639 へお問い合わせください。腕時計をお
買い上げの販売店にご用意してあることもあります。
または www.TIMEX.com をご覧ください。腕時計と一
緒に、郵送料と手数料(修理代ではありません)とし
て、米国では 8 ドルのチェックかマネーオーダー、カ
ナダでは 7 カナダドルのチェックかマネーオーダーを
同封してください。その他の国でも、Timex が郵送料
と手数料を請求させていただきますのでご了承くださ
い。
** 郵送料と手数料がかかります。*通常使用で
腕時計と一緒に特製のバンドや個人的な飾り
などを送ることは絶対にしないでください。
40
日本語
経過タイムリング
お買い上げの腕時計の文字盤の外側に回転式リングが
あり、分と対応する数字がある場合、これを経過タイ
ムリングとして使うことができ、アクティビティのス
タートからの経過タイムを計測、またはアクティビテ
ィの終わりのタイムをマークすることができます。
アクティビティをスタートから計るには:
アクティビティを開始するときに、その時間(時刻ま
たは分)にスタート/ストップのトライアングルを設定
します(下記の左図を参照)。終了したとき、そのア
クティビティがどのぐらいかかったかを見ます。
41
Page 26

W217_JA_analoglayout_4 3/9/10 11:26 AM Page 42
日本語
残りのタイムを計るには:
アクティビティを終了したい時刻または分の位置にト
ライアングルを設定し、ゴールに向かっての進行状況
をときどきチェックします。
前ページの右図に示されたように、分針が 12 時の位置
から 20 分過ぎたとき、アクティビティを止めます。
42
日本語
タキメーターリング
タキメーターの機能は、秒針と腕時計の文字盤の上の
スケールを使って、1 時間に何マイル(MPH)、1 時
間に何海里(knots)または1 時間に何キロメートル
(KPH)進むかのスピードを計ることができます。こ
れには計測する実際の距離をマイルまたはキロメート
ルで知っておく必要があります。
クロノグラフの秒針をゼロ(12 時の位置)にしてスタ
ートします。1 分以内に、秒針が 1 マイル(または 1
キロメートル)コースのレートを指します。もし 45
秒かかったとすると、針は 80 を指します ‒ 80 MPH
または 80 KPH となります。
最初の 1 分以内で、1 マイルまたは 1 キロメートル以
上を計測する場合、正確なレートを得るには、タキメ
ーターの数に距離をかけます:例えば 1.2 マイルを 45
秒で進んだ場合、80 に 1.2 をかけて ‒ 96 MPH となり
ます。
43
Page 27

W217_JA_analoglayout_4 3/9/10 11:26 AM Page 44
日本語
コンパスリング
お買い上げの腕時計の文字
盤の周りに可動式リングが
あり、“N”, “E”, “W”, “S”
(コンパスの方向)の文字
か、またはコンパスの方角
がマークされている場合は、
これをコンパス代わりとして方向を
読むことができます。
1) 腕時計を平らな面に置くか、また
は腕時計の文字盤が地面と平行に
なるようにします。
2) 時刻針が太陽を指すようにしま
す。
3) 午前中は、“S” (南)のマーカーが時刻針と
12:00 の中間になるまでリングを回します(時刻針
の後で、または時刻針と12:00 の間の最短の間隔内
で)。
4) 午後は、“S” が時刻針の前で、時刻針と12:00 の中
間になるまでリングを回します。
44
S
12
1
11
10
9
8
E
5
7
6
日本語
W
2
3
4
N
ブレスレットの調整
(下記のブレスレットの調整は腕時計のすべてのモデル
に適用します)。
スライド式留め金ブレスレット
1. ロッキングプレートを開けます。
2. ブレスレットが希望の長さになるように留め金を
動かします。
3. ロッキングプレートを
しっかりと持ち、ブレ
スレットの下にある溝
とかみ合わされるまで
留め金を前後にスライ
ドさせます。
4. ロッキングプレートが
カチッと締まるまで押
し下げます。力を入れすぎると、留め金を損傷す
ることがあります。
45
Page 28

W217_JA_analoglayout_4 3/9/10 11:26 AM Page 46
日本語
折り重ね式留め金
ブレスレット
1. ブレスレットと留め金をつ
ないでいるスプリング
バーをみつけます。
2. 先の尖った道具を使って、
スプリングバーを押し、
ブレスレットをそっとねじ
ってはずします。
3. 手首の長さを決めたら、
正しい下穴にスプリングバ
ーを差し入れます。
4. スプリングバーを押し下
げ、上穴にあててリリース
し、定位置にはめ込みます。
46
図1
図2
図3
日本語
ブレスレットのリンクの取りはずし
リンクの取りはずし:
1. ブレスレットを垂直に立
てて置き、先の尖った道
具をリンクの隙間に入れ
ます。
2. リンクがはずれるまで、
力をいれてピンを矢印の方向に押します(リンク
ははずれにくいように設計されています)。
3. 必要な数のリンクをはずすまで繰り返します。
接続:
1. ブレスレットの部分を
接続します。
2. ピンを矢印と反対の方
向に押してリンクに戻
します。
3. ブレスレットと平らに
なるまで、ピンをしっ
かりと押し込みます。
47
Page 29

W217_JA_analoglayout_4 3/9/10 11:26 AM Page 48
日本語
電池
Timex では販売店または時計専門店で腕時計の電池を
交換するように強くお勧めします。リセットボタンが
ある場合は、電池交換の際に押してください。電池の
種類はケースバックに表記されています。電池の寿命
は一定の使用条件を仮定して概算したものです。電池
の寿命は実際の使用方法によって異なります。
電池を焼却しないでください。再充電はできません。
はずした電池はお子様の手が届かないように注意して
ください。
48
日本語
TIMEX 国際保証書
お買い上げの TIMEX®腕時計は、お買い上げの日から1 年
間、Timex Group USA, Inc. の製造上の欠陥に対して保証さ
れています。Timex および世界各地の関連会社がこの国際
保証書を履行します。
Timex は当社の判断に基づいて、お客様の腕時計を新品ま
たは再調整して検査済みの部品を使って修理するか、あるい
は同等または類似のモデルと交換する場合もありますのでご
了承ください。重要 この保証は下記の場合に起きた腕時
計の欠陥、または損傷については適用されません:
1) 保証期間後
2) 腕時計が正規の Timex 販売店以外から購入された場合
3) Timex 以外によって修理が行われた場合
4) 事故、改造、乱用によって生じた場合
5) レンズまたはクリスタル、ストラップまたはバンド、腕
時計のケース、付属品または電池。Timex ではこれらの
交換は有料とさせていただくことがあります。
この保証およびここに含まれる救済は排他的なものであり、
商品性または特定目的への適合性に関する黙示保証を含め、
明示的にも黙示的にも他のすべての保証に代わるものです。
Timex はいかなる特別損害、付随損害、間接損害に対して
も責任は負いません。国や州によっては、黙示保証に対する
制限や損害に対する除外もしくは制限を認めないこともあり
ますので、これらの制限が適用されないこともあります。
49
Page 30

W217_JA_analoglayout_4 3/9/10 11:26 AM Page 50
日本語
この保証はお客様に特定の法的権利を与えるもので、国や州
によって異なる他の権利を有する場合もあります。
保証によるサービスを受けるには、お客様の腕時計を
Timex 、Timex の関連会社、または腕時計をお買い上げに
なった Timex 販売店にご返送ください。腕時計と一緒に、
腕時計修理クーポンのオリジナルに記入してください。また
米国とカナダのみでは、腕時計修理クーポンのオリジナルに
記入するか、またはお客様のお名前、ご住所、電話番号、購
入日、購入場所を明記した報告書を同封してください。腕時
計と一緒に、郵送料と手数料(修理代ではありません)とし
て、米国では 8 ドルのチェックかマネーオーダー、カナダ
では 7 カナダドルのチェックかマネーオーダー、英国では
2.5 ポンドのチェックかマネーオーダーを同封してくださ
い。その他の国でも、Timex が郵送料と手数料を請求させ
ていただきますのでご了承ください。腕時計と一緒に特製の
バンドや個人的な飾りなどを送ることは絶対にしないでくだ
さい。
保証についての詳細は下記の電話番号にお問い合わせくださ
い:
アジア:+852 27407311、ブラジル:+55 11 3068 3500、
米国:+1 800 448 4639、カナダ:1 800 263 0981、カリブ
海諸国、バミューダ、バハマ:+1 501 370 5775 (U.S.)、フ
ランス:+33 3 81 63 42 00、ドイツ/オーストリア:
+49 662 88921 30、メキシコ、中米:01 800 01 06000
50
日本語
(U.S.)、ポルトガル:+351 212 555 460、英国、中東、
アフリカ:+44 20 8687 9620。
その他の地域については、最寄りの Timex 販売店、または
Timex 販売代理店にお問い合わせください。カナダ、
米国、その他の特定地域によっては、お客様が工場でのサー
ビスを受けやすいように、Timex 販売店に郵送料支払い済
みで、宛名を記載した封筒(Watch Repair Mailer)をご用
意しておりますのでご利用ください。
©2010 Timex Group USA, Inc. TIMEX と QUICKDATE は
Timex Group USA, Inc. の登録商標です。INDIGLO は米国お
よびその他の国で、Indiglo Corporation の登録商標です。
51
Page 31

W217_CS_analoglayout_4 3/9/10 11:01 AM Page CSii
感谢您选购TIMEX®手表。
TIMEX®手表
请仔细阅读以下说明,以
了解Timex手表的操作方法。
您的手表不一定具备本手册描述的全部功能。
有关详细信息,请访问:
www.timex.com
Page 32

W217_CS_analoglayout_4 3/9/10 11:01 AM Page CSiv
目录
54 如何启用手表
55 防水防震
56 INDIGLO
57 日期显示型手表
59 星期/日期显示型手表
60 简便闹铃
69 测速计刻度环
®
夜间照明灯
64 万年历
67 计时刻度环
70 罗盘刻度环
71 如何调整表带
73 拆卸表带环扣
74 电池
75 国际保修规定
简体中文
Page 33

W217_CS_analoglayout_4 3/9/10 11:01 AM Page 54
简体中文
如何启用手表
要启用手表,请从表冠下方揭掉塑料保护罩,然后将表
冠按向表壳。此时,秒针将以1秒为间隔开始向前走动。
有些高深度防水表型需要将表冠旋入固定,以确保 防水
性。如果您的表壳上有带镙纹的凸起部分,则必须在设
置好手表后将表冠旋入。
旋入时,请将表冠紧贴带螺纹的凸起部分,同时沿顺时
针方向旋转表冠。不断旋转直到将表冠拧紧。下一次设
置手表时,需要先拧开表冠(沿逆时针方向)才能将其
拔出。
54
简体中文
防水防震
如果您的手表具有防水性能,则会显示米数刻度
(WR_M)。
防水深度 p.s.i.a. * 水面以下水压
30 /98 60
50 /164 86
100 /328
200 /656 284
*按磅计算的每平方英寸压力绝对值
警告:为保持防水性能,请勿在水中按任何键钮或将表
冠拉出,除非您的手表标明其防水深度为200米。
160
55
Page 34

W217_CS_analoglayout_4 3/9/10 11:01 AM Page 56
简体中文
1. 只有在晶片、表冠和表壳保持完整无损的情况下,
手表才具有防水性。
2. 本表非跳水用手表,
不宜在跳水时使用。
3. 接触盐水后,请用清水冲洗。
4. 表盘或表壳背面会注明防震性能。
本表的防震设计可通过ISO国际标准测试。
但应注意避免损坏水晶。
INDIGLO®夜间照明灯
按下键钮或表冠打开照明灯。INDIGLO®夜间照明灯采
用了电致发光技术,可在夜间和低光度环境下照亮整个
表盘。
56
简体中文
日期显示型手表
时间设置:
1) 将表冠全部拔出,然后
转动调至正确的时间。
2) 将表冠按回,
重新启动计时。
如为旋入式表冠,
则要按住表冠,
同时沿顺时针方
向把它拧紧。
带日期显示功能的手表:请注意调准时间 (A.M.或P.M.)
以便正常使用日期功能。
星期设置:
1) 将表冠拔出至“中间”位置,并沿顺时钟方向拧
动,直至显示正确的星期。如果星期没有变化,
则请将表冠拔出至“外部”位置,并沿顺时针方向
或逆时针方向拧动24小时内的相应时数,直至显示
正确的星期。
57
CB A
Page 35

W217_CS_analoglayout_4 3/9/10 11:01 AM Page 58
简体中文
“快捷日期®”功能设置:
3档表冠:
1) 将表冠拔出至“中间”位置,并沿顺时针方向或逆
时针方向拧动,直至显示正确的日期。
2档表冠:
1) 将表冠拔出至“外部”位置,并沿顺时针方向拧
动,直至日期发生变动。反复旋转,直到显示正确
的日期。月份不足31天时,请相应地调整日期。
完成后将表冠按回。
注意:表冠处于“中间”位置时佩戴或存放手表将会损坏
机芯。请始终将表冠返回正常位置,或如果您希望在存放
手表时延长电池寿命,请使表冠处于“外部”位置。
日期功能将在每天的10 PM和2 AM之间使日期前进一
天。请避免在这一时段设置日期。如果要在这一时段设
置,请缓慢地旋转表冠,以避免损坏手表。
58
简体中文
星期/日期显示型手表
时间设置:
1) 将表冠拔出至“C”档。
2) 沿任意方向旋转表冠调
至正确的时间。
3) 将表冠推入至“A”档。
日期设置:
1) 将表冠拔出至“B”档。
2) 沿任意方向旋转表冠调
至正确的日期。
3) 将表冠推入至“A”档。
星期设置:
1) 将表冠拔出至“C”档。
2) 沿任意方向按24小时周期旋转表冠以设置星期。
3) 将表冠推入至“A”档。
59
CB A
Page 36

W217_CS_analoglayout_4 3/9/10 11:01 AM Page 60
简体中文
简便闹铃
®INDIGLO
INDIGLO
A B C
D E F
简便闹铃
的日期与INDIGLO
1) 将计时表冠从“A”档(沿表壳方向)推入即可启动
INDIGLO
®
夜间照明灯
®
夜间照明灯并照亮表盘。
60
简体中文
简便闹铃的日期与时间设置
日期设置:
1) 先将计时表冠放在“B”档,然后沿任意方向旋转计时
表冠或旋转环来设置日期。
时间设置:
1) 先将计时表冠放在“C”档,然后沿任意方向旋转计时
表冠或旋转环来设置时间。
简便闹铃设置
1) 带简便闹铃功能的表型配有两种闹铃:
2) 12小时闹铃:只要闹铃处于启动状态,每天会在设定
的时分闹响或震动两次。(闹铃表冠必须放在“E”档。)
3) 每小时闹铃:启动后每小时会在设定的分钟闹响或
震动。(闹铃表冠必须放在“F”档。)
61
Page 37

W217_CS_analoglayout_4 3/9/10 11:01 AM Page 62
简体中文
12小时闹铃设置:
1) 先将闹铃表冠放在“D”档,然后沿任意方向旋转闹铃
表冠或旋转环来设置闹铃的小时和分钟值。将闹铃
表冠向外拔出至“E”档,即可启动闹铃,并在设定的
时间闹响或震动。手表发出蜂鸣声或闪烁一次,或
震动一次,即表示12小时闹铃已启用。
2) 到了设定的时间(时分),闹铃会闹响,表盘会闪
烁或震动,并会每隔十二小时不断重复,除非把闹
铃关闭。
注:将闹铃表冠置于“D”档即可关闭闹铃。
如果不把它关闭,闹铃会在鸣响或闪烁20次后自动停
止闹音或震动,并会在十二小时以后的 设定时间重新闹
响。
62
简体中文
每小时闹铃设置:
1) 先将闹铃表冠放在“D”档,然后沿任意方向旋转闹铃
表冠或旋转环来设置闹铃的分钟值。
2) 只要将闹铃表冠向外拔出至“F”档,即可启动闹铃,
并在设定的分钟闹响或震动。手表发出蜂鸣声或闪
烁三次,或震动一次,即表示每小时闹铃 已启用。
3) 到了设定的分钟,闹铃会闹响,表盘会闪烁或震
动,并会每隔一小时在设定的时间不断重复,
除非把闹铃关闭。
注:将闹铃表冠置于“D”档即可关闭闹铃。
如果不把它关闭,闹铃会在鸣响或闪烁20次后自动
停止闹音或震动,并会在一小时以后的设定时间重
新闹响。
63
Page 38

W217_CS_analoglayout_4 3/9/10 11:01 AM Page 64
简体中文
万年历
带万年历的表型准确记录每月的日期数。同时具有闰年
调校功能。您手表内的日期(包括月份和年份)均由 厂
家按东部标准时间、格林威治时间或香港标准时间(视
购表地点而异)预先进行了设置。您只需要调校一下时
间。
外部位置
设置时间
星期、日期
64
WED 14
I
I
I
WED 14
I
检查日期
(仅供工厂使用)
中间位置
简体中文
时间设置
设置时间时,只需将表冠全部拉出,然后旋转调整。所
调时间一旦经过午夜,星期和日期就会自动变更;星期
和日期设置没有其它额外步骤。完成后将表冠按回。
设置完成后,如果日期变更发生在中午,则需要把时间
向前或向后调12个小时。
如果在调整时不小心把表冠放在中档,日期只会暂时有
所变动,而日期设置并未受任何影响。只需将表冠全部
拔出,然后旋转设置时间。即可恢复正确的日期显示。
65
Page 39

W217_CS_analoglayout_4 3/9/10 11:02 AM Page 66
简体中文
7年电池寿命
*并免费终身更换**
如需更换电池,我们建议仅使用TIMEX电池。换好电池
后,需要重新校准您的手表的时间和日期。将手表退还
给Timex时,请使用邮资预付的托运公司。请致电
1-800-448-4639、前往您 购置手表的商店或访问
www.TIMEX.com索取有关邮资预付托运公司的信息。
请随表按以下费率寄交邮费和手续费 (不属于修理费):
美国用户请寄一张8.00美元的支票或汇票;加拿大用户
请寄一张7.00加元的支票或汇票;其他国家和地区的用
户,Timex会相应收取邮费和手续费。
**将收取托运费用。*在正常使用情况下。
切勿在寄交的包裹内附带特殊款式的表带或其他具
有个人价值的物品。
66
简体中文
计时刻度环
如果您的手表表盘上配有一个可以旋转并带分钟刻度的
外环,则可使用这个计时刻度环来为某一活动的过程从
头开始计时,或按结束时间倒计时。
为某一活动从头开始计时:
将Start/Stop (开始/停止) 三角设定在活动开始的时间
(小时或分钟) (如下左图)。活动结束时即可看到所花费的
时间。
67
Page 40

W217_CS_analoglayout_4 3/9/10 11:02 AM Page 68
简体中文
计量剩余的时间:
将三角设定在您希望完成活动的具体小时或分钟刻度,
并定时查看手表以了解进度。
在上一页示意图的右图中,当分针到达某钟点20分时,
即可停止计时。
68
简体中文
测速计刻度环
通过使用长秒针和表盘上壁的刻度,可以用测速计功能
按英里(MPH)、海里 (knots) 或公里(KPH)测量时速。您
事先要知道按英里或公里计算的实际 行程距离。
开始计时的时候秒针要处于零位(即12点钟位置)。在
第一分钟内,秒针将指向一英里(或一公里)行程的时
速:如果花了45秒钟,秒针会指向相应位置的80 - 即
80 MPH(英里/小时)或 80 KPH(公里/小时)。
如果在第一分钟内所行距离大于一英里或一公里,则应
以测速计读数乘以该距离才能得到实际速度:假如您在
45秒内的行程为1.2英里,则应以80乘以1.2 – 96 MPH。
69
Page 41

W217_CS_analoglayout_4 3/9/10 11:02 AM Page 70
简体中文
罗盘刻度环
如果您的手表沿表盘配有一个
可移动环并刻有 “N” “E” “W”
“S” 的字样(表示四个罗盘
方向)或罗盘度数,您即可利
用这一功能来了解 大致的罗盘
方向读数。
1) 将手表放在平面上或手持并 使之与
地面保持平行。
2) 找到太阳并使小时针对准太阳
方向。
3) 如时间为上午,则需旋转刻度环使
“S”(南)标记处于小时针和12:00
的中间位置(以小时针之后或小
时针与12:00之间的最短距离为
准)。
4) 如时间为下午,则需旋转刻度环使“S”标记处于小时
针之前并在小时针与12:00之间的中间位置。
70
S
12
1
11
10
9
8
E
5
7
6
简体中文
W
2
3
4
N
如何调整表带
(各表型均可能出现与以下有关表带的描述略有不符的情
形)。
滑扣式表带
1. 打开锁盖。
2. 移动搭扣,使表带达到
所需长度。
3. 用力按住锁盖并来回滑
动搭扣,直到搭扣被卡
入表带底侧的槽内。
4. 将锁盖按下卡紧。请勿
过分用力,否则可能损坏搭扣。
71
Page 42

W217_CS_analoglayout_4 3/9/10 11:02 AM Page 72
简体中文
翻扣式表带
1. 找到 连接表带
和搭扣的弹簧轴。
2. 用一个带尖头的工具将弹簧
轴推进去,然后轻轻扭动表
带,使其脱扣。
3. 确定好腕长之后,将弹簧轴
插入正确的底端轴孔。
4. 将弹簧轴按入,与上端轴孔
对齐,然后松开使之锁定到
位。
72
图1
图2
图3
简体中文
拆卸表带环扣
拆卸环扣:
1. 垂立放置表带,并用带
尖头的工具插入环扣上
的针口。
2. 沿箭头方向用力推挤插
针,使环扣脱节(插针
经专门设计,难以拆卸
)。
3. 重复上述步骤,直到拆掉所有不需要的环扣。
重新组装:
1. 将表带各配件重新接
好。
2. 按箭头反方向把插针推
入环扣。
3. 用力将插针按入表带,
直到针尾与孔口保持齐
平。
73
Page 43
W217_CS_analoglayout_4 3/9/10 11:02 AM Page 74
简体中文
电池
Timex强烈建议由零售商店或钟表店来更换电池。在适
用情况下,更换电池时应按下重置(reset)键。电池类型
注明在 表壳后。电池寿命是根据对使用方式的某些假设
而估计确定的;电池寿命长短取决于实际使用方式。
切勿将电池扔到火中。请勿为电池充电。请将拆下的电
池放在远离儿童的地方。
74
简体中文
TIMEX国际保修规定
Timex Group USA, Inc.为您的TIMEX 手表提供自最初购买日
算起、为期一年的制造缺陷保修。Timex及其遍布全球的联属
机构都会承诺这项国际保修义务。
请注意,Timex在为您修理手表时,既可能安装新配件,也可
能安装经过完全修复和检验的配件,也许还会以相同或近似型
号加以更换。重要说明—请注意,本保修服务不包括在以下情
况中出现的手表故障或损坏:
1) 保修期已过;
2) 手表并非从经授权的Timex零售店直接购买;
3) 由 Timex 以外的人进行维修;
4) 意外事故、自行拨弄或使用不当;以及
5) 晶片或水晶、表带或表链、表壳、附件或电池受损。
Timex会为更换这些配件向您收取一定费用。
本保修规定及其所含补偿条款具有专有性质,并取代所有其它
明示或暗示的保修承诺,包括任何对适销性和适宜任何具体目
的的暗示保证。TIMEX对任何特别、附带或因之而产生的损失
概不负责。部分国家/地区和州不允许 限制暗示性保证,也不
允许排除或限制有关损失,因此上述限制可能对您无效。本保
修规定赋予您特定的合法权利,同时因所在国家或地区而异,
您可能还享有其它权利。
如需保修服务,请将您的手表退还给Timex、其联属机构或购
买该表的Timex零售店,同时附上填好的“手表维修单”
(Watch Repair Coupon) 原件。如果您在美国或加拿大,则可
75
Page 44

W217_CS_analoglayout_4 3/9/10 11:02 AM Page 76
简体中文
附上填好的“手表维修单”原件或一份书面声明,其中注明您
的姓名、住址、电话号码以及购买日期和地点。请随表按以下
费率寄交邮费和 手续费(不属于修理费):美国用户请寄一张
8.00美元的支票或汇票;加拿大用户请寄一张7.00加元的支票
或汇票;英国用户则请寄一张2.50英镑的支票或汇票。其他国
家/地区的用户,Timex会相应收取邮费和手续费。切勿在寄
送的包裹内夹带特殊款式的表带或其他个人贵重物品。有关保
修的其它信息,请使用下列任一号码来电恰询:
亚洲请致电 +852 27407311;巴西请致电+55 11 3068 3500;
美国请致电+1 800 448 4639;加拿大请致电1 800 263 0981;
加勒比、百慕大及巴哈马地区请致电+1 501 370 5775 (美国);
法国请致电+33 3 81 63 42 00;德国/奥地利请致电+49 662
88921 30;墨西哥和美洲中部请致电01 800 01 06000
(美国);葡萄牙请致电+351 212 555 460;英国、
中东及非洲请致电+44 20 8687 9620。
其它地区请与当地Timex零售商或Timex经销商联系并了解有
关保修信息。在加拿大、美国和部分其他地区,参与有关计划
的Timex零售商可为您提供一个邮资已付并印好收件地址的“
手表修理信封”,以便您获得厂家服务。
©2010 Timex Group USA, Inc.TIMEX和QUICKDATE均为
Timex Group USA, Inc.的注册商标。INDIGLO为Indiglo
Corporation在美国和其它国家的注册商标。
76
简体中文
77
Page 45

W217_RU_W217_RU 3/9/10 11:02 AM Page RUii
Поздравляем Вас с покупкой часов TIMEX®.
ЧАСЫ TIMEX
Пожалуйста, внимательно прочитайте инструкцию
по эксплуатации, чтобы понять, как правильно
пользоваться Вашими часами Timex.
В приобретённой Вами модели могут отсутствовать
те или иные функции, описание которых приводится
в настоящем буклете.
Для получения дополнительной информации
обращайтесь на сайт
www.timex.com
®
Page 46

W217_RU_W217_RU 3/9/10 11:02 AM Page RUiv
РУССКИЙ
ОГЛАВЛЕНИЕ
80 С чего начать настройку часов
81 Водонепроницаемость и ударопрочность
82 Ночная подсветка Indiglo
83 Модели с окошком даты
86 Модели с окошком дня недели/даты
88 Упрощённый режим установки будильника
93 Вечный календарь
96 Кольцо интервала времени
99 Кольцо тахометра
100 Кольцо компаса
101 Регулирование браслета
103 Удаление лишних звеньев браслета
105 Батарейка
106 Гарантия
®
Page 47

W217_RU_W217_RU 3/9/10 11:02 AM Page 80
РУССКИЙ
С ЧЕГО НАЧАТЬ НАСТРОЙКУ ЧАСОВ
Удалите из-под часовой головки блокировочную
вставку. Надавив на головку до упора, переведите её
в рабочее положение. Секундная стрелка начнёт
двигаться с интервалом в одну секунду.
В некоторых моделях часов, водонепроницаемых на
большой глубине, необходимо “вкрутить” головку
для обеспечения водонепроницаемости. Если на
корпусе Ваших часов имеется выступ с винтовой
резьбой, необходимо вкрутить головку после
настройки часов.
Для того чтобы вкрутить часовую головку, прижмите
ее сильно к выступу с винтовой резьбой и,
придерживая, вращайте головку по часовой стрелке.
Продолжайте завинчивать головку до тех пор, пока
она не будет плотно закреплена. В следующий раз,
когда Вам будет необходимо произвести настройку
часов, для того чтобы выдвинуть головку, Вы
должны будете ее отвинтить (против часовой
стрелки).
80
РУССКИЙ
ВОДОНЕПРОНИЦАЕМОСТЬ
И УДАРОПРОЧНОСТЬ
Если Ваши часы водонепроницаемы, на них будет
обозначена соответствующая глубина в метрах
(WR_M).
Глубина уровня
водозащиты
30м/98 футов 60
50м/164 фута 86
100м/328 футов 160
200м/656 футов 284
*абсолютное давление в фунтах на кв. дюйм
Чтобы сохранять водонепроницаемость любых
часов, не вытягивайте заводную головку, когда часы
погружены в воду. Более того, не следует нажимать
кнопки на часах с глубиной уровня водозащиты
меньше 200 метров, когда часы погружены в воду.
Любое из этих действий может привести к
попаданию воды в корпус часов.
p.s.i.a. *Давление
водяного столба ниже
поверхности
81
Page 48

W217_RU_W217_RU 3/9/10 11:02 AM Page 82
РУССКИЙ
1. Часы сохраняют водонепроницаемость только до
тех пор, пока стекло циферблата, кнопки и
корпус остаются неповреждёнными.
2. Часы не являются водолазными часами и не
предназначены для ныряния.
3. После контакта с морской водой часы следует
сполоснуть в пресной воде.
4. Противоударные модели имеют
соответствующую маркировку на лицевой
стороне часов или задней части корпуса. Такие
часы отвечают требованиям MOC по
ударопрочности. Тем не менее, следует избегать
повреждения стекла циферблата.
НОЧНАЯ ПОДСВЕТКА INDIGLO
Для освещения циферблата нажмите кнопку или
заводную головку. Электролюминесцентная
технология, используемая в устройстве ночной
подсветки INDIGLO
ночью, а также в условиях слабого освещения.
®
, освещает весь дисплей часов
82
®
РУССКИЙ
МОДЕЛИ С ОКОШКОМ ДАТЫ
УСТАНОВКА
ВРЕМЕНИ:
1) ВЫТЯНИТЕ заводную
головку в самое
крайнее положение и
вращайте до тех пор,
пока не будет
выставлено нужное
время.
2) Чтобы включить ход, верните головку в исходное
положение. У часов с “вкручиваемой” головкой
её нужно вдавить, одновременно вращая
головку ПО ЧАСОВОЙ СТРЕЛКЕ, чтобы
зафиксировать положение.
83
ДАТА
C B A
ПОЛОЖЕНИЕ
ЗАВОДНОЙ
ГОЛОВКИ
Page 49

W217_RU_W217_RU 3/9/10 11:02 AM Page 84
РУССКИЙ
Часы с окошком даты: для обеспечения правильной
установки даты проверьте, какое время дня
установлено на Ваших часах (AM – до полудня,
PM – после полудня).
УСТАНОВКА ДНЯ НЕДЕЛИ
1) ВЫТЯНИТЕ головку в “среднее” положение и,
вращая ПО ЧАСОВОЙ СТРЕЛКЕ, установите
соответствующий день недели. Если день недели
не меняется, вытяните головку в “крайнее”
положение и проверните нужное количество 24часовых циклов ПО или ПРОТИВ ЧАСОВОЙ
СТРЕЛКИ, пока не появится правильный день
недели.
ФУНКЦИЯ “QUICK DATE”
(ЭКСПРЕСС-УСТАНОВКА) ДАТЫ
Заводная головка с 3-мя положениями:
1) ВЫТЯНИТЕ головку в “среднее” положение и
вращайте её ПО или ПРОТИВ ЧАСОВОЙ
СТРЕЛКИ, пока не появится соответствующая
дата.
®
84
РУССКИЙ
Заводная головка с 2-мя положениями:
1) Вытяните головку в “КРАЙНЕЕ” положение и
вращайте её ПО ЧАСОВОЙ СТРЕЛКЕ, пока дата не
изменится. Продолжайте вращать до тех пор, пока
не появится соответствующая дата. В дальнейшем
подстройка даты будет необходима, если в
месяце меньше 31 дня. По окончании процедуры
верните головку в исходное положение.
Внимание: использование или хранение часов
с заводной головкой, находящейся в ''среднем''
положении, приведет к повреждению хода. Всегда
возвращайте заводную головку в нормальное
положениe или, если Вы хотите продлить срок
службы батарейки, при хранении часов оставьте
заводную головку в ''крайнем'' положении.
Функция автоматического изменения даты
срабатывает в период между 22:00 ночи (10 PM)
и 2:00 утра (2 AM). Старайтесь избегать установку
даты в указанный период времени. Если Вы все же
пытаетесь установить дату в этот период времени,
вращайте часовую головку очень медленно, чтобы
не повредить часы.
85
Page 50

W217_RU_W217_RU 3/9/10 11:02 AM Page 86
РУССКИЙ
МОДЕЛИ С ОКОШКОМ ДНЯ
НЕДЕЛИ/ДАТЫ
УСТАНОВКА
ВРЕМЕНИ
1) ВЫТЯНИТЕ
заводную головку в
положение “C”.
2) ВРАЩАЙТЕ головку
в любом
направлении, пока
не будет
выставлено
правильное время.
3) ЗАДВИНЬТЕ головку в положение “A”.
86
ДЕНЬ НЕДЕЛИ/
ДАТА
C B A
ПОЛОЖЕНИЕ
ЗАВОДНОЙ
ГОЛОВКИ
РУССКИЙ
УСТАНОВКА ДАТЫ
1) ВЫДВИНЬТЕ заводную головку в положение “В”.
2) ВРАЩАЙТЕ головку в любом направлении, пока
не будет выставлено правильное время.
3) ЗАДВИНЬТЕ головку в положение “A”.
УСТАНОВКА ДНЯ НЕДЕЛИ
1) ВЫДВИНЬТЕ заводную головку в положение “C”.
2) ПРОКРУТИТЕ головку до полного 24-часового
цикла в любом направлении для установки дня
недели.
3) ЗАДВИНЬТЕ головку в положение “A”.
87
Page 51

W217_RU_W217_RU 3/9/10 11:02 AM Page 88
РУССКИЙ
УПРОЩЁННЫЙ РЕЖИМ УСТАНОВКИ
БУДИЛЬНИКА
МАРКЕР МИНУТЫ
ГОЛОВКА ХРОНОГРАФА/
НОЧНОЙ ПОДСВЕТКИ INDIGLO®.
МАРКЕР ЧАСА
ПОВОРОТНОЕ
КОЛЬЦО
УСТАНОВКИ
БУДИЛЬНИКА
УПРОЩЁННАЯ УСТАНОВКА БУДИЛЬНИКА С
ДАТОЙ И НОЧНОЙ ПОДСВЕТКОЙ INDIGO
1) Из позиции “А” ЗАДВИНЬТЕ головку хронографа
(в направлении корпуса часов) для включения
ночной подсветки INDIGLO
циферблата часов.
НАЖМИТЕ ГОЛОВКУ. ЧТОБЫ
ВКЛЮЧИТЬ НОЧНУЮ ПОДСВЕТКУ
INDIGLO
A B C
DEF
ГОЛОВКА УСТАНОВКИ БУДИЛЬНИКА
ВЫДВИНЬТЕ ГОЛОВКУ В “КРАЙНЕЕ”
ПОЛОЖЕНИЕ ДЛЯ ЗАВОДА
БУДИЛЬНИКА
®
и освещения
88
ПОЛОЖЕНИЕ
ПОЛОЖЕНИЕ
®
РУССКИЙ
РЕЖИМ УСТАНОВКИ ДАТЫ И ВРЕМЕНИ ДЛЯ
МОДЕЛЕЙ С УПРОЩЕННОЙ УСТАНОВКОЙ
БУДИЛЬНИКА
УСТАНОВКА ДАТЫ
1) ВРАЩАЙТЕ ГОЛОВКУ ХРОНОГРАФА,
находящуюся в положении “В”, или
ПОВОРОТНОЕ КОЛЬЦО в любом направлении
для установки даты.
УСТАНОВКА ВРЕМЕНИ
1) ВРАЩАЙТЕ ГОЛОВКУ ХРОНОГРАФА,
находящуюся в положении “С”, или
ПОВОРОТНОЕ КОЛЬЦО в любом направлении
для установки времени.
ХАРАКТЕРИСТИКИ РЕЖИМА УПРОЩЁННОЙ
УСТАНОВКИ БУДИЛЬНИКА
1) Ваши часы с режимом упрощённой установки
будильника снабжены двумя типами
будильника:
2) Будильник с 12-часовой шкалой: звонит ИЛИ
вибрирует два раза в день в определённое
89
Page 52

W217_RU_W217_RU 3/9/10 11:02 AM Page 90
РУССКИЙ
время, пока будильник находится во
включённом состоянии (головка будильника
должна находиться в положении “E”).
3) Почасовой будильник: звонит ИЛИ вибрирует
каждый час в определённую минуту, пока
будильник находится во включённом состоянии
(головка будильника должна находиться в
положении “F”).
УСТАНОВКА БУДИЛЬНИКА С 12-ЧАСОВОЙ
ШКАЛОЙ
1) ВРАЩАЙТЕ ГОЛОВКУ БУДИЛЬНИКА,
находящуюся в положении “D”, или
ПОВОРОТНОЕ КОЛЬЦО в любом направлении
для установки маркеров часа и минуты. Для
включения режима звонка или вибрирования
будильника в установленное время ВЫДВИНЬТЕ
ГОЛОВКУ БУДИЛЬНИКА в положение “Е”.
Одиночный звуковой сигнал в сопровождении
освещения циферблата ИЛИ вибрация
продемонстрирует включение режима
будильника с 12-часовой шкалой.
90
РУССКИЙ
2) В установленное время (час и минуту) прозвучит
звуковой сигнал будильника, и осветится
циферблат, ИЛИ часы начнут вибрировать.
Будильник будет срабатывать каждые 12 часов,
если он не будет отключён.
ПРИМЕЧАНИЕ: Будильник отключён, когда
ГОЛОВКА БУДИЛЬНИКА находится в положении “D”.
Если будильник не отключён, он автоматически
прекратит звонить после 20 сигналов и световых
вспышек ИЛИ прекратит вибрировать. Будильник
сработает опять через 12 часов в установленное
время.
УСТАНОВКА ПОЧАСОВОГО БУДИЛЬНИКА
1) ВРАЩАЙТЕ ГОЛОВКУ БУДИЛЬНИКА,
находящуюся в положении “D”, или
ПОВОРОТНОЕ КОЛЬЦО в любом направлении
для установки маркера минуты.
2) Для включения режима звонка или
вибрирования будильника в установленное
время ВЫТЯНИТЕ ГОЛОВКУ БУДИЛЬНИКА в
положение “F”. Тройной звуковой сигнал в
91
Page 53
W217_RU_W217_RU 3/9/10 11:02 AM Page 92
РУССКИЙ
сопровождении световых вспышек ИЛИ
вибрация продемонстрирует включение режима
почасового будильника.
3) В установленное время (час и минуту) прозвучит
звуковой сигнал , и осветится циферблат, ИЛИ
часы начнут вибрировать. Будильник будет
срабатывать каждый час в установленную
минуту, если он не будет отключён.
ПРИМЕЧАНИЕ: Будильник отключён, когда
ГОЛОВКА БУДИЛЬНИКА находится в положении
“D”.
Если будильник не отключён, он автоматически
прекратит звонить после 20 сигналов и световых
вспышек ИЛИ прекратит вибрировать. Будильник
сработает опять в установленную минуту через
час.
92
РУССКИЙ
ВЕЧНЫЙ КАЛЕНДАРЬ
Вечный календарь на Ваших часах точно
отслеживает количество дней в каждом месяце.
Он также осуществляет корректировку дней в
високосном году. Дата (в том числе, месяц и год)
на Ваших часах заранее установлена на заводеизготовителе для часового пояса восточного
побережья Северной Америки, Гринвичского
меридиана или стандартного временного пояса
в Гонконге (в зависимости от того, где были
приобретены часы). Вы должны только выставить
время.
ПРОВЕРКА ДАТЫ
(ТОЛЬКО ДЛЯ ФАБРИЧНОГО
ИСПОЛЬЗОВАНИЯ)
WED 14
I
I
В СРЕДНЕМ
ПОЛОЖЕНИИ
WED 14
УСТАНОВКА ВРЕМЕНИ
ДНЯ НЕДЕЛИ, ДАТЫ
93
В КРАЙНЕМ
ПОЛОЖЕНИИ
I
I
Page 54

W217_RU_W217_RU 3/9/10 11:02 AM Page 94
РУССКИЙ
УСТАНОВКА ВРЕМЕНИ
Для установки времени необходимо просто вытянуть
головку в самое крайнее положение и повернуть.
День недели и дата поменяются автоматически, если
время установлено на после полуночи. Никаких
дополнительных операций для установки дня
недели или даты не требуется. По окончании
нажатием верните головку в исходное положение.
После установки, если дата меняется в полдень,
необходимо откорректировать время
соответствующим образом на 12 часов назад или
вперёд.
Если головка была случайно установлена в СРЕДНЕЕ
положение и повернута, дисплей даты временно
изменится, но установка даты не изменится. В таком
случае нужно просто вытянуть головку в самое
крайнее положение и установить время. На дисплее
появится соответствующая дата.
94
РУССКИЙ
БАТАРЕЙКА С 7-ЛЕТНЕЙ ГАРАНТИЕЙ*
И БЕСПЛАТНОЙ ЗАМЕНОЙ В ТЕЧЕНИЕ
ГАРАНТИЙНОГО ПЕРИОДА**
Фирма TIMEX настоятельно рекомендует обращаться
только к производителю часов для замены
батарейки. После замены батарейки необходимо
будет заново произвести калибровку для установки
правильного времени и даты. Для отправки Ваших
часов на фирму Timex воспользуйтесь специальной
предоплаченной почтовой упаковкой с уже
напечатанным адресом получателя. Эту упаковку
можно получить, позвонив по телефону 1-800-4484639 или обратившись к дистрибютеру, у которого
были приобретены часы, а также через сайт
www.TIMEX.com. Пожалуйста, включите оплату
почтовых расходов и затрат на упаковку (не
включённых в стоимость ремонта) в виде: чека или
платёжного поручения на сумму 8.00 долларов США
на территории США; чека или платёжного поручения
на сумму 7.00 канадских долларов на территории
Канады. В других странах фирма Timex предъявит
Вам счёт за почтовые расходы и затраты на упаковку.
95
Page 55

W217_RU_W217_RU 3/9/10 11:02 AM Page 96
РУССКИЙ
** Оплата расходов на пересылку и упаковку
производится за счет клиента. *При
эксплуатации в обычных условиях.
НИ В КОЕМ СЛУЧАЕ НЕ ПРИЛАГАЙТЕ К
ВАШЕЙ ПОСЫЛКЕ БРАСЛЕТ ОТ ЧАСОВ ИЛИ
КАКИЕ-ЛИБО ПРЕДМЕТЫ,
ПРЕДСТАВЛЯЮЩИЕ ДЛЯ ВАС ЛИЧНУЮ
ЦЕННОСТЬ.
КОЛЬЦО ИНТЕРВАЛА ВРЕМЕНИ
Если Ваша модель часов имеет поворотное внешнее
кольцо на циферблате с цифрами,
соответствующими минутам, Вы можете
использовать это кольцо интервала времени для
хронометрирования какого-либо события или
деятельности с момента их начала или для отметки
окончания этого события или деятельности.
96
РУССКИЙ
ДЛЯ ХРОНОМЕТРИРОВАНИЯ ДЕЯТЕЛЬНОСТИ
С МОМЕНТА ЕЁ НАЧАЛА
Установите треугольник Start/Stop (Старт/Стоп) на
время (час или минута), когда начнётся Ваша
деятельность (как показано ниже на левом рисунке).
По завершении, вы можете определить, сколько
времени продлилась указанная деятельность.
97
Page 56

W217_RU_W217_RU 3/9/10 11:02 AM Page 98
РУССКИЙ
ДЛЯ ИЗМЕРЕНИЯ ОСТАВШЕГОСЯ ВРЕМЕНИ
Установите треугольник в положение часа или
минуты, когда Вы хотите завершить Вашу
деятельность. Периодически проверяйте часы, чтобы
проследить сколько времени осталось до
достижения цели.
На рисунке справа на предыдущей странице
показано, что вы можете остановить время, когда
минутная стрелка достигнет позиции 20 минут после
часа.
98
РУССКИЙ
КОЛЬЦО ТАХОМЕТРА
Функция тахометра используется для измерения
скорости в милях/час (MPH), морских милях/час
(узлы) или км/ч. (KPH). Эта функция работает с
использованием секундной стрелки и масштабной
линейки на стене над циферблатом часов. При этом
Вам необходимо знать реальное расстояние, которое
необходимо пройти, в милях или километрах.
Установите секундную стрелку хронографа в нулевое
положение (позиция 12 часов). В течение первой
минуты секундная стрелка будет показывать
скорость для курса длиной в одну милю (или один
километр): если указанное время составляет 45
секунд, то стрелка покажет 80 в этой позиции, что
соответствует значениям 80 миль/час или 80 км/ч.
Если в течение первой минуты пройдено расстояние
более одной мили или километра, умножьте
значение тахометра на значение расстояния для
получения фактической скорости: если Вы прошли
1,2 мили за 45 секунд, умножьте 80 на 1.2.
Результат: 96 миль/час.
99
Page 57

W217_RU_W217_RU 3/9/10 11:02 AM Page 100
РУССКИЙ
КОЛЬЦО КОМПАСА
Если Ваши часы оснащены
подвижным кольцом с
маркерами сторон света
“N”, “E”, “W”, “S”(четыре
направления по компасу)
или указателями градусов,
вы можете использовать
эти функции для поиска
приблизительного азимута.
1) Положите часы на плоскую
поверхность или держите их
так, чтобы циферблат был
параллелен земле.
2) Определите положение солнца
и направьте часовую стрелку на солнце.
3) В режиме АМ (до полудня), поворачивайте
кольцо, пока маркер “S” (юг) не окажется
посередине между часовой стрелкой и 12:00
(после часовой стрелки или в пределах
кратчайшего расстояния между часовой стрелкой
и 12:00).
100
S
11
10
9
8
E
7
РУССКИЙ
4) В режиме РМ (после полудня), поворачивайте
кольцо, пока маркер “S” (юг) не окажется
12
W
1
2
3
4
5
6
N
посередине между часовой стрелкой и 12 часами.
РЕГУЛИРОВАНИЕ БРАСЛЕТА
(Один из приведённых ниже параграфов по
регулировке браслета относится к Вашей модели
часов)
БРАСЛЕТ СО СКОЛЬЗЯЩЕЙ ЗАСТЁЖКОЙ
1. Откройте блокировочную пластину.
2. Переместите застёжку до
нужной длины браслета.
3. Удерживая и прижимая
блокировочную пластину,
двигайте застёжку взадвперёд, пока она не
встанет в направляющие канавки на нижней
стороне браслета.
4. Закройте блокировочную пластину, вдавив её до
защёлкивания. Учтите, что избыточная сила
может привести к повреждению застёжки.
101
Page 58
W217_RU_W217_RU 3/9/10 11:02 AM Page 102
РУССКИЙ
БРАСЛЕТ С БЕЗОПАСНОЙ НАКЛАДНОЙ
ЗАСТЁЖКОЙ
1. Найдите подпружиненный
стержень, соединяющий
браслет с застёжкой.
2. С помощью инструмента с
острым концом нажмите
на этот стержень и
аккуратным поворотом
отсоедините браслет.
3. Определите размер
запястья, затем установите
стержень в
соответствующее нижнее
отверстие.
4. Нажмите на
подпружиненный
стержень, направьте в
верхнее отверстие и
отпустите, чтобы стержень
встал на место.
Рис. 1
Рис. 2
Рис. 3
102
РУССКИЙ
УДАЛЕНИЕ ЛИШНИХ ЗВЕНЬЕВ
БРАСЛЕТА
УДАЛЕНИЕ ЗВЕНЬЕВ
1. Поставьте браслет
торцом и вставьте
инструмент с острым
концом в открытое
отверстие звена.
2. Сильно нажмите штифт в направлении стрелки,
чтобы отсоединить звено (конструкция
предусматривает необходимость применения
усилия для отделения штифтов).
3. Повторяйте процедуру до тех пор, пока не будет
отсоединено нужное количество звеньев.
103
Page 59
W217_RU_W217_RU 3/9/10 11:02 AM Page 104
РУССКИЙ
СБОРКА:
1. Соедините элементы браслета.
2. Вставьте штифт обратно в звено в направлении,
противоположном
направлению стрелки.
3. Нажимайте на штифт
до тех пор, пока он не
будет надёжно
закреплён вровень с
кромкой.
104
РУССКИЙ
БАТАРЕЙКА
Фирма Timex настоятельно рекомендует обращаться
в магазин или к ювелиру для замены батарейки. При
необходимости после замены батарейки нажмите
переключатель внутреннего сброса. Тип батарейки
указан на задней стороне часов. Срок службы
батарейки оценивается на основании некоторых
допущений в отношении условий эксплуатации.
Срок службы батарейки может варьироваться в
зависимости от конкретных условий эксплуатации.
НЕ БРОСАЙТЕ БАТАРЕЙКУ В ОГОНЬ. НЕ
ПЕРЕЗАРЯЖАЙТЕ БАТАРЕЙКУ. ХРАНИТЕ
НЕЗАПАКОВАННЫЕ БАТАРЕЙКИ В
НЕДОСТУПНЫХ ДЛЯ ДЕТЕЙ МЕСТАХ.
105
Page 60

W217_RU_W217_RU 3/9/10 11:02 AM Page 106
РУССКИЙ
МЕЖДУНАРОДНАЯ ГАРАНТИЯ
НА ЧАСЫ TIMEX
Фирма Timex Group USA, Inc. гарантирует отсутствие в
ваших часах TIMEX®каких-либо производственных
дефектов на период до ОДНОГО ГОДА со дня
первоначальной покупки. Фирма Timex и её
международные филиалы признают настоящую
международную гарантию.
Пожалуйста, учтите, что фирма Timex может, на своё
усмотрение, отремонтировать ваши часы с
использованием новых или полностью
отремонтированных и прошедших инспекцию
компонентов или заменить изделием той же или
аналогичной модели. ВНИМАНИЕ: ПОЖАЛУЙСТА,
ИМЕЙТЕ В ВИДУ, ЧТО НАСТОЯЩАЯ ГАРАНТИЯ НЕ
РАСПРОСТРАНЯЕТСЯ НА ДЕФЕКТЫ ИЛИ ПОВРЕЖДЕНИЯ
ВАШИХ ЧАСОВ ПРИ СЛЕДУЮЩИХ ОБСТОЯТЕЛЬСТВАХ:
1) по истечении срока гарантии;
2) если часы не были куплены первоначально у
официального распространителя продукции фирмы
Timex;
3) если повреждения явились результатом ремонта или
обслуживания, не произведённого фирмой Timex;
4) если повреждения явились результатом аварии,
106
РУССКИЙ
вскрытия часов или других недозволенных действий;
кроме того,
5) гарантия не распространяется на стекло, ремешок
или браслет, футляр от часов, прочие
принадлежности и батарейку. Замена этих частей
может быть произведена фирмой Timex за
дополнительную плату.
НАСТОЯЩАЯ ГАРАНТИЯ И ПРЕДУСМОТРЕННЫЕ ЕЮ МЕРЫ
ЯВЛЯЮТСЯ ИСКЛЮЧИТЕЛЬНЫМИ И ЗАМЕНЯЮТ ВСЕ
ДРУГИЕ ГАРАНТИИ, ЯВНЫЕ ИЛИ ПОДРАЗУМЕВАЕМЫЕ,
ВКЛЮЧАЯ ЛЮБЫЕ ПОДРАЗУМЕВАЕМЫЕ ГАРАНТИИ
КОММЕРЧЕСКОГО КАЧЕСТВА ИЛИ ПРИГОДНОСТИ ДЛЯ
КАКОГО-ЛИБО СПЕЦИФИЧЕСКОГО ПРИМЕНЕНИЯ.
КОМПАНИЯ TIMEX НЕ НЕСЕТ НИКАКОЙ
ОТВЕТСТВЕННОСТИ ЗА КАКИЕ-ЛИБО ОСОБЫЕ,
ПОБОЧНЫЕ ИЛИ ВТОРИЧНЫЕ ПОВРЕЖДЕНИЯ. Некоторые
страны и штаты не допускают ограничений в отношении
подразумеваемых гарантий и не допускают исключений
или ограничений в отношении повреждений. В таком
случае на Вас не будут распространяться эти ограничения.
Настоящая гарантия предоставляет Вам конкретные
юридические права, но Вы можете иметь также и другие
права, варьируемые в зависимости от конкретной страны
или штата.
107
Page 61

W217_RU_W217_RU 3/9/10 11:02 AM Page 108
РУССКИЙ
Для получения гарантийного обслуживания, пожалуйста,
отправьте Ваши часы на фирму Timex, в одно из её
отделений или официальному распространителю её
продукции, у которого часы были куплены. Пожалуйста,
приложите заполненный оригинал Гарантийного талона
на ремонт часов, а в США и Канаде - заполненный
оригинал Гарантийного талона на ремонт часов или
сопроводительное письмо с указанием Вашего имени,
адреса, номера телефона, а также даты и места покупки
часов. Пожалуйста, включите оплату почтовых расходов и
затрат на упаковку (не включённых в стоимость ремонта)
в виде: чека или платёжного поручения на сумму 8.00
долларов США на территории США; чека или платёжного
поручения на сумму 7.00 канадских долларов на
территории Канады; чека или платёжного поручения на
сумму 2.50 английских фунтов стерлингов на территории
Великобритании. В других странах фирма Timex
предъявит Вам счёт за почтовые расходы и затраты на
упаковку. НИ В КОЕМ СЛУЧАЕ НЕ ПРИЛАГАЙТЕ К ВАШЕЙ
ПОСЫЛКЕ БРАСЛЕТ ОТ ЧАСОВ ИЛИ КАКИЕ-ЛИБО
ПРЕДМЕТЫ, ПРЕДСТАВЛЯЮЩИЕ ДЛЯ ВАС ЛИЧНУЮ
ЦЕННОСТЬ
Для получения дополнительной информации о гарантии,
пожалуйста, звоните по соответствующему номеру
телефона, приведённому ниже:
108
РУССКИЙ
Азия: 852-27407311, Бразилия: 55-11-3068-3500,
США: 1-800-448-4639, Канада: 1-800-263-0981,
страны Карибского бассейна, Бермуды и Багамские
острова: 1-501-370-5775(США), Франция: 33-3-81-6342-00, Германия/Австрия: 43-662-88921-30, Мексика и
Центральная Америка: 01-800-01-06000(США),
Португалия: 351-212-555-460, Великобритания,
Ближний Восток и Африка: 44-20-8687-9620.
В других регионах для получения дополнительной
информации о гарантии, пожалуйста, свяжитесь с
местным представителем или дистрибьютором фирмы
Timex. В Канаде, США и в некоторых других регионах,
некоторые дистрибьюторы фирмы Timex могут
предоставить Вам предоплаченные специальные
почтовые упаковки с уже напечатанным адресом
получателя для отправки часов в ремонт. Это облегчит для
Вас процесс получения фабричного обслуживания.
©2010 Timex Group USA, Inc. TIMEX и QUICKDATE
являются зарегистрированными торговыми марками
фирмы Timex Group USA, Inc. INDIGLO является
зарегистрированной торговой маркой корпорации Indiglo
Corporation в США и других странах.
109
Page 62
W217_NA_Cover_Analog_1_Cover 3/9/10 9:52 AM Page cvr1
W217 NA 111-095009
Page 63
W217_NA_Cover_Analog_1_Cover 3/9/10 9:52 AM Page cvr3
English page 2
Français page 28
Español página 58
Português página 88
Page 64

W217_NA_EN_analoglayout_4 3/9/10 9:52 AM Page ENi
TIMEX®WATCHES
Congratulations on purchasing your TIMEX®watch.
Please read these instructions carefully to
understand how to operate your Timex timepiece.
Your watch may not have all of the features
described in this booklet.
For more information, please visit:
www.timex.com
Page 65

W217_NA_EN_analoglayout_4 3/9/10 9:52 AM Page ENii
TABLE OF CONTENTS
2 How to Start Your Watch
3 Water and Shock Resistance
4 Indiglo
5 Date Models
7 Day/Date Models
8 Easy Set Alarm
12 Perpetual Calendar
15 Elapsed Time Ring
17 Tachymeter Ring
18 Compass Ring
19 How to Adjust Bracelet
21 Bracelet Link Removal
22 Battery
23 Warranty
ENGLISH
®
Night-Light
Page 66

W217_NA_EN_analoglayout_4 3/9/10 9:52 AM Page 2
ENGLISH
HOW TO START YOUR WATCH
To start your watch remove the plastic guard from
under the crown, then press the crown in against
the case. The second hand will begin advancing in
one-second intervals.
Some deep-depth water-resistant watches require
the setting crown to be screwed in to secure
water-resistance. If your watch case has a protrusion
with screw threads, the crown must be screwed in
after setting the watch.
To screw in, push the crown firmly against the
threaded protrusion and hold in while turning the
crown clockwise. Continue to screw in the crown
until it is tight. You will need to unscrew the crown
(counter-clockwise) before pulling it out the next time
you want to set your watch.
2
ENGLISH
WATER AND SHOCK RESISTANCE
If your watch is water-resistant, meter marking
(WR_M) is indicated.
Water-Resistance Depth p.s.i.a. * Water pressure
30m/98ft 60
50m/164ft 86
100m/328ft 160
200m/656ft 284
*pounds per square inch absolute
WARNING: TO MAINTAIN WATER-RESISTANCE,
DO NOT PRESS ANY BUTTONS OR PULL OUT
THE CROWN UNDER WATER UNLESS YOUR
WATCH IS INDICATED AS 200 METER WATERRESISTANT.
Below Surface
3
Page 67

W217_NA_EN_analoglayout_4 3/9/10 9:52 AM Page 4
ENGLISH
1. Watch is water-resistant only as long as crystal,
crown and case remain intact.
2. Watch is not a diver watch and should not be
used for diving.
3. Rinse watch with fresh water after exposure to
salt water.
4. Shock-resistance will be indicated on the watch
face or caseback. Watches are designed to pass
ISO test for shock-resistance. However, care
should be taken to avoid damaging the crystal.
INDIGLO®NIGHT-LIGHT
Press button or crown to activate light.
Electroluminescent technology used in the INDIGLO
night-light illuminates entire watch face at night and in
low light conditions.
4
ENGLISH
DATE MODELS
TO SET TIME:
1) PULL crown all the
way out and turn to
correct time.
2) Push crown in to
restart. For screw-in
setting crown, push
crown in while turning
CLOCKWISE to tighten.
Watches with date: Note correct time of day
®
(A.M or P.M.) for proper date function.
TO SET DAY:
1) PULL crown to “middle” position and turn
CLOCKWISE until correct day appears. If day does
not change, pull crown to “out” position and turn
CLOCKWISE or COUNTERCLOCKWISE through
necessary number of 24 hour periods until
correct day appears.
5
DATE
CB A
CROWN
POSITION
Page 68

W217_NA_EN_analoglayout_4 3/9/10 9:52 AM Page 6
ENGLISH
TO SET “QUICK DATE®” FEATURE:
3-Position Crown:
1) Pull crown to “Middle” position and turn CLOCKWISE or COUNTERCLOCKWISE until correct date
appears.
2-Position Crown:
1) Pull crown to “OUT” position and turn CLOCKWISE
until date changes. Repeat until correct date
appears. Adjust date when month has less than
31 days. Push crown in when finished.
Caution: Wearing or storing the watch with the crown
in the "middle" position will cause damage to the movement. Always return the crown to the normal position,
or if you wish to save the battery life while storing the
watch, leave the crown in the "out" position.
The date function advances the date between the
hours of 10 PM and 2 AM. Avoid setting the date
during this timeframe. If you attempt to set the date
during this time period, rotate the crown at a very
slow rate to avoid damaging the watch.
6
ENGLISH
DAY / DATE MODELS
TO SET THE TIME:
1) PULL the crown out
to the “C” position.
2) TURN the crown
either way to the
correct time.
3) PUSH in the crown to
the “A” position.
TO SET THE DATE:
1) PULL the crown out to the “B” position.
2) TURN the crown either way to the correct date.
3) PUSH in the crown to the “A” position.
TO SET THE DAY:
1) PULL the crown out to the “C” position.
2) TURN the crown either way for full 24 hour cycle
to set day.
3) PUSH the crown in to the “A” position.
7
DAY/DATE
CROWN
POSITION
CBA
Page 69

W217_NA_EN_analoglayout_4 3/9/10 9:52 AM Page 8
ENGLISH
EASY SET ALARM
MINUTE MARKER
TIMEKEEPING / INDIGLO®
D E F
ALARM CROWN
PULL CROWN “OUT” TO ACTIVATE
THE ALARM
®
NIGHT-LIGHT
8
NIGHT-LIGHT CROWN.
PUSH CROWN TO ACTIVATE
THE INDIGLO NIGHT-LIGHT
A B C POSITION
POSITION
HOUR MARKER
ALARM SET
TURNING RING
EASY SET ALARM
WITH DATE & INDIGLO
1) From the “A” position, PUSH the TIMEKEEPING
CROWN in (towards the watch case) to activate
the INDIGLO
dial.
®
Night-Light and illuminate the watch
ENGLISH
EASY SET ALARM DATE & TIME SETTINGS
TO SET THE DATE:
1) With the TIMEKEEPING CROWN in the “B” position
TURN the TIMEKEEPING CROWN or TURNING RING
in either direction to set the date.
TO SET THE TIME:
1) With the TIMEKEEPING CROWN in the “C” position
TURN the TIMEKEEPING CROWN or TURNING RING
in either direction to set the time.
EASY SET ALARM SETTINGS
1) Your easy set alarm watch is equipped with two
types of alarms:
2) 12-Hour Alarm: rings OR vibrates twice per day at
the desired hour and minute as long as the alarm
is activated. (Alarm crown must be in “E” position.)
3) Hourly Alarm: rings OR vibrates every hour at the
desired minute if activated. (Alarm crown must be
in “F” position.)
9
Page 70

W217_NA_EN_analoglayout_4 3/9/10 9:52 AM Page 10
ENGLISH
TO SET THE 12-HOUR ALARM:
1) With the ALARM CROWN in the “D” position,
TURN the ALARM CROWN or TURNING RING in
either direction to set the hour and minute alarm
markers. To activate the alarm to ring or vibrate at
the desired time, PULL the ALARM CROWN out to
the “E” position. A single beep sound and flash,
OR a vibration will indicate that the 12-Hour
Alarm is activated.
2) The alarm will sound and the dial will flash OR
vibrate at the desired time (hour and minute) and
will repeat every twelve hours unless the alarm is
deactivated.
NOTE: Alarm is deactivated when the ALARM
CROWN is in the “D” position.
If the alarm is not deactivated it will automatically
stop ringing after 20 beeps and flashes OR stop
vibrating, and will resume in 12 hours at the
indicated time.
10
ENGLISH
TO SET THE HOURLY ALARM:
1) With the ALARM CROWN in the “D” position, TURN
the ALARM CROWN or TURNING RING in either
direction to set the minute alarm marker.
2) To activate the alarm to ring or vibrate at the
desired minute, PULL the ALARM CROWN out to
the “F” position. Three beeps sound and flash
OR a vibration indicates the Hourly Alarm is
activated.
3) The alarm will sound and the dial will flash OR
vibrate at the desired minute and will repeat
every hour on the specified minute unless the
alarm is deactivated.
NOTE: Alarm is deactivated when the ALARM
CROWN is in the “D” position.
If the alarm is not deactivated it will automatically
stop ringing after 20 beeps and flashes OR stop
vibrating, and will resume again in one hour at
the indicated minute.
11
Page 71

W217_NA_EN_analoglayout_4 3/9/10 9:52 AM Page 12
ENGLISH
PERPETUAL CALENDAR
Your Perpetual Calendar watch accurately keeps
track of how many days are in each month. It also
adjusts for leap years. The date on your watch
(including the month and year) was preset at the
factory to Eastern Standard Time, Greenwich Mean
Time or Hong Kong Standard Time (depending on
where you purchased your watch). You only need to
adjust the time.
MIDDLE OUT
I
WED 14
I
CHECK DATE
(FACTORY USE ONLY)
12
WED 14
SET TIME
DAY, DATE
I
I
ENGLISH
TO SET TIME
To set time, simply pull crown all the way out and
turn. Day and date change automatically when time
is adjusted past midnight; there is no additional step
for setting day or date. Push crown in when done.
After setting, if date changes at noon, time needs to
be adjusted ahead or back 12 hours.
If crown is accidentally put in MIDDLE position and
turned, date display will change temporarily, but date
setting is unaffected. Simply pull crown all the way
out and set time. Proper date display will resume.
7-YEAR BATTERY LIFE* WITH
FREE LIFETIME REPLACEMENT**
If the battery needs to be changed, we recommend
that only TIMEX replace it. Your watch will need to be
recalibrated to correct time and date after changing
the battery. To return your watch to Timex use a prepaid shipper. To obtain a pre-paid shipper please call
1-800-448-4639 or visit the retailer where you
purchased your watch or go to www.TIMEX.com.
Please include the following with your watch to cover
13
Page 72

W217_NA_EN_analoglayout_4 3/9/10 9:52 AM Page 14
ENGLISH
postage and handling (this is not a repair charge);
a U.S.$8.00 check or money order in the U.S.; a
CAN$7.00 cheque or money order in Canada;
In other countries Timex will charge you for postage
and handling.
** Shipping & handling charges apply. *With
normal usage.
NEVER INCLUDE A SPECIAL WATCHBAND
OR ANY OTHER ARTICLE OF PERSONAL
VALUE IN YOUR SHIPMENT.
14
ENGLISH
ELAPSED TIME RING
If your watch is equipped with a rotatable outer ring
on the face, with numbers corresponding to minutes,
you can use this Elapsed Time Ring to time an activity
from the start, or to mark the ending time for the
duration of an activity.
TO TIME AN ACTIVITY FROM THE START:
Set the Start/Stop triangle at the time (hour or
minute) when you start the activity (As shown on the
left in the illustration shown below). At completion,
you can see how long the activity took.
15
Page 73

W217_NA_EN_analoglayout_4 3/9/10 9:52 AM Page 16
ENGLISH
TO MEASURE THE TIME REMAINING:
Set the triangle to the hour or minute position when
you wish to complete the activity, and check the
watch periodically for progress towards that goal.
In the illustration shown on the previous page on the
right you can stop when the minute hand reaches
the 20 minutes past the hour position.
16
ENGLISH
TACHYMETER RING
The tachymeter feature can be used to measure
speed in miles per hour (MPH), nautical miles per
hour (knots) or kilometers per hour (KPH) using the
sweep second hand and the scale on the wall above
the watch face. You need to know the actual distance
you are covering in miles or km.
Start the chronograph with the second hand at zero
(the twelve o’clock position). Within the first minute,
the second hand will point to the rate for a one-mile
(or one kilometer) course: if it takes 45 seconds, the
hand will point to 80 at that position – 80 MPH or
80 KPH.
If within the first minute, a distance greater than one
mile or kilometer is covered, multiply the tachymeter
number by the distance to get the actual rate: if you
went 1.2 miles in 45 seconds, multiply the 80 by
1.2 – 96 MPH.
17
Page 74

W217_NA_EN_analoglayout_4 3/9/10 9:52 AM Page 18
ENGLISH
COMPASS RING
If your watch is equipped
with a movable ring around
the dial marked at the
letters “N”, “E”, “W”, “S”
(for the four compass
directions) or compass
degrees, you can use this feature
to find an approximate compass
directional reading.
1) Lay the watch on a flat surface,
or hold it so that the face is
parallel to the ground.
2) Locate the sun and point the
hour hand at the sun.
3) In the A.M., rotate the ring until the “S” (south)
marker is halfway between the hour hand and
12:00 (after the hour hand or within the shortest
distance between the hour hand and 12:00).
4) In the P.M., rotate the ring until “S” is before the
hour hand and halfway between the hour hand
and 12:00.
18
S
12
1
11
10
9
8
E
5
7
6
ENGLISH
HOW TO ADJUST BRACELET
W
2
3
4
N
(Variations of the following bracelet sections apply to
all watch models).
SLIDING CLASP BRACELET
1 Open locking plate.
2. Move clasp to desired bracelet length.
3. Exert pressure while holding locking plate and
slide clasp back and
forth until it engages
in grooves on underside of bracelet.
4. Press locking plate
down until it snaps
closed. Clasp can be
damaged if excessive
force is used.
19
Page 75
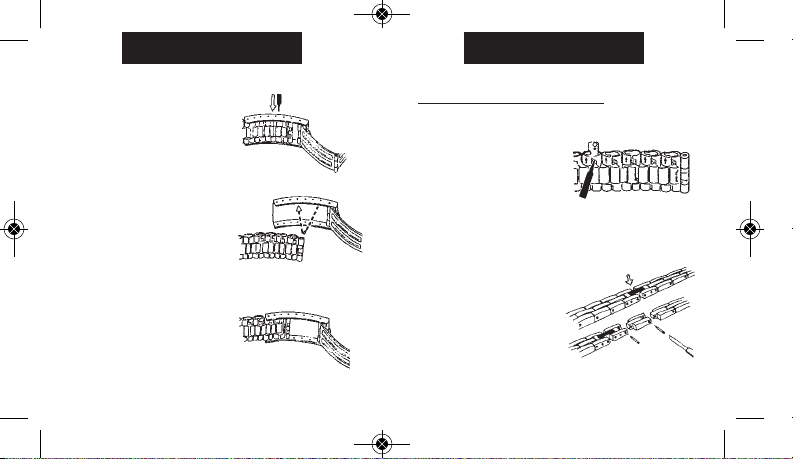
W217_NA_EN_analoglayout_4 3/9/10 9:52 AM Page 20
ENGLISH
FOLDOVER CLASP
BRACELET
1. Find spring bar that
connects bracelet
to clasp.
2. Using a pointed tool, push
in spring bar and gently
twist bracelet to disengage.
3. Determine wrist size, then
insert spring bar in correct
bottom hole.
4. Push down on spring bar,
align with top hole and
release to lock in place.
20
Fig. 1
Fig. 2
Fig. 3
ENGLISH
BRACELET LINK REMOVAL
REMOVING LINKS:
1. Place bracelet upright
and insert pointed tool
in opening of link.
2. Push pin forcefully in
direction of arrow until
link is detached (pins
are designed to be difficult to remove).
3. Repeat until desired number of links are removed.
RE-ASSEMBLY:
1. Rejoin bracelet parts.
2. Push pin back into link
in opposite direction of
arrow.
3. Press pin down securely
into bracelet until it is
flush.
21
Page 76

W217_NA_EN_analoglayout_4 3/9/10 9:52 AM Page 22
ENGLISH
BATTERY
Timex strongly recommends that a retailer or jeweler
replace battery. If applicable, push reset button when
replacing battery. Battery type is indicated on
caseback. Battery life estimates are based on certain
assumptions regarding usage; battery life may vary
depending on actual usage.
DO NOT DISPOSE OF BATTERY IN FIRE. DO NOT
RECHARGE. KEEP LOOSE BATTERIES AWAY
FROM CHILDREN.
22
ENGLISH
TIMEX INTERNATIONAL WARRANTY
Your TIMEX®watch is warranted against manufacturing
defects by Timex Group USA, Inc. for a period of ONE YEAR
from the original purchase date. Timex and its worldwide
affiliates will honor this International Warranty.
Please note that Timex may, at its option, repair your
watch by installing new or thoroughly reconditioned and
inspected components or replace it with an identical or
similar model. IMPORTANT — PLEASE NOTE THAT THIS
WARRANTY DOES NOT COVER DEFECTS OR DAMAGES TO
YOUR WATCH:
1) after the warranty period expires;
2) if the watch was not originally purchased from an
authorized Timex retailer;
3) from repair services not performed by Timex;
4) from accidents, tampering or abuse; and
5) lens or crystal, strap or band, watch case, attach-
ments or battery. Timex may charge you for replacing
any of these parts.
THIS WARRANTY AND THE REMEDIES CONTAINED HEREIN
ARE EXCLUSIVE AND IN LIEU OF ALL OTHER WARRANTIES,
EXPRESS OR IMPLIED, INCLUDING ANY IMPLIED WARRANTY
OF MERCHANTABILITY OR FITNESS FOR PARTICULAR PURPOSE. TIMEX IS NOT LIABLE FOR ANY SPECIAL, INCIDENTAL
23
Page 77
W217_NA_EN_analoglayout_4 3/9/10 9:52 AM Page 24
ENGLISH
OR CONSEQUENTIAL DAMAGES. Some countries and states
do not allow limitations on implied warranties and do not
allow exclusions or limitations on damages, so these
limitations may not apply to you. This warranty gives you
specific legal rights and you may also have other rights,
which vary from country to country and state to state.
To obtain warranty service, please return your watch to
Timex, one of its affiliates or the Timex retailer where the
watch was purchased, together with a completed original
Watch Repair Coupon or, in the U.S. and Canada only, the
completed original Watch Repair Coupon or a written
statement identifying your name, address, telephone
number and date and place of purchase. Please include
the following with your watch to cover postage and
handling (this is not a repair charge): a US$ 8.00 check or
money order in the U.S.; a CAN$7.00 cheque or money
order in Canada; and a UK£2.50 cheque or money order in
the U.K. In other countries, Timex will charge you for
postage and handling. NEVER INCLUDE A SPECIAL WATCHBAND OR ANY OTHER ARTICLE OF PERSONAL VALUE IN
YOUR SHIPMENT.
For additional warranty information please call one of the
numbers listed below:
Asia +852 27407311; Brazil +55 11 3068 3500; U.S. +1 800
448 4639; Canada 1 800 263 0981; the Caribbean,
24
ENGLISH
Bermuda and the Bahamas +1 501 370 5775 (U.S.); France
+33 3 81 63 42 00; Germany/Austria +49 662 88921 30;
Mexico and Central America 01 800 01 06000 (U.S.);
Portugal +351 212 555 460; UK, Middle East and Africa +44
20 8687 9620
For other areas, please contact your local Timex retailer or
Timex distributor for warranty information. In Canada, the
U.S. and in certain other locations, participating Timex
retailers can provide you with a postage-paid, preaddressed Watch Repair Mailer for your convenience in
obtaining factory service.
EXTENDED WARRANTY
Available in U.S. only. Extend your warranty for an
additional 4 years from date of purchase for $5. You can
pay with AMEX, Discover, Visa or MasterCard by calling
1 800-448-4639 during normal business hours. Payment
must be made within 30 days of purchase. Name, address,
telephone number, purchase date, and 5-digit model
number required. You can also mail a check for $5 to:
Timex Extended Warranty, P.O. Box 1676, Dept. EF,
Little Rock, AR 72203.
©2010 Timex Group USA, Inc. TIMEX and QUICKDATE are
registered trademarks of Timex Group USA, Inc. INDIGLO is
a registered trademark of Indiglo Corporation in the US
and other countries.
25
Page 78

W217_NA_FR_T-1002-24_W217_FR 3/9/10 10:05 AM Page FRii
MONTRES TIMEX
Félicitations pour votre achat d’une montre Timex®.
Lire ces instructions attentivement pour bien
comprendre le fonctionnement de cette montre Timex.
Il est possible que ce modèle ne présente pas toutes
les fonctions décrites dans le dépliant.
Pour de plus amples renseignements, visiter le site :
www.timex.com
®
Page 79

W217_NA_FR_T-1002-24_W217_FR 3/9/10 10:05 AM Page FRiv
SOMMAIRE
28 Comment mettre la montre en marche
29 Étanchéité et résistance aux chocs
30 Veilleuse Indiglo
31 Modèles avec affichage de la date
34 Modèles avec affichage jour/date
35 Modèles avec alarme « Easy set »
40 Calendrier perpétuel
43 Bague de durée écoulée
45 Bague de tachymètre
46 Bague de la boussole
47 Comment ajuster le bracelet
49 Démontage de maillons du bracelet
51 Pile
52 Garantie
FRANÇAIS
®
Page 80

W217_NA_FR_T-1002-24_W217_FR 3/9/10 10:05 AM Page 28
FRANÇAIS
COMMENT METTRE LA MONTRE
EN MARCHE
Pour mettre la montre en marche, retirez le capot de
protection en plastique situé sous la couronne, puis
enfoncez la couronne vers le boîtier. L’aiguille des
secondes commencera à avancer par intervalles
d’une seconde.
Pour certaines montres étanches en eaux profondes,
la couronne de réglage doit être vissée afin d’en
garantir l’étanchéité. Si le boîtier présente un bouton
fileté, la couronne doit être vissée après le réglage de
la montre.
Pour visser, enfoncez fermement la couronne sur le
bouton fileté et maintenez-la enfoncée tout en la
faisant tourner dans le sens horaire. Continuez à
visser la couronne jusqu’à ce qu’elle soit bien serrée.
Il faudra dévisser la couronne (dans le sens antihoraire) avant de la tirer la prochaine fois que vous
souhaiterez régler la montre.
28
FRANÇAIS
ÉTANCHÉITÉ ET RÉSISTANCE
AUX CHOCS
Si la montre est étanche, la profondeur maximale
(WR_M) est indiquée.
Profondeur d’étanchéité Pression de l’eau sous la
30m / 98 ft/pi 60
50m / 164 ft/pi 86
100m / 328 ft/pi 160
200m / 656 ft/pi 284
*livres par pouce carré (abs.)
ATTENTION : POUR PRÉSERVER L’ÉTANCHÉITÉ,
NE PAS ENFONCER LES BOUTONS NI TIRER
LES COURONNES SOUS L’EAU, SAUF SUR LES
MODÈLES ÉTANCHES JUSQU’À 200 MÈTRES.
surface en p.s.i.a.*
29
Page 81

COURONNE
W217_NA_FR_T-1002-24_W217_FR 3/9/10 10:05 AM Page 30
FRANÇAIS
1. La montre est étanche aussi longtemps que le
verre, les couronnes et le boîtier sont intacts.
2. La montre n’est pas conçue pour la plongée.
Ne pas l’utiliser dans ces conditions.
3. Rincer à l’eau douce après tout contact avec l’eau
de mer.
4. La résistance aux chocs est indiquée sur la face
de la montre ou le dos du boîtier. Les montres
sont conçues pour se conformer à l’essai de
choc ISO. Toutefois, prendre garde à éviter
d’endommager le verre.
VEILLEUSE INDIGLO
Appuyer sur le bouton ou la couronne pour activer
l'éclairage. La technologie électroluminescente
brevetée utilisée dans la veilleuse INDIGLO
®
®
permet
30
FRANÇAIS
d'illuminer toute la face de la montre la nuit et dans
des conditions de faible éclairage.
MODÈLES AVEC AFFICHAGE
DE LA DATE
POUR RÉGLER
L’HEURE :
1) TIRER la couronne
complètement et
tourner jusqu’à
afficher l’heure
exacte.
2) Enfoncer la couronne
pour redémarrer.
Pour la couronne à
vis, enfoncer celle-ci en tournant DANS LE SENS
HORAIRE pour la resserrer.
Montres affichant la date : Tenir compte de l’heure
(AM ou PM) afin de régler la date correctement.
31
DATE
C B A
POSITION
DE LA
Page 82

W217_NA_FR_T-1002-24_W217_FR 3/9/10 10:05 AM Page 32
FRANÇAIS
RÉGLAGE DU JOUR :
1) TIRER la couronne en position « centre » et
tourner DANS LE SENS HORAIRE jusqu’à afficher
la date courante. Si la date ne change pas, tirer la
couronne complètement et tourner DANS LE
SENS HORAIRE ou DANS LE SENS ANTI-HORAIRE
en passant par le nombre requis de périodes de
24 heures jusqu’à afficher la date correcte.
RÉGLAGE DE FONCTION « QUICKDATE®»
Couronne à 3 positions :
1) Tirer la couronne en position « Centre » et
tourner DANS LE SENS HORAIRE ou DANS LE
SENS ANTI-HORAIRE jusqu’à afficher la date
courante.
Couronne à 2 positions :
1) Tirer la couronne complètement et tourner DANS
LE SENS HORAIRE jusqu’à ce que la date change.
Répéter jusqu’à ce que la date correcte s’affiche.
Régler la date pour les mois comptant moins de
31 jours. Enfoncer la couronne pour valider.
32
FRANÇAIS
Attention : Porter ou ranger la montre alors que la
couronne est en position « Centre » endommage le
mouvement. Toujours remettre la couronne en position
normale, ou pour allonger la durée de vie de la pile,
laisser la couronne complètement tirée lorsque la
montre est rangée.
La fonction « date » fait avancer la date entre 22 h
et 2 h. Éviter de régler la date durant cette période.
Pour tenter de régler la date durant cette période,
faire tourner la couronne très lentement pour éviter
d'endommager la montre.
33
Page 83

W217_NA_FR_T-1002-24_W217_FR 3/9/10 10:05 AM Page 34
FRANÇAIS
MODÈLES AVEC AFFICHAGE
JOUR / DATE
RÉGLAGE DE
L’HEURE :
1) TIRER la couronne
en position « C ».
2) TOURNER la
couronne dans un
sens ou dans l’autre
jusqu’à afficher
l’heure exacte.
3) ENFONCER la
couronne en position « A ».
RÉGLAGE DE LA DATE :
1) TIRER la couronne en position « B ».
2) TOURNER la couronne dans un sens ou dans
l’autre jusqu’à afficher la date exacte.
3) ENFONCER la couronne en position « A ».
34
JOUR/DATE
COURONNE
C B A
POSITION
DE LA
FRANÇAIS
RÉGLAGE DU JOUR :
1) TIRER la couronne en position « C ».
2) TOURNER la couronne dans un sens ou dans
l’autre et effectuer un cycle complet de
24 heures pour régler le jour.
3) ENFONCER la couronne en position « A ».
ALARME « EASY SET »
MARQUEUR DE MINUTE
MARQUEUR
D’HEURE
BAGUE
TOURNANTE
POUR LE
RÉGLAGE
DE L’ALARME
COURONNE HORAIRE/VEILLEUSE
INDIGLO®. ENFONCER LA
COURONNE POUR ACTIVER
LA VEILLEUSE INDIGLO
A B C POSITION
DEF
POSITION
COURONNE DE L’ALARME
TIRER LA COURONNE POUR
ACTIVER L’ALARME
35
Page 84

W217_NA_FR_T-1002-24_W217_FR 3/9/10 10:05 AM Page 36
FRANÇAIS
ALARME « EASY SET »
AVEC DATE ET VEILLEUSE INDIGLO
1) À partir de la position « A », ENFONCER la
COURONNE HORAIRE (vers le boîtier de la montre)
pour activer la veilleuse INDIGLO
cadran.
RÉGLAGE DE LA DATE ET DE L’HEURE
DE L’ALARME « EASY SET »
POUR RÉGLER LA DATE :
1) Alors que la COURONNE HORAIRE est en position
« B », TOURNER celle-ci ou la BAGUE TOURNANTE
dans n’importe quelle direction pour régler la
date.
POUR RÉGLER L’HEURE :
1) Alors que la COURONNE HORAIRE est en position
« C », TOURNER celle-ci ou la BAGUE TOURNANTE
dans n’importe quelle direction pour régler
l’heure.
36
®
®
et illuminer le
FRANÇAIS
RÉGLAGE DE L’ALARME « EASY SET »
1) La montre avec alarme « easy set » possède deux
types d’alarmes :
2) Alarme 12-Heures : sonne OU vibre deux fois par
jour à l’heure et à la minute souhaitées tant que
l’alarme est activée. (La couronne de l’alarme doit
être en position « E ».)
3) Alarme horaire : sonne OU vibre toutes les heures
à la minute souhaitée lorsqu’elle est activée. (La
couronne de l’alarme doit être en position « F ».)
POUR RÉGLER L’ALARME 12-HEURES :
1) Alors que la COURONNE DE L’ALARME est en
position « D », tourner celle-ci ou la BAGUE
TOURNANTE dans n’importe quelle direction pour
configurer l’alarme. Pour activer la sonnerie ou la
vibration de l’alarme à l’heure souhaitée, TIRER la
COURONNE DE L’ALARME en position « E ». Un
bip sonore et un clignotement uniques OU une
vibration indiquent que l’alarme 12-Heures est
activée.
37
Page 85

W217_NA_FR_T-1002-24_W217_FR 3/9/10 10:05 AM Page 38
FRANÇAIS
2) L’alarme sonne et le cadran clignote OU vibre à
l’heure souhaitée (heure et minute) et se répète
toutes les douze heures à moins qu’elle ne soit
désactivée.
REMARQUE : L’alarme est désactivée lorsque la
COURONNE DE L’ALARME est en position « D ».
Si l’alarme n’est pas désactivée, elle cesse de sonner
automatiquement après 20 bips sonores et
clignotements OU cesse de vibrer et se répète
12 heures plus tard à l’heure indiquée.
38
FRANÇAIS
POUR RÉGLER L’ALARME HORAIRE :
1) Alors que la COURONNE DE L’ALARME est en
position « D », TOURNER celle-ci ou la BAGUE
TOURNANTE dans n’importe quelle direction pour
configurer l’alarme.
2) Pour activer la sonnerie ou la vibration de
l’alarme à la minute souhaitée, TIRER la
COURONNE DE L’ALARME en position « F ». Trois
bips sonores et clignotements OU une vibration
indiquent que l’alarme horaire est activée.
3) L’alarme sonne et le cadran clignote OU vibre à la
minute souhaitée et se répète toutes les heures à
cette minute précise à moins qu’elle ne soit
désactivée.
REMARQUE : L’alarme est désactivée lorsque la
COURONNE DE L’ALARME est en position « D ».
Si l’alarme n’est pas désactivée, elle cesse de
sonner automatiquement après 20 bips sonores
et clignotements OU cesse de vibrer et se répète
1 heure plus tard à la minute indiquée.
39
Page 86

W217_NA_FR_T-1002-24_W217_FR 3/9/10 10:05 AM Page 40
FRANÇAIS
CALENDRIER PERPÉTUEL
Votre montre à calendrier perpétuel tient compte
avec précision du nombre de jours de chaque mois.
Elle s’ajuste également aux années bissextiles. La
date affichée sur votre montre (y compris le mois et
l’année) a été préréglée à l’usine à l’heure standard
de l’Est, au temps universel ou à l’heure standard de
Hong Kong (selon l’endroit où vous l’avez achetée).
Vous n’avez qu’à régler l’heure.
CENTRE EXTRÉMITÉ
I
WED 14
I
VÉRIFIER LA DATE
(À L’USAGE EXCLUSIF DE L’USINE)
I
WED 14
I
RÉGLAGE DE L’HEURE
DU JOUR ET DE LA DATE
40
FRANÇAIS
RÉGLAGE DE L’HEURE
Pour régler l’heure, tirer la couronne complètement
et tourner. Le jour et la date changent automatiquement lorsque l’heure est réglée après minuit ; il n’y a
aucune étape supplémentaire pour régler le jour ou
la date. Enfoncer la couronne pour valider.
Si la date change à midi après avoir réglé la montre,
on doit faire avancer ou reculer celle-ci de 12 heures.
Si la couronne est accidentellement enfoncée en
position CENTRE et qu’on la fait tourner, la date
affichée change temporairement sans que le réglage
de la date en soit affecté. Pour régler l’heure, tirer
la couronne complètement et tourner. La date
s’affichera correctement à nouveau.
PILE D’UNE DURÉE DE VIE DE 7 ANS*
AVEC REMPLACEMENT À VIE GRATUIT**
Si la pile doit être changée, nous recommandons que
seul TIMEX s’en charge. Votre montre devra être
étalonnée de nouveau pour régler l’heure et la date
après le changement de la pile. Lorsque vous
retournez votre montre à Timex, les frais de port
41
Page 87

W217_NA_FR_T-1002-24_W217_FR 3/9/10 10:05 AM Page 42
FRANÇAIS
doivent être prépayés. Pour obtenir un emballage
pré-affranchi, composez le 1-800-448-4639 ou
rendez-vous chez le détaillant où vous avez acheté
votre montre ou visitez www.TIMEX.com. Veuillez
inclure la somme suivante avec votre montre pour
couvrir les frais de poste et de manutention (ce ne
sont pas des frais de réparation) ; un chèque ou
mandat-poste de 8,00 $ É.U. aux États-Unis ; de 7,00
$ CAN pour le Canada ; Pour les autres pays, Timex
vous demande de couvrir les frais de poste et de
manutention.
** Les frais de port et de manutention seront
facturés. *Avec un usage normal.
N’INCLUEZ JAMAIS DANS VOTRE ENVOI UN
BRACELET SPÉCIAL OU AUTRE ARTICLE
AYANT UNE VALEUR SENTIMENTALE.
42
FRANÇAIS
BAGUE DE DURÉE ÉCOULÉE
Si le cadran de votre montre est doté d’une bague
extérieure rotative dont les chiffres indiquent les
minutes, vous pouvez utiliser cette bague de durée
écoulée pour chronométrer une activité depuis le début
ou encore pour marquer le moment où elle se termine.
POUR CHRONOMÉTRER UNE ACTIVITÉ
DEPUIS LE DÉBUT :
Régler le triangle Start/Stop au moment (heure ou
minute) où l’activité commence (tel qu’illustré
ci-dessous à gauche). Lorsque celle-ci prend fin, vous
pouvez en vérifier la durée.
43
Page 88

W217_NA_FR_T-1002-24_W217_FR 3/9/10 10:05 AM Page 44
FRANÇAIS
MESURE DE LA DURÉE RESTANTE :
Régler le triangle à l’heure ou à la minute de la fin
souhaitée d’une activité et consulter régulièrement la
montre pour mesurer votre progrès par rapport au
but fixé.
Tel qu’indiqué sur l’illustration de droite à la page
précédente, vous pouvez arrêter lorsque l’aiguille des
minutes atteint la position 20 minutes dans la partie
droite du cadran.
44
FRANÇAIS
BAGUE DE TACHYMÈTRE
La fonction tachymètre sert à mesurer la vitesse en
milles à l’heure (MPH), milles marins à l’heure
(nœuds) ou kilomètres à l’heure (KPH) à l’aide de la
trotteuse et de l’échelle située au-dessus du cadran.
Vous devez connaître la distance que vous parcourez
en milles ou en km.
Démarrez le chronographe lorsque l’aiguille des
secondes est à zéro (dans la position 12 heures).
Au cours de la première minute, l’aiguille des
secondes indique la vitesse pour un parcours
d’un mille (ou d’un kilomètre) : si celui-ci dure
45 secondes, l’aiguille indique 80 dans cette position
– 80 mi/h (MPH) ou 80 km/h (KPH).
Si la distance franchie au cours de la première
minute est de plus d’un mille ou d’un kilomètre,
multipliez le chiffre indiqué par le tachymètre par la
distance pour obtenir la vitesse courante : si vous
avez parcouru 1,2 milles en 45 secondes, multipliez
80 par 1,2 – 96 mi/h (MPH).
45
Page 89

W217_NA_FR_T-1002-24_W217_FR 3/9/10 10:05 AM Page 46
FRANÇAIS
BAGUE DE LA
BOUSSOLE
Si le cadran de la montre
est doté d’une bague
mobile où sont inscrites les
lettres « N », « E », « W »,
« S » (représentant les quatre points
cardinaux) ou les degrés d’une boussole, cette fonction peut être utilisée
pour effectuer une mesure
d’orientation approximative.
1) Poser la montre sur une surface
plane, ou la tenir de sorte que le
cadran soit parallèle au sol.
2) Noter la position du soleil et pointer l’aiguille des
heures dans sa direction.
3) Le matin, faire tourner la bague jusqu’à ce que la
lettre « S » (sud) soit à mi-distance entre l’aiguille des
heures et 12h (après l’aiguille des heures ou dans la
plus courte distance entre l’aiguille des heures et 12h).
4) L’après-midi, faire tourner la bague jusqu’à ce que
le « S » précède l’aiguille des heures et soit à
mi-distance entre l’aiguille des heures et 12h.
46
S
12
W
1
11
2
10
9
3
4
8
E
5
7
6
FRANÇAIS
COMMENT AJUSTER LE BRACELET
(Les sections suivantes s’appliquent aux bracelets
de tous les modèles de montre, avec certaines
variantes.)
N
BRACELET À FERMOIR COULISSANT
1 Ouvrir la plaquette de blocage.
2. Glisser le fermoir jusqu’à la longueur de bracelet
souhaitée.
3. Appuyer tout en tenant la plaquette de blocage et
glisser le fermoir d’avant en arrière jusqu’à ce
qu’il s’engage dans
les rainures sur la
face inférieure du
bracelet.
4. Appuyer sur la plaquette de blocage
jusqu’au déclic. Une
force excessive
peut endommager le fermoir.
47
Page 90

W217_NA_FR_T-1002-24_W217_FR 3/9/10 10:05 AM Page 48
FRANÇAIS
BRACELET À FERMOIR
DÉPLIANT
1. Trouver la barrette à
ressort qui attache le
bracelet au fermoir.
2. À l’aide d’un outil
pointu, enfoncer la
barrette et pivoter
délicatement le bracelet
pour le dégager.
3. Déterminer la taille du
poignet puis introduire
la barrette à ressort
dans l’orifice inférieur
correspondant.
4. Enfoncer la barrette,
l’aligner sur l’orifice
supérieur puis la
relâcher pour la mettre
en place.
FRANÇAIS
DÉMONTAGE DE MAILLONS
DU BRACELET
DÉMONTAGE DE MAILLONS :
Fig. 1
Fig. 2
Fig. 3
48
1. Placer le bracelet
verticalement et
introduire un outil
pointu dans l’ouverture
du maillon.
2. Pousser fortement la
goupille dans le sens de la flèche jusqu’à
détacher le maillon (les goupilles sont conçues
pour résister à l’extraction).
3. Répéter jusqu’à ce que le nombre souhaité de
maillons soit démonté.
49
Page 91

W217_NA_FR_T-1002-24_W217_FR 3/9/10 10:05 AM Page 50
FRANÇAIS
RÉASSEMBLAGE :
1. Mettre les pièces du
bracelet en place.
2. Pousser la goupille
dans le maillon dans le
sens opposé à la
flèche.
3. Enfoncer la goupille
jusqu’à ce qu’elle ne
dépasse plus du
bracelet.
FRANÇAIS
PILE
Timex recommande fortement de faire changer la
pile par un détaillant ou un bijoutier. Le cas échéant,
appuyer sur le bouton de remise à zéro lors du
changement de la pile. Le type de pile est indiqué sur
le dos du boîtier. L’estimation de la durée de vie de la
pile est basée sur certaines hypothèses quant à
l’usage ; la durée réelle peut varier selon l’utilisation
de la montre.
NE PAS JETER LA PILE AU FEU. NE PAS
RECHARGER LA PILE. GARDER LES PILES HORS
DE LA PORTÉE DES ENFANTS.
50
51
Page 92

W217_NA_FR_T-1002-24_W217_FR 3/9/10 10:05 AM Page 52
FRANÇAIS
GARANTIE INTERNATIONALE TIMEX
Votre montre TIMEX®est garantie contre les défauts de
fabrication par Timex Group USA, Inc. pour une période
d’UN AN, à compter de la date d’achat. Timex ainsi que
ses filiales du monde entier honoreront cette garantie
internationale.
Timex se réserve le droit de réparer votre montre en y
installant des composants neufs ou révisés, ou bien de la
remplacer avec un modèle identique ou similaire.
IMPORTANT — CETTE GARANTIE NE COUVRE PAS LES
DÉFAUTS OU DOMMAGES DE VOTRE MONTRE :
1) après l’expiration de la période de garantie ;
2) si la montre n’a pas été achetée chez un revendeur
TIMEX agréé ;
3) si la réparation n’a pas été faite par Timex ;
4) s’il s’agit d’un accident, falsification ou abus ;
5) s’il s’agit du verre ou cristal, du bracelet, du boîtier,
des accessoires ou de la pile. Le remplacement de
ces pièces peut vous être facturé par Timex.
52
FRANÇAIS
CETTE GARANTIE AINSI QUE LES RECOURS PRÉVUS DANS
LES PRÉSENTES SONT EXCLUSIFS ET REMPLACENT TOUTE
AUTRE GARANTIE EXPRESSE OU IMPLICITE, Y COMPRIS
TOUTE GARANTIE IMPLICITE DE QUALITÉ MARCHANDE ET
D’ADAPTATION À UN USAGE PARTICULIER. TIMEX N’EST
RESPONSABLE D’AUCUN DOMMAGE PARTICULIER,
ACCESSOIRE OU INDIRECT. Certains états ou provinces
n’autorisent pas les limitations de garanties implicites et
n’autorisent pas les exclusions ou limitations pour des
dommages, auquel cas lesdites limitations pourraient ne
pas vous concerner. Les modalités de la présente garantie
vous donnent des droits légaux précis et vous pouvez
également vous prévaloir d’autres droits qui varient d’un
état ou d’une province à l’autre.
Pour obtenir le service garanti, retourner la montre à
Timex, à une de ses filiales ou au détaillant Timex où il a
été acheté. Inclure un coupon de réparation original
dûment rempli ou, aux É.-U. et au Canada, le coupon
original ou une déclaration écrite comprenant votre nom,
adresse, numéro de téléphone ainsi que la date et le lieu
d’achat. Veuillez inclure la somme suivante avec votre
montre pour couvrir les frais de poste et de manutention
(ce ne sont pas des frais de réparation) : un chèque ou
mandat de 8,00 $ É.U. aux États-Unis, de 7,00 $ CAN au
Canada et de 2,50 £ au Royaume-Uni. Dans les autres
pays, Timex vous facturera les frais de poste et de
53
Page 93
W217_NA_FR_T-1002-24_W217_FR 3/9/10 10:05 AM Page 54
FRANÇAIS
manutention. N’INCLUEZ JAMAIS DANS VOTRE ENVOI UN
BRACELET SPÉCIAL OU AUTRE ARTICLE AYANT UNE VALEUR
SENTIMENTALE.
Pour plus de renseignements sur la garantie, veuillez
composer un des numéros ci-dessous :
Asie +852 27407311 ; Brésil +55 11 3068 3500 ; É.-U.
+1 800 448 4639 ; Canada 1 800 263 0981 ; les Caraïbes,
les Bermudes et les Bahamas +1 501 370 5775 (É.-U.) ;
France +33 3 81 63 42 00 ; Allemagne/Autriche
+49 662 88921 30 ; Mexique et Amérique Centrale
01 800 01 06000 (É.-U.) ; Portugal +351 212 555 460 ;
Royaume-Uni, Moyen-Orient et Afrique +44 20 8687 9620
Dans les autres régions, veuillez contacter votre détaillant
ou distributeur Timex local pour des renseignements sur la
garantie. Au Canada, aux É.-U. et en certains autres
endroits, les détaillants Timex participants peuvent vous
faire parvenir un emballage pré-adressé et pré-affranchi
pour vous faciliter l’envoi de la montre à l’atelier de
réparation.
54
FRANÇAIS
GARANTIE ÉTENDUE
Disponible aux É.-U. exclusivement. La garantie peut
être prolongée pour une période additionnelle de 4 ans à
compter de la date d’achat pour la somme de 5 $. Vous
pouvez effectuer ce paiement avec AMEX, Discover, Visa
ou MasterCard en composant le 1 800-448-4639 durant
les heures normales d’ouverture. Le paiement doit être
effectué dans les 30 jours qui suivent l’achat. Indiquer les
nom, adresse, numéro de téléphone, date d’achat et
numéro de modèle à 5 chiffres. Il est également possible
d’envoyer un chèque de 5 $ US par courrier à : Timex
Extended Warranty, P.O. Box 1676, Dept. EF, Little Rock,
AR 72203.
© 2010 Timex Group USA, Inc. TIMEX et QUICKDATE sont
des marques déposées de Timex Group USA, Inc. INDIGLO
est une marque déposée d’Indiglo Corporation aux ÉtatsUnis et dans d’autres pays.
55
Page 94
W217_NA_SP_T0507-18_TMX_Analog1_SP.qxd 3/9/10 9:54 AM Page SPii
RELOJES TIMEX
Felicitaciones por la compra de su reloj Timex®.
Lea atentamente estas instrucciones para saber
cómo hacer funcionar su reloj Timex.
Es posible que su reloj no tenga todas las
características descritas en este folleto.
Para obtener más información, visite:
www.timex.com
®
Page 95
W217_NA_SP_T0507-18_TMX_Analog1_SP.qxd 3/9/10 9:54 AM Page SPiv
ESPAÑOL
ÍNDICE DE CONTENIDOS
58 Cómo inicializar su reloj
59 Resistencia al agua y a los golpes
60 Luz nocturna Indiglo
61 Modelos con fecha
64 Modelos con día/fecha
65 Modelos con alarma fácil de ajustar
70 Calendario Perpetuo
73 Anillo de tiempo transcurrido
75 Anillo de tacómetro
76 Anillo de brújula
77 Cómo ajustar las pulsera
79 Remoción de eslabones de la pulsera
81 Pila
82 Garantía
®
Page 96

W217_NA_SP_T0507-18_TMX_Analog1_SP.qxd 3/9/10 9:54 AM Page 58
ESPAÑOL
COMO INICIALIZAR SU RELOJ
Para inicializar su reloj retire el protector plástico de
debajo de la corona y luego presione la corona
contra la caja. El segundero comenzará a avanzar a
intervalos de un segundo.
Algunos relojes resistentes al agua a grandes
profundidades necesitan que la corona de ajuste se
atornille para asegurar la resistancia al agua. Si la
caja de su reloj tiene una protuberancia roscada, la
corona debe atornillarse después de ajustar el reloj.
Para atornillarla, empuje la corona con firmeza contra
la protuberancia roscada y mantenga la presión
mientras gira la corona en sentido horario. Continúe
atornillando la corona hasta que esté firme.
Necesitará desatornillar la corona (en sentido
antihorario) antes de tirarla hacia afuera la próxima
vez que quiera ajustar su reloj.
58
ESPAÑOL
RESISTENCIA AL AGUA Y LOS GOLPES
Si su reloj es resistente al agua, se indicarán los
metros (WR_M).
Profundidad de Resistencia
al Agua
30m/98pies 60
50m/164pies 86
100m/328pies 160
200m/656pies 284
*libras por pulgada cuadrada absoluta
ADVERTENCIA: PARA MANTENER LA
RESISTENCIA AL AGUA, NO APRIETE NINGÚN
BOTÓN NI TIRE DE LA CORONA DEBAJO DEL
AGUA A MENOS QUE SU RELOJ ESTÉ INDICADO
PARA UNA RESISTENCIA AL AGUA DE
200 METROS.
Presión del agua
por debajo de la
superficie, en p.s.i.a.*
59
Page 97

POSICIÓN
W217_NA_SP_T0507-18_TMX_Analog1_SP.qxd 3/9/10 9:54 AM Page 60
ESPAÑOL
1. El reloj es resistente al agua solamente mientras
el cristal, la corona y la caja estén intactos.
2. El reloj no es apropiado para hacer submarinismo
y no debería utilizarse para ello.
3. Enjuague el reloj con agua fresca después de
haber estado expuesto al agua salada.
4. La resistencia a los golpes estará indicada en la
esfera del reloj o al respaldo de la caja. Los
relojes están diseñados para pasar la prueba ISO
de resistencia a los golpes. Sin embargo, se debe
tener cuidado para evitar dañar el cristal.
LUZ NOCTURNA INDIGLO
Pulse el botón o la corona para activar la luz. La
tecnología electroluminiscente utilizada en la luz
nocturna INDIGLO
la noche y en condiciones de poca luz.
®
ilumina toda la esfera del reloj por
®
60
ESPAÑOL
MODELOS CON FECHA
PARA FIJAR LA HORA:
1) TIRE de la corona
completamente hacia
afuera y gire para
corregir la hora.
2) Pulse la corona hacia
adentro para reiniciar.
Para coronas de
ajuste atornillado,
pulse la corona
mientras gira en
sentido HORARIO para ajustar.
Relojes con fecha: Para ver la fecha correcta,
elija “A.M.” o “P.M.”.
61
FECHA
C B A
DE LA
CORONA
Page 98

W217_NA_SP_T0507-18_TMX_Analog1_SP.qxd 3/9/10 9:54 AM Page 62
ESPAÑOL
PARA FIJAR DÍA:
1) TIRE de la corona hasta el punto “medio” y gírela
en sentido HORARIO hasta que aparezca el día
correcto. Si el día no cambia, tire de la corona hasta
la posición “afuera” y gire en sentido HORARIO o
ANTIHORARIO el número necesario de periodos de
24 horas hasta que aparezca el día correcto.
PARA AJUSTAR LA FUNCIÓN
“QUICK DATE”
Corona de 3 posiciones:
1) Tire de la corona hasta el punto “medio” y gírela
en sentido HORARIO o ANTIHORARIO hasta que
aparezca la fecha correcta.
Corona de 2 posiciones:
1) Tire de la corona hasta la posición “AFUERA” y
gírela en sentido HORARIO hasta que cambie la
fecha. Repita hasta que aparezca la fecha
correcta. Ajuste la fecha cuando el mes tenga
menos de 31 días. Pulse la corona hacia adentro
cuando termine.
®
:
62
ESPAÑOL
Precaución: Usar o guardar el reloj con la corona en la
posición “medio” afectará el movimiento. Siempre
retorne la corona a la posición normal, o, si desea
ahorrar la duración de la pila cuando el reloj está
guardado, deje la corona en la posición “afuera”.
La función fecha avanza ésta entre las 10 PM y las
2 AM. Evite programar la fecha durante este período
de tiempo. Si intenta hacerlo durante dicho período,
gire la corona muy despacio para evitar que se dañe
el reloj.
63
Page 99

MARCADOR DE MINUTOS
W217_NA_SP_T0507-18_TMX_Analog1_SP.qxd 3/9/10 9:54 AM Page 64
ESPAÑOL
MODELOS CON DÍA/FECHA
PARA FIJAR LA HORA:
1) TIRE de la corona
hacia afuera hasta
la posición “C”.
2) GIRE la corona en
cualquiera de los
dos sentidos para
corregir la hora.
3) PULSE la corona
hasta la posición
“A”.
PARA FIJAR LA FECHA:
1) TIRE de la corona hacia afuera hasta la posición
“B”.
2) GIRE la corona en cualquiera de los dos sentidos
para corregir la fecha.
3) PULSE la corona hasta la posición “A”.
64
DÍA/FECHA
C B A
POSICIÓN
DE LA
CORONA
ESPAÑOL
PARA FIJAR EL DÍA:
1) TIRE de la corona hacia afuera hasta la posición
“C”.
2) GIRE la corona en cualquier sentido por un
periodo de 24 horas completo para fijar el día.
3) PULSE la corona hasta la posición “A”.
ALARMA FÁCIL DE AJUSTAR
A B C POSICIÓN
DE F
CORONA DE ALARMA
JALE LA CORONA HACIA “AFUERA”
PARA ACTIVAR LA ALARMA
65
CORONA HORARIA / LUZ
NOCTURNA INDIGLO®.
PULSE LA CORONA
PARA ACTIVAR LA LUZ
NOCTURNA INDIGLO
POSICIÓN
MARCADOR
DE HORA
ANILLO
ROTATORIO
PARA FIJAR
LA ALARMA
Page 100

W217_NA_SP_T0507-18_TMX_Analog1_SP.qxd 3/9/10 9:54 AM Page 66
ESPAÑOL
ALARMA FÁCIL DE AJUSTAR CON FECHA
Y LUZ NOCTURNA INDIGLO
1) En la posición “A”, PULSE la CORONA HORARIA
hacia la caja del reloj para activar la luz nocturna
®
e iluminar la esfera del reloj.
INDIGLO
AJUSTES DE LA FECHA Y HORA DE LA
ALARMA
PARA FIJAR LA FECHA:
1) Con la CORONA HORARIA en la posición “B”, GIRE
la CORONA HORARIA o el ANILLO GIRATORIO en
cualquier dirección para fijar la fecha.
PARA FIJAR LA HORA:
1) Con la CORONA HORARIA en la posición “C”, GIRE
la CORONA HORARIA o el ANILLO GIRATORIO en
cualquier dirección para fijar la hora.
®
66
ESPAÑOL
AJUSTE DE LA ALARMA
1) Su reloj con alarma de ajuste fácil está equipado
con dos tipos de alarma:
2) Alarma de 12 horas: suena O vibra dos veces por
día a la hora y los minutos deseados mientras la
alarma esté activada. (La corona de la alarma debe
estar en la posición “B”.)
3) Alarma a cada hora: suena O vibra cada hora a
los minutos deseados si está activada. (La corona
de la alarma debe estar en la posición “C”.)
67
 Loading...