

Page 1
www.timex.com
558-095002
THANK YOU FOR PURCHASING YOUR TIMEX WATCH.
EXTENDED WARRANTY
Available in U.S. only. Extend your warranty for an additional 4 years from date of purchase
for $5. You can pay with AMEX, Discover, Visa or MasterCard by calling 1 800-448-4639 during
normal business hours. Payment must be made within 30 days of purchase. Name, address,
telephone number, purchase date, and 5-digit model number required. You can also mail a
check for $5 to: Timex Extended Warranty, P.O. Box 1676, Dept. EF, Little Rock, AR 72203.
Please read instructions carefully to understand how to operate your Timex watch.
Your model may not have all of the features described in this booklet.
FEATURES
• Analog and digital time display • Auto calendar 2000-2099 • Two time zones • Two daily
alarms linked to time zone •Three linked countdown timers • Chronograph with 42-lap memory
BASIC OPERATIONS
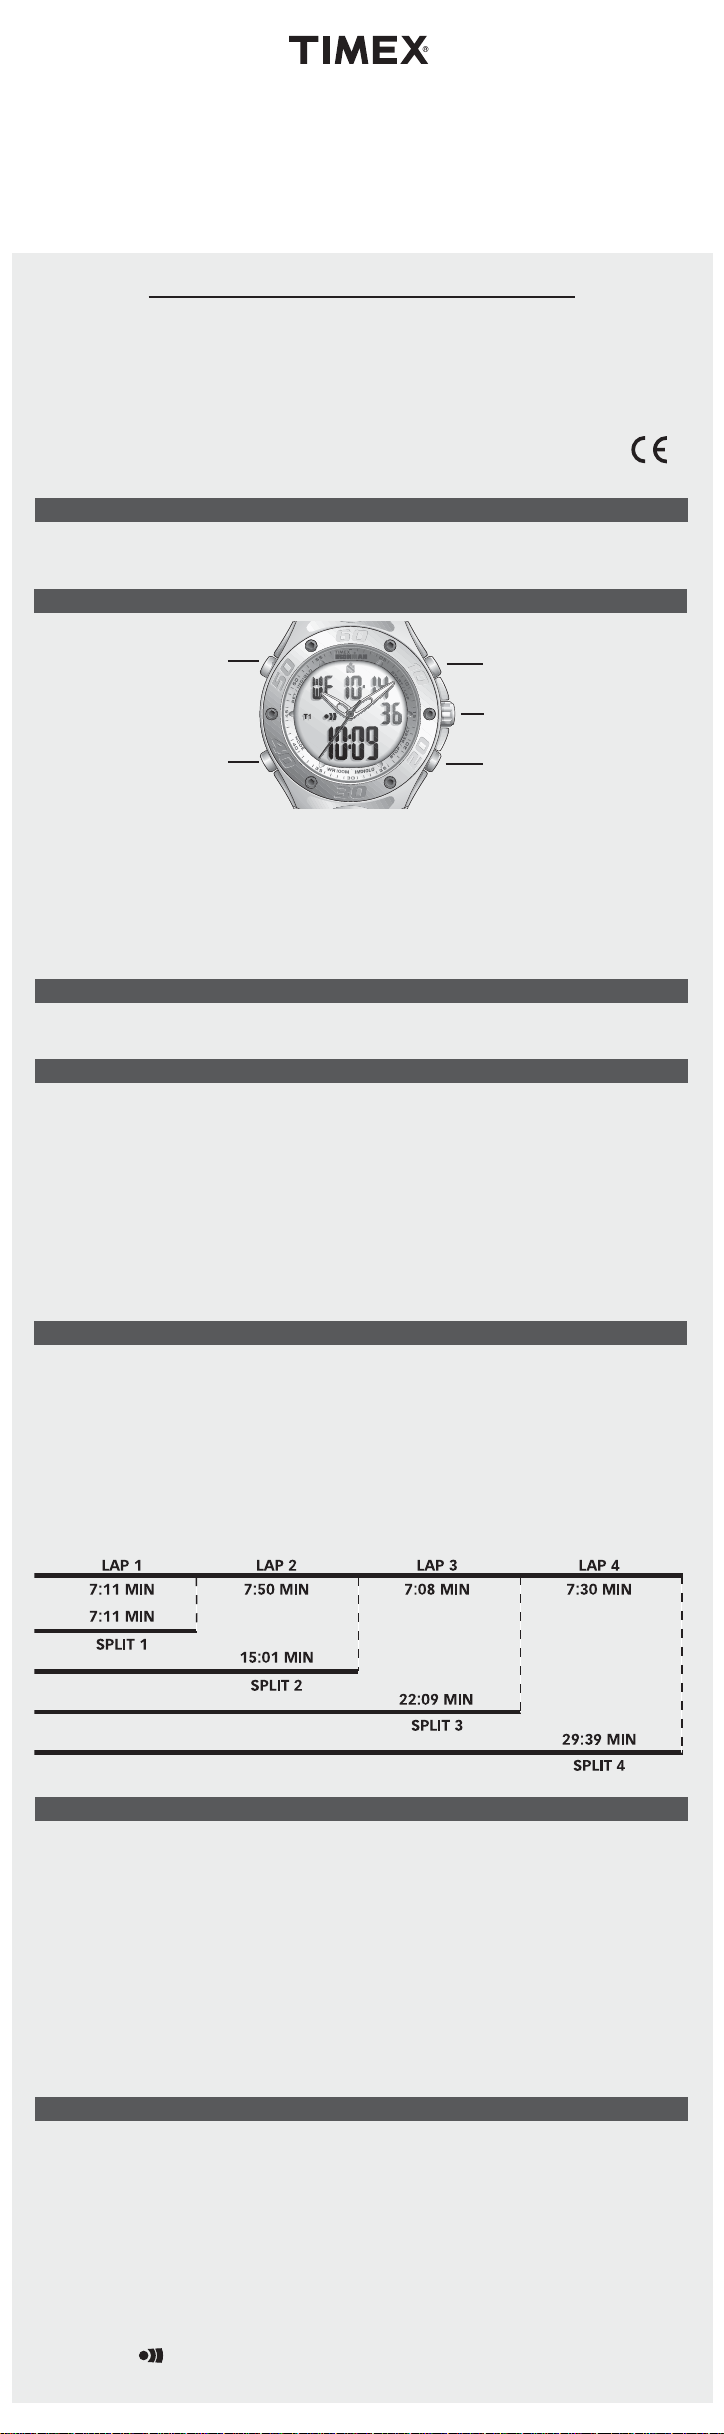
SET/INDIGLO
MODE
START/STOP
CROWN
LAP/RESET
A. In TIME mode, press and hold START/STOP to shut off digital display. Press once to turn
back on.
BPress SET/INDIGLO to illuminate watch face.
C. Press MODE to cycle through CHRONO, RECALL, TIMER, ALARM and TIME modes. Press and
hold MODE in any mode to return to TIME display.
D. When setting digits, press START/STOP to go forward or LAP/RESET to go backward or
hold to change rapidly.
ANALOG TIME
Pull crown and turn to set HOUR and MINUTE hands. Push crown in to complete setting.
DIGITAL TIME AND DATE
A. Press MODE until TIME appears. Press and hold SET/INDIGLO to begin setting time.
B. Press START/STOP or LAP/RESET to set SECONDS to 0.
C. Press MODE to select HOURS digits.
D. Press START/STOP or LAP/RESET to advance. Go through 12 hours for AM or PM.
E. Press MODE to select MINUTES, YEAR, MONTH, DAY, 12- or 24-time display, MONTH-DAY or
DAY-MONTH date display. Press START/STOP or LAP/RESET to advance selected item.
F. P r ess SET/INDIGLO when done.
G. Press and hold LAP/RESET and wait for beep to change display to second TIME ZONE.
Repeat above to set time.
Note: once date is set, calendar runs automatically.
CHRONOGRAPH
A. Press MODE until CHRONO appears. Watch will briefly display available storage (1-42).
B. Press START/STOP to start CHRONO.
C. Press LAP/RESET to take a lap. Display of running time resumes after 5 seconds.
D. Press START/STOP to stop timing. Press again to resume.
E. While CHRONO is stopped, press MODE to enter RECALL mode. Press START/STOP repeat-
edly to recall stored lap and split times.
F. P r ess and hold LAP/RESET to clear stored times. Chrono will automatically clear. OR
G. In CHRONO mode, press and hold LAP/RESET to reset and stored laps/splits will automati-
cally clear.
COUNTDOWN TIMERS
A. Press MODE until TIMER appears. Press LAP/RESET to select LOOP 1, 2 or 3. Timers will
count upwards starting with last LOOP TIMER set, unless last LOOP TIMER set is 3 (timers
will then count backwards from LOOP 3).
B. Press and hold SET/INDIGLO to set LOOP TIMER. Press START/STOP or LAP/RESET to set
seconds.
C. Press MODE to select MINUTES, press START/STOP or LAP/RESET to set minutes.
D. Press MODE and then START/STOP or LAP/RESET to select next LOOP.
E. Repeat above steps to set each additional LOOP.
F. P r ess SET/INDIGLO when done.
G. Press START/STOP to start or stop LOOP TIMER.
H. With TIMER stopped, press and hold SET/INDIGLO to reset all LOOPS to zero.
At end of timed LOOP, next LOOP TIMER starts. Cycle is continuous for up to 30 loops.
ALARM
A. Press MODE until ALARM appears.
B. Press LAP/RESET to select ALARM 1 or 2.
C. Press and hold SET/INDIGLO to set.
D. Press START/STOP or LAP/RESET to set HOURS. Go through 12 hours for AM or PM.
E. Press MODE to select MINUTES, press START/STOP or LAP/RESET to set
F. P r ess MODE to select TIME ZONE for alarm, press START/STOP or LAP/RESET to set.
G. Repeat to select MONTH and DAY. Leave blank for daily alarm.
H. Press SET/INDIGLO when done.
I. Repeat for second ALARM.
J. Press START/STOP to turn ALARM on or off.
Alarm symbol ( ) will appear in TIME display when ALARM is armed for that TIME ZONE.
Beep will sound when ALARM time is reached. Press any button to silence alarm.
Page 2
INDIGLO® NIGHT-LIGHT
SET/INDIGLO
Press
to illuminate watch face.
Electroluminescent technology used in the INDIGLO® night-light illuminates entire watch face
at night and in low light conditions.
WATER RESISTANCE
If your watch is water-resistant, meter marking or ( ) is indicated. (See Fig. 1.)
Water-Resistance Depth p.s.i.a.* Water Pressure Below Surface
30m/98ft 60
50m/164ft 86
100m/328ft 160
*pounds per square inch absolute
Fig. 1
WARNING: TO MAINTAIN WATER-RESISTANCE, DO NOT PRESS ANY BUTTONS UNDER WATER.
1. Watch is water-resistant only as long as lens, push buttons and case remain intact.
2. Watch is not a diver watch and should not be used for diving.
3. Rinse watch with fresh water after exposure to salt water.
BRACELET ADJUSTMENT
SLIDING CLASP BRACELET
Open locking plate. Move clasp to desired bracelet length. Exert pressure while holding locking
plate and slide clasp back and forth until it engages in grooves on underside of bracelet. Press
locking plate down until it snaps closed. Clasp can be damaged if excessive force is used.
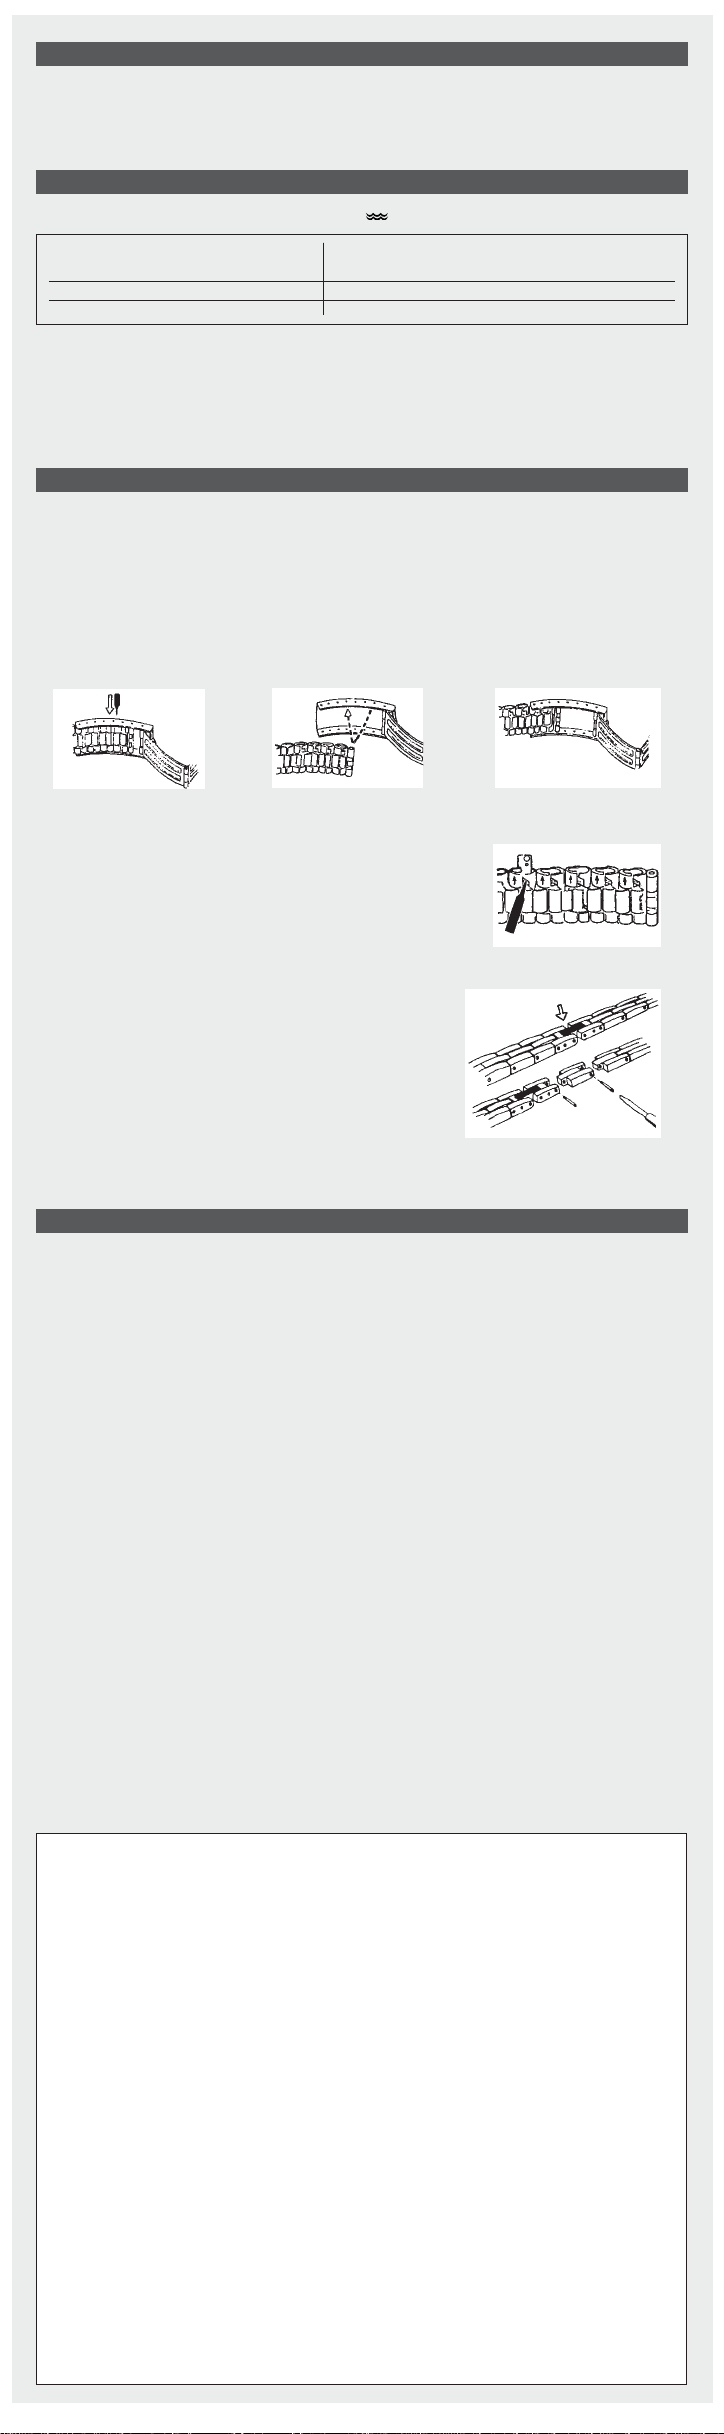
FOLDOVER CLASP BRACELET
Find spring bar that connects bracelet to clasp. Using a pointed tool (Fig. 2), push spring bar in
and gently twist bracelet to disengage. Determine wrist size, then insert spring bar in correct
bottom hole (Fig. 3). Push down on spring bar, align with top hole and release to lock in place
(Fig. 4).
Fig. 2
Fig. 3
Fig. 4
Bracelet Link Removal
Removing Links: Place bracelet upright and insert pointed tool
in opening of link (Fig. 5). Push pin forcefully in direction of arrow
until link is detached (pins are designed to be difficult to
remove). Repeat until desired number of links are removed.
Reassembly: Rejoin bracelet parts. Push pin back into link in
opposite direction of arrow. Press pin down securely into
bracelet until it is flush.
Fig. 5
SOLID LINK BRACELET
Removing Links: Using a very small screwdriver, remove
screws by turning COUNTERCLOCKWISE.Repeat until
desired number of links are removed. Do not remove links
adjacent to clasp (Fig. 6).
Reassembly: Rejoin bracelet parts and insert screw in end
of opening where it was removed. Turn screw clockwise
until tight and flush with bracelet.
Fig. 6
BATTERY
Timex strongly recommends that a retailer or jeweler replace battery. If applicable, push
reset button when replacing battery. Battery type is indicated on caseback. Battery life estimates are based on certain assumptions regarding usage; batter life may vary depending on
actual usage. DO NOT DISPOSE OF BATTERY IN FIRE. DO NOT RECHARGE. KEEP LOOSE
BATTERIES AWAY FROM CHILDREN.
(U.S. – LIMITED WARRANTY – PLEASE SEE FRONT OF INSTRUCTION BOOKLET
Your TIMEX watch is warranted against manufacturing defects by Timex Corporation for a period of ONE YEAR
from the original purchase date. Timex and its worldwide affiliates will honor this International Warranty.
Please note that Timex may, at its option, repair your watch by installing new or thoroughly reconditioned and
inspected components or replace it with an identical or similar model. IMPORTANT — PLEASE NOTE THAT THIS
WARRANTY DOES NOT COVER DEFECTS OR DAMAGES TO YOUR WATCH:
1) after the warranty period expires;
2) if the watch was not originally purchased from an authorized Timex retailer;
3) from repair services not performed by Timex;
4) from accidents, tampering or abuse; and
5) lens or crystal, strap or band, watch case, attachments or battery. Timex may charge you for replacing any
of these parts.
THIS WARRANTY AND THE REMEDIES CONTAINED HEREIN ARE EXCLUSIVE AND IN LIEU OF ALL OTHER WARRANTIES, EXPRESS OR IMPLIED, INCLUDING ANY IMPLIED WARRANTY OF MERCHANTABILITY OR FITNESS FOR PARTICULAR PURPOSE. TIMEX IS NOT LIABLE FOR ANY SPECIAL, INCIDENTAL OR CONSEQUENTIAL DAMAGES. Some
countries and states do not allow limitations on implied warranties and do not allow exclusions or limitations on
damages, so these limitations may not apply to you.This warranty gives you specific legal rights and you may also
have other rights which vary from country to country and state to state.
To obtain warranty service, please return your watch to Timex, one of its affiliates or the Timex retailer where the
watch was purchased, together with a completed original Watch Repair Coupon or, in the U.S. and Canada only,
the completed original Watch Repair Coupon or a written statement identifying your name, address, telephone
number and date and place of purchase. Please include the following with your watch to cover postage and handling (this is not a repair charge): a US$ 7.00 check or money order in the U.S.; a CAN$6.00 cheque or money order
in Canada; and a UK£2.50 cheque or money order in the U.K.In other countries, Timex will charge you for postage
and handling. NEVER INCLUDE A SPECIAL WATCHBAND OR ANY OTHER ARTICLE OF PERSONAL VALUE IN YOUR
SHIPMENT.
For the U.S., please call 1-800-448-4639 for additional warranty information. For Canada, call 1-800-263-0981.For
Brazil, call 0800-168787. For Mexico, call 01-800-01-060-00. For Central America, the Caribbean, Bermuda and the
Bahamas, call (501) 370-5775 (U.S.). For Asia, call 852-2815-0091. For the U.K., call 44 208 687 9620. For Portugal,
call 351 212 946 017. For France, call 33 3 81 63 42 00. For Germany, call +43 662 88 92130. For the Middle East
and Africa, call 971-4-310850. For other areas, please contact your local Timex retailer or Timex distributor for
warranty information. In Canada, the U.S. and in certain other locations, participating Timex retailers can provide
you with a postage-paid, pre-addressed Watch Repair Mailer for your convenience in obtaining factory service.
FOR TERMS OF EXTENDED WARRANTY OFFER)
TIMEX INTERNATIONAL WARRANTY
 Loading...