

Page 1

CVRS1
Page 2
®
W-195 567-095006 NA
Page 3

1
Page 4

SELECTING PRESSURE AND TEMPERATURE UNITS 24
CALIBRATING THE BAROMETER 25
ALTI - ALTIMETER MODE 28
USING THE ALTIMETER 29
SELECTING ALTITUDE UNITS 30
ALTIMETER PERFORMANCE 31
CALIBRATING THE ALTIMETER AND CLEARING HIGH AND ACC 32
CHRO - CHRONOGRAPH MODE 34
TERMINOLOGY 34
USING THE CHRONOGRAPH 35
LAP/SPLIT TIMING 36
CHANGING THE DISPLAY FORMAT 37
If no laps have yet been taken: 37
If you have taken at least one lap: 38
REVIEWING STORED LAP/SPLIT TIMES 38
TIMER - COUNTDOWN TIMER MODE 40
SETTING THE COUNTDOWN TIMER 40
USING THE COUNTDOWN TIMER 41
ALARM - ALARM MODE 43
SETTING AN ALARM 43
SELECTING AND ARMING/DISARMING ALARMS 44
BACKUP ALERT 45
TRADEMARK AND WARRANTY INFORMATION 46
INTRODUCTION 4
WATCH FEATURES 5
WA
TCH MODES 8
BUTTON FUNCTIONS 9
NORMAL OPERATION 9
SETTING OPERATION 11
WATCH DISPLAY SYMBOLS 13
WEATHER FORECASTING 14
NOTES ON CALIBRATING THE ALTIMETER AND BAROMETER15
WHAT IS CALIBRATION? 15
HOW OFTEN SHOULD I CALIBRATE? 15
DO I NEED TO CALIBRATE BOTH THE BAROMETER AND THE ALTIMETER? 16
TEMPERATURE ACCURACY 17
TIME - TIME OF DAY MODE 18
SETTING TIME OF DAY 19
USING THE DUAL TIME ZONE FEATURE 21
Viewing the secondary time zone 21
Switching time zones 22
VIEWING TEMPERATURE AND AIR PRESSURE DATA 22
BARO - BAROMETER MODE 23
VIEWING TEMPERATURE AND PRESSURE DATA 24
32
Page 5

Watch Features
Time of Day
• Displays hours, minutes and seconds in 12- or 24-hour
format for two time zones.
• Displays month and date, as well as day of the week.
• Optional hourly chime.
Altimeter
• Reports altitude from -2296 to 29,520 feet (-700 to
9000 meters) with 10 ft or 5 m resolution.
• Displays current altitude as well as a graph of altitude
change over time.
• Displays accumulated total of all altitude gains, known
as “total ascent” or “climb”.
• Records highest altitude achieved.
• Selectable display units (meters or feet)
Introduction
Welcome!
Thank you for purchasing a TIMEX® EXPEDITION®
adventure tech altimeter watch. The watch is equipped
with a variety of features to enhance your outdoor
experience. So, if you are trekking the trails, skiing the
slopes or just hanging out, enjoy the journey.
Register your product at www.timex.com
54
Page 6

Chronograph
• Time events up to 24 hours with 1/100-second
resolution.
• Store up to 30 lap/split times.
• View stored lap times as well as best (shortest) lap
time, average lap time and total event time.
Count Down Timer
• Time events up to 24 hours. An alert is generated
when the timer reaches zero.
• Timer can be set to count down to zero once or to
repeat the countdown indefinitely.
Alarm
• Five independent daily alarms, each with a five-minute
backup alert.
Barometer
• Reports air pressure from 8.85 to 32.45 inches of
Mercury (“inHg”) (300 to 1100 mbar) with 0.05 inHg
(1 mbar) resolution.
• Displays current air pressure as well as a graph of
change in air pressure over time.
• Both sea level and local (absolute) air pressure can be
displayed.
• Forecasts the weather for the next 4–6 hour period.
• Selectable display units (inHG or mbar)
Thermometer
• Selectable display units (°F or °C)
• Reports current air temperature from 14 to 140 °F
(-10 to 60 °C).
76
Page 7

TIMER - The Countdown Timer is useful for timing
fixed-time events
ALARM -Five daily alarms to keep you on time
TIP: Press and hold the MODE button for three seconds to
go directly to TIME mode from any other mode in the
watch.
Button Functions
The buttons on your watch are multi-functional, serving
two main purposes - enabling you to perform everyday
functions like checking the time and timing a workout,
and setting things like Time of Day or an Alarm.
Normal Operation
The buttons on your watch largely operate in the same
way from mode to mode and the primary functions for
them are printed on the case itself. This section describes
the typical functions of the buttons.
INDIGLO® Night-Light
Watch Modes
The features of this watch are grouped into modes that
are accessible by pressing and releasing the MODE button
– each depression of the MODE button takes you to the
next mode in the loop. The modes are arranged in the
following order:
TIME > BARO > ALTI > CHRO > TIMER > ALARM
TIME - Displays the time of day and date as well as
weather info
BARO - View air pressure, temperature & weather
information
ALTI - Presents altitude and temperature data
CHRO - Use the Chronograph for timing purposes
98
Page 8
Setting Operation
When setting Time of Day, Alarms or the Countdown Timer
and so on, the button functions change from what is printed on the case.
NOTE: These setting functions are the same in any mode
where you can set a value.
1. Press and hold the SET button. While you are holding
the button, “HOLD ADJUST” will appear on the display.
2. After a couple of seconds, the “HOLD” message will
disappear followed by a flashing value.
3. Change the flashing value by pressing either
START/SPLIT (to increase) or STOP/RESET
(to decrease). Press and hold the button to
increase/decrease the value quickly.
4. When the flashing value is set as intended, press
MODE to advance to the next value.
1110
SET
START / SPLIT
INDIGLO®
STOP / RESET
MODE
Page 9
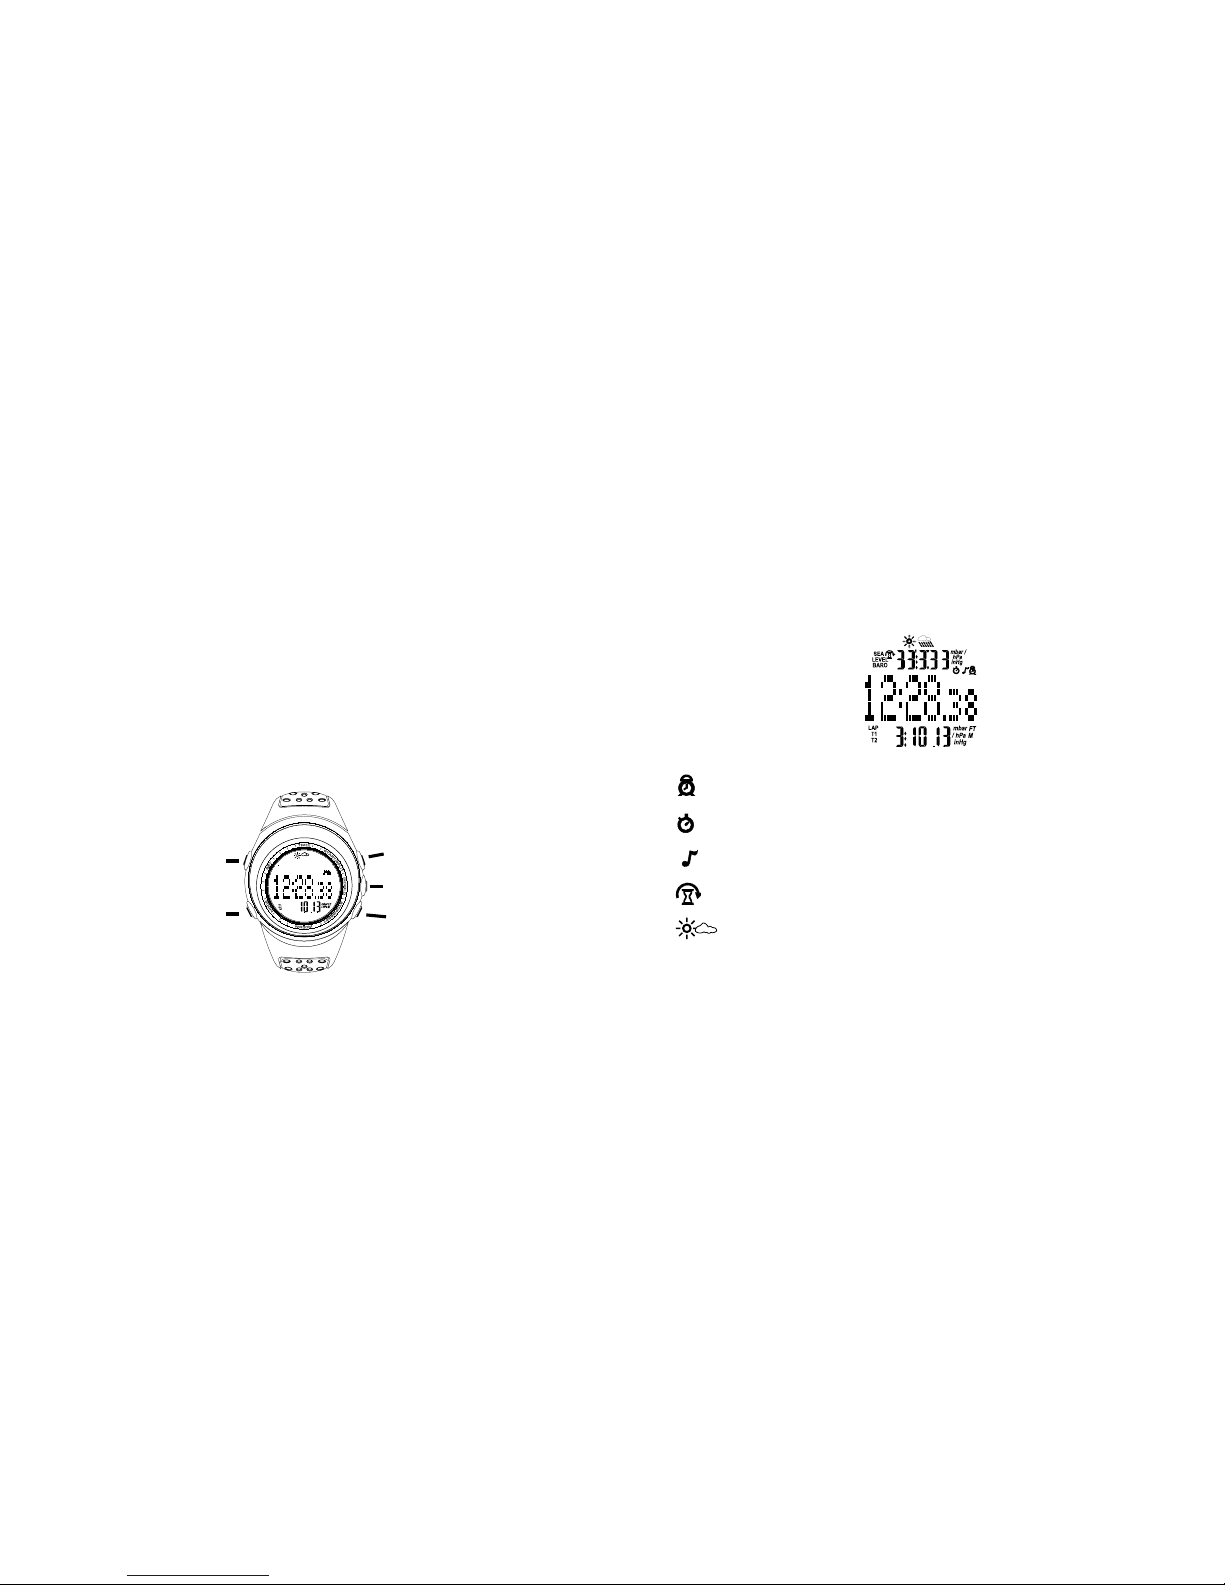
Watch Display Symbols
Alarm is armed (flashing if backup alarm is active)
Chronograph is running
Hourly Chime is enabled
Countdown Timer is running
Indicates weather forecast
5. Repeat steps 3 and 4 for each of the values you wish
to set.
TIP: If you accidentally skip past a setting, continue to
press and release the MODE button to move all the way
through the settings and back to the one that requires
adjustment.
6. When you are satisfied that everything is set as
intended, press the SET button to save your settings
and exit.
1312
PRESS TO EXIT SETTING
PRESS FOR NEXT VALUE
INCREASE FLASHING VALUE
LAMP
DECREASE FLASHING VALUE
Page 10

Notes on calibrating the Altimeter and Barometer
The watch relies on a sensitive electronic sensor to
measure the air pressure and temperature. This sensor
must be calibrated periodically to maintain the high degree
of accuracy you expect from the watch.
What is calibration?
“Calibration” is simply a technique to improve the accuracy of the pressure/temperature sensor, primarily by compensating for local temperature and weather effects. The
watch employs two related methods of calibration, using
either sea level pressure or the local altitude as a reference, depending on the watch mode used for calibration.
How often should I calibrate?
Timex recommends that you calibrate the sensor prior to
any activity where you will be using the altimeter feature
Weather Forecasting
The watch can predict the weather for the upcoming 4 - 6
hour period based on the air pressure trend information for
the previous twelve hours. The weather forecast is indicated
at the top of the watch display by a series of symbols.
Generally, if the air pressure is rising, the weather situation is
considered to be improving and is indicated by the presence
of the sun symbol. If the air pressure trend is falling, then the
weather situation is worsening and is indicated by showing
the clouds and/or precipitation symbols.
The weather forecast is always visible in TIME and BARO
modes and visible in ALTI mode when no altitude changes
are detected.
1514
CONDITIONS
Page 11

reference source available.
For example, if you are standing at a trail head and know
the correct altitude, then the most accurate calibration will
be obtained by calibrating within ALTI mode (since it relies
on altitude as the reference). However, if you don’t know
your altitude, you can find out the current sea level pressure (published online or in a newspaper) and calibrate the
sensor within BARO mode. For example, the U.S. weather
service publishes the sea-level pressure for all of its
stations at http://www.weather.gov
Temperature Accuracy
When worn on your wrist, the thermometer reading is
affected by body heat and may report a temperature
different from the actual air temperature by 10 degrees or
more. Long periods of exposure to direct sunlight may also
affect the accuracy. Try wearing the watch outside your
and then again whenever you experience significant
changes in altitude or temperature during your activity.
If you are not using the altimeter feature, then daily
calibration will maintain the accuracy of the barometer
and weather forecasting feature.
Whenever possible, the sensor should be calibrated soon
after you experience significant temperature changes.
Do I need to calibrate both the Barometer and the
Altimeter?
No. BARO mode calibrates the sensor based upon the sea
level air pressure, while ALTI allows you to calibrate the
sensor by telling the watch about your current altitude.
Calibration performed in either mode will calibrate the
sensor for all modes. For the best accuracy, we recommend that you choose only one calibration method each
time you calibrate the sensor, based on the most accurate
1716
Page 12

(in the lower display line) and the weather forecast
(at the top of the display).
Setting Time of Day
Refer to section entitled “Setting Operation” on page 11 to
understand how the buttons function during setting.
You may set the following values for Time of Day:
Hour, Minute, Seconds, Year, Month, Date, Date Format,
Time Format, Hourly Chime.
jacket (in cold weather) or clipping it to your belt or pack
(ideally in an area not constantly exposed to the sun) to
improve the accuracy of the temperature readings during
outdoor activities. For the most accurate readings, remove
the watch from your wrist and put in shade for at least
several minutes.
The watch can measure water temperature also, if
submerged. Be sure to select temperature display before
placing the watch in water, as buttons should not be
pressed with the watch underwater.
TIME - Time of Day Mode
In this mode you may view the current time and date in
either of two time zones and switch between them. The
time can be displayed in 12- or 24-hour format. In addition
to the time of day, the watch can display the current
barometer (air pressure) value or the current temperature
1918
Page 13

Using the Dual Time Zone feature
The watch can keep track of the time for two zones
(T1 and T2). By default, T1 is the “primary” time zone (the
one that you can see) and T2 is the “secondary” time zone
(the one you can’t see). The indicator for the primary time
zone is shown in the lower left of the display.
Viewing the secondary time zone
You may temporarily view (or “peek” at) the secondary
time zone by briefly pressing and holding the STOP/RESET
button. While you are “peeking” at the secondary time
zone, its indicator (T1 or T2) will flash in the lower
left-hand side of the display. When you release the
STOP/RESET button, the watch will display the time for
the primary time zone once again.
NOTES:
• Be sure you have selected the intended time zone
(T1 or T2) before you begin setting; you cannot switch
zones while setting (see “Using the Dual Time Zone
feature” on pg 21).
• When setting the hour value, be sure to set to the
correct part of the day (AM or PM) (12-hour format only).
• The seconds’ value can only be set to “0” and cannot
be set individually for each time zone.
• The day of the week is automatically calculated based
on the date.
• The watch will automatically adjust for leap years up
to 2049.
• When the hourly chime is enabled, a confirmation
beep will also be generated whenever a key is
pressed.
2120
Page 14

BARO - Barometer Mode
Want a better understanding of the forces that influence
the weather? This is the mode to do just that – here you
can view the current air pressure (local and sea level),
monitor the current temperature and study the changes in
air pressure over time, presented in a graphical format.
Finally, the weather forecast for the next 4 - 6 hours is
shown at the top of the display.
Switching time zones
If you wish to switch to the secondary time zone, simply
continue holding the STOP/RESET button until the time
zone indicator (T1 or T2) stops flashing (this takes about
three seconds). This will be your new primary time zone
until you switch it back.
Viewing Temperature and Air Pressure Data
While in TIME mode, press and release the START/SPLIT
button to view the following information on the lower line
of the watch display:
• The current air pressure
• The current temperature
• The month and date
2322
Page 15

When viewing the Time of Day, Sea Level Pressure and
Temperature group, press STOP/RESET to toggle temperature display units (°F or °C).
NOTE: Unit selection made for temperature and barometric
pressure in BARO mode applies to all modes in the watch.
For example, if you select “°C” for the temperature display
in BARO mode, it will also appear in °C in Time of Day and
Altimeter modes.
Calibrating the Barometer
Calibration in BARO mode allows you to synchronize the
weather forecasting feature with the current weather
situation and also to calibrate the pressure sensor for
improved accuracy.
Refer to section entitled “Setting Operation” on page 11 to
understand how the buttons function during setting. Refer
Viewing Temperature and Pressure Data
Press and release MODE until you see “BARO” on the
display.
Press and release the START/SPLIT button to view each of
the following data combinations:
• Temperature, Sea Level Pressure and Local Pressure
• Time of Day, Sea Level Pressure and Temperature
• Time of Day, a graph of the sea level pressure for the
last 24 hours and Sea Level Pressure.
Temperature is updated every four minutes and barometric pressure every 2.5 minutes.
Selecting Pressure and Temperature Units
When viewing the Temperature, Sea Level Pressure and
Local Pressure group, press STOP/RESET to toggle barometric pressure display units (inches of mercury [inHg] or
millibars [mbar]).
2524
Page 16

What is “Sea Level Pressure”?
Sea Level Pressure is simply the air pressure for a specific
location adjusted to account for the air pressure difference
due to the altitude of the location. Because very few
places on the earth are actually at sea level, this adjustment factor was devised to allow for easy comparison of
air pressure values from place to place. For example, without this compensation, a pressure reading of 29.5 inHg in
Denver, CO would not mean the same as the same reading
in Miami, FL due to the large difference in altitude.
Meteorologists would have a very difficult time measuring
the change in the weather as fronts move across the land
masses if there was no way to compensate for the altitude
effects. So, whenever you see a barometer value published
online or in a newspaper, it is always the pressure adjusted for the altitude of the measuring station.
to the section entitled “Notes on calibrating the Altimeter
and Barometer” on page 15 for general information regarding calibration.
1. Press and hold SET until the word “SET” appears in the
lower line of the display.
2. Using START/SPLIT or STOP/RESET, adjust the
weather icons to the actual weather conditions.
3. Press MODE to move on to entering the sea level air
pressure.
4. Using START/SPLIT (to increase) and STOP/RESET
(to decrease), adjust flashing value.
5. Repeat steps 3 and 4 until for each flashing value until
the pressure is set as intended.
6. Press SET to complete calibration.
2726
Page 17

Using the Altimeter
Press and release MODE until you see “ALTI” on the display. After a couple of seconds, the watch will display the
following data, in the order shown, for two seconds each:
• The highest recorded altitude (indicated by “HIGH” in
the lower display line).
• The total accumulated positive altitude changes
(indicated by “ACC” in the lower display line).
Typically, if you are above sea level, the “local” pressure
value that the watch also displays will be lower than the
sea level pressure (because air pressure decreases with
altitude) and if you are at a point below sea level the local
pressure will be slightly higher.
Incidentally, this difference between sea level air pressure
and the local air pressure is how the watch determines
the altitude.
ALTI - Altimeter Mode
This mode provides altitude and temperature information
to make outdoor activities like hiking, mountain biking and
trail running more enjoyable. The watch will keep track of
the highest altitude you achieved as well as accumulate all
of the positive altitude changes you experience. These
statistics are visible when you first enter ALTI mode.
2928
Page 18

Altimeter Performance
When ALTI mode is first entered, the watch will update the
altitude information every two seconds and will continue
this fast data update rate for thirty minutes. After thirty
minutes elapses, if the watch determines that the altitude
is no longer changing significantly, it will reduce its data
update rate to that of the barometer function (every 2.5
minutes). At that point, two things will happen:
1. The weather icons will appear in the upper part of the
display indicating the forecast.
2. The watch will stop data accumulation for the ACC
and HIGH statistics.
The watch will continue to monitor the air pressure at this
slower rate and, if it determines that the altitude is changing significantly, it will go back to faster update rate. If this
change occurs, the weather icons will be removed from
After the accumulated data is displayed, the watch
will then display either of the following views of the
altitude data:
• Current time, altitude and temperature data.
• A graph of the altitude changes for the last five hours
(each column represents 10 minutes) shown in the
center of the display. The current time is displayed in
the upper line and the current altitude is displayed in
the lower line.
Press and release the START/SPLIT button to switch
between these two views.
Selecting Altitude Units
While viewing the current time, altitude and temperature
data, press STOP/RESET to switch units between feet (FT)
and meters (M).
3130
Page 19

1. Press and hold SET until the word “CAL” appears in
the upper line of the display and the sign of the
calibration value is flashing.
2. Press START/SPLIT to adjust the sign (positive for
altitudes above sea level, negative for altitudes below).
3. Press MODE to move on to adjusting the current
altitude value.
4. Using START/SPLIT (to increase) and STOP/RESET
(to decrease), adjust flashing value.
5. Repeat steps 3 and 4 for each value of the calibration
altitude.
6. Press MODE to move on to enable clearing of the
HIGH data value. “HIGH” will be flashing in the upper
line; the current value for the highest altitude will be
displayed.
7. Press and hold START/SPLIT to clear the value, if
desired.
the display and the watch will again update the statistical
data with altitude information as necessary.
Calibrating the Altimeter and Clearing
HIGH and ACC
Calibration in ALTI mode allows you to calibrate the
pressure sensor for improved accuracy as well as clear
the HIGH and ACC data values.
Calibration operates exactly like setting, so refer to the
section entitled “Setting Operation” on page 11 to understand how the buttons function during setting. Also refer
to the section entitled “Notes on calibrating the Altimeter
and Barometer” on page 15 for general information regarding calibration.
For proper calibration, adjust the “CAL” value to reflect
your actual altitude. The “CAL “ value can be set to a value
from -2296 ft (-700m) to +26520 ft (+9000m).
3332
Page 20

track, the lap time would be the time for one lap around
the track, assuming that you push the START/SPLIT button
as you cross the start/finish line each time.
Split Time: The elapsed time from the start of the
workout, sometimes called the “total time”.
“Taking a Lap”: Marking the end of one segment (or lap)
and the beginning of another by pressing START/SPLIT
while the Chronograph is running. Also called “taking a
split”.
Using the Chronograph
Press and release MODE until you see “CHRO” on the
display.
Start the Chronograph by pressing START/SPLIT and stop
it by pressing STOP/RESET.
While the Chronograph is stopped, you may restart it by
pressing START/SPLIT, or you may reset it to zero by
8. Repeat steps 6 and 7 to clear the ACC data.
9. Press SET to complete calibration.
CHRO – Chronograph Mode
The Chronograph gives you the ability to time a hike, a ski
or a run – just about anything you’d like to time. You can
also track the time for specific segments of an activity
with the lap/split features; the Chronograph will store
lap/split times for thirty laps as well as the best (or shortest) lap time and the average for all the stored lap times.
In the event you take more than thirty laps, the watch will
store timing information for the first thirty.
Terminology
Lap Time: The elapsed time for a segment of a course,
marked by pressing the START/SPLIT button on the watch.
For example, if you are running on a standard quarter-mile
3534
Page 21

Changing the Display Format
You have the option of viewing either the lap or split time
in the large digits in the center of the watch display. The
display format can be changed at any time, though the
method changes based on whether or not laps have been
taken. The word “LAP” will appear on the display to inform
you where the lap time is displayed.
If no laps have yet been taken:
Press SET. “FORMAT” will appear on the display, followed
by the current configuration, which will be flashing. Press
START/SPLIT or STOP/RESET to select the desired format
and then press SET to save the setting and return to the
Chronograph display.
pressing and holding STOP/RESET.
You may leave CHRO mode while the Chronograph is running; it will continue to run in the background, indicated by
the icon on the display when in TIME mode.
Lap/Split Timing
Press START/SPLIT each time you pass a segment marker
(like trail head marker) to complete the timing of the
previous lap or segment and begin timing a new one. The
lap and split times for the segment just completed will be
displayed for ten seconds (it will still be timing the new
segment in the background, indicated by the flashing
symbol on the display). If you wish to return to the running
Chronograph immediately, press MODE to dismiss the
previous lap time data.
3736
Page 22

2. Press START/SPLIT to view each successive lap/split
time, followed by the BEST and AVERAGE lap
(if the Chronograph is stopped). You may also press
STOP/RESET to go back and view earlier lap/split
times.
NOTE: You may recall the stored timing information while
the Chronograph is running or stopped, as long as you
have taken at least one lap. If the Chronograph is stopped,
the BEST and AVG information will follow the last entry; if
the Chronograph is still running, these data are not shown.
3. When you have finished reviewing the lap/split times,
press SET to return CHRO mode.
NOTE: You may also change the display format for CHRO
mode while viewing stored lap/split information. Press
If you have taken at least one lap:
Press SET. “RECALL” will appear on the display, followed by
the lap and split times for Lap 1. Press MODE – “FORMAT”
will appear on the display followed by the current display
format configuration, which will be flashing. Press
START/SPLIT or STOP/RESET to select the desired format
and then press SET to save the setting and return to the
Chronograph display.
Reviewing Stored Lap/Split Times
1. In CHRO mode, press SET to begin. If there are
lap/split times stored, “RECALL” will appear on the
display, followed by the lap/split time for Lap 1.
NOTE: If there are no lap/split times to recall, the watch
will display “FORMAT” and allow you to change the display
format (see “Changing the Display Format” above).
3938
Page 23

HOUR MINUTE SECONDS “ONCE”/“REPEAT”
Setting the Timer to “ONCE” will cause the Timer to stop
after it completes its countdown; selecting “REPEAT” will
cause the Timer to repeat the countdown indefinitely until
the Timer is manually stopped.
The Timer can be set to a maximum time of 23:59.59
(24 hours).
Using the Countdown Timer
Press and release MODE until you see “TIMER” on the
display.
Press START/SPLIT to start the Timer, press STOP/RESET
to stop it. You may press START/SPLIT to resume the
countdown, or press STOP/RESET once again to reset the
Timer to the original countdown time.
MODE to enter this mode (FORMAT will appear on the display). Press START/SPLIT to change to the desired format
and then press MODE to return to RECALL, or press SET to
return to CHRO mode.
TIMER - Countdown Timer Mode
The Countdown Timer is useful for situations where you
want to time an event with a fixed duration, like a 30minute hike, a 3-minute egg or series of 1-minute
sprint/rest intervals.
Setting the Countdown Timer
Refer to section entitled “Setting Operation” on page 11 to
understand how the buttons function during setting.
You may set the following values for the Countdown
Timer:
4140
Page 24

ALARM - Alarm Mode
The watch includes five independent daily alarms to help
you coordinate your schedule.
Setting an Alarm
Refer to section entitled “Setting Operation” on page 11 to
understand how the buttons function during setting.
• You may set the Hour and Minute value for each
Alarm.
• If the watch is displaying time in AM/PM format, be
sure to set the hour value to the correct part of the
day (AM or PM).
• The Alarm is automatically armed if you change the
Hour or Minute value during setting.
The watch will generate an alert when the countdown is
complete. If the Timer is set to repeat, an alert is generated each time the count reaches zero.
You may leave TIMER mode while the Countdown Timer is
running; it will continue to run in the background. This is
indicated by the icon on the display when in TIME
mode.
4342
Page 25

Backup Alert
When the Alarm time arrives, the watch will generate an
alert for 20 seconds. Y
ou may press any button on the
watch to silence this alert. If you don’t silence the alert,
the watch will assume that you missed that Alarm time
and will automatically enable a backup alert, indicated by
a flashing icon on the display, which will sound five
minutes after the Alarm time.
Selecting and Arming/Disarming Alarms
Press and release MODE until you see “ALARM” on the
display.
Press and release STOP/RESET to select an Alarm
(AL-1 through AL-5)
Arm or disarm the selected Alarm by pressing
START/SPLIT. The word “ON” and the icon will appear
next to the Alarm time when the Alarm is armed.
The icon will also be visible in TIME mode if any one of
the Alarms is armed. When the Alarm is armed, it will
generate an alert at the set time.
4544
Page 26

ages, so these limitations may not apply to you. This warranty gives you specific legal rights
and you may also have other rights which vary from country to country and state to state.
To obtain warranty service, please return your watch to Timex, one of its affiliates or the
Timex retailer where the watch was purchased, together with a completed original Watch
Repair Coupon or, in the U.S. and Canada only, the completed original Watch Repair
Coupon or a written statement identifying your name, address, telephone number and date
and place of purchase. Please include the following with your watch to cover postage and
handling (this is not a repair charge): a US$ 7.00 check or money order in the U.S.; a
CAN$6.00 cheque or money order in Canada; and a UK£2.50 cheque or money order in the
U.K. In other countries, Timex will charge you for postage and handling. NEVER INCLUDE A
SPECIAL WATCHBAND OR ANY OTHER ARTICLE OF PERSONAL VALUE IN YOUR SHIPMENT.
For the U.S., please call 1-800-328-2677 for additional warranty information. For Canada,
Call 1-800-263-0981. For Brazil, call +55 (11) 5572 9733. For Mexico, call 01-800-01-060-00.
For Central America, the Caribbean, Bermuda and the Bahamas, call (501) 370-5775 (U.S.).
For Asia, call 852-2815-0091. For the U.K., call 44 020 8687 9620. For Portugal, call
351 212 946 017. For France, call 33 3 81 63 42 00. For Germany, call 49 7 231 494140. For
the Middle East and Africa, call 971-4-310850. For other areas, please contact your local
Timex retailer or Timex distributor for warranty information. In Canada, the U.S. and in
certain other locations, participating Timex retailers can provide you with a postage-paid,
pre-addressed Watch Repair Mailer for your convenience in obtaining factory service.
©2005 Timex Corporation. TIMEX, EXPEDITION and are registered trademarks of
Timex Corporation. INDIGLO is a registered trademark of Indiglo Corporation in the U.S.
and other countries.
47
Trademark and Warranty Information
TIMEX INTERNATIONAL WARRANTY
(U.S. – LIMITED WARRANTY)
Your TIMEX® watch is warranted against manufacturing defects by Timex Corporation for
a period of ONE YEAR from the original purchase date. Timex and its worldwide affiliates
will honor this International Warranty.
Please note that Timex may, at its option, repair your watch by installing new or thoroughly reconditioned and inspected components or replace it with an identical or similar
model. IMPORTANT — PLEASE NOTE THAT THIS WARRANTY DOES NOT COVER
DEFECTS OR DAMAGES TO YOUR WATCH:
1) after the warranty period expires;
2) if the watch was not originally purchased from an authorized Timex retailer;
3) from repair services not performed by Timex;
4) from accidents, tampering or abuse; and
5) lens or crystal, strap or band, watch case, attachments or battery. Timex may
charge you for replacing any of these parts.
THIS WARRANTY AND THE REMEDIES CONTAINED HEREIN ARE EXCLUSIVE AND IN LIEU OF
ALL OTHER WARRANTIES, EXPRESS OR IMPLIED, INCLUDING ANY IMPLIED WARRANTY OF
MERCHANTABILITY OR FITNESS FOR PARTICULAR PURPOSE. TIMEX IS NOT LIABLE FOR ANY
SPECIAL, INCIDENTAL OR CONSEQUENTIAL DAMAGES. Some countries and states do not
allow limitations on implied warranties and do not allow exclusions or limitations on dam-
46
Page 27

SELECCIÓN DE LAS UNIDADES DE PRESIÓN Y TEMPERATURA 116
CALIBRACIÓN DEL BARÓMETRO 117
ALTI - MODO ALTÍMETRO 120
USO DEL ALTÍMETRO 121
SELECCIÓN DE UNIDADES DE ALTITUD 122
DESEMPEÑO DEL ALTÍMETRO 123
CALIBRACIÓN DEL ALTÍMETRO Y BORRADO DE “HIGH” Y “ACC” 124
CHRO - MODO CRONÓGRAFO 126
TERMINOLOGÍA 127
USO DEL CRONÓGRAFO 128
CÓMO TOMAR EL TIEMPO DE VUELTA/ACUMULATIVO 128
CAMBIO DEL FORMATO DE LA PANTALLA 129
Si todavía no se midió ninguna vuelta: 130
Si se midió al menos una vuelta: 130
REVISIÓN DE TIEMPOS DE VUELTA/ACUMULATIVO ALMACENADOS 131
TIMER - MODO TEMPORIZADOR DE CUENTA REGRESIVA 133
PROGRAMACIÓN DEL TEMPORIZADOR DE CUENTA REGRESIVA 133
USO DEL TEMPORIZADOR DE CUENTA REGRESIVA 134
ALARM - MODO ALARMA 135
PROGRAMACIÓN DE LA ALARMA 135
SELECCIÓN Y ACTIVACIÓN/DESACTIVACIÓN DE ALARMAS 136
ALERTA DE RESPALDO 137
INFORMACIÓN DE MARCA REGISTRADA Y GARANTÍA 138
95
INTRODUCCIÓN 96
FUNCIONES DEL RELOJ 97
MODOS DEL RELOJ 100
FUNCIONES DE LOS BOTONES 101
OPERACIÓN NORMAL 101
PROGRAMACIÓN 103
SÍMBOLOS DE LA PANTALLA DEL RELOJ 105
PRONÓSTICO DEL TIEMPO 106
NOTAS SOBRE LA CALIBRACIÓN DEL ALTÍMETRO
Y EL BARÓMETRO 107
¿QUÉ ES LA CALIBRACIÓN? 107
¿CON QUÉ FRECUENCIA DEBO CALIBRAR EL RELOJ? 108
¿TENGO QUE CALIBRAR TANTO EL BARÓMETRO COMO EL ALTÍMETRO? 108
EXACTITUD DE LA TEMPERATURA 109
TIME - MODO HORA DEL DÍA 110
PROGRAMACIÓN DE LA HORA DEL DÍA 111
USO DE LA FUNCIÓN ZONA DE TIEMPO DUAL 113
Cómo ver la zona horaria secundaria 113
Cambio de zona horaria 114
CÓMO VER LOS DATOS DE TEMPERATURA Y PRESIÓN ATMOSFÉRICA 114
BARO - MODO BARÓMETRO 115
CÓMO VER LOS DATOS DE TEMPERATURA Y PRESIÓN ATMOSFÉRICA 116
94
Page 28

Funciones del reloj
Hora del Día
• Muestra horas, minutos y segundos en el formato de
12 ó 24 horas para dos zonas horarias.
• Muestra mes y fecha, así como también el día de la semana.
• Timbre de hora opcional.
Altímetro
• Reporta la altitud desde –2.296 hasta 29.520 pies (-700
a 9.000 metros) con 10 pies o 5 metros de resolución.
• Muestra la altitud en ese momento y también un
gráfico del cambio de la altitud en función del tiempo.
• Muestra el total de la altitud ganada, conocida como
“ascenso total” o “escalada”.
• Registra la máxima altitud alcanzada.
• Unidades de medida seleccionables (metros o pies)
97
Introducción
¡Bienvenido!
Gracias por comprar el reloj TIMEX® EXPEDITION®
adventure tech altimeter. Este reloj cuenta con diversas
funciones para que disfrute al máximo de sus actividades
al aire libre. Si sale a correr, esquiar o simplemente
caminar... su nuevo reloj hará que la jornada le resulte
mucho más placentera.
Registre su producto en www.timex.com
96
Page 29

Cronógrafo
• Cronometra eventos hasta 24 horas con una
resolución de 1/100 de segundo.
• Almacena hasta 30 tiempos de vuelta/acumulativo.
• Muestra tiempos de vuelta almacenados y también el
mejor tiempo de vuelta (el más breve), tiempo de
vuelta promedio y tiempo total del evento.
Temporizador de cuenta regresiva
• Mide eventos hasta 24 horas. Cuando el temporizador
llega a cero, se genera una alerta.
• El temporizador puede programarse para contar hasta
cero una vez o para repetir la cuenta regresiva
indefinidamente.
Alarma
• Cinco alarmas diarias independientes, todas con una
alerta de respaldo de cinco minutos.
99
Barómetro
• Indica la presión atmosférica desde 8.85 a 32.45
pulgadas de mercurio (“inHg”) (300 a 1100 milibares)
con una resolución de 0.05 inHg (1 mbar).
• Muestra la presión atmosférica y también un gráfico
del cambio de la presión en función del tiempo.
• Puede mostrarse tanto la presión atmosférica a nivel
del mar como la local (absoluta).
• Pronóstico del tiempo para las siguientes 4 a 6 horas.
• Unidades de medida seleccionables (inHg o milibares)
Termómetro
• Unidades de medida seleccionables (°F o °C)
• Indica temperatura ambiente desde 14 °F a 140 °F
(-10 °C a 60 °C).
98
Page 30

ALARMA - Cinco alarmas diarias para que recuerde todo
lo importante
SUGERENCIA: Para ir directamente al modo TIME desde
cualquier otro modo en el reloj, mantenga pulsado el
botón MODE por tres segundos.
Funciones de los botones
Los botones del reloj son multifuncionales y cumplen dos
fines principales: realizar funciones comunes (ver la hora y
cronometrar una sesión de ejercicios) y programar, por
ejemplo, la hora o una alarma.
Operación normal
Los botones del reloj funcionan prácticamente de la
misma manera en todos los modos, y sus funciones
principales están impresas en la caja misma del reloj. En
esta sección se describen las funciones típicas de los
botones.
101
Luz nocturna INDIGLO®
Modos del reloj
Las funciones de este reloj están agrupadas en modos a
los que se accede pulsando el botón MODE: cada vez que
se pulsa el botón MODE se observa el siguiente modo en
la secuencia. Los modos están dispuestos en el siguiente
orden:
TIME > BARO > ALTI > CHRO > TIMER > ALARM
HORA - Muestra la hora y la fecha, así como la
información del clima
BARO - Muestra presión atmosférica, temperatura e
información del clima
ALTI - Presenta datos de altitud y temperatura
CHRO - Uso del cronógrafo como temporizador
TEMPORIZADOR - El temporizador de cuenta regresiva es
útil para medir eventos de tiempo fijo
100
Page 31

Programación
Cuando se programan la hora, las alarmas, la cuenta
regresiva, etc., las funciones de los botones cambian
respecto a lo que está impreso en la caja del reloj.
NOTA: Estas funciones de programación son las mismas en
cualquier modo en el que se puede establecer un valor.
1. Pulse y mantenga pulsado el botón SET. Mientras
mantiene pulsado el botón, en la pantalla aparecerá
“HOLD ADJUST”.
2. Luego de un par de segundos, el mensaje “HOLD” desaparecerá y después se verá un valor intermitentemente.
3. Para cambiar ese valor intermitente, pulse
START/SPLIT
(para aumentarlo) o STOP/RESET (para disminuirlo). Para
aumentar o disminuir rápidamente ese valor, mantenga
oprimido el botón correspondiente.
4. Cuando el valor intermitente sea el deseado, pulse
MODE para avanzar hasta el próximo valor.
103102
PROGRAMACIÓN
INICIAR /
ACUMULATIVO
INDIGLO®
DETENER /
REINICIALIZAR
MODO
Page 32

Símbolos de la pantalla del reloj
Alarma activada (intermitente si se activó la
alarma de respaldo)
El cronógrafo está funcionando
Señal sonora cada hora activada
El temporizador de cuenta regresiva está
funcionando
Indica el pronóstico del tiempo
105
5. Repita los pasos 3 y 4 para cada valor que desee
programar.
SUGERENCIA: Si accidentalmente olvidara programar uno
de los valores, pulse varias veces el botón
MODE hasta
regresar al valor que había quedado sin programar o ajustar.
6. Cuando considere que todos los valores son los
deseados, pulse el botón SET para guardar dichos
valores y salir del modo programación.
104
PULSAR PARA
TERMINAR
PROGRAMACIÓN
PULSAR PARA PASAR AL
PRÓXIMO VALOR
AUMENTA VALOR
DESTELLANTE
LUZ
DISMINUYE VALOR
DESTELLANTE
Page 33

Notas sobre calibración del altímetro
y del barómetro
El reloj utiliza un sensor electrónico altamente sensible
para medir la presión atmosférica y la temperatura. Este
sensor debe calibrarse periódicamente para mantener el
alto grado de exactitud que usted exige que tenga su reloj.
¿Qué es la calibración?
En términos simples, la “calibración” es una técnica que
mejora la exactitud del sensor de presión/temperatura,
principalmente compensando los efectos de la
temperatura y el clima locales. El reloj emplea dos
métodos de calibración relacionados, utilizando ya sea la
presión a nivel del mar o la altitud local como referencia,
según cuál sea el modo del reloj usado para la calibración.
107
Pronóstico del tiempo
El reloj pronostica el clima para las 4 a 6 horas siguientes,
basado en la información de la presión atmosférica durante
las doce horas previas. El pronóstico del tiempo se indica en la
parte superior de la pantalla mediante una serie de símbolos.
Por lo general, si la presión atmosférica está aumentando, se
considera que el tiempo está mejorando, y eso se indica
mediante un símbolo del sol. Si la presión atmosférica
estuviera disminuyendo, se considerará que el tiempo está
desmejorando y eso se indica mediante un símbolo de
nubes y/o lluvia.
El pronóstico del tiempo siempre se ve en los modos TIME y
BARO; también se ve en el modo ALTI cuando no se detectan
cambios de altitud.
106
CONDITIONS
CONDICIONES
Page 34

una mayor exactitud, se recomienda elegir un único
método de calibración cada vez que calibre el sensor,
basado en la referencia más precisa disponible.
Por ejemplo, si estuviera en un sitio donde se conoce la
altitud exacta, logrará la mejor calibración si utiliza el
modo ALTI (puesto que la referencia utilizada es la altitud
en el lugar de la calibración). Sin embargo, si desconoce la
altitud, averigüe cuál es la presión atmosférica a nivel del
mar (publicada en la Internet o en el periódico) y calibre el
sensor usando el modo BARO. Por ejemplo, el servicio
meteorológico de EUA publica la presión atmosférica de
todas sus estaciones en http://www.weather.gov
Exactitud de la temperatura
Cuando usa el reloj en la muñeca, la lectura del termómetro
se ve afectada por el calor de su cuerpo y podría indicarse
una temperatura diferente a la temperatura ambiente real
109
¿Con qué frecuencia debo calibrar el reloj?
Timex recomienda que calibre el sensor antes de realizar
cualquier actividad en la que vaya a usar el altímetro, y
nuevamente cuando se produzcan cambios significativos en la
altitud o temperatura durante el desarrollo de su actividad.
Si no usa el altímetro, la calibración diaria mantendrá la exactitud
del barómetro y de la función de pronóstico del clima.
Toda vez que sea posible, vuelva a calibrar el sensor cuando
se produzca un cambio significativo de la temperatura.
¿Tengo que calibrar tanto el barómetro como el
altímetro?
No. El modo BARO calibra el sensor según la presión
atmosférica a nivel del mar, en tanto que ALTI calibra el
sensor porque le transmite al reloj cuál es la altitud en ese
momento. La calibración realizada en cualquiera de los
modos calibra el sensor para todos los modos. Para lograr
108
Page 35

puede mostrarse en formato de 12 o de 24 horas. Además
de la hora, el reloj puede mostrar el valor indicado por el
barómetro (la presión atmosférica) o la temperatura (en la
línea inferior de la pantalla) y el pronóstico del tiempo (en
la parte superior de la pantalla).
Programación de la Hora del Día
Para comprender cómo funcionan los botones durante el
ajuste, refiérase a la sección titulada “Programación”,
página 103.
En Hora del Día pueden programarse los siguientes
valores:
Hora, minutos, segundos, año, mes, fecha, formato de
fecha, formato de hora, señal sonora cada hora.
111
(hasta 10 grados de diferencia o más). La exactitud también
puede verse afectada si el reloj se expone por largos períodos a la luz directa del sol. Cuando hace frío, use el reloj en
la parte externa de su abrigo o cuélgueselo en el cinturón o
la mochila (lo ideal es usar un área que no esté constantemente expuesta al sol) para aumentar la exactitud de la lectura de la temperatura durante la realización de actividades
al aire libre. Para lograr la lectura más exacta, quítese el reloj
de la muñeca y déjelo a la sombra durante varios minutos.
El reloj también mide la temperatura del agua cuando está
sumergido. Recuerde seleccionar la pantalla para temperatura antes de introducir el reloj en el agua, puesto que los
botones no deben pulsarse mientras el reloj esté sumergido.
TIME - Modo Hora del Día
En este modo se ve la hora y la fecha en cualquiera de las
dos zonas horarias, y puede pasar de una a la otra. La hora
110
Page 36

• Cuando la señal sonora a cada hora está activada,
toda vez que se pulse una tecla se escuchará un pitido
de confirmación.
Uso de la función Zona de Tiempo Dual
El reloj puede funcionar en dos zonas horarias diferentes
(T1 y T2). El valor predeterminado es T1, la zona de tiempo
“primaria” (la que se ve) y T2 es la “secundaria” (la que no
se ve). El indicador de la zona de tiempo primaria se ve en
la esquina inferior izquierda de la pantalla.
Cómo ver la zona horaria secundaria
Para ver la zona horaria secundaria, pulse y mantenga
pulsado brevemente el botón STOP/RESET. Mientras mira
brevemente la zona horaria secundaria, el indicador (T1 o
T2) destellará en el lado izquierdo de la pantalla. Cuando
deje de pulsar el botón STOP/RESET el reloj mostrará
nuevamente la hora de la zona horaria primaria.
113
NOTAS:
• Antes de comenzar la programación, recuerde
seleccionar la zona de tiempo deseada (T1 o T2),
porque mientras realiza dicha programación, no podrá
cambiar de una zona a la otra (vea “Uso de la función
Zona de Tiempo Dual”, página 113).
• Cuando programe la hora, recuerde seleccionar la
parte del día correcta (AM o PM) (sólo para el formato
de 12 horas).
• El valor en segundos solamente puede ajustarse en
“0” y no puede establecerse individualmente para
cada zona de tiempo.
• El día de la semana se calcula automáticamente
basándose en la fecha.
• El reloj se ajustará automáticamente por años
bisiestos hasta 2049.
112
Page 37

BARO - Modo Barómetro
¿Quiere entender mejor las fuerzas de la naturaleza que
influyen sobre el clima? Este es el modo que le permite
hacer justamente eso, para ver la presión atmosférica
(local y a nivel del mar), monitorizar la temperatura y
estudiar los cambios de la presión atmosférica en función
del tiempo, los cuales se presentan en formato gráfico. Por
último, el pronóstico del tiempo para las próximas
4 a 6 horas se ve en la parte superior de la pantalla.
115
Cambio de zona horaria
Si desea cambiar a la zona horaria secundaria, mantenga
pulsado el botón STOP/RESET hasta que el indicador de
zona horaria (T1 o T2) deje de destellar (esto demora en
ocurrir unos tres segundos). Esta será su zona primaria de
tiempo hasta que vuelva a cambiarla.
Cómo ver los datos de temperatura
y presión atmosférica
Estando en el modo TIME, pulse el botón START/SPLIT
para ver la siguiente información en la línea inferior de la
pantalla del reloj:
• La presión atmosférica
• La temperatura
• El mes y la fecha
114
Page 38

Mientras se ve la hora, la presión a nivel del mar y la
temperatura, pulse STOP/RESET para cambiar las
unidades de temperatura (°F o °C).
NOTA: Las unidades seleccionadas para temperatura y
presión barométrica en el modo BARO se aplican a todos
los modos del reloj. Por ejemplo, si selecciona “°C” para la
temperatura en el modo BARO, también aparecerá en °C
en los modos Hora del Día y Altímetro.
Calibración del barómetro
La calibración en el modo BARO permite sincronizar la
función de pronóstico del tiempo con la situación del clima
en ese momento y también calibrar el sensor de presión
para aumentar la exactitud.
Para comprender cómo funcionan los botones durante la programación, refiérase a la sección titulada “Programación”,
117
Cómo ver los datos de temperatura y presión
atmosférica
Pulse varias veces MODE hasta ver “BARO” en la pantalla.
Pulse varias veces el botón START/SPLIT para ver las
siguientes combinaciones de datos:
• T
emperatura, presión a nivel del mar y presión local
• Hora, presión a nivel del mar y temperatura
• Hora del día, un gráfico de la presión a nivel del mar
durante las últimas 24 horas y presión a nivel del mar.
La temperatura se actualiza cada cuatro minutos y la
presión barométrica cada dos minutos y medio.
Selección de las unidades de presión y temperatura
Mientras se ve la temperatura, la presión a nivel del mar y
la presión local, pulse STOP/RESET para cambiar las
unidades de presión barométrica (pulgadas de mercurio
[inHg] o milibares [mbar]).
116
Page 39

¿Qué significa “presión a nivel del mar”?
La presión a nivel del mar es simplemente la presión
atmosférica para un lugar específico, ajustada para tener
en cuenta la diferencia de presión atmosférica debida a la
altitud de dicho lugar. Dado que muy pocos lugares en la
Tierra están realmente al nivel del mar, este factor de
ajuste se usa para poder comparar los valores de presión
atmosférica de distintos lugares. Por ejemplo, sin esta
compensación, una lectura de presión de 29.5 inHg en
Denver (estado de Colorado) no significaría lo mismo que
una lectura idéntica en Miami (estado de Florida) debido a
la gran diferencia de altitud entre un sitio y otro. Si no se
puediera compensar por el efecto de la altitud, a los
meteorólogos les daría muchísimo trabajo medir los
cambios del clima cuando las masas de aire se mueven de
un sitio a otro. Así que cada vez que vea publicado en
119
página 103. Refiérase a la sección titulada “Notas sobre
calibración del Altímetro y del Barómetro”, página 107, donde
encontrará información general relativa a la calibración.
1. Mantenga pulsado SET hasta que aparezca la palabra
“SET” en la línea inferior de la pantalla.
2. Con los botones START/SPLIT o STOP/RESET, ajuste
los símbolos de clima según las condiciones reinantes
en ese momento.
3. Pulse MODE para ingresar la presión atmosférica al
nivel del mar.
4. Con los botones START/SPLIT (para aumentar) y
STOP/RESET (para disminuir), ajuste el valor
destellante.
5. Repita los pasos 3 y 4 para todos los valores destellantes
hasta obtener el valor de presión deseado.
6. Pulse SET para completar la calibración.
118
Page 40

registro de la altitud máxima que haya alcanzado y
también acumula todos los cambios de altitud positiva que
usted experimente. Estas estadísticas se ven cuando se
ingresa por primera vez el modo ALTI.
Uso del Altímetro
Pulse varias veces MODE hasta ver “ALTI” en la pantalla.
Luego de un par de segundos el reloj mostrará los
siguientes datos, en el orden mostrado, durante dos
segundos (cada uno de ellos):
• La mayor altitud registrada (indicada mediante “HIGH”
en la línea inferior de la pantalla).
• El cambio total acumulado de altitud positiva (indicada
mediante “ACC” en la línea inferior de la pantalla).
121
Internet o en el periódico un valor de presión atmosférica,
se tratará siempre de la presión ajustada según la altitud
de la estación donde se tomó la medida.
Generalmente, si está por encima del nivel del mar, el valor
de presión “local” que muestra el reloj será menor que el
valor al nivel del mar (porque la presión atmosférica
disminuye con la altitud); si está en un sitio por debajo del
nivel del mar, el valor de presión “local” será ligeramente
superior.
Dicho sea de paso, esta diferencia entre la presión al nivel
del mar y la presión local es la que el reloj utiliza para
determinar la altitud.
ALTI - Modo Altímetro
Este modo informa sobre la altitud y la temperatura para
que sus actividades al aire libre (caminar, montar bicicleta,
correr) resulten más disfrutables. El reloj mantiene un
120
Page 41

Desempeño del altímetro
Cuando se ingresa el modo ALTI por primera vez, el reloj
actualizará la información de altitud cada dos segundos y
continuará con esta rápida actualización de datos durante
treinta minutos. Luego de esos treinta minutos, si el reloj
determinara que la altitud ya no está cambiando
significativamente, reducirá la velocidad de actualización
de datos hasta que sea igual a la del barómetro (cada dos
minutos y medio). En ese momento sucederán dos cosas:
1. Los símbolos del estado del tiempo aparecen en la
parte superior de la pantalla e indican el pronóstico
del tiempo.
2. El reloj dejará de acumular datos para las estadísticas
de ACC y HIGH.
El reloj continuará monitorizando la presión atmosférica a
una frecuencia menor, pero si determina que la altitud
123
Después de mostrar los datos acumulados, el reloj
mostrará cualquiera de los siguientes datos de altitud:
• Hora, altitud y temperatura.
• Un gráfico con los cambios de altitud durante las últimas
cinco horas (cada columna representa 10 minutos),
mostrado en el centro de la pantalla. La hora se muestra
en la línea superior y la altitud en la inferior.
Pulse el botón START/SPLIT para cambiar de una pantalla
a la otra.
Selección de unidades de altitud
Mientras ve la hora, la altitud y la temperatura, pulse
STOP/RESET para cambiar de unidad entre pies (FT) y
metros (M).
122
Page 42

general relativa a la calibración.
Para lograr una calibración correcta, ajuste el valor “CAL”
para que corresponda a la altitud en ese sitio. El valor
“CAL” puede ajustarse desde -2296 ft (-700 m) hasta más
de 26520 ft (más de 9000 m).
1. Mantenga pulsado SET hasta que aparezca la palabra
“CAL” en la línea superior de la pantalla y el signo del
valor de calibración esté destellando.
2. Pulse START/SPLIT para ajustar el signo (positivo para
altitudes superiores al nivel del mar, negativo para las
altitudes inferiores).
3. Pulse MODE para programar el valor de altitud en ese
sitio.
4. Con los botones START/SPLIT (para aumentar) y
STOP/RESET (para disminuir), ajuste el valor destellante.
5. Repita los pasos 3 y 4 para cada uno de los valores de
la altitud de calibración.
125
está cambiando significativamente, volverá a actualizar los
datos con mayor frecuencia. Si se produjera este cambio,
desaparecerán los símbolos del estado del tiempo y el
reloj volverá a actualizar los datos estadísticos con la
información de la altitud según sea necesario.
Calibración del Altímetro y borrado de datos de
HIGH y ACC
La calibración en el modo ALTI permite calibrar el sensor
de presión y así se mejora la exactitud, al tiempo que se
borran los valores HIGH y ACC.
La calibración opera exactamente como una programación; refiérase a la sección titulada “Programación”,
página 103, para comprender el funcionamiento de los
botones durante la programación. Refiérase también a la
sección titulada “Notas sobre calibración del Altímetro y
del Barómetro”, página 107, donde encontrará información
124
Page 43

vueltas, el reloj almacenará información de las
primeras treinta.
Terminología
Tiempo de vuelta: Tiempo transcurrido para un segmento
de un curso, que se registra al pulsar el botón
START/SPLIT. Por ejemplo, si corre en una pista estándar
de un cuarto de milla, el tiempo de vuelta será el tiempo
de una vuelta alrededor de la pista, suponiendo que pulsa
el botón START/SPLIT cada vez que cruza la línea de
salida/llegada.
Tiempo acumulativo: El tiempo transcurrido desde el inicio
de la sesión de ejercicios, a veces llamado “tiempo total”.
“Tomar el tiempo de una vuelta”: Marcar el final de un
segmento (o vuelta) y el comienzo de otra, para lo cual se
pulsa START/SPLIT mientras el cronógrafo sigue funcionando.
También se le llama “tomar el tiempo de un intervalo”.
127
6. Pulse MODE para borrar el dato “HIGH”. En la línea
superior se verá destellar “HIGH”; se mostrará el valor
actual de la máxima altitud alcanzada.
7. Si desea borrar ese valor, pulse y mantenga pulsado
START/SPLIT.
8. Repita los pasos 6 y 7 para borrar el dato “ACC”.
9. Pulse SET para completar la calibración.
CHRO – Modo Cronógrafo
El cronógrafo le permite cronometrar cualquier actividad
que realice: caminar, esquiar, correr. Con la función
vuelta/acumulativo también puede medir el tiempo de
segmentos específicos de una actividad; el cronógrafo
almacenará los tiempos de vuelta/acumulativo por treinta
vueltas, así como el mejor tiempo de vuelta
(el más corto) y el promedio de todos los tiempos de
vuelta almacenados. En caso de medir más de treinta
126
Page 44

segmento que acaba de completar se mostrarán durante
diez segundos (el reloj igualmente continuará midiendo el
tiempo del nuevo segmento, lo cual se indica mediante el
símbolo destellante en la pantalla). Si desea regresar
inmediatamente al cronógrafo que sigue funcionando,
pulse MODE para ignorar el dato del tiempo de vuelta
previo.
Cambio del formato de la pantalla
Puede elegir ver el tiempo de la vuelta o el acumulado en
números grandes en el centro de la pantalla del reloj. Puede
cambiar el formato de la pantalla cuando lo desee, aunque el
método usado dependerá de si se tomaron tiempos de
vuelta o no. La palabra “LAP” aparecerá en la pantalla para
informarle dónde se muestra el tiempo de vuelta.
129
Uso del cronógrafo
Pulse varias veces MODE hasta ver “CHRO” en la pantalla.
Para iniciar el cronógrafo, pulse START/SPLIT y para
detenerlo pulse STOP/RESET.
Cuando el cronógrafo está detenido, puede pulsar
START/SPLIT para reiniciarlo o puede pulsar y mantener
pulsado STOP/RESET para llevarlo a cero.
Puede salir del modo CHRO mientras el cronógrafo está
funcionando; seguirá funcionando igual, lo cual se indica
mediante el símbolo en el modo TIME.
Cómo tomar el tiempo de vuelta/acumulativo
Pulse START/SPLIT cada vez que pase por un punto de
referencia del segmento (por ejemplo, un mojón del
camino) para completar la medición de tiempo de la vuelta
o segmento previo y comenzar a medir el siguiente. Los
tiempos correspondientes a la vuelta y al acumulado del
128
Page 45

Revisión de los tiempos de vuelta/acumulativo
almacenados
1. En el modo CHRO, pulse
SET para comenzar. Si se
almacenaron tiempos de vuelta/acumulativo, en la
pantalla aparecerá la palabra “RECALL” y luego los
tiempos de vuelta y acumulado para la Vuelta 1.
NOTA: Si no hubiera tiempos de vuelta/acumulativo
almacenados para revisar, se verá la palabra “FORMAT” y
podrá cambiarse el formato de la pantalla (vea “Cambio
del formato de la pantalla” anterior).
2. Pulse START/SPLIT para ver cada uno de los tiempos
de vuelta/acumulativo sucesivos, seguidos de las
vueltas BEST (mejor) y AVERAGE (promedio) (si es que
se detuvo el cronógrafo). También puede pulsar
STOP/RESET para regresar y ver tiempos de
vuelta/acumulativo anteriores.
131
Si todavía no se tomó el tiempo de ninguna vuelta:
Pulse SET. En la pantalla se verá la palabra “FORMAT”,
seguida de la configuración actual, que se verá
destellando. Pulse
START/SPLIT o STOP/RESET para
seleccionar el formato deseado y luego pulse SET para
guardar esa configuración y retornar a la pantalla del
cronógrafo.
Si se tomó el tiempo de al menos una vuelta:
Pulse SET. En la pantalla se verá la palabra “RECALL” y
luego los tiempos de vuelta y acumulado para la Vuelta 1.
Pulse MODE: en la pantalla aparecerá “FORMAT”, seguido
de la configuración del formato actual, que se verá destellando. Pulse START/SPLIT o STOP/RESET para seleccionar
el formato deseado y luego pulse SET para guardar esa
configuración y retornar a la pantalla del cronógrafo.
130
Page 46

TIMER - Modo Temporizador de cuenta regresiva
El Temporizador de cuenta regresiva es útil en situaciones
en las que quiere tomar el tiempo de un evento con una
duración fija, como por ejemplo: una caminata de
30 minutos, la cocción de un huevo por 3 minutos o una
serie de intervalos de “sprints”/descansos de 1 minuto.
Programación del Temporizador de cuenta regresiva
Para comprender cómo funcionan los botones durante la
programación, refiérase a la sección titulada
“Programación”, página 103. En Temporizador de cuenta
regresiva pueden programarse los siguientes valores:
HORA MINUTOS SEGUNDOS “UNA VEZ”/”REPETIR”
Si programa el Temporizador en “ONCE”, éste se detendrá
luego de terminar la cuenta regresiva; si selecciona
133
NOTA:
Mientras el cronógrafo está funcionando o
detenido, puede recuperar la información almacenada de
los tiempos, siempre y cuando haya tomado el tiempo de
al menos una vuelta. Si el cronógrafo estuviera detenido, la
información de BEST y AVG seguirá al último dato
ingresado; si el cronógrafo estuviera aún midiendo el
tiempo, esos datos no se mostrarán.
3. Cuando termine de revisar los tiempos de vuelta/-
acumulativo, pulse SET para regresar al modo CHRO.
NOTA: También puede cambiar el formato de la pantalla
para el modo CHRO mientras ve la información almacenada de vuelta/acumulativo. Pulse
MODE para ingresar este
modo (en la pantalla aparecerá la palabra “FORMAT”).
Pulse START/SPLIT para cambiar el formato deseado y
luego pulse MODE para regresar a RECALL, o pulse SET
para regresar al modo CHRO.
132
Page 47

Mientras el Temporizador de cuenta regresiva esté midiendo el tiempo, puede dejar el reloj en el modo TIMER, pues
el Temporizador igual seguirá funcionando. Esto se indica
mediante el símbolo en la pantalla cuando el reloj
está en el modo TIME.
ALARM - Modo Alarma
El reloj cuenta con cinco alarmas diarias independientes
que le ayudan a coordinar sus actividades.
Programación de la Alarma
Para comprender cómo funcionan los botones durante la
programación, refiérase a la sección titulada
“Programación”, página 103.
• Puede programar la hora y los minutos para cada alarma.
• Si en el reloj se ve la hora con el formato AM/PM, recuerde
programar la hora correctamente (use “AM” o “PM”).
135
“REPEAT”, repetirá la cuenta regresiva indefinidamente
hasta que usted lo detenga manualmente.
El Temporizador puede programarse para un máximo de
23:59.59 (24 horas).
Uso del Temporizador de cuenta regresiva
Pulse varias veces MODE hasta ver “TIMER” en la pantalla.
Pulse START/SPLIT para iniciar el Temporizador,
STOP/RESET para detenerlo. Pulse
START/SPLIT para
reanudar la cuenta regresiva o pulse STOP/RESET otra vez
para regresar el Temporizador al tiempo de la cuenta
regresiva original.
Cuando termine la cuenta regresiva el reloj emitirá una
señal de alerta. Si el Temporizador fue programado para
repetir, el reloj emitirá una señal de alerta cada vez que la
cuenta llegue a cero.
134
Page 48

Alerta de respaldo
Cuando llega la hora de sonar la alarma, el reloj emite una
alerta durante 20 segundos. Para silenciar la alarma basta
con pulsar cualquier botón. Si usted no silencia la alarma,
el programa del reloj asumirá que usted no escuchó la
alarma y automáticamente activará una alerta de respaldo,
que se indica mediante un símbolo destellante en la
pantalla, que sonará cinco minutos después de la hora
elegida para la alarma.
137
• La Alarma se activa automáticamente si usted cambia
la hora o los minutos durante la programación.
Selección y activación/desactivación de alarmas
Pulse varias veces MODE hasta ver “ALARM” en la
pantalla.
Pulse varias veces STOP/RESET para seleccionar una
alarma (AL-1 a AL-5)
Para activar o desactivar la alarma seleccionada, pulse
START/SPLIT. Cuando se active la alarma, aparecerá la
palabra “ON” y el símbolo próximo a la hora de la
alarma. El símbolo también se verá en el modo TIME si
se activa cualquiera de las alarmas. Cuando se activa la
alarma, se genera una señal de alerta para el tiempo
programado.
136
Page 49

por ley, pero usted también podría tener otros derechos que difieren de un país a otro, o
de un estado a otro.
Para solicitar los servicios incluidos en la garantía, devuelva el reloj a Timex, a una de sus
sucursales o al comercio minorista adonde se compró el reloj, adjuntando el Cupón de
Reparación que originalmente viene con el mismo; en EUA y Canadá se puede adjuntar el
original del Cupón de Reparación del Reloj o una nota en la que figure su nombre, domicilio, número telefónico y fecha y lugar de compra. Para cubrir el costo de envío, adjunte
el siguiente importe (este importe no es para el pago de la reparación): En EUA, un cheque
o giro por valor de US $ 7.00 (dólares estadounidenses); en Canadá, un cheque certificado
o giro por valor de CAN $6.00 (dólares canadienses); en el Reino Unido, un cheque certificado o giro por valor de UK £ 2.50 (libras). En otros países, Timex se encargará de cobrarle el importe por gastos de envío. NO INCLUYA CON EL RELOJ UNA MALLA O BANDA ESPECIAL NI NINGÚN OTRO ARTÍCULO DE VALOR PERSONAL.
En EUA puede llamar al número 1-800-328-2677 para obtener información adicional sobre la
garantía. En Canadá, llame al número 1-800-263-0981; en Brasil, al +55 (11) 5572 9733; en
México, al 01-800-01-060-00; en América Central, países del Caribe, Bermuda y Bahamas, al
(501) 370-5775 (EUA). En Asia, llame al 852-2815-0091; en el Reino Unido, al 44 020 8687
9620; en Portugal, al 351 212 946 017; en Francia, al 33 3 81 63 42 00; en Alemania, al 49 7
231 494140; en Medio Oriente y África, al 971-4-310850. En otras áreas, consulte al vendedor local de Timex o al distribuidor de Timex para obtener información sobre la garantía. En
Canadá, EUA y en otros lugares, algunos distribuidores de Timex podrían proporcionarle un
sobre con la dirección y el franqueo previamente pagado para que envíe el reloj para
repararlo.
©2005 Timex Corporation. TIMEX, EXPEDITION y son marcas comerciales registradas de Timex Corporation. INDIGLO es una marca comercial registrada de Indiglo
Corporation en EUA y otros países.
139
Información de marca registrada y de garantía
GARANTÍA INTERNACIONAL DE TIMEX
(GARANTÍA LIMITADA PARA EUA)
Timex Corporation garantiza su reloj TIMEX® contra defectos de fabricación por un
período de UN AÑO a partir de la fecha de compra original. Timex y sus sucursales en todo
el mundo respaldan esta Garantía Internacional.
Cabe aclarar que Timex tiene la libertad de optar por reparar el reloj con componentes
nuevos o reacondicionados e inspeccionados, y también podría optar por reemplazarlo
por un modelo idéntico o similar. IMPORTANTE — OBSÉRVESE QUE ESTA GARANTÍA
NO CUBRE DEFECTOS O DAÑOS A SU RELOJ:
1) después de vencido el plazo de la garantía;
2) si el reloj inicialmente no se compró a un distribuidor autorizado;
3) si las reparaciones efectuadas no las hizo Timex;
4) si son consecuencia de accidentes, manipulación no autorizada o abuso; y
5) por cristal, correa o pulsera, caja, accesorios o pila. Timex podría cobrar por el
cambio de cualquiera de estas partes.
ESTA GARANTÍA SE OFRECE EN FORMA EXCLUSIVA Y EN LUGAR DE CUALQUIER OTRA
GARANTÍA, SEA EXPRESA O IMPLÍCITA, INCLUSIVE TODA GARANTÍA IMPLÍCITA PARA FINES
COMERCIALES O DE ADECUACIÓN A FINES PARTICULARES. TIMEX NO ASUME NINGUNA
RESPONSABILIDAD POR PERJUICIOS DIRECTOS, INDIRECTOS NI ESPECIALES. En ciertos
países y estados no se permiten limitaciones de las garantías implícitas ni exclusiones o
limitaciones de perjuicios, por lo cual las limitaciones mencionadas anteriormente
podrían no aplicarse en su caso particular. Esta garantía le otorga derechos establecidos
138
 Loading...