

Page 1

DGTL Ana-Digi Model 03X
USER GUIDE…..……..……..……..… 1
GUÍA DEL USUARIO ..……..……..… 3
MODE D’EMPLOI …..……..……..… 5
GUIA DO USUÁRIO ..……..……..… 7
GUIDA DELL’UTENTE.……..……..… 9
BENUTZERHANDBUCH …..……..… 11
GEBRUIKERSHANDLEIDING …..… 13
用户指南 ..……..……..……..……..… 15
ユ ー ザ ガ イド …..……..……..……..… 16
ИНСТРУКЦИИ ПО ЭКСПЛУАТАЦИИ ..… 17
03X-096000 7.29.19
Register your product at
Registra tu producto en www.timex.es/es_ES/product-registration.html
timex.com.mx/pages/registro-de-productos
Enregistrez votre produit sur fr.timex.ca/product-registration.html
www.timex.fr/fr_FR/product-registration.html
Registre o seu produto no site www.timex.eu/en_GB/product-registration.html
Registrare il prodotto all’indirizzo www.timex.it/it_IT/product-registration.html
Registrieren Sie Ihr Produkt bei www.timex.de/de_DE/product-registration.html
Registreer uw product bij www.timex.eu/en_GB/product-registration.html
请在 www.timex.eu/en_GB/product-registration.html 上注册您的产品
製品登録サイト
Зарегистрируйте свое изделие на сайте www.timex.eu/en_GB/product-registration.html
https://www.timexwatch.jp/
https://www.timex.com/product-registration.html
00745_19
Page 2

ENGLISH 03X-096000
EXTENDED WARRANTY
Available in U.S. only. Extend your warranty for an additional 4 years
from date of purchase for $5. You can pay with AMEX, Discover, Visa or
MasterCard by calling 1 800-448-4639 during normal business hours.
Payment must be made within 30 days of purchase. Name, address,
telephone number, purchase date, and 5-digit model number required. You
can also mail a check for $5 to: Timex Extended Warranty, P.O. Box 1676,
Dept. EF, Little Rock, AR 72203.
Please read instructions carefully to understand how to operate your Timex
watch.
®
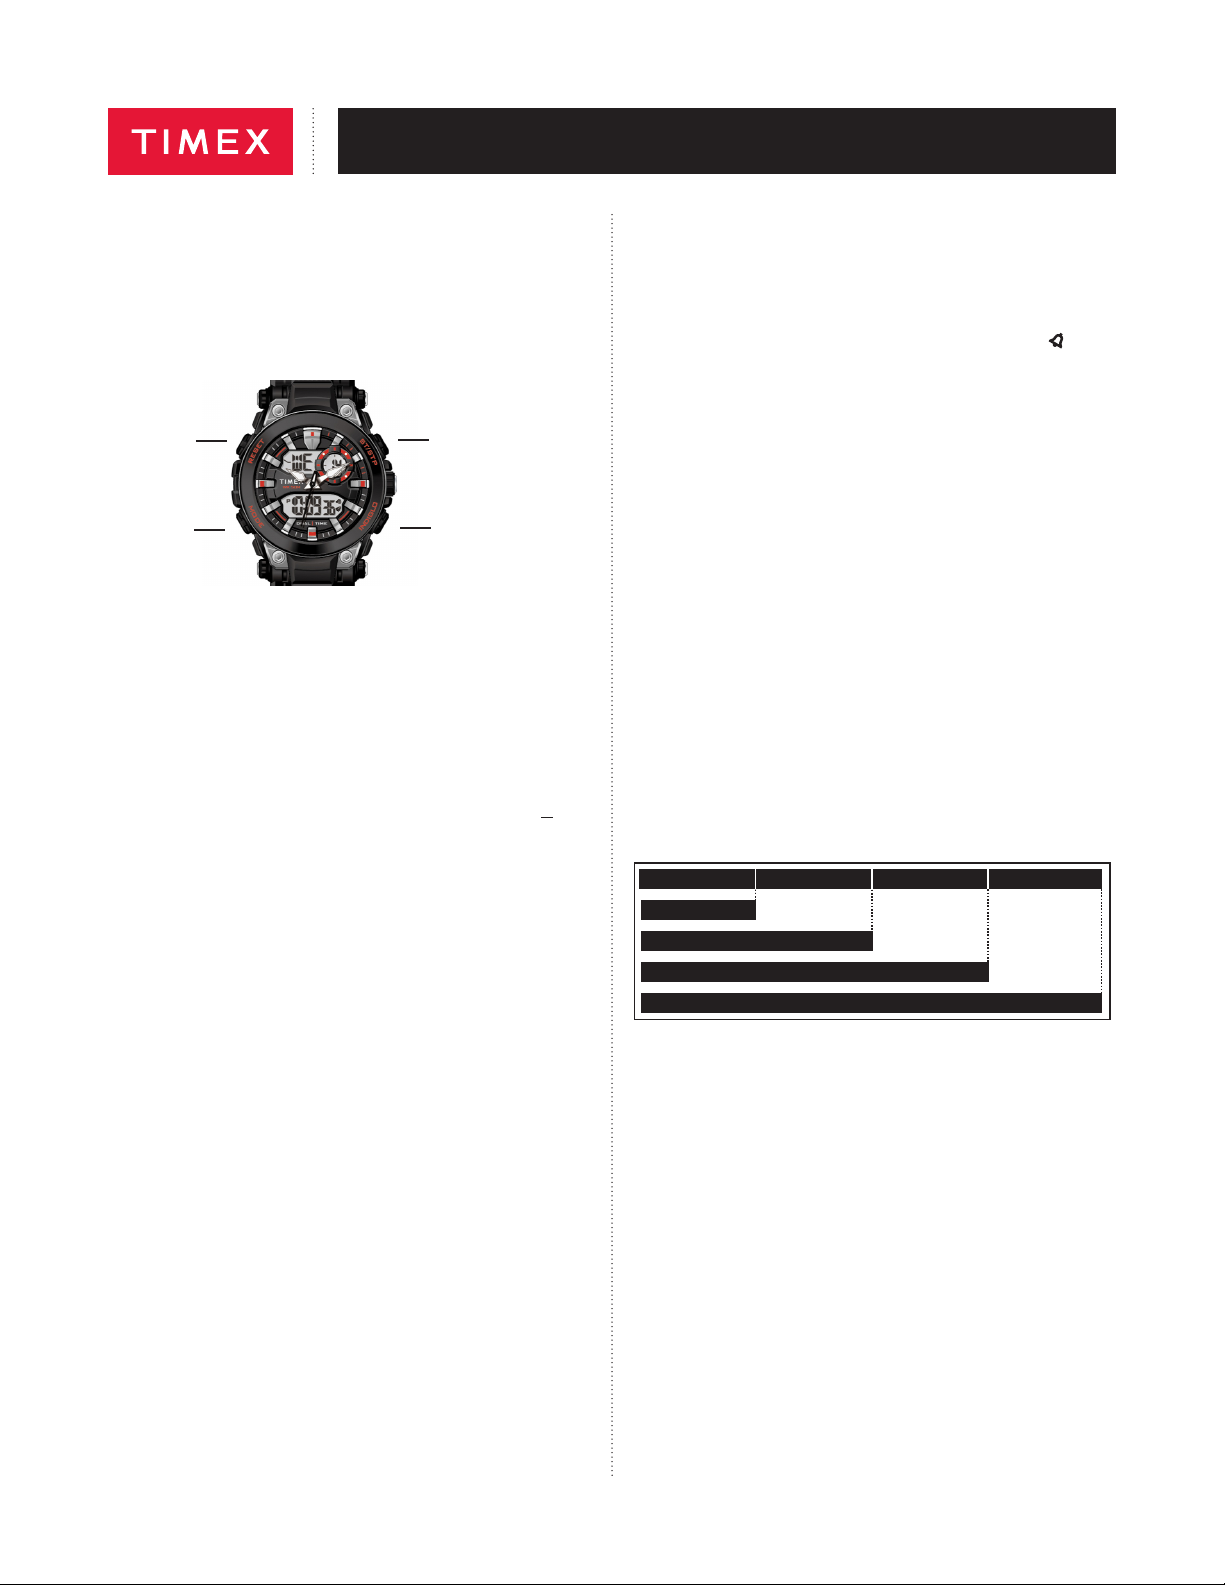
FEATURES AND BASIC OPERATION
1. Date with MM-DD format (month/day)
2. 24-Hour Stopwatch with Split time
3. Daily Alarm and Hourly Chime
4. Dual Time (2nd Time Zone)
5. INDIGLO® night-light
RESET
MODE
(NEXT STEP)
ST/STP
(INCREASE VALUE)
®
INDIGLO
BUTTON
Button functions shown with setting functions in parentheses
TIME
To set time and date
1. To start your watch remove the plastic guard from under the crown,
then press the crown in against the case. The second hand will begin
advancing in one-second intervals.
2. Pull the crown out all the way and turn to the correct analog time. Push
the crown in to restart the analog watch.
3. From Time of Day mode in the digital watch, press and hold RESET. The
watch beeps and Seconds can be seen flashing.
4. Press ST/STP to set Seconds to zero.
5. Press MODE to set Hours, as indicated by its flashing. Press ST/STP to
advance the Hours setting. Press and hold to increment quickly.
6. Press MODE to set Minutes, as indicated by its flashing. Press ST/STP to
advance the Minutes setting. Press and hold to increment quickly.
7. Press MODE to set the Year number, as indicated by its flashing. Press
ST/STP to advance the Year setting. Press and hold to increment quickly.
8. Press MODE to set the Month number, as indicated by its flashing. Press
ST/STP to advance the Month setting. Press and hold to increment
quickly.
9. Press MODE to set the Date, as indicated by its flashing. Press ST/STP to
advance the Date setting. Press and hold to increment quickly.
10. Press RESET to exit Time Set.
11. To toggle between 12-Hour (A/P indicator) and 24-Hour time format, press
RESET.
Note: Press and hold ST/STP to peek at Month Number and Year.
ALARM
To turn on/off or to set the Daily alarm, or to turn on/off an hourly chime.
1. Press MODE until “AL” appears.
Note: The alarm settings are tied to the primary time zone (T1).
2. Press ST/STP repeatedly to toggle the Alarm (s) on/off, to toggle the
Hourly Chime (
3. To Set the Alarm, press RESET. The Hour digit flashes and the Alarm ON
(
) lights.
s
4. Press ST/STP to advance the Hours setting. Press and hold to increment
quickly.
Note: The Hours will be presented in the same format (12- or 24-hour
time) as the time setting.
) on/off, or to toggle both on/off.
5. Press MODE to set the Minutes as indicated by its flashing. Press ST/STP
to advance the Minutes setting. Press and hold to increment quickly.
6. Press RESET to exit the Alarm Set.
7. When the alarm sounds, press ANY button to silence the alert, or it will
stop automatically in about 60 seconds.
STOPWATCH
Use this function for timing events.
1. Press MODE until “SP” appears.
2. Press ST/STP to start timing.
3. With the stopwatch running, press RESET to record the Split time. The
display will show the Split time, but the stopwatch will continue timing in
the background.
4. Press RESET to release the display and show the current running
stopwatch time.
5. Press RESET to record another Split time.
6. Press ST/STP to pause the timing.
7. Either press ST/STP to resume timing, or press RESET to reset the
Stopwatch to zero.
LAP 1 = 7.11 LAP 2 = 7.50
SPLIT 1 = 7.11
SPLIT 2 = 15.01
LAP 3 = 7.08
SPLIT 3 = 22.09
SPLIT 4 = 29.39
DUAL TIME
To set the time for a second time zone
1. Press MODE until “T2” appears.
2. Press RESET. The Hours can be seen flashing. Press ST/STP to advance
the Hours setting. Press and hold to increment quickly.
3. Press MODE to set Minutes, as indicated by its flashing. Press ST/STP
to toggle between the same Minutes setting as Time Mode (T1) or 30
Minutes difference.
4. Press RESET to exit Dual Time Set.
Note: The Hours will be presented in the same format (12- or 24-hour
time) as the time setting.
INDIGLO® NIGHT-LIGHT
Press INDIGLO® button to illuminate watch display for 2-3 seconds.
Electroluminescent technology used in the INDIGLO
watch face at night and in low light conditions.
®
night-light illuminates
WATER AND SHOCK RESISTANCE
If your watch is water-resistant, meter marking or (O) is indicated
Water-Resistance Depth p.s.i.a. * Water Pressure Below Surface
30m/98ft 60
50m/164ft 86
100m/328ft 160
*pounds per square inch absolute
WARNING: TO MAINTAIN WATER-RESISTANCE, DO NOT PRESS ANY
BUTTONS UNDER WATER.
1. Watch is water-resistant only as long as lens, push buttons and case
remain intact.
2. Watch is not a diver watch and should not be used for diving.
3. Rinse watch with fresh water after exposure to salt water.
4. Shock-resistance will be indicated on watch face or caseback. Watches
are designed to pass ISO test for shock-resistance. However, care should
be taken to avoid damaging crystal/lens.
LAP 4 = 7.30
1
Page 3

BATTERY
Timex strongly recommends that a retailer or jeweler replace battery.
If applicable, push reset button when replacing battery. Battery type
is indicated on caseback. Battery life estimates are based on certain
assumptions regarding usage; battery life may vary depending on actual
usage.
DO NOT DISPOSE OF BATTERY IN FIRE. DO NOT RECHARGE. KEEP
LOOSE BATTERIES AWAY FROM CHILDREN.
TIMEX INTERNATIONAL WARRANTY
http://www.timex.com/productWarranty.html
©2019 Timex Group USA, Inc. TIMEX and INDIGLO are registered
trademarks of Timex Group B.V. and its subsidiaries.
ENGLISH 03X-096000
2
Page 4

ESPAÑOL 03X-096000
Lee atentamente las instrucciones para saber cómo funciona tu reloj Timex®.
CARACTERÍSTICAS Y FUNCIONAMIENTO BÁSICO
1. Fecha con formato MM-DD (mes/día)
2. Cronómetro de hasta 24 horas con tiempo fraccionado
3. Alarma diaria y señal horaria
4. Hora dual (2ª zona horaria)
5. Luz nocturna INDIGLO®
RESET
(REINICIAR)
MODE
(SIGUIENTE
ST/STP
(AUMENTAR
EL VALOR)
BOTÓN
®
INDIGLO
PASO)
Las funciones de los botones se muestran con las funciones de ajuste
entre paréntesis
HORA
Para ajustar la hora y fecha
1. Para iniciar tu reloj retira el protector de plástico de debajo de la corona y
luego empuja la corona contra la caja. El segundero comenzará a avanzar
a intervalos de un segundo.
2. Tira de la corona del todo y gira hasta la hora analógica correcta. Empuja
la corona para reiniciar el reloj analógico.
3. Desde el modo de hora del día en el reloj digital, pulsa y mantén oprimido
RESET. El reloj pita y los segundos destellan.
4. Pulsa ST/STP para poner los segundos a cero.
5. Pulsa MODE para ajustar las horas, como se indica con su parpadeo.
Pulsa ST/STP para avanzar el ajuste de las horas. Mantenlo pulsado para
avanzar rápido.
6. Pulsa MODE para ajustar los minutos, como se indica con su parpadeo.
Pulsa ST/STP para avanzar el ajuste de los minutos. Mantenlo pulsado para
avanzar rápido.
7. Pulsa MODE para ajustar el número del año, como se indica con su
parpadeo. Pulsa ST/STP para avanzar el ajuste del año. Mantenlo pulsado
para avanzar rápido.
8. Pulsa MODE para ajustar el número del mes, como se indica con su
parpadeo. Pulsa ST/STP para avanzar el ajuste del mes. Mantenlo pulsado
para avanzar rápido.
9. Pulsa MODE para ajustar la fecha, como se indica con su parpadeo.
Pulsa ST/STP para avanzar el ajuste de la fecha. Mantenlo pulsado para
avanzar rápido.
10. Pulsa RESET para salir del ajuste de la hora.
11. Para cambiar entre el formato de 12 horas (indicador A/P) y el formato de
24 horas, pulsa RESET.
Nota: Pulsa y mantén oprimido ST/STP para echar un vistazo al número
del mes y al año.
ALARMA
Para activar/desactivar o ajustar la alarma diaria, o para activar/desactivar una
señal horaria.
1. Pulsa MODE hasta que aparezca «AL».
Aviso: los ajustes de la alarma están vinculados a la zona horaria principal
(T1).
2. Pulsa ST/STP repetidamente para activar/desactivar la alarma (
desactivar la señal horaria (
3. Para ajustar la alarma, pulsa RESET. El dígito de las horas destella
y se ilumina el indicador de alarma activada (
4. Pulsa ST/STP para avanzar el ajuste de las horas. Mantenlo pulsado para
avanzar rápido.
Aviso: las horas se presentarán en el mismo formato (12 o 24 horas) del
ajuste horario.
) o activar/desactivar ambas.
).
s
), activar/
s
5. Pulsa MODE para ajustar los minutos, como se indica con su parpadeo.
Pulsa ST/STP para avanzar el ajuste de los minutos. Mantenlo pulsado para
avanzar rápido.
6. Pulsa RESET para salir del ajuste de alarma.
7. Cuando suene la alarma, pulsa CUALQUIER botón para silenciarla, o se
detendrá automáticamente en unos 60 segundos.
CRONÓMETRO
Usa esta función para cronometrar eventos.
1. Pulsa MODE hasta que aparezca «SP».
2. Pulsa ST/STP para iniciar el cronometraje.
3. Con el cronómetro en marcha, pulsa RESET para registrar un tiempo
fraccionado. La pantalla mostrará el tiempo fraccionado, pero el cronómetro
seguirá funcionando en segundo plano.
4. Pulsa RESET para despejar la pantalla y mostrar el tiempo transcurrido
actual del cronómetro.
5. Pulsa RESET para registrar otro tiempo fraccionado.
6. Pulsa ST/STP para pausar el cronometraje.
7. Pulsa ST/STP para reanudar el cronometraje, o pulsa RESET para poner el
cronómetro a cero.
VUELTA 1 = 7.11 VUELTA 2 = 7.50
SECCIÓN 1 = 7.11
SECCIÓN 2 = 15.01
VUELTA 3 = 7.08
SECCIÓN 3 = 22.09
VUELTA 4 = 7.30
SECCIÓN 4 = 29.39
HORA DUAL
Para ajustar la hora de una segunda zona horaria
1. Pulsa MODE hasta que aparezca «T2».
2. Pulsa RESET. Verás que los horas destellan. Pulsa ST/STP para avanzar
el ajuste de las horas. Mantenlo pulsado para avanzar rápido.
3. Pulsa MODE para ajustar los minutos, como se indica con su parpadeo.
Pulsa ST/STP para cambiar entre el mismo ajuste de minutos que el modo
de hora (T1) o 30 minutos de diferencia.
4. Pulsa RESET para salir del ajuste de hora dual.
Aviso: las horas se presentarán en el mismo formato (12 o 24 horas) del
ajuste horario.
LUZ NOCTURNA INDIGLO®
Pulsa el botón INDIGLO® para iluminar la pantalla del reloj durante 2-3
segundos. La tecnología electroluminiscente utilizada en la luz nocturna
®
INDIGLO
ilumina la esfera del reloj por la noche y en condiciones de poca luz.
RESISTENCIA AL AGUA Y LOS GOLPES
Si tu reloj es resistente al agua, se indicarán los metros o (O).
Profundidad de resistencia al agua p.s.i.a. * Presión bajo la superficie
del agua
30 m/98 pies 60
50 m/164 pies 86
100 m/328 pies 160
*libras por pulgada cuadrada absoluta
ADVERTENCIA: PARA MANTENER LA RESISTENCIA AL AGUA, NO
PULSES NINGÚN BOTÓN DEBAJO DEL AGUA.
1. El reloj es resistente al agua solamente mientras el cristal, los botones
y la caja permanezcan intactos.
2. El reloj no es apropiado para hacer submarinismo y no debería usarse
para ello.
3. Aclara el reloj con agua dulce después de haber estado expuesto
a agua salada.
4. La resistencia a los golpes estará indicada en la esfera del reloj o en la parte
posterior de la carcasa. Los relojes están diseñados para pasar la prueba
ISO de resistencia a los golpes. Sin embargo, se debe tener cuidado para
evitar dañar el cristal/la lente.
3
Page 5

PILA
Timex recomienda encarecidamente que un minorista o un joyero lleve a
cabo el cambio de pila. Si procede, pulsa el botón de reinicio (Reset) cuando
cambies la pila. El tipo de pila se indica en la parte posterior de la carcasa. La
vida útil estimada de la pila depende de ciertas suposiciones relacionadas con
el uso; la vida útil de la pila puede variar según el uso real.
NO ARROJES LA PILA AL FUEGO. NO LA RECARGUES. MANTÉN LAS
PILAS SUELTAS FUERA DEL ALCANCE DE LOS NIÑOS.
GARANTÍA INTERNACIONAL DE TIMEX
www.timex.es/es_ES/productWarranty.html
timex.com.mx/pages/devoluciones-y-cambios
©2019 Timex Group USA, Inc. TIMEX e INDIGLO son marcas comerciales
registradas de Timex Group B.V. y sus filiales.
ESPAÑOL 03X-096000
4
Page 6
FRANÇAIS 03X-096000
Veuillez lire les instructions attentivement pour bien comprendre le
fonctionnement de votre montre Timex
®
.
FONCTIONS ET OPÉRATIONS DE BASE
1. Date au format MM-JJ (mois/jour)
2. Chronomètre 24-heures avec affichage du temps intermédiaire
3. Alarme quotidienne et Carillon horaire
4. Deux horaires (Deuxième fuseau horaire)
5. Veilleuse INDIGLO®
RESET
(REMISE À
ZÉRO)
MODE
(ÉTAPE
ST/STP (DÉM/ARR)
(AUGMENTER
LA VALEUR)
BOUTON
®
INDIGLO
SUIVANTE)
Les fonctions des boutons sont indiquées avec les fonctions de réglage entre
parenthèses
HEURE
Réglage de l’heure et de la date
1. Pour mettre la montre en marche, retirer la bague de protection en plastique
située sous la couronne, puis enfoncer la couronne vers le boîtier. L’aiguille
des secondes commencera à avancer par intervalles d’une seconde.
2. Tirer la couronne complètement et tourner jusqu’à afficher l’heure
analogique correcte. Enfoncer la couronne pour redémarrer la montre
analogique.
3. Du mode Heure de la journée de la montre numérique, appuyer sur et
maintenir le bouton RESET (REMISE À ZÉRO). La montre émet un bip et
l’affichage des Secondes clignote.
4. Appuyer sur ST/STP pour remettre les secondes à zéro.
5. Appuyer sur MODE pour régler les Heures. (Un affichage qui clignote
indique que le réglage est en cours.) Appuyer sur ST/STP pour effectuer
le réglage de l’Heure. Tenir le bouton enfoncé pour changer le réglage
rapidement.
6. Appuyer sur MODE pour régler les Minutes. (Un affichage qui clignote
indique que le réglage est en cours.) Appuyer sur ST/STP pour effectuer
le réglage des Minutes. Tenir le bouton enfoncé pour changer le réglage
rapidement.
7. Appuyer sur MODE pour régler l’Année. (Un affichage qui clignote indique
que le réglage est en cours.) Appuyer sur ST/STP pour effectuer le réglage
de l’Année. Tenir le bouton enfoncé pour changer le réglage rapidement.
8. Appuyer sur MODE pour régler le Mois. (Un affichage qui clignote indique
que le réglage est en cours.) Appuyer sur ST/STP pour effectuer le réglage
du Mois. Tenir le bouton enfoncé pour changer le réglage rapidement.
9. Appuyer sur MODE pour régler la Date. (Un affichage qui clignote indique
que le réglage est en cours.) Appuyer sur ST/STP pour effectuer le réglage
de la Date. Tenir le bouton enfoncé pour changer le réglage rapidement.
10. Appuyer sur RESET pour quitter le réglage de l’Heure.
11. Pour alterner entre le système horaire de 12 heures (indicateur A/P, à savoir
avant et après midi) et celui de 24 heures, appuyer sur RESET (REMISE À
ZÉRO).
Remarque : Tenir le bouton ST/STP enfoncé pour consulter rapidement le
Numéro du mois et l’Année.
ALARME
Pour activer/désactiver L’Alarme quotidienne, ou pour activer/désactiver le
Carillon horaire.
1. Appuyer sur MODE jusqu’à afficher « AL ».
Remarque : Tous les réglages d’alarme sont liés au fuseau horaire principal
(T1).
2. Appuyer sur le bouton ST/STP de façon répétée pour alterner entre
l’activation et la désactivation de l’Alarme (
ou des deux.
3. Pour régler l’Alarme, appuyer sur RESET. Le chiffre de l’Heure clignote
et le voyant Alarme activé (
4. Appuyer sur ST/STP pour effectuer le réglage de l’Heure. Tenir le bouton
enfoncé pour changer le réglage rapidement.
Remarque : Le format d’affichage des Heures sera identique au système
horaire utilisé pour l’Heure (12 ou 24 heures).
5. Appuyer sur MODE pour régler les Minutes. (Un affichage qui clignote
indique que le réglage est en cours.) Appuyer sur ST/STP pour effectuer
le réglage des Minutes. Tenir le bouton enfoncé pour changer le réglage
rapidement.
) s’illumine.
s
), du Carillon horaire ( )
s
6. Appuyer sur RESET pour quitter le Réglage des alarmes.
7. Quand l’alarme sonne, appuyer sur TOUT bouton pour éteindre la sonnerie,
faute de quoi elle s’arrêtera automatiquement dans environ 60 secondes.
CHRONOGRAPHE
Utiliser cette fonction pour chronométrer des événements.
1. Appuyer sur MODE jusqu’à afficher « SP ».
2. Appuyer sur ST/STP pour démarrer le chronométrage.
3. Quand le chronomètre est en marche, appuyer sur RESET pour enregistrer
le Temps intermédiaire. L’affichage montrera le Temps intermédiaire, mais le
chronomètre continuera le chronométrage dans l’arrière-plan.
4. Appuyer sur RESET pour enlever l’affichage et montrer la durée
chronométrée en cours.
5. Appuyer sur RESET pour enregistrer un autre Temps intermédiaire.
6. Appuyer sur ST/STP pour suspendre le chronométrage.
7. Appuyer sur le bouton ST/STP pour reprendre le chronométrage, ou sur
RESET pour réinitialiser le Chronomètre en le remettant à zéro.
TOUR 1 = 7.11 TOUR 2 = 7.50
TPS INTERM. 1 = 7.11
TPS INTERM. 2 = 15.01
TOUR 3 = 7.08
TPS INTERM. 3 = 22.09
TOUR 4 = 7.30
TPS INTERM. 4 = 29.39
DOUBLE AFFICHAGE DE L’HEURE
Pour régler l’heure d’un deuxième fuseau horaire
1. Appuyer sur MODE jusqu’à afficher « T2 ».
2. Appuyer sur RESET. Le chiffre de l’Heure clignotera. Appuyer sur ST/STP
pour effectuer le réglage de l’Heure. Tenir le bouton enfoncé pour changer
le réglage rapidement.
3. Appuyer sur MODE pour régler les Minutes. (Un affichage qui clignote
indique que le réglage est en cours.) Appuyer sur ST/STP pour basculer
entre le même réglage de Minutes que le mode Heure (T1) et un décalage
de 30 Minutes par rapport à celui-ci.
4. Appuyer sur RESET pour quitter le réglage du Double affichage de l’heure.
Remarque : Le format d’affichage des Heures sera identique au système
horaire utilisé pour l’Heure (12 ou 24 heures).
5
Page 7

FRANÇAIS 03X-096000
VEILLEUSE INDIGLO
Appuyer sur le bouton INDIGLO® pour illuminer l’affichage de la montre
pendant 2 à 3 secondes. La technologie électroluminescente utilisée dans la
veilleuse INDIGLO
des conditions de faible éclairage.
®
®
permet d’illuminer le cadran de la montre la nuit et dans
ÉTANCHÉITÉ ET RÉSISTANCE AUX CHOCS
Si la montre est étanche, la profondeur maximale ou le symbole (O) est
indiqué
Profondeur d'étanchéité p.s.i.a. * Pression de l’eau sous
la surface
30 mètres/98 pieds 60
50 mètres/164 pieds 86
100 mètres/328 pieds 160
*livres par pouce carré (abs.)
AVERTISSEMENT : POUR PRÉSERVER L’ÉTANCHÉITÉ, NE PAS
ENFONCER LES BOUTONS SOUS L’EAU.
1. La montre est étanche aussi longtemps que le verre, les boutons poussoir
et le boîtier sont intacts.
2. La montre n’est pas conçue pour la plongée. Ne pas l’utiliser dans ces
conditions.
3. Rincer à l’eau douce après tout contact avec l’eau de mer.
4. La résistance aux chocs est indiquée sur le cadran de la montre ou le dos
du boîtier. Les montres sont conçues pour se conformer à l’essai de choc
ISO. Toutefois, prendre garde à éviter d’endommager le verre/cristal.
PILE
Timex recommande fortement de faire changer la pile par un détaillant ou un
bijoutier. Le cas échéant, appuyer sur le bouton de remise à zéro (Reset) lors
du changement de la pile. Le type de pile est indiqué sur le dos du boîtier.
L’estimation de la durée de vie de la pile est basée sur certaines hypothèses
d’utilisation ; la durée réelle peut varier selon l’utilisation de la montre.
NE PAS JETER LA PILE AU FEU. NE PAS RECHARGER LA PILE.
GARDER LES PILES HORS DE LA PORTÉE DES ENFANTS.
GARANTIE INTERNATIONALE TIMEX
fr.timex.ca/productWarranty.html
www.timex.fr/fr_FR/productWarranty.html
©2019 Timex Group USA, Inc., TIMEX et INDIGLO sont des marques déposées
de Timex Group B.V. et de ses filiales.
6
Page 8

PORTUGUÊS 03X-096000
Leia atentamente as instruções para saber como utilizar o seu relógio Timex®.
RECURSOS E OPERAÇÃO BÁSICA
1. Data com formato MM-DD (mês-dia)
2. Cronógrafo de 24 horas com tempo fracionado
3. Alarme diário e sinal sonoro da hora
4. Tempo dual (segundo fuso horário)
5. Luz noturna INDIGLO®
(RECONFIGURAR)
RESET
MODE (MODO)
(PRÓXIMA
ST/STP
(AUMENTAR
VALOR)
BOTÃO
®
INDIGLO
ETAPA)
Funções dos botões apresentadas com as funções de conguração
entre parêntesis.
TIME (HORA)
Para configurar a hora e a data:
1. Retire a proteção plástica abaixo da coroa e pressione a coroa contra a
caixa para iniciar o funcionamento do relógio. O ponteiro dos segundos
começará a avançar em intervalos de um segundo.
2. Puxe a coroa completamente para fora e gire para a hora analógica correta.
Empurre a coroa para dentro para reiniciar o relógio analógico.
3. A partir do modo Time of Day (hora do dia) no relógio digital, pressione
e mantenha pressionada a função RESET. O relógio emite um som e os
segundos podem ser vistos piscando.
4. Pressione ST/STP para ajustar os segundos para zero.
5. Pressione MODE para definir a hora, conforme indicado pela hora piscando.
Pressione ST/STP para avançar a configuração da hora. Pressione
e mantenha pressionado para aumentar rapidamente.
6. Pressione MODE para definir os minutos, conforme indicado pelos minutos
piscando. Pressione ST/STP para avançar a configuração dos minutos.
Pressione e mantenha pressionado para aumentar rapidamente.
7. Pressione MODE para definir o número do ano, conforme indicado pelo
número piscando. Pressione ST/STP para avançar a configuração do ano.
Pressione e mantenha pressionado para aumentar rapidamente.
8. Pressione MODE para definir o número do mês, conforme indicado pelo
número piscando. Pressione ST/STP para avançar a configuração do mês.
Pressione e mantenha pressionado para aumentar rapidamente.
9. Pressione MODE para definir a data, conforme indicado pela data piscando.
Pressione ST/STP para avançar a configuração da data. Pressione
e mantenha pressionado para aumentar rapidamente.
10. Pressione RESET para sair do modo Time Set.
11. Para alternar entre o formato de hora de 12 horas (indicador de A/P) e 24
horas, pressione RESET.
Observação: Pressione e mantenha pressionada a função ST/STP para
visualizar o número do mês e o ano.
ALARM (ALARME)
Para ativar/desativar ou para definir um alarme diário ou para ativar/desativar o
sinal sonoro da hora.
1. Pressione MODE até “AL” aparecer.
Observação: As configurações do alarme estão associadas com o fuso
horário principal (T1).
2. Pressione ST/STP repetidamente para alternar o Alarme (
desligado, para alternar o sinal sonoro da hora (
ou para alternar ambos ligado/desligado.
3. Para configurar o alarme, pressione RESET. O dígito da hora pisca
e o alarme ON (
4. Pressione ST/STP para avançar a configuração da hora. Pressione
e mantenha pressionado para aumentar rapidamente.
Observação: A hora é apresentada no mesmo formato (12 ou 24 horas)
que a configuração do tempo.
) é iluminado.
s
) ligado/
s
) ligado/desligado
5. Pressione MODE para definir os minutos, conforme indicado pelos minutos
piscando. Pressione ST/STP para avançar a configuração dos minutos.
Pressione e mantenha pressionado para aumentar rapidamente.
6. Pressione RESET para sair da configuração do alarme.
7. Quando o alarme tocar, pressione QUALQUER botão para silenciar o alerta
ou ele para automaticamente em aproximadamente 60 segundos.
STOPWATCH (CRONÓGRAFO)
Use este recurso para eventos controlados pela hora.
1. Pressione MODE até “SP” aparecer.
2. Pressione ST/STP para iniciar o cronômetro.
3. Com o cronômetro em execução, pressione RESET para registrar o tempo
fracionado. O mostrador mostra o tempo fracionado, mas o cronômetro
continua marcando o tempo no plano de fundo.
4. Pressione RESET para liberar o mostrador e mostrar a hora atual no
cronômetro em execução.
5. Pressione RESET para registrar outro tempo fracionado.
6. Pressione ST/STP para pausar o cronômetro.
7. Pressione ST/STP para retomar o cronômetro ou pressione RESET para
reconfigurar o cronômetro para zero.
VOLTA 1 = 7.11 VOLTA 2 = 7.50
FRACIONADO 1 = 7.11
FRACIONADO 2 = 15.01
VOLTA 3 = 7.08
FRACIONADO 3 = 22.09
VOLTA 4 = 7.30
FRACIONADO 4 = 29.39
DUAL TIME (TEMPO DUAL)
Para configurar a hora para um segundo fuso horário:
1. Pressione MODE até “T2” aparecer.
2. Pressione RESET. A hora pode ser vista piscando. Pressione ST/STP para
avançar a configuração da hora. Pressione e mantenha pressionado para
aumentar rapidamente.
3. Pressione MODE para definir os minutos, conforme indicado pelos minutos
piscando. Pressione ST/STP para alternar entre a mesma configuração de
minutos que no modo Time (T1) ou com uma diferença de 30 minutos.
4. Pressione RESET para sair da configuração do tempo dual.
Observação: A hora é apresentada no mesmo formato (12 ou 24 horas)
que a configuração do tempo.
LUZ NOTURNA INDIGLO
Pressione o botão INDIGLO® para iluminar o mostrador do relógio por
2 a 3 segundos. A tecnologia eletroluminescente utilizada na luz noturna
®
INDIGLO
de pouca luz.
ilumina todo o mostrador do relógio à noite e em condições
®
RESISTÊNCIA À ÁGUA E A CHOQUES
Se o relógio for resistente à água, haverá uma indicação de profundidade em
metros ou (O).
Profundidade da resistência à água p.s.i.a. * Pressão da água abaixo
da superfície
30 metros/98 pés 60
50 metros/164 pés 86
100 metros/328 pés 160
*pressão absoluta em libras por polegada quadrada
ADVERTÊNCIA: PARA MANTER A RESISTÊNCIA À ÁGUA, NÃO
PRESSIONE NENHUM BOTÃO QUANDO ESTIVER EMBAIXO D’ÁGUA.
1. Essa resistência à água continuará invariável sempre que o cristal,
os botões e a caixa se mantiverem intactos.
2. Este não é um relógio de mergulho e, por isso, não deve ser usado para
essa atividade.
3. Enxágue o relógio com água limpa depois de tê-lo exposto à água salgada.
4. A resistência a choques será indicada na face ou na caixa traseira do
relógio. Os relógios são fabricados para passarem na prova de resistência
a choques da ISO. Contudo, deve-se ter cuidado para não danificar
o cristal/lentes.
7
Page 9

BATERIA
A Timex recomenda veementemente que a bateria seja trocada por um
representante autorizado ou por um relojoeiro. Se for o caso, pressione o botão
de reinicialização quando substituir a bateria. O tipo da bateria está indicada
na tampa do relógio. A duração de vida útil estimada da bateria se baseia em
certas conjeturas relacionadas com o seu uso. A vida útil da bateria variará com
o seu uso real.
NÃO DESCARTE A BATERIA NO FOGO. NÃO RECARREGUE A
BATERIA. MANTENHA AS BATERIAS SOLTAS FORA DO ALCANCE DAS
CRIANÇAS.
GARANTIA INTERNACIONAL TIMEX
www.timex.eu/en_GB/productWarranty.html
©2019 Timex Group USA, Inc. TIMEX e INDIGLO são marcas comerciais
registradas da Timex Group B.V. e suas subsidiárias.
PORTUGUÊS 03X-096000
8
Page 10

ITALIANO 03X-096000
Leggere attentamente le istruzioni per comprendere il funzionamento
dell’orologio Timex
®
.
CARATTERISTICHE E FUNZIONAMENTO BASILARE
1. Data con formato MM-GG (mese/giorno)
2. Cronometro da 24 ore con tempo intermedio
3. Sveglia giornaliera e cicalino orario
4. Doppio fuso orario (secondo fuso orario)
5. Luce notturna INDIGLO®
RESET
ST/STP
(AUMENTARE
IL VALORE)
®
(PROCEDIMENTO
MODE
INDIGLO
PULSANTE
SUCCESSIVO)
Funzioni dei pulsanti mostrate con le funzioni di impostazione fra parentesi
ORARIO
Per impostare ora e data, procedere come segue
1. Per avviare l’orologio, rimuovere dalla corona la protezione di plastica
e premere la corona contro la cassa. La lancetta dei secondi inizierà a
spostarsi in avanti a intervalli di un secondo.
2. Tirare la corona completamente e ruotarla per correggere l’ora analogica.
Premere la corona per riavviare l’orologio analogico.
3. Dalla modalità Time of Day (Ora del giorno) nell’orologio digitale, premere
e tenere premuto RESET. L’orologio emette un segnale acustico e i secondi
lampeggiano.
4. Premere ST/STP (Inizio/Stop) per impostare i secondi sullo zero.
5. Premere MODE (Modalità) per impostare le ore come indicato dal
lampeggio. Premere ST/STP (Inizio/Stop) per passare all’impostazione
delle ore. Premere e tenere premuto per un incremento rapido.
6. Premere MODE (Modalità) per impostare i minuti come indicato dal
lampeggio. Premere ST/STP (Inizio/Stop) per passare all’impostazione
dei minuti. Premere e tenere premuto per un incremento rapido.
7. Premere MODE (Modalità) per impostare l’anno come indicato dal
lampeggio. Premere ST/STP (Inizio/Stop) per passare all’impostazione
dell’anno. Premere e tenere premuto per un incremento rapido.
8. Premere MODE (Modalità) per impostare il mese come indicato dal
lampeggio. Premere ST/STP (Inizio/Stop) per passare all’impostazione
del mese. Premere e tenere premuto per un incremento rapido.
9. Premere MODE (Modalità) per impostare la data come indicato dal
lampeggio. Premere ST/STP (Inizio/Stop) per passare all’impostazione
della data. Premere e tenere premuto per un incremento rapido.
10. Premere RESET per uscire dall’impostazione dell’orario.
11. Per passare tra il formato dell’ora a 12 ore (con indicatore antimeridiano/
postmeridiano) e quello a 24 ore, premere RESET.
Nota: Premere e tenere premuto ST/STP (Inizio/Stop) per dare
un’occhiata al mese e all’anno.
SVEGLIA
Per attivare/disattivare o impostare la sveglia giornaliera o per attivare/disattivare
un cicalino orario.
1. Premere MODE (Modalità) finché non appare il simbolo “AL”.
Nota: Le impostazioni della sveglia sono vincolate al fuso orario principale
(T1).
2. Premere ST/STP (Inizio/Stop) ripetutamente per attivare/disattivare
la sveglia (
disattivare entrambi.
3. Per impostare la sveglia, premere RESET. Il numero dell’ora inizierà a
lampeggiare e il simbolo Alarm ON (Sveglia attivata) (
4. Premere ST/STP (Inizio/Stop) per passare all’impostazione delle ore.
Premere e tenere premuto per un incremento rapido.
Nota: Le ore saranno visualizzate nello stesso formato (12 o 24 ore) in cui
è impostato l’orario.
), per attivare/disattivare il cicalino orario ( ), o per attivare/
s
) si illumina.
s
5. Premere MODE (Modalità) per impostare i minuti come indicato dal
lampeggio. Premere ST/STP (Inizio/Stop) per passare all’impostazione
dei minuti. Premere e tenere premuto per un incremento rapido.
6. Premere RESET per uscire dall’impostazione della sveglia.
7. Quando la sveglia suona, premere QUALSIASI pulsante per disattivare
il segnale acustico, oppure si disattiverà automaticamente dopo circa
60 secondi.
CRONOMETRO
Utilizzare questa funzione per gli eventi che si desidera cronometrare.
1. Premere MODE (Modalità) finché non appare il simbolo “SP”.
2. Premere ST/STP (Inizio/Stop) per avviare il cronometraggio.
3. Mentre il cronometro è in funzione, premere RESET per registrare un tempo
intermedio. Il display visualizzerà il tempo intermedio, ma il cronometro
continuerà a registrare il tempo in sottofondo.
4. Premere RESET per sbloccare il display e visualizzare il tempo che si sta
cronometrando attualmente.
5. Premere RESET per registrare un altro tempo intermedio.
6. Premere ST/STP (Inizio/Stop) per mettere in pausa il cronometraggio.
7. Premere ST/STP (Inizio/Stop) per riavviare il cronometraggio oppure
premere RESET per resettare il cronometro a zero.
GIRO 1 = 7.11 GIRO 2 = 7.50
TE INTER 1 = 7.11
TE INTER 2 = 15.01
GIRO 3 = 7.08
TE INTER 3 = 22.09
GIRO 4 = 7.30
TE INTER 4 = 29.39
DOPPIO FUSO ORARIO
Per impostare l’ora per un secondo fuso orario
1. Premere MODE (Modalità) finché non appare il simbolo “T2”.
2. Premere RESET. Le ore iniziano a lampeggiare. Premere ST/STP (Inizio/
Stop) per passare all’impostazione delle ore. Premere e tenere premuto per
un incremento rapido.
3. Premere MODE (Modalità) per impostare i minuti come indicato dal
lampeggio. Premere ST/STP (Inizio/Stop) per passare tra la stessa
impostazione dei minuti come Time Mode (Modalità Ora) (T1) o 30 minuti
di differenza.
4. Premere RESET per uscire dall’impostazione del doppio fuso orario
(Dual Time Set).
Nota: Le ore saranno visualizzate nello stesso formato (12 o 24 ore) in cui
è impostato l’orario.
LUCE NOTTURNA INDIGLO
Premere il pulsante INDIGLO® per illuminare il quadrante dell’orologio per
2-3 secondi. La tecnologia elettroluminescente impiegata per la luce notturna
®
INDIGLO
di scarsa luminosità.
illumina l’intero quadrante dell’orologio di notte e in condizioni
®
RESISTENZA ALL’ACQUA E AGLI URTI
Se l’orologio è resistente all’acqua, indicherà il numero dei metri di resistenza
o il contrassegno (O)
Profondità di immersione p.s.i.a. * Pressione dell'acqua sotto
la superficie
30 m/98 piedi 60
50 m/164 piedi 86
100 m/328 piedi 160
*libbre per pollice quadrato assolute
9
Page 11

AVVERTENZA: PER SALVAGUARDARE LA RESISTENZA ALL’ACQUA
DELL’OROLOGIO, NON PREMERE ALCUN PULSANTE SOTT’ACQUA.
1. L’orologio è resistente all’acqua solo fintanto che la lente, i pulsanti e la
cassa restano intatti.
2. L’orologio non è un orologio subacqueo e non va usato per le immersioni.
3. Risciacquare l’orologio con acqua dolce dopo l’esposizione all’acqua
marina.
4. La resistenza agli urti verrà indicata sul quadrante o sul retro della cassa
dell’orologio. Gli orologi sono progettati in modo da superare il test ISO
di resistenza agli urti. Fare tuttavia attenzione per evitare danni al cristallo/
alla lente.
BATTERIA
Timex raccomanda espressamente di portare l’orologio da un rivenditore o da
un gioielliere per la sostituzione della batteria. Se pertinente, premere il pulsante
di ripristino alla sostituzione della batteria. Il tipo di batteria è indicato sul retro
della cassa. Le stime sulla durata di vita della batteria si basano su determinati
presupposti relativi all’uso; la durata della batteria può variare a seconda
dell’uso effettivo dell’orologio.
NON GETTARE LE BATTERIE NEL FUOCO. NON RICARICARLE. TENERE
LE BATTERIE SFUSE LONTANO DAI BAMBINI.
GARANZIA INTERNAZIONALE TIMEX
www.timex.it/it_IT/productWarranty.html
©2019 Timex Group USA, Inc. TIMEX e INDIGLO sono marchi registrati
di Timex Group B.V. e delle sue sussidiarie.
ITALIANO 03X-096000
10
Page 12

DEUTSCH 03X-096000
Bitte lesen Sie die Gebrauchsanweisung für Ihre Timex®-Uhr sorgfältig durch.
MERKMALE UND GRUNDFUNKTIONEN
1. Datum im Format MM-TT (Monat/Tag)
2. 24-Stunden-Stoppuhr mit Zwischenzeitanzeige
3. Täglicher Weckruf und Stundensignal
4. Dualzeit (2. Zeitzone)
5. INDIGLO®-Zifferblattbeleuchtung
(ZURÜCKSETZEN)
RESET
MODE
(MODUS)
(NÄCHSTER
SCHRITT)
Knopunktionen mit Einstellfunktion in Klammern
ST/STP
(WERT ERHÖHEN)
INDIGLO®KNOPF
ZEIT
Zeit- und Datumseinstellung:
1. Zunächst den Plastikschutz unter der Krone entnehmen und diese dann
gegen das Gehäuse drücken. Der Sekundenzeiger beginnt, sich in
Sekundenintervallen vorwärts zu bewegen.
2. Ziehen Sie die Krone vollständig heraus und stellen Sie durch Drehen der
Krone die korrekte Zeit ein. Drücken Sie die Krone hinein und starten Sie die
analoge Uhr von Neuem.
3. Halten Sie im Uhrzeit-Modus der digitalen Uhr RESET gedrückt. Die Uhr
beginnt zu piepsen und die Sekundenanzeige blinkt.
4. Den Knopf ST/STP drücken, um die Sekunden auf Null zu stellen.
5. Drücken Sie MODE, um die Stunden einzustellen, was durch das Blinken
der Anzeige bestätigt wird. Drücken Sie ST/STP, um die Stunden
vorzurücken. Drücken und halten, um die Intervalle zu beschleunigen.
6. Drücken Sie MODE, um die Minuten einzustellen, was durch das Blinken
der Anzeige bestätigt wird. Drücken Sie ST/STP, um die Minuten
vorzurücken. Drücken und halten, um die Intervalle zu beschleunigen.
7. Drücken Sie MODE, um das Jahr einzustellen, was durch das Blinken der
Anzeige bestätigt wird. Drücken Sie ST/STP, um die Jahre vorzurücken.
Drücken und halten, um die Intervalle zu beschleunigen.
8. Drücken Sie MODE, um den Monat einzustellen, was durch das Blinken der
Anzeige bestätigt wird. Drücken Sie ST/STP, um die Monate vorzurücken.
Drücken und halten, um die Intervalle zu beschleunigen.
9. Drücken Sie MODE, um das Datum einzustellen, was durch das Blinken
der Anzeige bestätigt wird. Drücken Sie ST/STP, um zur Einstellung
der Stunden überzugehen. Drücken und halten, um die Intervalle zu
beschleunigen.
10. Drücken Sie RESET, um das Einstellen der Zeit zu beenden.
11. Drücken Sie den RESET-Knopf, um zwischen dem 12-Stunden-Format
(A/P-Anzeige) und dem 24-Stunden-Format zu wechseln.
Hinweis: Halten Sie ST/STP gedrückt, um die Monatszahl und das Jahr
angezeigt zu bekommen.
WECKRUF
Einstellung bzw. An-/Abschalten des täglichen Weckrufs bzw. des
Stundensignals.
1. Drücken Sie MODE, bis „AL” angezeigt wird.
Hinweis: Die Einstellungen für den Weckruf gelten für die erste Zeitzone (T1)
2. Drücken Sie ST/STP wiederholt, um zwischen Weckruf (
Stundensignal (
3. Drücken Sie RESET, um den Weckruf einzustellen. Die Stunden beginnen
zu blinken und Alarm ON (
4. Drücken Sie ST/STP, um die Stunden vorzurücken. Drücken und halten,
um die Intervalle zu beschleunigen.
Hinweis: Die Stunden werden im selben Format (12 oder 24 Stunden) wie
die Zeiteinstellung angezeigt.
) an/aus oder zwischen beiden an/aus zu wählen.
) leuchtet auf.
s
) an/aus,
s
5. Drücken Sie MODE, um die Minuten einzustellen, was durch das Blinken
der Anzeige bestätigt wird. Drücken Sie ST/STP, um die Minuten
vorzurücken. Drücken und halten, um die Intervalle zu beschleunigen.
6. Drücken Sie RESET, um das Einstellen des Weckrufs zu beenden.
7. Wenn der Weckruf ertönt, können Sie ihn durch Drücken eines BELIEBIGEN
Knopfs stumm schalten, ansonsten hört er nach ca. 60 Sekunden
automatisch auf.
STOPPUHR
Funktion zur Zeitmessung bei Veranstaltungen.
1. Drücken Sie MODE, bis „SP“ erscheint.
2. Drücken Sie ST/STP, um mit der Zeitmessung zu beginnen.
3. Zur Aufzeichnung einer Zwischenzeit drücken Sie bei laufender Stoppuhr
RESET. Auf der Anzeige erscheint die Zwischenzeit, während die Stoppuhr
im Hintergrund weiterläuft.
4. Drücken Sie RESET, um die Anzeige freizugeben und die aktuell laufende
Stoppuhrzeit zu sehen.
5. Drücken Sie RESET, um eine weitere Zwischenzeit aufzuzeichnen.
6. Drücken Sie ST/STP, um die Zeitmessung zu unterbrechen.
7. Drücken Sie entweder ST/STP, um die Zeitmessung wieder aufzunehmen
oder drücken Sie RESET, um die Stoppuhr auf Null zurückzusetzen.
RUNDE 1 = 7.11 RUNDE 2 = 7.50
ZWISCHENZEIT 1 = 7.11
ZWISCHENZEIT 2 = 15.01
RUNDE 3 = 7.08
ZWISCHENZEIT 3 = 22.09
RUNDE 4 = 7.30
ZWISCHENZEIT 4 = 29.39
DUALZEIT
Einstellung der Uhrzeit für eine zweite Zeitzone
1. Drücken Sie MODE, bis „T2” erscheint.
2. Drücken Sie RESET. Die Stundenanzeige beginnt zu blinken. Drücken
Sie ST/STP, um die Stunden vorzurücken. Drücken und halten, um die
Intervalle zu beschleunigen.
3. Drücken Sie MODE, um die Minuten einzustellen, was durch das Blinken
der Anzeige bestätigt wird. Drücken Sie ST/STP, um zwischen derselben
Minuteneinstellung wie im Zeitmodus (T1) oder 30 Minuten Unterschied hinund herzuschalten.
4. Drücken Sie RESET, um das Einstellen der Dualzeit zu beenden.
Hinweis: Die Stunden werden im selben Format (12 oder 24 Stunden) wie
die Zeiteinstellung angezeigt.
INDIGLO®-ZIFFERBLATTBELEUCHTUNG
Drücken Sie den INDIGLO®-Knopf, um die Anzeige für 2-3 Sekunden
zu beleuchten. Die bei der INDIGLO
Elektroleuchttechnik beleuchtet in der Nacht und bei schlechten
Lichtverhältnissen das gesamte Zifferblatt der Uhr.
®
-Zifferblattbeleuchtung eingesetzte
WASSER- UND STOSSFESTIGKEIT
Wenn Ihre Uhr wasserdicht ist, wird eine Meterangabe oder (O) angezeigt
Wassertiefe/Dichte p.s.i.a. * Wasserdruck unterhalb
der Oberfläche
30 m 60
50 m 86
100 m 160
*Pound-Force pro Quadratzoll absolut
HINWEIS: ZUR AUFRECHTERHALTUNG DER WASSERDICHTIGKEIT
BITTE KEINE KNÖPFE UNTER WASSER DRÜCKEN.
1. Die Uhr ist nur wasserdicht, solange Uhrglas, Knöpfe und Gehäuse intakt
sind.
2. Die Uhr ist keine Taucheruhr und sollte nicht als solche verwendet werden.
3. Die Uhr nach Kontakt mit Salzwasser mit Leitungswasser abspülen.
4. Die Stoßfestigkeit wird auf der Vorderseite oder auf dem Gehäuse der Uhr
angezeigt. Die Uhren halten den Stoßfestigkeitstests gemäß ISO stand. Eine
Beschädigung des Uhrenglases/der Linse sollte jedoch vermieden werden.
11
Page 13

BATTERIE
Timex empfiehlt, den Batteriewechsel von einem Fachhändler vornehmen zu
lassen. Beim Batteriewechsel den Reset-Knopf drücken, sofern vorhanden.
Die Batterieart ist auf dem Gehäuse angegeben. Die geschätzte Lebensdauer
einer Batterie basiert auf Annahmen bezüglich der Verwendung; die tatsächliche
Lebensdauer der Batterie kann davon je nach tatsächlicher Verwendung
abweichen.
BATTERIE NICHT IN EIN FEUER WERFEN. BATTERIE NICHT WIEDER
AUFLADEN. LOSE BATTERIEN VON KINDER FERNHALTEN.
TIMEX INTERNATIONALE GARANTIE
www.timex.de/de_DE/productWarranty.html
©2019 Timex Group USA, Inc. TIMEX und INDIGLO sind eingetragene Marken
der Timex Group B.V. und ihrer Tochtergesellschaften.
DEUTSCH 03X-096000
12
Page 14

NEDERLANDS 03X-096000
Lees de instructies goed door zodat u weet hoe u uw Timex® horloge moet
bedienen.
FUNCTIES EN ALGEMENE WERKING
1. Datum met MM-DD-indeling (maand/dag)
2. 24-uurs stopwatch met tussentijd
3. Dagelijks alarm en uursignaal
4. Twee tijdzones (2e tijdzone)
5. INDIGLO® nachtverlichting
RESET
ST/STP (start/stop)
(WAARDE
VERHOGEN)
®
MODE
(modus)
INDIGLO
KNOP
(VOLGENDE
STAP)
Functies van knoppen afgebeeld met instelfuncties tussen haakjes
TIJD
Tijd en datum instellen:
1. Om uw horloge te starten, haalt u de plastic bescherming onder de kroon
weg en drukt u de kroon vervolgens tegen de kast aan. De secondewijzer
begint te lopen in stappen van één seconde.
2. Trek de kroon helemaal naar buiten en draai hem naar de juiste analoge tijd.
Druk de kroon naar binnen om het analoge horloge opnieuw te starten.
3. Druk in de modus Tijd van dag in het digitale horloge op RESET en houd dit
ingedrukt. Het horloge geeft een pieptoon en u ziet de seconden knipperen.
4. Druk op ST/STP om de seconden op nul in te stellen.
5. Druk op MODE om de uren in te stellen zoals knipperend aangegeven. Druk
op ST/STP om de ureninstelling te verhogen. Houd dit ingedrukt om snel te
verhogen.
6. Druk op MODE om de minuten in te stellen zoals knipperend aangegeven.
Druk op ST/STP om de minuteninstelling te verhogen. Houd dit ingedrukt
om snel te verhogen.
7. Druk op MODE om het jaargetal in te stellen zoals knipperend aangegeven.
Druk op ST/STP om de jaarinstelling te verhogen. Houd dit ingedrukt om
snel te verhogen.
8. Druk op MODE om het maandgetal in te stellen zoals knipperend
aangegeven. Druk op ST/STP om de maandinstelling te verhogen.
Houd dit ingedrukt om snel te verhogen.
9. Druk op MODE om de datum in te stellen zoals knipperend aangegeven.
Druk op ST/STP om de datuminstelling te verhogen. Houd dit ingedrukt
om snel te verhogen.
10. Druk op RESET om het instellen van de tijd af te sluiten.
11. Om te wisselen tussen 12-uurs (A/P-indicator) en 24-uurs tijdsindeling drukt
u op RESET.
Opmerking: Houd ST/STP ingedrukt om het maandgetal en jaar even
te zien.
ALARM
Het dagelijkse alarm aan-/uitzetten of instellen, of een uursignaal aan-/uitzetten.
1. Druk op MODE totdat “AL” verschijnt.
Opmerking: De alarminstellingen zijn aan de primaire tijdzone (T1)
gekoppeld.
2. Druk herhaaldelijk op ST/STP om het alarm (
uursignaal (
3. Druk op RESET om het alarm in te stellen. Het uurcijfer knippert en Alarm
AAN (
4. Druk op ST/STP om de ureninstelling te verhogen. Houd dit ingedrukt om
snel te verhogen.
Opmerking: De uren worden in dezelfde indeling (12- of 24-uurs tijd)
weergegeven als de tijdsinstelling.
5. Druk op MODE om de minuten in te stellen zoals knipperend aangegeven.
Druk op ST/STP om de minuteninstelling te verhogen. Houd dit ingedrukt
om snel te verhogen.
) aan/uit te zetten of beide aan/uit te zetten.
) is verlicht.
s
) aan/uit te zetten, het
s
6. Druk op RESET om het instellen van het alarm af te sluiten.
7. Druk op om het even welke knop om het alarm te stoppen wanneer het
afgaat, of anders stopt het na ongeveer 60 seconden automatisch.
STOPWATCH
Gebruik deze functie voor het opnemen van de tijd van evenementen.
1. Druk op MODE totdat “SP” verschijnt.
2. Druk op ST/STP om de tijd te gaan opnemen.
3. Druk op RESET terwijl de stopwatch loopt, om de tussentijd te registreren.
Het display toont de tussentijd maar de stopwatch blijft de tijd op de
achtergrond opnemen.
4. Druk op RESET om het display vrij te geven en de huidige tijd van de
lopende stopwatch te tonen.
5. Druk op RESET om nog een tussentijd te registreren.
6. Druk op ST/STP om het opnemen van de tijd te pauzeren.
7. Druk op ST/STP om het opnemen van de tijd te hervatten of druk op
RESET om de stopwatch op nul terug te stellen.
RONDE 1 = 7.11 RONDE 2 = 7.50
TUSSENTIJD 1 = 7.11
TUSSENTIJD 2 = 15.01
RONDE 3 = 7.08
TUSSENTIJD 3 = 22.09
RONDE 4 = 7.30
TUSSENTIJD 4 = 29.39
TWEE TIJDZONES
De tijd instellen voor een tweede tijdzone
1. Druk op MODE totdat “T2” verschijnt.
2. Druk op RESET. U ziet de uren knipperen. Druk op ST/STP om de
ureninstelling te verhogen. Houd dit ingedrukt om snel te verhogen.
3. Druk op MODE om de minuten in te stellen zoals knipperend aangegeven.
Druk op ST/STP om te wisselen tussen dezelfde minuteninstelling als de
tijdmodus (T1) of 30 minuten verschil.
4. Druk op RESET om het instellen van twee tijdzones af te sluiten.
Opmerking: De uren worden in dezelfde indeling (12- of 24-uurs tijd)
weergegeven als de tijdsinstelling.
INDIGLO® NACHTVERLICHTING
Druk op de knop INDIGLO® om het display van het horloge 2-3
seconden te verlichten. De in de INDIGLO
elektroluminescentietechnologie verlicht de wijzerplaat van het horloge 's nachts
en wanneer er weinig licht is.
®
nachtverlichting gebruikte
WATERBESTENDIGHEID EN SCHOKVASTHEID
Als het horloge waterbestendig is, wordt de metermarkering of (O)
aangegeven.
Waterbestendige diepte p.s.i.a. * Waterdruk onder oppervlak
30 m/98 ft 60
50 m/164 ft 86
100 m/328 ft 160
*lb per vierkante inch absoluut
WAARSCHUWING: OM HET HORLOGE WATERBESTENDIG TE HOUDEN
MAG U ONDER WATER OP GEEN ENKELE KNOP DRUKKEN.
1. Het horloge is alleen waterbestendig zo lang het glas, de drukknoppen en de
kast intact blijven.
2. Het horloge is geen duikershorloge en mag niet voor duiken worden
gebruikt.
3. Spoel het horloge met zoet water af nadat het aan zout water is
blootgesteld.
4. De schokvastheid wordt op de wijzerplaat of de achterkant van de kast
aangegeven. De horloges zijn zodanig ontworpen dat ze aan de ISO-test
voor schokvastheid voldoen. Beschadiging van het horlogeglas moet echter
worden vermeden.
13
Page 15

BATTERIJ
Timex raadt ten sterkste aan om de batterij door een winkelier of juwelier te
laten vervangen. Druk, indien van toepassing, op de terugstelknop wanneer
u de batterij vervangt. Het type batterij vindt u aan de achterkant van de kast.
De geschatte levensduur van de batterij is op bepaalde veronderstellingen met
betrekking tot het gebruik gebaseerd; de levensduur van de batterij varieert al
naargelang het werkelijke gebruik.
DE BATTERIJ NIET IN HET VUUR WEGGOOIEN. NIET OPLADEN. LOSSE
BATTERIJEN UIT DE BUURT VAN KINDEREN HOUDEN.
INTERNATIONALE GARANTIE VAN TIMEX
www.timex.eu/en_GB/productWarranty.html
©2019 Timex Group USA, Inc. TIMEX en INDIGLO zijn gedeponeerde
handelsmerken van Timex Group B.V. en zijn dochterondernemingen.
NEDERLANDS 03X-096000
14
Page 16

中文 03X-096000
请仔细阅读本说明,以了解 Timex® 手表的操作方法。
功能与基本操作方法
1. 采用 MM-DD(月/日)格式的日期
2. 带分项计时的 24 小时码表
3. 每日闹铃和整点报时
4. 双时间(第二时区)
5. INDIGLO® 夜间照明功能
RESET
(重设)
MODE
(模式)
(后续步骤)
ST/STP (开始/停止)
(增加值)
®
INDIGLO
键钮
键钮功能说明包括在括号内的设置功能
时间
要设置时间和日期
1. 要启用手表,请从表冠下方揭掉塑料保护罩,然后将表冠按向表壳。此时,
秒针将以 1 秒为间隔开始向前走动。
2. 将表冠全部拔出,然后转动调至正确的时间。推入表冠重启指针式手表。
3. 从数字手表的 “Time of Day (时间)” 模式中,长按 RESET(重设)。手表
将发出蜂鸣,秒数开始闪烁。
4. 按 ST/STP(开始/停止)键钮将秒数设置为零。
5. 按 MODE(模式)设置小时,如闪烁所示。按 ST/STP(开始/停止)向前
调整小时设置。按下并按住快速增加。
6. 按 MODE(模式)设置分钟,如闪烁所示。按 ST/STP(开始/停止)向前
调整分钟设置。按下并按住快速增加。
7. 按 MODE(模式)设置年份数字,如闪烁所示。按 ST/STP(开始/停止)
向前调整日设置。按下并按住快速增加。
8. 按 MODE(模式)设置月份数字,如闪烁所示。按 ST/STP(开始/停止)
向前调整月份设置。按下并按住快速增加。
9. 按 MODE(模式)设置日期,如闪烁所示。按 ST/STP(开始/停止)向前
调整日期设置。按下并按住快速增加。
10. 按 RESET(重设)退出时间设置。
11. 如需切换12小时(用A/P标记)和24小时显示格式,可按 RESET (重设)
键。
注:长按 ST/STP(开始/停止)键可快速浏览月份与年份。
闹铃
如需开关或设置每日闹铃,或开关整点报时功能,请按如下操作。
1. 按 MODE(模式),直到出现 “AL”。
注:闹铃设置与主时区(T1)相关。
2. 反复按 ST/STP(开始/停止)键切换闹铃(s)开关以及整点闹铃(
开关,或将两者同时打开/关闭。
3. 要设置闹铃,按 RESET(重设)。小时数字闪烁,闹铃打开(s)亮起。
4. 按 ST/STP(开始/停止)向前调整小时设置。按下并按住快速增加。
注:小时将以与时间设置相同的格式(12 或 24 小时)显示。
5. 按 MODE(模式)设置分钟,如闪烁所示。按 ST/STP(开始/停止)向前
调整分钟设置。按下并按住快速增加。
6. 按 RESET(重设)退出闹铃设置。
7. 闹铃响起时,按任何键钮禁音闹音,或在约 60 秒后自动停止。
)
码表
为定时活动使用本功能。
1. 按 MODE(模式),直到出现 “SP”。
2. 按 ST/STP(开始/停止)开始计时。
3. 运行码表期间,按 RESET(重设)记录分项计时。屏幕上将显示分项时
间,但码表将在后台继续计时。
4. 按 RESET(重设)松开显示并显示当前正在运行的码表时间。
5. 按 RESET(重设)记录另一个分项计时。
6. 按 ST/STP(开始/停止)暂停计时。
7. 按 ST/STP(开始/停止)恢复计时,或按 RESET(重设)将码表复位为
零。
LAP 1 = 7.11 LAP 2 = 7.50
SPLIT 1 = 7.11
SPLIT 2 = 15.01
LAP 3 = 7.08
SPLIT 3 = 22.09
LAP 4 = 7.30
SPLIT 4 = 29.39
双时间
设置第二时区的时间
1. 按 MODE(模式),直到出现 “T2”。
2. 按 RESET(重设)键。可以看到小时闪烁。按 ST/STP(开始/停止)向前
调整小时设置。按下并按住快速增加。
3. 按 MODE(模式)设置分钟,如闪烁所示。按 ST/STP(开始/停止)在与
时间模式 (T1) 相同的分钟设置或 30 分钟差别之间切换。
4. 按 RESET(重设)退出双时间设置。
注:小时将以与时间设置相同的格式(12 或 24 小时)显示。
INDIGLO® 夜间照明
按 INDIGLO® 键钮照亮手表屏幕 2-3 秒钟。INDIGLO® 夜间照明采用了电致发
光技术,可在夜间和低光度环境下照亮手表表面。
防水防震
如果您的手表如果具有防水性能,则会显示米数刻度或 (O)。
防水深度 p.s.i.a.* 水面以下水压
30米/98 英尺 60
50米/164英尺 86
100米/328英尺 160
* 按磅每平方英寸计算的压力绝对值
警告:为保持防水性能,请勿在水中按任何键钮。
1. 只有在镜面、键钮和表壳完好无损的情况下,本表才能保持防水性能。
2. 本表非潜水用手表,不宜在潜水时使用。
3. 接触盐水后,请用清水冲洗。
4. 表盘上或表壳背面会注明手表是否具有防震性能。本表的防震设计通过了
ISO 国际标准测试。但应注意避免损坏晶体/镜面。
电池
Timex 强烈建议由零售商店或钟表店来更换电池。在适用情况下,更换电池时
应按下重置(reset)键。电池类型注明在表壳背面后。电池寿命是根据对使用方式
的某些假设而估算的;电池寿命长短取决于实际使用方式。
切勿将电池弃置于火内。请勿为电池充电。切勿让儿童接触拆下的电池。
TIMEX 国际保修规定
www.timex.eu/en_GB/productWarranty.html
©2019 Timex Group USA, Inc. TIMEX 和 INDIGLO 均为 Timex Group B.V. 及其
分公司的注册商标。
15
Page 17

日本語 03X-096000
使用説明書をよくお読みになり、Timex® 時計の操作方法をご理解ください。
機能と基本操作
1. 日付表示 (月・日)
2. ス プリット タ イ ム 付 き 24 時 間 ストップ ウォッチ
3. デ イリーア ラ ー ム と 時 間 チ ャ イム
4. デュアル タイム ( 第 2のタイムゾ ーン )
5. INDIGLO® ナ イトラ イト
RESET
MODE
( 次 の ス テップ )
ST/STP
(設定値を進める)
®
INDIGLO
ボ タン
括弧内に設定機能を示したボタン機能
時刻
時間と日付を設定するには
1. 腕 時 計 を ス タ ートさせ る に は 、 リュー ズ の 下 から プ ラ スチック の ガ ードを は ず し た
後 、 リューズをケースに 向 かって押し込 みます。 秒 針 が1秒ごとに動き始 めます。
2. リューズを外まで引いて、 正しいアナログ時 刻に合わせます。 リューズを押し込
むとアナログ時計は再開されます。
3. 時刻表示モードで RESET ボタンを押し続けます。 ビープ音とともに秒の表示は
点 滅します。
4. ST/STP を押して秒をゼロに設 定します。
5. MODE ボタンを押すと時間の表示が点滅し、設定可能となります。ST/STP
ボタンを押すと設定値が進みます。押し続けると設定値が早く進みます。
6. MODE ボタンを押すと分の表示が点滅し、設定可能となります。ST/STP
ボタンを押すと設定値が進みます。押し続けると設定値が早く進みます。
7. MODE ボタンを押すと年の表示が点滅し、設定可能となります。ST/STP
ボタンを押すと設定値が進みます。押し続けると設定値が早く進みます。
8. MODE ボタンを押すと月の表示が点滅し、設定可能となります。ST/STP
ボタンを押すと設定値が進みます。押し続けると設定値が早く進みます。
9. MODE ボタンを押すと日付の表示が点滅し、設定可能となります。ST/STP
ボタンを押すと設定値が進みます。押し続けると設定値が早く進みます。
10. RESET ボタンを 押して 設 定を 終 了します。
11. RESET. ボタンを押すと時間の表示方法を12時間 (A/Pインジ ケ ー タ) と24時間
に切り替えます 。
ヒント : ST/STP ボタンを押すと当 月と年が 表示されます。
アラーム
毎日用アラームの切り替えや、毎時チャイムの切り替えを行います。
1. 「AL」が 表 示 さ れ る ま で MODE ボ タン を 押し ま す 。
ヒント : アラームの設定は第 1 タイムゾ ーン ( T1) に対応しています。
2. ST/STP を押すとアラーム (s)、毎時チャイム (
ます。
3. RESET. ボタンを押してアラームを設定します。時間の数字が点滅され、アラー
ム作動中の表示 (s) が点灯されます。
4. ST/STP ボタンを押すと設定値が進みます。 押し続けると設定値が早く進み
ます。
ヒント : 時間の表示方法は現在時刻と同じ設定 (12・24 時間表示) となります。
5. MODE ボタンを押すと分の表示が点滅し、設定可能となります。ST/STP
ボタンを押すと設定値が進みます。押し続けると設定値が早く進みます。
6. RESET を押すアラーム 設定は 終 了します。
7. アラームが鳴ったら、いずれ かのボタンを押すと止まります。そのまま放 置すると
約60秒間で自動的に止まります。
)、またはその両方を切り替え
ストップ ウォッ チ
競争などのイベントを計測します。
1. 「SP」が 表 示 さ れ る ま で MODE ボ タン を 押し ま す 。
2. ST/STP ボタンを 押して 計測を 開始します。
3. 計測中に RESET ボタンを押 すとスプリットタイムは記 録 されます 。このスプリッ
トタイムは表示されている間、計測は非表示でそのまま続きます。
4. RESET ボタンを押すと表示は解除され、現在の計測時間が表示されます。
5. RESET ボタンを 押すとスプリットタイムは 更に 記 録され ます。
6. ST/STP ボタンを押すと計測は一時停止します。
7. この状態 で ST/STP ボタンを押して 計測を再 開するか、 RESET ボ タン を 押し
て リセット し ます 。
LAP 1 = 7.11 LAP 2 = 7.50
SPLIT 1 = 7.11
SPLIT 2 = 15.01
LAP 3 = 7.08
SPLIT 3 = 22.09
LAP 4 = 7.30
SPLIT 4 = 29.39
デュア ルタイム
第 2 の タイム ゾーン を 設 定 しま す 。
1. 「T2」が 表 示 さ れ る ま で MODE ボ タ ン を 押 し ま す 。
2. RESET を押します。時間の表示は点滅します。ST/STP ボタンを押すと設定値
が進 みます。押し続けると設定値 が早く進みます。
3. MODE ボタンを押すと分の表示が点滅し、設定可能となります。ST/STP を押
す と 、時 刻 モ ー ド ( T1) と同じ分 の設 定にするか 、30分間ずれるかを選択します。
4. RESET ボタンを 押して 設定を 終了します。
ヒント : 時間の表示方法は現在時刻と同じ設定 (12・24 時間表示) となります。
INDIGLO® ナ イト ラ イト
INDIGLO® ボタンを押すと腕時計の表示が 2-3 秒間明るくなります。INDIGLO
で使用されている電子発光技術により、低光条件で文字盤を照明します。
®
耐水性・耐衝撃性
時計が防 水であれば、メートルマーキングまたは (O) が 示され ています。
防水水深 p.s.i.a.* 水圧
30m/98ft 60
50m/164ft 86
100m/328ft 160
*重量ポンド毎平方インチ絶対圧
警告: 水性を維持するためには、水中ではどのボタンも押さないでください。
1. この時計はレンズ、プッシュボタン、ケースが無傷の場合のみで耐水性がありま
す。
2. 計はダイバーウォッチではありませんので潜水には使用しないでください。
3. 腕時計に塩水がかかった場合は真水ですすいでください。
4. 耐衝撃性は腕時計の文字盤、またはケース裏に表記されています。腕時計は
ISO の耐衝撃性試験に合格するよう設計されていますが、クリスタル/レンズが損
傷しないよう十分注意してください。
電池
Timex 社では、 電池の交換は販売店または時計専門店に依頼されますよう強く推
奨しています。リセットボタンがある場合は電池交換時に押してください。電池の種類
はケース裏に記されています。電池の寿命は一定の使用条件を仮定して概算したも
のです。 電池の寿命は実際の使用法によって異なります。
電池を焼却しないでください。再充電しないでください。外した電池はお子様の手
の 届 か ない ところに保 管し て ください 。
TIMEX 国際保証書
www.timexwatch.jp/fs/timex/c/guide#returns
©2019 Timex Group USA, Inc. TIMEX および INDIGLO は、Timex Group B.V. お
よびその系列会社の登録商標です。
16
Page 18

РУССКИЙ 03X-096000
Пожалуйста, внимательно прочитайте инструкцию по эксплуатации, чтобы понять,
как правильно пользоваться часами Timex®.
ФУНКЦИИ И ПРИНЦИП РАБОТЫ
1. Отображение даты в формате MM-DD (месяц-день)
2. 24-часовой секундомер с отображением промежуточного времени
3. Ежедневный будильник и почасовой звуковой сигнал
4. Двойная индикация времени (время во втором часовом поясе)
5. Ночная подсветка INDIGLO®
RESET
(СБРОС)
MODE
(РЕЖИМ)
ST/STP
(Увеличение
значения)
®
INDIGLO
КНОПКА
(Следующее
действие)
Установочные функции кнопок указаны в скобках
ВРЕМЯ
Установка даты и времени
1. Для запуска часов удалите из-под заводной головки блокировочную вставку,
затем, надавив на головку, задвиньте ее до упора. Секундная стрелка начнет
двигаться с интервалом в одну секунду.
2. Выдвините заводную головку в крайнее положение и, поворачивая,
установите правильное аналоговое время. Задвиньте заводную головку до
упора для перезапуска аналоговых часов.
3. Находясь в режиме времени суток на цифровом дисплее, нажмите и
удерживайте кнопку RESET. Часы издадут звуковой сигнал и замигают
секунды.
4. Нажмите на кнопку ST/STP для обнуления секунд.
5. Нажмите на кнопку MODE для установки часов, о чем будет свидетельствовать
их мигание. Нажимайте на кнопку ST/STP для изменения часов. Нажмите и
удерживайте кнопку для ускоренной смены цифр.
6. Нажмите на кнопку MODE для установки минут, о чем будет свидетельствовать
их мигание. Нажимайте на кнопку ST/STP для изменения минут. Нажмите и
удерживайте кнопку для ускоренной смены цифр.
7. Нажмите на кнопку MODE для установки года, о чем будет свидетельствовать
его мигание. Нажимайте на кнопку ST/STP для изменения года. Нажмите и
удерживайте кнопку для ускоренной смены цифр.
8. Нажмите на кнопку MODE для установки месяца, о чем будет
свидетельствовать его мигание. Нажимайте на кнопку ST/STP для изменения
месяца. Нажмите и удерживайте кнопку для ускоренной смены цифр.
9. Нажмите на кнопку MODE для установки числа месяца, о чем будет
свидетельствовать его мигание. Нажимайте на кнопку ST/STP для изменения
числа месяца. Нажмите и удерживайте кнопку для ускоренной смены цифр.
10. Нажмите на кнопку RESET для выхода из режима настройки времени.
11. Для переключения между 12-часовым (индикатор A/P) и 24-часовым форматом
отображения времени, нажимайте на кнопку RESET
Примечание: Нажмите и удерживайте кнопку ST/STP для того, чтобы
просмотреть число месяца и год.
БУДИЛЬНИК
Включение/отключение и установка ежедневного будильника, а также включение/
отключение почасового звукового сигнала.
1. Нажимайте на кнопку MODE до тех пор, пока не появится «AL».
Примечание: Установка будильника привязана к первичному часовому
поясу (T1).
2. Нажимайте на кнопку ST/STP многократно для включения/отключения
будильника (
), почасового звукового сигнала ( ) или и того, и другого.
s
3. Для установки будильника нажмите на кнопку RESET. Замигают часы и
загорится значок Alarm ON (будильник вкл.) (
4. Нажимайте на кнопку ST/STP для изменения часов. Нажмите и удерживайте
кнопку для ускоренной смены цифр.
Примечание: Часы будут отображены в том же формате (12- или 24-часовом),
в котором установлено время.
5. Нажмите на кнопку MODE для установки минут, о чем будет свидетельствовать
их мигание. Нажимайте на кнопку ST/STP для изменения минут. Нажмите и
удерживайте кнопку для ускоренной смены цифр.
).
s
6. Нажмите на кнопку RESET для выхода из режима установки будильника.
7. При срабатывании будильника нажмите на ЛЮБУЮ кнопку для отключения
звукового сигнала. Сигнал отключится автоматически через 60 секунд.
СЕКУНДОМЕР
Пользуйтесь данной функцией для отсчета времени событий.
1. Нажимайте на кнопку MODE до тех пор, пока не появится «SP».
2. Нажмите на кнопку ST/STP для начала отсчета.
3. При работающем секундомере, нажмите на кнопку RESET для замера
промежуточного времени. На дисплее отобразится промежуточное время,
однако секундомер продолжит отсчет времени в фоновом режиме.
4. Нажмите на кнопку RESET для разблокирования дисплея и отображения
текущего времени секундомера.
5. Нажмите на кнопку RESET для замера нового промежуточного времени.
6. Нажмите на кнопку ST/STP для приостановки отсчета времени.
7. Нажмите на кнопку ST/STP для возобновления отсчета или на кнопку RESET
для сброса секундомера.
ДВОЙНАЯ ИНДИКАЦИЯ ВРЕМЕНИ
Установка времени во втором часовом поясе
1. Нажимайте на кнопку MODE до тех пор, пока не появится «T2».
2. Нажмите на кнопку RESET. Замигают часы. Нажимайте на кнопку ST/STP
для изменения часов. Нажмите и удерживайте кнопку для ускоренной
смены цифр.
3. Нажмите на кнопку MODE для установки минут, о чем будет свидетельствовать
их мигание. Нажимайте на кнопку ST/STP для переключения между той
же установкой минут, что и во времени первого часового пояса (T1), или
разницей в 30 минут.
4. Нажмите на кнопку RESET для выхода из режима установки времени во
втором часовом поясе.
Примечание: Часы будут отображены в том же формате (12- или 24-часовом),
в котором установлено время.
НОЧНАЯ ПОДСВЕТКА INDIGLO
Нажмите на кнопку INDIGLO® для освещения дисплея часов на 2-3 секунды.
Электролюминесцентная технология, используемая в ночной подсветке INDIGLO
освещает циферблат часов в ночное время и в условиях слабой освещенности.
®
®
,
17
Page 19

ВОДОНЕПРОНИЦАЕМОСТЬ И УДАРОПРОЧНОСТЬ
О водонепроницаемости ваших часов свидетельствует метровая отметка или
значок (O).
Глубина водонепроницаемости p.s.i.a. * Давление воды ниже
поверхности
30м/98футов 60
50м/164фута 86
100м/328футов 160
*абсолютное давление в фунтах на кв. дюйм
ПРЕДУПРЕЖДЕНИЕ: ДЛЯ СОХРАНЕНИЯ ВОДОНЕПРОНИЦАЕМОСТИ НЕ
НАЖИМАЙТЕ КНОПКИ ПОД ВОДОЙ.
1. Часы сохраняют водонепроницаемость только до тех пор, пока стекло
циферблата, кнопки и корпус остаются неповрежденными.
2. Часы не являются водолазными и не предназначены для ныряния.
3. После контакта с морской водой часы следует ополоснуть пресной водой.
4. Ударопрочные модели имеют соответствующую маркировку на
циферблате или задней крышке. Такие часы отвечают требованиям MOC
по ударопрочности. Тем не менее, следует избегать повреждения стекла
циферблата.
БАТАРЕЙКА
Для замены батарейки фирма Timex настоятельно рекомендует обращаться
к розничному продавцу или ювелиру. В зависимости от модели часов, при
замене батарейки нажмите на кнопку сброса. Тип батарейки указан на задней
крышке. Приблизительный срок службы батарейки основан на определенных
предположениях относительно пользования и может варьироваться, в
зависимости от фактического пользования.
НЕ БРОСАЙТЕ БАТАРЕЙКУ В ОГОНЬ. НЕ ПОДЗАРЯЖАЙТЕ БАТАРЕЙКУ.
ХРАНИТЕ РАСПАКОВАННЫЕ БАТАРЕЙКИ ВНЕ ДОСЯГАЕМОСТИ ДЕТЕЙ.
МЕЖДУНАРОДНАЯ ГАРАНТИЯ TIMEX
www.timex.eu/en_GB/productWarranty.html
РУССКИЙ 03X-096000
©2019 Timex Group USA, Inc. TIMEX и INDIGLO являются зарегистрированными
торговыми марками компании Timex Group B.V. и ее дочерних предприятий.
18
 Loading...