

Page 1

W-188 589-095006 NA
p e r f o r m a n c e w a t c h u s e r g u i d e
Performance Watch User Guide
English page 1
Français page 81
Español página 159
Português página 239
BODYLINK SYSTEM
®
©2005 Timex Corporation
589-095006_W188_NA_EN_589-095006_W188_NA_EN 3/11/11 8:39 AM Page CVR2
Page 2

T A B L E O F CO N T E N T S
Register your product at www.timex.com
Introduction...........................................................................................7
Welcome!...............................................................................................7
Manual organization............................................................................8
Resources..............................................................................................9
Print resources ...................................................................................9
Web resources.....................................................................................9
Performance Watch Overview ............................................................10
Watch terminology.............................................................................10
The chronograph................................................................................11
Watch button functions .....................................................................12
Watch case buttons ..........................................................................12
Setting buttons.................................................................................13
To Set Watch functions..................................................................13
Viewing buttons ...............................................................................14
Watch display icons............................................................................15
Starting the Bodylink® System ........................................................16
Viewing Performance Data................................................................17
1
589-095006_W188_NA_EN_589-095006_W188_NA_EN 3/11/11 8:39 AM Page CVR4
Page 3

Vertical Mode functions ...................................................................31
To operate Vertical Mode...............................................................32
To view performance data in Vertical Mode.................................32
Vertical Mode example.....................................................................33
Finish Mode........................................................................................34
Finish Mode functions .....................................................................34
To set Finish Mode.........................................................................35
To view performance data in Finish Mode...................................35
Finish Mode example .......................................................................36
Navigate Mode ...................................................................................37
Navigate Mode terminology ............................................................37
Navigate Mode functions.................................................................38
To operate Navigate Mode.............................................................38
To store waypoints in Navigate Mode ..........................................38
To view performance data in Navigate Mode ..............................39
Navigate Mode example...................................................................40
Waypoints Mode.................................................................................40
Waypoints Mode terminology..........................................................40
Waypoints Mode functions ..............................................................41
To operate Waypoints Mode ..........................................................42
To store a waypoint........................................................................42
To view or edit waypoints..............................................................43
3
Watch messages..................................................................................19
Display formatting .............................................................................20
Watch modes ......................................................................................20
Using the Watch.................................................................................21
Performance Watch Modes .................................................................22
Time of Day Mode..............................................................................22
Time of Day Mode terminology.......................................................22
Time of Day Mode functions ...........................................................22
To set time of day...........................................................................23
To switch time zones......................................................................24
To synchronize Time of Day with Fitness sensors ......................24
To view performance data in Time of Day Mode.........................25
Time of Day Mode example.............................................................26
Chronograph Mode ............................................................................27
Chronograph Mode terminology .....................................................27
Chronograph Mode functions..........................................................27
To operate Chronograph Mode manually.....................................28
To operate Chronograph Mode hands-free...................................29
To view performance data in Chronograph Mode .......................29
Chronograph Mode example ...........................................................30
Vertical Mode......................................................................................31
Vertical Mode terminology ..............................................................31
2
589-095006_W188_NA_EN_589-095006_W188_NA_EN 3/11/11 8:39 AM Page 2
Page 4

Alarm Mode functions .....................................................................58
To set an alarm in Alarm Mode ....................................................59
Configure Mode..................................................................................60
Configure Mode terminology...........................................................60
Configure Mode setting groups .......................................................60
To set functions in Configure Mode .............................................61
Configure Mode options...................................................................62
HRM settings .................................................................................62
GPS-3D Sensor Settings................................................................64
Altitude settings.............................................................................65
Hands-Free settings.......................................................................66
Watch settings ................................................................................67
Unit settings...................................................................................68
Care & Maintenance ...........................................................................69
Changing the battery.........................................................................69
INDIGLO® night-light......................................................................71
Water resistance.................................................................................71
Legal Information................................................................................72
International warranty (U.S. limited warranty)..............................72
Service.................................................................................................75
FCC notice (United States)/IC notice (Canada)...............................75
Declaration of conformity..................................................................78
5
To operate the Track Back feature ...............................................44
Waypoints Mode example ................................................................46
Lap Data Mode ...................................................................................46
Lap Data Mode functions ................................................................47
To operate Lap Data ......................................................................47
To view performance data in Lap Data Mode..............................47
Lap Data Mode example ..................................................................48
Summary Mode ..................................................................................49
Summary Mode terminology ...........................................................49
Summary Mode functions ...............................................................49
To operate Summary Mode ...........................................................50
To reset Features in Summary Mode ...........................................50
To view performance data in Summary Mode .............................50
Summary Mode example .................................................................53
Timer Mode ........................................................................................54
Timer Mode terminology .................................................................54
Timer Mode functions .....................................................................54
To set Timer Mode .........................................................................55
To operate the Timer in Timer Mode...........................................55
To view performance data in Timer Mode ...................................57
Timer Mode example .......................................................................57
Alarm Mode ........................................................................................58
4
589-095006_W188_NA_EN_589-095006_W188_NA_EN 3/11/11 8:39 AM Page 4
Page 5

I N T R O D U C T I O N
Welcome!
Congratulations! With your purchase of the Timex® Bodylink®
System you have hired your new personal coach. Using your
Performance Watch in partnership with the Heart Rate and Speed
+ Distance Sensors offers you an unprecedented ability to track,
store, and analyze several key indicators of your personal fitness
level.
We dedicate this manual to information regarding your Performance
Watch. This sport Watch functions as the brain for your Bodylink
System, providing you comprehensive, real-time workout data
gathered from the Heart Rate Sensor, Speed + Distance Sensor, or
both.
You will find your Performance Watch provides you with very userfriendly fitness technology. But, like any new technology, you should
take the time to familiarize yourself with it to optimize the
usefulness of your purchase.
So, have fun exploring! Review the Performance Watch modes. Use
the Quick Start Guide to give you a baseline knowledge of the
Bodylink System. Most of all, enjoy your new fitness partner on
your road to increased performance!
76
589-095006_W188_NA_EN_589-095006_W188_NA_EN 3/11/11 8:39 AM Page 6
Page 6
9
Manual organization
This manual contains information about, and instructions for,
setting up your new Performance Watch and using it with the
Bodylink Fitness Sensors as part of the coordinated Bodylink
System.
To assist you in learning about your Performance Watch, this
manual contains several key elements to increase your
understanding, including:
❖
An overview of the Performance Watch buttons, display icons, and
modes.
❖
A glossary for each section that explains many of the references
used for the Performance Watch and the Performance Watch
modes.
❖
Complete, comprehensive instructions for setting up and using
your Performance Watch in each mode.
❖
A primer covering the links between your Performance Watch and
each of the Fitness Sensors in each mode.
❖
Real-world scenarios that explain how you might use your
Performance Watch as part of your activity routine. You will see
these scenarios throughout the manual, appearing in grey text
boxes.
8
Resources
Print resources
In addition to this manual, your Bodylink System includes these
valuable resources:
❖
Bodylink® System Quick Start Guide: Information to help
you set up and begin using your Performance Watch in
conjunction with your Fitness Sensors, and an overview map of
the different Performance Watch modes.
❖
Fitness Sensors User Guide: Information for set-up,
operation, and maintenance of your Speed + Distance and
Heart Rate Sensors.
Web resources
The Timex Websites offer beneficial information to help you
optimize your Bodylink System. These sites include:
❖ www.timex.com/bodylink/: Information about Bodylink
System features and product simulations.
❖ www.timex.com/software/: Current software releases for
Timex products.
❖
www.timex.com/fitness/: Fitness and training tips for using
the Bodylink System.
589-095006_W188_NA_EN_589-095006_W188_NA_EN 3/11/11 8:39 AM Page 8
Page 7

GPS: The GPS-3D Sensor uses information gathered from global
positioning satellites (GPS) to calculate your speed, distance, and
elevation, and to track your movements.
Heart Rate Sensor: The Heart Rate Sensor (HR Sensor)
measures your heart rate. The Fitness Sensor User Guide
provides detailed information for setting up and using your HR
Sensor.
The chronograph
As you use this manual to learn about your Watch, the word
chronograph can potentially cause some confusion. Try to remember
this: a chronograph is a tool for measuring time. So, you will
notice a Chronograph Mode, but Vertical and Finish Modes also
operate from the chronograph. Any time your Watch functions as a
timing tool, it operates using chronograph (or timing) functionality.
chronograph
measures time
Chronograph
Mode
Vertical Mode
Finish Mode
11
P E R F O R M A N C E WA T C H O V E R V I E W
Watch terminology
The following terms appear throughout this manual. Knowing these
terms will provide you a greater understanding of the information
provided.
Bodylink® System: The Bodylink System allows you to track realtime data by using Fitness Sensors in conjunction with your
Performance Watch.
Fitness Sensors: The Bodylink System includes two digital
sensors: the Heart Rate Sensor and the Speed + Distance Sensor.
Performance Watch: The Performance Watch, (Watch) houses the
data center for the Bodylink System.
Speed + Distance Sensor: The Speed + Distance Sensor (GPS3D Sensor) tracks speed, pace, distance traveled, altitude, location,
and more, using GPS based technology. The Fitness Sensor User
Guide provides detailed instructions for setting up and using your
GPS-3D Sensor.
10
589-095006_W188_NA_EN_589-095006_W188_NA_EN 3/11/11 8:39 AM Page 10
Page 8

Setting buttons
Watch buttons also set Watch functions (for example, setting the
time or a target heart rate zone). When the
+ and - symbols
appear on the Watch display, you have initiated the setting process.
TO SET WATCH FUNCTIONS
Use the following steps to set Watch functions:
1. Press and hold SELECT (SET/FORMAT). The message
HOLD TO SET may appear.
2. Continue pressing SELECT (SET/FORMAT) until SET
briefly appears on the display, followed by a flashing value.
3. Set the first value by pressing
+ (DISPLAY) or -
(STOP/RESET).
DONE
Press when finished
setting
INDIGLO®
night-light
Press to light
the watch
+
Press to increase the
displayed value
SELECT
Press to begin setting or
move to the next value
-
Press to decrease the
displayed value
13
Watch button functions
The buttons on your Watch are multi-functional, serving three
purposes. You do not have to memorize button functions for each
mode. Let the Watch serve as your guide.
Watch case buttons
Most of the time, the Watch buttons function according to the
labels printed on the case. If you do not see any of symbols on the
display, follow the information printed on the Watch case to guide
you in using the buttons.
MODE
Press to go to
the next mode
START/SPLIT
Press to start timing or
take a split
INDIGLO
®
night-light
Press to light
the watch
DISPLAY
Press to display
performance data
SET/FORMAT
Press to set or change
the display format
STOP/RESET
Press to stop or press
and hold to reset
12
589-095006_W188_NA_EN_589-095006_W188_NA_EN 3/11/11 8:39 AM Page 12
Page 9

1514
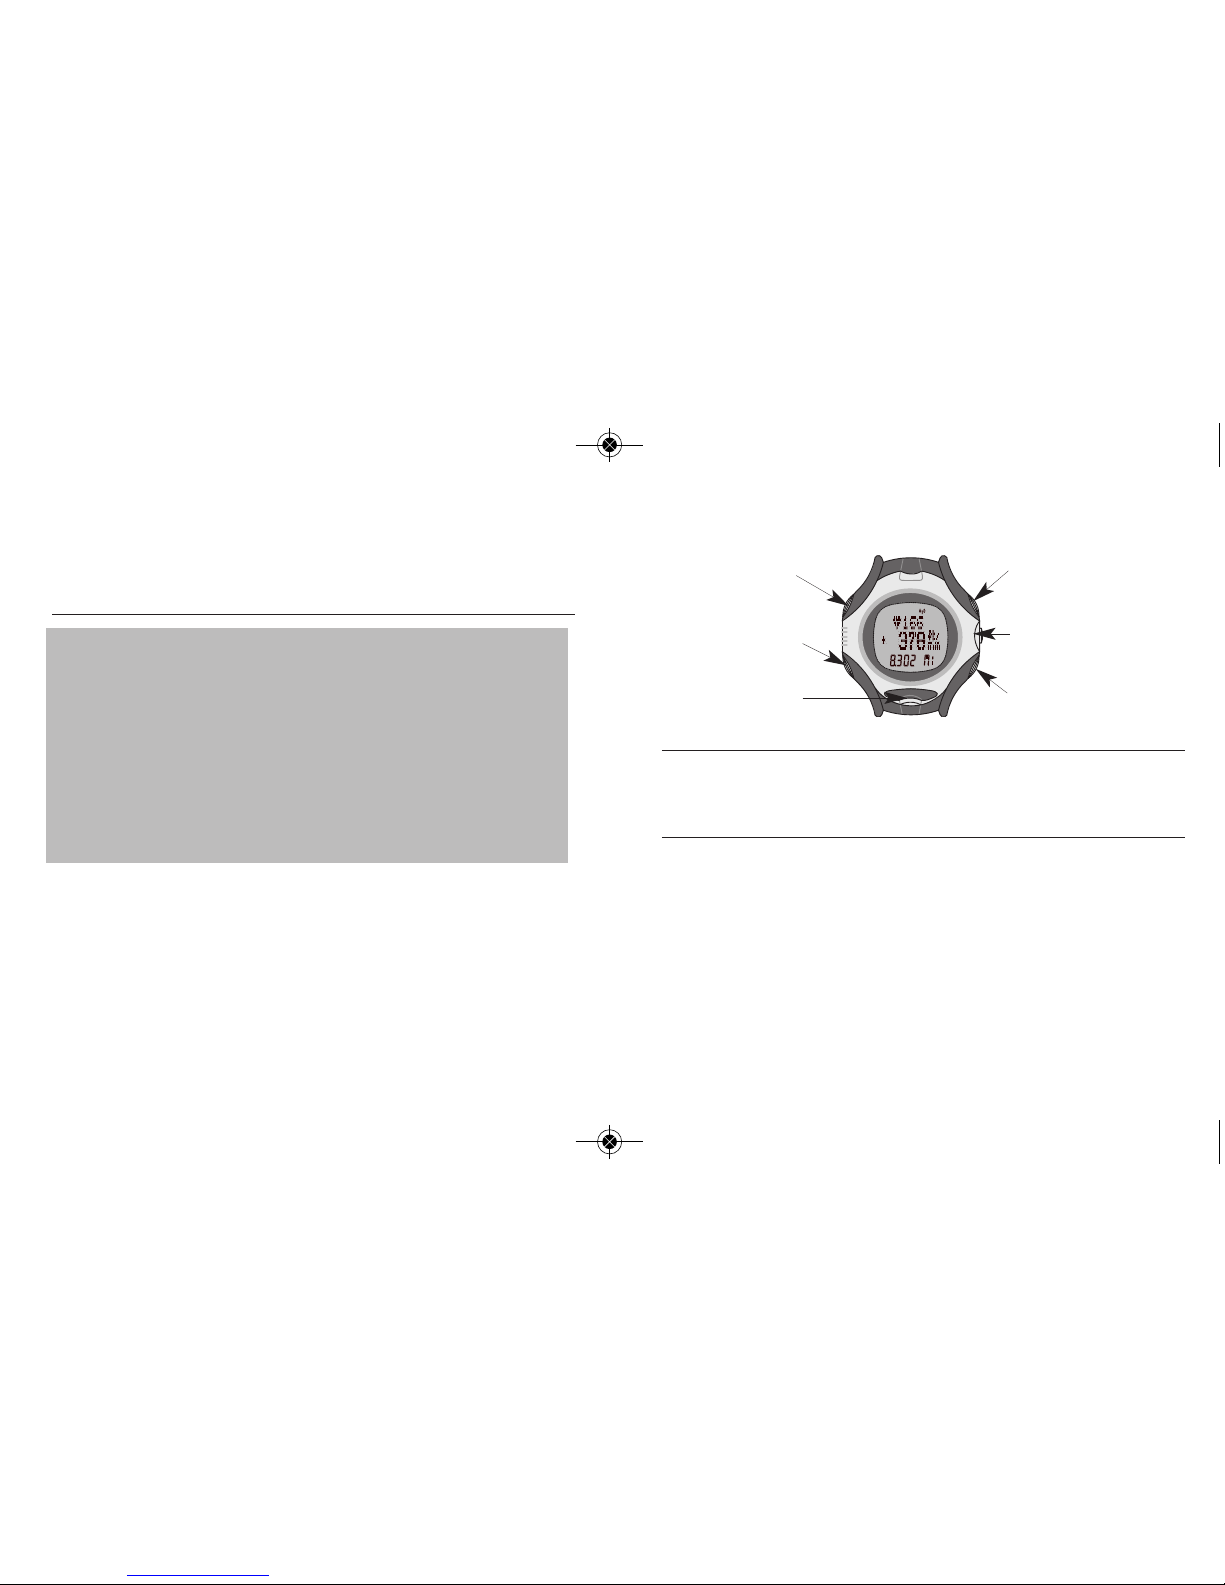
Watch display icons
Timer running
Chronograph
running
Night Mode enabled
GPS-3D Sensor
battery low
Sensor(s) activated
(blinks when trouble)
Alarm armed
Hourly chime
enabled
Watch display
icons
4. When you reach the desired value, press SELECT
(SET/FORMAT) to move to the next value.
5. Repeat steps 3 and 4 for each value you want to set.
6. When you have adjusted all values, press DONE (MODE) to
return to the main display of the mode.
Viewing buttons
Finally, buttons help you navigate through viewing options. When
you see the ▲ and ▼ triangles on the display, you know there is
information to view.
MODE
Press to go to the
next mode
INDIGLO®
night-light
Press to light
the watch
▲
Press to display next
data value
▼
Press to display
previous data value
589-095006_W188_NA_EN_589-095006_W188_NA_EN 3/11/11 8:39 AM Page 14
Page 10

Starting the Bodylink® System
When using the Performance Monitor, you can view real-time data
from a Heart Rate Sensor or Speed + Distance Sensor, or both, in
Time of Day, Chrono and Timer. The procedure to do this is the
same in all modes, though the data that you can view and their
position on the display in each mode will vary.
1. Make sure you’re wearing your Heart Rate Sensor or Speed +
Distance Sensor, or both, and that they are powered up and
functional.
2. Stand at least 6 feet (2 meters) away from any other users of
fitness monitor systems and from any source of radio interference
such as electrical equipment, power lines, etc.
3. Press and release the DISPLAY button. This tells the watch to
look for any Bodylink
®
sensors nearby; it will search for one
minute. The antenna icon will appear on the watch display,
indicating that the Bodylink®system is active.
16
NOTE: Though the Bodylink®system has a working range of
about 3 feet (1 meter) from the sensors to the watch, for the most
reliable operation, make sure that the watch is as close to the
sensors as possible when starting the system up.
4. When the watch has successfully detected transmissions from the
sensors, the watch display will switch to a new format showing
some or all of the sensor data, depending on the mode. Time of
Day and Timer show the data in the lower line exclusively, while
Chrono allows up to three lines of performance data.
Viewing Performance Data
Press and release the DISPLAY button to select the data or
combination of data that you wish to view during your workout. For
your convenience, a “banner” showing the names of the information
and their position on the display is shown briefly before showing the
data itself.
Here are a few more things you should know to use the watch
effectively:
• While in the Chrono, press and release SET/FORMAT to swap
the positions of the information in the upper and middle display
lines. This allows you to view the data most important in the
larger middle display line.
17
NOTE: As a convenience, Chrono and Timer will automatically
search for Bodylink®sensors for fifteen seconds upon entering
the mode.
589-095006_W188_NA_EN_589-095006_W188_NA_EN 3/11/11 8:39 AM Page 16
Page 11

Watch messages
When using the Watch with the Fitness Sensors, the Watch may
display messages to communicate the status of the Sensor in
conjunction with the Watch. Messages include:
❖
SEARCHING The GPS-3D Sensor is still trying to link to GPS
data. You cannot view speed, pace, distance, or positional
information until the Sensor locates GPS satellites.
❖
WEAK GPS SIGNAL The GPS-3D Sensor lost its link with GPS
satellites. The GPS-3D Sensor operates more accurately in more
open areas (such as an area without a lot of tree or cloud cover)
and at quicker speeds.
❖
NO DATA FROM HRM (GPS) The Watch is not receiving data
from the HR or the GPS-3D Sensor. Ensure that the Sensor is not
more than 3 feet (1 meter) away from the Watch, is operating, or
has not inadvertently locked onto someone else’s Sensor. The
Watch will attempt to establish a connection for one minute after
this message displays.
❖
NOISY DATA FROM HRM (GPS) The Watch is experiencing
radio interference. Try to move away from any potential sources
of interference (for example, televisions, monitors, or motorized
devices). The Watch will attempt to establish a connection for 30
seconds after this message displays.
❖
FATAL GPS ERROR The GPS-3D Sensor has encountered a
severe internal error. Contact Timex Customer Service.
19
• If you want to stop monitoring data from your Bodylink
®
sensors,
hold the DISPLAY button down until the message HOLD TO
SHUT OFF RCVR is displayed on the watch display. Continue
holding the DISPLAY button for a few more seconds; the watch
will beep indicating that the radio link between the watch and the
sensors has been shut down.
18
TIP: If you are already viewing data from one sensor, for example,
the Heart Rate Sensor, and you wish to also view data from the
Speed + Distance Sensor, simply press and hold the DISPLAY
button until the watch emits a short beep and the antenna icon
begins flashing. The watch is now searching for a second
Bodylink
®
sensor. When it detects this second device, the antenna
icon will stop flashing and the display may change to a new
format that includes the new information. Press and release the
DISPLAY button (as detailed previously) to view various
combinations of two sensor’s data.
589-095006_W188_NA_EN_589-095006_W188_NA_EN 3/11/11 8:39 AM Page 18
Page 12

❖
Waypoints support up to ten reference points as you travel from
one location to another and uses these reference points to help
you travel back to your beginning location.
❖
Lap Data presents stored lap information.
❖
Summary displays data recorded while the chronograph runs.
❖
Timer enables you to time an event that counts down from a
specific time to zero.
❖
Alarm manages up to five alarms.
❖
Configure permits you to customize Watch functions to meet
your needs.
Using the Watch
To access all features and functionality of your Watch, you must use
it in conjunction with the Fitness Sensors. However, your Watch
does offer some flexibility of use. For example:
❖
You can use your Watch without either of the Fitness Sensors to
view time Time of Day Mode, as an alarm in Alarm Mode, or to
time a workout in any of the chronograph modes.
❖
You can use your Watch with only the HR Sensor in any of the
chronograph modes to track heart rate and time information.
❖
You can use your Watch with the GPS-3D Sensor in any of the
navigational modes to track distance information. Or, you can use
this Sensor in any of the chronograph modes to track distance
information.
21
Display formatting
In Chronograph, Vertical (with the exception of ascent rate
information), Finish, and Navigate Modes, you can press and release
SET/FORMAT to switch the display reading positions in the upper
and middle display lines.
Watch modes
You can cycle through each of the 11 modes by pressing MODE.
The modes include:
❖
Time of Day allows you to display the time, date, and day of the
week for two different time zones.
❖
Chronograph tracks and displays performance data.
❖
Vertical applies a view for vertical data such as ascent rate,
altitude, and elevation.
❖
Finish lets you predict a time for a specified distance and set
alerts if you are off pace.
❖
Navigate recognizes positional, compass-type information for
your location.
Pace
Time
Pace
Time
20
589-095006_W188_NA_EN_589-095006_W188_NA_EN 3/11/11 8:39 AM Page 20
Page 13

23
P E R F O R M A N C E WA T C H M O D E S
Time of Day Mode
Time of Day Mode terminology
UTC: Universal Time, Coordinated (formerly known as GMT)
describes the local time zone in relationship to the Greenwich
Meridian. For example, New York City is in the -5 UTC zone, since
New York is five hours earlier than Greenwich Meridian; Moscow
is +3 UTC, since it is three hours later than Greenwich Meridian.
Time of Day Mode functions
Your Watch can act as an ordinary watch to display the time, date,
and day for two different time zones, using a 12- or 24-hour
format.
View performance
data
View or switch to
secondary time
Hold to set
INDIGLO®
night-light
To Chronograph
Mode
22
You can return to Time of Day Mode from any other mode on the
Watch by pressing and holding MODE until the time of day
displays.
TO SET TIME OF DAY
For instructions on setting Watch functions, including Time of
Day, refer to page 13, “To set Watch functions.”
For Time of Day, you can set the following values:
NOTE: You cannot adjust seconds. When you use the Watch with
the GPS-3D Sensor, it will align with UTC.
When switching between Standard Time and Daylight
Savings Time, manually adjust the hour.
You can set the Watch slightly ahead or behind current
time. For example, if you typically arrive ten minutes
late, set the Watch ten minutes ahead. The Watch
remains ahead of time even when you synchronize it with
the GPS-3D Sensor.
v Hour v Month
v Minute v Date (automatically sets the day of week
when you set the date)
v Year v Hour format (i.e., AM/PM versus 24-hours)
589-095006_W188_NA_EN_589-095006_W188_NA_EN 3/11/11 8:39 AM Page 22
Page 14

After initial use, the Watch will automatically correct any time
inaccuracy upon activation of the GPS-3D Sensor and every 15
minutes thereafter.
TO VIEW PERFORMANCE DATA IN TIME OF DAY MODE
When using Fitness Sensors with your Watch, scroll through
performance data by pressing and releasing DISPLAY.
Performance data viewing options for Time of Day Mode include:
❖
Heart Rate: Current heart rate (requires HR Sensor).
❖
Speed: Current velocity (requires GPS-3D Sensor).
❖
Pace: Current velocity, expressed in minutes per selected
distance unit, such as miles or kilometers (requires GPS-3D
Sensor).
❖
Distance: Distance traveled since the activation of the GPS-3D
Sensor (requires GPS-3D Sensor).
Performance data
Press to view
performance data
25
TO SWITCH TIME ZONES
The Watch can track two time zones (T1 and T2). Look at the
other zone by pressing START/SPLIT. Or, switch from T1 to T2
using these steps:
1. Press and hold START/SPLIT until HOLD FOR TIME 2
displays.
2. Continue to hold until the time switches and the Watch beeps.
3. Repeat steps 1 and 2 to switch back to T1. The message will
read HOLD FOR TIME 1.
You must independently set the time of day for each time zone.
TO SYNCHRONIZE TIME OF DAY WITH FITNESS SENSORS
When you first activate the GPS-3D Sensor in conjunction with
your Watch, you can expect one of the following scenarios:
❖
If you activate the GPS-3D Sensor before setting the time of
day, the Watch will synchronize both T1 and T2 with UTC. You
will need to adjust the hour for both time zones to your local
time.
❖
If you activate the GPS-3D Sensor after setting the time of day,
the Watch maintains the hour and date settings and
synchronizes minutes and seconds to UTC for each time zone.
24
589-095006_W188_NA_EN_589-095006_W188_NA_EN 3/11/11 8:39 AM Page 24
Page 15

Chronograph Mode
Chronograph Mode terminology
Chronograph: The chronograph records time segments for the
duration of your activity.
Lap: Lap time records the time for one segment of your activity.
Split: Split time records the total elapsed time since the beginning
of your current activity.
Taking a split: When you take a split, the chronograph will
complete timing one lap and begin timing a new one.
Chronograph Mode functions
Chronograph Mode operates as the main workout data center for
your Watch. It can record elapsed time for up to 100 hours. It can
also register information for up to 100 laps, including data for
speed, pace, and distance (using the GPS-3D Sensor); and average
heart rate (using the HR Sensor).
View performance
data
Swap upper and
middle lines
Stop or reset the
chronograph
INDIGLO®
night-light
Start timing or
take a split
To Vertical Mode
or hold for time
27
❖
Altitude: Current elevation above sea level (requires GPS -3D
Sensor).
NOTE: If the Watch does not detect either Fitness Sensor, the
day of the week shows on the bottom line of the display.
You can continue viewing the day of the week while using
the Fitness Sensors by hiding performance data (for data
hiding information, see “Watch settings” on page 67). If
you choose Day of Week, it will appear as though the
Watch does not receive any data.
Time of Day Mode example
Assume that you live in San Francisco and work with a client in
Singapore. Like all busy people, it is imperative you keep track
of time, so you set T1 to your local time. But it is also important
to have a quick reminder of your client's time, so you set T2 to
Singapore time. With both time zones available, you can quickly
check your client's time or even switch your monitor to display
T2 when you travel to Singapore.
26
589-095006_W188_NA_EN_589-095006_W188_NA_EN 3/11/11 8:39 AM Page 26
Page 16

TO OPERATE CHRONOGRAPH MODE HANDS-FREE
You can set Chronograph Mode to start when you begin moving
and to stop when you stop moving or to automatically take splits
based on either distance or elapsed time. See “Hands-free
settings” on page 66.
TO VIEW PERFORMANCE DATA IN CHRONOGRAPH MODE
When using Fitness Sensors with your Watch, scroll through
performance data by pressing and releasing DISPLAY.
Performance data viewing options for Chronograph Mode include:
❖
Heart Rate: Current heart rate (requires HR Sensor).
❖
Speed: Current velocity (requires GPS-3D Sensor).
❖
Average Speed: Average velocity for the period that
chronograph has been running (requires GPS-3D Sensor).
❖
Pace: Current velocity, expressed in minutes per selected
distance unit, such as miles or kilometers (requires GPS-3D
Sensor).
❖
Average Pace: Average per-minute speed for the period that
chronograph has been running (requires GPS-3D Sensor).
❖
Distance: Distance traveled since the chronograph was started
(requires GPS-3D Sensor).
❖
Altitude: Current height above sea level (requires GPS -3D
Sensor).
29
NOTE: Press MODE to switch the Watch display to any other
mode while the chronograph continues to run. The
stopwatch icon will appear to indicate the chronograph
is still functioning.
TO OPERATE CHRONOGRAPH MODE MANUALLY
1. Press MODE until Chronograph Mode appears.
2. Press START/SPLIT to begin timing.
3. Press START/SPLIT again to take a split and automatically
begin timing a new lap.
The Watch stores lap and split information and displays
average statistics for the lap if you are using the Fitness
Sensors.
4. Press MODE to immediately display new lap information
OR
Wait for a few seconds and the Watch will automatically begin
to display data for a new lap.
5. Press STOP/RESET to stop timing when you reach the end
of your activity.
6. Press START/SPLIT to continue timing.
OR
Press and hold STOP/RESET to reset the chronograph
display to zero.
28
589-095006_W188_NA_EN_589-095006_W188_NA_EN 3/11/11 8:39 AM Page 28
Page 17
Vertical Mode
Vertical Mode terminology
Ascent rate: How quickly you climb or descend.
Vertical speed: Another term for ascent rate.
Vertical Mode functions
Vertical Mode operates as a viewing mode in conjunction with the
GPS-3D Sensor with a focus on displaying altitudinal data. In
particular, Vertical Mode tailors the Watch to view data related to
vertical activities (for example, climbing or skiing).
NOTE: If you do not use the GPS-3D Sensor, Vertical Mode
operates identically to Chronograph Mode, displaying only
time and lap information.
View performance
data
Swap upper and
middle lines
Stop or reset the
chronograph
INDIGLO®
night-light
Start lap or take a
split
To Finish Mode
or hold for time
31
❖
Elevation: Difference between your current altitude and the
altitude when you started the chronograph (requires GPS -3D
Sensor).
Chronograph Mode example
Assume that you run regularly, and you want to gain information
about your current workout routine so that you can set fitness
goals for yourself. You use Chronograph Mode to record lap time
for each of the three stages of your workout. When you finish
your workout, use the lap information to determine distance and
pace, both per lap and as a total of all three laps. If you ran uphill
for part of your workout, you can also determine your elevation
to learn how far you climbed. With your current fitness level in
mind, you can then set realistic fitness goals for yourself and
monitor your progress on a regular basis.
30
589-095006_W188_NA_EN_589-095006_W188_NA_EN 3/11/11 8:39 AM Page 30
Page 18

❖
Distance: Distance traveled since the GPS-3D Sensor was
started (requires GPS-3D Sensor).
❖
Altitude: Current height above sea level (requires GPS -3D
Sensor).
❖
Elevation: Difference between your current altitude and the
altitude when you started the chronograph (requires GPS -3D
Sensor).
Vertical Mode example
You are heli-skiing in Banff on a run estimated at 2,700 vertical
feet (214 vertical meters). Curious about the accuracy of the
estimate as well as how long it will take you to make your run,
you start your GPS -3D Sensor, navigate to Vertical Mode and
press START as you take off down the mountain. At the end of
your run, you press STOP and then DISPLAY until you see
Ascent Rate and Elevation (expressed in a negative number since
you traveled downhill). Use this information to see how fast you
skiied and compare the Watch’s expressed elevation to your
guide’s estimate.
33
TO OPERATE VERTICAL MODE
1. Press MODE until Vertical Mode appears.
2. Press START/SPLIT to begin timing.
3. Press START/SPLIT again to take a split and automatically
begin timing a new lap.
4. Press STOP/RESET to stop timing when you reach the end
of your activity.
5. Press START/SPLIT to continue timing.
OR
Press and hold STOP/RESET again to reset the display to
zero.
TO VIEW PERFORMANCE DATA IN VERTICAL MODE
When using Fitness Sensors with your Watch, scroll through
performance data by pressing and releasing DISPLAY.
Performance data viewing options for Vertical Mode include:
❖
Heart Rate: Current heart rate (requires HR Sensor).
❖
Ascent Rate: Vertical speed (requires GPS-3D Sensor).
❖
Pace: Current velocity, expressed in minutes per selected
distance unit, such as miles or kilometers (requires GPS-3D
Sensor).
❖
Speed: Current velocity (requires GPS-3D Sensor).
32
589-095006_W188_NA_EN_589-095006_W188_NA_EN 3/11/11 8:39 AM Page 32
Page 19

35
Finish Mode
Finish Mode functions
Finish Mode allows you to predict how much time it will take you
to finish a specified distance based on current GPS-3D Sensor
data. To help you stay on pace for your predicted finish, you can
also set the Watch to alert you if you are moving either too quickly
or too slowly for your desired pace.
NOTE: If you do not use the GPS-3D Sensor, Finish Mode
operates identically to Chronograph Mode, displaying only
time and lap information.
You must reset the chronograph to zero prior to operating
Finish Mode or it will not operate properly.
View performance
data
Stop timing
INDIGLO®
night-light
Start timing or
take a split.
To Navigate Mode
or hold for time
34
TO SET FINISH MODE
For instructions on setting Watch functions, including Finish
Mode, refer to page 13, “To set Watch functions.”
For Finish Mode, you can set the following values:
❖
Pre-set or custom distance [(for custom set the distance (up to
999.99) and the unit (NM, KM, or MI)]
❖
Target time
❖
Alert option (an audible alert will cause the Watch to both beep
and flash the predicted finish time and a silent alert will only
flash the predicted finish time)
TO VIEW PERFORMANCE DATA IN FINISH MODE
When using Fitness Sensors with your Watch, scroll through
performance data by pressing and releasing DISPLAY.
Performance data viewing options for Finish Mode include:
❖
Finish Time: The predicted finish time based on your current
speed and distance. The finish time will flash if you move
slower or quicker than your predicted finish time. If you stop
moving, the Watch replaces the finish time with STOPPED.
(requires GPS-3D Sensor)
❖
Pace: Current velocity, expressed in minutes per selected
distance unit, such as miles or kilometers (requires GPS-3D
Sensor).
589-095006_W188_NA_EN_589-095006_W188_NA_EN 3/11/11 8:39 AM Page 34
Page 20

Navigate Mode
Navigate Mode terminology
Waypoints: A point between the beginning and ending point on a
route. Waypoints serve as landmarks during an activity that you
can use to help you find your way from your ending point back to
your beginning point.
Heading: The direction you are traveling in relation to North.
The Watch includes a numeric heading display in Navigate Mode.
NOTE: In Configure Mode, you can set your Watch to read True
North (the geographic North Pole where all longitude lines
meet) or Magnetic North (North in alignment with the
earth's magnetic field). See “Unit settings” on page 68
for more information.
Store current
position as a
waypoint
To Waypoints Mode
or hold for time
View performance
data
INDIGLO®
night-light
37
❖
Average Pace: Average per-minute speed for the period that
chronograph has been running (requires GPS-3D Sensor).
❖
Distance: Distance traveled since the chronograph was started
(requires GPS-3D Sensor).
❖
Speed: Current velocity (requires GPS-3D Sensor).
❖
Average Speed: Average velocity for the period that the
chronograph has been running (requires GPS-3D Sensor).
❖
Heart Rate: Current heart rate (requires HR Sensor).
Finish Mode example
You are training for a 100 KM bicycle race. Last year you rode in
the same race and finished in 4 hours, 15 minutes. This year your
goal is to finish in less than 4 hours. You read in a training
magazine that when training for a race, you should devote one
day a week to riding at a distance equal to your event working
toward your goal time. To help keep you on pace, you set Finish
Mode to 100 KM for a distance and 4 hours for a time. You set
the Watch to alert you audibly when you go slower than your
pace to help keep you on track as you ride.
36
589-095006_W188_NA_EN_589-095006_W188_NA_EN 3/11/11 8:39 AM Page 36
Page 21

39
Navigate Mode functions
Navigate Mode displays directional information and tracks your
speed, distance, and altitude during an activity. While you can set
up to 10 waypoints to mark specific locations during your activity,
this mode does not operate like a compass. You must be moving for
accurate heading information.
In addition, Navigate Mode does not operate in conjunction with
the chronograph. This mode displays and automatically updates
current positional information, but does not keep time.
NOTE: Navigate Mode will not operate without the use of the
GPS-3D Sensor. If the GPS-3D Sensor is not operational,
you will receive the message: NO GPS DATA.
TO OPERATE NAVIGATE MODE
1. Press MODE until Navigate Mode appears.
2. Begin moving. The Watch automatically updates the
information displayed on the Watch.
If you stop moving the altitude and heading values freeze.
TO STORE WAYPOINTS IN NAVIGATE MODE
For Navigate Mode, you can only store waypoints. For all other
waypoints options, you must use Waypoints Mode.
For instructions on storing waypoints, refer to “To store a
waypoint” on page 42.
38
TO VIEW PERFORMANCE DATA IN NAVIGATE MODE
When using Fitness Sensors with your Watch, scroll through
performance data by pressing and releasing DISPLAY.
All data in Navigate Mode requires the GPS-3D Sensor.
Performance data viewing options for Navigate Mode include:
❖
Longitude: East/West position expressed in degrees, minutes,
and seconds from the Greenwich Meridian.
❖
Latitude: North/South position expressed in degrees, minutes,
and seconds from the equator.
❖
Heading: The direction you are traveling.
❖
Speed: Current velocity.
❖
Distance: Distance traveled since the activation of the GPS -3D
Sensor.
❖
Altitude: Current height above sea level.
589-095006_W188_NA_EN_589-095006_W188_NA_EN 3/11/11 8:39 AM Page 38
Page 22

Heading: The direction you are traveling in relation to North. In
Waypoints Mode you can view a graphical heading when you
activate the Track Back function.
Bearing: Direction to a target. Bearing information only
appears when you operate the Track Back feature and is
indicated by a house graphic.
Track Back: The Track Back feature allows you to navigate to a
stored waypoint from your current position.
Waypoints Mode functions
Waypoints Mode displays positional information and allows you to
store up to 10 waypoints to mark specific navigational locations
during your activity. Your current location will always be marked
with CURRENT.
When you store waypoints, you can select a label from a list of presets included with the Watch. Pre-set labels include: WAYPNT #
(where # equals the waypoint number), JCT, HOME, START,
FINISH, CAMP, TRAILHD, PEAK, or VISTA.
Numeric
heading in
Navigate
Mode
Graphical
heading
using Track
Back in
Waypoints
Mode
41
Navigate Mode example
Waypoints Mode
Waypoints Mode terminology
Waypoint: A point between the beginning and ending point on a
route. Waypoints serve as location landmarks during an activity.
View a stored
waypoint
Change the label for a
stored waypoint
Erase a waypoint
INDIGLO®
night-light
Store a waypoint
To Lap Data or
hold for time
You recently began orienteering where you move between
waypoints in the fastest time. Your last race included eight
waypoints and you finished in 42 minutes. To help improve your
time, you set up a practice course. Using heading information
from Navigate Mode, you move between waypoints. At the end of
the course, you scroll to speed data to view how quickly you
completed the course.
40
589-095006_W188_NA_EN_589-095006_W188_NA_EN 3/11/11 8:39 AM Page 40
Page 23

If you attempt to set more than 10 waypoints, you will receive
the message MEMORY FULL.
NOTE: You can also store waypoints in Navigate Mode.
TO VIEW OR EDIT WAYPOINTS
1. Press
▲
(DISPLAY) to recall a stored waypoint.
2. Choose one of the following options to view or edit a waypoint:
❖
To view a waypoint, press ▲(DISPLAY) until you locate
the waypoint you wish to view.
You can also continue to press
▲
(DISPLAY) until you
navigate back to the current location.
❖
To change the label of a waypoint, press SET/FORMAT
until you locate the label you wish to use.
43
Waypoints Mode includes the Track Back feature that allows you
to navigate from your current position to a stored waypoint.
Waypoints Mode does not operate in conjunction with the
chronograph. This mode displays and automatically updates
current positional information, but does not keep time. In addition,
Waypoints Mode does not display any performance data.
NOTE: Waypoints Mode will not operate without the use of the
GPS-3D Sensor. If the GPS-3D Sensor is not operational,
you will receive the message NO GPS DATA.
TO OPERATE WAYPOINTS MODE
1. Press MODE until Waypoints Mode appears.
2. Begin moving. The Watch automatically updates displayed
positional information.
TO STORE A WAYPOINT
1. Press and hold START/SPLIT to store a waypoint.
2. Press
+ (DISPLAY) or - (STOP/RESET) to scroll
through the nine pre-set waypoint labels.
3. Press DONE (MODE) to store the waypoint.
4. Repeat steps 1 through 3 to store up to nine other waypoints.
A plus (
+ ) sign will appear above the START/SPLIT key if
the Watch has room for more waypoints.
42
View stored
waypoints
Change label for
stored waypoints
Erase stored
waypoints
589-095006_W188_NA_EN_589-095006_W188_NA_EN 3/11/11 8:39 AM Page 42
Page 24

The Watch will display the current heading and bearing and
the estimated distance from your current location to the
selected waypoint.
3. Begin moving. The Watch will display your current location
until your location aligns with your chosen waypoint.
The Watch calculates the distance between your current
position and the chosen waypoint as a straight line. Depending
on your heading and bearing, the distance may appear to
increase as you move towards your desired waypoint.
4. Press and hold STOP/RESET to deactivate the Track Back
feature once you reach your destination.
5. Repeat steps 1 through 4 to navigate to another stored
waypoint. This allows you to retrace your path through a
series of stored waypoints.
45
❖
To erase a waypoint, press and hold STOP/RESET .
If you erase a waypoint, it will not re-order the other
waypoints. For instance, if you have labeled your waypoints
WAYPNT 1, 2, and 3 and you erase WAYPNT 2 you will
then have waypoints labeled WAYPNT 1 and 3.
TO OPERATE THE TRACK BACK FEATURE
You can activate the Track Back feature when you are ready to
navigate from a current position to one of your stored waypoints.
When activated, the Track Back feature takes over Waypoints
Mode. You cannot perform any other functions until you
deactivate Track Back.
1. Press
▲
(DISPLAY) to select the desired waypoint.
2. Press and hold START/SPLIT. You will see the message
HOLD TO BEGIN TRACK.
Recall a stored
waypoint
Deactivate Track
Back
Activate
Track
Back
44
589-095006_W188_NA_EN_589-095006_W188_NA_EN 3/11/11 8:39 AM Page 44
Page 25

Lap Data Mode functions
Lap Data Mode allows you to review stored lap information at any
time. To record lap data, you must run the chronograph.
Once you restart the chronograph from zero for your next activity,
lap data from the previous activity is erased.
NOTE: To view summary information for your entire activity,
refer to “Summary Mode” on page 49.
TO OPERATE LAP DATA
1. Press MODE until the Lap Data Mode appears.
2. Press
▲ (DISPLAY) or ▼ (STOP/RESET) to navigate
through lap data.
Each recalled lap will display three lines of data. The lower
line will show the lap number labeled RCL (for recall) for each
lap you stored in the chronograph.
TO VIEW PERFORMANCE DATA IN LAP DATA MODE
With the exception of lap and split times, Lap Data Mode relies on
the Fitness Sensors.
If you only use one Sensor, information for the other Sensor will
appear blank if you have set the Watch to hide blank data.
For information on data hiding, refer to “Watch settings” on
page 67.
47
Waypoints Mode example
Lap Data Mode
▲
data value
▼
data value
INDIGLO®
night-light
To Summary
Mode or
hold
for time
As a member of a local backpacking club, you volunteer to
conduct trail clean-up before the opening of each camping
season. Your map indicates various landmarks along the trail,
but the trail itself has become overgrown. You move along the
trail, clearing the underbrush to reveal the trail and at each
landmark you set a waypoint on your Watch. When you reach
the end of your designated clean-up route, you activate the
Track Back feature to return to each landmark on your route
and ensure you have properly cleared the trail.
46
589-095006_W188_NA_EN_589-095006_W188_NA_EN 3/11/11 8:39 AM Page 46
Page 26

Summary Mode
Summary Mode terminology
Odometer: The Odometer tracks distance across activities until
you reset it to zero.
Zone: A predetermined heart rate range for your activity.
Recovery: A measure of your fitness and fatigue based on the
difference of your heart rate over a short period of time after
strenuous exercise. For further information, refer to Heart
Zones® Tools for Success.
Summary Mode functions
Summary Mode allows you to review overall information recorded
by the chronograph for your most recent activity. Data does not
update while displayed.
▲
data value
▼
data value
INDIGLO®
night light
Hold to reset the
odometer, max
speed, or best pace
To Timer Mode
or hold for time
49
Performance data viewing options for Lap Data Mode include:
❖
Lap and Split Time: Lap Time includes data for each
segment of your activity, and Split Time shows data for the
overall activity.
❖
Lap Average Speed and Pace: Average Speed informs you of
your average speed for the lap, and Average Pace displays your
average speed in terms of minutes per unit distance.
❖
Lap Average Heart Rate and Lap Distance: Average heart
rate displays the average heart rate for the lap, and Lap
Distance indicates how far you traveled for the lap.
❖
Altitude and Elevation: Altitude displays the height above
sea level at the end of your lap, and Elevation is the change in
altitude for the lap.
Lap Data Mode example
You love to ride your bike, but you just finished a long ride and
you are exhausted! In your exhaustion, you forget to look at the
lap data for your ride and you reset the chronograph to zero. You
think you have lost your data, but then you remember. You can
still view lap data for your ride, as long as you do not restart the
chronograph first.
48
589-095006_W188_NA_EN_589-095006_W188_NA_EN 3/11/11 8:39 AM Page 48
Page 27

Speed
❖
Average Speed: Your average speed calculated by dividing
distance by time.
❖
Maximum Speed: Your quickest speed.
❖
Average Pace: Your average speed calculated as minutes per
distance unit traveled.
❖
Best Pace: Your fastest time traveled per minute.
Distance
❖
Event Distance: Your accumulated distance traveled during
the activity while the chronograph was running.
❖
Odometer: Your accumulated distance traveled since you last
manually reset the odometer. Since the odometer does not
operate in conjunction with the chronograph, you can use this
feature to track accumulated distance over several workouts.
Vertical
❖
Total Ascent: Total ascent accumulates all positive altitude
changes throughout your activity. If you run up and down a 200
foot hill 10 times, your total ascent is 2000 feet (200 feet times
10 trips).
❖
Total Descent: Total descent accumulates all negative altitude
changes throughout your activity. If you run up and down a 200
foot hill 10 times, your total descent is 2000 feet (200 feet
times 10 trips).
51
Starting the chronograph from zero for your next activity erases
summary data from the previous activity, except the odometer
information, which you must clear manually.
NOTE: To view information for each individual segment of your
activity, refer to “Lap Data Mode” on page 46.
TO OPERATE SUMMARY MODE
1. Press MODE until Summary Mode appears.
2. Press
▲ (DISPLAY) or ▼ (STOP/RESET) to navigate
through summary data.
TO RESET FEATURES IN SUMMARY MODE
While viewing either the Odometer, Max Speed, or Best Pace
values, press and hold START/SPLIT to reset the value to zero.
TO VIEW PERFORMANCE DATA IN SUMMARY MODE
With the exception of lap and split times, Summary Mode relies
on the Fitness Sensors.
If you only use one Sensor, information for the other Sensor will
appear blank if you have set the Watch to hide blank data. For
information on data hiding, refer to “Watch settings” on page 67.
Performance data viewing options for Summary Mode include
data for the following six data groups:
50
589-095006_W188_NA_EN_589-095006_W188_NA_EN 3/11/11 8:39 AM Page 50
Page 28

Time
❖
Event Time: The total time for your activity while the
chronograph was running. Event time is equivalent to split
time in the chronograph modes.
GPS
❖
GPS Battery Level: The current voltage level for the GPS-3D
Sensor displayed in bar graph format. You must be wearing the
GPS-3D Sensor to view this information. When the graph
displays only one segment (you will also see the battery icon on
the Watch display), you should change the battery.
Summary Mode example
You are six weeks away from running a half-marathon. This halfmarathon includes a pretty grueling uphill portion that rises
from 2,500 to 4,500 feet above sea level and then returns to 3,000
feet above sea level. To help you train for this event, you have set
two goals for the next month: to run 100 miles and to schedule
one run per week in which you climb at least 1,500 feet. With
Summary Mode, you can use the odometer to track your total
distance for the month and you can use the vertical information
to track both the total ascent and the time above 2,500 feet for
your weekly uphill run.
53
❖
At/Above XXXX: Your time at or above a specific elevation
during your activity (see “Altitude settings” on page 65 for
information on setting up this feature).
Heart Rate
❖
Average Heart Rate: Your average heart rate calculated over
the period the chronograph was running.
❖
Maximum Heart Rate: The highest recorded heart rate
during your activity.
❖
Minimum Heart Rate: The lowest recorded heart rate during
your activity.
❖
Time in Zones: Taking into account your total workout time,
the Watch displays how much time you spent in each of the two
heart rate zones during your activity (refer to “HRM settings”
on page 62 for information on setting up this feature).
❖
Average Heart Rate in Zones: The average heart rate in
each of the two heart rate zones.
❖
Recovery: Your heart rate change over a selected period of
time recorded at the end of your activity (refer to “HRM
settings” on page 62 for information on setting up this feature).
If you are wearing the HR Sensor, you can initiate a recovery
calculation while in Summary Mode by pressing and holding
START/SPLIT.
52
589-095006_W188_NA_EN_589-095006_W188_NA_EN 3/11/11 8:39 AM Page 52
Page 29

You can press MODE from Timer Mode to switch the display to
another mode without disrupting the operation of the timer.
The timer icon will appear indicating timer operation.
NOTE: The Timer includes settings for two intervals. However, if
you set either interval to zero, it will operate using only
one interval.
TO SET TIMER MODE
For instructions on setting Watch functions, including Timer
Mode, refer to page 13, “To set Watch functions.”
For Timer Mode, you can set the following values:
❖
Time (hours, minutes, seconds for up to 99 hours, 59 minutes,
and 59 seconds).
❖
End action (STOP, REPEAT, or CHRONO, VERTI, or FINISH).
TO OPERATE THE TIMER IN TIMER MODE
1. Press START/SPLIT to start the Timer countdown.
Pause the countdown by pressing STOP/RESET, resume the
countdown by pressing START/SPLIT again, or reset the
timer, by pressing and holding STOP/RESET.
2. When the timer reaches zero for each interval, a brief alert
sounds.
55
Timer Mode
Timer Mode terminology
Interval Training: You can use interval training to help you vary
the intensity level within one workout for specific periods of time,
which will ultimately help you work out longer and harder. Timer
Mode includes timing for two intervals, I1 and I2, to support your
interval training.
Timer Mode functions
Timer Mode allows you to set a fixed time from which the Watch
counts down to zero (for example, 10, 9, 8, …) for up to two timed
intervals (I1 and I2). You can set the timer to stop, repeat or
switch to Chronograph, Vertical, or Finish Mode after the
countdown.
View performance
data
Set timer
Stop or reset the
timer
INDIGLO®
night-light
Start the
timer
To Alarm Mode
or hold for time
54
589-095006_W188_NA_EN_589-095006_W188_NA_EN 3/11/11 8:39 AM Page 54
Page 30

TO VIEW PERFORMANCE DATA IN TIMER MODE
When using Fitness Sensors with your Watch, scroll through
performance data by pressing and releasing DISPLAY.
Performance data viewing options for Timer Mode include:
❖
Heart Rate: Current heart rate (requires HR Sensor).
❖
Speed: Current velocity (requires GPS-3D Sensor).
❖
Pace: Current velocity, expressed in minutes per selected
distance unit, such as miles or kilometers (requires GPS-3D
Sensor).
❖
Distance: Distance traveled while the timer is running
(requires GPS-3D Sensor).
❖
Altitude: Current height above sea level (requires GPS-3D
Sensor).
Timer Mode example
As part of an overall health program, you have set a goal to run
30 minutes, four days per week. You begin by walking for 25
minutes and running for 5 minutes. You set I1 in Timer Mode for
25 minutes, and I2 for five minutes and then set out for your
walk. When you hear the beep 25 minutes into your walk, you
know it is time to begin your five minute run. Over time, you
build your running intervals until you are able to run for the
entire 30 minutes.
57
3. The timer will stop after the alert if set to STOP.
OR
The timer will begin another countdown if set to REPEAT and
continue until you press STOP/RESET.
The lower line of the display will show RPT and a number (for
example, RPT 2). RPT indicates the timer is repeating and the
number indicates how many times the timer has cycled
through the repeat countdown. You will also see the
repeat icon, indicating the timer is set to repeat.
OR
The timer will switch to Chronograph, Finish, or Vertical
Mode if set to one of these modes. You will
see the switch mode icon, indicating the timer
will switch modes at the end of the
countdown.
NOTE: The timer will only switch to the Chronograph, Finish, or
Vertical Mode if you reset the chronograph to zero and
Sync Timer & Chrono is turned off (see “hands-free
settings” on page 66).
When you set the timer to switch modes at the end of the
countdown, the information recorded while in Timer
Mode will not carry over to the next mode and will not
show up in Summary Mode.
56
589-095006_W188_NA_EN_589-095006_W188_NA_EN 3/11/11 8:39 AM Page 56
Page 31

TO SET AN ALARM IN ALARM MODE
For instructions on setting Watch functions, including Alarm
Mode, refer to page 13, “To set Watch functions.”
For Alarm Mode, you can set the following values:
❖
Alarm number (ALM 1 through ALM 5).
❖
Alarm status (OFF or ON).
You can also press START/SPLIT to switch the alarm status.
❖
Alarm type (WEEKDAYS, WEEKENDS, ONCE, or DAILY).
A DAILY alarm will ring every day at the selected time, a
WEEKDAYS alarm will ring Monday through Friday at the
selected time, a WEEKENDS alarm will ring Saturday and
Sunday at the selected time, and a ONCE alarm will only ring
one time at the selected time and then automatically turn off.
❖
Alarm time (hours, minutes and AM/PM if the time is set to 12hour format).
NOTE: If you change any alarm settings, you automatically arm
the alarm.
59
Alarm Mode
Alarm Mode functions
You can use your Watch as an alarm clock for up to five separate
alarms. When you set an alarm, the alarm clock icon appears in
Time of Day Mode. The alarm can alert you at the same time every
day, or only weekdays, weekends, or even only one time (useful for
appointment reminders).
When the Watch reaches a scheduled alarm, the alarm tone sounds
and the INDIGLO night light flashes for a period of 20 seconds.
You can silence the alarm during this period by pressing any
button on the Watch, or, if you do not silence the alarm before the
alert finishes, a backup alarm will sound after five minutes.
▲
alarm
Set alarm
▼
alarm
INDIGLO®
night-light
Turn alarm
ON or OFF
To Configure
Mode or hold for
time
58
589-095006_W188_NA_EN_589-095006_W188_NA_EN 3/11/11 8:39 AM Page 58
Page 32

❖
S+D SETTINGS: Speed and distance settings affect the
Watch's response to data received from the GPS-3D Sensor.
❖
ALTITUDE SETTINGS: Altitude settings configure target
altitude and set smoothing and ascent rate calculations.
❖
HANDS-FREE SETTINGS: Hands-free settings provide
options to configure the Watch to operate automatically in
conjunction with the GPS-3D Sensor.
❖
WATCH SETTINGS: Watch settings provide options for
customizing the general operation of the Watch, including hiding
data or modes.
❖
UNIT SETTINGS: Unit settings allow you to determine
distance (for example miles versus kilometers) and heart rate
(beats versus percentage) display units.
TO SET FUNCTIONS IN CONFIGURE MODE
Unlike other setting functions in the Watch, the setting groups in
Configure Mode are arranged in a menu hierarchy.
1. Press MODE until Configure Mode appears.
2. Press
▲ (DISPLAY) or ▼ (STOP/RESET) to move to the
next or previous setting group.
3. Press SELECT (SET/FORMAT) to enter a setting group.
4. Press
▲ (DISPLAY) or ▼ (STOP/RESET) to navigate
through the options within a setting group.
61
Configure Mode
Configure Mode terminology
Quick Set: By pressing START/SPLIT when the + sign appears,
you may easily change the most common setting for the setting
group without initiating the entire setting procedure.
NOTE: In the Configure Mode section, terminology will also
appear in the section for the setting group to which it
applies.
Configure Mode setting groups
Use Configure Mode to set options that enhance the performance
of other Watch modes. Configure Mode settings include six setting
groups:
❖
HRM SETTINGS: Heart rate settings allow you to set target
zones for your heart rate.
▲
option
Select an item
▼
option
INDIGLO®
night-light
Press to activate
a Quick Set
Press when done
viewing options
60
589-095006_W188_NA_EN_589-095006_W188_NA_EN 3/11/11 8:39 AM Page 60
Page 33

Configure the following heart rate settings:
❖
TZ1 and TZ2: For each of the two target zones, you may select
from one of five preset heart rate zones based on a percentage
of your maximum heart rate. You may also customize each limit
to your own selected upper and lower limits. Since both TZI
and TZ2 operate at the same time, you will track more useful
data if you do not set the zone limits to overlap with each other.
For information on the importance of tracking heart rate
information, refer to Heart Zones® Tools for Success.
❖
Audible Alert: You can set the alert to warn you with a beep
when you go above, below, or either above or below your heart
rate zone, or not to alert you at all.
❖
Recovery: You can set the recovery time to one minute, two
minutes, or off. This helps you determine how quickly your
heart rate returns to a lower heart rate value at the end of your
activity. The quicker you return, the better your fitness level.
❖
Max Heart Rate: Enter your Maximum Heart Rate. This
value is used to calculate five preset heart rate zones and serve
as a reference for your heart rate expressed as a percentage of
maximum.
NOTE: Prior to configuring your heart rate settings, refer to
Heart Zones® Tools for Success for information on
how to determine your maximum heart rate.
63
5. Press SELECT (SET/FORMAT) to select an option within a
setting group. This may allow you to change a setting or take
you to another level.
6. Press
+ (DISPLAY) or - (STOP/RESET) to set the option
within a setting group.
7. Press DONE (MODE) when you have finished setting an
option within a setting group.
8. Press DONE (MODE) again to return to the setting group
level.
Configure Mode options
HRM SETTINGS
Selected zone
Upper target
zone limit
Lower target
zone limit
Alert type
62
589-095006_W188_NA_EN_589-095006_W188_NA_EN 3/11/11 8:39 AM Page 62
Page 34

❖
Speed Smoothing: Turn speed smoothing off or on.
❖
Pace Smoothing: Turn pace smoothing off or on.
ALTITUDE SETTINGS
Smoothing: Smoothing is useful if you feel that the displayed
altitude values appear to be too erratic. Smoothing applies an
averaging filter and may cause the displayed altitude values to
respond more slowly to changes.
Configure the following altitude settings:
❖
Target Altitude: Set the target altitude to alert you when you
move above a specified altitude. When you reach the target
altitude, the Watch beeps and begins timing. If you move below
the target altitude, the Watch suspends timing until you once
again move above the target altitude.
❖
Max Altitude: Set the max altitude to alert you if you move
above an altitude value you do not wish to exceed. If you exceed
your altitude, the Watch will beep until you move below the
maximum altitude.
❖
Smoothing: Turn altitude smoothing off or on.
❖
Update Ascent Rate: Set the Watch to update the period at
which the ascent rate is calculated. You can choose intervals of
30 seconds, or one, 10, 30, or 60 minutes. Set this feature
shorter for faster vertical activities such as skiing or longer for
slower vertical activities such as climbing.
65
GPS-3D SENSOR SETTINGS
Smoothing: Smoothing is useful if you feel that the displayed
speed or pace values appear to be too erratic. Smoothing applies
an averaging filter and may cause the displayed speed or pace
values to respond more slowly to changes.
Configure the following speed and distance settings:
❖
Zone Type: Set the Watch to track your speed or your pace and to
alert you if you move too slowly or too quickly (alert types include
an audible alert that beeps or a silent alert that flashes).
NOTE: You can set speed and pace limits independently. For
instance, set pace limits to control pace for your run and
set speed limits to values useful for cycling. Then simply
switch between the settings for each activity.
❖
Distance Alert: Set the Watch to alert you for distance
intervals. For example, you can set the Watch to alert you for
every mile you travel. The distance alert will only function
when the chronograph is running.
Fastest speed
Slowest speed
Slowest pace
Fastest pace
Alert
Type
64
589-095006_W188_NA_EN_589-095006_W188_NA_EN 3/11/11 8:39 AM Page 64
Page 35

❖
Sync Timer & Chrono: This feature allows you to set the
timer and the chronograph to start and stop simultaneously so
you can record chronograph data when you use the timer.
You must turn the Sync Timer & Chrono setting off if you want
the timer to switch to the Chronograph, Finish, or Vertical
Mode at the end of a countdown in Timer Mode.
WATCH SETTINGS
Configure the following Watch settings:
❖
Night Mode® feature: When enabled, the INDIGLO® nightlight turns on when you press any button. This feature disables
itself after eight hours.
❖
Hourly Chime: When enabled, the Watch will chime at the top
of every hour.
❖
Button Beep: When enabled, the Watch will emit a beep when
you press any button.
❖
Mode Hiding: You can choose to show, hide, or disable the
following modes: Vertical, Finish, Lap Data, Summary, Timer,
Navigate, Waypoints, or Alarm. For example, if you hide
Navigate Mode, you will not see any information from this
mode unless you are using the GPS-3D Sensor. If you disable
Navigate Mode it will not show up at all until you enable it
again from Configure Mode.
67
HANDS-FREE SETTINGS
Hands-free features operate in conjunction with the GPS -3D
Sensor. They automate chronograph features, freeing you to focus
on your workout instead of operating your Watch.
Configure the following hands-free settings:
❖
Auto Split: This feature enables the chronograph to
automatically take splits based on intervals (when you set
intervals in Timer Mode), or by a distance, altitude, or a time
you determine. For instance, you can configure the Watch to
take a split every mile and then you can compare data for each
mile in Lap Data Mode after you complete your activity.
❖
Auto Start: This feature enables the chronograph to start
when you start moving. It may take a few seconds for the GPS3D Sensor to detect your movement, causing a slight delay in
start time.
❖
Auto Stop: This feature enables the chronograph to stop when
you stop moving. It may take a few seconds for the GPS-3D
Sensor to detect that you have stopped moving, causing a slight
delay in stop time.
NOTE: Even when enabled, you can still start and stop the
chronograph manually and take manual splits without
affecting the hands-free operation.
66
589-095006_W188_NA_EN_589-095006_W188_NA_EN 3/11/11 8:39 AM Page 66
Page 36

❖
Speed: Set the Watch to display speed in terms of miles per
hour (MPH), kilometers per hour (KPH), nautical miles (NM),
or auto.
❖
Pace: Set the Watch to display pace in terms of miles,
kilometers, nautical miles, or auto.
❖
Altitude: Set the Watch to display altitude in terms of feet,
meters, or auto.
❖
North Reference: Set the North reference to True North or
Magnetic North.
❖
Heart Rate: Set the Watch to display your heart rate at beats
per minute (BPM) or as a percentage of your maximum heart
rate (%MAX). The selected heart rate units will appear in all
heart rate data of the Watch, including target heart rate zones.
NOTE: If you change units during a workout, the speed, pace, and
distance data will be correct for the newly selected units.
C A R E & M A I N T E N A N C E
Changing the battery
WARNING: CHANGING THE BATTERY YOURSELF MAY
RESULT IN DAMAGE TO THE WATCH. TIMEX
STRONGLY RECOMMENDS YOU HAVE A WATCH
RETAILER OR JEWELER REPLACE THE BATTERY.
69
❖
Data Hiding: You can choose to show or hide blank data from
each of the fitness sensors. For instance, if you use only the HR
Sensor for your workout and you choose to hide blank GPS-3D
Sensor data, you will not see any information related to speed
since speed data relies on the use of the GPS-3D Sensor.
UNIT SETTINGS
Auto Units (when to use): In the Unit settings you can set
speed, pace, altitude, and North reference to auto. Each unit
setting set to auto will follow the unit setting for distance.
Auto Units (when not to use): Do not use auto when you want
different units for speed, pace, or altitude.
Configure the following unit settings:
❖
Distance: Set the Watch to display distance in terms of miles,
kilometers, or nautical miles.
For example, a runner typically choses kilometers for her unit
settings. However, when running a marathon, she changes her
distance unit to miles (a marathon is always 26.2 miles), but she
chooses the kilometers unit setting for pace. During the
marathon, the runner can view her distance in miles to match
the course markers of the race, but she can view her pace in the
more familiar kilometers for a greater understanding of how
quickly she is running.
68
589-095006_W188_NA_EN_589-095006_W188_NA_EN 3/11/11 8:39 AM Page 68
Page 37

7. Replace the caseback, making sure the black gasket sits firmly in
the case groove and the caseback properly aligns with the Watch
to ensure the buzzer will line up with the internal connections
(see note after Step 2).
8. Carefully reattach the straps so that the shorter piece with the
buckle attaches to the upper set of lugs.
INDIGLO®night-light
Electroluminescent technology used in the INDIGLO night-light
illuminates the entire Watch face at night and in low light
conditions.
Water resistance
Your Watch withstands water pressure up to 86 psi (equals
immersion to 164 feet or 50 meters below sea level). This 50-meter
resistance remains intact so long as you keep the lens, push
buttons, and case intact.
WARNING: TO MAINTAIN WATER RESISTANCE, DO NOT
PRESS ANY BUTTONS WHILE UNDER WATER.
While your Watch will resist water, you should not use this Watch
for diving, as it is not a diver’s Watch and you should rinse your
Watch with fresh water after exposure to salt water.
NOTE: THIS WATCH WILL NOT DISPLAY S+D OR HEART
RATE DATA WHEN OPERATED UNDER WATER.
71
If you choose to replace the battery yourself, carefully follow the
steps below:
1. Place the Watch face-down on a flat work surface.
2. Separate both halves of the Watch band using a small flat
screwdriver.
NOTE: You must install the back of the Watch (caseback) in the
same direction you removed it or the buzzer element will not
function after reassembly.
3. Using a 00 Phillips-head screwdriver, remove the four screws
that secure the caseback and set them aside. Carefully remove
the caseback and set it aside.
WARNING: ALWAYS KEEP THE WATCH FACE DOWN ON YOUR
WORK SURFACE. IF YOU TURN THE WATCH OVER
TO REMOVE THE SCREWS OR CASEBACK YOU
MAY LOSE THE SMALL ELECTRICAL
CONNECTORS INSIDE THE WATCH.
4. Carefully open the battery clamp and remove the battery.
5. Place a new CR2430 cell in the battery compartment, making
sure the side with the “+” marking faces you.
6. Reattach the battery clamp.
70
589-095006_W188_NA_EN_589-095006_W188_NA_EN 3/11/11 8:39 AM Page 70
Page 38

THIS WARRANTY AND THE REMEDIES CONTAINED HEREIN
ARE EXCLUSIVE AND IN LIEU OF ALL OTHER WARRANTIES,
EXPRESS OR IMPLIED, INCLUDING ANY IMPLIED
WARRANTY OF MERCHANTA BIL ITY OR FITNESS FOR
PARTICULAR PURPOSE. TIMEX IS NOT LIABLE FOR ANY
SPECIAL, INCIDENTAL OR CONSEQUENTIAL DAMAGES.
Some countries and states do not allow limitations on implied
warranties and do not allow exclusions or limitations on damages,
so these limitations may not apply to you. This warranty gives you
specific legal rights and you may also have other rights which vary
from country to country and state to state.
To obtain warranty service, please return your Watch to the
manufacturer, one of its affiliates or the retailer where the product
was purchased, together with a completed original Product Repair
Coupon or, in the U.S. and Canada only, the completed original
Product Repair Coupon or a written statement identifying your
name, address, telephone number and date and place of purchase.
Please include the following with your Watch to cover postage and
handling (this is not a repair charge): a US$ 7.00 check or money
order in the U.S.; a CAN$6.00 cheque or money order in Canada;
and a UK£ 2.50 cheque or money order in the U.K. In other
countries, you will be charged for postage and handling.
73
L E G A L I N F O R M A T I O N
International warranty (U.S. limited warranty)
Your Watch is warranted against manufacturing defects by Timex
Corporation for a period of ONE YEAR from the original purchase
date. Timex and its worldwide affiliates will honor this
International Warranty.
Please note that Timex may, at its option, repair your Watch by
installing new or thoroughly reconditioned and inspected
components or replace it with an identical or similar model.
WARNING: THIS WARRANTY DOES NOT COVER DEFECTS OR
DAMAGES TO YOUR PRODUCT BASED ON THESE
CONDITIONS:
1) after the warranty period expires;
2) if the product was not originally purchased from an
authorized retailer;
3) from repair services not performed by the
manufacturer;
4) from accidents, tampering or abuse; and
5) Case, attachments or battery. You may be charged
for replacing any of these parts.
72
589-095006_W188_NA_EN_589-095006_W188_NA_EN 3/11/11 8:39 AM Page 72
Page 39

Service
If your Watch should ever need service, send it to Timex as outlined
in the Timex International Warranty or send it to: Street address:
For your convenience in obtaining factory service, participating
Timex retailers can provide you with a pre-addressed Watch Repair
Mailer. See the Timex International Warranty for specific
instructions on the care and service of your Watch.
For service questions, call 1-800-448-4639.
Should you need a replacement strap or band, call 1-800-448-4639.
FCC notice (United States)/IC notice (Canada)
Timex Corporation declares that the following products, which
include all components of the Timex Bodylink System, are
compliant to the relevant FCC Part 15 and Industry Canada rules
for Class B devices as follows:
HotLine Watch Service HotLine Watch Service
1302 Pike Avenue OR P.O. Box 2740
North Little Rock, AR 72203 Little Rock, AR 72203
75
WARNING: NEVER INCLUDE ANY ARTICLE OF PERSONAL
VALUE IN YOUR SHIPMENT.
U.S.: call 1-800-328-2677 for additional warranty information.
Canada: call 1-800-263-0981. Brazil: call 0800-168787. Mexico:
call 01-800-01-060-00. Central America, the Caribbean,
Bermuda and the Bahamas: call (501) 370-5775 (U.S.). Asia: call
852-2815-0091. The U.K.: call 44 020 8687 9620. Portugal: call 351
212 946 017. France: call 33 3 81 63 42 00. Germany: call +43 662
88 92130. The Middle East and Africa: call 971-4-310850. Other
Areas: contact your local Timex retailer or distributor for warranty
information.
THIS IS YOUR WATCH REPAIR COUPON. PLEASE KEEP IT IN A SAFE PLACE.
TIMEX INTERNATIONAL WARRANTY — WATCH REPAIR COUPON
Original Purchase Date:
(Attach copy of sales receipt, if available)
Purchased by:
(Name, address and telephone number)
Place of Purchase:
(Name and address)
Reason for Return:
74
589-095006_W188_NA_EN_589-095006_W188_NA_EN 3/11/11 8:39 AM Page 74
Page 40

Performance Watch
PRODUCT NAMES
❖
Watch Receivers HRM/Speed+Distance Series M8xx/M5xx
❖
Data Recorders HRM/Speed+Distance Series M5xx/M1xx
PRODUCT TYPE:
Unintentional Radiator
This equipment has been tested and found to comply with the
limits for a Class B digital device, pursuant to Part 15 of the FCC
rules. These limits are designed to provide reasonable protection
against harmful interference in a residential environment. This
equipment generates, uses, and can radiate radio frequency
energy and, if not used in accordance with the instruction
manual, may cause harmful interference to radio
communications. If this equipment does cause harmful
interference to radio or television reception, which can be
determined by turning the equipment off and on, the user is
encouraged to try to correct the interference by reorienting or
relocating the receiving antenna; or by increasing the separation
between the equipment and receiver.
WARNING: Any changes or modifications to the equipment listed
above, not expressly approved by Timex Corporation,
could void the user’s authority to operate this
equipment.
77
Fitness Sensors
PRODUCT NAMES
❖
Speed + Distance System GPS Transceiver Series
M8xx/M5xx/M1xx
❖
Heart Rate Monitor System HRM Transmitter Series
M8xx/M5xx
PRODUCT TYPES
Intentional Radiator
These devices comply with Part 15 of the FCC rules. Operation is
subject to the following two conditions: (1) The device may not
cause harmful interference, and (2) the device must accept any
interference received, including interference that may cause
undesired operations.
76
Model FCC ID No. Certification No.
M821 Heart Rate
Monitor
EP9TMXHRM 481021492A
M515 Heart Rate
Monitor
EP9TMXM515 3348A-M515
M850 Speed +
Distance Monitor
EP9TMXM850 3348A-12181
M185 Speed +
Distance Monitor
EP9TMXM185 348A-M185
589-095006_W188_NA_EN_589-095006_W188_NA_EN 3/11/11 8:39 AM Page 76
Page 41

❖
EMC: 89/336/EEC and amendments 92/31/EEC, 93/68/EEC,
and 98/13/EEC
Emissions: EN300-330-1, -2
Radiated Emission 9kHz to 30MHz H-Field
(magnetic)
Radiated Emission 30MHz to 1000MHz
E-Field (electric), Ref. EN55022
Immunity: EN300-683
Radiated Immunity 80MHz to 1000MHz, Ref.
EN61000-4-3
ESD Electrostatic discharge Ref. EN61000-4-2
❖
Supplemental Information: The above products comply with
the requirements of the Low-Voltage Directive 72/23/EEC and
the EMC Directive 89/336/EEC (including amendments
92/31/EEC, 93/68/EEC, and 98/13/EEC) and carry the 0983(!)
marking accordingly. Notifying Body – Underwriters
Laboratories Inc., CAB# - 0983; 1285 Walt Whitman Road,
Melville, NY 11747.
Timex Corporation declares that these low power radio
equipment devices are in compliance with the essential
requirements and other relevant provisions of R&TTE Directive
1999/5/EC.
7978
INDUSTRY CANADA NOTICE: This Class B digital apparatus
complies with Canadian ICES-003. Cet appariel numérique de la
classe B est conforme à la norme NMB-003 du Canada.
Declaration of conformity
Manufacturers Name: Timex Corporation
Manufacturers Address: 555 Christian Road
Middlebury, CT 06762
United States of America
declares that the following products, which include all components
of the Timex Bodylink System, are compliant to the relevant EU
Directives as follows:
TIMEX and NIGHT-MODE are registered trademarks of Timex
Corporation. BODYLINK is a registered trademark of Timex Group,
B.V. INDIGLO is a registerd trademark of Indiglo Corporation in
the U.S. and other countries.
Product Name
❖
Speed + Distance System GPS Transceiver Series
M8xx/M5xx/M1xx
❖
Heart Rate Monitor System HRM Transmitter Series
M8xx/M5xx
conforms to the following product specifications:
❖
LVD: 72/23/EEC Safety: IEC 60950
589-095006_W188_NA_EN_589-095006_W188_NA_EN 3/11/11 8:39 AM Page 78
Page 42

Product Name
❖
Watch Receivers HRM/Speed+Distance Series M8xx/M5xx
❖
Data Recorders HRM/Speed+Distance Series M5xx/M1xx
conforms to the following product specifications:
❖
Generic Emissions Standard EN 55022: 1998
❖
Generic Immunity Standard EN 55024: 1998
❖
Supplemental Information: The above products comply with
the requirements of Electromagnetic Compatibility (EMC)
Directive 89/336/EEC (including amendments 92/31/EEC,
93/68/EEC, and 98/13/EEC) and carry the marking
accordingly. Conformity Assessment Body (CAB) – Underwriters
Laboratories Inc., CAB# 0983; 1285 Walt Whitman Road,
Melville, NY 11747.
Timex Corporation declares that these low power electronic
devices are in compliance with the essential requirements and
other relevant provisions of the EMC Directive.
Agent:
Brian J. Hudson
Director, Test Engineering and Module Development
Date: 13 August 2004, Middlebury, Connecticut, U.S.A.
80
589-095006_W188_NA_EN_589-095006_W188_NA_EN 3/11/11 8:39 AM Page 80
Page 43

W-188 589-095007 EU
p e r f o r m a n c e w a t c h u s e r g u i d e
Performance Watch User Guide
English page 1
Deutsch Seite 81
Italiano pagina 169
Nederlands pagina 257
BODYLINK SYSTEM
®
©2005 Timex Corporation
589-095007_W188_EU_EN_T-0411-16_TMX_W188_EN.qxd 3/11/11 9:02 AM Page CVR2
Page 44

I NHOUDSOPGAVE
Inleiding . . . . . . . . . . . . . . . . . . . . . . . . . . . . . . . . . . . . . . . . . . . . . . 263
Welkom!. . . . . . . . . . . . . . . . . . . . . . . . . . . . . . . . . . . . . . . . . . . . . . 263
Indeling van de handleiding . . . . . . . . . . . . . . . . . . . . . . . . . . . . . 264
Hulpbronnen. . . . . . . . . . . . . . . . . . . . . . . . . . . . . . . . . . . . . . . . . . 265
Hulpbronnen in druk . . . . . . . . . . . . . . . . . . . . . . . . . . . . . . . . . . 265
Hulpbronnen op internet . . . . . . . . . . . . . . . . . . . . . . . . . . . . . . . 265
Overzicht van prestatiehorloge . . . . . . . . . . . . . . . . . . . . . . . . . . . . 266
Terminologie m.b.t. horloge. . . . . . . . . . . . . . . . . . . . . . . . . . . . . . 266
De chronograaf . . . . . . . . . . . . . . . . . . . . . . . . . . . . . . . . . . . . . . . . 267
Functies van horlogeknoppen . . . . . . . . . . . . . . . . . . . . . . . . . . . . 268
Knoppen op horlogekast. . . . . . . . . . . . . . . . . . . . . . . . . . . . . . . . 268
Instelknoppen . . . . . . . . . . . . . . . . . . . . . . . . . . . . . . . . . . . . . . . . 269
Horlogefuncties instellen . . . . . . . . . . . . . . . . . . . . . . . . . . . . . . 269
Beeldknoppen . . . . . . . . . . . . . . . . . . . . . . . . . . . . . . . . . . . . . . . . 270
Pictogrammen op horlogedisplay . . . . . . . . . . . . . . . . . . . . . . . . . 271
Het Bodylink®systeem starten . . . . . . . . . . . . . . . . . . . . . . . . . . . 272
Prestatiegegevens bekijken . . . . . . . . . . . . . . . . . . . . . . . . . . . . . . 273
Berichten op horloge . . . . . . . . . . . . . . . . . . . . . . . . . . . . . . . . . . . 275
Indeling van display . . . . . . . . . . . . . . . . . . . . . . . . . . . . . . . . . . . . 276
257
Page 45

De modus Verticaal gebruiken . . . . . . . . . . . . . . . . . . . . . . . . . . 288
Prestatiegegevens in de modus Verticaal bekijken. . . . . . . . . . 288
Voorbeeld van de modus Verticaal. . . . . . . . . . . . . . . . . . . . . . . . 289
De modus Finish. . . . . . . . . . . . . . . . . . . . . . . . . . . . . . . . . . . . . . . 290
Functies van de modus Finish . . . . . . . . . . . . . . . . . . . . . . . . . . . 290
De modus Finish instellen . . . . . . . . . . . . . . . . . . . . . . . . . . . . . 291
Prestatiegegevens in de modus Finish bekijken. . . . . . . . . . . . 291
Voorbeeld van de modus Finish . . . . . . . . . . . . . . . . . . . . . . . . . . 292
De modus Navigeren . . . . . . . . . . . . . . . . . . . . . . . . . . . . . . . . . . . 293
Terminologie m.b.t. de modus Navigeren. . . . . . . . . . . . . . . . . . 293
Functies van de modus Navigeren . . . . . . . . . . . . . . . . . . . . . . . 294
De modus Navigeren gebruiken . . . . . . . . . . . . . . . . . . . . . . . . 294
Waypoints in de modus Navigeren opslaan . . . . . . . . . . . . . . . 294
Prestatiegegevens in de modus Navigeren bekijken . . . . . . . . 295
Voorbeeld van de modus Navigeren . . . . . . . . . . . . . . . . . . . . . . 296
De modus Waypoints . . . . . . . . . . . . . . . . . . . . . . . . . . . . . . . . . . . 296
Terminologie m.b.t. de modus Waypoints. . . . . . . . . . . . . . . . . . 296
Functies van de modus Waypoints . . . . . . . . . . . . . . . . . . . . . . . 297
De modus Waypoints gebruiken . . . . . . . . . . . . . . . . . . . . . . . . 298
Een waypoint opslaan. . . . . . . . . . . . . . . . . . . . . . . . . . . . . . . . . 298
Waypoints bekijken of bewerken . . . . . . . . . . . . . . . . . . . . . . . . 299
259
Horlogemodi . . . . . . . . . . . . . . . . . . . . . . . . . . . . . . . . . . . . . . . . . . 276
Het horloge gebruiken . . . . . . . . . . . . . . . . . . . . . . . . . . . . . . . . . . 277
Modi van prestatiehorloge. . . . . . . . . . . . . . . . . . . . . . . . . . . . . . . . 278
De modus Tijd. . . . . . . . . . . . . . . . . . . . . . . . . . . . . . . . . . . . . . . . . 278
Terminologie m.b.t. de modus Tijd . . . . . . . . . . . . . . . . . . . . . . . 278
Functies van de modus Tijd. . . . . . . . . . . . . . . . . . . . . . . . . . . . . 278
Tijd instellen . . . . . . . . . . . . . . . . . . . . . . . . . . . . . . . . . . . . . . . . 279
Van tijdzone wisselen . . . . . . . . . . . . . . . . . . . . . . . . . . . . . . . . . 280
Tijd met fitnesssensoren synchroniseren . . . . . . . . . . . . . . . . . 280
Prestatiegegevens in de modus Tijd bekijken. . . . . . . . . . . . . . 281
Voorbeeld van de modus Tijd. . . . . . . . . . . . . . . . . . . . . . . . . . . . 282
De modus Chronograaf . . . . . . . . . . . . . . . . . . . . . . . . . . . . . . . . . 283
Terminologie m.b.t. de modus Chronograaf . . . . . . . . . . . . . . . . 283
Functies van de modus Chronograaf. . . . . . . . . . . . . . . . . . . . . . 283
De modus Chronograaf met de hand gebruiken. . . . . . . . . . . . 284
De modus Chronograaf zonder handen gebruiken. . . . . . . . . . 285
Prestatiegegevens in de modus Chronograaf bekijken . . . . . . 285
Voorbeeld van de modus Chronograaf. . . . . . . . . . . . . . . . . . . . . 286
De modus Verticaal. . . . . . . . . . . . . . . . . . . . . . . . . . . . . . . . . . . . . 287
Terminologie m.b.t. de modus Verticaal . . . . . . . . . . . . . . . . . . . 287
Functies van de modus Verticaal. . . . . . . . . . . . . . . . . . . . . . . . . 287
258
Page 46

Functies van de modus Alarm . . . . . . . . . . . . . . . . . . . . . . . . . . . 314
Een alarm in de modus Alarm instellen . . . . . . . . . . . . . . . . . . 315
De modus Configureren . . . . . . . . . . . . . . . . . . . . . . . . . . . . . . . . . 316
Terminologie m.b.t. de modus Configureren . . . . . . . . . . . . . . . 316
Instellingsgroepen van de modus Configureren . . . . . . . . . . . . . 317
Functies in de modus Configureren instellen. . . . . . . . . . . . . . 318
Opties van de modus Configureren . . . . . . . . . . . . . . . . . . . . . . . 319
HSM-instellingen . . . . . . . . . . . . . . . . . . . . . . . . . . . . . . . . . . . . 319
Instellingen van GPS-3D-sensor . . . . . . . . . . . . . . . . . . . . . . . . 320
Hoogte-instellingen. . . . . . . . . . . . . . . . . . . . . . . . . . . . . . . . . . . 322
Instellingen zonder handen . . . . . . . . . . . . . . . . . . . . . . . . . . . . 323
Horloge-instellingen . . . . . . . . . . . . . . . . . . . . . . . . . . . . . . . . . . 324
Eenheidsinstellingen . . . . . . . . . . . . . . . . . . . . . . . . . . . . . . . . . 325
Onderhoud . . . . . . . . . . . . . . . . . . . . . . . . . . . . . . . . . . . . . . . . . . . . 327
De batterij vervangen? . . . . . . . . . . . . . . . . . . . . . . . . . . . . . . . . . . 327
INDIGLO® nachtlicht . . . . . . . . . . . . . . . . . . . . . . . . . . . . . . . . . . 329
Waterbestendigheid . . . . . . . . . . . . . . . . . . . . . . . . . . . . . . . . . . . . 329
Wettelijke informatie . . . . . . . . . . . . . . . . . . . . . . . . . . . . . . . . . . . . 330
Internationale garantie (beperkte garantie voor de VS) . . . . . . . 330
Service . . . . . . . . . . . . . . . . . . . . . . . . . . . . . . . . . . . . . . . . . . . . . . . 333
FCC-kennisgeving
(Verenigde Staten)/IC-kennisgeving (Canada) . . . . . . . . . . . . . 333
261
De functie Terugkeren gebruiken . . . . . . . . . . . . . . . . . . . . . . . 300
Voorbeeld van de modus Waypoints . . . . . . . . . . . . . . . . . . . . . . 302
De modus Rondegegevens . . . . . . . . . . . . . . . . . . . . . . . . . . . . . . . 302
Functies van de modus Rondegegevens . . . . . . . . . . . . . . . . . . . 303
Rondegegevens gebruiken . . . . . . . . . . . . . . . . . . . . . . . . . . . . . 303
Prestatiegegevens in de modus Rondegegevens bekijken . . . . 303
Voorbeeld van de modus Rondegegevens . . . . . . . . . . . . . . . . . . 304
De modus Overzicht . . . . . . . . . . . . . . . . . . . . . . . . . . . . . . . . . . . . 305
Terminologie m.b.t. de modus Overzicht . . . . . . . . . . . . . . . . . . 305
Functies van de modus Overzicht . . . . . . . . . . . . . . . . . . . . . . . . 305
De modus Overzicht gebruiken . . . . . . . . . . . . . . . . . . . . . . . . . 306
Functies in de modus Overzicht terugstellen . . . . . . . . . . . . . . 306
Prestatiegegevens in de modus Overzicht bekijken . . . . . . . . . 306
Voorbeeld van de modus Overzicht . . . . . . . . . . . . . . . . . . . . . . . 309
De modus Timer . . . . . . . . . . . . . . . . . . . . . . . . . . . . . . . . . . . . . . . 310
Terminologie m.b.t. de modus Timer . . . . . . . . . . . . . . . . . . . . . 310
Functies van de modus Timer . . . . . . . . . . . . . . . . . . . . . . . . . . . 310
De modus Timer instellen . . . . . . . . . . . . . . . . . . . . . . . . . . . . . 311
De timer in de modus Timer gebruiken . . . . . . . . . . . . . . . . . . 311
Prestatiegegevens in de modus Timer bekijken . . . . . . . . . . . . 313
Voorbeeld van de modus Timer . . . . . . . . . . . . . . . . . . . . . . . . . . 313
De modus Alarm . . . . . . . . . . . . . . . . . . . . . . . . . . . . . . . . . . . . . . . 314
260
Page 47

I NLEIDING
Welkom!
Gefeliciteerd! Met de aankoop van het Timex® Bodylink® systeem
hebt u uw nieuwe persoonlijke trainer in dienst genomen. Als u uw
prestatiehorloge samen met de hartslagsensor en
snelheid/afstandsensor gebruikt, kunt u op ongekende wijze een
aantal belangrijke indicatoren van uw persoonlijke fitnessniveau
volgen, opslaan en analyseren.
In deze handleiding vindt u informatie over uw prestatiehorloge. Dit
sporthorloge werkt als het brein van uw Bodylink systeem. Het
levert uitgebreide, real-time trainingsgegevens die van de
hartslagsensor, snelheid/afstandsensor of beide worden verzameld.
U zult merken dat uw prestatiehorloge u zeer
gebruikersvriendelijke fitnesstechnologie biedt. Maar zoals bij elke
nieuwe technologie moet u de tijd nemen om ermee vertrouwd te
raken zodat u het meeste nut uit uw aankoop haalt.
Dus veel plezier met verkennen! Neem de modi van het
prestatiehorloge door. Gebruik de Snelstartgids voor basiskennis
van het Bodylink systeem. Geniet vooral van uw nieuwe
fitnesspartner, op weg naar betere prestaties!
263262
Page 48

265
Indeling van de handleiding
Deze handleiding bevat informatie over, en instructies voor, het
instellen van uw nieuwe prestatiehorloge en het gebruik ervan met
de Bodylink fitnesssensoren die deel uitmaken van het
gecoördineerde Bodylink systeem.
Als hulp bij het bestuderen van uw prestatiehorloge bevat deze
handleiding een aantal sleutelelementen voor een beter inzicht in
uw prestatiehorloge, waaronder:
v
Een overzicht van de knoppen, pictogrammen op het display en
modi van het prestatiehorloge.
v
Een woordenlijst voor elk gedeelte die vele referenties uitlegt die
voor het prestatiehorloge en de modi ervan worden gebruikt.
v
Volledige, uitgebreide instructies voor het instellen en gebruiken
van uw prestatiehorloge in elke modus.
v
Een beknopt overzicht voor de koppelingen tussen uw
prestatiehorloge en elk van de fitnesssensoren in elke modus.
v
Echte scenario’s die uitleggen hoe u uw prestatiehorloge als deel
van uw routineactiviteiten kunt gebruiken. U zult deze scenario’s
overal in de handleiding aantreffen; ze staan in grijze
tekstkaders.
264
Hulpbronnen
Hulpbronnen in druk
Naast deze handleiding omvat uw Bodylink systeem de volgende
waardevolle hulpbronnen:
v
Snelstartgids voor Bodylink® systeem
: Informatie om u te
helpen uw prestatiehorloge in te stellen en beginnen te
gebruiken samen met de fitnesssensoren, en een overzichtskaart
van de verschillende modi van het prestatiehorloge.
v
Gebruikersgids voor fitnesssensoren: Informatie voor de
instelling, bediening en het onderhoud van de
snelheid/afstandsensor en de hartslagsensor.
Hulpbronnen op internet
De Timex-websites bieden nuttige informatie om u te helpen het
Bodylink systeem optimaal te gebruiken. De sites zijn:
v www.timex.com/bodylink/: Informatie over functies van het
Bodylink systeem en productsimulaties.
v www.timex.com/software/: Huidige softwareversies voor
Timex-producten.
v
www.timex.com/fitness/: Tips over fitness en training voor
gebruik van het Bodylink systeem.
Page 49

GPS: De GPS-3D-sensor gebruikt informatie die via GPSsatellieten wordt verzameld om uw snelheid, afstand en stijging te
berekenen en uw voortgang te volgen.
Hartslagsensor: De hartslagsensor (HS-sensor) meet uw hartslag.
De Gebruikersgids voor fitnesssensoren geeft gedetailleerde
informatie voor het instellen en gebruiken van de HS-sensor.
De chronograaf
Terwijl u deze handleiding gebruikt om meer over uw horloge te
leren, kan het woord chronograaf mogelijk enige verwarring
veroorzaken. Onthoud het volgende: een chronograaf is een
instrument voor het meten van tijd. Er is een modus
Chronograaf maar de modi Verticaal en Finish werken ook vanuit
de chronograaf. Steeds wanneer uw horloge voor het opnemen van
de tijd wordt gebruikt, werkt het met de chronograaffunctie (of
tijdopnamefunctie).
267
O VERZICHT V AN PRESTA TIEHORLOGE
Terminologie m.b.t. horloge
De volgende termen verschijnen overal in deze handleiding. Als u
deze termen kent, zult u de verstrekte informatie beter begrijpen.
Bodylink
® systeem
: Met het Bodylink systeem kunt u real-time
gegevens volgen met behulp van fitnesssensoren en uw
prestatiehorloge.
Fitnesssensoren
: Het Bodylink systeem heeft twee digitale
sensoren: de hartslagsensor en de snelheid/afstandsensor.
Prestatiehorloge: In het prestatiehorloge (horloge) bevindt zich
het gegevenscentrum voor het Bodylink systeem.
Snelheid/afstandsensor De snelheid/afstandsensor (GPS-3D-
sensor) volgt de snelheid, het tempo, de afgelegde afstand, de
hoogte, de locatie en nog meer met behulp van op GPS gebaseerde
technologie. De Gebruikersgids voor fitnesssensoren geeft
gedetailleerde instructies voor het instellen en gebruiken van de
GPS-3D-sensor.
266
chronograaf
meet tijd
Modus
Chronograaf
Modus
Verticaal
Modus Finish
Page 50

Instelknoppen
De knoppen op het horloge stellen ook de functies van het horloge
in (bijvoorbeeld: de tijd of een streefhartslagzone instellen).
Wanneer de symbolen + en - op het display van het horloge
staan, hebt u het instelproces gestart.
HORLOGEFUNCTIES INSTELLEN
Stel de functies van het horloge aan de hand van de volgende
stappen in:
1. Houd SELECT (SET/FORMAT) ingedrukt. Het bericht
HOLD TO SET kan verschijnen.
2. Blijf SELECT (SET/FORMAT) ingedrukt houden totdat
SET even op het display verschijnt, gevolgd door een
knipperende waarde.
3. Stel de eerste waarde in door + (DISPLAY) of (STOP/RESET) in te drukken.
269
Functies van horlogeknoppen
De knoppen op uw horloge hebben meerdere functies en zijn voor
drie doeleinden bestemd. U hoeft de functie van de knoppen voor
elke modus niet te onthouden. Laat het horloge als gids dienen.
Knoppen op horlogekast
Meestal werken de knoppen op het horloge volgens de opschriften
die op de horlogekast zijn gedrukt. Als u geen symbolen op het
display ziet, houdt u zich aan de informatie die op de horlogekast
is gedrukt als leidraad bij het gebruik van de knoppen.
268
MODE
Indrukken om naar
volgende modus
te gaan
START/SPLIT
Indrukken om
tijdopname te starten of
tussentijd te nemen
INDIGLO
®
nachtlicht
Indrukken om horloge
te verlichten
DISPLAY
Indrukken om
prestatiegegevens weer
te geven
SET/FORMAT
Indrukken om displayindeling in te stellen of
te veranderen
STOP/RESET
Indrukken om te
stoppen of ingedrukt
houden om terug te
stellen
DONE
Indrukken wanneer
klaar met instellen
INDIGLO®
nachtlicht
Indrukken om
horloge te verlichten
+
Indrukken om weergegeven
waarde te verhogen
SELECT
Indrukken om instellen te
beginnen of naar volgende
waarde te gaan
-
Indrukken om weergegeven
waarde te verlagen
Page 51

271270
Pictogrammen op horlogedisplay
4. Wanneer u de gewenste waarde bereikt, drukt u op SELECT
(SET/FORMAT) om naar de volgende waarde te gaan.
5. Herhaal stap 3 en 4 voor elke waarde die u wilt instellen.
6. Wanneer u alle waarden hebt bijgesteld, drukt u op
DONE
(MODE) om naar het hoofddisplay van de modus terug te
keren.
Beeldknoppen
Ten slotte helpen knoppen u om door de beeldopties te navigeren.
Wanneer u de driehoekjes ▲ en ▼ op het display ziet, weet u dat
er te bekijken informatie is.
MODE
Indrukken om naar
volgende modus
te gaan
INDIGLO®
nachtlicht
Indrukken om
horloge te verlichten
▲
Indrukken om
volgende
gegevenswaarde
weer te geven
▼
Indrukken om vorige
gegevenswaarde
weer te geven
Pictogrammen
op
horlogedisplay
Timer loopt
Chronograaf loopt
Night Mode
geactiveerd
Batterij GPS-3Dsensor bijna leeg
Sensor(en) geactiveerd
(knippert bij storing)
Alarm ingeschakeld
Uursignaal
geactiveerd
Page 52

Het Bodylink®systeem starten
Wanneer u de prestatiemonitor gebruikt, kunt u real-time gegevens
van de hartslagsensor of de snelheid/afstandsensor, of beide,
bekijken in Tijd, Chrono en Timer. De procedure om dit te doen is
in alle modi hetzelfde, maar de gegevens die u kunt bekijken, en de
positie op het display zijn in elke modus verschillend.
1. Zorg dat u de hartslagsensor of snelheid/afstandsensor, of beide,
draagt en dat ze aan staan en werken.
2. Ga minstens 2 meter (6 ft) van andere gebruikers van
fitnessmonitorsystemen, en van enige bron van radiostoring zoals
elektrische apparatuur, elektriciteitsleidingen enz. staan.
3. Druk even op de knop DISPLAY. Het horloge zoekt nu naar
Bodylink® sensoren in de buurt; het zoekt één minuut. Het
antennepictogram verschijnt op het horlogedisplay en geeft aan
dat het Bodylink® systeem in werking is.
272
OPMERKING: Hoewel het Bodylink® systeem een werkbereik
van ongeveer 1 meter (3 ft) van de sensoren tot het horloge
heeft, verzeker u er voor de meest betrouwbare werking van dat
het horloge toch zo dicht mogelijk bij de sensoren is wanneer u
het systeem opstart.
4. Wanneer het horloge de signalen van de sensoren heeft
gedetecteerd, schakelt het horlogedisplay over naar een nieuwe
indeling en toont sommige of alle sensorgegevens, afhankelijk van
de modus. Tijd en Timer tonen de gegevens uitsluitend op de
onderste regel terwijl Chrono maximaal drie regels met
prestatiegegevens kan hebben.
Prestatiegegevens bekijken
Druk de knop DISPLAY even in om de gegevens of een combinatie
van gegevens te selecteren die u tijdens uw training wilt bekijken.
Voor uw gemak wordt even een “kop” met de namen van de
informatie en de positie ervan op het display weergegeven voordat
de gegevens zelf verschijnen.
Hieronder vindt u nog enkele dingen die u moet weten om het
horloge doeltreffend te kunnen gebruiken:
• In Chrono drukt u even op SET/FORMAT om de plaats van de
informatie op de bovenste en middelste displayregel om te
wisselen. Zodoende kunt u de belangrijkste gegevens op de grote
middelste displayregel bekijken.
273
OPMERKING: Gemakshalve zoeken Chrono en Timer
automatisch gedurende vijftien seconden nadat de modus is
opgeroepen, naar de Bodylink® sensoren.
Page 53

Berichten op horloge
Wanneer u het horloge met de fitnesssensoren gebruikt, kan het
horloge berichten weergeven om de status van de sensor in
samenwerking met het horloge weer te geven. De berichten zijn:
v
SEARCHING De GPS-3D-sensor is nog aan het proberen een
verbinding met GPS-gegevens te krijgen. U kunt de snelheid, het
tempo, de afstand of positie-informatie pas bekijken als de sensor
de GPS-satellieten vindt.
v
WEAK GPS SIGNAL De GPS-3D-sensor heeft de verbinding
met de GPS-satellieten verloren. De GPS-3D-sensor werkt
nauwkeuriger en sneller in open ruimten (zoals een gebied zonder
veel bomen of wolken) en bij hogere snelheden.
v
NO DATA FROM HRM (GPS) Het horloge ontvangt
momenteel geen gegevens van de HS- of GPS-3D-sensor. Verzeker
u ervan dat de sensor niet meer dan 1 meter (3 ft) van het
horloge vandaan is, werkt en niet per ongeluk de sensor van
iemand anders volgt. Het horloge probeert na het weergeven van
dit bericht gedurende één minuut een verbinding te maken.
v
NOISY DATA FROM HRM (GPS)
Het horloge leeft last van
radiostoring. Probeer bij mogelijke storingbronnen vandaan te
gaan (bijvoorbeeld: televisies, monitors of gemotoriseerde
apparaten). Het horloge probeert na het weergeven van dit
bericht gedurende 30 seconden een verbinding te maken.
v
FAT
AL GPS ERROR
Er is een ernstige interne fout in de
GPS-3D-sensor. Neem contact op met de klantenservice van Timex.
275
• Als u de gegevens van de Bodylink® sensoren niet meer wilt
bekijken, houdt u de knop DISPLAY ingedrukt totdat het bericht
HOLD TO SHUT OFF RCVR (INGEDRUKT HOUDEN OM
ONTVANGER UIT TE ZETTEN) op het horlogedisplay
verschijnt. Blijf de knop DISPLAY nog enkele seconden
ingedrukt houden; het horloge geeft een pieptoon om aan te
geven dat de radioverbinding tussen het horloge en de sensoren
uitgeschakeld is.
274
TIP: Als u reeds gegevens van één sensor bekijkt, bijvoorbeeld de
hartslagsensor, en u ook gegevens van de snelheid/afstandsensor
wilt bekijken, houdt u de knop DISPLAY ingedrukt totdat het
horloge een korte pieptoon geeft en het antennepictogram begint
te knipperen. Het horloge zoekt nu naar een tweede Bodylink®
sensor. Wanneer het dit tweede apparaat detecteert, stopt het
antennepictogram met knipperen en kan de indeling van het
display veranderen en de nieuwe informatie weergeven. Druk de
knop DISPLAY even in (zoals eerder beschreven) om
verschillende combinaties van de gegevens van twee sensoren
te bekijken.
Page 54

v
Waypoints ondersteunen maximaal tien referentiepunten terwijl
u van de ene naar de andere locatie reist en gebruikt deze
referentiepunten om u naar de beginplek terug te helpen reizen.
v
Rondegegevens geven opgeslagen informatie over ronden.
v
Overzicht geeft gegevens weer die geregistreerd worden terwijl
de chronograaf loopt.
v
Timer hiermee kunt u de tijd van een evenement opnemen
waarbij van een bepaalde tijd tot nul wordt afgeteld.
v
Alarm beheert maximaal vijf alarmen.
v
Configureren stelt u in staat om de horlogefuncties aan uw
behoeften aan te passen.
Het horloge gebruiken
Om alle functies van uw horloge te kunnen gebruiken moet u het
samen met de fitnesssensoren gebruiken. Uw horloge kan echter op
verschillende manieren worden gebruikt. Bijvoorbeeld:
v
U kunt uw horloge zonder fitnesssensoren gebruiken om de modus
Tijd te bekijken, als een alarm in de modus Alarm of om de tijd van
een training in een van de chronograafmodi op te nemen.
v
U kunt uw horloge met alleen de HS-sensor in een van de chronograafmodi gebruiken om informatie over de hartslag en tijd te volgen.
v
U kunt uw horloge met de GPS-3D-sensor in een van de
navigatiemodi gebruiken om informatie over de afstand te volgen.
Of u kunt deze sensor in een van de chronograafmodi gebruiken
om informatie over afstand te volgen.
277
Indeling van display
In de modi Chronograaf, Verticaal (met uitzondering van informatie
over de stijgsnelheid), Finish en Navigeren kunt u even op
SET/FORMAT drukken om de tekst op de bovenste en middelste
regel van het display te verwisselen.
Horlogemodi
U kunt elk van de 11 modi doorlopen door op MODE te drukken.
De modi zijn:
v
Tijd hiermee kunt u de tijd, datum en dag van de week voor twee
verschillende tijdzones weergeven.
v
Chronograaf volgt prestatiegegevens en geeft deze weer.
v
Verticaal geeft een beeld voor verticale gegevens zoals
stijgsnelheid, hoogte en stijging.
v
Finish hiermee kunt u een tijd voor een bepaalde afstand
voorspellen en waarschuwingen instellen als u niet het juiste
tempo aanhoudt.
v
Navigeren herkent positie-informatie (zoals van een kompas)
voor uw locatie.
276
Tijd
Tempo
Tempo
Tijd
Page 55

279
M ODI V AN PRESTA TIEHORLOGE
De modus Tijd
Terminologie m.b.t. de modus Tijd
UTC
: Universal Time, Coordinated (vroeger bekend als GMT)
beschrijft de plaatselijke tijdzone in verhouding tot de Greenwich
meridiaan. New York City is bijvoorbeeld in de -5 UTC-zone
omdat New York vijf uur vroeger dan de Greenwich meridiaan is;
Moskou is +3 UTC omdat het drie uur later dan de Greenwich
meridiaan is.
Functies van de modus Tijd
Uw horloge kan als een gewoon horloge dienen om de tijd, datum
en dag voor twee verschillende tijdzones weer te geven met een
12- of 24-uurs indeling.
278
U kunt vanuit elke modus op het horloge naar de modus Tijd
teruggaan door
MODE ingedrukt te houden totdat de tijd wordt
weergegeven.
TIJD INSTELLEN
Voor instructies voor het instellen van de horlogefuncties,
waaronder de tijd, kunt u pagina 269, “Horlogefuncties instellen”,
raadplegen.
V
oor de tijd kunt u de volgende waarden instellen:
OPMERKING: U kunt de seconden niet bijstellen. Wanneer u
het horloge met de GPS-3D-sensor gebruikt,
wordt het gelijkgezet met UTC.
Wanneer u tussen standaard en zomertijd wisselt, moet u
het uur met de hand veranderen.
U kunt het horloge een klein beetje te vroeg of te laat
stellen. Als u bijvoorbeeld gewoonlijk tien minuten te laat
ergens aankomt, kunt u het horloge tien minuten laten
voorlopen. Het horloge blijft voorlopen zelfs wanneer u
het met de GPS-3D-sensor synchroniseert.
v
Uur
v
Maand
v
Minuut
v
Datum (stelt de dag van de week
automatisch in wanneer u de datum instelt)
v
Jaar
v
Uurindeling (AM/PM t.o. 24 uur)
Prestatiegegevens
bekijken
Bekijken of naar
tweede tijd
overschakelen
Ingedrukt houden
om in te stellen
INDIGLO®
nachtlicht
Naar modus
Chronograaf
Page 56

Nadat het horloge voor het eerst is gebruikt, corrigeert het
automatisch onnauwkeurige tijd wanneer de GPS-3D-sensor
wordt geactiveerd en daarna om de 15 minuten.
PRESTATIEGEGEVENS IN DE MODUS TIJD BEKIJKEN
Wanneer u de fitnesssensoren met uw horloge gebruikt, kunt u de
prestatiegegevens doorlopen door even op DISPLAY te drukken.
De opties voor het bekijken van prestatiegegevens voor de modus
Tijd zijn:
v
Hartslag: Huidige hartslag (HS-sensor vereist).
v
Snelheid: Huidige snelheid (GPS-3D-sensor vereist).
v
Tempo
: Huidige snelheid, uitgedrukt in minuten per
geselecteerde afstandseenheid, zoals mijl of kilometer
(GPS-3D-sensor vereist).
v
Afstand: Afstand afgelegd sinds de activering van de
GPS-3D-sensor (GPS-3D-sensor vereist).
281
VAN TIJDZONE WISSELEN
Het horloge kan twee tijdzones volgen (T1 en T2). U kunt de
andere zone zien door op START/SPLIT
te drukken. Of volg de
onderstaande stappen om van T1 naar T2 over te schakelen:
1. Houd START/SPLIT ingedrukt totdat HOLD FOR TIME 2
verschijnt.
2. Blijf dit ingedrukt houden totdat de tijd verandert en het
horloge een pieptoon geeft.
3. Herhaal stap 1 en 2 om terug naar T1 te schakelen. Het
volgende bericht verschijnt: HOLD FOR TIME 1.
U moet de tijd voor elke tijdzone apart instellen.
TIJD MET FITNESSSENSOREN SYNCHRONISEREN
Wanneer u de GPS-3D-sensor voor het eerst samen met uw
horloge activeert, kunt u een van de volgende scenario’s
verwachten:
v
Als u de GPS-3D-sensor activeert voordat u de tijd instelt,
synchroniseert het horloge T1 en T2 met UTC. U moet het uur
voor beide tijdzones op uw plaatselijke tijd afstellen.
v
Als u de GPS-3D-sensor activeert nadat u de tijd hebt
ingesteld, handhaaft het horloge de uur- en datuminstellingen
en synchroniseert het de minuten en seconden met UTC voor
elke tijdzone.
280
Prestatiegegevens
Indrukken om
prestatiegegevens
te bekijken
Page 57

De modus Chronograaf
Terminologie m.b.t. de modus Chronograaf
Chronograaf: De chronograaf registreert tijdsegmenten tijdens de
duur van uw activiteit.
Ronde: De rondetijd registreert de tijd voor één segment van uw
activiteit.
Tussentijd
: De tussentijd registreert de totale verstreken tijd
sinds het begin van uw huidige activiteit.
Tussentijd nemen: Wanneer u een tussentijd neemt, maakt de
chronograaf het opnemen van de tijd van één ronde af en begint
een nieuwe op te nemen.
Functies van de modus Chronograaf
De modus Chronograaf werkt als het hoofdcentrum voor trainingsgegevens voor uw horloge. Het kan de verstreken tijd voor maximaal 100 uur registreren. Het kan ook informatie voor maximaal
283
v
Hoogte: Huidige hoogte boven zeeniveau
(GPS-3D-sensor vereist).
OPMERKING
: Als het horloge geen van beide fitnesssensoren
detecteert, wordt de dag van de week op de
onderste regel van het display weergegeven. U
kunt de dag van de week blijven bekijken terwijl
u de fitnesssensoren gebruikt door de
prestatiegegevens te verbergen (zie “Horlogeinstellingen” op pagina 324 voor informatie over
het verbergen van gegevens). Als u de dag van
de week kiest, lijkt het alsof het horloge geen
gegevens ontvangt.
Voorbeeld van de modus Tijd
282
Prestatiegegevens
bekijken
Bovenste en middelste
regel omwisselen
Chronograaf stoppen
of terugstellen
INDIGLO®
nachtlicht
Tijdopname starten of
tussentijd nemen
Naar modus Verticaal
of ingedrukt
houden voor tijd
Veronderstel dat u in San Francisco woont en met een klant in
Singapore werkt. Net zoals voor alle druk bezette mensen is het
noodzakelijk voor u om de tijd bij te houden. Daarom stelt u T1 op
uw plaatselijke tijd in. Maar het is ook belangrijk dat u snel de tijd
van uw klant weet. Daarom stelt u T2 op de tijd in Singapore in.
Als beide tijdzones beschikbaar zijn, kunt u snel de tijd bij uw
klant opzoeken of uw monitor zelfs op T2 overschakelen wanneer
u naar Singapore reist.
Page 58

6. Druk op START/SPLIT om verder te gaan met de
tijdopname.
OF
Houd STOP/RESET ingedrukt om het chronograafdisplay op
nul terug te stellen.
DE MODUS CHRONOGRAAF ZONDER HANDEN GEBRUIKEN
U kunt de modus Chronograaf zo instellen dat deze start wanneer
u begint te bewegen en stopt wanneer u niet meer beweegt of dat
tussentijden automatisch worden opgenomen op grond van
afstand of verstreken tijd. Zie “Instellingen zonder handen” op
pagina 323.
PRESTATIEGEGEVENS IN DE MODUS CHRONOGRAAF BEKIJKEN
Wanneer u de fitnesssensoren met uw horloge gebruikt, kunt u de
prestatiegegevens doorlopen door even op DISPLAY te drukken.
De opties voor het bekijken van prestatiegegevens voor de modus
Chronograaf zijn:
v
Hartslag
: Huidige hartslag (HS-sensor vereist).
v
Snelheid: Huidige snelheid (GPS-3D-sensor vereist).
v
Gemiddelde snelheid: Gemiddelde snelheid voor de periode
gedurende welke de chronograaf gelopen heeft (GPS-3D-sensor
vereist).
v
Tempo
: Huidige snelheid, uitgedrukt in minuten per
geselecteerde afstandseenheid, zoals mijl of kilometer
(GPS-3D-sensor vereist).
285284
100 ronden registreren, waaronder gegevens voor snelheid, tempo
en afstand (met behulp van de GPS-3D-sensor) en gemiddelde
hartslag (met behulp van de HS-sensor).
OPMERKING:
Druk op MODE om het horlogedisplay naar een
andere modus over te schakelen terwijl de
chronograaf blijft lopen. Het stopwatchpictogram verschijnt om aan te geven dat de
chronograaf nog steeds werkt.
DE MODUS CHRONOGRAAF MET DE HAND GEBRUIKEN
1. Druk op MODE totdat de modus Chronograaf verschijnt.
2. Druk op START/SPLIT om de tijdopname te beginnen.
3. Druk nogmaals op START/SPLIT om een tussentijd te
nemen en automatisch de tijd voor een nieuwe ronde te gaan
opnemen.
Het horloge slaat de informatie over ronde- en tussentijd op
en geeft de gemiddelde statistische gegevens voor de ronde
weer als u de fitnesssensoren gebruikt.
4. Druk op MODE om onmiddellijk informatie over de nieuwe
ronde weer te geven.
OF
Wacht enkele seconden en het horloge begint dan automatisch
gegevens voor een nieuwe ronde weer te geven.
5. Druk op STOP/RESET om de tijdopname te stoppen
wanneer u de activiteit hebt beëindigd.
Page 59

De modus Verticaal
Terminologie m.b.t. de modus Verticaal
Stijgsnelheid: Hoe snel u klimt of afdaalt.
Verticale snelheid: Een andere term voor stijgsnelheid.
Functies van de modus Verticaal
De modus Verticaal werkt als een beeldmodus in samenwerking
met de GPS-3D-sensor en is gericht op het weergeven van
hoogtegegevens. De modus Verticaal zorgt in het bijzonder dat
gegevens met betrekking tot verticale activiteiten kunnen worden
bekeken (bijvoorbeeld: klimmen of skiën).
OPMERKING: Als u de GPS-3D-sensor niet gebruikt, werkt de
modus Verticaal net zoals de modus Chronograaf
en geeft deze alleen informatie over de tijd en
ronden weer.
287
v
Gemiddeld tempo: Gemiddelde snelheid per minuut
voor de periode gedurende welke de chronograaf gelopen heeft
(GPS-3D-sensor vereist).
v
Afstand
: Afstand afgelegd sinds de chronograaf is gestart
(GPS-3D-sensor vereist).
v
Hoogte: Huidige hoogte boven zeeniveau (GPS-3D-sensor
vereist).
v
Stijging
: Verschil tussen de huidige hoogte en de hoogte toen u
de chronograaf startte (GPS-3D-sensor vereist).
Voorbeeld van de modus Chronograaf
286
Prestatiegegevens
bekijken
Bovenste en
middelste regel
omwisselen
Chronograaf
stoppen of
terugstellen
INDIGLO®
nachtlicht
Rondetijd starten of
tussentijd nemen
Naar modus Finish
of ingedrukt houden
voor tijd
Veronderstel dat u regelmatig hardloopt en u informatie over uw
huidige trainingsroutine wilt verkrijgen zodat u fitnessdoelen
voor uzelf kunt stellen. U gebruikt de modus Chronograaf om de
rondetijd voor elk van de drie fasen van uw training te
registreren. Wanneer u klaar bent met uw training, gebruikt u de
informatie over de rondetijd om de afstand en het tempo te
bepalen, zowel per ronde als voor een totaal van alle drie de
ronden. Als u tijdens een deel van de training heuvelopwaarts
loopt, kunt u ook uw stijging bepalen om te weten hoe ver u
geklommen hebt. Terwijl uw huidige fitnessniveau bekend is,
kunt u dan realistische fitnessdoelen voor uzelf stellen en uw
vorderingen regelmatig bewaken.
Page 60

v
Snelheid: Huidige snelheid (GPS-3D-sensor vereist).
v
Afstand
: Afstand afgelegd sinds de GPS-3D-sensor werd
gestart (GPS-3D-sensor vereist).
v
Hoogte: Huidige hoogte boven zeeniveau (GPS-3D-sensor
vereist).
v
Stijging
: Verschil tussen de huidige hoogte en de hoogte toen u
de chronograaf startte (GPS-3D-sensor vereist).
Voorbeeld van de modus Verticaal
289288
U bent aan het heli-skiën op een piste die naar schatting 214
verticale meter (2700 verticale ft) is. U bent nieuwsgierig naar de
nauwkeurigheid van de schatting en u wilt ook weten hoe lang u
over het afdalen van de piste zult doen. Daarom start u uw GPS3D-sensor, navigeert u naar de modus Verticaal en drukt u op
START zodra u de berg gaat afdalen. Aan het einde van de piste
drukt u op STOP en dan DISPLAY totdat u de stijgsnelheid en
stijging (uitgedrukt in een negatief getal omdat u heuvelafwaarts
skiede) ziet. Gebruik deze informatie om te zien hoe snel u skiede
en vergelijk de op uw horloge weergegeven stijging met de
schatting van uw gids.
DE MODUS VERTICAAL GEBRUIKEN
1. Druk op MODE totdat de modus Verticaal verschijnt.
2. Druk op
START/SPLIT
om de tijdopname te beginnen.
3. Druk nogmaals op START/SPLIT
om een tussentijd te
nemen en automatisch de tijd voor een nieuwe ronde te gaan
opnemen.
4. Druk op STOP/RESET om de tijdopname te stoppen
wanneer u de activiteit hebt beëindigd.
5. Druk op START/SPLIT om verder te gaan met de
tijdopname.
OF
Houd STOP/RESET ingedrukt om het display op nul terug te
stellen.
PRESTATIEGEGEVENS IN DE MODUS VERTICAAL BEKIJKEN
Wanneer u de fitnesssensoren met uw horloge gebruikt, kunt u de
prestatiegegevens doorlopen door even op DISPLAY te drukken.
De opties voor het bekijken van prestatiegegevens voor de modus
Verticaal zijn:
v
Hartslag: Huidige hartslag (HS-sensor vereist).
v
Stijgsnelheid: Verticale snelheid (GPS-3D-sensor vereist).
v
Tempo
: Huidige snelheid, uitgedrukt in minuten per
geselecteerde afstandseenheid, zoals mijl of kilometer
(GPS-3D-sensor vereist).
Page 61

291
De modus Finish
Functies van de modus Finish
Met de modus Finish kunt u voorspellen hoe lang het zal duren
totdat u een bepaalde afstand hebt afgelegd op grond van huidige
gegevens van de GPS-3D-sensor. Om u te helpen het tempo erin te
houden voor de verwachte finish kunt u het horloge ook zo
instellen dat het u waarschuwt als u te snel of te langzaam
beweegt voor het gewenste tempo.
OPMERKING: Als u de GPS -3D-sensor niet gebruikt, werkt de
modus Finish net zoals de modus Chronograaf en
geeft deze alleen informatie over de tijd en
ronden weer.
U moet de chronograaf op nul terugstellen voordat u de
modus Finish gebruikt; anders werkt deze niet naar
behoren.
290
DE MODUS FINISH INSTELLEN
Voor instructies voor het instellen van de horlogefuncties,
waaronder de modus Finish, kunt u pagina 269, “Horlogefuncties
instellen”, raadplegen.
Voor de modus Finish kunt u de volgende waarden instellen:
v
Vooringestelde of speciale afstand [voor speciale afstand stelt u de
afstand (maximaal 999.99) en de eenheid (NM, KM of MI) in]
v
Streeftijd
v
Waarschuwingsoptie (een hoorbare waarschuwing veroorzaakt
een pieptoon en doet de voorspelde finishtijd knipperen, en een
stil alarm knippert alleen de voorspelde finishtijd)
PRESTATIEGEGEVENS IN DE MODUS FINISH BEKIJKEN
Wanneer u de fitnesssensoren met uw horloge gebruikt, kunt u de
prestatiegegevens doorlopen door even op DISPLAY te drukken.
De opties voor het bekijken van prestatiegegevens voor de modus
Finish zijn:
v
Finishtijd
: De voorspelde finishtijd op grond van uw huidige
snelheid en de afstand. De finishtijd knippert als u langzamer
of sneller dan de voorspelde finishtijd beweegt. Als u stopt met
bewegen, vervangt het horloge de finishtijd door STOPPED
.
(GPS-3D-sensor vereist)
v
Tempo
: Huidige snelheid, uitgedrukt in minuten per
geselecteerde afstandseenheid, zoals mijl of kilometer
(GPS-3D-sensor vereist).
Prestatiegegevens
bekijken
Tijdopname
stoppen
INDIGLO®
nachtlicht
Tijdopname starten
of tussentijd
nemen.
Naar modus
Navigeren of
ingedrukt houden
voor tijd
Page 62

De modus Navigeren
Terminologie m.b.t. de modus Navigeren
Waypoints: Een punt tussen het begin- en eindpunt op een route.
Waypoints dienen als markering tijdens een activiteit; u kunt ze
gebruiken om uw weg van het eindpunt terug naar het beginpunt
te vinden.
Koers: De richting waarin u zich t.o.v. het noorden verplaatst. Het
horloge heeft een numeriek koersdisplay in de modus Navigeren.
OPMERKING: In de modus Configureren kunt u uw horloge zo
instellen dat het het ware noorden (de
geografische noordpool waar alle lengtelijnen
samenkomen) of het magnetische noorden
(noorden uitgelijnd met het magnetische veld van
de aarde) afleest. Zie “Eenheidsinstellingen” op
pagina 325 voor meer informatie.
293
v
Gemiddeld tempo: Gemiddelde snelheid per minuut voor de
periode gedurende welke de chronograaf gelopen heeft
(GPS-3D-sensor vereist).
v
Afstand: Afstand afgelegd sinds de chronograaf is gestart
(GPS-3D-sensor vereist).
v
Snelheid: Huidige snelheid (GPS-3D-sensor vereist).
v
Gemiddelde snelheid: Gemiddelde snelheid voor de periode
gedurende welke de chronograaf gelopen heeft (GPS-3D-sensor
vereist).
v
Hartslag
: Huidige hartslag (HS-sensor vereist).
Voorbeeld van de modus Finish
292
Prestatiegegevens
bekijken
INDIGLO®
nachtlicht
Huidige positie
als waypoint
opslaan
Naar modus
Waypoints of
ingedrukt
houden voor tijd
U bent aan het trainen voor een fietswedstrijd van 100 km.
Vorig jaar deed u aan dezelfde wedstrijd mee en eindigde u in
4 uur, 15 minuten. Dit jaar is uw doel om in minder dan 4 uur te
eindigen. U leest in een trainingtijdschrift dat u, wanneer u voor
een wedstrijd traint, één dag per week moet wijden aan het
fietsen van een afstand gelijk aan die van het evenement en
daarbij naar uw streeftijd moet werken. Om het tempo erin te
houden stelt u de modus Finish op 100 km in voor afstand en
4 uur voor tijd. U stelt het horloge zo in dat het u hoorbaar
waarschuwt wanneer u langzamer fietst dan uw tempo om u op
het spoor te houden terwijl u fietst.
Page 63

295294
PRESTATIEGEGEVENS IN DE MODUS NAVIGEREN BEKIJKEN
Wanneer u de fitnesssensoren met uw horloge gebruikt, kunt u de
prestatiegegevens doorlopen door even op DISPLAY te drukken.
Voor alle gegevens in de modus Navigeren is de GPS-3D-sensor
vereist. De opties voor het bekijken van prestatiegegevens voor de
modus Navigeren zijn:
v
Lengte: De positie oost/west uitgedrukt in graden, minuten en
seconden t.o.v. de Greenwich meridiaan.
v
Breedte:. De positie noord/zuid uitgedrukt in graden, minuten
en seconden t.o.v. de evenaar.
v
Koers: De richting waarin u zich verplaatst.
v
Snelheid: Huidige snelheid.
v
Afstand: Afstand afgelegd sinds de activering van de GPS-3Dsensor.
v
Hoogte: Huidige hoogte boven zeeniveau.
Functies van de modus Navigeren
De modus Navigeren geeft richtingsinformatie weer en volgt uw
snelheid, afstand en hoogte tijdens een activiteit. Hoewel u wel 10
waypoints tijdens een activiteit kunt instellen om specifieke
plekken te markeren, werkt deze modus niet als een kompas.
U moet in beweging zijn voor juiste koersinformatie.
Bovendien werkt de modus Navigeren niet samen met de
chronograaf. Deze modus geeft huidige positie-informatie weer
en werkt deze automatisch bij maar houdt de tijd niet bij.
OPMERKING: De modus Navigeren werkt niet zonder het
gebruik van de GPS-3D-sensor. Als de GPS-3Dsensor niet werkt, ontvangt u het bericht:
NO GPS DATA.
DE MODUS NAVIGEREN GEBRUIKEN
1. Druk op MODE totdat de modus Navigeren verschijnt.
2. Begin te bewegen. Het horloge werkt de op het horloge
weergegeven informatie automatisch bij.
Als u stopt met bewegen, stoppen de hoogte- en koerswaarden.
W
AYPOINTS IN DE MODUS NAVIGEREN OPSLAAN
Voor de modus Navigeren kunt u alleen waypoints opslaan. Voor
alle andere waypoint-opties moet u de modus Waypoints gebruiken.
Voor instructies voor het opslaan van waypoints kunt u
“Een waypoint opslaan” op pagina 298 raadplegen.
Page 64

Koers: De richting waarin u zich t.o.v. het noorden verplaatst. In
de modus Waypoints kunt u een grafische koers bekijken wanneer
u de functie Terugkeren activeert.
Richting: Richting naar een doel. Informatie over richting
verschijnt alleen wanneer u de functie Terugkeren gebruikt
en wordt met het symbool voor een huis aangegeven.
Terugkeren: Met de functie Terugkeren kunt u vanuit uw
huidige positie naar een opgeslagen waypoint navigeren.
Functies van de modus Waypoints
De modus Waypoints geeft positie-informatie weer en stelt u in
staat om maximaal 10 waypoints op te slaan om specifieke
navigatielocaties tijdens uw activiteit te markeren. Uw huidige
locatie is altijd met CURRENT gemarkeerd.
Wanneer u waypoints opslaat, kunt u een label uit een lijst met
vooraf ingestelde labels selecteren die bij het horloge zijn
inbegrepen. De vooringestelde labels zijn: WAYPNT # (waarin #
gelijk is aan het waypointnummer), JCT, HOME, START, FINISH,
CAMP, TRAILHD, PEAK en VISTA.
297
Voorbeeld van de modus Navigeren
De modus Waypoints
Terminologie m.b.t. de modus Waypoints
Waypoint: Een punt tussen het begin- en eindpunt op een route.
Waypoints dienen als een mijlpaal tijdens een activiteit.
296
Numerieke
koers in
modus
Navigeren
Grafische
koers m.b.v.
Terugkeren
in modus
Waypoints
U bent onlangs met een oriënteringsloop begonnen waarbij u zich
in de kortste tijd tussen waypoints verplaatst. Uw laatste wedloop
omvatte acht waypoints en u eindigde in 42 minuten. Om uw tijd
te helpen verbeteren stelt u een oefenbaan op. U gebruikt de
koersinformatie uit de modus Navigeren en verplaatst u tussen
waypoints. Aan het einde van de baan schuift u naar
snelheidsgegevens om te zien hoe snel u de baan hebt voltooid.
Opgeslagen
waypoint bekijken
Label voor opgeslagen
waypoint veranderen
Waypoint wissen
INDIGLO®
nachtlicht
Waypoint
opslaan
Naar modus
Rondegegevens of
ingedrukt houden
voor tijd
Page 65

Als u probeert om meer dan 10 waypoints in te stellen,
ontvangt u het bericht MEMORY FULL.
OPMERKING: U kunt ook waypoints in de modus Navigeren
opslaan.
WA
YPOINTS BEKIJKEN OF BEWERKEN
1. Druk op
▲
s
(DISPLAY
) om een opgeslagen waypoint terug te
roepen.
2. Kies een van de volgende opties om een waypoint te bekijken
of te bewerken:
v
Om een waypoint te bekijken drukt u op
▲
s
(DISPLAY)
totdat u het waypoint vindt dat u wilt bekijken.
U kunt ook op
▲
s
(
DISPLAY) blijven drukken totdat u
terug naar de huidige locatie bent genavigeerd.
v
Om het label te veranderen van een waypoint drukt u op
SET/FORMAT totdat u het label vindt dat u wilt
gebruiken.
299
Bij de modus Waypoints is de functie Terugkeren inbegrepen
waarmee u vanuit uw huidige positie naar een opgeslagen
waypoint kunt navigeren.
De modus Waypoints werkt niet samen met de chronograaf. Deze
modus geeft huidige positie-informatie weer en werkt deze
automatisch bij maar houdt de tijd niet bij. Bovendien geeft de
modus Waypoints geen prestatiegegevens weer.
OPMERKING: De modus Waypoints werkt niet zonder het
gebruik van de GPS-3D-sensor. Als de GPS-3Dsensor niet werkt, ontvangt u het bericht
NO GPS DATA.
DE MODUS WAYPOINTS GEBRUIKEN
1. Druk op
MODE totdat de modus Waypoints verschijnt.
2. Begin te bewegen. Het horloge werkt de weergegeven
positie-informatie automatisch bij.
EEN WAYPOINT OPSLAAN
1. Houd START/SPLIT
ingedrukt om een waypoint op te slaan.
2. Druk op + (DISPLAY) of - (STOP/RESET) om de negen
vooraf ingestelde waypointlabels te doorlopen.
3. Druk op DONE (MODE) om het waypoint op te slaan.
4. Herhaal stap 1 tot en met 3 om maximaal negen andere
waypoints op te slaan.
Er verschijnt een plusteken ( + ) boven de toets START/SPLIT
als het horloge ruimte voor meer waypoints heeft.
298
Opgeslagen waypoints
bekijken
Label voor opgeslagen
waypoints veranderen
Opgeslagen
waypoint wissen
Page 66

Het horloge geeft de huidige koers en richting en de geschatte
afstand vanaf uw huidige locatie tot het geselecteerde
waypoint weer.
3. Begin te bewegen. Het horloge geeft uw huidige locatie weer
totdat uw locatie met het door u gekozen waypoint is
uitgelijnd.
Het horloge berekent de afstand tussen uw huidige positie en
het gekozen waypoint als een rechte lijn. Afhankelijk van uw
koers en richting kan de afstand groter lijken te worden
naarmate u naar het gewenste waypoint beweegt.
4. Houd STOP/RESET ingedrukt om de functie Terugkeren te
activeren zodra u uw bestemming hebt bereikt.
5. Herhaal stap 1 tot en met 4 om naar een ander opgeslagen
waypoint te navigeren. Zo kunt u via een serie opgeslagen
waypoints de weg terug vinden.
301
v
Om een waypoint te wissen houdt u STOP/RESET
ingedrukt.
Als u een waypoint wist, verandert de volgorde van de
andere waypoints niet. Als u uw waypoints bijvoorbeeld
hebt voorzien van het label WAYPNT 1, 2 en 3 en u
WAYPNT 2 wist, dan houdt u waypoints met het label
W
AYPNT 1 en 3 over.
DE FUNCTIE TERUGKEREN GEBRUIKEN
U kunt de functie Terugkeren activeren waarmee u klaar bent om
vanuit een huidige positie naar een van de opgeslagen waypoints
te navigeren. Wanneer de functie Terugkeren geactiveerd is,
neemt deze de modus Waypoints over. U kunt pas weer andere
functies uitvoeren nadat Terugkeren gedeactiveerd is.
1. Druk op
▲
s
(DISPLAY) om het gewenste waypoint te
selecteren.
2. Houd START/SPLIT ingedrukt. U ziet nu het bericht HOLD
TO BEGIN TRACK.
300
Opgeslagen
waypoint
terugroepen
Terugkeren
deactiveren
Terugkeren
activeren
Page 67

Functies van de modus Rondegegevens
Met de modus Rondegegevens kunt u informatie over opgeslagen
ronden op elk gewenst moment bekijken. U moet de chronograaf
laten lopen om rondegegevens te registreren.
Zodra u de chronograaf op nul hebt gesteld voor uw volgende
activiteit, worden de rondegegevens van de vorige activiteit gewist.
OPMERKING: Om een overzicht van uw gehele activiteit te
bekijken, kunt u “De modus Overzicht” op
pagina 305 raadplegen.
RONDEGEGEVENS GEBRUIKEN
1. Druk op
MODE totdat de modus Rondegegevens verschijnt.
2. Druk op ▲ (DISPLAY) of ▼ (STOP/RESET) om door
rondegegevens te navigeren.
De gegevens van elke teruggeroepen ronde worden op drie
regels weergegeven. Op de onderste regel staat het
rondenummer met het label RCL [voor Recall (terugroepen)]
voor elke ronde die u in de chronograaf hebt opgeslagen.
PRESTATIEGEGEVENS IN DE MODUS RONDEGEGEVENS BEKIJKEN
Met uitzondering van de ronde- en tussentijden vertrouwt de
modus Rondegegevens op de fitnesssensoren.
Als u slechts één sensor gebruikt, verschijnt geen informatie voor
de andere sensor als u het horloge zo hebt ingesteld dat niet
ingevulde gegevens worden verborgen. Voor informatie over het
303
Voorbeeld van de modus Waypoints
De modus Rondegegevens
302
Als lid van een plaatselijke trekkersclub meldt u zich aan om
paden vóór de opening van het kampeerseizoen op te ruimen.
Uw kaart geeft verschillende oriëntatiepunten langs het pad aan
maar het pad zelf is overwoekerd. U loopt over het pad en ruimt
kreupelhout uit de weg om het pad vrij te maken en bij elk
oriëntatiepunt stelt u een waypoint op uw horloge in. Wanneer u
het einde van de u aangewezen, op te ruimen route hebt bereikt,
activeert u de functie Terugkeren om naar elk oriëntatiepunt op
uw route terug te keren en er zeker van te zijn dat u het pad
goed hebt opgeruimd.
▲
s
gegevenswaarde
▼
t
gegevenswaarde
INDIGLO®
nachtlicht
Naar modus
Overzicht of
ingedrukt houden
voor tijd
Page 68

De modus Overzicht
Terminologie m.b.t. de modus Overzicht
Afstandsmeter: De afstandsmeter houdt de afstand van alle
activiteiten bij totdat u hem op nul terugstelt.
Zone: Een vooraf bepaald hartslagbereik voor uw activiteit.
Herstel: Een maat van uw fitness en vermoeidheid gebaseerd op
het verschil van uw hartslag over een korte periode na
inspannende oefening. Voor meer informatie kunt u Heart
Zones® hulpmiddelen voor succes raadplegen.
Functies van de modus Overzicht
Met de modus Overzicht kunt u een samenvatting van de
informatie bekijken die door de chronograaf voor uw meest recente
activiteit is geregistreerd. De gegevens worden niet bijgewerkt
terwijl ze worden weergegeven.
305
verbergen van gegevens kunt u “Horloge-instellingen” op
pagina 324 raadplegen.
De opties voor het bekijken van prestatiegegevens voor de modus
Rondegegevens zijn:
v
Ronde- en tussentijd
: Rondetijd omvat gegevens voor elk
segment van uw activiteit en de tussentijd toont gegevens voor
de gehele activiteit.
v
Gemiddelde rondesnelheid en gemiddeld tempo:
Gemiddelde snelheid brengt u op de hoogte van uw gemiddelde
snelheid voor de ronde en gemiddeld tempo geeft uw gemiddelde
snelheid weer in termen van minuten per eenheidsafstand.
v
Gemiddelde hartslag voor de ronde en rondeafstand:
Gemiddelde hartslag geeft de gemiddelde hartslag voor de
ronde weer en rondeafstand geeft aan hoeveel van de ronde u
hebt afgelegd.
v
Hoogte en stijging
: Hoogte geeft de hoogte boven zeeniveau
aan het einde van de ronde weer en stijging is de verandering
in hoogte voor de ronde.
Voorbeeld van de modus Rondegegevens
304
▲
s
gegevenswaarde
▼
t
gegevenswaarde
INDIGLO®
nachtlicht
Ingedrukt houden om
afstandsmeter, max
snelheid of beste
tempo terug te stellen
Naar modus Timer
of ingedrukt
houden voor tijd
U fietst graag maar u hebt net een lange rit gemaakt en bent
uitgeput! U bent zo uitgeput dat u vergeet om naar de rondetijdgegevens voor uw rit te kijken en u stelt de chronograaf op nul terug.
U denkt dat u de gegevens verloren hebt maar dan herinnert u het
zich weer. U kunt de rondegegevens voor uw rit toch nog bekijken
zo lang u de chronograaf nog niet opnieuw hebt gestart.
Page 69

307
Als u de chronograaf voor uw volgende activiteit op nul start, worden
de overzichtgegevens van de vorige activiteit gewist, behalve de
afstandsmeterinformatie die u met de hand moet wissen.
OPMERKING: Om informatie over elk afzonderlijk segment van
uw activiteit te bekijken, kunt u “De modus
Rondegegevens” op pagina 302 raadplegen.
DE MODUS OVERZICHT GEBRUIKEN
1. Druk op
MODE totdat de modus Overzicht verschijnt.
2. Druk op ▲ (DISPLAY) of ▼ (STOP/RESET) om door de
overzichtsgegevens te navigeren.
FUNCTIES IN DE MODUS OVERZICHT TERUGSTELLEN
Terwijl u waarden van de snelheidsmeter, maximale snelheid of
het beste tempo bekijkt, houdt u START/SPLIT ingedrukt om de
waarde op nul terug te stellen.
PRESTATIEGEGEVENS IN DE MODUS OVERZICHT BEKIJKEN
Met uitzondering van de ronde- en tussentijden vertrouwt de
modus Overzicht op de fitnesssensoren.
Als u slechts één sensor gebruikt, verschijnt geen informatie voor de
andere sensor als u het horloge zo hebt ingesteld dat niet ingevulde
gegevens worden verborgen. Voor informatie over het verbergen van
gegevens kunt u “Horloge-instellingen” op pagina 324 raadplegen.
De opties voor het bekijken van prestatiegegevens voor de modus
Overzicht omvatten gegevens voor de volgende zes gegevensgroepen:
306
Snelheid
v
Gemiddelde snelheid: Uw gemiddelde snelheid berekend
door afstand door tijd te delen.
v
Maximale snelheid: Uw hoogste snelheid.
v
Gemiddeld tempo: Uw gemiddelde snelheid berekend als
minuten per afgelegde afstandseenheid.
v
Beste tempo: Uw snelste tijd afgelegd per minuut.
A
fstand
v
Afstand van evenement: Uw totale afstand afgelegd tijdens
de activiteit terwijl de chronograaf liep.
v
Afstandsmeter: De totale, door u afgelegde afstand sinds u de
afstandsmeter voor het laatst teruggesteld hebt. Omdat de
afstandsmeter niet samen met de chronograaf werkt, kunt u
deze functie gebruiken om totale afstand over een aantal
trainingen te volgen.
V
erticaal
v
Totale stijging: Totale stijging telt alle positieve
hoogteveranderingen tijdens uw gehele activiteit bij elkaar op.
Als u 10 keer een heuvel van 200 ft op en af rent, is uw totale
stijging 2000 ft (200 ft maal 10 trips).
v
Totale daling: Totale daling telt alle negatieve
hoogteveranderingen tijdens uw gehele activiteit bij elkaar op.
Als u 10 keer een heuvel van 200 ft op en af rent, is uw totale
daling 2000 ft (200 ft maal 10 trips).
Page 70

Tijd
v
Tijd van evenement: De totale tijd voor uw activiteit terwijl
de chronograaf liep. De tijd van het evenement is gelijk aan de
tussentijd in de chronograafmodi.
GPS
v
Niveau van GPS-batterij: Het huidige spanningsniveau voor
de GPS-3D-sensor weergegeven als staafdiagram. U moet de
GPS-3D-sensor dragen om deze informatie te kunnen bekijken.
Wanneer het staafdiagram slechts één segment toont (u ziet
ook het batterijpictogram op het display van het horloge), moet
u de batterij vervangen.
Voorbeeld van de modus Overzicht
309
v
Op/Boven XXXX: Uw tijd op of boven een specifieke hoogte
tijdens uw activiteit (zie “Hoogte-instellingen” op pagina 322
voor informatie over het instellen van deze functie).
Hartslag
v
Gemiddelde hartslag: Uw gemiddelde hartslag berekend over
de periode gedurende welke de chronograaf liep.
v
Maximale hartslag: De hoogste geregistreerde hartslag
tijdens uw activiteit.
v
Minimale hartslag: De laagste geregistreerde hartslag tijdens
uw activiteit.
v
Tijd in zones: Het horloge houdt rekening met de totale
trainingstijd en geeft weer hoeveel tijd u tijdens uw activiteit in
elk van de twee hartslagzones hebt doorgebracht (raadpleeg
“HSM-instellingen” op pagina 319 voor informatie over het
instellen van deze functie).
v
Gemiddelde hartslag in zones: De gemiddelde hartslag in
elk van de twee hartslagzones.
v
Herstel: De verandering in uw hartslag over een geselecteerde
periode, die aan het einde van uw activiteit is geregistreerd (zie
“HSM-instellingen” op pagina 319 voor informatie over het
instellen van deze functie). Als u de HS-sensor draagt, kunt u
in de modus Overzicht een herstelberekening starten door
START/SPLIT ingedrukt te houden.
308
Over zes weken gaat u een halve marathon lopen. Deze halve
marathon omvat een zwaar heuvelopwaarts gedeelte dat van
2500 tot 4500 ft boven zeeniveau stijgt en dan naar 3000 ft boven
zeeniveau terugkeert. Om u voor dit evenement te helpen trainen
hebt u twee doelen voor de volgende maand gesteld: 100 mijl
lopen en één loop per week plannen waarin u minstens 1500 ft
klimt. Met de modus Overzicht kunt u de afstandsmeter
gebruiken om uw totale afstand voor de maand bij te houden en u
kunt de verticale informatie gebruiken om zowel de totale stijging
als de tijd boven 2500 ft voor uw wekelijkse heuvelopwaartse loop
bij te houden.
Page 71

In de modus Timer kunt u op MODE drukken om het display naar
een andere modus over te schakelen zonder de werking van
de timer te verstoren. Het timerpictogram verschijnt en
geeft aan dat de timer loopt.
OPMERKING: De timer heeft instellingen voor twee intervallen.
Als u een van beide intervallen echter op nul
instelt, werkt de timer alleen met één interval.
DE MODUS TIMER INSTELLEN
Voor instructies voor het instellen van de horlogefuncties,
waaronder de modus Timer, kunt u pagina 269, “Horlogefuncties
instellen”, raadplegen.
Voor de modus Timer kunt u de volgende waarden instellen:
v
Tijd (uren, minuten en seconden voor maximaal 99 uur,
59 minuten en 59 seconden).
v
Actie beëindigen (STOP, REPEAT of CHRONO, VERTI of
FINISH).
DE TIMER IN DE MODUS
TIMER GEBRUIKEN
1. Druk op START/SPLIT om het aftellen van de timer te
beginnen.
Pauzeer het aftellen door op STOP/RESET te drukken,
hervat het aftellen door weer op START/SPLIT te drukken
of reset de timer door STOP/RESET ingedrukt te houden.
2. Wanneer de timer voor elk interval nul bereikt, hoort u een
korte waarschuwing.
311
De modus Timer
Terminologie m.b.t. de modus Timer
Intervaltraining: U kunt intervaltraining gebruiken om het
intensiteisniveau binnen één training gedurende bepaalde
tijdsperioden te variëren. Zodoende kunt u uiteindelijk langer en
harder trainen. De modus Timer omvat tijdopname voor twee
intervallen, I1 en I2, om uw intervaltraining te ondersteunen.
Functies van de modus Timer
Met de modus Timer kunt u een vaste tijd instellen waarvan het
horloge tot nul aftelt (bijvoorbeeld: 10, 9, 8, …) voor maximaal
twee intervallen met tijdopname (I1 en I2). U kunt de timer zo
instellen dat hij na het aftellen stopt, herhaalt of naar de modus
Chronograaf, Verticaal of Finish overschakelt.
310
Prestatiegegevens
bekijken
Timer instellen
Timer stoppen of
terugstellen
INDIGLO®
nachtlicht
Timer
starten
Naar modus Alarm
of ingedrukt houden
voor tijd
Page 72

PRESTATIEGEGEVENS IN DE MODUS TIMER BEKIJKEN
Wanneer u de fitnesssensoren met uw horloge gebruikt, kunt u de
prestatiegegevens doorlopen door even op DISPLAY te drukken.
De opties voor het bekijken van prestatiegegevens voor de modus
Timer zijn:
v
Hartslag: Huidige hartslag (HS-sensor vereist).
v
Snelheid: Huidige snelheid (GPS-3D-sensor vereist).
v
Tempo
: Huidige snelheid, uitgedrukt in minuten per
geselecteerde afstandseenheid, zoals mijl of kilometer
(GPS-3D-sensor vereist).
v
Afstand: Afstand afgelegd terwijl de timer loopt
(GPS-3D-sensor vereist).
v
Hoogte: Huidige hoogte boven zeeniveau (GPS-3D-sensor
vereist).
Voorbeeld van de modus Timer
313
3. De timer stopt na de waarschuwing als deze op STOP is ingesteld.
OF
De timer begint opnieuw af te tellen als deze op REPEAT is
ingesteld en gaat verder totdat u op STOP/RESET drukt.
Op de onderste regel van het display staat RPT en een getal
(bijvoorbeeld: RPT 2). RPT geeft aan dat de timer aan het
herhalen is en het getal geeft aan hoeveel keer de timer het
aftellen reeds heeft herhaald. U ziet ook het
herhalingspictogram dat aangeeft dat de timer op
herhalen is ingesteld.
OF
De timer schakelt over naar de modus Chronograaf, Finish of
Verticaal als hij op een van deze modi is ingesteld. U ziet het
moduswisselpictogram dat aangeeft dat de
timer aan het einde van het aftellen van
modus zal wisselen.
OPMERKING:De timer schakelt alleen naar de modus
Chronograaf, Finish of Verticaal over als u de
chronograaf op nul terugstelt en Sync Timer en
Chrono uit staan (zie “Instellingen zonder
handen” op pagina 323).
Wanneer u de timer zo instelt dat de modus na
het aftellen verandert, wordt de informatie die
in de modus Timer is geregistreerd, niet naar de
volgende modus overgedragen en verschijnt
deze niet in de modus Overzicht.
312
Als deel van een totaal gezondheidsprogramma hebt u als doel
gesteld om vier dagen per week 30 minuten hard te lopen.
U begint met 25 minuten gewoon lopen en 5 minuten hard lopen.
U stelt I1 in op 25 minuten in de modus Timer en I2 in op vijf
minuten en dan begint u uw wandeling. Wanneer u na
25 minuten lopen de pieptoon hoort, weet u dat het tijd is om met
de vijf minuten hardlopen te beginnen. Na verloop van tijd bouwt
u de hardloopintervallen op totdat u in staat bent om de gehele
30 minuten hard te lopen.
Page 73

EEN ALARM IN DE MODUS ALARM INSTELLEN
Voor instructies voor het instellen van de horlogefuncties,
waaronder de modus Alarm, kunt u pagina 269, “Horlogefuncties
instellen”, raadplegen.
Voor de modus Alarm kunt u de volgende waarden instellen:
v
Alarmnummer (ALM 1 tot en met ALM 5).
v
Alarmstatus (UIT of AAN).
U kunt ook op
START/SPLIT
drukken om de alarmstatus te
wisselen.
v
Alarmtype (WERKDAGEN, WEEKENDS, EENMALIG of
DAGELIJKS).
Een DAGELIJKS alarm gaat elke dag op de geselecteerde tijd
af, een alarm voor WERKDAGEN gaat maandag tot en met
vrijdag op de geselecteerde tijd af, een alarm voor WEEKENDS
gaat zaterdag en zondag op de geselecteerde tijd af en een
EENMALIG alarm gaat slechts eenmaal op de geselecteerde
tijd af en gaat dan automatisch uit.
v
Alarmtijd (uren, minuten en AM/PM als de tijd op 12-uurs
indeling is ingesteld).
OPMERKING: Als u alarminstellingen verandert, activeert u
het alarm automatisch.
315
De modus Alarm
Functies van de modus Alarm
U kunt uw horloge als een wekker gebruiken voor maximaal vijf
aparte alarmen. Wanneer u een alarm instelt, verschijnt het
wekkerpictogram in de modus Tijd. Het alarm kan u elke dag op
dezelfde tijd waarschuwen of alleen op werkdagen of weekends of
zelfs alleen één maal (ter herinnering aan een afspraak).
Wanneer het horloge een ingestelde alarmtijd bereikt, klinkt de
alarmtoon en knippert het INDIGLO nachtlicht gedurende
20 seconden. U kunt het alarm tijdens deze periode stopzetten
door op een willekeurige knop op het horloge te drukken of, als u
het alarm niet stopzet voordat de waarschuwing is afgelopen,
klinkt een tweede alarm na vijf minuten.
314
▲
s
alarm
Alarm instellen
▼
t
alarm
INDIGLO®
nachtlicht
Alarm AAN
of UIT zetten
Naar modus
Configureren of
ingedrukt houden
voor tijd
Page 74

Instellingsgroepen van de modus
Configureren
Gebruik de modus Configureren om opties in te stellen die de
prestaties van andere horlogemodi verbeteren. De instellingen van
de modus Configureren omvatten zes instellingsgroepen:
v
HSM-INSTELLINGEN: Met de hartslaginstellingen kunt u
streefzones voor uw hartslag instellen.
v
S/A-INSTELLINGEN: Snelheids- en afstandsinstellingen zijn
van invloed op de wijze waarop het horloge reageert op gegevens
die van de GPS-3D-sensor worden ontvangen.
v
HOOGTE-INSTELLINGEN: Hoogte-instellingen configureren
de streefhoogte en stellen berekeningen voor vereffenen en
stijgsnelheid in.
v
INSTELLINGEN ZONDER HANDEN: Instellingen zonder
handen geven opties om het horloge zo te configureren dat het
automatisch samen met de GPS-3D-sensor werkt.
v
HORLOGE-INSTELLINGEN: De instellingen van het horloge
bieden opties voor het aanpassen van de algemene werking van
het horloge, waaronder het verbergen van gegevens of modi.
v
EENHEIDSINSTELLINGEN: Met de instelling van de
eenheden kunt u de weergegeven eenheden voor afstand
(bijvoorbeeld mijl t.o. kilometer) en hartslag (slagen t.o.
percentage) bepalen.
317
De modus Configureren
Terminologie m.b.t. de modus Configureren
Snel instellen: Als u op START/SPLIT drukt wanneer het
plusteken (+) verschijnt, kunt u de meest algemene instelling voor
de instellingsgroep gemakkelijk veranderen zonder de gehele
instellingsprocedure te starten.
OPMERKING: In het gedeelte over de modus Configureren
verschijnt ook terminologie in het gedeelte voor
de instellingsgroep waarop deze van toepassing is.
316
▲
s
optie
Een item
selecteren
▼
t
optie
INDIGLO®
nachtlicht
Indrukken om Snel
instellen te activeren
Indrukken wanneer
klaar met bekijken
van opties
Page 75

Opties van de modus Configureren
HSM-INSTELLINGEN
Configureer de volgende hartslaginstellingen:
v
TZ1 en TZ2: Voor elk van de twee streefzones kunt u één van
vijf vooringestelde hartslagzones op grond van een percentage
van uw maximale hartslag selecteren. U kunt tevens elke grens
aan uw eigen geselecteerde onder- en bovengrens aanpassen.
Aangezien TZI en TZ2 allebei tegelijk werken, houdt u
nuttigere gegevens bij als u de zonegrenzen zo instelt dat ze
elkaar niet overlappen.
Voor informatie over het belang van het bijhouden van
informatie over de hartslag kunt u Heart Zones®
hulpmiddelen voor succes raadplegen.
v
Hoorbare waarschuwing: U kunt de waarschuwing instellen
om u met een pieptoon te waarschuwen wanneer u boven,
onder, of boven of onder uw hartslagzone komt of om u
helemaal niet te waarschuwen.
319
FUNCTIES IN DE MODUS CONFIGUREREN INSTELLEN
In tegenstelling tot andere instellingsfuncties in het horloge zijn
de instellingsgroepen in de modus Configureren in een
menuhiërarchie opgesteld.
1. Druk op MODE totdat de modus Configureren verschijnt.
2. Druk op ▲ (
DISPLAY) of ▼ (STOP/RESET) om naar de
volgende of vorige instellingsgroep te gaan.
3. Druk op SELECT (SET/FORMAT) om een instellingsgroep
op te roepen.
4. Druk op ▲ (DISPLAY) of ▼ (STOP/RESET) om door de
opties in een instellingsgroep te navigeren.
5. Druk op SELECT (SET/FORMAT) om een optie in een
instellingsgroep te selecteren. Zodoende kunt u een instelling
veranderen of naar een ander niveau gaan.
6. Druk op + (DISPLAY) of - (STOP/RESET) om de optie in
een instellingsgroep in te stellen.
7. Druk op DONE (MODE) wanneer u klaar bent met het
instellen van een optie in een instellingsgroep.
8. Druk nogmaals op DONE (MODE) om naar het
instellingsgroepniveau terug te keren.
318
Geselecteerde
zone
Bovengrens
streefzone
Ondergrens
streefzone
Waarschuwing
stype
Page 76

OPMERKING: U kunt de grenzen voor snelheid en tempo apart
instellen. Stel bijvoorbeeld de tempogrenzen in
om het tempo voor hardlopen te beheersen en
stel de snelheidsgrenzen op waarden in die
nuttig zijn voor fietsen. Wissel vervolgens tussen
de instellingen voor elke activiteit.
v
Afstandswaarschuwing: Stel het horloge zo in dat het u voor
afstandsintervallen waarschuwt. U kunt het horloge
bijvoorbeeld zo instellen dat het u na elke kilometer die u hebt
afgelegd, waarschuwt. De afstandswaarschuwing werkt alleen
als de chronograaf loopt.
v
Snelheid vereffenen: Zet vereffenen van de snelheid uit of
aan.
v
Tempo vereffenen
: Zet vereffenen van het tempo uit of aan.
321
v
Herstel: U kunt de hersteltijd op één minuut, twee minuten of
uit instellen. Dit helpt u om te bepalen hoe snel uw hartslag
aan het einde van uw activiteit naar een lagere hartslagwaarde
terugkeert. Des te sneller u daarnaar terugkeert, des te beter is
uw fitnessniveau.
v
Maximale hartslag: Voer uw maximale hartslag in. Deze
waarde wordt gebruikt om vijf vooringestelde hartslagzones te
berekenen en dient als referentie voor uw hartslag, uitgedrukt
als een percentage van het maximum.
OPMERKING: Raadpleeg, voordat u uw hartslaginstellingen
configureert,
Heart Zones® hulpmiddelen
voor succes voor informatie over het bepalen
van uw maximale hartslag.
INSTELLINGEN VAN GPS-3D-SENSOR
Vereffenen: Vereffenen is nuttig als u denkt dat de weergegeven
waarden voor de snelheid of het tempo te veel afwijken.
Vereffenen past een filter voor het berekenen van het gemiddelde
toe en kan tot gevolg hebben dat de weergegeven waarden voor de
snelheid en het tempo langzamer op veranderingen reageren.
Configureer de volgende snelheids- en afstandsinstellingen:
v
Zonetype: Stel het horloge zo in dat het uw snelheid of tempo
volgt en u waarschuwt als u te langzaam of te snel beweegt
(waarschuwingstypen bestaan uit een hoorbare waarschuwing die
een pieptoon geeft of een stille waarschuwing die knippert).
320
Hoogste
snelheid
Laagste
snelheid
Laagste
tempo
Hoogste
tempo
Waarschu-
wingstype
Page 77

INSTELLINGEN ZONDER HANDEN
De functies zonder handen werken in combinatie met de
GPS-3D-sensor. Ze automatiseren de chronograaffuncties, zodat u
zich op uw training in plaats van het bedienen van uw horloge
kunt concentreren.
Configureer de volgende instellingen zonder handen:
v
Automatische tussentijd: Deze functie stelt de chronograaf
in staat om automatisch tussentijden te nemen op grond van
intervallen (wanneer u de intervallen in de modus Timer
instelt) of volgens een afstand, hoogte of tijd die u bepaalt.
U kunt het horloge bijvoorbeeld zo configureren dat het om de
kilometer een tussentijd neemt en dan kunt u de gegevens voor
elke kilometer in de modus Rondegegevens vergelijken nadat u
uw activiteit hebt beëindigd.
v
Automatisch starten: Deze functie stelt de chronograaf in
staat om te starten wanneer u begint te bewegen. Het kan
enkele seconden duren voordat de GPS-3D-sensor uw beweging
detecteert met als gevolg een kleine vertraging in de starttijd.
v
Automatisch stoppen: Deze functie stelt de chronograaf in
staat om te stoppen wanneer u stopt met bewegen. Het kan
enkele seconden duren voordat de GPS-3D-sensor detecteert
dat u niet meer beweegt, met als gevolg een kleine vertraging
in de stoptijd.
323
HOOGTE-INSTELLINGEN
Vereffenen: Vereffenen is nuttig als u denkt dat de weergegeven
waarden voor de hoogte te veel afwijken. Vereffenen past een
filter voor het berekenen van het gemiddelde toe en kan tot
gevolg hebben dat de weergegeven waarden voor de hoogte
langzamer op veranderingen reageren.
Configureer de volgende hoogte-instellingen:
v
Streefhoogte: Stel de streefhoogte zo in dat u wordt
gewaarschuwd wanneer u boven een bepaalde hoogte komt.
Wanneer u de streefhoogte hebt bereikt, geeft het horloge een
pieptoon en begint het de tijd op te nemen. Als u onder de
streefhoogte komt, stopt het horloge met het opnemen van de
tijd totdat u weer boven de streefhoogte bent.
v
Maximale hoogte
: Stel de maximale hoogte zo in dat u wordt
gewaarschuwd als u boven een hoogte komt die u niet wilt
overschrijden. Als u de hoogte overschrijdt, geeft het horloge
een pieptoon totdat u weer onder de maximale hoogte bent.
v
Vereffenen: Zet vereffenen van de hoogte uit of aan.
v
Stijgsnelheid bijwerken: Stel het horloge zo in dat de
periode waarop de stijgsnelheid wordt berekend, wordt
bijgewerkt. U kunt intervallen van 30 seconden of één, 10,
30 of 60 minuten kiezen. Stel deze functie korter in voor
snellere verticale activiteiten zoals skiën, of langer voor
langzamere verticale activiteiten zoals klimmen.
322
Page 78

v
Modus verbergen: U kunt ervoor kiezen om de volgende modi
te tonen, te verbergen of te deactiveren: Verticaal, Finish,
Rondegegevens, Overzicht, Timer, Navigeren, Waypoints of
Alarm. Als u bijvoorbeeld de modus Navigeren verbergt, ziet u
alleen informatie uit deze modus als u de GPS-3D-sensor
gebruikt. Als u de modus Navigeren deactiveert, verschijnt hij
pas als u hem weer in de modus Configureren activeert.
v
Gegevens verbergen: U kunt ervoor kiezen om niet
ingevulde gegevens van elk van de fitnesssensoren te tonen of
te verbergen. Als u de HS-sensor bijvoorbeeld alleen voor uw
training gebruikt en u ervoor kiest om niet ingevulde gegevens
van de GPS-3D-sensor te verbergen, ziet u geen informatie
over snelheid aangezien snelheidsgegevens op het gebruik van
de GPS-3D-sensor vertrouwen.
EENHEIDSINSTELLINGEN
Automatische eenheden (wanneer te gebruiken): In de
eenheidsinstellingen kunt u de snelheid, het tempo, de hoogte en
de noordreferentie op automatisch instellen. Elke op automatisch
ingestelde eenheidsinstelling volgt de eenheidsinstelling voor
afstand.
Automatische eenheden (wanneer niet te gebruiken):
Gebruik automatisch niet wanneer u verschillende eenheden voor
snelheid, tempo of hoogte wilt.
325
OPMERKING
: Zelfs waneer deze functie geactiveerd is, kunt u
de chronograaf toch met de hand starten en
stoppen en met de hand tussentijden nemen
zonder dat de werking zonder handen daardoor
wordt beïnvloed.
v
Timer en chronograaf synchroniseren: Met deze functie
kunt u de timer en chronograaf zo instellen dat ze tegelijk
starten en stoppen. Hierdoor kunt u chronograafgegevens
registreren wanneer u de timer gebruikt.
U moet de instelling voor timer en chronograaf synchroniseren
uitzetten als u wilt dat de timer aan het einde van aftellen in
de modus Timer naar de modus Chronograaf, Finish of
Verticaal overschakelt.
HORLOGE-INSTELLINGEN
Configureer de volgende horloge-instellingen:
v
De functie Night Mode®: Wanneer deze functie geactiveerd
is, gaat het INDIGLO® nachtlicht branden wanneer u op een
willekeurige knop drukt. Deze functie wordt na acht uur
automatisch gedeactiveerd.
v
Uursignaal: Wanneer dit geactiveerd is, geeft het horloge op
het hele uur een signaal.
v
Pieptoon van knop
: Wanneer dit geactiveerd is, geeft het
horloge een pieptoon wanneer u op een knop drukt.
324
Page 79

v
Hartslag: Stel het horloge zo in dat het uw hartslag met slagen
per minuut (BPM) of als een percentage van uw maximale
hartslag (%MAX) weergeeft. De geselecteerde hartslageenheden
verschijnen in alle hartslaggegevens van het horloge,
waaronder de streefhartslagzones.
OPMERKING
: Als u de eenheden tijdens een training verandert,
zijn de snelheids-, tempo- en afstandsgegevens
correct voor de nieuwe eenheden.
O NDERHOUD
De batterij vervangen?
WAARSCHUWING: ALS U DE BATTERIJ ZELF VERVANGT,
KAN HET HORLOGE SCHADE OPLOPEN.
TIMEX RAADT TEN STERKSTE AAN OM
DE BATTERIJ DOOR EEN WINKELIER OF
JUWELIER TE LATEN VERVANGEN.
327
Configureer de volgende eenheidsinstellingen:
v
Afstand: Stel het horloge zo in dat het de afstand in termen
van mijlen, kilometers of nautische mijlen weergeeft.
v
Snelheid: Stel het horloge zo in dat het de snelheid in termen
van mijl per uur (MPH), kilometer per uur (KPH), nautische
mijl (NM) of automatisch weergeeft.
v
Tempo: Stel het horloge zo in dat het het tempo in termen van
mijl, kilometer, nautische mijl of automatisch weergeeft.
v
Hoogte: Stel het horloge zo in dat het de hoogte in termen van
ft, meter of automatisch weergeeft.
v
Noordreferentie
: Stel de noordreferentie op het ware noorden
of het magnetische noorden in.
326
Een hardloopster kiest bijvoorbeeld gewoonlijk kilometers voor
haar eenheidsinstellingen. Wanneer ze aan een marathon
meedoet, verandert ze echter haar afstandseenheid in mijlen
(een marathon is altijd 26,2 mijl), maar ze kiest de
kilometereenheidsinstelling voor het tempo. Tijdens de marathon
kan de hardloopster haar afstand in mijlen bekijken die
overeenkomt met de mijlpalen van de wedstrijd, maar ze kan
haar tempo in de meer vertrouwde kilometers bekijken zodat ze
beter begrijpt hoe snel ze loopt.
Page 80

329
Als u batterij toch zelf vervangt, volg de onderstaande stappen dan
nauwlettend:
1. Plaats het horloge ondersteboven op een plat werkoppervlak.
2. Haal beide helften van het horlogebandje van elkaar met een
kleine platte schroevendraaier.
OPMERKING: U moet de achterkant van het horloge (horlogekast)
in dezelfde richting installeren als waarin u hem
verwijderd had; anders werkt de zoemer niet meer.
3. Verwijder de vier schroeven waarmee de achterkant van de
horlogekast vastzit, met een 00 kruiskopschroevendraaier en leg
ze opzij. Verwijder de achterkant van de horlogekast voorzichtig
en leg hem opzij.
WAARSCHUWING: HOUD HET HORLOGE ALTIJD
ONDERSTEBOVEN OP UW
WERKOPPERVLAK. ALS U HET HORLOGE
OMKEERT OM DE SCHROEVEN OF DE
ACHTERKANT VAN DE HORLOGEKAST
TE VERWIJDEREN, KUNT U DE
ELEKTRISCHE STEKKERTJES BINNEN IN
HET HORLOGE VERLIEZEN.
4. Open de batterijklem voorzichtig en neem de batterij eruit.
5. Plaats een nieuwe CR2430 batterij in de batterijruimte en let
erop dat de zijkant met het plusteken (+) naar u toe gericht is.
6. Bevestig de batterijklem weer.
328
7. Breng de achterkant van de horlogekast weer aan en let erop dat
de zwarte pakking stevig in de groef in de horlogekast past en de
horlogekast goed met het horloge is uitgelijnd om er zeker van te
zijn dat de zoemer in lijn ligt met de interne verbindingen (zie de
opmerking na stap 2).
8. Bevestig de bandjes weer voorzichtig zodat het korte stuk met de
gesp aan het bovenste stel nokjes wordt bevestigd.
INDIGLO®nachtlicht
De in het INDIGLO® nachtlicht gebruikte, elektroluminescentietechnologie verlicht de gehele wijzerplaat van het horloge‘snachts
en wanneer er weinig licht is.
Waterbestendigheid
Uw horloge is bestand tegen waterdruk van maximaal 86 psi (gelijk
aan onderdompeling tot 50 meter of 164 ft onder zeeniveau). Deze
bestendigheid tot 50 meter blijft intact zo lang u het glas, de
drukknoppen en de kast intact houdt.
WAARSCHUWING: DRUK ONDER WATER OP GEEN ENKELE
KNOP OPDAT HET HORLOGE
WATERBESTENDIG BLIJFT.
Het horloge is bestand tegen water maar u mag dit horloge niet
voor duiken gebruiken omdat het geen duikershorloge is en u moet
het horloge met zoet water afspoelen nadat het aan zout water is
blootgesteld.
Page 81

DEZE GARANTIE EN HET HIERIN UITEENGEZETTE
VERHAAL ZIJN EXCLUSIEF EN KOMEN IN DE PLAATS VAN
ALLE ANDERE GARANTIES, UITDRUKKELIJK OF IMPLICIET,
MET INBEGRIP VAN IMPLICIETE GARANTIE VAN VERKOOPBAARHEID OF GESCHIKTHEID VOOR EEN BEPAALD DOEL.
TIMEX IS NIET AANSPRAKELIJK VOOR SPECIALE,
INCIDENTELE OF GEVOLGSCHADE.
Sommige landen en staten staan geen beperkingen toe met
betrekking tot impliciete garanties en staan geen uitsluitingen of
beperkingen met betrekking tot schade toe, zodat deze beperkingen
wellicht niet voor u van toepassing zijn. Deze garantie geeft u
specifieke wettelijke rechten en u kunt ook andere rechten hebben
die van land tot land en van staat tot staat verschillen.
Voor het verkrijgen van service onder de garantie dient u het
horloge naar de fabrikant, een van de gelieerde ondernemingen of
de winkelier waar het product gekocht is, te retourneren, samen
met een ingevulde, originele productreparatiebon of, alleen in de VS
en Canada, de ingevulde originele productreparatiebon of een
schriftelijke verklaring waarin uw naam, adres, telefoonnummer en
datum en plaats van aankoop worden vermeld. Wilt u het volgende
met uw horloge sturen voor port en behandeling (dit zijn geen
reparatiekosten): een cheque of postwissel voor US$ 7,00 in de VS;
een cheque of postwissel voor CAN$6,00 in Canada; en een cheque
of postwissel voor UK£2,50 in Groot-Brittannië. In andere landen
worden port en behandeling in rekening gebracht.
331
OPMERKING
: DIT HORLOGE GEEFT GEEN S/A- OF
HARTSLAGGEGEVENS WEER WANNEER HET
ONDER WATER WORDT GEBRUIKT.
W ETTELIJKE INFORMATIE
Internationale garantie
(beperkte garantie voor de VS)
Het horloge heeft een garantie van Timex Corporation voor gebreken
in fabricage gedurende een periode van EEN JAAR vanaf de
oorspronkelijke aankoopdatum. Timex en gelieerde ondernemingen
over de hele wereld erkennen deze internationale garantie.
Timex mag, naar eigen keuze, het horloge repareren door nieuwe of
grondig gereviseerde en geïnspecteerde componenten te installeren
of het vervangen door een identiek of gelijksoortig model.
WAARSCHUWING: DEZE GARANTIE DEKT GEEN GEBREKEN
OF SCHADE AAN HET PRODUCT:
1) nadat de garantietermijn is verlopen;
2) als het product oorspronkelijk niet bij een erkende
winkelier is gekocht;
3) als gevolg van reparaties die niet door de fabrikant
zijn uitgevoerd;
4) als gevolg van ongelukken, knoeien of misbruik; en
5) behuizing, accessoires of batterij. Het vervangen van
deze onderdelen kan aan u in rekening worden gebracht.
330
Page 82

Service
Mocht het horloge ooit gerepareerd moeten worden, stuur het dan
naar Timex zoals uiteengezet in de internationale garantie van
Timex of stuur het naar: Straatadres:
HotLine Watch Service HotLine Watch Service
1302 Pike Avenue OF P.O. Box 2740
North Little Rock, AR 72203 USA Little Rock, AR 72203 USA
Om gemakkelijk service van de fabriek te verkrijgen kunnen
deelnemende Timex-winkeliers u een geadresseerde
horlogereparatie-enveloppe verstrekken. Zie de internationale
garantie van Timex voor specifieke instructies over het onderhoud
en de service van het horloge.
Bel voor vragen over service: 1-800-328-2677
Bel 1-800-328-2677 als u een nieuwe borst- of armband nodig hebt.
FCC-kennisgeving (Verenigde Staten)/ICkennisgeving (Canada)
Timex Corporation verklaart dat de volgende producten, waaronder
alle componenten van het Timex Bodylink systeem, voldoen aan de
regels van het relevante deel 15 van de FCC en de regels van
Industry Canada voor apparaten van klasse B, en wel als volgt:
333332
WAARSCHUWING: STUUR NOOIT EEN ARTIKEL VAN
PERSOONLIJKE WAARDE MEE.
VS: bel 1-800-328-2677 voor meer informatie over de garantie.
Canada: bel 1-800-263-4639. Brazilië: bel 0800-168787. Mexico:
bel 01-800-01-060-00. Midden-Amerika, het Caribisch gebied,
Bermuda en de Bahamas: bel (501) 370-5775 (VS). Azië: bel
852-2815-0091. Groot-Brittannië: bel 44 020 8687 9620. Portugal:
bel 351 212 946 017. Frankrijk: bel 33 3 81 63 42 00. Duitsland:
bel +43 662 88 92130. Midden-Oosten en Afrika: bel 971-4-310850.
Andere gebieden: neem contact op met uw plaatselijke Timexwinkelier of -distributeur voor informatie over de garantie.
DIT IS UW REPARATIEBON VOOR HET HORLOGE. BEWAAR HEM
OP EEN VEILIGE PLAATS.
INTERNATIONALE GARANTIE VAN TIMEX —
REPARATIEBON VOOR HORLOGE
Oorspronkelijke aankoopdatum:
(kopie van ontvangstbewijs aanhechten, indien beschikbaar)
Gekocht door:
(naam, adres en telefoonnummer)
Plaats van aankoop:
(naam en adres)
Reden voor terugzending:
Page 83

Prestatiehorloge
PRODUCTNAMEN
v
Horlogeontvangers HSM / snelheid/afstand serie M8xx/M5xx
v
Gegevensrecorders HSM / snelheid/afstand serie M5xx/M1xx
PRODUCTTYPE:
Onopzettelijke straler
Deze apparatuur is getest en er is gebleken dat deze aan de
grenzen voor een digitaal apparaat van klasse B voldoet conform
deel 15 van de FCC-voorschriften. Deze grenzen zijn bedoeld om
redelijke bescherming tegen schadelijke storing in woonwijken te
bieden. Deze apparatuur produceert en gebruikt radiofrequente
energie en kan deze energie uitstralen, en kan, als deze niet
volgens de handleiding wordt gebruikt, schadelijke storing voor
radiocommunicatie veroorzaken. Als deze apparatuur schadelijke
storing voor radio- en televisieontvangst veroorzaakt, wat
vastgesteld kan worden door de apparatuur uit en aan te zetten,
wordt de gebruiker aangeraden te proberen de storing te
verhelpen door de ontvangstantenne te heroriënteren of te
verplaatsen; of door de afstand tussen de apparatuur en de
ontvanger te vergroten.
335334
Fitnesssensoren
PRODUCTNAMEN
v
Snelheid/afstandssysteem GPS-zendontvanger serie
M5xx/M1xx
v
Hartslagmonitorsysteem HSM-zender serie M8xx/M5xx
PRODUCTTYPEN
Opzettelijke straler
Deze apparaten voldoen aan deel 15 van de FCC-voorschriften.
Het gebruik is afhankelijk van de volgende twee voorwaarden:
(1) Het apparaat mag geen schadelijke storing veroorzaken en
(2) het apparaat moet alle ontvangen storing accepteren,
waaronder storing die ongewenste werking kan veroorzaken.
Model FCC ID nr. Certificatienr.
M821 hartslagmonitor EP9TMXHRM 481021492A
M515 hartslagmonitor EP9TMXM515 3348A-M515
M850
snelheid/afstandmonitor
EP9TMXM850 3348A-12181
M185
snelheid/afstandmonitor
EP9TMXM185 348A-M185
Page 84

WAARSCHUWING: Alle veranderingen of wijzigingen in de
hierboven vermelde apparatuur die niet
uitdrukkelijk door Timex Corporation zijn
goedgekeurd, kunnen ertoe leiden dat de
toestemming voor de gebruiker om deze
apparatuur te gebruiken wordt ingetrokken.
KENNISGEVING VAN INDUSTRY CANADA: This Class B
digital apparatus complies with Canadian ICES-003. Cet appariel
numérique de la classe B est conforme à la norme NMB-003 du
Canada.
336
Page 85

W-188 589-095009 AS
p e r f o r m a n c e w a t c h u s e r g u i d e
Performance Watch User Guide
English page 1
日本語83 ページ
BODYLINK SYSTEM
®
©2005 Timex Corporation
589-095009_W188_AS_EN_T-0411-16_TMX_W188_EN.qxd 5/19/11 12:57 PM Page CVR2
Page 86

T A B L E O F C O N T E N T S
Register your product at www.timex.com
Introduction...........................................................................................7
Welcome!...............................................................................................7
Manual organization............................................................................8
Resources..............................................................................................9
Print resources ...................................................................................9
Web resources.....................................................................................9
Performance Watch Overview ............................................................10
Watch terminology.............................................................................10
The chronograph................................................................................11
Watch button functions .....................................................................12
Watch case buttons ..........................................................................12
Setting buttons.................................................................................13
To Set Watch functions..................................................................13
Viewing buttons ...............................................................................14
Watch display icons............................................................................15
Starting the Bodylink® System ........................................................16
Viewing Performance Data................................................................17
1
589-095009_W188_AS_EN_T-0411-16_TMX_W188_EN.qxd 5/19/11 12:57 PM Page CVR4
Page 87

Vertical Mode functions ...................................................................31
To operate Vertical Mode...............................................................32
To view performance data in Vertical Mode.................................32
Vertical Mode example.....................................................................33
Finish Mode........................................................................................34
Finish Mode functions .....................................................................34
To set Finish Mode.........................................................................35
To view performance data in Finish Mode...................................35
Finish Mode example .......................................................................36
Navigate Mode ...................................................................................37
Navigate Mode terminology ............................................................37
Navigate Mode functions.................................................................38
To operate Navigate Mode.............................................................38
To store waypoints in Navigate Mode ..........................................38
To view performance data in Navigate Mode ..............................39
Navigate Mode example...................................................................40
Waypoints Mode.................................................................................40
Waypoints Mode terminology..........................................................40
Waypoints Mode functions ..............................................................41
To operate Waypoints Mode ..........................................................42
To store a waypoint........................................................................42
To view or edit waypoints..............................................................43
3
Watch messages..................................................................................19
Display formatting .............................................................................20
Watch modes ......................................................................................20
Using the Watch.................................................................................21
Performance Watch Modes .................................................................22
Time of Day Mode..............................................................................22
Time of Day Mode terminology.......................................................22
Time of Day Mode functions ...........................................................22
To set time of day...........................................................................23
To switch time zones......................................................................24
To synchronize Time of Day with Fitness sensors ......................24
To view performance data in Time of Day Mode.........................25
Time of Day Mode example.............................................................26
Chronograph Mode ............................................................................27
Chronograph Mode terminology .....................................................27
Chronograph Mode functions..........................................................27
To operate Chronograph Mode manually.....................................28
To operate Chronograph Mode hands-free...................................29
To view performance data in Chronograph Mode .......................29
Chronograph Mode example ...........................................................30
Vertical Mode......................................................................................31
Vertical Mode terminology ..............................................................31
2
589-095009_W188_AS_EN_T-0411-16_TMX_W188_EN.qxd 5/19/11 12:57 PM Page 2
Page 88

Alarm Mode functions .....................................................................58
To set an alarm in Alarm Mode ....................................................59
Configure Mode..................................................................................60
Configure Mode terminology...........................................................60
Configure Mode setting groups .......................................................60
To set functions in Configure Mode .............................................61
Configure Mode options...................................................................62
HRM settings .................................................................................62
GPS-3D Sensor Settings................................................................64
Altitude settings.............................................................................65
Hands-Free settings.......................................................................66
Watch settings ................................................................................67
Unit settings...................................................................................68
Care & Maintenance ...........................................................................69
Changing the battery.........................................................................69
INDIGLO® night-light......................................................................71
Water resistance.................................................................................71
Legal Information................................................................................72
International warranty (U.S. limited warranty)..............................72
Service.................................................................................................75
FCC notice (United States)/IC notice (Canada)...............................75
Declaration of conformity..................................................................78
5
To operate the Track Back feature ...............................................44
Waypoints Mode example ................................................................46
Lap Data Mode ...................................................................................46
Lap Data Mode functions ................................................................47
To operate Lap Data ......................................................................47
To view performance data in Lap Data Mode..............................47
Lap Data Mode example ..................................................................48
Summary Mode ..................................................................................49
Summary Mode terminology ...........................................................49
Summary Mode functions ...............................................................49
To operate Summary Mode ...........................................................50
To reset Features in Summary Mode ...........................................50
To view performance data in Summary Mode .............................50
Summary Mode example .................................................................53
Timer Mode ........................................................................................54
Timer Mode terminology .................................................................54
Timer Mode functions .....................................................................54
To set Timer Mode .........................................................................55
To operate the Timer in Timer Mode...........................................55
To view performance data in Timer Mode ...................................57
Timer Mode example .......................................................................57
Alarm Mode ........................................................................................58
4
589-095009_W188_AS_EN_T-0411-16_TMX_W188_EN.qxd 5/19/11 12:57 PM Page 4
Page 89

I N T R O D U C T I O N
Welcome!
Congratulations! With your purchase of the Timex® Bodylink®
System you have hired your new personal coach. Using your
Performance Watch in partnership with the Heart Rate and Speed
+ Distance Sensors offers you an unprecedented ability to track,
store, and analyze several key indicators of your personal fitness
level.
We dedicate this manual to information regarding your Performance
Watch. This sport Watch functions as the brain for your Bodylink
System, providing you comprehensive, real-time workout data
gathered from the Heart Rate Sensor, Speed + Distance Sensor, or
both.
You will find your Performance Watch provides you with very userfriendly fitness technology. But, like any new technology, you should
take the time to familiarize yourself with it to optimize the
usefulness of your purchase.
So, have fun exploring! Review the Performance Watch modes. Use
the Quick Start Guide to give you a baseline knowledge of the
Bodylink System. Most of all, enjoy your new fitness partner on
your road to increased performance!
76
589-095009_W188_AS_EN_T-0411-16_TMX_W188_EN.qxd 5/19/11 12:57 PM Page 6
Page 90

9
Manual organization
This manual contains information about, and instructions for,
setting up your new Performance Watch and using it with the
Bodylink Fitness Sensors as part of the coordinated Bodylink
System.
To assist you in learning about your Performance Watch, this
manual contains several key elements to increase your
understanding, including:
❖
An overview of the Performance Watch buttons, display icons, and
modes.
❖
A glossary for each section that explains many of the references
used for the Performance Watch and the Performance Watch
modes.
❖
Complete, comprehensive instructions for setting up and using
your Performance Watch in each mode.
❖
A primer covering the links between your Performance Watch and
each of the Fitness Sensors in each mode.
❖
Real-world scenarios that explain how you might use your
Performance Watch as part of your activity routine. You will see
these scenarios throughout the manual, appearing in grey text
boxes.
8
Resources
Print resources
In addition to this manual, your Bodylink System includes these
valuable resources:
❖
Bodylink® System Quick Start Guide: Information to help
you set up and begin using your Performance Watch in
conjunction with your Fitness Sensors, and an overview map of
the different Performance Watch modes.
❖
Fitness Sensors User Guide: Information for set-up,
operation, and maintenance of your Speed + Distance and
Heart Rate Sensors.
Web resources
The Timex Websites offer beneficial information to help you
optimize your Bodylink System. These sites include:
❖ www.timex.com/bodylink/: Information about Bodylink
System features and product simulations.
❖ www.timex.com/software/: Current software releases for
Timex products.
❖
www.timex.com/fitness/: Fitness and training tips for using
the Bodylink System.
589-095009_W188_AS_EN_T-0411-16_TMX_W188_EN.qxd 5/19/11 12:57 PM Page 8
Page 91

GPS: The GPS-3D Sensor uses information gathered from global
positioning satellites (GPS) to calculate your speed, distance, and
elevation, and to track your movements.
Heart Rate Sensor: The Heart Rate Sensor (HR Sensor)
measures your heart rate. The Fitness Sensor User Guide
provides detailed information for setting up and using your HR
Sensor.
The chronograph
As you use this manual to learn about your Watch, the word
chronograph can potentially cause some confusion. Try to remember
this: a chronograph is a tool for measuring time. So, you will
notice a Chronograph Mode, but Vertical and Finish Modes also
operate from the chronograph. Any time your Watch functions as a
timing tool, it operates using chronograph (or timing) functionality.
chronograph
measures time
Chronograph
Mode
Vertical Mode
Finish Mode
11
P E R F O R M A N C E W A T C H O V E R V I E W
Watch terminology
The following terms appear throughout this manual. Knowing these
terms will provide you a greater understanding of the information
provided.
Bodylink® System: The Bodylink System allows you to track realtime data by using Fitness Sensors in conjunction with your
Performance Watch.
Fitness Sensors: The Bodylink System includes two digital
sensors: the Heart Rate Sensor and the Speed + Distance Sensor.
Performance Watch: The Performance Watch, (Watch) houses the
data center for the Bodylink System.
Speed + Distance Sensor: The Speed + Distance Sensor (GPS3D Sensor) tracks speed, pace, distance traveled, altitude, location,
and more, using GPS based technology. The Fitness Sensor User
Guide provides detailed instructions for setting up and using your
GPS-3D Sensor.
10
589-095009_W188_AS_EN_T-0411-16_TMX_W188_EN.qxd 5/19/11 12:57 PM Page 10
Page 92

Setting buttons
Watch buttons also set Watch functions (for example, setting the
time or a target heart rate zone). When the
+ and - symbols
appear on the Watch display, you have initiated the setting process.
TO SET WATCH FUNCTIONS
Use the following steps to set Watch functions:
1. Press and hold SELECT (SET/FORMAT). The message
HOLD TO SET may appear.
2. Continue pressing SELECT (SET/FORMAT) until SET
briefly appears on the display, followed by a flashing value.
3. Set the first value by pressing
+ (DISPLAY) or -
(STOP/RESET).
DONE
Press when finished
setting
INDIGLO®
night-light
Press to light
the watch
+
Press to increase the
displayed value
SELECT
Press to begin setting or
move to the next value
-
Press to decrease the
displayed value
13
Watch button functions
The buttons on your Watch are multi-functional, serving three
purposes. You do not have to memorize button functions for each
mode. Let the Watch serve as your guide.
Watch case buttons
Most of the time, the Watch buttons function according to the
labels printed on the case. If you do not see any of symbols on the
display, follow the information printed on the Watch case to guide
you in using the buttons.
MODE
Press to go to
the next mode
START/SPLIT
Press to start timing or
take a split
INDIGLO
®
night-light
Press to light
the watch
DISPLAY
Press to display
performance data
SET/FORMAT
Press to set or change
the display format
STOP/RESET
Press to stop or press
and hold to reset
12
589-095009_W188_AS_EN_T-0411-16_TMX_W188_EN.qxd 5/19/11 12:57 PM Page 12
Page 93

1514
Watch display icons
Timer running
Chronograph
running
Night Mode enabled
GPS-3D Sensor
battery low
Sensor(s) activated
(blinks when trouble)
Alarm armed
Hourly chime
enabled
Watch display
icons
4. When you reach the desired value, press SELECT
(SET/FORMAT) to move to the next value.
5. Repeat steps 3 and 4 for each value you want to set.
6. When you have adjusted all values, press DONE (MODE) to
return to the main display of the mode.
Viewing buttons
Finally, buttons help you navigate through viewing options. When
you see the ▲ and ▼ triangles on the display, you know there is
information to view.
MODE
Press to go to the
next mode
INDIGLO®
night-light
Press to light
the watch
▲
Press to display next
data value
▼
Press to display
previous data value
589-095009_W188_AS_EN_T-0411-16_TMX_W188_EN.qxd 5/19/11 12:57 PM Page 14
Page 94

Starting the Bodylink® System
When using the Performance Monitor, you can view real-time data
from a Heart Rate Sensor or Speed + Distance Sensor, or both, in
Time of Day, Chrono and Timer. The procedure to do this is the
same in all modes, though the data that you can view and their
position on the display in each mode will vary.
1. Make sure you’re wearing your Heart Rate Sensor or Speed +
Distance Sensor, or both, and that they are powered up and
functional.
2. Stand at least 6 feet (2 meters) away from any other users of
fitness monitor systems and from any source of radio interference
such as electrical equipment, power lines, etc.
3. Press and release the DISPLAY button. This tells the watch to
look for any Bodylink
®
sensors nearby; it will search for one
minute. The antenna icon will appear on the watch display,
indicating that the Bodylink®system is active.
16
NOTE: Though the Bodylink®system has a working range of
about 3 feet (1 meter) from the sensors to the watch, for the most
reliable operation, make sure that the watch is as close to the
sensors as possible when starting the system up.
4. When the watch has successfully detected transmissions from the
sensors, the watch display will switch to a new format showing
some or all of the sensor data, depending on the mode. Time of
Day and Timer show the data in the lower line exclusively, while
Chrono allows up to three lines of performance data.
Viewing Performance Data
Press and release the DISPLAY button to select the data or
combination of data that you wish to view during your workout. For
your convenience, a “banner” showing the names of the information
and their position on the display is shown briefly before showing the
data itself.
Here are a few more things you should know to use the watch
effectively:
• While in the Chrono, press and release SET/FORMAT to swap
the positions of the information in the upper and middle display
lines. This allows you to view the data most important in the
larger middle display line.
17
NOTE: As a convenience, Chrono and Timer will automatically
search for Bodylink®sensors for fifteen seconds upon entering
the mode.
589-095009_W188_AS_EN_T-0411-16_TMX_W188_EN.qxd 5/19/11 12:57 PM Page 16
Page 95

Watch messages
When using the Watch with the Fitness Sensors, the Watch may
display messages to communicate the status of the Sensor in
conjunction with the Watch. Messages include:
❖
SEARCHING The GPS-3D Sensor is still trying to link to GPS
data. You cannot view speed, pace, distance, or positional
information until the Sensor locates GPS satellites.
❖
WEAK GPS SIGNAL The GPS -3D Sensor lost its link with GPS
satellites. The GPS-3D Sensor operates more accurately in more
open areas (such as an area without a lot of tree or cloud cover)
and at quicker speeds.
❖
NO DATA FROM HRM (GPS) The Watch is not receiving data
from the HR or the GPS-3D Sensor. Ensure that the Sensor is not
more than 3 feet (1 meter) away from the Watch, is operating, or
has not inadvertently locked onto someone else’s Sensor. The
Watch will attempt to establish a connection for one minute after
this message displays.
❖
NOISY DATA FROM HRM (GPS) The Watch is experiencing
radio interference. Try to move away from any potential sources
of interference (for example, televisions, monitors, or motorized
devices). The Watch will attempt to establish a connection for 30
seconds after this message displays.
❖
FATAL GPS ERROR The GPS-3D Sensor has encountered a
severe internal error. Contact Timex Customer Service.
19
• If you want to stop monitoring data from your Bodylink
®
sensors,
hold the DISPLAY button down until the message HOLD TO
SHUT OFF RCVR is displayed on the watch display. Continue
holding the DISPLAY button for a few more seconds; the watch
will beep indicating that the radio link between the watch and the
sensors has been shut down.
18
TIP: If you are already viewing data from one sensor, for example,
the Heart Rate Sensor, and you wish to also view data from the
Speed + Distance Sensor, simply press and hold the DISPLAY
button until the watch emits a short beep and the antenna icon
begins flashing. The watch is now searching for a second
Bodylink
®
sensor. When it detects this second device, the antenna
icon will stop flashing and the display may change to a new
format that includes the new information. Press and release the
DISPLAY button (as detailed previously) to view various
combinations of two sensor’s data.
589-095009_W188_AS_EN_T-0411-16_TMX_W188_EN.qxd 5/19/11 12:57 PM Page 18
Page 96

❖
Waypoints support up to ten reference points as you travel from
one location to another and uses these reference points to help
you travel back to your beginning location.
❖
Lap Data presents stored lap information.
❖
Summary displays data recorded while the chronograph runs.
❖
Timer enables you to time an event that counts down from a
specific time to zero.
❖
Alarm manages up to five alarms.
❖
Configure permits you to customize Watch functions to meet
your needs.
Using the Watch
To access all features and functionality of your Watch, you must use
it in conjunction with the Fitness Sensors. However, your Watch
does offer some flexibility of use. For example:
❖
You can use your Watch without either of the Fitness Sensors to
view time Time of Day Mode, as an alarm in Alarm Mode, or to
time a workout in any of the chronograph modes.
❖
You can use your Watch with only the HR Sensor in any of the
chronograph modes to track heart rate and time information.
❖
You can use your Watch with the GPS-3D Sensor in any of the
navigational modes to track distance information. Or, you can use
this Sensor in any of the chronograph modes to track distance
information.
21
Display formatting
In Chronograph, Vertical (with the exception of ascent rate
information), Finish, and Navigate Modes, you can press and release
SET/FORMAT to switch the display reading positions in the upper
and middle display lines.
Watch modes
You can cycle through each of the 11 modes by pressing MODE.
The modes include:
❖
Time of Day allows you to display the time, date, and day of the
week for two different time zones.
❖
Chronograph tracks and displays performance data.
❖
Vertical applies a view for vertical data such as ascent rate,
altitude, and elevation.
❖
Finish lets you predict a time for a specified distance and set
alerts if you are off pace.
❖
Navigate recognizes positional, compass-type information for
your location.
Time
Pace
Time
Pace
20
589-095009_W188_AS_EN_T-0411-16_TMX_W188_EN.qxd 5/19/11 12:57 PM Page 20
Page 97

23
P E R F O R M A N C E W A T C H M O D E S
Time of Day Mode
Time of Day Mode terminology
UTC: Universal Time, Coordinated (formerly known as GMT)
describes the local time zone in relationship to the Greenwich
Meridian. For example, New York City is in the -5 UTC zone, since
New York is five hours earlier than Greenwich Meridian; Moscow
is +3 UTC, since it is three hours later than Greenwich Meridian.
Time of Day Mode functions
Your Watch can act as an ordinary watch to display the time, date,
and day for two different time zones, using a 12- or 24-hour
format.
View performance
data
View or switch to
secondary time
Hold to set
INDIGLO®
night-light
To Chronograph
Mode
22
You can return to Time of Day Mode from any other mode on the
Watch by pressing and holding MODE until the time of day
displays.
TO SET TIME OF DAY
For instructions on setting Watch functions, including Time of
Day, refer to page 13, “To set Watch functions.”
For Time of Day, you can set the following values:
NOTE: You cannot adjust seconds. When you use the Watch with
the GPS-3D Sensor, it will align with UTC.
When switching between Standard Time and Daylight
Savings Time, manually adjust the hour.
You can set the Watch slightly ahead or behind current
time. For example, if you typically arrive ten minutes
late, set the Watch ten minutes ahead. The Watch
remains ahead of time even when you synchronize it with
the GPS-3D Sensor.
v Hour v Month
v Minute v Date (automatically sets the day of week
when you set the date)
v Year v Hour format (i.e., AM/PM versus 24-hours)
589-095009_W188_AS_EN_T-0411-16_TMX_W188_EN.qxd 5/19/11 12:57 PM Page 22
Page 98

After initial use, the Watch will automatically correct any time
inaccuracy upon activation of the GPS-3D Sensor and every 15
minutes thereafter.
TO VIEW PERFORMANCE DATA IN TIME OF DAY MODE
When using Fitness Sensors with your Watch, scroll through
performance data by pressing and releasing DISPLAY.
Performance data viewing options for Time of Day Mode include:
❖
Heart Rate: Current heart rate (requires HR Sensor).
❖
Speed: Current velocity (requires GPS-3D Sensor).
❖
Pace: Current velocity, expressed in minutes per selected
distance unit, such as miles or kilometers (requires GPS -3D
Sensor).
❖
Distance: Distance traveled since the activation of the GPS -3D
Sensor (requires GPS-3D Sensor).
Performance data
Press to view
performance data
25
TO SWITCH TIME ZONES
The Watch can track two time zones (T1 and T2). Look at the
other zone by pressing START/SPLIT. Or, switch from T1 to T2
using these steps:
1. Press and hold START/SPLIT until HOLD FOR TIME 2
displays.
2. Continue to hold until the time switches and the Watch beeps.
3. Repeat steps 1 and 2 to switch back to T1. The message will
read HOLD FOR TIME 1.
You must independently set the time of day for each time zone.
TO SYNCHRONIZE TIME OF DAY WITH FITNESS SENSORS
When you first activate the GPS-3D Sensor in conjunction with
your Watch, you can expect one of the following scenarios:
❖
If you activate the GPS-3D Sensor before setting the time of
day, the Watch will synchronize both T1 and T2 with UTC. You
will need to adjust the hour for both time zones to your local
time.
❖
If you activate the GPS-3D Sensor after setting the time of day,
the Watch maintains the hour and date settings and
synchronizes minutes and seconds to UTC for each time zone.
24
589-095009_W188_AS_EN_T-0411-16_TMX_W188_EN.qxd 5/19/11 12:57 PM Page 24
Page 99

Chronograph Mode
Chronograph Mode terminology
Chronograph: The chronograph records time segments for the
duration of your activity.
Lap: Lap time records the time for one segment of your activity.
Split: Split time records the total elapsed time since the beginning
of your current activity.
Taking a split: When you take a split, the chronograph will
complete timing one lap and begin timing a new one.
Chronograph Mode functions
Chronograph Mode operates as the main workout data center for
your Watch. It can record elapsed time for up to 100 hours. It can
also register information for up to 100 laps, including data for
speed, pace, and distance (using the GPS-3D Sensor); and average
heart rate (using the HR Sensor).
View performance
data
Swap upper and
middle lines
Stop or reset the
chronograph
INDIGLO®
night-light
Start timing or
take a split
To Vertical Mode
or hold for time
27
❖
Altitude: Current elevation above sea level (requires GPS-3D
Sensor).
NOTE: If the Watch does not detect either Fitness Sensor, the
day of the week shows on the bottom line of the display.
You can continue viewing the day of the week while using
the Fitness Sensors by hiding performance data (for data
hiding information, see “Watch settings” on page 67). If
you choose Day of Week, it will appear as though the
Watch does not receive any data.
Time of Day Mode example
Assume that you live in San Francisco and work with a client in
Singapore. Like all busy people, it is imperative you keep track
of time, so you set T1 to your local time. But it is also important
to have a quick reminder of your client's time, so you set T2 to
Singapore time. With both time zones available, you can quickly
check your client's time or even switch your monitor to display
T2 when you travel to Singapore.
26
589-095009_W188_AS_EN_T-0411-16_TMX_W188_EN.qxd 5/19/11 12:57 PM Page 26
Page 100

TO OPERATE CHRONOGRAPH MODE HANDS-FREE
You can set Chronograph Mode to start when you begin moving
and to stop when you stop moving or to automatically take splits
based on either distance or elapsed time. See “Hands-free
settings” on page 66.
TO VIEW PERFORMANCE DATA IN CHRONOGRAPH MODE
When using Fitness Sensors with your Watch, scroll through
performance data by pressing and releasing DISPLAY.
Performance data viewing options for Chronograph Mode include:
❖
Heart Rate: Current heart rate (requires HR Sensor).
❖
Speed: Current velocity (requires GPS-3D Sensor).
❖
Average Speed: Average velocity for the period that
chronograph has been running (requires GPS-3D Sensor).
❖
Pace: Current velocity, expressed in minutes per selected
distance unit, such as miles or kilometers (requires GPS -3D
Sensor).
❖
Average Pace: Average per-minute speed for the period that
chronograph has been running (requires GPS-3D Sensor).
❖
Distance: Distance traveled since the chronograph was started
(requires GPS-3D Sensor).
❖
Altitude: Current height above sea level (requires GPS-3D
Sensor).
29
NOTE: Press MODE to switch the Watch display to any other
mode while the chronograph continues to run. The
stopwatch icon will appear to indicate the chronograph
is still functioning.
TO OPERATE CHRONOGRAPH MODE MANUALLY
1. Press MODE until Chronograph Mode appears.
2. Press START/SPLIT to begin timing.
3. Press START/SPLIT again to take a split and automatically
begin timing a new lap.
The Watch stores lap and split information and displays
average statistics for the lap if you are using the Fitness
Sensors.
4. Press MODE to immediately display new lap information
OR
Wait for a few seconds and the Watch will automatically begin
to display data for a new lap.
5. Press STOP/RESET to stop timing when you reach the end
of your activity.
6. Press START/SPLIT to continue timing.
OR
Press and hold STOP/RESET to reset the chronograph
display to zero.
28
589-095009_W188_AS_EN_T-0411-16_TMX_W188_EN.qxd 5/19/11 12:57 PM Page 28
 Loading...