

Page 1

1
INTRODUCTION
Your blood pressure monitor (with integrated time/date display) is a fully automatic,
digital blood pressure measuring device for use on the wrist. This enables very fast
and reliable measurement of the systolic and diastolic blood pressure
as well as pulse by way of the oscillometric method of
measuring. This device is easy to use and is proven in
clinical studies to provide excellent accuracy and
is designed for maximum user-friendliness.
Before using, please read through this
instruction manual carefully and keep
it in a safe place. For further questions
on the subject of blood pressure and
its measurement, please contact your doctor.
Attention! Important information
about self-measurement
• Self-measurement means control, not diagnosis or treatment.Your values must
always be discussed with your physician. You should never alter the dosages of any
medication without direction from your physician.
• The pulse display is not suitable for checking the frequency of heart pacemakers.
• In cases of irregular heartbeat (arrhythmia), measurements made with this instrument should only be evaluated after consultation with your doctor.
Electromagnetic Interference:
This device contains sensitive electronic components.Avoid strong electrical or electromagnetic fields in the direct vicinity of the device (e.g. cellular phones, microwave
ovens). These can lead to temporary impairment of the measuring accuracy.
IMPORTANT INFORMATION ON THE SUBJECT OF BLOOD PRESSURE
AND ITS MEASUREMENT
How does high/low blood pressure arise?
Your level of blood pressure is determined in the circulatory center of the brain and adjusts to a variety of situations
through feedback from the nervous system. To adjust blood pressure, the strength and
frequency of the heart (pulse), as well as the width of circulatory blood vessels is
altered. Blood vessel width is affected by way of fine muscles in the blood vessel
walls.Your level of arterial blood pressure changes periodically during heart activity.
During the "blood ejection" (systole), the value is highest (systolic blood pressure
value). At the end of the heart’s "rest period" (diastole) pressure is lowest (diastolic
blood pressure value). Your blood pressure values must lie within certain normal
ranges in order to prevent particular diseases.
Which values are normal?
Blood pressure is too high if your diastolic pressure is
above 90 mmHg and/or your systolic blood pressure is over 160 mmHg, while at rest.
In this case, please consult your physician immediately. Long-term values at this level
endanger your health through continual damage to the blood vessels in your body.
Regular self-checks will be necessary. If you have blood pressure values that are too
low, (i.e., systolic values under 105mmHg and/or diastolic values under 60 mmHg),
consult your physician. Even with normal blood pressure values, a regular self-check
with your blood pressure monitor is recommended. You can detect possible changes
in your values early and react appropriately. If you are undergoing medical treatment
to control your blood pressure, keep a record of values along with time of day and
date. Show these values to your physician. Never use the results of your measurements to independently alter the drug doses prescribed by your physician.
Further information
• If your values are mostly normal under resting conditions but exceptionally high
under conditions of physical or psychological stress, it is possible that you are suffering from so-called "labile hypertension" (frequent changing levels of elevated
blood pressure). Consult your physician.
• Correctly measured diastolic blood pressure values above 120mmHg require immediate medical treatment.
What can be done, if regular increased/low values are obtained?
Increased
blood pressure values (various forms of hypertension) over time are associated with
considerable risks to health. Blood vessels in your body are endangered due to
constriction caused by deposits in the vessel walls (arteriosclerosis). This can result in
a deficient supply of blood to important organs (heart, brain, muscles). Additionally,
the heart will become structurally damaged. There are many different causes of high
blood pressure.We differentiate between the common primary (essential) hypertension, and secondary hypertension. Secondary hypertension can cause organ malfunctions. Please consult your doctor for information about the possible origins of your
own increased blood pressure values.
Eating habits
• Maintain a normal weight as prescribed by your doctor
• Avoid excessive consumption of salt
• Avoid fatty foods
Previous/Existing illnesses
• Follow consistently any medical instructions for treating previous illness such as:
• Diabetes (Diabetes mellitus)
• Fat metabolism disorder
• Gout
Habits
• Eliminate smoking
• Drink only moderate amounts of alcohol
• Restrict your caffeine consumption (coffee)
Physical conditioning
• After a preliminary medical examination, exercise regularly
• Choose sports which require endurance
• Avoid over-exertion
• With previous illnesses and/or an age of over 40 years, please consult your doctor
before beginning your exercise routine.Your physician will help you develop an
exercise routine that is appropriate for you.
AAT Mode (Advanced Accuracy Technology)
• "AAT Mode" is a new type of concept for optimum reliability in self-measurement
of blood pressure.
• An advanced accuracy measurement is achieved by the automatic analysis of three
successive measurements.
• The new system provides reliable values for the doctor and can be used as the basis
for reliable diagnostics and medication therapy for high blood pressure.
Why AAT?
• Human blood pressure can rise and fall rapidly.
• Three measurements allows for adjustments to abnormalities in the reading such as
exertion or movement.
Key advantages
Reduction of errors:
• Insufficient rest prior to measurement
• Movement
• Improper cuff positioning
Medical benefits
• Improved accuracy
• Reliable patient self-measurement data for the doctor
• Safe hypertension diagnostic
• Reliable therapy control
Measurement sequence
• With the full measurement cycles, the total measurement time remains less than
3 minutes, compared to a single measurement time of 1 minute.
• Single results are not displayed.
• Due to the "Data Analysis" result, a 4th measurement may be applied.
Blood Pressure
Monitor
Professional Series
Model# 80224
Page 2
2
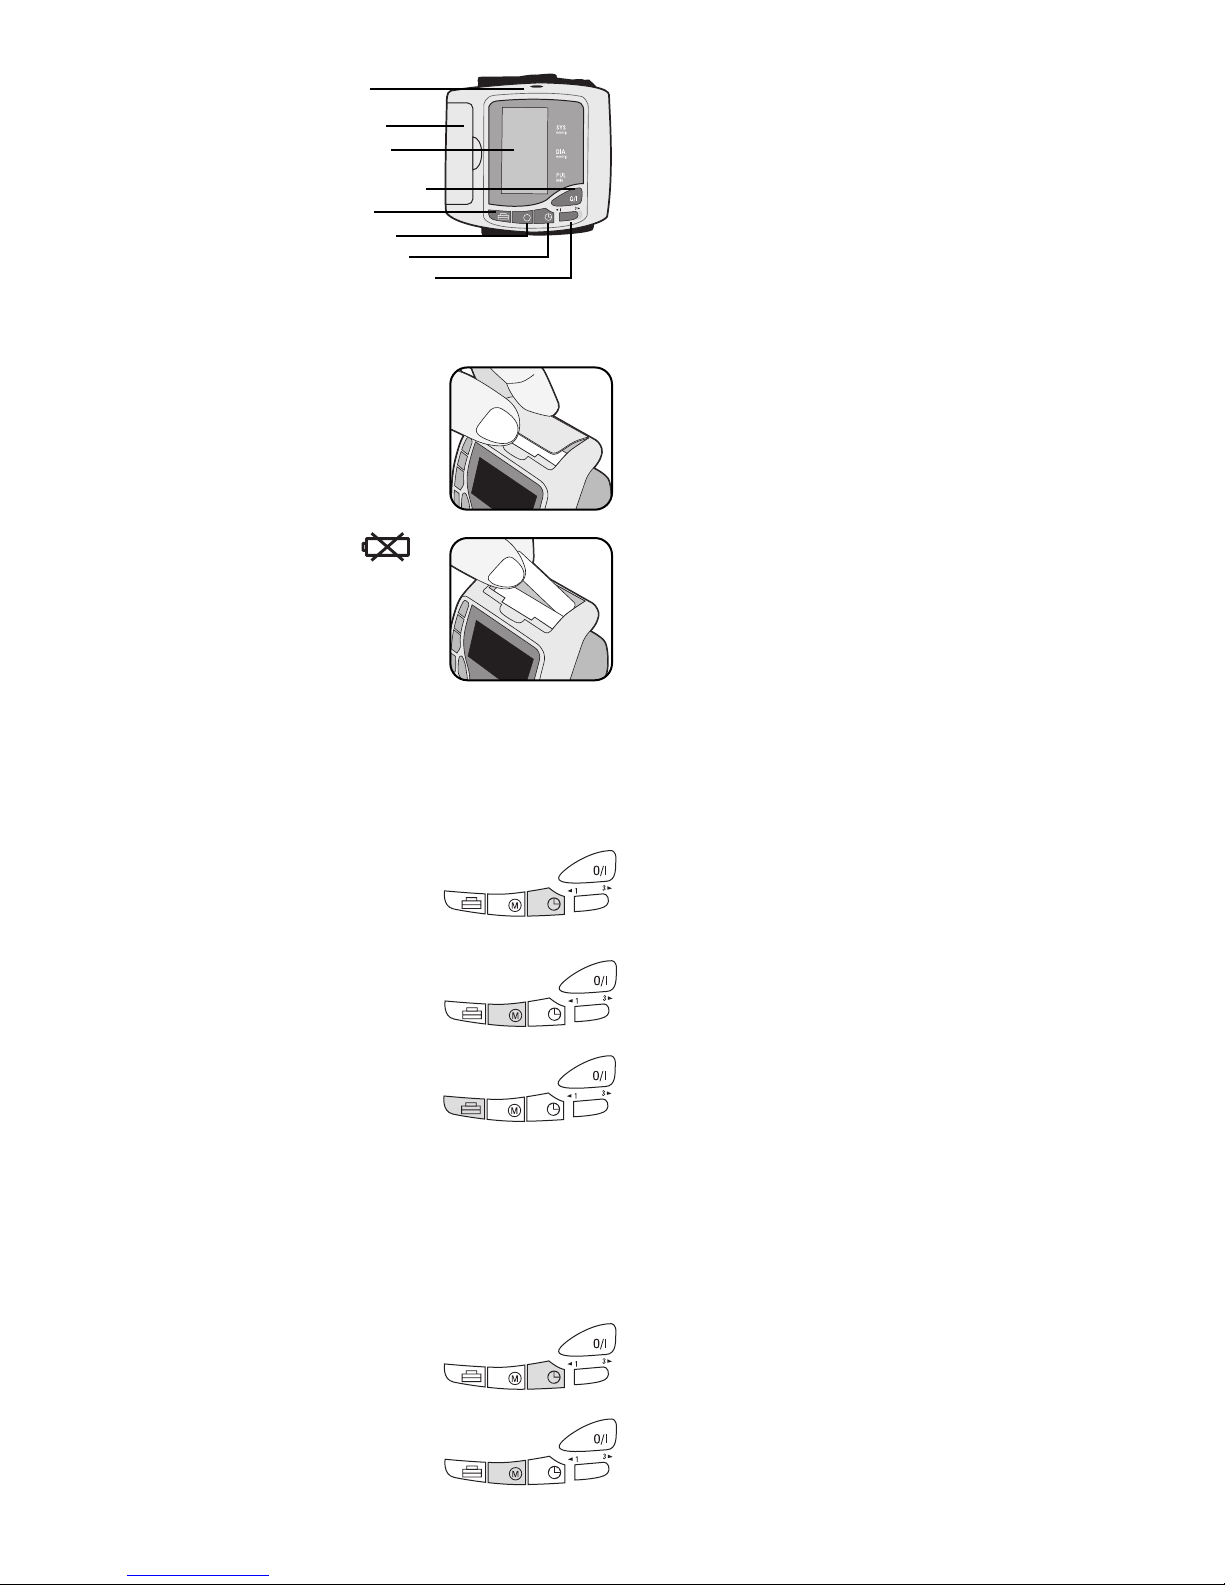
COMPONENTS OF YOUR
BLOOD PRESSURE MONITOR
The illustration shows your
Timex Professional Series Wrist
Blood Pressure Monitor
model # 80224, consisting of:
PUTTING YOUR BLOOD PRESSURE MONITOR INTO OPERATION
Inserting the batteries
After you have unpacked your device, insert the batteries.The
battery compartment is located on the left lateral side of the
device (see Diagrams).
a) Remove cover as illustrated in Diagram 1.
b) Insert two AAA batteries, observing the indicated polarity
as shown in Diagram 2.
c) If the battery warning appears in the display, the batteries
are low and must be replaced by new ones.
Attention!
• After the battery warning appears, the device is blocked
until the batteries have been replaced.
• Please use AAA Long-Life. The use of rechargeable batteries
is not recommended.
• If the blood pressure monitor is left unused for long periods,
please remove the batteries.
Functional check:
Hold the 0/I button to test all the display elements.When functioning correctly all
symbols must appear.
Sleep mode
The device is designed to stay at the sleep mode as
batteries are loaded. In this mode, the time and user
icon set will be displayed. You can conduct the
following operations during this mode.
• Reading the set date press the TIME button.The date set
will be displayed for 2 seconds.
• Recalling the measurements Press the MEMORY button.
The measuring data stored can be displayed. For more
information refer to the section on memory storage and
recall.
• Printing the measuring data please press the PRINT
button. The stored measurements can be printed.
For details, please refer to the section on Printer
Function.
Setting the time and date
This blood pressure monitor incorporates an integrated clock with date display.This
has the advantage, that at each measurement procedure, not only the blood pressure
values are stored, but also the exact moment of the measurement.After new batteries
have been inserted, the clock begins to run from the following setting: 2001-01-01
00:00. You must then enter the current date and current time as follows:(Example:
Entering (year-month-date-time) 2001-06-20 Time 09:30):
1) Press and hold the TIME button for three seconds. User
1 or 2 will begin flashing. Press the Time button again
briefly. Now you can begin changing the time and date.
2) The correct year can be entered by pressing the MEMO-
RY button. (Example: 1 x press)
3) Press the TIME button again.The display now switches
to the current date, during which the first character (month)
blinks.
4) The corresponding month can now be entered by press-
ing the MEMORY button. (Example: 6 x presses)
5) Press the TIME button again.The last two characters (day) are now blinking.
6) The corresponding day can now be entered by pressing the MEMORY button.
(Example: 15 x presses)
7) Press the TIME button again.The display now switches to the current time, during
which the first character (hour) blinks
8) The corresponding hour can now be entered by pressing the MEMORY button.
(Example: 9 x presses)
9) Press the TIME button again.The last two characters (minutes) now blink
10) The exact time can now be entered by pressing the MEMORY button. (Example:
30 x presses)
11) Now after all settings have been made, press the TIME button once again.The
date is briefly displayed and then the time.The input is now confirmed and the clock
begins to run.
User selection:
This advanced blood pressure monitor allows you to track blood pressure readings for
2 individuals independently.
a) Before measurement, make sure you set the unit for the intended user.The unit can
track results for 2 individuals. (User 1, User 2)
b) The unit is set to User 1. Push and hold the TIME button for 4 seconds to initiate
the user selection.
c) When the user icon is flashing, press the MEMORY button to toggle between users.
d) When the correct user is selected wait three seconds for the user icon to stop
flashing. The monitor is now ready for use.
e) Repeat the procedure again to change users again.
Further Information
With each press of the button (TIME, MEMORY) one input is made (e.g. switching
over from hours to minutes mode, or altering the value by +1). However, if you keep
the button pressed, you can switch more quickly to the desired mode,or find the
desired value.
CARRYING OUT A MEASUREMENT
Before the measurement:
• Avoid eating or smoking as well as all forms of exertion directly before measurement. All these factors influence the measurement result. Relax by sitting in an armchair in a quiet atmosphere for about ten minutes before the measurement.
• Remove any clothing that fits closely to your wrist.
• Your wrist should be supported on a table or pillow such that it is approximately
level with you heart.
• Remain perfectly still while measuring.
• Always measure on the same wrist (normally left).
• Attempt to take measurements regularly at the same time of day, since the blood
pressure changes during the course of the day.
Common sources of error:
Note: Comparable blood pressure measurements always require the same condi-
tions! These are normally always quiet conditions.
• All efforts to support the arm can increase blood pressure. Make sure you are in a
comfortable, relaxed position and do not move any of the muscles in the measurement arm during the measurement. Use a cushion for support if necessary.
• If the wrist artery lies considerably lower (higher) than the heart, an erroneously
higher (lower) blood pressure will be measured! (Each 15cm/6" difference in height
results in a measurement error of10mmHg!)
• A loose cuff causes false measurement values.
• With repeated measurements, blood accumulates in the respective arm, which can
lead to false results. Correctly executed blood pressure measurements should therefore first be repeated after a 5 minute pause or after the arm has been held up in
order to allow the accumulated blood to flow away (after at least 3 minutes).
Fitting the cuff
a) Remove all objects and jewelry (e.g. wristwatch) from the wrist in use. Put the cuff
over the wrist with the monitor face on the inside of the wrist.
b) The distance between the cuff and the hand should be approx. 10 mm (1/2").
c) Secure the cuff, so that it lies comfortably and is not too tight. No space should
remain between the cuff and the wrist.
d) Lay your arm on a table, with the palm upwards.
Support the arm a little with a cushion, so that the cuff rests at the same height as
the heart. Remain still for 2 minutes, before beginning the measurement.
Printer Port
Battery Cover
Digital Display
On/Off/Start Button
Print Button
Memory Button
Time/User Button
AAT Selection Switch
Dia. 1
Dia. 2
Time Button
Memory Button
Print Button
Time Button
Memory Button
Page 3

3
Measuring procedure
After the cuff has been appropriately positioned, and you’ve
selected User 1 or User 2, the measurement can begin:
a) If you want to take an AAT Mode measurement,
position the slide switch to the 3. Remember, in this
mode, the unit takes 3 measurements (one after another)
and calculates the result. There is a 15 second rest time
between measurements.The unit beeps five seconds before
each upcoming measurement. (Data obtained in AAT Mode are
indicated by an AAT symbol.)
b) If you want to take a Single Mode measurement position the
slide switch to the 1. In this mode there is only one
measurement cycle.
c) Once you’ve selected the correct user, and measurement
mode you can press the 0/I button to begin. After pressing the
0/l button the pump begins to inflate the cuff. In the
display, the increasing cuff-pressure is continually displayed.
d) After reaching the inflation pressure, the pump stops and
the pressure slowly falls.The cuff-pressure (large characters) is
displayed during the measurement. When the device has detected
the pulse, the heart symbol in the display begins to blink and a
beep tone is audible for every pulse beat.
e) When the measurement has been concluded, a long beep tone sounds.The measured systolic and diastolic blood pressure values are displayed as well as the pulse.
(Pulse=number of heartbeats each minute) Example (Fig.): Systolic 118, Diastolic 73,
Pulse 75. The measurement results are displayed, until you switch the device off. If no
button is pressed for 5 minutes, the device switches automatically off, to save the batteries.
f) When the unit is set to AAT Mode setting, three separate measurements will take
place in succession followed by a calculation of your detected blood pressure value.
There will be 15 seconds of resting time between each measurement.A count down
indicates the remaining time and a beep will sound 5 seconds before the 2nd and 3rd
readings begin. If one of the measurements causes an error message,it will be
repeated one more time. In case any additional error occurs, the measurement will be
discontinued and an error code displayed.
Discontinuing a measurement
If it is necessary to interrupt a blood pressure measurement for any reason (e.g. you
don’t feel well), the 0/I button can be pressed at any time.The device then immediately lowers the cuff-pressure automatically and enters into sleep mode.
Memory – storage and recall of the measurements
This blood pressure monitor automatically stores each of the last 30 measurement
values per user. (Be sure to select the desired user (either user 1 or user 2) before
accessing the stored measurements.) By pressing the MEMORY button, the last measurement (MR1) as well as the last 29 measurements of that user (MR2, MR3, MR30)
can be displayed one after the other. (MR1:Values of the last measurement.) (MR2MR30: Values of the measurement before MR1.)
Further Information
When the unit is in AAT Mode, time between measurements is carefully controlled to
ensure accuracy. If you take successive measurements when the unit is in the single
measurement mode wait for several minutes in a relaxed position before you repeat a
measurement. Make sure all measurements are taken in a seated position.
Memory-recall of 3 intermittent average results
The blood pressure monitor can display the 3 intermittent average results of the last
stored memory. By pressing the MEMORY button at least 3 seconds, the LCD will
show an icon first with one short beep.
Then release the MEMORY button, and the 3 intermittent average results will appear.
NOTE:This only occurs if the last stored measurement is taken in AAT Mode.
Memory– cancellation of all measurements
Attention! To delete all stored readings, press the MEMORY button for at least 7
seconds.The display will show the symbol "CL" and 3 short beeps will sound to indicate deletion of stored readings.
Note: If your last stored measurement was taken in the Average Mode, you will see
the AAT icon with a short beep during the deletion procedure. (The display will show
these symbols during deletion of all stored measurements if the last measurement is
taken from the Average Mode)
AAT Mode is on
AAT Switch
PRINTER FUNCTIONS
This unit can be used in connection with the diagnostic printer.
The unit can print out measurements stored in the memory by pressing the PRINTER
button. There are 2 kinds of formats available. Please make sure you set the unit to
User 1 or User 2 based on the data you want to print.
Note: Printer may be purchased by calling 1-800-422-0360 or on-line at
www.timexhealthcare.com.
How to print the last stored measurement
(Single data print)
a) Select correct printer objective first before you press the PRINTER button.
b) Connect the printer with the monitor and switch the printer on (for details please
refer to the manual of the printer).
c) Press the PRINTER button of the monitor once.The display will show "Pr1" and the
printer will print the last stored measurement for User 1 or 2 based on your selection.
How to print all measurements stored in memory and a data chart
(data
print out with chart).
a) Select correct printer objective first before you depress the PRINTER button.
b) Connect the printer with the monitor and switch the printer on (for details please
refer to the manual of the printer).
c) Press the PRINTER button for at least 3 seconds.The display will show "Pr1"
followed by "Pr2"
d) Release the button, and the printer will print all stored measurements with a
corresponding chart.
Stop printing
If you would like to stop printing, click the PRINTER button during the printing
process.
NOTE: Further details regarding the printer can be found in the printer instruction
manual.
ERROR MESSAGES/MALFUNCTION
If an error occurs during a measurement, the measurement is discontinued
and a corresponding error code is displayed (Example: Error No.2).
Error No. Possible cause(s)
ERR 1 No pulse has been detected.
ERR 2 Unnatural pressure impulses influence the measurement result.
Reason: The arm was moved during the measurement (artefact).
ERR 3 The inflation of the cuff takes too long. The cuff is not correctly
positioned.
ERR 5 The measured readings indicated an unacceptable difference
between systolic and diastolic pressures. Take another reading
following direction carefully. Contact your doctor if you continue
to get unusual readings.
Other possible malfunctions and their elimination
If problems occur when using the device, the following points should be checked and
if necessary, the corresponding measures are to be taken:
Malfunction Remedy
The display remains blank when 1. Check batteries for correct polarity and if
the instrument is switched on batteries are in place.
although the necessary batteries 2. If the display is unusual, re-insert
are inserted correctly. batteries or exchange them.
The device frequently fails to measure 1. Check the positioning of the cuff.
the blood pressure values, or the values 2. Measure the blood pressure again in a
measured are too low (too high). quiet atmosphere under observance of the
detail made on page 15.
Every measurement produces 1. Please read the following information
different values although the listed in "Common sources of error"
instrument functions normallly page 16. Repeat the measurement.
and the values displayed are normal.
Please note: Blood pressure
fluctuates continually so successive
measurements will show some
variability.
Blood pressure values measured differ 1. Record the daily development of your
from those measured by your doctor. blood pressure measured & consult your
doctor.
Please note: Individuals visiting
their doctor frequently experience
anxiety which can result in a higher
reading at the doctor’s office than
obtained at home under resting
conditions.
Page 4

4
Further Information
Your level of blood pressure is subject to fluctuations even with healthy people.
Comparable measurements always require the same conditions (quiet conditions)! If,
in spite of observing all these factors, the fluctuations are larger than 15mmHg,
and/or you hear irregular pulse tones, please consult your doctor.This device has been
subjected to strict clinical tests.The computer program used to measure the blood
pressure values was tested by experienced physicians.The same computer program is
used in every individual device, and has also been clinically tested.The manufacture of
the devices takes place according to the terms of the European standard for blood
pressure measuring devices (see technical data) under the supervision of the Technical
Monitoring Association Essen (RWTüV-Essen). Never attempt to repair the instrument
yourself! Any unauthorized opening of the instrument invalidates all warranty claims!
CARE AND MAINTENANCE
a) Do not expose the device to extreme temperatures, humidity, dust or direct sunlight.
b) The cuff contains a sensitive air-tight bubble. Handle this carefully and avoid all
types of straining through twisting or buckling.
c) Clean the device with a soft, dry cloth. Do not use gasoline, thinners or similar solvents. Spots on the cuff can be removed carefully with a damp cloth and soapsuds.
The cuff must not be immersed in water!
d) Do not drop the instrument or treat it roughly in any way.Avoid strong vibrations.
e) Never open the device! Otherwise the manufacturer warranty becomes invalid!
Periodical Re-calibration: Sensitive measuring devices must be checked for
accuracy from time to time.We recommend a periodical inspection of the static
pressure display every 2 years. Contact our Customer Service Team at
1-800-422-0360 for further information.
REFERENCE TO STANDARDS
Device standard:
Device corresponds to the requirements of the European standard for non-invasive
blood- pressure monitor
EN1060-1 / 12:95
EN1060-3 / 09:97
DIN 58130, NIBP – clinical investigation
ANSI / AAMI SP10, NIBP – requirements
(US Standard)
Electromagnetic compatibility:
Device fulfills the stipulations of the European standard EN 60601-1-2
Clinical testing:
The clinical performance test was carried out in Germany according to the DIN 58130
/ 1997 procedure N6 (sequential). The stipulations of the EU-Guidelines 93/42/EWG
for Medical Products Class IIa have been fulfilled.
TECHNICAL SPECIFICATIONS
Weight: 148g (with batteries and cuff)
Size: 85 x 77 x 75mm (including cuff)
Storage temperature: 23˚F - 122˚F (-5 to +50˚C)
Humidity: 15 to 85% relative humidity max.
Operation temperature: 50˚F - 104˚F (10 to 40˚C)
Display: LCD-Display
Measuring method: Oscillometric
Pressure sensor: Capacitive
Measuring range: SYS/DIA: 30 to 280 mmHg
Pulse: 40 to 200 per minute
Cuff pressure display range: 0-299 mmHg
Memory: Stores the last 30 measurements automatically for
2 users
Measuring resolution: 1 mmHg
Accuracy: Pressure within ± 3 mmHg
Pressure ± 5% of the reading
Power source: 2 dry cells (batteries) UM-4, size AA 1.5V
WARRANTY
Your TIMEX Professional Series Wrist Blood Pressure Monitor is a durable and precise medical
device manufactured under license by MEDport, LLC. MEDport takes pride in the quality and
workmanship crafted into every product made. Accordingly, MEDport will repair or replace at our
option any product that is defective in material or workmanship for three years. This warranty
does not cover the batteries or damage caused by accident, negligence or improper use or care.
Please take a moment to mail in the enclosed warranty card now. It will expedite any claims you
may have against this warranty in the future.
Product should be returned to MEDport, LLC., postage prepaid with proof of purchase and an
explanation of the problem. If you follow the instructions for proper use and care, the TIMEX
Professional Series Wrist Blood Pressure Monitor should last for years. However, if for any reason
you are not satisfied, call our toll-free customer service line: 1.800.422.0360. Our hours of operation are Monday – Friday 8:00 a.m. – 8:30 p.m. EST.
The warranty is only valid upon presentation of the warranty card filled out by the consumer and
on file.
Detailed user information about our thermometers and blood pressure monitors as
well as services can be found at www.timexhealthcare.com.
Manufactured and Distributed under license by:
MEDport LLC.
23 Acorn Street
Providence, RI 02903
1-800-422-0360
e-mail: info@medportllc.com
www.timexhealthcare.com
Made in China
TIMEX is a trademark of Timex Corporation.
 Loading...