

Page 1
Please DO NOT return product to the retail store.
For technical assistance and product return information, please call
Customer Care: 877-221-1252 Mon. - Fri. 8:00 A.M. to 4:30 P.M. (CST)
www.chaneyinstrument.com
Timex® is a registered trademark of Timex Corporation in the U.S. and other countries.
Indiglo® is a registered trademark of Indiglo Corporation in the U.S. and other countries.
LIMITED ONE YEAR WARRANTY
Chaney Instrument Company warrants that all products it manufactures to be of good material and
workmanship and to be free of defects if properly installed and operated for a period of one year from date of
purchase. REMEDY FOR BREACH OF THIS WARRANTY IS EXPRESSLY LIMITED TO REPAIR OR REPLACEMENT
OF DEFECTIVE ITEMS. Any product which, under normal use and service, is proven to breach the warranty
contained herein within ONE YEAR from date of sale will, upon examination by Chaney, and at its sole option,
be repaired or replaced by Chaney. In all cases, transporation costs and charges for returned goods shall
be paid for by the purchaser. Chaney hereby disclaims all responsibility for such transportation costs and
charges. This warranty will not be breached, and Chaney will give no credit for products it manufactures
which shall have received normal wear and tear, been damaged, tampered, abused, improperly installed,
damaged in shipping, or repaired or altered by others than authorized representatives of Chaney.
Manufactured and serviced by
Chaney Instrument Co.
Lake Geneva, WI 53147
www.chaneyinstrument.com
©
2010 Chaney Instrument Co.
INST - 75071T 120210
INST - 75071T 120210
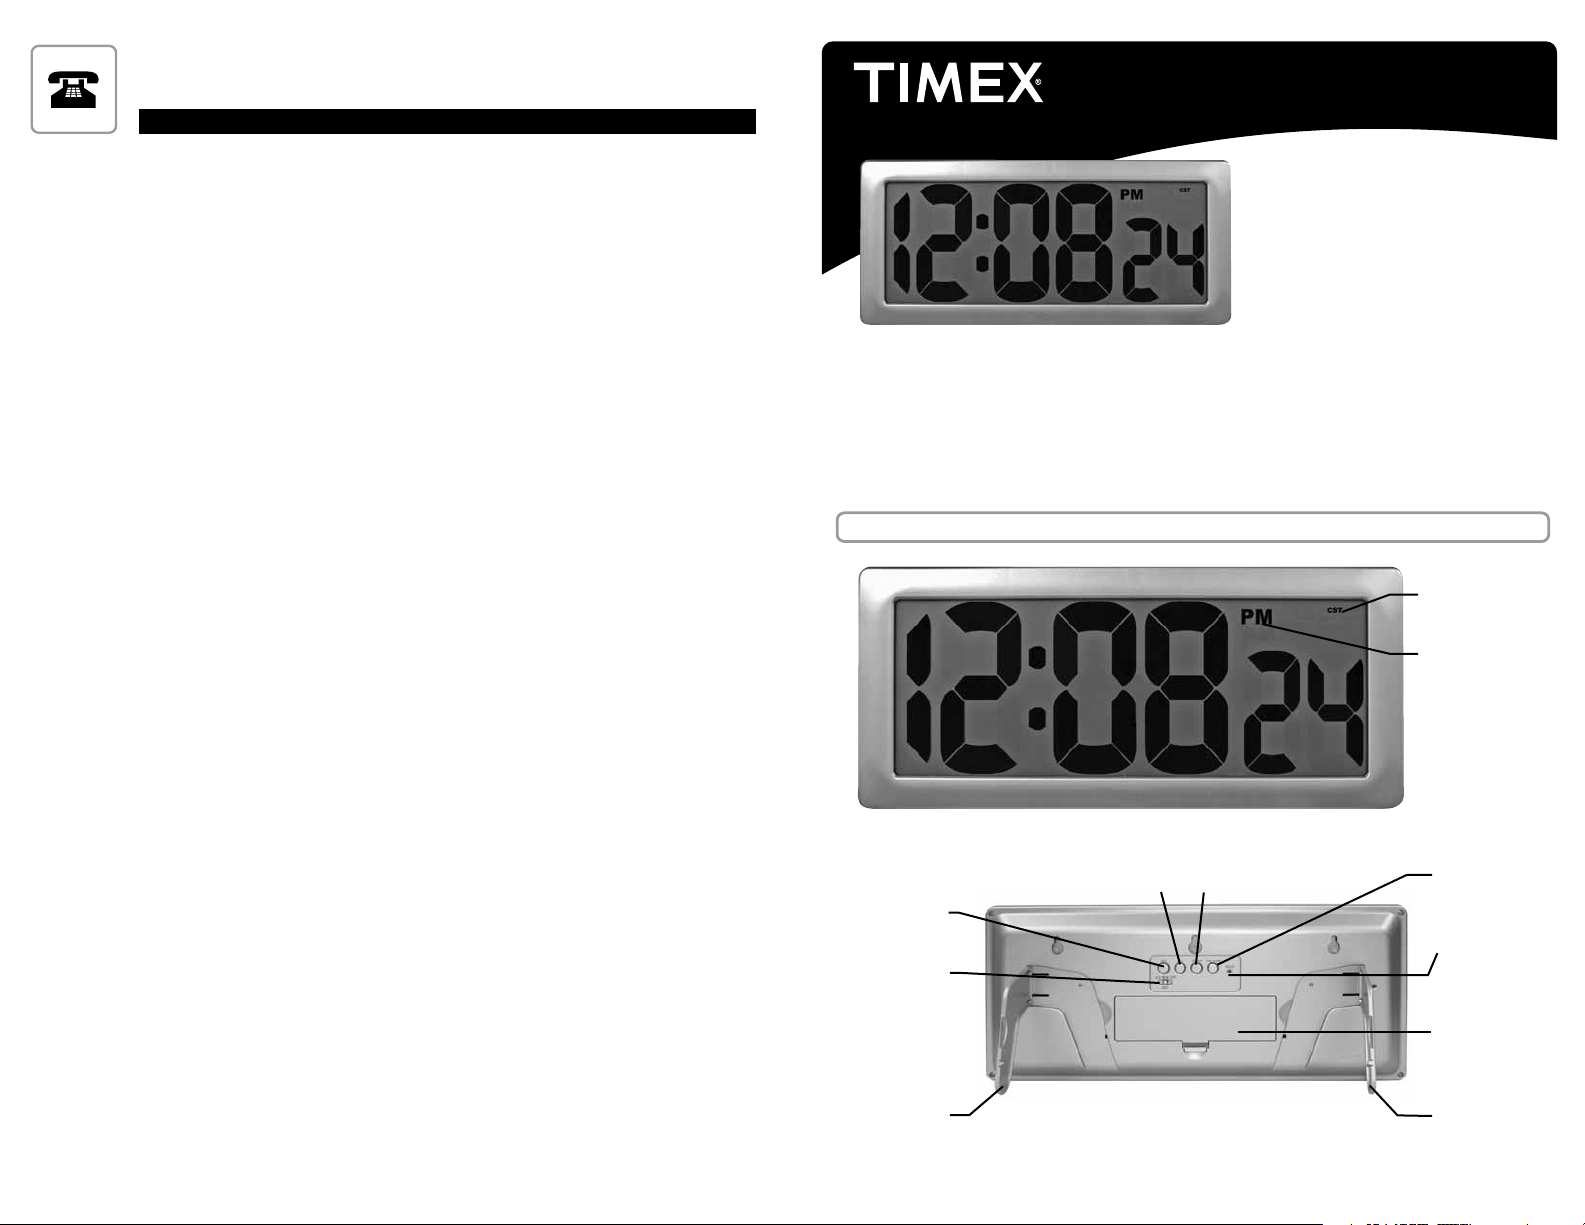
Intelli-Time® Digital Clock
with extra large LCD
#75071T
USER GUIDE
Package Contents:
(1) Digital Clock
(1) User Guide
What You’ll Need:
(4) AA Batteries
®
Thank You for purchasing this TIMEX
product. This digital clock features Intelli-Time
technology, which instantly sets the clock once the batteries are in. Please read this
manual in its entirety to fully enjoy the benets and features of this product. Please keep
this manual for future reference.
NOTE: A protective plastic case is placed over the display at the factory that must be
removed prior to using this product.
1 • OVERVIEW OF FEATURES
Time Zone
®
THE ABOVE-DESCRIBED WARRANTY IS EXPRESSLY IN LIEU OF ALL OTHER WARRANTIES, EXPRESS OR
IMPLIED, AND ALL OTHER WARRANTIES ARE HEREBY DISCLAIMED, INCLUDING WITHOUT LIMITATION THE
IMPLIED WARRANTY OF MERCHANTABILITY AND THE IMPLIED WARRANTY OF FITNESS FOR A PARTICULAR
PURPOSE. CHANEY EXPRESSLY DISCLAIMS ALL LIABILITY FOR SPECIAL, CONSEQUENTIAL OR INCIDENTAL
DAMAGES, WHETHER ARISING IN TORT OR BY CONTRACT FROM ANY BREACH OF HTIS WARRANT. SOME
STATES DO NOT ALLOW THE EXCLUSIONS OR LIMITATION OF INCIDENTAL OR CONSEQUENTIAL DAMAGES,
SO THE ABOVE LIMITATION OR EXCLUSION MAY NOT APPLY TO YOU. CHANEY FURTHER DISCLAIMS ALL
LIABILITY FROM PERSONAL INJURY RELATING TO ITS PRODUCTS TO THE EXTENT PERMITTED BY LAW. BY
ACCEPTANCE OF ANY OF CHANEY’S EQUIPMENT OR PRODUCTS, THE PURCHASER ASSUMES ALL LIABILITY
FOR THE CONSEQUENCES ARISING FROM THEIR USE OR MISUSE. NO PERSON, FIRM OR CORPORATION
IS AUTHORIZED TO ASSUME FOR CHANEY ANY OTHER LIABILITY IN CONNECTION WITH THE SALE OF ITS
PRODUCTS. FURTHERMORE, NO PERSON, FIRM OR CORPORATION IS AUTHORIZED TO MODIFY OR WAIVE
THE TERMS OF THIS PARAGRAPH, AND THE PRECEDING PARAGRAPH, UNLESS DONE IN WRITING AND
SIGNED BY A DULY AUTHORIZED AGENT OF CHANEY. THIS WARRANTY GIVES YOU SPECIFIC LEGAL RIGHTS,
AND YOU MAY ALSO HAVE OTHER RIGHTS WHICH VARY FROM STATE TO STATE.
For in-warranty repair, please contact:
Customer Care Department
Chaney Instrument Company
965 Wells Street
Lake Geneva, WI 53147
Mon-Fri 8:00 a.m. to 4:30 p.m. CST
Chaney Customer Care
877-221-1252
www.chaneyinstrument.com
PATENT PENDING
-4-
Set
DST Selection
Switch
Fold -Out Stand
UP
Adjust
DOWN
Adjust
BACK OF CLOCK
-1-
AM/PM indicator
Time Zone
Reset
Battery
compartment
Fold-Out Stand
Page 2
About Intelli-Time
Your new digital clock is equipped with Intelli-Time® technology which is pre-programmed
with the correct time and date. Intelli-Time
installed. The Intelli-Time
This battery is located in the Intelli-Time
®
®
®
feature requires an internal memory battery to operate correctly.
instructs the clock to set itself once batteries are
®
memory battery compartment on the back of the
clock and is pre-installed at the factory. We suggest replacement of the backup battery every
5 years. We recommend the replacement of backup battery in 1-2 years if the unit is not
powered on for a long period of time. Do not replace the memory battery unless the clock is
powered and the display is operating with the correct time.
Changing the Backup Battery
Do not change the backup batteries unless the main 4 “AA” batteries are working. This
will prevent the clock from being without power, and the internal calendar memory will
function properly.
When changing the backup batteries, remove the battery compartment cover on the back of
the unit. The backup battery compartment is inside. Open the backup battery cover. Replace
the 1 “3V” CR2032 lithium battery with a fresh one and replace the cover.
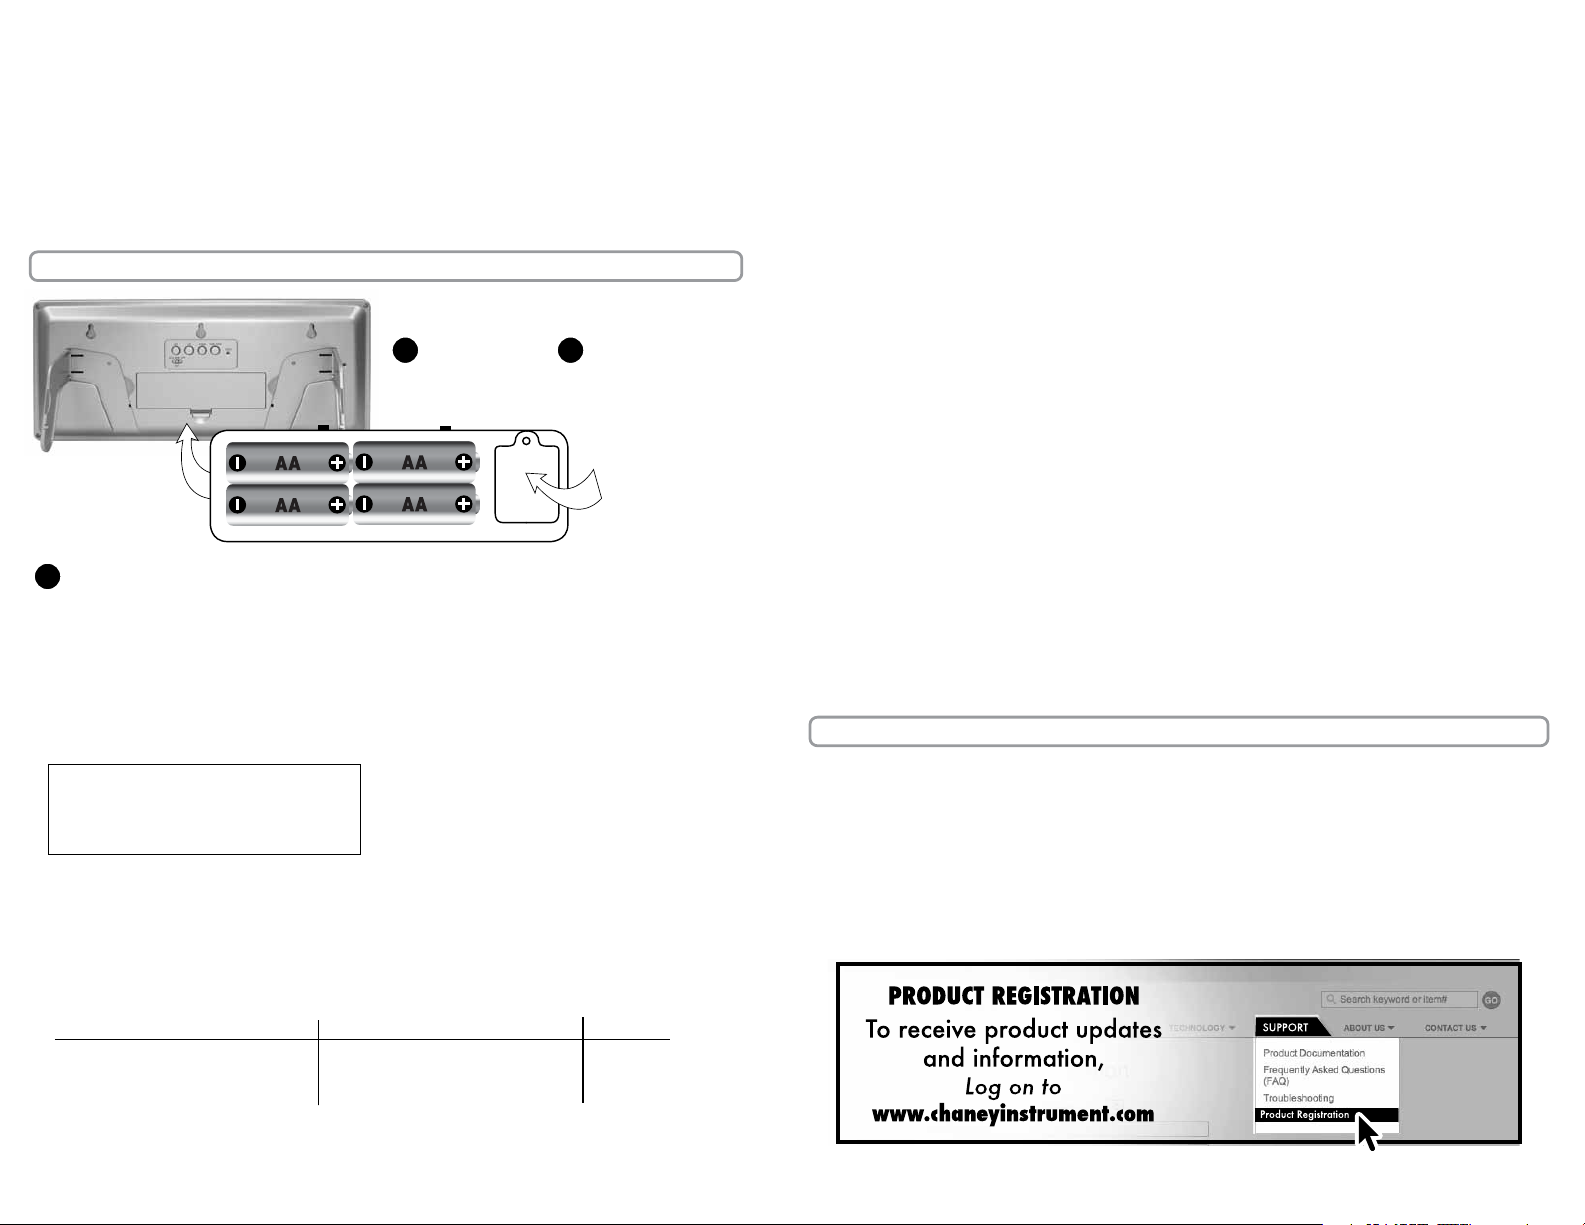
2 • SETUP
BATTERY INSTALLATION:
REMOVE
1
BATTERY
COMPARTMENT
COVER
INITIAL SETUP: Once the batteries are installed, the clock will power up. The
3
INSTALL 4 “AA”
2
ALKALINE
BATTERIES
BACKUP
BATTERY
COMPARTMENT
clock will set itself to the correct time and date, defaulting to EST (eastern
standard time).
Setting the time zone and daylight saving time:
1. Press, then release the “TIME ZONE” button on the back of the digital clock until it
reaches the desired time zone position. You will see the time zone on the front of the clock
in the upper right hand corner.
TIME ZONES
AST: Atlantic
EST: Eastern
CST: Central
2. You must also determine which Daylight Saving time setting to use on the back of the
unit; new or old. Due to possible future changes in DST, this unit is equipped with a
selection switch to choose between the traditional DST setting (OLD) or the new DST time
change dates. You may slide the button to the left for (OLD), middle for (NEW) or right
for (OFF). “DAYLIGHT ST” will appear on the screen when Daylight Saving Time is observed.
The following chart illustrates the differences between the auto DST settings and when
each setting automatically changes the time during the year.
NEW DST OLD DST OFF
2007 and beyond 2006 NO DST
2:00 am 2nd Sunday in March 2:00 am 1st Sunday in April changes
2:00 am 1st Sunday n November 2:00am last Sunday in October
AUTO DST NOTE: portions of the country do not observe daylight savings time. If you live in
an area that does not observe daylight saving time, please turn off DST function.
MST: Mountain
PST: Pacific
AKST: Alaska
HAST: Hawaii-Aleutian
Optional Custom Time Setting:
If you wish to set the clock slightly ahead or slightly behind, or if the Intelli-Time® internal
memory battery is allowed to go dead, you may set the time and date by simply following
the custom setup procedure below:
1. Press and hold the “SET” button for 5 seconds then release to enter the manual time set mode.
2. The hour will be flashing, adjust up or down using the “UP” or “DOWN” buttons.
Note the AM or PM indicator on the display.
3. Press and release the “SET” button once to move on to the minute setting mode.
4. The minute will be flashing, adjust up or down using the “UP” or “DOWN” buttons.
5. Press and release the “SET” button once to move on to the month setting mode.
6. The month will be flashing, adjust up or down using the “UP” or “DOWN” buttons.
7. Press and release the “SET” button once to move on to the day setting mode.
8. The day will be flashing, adjust up or down using the ”UP” or “DOWN” buttons.
9. Press and release the “SET” button once to move on to the year setting mode.
10. The year will be flashing, adjust up or down using the “UP” or “DOWN” buttons.
11. Press and release the “SET” button again to exit the manual set mode.
To view the MONTH/DAY/YEAR at any time press and release the “SET” button.
3 • TROUBLESHOOTING
During shipping a static charge may build up. It will NOT damage the product but may
prevent the display from showing. To restore the display you need to reset the unit. To
do this, simply look at the back of the clock. You will see a small hole that is the RESET
button. Use the end of a paper clip to press the button. This will restore the display.
-2-
-3-
 Loading...