

Page 1

TIMEX is a registered trademark of Timex Corporation. ©2004 Timex Corporation.
W-177-US 584-095000
Page 2

1
THE TIMEX®DIGITAL HEART RATE MONITOR
30-LAP/FITNESS MODELS
AN ADVANCED DIGITAL SPORT WATCH
Plus
AN ALL-DIGITAL HEART RATE MONITOR SYSTEM
The Timex
®
Digital Heart Rate Monitor incorporates the very latest digital
technology from Timex with fitness methodologies used by fitness experts and
personal trainers. As the world leader in sports timing devices, Timex has
created a digital fitness system that combines the digital accuracy demanded by
world-class athletes with features anyone at any age can use to stay “fit for life.”
Note: This manual may describe features or functions that are not available on all models.
Resources on the Internet
The Timex web site (www
.timex.com) is an excellent source of information
to help you get more out of your Timex
®
Digital Heart Rate Monitor
purchase. Resources to check on the Timex site include:
www
.timex.com/hrm/
For more information on Timex Digital Heart Rate Monitors, including
product feature listings and simulations.
www
.timex.com/fitness/
For fitness and training tips using the Timex Digital Heart Rate Monitors.
Note: Always consult your physician before beginning or modifying an exercise program.
Page 3

3
How This Manual Is Organized
We’ve divided this manual into four main sections:
• Overview —
General descriptions of the buttons, features and display.
• Using Your Heart Rate Monitor —
Describes how to combine your watch with a Heart Rate Monitor (HRM)
to obtain, measure and review heart rate information.
• Modes and Features —
Simple, step-by-step walkthroughs of how to use watch modes and
features.
• Usage Examples —
Real-world scenarios that show you how to make your Timex
®
watch an
integral part of your workout activities.
2
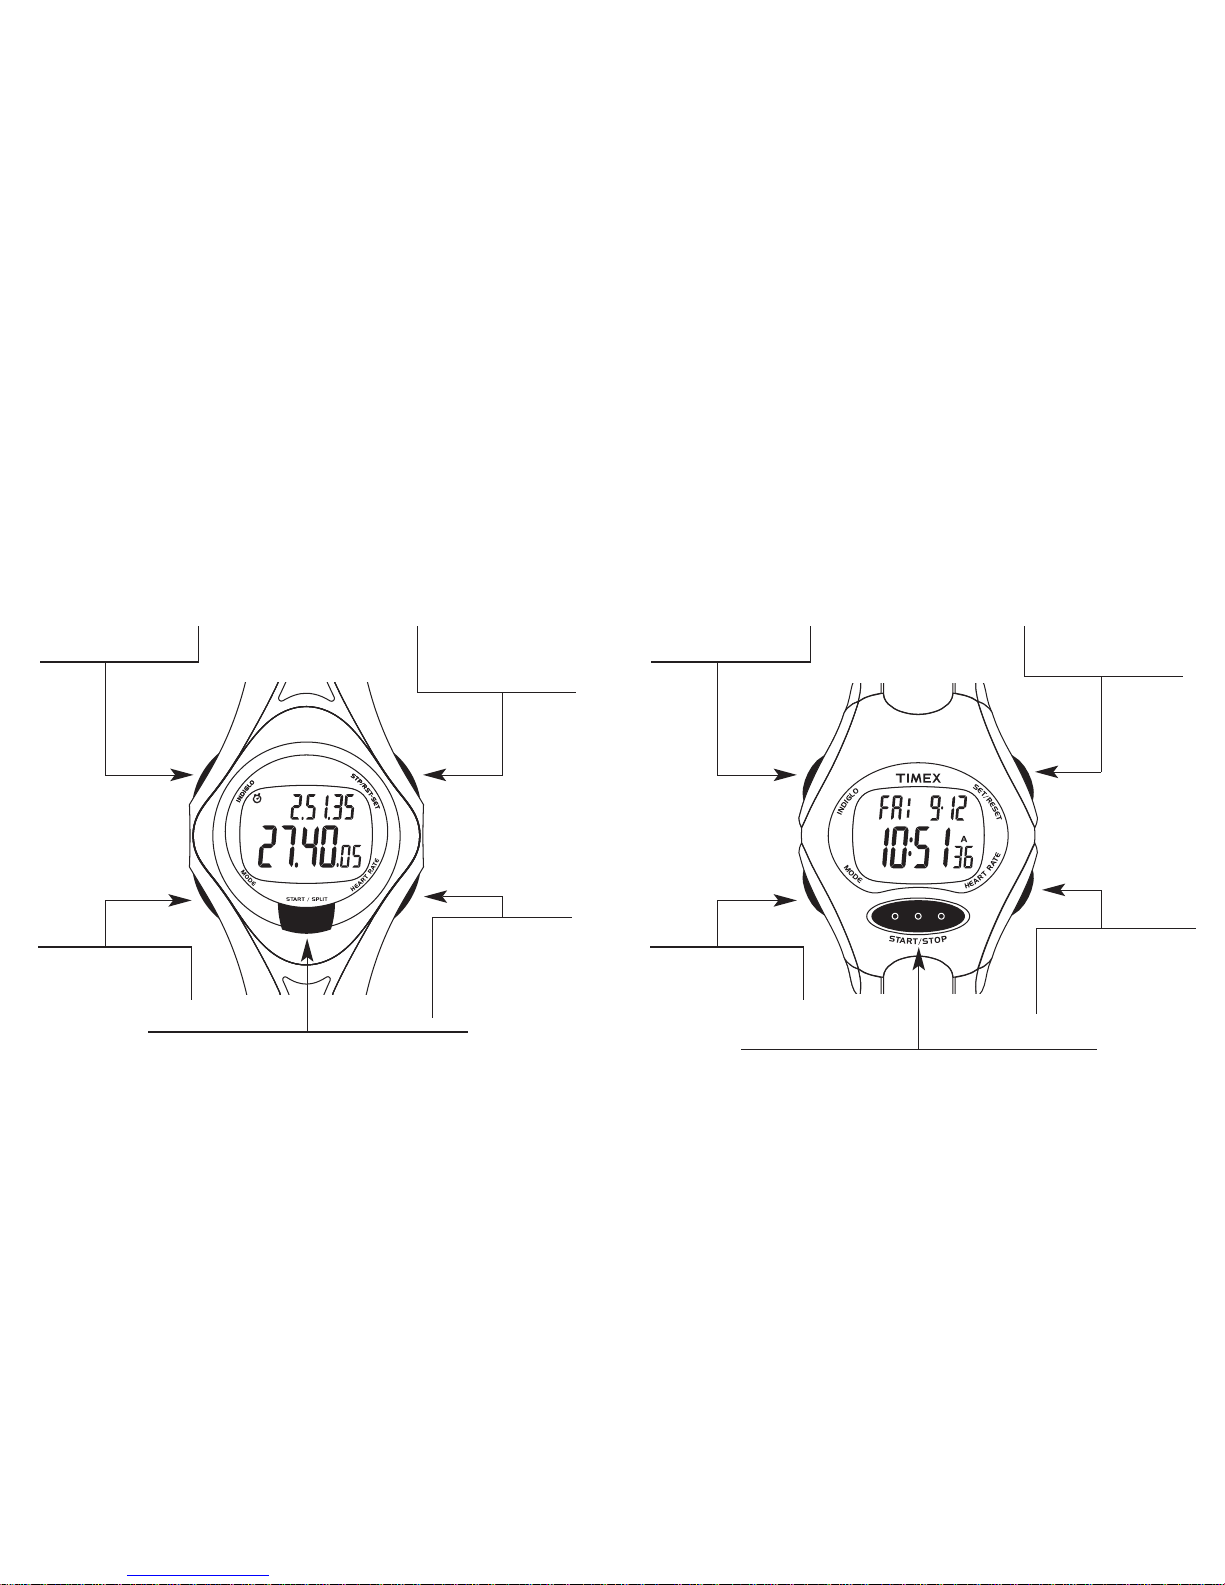
Overview
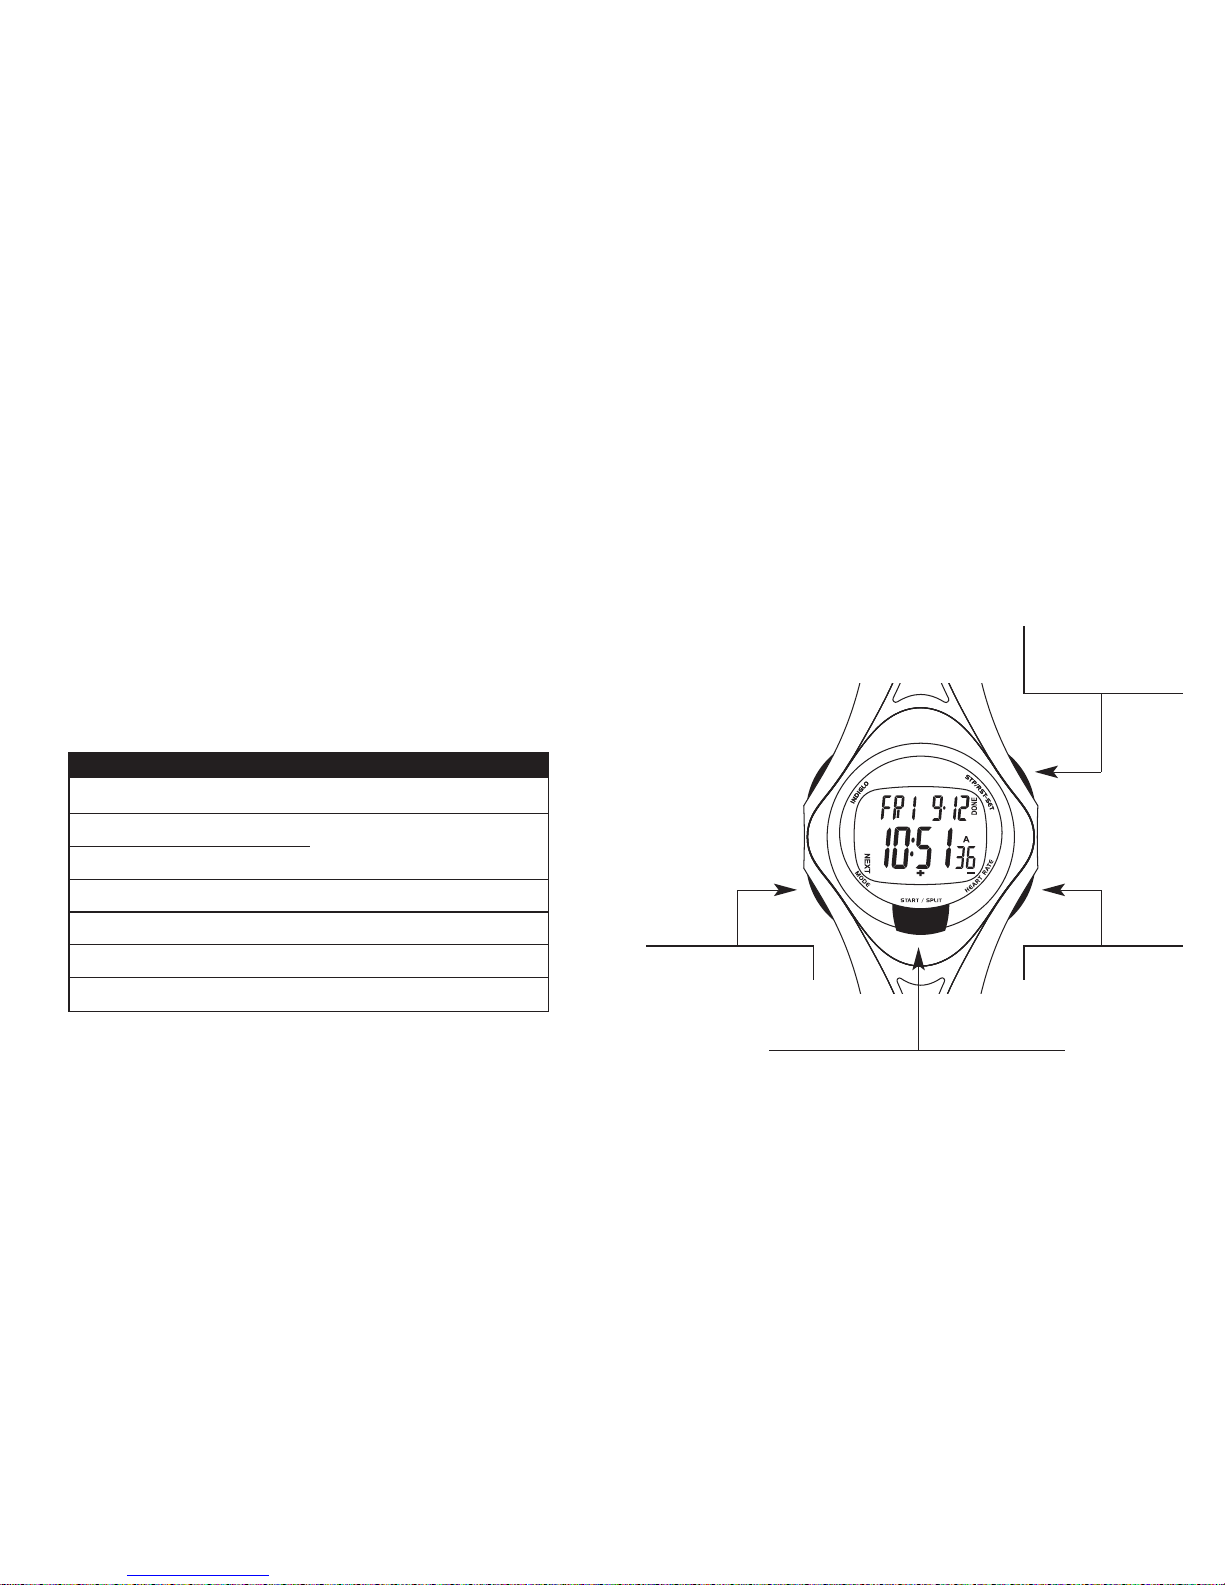
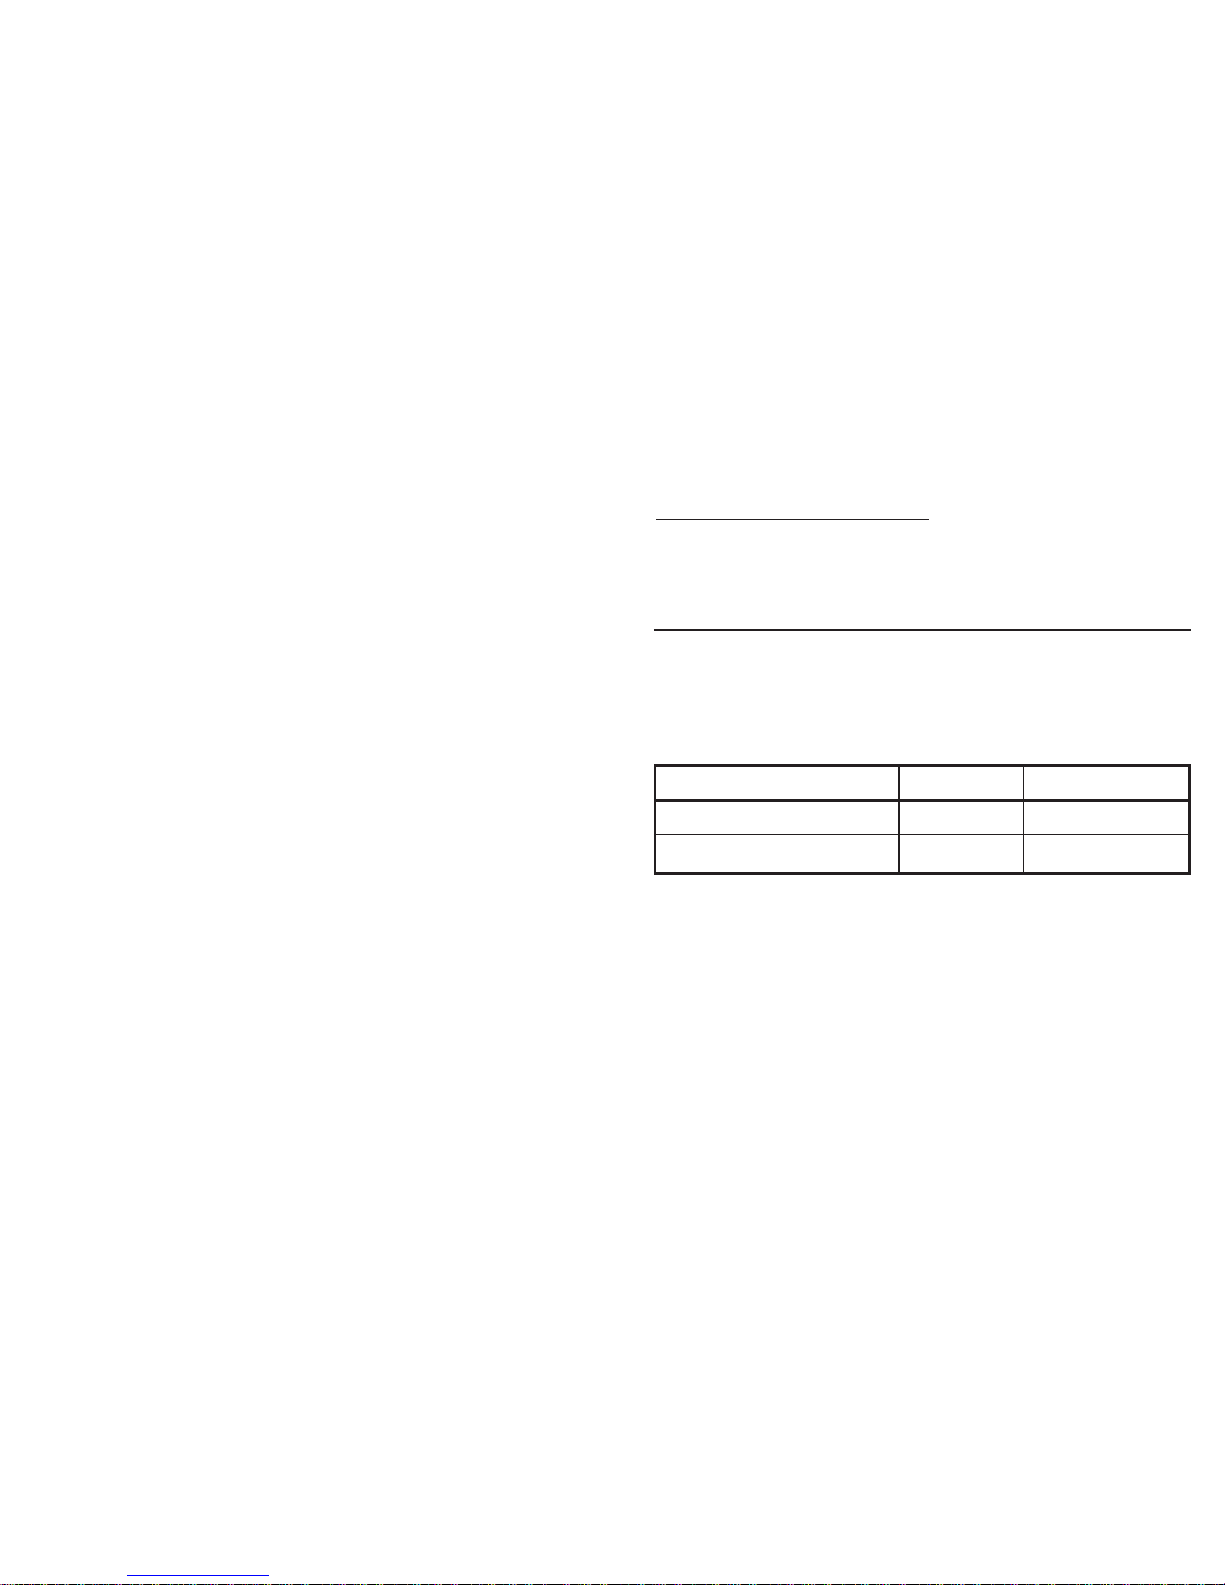
Display Information
TOP LINE - Top one-third of
the display, used for
information such as lap
times, day/date, HRM
information and flags.
In some modes information
displayed on these two
lines can be swapped based
on your preference.
BOTTOM LINE - Bottom
two-thirds of the display,
used for information such
as time of day, lap/split
time, HRM information
and flags.
FLAGS - Appear around the
display to reflect the
current mode, or to indicate
an activity occurring in the
background. For example,
the stopwatch flag indicates
the Chronograph or
Stopwatch feature is
actively timing your laps.
Page 4
54
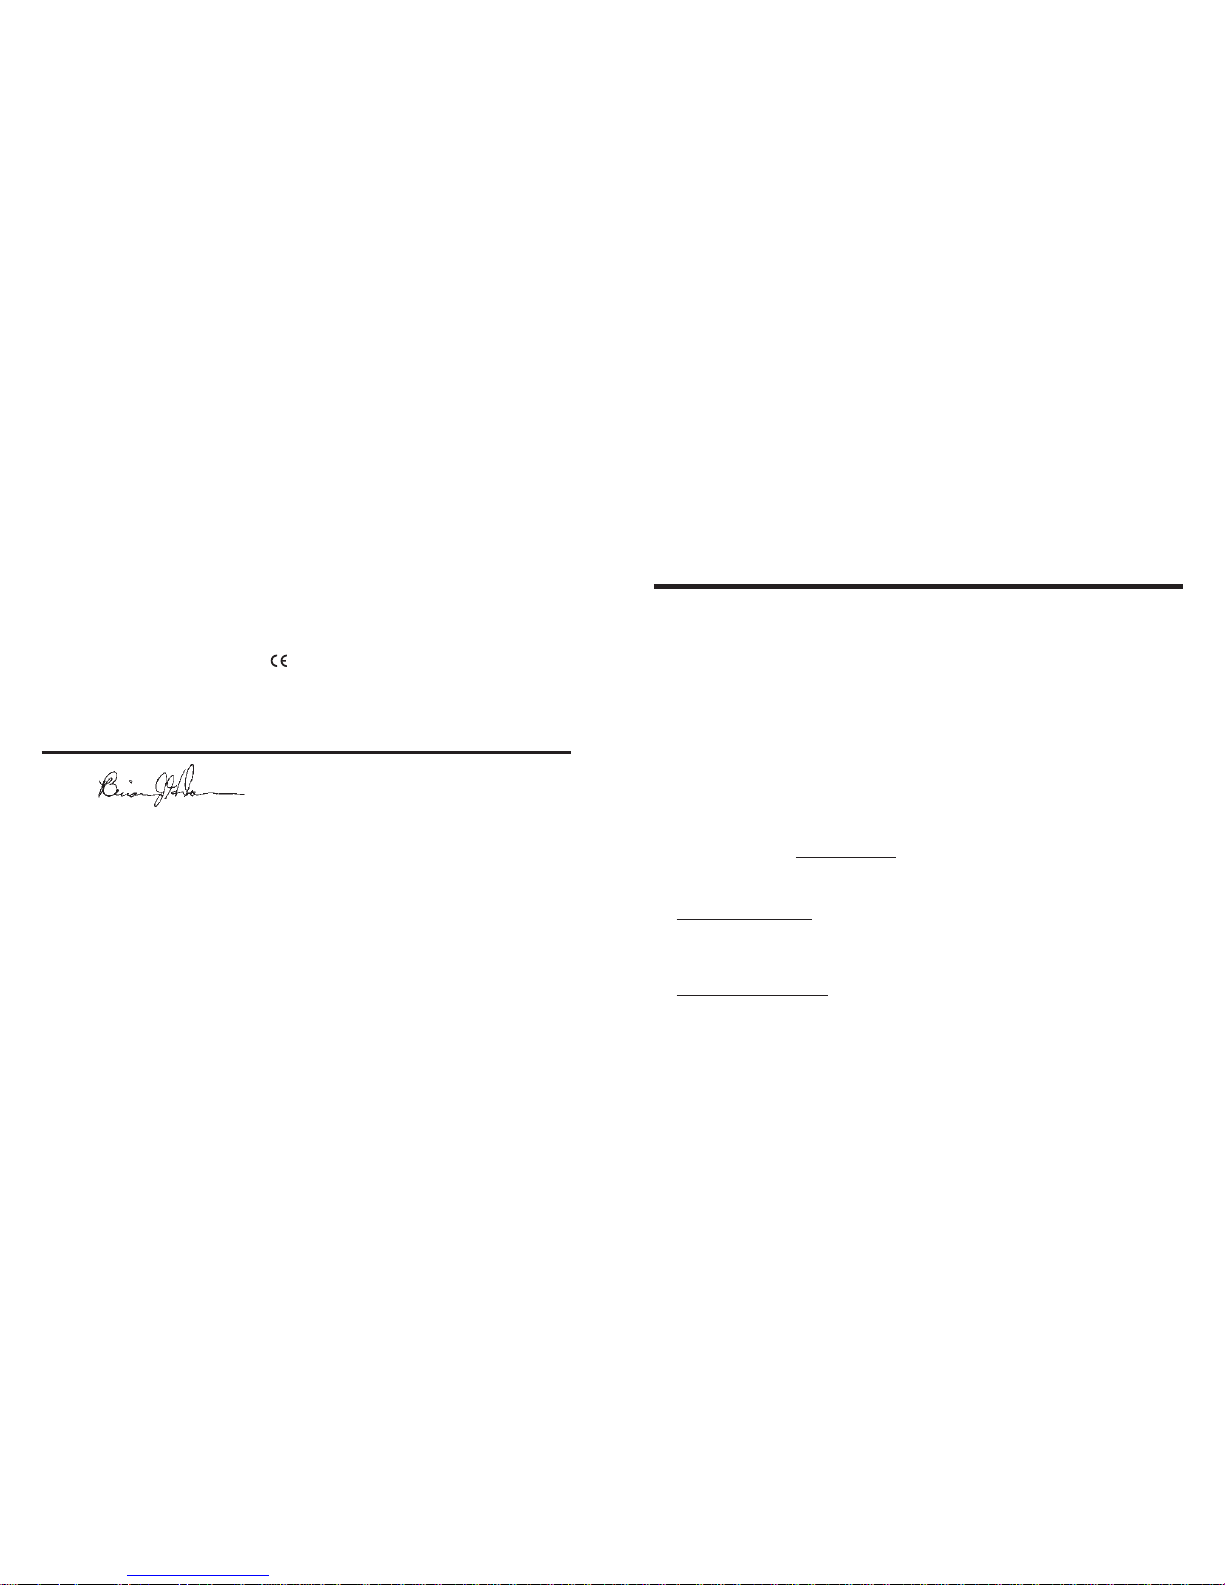
The 30-Lap Model
STOP/RESET/SET Button –
Stop or reset the
Chronograph or Timer; hold
to begin setting.
INDIGLO®Button –
Illuminate the watch display.
HEART RATE Button –
Turn the Heart Rate
Monitor on or off; also,
change the HRM data
format when the Heart
Rate Monitor is on.
MODE Button – Press and
release to go to the next
mode.
START/SPLIT Button – Start Chronograph or Timer; peek
at the second Time Zone in Time of Day.
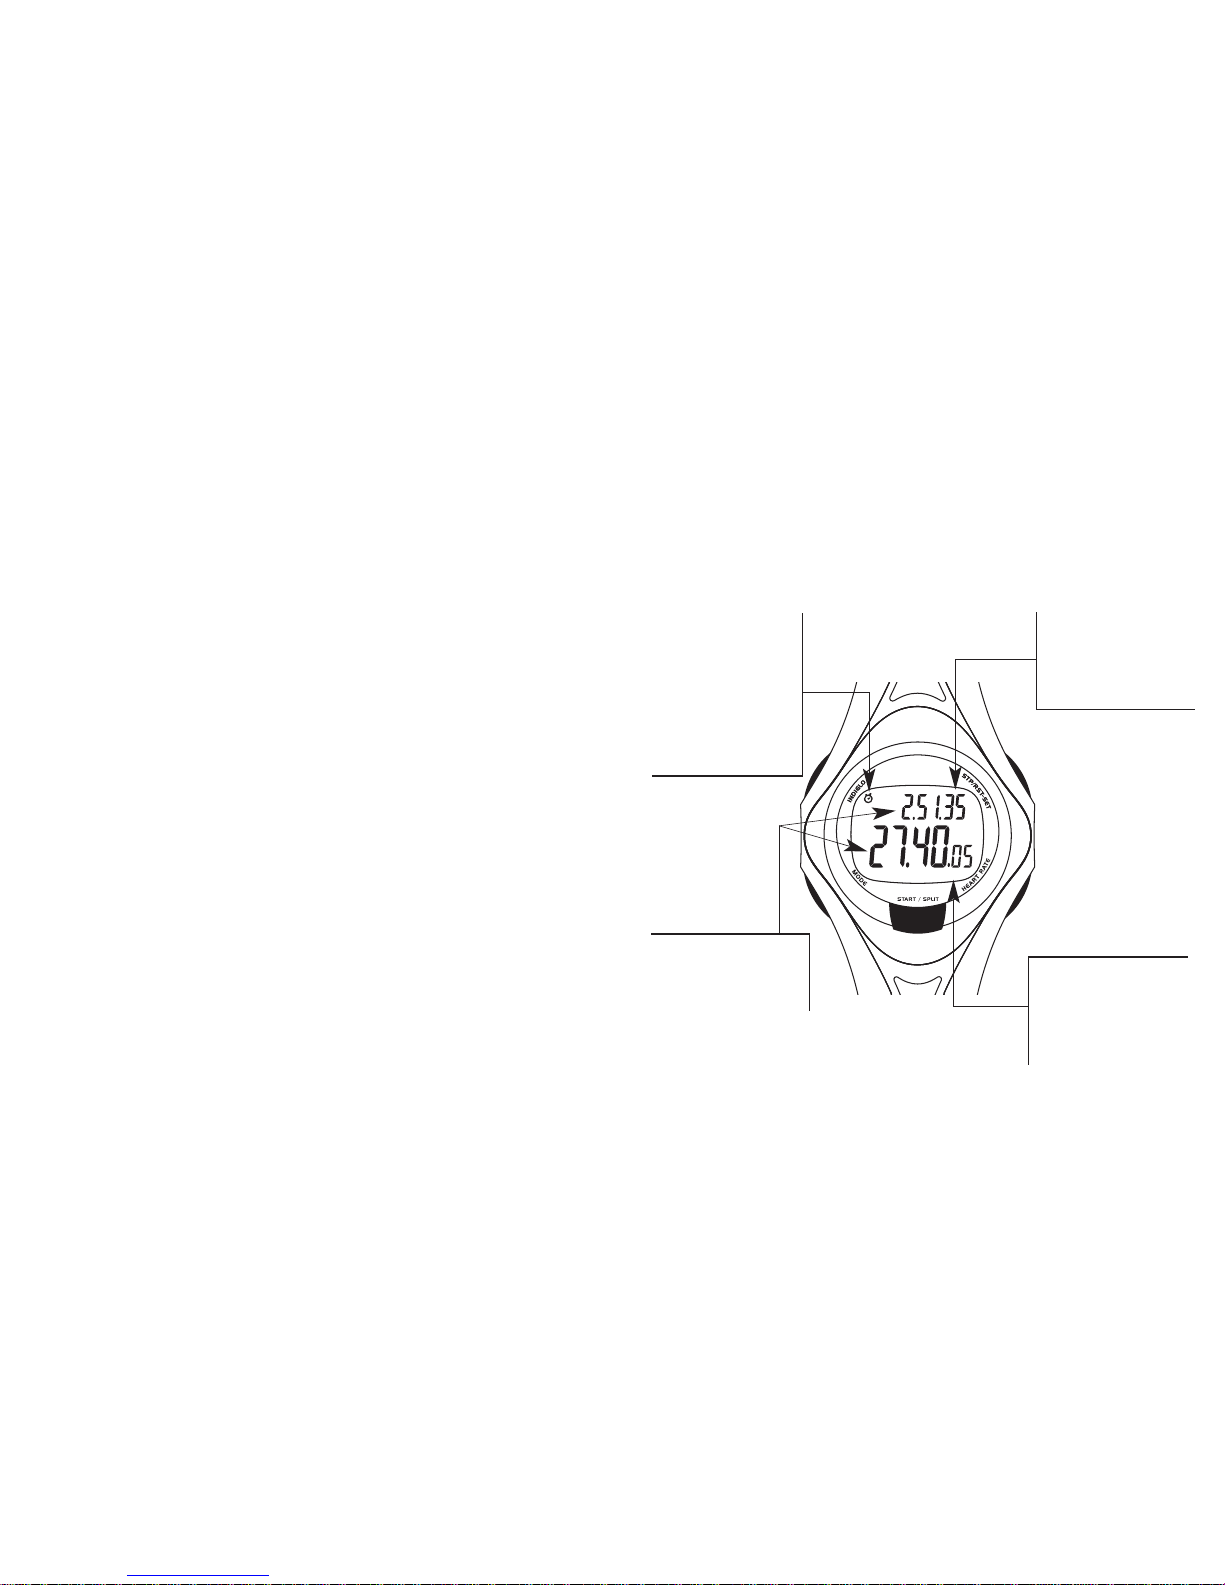
SET/RESET - Reset the
Timing feature; hold to
begin setting.
The Fitness Model
HEART RATE Button – Turn
the heart rate monitor on or
off; change HRM data
position when heart rate
monitor is on.
START/STOP Button – Start or stop the Timing feature.
INDIGLO®Button –
Illuminate the watch display.
MODE Button – Press and
release to go to the next
mode.
Page 5
7
Using Your Heart Rate Monitor
When combined with a heart rate sensor, your sport watch becomes part of
an overall fitness system. The heart rate sensor records your heart rate and
transmits the data to the watch. You simply glance at the watch during
exercise/training to make sure you are in the desired heart rate zone to
maintain or improve your fitness level (see any fitness guide for target
heart rate zones). If set, an out-of-zone alert automatically sounds if your
heart rate leaves the selected zone.
This section describes how to:
• Set up your watch to work with a heart rate sensor
• Set your watch to track your heart rate against a selected heart rate
fitness zone
• Record and review heart rate information
Setting Up Your Watch to Work with a Heart Rate Sensor
1. Put the heart rate sensor on your chest. For detailed guidelines on how
the heart rate sensor should be worn, refer to the Fitness Sensor User
Guide that came with it. The instructions in this section assume the heart
rate sensor is being worn as recommended.
2. Start the Heart Rate Monitor system. In TIME OF DAY, TIMING,
CHRONO or TIMER modes, press HEART RATE.
A flag showing the outline of a heart appears as the watch searches for a
heart rate sensor signal. When the watch begins receiving a signal, the
outlined heart becomes solid and begins pulsing.
6
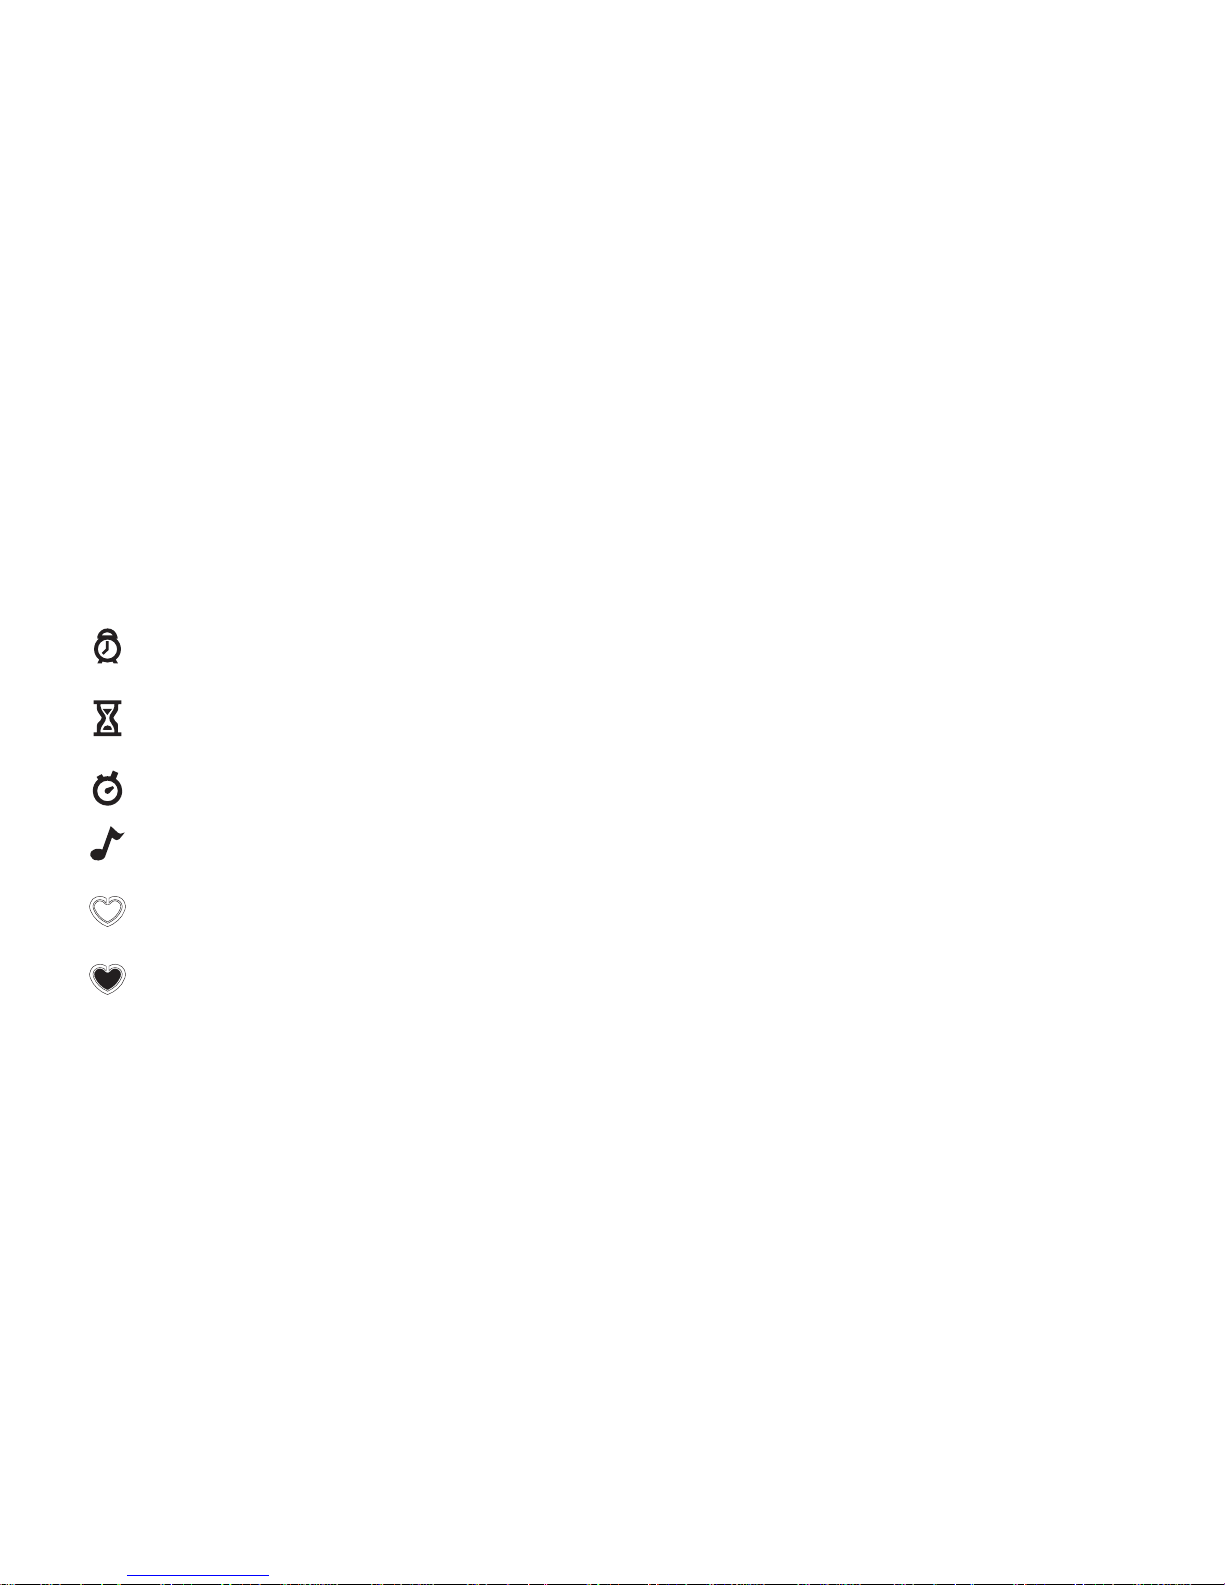
Flags in the Display
Your watch can convey a lot of information at a glance while occupying
only a small space on your wrist. Here is an overview of the flags (small
graphic symbols) that appear on the display:
Alarm is armed.
Timer is running (30-Lap Model) or TIMING Mode is counting
down to zero (Fitness Model).
Chrono is running (30-Lap Model), or TIMING Mode is
counting up from zero (Fitness Model).
Hourly chime is set.
Searching for HRM data from chest sensor.
HRM data is being received from a heart rate sensor.
Page 6
98
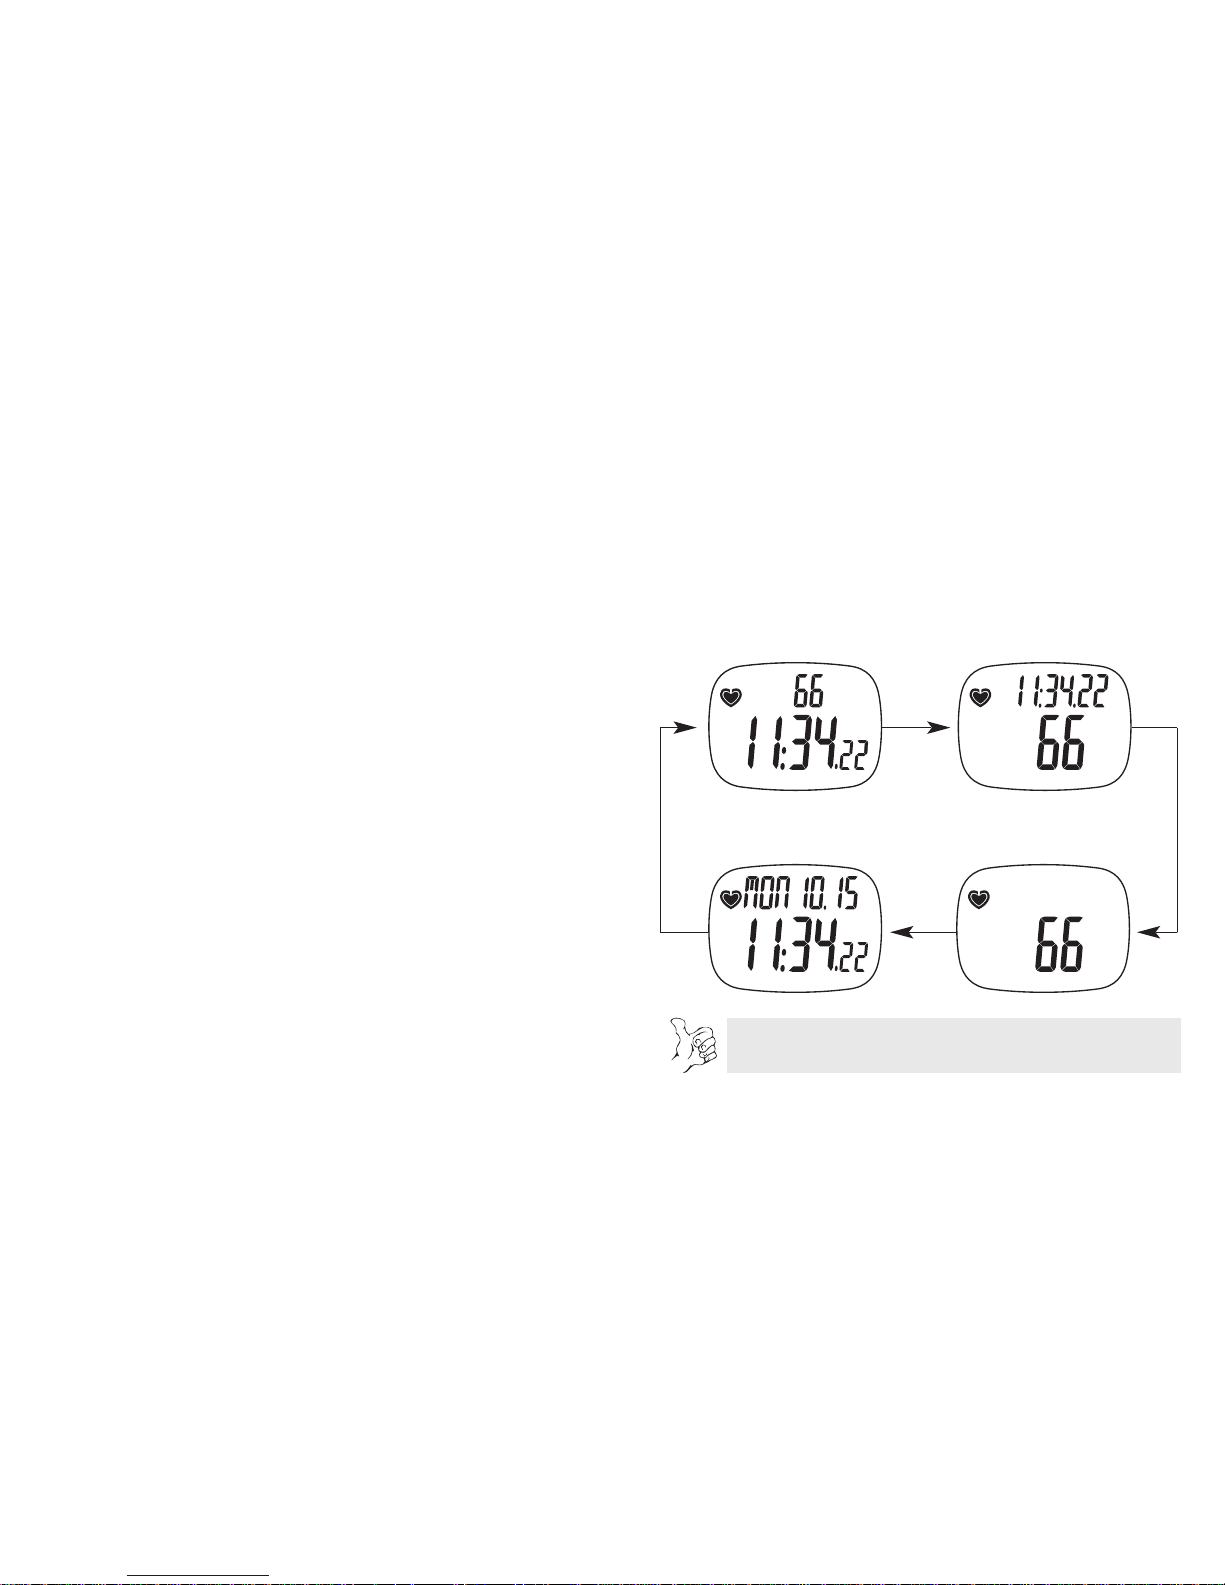
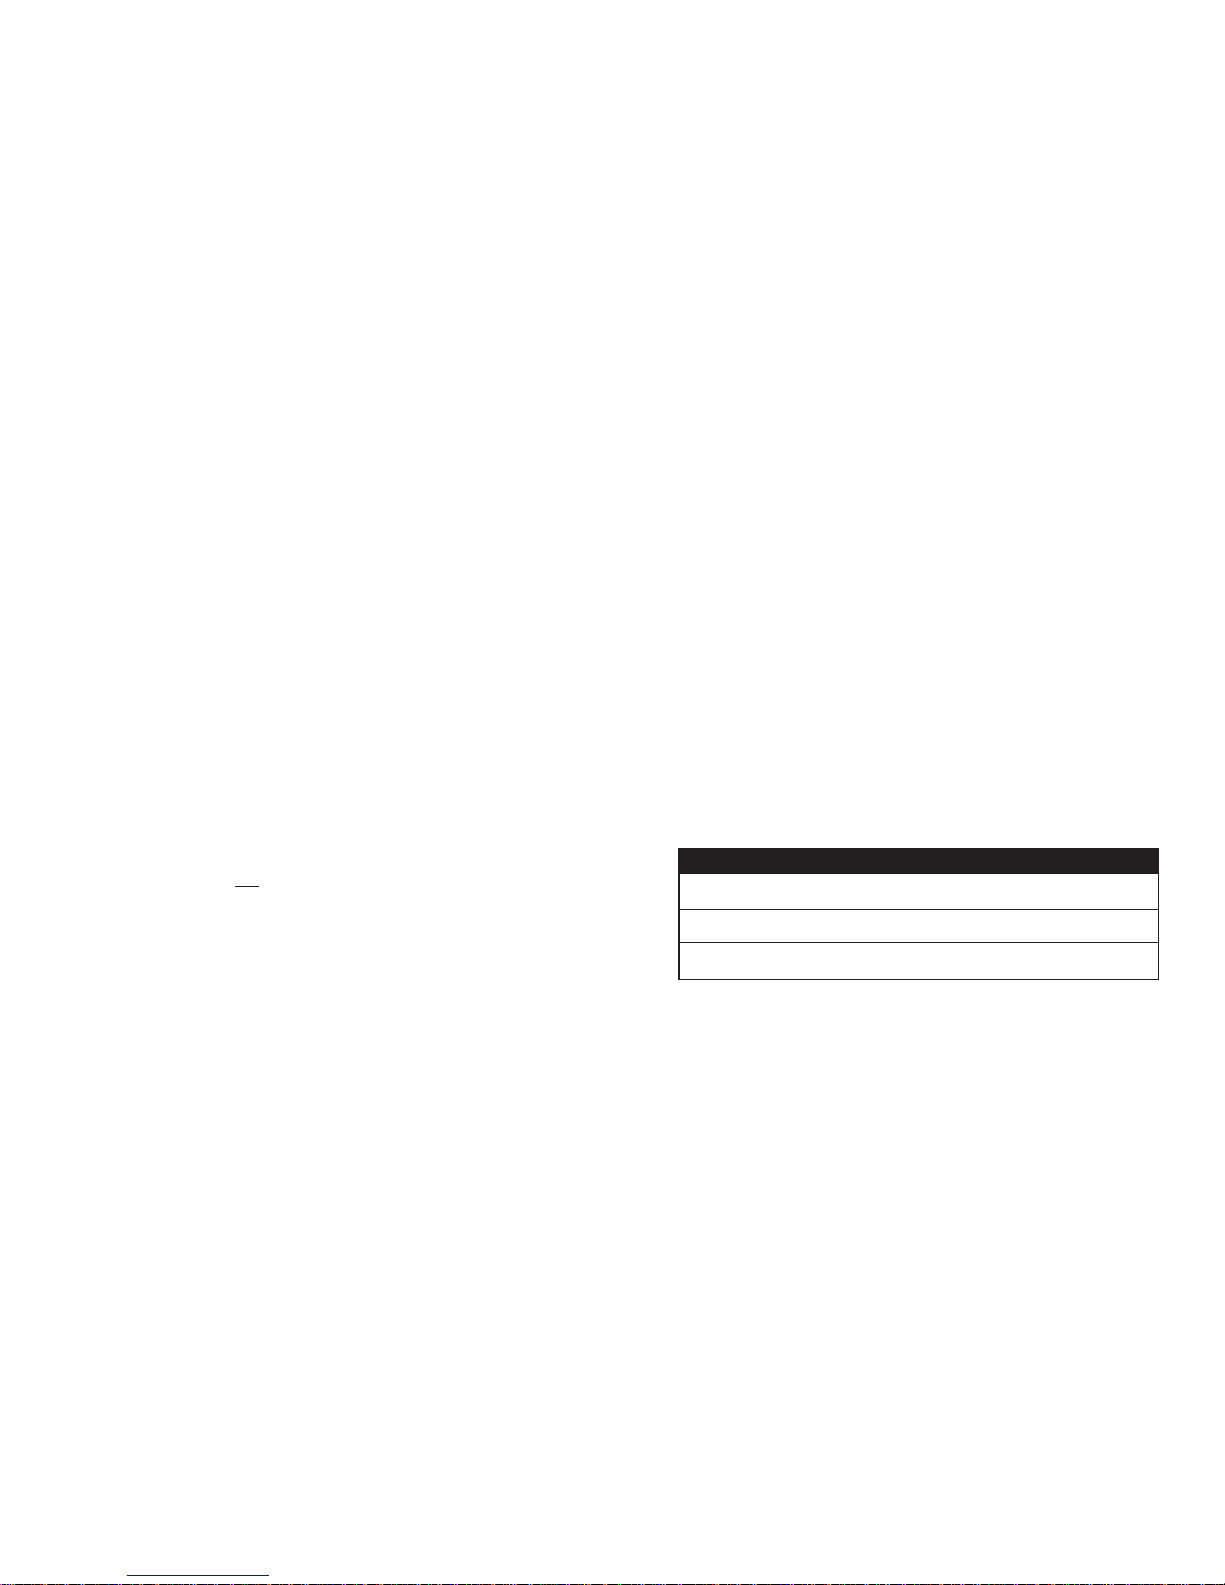
Figure 2.1 – Heart Rate Monitor Display Formats
Heart Rate Over Time
Heart Rate Only
Time Over Heart Rate
No Heart Rate Information
TIP: Press HEART RATE to cycle through display formats
while heart rate monitor is on.
To ensure a clear signal, stand at least six feet away from anyone else
using a sensor.
Whenever you move into TIMING, CHRONO or TIMER modes, the watch
automatically looks for a transmitter signal for 15 seconds. If no signal is
found, the watch stops looking for signals until you push the HEART RATE
button again.
3. Read your heart rate. When the watch establishes contact with the
transmitter, your heart rate (shown in beats per minute) is displayed.
To turn the monitor off, press and hold HEART RATE.
Viewing Heart Rate and Time Information
The HRM display can be formatted in four different ways. Use the HEART
RATE button to cycle through the choices. For example, when using the
HRM in CHRONO or TIMER Modes, the heart rate will be displayed in the
top line, and the CHRONO or TIMER Mode count in the bottom line. Press
the HEART RATE button to cause these values to swap places. You may
also choose to display only heart rate information, or no heart rate
information at all. (See Figure 2.1 following paragraph below.)
HRM Setup Mode
This mode allows you to set up a target heart rate zone for exercise. A
target zone consists of a lower and upper heart rate limit. You may select
one of the preset zones, or manually set values for customized zones of
your choosing. When your heart rate drops below the lower limit, or
exceeds the upper limit of your zone, an optional alarm sounds. While you
may use the heart rate monitor without selecting a target zone, configuring
Page 7
1110
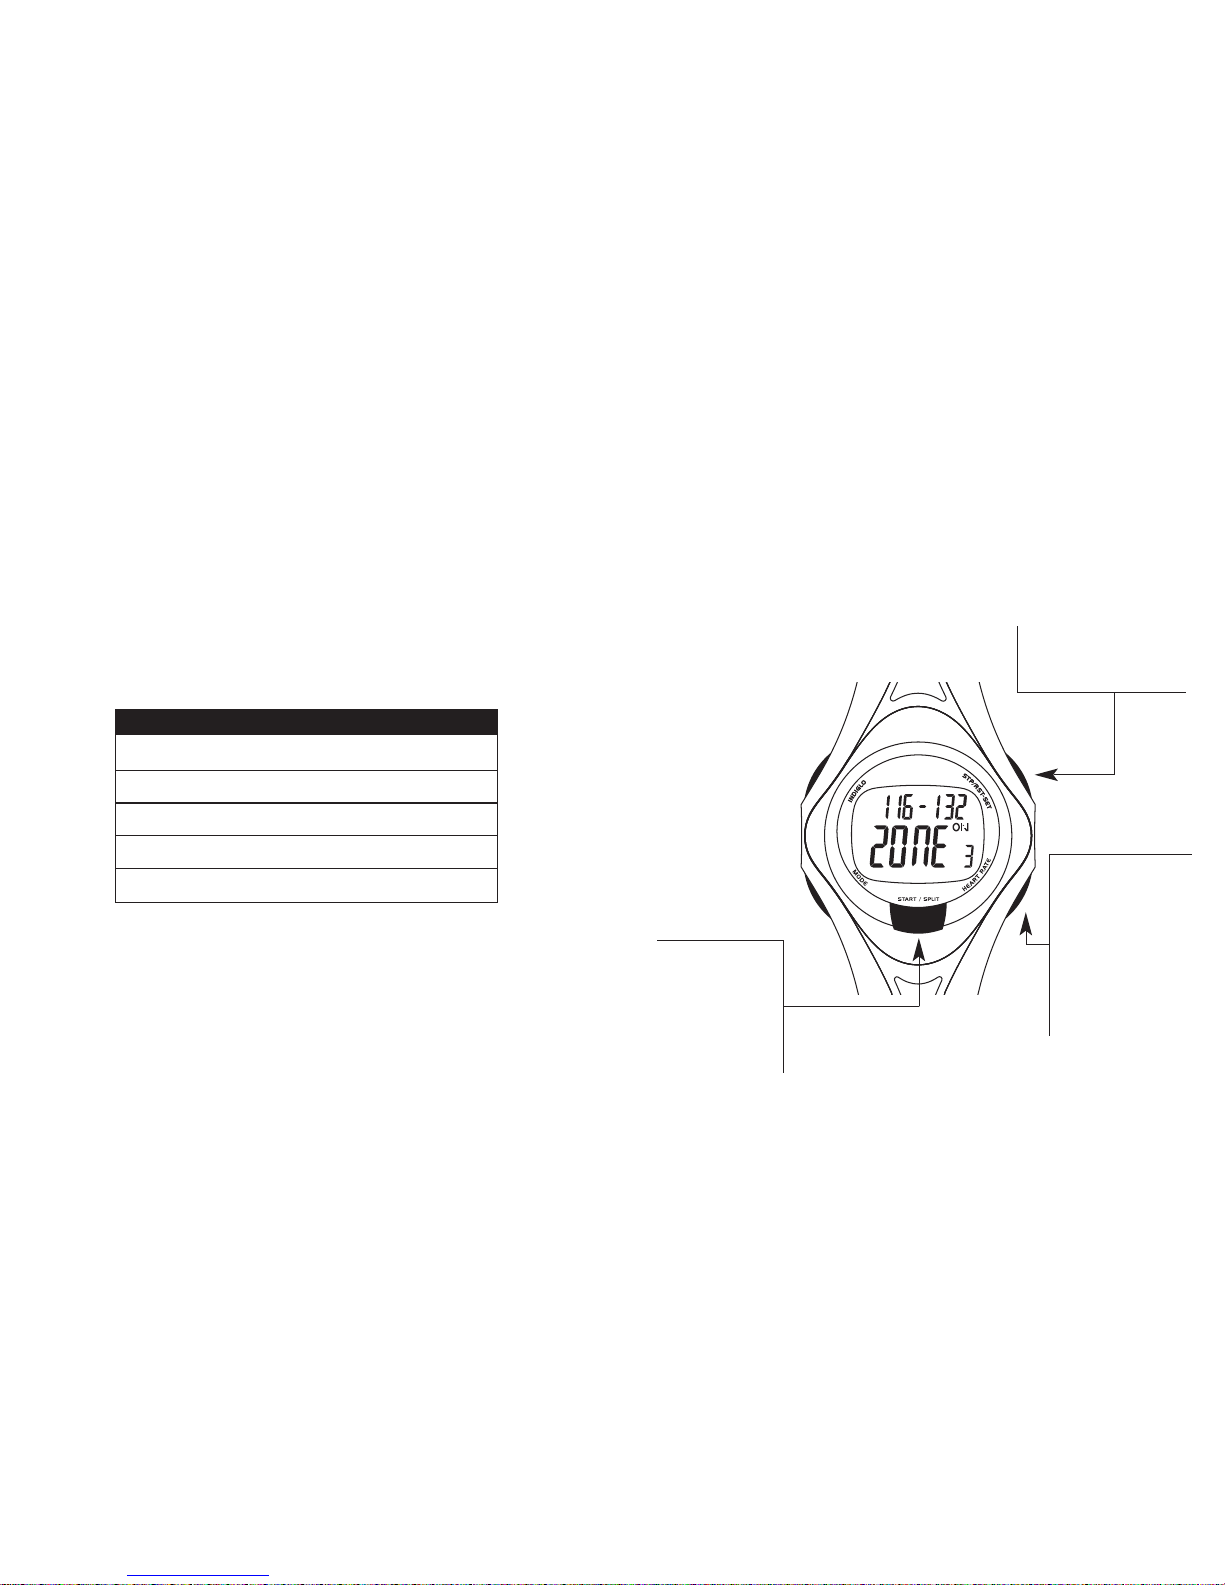
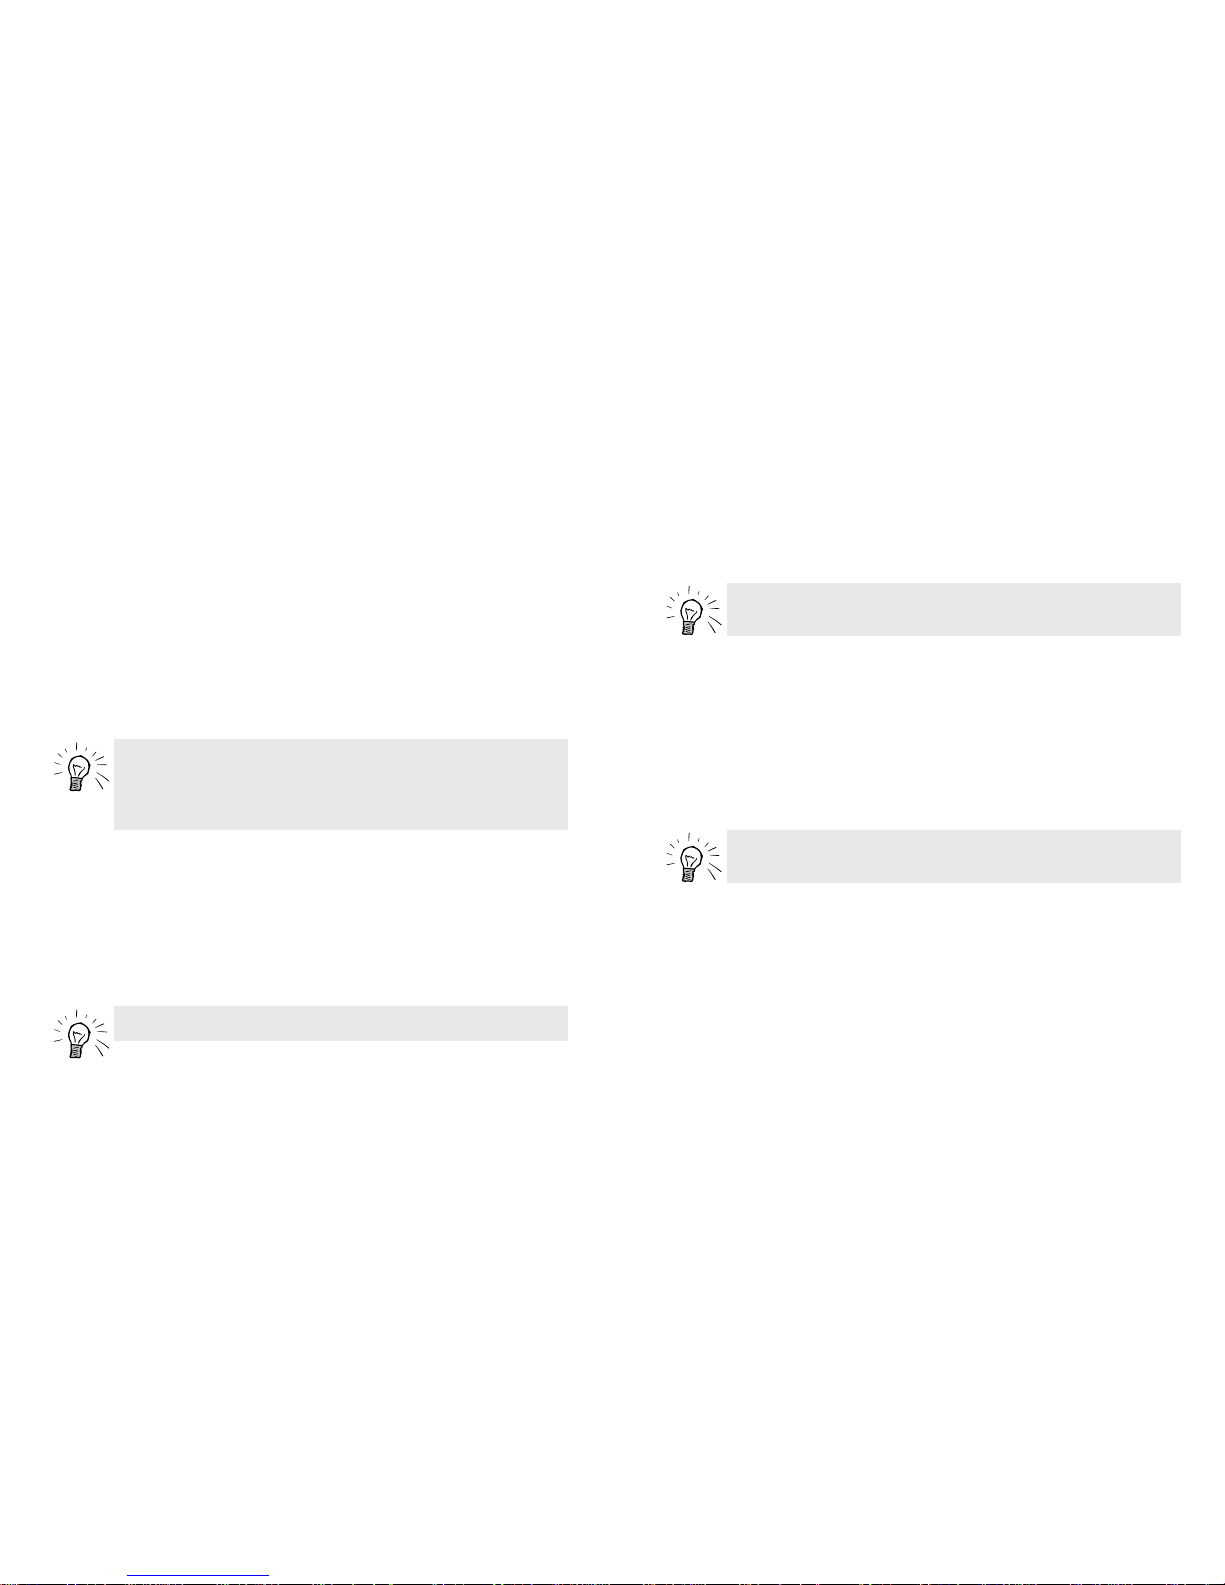
START/SPLIT Button –
(START/STOP for
Fitness Model) - Press
to toggle the ON/OFF
flag, which indicates
whether the out-ofzone alert has been
activated/deactivated.
Figure 2.2 – Default Settings for HRM Setup Mode
STOP/RESET/SET Button –
(SET/RESET for Fitness Model)
- Press to enter the setting
state for HRM Setup Mode.
HEART RATE Button –
Press to select a target
heart rate zone. In this
example Zone 3 is your
target heart rate zone.
The selected zone is
based on a Maximum
Heart Rate (MHR) of
165; setting a different
maximum rate changes
the zone’s range.
this feature first is highly recommended. It helps you stay within your
desired zone and maximize your fitness program.
Target Fitness Zones
The lower and upper heart rate limits for target fitness zones are based on
the Maximum Heart Rate (MHR) value. Table 2.1 illustrates the formula used
by the watch to calculate the lower and upper heart rate limits for each zone.
Table 2.1: Fitness Zones
It’s important that you set a Maximum Heart Rate value because the five
automatic target zones are based upon that value. You can determine your
rate either through controlled testing or by one of many estimation
methods. One widely used method is to subtract your age from 220. Note,
however, that methods like this may yield inaccurate results because
maximum heart rate depends on physiological factors besides age, such as
fitness level and genetic make-up.
ZONE Lower Limit Upper Limit
5
❘
90% MHR
❘
100% MHR
4
❘
80%
❘
90%
3
❘
70%
❘
80%
2
❘
60%
❘
70%
1
❘
50%
❘
60%
Page 8

13
Entering your Weight and Maximum Heart Rate
1. Press MODE until you get to the HRM SETUP Mode. Next press
STOP/RESET/SET to enter the setting state. The currently selected zone
begins to flash. (For the Fitness Model, press SET/RESET.)
2. Press START/SPLIT (+) or HEART RATE (-) to cycle through the preset
target zones as well as the MANUAL setting. (For the Fitness Model,
press START/STOP (+) or HEART RATE (-).) Each zone, including the
default lower and upper heart rate limits, will be flashing.
3. Press MODE (NEXT) to move through the values that define your body
weight and maximum heart rate (MHR) settings. Press START/SPLIT (+)
or HEART RATE (-) to increase or decrease values. (For the Fitness
Model, press START/STOP (+) or HEART RATE (-).) Body weight is used
in calculating the number of calories burned.
NOTE: When specifying the weight setting, press
START/SPLIT (+) to toggle between pounds and kilograms.
NOTE: Your target zones are customized once you complete the
HRM Setup.
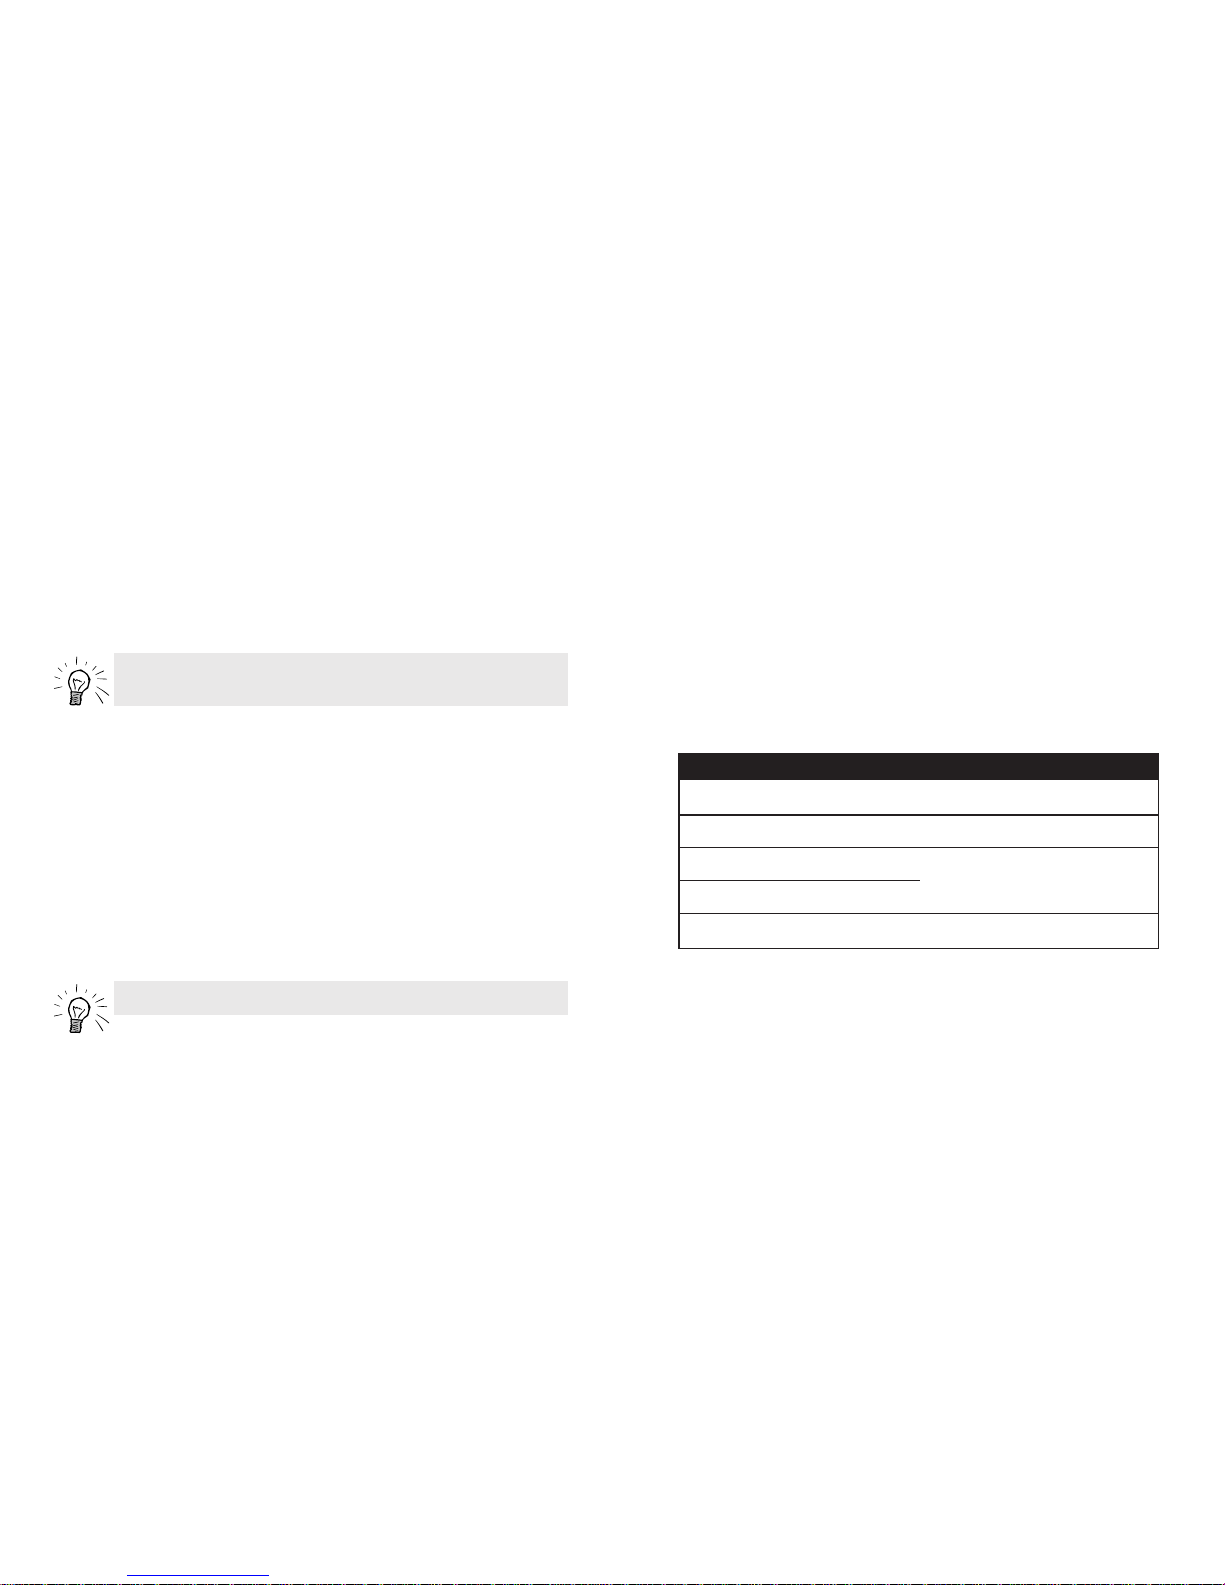
Figure 2.3 – Setting Values in HRM Setup Mode
MODE (NEXT) Button – Press
to cycle through weight and
maximum heart rate settings
when customizing a heart
rate zone.
HEART RATE (-) Button –
Press to cycle through the
target heart rate zones.
START/SPLIT (+) Button – (START/STOP (+) for Fitness Model) - Press to cycle upward through
the preset and manually set target heart rate zones. When setting the weight value, press to toggle
between pounds (LB) and kilograms (KG).
STOP/RESET/SET
(DONE) Button –
(SET/RESET (DONE) for
Fitness Model) - Press
when done to save your
settings.
12
Page 9

1514
2. Press START/SPLIT (+) or HEART RATE (-) to cycle through the preset
target zones until you reach the MANUAL setting, which will be flashing.
(For the Fitness Model, press START/STOP (+) or HEART RATE (-).)
3. Press MODE (NEXT) to cycle through the numbers that define your upper
heart rate limit, lower heart rate limit, weight, and maximum heart rate (MHR)
settings. Press START/SPLIT (+) or HEART RATE (-) to increase or decrease
numbers. (For the Fitness Model, press START/STOP (+) or HEART RATE (-).)
When each digit is set, press MODE (NEXT) to move to the next one.
Use of a preset target heart rate zone will reset your entry for the “manual”
target zone to the original factory setting.
4. Press STOP/RESET/SET (DONE) to save your settings and exit the HRM
SETUP Mode. (For the Fitness Model, press SET/RESET (DONE).)
Reviewing HRM Information
You can use your watch to review HRM information, including average,
minimum and peak heart rates, the amount of time your heart rate is within
your target zone, and the number of calories burned. As a fitness
yardstick, you also can see how much your heart rate declines over a preset period. For details refer to the REVIEW and RECOVER Modes.
4. Press STOP/RESET/SET (DONE) to save settings and exit. (For the
Fitness Model, press SET/RESET (DONE).)
Selecting a Target Zone
To select a target heart rate zone based on your maximum heart rate:
1. Press MODE until HRM SETUP appears.
2. Press HEART RATE to cycle through the preset target zones (as well as
the MANUAL setting). Each preset zone, including the default lower and
upper heart rate limit, is displayed.
When you leave HRM SETUP mode, the watch will use the zone you have
selected for all of its HRM-based statistical calculations.
Setting the “Manual” Target Zone
1. While in HRM SETUP mode, press STOP/RESET/SET to enter the setting
state. The currently selected zone begins to flash. (For the Fitness Model
press SET/RESET.)
NOTE: Press START/SPLIT to toggle the out-of-zone alert ON or
OFF. (For the Fitness Model, press START/STOP).
NOTE: Changing your weight setting during a workout will cause
an inaccurate calorie calculation.
Page 10

1716
interference or brief jamming of the signal. If this occurs, the watch
suspends the flashing of the heart. Usually the problem resolves itself
and the flashing resumes. If the interruption continues, the watch
alerts you with the error message described below.
The message “NO HRM DATA” appears on the display.
This error message is displayed if the watch is not receiving regular heart
rate updates from the sensor. However, as long as the sensor is on the
chest, its pads are wet, and the battery in the transmitter is not weak, the
watch will usually recover without intervention on your part. If it does not
recover, try the following:
• The sensor pads on the chest transmitter may have lost contact with
your chest for a few seconds. Be sure the transmitter is snug on
your body.
• The sensor pads may be dry. Liberally moisten them and readjust the
chest transmitter if necessary.
• The battery in the chest transmitter may be weak and need replacing.
(See instructions in the Fitness Sensor User Guide for battery
replacement.)
Troubleshooting HRM-related Problems
Troubleshooting advice for common problems:
I’m having trouble getting a first reading, OR the heart rate numbers
appear to be incorrect during operation.
• Liberally reapply moisture to the textured contact pads on the back of
the heart rate sensor.
• Tighten the chest strap until it fits snugly and makes good contact
with the skin. Make sure the sensor is secure against your skin and is
placed with TIMEX facing up.
• Move away from other heart rate sensors and other sources of radio
signals and static electricity such as exercise equipment and other
electrical machinery.
• Wait a couple of minutes and press HEART RATE again.
Sometimes I see dashes on the display bracketing my heart rate, OR the
heart rate displayed remains unchanged for an extended period of time.
What does this mean?
• This usually indicates that either the sensor pads need moisture or the
chest unit is not snug on your chest, causing poor electrical contact
with your skin. Moisten the sensor pads and adjust the transmitter so
that both pads are making good contact with your chest.
Sometimes the heart stops flashing briefly.
• As long as the heart is flashing, the watch is receiving a clear signal
from the monitor. As with any radio system, there may be occasional
Page 11
1918
STOP/RESET/SET (DONE) –
(SET/RESET (DONE) for
Fitness Model) – Press to
save changes and exit.
Button Operation When Setting
MODE Button (NEXT) – Move
to the next value to set.
HEART RATE Button (–) –
Decrease the flashing value.
START/SPLIT (+) - (START/STOP (+) for Fitness
model) – Increase the flashing value.
Modes and Features
This section describes the modes and features available on your watch. A
mode gives you access to a specific area of your watch’s operation. For
example, you enter the ALARM Mode to set an alarm to sound at a specific
time.
Your watch has several features that can be accessed by pressing the
MODE button. Pressing the MODE button cycles through all the modes
available within your watch.
Table 3.1: Mode Summary
30-Lap Model Fitness Model
TIME OF DAY
❘
TIME OF DAY
CHRONO
❘
TIMING
TIMER
❘
RECOVER
❘
RECOVER
REVIEW
❘
REVIEW
HRM SETUP
❘
HRM SETUP
ALARM
❘
ALARM
Page 12
21
When setting HOURS in the12-hour format, change the AM or PM setting
(indicated by “A” or “P” on the display) by increasing the number of hours
past “12.”
When setting SECONDS, press START/SPLIT (+) or HEART RATE (-) to set
them to zero. This is useful for synchronizing the watch to a time reference.
(For the Fitness Model, press START/STOP (+) or HEART RATE (-).)
3. When finished, press STOP/RESET/SET (DONE) to save your selections
and exit the TIME OF DAY Mode. (For the Fitness Model, press
SET/RESET.)
Peeking at a Second Time Zone
The 30-Lap Model allows you to keep track of time in two time zones
(identified as T1 and T2). You may “peek” at the second zone by pressing
the START/SPLIT button for two seconds while in TIME OF DAY Mode.
Release the button to return to your primary time zone. To swap time zone
settings, hold the button for four seconds.
TIP: The watch skips over February 29. To accommodate leap
years, set the date manually on February 29 to “February 29.”
The watch will roll over to March 1 the next day.
NOTE: You can set your watch to generate a chime melody on
the hour by setting the HOURLY CHIME feature to ON.
TIME OF DAY Mode
Your watch will display the time, date and day of the week.
Setting the Time of Day
1. Press and hold STOP/RESET/SET firmly for two seconds. (For the
Fitness Model, press and hold SET/RESET.) “HOLD TO SET” appears. If
you continue to hold down this button, “SET TIME” appears.
The 30-Lap Model allows you to set the time of day for two different time
zones. When you begin setting the time, the “1” flashing in the lower right
of the display indicates the primary time zone. Press START/SPLIT (+) or
HEART RATE (-) to select the primary (1) or secondary (2) time zone. Then
press MODE (NEXT) to begin setting the time as described above.
2. Press MODE (NEXT) to set:
HOURS ➤ MINUTES ➤ SECONDS ➤ DAY OF THE WEEK
➤ MONTH ➤ DATE ➤ TIME FORMAT (12- or 24-hour)
➤ DATE FORMAT (Month-Day or Day-Month)
➤ HOURLY CHIME (on or off) ➤ BUTTON BEEP (on or off).
The value to be changed will be flashing. Press START/SPLIT (+) or
HEART RATE (-) to increase or decrease values. (For the Fitness Model,
press START/STOP (+) or HEART RATE (-).) Hold the buttons down to
advance more quickly. When each value is set, press MODE (NEXT) to
move to the next value.
20
Page 13

23
You can switch to any other mode, such as TIME OF DAY, while the
CHRONO Mode is running. A stopwatch flag indicates that CHRONO Mode
is running in the background.
Chronograph Display Options
If you are not using a heart rate sensor, the watch displays both lap and
split times (after you have taken your first split). To select which time is
displayed in the lower display line, press and release STOP/RESET/SET
when the Chronograph is reset (00.00.00) but before you begin timing laps.
If you are using the heart rate sensor, the watch displays heart rate
information in addition to the Chronograph time. You may choose to view
either lap or split time as well as heart rate data. For heart rate data display
options, see pages 8–9 and Figure 2.1, on formatting the display when the
HRM is active.
Using the Chronograph
1. Press MODE until CHRONO appears.
2. Press START/SPLIT to begin timing.
3. Press START/SPLIT while CHRONO Mode is running to take a lap/split.
This stores the current lap and split data and starts a new lap. The watch
briefly shows the lap and split times you just recorded as well as the lap
number. If you are viewing HRM data, the watch next displays heart rate
information for the lap.
(Instructions continue on page 25)
CHRONO Mode (30-Lap Model only)
The CHRONO Mode is the main “workout” mode in your watch. It provides
a stopwatch for recording the elapsed time for 30 readings, such as a lap,
in a single event, as well as other information for an entire event up to 100
hours in duration. Data for up to 30 readings may be stored including the
lap number, the individual lap time and the total elapsed split time.
When the heart rate sensor is active, CHRONO Mode tracks three pieces of
statistical data:
• The amount of time your heart rate is within the target zone while
CHRONO Mode is running
• The average heart rate for the period that the HRM system was active
and CHRONO Mode is running
• The peak and minimum heart rate for the period that the HRM system
was active and CHRONO Mode is running
Data accumulation stops if you stop the Chronograph while the HRM
system is active and resumes when you restart the Chronograph. If the
Chronograph is allowed to run out while the HRM system is running, the
HRM shuts off automatically and data accumulation ceases.
NOTE: Throughout this section we will talk about “laps” and
“splits.” “Lap time” is the time for each segment (lap) of an event.
“Split time” is the total elapsed time since the start of the event.
22
Page 14
25
It then returns to the running CHRONO Mode, which is still timing the current
lap/split. The watch stores data for the last 30 laps.
4. Press STOP/RESET/SET to stop timing.
5. Press START/SPLIT to resume timing, or press and hold
STOP/RESET/SET to reset the chronograph to zero. (Do not reset if you
wish to save the data for later review.)
TIMER Mode (30-Lap Model only)
This mode allows you to set a time from which the watch counts down to
zero. This feature is useful for fixed time events up to 100 hours. At the
end of the countdown, the Timer can be set to stop, repeat the countdown,
or switch to CHRONO Mode and start the chronograph.
While the Timer is running, you can press MODE to switch to any other
mode, such as TIME OF DAY, without disrupting its operation. An hourglass
flag appears when the Timer is active.
Setting the Timer
1. Press MODE until TIMER appears.
2. Press STOP/RESET/SET to enter TIMER Mode set state. The hours value
will be flashing.
3. Press START/SPLIT (+) or HEART RATE (-) to change values. Hold the
keys down to advance more quickly. When each value is set, press
MODE (NEXT) to move to the next values (MINUTES then SECONDS).
24
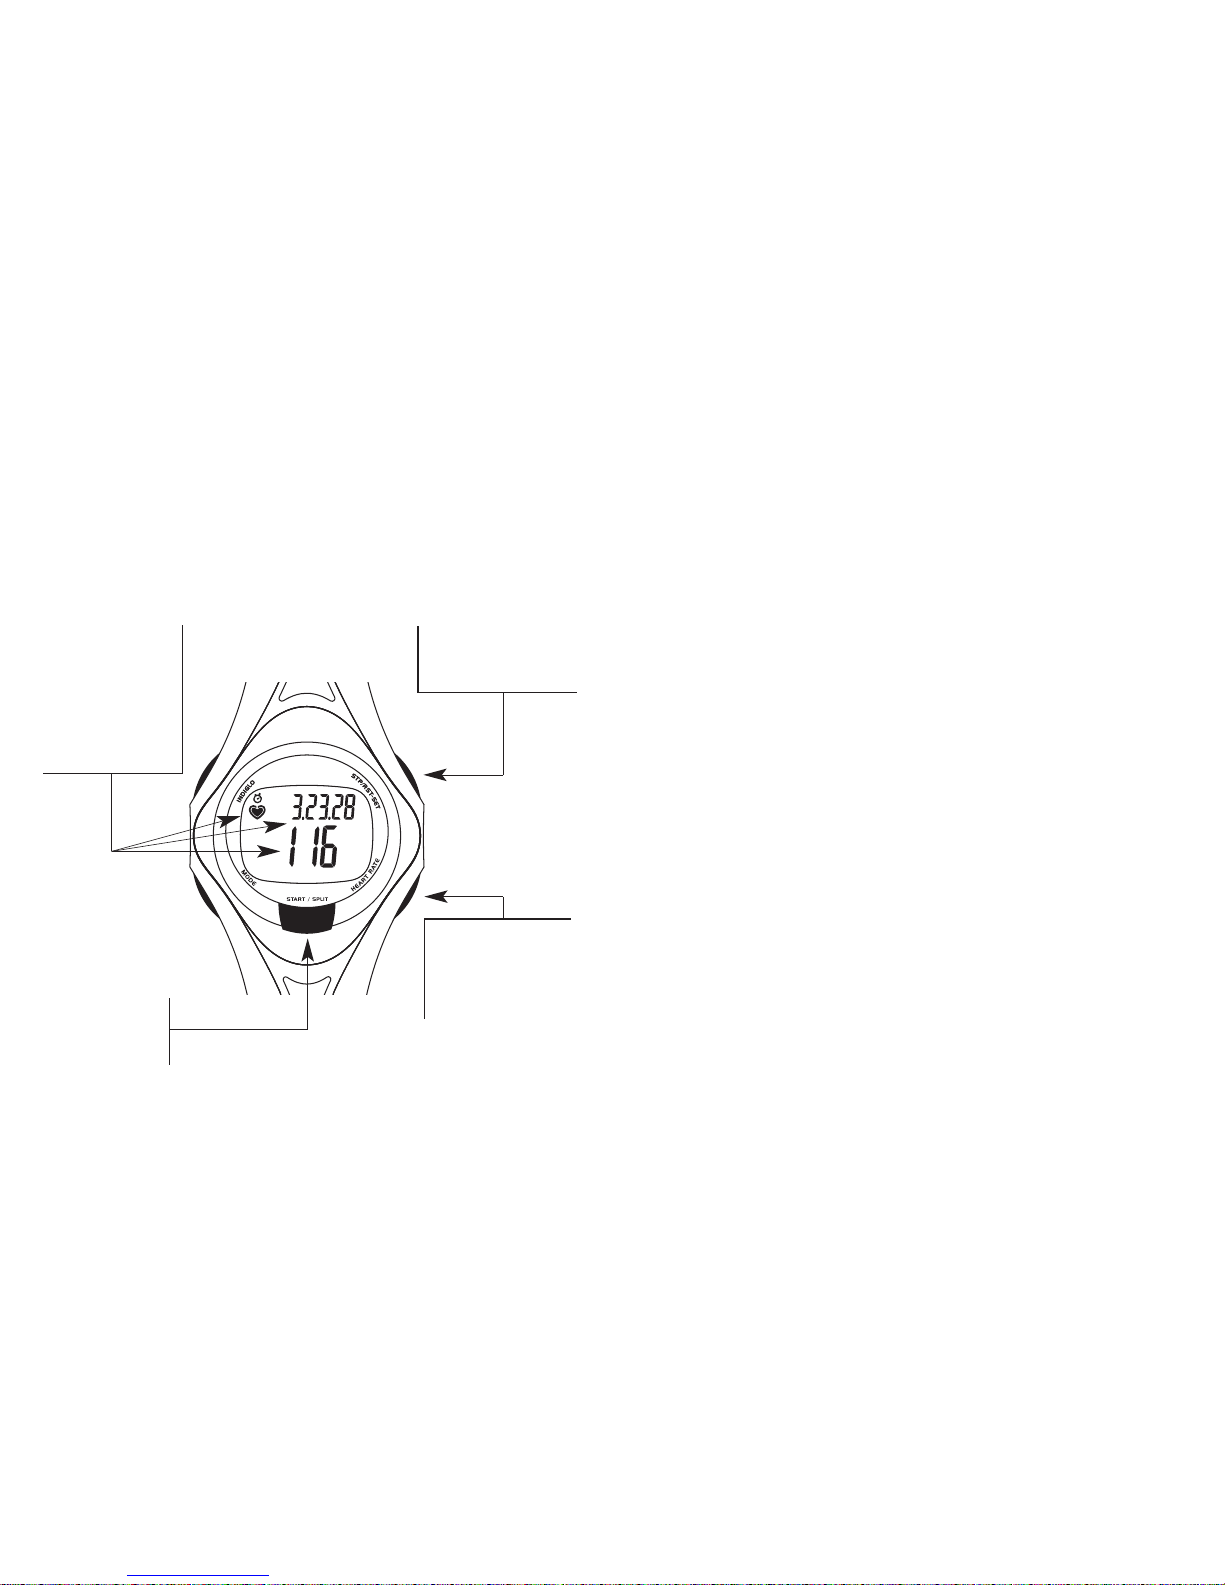
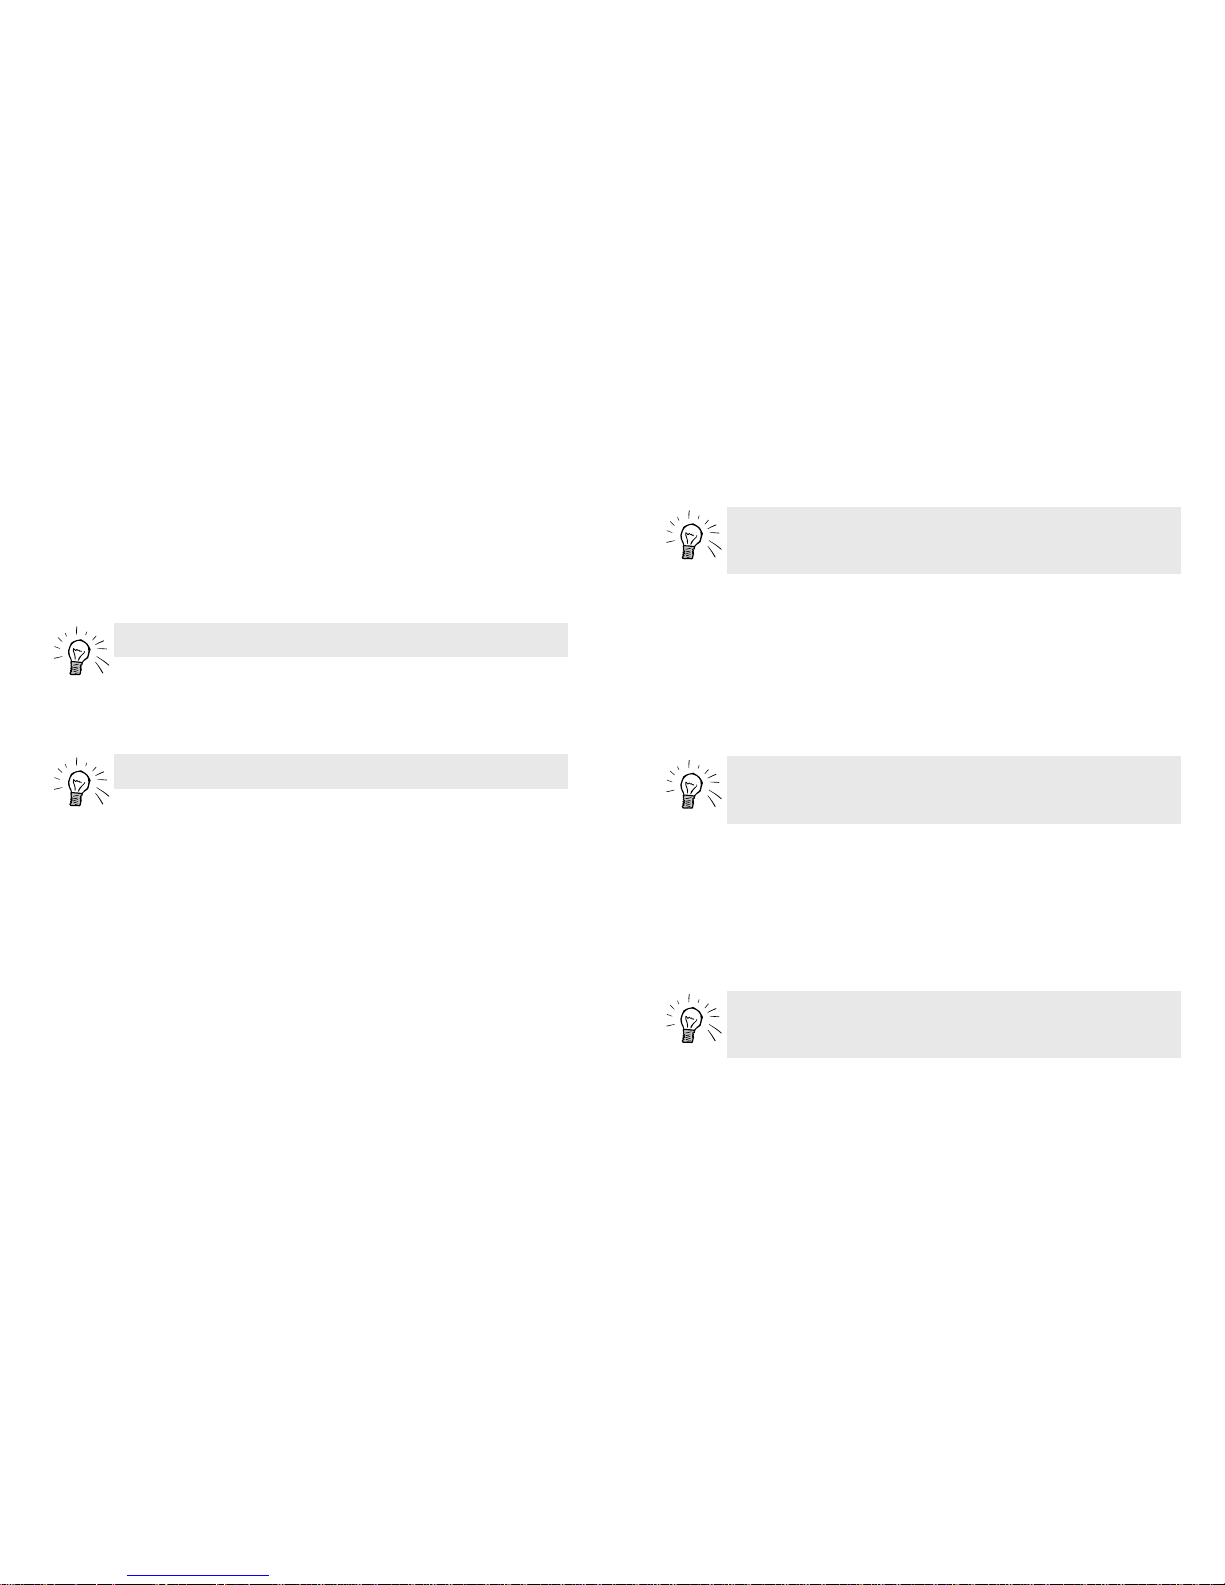
Figure 3.1 – Timing Laps/Splits with the 30-Lap Model
STOP/RESET/SET Button –
In CHRONO Mode, press to
stop or reset the
Chronograph.
HEART RATE Button –
Turn on or turn off the
heart rate monitor; also
used to change HRM
data position when heart
rate monitor is on.
START/SPLIT Button –
In CHRONO Mode,
press to start the
Chronograph.
CHRONO Mode Display
Format Example – The
current lap time (top) and
heart rate (bottom) are
displayed. The stopwatch
flag appears during
timing; the solid beating
heart flag indicates an
active HRM.
Page 15

27
TIMING Mode (Fitness Model only)
This mode has two purposes:
• It can act as either a stopwatch (count up) or a countdown timer, allowing
you to count down to or up from zero, respectively. You can record up to
100 hours worth of statistical data.
• When used with a heart rate sensor, this mode allows you to record heart
rate information.
You can leave the Timing mode while counting up or down. In TIME OF
DAY Mode a stopwatch flag indicates that TIMING Mode is counting up in
the background. An hourglass flag indicates TIMING Mode is counting
down.
Using Timing to Count Up (Stopwatch Operation)
1. Press MODE until TIMING appears.
2. Press SET/RESET until “00.00.00” appears. If you enter Timing Set
mode accidentally, press SET/RESET (DONE) to exit the set mode.
3. Press START/STOP (+) to begin timing. The SECONDS value begins to
count up.
To pause the timing, press START/STOP; press again to restart. To reset the
stopwatch to zero, press and hold SET/RESET while TIMING is stopped.
Using Timing to Count Down (Countdown Timer Operation)
To count down, you must first set a countdown time.
4. After the time for the countdown is correct, press MODE (NEXT) again to
select an ending action after the count down. Press START/SPLIT (+) or
HEART RATE (-) to toggle between STOP, REPEAT or CHRONO.
5. When finished, press STOP/RESET/SET (DONE) to save the desired action.
Timer Operation
1. Press START/SPLIT to start the Timer countdown.
2. Press STOP/RESET/SET to stop the countdown.
3. With the Timer stopped, press START/SPLIT to resume the countdown,
or STOP/RESET/SET to reset the Timer to the start time.
4. When the Timer reaches zero, it sounds an alert. The INDIGLO
®
night-
light also glows so you can see the watch in the dark.
• If the Timer was set to stop, it will be stopped after the alert.
• If the Timer was set to repeat, it resets to the start time and
immediately begins another countdown. It continues repeating until
STOP/RESET/SET is pressed. The repeat count is displayed in the
lower line of the display. The watch counts up to 99 repetitions, after
which it rolls over to zero and continues.
• If the Timer was set to start the CHRONO Mode, the watch will
automatically switch to CHRONO Mode and start it. CHRONO Mode
must be reset to zero to be automatically launched by the Timer.
26
Page 16
29
1. If you are not in TIMING mode, press MODE until TIMING appears.
2. Press and release SET/RESET until you enter TIMING mode set state.
The HOURS digits will be flashing.
3. Set the amount of time to count down from. Press START/STOP (+) or
HEART RATE (-) to increase or decrease the flashing values. Hold the
buttons down to advance more quickly. After each value is set, press
MODE (NEXT) to advance to the next values (MINUTES then SECONDS).
4. When finished, press SET/RESET (DONE) to save the countdown time.
5. Press START/STOP to begin timing. The time begins to count down to zero.
To pause the countdown, press START/STOP; press it again to restart timing.
To reset the count to the starting value, press SET/RESET while TIMING is
stopped. Press SET/RESET again to clear the set time to zero.
Using Timing Mode with the HRM System
When the HRM is active, the TIMING Mode keeps track of three pieces of
data related to heart rate:
• The amount of time your heart rate is within the target zone while TIMING is running.
• The average heart rate for the period that the HRM function is active
and TIMING is running.
• The peak heart rate for the period that the HRM function is active and
TIMING is running.
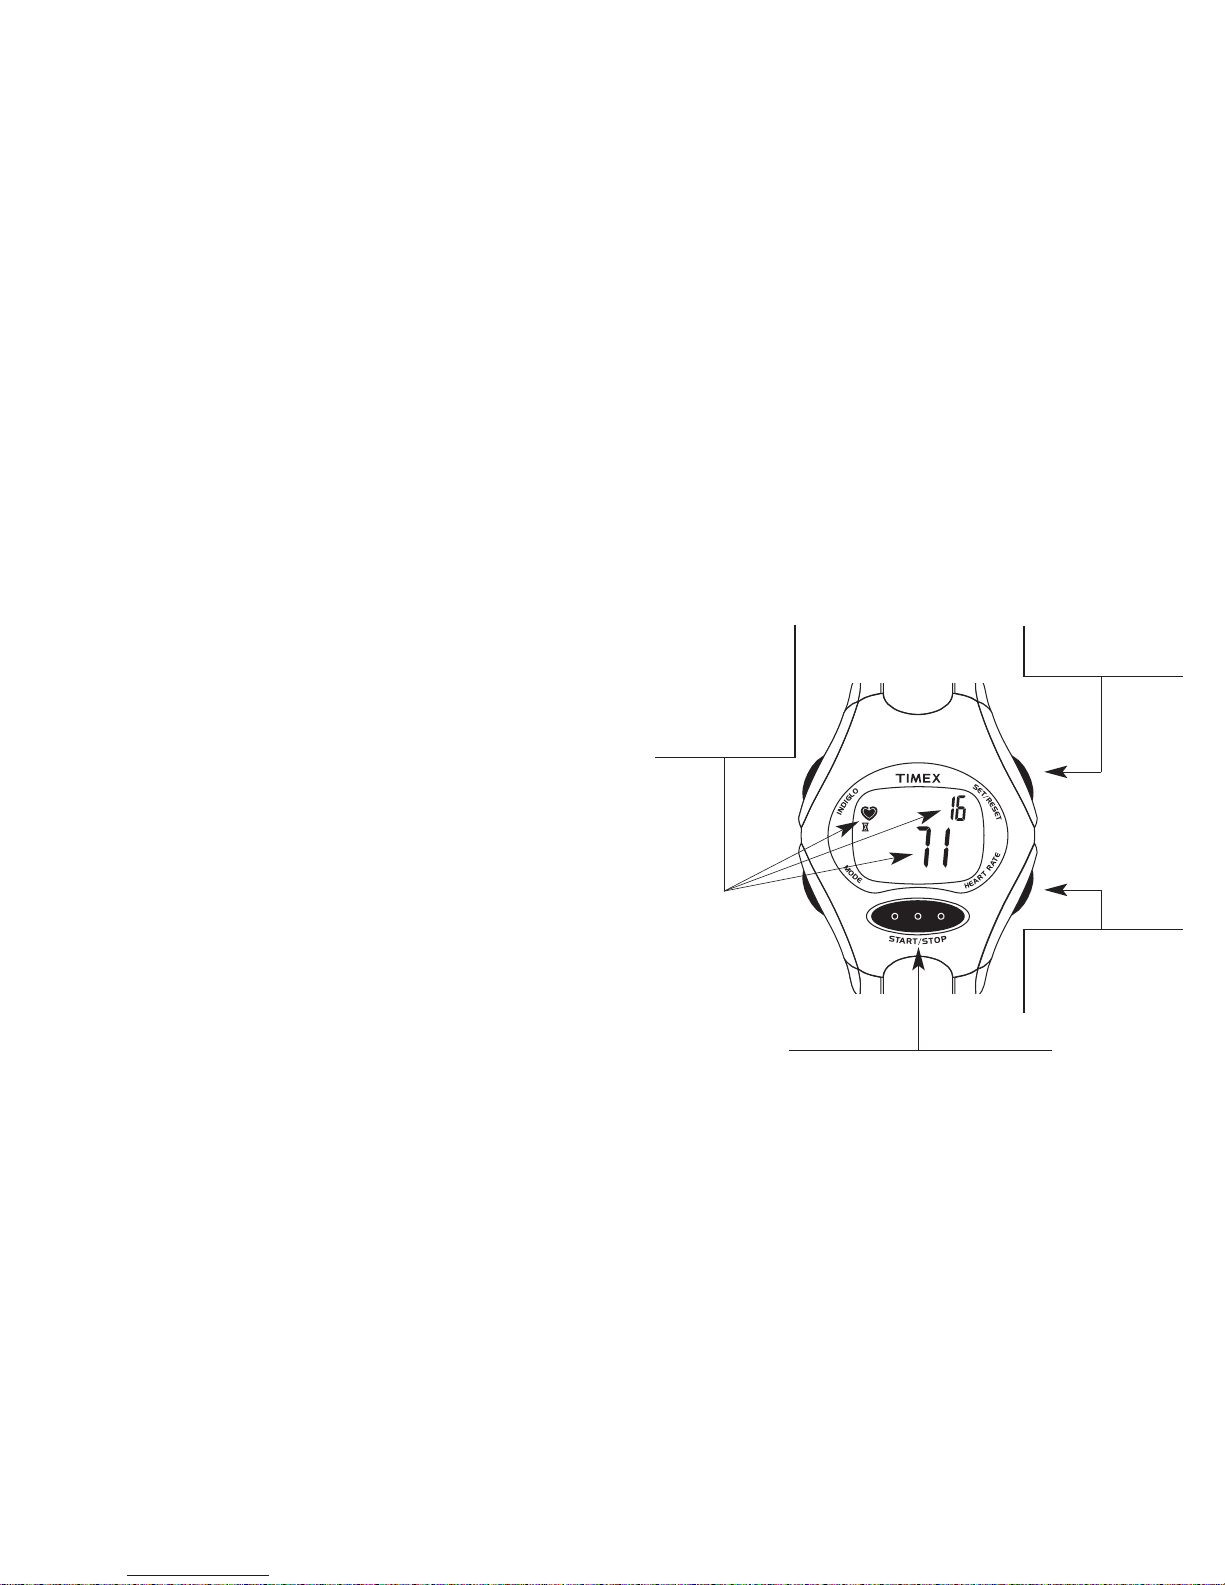
28
SET/RESET Button – Hold
to begin setting a time to
count up or down.
Using Timing with the Fitness Model
HEART RATE Button – Turn
on or turn off the heart rate
monitor; change HRM data
position when heart rate
monitor is on.
START/STOP Button – Press to start or stop
the countdown.
TIMING Mode Display
Format Example – The
countdown time (top) is
displayed with the
Hourglass and Heart Rate
flags. Current heart rate
is displayed in the
bottom.
Page 17

3130
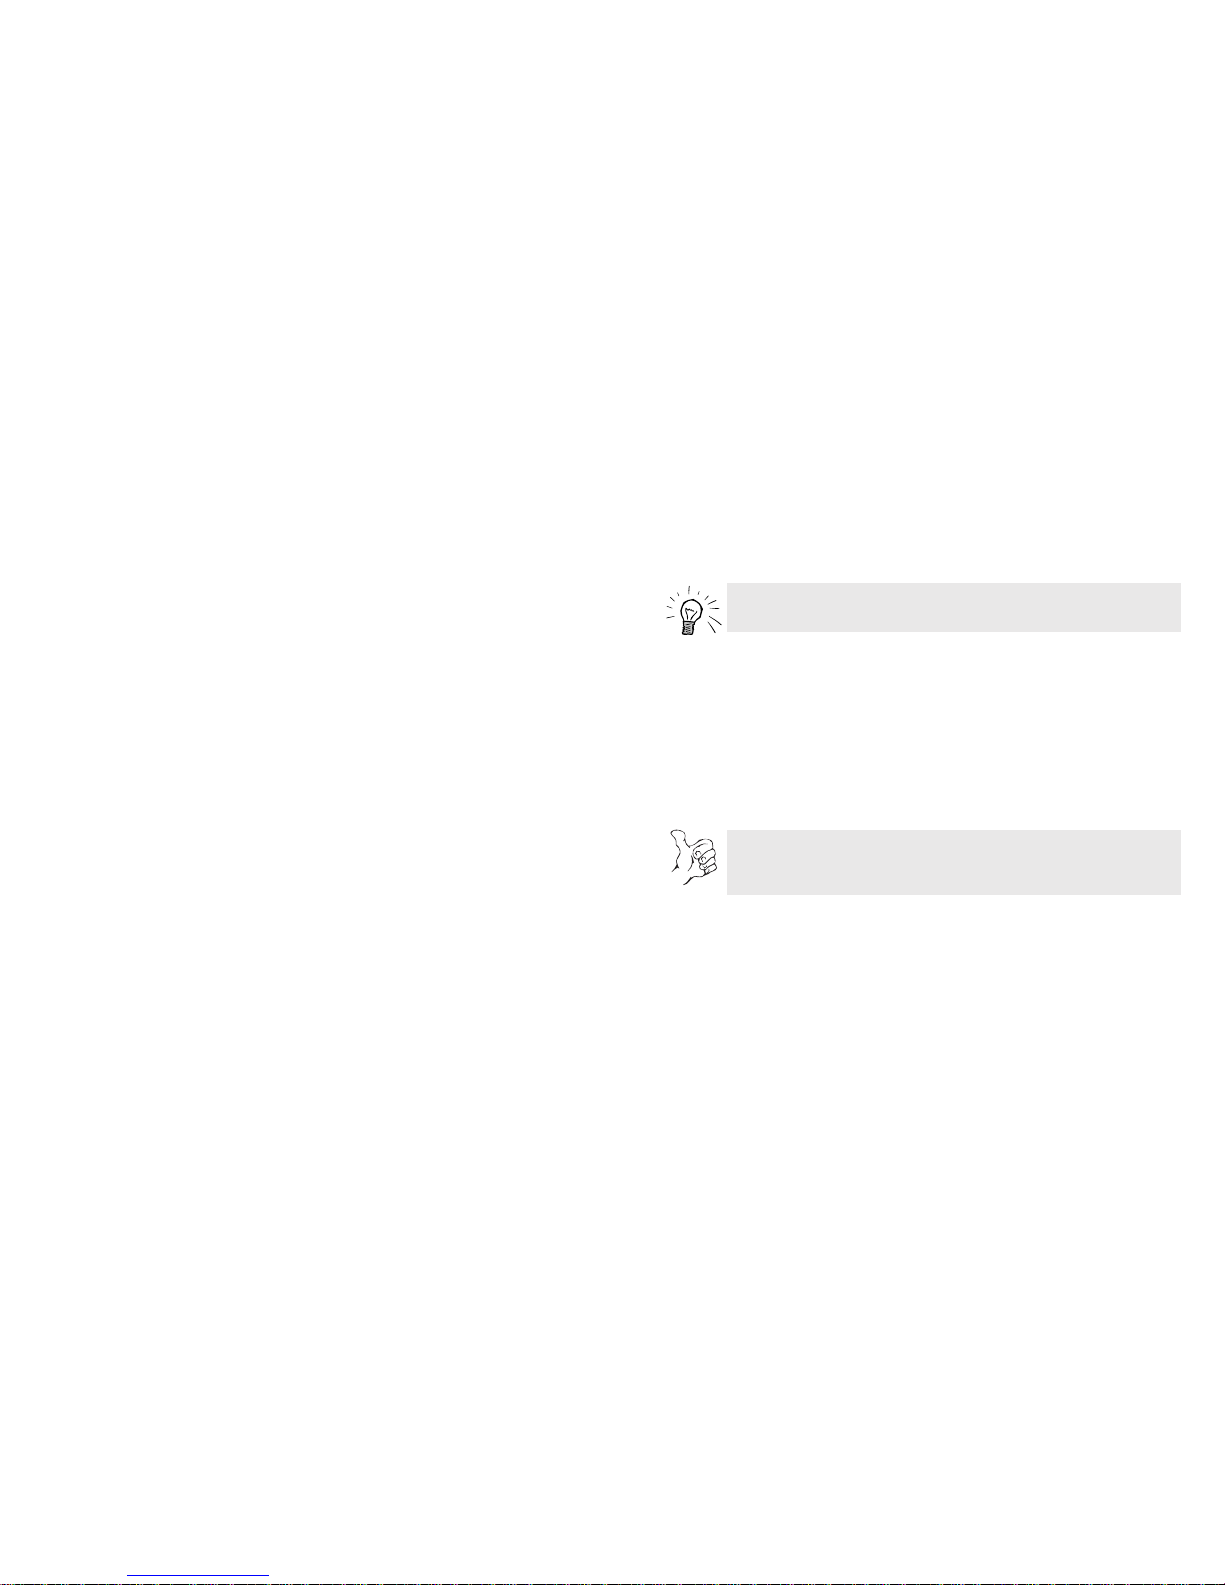
RECOVER Mode
This mode is used with an active HRM system. It is a fitness yardstick that measures
how quickly your heart rate declines from an elevated rate over a one- or two-minute
countdown period. When the timer ends an alert sounds and your beginning and
ending heart rates are displayed.
Using RECOVER Mode
1. Press MODE until RECOVER appears.
2. Press STOP/RESET/SET to toggle the recover time. You can choose one
or two minutes. (For the Fitness Model, press SET/RESET.)
3. Press START/SPLIT to begin the countdown (For the Fitness Model,
press START/STOP). The watch display will now show two heart rates your heart rate at the time you started the recovery timer in the top line
and your current heart rate in the bottom line.
4. When the alert sounds at the end of the recovery time, note the heart
rate in the lower line. Subtract this value from the value in the top line;
the difference is your recovery heart rate.
5. Press MODE to exit RECOVER Mode.
NOTE: The watch must be receiving the heart rate signal for the
RECOVER Mode to work.
Using the RECOVER Mode
STOP/RESET/SET Button –
(SET/RESET for Fitness
Model) - Press to toggle
the recovery time between
either one or two minutes.
HEART RATE Button –
At the start of your
workout, press to
acquire the signal from
the heart rate sensor.
Bottom line 123 RE is
your current heart rate
as the RECOVER Mode
timer counts down.
START/SPLIT Button – (START/STOP for Fitness Model) - Press
to begin the selected recovery period.
RECOVER Mode Display
Format Example – Top
line HR165 is your heart
rate at the start of the
recovery period.
Page 18

reached, the alarm tone sounds, the INDIGLO®night-light flashes, and the
alarm time is displayed for twenty seconds. To silence the alarm, press any
button. If you don’t silence the alarm before the alert finishes, a backup
alarm will sound in five (5) minutes.
Setting an Alarm
1. Press MODE until ALARM appears.
2. Press STOP/RESET/SET to set the time of the alarm. (For the Fitness
Model, press SET/RESET.) The hour to be changed will be flashing. The
AM/PM value will also flash if the watch is set for the 12-hour display
format.
3. Press START/SPLIT (+) or HEART RATE (-) to increase or decrease the
hours. (For the Fitness Model, press START/STOP (+) or HEART RATE (-).)
Then press MODE (NEXT) to proceed to minutes.
4. When finished, press STOP/RESET/SET (DONE) to save your settings.
(For the Fitness Model, press SET/RESET (DONE).)
To turn an Alarm ON or OFF without entering the setting state, press and
release the START/SPLIT button while in ALARM Mode. (For the Fitness
Model, press START/STOP). Changing any Alarm setting automatically
turns the alarm ON.
32
REVIEW Mode
This mode enables you to review workout data such as lap timings. The
following information can be reviewed when a heart rate sensor is active
and CHRONO (30-Lap Model) or TIMING (Fitness Model) are running:
• In Zone - The amount of time your heart rate was within the target
zone you specified.
• Average Heart Rate
• Peak Heart Rate
• Minimum Heart Rate (30-Lap Only)
• Total Calories Burned - Calculated from elapsed time, heart rate data
and body weight.
• Chronograph lap and split times (30-Lap Only)
• Average heart rate per lap (30-Lap Only)
Reviewing Heart Rate Information
1. Press MODE until REVIEW appears.
2. Press START/SPLIT (+) to advance through the HRM data (IN ZONE,
AVERAGE HEART RATE, PEAK HEART RATE, MINIMUM HEART RATE,
TOTAL CALORIES) and the stored Chrono lap data. (For the Fitness
Model, press START/STOP (+).) Press HEART RATE (-) to cycle
backwards through the HRM data.
ALARM Mode
This mode sets an alarm to sound at a pre-set time. When the alarm is ON,
the alarm clock flag appears on the display. When the alarm time is
33
Page 19
35
Usage Examples
Your Timex®watch can become an important part of your daily fitness
routine. Together with a heart rate monitor, it lets you easily keep tabs on
your workout progress by timing, collecting, storing and displaying fitness
data. Here are a few real-world scenarios to give you some ideas for
getting the most out of your watch.
Usage Example 1 Using Your Watch to Time Laps In a Simple Workout
Your usual workout consists of jogging around a half-mile course. You want
to jog five miles today, which means ten laps around the course. Also, you
have to remember to call your teenager, who will be coming home from
school during your workout, to tell her to put the lasagna in the oven at 4:15.
In this example, you’ll use the following watch modes:
■ Setting an Alarm: To remind you to call your daughter, go to the ALARM
Mode and set the alarm to sound at 4:15 PM. When the alarm sounds,
press any key to silence it, then grab your phone and make the call!
30-Lap Model Fitness Model
ALARM
❘
ALARM
CHRONO
❘
TIMING
REVIEW
❘
REVIEW
Global Features
These are handy features that do not directly affect mode operations.
Auto Return to Time of Day
If you are in ALARM, TIMER, RECOVER or HRM SETUP mode but take no
action for two to three minutes, the watch automatically exits the current
mode and returns to TIME OF DAY Mode. If you changed any settings
during that time, they are processed as if they had been completed.
INDIGLO
®
Night-Light
The INDIGLO®night-light illuminates the display to help you see in the
dark. Just press the INDIGLO Button to activate. After you release the
button, the light remains on for three (3) seconds (or for six (6) seconds if
you are setting values).
NIGHT MODE
®
Feature (30-Lap Model only)
For NIGHT-MODE
®
feature, any button press illuminates the display for
three (3) seconds (or for six (6) seconds if you are setting values), so a
separate press of the INDIGLO Button is not required during low-light
conditions. To activate the NIGHT-MODE
®
feature, press and hold the
INDIGLO Button for 3 seconds until the watch beeps. The NIGHT-MODE
®
feature will continue to stay activated for 7-8 hours, or it can be manually
deactivated by pressing and holding the INDIGLO Button again for three (3)
second until the watch beeps.
34
Page 20

37
Usage Example 2 Using Your Watch to Measure Fitness and Time a
Club Workout
An avid spinner, you go to your health club four times a week and spin for
30 minutes each session. You like to monitor your heart rate when spinning
to maximize the workout by spending as much time as possible in your
target heart rate zone. At the end of your workout you measure how quickly
your heart rate recovers during a standard one-minute recovery period.
In this example, you’ll use the following watch modes:
30-Lap Model Fitness Model
HRM SETUP
❘
HRM SETUP
CHRONO
❘
TIMING
TIMER
❘
RECOVER
❘
RECOVER
REVIEW
❘
REVIEW
NOTE: Pages 32 discuss REVIEW Mode in more detail.
■ Timing Your Workout: Use the CHRONO Mode or TIMING Mode to time
your workout:
• 30-Lap Model: Go to CHRONO Mode and make sure the Chrono is
reset to zero (0). Press START/SPLIT when you begin your run,
and each time you complete a lap. The watch will store the ten (10)
individual lap times. When you complete your final lap, press
STOP/RESET/SET.
• Fitness Model: In TIMING Mode, make sure the watch is set to
count up from zero (0), like a stopwatch. Press START/STOP when
you begin your run and when you complete your final lap.
• Reviewing Your Lap Times: During your victory walk home, you can
review the data from your workout in REVIEW Mode. If you were
using a heart rate sensor, you’ll see your heart rate statistics there
(both models), as well as all of your lap times (30-Lap Model only).
NOTE: Not sure how to configure TIMING Mode? See pgs. 27–29
for more information.
NOTE: See pgs. 22–25 for more detail about using the Chrono.
NOTE: See pg. 33 for tips on setting the alarm.
36
Page 21
39
• Fitness Model: In TIMING Mode, make sure the watch is set to
count up from zero, like a stopwatch. Press START/STOP when
you begin spinning.
■ Timing Option 2 - Counting Down: Use the TIMER Mode (30-Lap Model)
or TIMING Mode (Fitness Model) to time your workout by counting down
from 30 minutes. Counting down is used for a planned, or timed, training
regimen and includes an alert at the end of the countdown.
• 30-Lap Model: Go to TIMER Mode and set the countdown time for 30
minutes. Press START/SPLIT when you begin your workout.
• Fitness Model: In TIMING Mode, make sure the watch is set to
count down from 30. Press START/STOP when you begin your
workout.
NOTE: See pg. 25 for more detail about using the TIMER Mode
features.
NOTE: Not sure how to configure TIMING Mode?
See pgs. 27–29 for more information.
■ Connecting the Heart Rate Sensor and Selecting a Target Heart Rate:
You arrive at your club wearing your watch and heart rate sensor.
Before you begin spinning you must establish the wireless link between
your watch and the heart rate sensor.
• Both Models: Press HEART RATE. The “hollow heart” flag shows
the watch searching for the heart rate sensor signal. When the
signal is found the heart turns solid and begins an animated
beating. Heart rate data is displayed according to how you have
configured your watch. Next, go to HRM SETUP Mode and select
your target heart rate for this workout from zones 1-5.
■ Timing Option 1 - Counting Up: Use the CHRONO Mode (30-Lap
Model) or TIMING Mode (Fitness Model) to time your workout by
counting up to 30 minutes. Counting up is handy when you want
flexibility in timing the end of your workout.
• 30-Lap Model: Go to CHRONO Mode and press START/SPLIT
when you begin spinning.
NOTE: See pgs. 22–25 for more details about using CHRONO Mode.
NOTE: See pgs. 10–15 for details on setting target heart rate
zones in HRM SETUP Mode; configuring the display for
displaying heart rate and time information; and activating “out
of zone” alerts.
38
Page 22
41
Usage Example 3 Using Your Watch in a Race While Traveling Between
Time Zones
You are flying with your running club from Chicago to Washington DC for a
10K citizen’s race. Your strategy is to stay within your target training heart
zone over the first half of the race and to push yourself in the second half.
You want to finish the race around 32 minutes, which means you will
probably exceed your target training heart zone during the second half of
the race to achieve this time goal.
In this example, you’ll use the following watch features::
■ Setting the Time Ahead: After you are settled into your airplane seat
you set your watch ahead for the Eastern Time Zone (U.S.).
• 30-Lap Model: You frequently travel to the East Coast for
business so you already have set your secondary time zone for the
30-Lap Model Fitness Model
SECONDARY TIME ZONES
❘
TIME OF DAY
HEART RATE SENSOR
❘
HEART RATE SENSOR
TIMER
❘
TIMING
CHRONO
❘
REVIEW
❘
REVIEW
■ Your Workout is Over:
• 30-Lap Model: Press any button to stop the countdown alert in
TIMER Mode.
• Fitness Model: Press any button to stop the countdown alert in
TIMING Mode.
■ Measuring Your Fitness: RECOVER Mode is a tool for measuring how
much your heart rate declines over a fixed one or two-minute period.
Immediately upon completing your workout, go to RECOVER and press
START/SPLIT (30-Lap Model) or START/STOP (Fitness Model) to begin
the recovery period. When the alert sounds ending the one-minute
recovery time, note your heart rate.
■ Reviewing Your Lap Times: During your victory walk to the locker
room you can review the data from your workout in REVIEW Mode.
You’ll see your heart rate statistics, as well as all of your lap times if you
were taking multiple lap times (30-Lap Model only).
NOTE: Pages 32 discuss REVIEW Mode in more detail.
NOTE: See section 3 for more information on TIMING Mode,
TIMER Mode, and CHRONO Mode.
40
Page 23
43
■ The race is about to start. You decide to set a timer alert to step up
your pace at the halfway point of the anticipated 32-minute time for the
10K race.
• 30-Lap Model: Go to TIMER Mode and set it for 16 minutes and
CHRONO AT END. When the race starts press START/SPLIT to start
the timer countdown.
• Fitness Model: Go to TIMING mode and set it to count down from
16 minutes. TIMING Mode must be set for counting down
(decrementing). Press START/STOP (+) to begin timing as the
race starts. The display begins counting down from 16 minutes in
whichever format you configured to show heart rate and elapsed
time information.
NOTE: TIMING Mode has many choices. See pgs. 27–29 for how to
reset the TIMING Mode, toggle between counting up and counting
down, and how to set the display to reflect your preferences.
NOTE: See pg. 25 for details on setting the Timer and changing
the action automatically launched upon completion of the
countdown.
NOTE: To set a target heart rate zone see HRM SETUP Mode on
pg. 8. This section has details on configuring the display for
heart rate and time information.
Eastern Time Zone. While in TIME OF DAY Mode press and hold
START/SPLIT for four seconds to switch from the primary to the
secondary time zone. You will leave your watch in the secondary
time zone for the duration of your trip and switch it back to the
primary time zone on the trip home.
• Fitness Model: Set your watch ahead in TIME OF DAY Mode from
Chicago’s Central Time Zone to the Eastern Time Zone (U.S.).
■ Linking the Heart Rate Sensor: After a good night’s sleep, you arrive at
your race wearing your watch and heart rate sensor. Before the race,
you establish the wireless link between your watch and the heart rate
sensor.
• Both Models: Press HEART RATE. A “hollow heart” flag shows
the watch is searching for the heart rate sensor signal. When it is
found, the hollow heart turns solid and begins an animated beating.
Heart rate data is displayed in the bottom line.
NOTE: See pg. 20–21 for details on setting the time of day.
NOTE: See pg. 21 for how to set the time in the secondary time zone.
42
Page 24

45
Watch Maintenance and Warranty
Maintenance
The Heart Rate Monitor transmitter and its strap should be rinsed in fresh
water to avoid the build-up of materials that can interfere with the
measurement of your heart rate. The Fitness System watch does not need
to be rinsed.
Watch Battery Replacement
To avoid the possibility of permanently damaging the watch, TIMEX
STRONGLY RECOMMENDS TAKING YOUR WATCH TO A LOCAL RETAILER
OR JEWELER TO HAVE THE BATTERY REPLACED.
HRM Transmitter Battery Life and Replacement
Assuming an hour-a-day usage, the battery life of the transmitter should
exceed two years. Greater usage will shorten the battery life. The battery
should be replaced when any of the following occurs:
• The watch no longer receives heart rate information from the chest
transmitter when properly worn on the chest.
• Error messages begin to appear with increased frequency on the display.
Turn the unit over and use a coin to open the battery compartment cover.
Replace the battery, making sure the “+” is facing you when you insert the
new one. Push the reset button next to the battery (a toothpick or
straightened paper clip will help you do this) before replacing the battery
cover.
■ You Reach the Mid-Point of the Race: You have been running the race
comfortably in your target heart rate zone and the timer counts down to
zero.
• 30-Lap Model: TIMER Mode automatically launches CHRONO
Mode, which was the mode selected in the step above to follow the
TIMER Mode countdown. The previously configured display
format for CHRONO and HEART RATE information appears. You
step up your pace in the second half. As you cross the finish line,
press STOP/RESET/SET (DONE) to stop CHRONO Mode timing.
• Fitness Model: Press any button to disable the Timer alert and
step up your pace at the 16-minute point of the race. As you cross
the finish line, press START/STOP to stop TIMING Mode.
■ Reviewing Your Heart Rate Data and Race Times: Later you can scroll
through your accumulated fitness data for the race.
• To review your HRM data and race times, go to REVIEW. Press
START/SPLIT (+) or START/STOP (+) to advance through your HRM
and race data, or press HEART RATE (-) to cycle backwards.
NOTE: CHRONO Mode must be reset to zero to be automatically
launched by TIMER Mode.
44
Page 25

47
TIMEX INTERNATIONAL WARRANTY (U.S. LIMITED WARRANTY)
Your watch is warranted against manufacturing defects by Timex
Corporation for a period of ONE YEAR from the original purchase date.
Timex and its worldwide affiliates will honor this International Warranty.
Please note that Timex may, at its option, repair your watch by installing
new or thoroughly reconditioned and inspected components or replace it
with an identical or similar model.
IMPORTANT: PLEASE NOTE THAT THIS WARRANTY DOES NOT COVER
DEFECTS OR DAMAGES TO YOUR PRODUCT:
1) after the warranty period expires;
2) if the product was not originally purchased from an authorized
retailer;
3) from repair services not performed by the manufacturer;
4) from accidents, tampering or abuse; and
5) Case, attachments or battery. You may be charged for replacing any
of these parts.
A quick test of the unit should be performed after changing the battery:
1. Move away from any possible sources of electrical or radio
interference.
2. Liberally moisten the sensor pads and put the unit on your chest
securely against your skin.
3. Press the MODE button until the watch is in TIME OF DAY Mode.
4. Press the HEART RATE button on the watch to enable the Heart Rate
Monitor.
5. Within a few seconds the “heart” graphic on the watch display
should begin flashing, indicating that the chest belt transmitter is
active. This indicates that the battery was installed correctly. NOTE:
It is not necessary for a heart rate value to appear on the display
during this test.
IF YOU DO NOT SEE A FLASHING HEART ON THE WATCH, try the
following:
Press the reset switch in the battery compartment again and replace the
battery cover.
Reinstall the battery and press reset as instructed above.
46
Page 26

49
For the U.S., please call 1-800-448-4639 for additional warranty information.
For Canada, call 1-800-263-0981.
For Brazil, call 0800-168787.
For Mexico, call 01-800-01-060-00.
For Central America, the Caribbean, Bermuda and the Bahamas,
call (501) 370-5775 (U.S.).
For Asia, call 852-2815-0091.
For the U.K., call 44 208 687 9620.
For Portugal, call 351 212 946 017.
For France, call 33 3 81 63 42 00.
For Germany, call +43 662 88 92130.
For the Middle East and Africa, call 971-4-310850.
For other areas, please contact your local Timex retailer or Timex
distributor for warranty information.
THIS IS YOUR WATCH REPAIR COUPON. PLEASE KEEP IT IN A SECURE PLACE.
TIMEX INTERNATIONAL WARRANTY — WATCH REPAIR COUPON
Original Purchase Date:
(Attach copy of sales receipt, if available)
Purchased by:
(Name, address and telephone number)
Place of Purchase:
(Name and address)
Reason for Return:
THIS WARRANTY AND THE REMEDIES CONTAINED HEREIN ARE
EXCLUSIVE AND IN LIEU OF ALL OTHER WARRANTIES, EXPRESS OR
IMPLIED, INCLUDING ANY IMPLIED WARRANTY OF MERCHANTABILITY
OR FITNESS FOR PARTICULAR PURPOSE. TIMEX IS NOT LIABLE FOR
ANY SPECIAL, INCIDENTAL OR CONSEQUENTIAL DAMAGES.
Some countries and states do not allow limitations on implied warranties
and do not allow exclusions or limitations on damages, so these limitations
may not apply to you. This warranty gives you specific legal rights and you
may also have other rights which vary from country to country and state to
state.
To obtain warranty service, please return your watch to the manufacturer,
one of its affiliates or the retailer where the product was purchased,
together with a completed original Product Repair Coupon or, in the U.S.
and Canada only, the completed original Product Repair Coupon or a
written statement identifying your name, address, telephone number and
date and place of purchase. Please include the following with your watch to
cover postage and handling (this is not a repair charge): a US$ 7.50 check
or money order in the U.S.; a CAN$6.00 cheque or money order in Canada;
and a UK£ 2.50 cheque or money order in the U.K. In other countries, you
will be charged for postage and handling. NEVER INCLUDE ANY ARTICLE
OF PERSONAL VALUE IN YOUR SHIPMENT.
48
Page 27
51
Service
If your watch should ever need servicing, send it to Timex as set forth in
the Timex International Warranty or addressed to:
HotLine Watch Service
P.O. Box 2740
Little Rock, AR 72203.
Street address:
HotLine Watch Service
1302 Pike Ave. North
Little Rock, AR 72114
For your convenience in obtaining factory service, participating Timex
retailers can provide you with a pre-addressed Watch Repair Mailer. See
the Timex International Warranty for specific instructions on the care and
service of your watch.
For service questions, call 1-800-448-4639.
Should you need a replacement strap or band, call 1-800-448- 4639.
50
FCC Notice (U.S.) / IC Notice (Canada)
Timex Corporation declares that the following products, which include all
components of the Timex® Bodylink™ System, are compliant to the
relevant FCC Part 15 and Industry Canada rules for Class B devices as
follows:
Product Name:
Speed + Distance Sensor - GPS Transceiver Series M8xx/M5xx
Heart Rate Monitor Sensor – HRM Transmitter Series M8xx/M5xx
Product Type: Intentional Radiator
Model FCC ID No. IC Certification No.
M515 Heart Rate Monitor EP9TMXM515 3348A-M515
M850 Speed + Distance Monitor EP9TMXM850 3348A-12181
These devices comply with Part 15 of the FCC rules. Operation is subject to
the following two conditions: (1) The device may not cause harmful
interference, and (2) the device must accept any interference received,
including interference that may cause undesired operation.
Page 28

53
Product Name:
Watch Receivers – HRM/Speed+Distance Series M8xx/M5xx
Data Recorders – HRM/Speed+Distance Series M5xx
Product Type: Unintentional Radiator
This equipment has been tested and found to comply with the limits for a
Class B digital device, pursuant to Part 15 of the FCC rules. These limits
are designed to provide reasonable protection against harmful interference
in a residential environment. This equipment generates, uses, and can
radiate radio frequency energy and, if not used in accordance with the
instruction manual, may cause harmful interference to radio communications.
If this equipment does cause harmful interference to radio or television
reception, which can be determined by turning the equipment off and on,
the user is encouraged to try to correct the interference by reorienting or
relocating the receiving antenna; or by increasing the separation between
the equipment and receiver.
Caution: Any changes or modifications to the equipment listed above, not
expressly approved by Timex Corporation, could void the user’s authority
to operate this equipment.
Industry Canada Notice: This Class B digital apparatus complies with
Canadian ICES-003. Cet appariel numérique de la classe B est conforme à
la norme NMB-003 du Canada.
52
DECLARATION OF CONFORMITY
Manufacturers Name: Timex Corporation
Manufacturers Address: 555 Christian Road
Middlebury, CT 06762
United States of America
declares that the following products, which include all components of the Timex Bodylink
System, are compliant to the relevant EU Directives as follows:
Product Name:
Speed + Distance System — GPS Transceiver Series M8xx/M5xx
Heart Rate Monitor System — HRM Transmitter Series M8xx/M5xx
conforms to the following product specifications:
LVD: 72/23/EEC
Safety: IEC 60950
EMC: 89/336/EEC and amendments 92/31/EEC, 93/68/EEC, and 98/13/EEC
Emissions: EN300-330-1, -2
Radiated Emission 9kHz to 30MHz H-Field (magnetic
Radiated Emission 30MHz to 1000MHz E-Field (electric),
Ref. EN55022
Immunity: EN300-683
Radiated Immunity 80MHz to 1000MHz, Ref. EN61000-4-3
ESD Electrostatic discharge, Ref. EN61000-4-2
Supplemental Information: The above products comply with the requirements of the LowVoltage Directive 72/23/EEC and the EMC Directive 89/336/EEC (including amendments
92/31/EEC, 93/68/EEC, and 98/13/EEC) and carry the 0983(!) marking accordingly.
Notifying Body – Underwriters Laboratories Inc., CAB# - 0983; 1285 Walt Whitman Road,
Melville, NY 11747.
Timex Corporation declares that these low power radio equipment devices are in compliance
with the essential requirements and other relevant provisions of R&TTE Directive 1999/5/EC.
Page 29
55
MONITEUR DE FRÉQUENCE CARDIAQUE
NUMÉRIQUE TIMEX
®
MODÈLES 30-LAP/FITNESS
UNE MONTRE SPORT NUMÉRIQUE ÉVOLUÉE
Plus
UN MONITEUR DE FRÉQUENCE CARDIAQUE ENTIÈREMENT NUMÉRIQUE
Le moniteur de fréquence cardiaque numérique Timex
®
intègre les toutes dernières
technologies numériques Timex aux méthodologies d'exercice employées par les
spécialistes de la forme et les entraîneurs personnels. Leader mondial de l’horlogerie
sportive, Timex a créé un moniteur de forme numérique qui combine la précision
numérique requise par les athlètes de niveau international avec des fonctions
utilisables par tous et à tout âge pour « rester en forme ».
Remarque : Ce manuel peut décrire des caractéristiques ou fonctions n'existant pas
sur tous les modèles.
Ressources sur Internet
Le site Web de Timex (www.timex.com) est une excellente source de renseignements
pour tirer le plus grand parti de votre moniteur de fréquence cardiaque numérique
Timex
®
. Les ressources à consulter sur le site Timex sont notamment :
www
.timex.com/hrm/
Pour de plus amples renseignements sur les moniteurs de fréquence cardiaque
numériques Timex, notamment les listes et simulations des fonctions des
produits.
www
.timex.com/fitness/
Pour les conseils de mise en forme et d'entraînement à l'aide des moniteurs de
fréquence cardiaque numériques Timex.
Remarque : Veillez à toujours consulter votre médecin avant d’entamer ou de
modifier un programme d’exercice physique.
Product Name:
Watch Receivers – HRM/Speed+Distance Series M8xx/M5xx
Data Recorders – HRM/Speed+Distance Series M5xx
conforms to the following product specifications:
Generic Emissions Standard EN 55022: 1998
Generic Immunity Standard EN 55024: 1998
Supplemental Information: The above products comply with the requirements of
Electromagnetic Compatibility (EMC) Directive 89/336/EEC (including amendments 92/31/EEC,
93/68/EEC, and 98/13/EEC) and carry the marking accordingly. Conformity Assessment
Body (CAB) – Underwriters Laboratories Inc., CAB# 0983; 1285 Walt Whitman Road, Melville,
NY 11747.
Timex Corporation declares that these low power electronic devices are in compliance with the
essential requirements and other relevant provisions of the EMC Directive.
Agent: ___________________________
Brian J. Hudson
Director, Test Engineering and Module Development
Date: 28 April 2003, Middlebury, Connecticut, U.S.A.
54
Bodylink is a trademark of Timex Group, B.V.
TIMEX and NIGHT-MODE are registered trademarks of Timex Corporation
in the U.S. and other countries.
INDIGLO is a registered trademark of Indiglo Corporation in the U.S. and
other countries.
©2004 Timex Corporation.
Page 30
57
Vue d’ensemble
L'affichage
LIGNE DU HAUT - Tiers
supérieur de l'écran, utilisé
pour des données de type
temps intermédiaires,
jour/date, données CFM et
témoins.
Dans certains modes, les
données affichées sur ces
deux lignes peuvent être
inversées selon les
préférences.
LIGNE DU BAS - Deux-tiers
inférieurs de l'écran,
utilisés pour des données
de type heure courante,
temps intermédiaire/au
tour, données CFM et
témoins.
TÉMOINS - S'affichent
autour de l'écran pour
identifier le mode courant
ou une activité exécutée
en arrière-plan. Par
exemple, le témoin
chronomètre indique que
la fonction Chronomètre
est en cours de
fonctionnement.
Comment ce manuel est organisé
Nous avons divisé ce manuel en quatre sections principales :
• Vue d'ensemble —
Description générale des boutons, fonctions et affichages.
• Utiliser le moniteur de fréquence cardiaque —
Décrit comment associer la montre à un cardiofréquencemètre (CFM) pour
obtenir, mesurer et examiner des données de fréquence cardiaque.
• Modes et fonctions —
Une présentation pas-à-pas simple de l'utilisation des modes et fonctions de la
montre.
• Exemples d'utilisation —
Des scénarios réalistes qui montrent comment intégrer la montre Timex
®
aux
activités d'exercice.
56
Page 31

59
Bouton SET/RESET -
Réinitialiser la fonction de
minutage ; tenir enfoncé
pour passer au réglage.
Le modèle Fitness
Bouton HEART RATE –
Allumer et éteindre le
moniteur de fréquence
cardiaque ; changer la
position des données CFM
lorsque le moniteur est en
marche.
Bouton START/STOP – Démarrer ou arrêter la fonction de
minutage.
Bouton INDIGLO®–
Illuminer l'écran de la
montre.
Bouton MODE – Enfoncer
et relâcher pour passer au
mode suivant.
58
Le modèle 30-Lap
Bouton STOP/RESET/SET –
Arrêter ou réinitialiser le
chronomètre ou la
minuterie ; tenir enfoncé
pour passer au réglage.
Bouton INDIGLO®–
Illuminer l'écran de la
montre.
Bouton HEART RATE –
Allumer et éteindre le
moniteur de fréquence
cardiaque ; changer le
format des données CFM
lorsque le moniteur est
en marche.
Bouton MODE – Enfoncer
et relâcher pour passer au
mode suivant.
Bouton START/SPLIT – Démarrer le chronomètre ou la
minuterie ; consulter le second fuseau horaire depuis
l'heure courante.
Page 32

61
Utiliser le moniteur de fréquence
cardiaque :
Lorsqu'elle est associée à un cardiofréquencemètre, cette montre de sport
devient un élément à part entière d'un système de forme global. Le
cardiofréquencemètre enregistre la fréquence cardiaque et transmet les données
à la montre. Durant la séance d’exercice/entraînement, un simple coup d’œil sur
la montre vous permet de vérifier que vous êtes dans la plage de fréquence
cardiaque correcte pour maintenir ou améliorer votre forme physique (voir les
zones cibles de fréquence cardiaque dans tout guide de forme). Le cas échéant,
une alerte de sortie de zone se déclenche automatiquement si la fréquence
cardiaque quitte la zone sélectionnée.
Cette section décrit comment :
• Configurer la montre pour une utilisation avec un cardiofréquencemètre
• Régler la montre pour surveiller la fréquence cardiaque par rapport à une
zone de fréquence cardiaque choisie
• Enregistrer et examiner les données de fréquence cardiaque
Configurer la montre pour une utilisation avec un cardiofréquencemètre
1. Posez le cardiofréquencemètre sur la poitrine. Consultez au besoin les
instructions détaillées de mise en place du cardiofréquencemètre dans le mode
d'emploi qui l'accompagne. Dans cette section, on suppose que le
cardiofréquencemètre est porté correctement.
2. Démarrez le moniteur de fréquence cardiaque. Dans les modes HEURE DE LA
JOURNÉE, MINUTAGE, CHRONO ou MINUTERIE, appuyez sur HEART RATE.
Un témoin représentant un contour de cœur s'affiche pendant que la montre
recherche un signal de cardiofréquencemètre. Une fois que la montre reçoit un
signal, le témoin devient un cœur plein et commence à battre.
60
Témoins affichés
La montre peut fournir beaucoup d’informations d’un coup d’œil tout en
n’occupant qu’un espace restreint sur le poignet. Les témoins (petits symboles
graphiques) qui s'affichent sur l'écran sont les suivants :
L'alarme est activée.
La minuterie est en marche (modèle 30-Lap) ou le mode
MINUTAGE effectue un compte à rebours (modèle Fitness).
Le chronomètre est en marche (modèle 30-Lap) ou le mode
MINUTAGE effectue un comptage depuis zéro (modèle Fitness).
Le carillon horaire est activé.
Recherche de données CFM du capteur thoracique.
Réception de données CFM d'un cardiofréquencemètre.
Page 33

63
Figure 2.1 – Formats d'affichage du moniteur de fréquence cardiaque
Fréquence cardiaque sur heure
Fréquence cardiaque seule
Heure sur fréquence cardiaque
Pas de données de fréquence cardiaque
CONSEIL PRATIQUE : Appuyez sur HEART RATE pour faire
défiler les formats d'affichage lorsque le moniteur de
fréquence cardiaque fonctionne.
62
Pour assurer un signal clair, tenez-vous à plus de deux mètres de toute autre
personne utilisant un capteur.
Si vous revenez en mode MINUTAGE, CHRONO ou MINUTERIE, la montre
recherche automatiquement un signal pendant 15 secondes. Si aucun signal
n'est capté, la montre arrête de chercher jusqu'à ce que vous appuyiez à nouveau
sur le bouton HEART RATE.
3. Lisez la fréquence cardiaque. Une fois le contact établi avec l'émetteur, votre
fréquence cardiaque (indiquée en battements par minute) s'affiche. Pour
éteindre le moniteur, tenez HEART RATE enfoncé.
Afficher les données de fréquence cardiaque et l'heure
L'affichage CFM peut se faire sous quatre formats différents. Utilisez le bouton
HEART RATE pour faire défiler ces formats. Par exemple, lors de l'utilisation du
CFM dans les modes CHRONO ou MINUTERIE, la fréquence cardiaque s'affiche
dans la ligne du haut et le temps du mode CHRONO ou MINUTERIE dans la ligne
du bas. Appuyez sur le bouton HEART RATE pour inverser la position de ces
valeurs. Vous pouvez également afficher la fréquence cardiaque seule ou pas de
fréquence cardiaque du tout (voir Figure 2.1 après le paragraphe ci-dessous).
Mode Configuration CFM
Ce mode permet de définir une zone cible de fréquence cardiaque pour l'exercice
physique. Une zone cible consiste en une limite de fréquence cardiaque
supérieure et inférieure. Vous pouvez sélectionner l'une des zones préétablies ou
fixer les valeurs manuellement pour personnaliser les zones. Lorsque la
fréquence cardiaque passe en-dessous de la limite inférieure ou dépasse la limite
supérieure de la zone, une alarme sonore optionnelle se déclenche. Bien que le
moniteur de fréquence cardiaque puisse s'utiliser sans zone cible, il est
fortement conseillé de configurer cette fonction. Elle aide à rester à l'intérieur de
la zone souhaitée et à optimiser le programme de forme.
Page 34

Bouton START/SPLIT
– (START/STOP sur le
modèle Fitness) -
Appuyez pour alterner
entre les témoins
ON/OFF, qui indiquent
si l'alerte de sortie de
zone est activée/
désactivée.
Figure 2.2 – Réglages par défaut du mode Configuration CFM
Bouton STOP/RESET/SET –
(SET/RESET sur le modèle
Fitness) - Appuyez pour
accéder au réglage du mode
Configuration CFM.
Bouton HEART RATE –
Appuyez pour
sélectionner une zone
cible de fréquence
cardiaque. Dans cet
exemple, la zone cible
est la Zone 3. La zone
sélectionnée est basée
sur une fréquence
cardiaque maximale
(MHR) de 165 ; le choix
d'une fréquence
maximale différente
change la plage de la
zone.
65
Zones de forme cibles
Les limites de fréquence cardiaque supérieure et inférieure des zones de forme
cibles dépendent de la valeur de fréquence cardiaque maximale (MHR). La Table
2.1 illustre la formule utilisée par la montre pour calculer les limites de fréquence
cardiaque inférieure et supérieure pour chaque zone.
Table 2.1 : Zones de forme
Il est important de fixer la valeur de fréquence cardiaque maximale car les cinq
zones cibles automatiques sont basées dessus. Vous pouvez déterminer cette
fréquence soit par un essai contrôlé, soit par l’une des nombreuses méthodes
d’estimation existantes. L'une des méthodes les plus courantes consiste à
soustraire l'âge de 220. Une telle méthode peut toutefois produire des résultats
inexacts parce que la fréquence cardiaque maximale dépend aussi de facteurs
physiologiques autres que l'âge, notamment le niveau de forme et la constitution
génétique.
ZONE Limite inférieure Limite supérieure
5
❘
90% MHR
❘
100% MHR
4
❘
80%
❘
90%
3
❘
70%
❘
80%
2
❘
60%
❘
70%
1
❘
50%
❘
60%
64
Page 35

67
Entrer le poids et la fréquence cardiaque maximale
1. Appuyez sur MODE jusqu'à arriver au mode HRM SETUP. Appuyez ensuite sur
STOP/RESET/SET pour commencer le réglage. La zone actuellement
sélectionnée commence à clignoter (sur le modèle Fitness, appuyez sur
SET/RESET).
2. Appuyez sur START/SPLIT (+) ou HEART RATE (-) pour faire défiler les zones
cibles préétablies ainsi que le réglage MANUAL (sur le modèle Fitness,
appuyez sur START/STOP (+) ou HEART RATE (-)). Chaque zone, y compris
les limites de fréquence cardiaque supérieure et inférieure par défaut, clignote.
3. Appuyez sur MODE (NEXT) pour faire défiler les valeurs de réglage du poids
corporel et de la fréquence cardiaque maximale (MHR). Appuyez sur
START/SPLIT (+) ou HEART RATE (-) pour augmenter ou diminuer ces valeurs
(sur le modèle Fitness, appuyez sur START/STOP (+) ou HEART RATE (-)). Le
poids corporel sert au calcul du nombre de calories brûlées.
REMARQUE : Lors de la saisie du poids, appuyez sur
START/SPLIT (+) pour alterner entre les livres et les
kilogrammes.
REMARQUE : Vos zones cibles sont personnalisées une fois
que vous avez terminé la configuration CFM.
Figure 2.3 – Valeurs de réglages du mode Configuration CFM
Bouton MODE (NEXT) –
Appuyez pour faire défiler les
réglages de poids et de
fréquence cardiaque
maximale pour personnaliser
une zone de fréquence
cardiaque.
Bouton HEART RATE (-) –
Appuyez pour faire défiler
les zones cibles de
fréquence cardiaque.
Bouton START/SPLIT (+) – (START/STOP (+) sur le modèle Fitness) - Appuyez pour faire défiler en
montant les zones cibles de fréquence cardiaque préétablies et personnalisées. Lors du réglage du
poids, appuyez pour alterner entre les livres (LB) et les kilogrammes (KG).
Bouton
STOP/RESET/SET
(DONE) – (SET/RESET
(DONE) sur le modèle
Fitness) - Appuyez à la
fin pour valider les
réglages.
66
Page 36

69
2. Appuyez sur START/SPLIT (+) ou HEART RATE (-) pour faire défiler les zones
cibles préétablies jusqu'à MANUAL, qui clignote (sur le modèle Fitness,
appuyez sur START/STOP (+) ou HEART RATE (-)).
3. Appuyez sur MODE (NEXT) pour faire défiler les valeurs de réglage de limite
de fréquence cardiaque supérieure, limite de fréquence cardiaque inférieure,
poids et fréquence cardiaque maximale (MHR). Appuyez sur START/SPLIT (+)
ou HEART RATE (-) pour augmenter ou diminuer ces valeurs (sur le modèle
Fitness, appuyez sur START/STOP (+) ou HEART RATE (-)). Une fois un chiffre
réglé, appuyez sur MODE (NEXT) pour passer au suivant.
L’utilisation d’une zone cible de fréquence cardiaque préétablie ramène la zone
cible « manuelle » à son réglage d’usine initial.
4. Appuyez sur STOP/RESET/SET (DONE) pour enregistrer les réglages et quitter
le mode CONFIGURATION CFM (sur le modèle Fitness, appuyez sur
SET/RESET (DONE)).
Examiner les données CFM
La montre peut servir à examiner des données CFM, à savoir moyenne,
fréquences cardiaques minimale et de pointe, durée pendant laquelle la fréquence
cardiaque est dans la zone cible et nombre de calories brûlées. Pour jauger votre
niveau de forme, vous pouvez également voir comment votre fréquence
cardiaque diminue sur une période fixée. Reportez-vous aux modes EXAMEN et
RÉCUPÉRATION.
68
4. Appuyez sur STOP/RESET/SET (DONE) pour enregistrer les réglages et quitter
(sur le modèle Fitness, appuyez sur SET/RESET (DONE)).
Sélectionner une zone cible
Pour sélectionner une zone cible de fréquence cardiaque sur la base de la
fréquence cardiaque maximale :
1. Appuyez sur MODE jusqu’à afficher HRM SETUP.
2. Appuyez sur HEART RATE pour faire défiler les zones cibles préétablies (ainsi
que le réglage MANUAL). Chaque zone préétablie, y compris les limites de
fréquence cardiaque supérieure et inférieure par défaut, s'affiche.
Après avoir quitté le mode CONFIGURATION CFM, la montre utilise la zone
sélectionnée pour tous ses calculs statistiques basés sur le CFM.
Configurer la zone cible « manuelle »
1. Depuis le mode CONFIGURATION CFM, appuyez sur STOP/RESET/SET pour
commencer le réglage. La zone actuellement sélectionnée commence à
clignoter (sur le modèle Fitness, appuyez sur SET/RESET).
REMARQUE : Appuyez sur START/SPLIT pour activer ou
désactiver l'alerte de sortie de zone (sur le modèle Fitness,
appuyez sur START/STOP).
REMARQUE : Changer la valeur du poids durant une séance
d'exercice causera un calcul inexact des calories.
Page 37

71
Parfois le cœur cesse brièvement de clignoter.
• Tant que le cœur clignote, c'est que la montre reçoit un signal clair du
capteur. Comme avec tout système radio, le signal peut subir un bref
brouillage occasionnel. Si cela se produit, la montre interrompt le
clignotement du cœur. En général, ce problème se résout de lui-même et le
clignotement reprend. Si l'interruption se prolonge, la montre affiche le
message d'erreur décrit ci-dessous.
Le message « NO HRM DATA » (pas de données CFM) s'affiche à l'écran.
Ce message d'erreur s'affiche si la montre ne reçoit pas de réactualisations
régulières de la fréquence cardiaque de la part du capteur. Toutefois, tant que le
capteur est sur la poitrine, que les coussinets sont humides et que la pile de
l'émetteur n'est pas déchargée, la montre se rétablit habituellement sans
nécessiter d'intervention. Dans le cas contraire, essayez ce qui suit :
• Les coussinets du capteur thoracique peuvent avoir perdu le contact avec
votre poitrine pendant quelques secondes. Vérifiez que le capteur appuie
bien contre le corps.
• Les coussinets de capteur peuvent être secs. Humectez-les généreusement
et réajustez l'émetteur thoracique au besoin.
• La pile dans l'émetteur thoracique peut être déchargée et nécessiter d'être
changée (voir les instructions de changement de la pile dans le mode
d'emploi du capteur).
70
Résolution de problèmes liés au CFM
Conseils de résolution de problèmes communs :
J'ai du mal à obtenir une première mesure OU les valeurs de fréquence
cardiaque obtenues semblent incorrectes.
• Réhumectez généreusement les coussinets de contact texturés au dos du
cardiofréquencemètre.
• Serrez la sangle thoracique pour qu'elle soit bien ajustée et produise un bon
contact avec la peau. Assurez-vous que le capteur adhère à votre peau et
que TIMEX figure vers l’extérieur.
• Éloignez-vous des autres cardiofréquencemètres et autres sources de
signaux radio et d'électricité statique, notamment matériel d'exercice ou
autre machine électrique.
• Attendez quelques minutes et appuyez une nouvelle fois sur
HEART RATE.
Parfois la montre affiche des tirets encadrant la fréquence cardiaque OU la
fréquence cardiaque affichée reste inchangée pendant une durée prolongée.
Qu'est-ce que cela signifie ?
• Ceci indique habituellement que soit les coussinets du capteur doivent être
humectés, soit le capteur n'est pas suffisamment serré contre la poitrine,
causant un mauvais contact électrique avec la peau. Humectez les
coussinets et ajustez le capteur de manière à ce que les deux coussinets
soient bien au contact de la poitrine.
Page 38

73
STOP/RESET/SET (DONE) –
(SET/RESET (DONE) sur le
modèle Fitness) – Appuyez
pour valider les
changements et quitter.
Fonction des boutons lors des réglages
Bouton MODE (NEXT) – Pour
passer au paramètre suivant.
Bouton HEART RATE (–) –
Pour diminuer la valeur
clignotante.
START/SPLIT (+) - (START/STOP (+) sur le modèle
Fitness) – Pour augmenter la valeur clignotante.
72
Modes et fonctions
Cett section décrit les modes et les fonctions de la montre. Un mode donne
accès à un domaine particulier de fonctionnement de la montre. Par exemple,
vous accédez au mode ALARME pour régler le déclenchement d'une alarme à
une heure donnée.
La montre présente plusieurs fonctions accessibles en appuyant sur le bouton
MODE. Le bouton MODE permet de faire défiler successivement tous les modes
disponibles sur la montre.
Table 3.1 : Récapitulatif des modes
Modèle 30-Lap Modèle Fitness
HEURE DE LA JOURNÉE
❘
HEURE DE LA JOURNÉE
CHRONO
❘
MINUTAGE
MINUTERIE
❘
RÉCUPÉRATION
❘
RÉCUPÉRATION
EXAMEN
❘
EXAMEN
CONFIGURATION CFM
❘
CONFIGURATION CFM
ALARME
❘
ALARME
Page 39

75
Lors du réglage des HEURES au format sur 12 heures, changez le réglage du
matin ou de l'après-midi (indiqué par « A » ou « P » à l'écran) en augmentant les
heures au-delà de 12.
Lors du réglage des SECONDES, appuyez sur START/SPLIT (+) ou HEART RATE
(-) pour les mettre à zéro. Ceci est utile pour synchroniser la montre avec une
horloge de référence (sur le modèle Fitness, appuyez sur START/STOP (+) ou
HEART RATE (-)).
3. Pour finir, appuyez sur STOP/RESET/SET (DONE) pour enregistrer les réglages
et quitter le mode HEURE DE LA JOURNÉE (sur le modèle Fitness, appuyez
sur SET/RESET).
Consulter un second fuseau horaire
Le modèle 30-Lap vous permet de connaître l'heure dans deux fuseaux horaires
(identifiés par T1 et T2). Vous pouvez « consulter » le second fuseau en
appuyant sur le bouton START/SPLIT pendant deux secondes depuis le mode
HEURE DE LA JOURNÉE. Relâchez le bouton pour revenir au fuseau horaire
principal. Pour inverser les fuseaux horaires, tenez le bouton enfoncé pendant
quatre secondes.
CONSEIL PRATIQUE : La montre saute les 29 février. Le 29
février des années bissextiles, réglez manuellement la date sur
« 29 février ». La montre passera au 1er mars le lendemain.
REMARQUE : Pour que la montre émette un carillon mélodique
au passage de l'heure, activez la fonction CARILLON HORAIRE.
Mode HEURE DE LA JOURNÉE
La montre affiche l'heure, la date et le jour de la semaine.
Régler l’heure de la journée
1. Tenez STOP/RESET/SET fermement enfoncé pendant deux secondes (sur le
modèle Fitness, tenez SET/RESET enfoncé). « HOLD TO SET » s'affiche. Si
vous gardez ce bouton enfoncé, « SET TIME » s'affiche.
Le modèle 30-Lap permet de régler l'heure de la journée pour deux fuseaux
horaires différents. Lorsque vous commencez à régler l'heure, le « 1 » clignotant
en bas à droite de l'écran indique qu'il s'agit du fuseau principal. Appuyez sur
START/SPLIT (+) ou HEART RATE (-) pour sélectionner le fuseau horaire
principal (1) ou secondaire (2). Appuyez ensuite sur MODE (NEXT) pour
commencer à régler l'heure comme indiqué ci-dessus.
2. Appuyez sur MODE (NEXT) pour régler :
HEURES ➤ MINUTES ➤ SECONDES ➤ JOUR DE LA SEMAINE
➤ MOIS ➤ DATE ➤ FORMAT DE L'HEURE (12 ou 24 heures)
➤ FORMAT DE LA DATE (Mois-Jour ou Jour-Mois)
➤ CARILLON HORAIRE (activé ou non) ➤ BIP BOUTONS (activé ou non).
La valeur modifiable clignote. Appuyez sur START/SPLIT (+) ou HEART RATE (-)
pour l'augmenter ou la diminuer (sur le modèle Fitness, appuyez sur
START/STOP (+) ou HEART RATE (-)). Tenez les boutons enfoncés pour avancer
plus rapidement. Une fois une valeur réglée, appuyez sur MODE (NEXT) pour
passer à la suivante.
74
Page 40

77
Pendant que le mode CHRONO est en marche, vous pouvez passer dans tout
autre mode, comme HEURE DE LA JOURNÉE. Le témoin chronomètre indique
que le mode CHRONO fonctionne en arrière-plan.
Options d'affichage du chronomètre
Si vous n'utilisez pas de cardiofréquencemètre, la montre affiche à la fois les
temps intermédiaire et au tour (après avoir marqué le premier temps
intermédiaire). Pour choisir quel temps afficher dans la ligne d'affichage du bas,
appuyez sur STOP/RESET/SET lorsque le chronomètre est à zéro (00.00.00) mais
avant de commencer à chronométrer des tours.
Si vous utilisez le cardiofréquencemètre, la montre affiche les données de
fréquence cardiaque en plus de la durée chronométrée. Vous pouvez choisir
entre l'affichage soit du temps au tour, soit du temps intermédiaire, avec les
données de fréquence cardiaque. Consultez les options d'affichage des données
de fréquence cardiaque aux pages 62-63 et la Figure 2.1 pour le formatage de
l'affichage lorsque le CFM fonctionne.
Utiliser le chronomètre
1. Appuyez sur MODE jusqu'à afficher CHRONO.
2. Appuyez sur START/SPLIT pour démarrer le chronométrage.
3. Appuyez sur START/SPLIT pendant que le chrono est en marche pour marquer
un temps intermédiaire.
Ceci enregistre les temps au tour et intermédiaire courants et démarre un nouveau
tour. La montre affiche brièvement les temps au tour et intermédiaire qui viennent
d'être enregistrés, ainsi que le numéro de tour. Si vous affichez aussi des données
CFM, la montre affiche ensuite des données de fréquence cardiaque pour ce tour.
(Suite des instructions page 79)
Mode CHRONO (modèle 30-Lap seulement)
Le mode CHRONO est le mode d'« exercice » principal de la montre. Il s'agit d'un
chronomètre pouvant enregistrer 30 mesures de temps, tel que des tours, dans le
cadre d'un même événement, ainsi que d'autres données sur tout un événement
pouvant atteindre 100 heures de durée. Les données pouvant être stockées pour
ces 30 mesures sont notamment numéro du tour, temps au tour individuel et
temps intermédiaire total écoulé.
Lorsque le cardiofréquencemètre fonctionne, le mode CHRONO gère trois
données statistiques :
• La durée pendant laquelle la fréquence cardiaque est dans la zone cible
alors que le CHRONO est en marche
• La fréquence cardiaque moyenne pour la période pendant laquelle le CFM
fonctionne et le CHRONO est en marche
• La fréquence cardiaque de pointe et minimale pour la période pendant
laquelle le CFM fonctionne et le CHRONO est en marche
L'acquisition de données s'arrête si le chronomètre est arrêté alors que le CFM
fonctionne et reprend lorsque le chronomètre est redémarré. Si le chronomètre
arrive au bout alors que le CFM fonctionne, le CFM s'éteint automatiquement et
l'acquisition de données cesse.
REMARQUE : Dans cette section, il est question de temps « au
tour » et « intermédiaires ». Le temps « au tour » est la durée
d’une portion (tour ou longueur) d’un événement. Le temps
« intermédiaire » est la durée totale depuis le début de
l’événement.
76
Page 41

79
Elle revient ensuite au mode CHRONO en marche, qui continue à chronométrer le
tour courant. La montre stocke les données des 30 derniers tours.
4. Appuyez sur STOP/RESET/SET pour interrompre le chronométrage.
5. Appuyez sur START/SPLIT pour reprendre le chronométrage ou tenez
STOP/RESET/SET enfoncé pour remettre le chronomètre à zéro (ne le remettez
pas à zéro si vous souhaitez conserver les données pour les examiner
ultérieurement).
Mode MINUTERIE (modèle 30-Lap seulement)
Ce mode vous permet de fixer une durée à partir de laquelle la montre compte à
rebours jusqu'à zéro. Cette fonction est utile pour les événement de durée fixée,
jusqu'à 100 heures. À la fin du compte à rebours, la minuterie peut être réglée
pour s’arrêter, répéter le compte à rebours ou passer en mode CHRONO et
démarrer le chronomètre.
Vous pouvez appuyer sur MODE pour passer dans tout autre mode, HEURE DE
LA JOURNÉE par exemple, sans perturber le fonctionnement de la minuterie. Le
témoin sablier s'affiche lorsque la minuterie est en marche.
Régler la minuterie
1. Appuyez sur MODE jusqu'à afficher TIMER.
2. Appuyez sur STOP/RESET/SET pour accéder au réglage du mode MINUTERIE.
Les chiffres des heures clignotent.
3. Appuyez sur START/SPLIT (+) ou HEART RATE (-) pour changer la valeur.
Tenez les boutons enfoncés pour avancer plus rapidement. Après avoir réglé
chaque valeur, appuyez sur MODE (NEXT) pour passer à la valeur suivante
(MINUTES puis SECONDES).
78
Figure 3.1 – Chronométrer avec le modèle 30-Lap
Bouton STOP/RESET/SET
– En mode CHRONO,
appuyez pour arrêter le
chronomètre ou le remettre
à zéro.
Bouton HEART RATE –
Pour allumer et éteindre
le moniteur de
fréquence cardiaque ;
permet aussi de changer
la position des données
CFM lorsque le moniteur
est en marche.
Bouton START/SPLIT –
En mode CHRONO,
appuyez pour démarrer
le chronomètre.
Exemple de format
d'affichage du mode
CHRONO – Le temps au
tour courant (haut) et la
fréquence cardiaque
(bas) sont affichés. Le
témoin Chronomètre
s'affiche durant le
chronométrage ; le cœur
plein clignotant signale
un CFM actif.
Page 42

81
Mode MINUTAGE (modèle Fitness seulement)
Ce mode a deux fonctions :
• Elle peut servir soit de chronomètre, soit de compte à rebours, permettant de
compter vers le haut depuis ou vers le bas jusqu'à zéro respectivement. Vous
pouvez enregistrer jusqu'à 100 heures de données statistiques.
• Lorsque vous utilisez un cardiofréquencemètre, ce mode permet également
d'enregistrer des données de fréquence cardiaque.
Vous pouvez quitter le mode Minutage durant son fonctionnement. En mode
HEURE DE LA JOURNÉE, le témoin chronomètre indique que le mode MINUTAGE
compte vers le haut en arrière-plan. Le témoin sablier indique que le mode
MINUTAGE compte à rebours.
Utiliser la minuterie en guise de chronomètre
1. Appuyez sur MODE jusqu'à afficher TIMING.
2. Appuyez sur SET/RESET jusqu'à afficher « 00.00.00 ». Si vous accédez au
mode de réglage de la minuterie par accident, appuyez sur SET/RESET (DONE)
pour le quitter.
3. Appuyez sur START/STOP (+) pour démarrer le chronométrage. Les
SECONDES commencent à défiler vers le haut.
Pour marquer une pause, appuyez sur START/STOP ; appuyez de nouveau pour
redémarrer. Pour remettre le chronomètre à zéro, tenez SET/RESET pendant que
le MINUTAGE est arrêté.
Utiliser la minuterie en compte à rebours
Pour compter à rebours, vous devez d'abord régler une durée initiale.
4. Une fois que la durée de compte à rebours est correcte, appuyez une nouvelle
fois sur MODE (NEXT) pour sélectionner l'action à effectuer à la fin du compte
à rebours. Appuyez sur START/SPLIT (+) ou HEART RATE (-) pour passer
successivement à STOP (arrêter), REPEAT (répéter) ou CHRONO.
5. Enfin, appuyez sur STOP/RESET/SET (DONE) pour enregistrer l'action choisie.
Fonctionnement de la minuterie
1. Appuyez sur START/SPLIT pour démarrer le compte à rebours.
2. Appuyez sur STOP/RESET/SET pour arrêter le compte à rebours.
3. La minuterie étant arrêtée, appuyez sur START/SPLIT pour reprendre le
compte à rebours ou sur STOP/RESET/SET pour le remettre à la durée initiale.
4. Lorsque la minuterie arrive à zéro, elle déclenche une alerte sonore. La
veilleuse INDIGLO
®
brille également pour que vous puissiez voir la montre
dans l'obscurité.
• Si la minuterie est réglée pour s’arrêter, elle s’arrête après l’alerte.
• Si elle est réglée pour se répéter, elle revient à la durée initiale et démarre
immédiatement un nouveau compte à rebours. Elle continue à se répéter
jusqu'à ce que vous appuyiez sur STOP/RESET/SET. Le nombre de
répétitions est affiché sur la ligne du bas. La montre compte jusqu’à 99
répétitions, après quoi elle repasse à zéro et continue.
• Si la minuterie est réglée pour démarrer le mode CHRONO, la montre passe
automatiquement en mode CHRONO et le démarre. Le mode CHRONO doit
être remis à zéro pour pouvoir être automatiquement lancé par la minuterie.
80
Page 43

83
Bouton SET/RESET – Tenez
enfoncé pour accéder au
réglage d'une durée de
comptage.
Minutage avec le modèle Fitness
Bouton HEART RATE –
Pour allumer et éteindre le
moniteur de fréquence
cardiaque ; pour changer la
position des données CFM
lorsque le moniteur est en
marche.
Bouton START/STOP – Appuyez pour
démarrer ou arrêter le compte à rebours.
Exemple de format
d'affichage du mode
MINUTAGE – La durée
du compte à rebours
(haut) est affichée avec
les témoins Sablier et
Cœur. La fréquence
cardiaque courante est
affichée en bas.
1. Si vous n'êtes pas en mode MINUTAGE, appuyez sur MODE jusqu'à afficher
TIMING.
2. Appuyez sur SET/RESET jusqu'à accéder au réglage du mode MINUTAGE. Les
chiffres des HEURES clignotent.
3. Réglez la durée initiale du compte à rebours. Appuyez sur START/STOP (+) ou
HEART RATE (-) pour augmenter ou diminuer les chiffres clignotants. Tenez les
boutons enfoncés pour avancer plus rapidement. Une fois une valeur réglée,
appuyez sur MODE (NEXT) pour passer à la suivante (MINUTES puis
SECONDES).
4. Enfin, appuyez sur SET/RESET (DONE) pour enregistrer la durée de compte à
rebours.
5. Appuyez sur START/STOP pour démarrer le minutage. La montre commence à
compter à rebours vers zéro.
Pour marquer une pause, appuyez sur START/STOP ; appuyez de nouveau pour
redémarrer. Pour remettre la durée à sa valeur initiale, tenez SET/RESET pendant
que le MINUTAGE est arrêté. Appuyez de nouveau sur SET/RESET pour remettre
la durée à zéro.
Utiliser le mode Minutage avec le système CFM
Lorsque le CFM est actif, le mode MINUTAGE mesure trois grandeurs liées à la
fréquence cardiaque :
• La durée pendant laquelle la fréquence cardiaque est dans la zone cible alors
que le MINUTAGE est en marche.
• La fréquence cardiaque moyenne pour la période pendant laquelle le CFM
fonctionne et le MINUTAGE est en marche.
• La fréquence cardiaque de pointe pour la période pendant laquelle le CFM
fonctionne et le MINUTAGE est en marche.
82
Page 44

85
Utiliser le mode RÉCUPÉRATION
Bouton STOP/RESET/SET
– (SET/RESET sur le
modèle Fitness ) - Appuyez
pour alterner entre une
durée de récupération d'une
ou deux minutes.
Bouton HEART RATE –
Au début de la séance
d'exercice, appuyez pour
recevoir le signal du
cardiofréquencemètre.
123 RE sur la ligne du
bas est la fréquence
cardiaque courante
durant le compte à
rebours du mode
RÉCUPÉRATION.
Bouton START/SPLIT – (START/STOP sur le modèle Fitness) -
Appuyez pour démarrer la période de récupération choisie.
Exemple de format
d'affichage du mode
RÉCUPÉRATION – 165
HR sur la ligne du haut
est la fréquence
cardiaque au début de la
période de récupération.
84
Mode RÉCUPÉRATION
Ce mode s'utilise avec un système CFM actif. Il s'agit d'une mesure de référence
de la vitesse à laquelle votre fréquence cardiaque diminue depuis un pouls élevé
sur une période d'une ou deux minutes. Lorsque la minuterie s'arrête, elle
déclenche une alerte sonore et les fréquences cardiaques initiale et finale
s'affichent.
Utiliser le mode RÉCUPÉRATION
1. Appuyez sur MODE jusqu'à afficher RECOVER.
2. Appuyez sur STOP/RESET/SET pour alterner entre les durées de récupération.
Vous avez le choix entre une et deux minutes (sur le modèle Fitness, appuyez
sur SET/RESET).
3. Appuyez sur START/SPLIT pour démarrer le compte à rebours (sur le modèle
Fitness, appuyez sur START/STOP). La montre affiche à présent deux
fréquences cardiaques - votre fréquence cardiaque au début de la période de
récupération sur la ligne du haut et votre fréquence actuelle sur la ligne du bas.
4. Au moment de l'alerte sonore à la fin de la durée de récupération, notez la
valeur de fréquence cardiaque sur la ligne du bas. Soustrayez cette valeur de
celle de la ligne du haut ; la différence correspond à votre fréquence cardiaque
de récupération.
5. Appuyez sur MODE pour quitter le mode RÉCUPÉRATION.
REMARQUE : Pour que le mode RÉCUPÉRATION fonctionne, la
montre doit recevoir un signal de fréquence cardiaque.
Page 45

Mode ALARME
Ce mode règle le déclenchement d'une alarme à une heure choisie. Lorsque
l'alarme est ACTIVÉE, le témoin réveil s'affiche à l'écran. À l'heure fixée pour
l'alarme, l'alerte sonore se déclenche, la veilleuse INDIGLO
®
clignote et l'heure de
l'alarme s'affiche pendant vingt secondes. Appuyez sur un bouton quelconque
pour couper l’alarme sonore. Si vous ne coupez pas l’alarme avant la fin de
l’alerte, une alarme de rappel se déclenche au bout de cinq (5) minutes.
Régler une alarme
1. Appuyez sur MODE jusqu'à afficher ALARM.
2. Appuyez sur STOP/RESET/SET pour régler l'heure de l'alarme (sur le modèle
Fitness, appuyez sur SET/RESET). L'heure modifiable clignote. La valeur
AM/PM clignote également si la montre est réglée sur le format d'affichage sur
12 heures.
3. Appuyez sur START/SPLIT (+) ou sur HEART RATE (-) pour augmenter ou
diminuer les heures (sur le modèle Fitness, appuyez sur START/STOP (+) ou
sur HEART RATE (-).) Appuyez ensuite sur MODE (NEXT) pour passer aux
minutes.
4. Enfin, appuyez sur STOP/RESET/SET (DONE) pour enregistrer les réglages
(sur le modèle Fitness, appuyez sur SET/RESET (DONE)).
Pour ACTIVER ou DÉSACTIVER une alarme sans accéder au réglage, appuyez
brièvement sur START/SPLIT alors que la montre est en mode ALARME (sur le
modèle Fitness, appuyez sur START/STOP). La modification du réglage d'une
alarme l'ACTIVE automatiquement.
87
86
Mode EXAMEN
Ce mode vous permet d'examiner les données d'exercice comme les durées
intermédiaires, par exemple. Les informations suivantes peuvent être examinées
lorsqu'un cardiofréquencemètre fonctionne et que le mode CHRONO (modèle 30Lap) ou MINUTAGE (modèle Fitness) est en marche :
• Dans zone - La durée pendant laquelle la fréquence cardiaque est dans la
zone cible spécifiée.
• Fréquence cardiaque moyenne
• Fréquence cardiaque de pointe
• Fréquence cardiaque minimale (30-Lap seulement)
• Calories totales brûlées - Calculées à partir de la durée écoulée, des
données de fréquence cardiaque et du poids corporel.
• Temps intermédiaires et au tour chronométrés (30-Lap seulement)
• Fréquence cardiaque moyenne par tour (30-Lap seulement)
Examiner les informations de fréquence cardiaque
1. Appuyez sur MODE jusqu'à afficher REVIEW.
2. Appuyez sur START/SPLIT (+) pour faire défiler les données CFM (DANS
ZONE, FRÉQUENCE CARDIAQUE MOYENNE, FRÉQUENCE CARDIAQUE DE
POINTE, FRÉQUENCE CARDIAQUE MINIMALE, CALORIES TOTALES) et les
données au tour chronométrées en mémoire (sur le modèle Fitness, appuyez
sur START/STOP (+)). Appuyez sur HEART RATE (-) pour faire défiler les
données CFM à rebours.
Page 46

89
Exemples d'utilisation
Votre montre Timex®peut devenir un élément important de vos séances
d'exercice quotidiennes. Associée à un cardiofréquencemètre, elle vous permet
de suivre l'évolution de votre entraînement par le chronométrage, l'acquisition, le
stockage et l'affichage des données d'exercice. Voici quelques scénarios réalistes
offrant quelques idées sur les possibilités d'utilisation de la montre.
Exemple d'utilisation 1 Chronométrage de tours lors d'une même séance
Votre exercice habituel consiste à effectuer en courant un tour de piste de 500 m.
Aujourd'hui, vous souhaitez courir cinq kilomètres, c'est-à-dire dix tours de piste.
Vous voulez également penser à appeler votre fille, qui doit rentrer de l'école
durant votre séance d'exercice, pour lui demander de mettre les lasagnes au four à
16h15.
Pour cet exemple, vous utilisez les modes suivants :
■ Régler une alarme : Pour vous rappeler d'appeler votre fille, accédez au mode
ALARME et réglez l'alarme sur 4:15 PM. Lorsque l'alarme sonne, il vous suffit
d'appuyer sur n'importe quel bouton pour l'arrêter puis de passer votre coup de
téléphone !
Modèle 30-Lap Modèle Fitness
ALARME
❘
ALARME
CHRONO
❘
MINUTAGE
EXAMEN
❘
EXAMEN
Fonctions globales
Il s'agit de fonctions pratiques sans effet direct sur le fonctionnement des
modes.
Retour automatique à l'heure de la journée
Si vous êtes en mode ALARME, MINUTERIE, RÉCUPÉRATION ou
CONFIGURATION CFM mais n'avez effectué aucune action depuis deux ou trois
minutes, la montre quitte automatiquement le mode en cours et revient au mode
HEURE DE LA JOURNÉE. Si vous avez modifié des réglages durant cette période,
ils seront traités comme s'ils avaient été validés.
Veilleuse INDIGLO
®
La veilleuse INDIGLO®illumine l'affichage pour qu'il soit visible dans l'obscurité.
Appuyez sur le bouton INDIGLO pour l'activer. Une fois le bouton relâché,
l'éclairage se prolonge pendant trois (3) secondes (ou six (6) secondes si vous
réglez les valeurs).
FONCTION NIGHT-MODE
®
(modèle 30-Lap seulement)
Avec la fonction NIGHT-MODE
®
, appuyez sur tout bouton pour illuminer
l'affichage pendant trois (3) secondes (ou six (6) secondes si vous réglez les
paramètres), il n'est pas nécessaire d'appuyer séparément sur le bouton
INDIGLO dans des conditions de faible éclairage. Pour activer la fonction NIGHTMODE
®
, tenez le bouton INDIGLO enfoncé pendant 3 secondes jusqu'au bip
sonore. La fonction NIGHT-MODE
®
reste activée pendant 7 ou 8 heures ou peut
être manuellement désactivée en tenant de nouveau le bouton INDIGLO enfoncé
pendant trois (3) secondes jusqu'au bip sonore.
88
Page 47

91
Exemple d'utilisation 2 Mesure de la forme et chronométrage d'une séance
en salle
Grand adepte de spinning, vous vous rendez à votre club de forme quatre fois par
semaine pour des séances de pédalage de 30 minutes chacune. Vous aimez
mesurer votre fréquence cardiaque durant l'effort afin d'optimiser la séance en
passant autant de temps que possible dans votre zone cible de fréquence
cardiaque. À l'issue de votre séance, vous mesurez la vitesse de récupération de
votre coeur sur une période de récupération standard d'une minute.
Pour cet exemple, vous utilisez les modes suivants :
Modèle 30-Lap Modèle Fitness
CONFIGURATION CFM
❘
CONFIGURATION CFM
CHRONO
❘
MINUTAGE
MINUTERIE
❘
RÉCUPÉRATION
❘
RÉCUPÉRATION
EXAMEN
❘
EXAMEN
REMARQUE : Le mode EXAMEN est expliqué plus
en détail p. 86.
■ Chronométrer la séance d'exercice : Utilisez le mode CHRONO ou
MINUTAGE pour chronomètrer la sèance :
• Modèle 30-Lap : Accédez au mode CHRONO et vérifiez que le
chronomètre est à zéro (0). Appuyez sur START/SPLIT au départ de la
course puis à la fin de chaque tour. La montre stocke les temps des dix
(10) tours individuels. À la fin du dernier tour, appuyez sur
STOP/RESET/SET.
• Modèle Fitness : En mode MINUTAGE, vérifiez que la montre est réglée
pour compter vers le haut depuis zéro (0), comme un chronomètre.
Appuyez sur START/STOP au départ de la course puis à la fin du dernier
tour.
• Examen des temps au tour : Durant votre retour à la maison à pied, vous
pouvez passer en revue les données de votre séance en mode EXAMEN. Si
vous utilisiez un cardiofréquencemètre, vous verriez alors les statistiques
de fréquence cardiaque (les deux modèles), en plus de tous vos temps au
tour (modèle 30-Lap seulement).
REMARQUE : Des problèmes de configuration du mode
MINUTAGE ? Reportez-vous aux informations p. 81-83.
REMARQUE : Voir plus de détails sur l'utilisation du Chrono
p. 76-79.
REMARQUE : Voir les conseils de réglage de l'alarme p. 87.
90
Page 48

93
• Modèle Fitness : En mode MINUTAGE, vérifiez que la montre est réglée
pour compter vers le haut depuis zéro, comme un chronomètre.
Appuyez sur START/STOP en commençant à pédaler.
■ Option de mesure 2 - Compte à rebours : Utilisez le mode MINUTERIE
(modèle 30-Lap) ou MINUTAGE (modèle Fitness) pour chronométrer la séance
en comptant à rebours depuis 30 minutes. Le compte à rebours s'utilise pour un
régime d'exercice planifié, ou mesuré, et comporte une alerte à la fin du compte
à rebours.
• Modèle 30-Lap : Accédez au mode MINUTERIE et réglez le compte à
rebours sur 30 minutes. Appuyez sur START/SPLIT en commençant la
séance d'exercice.
• Modèle Fitness : En mode MINUTAGE, vérifiez que la montre est réglée
pour compter à rebours depuis 30. Appuyez sur START/STOP en
commençant la séance d'exercice.
REMARQUE : Voir plus de détails sur l'utilisation des fonctions
du mode MINUTERIE p. 79.
REMARQUE : Des problèmes de configuration du mode
MINUTAGE ? Reportez-vous aux informations p. 81-83.
■ Connecter le cardiofréquencemètre et sélectionner une zone cible de
fréquence cardiaque : Vous portez déjà la montre et le cardiofréquence en
arrivant au club. Avant de commencer à pédaler, vous devez établir la liaison
sans fil entre la montre et le cardiofréquencemètre.
• Les deux modèles : Appuyez sur HEART RATE. Le témoin « cœur
vide » indique que la montre cherche le signal du cardiofréquencemètre.
Une fois le signal détecté, le cœur devient plein et commence à battre.
Les données de fréquence cardiaque s'affichent suivant la configuration
choisie. Accédez ensuite au mode CONFIGURATION CFM et sélectionnez
votre fréquence cardiaque cible pour cet exercice parmi les zones 1 à 5.
■ Option de mesure 1 - Comptage vers le haut : Utilisez le mode CHRONO
(modèle 30-Lap) ou MINUTAGE (modèle Fitness) pour chronométrer la séance
en comptant 30 minutes. Le chronométrage offre une certaine souplesse sur
la durée exacte de la séance.
• Modèle 30-Lap : Accédez au mode CHRONO et appuyez sur
START/SPLIT en commençant à pédaler.
REMARQUE : Voir plus de détails sur l'utilisation du mode
CHRONO p. 76-79.
REMARQUE : Reportez-vous aux détails sur la sélection des
zones cibles de fréquence cardiaque en mode CONFIGURATION
CFM, la configuration de l'affichage de la fréquence cardiaque
et de l'heure et l'activation de l'alerte « sortie de zone »
p. 64-69.
92
Page 49

95
Exemple d'utilisation 3 Utilisation de la montre en compétition tout en
voyageant entre deux fuseaux horaires
Avec votre club de course à pied, vous prenez l'avion de Chicago à Washington
DC pour participer à une course de fond de 10 kilomètres. Votre stratégie est de
rester dans votre zone cible de fréquence cardiaque pendant la première moitié
de la course puis de forcer pendant la seconde moitié. Vous souhaitez finir la
course aux environs de 32 minutes, ce qui signifie que vous dépasserez
probablement votre zone cible durant la seconde moitié de la course pour
atteindre cet objectif de temps.
Pour cet exemple, vous utilisez les fonctions suivantes :
■ Avancer l'heure : Une fois assis dans l'avion, vous réglez votre montre sur le
fuseau de l'Heure Normale de l'Est (États-Unis).
• Modèle 30-Lap : Comme vous vous rendez souvent sur la Côte Est
pour affaires, vous avez déjà réglé votre second fuseau horaire sur
l'Heure Normale de l'Est. Depuis le mode HEURE DE LA JOURNÉE, tenez
START/SPLIT enfoncé pendant quatre secondes pour passer du fuseau
Modèle 30-Lap Modèle Fitness
FUSEAU HORAIRE SECONDAIRE
❘
HEURE DE LA JOURNÉE
CARDIOFRÉQUENCEMÈTRE
❘
CARDIOFRÉQUENCEMÈTRE
MINUTERIE
❘
MINUTAGE
CHRONO
❘
EXAMEN
❘
EXAMEN
■ À la fin de la séance d'exercice :
• Modèle 30-Lap : Appuyez sur n'importe quel bouton pour couper
l'alerte du compte à rebours en mode MINUTERIE.
• Modèle Fitness : Appuyez sur n'importe quel bouton pour couper
l'alerte du compte à rebours en mode MINUTAGE.
■ Mesurer votre forme : Le mode RÉCUPÉRATION est un outil qui mesure le
ralentissement de fréquence cardiaque sur une durée fixée d'une ou deux
minutes. Immédiatement après la fin de l'exercice, accédez au mode
RÉCUPÉRATION et appuyez sur START/SPLIT (modèle 30-Lap) ou
START/STOP (modèle Fitness) pour démarrer la période de récupération.
À l'alerte sonore marquant la fin de la minute de récupération, notez votre
fréquence cardiaque.
■ Examen des temps au tour : Durant votre retour au vestiaire, vous pouvez
passer en revue les données de votre séance en mode EXAMEN. Vous verrez
vos statistiques de fréquence cardiaque, ainsi que vos temps au tour si vous
avez marqué plusieurs temps intermédiaires (modèle 30-Lap).
REMARQUE : Le mode EXAMEN est expliqué plus en détail
p. 86.
REMARQUE : Voir les renseignements sur le mode MINUTAGE,
le mode MINUTERIE et le mode CHRONO en Section 3.
94
Page 50

97
■ La course est sur le point de démarrer. Vous décidez de régler une alerte de
minuterie afin d'accélérer votre cadence à mi-parcours de la durée visée de 32
minutes pour les 10 km.
• Modèle 30-Lap : Accédez au mode MINUTERIE et réglez-le sur 16
minutes avec CHRONO AT END (chrono à la fin). Au départ de la course,
appuyez sur START/SPLIT pour démarrer le compte à rebours.
• Modèle Fitness : Accédez au mode MINUTAGE et réglez-le pour
compter à rebours à partir de 16 minutes. Le mode MINUTAGE doit être
réglé pour compter à rebours (vers le bas). Appuyez sur START/STOP
(+) pour démarrer le minutage au départ de la course. La montre
commence le compte à rebours des 16 minutes dans le format choisi
pour l'affichage de la fréquence cardiaque et de la durée écoulée.
REMARQUE : Le mode MINUTAGE offre de nombreux choix.
Voir comment remettre le mode MINUTAGE à zéro, alterner entre le
comptage vers le haut et à rebours et choisir les options d'affichage
p. 81–83.
REMARQUE : Voir les instructions de réglage de la minuterie et
de changement de l'action déclenchée à la fin du compte à
rebours p. 79.
REMARQUE : Pour fixer une zone cible de fréquence cardiaque,
voir le mode CONFIGURATION CFM p. 62. Cette section
explique comment configurer l'affichage de l'heure et des
données de fréquence cardiaque.
horaire principal au fuseau secondaire. Laissez la montre sur le fuseau
horaire secondaire pendant la durée de votre séjour puis revenez au
fuseau principal durant le vol de retour.
• Modèle Fitness : Changez l'heure de la montre en mode HEURE DE LA
JOURNÉE de l'Heure Normale du Centre à l'Heure Normale de l'Est.
■ Établir la liaison avec le cardiofréquencemètre : Après une bonne nuit,
vous arrivez à la course équipé de la montre et du cardiofréquence.
Avant la course, vous établissez la liaison sans fil entre la montre et le
cardiofréquencemètre.
• Les deux modèles : Appuyez sur HEART RATE. Le témoin
« cœur vide » indique que la montre cherche le signal du
cardiofréquencemètre. Une fois le signal détecté, le cœur devient
plein et commence à battre. Les données de fréquence cardiaque
s'affichent sur la ligne du bas.
REMARQUE : Voir les instructions de réglage de l'heure de la
journée p. 74-75.
REMARQUE : Voir le réglage de l'heure du fuseau horaire secondaire
p. 75.
96
Page 51

99
Entretien de la montre et garantie
Entretien
Le cardiofréquencemètre et sa sangle doivent être rincés dans de l’eau propre
pour éviter l’accumulation de matières susceptibles d’entraver la mesure de
fréquence cardiaque. Il n'est pas nécessaire de rincer la montre du Fitness
System.
Changement de la pile de montre
Pour écarter le risque de dommage permanent de la montre, TIMEX CONSEILLE
FORTEMENT DE FAIRE CHANGER LA PILE PAR UN DÉTAILLANT OU UN
BIJOUTIER.
Durée de service et changement de la pile de l’émetteur CFM
À raison d'une utilisation d'une heure par jour, la durée de service de la pile de
l'émetteur devrait dépasser deux ans. Un usage plus intense raccourcira la durée
de service de la pile. La pile doit être changée dans tous les cas suivants :
• La montre ne reçoit plus de données de fréquence cardiaque alors que
l’émetteur est porté correctement sur la poitrine.
• Des messages d’erreur s’affichent de plus en plus fréquemment.
Retournez l'appareil et ouvrez le couvercle du logement de pile à l'aide d'une
pièce de monnaie. Changez la pile, en veillant à ce que le « + » de la pile neuve
soit face à vous. Enfoncez le bouton de réinitialisation à côté de la pile (avec un
cure-dent ou un trombone déplié) avant de remettre le couvercle de pile en place.
■ À mi-parcours de la course : Vous courez confortablement dans votre zone
cible de fréquence cardiaque depuis le début de la course puis le compte à
rebours atteint zéro.
• Modèle 30-Lap : Le mode MINUTERIE lance automatiquement le mode
CHRONO, choisi à l'étape précédente pour s'enchaîner au compte à
rebours. Les données de CHRONO et de FRÉQUENCE CARDIAQUE
s'affichent dans le format sélectionné précédemment. Vous augmentez
votre allure durant la seconde moitié. Lorsque vous franchissez la ligne
d'arrivée, appuyez sur STOP/RESET/SET (DONE) pour arrêter le
chronomètre.
• Modèle Fitness : Appuyez sur tout bouton pour désactiver l'alerte de la
minuterie et augmenter votre allure au bout des 16 minutes de course.
Lorsque vous franchissez la ligne d'arrivée, appuyez sur START/STOP
pour arrêter le minutage.
■ Examiner les données de fréquence cardiaque et les temps de course : Plus
tard, vous pouvez faire défiler les données accumulées durant la course.
• Pour examiner les données CFM et les temps de course, accédez au
mode EXAMEN. Appuyez sur START/SPLIT (+) ou START/STOP (+) pour
faire défiler les données CFM et de course ou appuyez sur HEART RATE
(-) pour les faire défiler à rebours.
REMARQUE : Le mode CHRONO doit être remis à zéro pour
pouvoir être automatiquement lancé par le mode MINUTERIE.
98
Page 52

101
GARANTIE INTERNATIONALE TIMEX (GARANTIE LIMITÉE ÉTATS-UNIS)
Votre montre est garantie contre les défauts de fabrication par Timex Corporation
pendant une durée de UN AN à compter de la date d’achat. Cette garantie
internationale est honorée par Timex et ses filiales à travers le monde.
Timex se réserve le droit de réparer votre montre en y installant des pièces
neuves ou remises à neuf et contrôlées avec soin ou de la remplacer par un
modèle identique ou comparable.
IMPORTANT : VEUILLEZ NOTER QUE CETTE GARANTIE NE COUVRE PAS LES
DÉFAUTS OU DOMMAGES DE VOTRE PRODUIT :
1) après l’expiration de la période de garantie ;
2) si le produit n’a pas été acheté initialement chez un revendeur agréé ;
3) résultant de travaux de réparation non effectués par le fabricant ;
4) résultant d’accidents, d’altérations ou d’emplois abusifs ;
5) s’il s’agit du boîtier, des accessoires ou de la pile. Le remplacement de ces
pièces peut être payant.
Effectuez un essai rapide de l'appareil après avoir changé la pile :
1. Éloignez-vous des sources possibles de brouillage électrique ou radio.
2. Humectez généreusement les coussinets du capteur et posez l'appareil
sur la poitrine, bien appuyé contre la peau.
3. Appuyez sur le bouton MODE jusqu'à accéder au mode HEURE DE LA
JOURNÉE.
4. Appuyez sur le bouton HEART RATE de la montre pour activer le moniteur
de fréquence cardiaque.
5. Au bout de quelques secondes, le témoin « cœur » doit commencer à
clignoter sur l’écran pour indiquer que l’émetteur est activé. Ceci signifie
que la pile est correctement installée. REMARQUE : Il n’est pas nécessaire
qu’une valeur de fréquence cardiaque s’affiche durant cet essai.
SI LE CŒUR CLIGNOTANT NE S'AFFICHE PAS SUR LA MONTRE, essayez ce
qui suit :
Appuyez de nouveau sur le bouton de réinitialisation dans le logement dans la
pile et remettez le couvercle en place.
Réinstallez la pile et appuyez sur le bouton de réinitialisation comme indiqué
plus haut.
100
Page 53

103
Aux États-Unis, appelez le 1-800-448-4639 pour obtenir plus de renseignements
sur la garantie.
Au Canada, appelez le 1-800-263-0981.
Au Brésil, appelez le 0800-168787.
Au Mexique, appelez le 01-800-01-060-00.
En Amérique Centrale, dans les Caraïbes, aux Bermudes et aux Bahamas,
appelez le (501) 370-5775 (États-Unis).
En Asie, appelez le 852-2815-0091.
Au Royaume-Uni, appelez le 44 208 687 9620.
Au Portugal, appelez le 351 212 946 017.
En France, appelez le 33 3 81 63 42 00.
En Allemagne, appelez le +43 662 88 92130.
Au Moyen-Orient et en Afrique, appelez le 971-4-310850.
Dans les autres régions, veuillez contacter votre détaillant ou distributeur
Timex local.
CECI EST LE COUPON DE RÉPARATION DE VOTRE MONTRE. CONSERVEZ-LE DANS
UN ENDROIT SÛR.
GARANTIE INTERNATIONALE TIMEX — COUPON DE RÉPARATION DE LA MONTRE
Date d’achat initiale :
(joindre si possible une copie du reçu)
Acheté par :
(Nom, adresse et numéro de téléphone)
Lieu d’achat :
(Nom et adresse)
Raison du renvoi :
CETTE GARANTIE ET LES RECOURS AUX PRÉSENTES SONT EXCLUSIFS ET
REMPLACENT TOUTE AUTRE GARANTIE, EXPRESSE OU IMPLICITE, Y
COMPRIS TOUTE GARANTIE IMPLICITE DE QUALITÉ MARCHANDE OU
D’ADAPTATION À UN USAGE PARTICULIER. TIMEX DÉCLINE TOUTE
RESPONSABILITÉ POUR LES DOMMAGES SPÉCIAUX, INDIRECTS OU
CONSÉCUTIFS.
Certains pays et états interdisent les limites sur les garanties implicites et les
exclusions ou limites sur les dommages, c’est pourquoi ces limites peuvent ne
pas s’appliquer à votre cas. Cette garantie vous confère des droits juridiques
particuliers et il est possible que vous ayez d’autres droits susceptibles de varier
d’un pays ou d’un état à l’autre.
Pour recourir à la garantie, veuillez renvoyer votre montre au fabricant, à l’une de
ses filiales ou au détaillant chez lequel le produit a été acheté, accompagnée de
l’original du Coupon de réparation de produit dûment rempli ou, aux États-Unis
et au Canada seulement, de l’original du Coupon de réparation de produit dûment
rempli ou d’une déclaration écrite indiquant votre nom, adresse et numéro de
téléphone ainsi que la date et le lieu d’achat. Veuillez joindre ce qui suit à la
montre pour couvrir l’affranchissement et la manutention (il ne s’agit pas de frais
de réparation) : un chèque ou mandat de 7,50 $ É.U. aux États-Unis ; un chèque
ou mandat de 6,00 $ CAN au Canada ; un chèque ou mandat de 2,50 £ au
Royaume-Uni. Dans les autres pays, vous serez facturé pour l’affranchissement
et la manutention. N’INCLUEZ JAMAIS D’ARTICLES DE VALEUR PERSONNELLE
DANS VOTRE ENVOI.
102
Page 54

105
Avis FCC (États-Unis) / Avis IC (Canada)
Timex Corporation déclare que les produits suivants, qui comprennent tous les
composants du système Timex® Bodylink™, sont conformes au règlement
applicable de FCC Partie 15 et d’Industrie Canada pour les appareils de Classe B
comme suit :
Nom du produit :
Capteur de vitesse + distance – Émetteur-récepteur GPS Série M8xx/M5xx
Cardiofréquencemètre – Émetteur CFM Série M8xx/M5xx
Type de produit : Source de rayonnement intentionnelle
Modèle N° matricule FCC N° d’homologation IC
Moniteur de fréquence cardiaque M515 EP9TMXM515 3348A-M515
Contrôleur de vitesse + distance M850 EP9TMXM850 3348A-12181
Ces appareils sont conformes à la Partie 15 du règlement de la FCC. L’utilisation
est sujette aux deux conditions suivantes : (1) L’appareil ne doit pas causer de
brouillage nuisible et (2) l’appareil doit accepter tout brouillage reçu, y compris
tout brouillage susceptible de causer un fonctionnement indésirable.
Réparation
Si votre montre doit être réparée, envoyez-la à Timex conformément aux
dispositions de la Garantie internationale Timex ou adressez-la à :
HotLine Watch Service
P.O. Box 2740
Little Rock, AR 72203
Adresse réelle :
HotLine Watch Service
1302 Pike Ave. North
Little Rock, AR 72114
Pour simplifier l’envoi à l’usine pour réparation, les revendeurs Timex
participants peuvent vous fournir une enveloppe de renvoi pour réparation avec
adresse. Reportez-vous aux instructions particulières d’entretien et de réparation
de votre montre dans la Garantie internationale Timex.
Pour toute question concernant les réparations,
appelez le 1-800-448-4639.
Pour obtenir un bracelet ou brassard de rechange,
appelez le 1-800-448-4639.
104
Page 55

107
MONITOR DIGITAL DE PULSO TIMEX
®
MODELOS "30-LAP" y "FITNESS"
RELOJ DEPORTIVO DIGITAL DE AVANZADA
Más
UN SISTEMA PARA MONITORIZAR EL PULSO COMPLETAMENTE DIGITAL
El Monitor digital de pulso de Timex
®
incorpora lo último en tecnología digital de
Timex, con metodologías usadas por los entrenadores personales y los expertos
en acondicionamiento físico. En su condición de líder mundial en dispositivos para
medir el tiempo durante la práctica de deportes, Timex creó un dispositivo digital
que combina la precisión digital que exigen los atletas de categoría mundial, con
funciones que puede usar cualquier persona, de cualquier edad, para conservar un
buen estado físico "de por vida".
Nota: Este manual puede describir funciones o características que tal vez no estén
disponibles en todos los modelos.
Recursos en Internet
La página web de Timex (www.timex.com) es una excelente fuente de
información que le ayuda a aprovechar al máximo su Monitor digital de pulso
Timex
®
. Recursos del sitio de Timex:
www
.timex.com/hrm/
Para obtener más información respecto a los Monitores digitales de pulso
de Timex, incluso listas de las funciones y simulaciones, vaya a:
www
.timex.com/fitness/
Respecto a sugerencias de entrenamiento usando el Monitor digital de
pulso de Timex.
Nota: Consulte siempre a su médico antes de comenzar o modificar un programa
de ejercicios.
Nom du produit :
Récepteurs de montre – CFM/Vitesse + distance Série M8xx/M5xx
Enregistreurs de données – CFM/Vitesse + distance Série M5xx
Type de produit : Source de rayonnement involontaire
Cet équipement a été contrôlé et déclaré conforme aux limites fixées pour un appareil
numérique de classe B, en vertu de la Partie 15 du règlement de la FCC. Ces limites
servent à assurer une protection raisonnable contre le brouillage préjudiciable dans un
environnement résidentiel. Cet équipement produit, utilise et peut rayonner de l’énergie
radiofréquence et, s’il n’est pas utilisé conformément au mode d’emploi, peut causer un
brouillage préjudiciable aux communications radio. Si cet équipement cause un brouillage
préjudiciable à la réception radio ou télévisuelle, ce qui peut être déterminé en éteignant
l’équipement et en le rallumant, l’utilisateur est invité à tenter d’éliminer le brouillage en
réorientant ou en déplaçant l’antenne de réception ou en augmentant la distance séparant
l’équipement du récepteur.
Attention : Tout changement ou modification de l’équipement indiqué ci-dessus non
expressément autorisé par Timex Corporation peut invalider le droit de l’utilisateur
d’exploiter ce matériel.
Avis Industrie Canada : Cet appareil numérique de la classe B est
conforme à la norme NMB-003 du Canada.
106
Bodylink est une marque commerciale de Timex Group, B.V.
TIMEX et NIGHT-MODE sont des marques déposées de Timex Corporation aux
États-Unis et dans d’autres pays.
INDIGLO est une marque déposée de Indiglo Corporation aux États-Unis et dans
d’autres pays.
© 2004 Timex Corporation
Page 56

109
Descripción general
Información de la pantalla
LÍNEA SUPERIOR - Tercio
superior de la pantalla,
usado para diversa
información (tiempo de
vueltas, día/fecha,
información del monitor de
pulso e iconos.
En algunos modos, la
información mostrada en
estas dos líneas puede
intercambiarse de lugar,
según su preferencia.
LÍNEA INFERIOR - Dos
tercios inferiores de la
pantalla, usados para
diversa información como
hora, tiempo de
vuelta/intervalo,
información del monitor de
pulso e iconos.
ICONOS - Aparecen en la
pantalla para indicar el
modo o para indicar la
actividad que está
desarrollándose
actualmente. Por ejemplo,
el icono del cronómetro
indica que el cronógrafo o
el cronómetro están
tomando el tiempo de sus
vueltas.
Información sobre el manual
El manual está dividido en cuatro secciones principales:
• Descripción general —
Descripción general de botones, funciones y pantalla.
• Uso del Monitor de pulso —
Descripción de cómo combinar el reloj con el Monitor de pulso ("HRM") para
obtener, medir y revisar la información del pulso.
• Modos y Funciones —
Explicaciones simples, paso por paso, sobre cómo usar los modos y
funciones del reloj.
• Ejemplos de uso —
Casos de usos reales que enseñan cómo hacer del reloj Timex
®
una parte
integral de su sesión de ejercicios.
108
Page 57

111
SET/RESET- Repone la
función Contador de
Tiempo; mantenga pulsado
para iniciar la
programación.
Modelo "Fitness"
Botón HEART RATE (pulso)
– Activa o desactiva el
monitor de pulso; cambia la
posición de los datos del
monitor cuando éste está
activado.
Botón START/STOP – Inicia o detiene la función Contador de
Tiempo.
Botón INDIGLO®– para
iluminar la esfera del reloj.
Botón MODE – Oprímalo
para pasar al siguiente
modo.
110
Modelo "30-Lap"
Botón STOP/RESET/SET
(parar/reponer/programar)
– Detiene o repone el
Cronógrafo o el
Temporizador; mantenga
pulsado para iniciar la
programación.
Botón INDIGLO®– para
iluminar la esfera del reloj.
Botón HEART RATE
(pulso) – Activa o
desactiva el Monitor de
Pulso; también cambia
el formato de datos del
monitor cuando éste
está activado.
Botón MODE – Oprímalo
para pasar al siguiente
modo.
Botón START/SPLIT (iniciar/intervalo) – Hace funcionar
el Cronógrafo o el Temporizador; permite ver la segunda
Zona de Tiempo en Hora del Día.
Page 58

113
Uso del Monitor de Pulso
Cuando se lo usa junto con un medidor de pulso, el reloj deportivo se vuelve
parte de un sistema de información sobre su estado físico. El medidor
transmite al reloj los datos del pulso. Una rápida mirada durante el
entrenamiento o la sesión de ejercicios le permitirá analizar si está en el rango
de pulso deseado para mantener o mejorar su estado físico (para saber cuál
es el rango adecuado, refiérase a las guías correspondientes). Si así se
programara, sonará una alerta en forma automática cuando su pulso esté
fuera de la zona seleccionada.
En esta sección se describe:
• Cómo programar el reloj para que funcione en coordinación con un
medidor de pulso
• Cómo programar el reloj para que compare su pulso con un rango de
pulso de su elección
• Cómo registrar y revisar la información del pulso
Programación del reloj para que funcione en coordinación con un medidor
de pulso
1. Póngase el medidor de pulso en el pecho. Los detalles relativos a cómo
usar el medidor de pulso figuran en la Guía del Usuario que lo acompaña.
En las instrucciones de esta sección se asume que el medidor de pulso se
está usando como se recomienda.
2. Inicie el Monitor de Pulso. En los modos TIME OF DAY (hora del día),
TIMING (contador de tiempo), CHRONO (cronógrafo) o TIMER
(temporizador), seleccione HEART RATE (pulso).
Cuando el reloj busque la señal del medidor de pulso, aparecerá el icono del
contorno de un corazón. Cuando el reloj comience a recibir una señal, el
contorno del corazón cambia a la figura de un corazón que comienza a latir.
112
Iconos en la pantalla
Si bien ocupa muy poco lugar en la muñeca, el reloj le ofrece mucha
información con un simple vistazo. La siguiente es una descripción general de
los iconos (pequeños símbolos gráficos) que aparecen en la pantalla:
Alarma activada.
Contador funcionando (Modelo "30-Lap") o el Modo TIMING
(contador de tiempo) está en cuenta regresiva hacia cero
(Modelo "Fitness").
Cronógrafo funcionando (Modelo "30-Lap") o el Modo TIMING
(contador de tiempo) está en cuenta progresiva desde cero
(Modelo "Fitness").
Se programó la señal sonora de las horas.
Buscando datos del monitor de pulso del medidor del pecho.
Están recibiéndose datos de un detector de pulso.
Page 59

115
Figura 2.1 – Formatos de Visualización del Monitor de Pulso
Pulso sobre tiempo
Solamente pulso
Tiempo sobre pulso
No hay información del pulso
SUGERENCIA: Oprima HEART RATE (pulso) para recorrer los
formatos mientras el monitor esté activado.
114
Para obtener una señal clara, aléjese al menos 6 pies (1.8 metros) de otras
personas que también estén usando un medidor de pulso.
Cada vez que pase a los modos TIMING (contador de tiempo), CHRONO
(cronómetro) o TIMER (temporizador), el reloj automáticamente buscará la
señal del transmisor durante 15 segundos. Si no encuentra ninguna señal,
el reloj deja de buscar hasta que vuelva a oprimirse el botón HEART RATE
(pulso).
3. Lea su pulso. Cuando el reloj establezca contacto con el transmisor, verá
su pulso (en latidos por minuto). Para desactivar el monitor, mantenga
oprimido HEART RATE.
Información de Pulso y Tiempo
A la visualización del pulso puede dársele cuatro formatos diferentes. Use el
botón HEART RATE para recorrer las distintas opciones. Por ejemplo, cuando
use el Monitor de Pulso en los modos CHRONO (cronógrafo) o TIMER
(temporizador), el pulso aparecerá en la línea superior, y el conteo del modo
CHRONO o TIMER aparecerá en la línea inferior. Si oprime el botón HEART
RATE (pulso), estos valores intercambiarán su lugar. También puede optar por
ver sólo la información del pulso o no ver nada de eso en absoluto. (Refiérase
a la Figura 2.1 luego del siguiente párrafo.)
Modo HRM Setup
Con este modo se programa el rango de pulso deseado durante la sesión de
ejercicios. El rango consiste de dos límites de pulso, uno inferior y otro
superior. Seleccione uno de los rangos preprogramados o establezca
manualmente otros valores de su elección. Cuando el pulso es menor a cierto
límite inferior o cuando rebasa el límite superior del rango establecido, suena
una alarma (opcional). Si bien puede usar el monitor de pulso sin seleccionar
un rango específico, se recomienda configurar esta función. De este modo
Page 60

117
Botón START/SPLIT –
(START/STOP en el
Modelo "Fitness") -
Oprima para
intercambiar el icono
"ON/OFF", que indica
si se activó/desactivó
la alerta de estar fuera
del rango.
Figura 2.2 – Valores preasignados para el Modo HRM Setup
(programación de pulso)
Botón STOP/RESET/SET –
(SET/RESET para el Modelo
"Fitness") - Oprima para
ingresar el estado de
programación del Modo HRM
Setup (programación de
pulso).
Botón HEART RATE –
Oprima para seleccionar
un rango de pulso. En
este ejemplo el Rango 3
es el rango escogido. El
rango seleccionado se
basa en un pulso
máximo de 165; si
cambia el máximo,
cambia el rango de
pulso.
116
podrá mantenerse en el rango deseado y aprovechará al máximo su programa
de ejercicios.
Rangos deseados
Los límites superior e inferior de pulso se basan en el valor máximo de pulso
("MHR" en inglés). En la Tabla 2.1 se ilustra la fórmula que usa el programa del
reloj para calcular los límites inferior y superior de cada rango.
Tabla 2.1: Rangos de Acondicionamiento Físico
Es importante que programe un valor máximo de pulso porque los cinco
rangos automáticos se basarán en ese valor. Para determinar su rango, realice
una prueba controlada o recurra a alguno de los varios métodos de cálculo
aproximado. Un método muy usado es el de restar su edad al número 220.
Recuerde, sin embargo, que métodos como este pueden dar resultados
imprecisos porque el pulso máximo depende de factores fisiológicos además
de la edad, como por ejemplo, su estado físico general y su genética individual.
RANGO Límite inferior Límite superior
5
❘
90% pulso máx.
❘
100% pulso máx.
4
❘
80%
❘
90%
3
❘
70%
❘
80%
2
❘
60%
❘
70%
1
❘
50%
❘
60%
Page 61

119
Ingreso de datos de peso y pulso máximo
1. Oprima MODE hasta llegar a HRM SETUP (programación del monitor de pulso).
Oprima ahora STOP/RESET/SET (parar/reponer/programar) para poder
programar el reloj. El rango seleccionado comenzará a destellar. (En el
Modelo "Fitness", oprima SET/RESET(programar/reponer).
2. Oprima START/SPLIT (+) o HEART RATE (-) para recorrer los rangos
preprogramados y también la programación MANUAL. (En el Modelo
'Fitness", oprima START/STOP (+) (iniciar/parar) o HEART RATE (-) (pulso).
Todos los rangos, incluso los límites preprogramados inferior y superior,
estarán destellando.
3. Oprima MODE (NEXT) (próximo) para recorrer los valores que definirán su
peso y pulso máximo ("MHR"). Oprima START/SPLIT (+ (iniciar/intervalo) o
HEART RATE (-) (pulso) para aumentar o disminuir cada valor. (En el
Modelo "Fitness", oprima START/STOP (+) (iniciar/parar) o HEART RATE (-)
(pulso). El peso se usa para calcular la cantidad de calorías quemadas.
NOTA: Cuando especifique el peso, oprima START/SPLIT (+)
(iniciar/intervalo) para escoger entre libras y kilogramos.
NOTA: Los rangos quedan personalizados a su gusto cuando
termina la programación del pulso.
Figura 2.3 – Programación de valores para el Modo HRM Setup
(programación de pulso)
Botón MODE (NEXT) –
Oprima para recorrer los
valores de peso y pulso
máximo cuando personalice
el rango de pulso.
Botón HEART RATE (-) –
Oprima para recorrer los
rangos de pulso.
Botón START/SPLIT (+) – (START/STOP (+) en el Modelo "Fitness") - Oprima para recorrer hacia
arriba y manualmente establecer rangos de pulso. Cuando ingrese el valor del peso, oprima para
escoger entre libras (LB) y kilogramos (KG).
Botón STOP/RESET/SET
(DONE) – (SET/RESET
(DONE) en el Modelo
"Fitness") - Oprima
cuando termine, para
guardar los valores
seleccionados.
118
Page 62

121
2. Oprima START/SPLIT (+) o HEART RATE (-) para recorrer los rangos
preprogramados hasta llegar a la programación MANUAL, que estará
destellando. (En el Modelo "Fitness", oprima START/STOP (+) (iniciar/parar)
o HEART RATE (-) (pulso).
3. Oprima MODE (NEXT) (próximo) para seleccionar los números que definan los
límites de pulso superior e inferior, el peso y el pulso máximo. Oprima
START/SPLIT (+) (iniciar/intervalo) o HEART RATE (-) (pulso) para aumentar o
disminuir cada número. (En el Modelo "Fitness", oprima START/STOP
(+)(iniciar/parar) o HEART RATE (-)(pulso). Cuando logre los números deseados,
oprima MODE (NEXT) (próximo) para pasar al siguiente valor.
El uso de un rango de pulso predeterminado cambiará el valor ingresado
manualmente al valor original predeterminado que se selecciona.
4. Oprima STOP/RESET/SET (DONE) (fin) para guardar su programación y
salir del Modo HRM SETUP (programación) del monitor. (En el Modelo
"Fitness", oprima SET/RESET (DONE)(fin).
Revisión de la información del monitor.
Use el reloj para revisar la información del monitor, como por ejemplo: pulso
promedio, mínimo y máximo; tiempo que el pulso estuvo dentro del rango
elegido; cantidad de calorías quemadas. Como referencia de su estado físico,
puede ver cuánto disminuyen sus pulsaciones durante un período
predeterminado. Encontrará más detalles en los Modos REVIEW (revisión) y
RECOVER (recuperación).
120
4. Oprima STOP/RESET/SET (DONE (fin) para guardar los valores y salir. (En
el Modelo "Fitness", oprima SET/RESET (DONE) (programar/reponer(fin).
Selección de un Rango de Pulso
Para seleccionar un rango de pulso en base a su pulso máximo:
1. Oprima MODE hasta que aparezca HRM SETUP (programación del monitor
de pulso).
2. Oprima HEART RATE (pulso) para recorrer los rangos preprogramados (y
también la programación MANUAL). Se mostrarán todos los rangos,
incluso los límites preprogramados inferior y superior.
Cuando deje el modo HRM SETUP (programación), el reloj usará el rango que
usted haya seleccionado para hacer todos sus cálculos estadísticos con los
datos del pulso.
Programación del rango "Manual"
1. Mientras esté en el modo HRM SETUP (programación), oprima
STOP/RESET/SET (parar/reponer/programar) para programar el reloj. El
rango seleccionado comenzará a destellar. (En el Modelo "Fitness", oprima
SET/RESET(programar/reponer)
NOTA: Oprima START/SPLIT (iniciar/intervalo) para escoger si
la alerta de "fuera del rango" estará activada o no. (En el Modelo
"Fitness", oprima START/STOP).
NOTA: Si cambia el valor del peso mientras hace ejercicio,
obtendrá un cálculo erróneo de calorías .
Page 63

123
sistema de radio, puede producirse alguna interferencia ocasional o una
breve saturación de la señal. Cuando sucede eso, el reloj suspende el
destello del icono del corazón. Normalmente el problema se resuelve
solo y el corazón sigue destellando. Si la interrupción continuara, el reloj
le alertará mediante el mensaje de error que se describe a continuación.
En la pantalla aparecerá el mensaje "NO HRM DATA" (sin datos HRM).
Este mensaje de error aparece cuando el reloj no recibe actualizaciones
regulares del medidor. Sin embargo, si el medidor continúa en el pecho, las
almohadillas están mojadas y la batería del transmisor está en buen estado, el
reloj se recuperará generalmente sin que usted tenga que intervenir. Si no se
recuperara, haga lo siguiente:
• Las almohadillas del transmisor del pecho quizás hayan perdido contacto
con el pecho durante unos segundos. Verifique que el transmisor esté
ajustado contra
el pecho.
• Las almohadillas del medidor tal vez estén secas. Mójelas bien y vuelva a
ajustar el transmisor contra el pecho si fuera necesario.
• La pila del transmisor podría estar descargada; reemplácela. (Para
reemplazar la pila, refiérase a las instrucciones de la Guía del Usuario del
medidor)
122
Solución de problemas vinculados al monitor
Solución de los problemas más comunes:
Es difícil obtener una primera lectura, O BIEN el pulso no parece ser el
correcto durante el uso.
• Moje las almohadillas de contacto texturizadas de la parte posterior del
medidor de pulso.
• Ajuste más la correa del pecho hasta que haga un contacto más estrecho
con la piel. Verifique que el medidor esté bien apoyado contra la piel y
que la palabra TIMEX esté hacia arriba.
• Aléjese de otras personas que estén usando medidores y aléjese también
de otras fuentes de señales de radio y electricidad estática, como por
ejemplo, equipos electrónicos de gimnasia y maquinaria eléctrica en
general.
• Espere un par de minutos y oprima HEART RATE (pulso) otra vez.
A veces veo guiones en lugar del valor del pulso, O BIEN el pulso no cambia
durante períodos prolongados. ¿Qué significa eso?
• Por lo general eso indica que se debe mojar las almohadillas del medidor
o que el dispositivo que se coloca en el pecho no está bien ajustado, por
lo cual el contacto eléctrico con la piel no es suficiente. Moje las
almohadillas del medidor y ajuste la correa con el transmisor para que
ambas almohadillas hagan buen contacto con el pecho.
A veces el icono del corazón deja de destellar brevemente.
• Mientras el icono del corazón siga destellando, el reloj continuará
recibiendo una clara señal del medidor. Igual que sucede con cualquier
Page 64

125
STOP/RESET/SET (DONE) –
(SET/RESET (DONE) en el
Modelo "Fitness") - Oprima
para guardar los cambios y
salir.
Operación del Botón Durante la Programación
Botón MODE (NEXT) – Pase
al próximo valor a
programar.
Botón HEART RATE (–) –
Disminuye el valor que
destella.
START/SPLIT (+) - (START/STOP (+) en el Modelo
"Fitness") – Aumenta el valor que destella.
124
Modos y Funciones
En esta sección se describen los modos y funciones del reloj. Cada modo le
permite acceder a una función específica del reloj. Por ejemplo, el Modo
ALARM se usa para programar una alarma que suene en un momento
determinado.
El reloj tiene varias funciones a las cuales se puede acceder cuando se oprime
el botón MODE. Al oprimir el botón MODE se ven todos los modos
disponibles en el reloj.
Tabla 3.1: Resumen de Modos
Modelo "30-Lap" Modelo "Fitness"
HORA DEL DÍA
❘
HORA DEL DÍA
CRONÓGRAFO
❘
CONTADOR DE TIEMPO
TEMPORIZADOR
❘
RECUPERACIÓN
❘
RECUPERACIÓN
REVISIÓN
❘
REVISIÓN
PROGRAMACIÓN DE PROGRAMACIÓN DE
MONITOR DE PULSO
❘
MONITOR DE PULSO
ALARMA
❘
ALARMA
Page 65

127
Cuando seleccione HORAS con el formato de 12 horas, cambie a AM o PM
(indicado con una “A” o una “P” en la pantalla) cuando aumente la cantidad
de horas pasando el “12”.
Cuando programe SEGUNDOS, oprima START/SPLIT (+)(iniciar/intervalo) o
HEART RATE (-)(pulso) para llevarlos a cero. Esto es muy útil cuando se
sincroniza el reloj con una hora de referencia. (En el modelo "Fitness", oprima
START/STOP (+)(iniciar/parar) o HEART RATE (-)(pulso).
3. Cuando termine, oprima STOP/RESET/SET (DONE) (parar/reponer/
programar (fin) para guardar la selección y salir de HORA DEL DÍA.
(En el Modelo "Fitness", oprima SET/RESET (programar/reponer).
Visualización de la segunda zona horaria
El Modelo "30-Lap" le permite ver la hora en dos zonas horarias (identificadas
como T1 y T2). Para ver la segunda zona, oprima el botón START/SPLIT
(iniciar/intervalo) por dos segundos en el Modo TIME OF DAY (hora del día).
Deje de oprimir el botón y regresará a la zona horaria primaria. Para
intercambiar las zonas horarias, mantenga oprimido el botón por cuatro
segundos.
SUGERENCIA: El reloj no cuenta los 29 de febrero. Durante los
años bisiestos, programe manualmente la fecha el 29 de
febrero a “29 de febrero”. Al día siguiente el reloj pasará a 1 de
marzo.
NOTA: Puede programar el reloj para que genere una señal
sonora a cada hora; para ello, active la función SEÑAL SONORA
HORARIA.
Modo TIME OF DAY (hora del día)
En el reloj se ve la hora, la fecha y el día de la semana.
Programación de la hora
1. Mantenga firmemente oprimido STOP/RESET/SET
(parar/reponer/programar) durante dos segundos. (En el Modelo "Fitness",
mantenga oprimido SET/RESET.) Aparecerá “HOLD TO SET” (mantenga
oprimido para programar). Si sigue manteniendo oprimido este botón,
aparecerá "SET TIME" (programe la hora).
El Modelo "30-Lap" le permite programar la hora para dos zonas horarias
diferentes. Cuando empiece a programar la hora, el "1" de la parte inferior
derecha de la pantalla indicará que es la zona horaria primaria. Oprima
START/SPLIT (+)(iniciar/intervalo) o HEART RATE (-)(pulso) para seleccionar
la zona horaria primaria (1) o secundaria (2). Oprima MODE
(NEXT)(próximo)para programar la hora según se describió antes.
2. Oprima MODE (NEXT)(próximo) para programar:
HORAS ➤ MINUTOS ➤ SEGUNDOS ➤ DÍA DE LA SEMANA
➤ MES ➤ FECHA ➤ FORMATO DE HORA (12 ó 24 horas)
➤ FORMATO DE FECHA (Mes-Día o Día-Mes)
➤ SEÑAL ACÚSTICA HORARIA (activada o desactivada) ➤ SEÑAL
ACÚSTICA DE BOTÓN OPRIMIDO (activada o desactivada).
El valor que va a cambiarse estará destellando. Oprima START/SPLIT
(+)(iniciar/intervalo) o HEART RATE (-)(pulso) para aumentar o disminuir
cada valor. (En el Modelo "Fitness", oprima START/STOP (+)(iniciar/parar) o
HEART RATE (-)(pulso). Para avanzar más rápidamente, mantenga oprimido
el botón. Cuando logre los números deseados, oprima MODE
(NEXT)(próximo) para pasar al siguiente valor.
126
Page 66

129
Mientras el Modo CHRONO (cronógrafo) esté activo, puede cambiar a otro
Modo, como por ejemplo, TIME OF DAY (hora del día). El icono de un
cronómetro indica que el Modo CHRONO (cronógrafo) sigue funcionando
actualmente.
Opciones de visualización del cronógrafo
Si no estuviera usando un medidor de pulso, el reloj mostrará los tiempos de la
vuelta y de los intervalos (después de que usted tome el primer intervalo). Para
seleccionar qué tiempo se mostrará en la línea inferior de la pantalla, oprima
STOP/RESET/SET(parar/reponer/programar) cuando lleve a cero el cronómetro
(00.00.00) pero antes de comenzar a cronometrar las vueltas.
Si estuviera usando el medidor de pulso, el reloj mostrará la información del
pulso además del tiempo medido por el cronómetro. Puede optar por ver el
tiempo de la vuelta o del intervalo, así como los datos del pulso. Respecto a
las opciones de los datos de pantalla, refiérase a las páginas 114 y 115, así
como a la Figura 2.1, respecto al formato de pantalla cuando el monitor está
activo.
Uso del Cronógrafo
1. Oprima MODE hasta que aparezca CHRONO (cronógrafo).
2. Oprima START/SPLIT(iniciar/intervalo) para iniciar la medición del tiempo.
3. Para medir una vuelta o intervalo, oprima START/SPLIT(iniciar/intervalo)
mientras está activo el Modo CHRONO (cronógrafo).
Así se guardan los datos de la vuelta y del intervalo, y se comienza una nueva
vuelta. El reloj mostrará brevemente los tiempos de la vuelta y del intervalo que
acaba de guardar, así como también el número de la vuelta. Si estuviera viendo
los datos del monitor, a continuación el reloj mostrará la información del pulso
para esa vuelta.
(Las instrucciones continúan en la página 131)
Modo CHRONO (cronógrafo) (sólo Modelo "30-Lap")
El Modo CHRONO (cronógrafo) es el modo principal del reloj para las
sesiones de ejercicios. Cuenta con un cronómetro para registrar el tiempo
transcurrido para 30 lecturas (una vuelta, por ejemplo), en un único evento,
así como otra información para un evento completo de hasta 100 horas de
duración. Pueden guardarse datos de hasta 30 lecturas, incluso número de
vuelta, tiempo individual de la vuelta y tiempo total transcurrido del intervalo.
Cuando el medidor de pulso está activado, el Modo CHRONO (cronógrafo)
mide tres datos estadísticos:
• El tiempo que el pulso está dentro del rango seleccionado mientras se
usa el Modo CHRONO (cronógrafo)
• El pulso promedio para el período en que el monitor de pulso estaba
activo y estaba usándose el Modo CHRONO (cronógrafo)
• El pulso máximo y el mínimo para el período en que el monitor de pulso
estaba activo y estaba usándose el Modo CHRONO (cronógrafo)
La acumulación de datos cesa cuando se detiene el cronógrafo mientras el
monitor esté activo y continúa cuando se reinicia el cronógrafo. Si se permite
que el cronógrafo funcione mientras el monitor de pulso está activo, éste se
desactivará automáticamente y cesará la acumulación de datos.
NOTA: En esta sección nos referiremos a “vueltas” e “intervalos”.
"Tiempo de vuelta" es el tiempo para cada segmento (vuelta) de
un evento. "Tiempo de intervalo" es el tiempo total transcurrido
desde que comenzó el evento.
128
Page 67
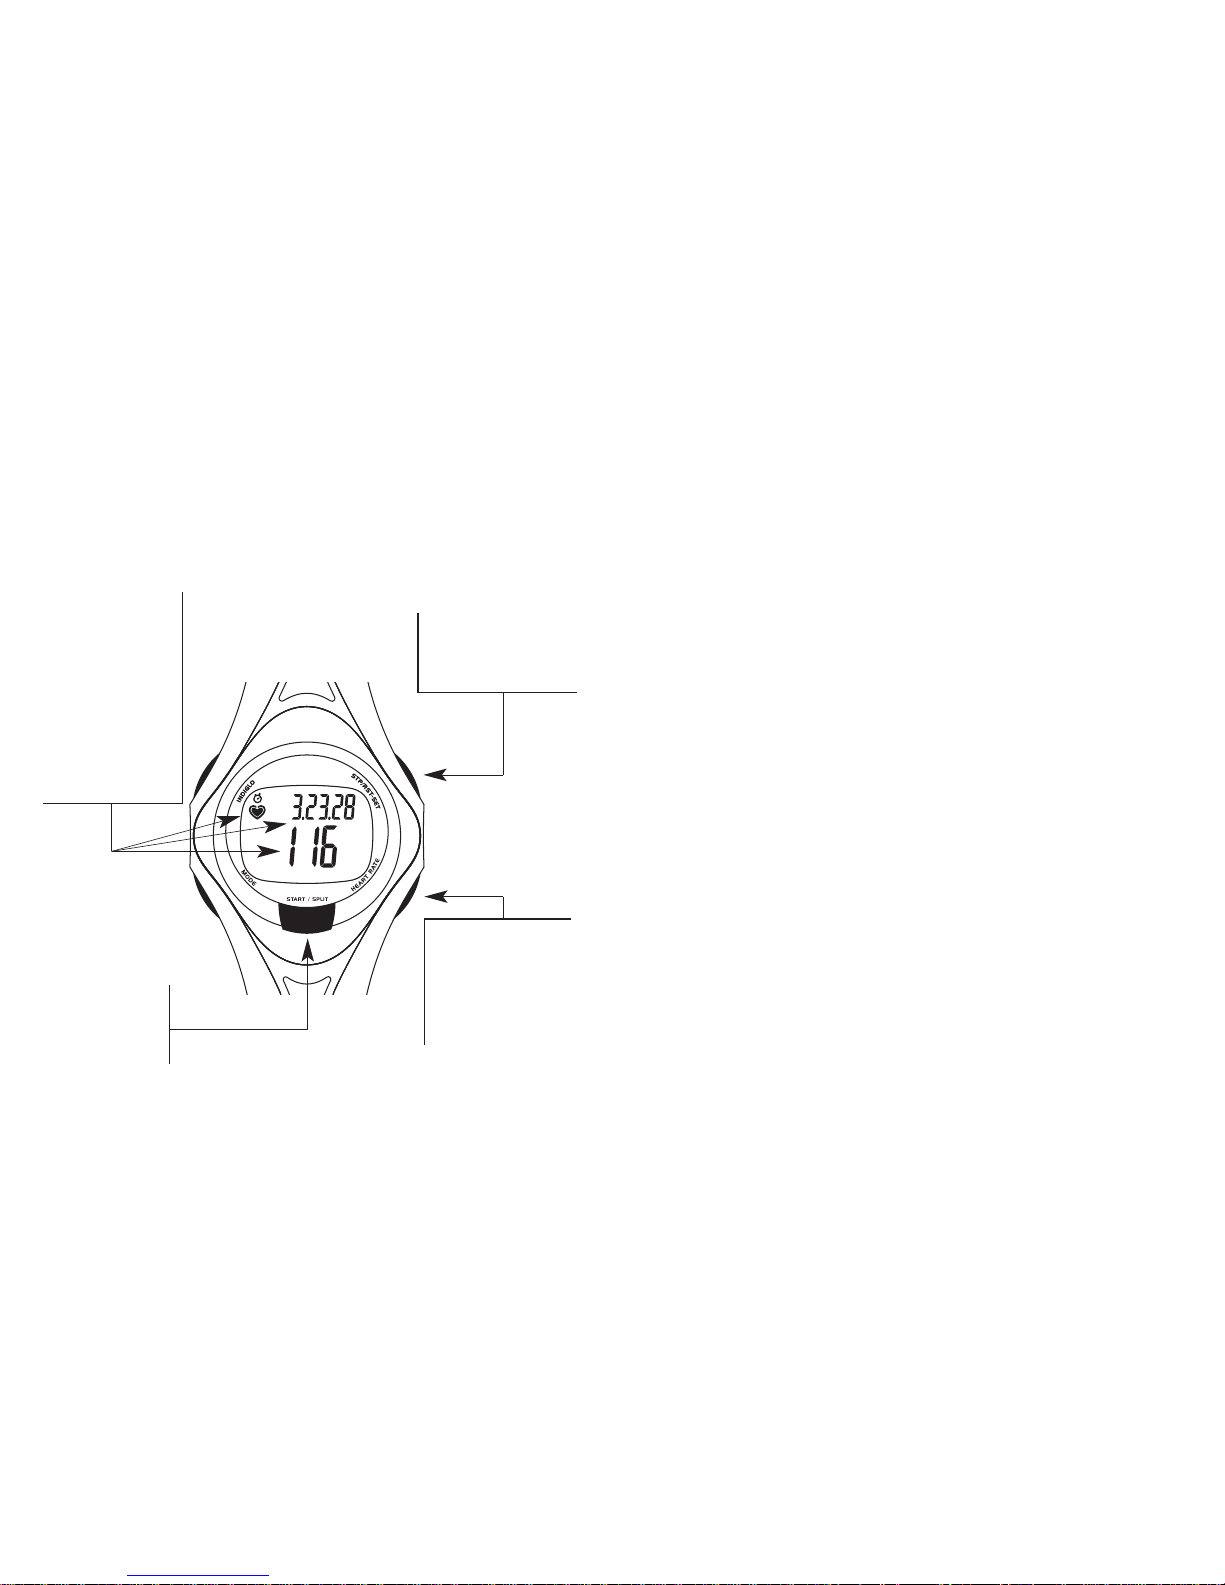
131
El reloj regresa entonces al Modo CHRONO (cronógrafo), que aún sigue
cronometrando la vuelta y el intervalo en curso. El reloj guarda los datos de las
últimas 30 vueltas.
4. Oprima STOP/RESET/SET para detener el cronometraje.
5. Oprima START/SPLIT para reanudar el cronometraje o mantenga oprimido
STOP/RESET/SET para regresar el cronómetro a cero. (No regrese a cero si
desea guardar los datos para revisarlos luego.)
Modo TIMER (temporizador) (sólo Modelo "30-Lap")
Con este modo se selecciona un tiempo desde el cual el reloj comienza una
cuenta regresiva a cero. Esta función se usa para eventos con tiempo fijo de
hasta 100 horas. Al finalizar la cuenta regresiva, el Temporizador puede
programarse para detenerse, repetir la cuenta regresiva o cambiar al Modo
CHRONO (cronógrafo) e iniciar éste.
Mientras esté funcionando el Temporizador, puede oprimir MODE para
cambiar a otro modo, como por ejemplo, TIME OF DAY (hora del día), sin por
ello alterar su funcionamiento. Cuando el Temporizador está funcionando,
aparece el icono de un reloj de arena.
Programación del Temporizador
1. Oprima MODE hasta que aparezca TIMER (temporizador).
2. Oprima STOP/RESET/SET (parar/reponer/programar) para programar el
Modo TIMER (temporizador). Comenzará a destellar el valor
correspondiente a las horas.
3. Oprima START/SPLIT (+) o HEART RATE(-) para cambiar los valores. Para
avanzar más rápidamente, mantenga oprimido el botón. Luego de
programar cada valor, oprima MODE (NEXT) para pasar a los siguientes
valores (MINUTOS y luego SEGUNDOS).
130
Figura 3.1 – Medición de tiempo de vueltas e intervalos con el Modelo
"30-Lap"
Botón STOP/RESET/SET –
En el Modo CHRONO
(cronógrafo), oprímalo para
parar o reponer el
cronógrafo.
Botón HEART RATE –
Activa o desactiva el
Monitor de pulso;
también se usa para
cambiar la posición de
los datos del monitor
cuando éste está
activado.
Botón START/SPLIT –
En Modo CHRONO
(cronógrafo), oprímalo
para iniciar el
cronógrafo.
Ejemplo de formato de
pantalla del Modo
CHRONO (cronógrafo)–
Se muestra el tiempo
actual de la vuelta (arriba)
y el pulso (abajo).
Cuando se mide el
tiempo, aparece el
símbolo de un
cronómetro; el icono del
corazón latiendo indica
que el Monitor de Pulso
está activado.
Page 68

133
Modo TIMING (Sólo Modelo "Fitness")
Este Modo tiene dos finalidades:
• Puede usarse como cronómetro o en cuenta regresiva, es decir, contando
desde o hacia cero, respectivamente. Pueden guardarse hasta 100 horas de
datos estadísticos.
• Cuando se usa con el medidor de pulsaciones para el pecho, puede
registrarse la información del pulso.
El Modo TIMING puede funcionar mientras se hace una cuenta progresiva o
regresiva. En el Modo TIME OF DAY, el icono de un cronómetro indica que el
Modo TIMING está funcionando actualmente en cuenta progresiva. El icono
del reloj de arena indica que el Modo Modo TIMING está en cuenta regresiva.
Uso del Contador de Tiempo en cuenta progresiva
1. Oprima MODE hasta que aparezca TIMING.
2. Oprima SET/RESET (programar/reponer) hasta que aparezca “00.00.00”. Si
por accidente ingresara el Modo Programación de Contador de Tiempo,
oprima SET/RESET (DONE) para salir de dicho modo.
3. Pulse START/STOP (+) para comenzar el cronometraje. El número
correspondiente a los SEGUNDOS empieza la cuenta progresiva.
Para pausar la operación, oprima START/STOP; vuelva a oprimir el botón para
reiniciar. Para regresar el cronómetro a cero, mantenga oprimido SET/RESET
mientras está detenido CONTADOR DE TIEMPO.
Uso del Contador de Tiempo en cuenta regresiva (funcionamiento como
contador regresivo)
Para hacer una cuenta regresiva, primero hay que establecer el tiempo desde
el cual empezar a contar.
4. Cuando llegue al tiempo de cuenta regresiva deseado, oprima otra vez
MODE (NEXT) para seleccionar una acción final luego de la cuenta
regresiva. Oprima START/SPLIT (+) o HEART RATE (-) para cambiar entre
STOP (parar), REPEAT (repetir) y CHRONO (cronógrafo).
5. Cuando termine, oprima STOP/RESET/SET (DONE) para guardar la acción
deseada.
Funcionamiento del Temporizador
1. Para iniciar una cuenta regresiva, oprima el botón START/SPLIT.
2. Oprima STOP/RESET/SET para detener la cuenta regresiva.
3. Con el Temporizador detenido, oprima START/SPLIT para reanudar la
cuenta regresiva u oprima STOP/RESET/SET para regresar el Temporizador
al tiempo inicial.
4. Cuando el Temporizador llegue a cero, sonará una alerta. La luz INDIGLO
®
para la noche también se enciende, para que pueda ver el reloj en la
oscuridad.
• Si el Temporizador se programó para detenerse, se detendrá luego
de la alerta.
• Si el Temporizador se programó para repetir, regresará a la hora incial e
inmediatamente comenzará con otra cuenta regresiva. Esto continuará
repitiéndose hasta que se oprima STOP/RESET/SET. La cuenta repetida
se muestra en la línea inferior de la pantalla. El reloj cuenta hasta 99
repeticiones, después de lo cual regresa a cero y continúa.
• Si el Temporizador se programó para iniciar el Modo CHRONO, el reloj
automáticamente cambiará e iniciará ese Modo. El Modo CHRONO
debe regresarse a cero para que el Temporizador pueda iniciarlo
automáticamente.
132
Page 69

135
Botón SET/RESET –
Mantenga oprimido para
comenzar a programar una
hora desde la cual hacer
una cuenta progresiva o
regresiva.
Uso del Timing con el Modelo "Fitness"
Botón HEART RATE –
Activa o desactiva el
Monitor de pulso; cambia la
posición de los datos del
monitor cuando éste está
activado.
Botón START/STOP – Oprima para iniciar o
parar la cuenta regresiva.
Ejemplo de formato de
pantalla del Modo
TIMING (contador del
tiempo) – La cuenta
regresiva (arriba) se
muestra con los iconos
de reloj de arena y pulso.
El pulso actual se
muestra en la parte
inferior.
1. Si no estuviera en el Modo TIMING, oprima MODE hasta que aparezca
TIMING.
2. Oprima SET/RESET hasta encontrar la pantalla para programar el Modo
TIMING. Comenzará a destellar el valor correspondiente a las HORAS.
3. Establezca el tiempo desde el cual se hará la cuenta regresiva. Oprima
START/STOP (+) o HEART RATE (-) para aumentar o disminuir cada valor.
Para avanzar más rápidamente, mantenga oprimido el botón. Cuando logre
los números deseados, oprima MODE (NEXT) para pasar a los siguientes
valores.
4. Cuando termine, oprima SET/RESET (DONE) para guardar el dato del
tiempo registrado.
5. Oprima START/STOP para comenzar el cronometraje. Comienza la cuenta
regresiva a cero.
Para pausar la cuenta regresiva, oprima START/STOP; vuelva a oprimir el botón
para reiniciarla. Para regresar la cuenta regresiva al valor inicial, oprima
SET/RESET mientras esté detenido TIMING (contador de tiempo). Oprima
SET/RESET otra vez para borrar el tiempo establecido y dejarlo en cero.
Uso del Modo TIMING (contador de tiempo) con el Monitor de Pulso
Cuando el Monitor está activo, el Modo TIMING registra tres datos
relacionados con el pulso:
• El tiempo que el pulso está dentro del rango seleccionado mientras se usa
el CONTADOR DE TIEMPO.
• El pulso promedio para el período en que la función monitor de pulso
estuvo activa y estaba usándose el CONTADOR DE TIEMPO.
• El pulso máximo para el período en que la función monitor de pulso
estuvo activa y estaba usándose el CONTADOR DE TIEMPO.
134
Page 70

137
Uso del Modo RECOVER (recuperación)
Botón STOP/RESET/SET –
(SET/RESET en el Modelo
"Fitness") - Oprímalo para
escoger el tiempo de
recuperación, que puede
ser de uno o dos minutos.
Botón HEART RATE – Al
inicio de la sesión de
ejercicios, oprímalo para
obtener la señal del
medidor del pulso.
En la línea inferior, 123
RE es su pulso actual
mientras el contador del
Modo RECOVER
(recuperación) está en
la cuenta regresiva.
Botón START/SPLIT – (START/STOP en el Modelo "Fitness") -
Oprímalo para iniciar el período de recuperación seleccionado.
Ejemplo de formato de
pantalla del Modo
RECOVER
(recuperación) – Línea
superior HR165 es su
pulso al comienzo del
período de recuperación.
136
Modo RECOVER (recuperación)
Este modo se usa con el Monitor de Pulso activo. Es una referencia de su estado físico,
para medir cuán rápidamente disminuyen sus pulsaciones desde un valor elevado
durante un período de uno o dos minutos. Cuando transcurre el tiempo preestablecido,
suena una alerta y se muestran los valores del pulso inicial y final.
Uso del Modo RECOVER (recuperación)
1. Oprima MODE hasta que aparezca RECOVER (recuperación).
2. Oprima STOP/RESET/SET (parar/reponer/programar) para alternar entre los tiempos
de recuperación. Puede elegir uno o dos minutos. (En el Modelo "Fitness",
oprimaSET/RESET (programar/reponer).
3. Oprima START/SPLIT (iniciar/intervalo) para comenzar la cuenta regresiva (En el
Modelo "Fitness", oprima START/STOP(iniciar/parar). Ahora en la pantalla se verán dos
pulsos: en la línea superior, el correspondiente al inicio del período de recuperación; en
la línea inferior, el pulso actual.
4. Cuando suene la alerta al finalizar el tiempo de recuperación, verá el pulso en la línea
inferior. Sustraiga este valor del valor de la línea superior; la diferencia es su pulso de
recuperación.
5. Oprima MODE para salir del Modo RECOVER (recuperación).
NOTA: El reloj debe estar recibiendo la señal del pulso para que
funcione el Modo RECOVER (recuperación).
Page 71

alarma en la pantalla. Al llegarse a la hora establecida, la alarma sonará, la luz
INDIGLO
®
para la noche se encenderá intermitentemente y la hora de la
alarma se mostrará durante veinte segundos. Para silenciar la alarma, oprima
cualquier botón. Si no silencia la alarma antes de que finalice la alerta, cinco
(5) minutos después sonará una alarma de respaldo.
Programación de la Alarma
1. Oprima MODE hasta que aparezca ALARM.
2. Oprima STOP/RESET/SET (parar/reponer/programar) para seleccionar la
hora en que sonará la alarma. (En el Modelo "Fitness", oprima
SET/RESET(programar/reponer). La hora que va a cambiarse estará
destellando. Si el reloj estuviera en el formato de 12 horas, también
destellará el dato AM/PM.
3. Oprima START/SPLIT (+) (iniciar/intervalo) o HEART RATE (-) (pulso) para
aumentar o disminuir las horas. (En el Modelo "Fitness", oprima START/STOP
(+) (iniciar/parar) o HEART RATE (-) (pulso). Oprima ahora MODE (NEXT)
(próximo) para pasar a los minutos.
4. Cuando termine, oprima STOP/RESET/SET (DONE)
(parar/reponer/programar (fin) para guardar los valores elegidos. (En el
Modelo "Fitness", oprima SET/RESET (DONE) (programar/reponer (fin).
Para ACTIVAR o DESACTIVAR la Alarma sin entrar en el modo programación,
oprima el botón START/SPLIT (iniciar/intervalo) mientras esté en el Modo
ALARM (alarma). (En el Modelo "Fitness", oprima START/STOP (iniciar/parar).
El cambio de cualquier alarma automáticamente ACTIVA la alarma.
139
138
Modo REVIEW (revisión)
Con este modo se revisan los datos de la sesión de ejercicios, como por
ejemplo, los tiempos de las vueltas. Cuando el medidor de pulso está activo y
también lo están las funciones CHRONO (cronógrafo) (Modelo "30-Lap") o
TIMING (contador de tiempo) (Modelo "Fitness"), podrá revisarse la siguiente
información:
• Dentro del rango - Tiempo en que el pulso estuvo dentro del rango
especificado.
• Pulso promedio
• Pulso máximo
• Pulso mínimo (solamente Modelo "30-Lap")
• Total de calorías quemadas - Calculado por el tiempo transcurrido,
los datos del pulso y el peso corporal.
• Tiempos del cronógrafo para vueltas e intervalos
(solamente Modelo "30-Lap")
• Pulso promedio por vuelta (solamente Modelo "30-Lap")
Revisión de la Información del Pulso
1. Oprima MODE hasta que aparezca REVIEW (revisión).
2. Oprima START/SPLIT (+) (iniciar/intervalo) para avanzar por los datos del
monitor (DENTRO DEL RANGO, PULSO PROMEDIO, PULSO MÁXIMO,
PULSO MÍNIMO, CALORÍAS TOTALES) y los datos guardados de vuelta del
cronógrafo. (En el Modelo "Fitness", oprima START/STOP (+) (iniciar/parar).
Oprima HEART RATE (-) (pulso) para ir hacia atrás por los datos del
Monitor.
Modo ALARM (alarma)
Con este modo se programa la alarma para que suene a una hora
preestablecida. Cuando la alarma esté ACTIVADA, aparecerá un icono de
Page 72

141
Ejemplos de uso
Su reloj Timex®puede convertirse en una parte muy importante de su rutina
de ejercicios diaria. Usado junto con el monitor de pulso, le permite archivar
datos de su entrenamiento (medición de tiempo, recolección, almacenamiento
y visualización). A continuación se citan posibles casos cotidianos que le
darán una idea de cómo aprovechar al máximo su reloj.
Ejemplo de uso 1 Uso del reloj para cronometrar vueltas en un
ejercicio físico simple
Su ejercicio habitual es correr en un circuito de media milla de longitud. Hoy
desea correr cinco millas, equivalente a diez vueltas en el circuito. Asimismo,
desea recordar llamar a su hija, que regresará de la escuela durante la sesión
de ejercicios suya, para decirle que tiene que poner la lasaña en el horno a
las 4:15.
En este ejemplo, deberá usar los siguientes modos:
■ Programación de la Alarma: Para acordarse de llamar a su hija, busque
el Modo ALARM (alarma) y prográmela para que suene a las 4:15 PM.
Cuando suene la alarma, oprima cualquier tecla para silenciarla, tome el
teléfono y llámela.
Modelo "30-Lap" Modelo "Fitness"
ALARMA
❘
ALARMA
CRONÓGRAFO
❘
CONTADOR DE TIEMPO
REVISIÓN
❘
REVISIÓN
Funciones Globales
Estas son funciones muy convenientes que no afectan directamente las
operaciones de los modos.
Regreso automático a Hora del Día
Si está en el modo ALARM (alarma), TIMER (temporizador), RECOVER
(recuperación) o HRM SETUP (programación de monitor) pero no hace nada
por dos o tres minutos, el reloj automáticamente abandona ese modo y
regresa al Modo TIME OF DAY (hora del día). Si cambió algo durante ese
tiempo, los cambios se procesarán como si los hubiera completado.
Funcione luz noctura INDIGLO
®
La luz noctura INDIGLO®ilumina la esfera del reloj para que pueda verlo en la
oscuridad. Para activar esta función, oprima el botón INDIGLO. Después de
oprimir el botón, la luz permanece encendida por tres (3) segundos (o por
seis (6) segundos si está cambiando los valores).
FUNCIONE NIGHT-MODE
®
(sólo Modelo “30-Lap”)
Para la función NIGHT-MODE
®
, cualquier botón que se oprima iluminará la
esfera por tres (3) segundos (o por seis (6) segundos si está cambiando los
valores), por lo cual no es necesario oprimir el botón INDIGLO cuando hay
poca iluminación ambiente. Para activar la función NIGHT-MODE
®
, mantenga
oprimido el botón INDIGLO por 3 segundos hasta que el reloj emita un pitido.
La función NIGHT-MODE
®
continuará activada por 7 a 8 horas, o puede
desactivarse manualmente si se mantiene nuevamente oprimido el botón
INDIGLO durante tres (3) segundos, hasta que el reloj emita un pitido.
140
Page 73

143
Ejemplo de uso 2 Uso del reloj para evaluar su estado físico y contar el
tiempo de la sesión de ejercicios en el club
Como le gusta la bicicleta estacionaria, va al club cuatro veces por semana y
realiza sesiones de 30 minutos. Usted desea monitorizar su pulso mientras
hace ejercicio para aprovechar al máximo la sesión y estar el mayor tiempo
posible en el rango de pulso deseado. Al finalizar la sesión, determina cuán
rápidamente se recupera el corazón durante el período de recuperacióne
estándar de un minuto.
En este ejemplo, deberá usar los siguientes modos:
Modelo "30-Lap" Modelo "Fitness"
PROGRAMACIÓN DE PROGRAMACIÓN DE
MONITOR DE PULSO
❘
MONITOR DE PULSO
CRONÓGRAFO
❘
CONTADOR DE TIEMPO
TEMPORIZADOR
❘
RECUPERACIÓN
❘
RECUPERACIÓN
REVISIÓN
❘
REVISIÓN
NOTA: En la página 138 hay más detalles respecto al Modo
REVIEW (revisión).
■ Contador de Tiempo para la sesión de ejercicios: Para medir el tiempo
de su sesión de ejercicios, use el Modo CHRONO o el Modo TIMING.
• Modelo "30-Lap": Pase al Modo CHRONO y verifique que el
cronógrafo esté nuevamente en cero (0). Oprima START/SPLIT
cuando comience a correr y cada vez que termine una vuelta. El reloj
almacenar los diez (10) tiempos de vuelta individuales. Cuando
termine la óltima vuelta, oprima STOP/RESET/SET.
• Modelo "Fitness": En el Modo TIMING, verifique que el reloj esté
programado para contar a partir de cero (0), como un cronómetro.
Oprima START/STOP cuando comience a correr y cuando finalice su
última vuelta.
• Revisión de los tiempos de cada vuelta: En su marcha triunfal de
regreso a casa, podrá revisar los datos de su sesión de ejercicios en el
Modo REVIEW. Si estuviera usando el medidor de pulso, verá las
estadísticas del pulso (ambos modelos), así como los tiempos de todas
las vueltas (sólo el Modelo "30-Lap").
NOTA: ¿No recuerda cómo configurar el Modo TIMING?
Refiérase a las pág. 133–135 para más información.
NOTA: Refiérase a las pág. 128–131, donde encontrará más
detalles acerca del uso del Cronógrafo.
NOTA: Refiérase a la pág. 139 para programar la alarma.
142
Page 74

145
• Modelo "Fitness": En el Modo TIMING (contador de tiempo),
verifique que el reloj esté programado para contar a partir de cero,
como un cronómetro. Oprima START/STOP (iniciar/parar) cuando
comience a pedalear.
■ Opción de Contador de Tiempo 2 - Cuenta regresiva: Use el Modo TIMER
(temporizador) (Modelo "30-Lap") o el Modo TIMING (contador de tiempo)
(Modelo "Fitness") para contar el tiempo de la sesión desde 30 minutos hasta
cero. La cuenta regresiva se usa para un régimen de entrenamiento
planificado (con plazos establecidos) e incluye una alerta al final de la cuenta
regresiva.
• Modelo "30-Lap": Pase al Modo TIMER (temporizador) y programe una
cuenta regresiva de 30 minutos. Oprima START/SPLIT (iniciar/parar)
cuando comience la sesión de ejercicios.
• Modelo "Fitness": En el Modo Modo TIMING (contador de tiempo),
verifique que el reloj esté programado para una cuenta regresiva a
partir de 30. Oprima START/STOP (iniciar/parar) cuando comience la
sesión de ejercicios.
NOTA: Refiérase a la pág. 131 respecto a cómo usar las
funciones del Modo TIMER (temporizador).
NOTA: ¿No recuerda cómo configurar el Modo Contador de
Tiempo? Refiérase a las pág. 133–135 para obtener más
información.
■ Conexión del medidor de pulso y selección de un rango de pulso: Vaya
al club con el reloj y el medidor de pulso puestos. Antes de iniciar su
sesión de bicicleta estacionaria, establezca la conexión inalámbrica entre su
reloj y el medidor de pulso.
• Para ambos modelos: Oprima HEART RATE (pulso). El icono del
contorno del corazón indica que el reloj está buscando la señal del
medidor de pulso. Cuando se recibe la señal, el contorno cambia a
un corazón que empieza a latir. El dato del pulso se muestra de
acuerdo a como se haya configurado el reloj. Pase ahora al Modo
HRM SETUP (programación del monitor) y seleccione el rango de
pulso deseado para esta sesión de ejercicios, opciones 1 a 5.
■ Opción de TIMING 1 - Cuenta progresiva: Use el Modo CHRONO
(cronógrafo) (Modelo "30-Lap") o el Modo TIMING (contador de tiempo)
(Modelo "Fitness") para contar el tiempo de la sesión (hasta 30 minutos).
La cuenta progresiva resulta ventajosa cuando desea la flexibilidad de
terminar la sesión en cualquier momento.
• Modelo "30-Lap": Pase al Modo CHRONO (cronógrafo) y oprima
START/SPLIT (iniciar/intervalo) cuando comience a pedalear.
NOTA: Refiérase a las pág. 128–131, donde encontrará más detalles
acerca del uso del Modo CHRONO (cronógrafo).
NOTA: Refiérase a las pág. 116–121 acerca de cómo programar
el rango de pulso en el Modo PROGRAMACIÓN del Monitor,
configuración de la pantalla para ver el pulso y el tiempo, y
activación de la alerta "fuera de rango".
144
Page 75

147
Ejemplo de uso 3 Uso del reloj en una carrera cuando cambia de zona
horaria
Usted viaja con su club de corredores desde Chicago a Washington DC para
participar en una carrera de 10 km. Su estrategia es permanecer dentro de su
rango de pulso durante la primera mitad de la carrera y correr más
rápidamente durante la segunda mitad. Desea terminar en unos 32 minutos,
lo cual significa que probablemente sobrepase su rango de pulso durante la
segunda mitad de la carrera si es que quiere alcanzar su objetivo.
En este ejemplo, deberá usar las siguientes funciones:
:
■ Adelanto de la hora: Ya acomodado en el avión, cambie el reloj para que
indique la hora de la Costa Este (EE.UU.).
• Modelo "30-Lap": Usted viaja con frecuencia a la Costa Este por
negocios, así que ya programó la zona horaria secundaria
correspondiente. En el Modo TIME OF DAY (hora del día) mantenga
oprimido START/SPLIT (iniciar/intervalo) durante cuatro segundos
Modelo "30-Lap" Modelo "Fitness"
ZONAS HORARIAS
❘
HORA DEL DÍA
SECUNDARIAS
MEDIDOR DE PULSO
❘
MEDIDOR DE PULSO
TEMPORIZADOR
❘
CONTADOR DE TIEMPO
CRONÓGRAFO
❘
REVISIÓN
❘
REVISIÓN
■ Cuando termine su sesión de ejercicios:
• Modelo "30-Lap": Oprima cualquier botón para silenciar la alerta de
cuenta regresiva en el Modo TIMER (temporizador).
• Modelo "Fitness": Oprima cualquier botón para silenciar la alerta de
cuenta regresiva en el Modo TIMING (contador de tiempo).
■ Análisis de su estado físico: El Modo RECOVER (recuperación) es una
herramienta que le permite medir el descenso del pulso durante un período
fijo de uno o dos minutos. Inmediatamente tras finalizar su sesión de
ejercicios, pase a RECOVER (recuperación) y oprima START/SPLIT
(iniciar/intervalo) (Modelo "30-Lap") o START/STOP (iniciar/parar) (Modelo
"Fitness") para iniciar el período de recuperación. Cuando suene la alerta al
finalizar el minuto de recuperación, tome nota de su pulso.
■ Revisión de los tiempos de cada vuelta: En su marcha triunfal de
regreso al vestuario, podrá revisar los datos de su sesión de ejercicios en
el Modo REVIEW (revisión). Verá las estadísticas del pulso, así como los
tiempos de las vueltas si es que estaba contanto los tiempos de múltiples
vueltas (sólo Modelo "30-Lap").
NOTA: En la página 138 hay más detalles respecto al Modo
REVIEW (revisión).
NOTA: En la sección 3 hay más información sobre los Modos
CONTADOR DE TIEMPO, TEMPORIZADOR y CRONÓGRAFO.
146
Page 76

149
■ Está por empezar la carrera. Usted decide programar una alerta para
avisarle que corra más rápido a partir de la segunda mitad de la carrera
para lograr su objetivo de correr en 32 minutos los 10 km.
• Modelo "30-Lap": Pase al Modo TIMER y prográmelo para 16
minutos y CHRONO AL FINAL. Cuando comience la carrera oprima
START/SPLIT para comenzar la cuenta regresiva.
• Modelo "Fitness": Pase al modo TIMING y prográmelo para una
cuenta regresiva de 16 minutos. Programe el modo TIMING para
una cuenta regresiva. Cuando comience la carrera, oprima
START/STOP(+) para medir el tiempo. En la pantalla verá que la
cuenta regresiva comienza a partir de 16 minutos en el formato que
usted haya configurado para la información de pulso y tiempo
transcurrido.
NOTA: El Modo CONTADOR DE TIEMPO presenta varias opciones.
Refiérase a las págs. 133–135 respecto a cómo reponer el Modo
CONTADOR DE TIEMPO, escoger entre cuenta progresiva y
regresiva, y cómo programar la pantalla de modo que refleje sus
preferencias.
NOTA: Refiérase a la pág. 131 respecto a cómo programar el
Temporizador y cambiar la acción automáticamente iniciada
luego de terminada la cuenta regresiva.
NOTA: Para programar un rango de pulso refiérase al Modo
PROGRAMACIÓN DE MONITOR DE PULSO en la pág. 114. En
esta sección se explica cómo configurar la pantalla para ver la
información de pulso y tiempo.
para cambiar de la zona primaria a la secundaria. Su reloj quedar·
programado para la zona secundaria mientras dure su viaje y lo
regresar· a la hora primaria cuando vuelva a casa.
• Modelo "Fitness": En el Modo TIME OF DAY (hora del día), adelante
la hora del reloj del horario de Chicago (Zona Central) a la hora de la
Zone Este (EE.UU.).
■ Conexión con el Medidor de Pulso: Luego de una buena noche de
descanso, llega al sitio de la carrera con su reloj y su medidor de pulso.
Antes de la carrera, establezca la conexión inalámbrica entre su reloj y el
medidor de pulso.
• Para ambos modelos: Oprima HEART RATE (pulso). El icono del
contorno del corazón indica que el reloj está buscando la señal del
medidor de pulso. Cuando se recibe la señal, el contorno cambia a un
corazón que empieza a latir. Los datos del pulso se muestran en la
línea inferior.
NOTA: Refiérase a la pág. 126-127 respecto a cómo programar
la hora del día.
NOTA: Refiérase a la pág. 127 respecto a cómo programar el tiempo
en la zona horaria secundaria.
148
Page 77

151
Mantenimiento y Garantía del Reloj
Mantenimiento
Enjuague el transmisor del Medidor de pulso y la tira con agua dulce, para
evitar que se acumulen materiales que pueden interferir con la medición del
pulso. No es necesario que enjuague el reloj.
Reemplazo de la Pila
Para que el reloj no se dañe en forma permanente, TIMEX RECOMIENDA
LLEVAR EL RELOJ A UN DISTRIBUIDOR O UN JOYERO PARA QUE CAMBIE
LA PILA.
Vida útil de la pila del transmisor del medidor de pulso y su reemplazo
Basándose en un uso de una hora diaria, la vida útil de la pila del transmisor
debería ser superior a los dos años. Un uso mayor acortará la vida útil de la
pila. Reemplace la pila si sucediera algo de lo siguiente:
• El reloj ya no recibe información de pulso del transmisor del pecho a
pesar de que éste esté bien colocado en el pecho.
• Mensajes de error empiezan a aparecer cada vez con mayor frecuencia
en el reloj .
Invierta el reloj y, con una moneda, abra el compartimiento de la pila.
Reemplace la pila; cuando instale la nueva pila, verifique que el signo “+” esté
hacia arriba. Oprima el botón "reset" (reponer) que está próximo a la pila
(hágalo con un palillo de dientes) antes de cerrar el compartimiento.
■ Al llegar al punto medio de la carrera: Hasta ahora corrió a un paso
cómodo dentro del rango de pulso deseado y el contador llegó a cero.
• Modelo "30-Lap": El Modo TIMER (temporizador) inicia
automáticamente el Modo CHRONO (cronógrafo) que fue el modo
seleccionado en el paso previo para seguir la cuenta regresiva en el
Modo TIMER. Ahora aparecerá la información en el formato que
usted haya configurado para CHRONO (cronógrafo) y HEART RATE
(pulso). Usted corre más rápidamente durante la segunda mitad.
Cuando cruce la línea de llegada, oprima STOP/RESET/SET (DONE)
(parar/reponer/programar (fin) para detener la medición del tiempo.
• Modelo "Fitness": Oprima cualquier botón para desactivar la alerta
del TEMPORIZADOR y correr más rápidamente cuando hayan
transcurrido 16 minutos de la carrera. Cuando cruce la línea de
llegada, oprima START/STOP (iniciar/parar) para detener la medición
del tiempo.
■ Revisión de los datos de Pulso y el Tiempo de la Carrera: Luego puede
revisar los datos acumulados durante la carrera.
• Para revisar los datos de pulso y tiempo de carrera, vaya a REVIEW
(revisión). Para avanzar por los datos de pulso y de la carrera, oprima
START/SPLIT (+) (iniciar/intervalo) o START/STOP (+) (iniciar/parar), o
bien oprima HEART RATE(-) (pulso) para retroceder.
NOTA: El Modo CHRONO (cronógrafo) debe regresarse a cero
para que el modo TIMER (temporizador) pueda iniciarlo
automáticamente.
150
Page 78

153
GARANTÍA DE TIMEX INTERNATIONAL (GARANTÍA LIMITADA EE.UU.)
Timex Corporation garantiza su reloj TIMEX® contra defectos de fabricación
por un período de UN AÑO a partir de la fecha de compra original. Timex y
sus sucursales en todo el mundo respaldan esta Garantía Internacional.
Cabe aclarar que Timex tiene la libertad de optar por reparar el reloj con
componentes nuevos o reacondicionados e inspeccionados, y también podría
optar por reemplazarlo por un modelo idéntico o similar.
IMPORTANTE: ESTA GARANTÍA NO CUBRE DEFECTOS O DAÑOS A SU
PRODUCTO:
1) después de que vence el plazo de la garantía;
2) si el producto inicialmente no se compró a un distribuidor autorizado;
3) si las reparaciones efectuadas no las hizo el fabricante;
4) si son consecuencia de accidentes, manipulación no autorizada o
abuso; y
5) si son en la caja, los accesorios o la pila. Timex podría cobrarle por el
reemplazo de cualquiera de estas piezas.
ESTA GARANTÍA SE OFRECE EN FORMA EXCLUSIVA Y EN LUGAR DE
CUALQUIER OTRA GARANTÍA, SEA EXPRESA O IMPLÍCITA, INCLUSIVE TODA
GARANTÍA IMPLÍCITA PARA FINES COMERCIALES O DE ADECUACIÓN A
FINES PARTICULARES. TIMEX NO ASUME NINGUNA RESPONSABILIDAD
POR PERJUICIOS DIRECTOS, INDIRECTOS NI ESPECIALES.
Luego de cambiar la pila, haga una prueba rápida del reloj:
1. Aléjese de las fuentes de interferencia eléctrica o radial.
2. Moje completamente las almohadillas del medidor de pulso y
colóquese esta unidad en el pecho, bien ajustada sobre la piel.
3. Oprima el botón MODE hasta llegar al Modo TIME OF DAY
(hora del día).
4. Oprima el botón HEART RATE (pulso) para activar el Monitor de pulso.
5. En unos pocos segundos empezará a destellar el símbolo de un
corazón en el reloj, indicando que el transmisor del pecho está
activado. Esto indica que la pila se instaló correctamente. NOTA:
Durante la prueba no es necesario que aparezca el valor del pulso en la
pantalla.
SI NO VIERA UN CORAZÓN DESTELLANDO, pruebe lo siguiente:
Vuelva a oprimir el interruptor "reponer" del compartimiento de la pila y
coloque la tapa.
Vuelva a instalar la pila y oprima reponer, tal como se indicó antes.
152
Page 79

155
En EE.UU. puede llamar al número 1-800-448-4639 para obtener información
adicional sobre la garantía.
En Canadá, llame al 1-800-263-0981.
En Brasil, llame al 0800-168787.
En México, llame al 01-800-01-060-00.
En América Central, el Caribe, Bermudas y las Bahamas,
llame al (501) 370-5775 (EE.UU.).
En Asia, llame al 852-2815-0091.
En el Reino Unido, llame al 44 208 687 9620.
En Portugal, llame al 351 212 946 017.
En Francia, llame al 33 3 81 63 42 00.
En Alemania, llame al +43 662 88 92130.
Para Medio Oriente y África, llame al 971-4-310850.
En otras áreas, comuníquese con el minorista local de Timex o con un
distribuidor de Timex respecto a información de la garantía.
ESTE ES SU CUPÓN PARA REPARAR EL RELOJ. GUÁRDELO EN UN SITIO SEGURO.
GARANTÍA INTERNACIONAL DE TIMEX — CUPÓN DE REPARACIÓN
Fecha de compra:
(Si la tiene, adjunte la factura de compra)
Comprado por:
(Nombre, dirección y teléfono)
Sitio de compra:
(Nombre y dirección)
Razón de devolución:
En ciertos países y estados no se permiten limitaciones de las garantías
implícitas ni exclusiones o limitaciones de perjuicios, por lo cual las
limitaciones mencionadas anteriormente podrían no aplicarse en su caso
particular. Esta garantía le otorga derechos establecidos por ley, pero usted
también podría tener otros derechos que difieren de un país a otro, o de un
estado a otro.
Para solicitar los servicios incluidos en la garantía, devolver el reloj al
fabricante, a una de sus sucursales o al comercio minorista adonde se
compró el producto, adjuntando el Cupón de Reparación que originalmente
viene con el producto. En EE.UU y Canadá se puede adjuntar el Cupón de
Reparación o una nota en la que figure su nombre, domicilio, número de
teléfono y fecha y lugar de compra. Para cubrir el costo de envío, adjuntar el
siguiente importe (este importe no es para el pago de la reparación): en
EE.UU., un cheque o giro postal ("money order") por US$7.50; en Canadá, un
cheque o giro postal por CAN$6.00; en el Reino Unido, un cheque o giro
postal por UK£ 2.50. En otros países se le cobrará por gastos de
manipulación y envío. JAMÁS INCLUYA NINGÚN ARTÍCULO DE VALOR
PERSONAL EN SU ENVÍO
154
Page 80

157
Aviso de FCC (EE.UU.) / Aviso de IC (Canadá)
Timex Corporation declara que los siguientes productos, con todos los
componentes del sistema Bodylink™ de Timex®, cumplen con las reglas
correspondientes de FCC Sección 15 y las reglas canadienses para la industria
para dispositivos Clase B de acuerdo con el siguiente detalle:
Nombre del Producto:
Medidor de Velocidad + Distancia - Transceptor GPS Serie M8xx/M5xx
Monitor de Pulso – Transmisor de Monitor de Pulso Serie M8xx/M5xx
Tipo de Producto: Radiador intencional
Modelo Núm. ID FCC Núm. Certificación IC
Monitor de Pulso M515 EP9TMXM515 3348A-M515
Monitor Velocidad+Distancia M850 EP9TMXM850 3348A-12181
Estos dispositivos cumplen con la Sección 15 de las Reglas de FCC. El
funcionamiento está sujeto a las siguientes dos condiciones: (1) no
provocarán interferencias nocivas y (2) aceptarán todas las interferencias que
reciban, incluso interferencias que podrían provocar un funcionamiento no
deseado.
Servicio
Si el reloj tuviera que ser reparado, envíelo a Timex según lo indicado en la
Garantía Internacional de Timex o bien envíelo a:
HotLine Watch Service
P.O. Box 2740
Little Rock, AR 72203.
Dirección:
HotLine Watch Service
1302 Pike Ave. North
Little Rock, AR 72114
Para facilitarle los trámites del servicio de reparación, los distribuidores de
Timex pueden enviarle un sobre con la dirección impresa que usted necesita.
En la Garantía Internacional de Timex encontrará instrucciones específicas
respecto a los cuidados y servicios que necesita el reloj.
Si tiene consultas sobre el servicio, llame al 1-800-448-4639.
Si necesita un brazalete o una tira de reemplazo,
llame al 1-800-448-4639.
156
Page 81

Nombre del Producto:
Receptores de reloj – Monitor de pulso/Velocidad + Distancia Serie
M8xx/M5xx
Registradores de datos – Monitor de pulso/Velocidad + Distancia Serie M5xx
Tipo de Producto: Radiador no intencional
Luego de probar este equipo se ha determinado que cumple con los límites
establecidos para los dispositivos digitales Clase B, de acuerdo con la Sección
15 del reglamento de FCC. Estos límites se han fijado para proporcionar un
grado de protección razonable contra interferencias nocivas en áreas
residenciales. Este equipo genera, usa y emite energía de radiofrecuencia y, si
no se usa según lo indicado en el manual de instrucciones, podrá causar
interferencias en las comunicaciones de radio. Si este equipo causa
interferencias en la recepción de señales de radio o televisión (determinado al
encender y apagar el equipo), se recomienda al usuario que para evitar la
interferencia oriente la antena receptora en otra dirección o la cambie de
lugar. También puede aumentar la distancia entre el equipo y el receptor.
Precaución: Cualquier cambio o modificación que no esté expresamente
aprobada por Timex Corporation podría anular la autoridad que tiene el
usuario de operar este reloj.
Aviso de la industria canadiense: Este aparato digital Clase B cumple con la
norma canadiense ICES-003. Cet appareil numérique de la classe B est
conforme à la norme NMB-003 du Canada.
158
Bodylink es una marca comercial de Timex Group, B.V.
TIMEX y NIGHT-MODE son marcas comerciales registradas de Timex
Corporation en EE.UU. y otros países.
INDIGLO es una marca registrada de Indiglo Corporation en los EE.UU. y
otros países.
©2004 Timex Corporation.
159
Page 82

Page 83

1
55
109
163
TIMEX is a registered trademark of Timex Corporation. ©2004 Timex Corporation.
W-177-EU 584-095002
Page 84

1
O MONITOR DE RITMO CARDÍACO DIGITAL
DA TIMEX
®
MODELOS 30-LAP/FITNESS
UM RELÓGIO DESPORTIVO DIGITAL AVANÇADO
Mais
UM SISTEMA DE MONITORIZAÇÃO DO RITMO CARDÍACO
COMPLETAMENTE DIGITAL
O Monitor de Ritmo Cardíaco Digital da Timex
®
incorpora a última tecnologia
digital da Timex com metodologias de boa forma física utilizadas pelos
especialistas de manutenção da forma física e treinadores pessoais. Como líder
mundial em dispositivos de contagem de tempo em eventos desportivos, a
Timex criou um sistema digital de manutenção da forma física que combina a
precisão digital exigida pelos atletas de classe mundial com funções que podem
ser utilizadas por pessoas de todas as idades para se manterem “em forma”.
Nota: Este manual poderá descrever características ou funções que não se
encontram disponíveis em todos os modelos.
Recursos na Internet
O web site da Timex (www
.timex.com) constitui uma excelente fonte de
informação para o ajudar a tirar os maiores benefícios da sua compra do
Monitor Digital do Ritmo Cardíaco da Timex
®
. Os recursos que pode
procurar no site da Timex incluem:
www
.timex.com/hrm/
Fara obter mais informações sobre os Monitores Digitais do Ritmo Cardíaco da Timex, incluindo listagens das funções dos produtos e simulações.
www
.timex.com/fitness/
Para conselhos sobre manutenção da forma física e treinos utilizando os
Monitores Digitais do Ritmo Cardíaco da Timex.
Nota: Consulte sempre o seu médico antes de iniciar ou de modificar um
programa de exercícios.
Page 85

3
Perspectiva Geral
Informações no Mostrador
LINHA SUPERIOR - Linha
do terço superior do
mostrador, utilizada para
apresentar informações tais
como os tempos das
voltas, o dia e data,
informações do Monitor do
Ritmo Cardíaco e
indicadores.
Nalguns dos modos a
informação apresentada
nestas duas linhas pode ser
trocada se for essa a sua
preferência.
LINHA INFERIOR - Linha
dos dois terços inferiores
do mostrador, utilizada para
apresentar informações tais
como a hora do dia, os
tempos das voltas ou
tempos repartidos,
informações do Monitor do
Ritmo Cardíaco
e indicadores.
INDICADORES - Aparecem
à volta do mostrador para
indicar o modo actual ou
uma actividade que ocorre
em segundo plano. Por
exemplo, o indicador
cronómetro indica que a
função Cronógrafo ou
Cronómetro se encontra
activa a contar o tempo das
voltas.
Organização deste Manual
Este manual está dividido em quatro secções principais:
• Perspectiva Geral —
Descrições gerais dos botões, funções e mostrador.
• Utilização do Monitor do Ritmo Cardíaco —
Descreve a maneira de combinar o seu relógio com um Monitor do Ritmo
Cardíaco (HRM) para obter, medir e examinar as informações sobre o
ritmo cardíaco.
• Modos e Funções —
Explicações simples e passo a passo sobre a utilização dos modos e
funções do relógio.
• Exemplos de Utilização —
Cenários reais que lhe mostram como fazer do seu relógio Timex
®
uma
parte integrante das suas actividades de exercícios físicos.
2
Page 86

5
SET/RESET - Restabelece a
função de contagem do
tempo; segure para iniciar a
programação.
O Modelo Fitness (Forma Física)
Botão HEART RATE – Liga
e desliga o Monitor do
Ritmo Cardíaco; também
serve para alterar a posição
dos dados do Monitor
quando este está ligado.
Botão START/STOP– Inicia ou pára a função de contagem do
tempo.
Botão INDIGLO®– Ilumina
o mostrador do relógio.
Botão MODE – Carregue e
liberte para passar ao
modo seguinte.
4
O Modelo 30-Lap (30 Voltas)
Botão STOP/RESET/SET –
Pára ou restabelece o
Cronógrafo ou o
Temporizador; segure para
proceder à programação.
Botão INDIGLO®– Ilumina
o mostrador do relógio.
Botão HEART RATE –
Liga e desliga o Monitor
do Ritmo Cardíaco;
também serve para
alterar o formato dos
dados do Monitor
quando este está ligado.
Botão MODE – Carregue e
liberte para passar ao
modo seguinte.
Botão START/SPLIT – Inicia o Cronógrafo ou o
Temporizador; no modo Time of Day (Hora do Dia)
permite espreitar as horas do segundo Fuso Horário.
Page 87

7
Utilização do Monitor do Ritmo Cardíaco
Combinado com um sensor de ritmo cardíaco, o seu relógio desportivo
torna-se parte integrante de um sistema global de manutenção da forma
física. O sensor do ritmo cardíaco regista o seu ritmo cardíaco e transmite os
dados para o relógio. Basta olhar para o relógio durante os exercícios/treino
para se certificar de que se encontra na zona de ritmo cardíaco desejada para
manter ou melhorar o seu nível de forma física (sobre as zonas alvo de ritmo
cardíaco consulte qualquer manual de manutenção da forma física). Se
estiver programado, um alerta de "fora da zona" soa automaticamente assim
que o ritmo cardíaco sair da zona seleccionada.
Esta secção explica como:
• Programar o relógio para trabalhar com um sensor do ritmo cardíaco
• Programar o relógio para efectuar o acompanhamento do ritmo
cardíaco relativamente a uma zona de ritmo cardíaco seleccionada
• Registar e examinar as informações sobre o ritmo cardíaco
Programação do Relógio para Trabalhar com um Sensor do Ritmo
Cardíaco
1. Coloque o sensor do ritmo cardíaco no peito. Para ver as instruções
detalhadas da maneira como o sensor do ritmo cardíaco deve ser
colocado, consulte o Guia do Utilizador do Sensor de Fitness que foi
fornecido com o mesmo. As instruções apresentadas nesta secção
assumem que o sensor do ritmo cardíaco foi colocado seguindo as
recomendações.
2. Inicie o sistema do Monitor de Ritmo Cardíaco. Nos modos TIME OF
DAY, TIMING, CHRONO ou TIMER, carregue em HEART RATE.
Enquanto o relógio procura os sinais do sensor do ritmo cardíaco aparece
um indicador com a forma do contorno de um coração. Quando o relógio
começa a receber os sinais, o contorno do coração transforma-se num
coração sólido a palpitar.
6
Indicadores do Mostrador
O seu relógio pode fornecer muitas informações obtidas num relance e
ocupam apenas uma pequena área do seu pulso. Apresentam-se a seguir
os indicadores (os pequenos símbolos gráficos) que aparecem no
mostrador:
O Alarme está armado.
O Temporizador está a funcionar (Modelo 30-Lap) ou o Modo
TIMING (Contagem de Tempo) está a contar o tempo de
forma decrescente até zero (Modelo Fitness).
O Cronógrafo está a funcionar (Modelo 30-Lap) ou o Modo
TIMING (Contagem de Tempo) está a contar o tempo de
forma crescente a partir do zero (Modelo Fitness).
O sinal horário está activado.
Procura de dados do Monitor do Ritmo Cardíaco provenientes
do sensor do peito.
Estão a ser recebidos dados do Monitor do Ritmo Cardíaco
provenientes de um sensor do ritmo cardíaco.
Page 88

9
Figura 2.1 – Formatos de Apresentação do Monitor do Ritmo Cardíaco
Dados do Ritmo Cardíaco Sobre o Tempo
Apenas Ritmo Cardíaco
Tempo Sobre os Dados do Ritmo
Cardíaco
Sem Informações Sobre o Ritmo Cardíaco
Conselho útil: Carregue em HEART RATE para percorrer os
formatos de apresentação quando o monitor do ritmo
cardíaco estiver activo.
8
Para assegurar a recepção de sinais claros, afaste-se para pelo menos 1,80
metros de distância de outras pessoas que também estejam a utilizar um
sensor.
Quando passar a um dos modos TIMING, CHRONO ou TIMER, o relógio
procura automaticamente um sinal do transmissor durante cerca de 15
segundos. Se não for encontrado nenhum sinal, o relógio pára de procurar
sinais até o botão HEART RATE ser novamente premido.
3. Leia o seu ritmo cardíaco. Quando o relógio estabelece contacto com
o transmissor, o seu ritmo cardíaco (medido em número de pulsações
por minuto) é apresentado. Para desligar o monitor, carregue e segure
HEART RATE.
Visualização da Informação do Ritmo Cardíaco e dos Tempos
O mostrador do Monitor do Ritmo Cardíaco pode ser formatado de quatro
maneiras diferentes. Utilize o botão HEART RATE para percorrer as várias
opções. Por exemplo, quando o Monitor é utilizado nos modos CHRONO
ou TIMER, o ritmo cardíaco será apresentado na linha superior e a
contagem do tempo do CHRONO ou TIMER na linha inferior. Carregue no
botão HEART RATE para trocar a linha onde esses valores são
apresentados. Poderá também optar por apresentar apenas a informação
relativa ao ritmo cardíaco ou não apresentar a informação do ritmo
cardíaco. (Ver Figura 2.1 a seguir ao parágrafo abaixo).
Modo HRM Setup (Configuração do Monitor do Ritmo
Cardíaco)
Este modo permite definir uma zona de ritmo cardíaco para os exercícios.
Uma zona alvo consiste num limite superior e num limite inferior do ritmo
cardíaco. Pode seleccionar uma das zonas predefinidas ou definir
manualmente os valores para personalizar as zonas pretendidas. Quando o
ritmo cardíaco desce abaixo do limite inferior ou sobe acima do limite
superior da zona, soa um alarme opcional. Se bem que possa utilizar o
Page 89

11
Botão START/SPLIT–
(START/STOPpara o
Modelo Fitness) -
Carregue no botão
para alternar o
indicador ON/OFF, que
indica se o alerta de
fora da zona está
activado/desactivado.
Figura 2.2 – Valores Predefinidos para o Modo HRM Setup
Botão STOP/RESET/SET –
(SET/RESET para o Modelo
Fitness) - Carregue no botão
para entrar no estado de
configuração do Modo HRM
Setup.
Botão HEART RATE –
Carregue no botão para
seleccionar uma zona
alvo do ritmo cardíaco.
Neste exemplo a zona
alvo do ritmo cardíaco é
a Zona 3. A zona
seleccionada baseia-se
no valor do Ritmo
Cardíaco Máximo (MHR)
de 165; a definição de
um ritmo máximo
diferente altera o
intervalo da zona.
10
Monitor do Ritmo Cardíaco sem ter seleccionado uma zona alvo,
recomenda-se vivamente que configure primeiro esta função. Ajuda-o a
manter-se dentro da zona seleccionada e maximiza a eficiência do
programa de manutenção da forma física.
Zonas Alvo para a Manutenção da Forma Física
Os limites superior e inferior do ritmo cardíaco para as zonas alvo de
manutenção da forma física baseiam-se no valor Maximum Heart Rate
(MHR - Ritmo Cardíaco Máximo). A Tabela 2.1 ilustra a fórmula utilizada
pelo relógio para calcular os limites superior e inferior do ritmo cardíaco
para cada zona.
Tabela 2.1: Zonas de Manutenção da Forma Física
É importante definir um valor do Ritmo Cardíaco Máximo porque as cinco
zonas alvo automáticas baseiam-se nesse valor. Pode determinar o seu
ritmo através de um teste controlado ou através de um dos muitos métodos
de estimativa existentes. Um método muito utilizado consiste em subtrair a
sua idade do número 220. Note, contudo, que métodos como este poderão
produzir resultados inexactos porque o ritmo cardíaco máximo depende de
factores fisiológicos além da idade, tais como o nível da forma física e a
constituição genética.
ZONA Limite Inferior Limite Superior
5
❘
90% MHR
❘
100% MHR
4
❘
80%
❘
90%
3
❘
70%
❘
80%
2
❘
60%
❘
70%
1
❘
50%
❘
60%
Page 90
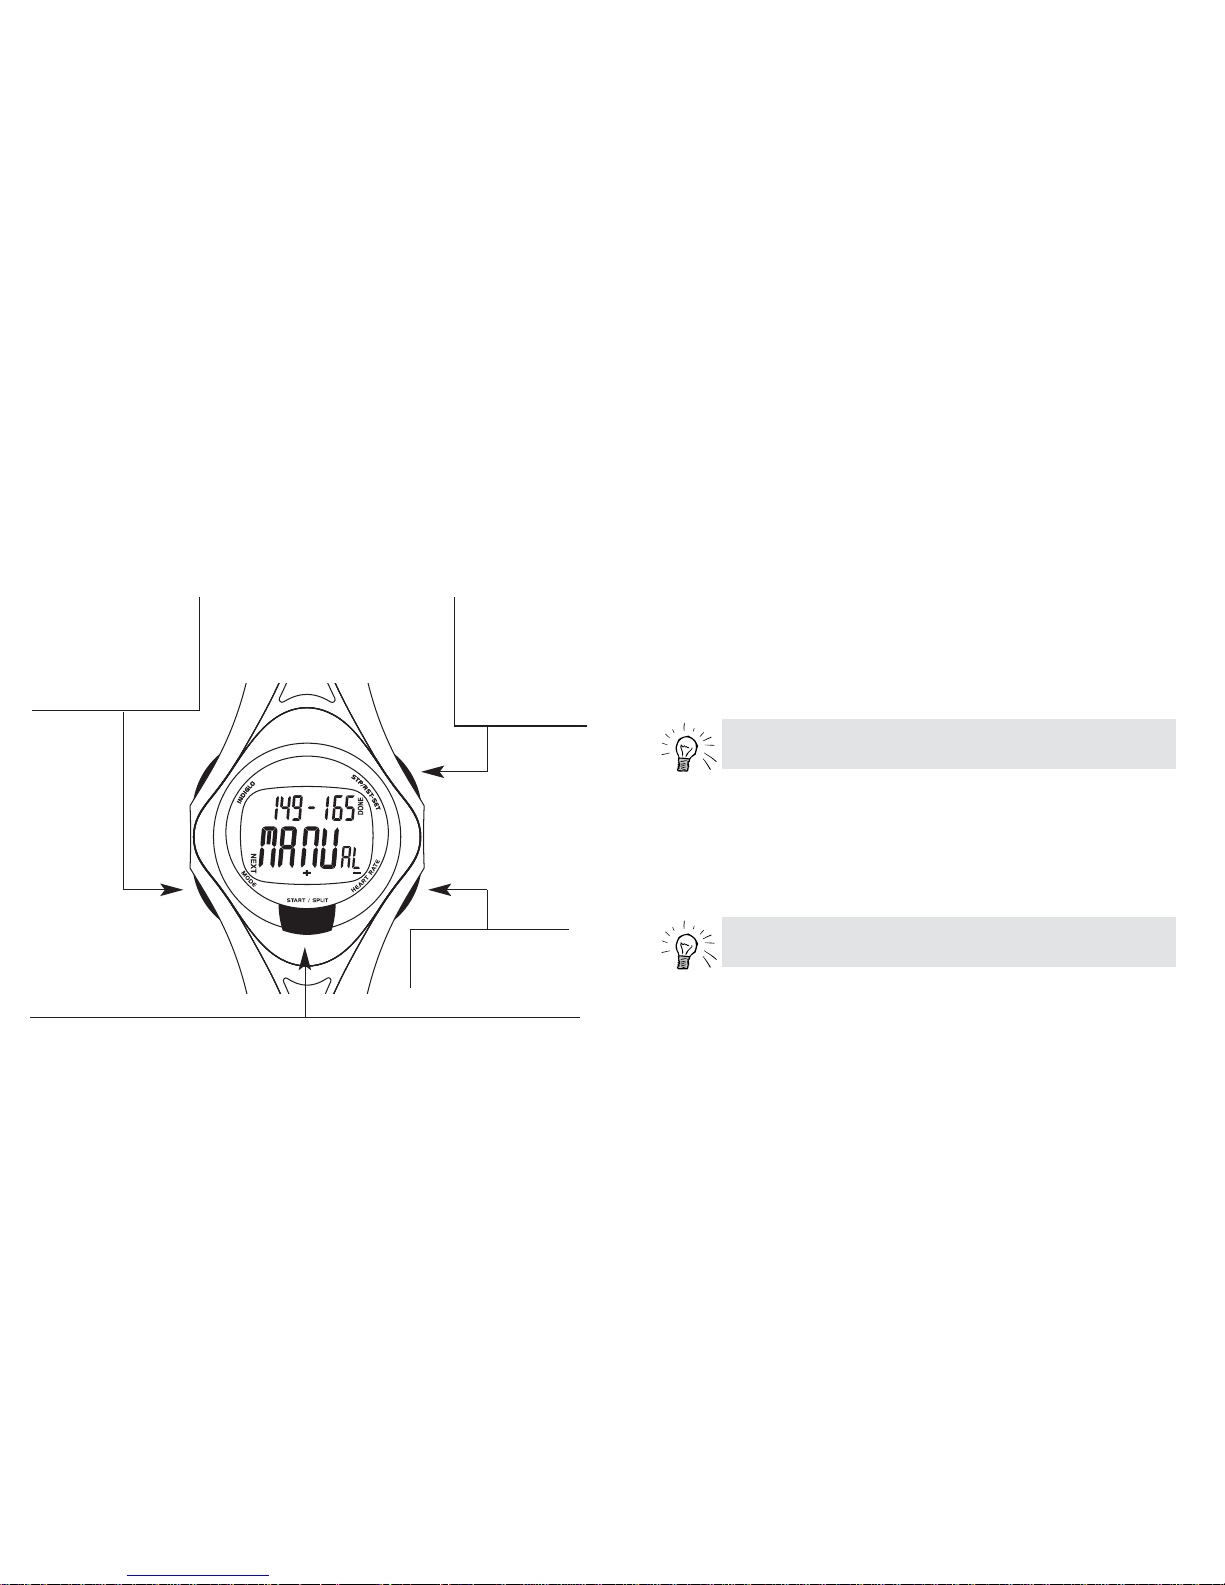
13
Introduzir o Peso e o Ritmo Cardíaco Máximo
1. Carregue em MODE até chegar ao Modo HRM SETUP (CONFIGURAÇÃO DO
MONITOR DO RITMO CARDÍACO). A seguir carregue em STOP/RESET/SET
para entrar no estado de configuração. A zona actualmente seleccionada
começa a piscar. (Para o Modelo Fitness, carregue emSET/RESET.)
2. Carregue em START/SPLIT (+) ou HEART RATE (-) para percorrer as
zonas alvo predefinidas bem como a definição MANUAL. (Para o Modelo
Fitness, carregue em START/STOP (+) ou HEART RATE (-)). Cada zona,
incluindo os limites inferior e superior predefinidos do ritmo cardíaco,
fica a piscar.
3. Carregue em MODE (NEXT - SEGUINTE) para se deslocar pelos valores
que definem o seu peso e o ritmo cardíaco máximo (MHR). Carregue em
START/SPLIT (+) ou HEART RATE (-) para aumentar ou diminuir os
valores. (Para o Modelo Fitness, carregue em START/STOP (+) ou
HEART RATE (-)). O peso do corpo é utilizado para calcular o número de
calorias que são queimadas.
NOTA: Quando estiver a especificar o valor do peso, carregue
em START/SPLIT (+) para alternar entre libras e quilogramas.
NOTA: As zonas alvo ficam personalizadas assim que concluir a
configuração do Módulo HRM Setup.
Figura 2.3 – Definição dos Valores para o Modo HRM Setup
Botão MODE (NEXT -
SEGUINTE) – Carregue no
botão para percorrer os
valores do peso e do ritmo
cardíaco máximo quando
desejar personalizar uma
zona de ritmo cardíaco.
Botão HEART RATE (-) –
Carregue no botão para
percorrer as zonas alvo do
ritmo cardíaco.
Botão START/SPLIT (+) – (START/STOP (+) para o Modelo Fitness) - Carregue no botão para
percorrer, no sentido ascendente, as zonas alvo do ritmo cardíaco predefinidas e definidas
manualmente. Quando estiver a definir o valor do peso, carregue no botão para alternar entre
libras (lb) e quilogramas (Kg).
Botão STOP/RESET/SET
(DONE) – (SET/RESET
(DONE - TERMINADO)
para o Modelo Fitness) Carregue no botão
quando terminar para
guardar as suas
definições.
12
Page 91

15
2. Carregue em START/SPLIT (+) ou HEART RATE (-) para percorrer as
zonas alvo predefinidas até chegar à definição MANUAL, que começa a
piscar. (Para o Modelo Fitness, carregue em START/STOP (+) ou HEART
RATE (-)).
3. Carregue em MODE (NEXT - SEGUINTE) para percorrer os números que
definem o limite superior do ritmo cardíaco, o limite inferior do ritmo
cardíaco, o peso e o ritmo cardíaco máximo. Carregue em START/SPLIT (+)
ou HEART RATE (-) para aumentar ou diminuir os números. (Para o Modelo
Fitness, carregue em START/STOP (+) ou HEART RATE (-)). Quando todos os
dígitos de um número estiverem definidos, carregue em MODE (NEXT -
SEGUINTE) para passar ao seguinte.
A utilização de uma zona de ritmo cardíaco alvo predefinida repõe a sua
entrada para a zona alvo “manual” nas regulações de fábrica originais.
4. Carregue em STOP/RESET/SET (DONE - TERMINADO) para guardar as
definições e sair do modo HRM SETUP. (Para o Modelo Fitness,
carregue em SET/RESET (DONE - TERMINADO)).
Examinar a Informação do Monitor de Ritmo Cardíaco
Pode utilizar o relógio para examinar a informação do Monitor do Ritmo
Cardíaco, incluindo o ritmo cardíaco médio, mínimo e máximo (de pico), o
período de tempo em que o coração se manteve dentro da zona alvo e o
número de calorias que foram queimadas. Como um parâmetro indicador
da sua forma física, também pode ver como o ritmo cardíaco diminui
durante um período de tempo predefinido. Para mais detalhes consulte os
modos REVIEW (REVER) e RECOVER (RECUPERAÇÃO).
14
4. Carregue em STOP/RESET/SET (DONE - TERMINADO) para guardar os
valores definidos e sair do modo. (Para o Modelo Fitness, carregue em
SET/RESET (DONE - TERMINADO)).
Seleccionar uma Zona Alvo
Para seleccionar uma zona alvo de ritmo cardíaco com base no ritmo
cardíaco máximo:
1. Carregue em MODE até aparecer HRM SETUP (CONFIGURAÇÃO).
2. Carregue em HEART RATE para percorrer as zonas alvo predefinidas
(bem como a definição MANUAL). Cada zona predefinida, incluindo os
limites inferior e superior predefinidos do ritmo cardíaco, fica a piscar.
Quando sair do modo HRM SETUP (CONFIGURAÇÃO), o relógio utiliza a
zona que seleccionou para todos os cálculos estatísticos baseados no
Monitor de Ritmo Cardíaco.
Definir a Zona Alvo “Manual”
1. No modo HRM SETUP (CONFIGURAÇÃO), carregue em
STOP/RESET/SET para entrar no estado de configuração. A zona
actualmente seleccionada começa a piscar. (Para o Modelo Fitness,
carregue em SET/RESET).
NOTA: Carregue em START/SPLIT para alternar o alerta de fora
da zona entre ON e OFF. (Para o Modelo Fitness, carregue em
START/STOP).
NOTA: A alteração da definição do peso durante uma sessão de
exercício irá causar um cálculo de calorias incorrecto.
Page 92

17
suspenso. Geralmente o problema resolve-se por si mesmo e o
coração recomeça a palpitar. Se a interrupção se prolongar, o relógio
alerta-o por meio de uma mensagem de erro descrita abaixo.
Aparece no mostrador a mensagem “NO HRM DATA”.
Esta mensagem de erro aparece se o relógio não estiver a receber
regularmente do sensor os dados actualizados do ritmo cardíaco. No
entanto, desde que o sensor esteja devidamente colocado no peito, as
placas estejam humedecidas e a bateria do transmissor não esteja fraca, o
relógio recupera normalmente sem a intervenção do utilizador. Se tal não
acontecer, tente o seguinte:
• As placas do sensor do transmissor colocado no peito podem ter
perdido o contacto com o peito durante alguns segundos. Certifique-
-se de que o transmissor está bem encostado ao corpo.
• As placas do sensor podem estar secas. Humedeça-as bem e reajuste
a posição do transmissor se necessário.
• A bateria do transmissor colocado no peito pode estar fraca e precisar
de ser substituída. (Ver no Guia do Utilizador do Sensor Fitness as
instruções sobre a substituição da bateria).
16
Resolução de Problemas Relacionados com o Monitor
do Ritmo Cardíaco
Conselhos para a resolução de problemas mais comuns:
Tenho dificuldades em obter uma primeira leitura OU os números do ritmo
cardíaco parecem estar incorrectos durante o funcionamento.
• Humedeça bem as placas de contacto na parte posterior do sensor do
ritmo cardíaco.
• Aperte a cinta do peito até esta assentar confortavelmente e
estabelecer bom contacto com a pele. Certifique-se de que o
sensor está bem seguro contra a pele e com a indicação TIMEX
virada para cima.
• Afaste-se de quaisquer outros sensores bem como de outras fontes
de sinais de rádio e de electricidade estática tais como os aparelhos
de exercícios físicos e outro equipamento eléctrico.
• Aguarde alguns minutos e carregue novamente em HEART RATE.
Às vezes vejo traços no mostrador à volta do valor do ritmo cardíaco OU o
ritmo cardíaco apresentado permanece inalterado durante um período
longo de tempo. O que é que isso significa?
• Geralmente isso significa que as placas dos sensores precisam de ser
humedecidas ou que a unidade não está bem justa ao peito e portanto
o contacto eléctrico com a pele não é suficiente. Humedeça as placas
dos sensores e ajuste o transmissor de forma a que ambas as placas
façam bom contacto com o peito.
Às vezes o símbolo do coração deixa de piscar por alguns instantes.
• Enquanto o coração está a piscar, o relógio está a receber sinais
nítidos do monitor. Tal como acontece com qualquer sistema de rádio,
poderá ocorrer uma interferência ocasional ou uma breve interrupção
do sinal. Se isso acontecer, o palpitar do símbolo do coração fica
Page 93

19
STOP/RESET/SET (DONE) –
(SET/RESET (DONE) para o
Modelo Fitness) – Carregue
no botão para guardar as
alterações e sair.
Operação dos Botões Durante a Programação
Botão MODE (NEXT) – Passa
ao valor seguinte a ser
definido.
Botão HEART RATE (–) –
Diminui o valor que está
apresentado a piscar.
START/SPLIT (+) - (START/STOP (+) para o
Modelo Fitness) – Aumenta o valor que está
apresentado a piscar.
18
Modos e Funções
Esta secção descreve os modos e as funções disponíveis no relógio. Os
modos dão acesso a áreas específicas do funcionamento do relógio. Por
exemplo, entra-se no Modo ALARM para programar um alarme para soar a
uma hora específica.
O relógio tem várias funções que podem ser acedidas carregando no botão
MODE. Carregando no botão MODE pode percorrer todos os modos
disponíveis no relógio.
Tabela 3.1: Resumo dos Modos
Modelo 30-Lap Modelo Fitness
TIME OF DAY
❘
TIME OF DAY
CHRONO
❘
TIMING
TIMER
❘
RECOVER
❘
RECOVER
REVIEW
❘
REVIEW
HRM SETUP
❘
HRM SETUP
ALARM
❘
ALARM
Page 94

21
Para definir o formato de 12 horas na regulação das HOURS (HORAS),
altere a definição AM ou PM (indicada pela letra “A” ou “P” no mostrador)
aumentando o número de horas para além das “12.”
Para regular os SECONDS (SEGUNDOS), carregue em START/SPLIT (+) ou
HEART RATE (-) para repor o valor em zero. Isto é útil para sincronizar o
relógio relativamente a uma hora de referência. (Para o Modelo Fitness,
carregue em START/STOP (+) ou HEART RATE (-)).
3. Quando tiver terminado, carregue em STOP/RESET/SET (DONE -
TERMINADO) para guardar as selecções e sair do Modo TIME OF DAY
(HORA). (Para o Modelo Fitness, carregue em SET/RESET).
Espreitar o Valor do Segundo Fuso Horário
O Modelo 30-Lap permite manter o registo da hora em dois fusos horários
(identificados como T1 e T2). Pode “espreitar” o valor do segundo fuso
horário carregando no botão START/SPLIT durante dois segundos quando
se encontra no Modo TIME OF DAY (HORA). Liberte o botão para voltar ao
fuso horário principal. Para trocar as definições dos fusos horários, segure
o botão durante quatro segundos.
Conselho útil: O relógio salta sobre o dia 29 de Fevereiro. Para
acertar o relógio nos anos bissextos, regule a data
manualmente no dia 29 de Fevereiro para “February 29”. No dia
seguinte o relógio salta para o dia 1 de Março.
NOTA: Pode programar o relógio de forma a tocar uma melodia
como sinal horário definindo a função HOURLY CHIME como
ON (activada).
Modo TIME OF DAY
O relógio apresenta a hora, a data e o dia da semana.
Regulação da Hora do Dia
1. Carregue e segure STOP/RESET/SET firmemente durante dois segundos.
(Para o Modelo Fitness, carregue e segure SET/RESET). Aparece a
indicação “HOLD TO SET” (SEGURE PARA CONFIGURAR). Se continuar
a segurar este botão, aparece a indicação “SET TIME”.
O modelo 30-Lap permite-lhe definir a hora para dois fusos horários
diferentes. Quando começar a regular a hora, o número “1” a piscar no
canto inferior direito do mostrador indica que está a definir a hora do fuso
horário principal. Carregue em START/SPLIT (+) ou HEART RATE (-) para
seleccionar o fuso horário principal (1) ou secundário (2). A seguir
carregue em MODE (NEXT -SEGUINTE) para começar a regular a hora
como descrito acima.
2. Carregue em MODE (NEXT - SEGUINTE) para regular:
HOURS (HORAS) ➤ MINUTES (MINUTOS) ➤ SECONDS (SEGUNDOS)
➤ DAY OF THE WEEK (DIA DA SEMANA)
➤ MONTH (MÊS) ➤ DATE (DATA) ➤ TIME FORMAT (FORMATO DA
HORA) (12 ou 24 horas)
➤ DATE FORMAT (FORMATO DA DATA) (Mês-Dia ou Dia-Mês)
➤ HOURLY CHIME (SINAL HORÁRIO) (activado ou desactivado)
➤ BUTTON BEEP (BIP DOS BOTÕES) (activado ou desactivado).
O valor que está a ser alterado aparece a piscar. Carregue em START/SPLIT
(+) ou HEART RATE (-) para aumentar ou diminuir os valores. (Para o
Modelo Fitness, carregue em START/STOP (+) ou HEART RATE (-)).
Segure os botões para avançar mais rapidamente. Quando um valor estiver
regulado, carregue em MODE (NEXT - SEGUINTE) para passar ao seguinte.
20
Page 95

23
Enquanto o Modo CHRONO estiver activo pode mudar para qualquer outro
modo, como o TIME OF DAY (HORA). Um indicador com a forma de um
cronómetro indica que o Modo CHRONO está activo no segundo plano.
Opções de Apresentação do Cronógrafo
Se não estiver a utilizar um sensor do ritmo cardíaco, o relógio apresenta os
tempos das voltas e os tempos repartidos (depois de ter tomado o primeiro
tempo repartido). Para seleccionar o valor que é apresentado na linha
inferior do mostrador, carregue e segure STOP/RESET/SETquando o
Cronógrafo tiver sido reposto a zero (00.00.00) mas antes de começar a
contagem do tempo das voltas.
Se estiver a utilizar um sensor do ritmo cardíaco, o relógio apresenta as
informações do ritmo cardíaco além do tempo indicado pelo Cronógrafo.
Pode optar por ver os tempos das voltas ou os tempos repartidos além
dos dados do ritmo cardíaco. Para ver as opções de apresentação dos
dados referentes ao ritmo cardíaco, consulte as páginas 8–9 e a Figura 2.1,
sobre a formatação do mostrador quando o HRM está activo.
Utilização do Cronógrafo
1. Carregue no botão MODE até aparecer CHRONO.
2. Carregue no botão START/SPLIT para iniciar a contagem do tempo.
3. Carregue em START/SPLIT quando o Modo CHRONO está activo para
obter o tempo da volta/repartido.
Esta acção armazena os dados da volta actual e do tempo repartido e inicia a
contagem de uma nova volta. O relógio mostra durante breves instantes os
tempos das voltas e repartidos que acabou de registar bem como o número
da volta. Se estiver a visualizar os dados do HRM, o relógio apresenta a
seguir a informação do ritmo cardíaco correspondente à volta.
(As instruções continuam na página 25)
Modo CHRONO (Apenas no Modelo 30-Lap)
O Modo CHRONO é o principal modo para “exercícios” do seu relógio.
Proporciona um cronómetro para registar o tempo decorrido para 30
leituras, como uma volta, um evento único, bem como outras informações
para um evento completo até 100 horas de duração. Podem ser
armazenados os dados de até 30 leituras incluindo o número da volta, o
tempo da volta individual e o tempo repartido total decorrido.
Quando o sensor do ritmo cardíaco está activo, o Modo CHRONO permite
registar três dados estatísticos:
• O período de tempo em que o seu coração se encontra dentro da zona
alvo enquanto o Modo CHRONO está seleccionado
• O ritmo cardíaco médio para o período em que o sistema HRM estava
activo e o Modo CHRONO seleccionado
• O ritmo cardíaco máximo e mínimo para o período em que o sistema
HRM estava activo e o Modo CHRONO seleccionado
O registo acumulado dos dados pára se parar o Cronógrafo quando o
sistema HRM estiver activo e é retomado quando reiniciar o Cronógrafo. Se
deixar o Cronógrafo terminar a contagem enquanto o sistema HRM estiver
activo, o HRM encerra-se automaticamente e a acumulação de dados é
interrompida.
NOTA: Ao longo desta secção fala-se em “voltas” e “tempos
repartidos”. Por “tempo da volta” entende-se o tempo
correspondente a cada segmento (volta) de um evento. Por
“tempo repartido” entende-se o tempo total decorrido desde o
início do evento.
22
Page 96

25
Volta então ao Modo CHRONO activo, que está ainda a contar o tempo da
volta actual/repartido. O relógio armazena os dados correspondentes às
últimas 30 voltas.
4. Carregue em STOP/RESET/SET para terminar a contagem do tempo.
5. Carregue em START/SPLIT para retomar a contagem ou carregue e
segure STOP/RESET/SET para repor o cronógrafo em zero. (Se desejar
guardar os dados para análise posterior não efectue a reposição a zero).
Modo TIMER (Apenas no Modelo 30-Lap)
Este modo permite definir um tempo a partir do qual o relógio efectua a
contagem até zero. Esta função é útil para eventos de duração fixa até 100
horas. No fim da contagem decrescente, é possível programar o
Temporizador para parar, repetir a contagem ou comutar para o Modo
CHRONO e iniciar o cronógrafo.
Enquanto o Temporizador está a funcionar, pode carregar em MODE para
passar a qualquer outro modo, como TIME OF DAY (HORA), sem perturbar
o seu funcionamento. Quando o Temporizador está activo aparece um
indicador com a forma de uma ampulheta.
Programar o Temporizador
1. Carregue no botão MODE até aparecer TIMER (TEMPORIZADOR).
2. Carregue em STOP/RESET/SET para entrar no estado de configuração
do Modo TIMER (TEMPORIZADOR). Os dígitos das horas ficam a piscar.
3. Carregue em START/SPLIT (+) ou HEART RATE (-) para alterar os
valores. Segure as teclas para avançar mais rapidamente. Quando o
valor das horas estiver programado, carregue em MODE (NEXT -
SEGUINTE) para passar aos valores seguintes (MINUTOS e a seguir
SEGUNDOS).
24
Figura 3.1 – Contagem dos Tempos das Voltas/Tempos Repartidos com
o Modelo 30-Lap
Botão STOP/RESET/SET –
No Modo CHRONO,
carregue no botão para
parar ou repor a zero o
Cronógrafo.
Botão HEART RATE –
Liga e desliga o Monitor
do Ritmo Cardíaco;
também serve para
alterar a posição dos
dados do Monitor
quando este está ligado.
Botão
STOP/RESET/SET –
No Modo CHRONO,
carregue no botão para
iniciar o Cronógrafo.
Exemplo do Formato
de Apresentação do
Modo CHRONO – São
apresentados os valores
actuais do tempo da volta
(em cima) e do ritmo
cardíaco (em baixo). O
indicador com a forma de
um cronómetro aparece
durante a contagem do
tempo; o indicador com a
forma de um coração
sólido a palpitar indica
que o HRM está activo.
Page 97

27
Modo TIMING (apenas Modelo Fitness)
Este modo tem dois objectivos:
• Pode funcionar como um cronómetro (contagem crescente) ou um
temporizador de contagem decrescente, permitindo-lhe efectuar a
contagem a partir de zero ou até zero, respectivamente. Podem ser
registados dados estatísticos correspondentes a até 100 horas.
• Quando utilizado com um sensor do ritmo cardíaco, este modo permite
registar as informações relativas ao ritmo cardíaco.
Pode sair do Modo Timing durante uma contagem crescente ou
decrescente. No Modo TIME OF DAY um indicador com a forma de um
cronómetro indica que o Modo TIMING está a proceder a uma contagem
crescente em segundo plano. Um indicador com a forma de uma ampulheta
indica que o Modo TIMING está a proceder a uma contagem decrescente.
Utilizar o Modo Timing para uma Contagem Crescente (Operação do
Cronómetro)
1. Carregue no botão MODE até aparecer TIMING.
2. Carregue em SET/RESET até aparecer “00.00.00”. Se entrar
acidentalmente no Modo Timing Set (Configuração da Contagem de
Tempo), carregue em SET/RESET (DONE - TERMINADO) para sair
desse modo.
3. Carregue em START/STOP (+) para iniciar a contagem do tempo. O valor
dos segundos (SECONDS) começa a contagem crescente.
Para introduzir uma pausa na contagem, carregue em START/STOP;
carregue novamente para reiniciar a contagem. Para repor o cronómetro a
zero, carregue e segure SET/RESET quando o Modo TIMING estiver parado.
Utilizar o Modo Timing para uma Contagem Decrescente (Operação do
Temporizador de Contagem Decrescente)
Para efectuar uma contagem decrescente é preciso definir primeiro o
tempo de contagem pretendido.
4. Quando o tempo de contagem decrescente estiver programado
correctamente, carregue em MODE (NEXT - SEGUINTE) novamente para
seleccionar a acção que deve ser empreendida quando a contagem
decrescente terminar. Carregue em START/SPLIT (+) ou HEART RATE (-)
para alternar entre as acções STOP (PARAR), REPEAT (REPETIR) ou
CHRONO (CRONÓGRAFO).
5. Quando tiver terminado, carregue em STOP/RESET/SET (DONE -
TERMINADO) para guardar a acção pretendida.
Operação do Temporizador
1. Carregue em START/SPLIT para iniciar a contagem decrescente do
Temporizador.
2. Carregue em STOP/RESET/SET para parar a contagem decrescente.
3. Com o Temporizador parado, carregue em START/SPLIT para retomar a
contagem decrescente ou em STOP/RESET/SET para repor o
Temporizador no tempo de início da contagem.
4. Quando o Temporizador atinge o valor zero, soa um alerta. A luz
nocturna INDIGLO
®
também se acende para que possa ver o mostrador
do relógio em condições de fraca luminosidade.
• Se o Temporizador tiver sido programado para parar, pára após o
alerta.
• Se o Temporizador tiver sido programado para repetir, será reposto no
tempo de início da contagem e começará imediatamente uma nova
contagem decrescente. Continuará a repetir a contagem decrescente
até se carregar em STOP/RESET/SET. A contagem repetida é
apresentada na linha inferior do mostrador. O relógio conta até 99
repetições, após o que passa para o valor zero e continua.
• Se o Temporizador tiver sido programado para iniciar o Modo
CHRONO, o relógio comuta automaticamente para o Modo CHRONO e
inicia-o. Para ser automaticamente lançado pelo Temorizador o Modo
CHRONO deve estar reposto a zero.
26
Page 98

29
Botão SET/RESET – Segure
para começar a programar
um tempo para a contagem
crescente ou decrescente.
Utilizar a Contagem do Tempo com o Modelo Fitness
Botão HEART RATE – Liga
e desliga o Monitor do
Ritmo Cardíaco; altera a
posição dos dados do
Monitor quando este está
ligado.
Botão START/SPLIT – Carregue para iniciar ou
parar a contagem decrescente.
Exemplo do Formato
de Apresentação do
Modo TIMING – O
tempo da contagem
decrescente (em cima) é
apresentado com os
indicadores da
Ampulheta e do Ritmo
Cardíaco. O ritmo
cardíaco actual é
apresentado em baixo.
1. Se não estiver no Modo TIMING, carregue em MODE até aparecer
TIMING.
2. Carregue e liberte SET/RESET até entrar no estado de configuração do
Modo TIMING. Os dígitos das horas (HOURS) ficam a piscar.
3. Programe o período de tempo para a contagem decrescente. Carregue
em START/STOP (+) ou HEART RATE (-) para aumentar ou diminuir os
valores que estão a piscar. Segure os botões para avançar mais
rapidamente. Depois de um valor estar programado, carregue em MODE
(NEXT - SEGUINTE) para passar aos valores seguintes (primeiro
minutos - MINUTES - e depois segundos - SECONDS).
4. Quando tiver terminado, carregue em SET/RESET (DONE - TERMINADO)
para guardar o tempo da contagem decrescente.
5. Carregue em START/STOP para iniciar a contagem do tempo. Inicia-se a
contagem decrescente até zero.
Para introduzir uma pausa na contagem decrescente, carregue em
START/STOP; carregue novamente para reiniciar a contagem. Para repor a
contagem no valor inicial, carregue em SET/RESET quando o Modo TIMING
estiver parado. Carregue novamente em SET/RESET para limpar o tempo
programado e repô-lo em zero.
Utilizar o Modo Timing com o Sistema HRM
Quando o HRM (Monitor de Ritmo Cardíaco) está activo, o Modo TIMING
regista os três elementos de dados relacionados com o ritmo cardíaco:
• O período de tempo em que o seu coração se encontra dentro da zona
alvo enquanto o Modo TIMING está seleccionado.
• O ritmo cardíaco médio para o período em que a função HRM está
activa e o Modo TIMING seleccionado.
• O ritmo cardíaco máximo para o período em que a função HRM está
activa e o Modo TIMING seleccionado.
28
Page 99

31
Utilizar o Modo RECOVER
Botão STOP/RESET/SET –
(SET/RESET para o Modelo
Fitness) - Carregue no
botão para alternar o tempo
de recuperação entre um
ou dois minutos.
Botão HEART RATE – No
início do exercício físico,
carregue no botão para
obter o sinal do sensor
do ritmo cardíaco.
O valor da linha inferior
123 RE representa o
seu ritmo cardíaco
actual enquanto o
temporizador do Modo
RECOVER conta o
tempo de forma
decrescente.
Botão START/SPLIT – (START/STOP para o Modelo Fitness) - Carregue
no botão para iniciar o período de recuperação seleccionado.
Exemplo do Formato de
Apresentação do Modo
RECOVER – O valor
HR165 apresentado na
linha superior
representa o seu ritmo
cardíaco no início do
período de recuperação.
30
Modo RECOVER (Recuperação)
Este modo é utilizado com um sistema HRM activo. Trata-se de um parâmetro da
forma física que mede a rapidez com que o ritmo cardíaco diminui a partir de um
valor elevado durante um período de contagem decrescente de um ou dois minutos.
Quando o temporizador chega ao fim soa um alarme e os valores inicial e final do
ritmo cardíaco são apresentados.
Utilizar o Modo RECOVER (RECUPERAÇÃO)
1. Carregue em MODE até aparecer RECOVER.
2. Carregue em STOP/RESET/SET para seleccionar o tempo pretendido para a
recuperação. Pode escolher um ou dois minutos. (Para o Modelo Fitness, carregue
em SET/RESET).
3. Carregue em START/SPLIT para iniciar a contagem decrescente (Para o Modelo
Fitness, carregue em START/STOP). O mostrador do relógio apresenta agora dois
valores do ritmo cardíaco - o valor do seu ritmo cardíaco no momento em que o
temporizador da recuperação foi iniciado, apresentado na linha superior e o valor
do seu ritmo cardíaco actual, apresentado na linha inferior.
4. Quando o alerta soa no fim do período de recuperação, tome nota do valor do
ritmo cardíaco na linha inferior. Subtraindo este valor do valor apresentado na linha
superior, obtém o valor da recuperação do seu ritmo cardíaco.
5. Carregue em MODE para sair do Modo RECOVER.
NOTA: Para o Modo RECOVER funcionar o relógio deve estar a
receber os sinais do ritmo cardíaco.
Page 100

de um despertador. Quando chega a hora para a qual o alarme foi
programado, ouve-se o sinal do alarme, a luz nocturna INDIGLO
®
acende-
-se e a hora do alarme é apresentada durante vinte segundos. Para
silenciar o alarme, carregue num botão qualquer. Se não silenciar o alarme
antes do sinal de alerta chegar ao fim, passados cinco (5) minutos soa um
outro alarme de segurança.
Programar o Alarme
1. Carregue no botão MODE até aparecer ALARM.
2. Carregue em STOP/RESET/SET para seleccionar a hora a que pretende
que o alarme soe. (Para o Modelo Fitness, carregue em SET/RESET).
O valor da hora a ser alterado aparece a piscar. A indicação AM/PM
também pisca se o relógio estiver programado para o formato de
apresentação de 12 horas.
3. Carregue em START/SPLIT (+) ou HEART RATE (-) para aumentar ou
diminuir o valor das horas. (Para o Modelo Fitness, carregue em
START/STOP (+) ou HEART RATE (-)). A seguir carregue em MODE
(NEXT - SEGUINTE) para programar os minutos.
4. Quando tiver terminado, carregue em STOP/RESET/SET (DONE TERMINADO) para guardar os valores programados. (Para o Modelo
Fitness, carregue em SET/RESET (DONE - TERMINADO)).
Para ligar ou desligar o Alarme sem entrar no estado de configuração,
carregue e segure o botão START/SPLIT quando estiver no Modo ALARM.
(Para o Modelo Fitness, carregue em START/STOP). A alteração de
qualquer valor programado do alarme liga-o automaticamente.
33
32
Modo REVIEW (REVER)
Este modo permite-lhe examinar os dados relativos aos exercícios físicos
tais como os tempos das voltas. As seguintes informações podem ser
examinadas quando o sensor do ritmo cardíaco está activo e o Modo
CHRONO (Modelo 30-Lap) ou o Modo TIMING (Modelo Fitness) está
seleccionado:
• Dentro da Zona - O período de tempo em que o seu ritmo cardíaco se
situou dentro da zona alvo que especificou.
• Ritmo Cardíaco Médio
• Ritmo Cardíaco Máximo
• Ritmo Cardíaco Mínimo (apenas no Modelo 30-Lap)
• Total de Calorias Queimadas - Valor calculado com base no tempo
decorrido, nos dados relativos ao ritmo cardíaco e no seu peso.
• Os tempos das voltas e os tempos repartidos registados pelo
Cronógrafo (apenas no Modelo 30-Lap)
• Ritmo Cardíaco Médio por volta (apenas no Modelo 30-Lap)
Examinar as Informações sobre o Ritmo Cardíaco
1. Carregue em MODE até aparecer REVIEW (REVER).
2. Carregue em START/SPLIT (+) para percorrer os dados do HRM (IN
ZONE (Dentro da Zona), AVERAGE HEART RATE (Ritmo Cardíaco
Médio), PEAK HEART RATE (Ritmo Cardíaco Máximo), MINIMUM
HEART RATE (Ritmo Cardíaco Mínimo), TOTAL CALORIES (Total de
Calorias)) e os dados das voltas armazenados pelo Cronógrafo. (Para o
Modelo Fitness, carregue em START/STOP (+)). Carregue em HEART
RATE (-) para percorrer os dados do HRM em sentido inverso.
Modo ALARM
Este modo programa um alarme para soar a uma hora predefinida. Quando
o alarme está activado, aparece no mostrador um indicador com a forma
 Loading...