


Your Digital Adapter
Easy Setup Guide

Connect with the
future of TV
You’re about to step up to a world of
even better picture and sound, and this
Easy Setup Guide is here to help every
step of the way. Just follow the simple
installation instructions on the next
few pages, activate your Digital Adapter,
and you’ll be all set.
Contents
Installation
and Activation
38
Using your new
remote control
910
Troubleshooting
and FAQs
1112
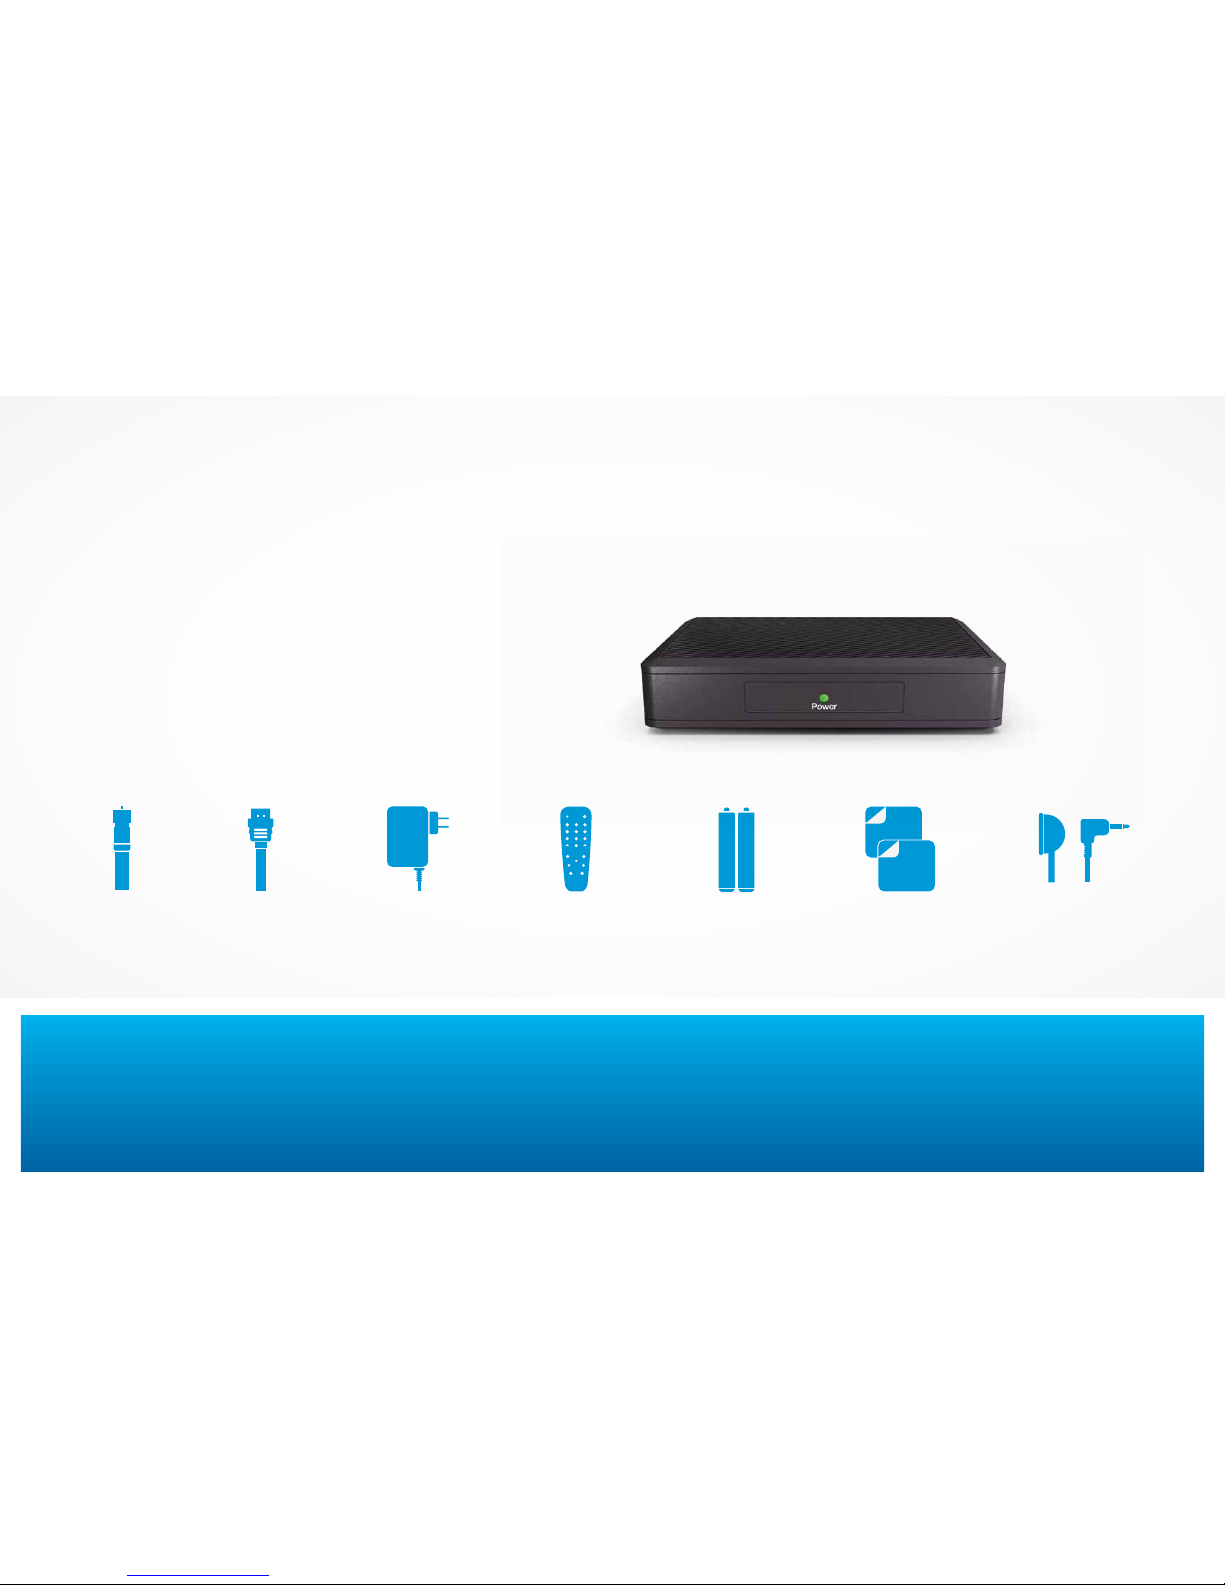
Included in this kit
TWO AA A
BAT TE RI ES
ADHESIVE
FASTENERS
COAX
CABLE
HDMI
CABLE
POWER
CORD
REMOT E
CONTROL
IR REC EIVER
DIGITAL ADAPTER
Connect the Adapter
to your cable outlet
Turn o your TV.
Locate the cable that runs from
the cable outlet to your TV.
Leave the cable connected to the
wall, but disconnect from your TV.
Reconnect this cable to the
“Cable In” input on the back of
the Adapter.
Connect the Adapter
to your TV
If your TV is Standard Deinition.
Connect the coax cable from this kit
to the “To TV” output on the Adapter.
Connect the other end of this
cable to the “Cable
In”
input on
your T V.
If your TV has an HDMI port.
Connect the HDMI cable from this kit
to the “HDMI” output on the Adapter.
Connect the other end of the
cable to the “HDMI” input on
your T V.
Choose the output channel
If your TV is Standard Deinition.
Set the CH 3/4 Output Switch on the
Adapter to Channel 3 (some parts
of the country use Channel 4).
If your TV has an HDMI port.
Set TV to choose HDMI as
input source.
Connect the power cord
Connect the power cord from this
kit into the “+5V DC In” input on
the Adapter. Plug the other end
into an electrical outlet.
NOTE: Make sure you don’t plug
your power cord into the IR
Receiver input.
The green light on the front of the
Adapter should now be on and
blinking. If it isn’t, make sure the
power cord is properly connected.
If a picture appears, you’re already
activated and can turn to page 9 to
learn how to program your remote.
If no picture appears, then turn to
page 8 to activate.
3 | QUE STIONS? twc.com/digitaladapter ^ 18552861736
Connect to your T V
If you run your cable line through a VCR/DVD, turn to page 5.
A
B
C
D
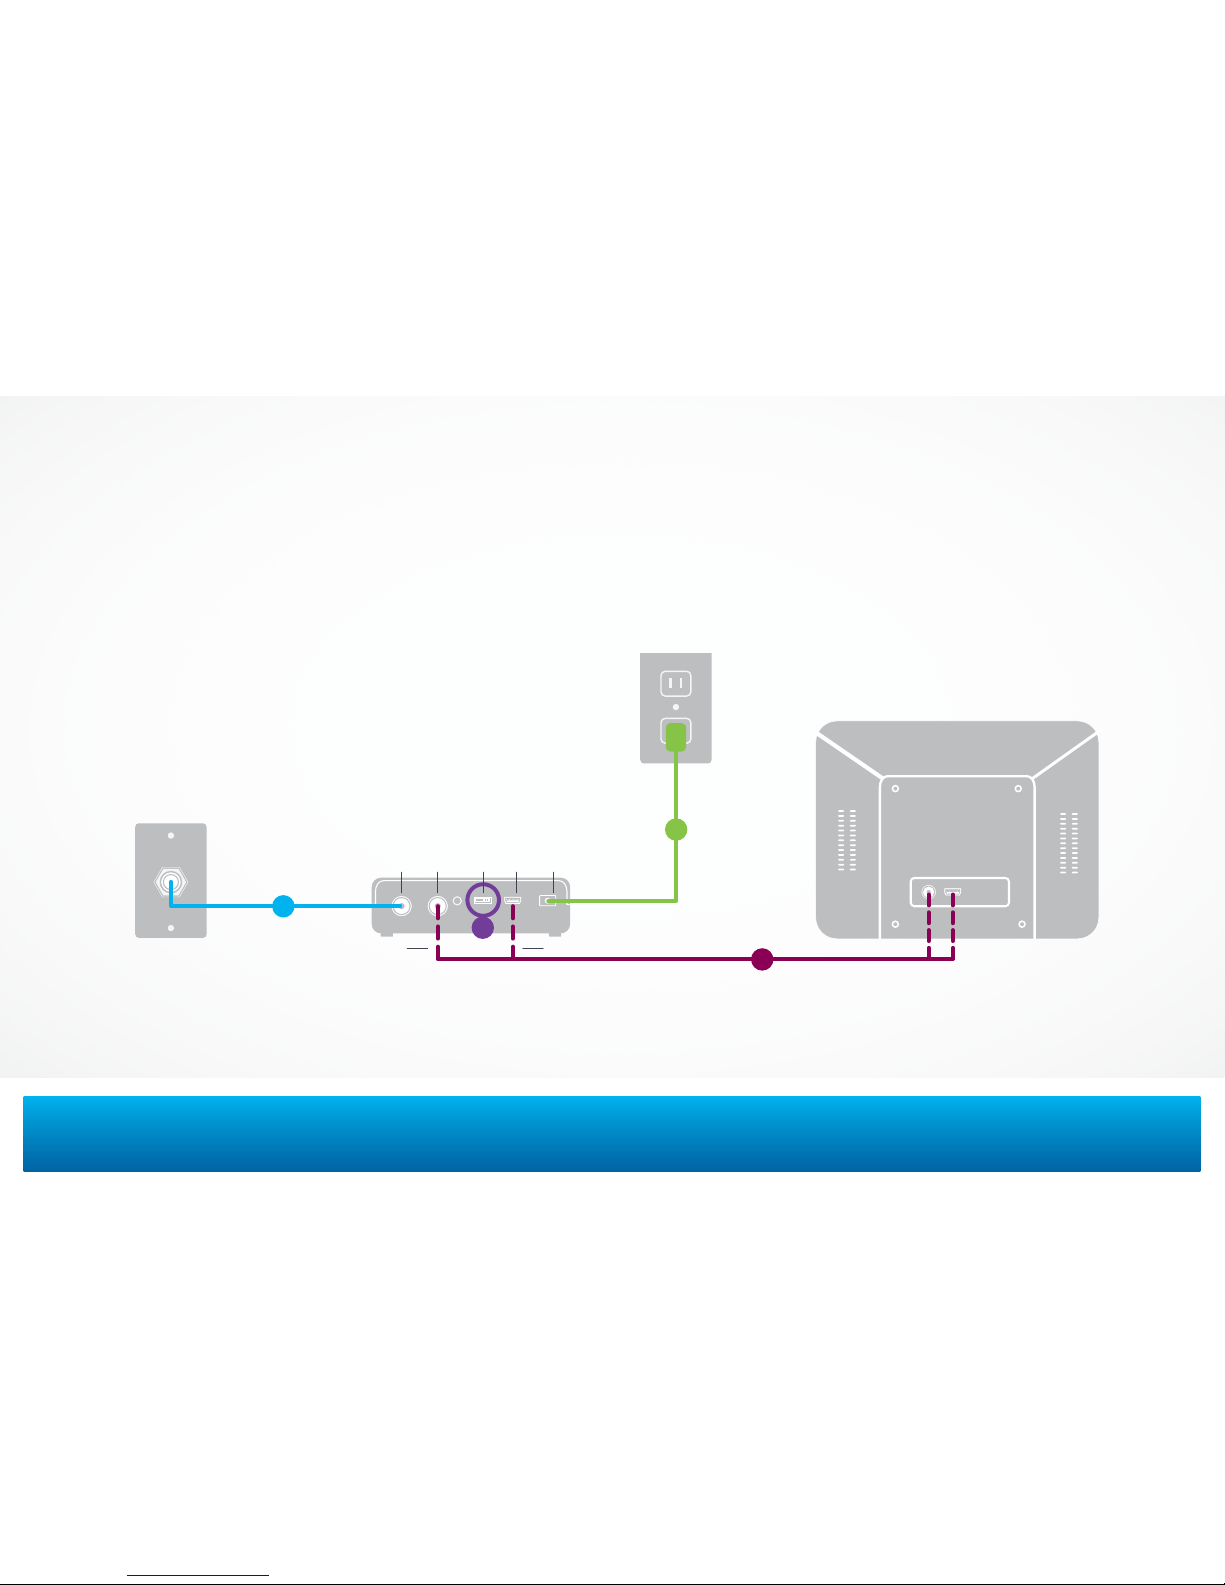
TELEVISION
DIGITAL ADAPTER
IN TO TV +5V DC INCH 3 /4 HDMI
ELECTRICAL OUTLET
CABLE O UTLET
INSTALLATION INSTRUCTIONS | 4
If the Adapter is in a spot where the remote control signal gets blocked, use the included IR Receiver. Plug the IR
Receiver into the “IR In” port on the Adapter, and place the other end where it can be seen in front of the TV using
the adhesive fasteners. Make sure the adhesive fasteners don’t cover your TV vents to avoid overheating.
NOTE: OPTIONAL
IR REC EIVER
Installation Diagram
A
C
B
D
STANDARD CONNECTION HDMI CONNECTION

5 | QUE STIONS? twc.com/digitaladapter ^ 18552861736
Connect the Adapter
to your cable outlet
Turn o your TV.
Locate the cable that runs from
the cable outlet to your VCR/DVD.
Leave the cable connected to the
wall, but disconnect from your TV.
Reconnect this cable to the
“Cable In” input on the back of
the Adapter.
Connect the Adapter
to your VCR/DVD
If your TV is Standard Deinition.
Connect the coax cable from this kit
to the “To TV” output on the Adapter
.
Connect the other end of the
cable to the “Cable
In”
input on
your VCR/DVD.
If your TV has an HDMI port.
Connect the HDMI cable from this kit
to the “HDMI” output on the Adapter.
Connect the other end of the
cable to the “HDMI” input on
your DVD.
Choose the output channel
If your TV is Standard Deinition.
Set the CH 3/4 Output Switch on
the Adapter to Channel 3 (some
parts of t
he country use Channel
4). Make sure this matches the
input channel you’ve selected
for your VCR/DVD.
If your TV has an HDMI port.
Set TV to choose HDMI as
input source.
Connect the power cord
Connect the power cord from this
kit into the “+5V DC In” input on
the Adapter. Plug the other end
into an electrical outlet.
NOTE: Make sure you don’t plug
your power cord into the IR
Receiver input.
The green light on the front of the
Adapter should now be on and
blinking. If it isn’t, make sure the
power cord is properly connected.
If a picture appears, you’re already
activated and can turn to page 9 to
learn how to program your remote.
If no picture appears, then turn to
page 8 to activate.
Connect to your T V + V CR /DVD
If you connect your cable line directly to your TV, turn to page 3.
A
B
C
D
TELEVISION
DIGITAL ADAPTER
VCR/DVD
CABLE O UTLET
INSTALLATION INSTRUCTIONS | 6
IN TO TV +5V DC INCH 3 /4 HDMI
Installation Diagram
A
B
C
D
ELECTRICAL OUTLET
B
If the Adapter is in a spot where the remote control signal gets blocked, use the included IR Receiver. Plug the IR
Receiver into the “IR In” port on the Adapter, and place the other end where it can be seen in front of the TV using
the adhesive fasteners. Make sure the adhesive fasteners don’t cover your TV vents to avoid overheating.
NOTE: OPTIONAL
IR REC EIVER
STANDARD CONNECTION HDMI CONNECTION

7 | QUESTION S? twc.com/digitaladapter ^ 18552861736
Activation
Once you’ve installed all your Adapters you’re ready to activate them.
See the easy to follow instructions to the right. Once activation is
complete, you’ll be ready to program your remote control and get
back to all your favorite shows.

ACTIVATION | 8
Activating your Adapter
Using your TV remote, tune to the HDMI or output
channel you chose during installation (Ch. 3 or 4).
You’ll see an activation screen with our contact number.
Call this number to activate your Adapter.
1 855 286 173 6
Activation is usually complete in 510 minutes, but could
take up to 20 during peak times. Once complete, the
picture will automatically turn on. If it doesn’t, turn to
the Troubleshooting section on page 11.
The last step is programming your new remote control,
which you can learn how to do on the next page.

9 | QUE STIONS? twc.com/digitaladapter ^ 18552861736
Using your new remote control
Program your remote control
Turn on your TV and tune it to the output channel you
chose during installation (Ch. 3 or 4), or to the proper
HDMI input.
Install the batteries that were included in this
kit in the remote. Press and hold the TV POWER
and PROG buttons until the LED light on the remote
turns on, then release the buttons.
Press the TV POWER button to enter automatic search
mode. Your remote will search for the correct code.
When your TV turns o, press the PROG button within
1 second to store your TV’s code.
Your remote is now programmed and the device code
will be permanently saved.
NOTE: If you have any q uestions, ple ase refer to the Programmin g
Guide that c ame with your remote.
A
B
C

Remote control functions
TV POWER: Turns TV on and o once
the remote has been programmed.
DTA POWER: Turns Digital Adapter
on and o once the remote has been
programmed.
VOLUME: Use VOLUME UP to raise
volume and VOLUME DOWN to lower it.
CHANNEL: Use CHANNEL UP to advance
one channel and CHANNEL DOWN to go
back one channel.
MENU: Press to display Menu screen.
MUTE: Press to turn sound on or o.
ENTER: Press to select the item the cursor
is pointing to.
NAVIGATION KEYS: Press to move
cursor UP, DOWN, LEFT and RIGHT.
INFO: Press to display current
channel information.
LAST: Press to return to the last
previously viewed channel.
PROG: Press to program the remote.
PAGE: Moves the menu up and
down by page.
EXIT: Press to exit on-screen menus.
For more info, please refer to the
Programming Guide included with
your remote, or visit us at twc.com/pyr
1
2
2
3
3
4
4
9
9
5
5
10
10
12
12
11
11
13
13
6
6
7
7
8
8
IMPORTANT NOTE: You may need to keep you r
original T V remote to perform advan ced functions
and to adjus t Picture and Audio Set tings.
1
REMOTE CONTROL FUNCTIONS | 10
If the remote control doesn’t work
Make sure the batteries are inserted correctly.
Make sure the remote can “see” the front of
the Adapter, or the front of the IR Receiver.
If there’s no picture and the light on
the Adapter is blinking
Check that all cables are irmly connected.
Make sure you’ve contacted Time Warner Cable
to activate your Adapter, as described on page 8.
Unplug the Adapter, plug it back in, and wait 5
minutes for it to reset.
If the light is still blinking, contact us.
twc.com/digitaladapter
1 855 286 173 6
If the light on the front of the Adapter
isn’t illuminated
Make sure the power cord is attached to the
Adapter and plugged into a live electrical outlet.
If there’s no picture and the light on
the Adapter is solid
If you are using an HDMI cable, make sure your
TV is set to the HDMI input.
If you are using a coax cable, make sure the TV
and Adapter are set to the same channel (3 or 4).
Try switching the TV and Adapter to the other
channel (3 or 4).
If connecting through a VCR/DVD player, make
sure it’s on.
Make sure all the cables are firmly connected.
Check the input setting on your TV. Make sure
it’s set to ANT or CABLE.
11 | QUESTIO NS? twc .com/digitaladapter ^ 18552861736
Troubleshooting

Do I need to set my TV to a speciic channel?
If you connected your Adapter with a coax cable,
set your TV and Adapter to either Channel 3 or
4, whichever channel doesn’t currently receive
programming. If you connected with an HDMI cable,
make sure your TV is set to the correct input.
How do I turn o my new Adapter?
Your new Adapter can be turned o by pressing
the DTA POWER button on the remote control.
What’s the dierence between a
Digital set-top box and a Digital Adapter?
A Digital set-top box (sometimes known as a
digital converter box or digital receiver) processes
digital-quality signals and oers access to On Demand,
Start Over
®
,* Look Back®,* our Interactive Program
Guide and nearly 50 commercial-free music channels.
An Adapter simply converts a digital signal into a
format your TV can use.
Where can I ind the latest channel lineup?
You can view the channel lineup or TV listings
for your area online. Just go to twc.com and
click WHAT ’S O N.
TROUBLESHOOTING AN D FAQS | 12
FAQs
*Not avail able in all areas .

Notes
13 | QUE STIONS? twc.com/digitaladapter ^ 18552861736

If you have any additional questions or concerns, please visit us online or call us.
twc.com/digitaladapter ^ 1-855-286-1736
©2012 Time Warn er Cable, In c. All rights res erved. Time War ner Cable and t he Time Warner Ca ble logo are tra demarks of Time Wa rner Cable In c. Used unde r license.
CISCO H D 07-2012
 Loading...