

Time Now Corporation Invisible ClockoII, Invisible Clock II Operation Instructions Manual

p
p
y
p
Invisible ClockII Operation Instructions
p
To Start: Install a AAA battery in the back of your Invisible Clock.
The Invisible Clock-II has 7 modes, accessed by the Mode button:
• Vibration and Beep adjustment (VIB & BEEP): Use to adjust Vibration Speed
(1 = low, 2 = medium, 3 = high), Beep Volume (1-3), Number of beeps (1-6).
• Time and date adjustment (TIME & DATE): Use to set time and date.
• Timer (TIMER SET): Use for simple timing or to repeat a time over and over.
• 12 Alarms (ALARMS SET): Use to set up to 12 alarms in a 24-hour period. Alarms
programmed in this mode will signal no matter what other mode the unit is in.
• Meeting Timer (MEET-TIMER): Use for meetings, presentations or to track time
during any interval. The Meeting Timer vibrates at ½ way, at 5 minutes before time’s
up, and at time’s up, for any time interval set between 10 –120 min.
• Custom Timer (CUSTOM TMR): Use to set any countdown time of up to 60
minutes, and program with up to six custom alerts to go off at any time in this period.
Can also set it to repeat, or count-up after countdown is complete.
• Sto
Please Read These Notes about Settings Protection: (settings protection engage automatically)
1. Setting Protection – To protect the Timer, Meeting Timer and Custom Timer settings from erasure by accidental button presses, the
Invisible Clock has a “button auto-lock” feature (which engages automatically). To exit from the Timer or Meeting Timer you have to
press the two middle buttons simultaneously, and then press the Mode button to exit. To exit from the Custom Timer
press and hold the two middle buttons simultaneously for 2 seconds.
2. Setting Protection for Alarms - To protect the 12 Alarms from accidental erasure: Go to Alarms mode and press and hold the Enter
button for 3 seconds before you can enter the Alarms Mode before setting or changing any Alarm.
watch (STOP-WATCH): use to count time for any event.
SETTING THE ADJUSTMENT & TIMING MODES
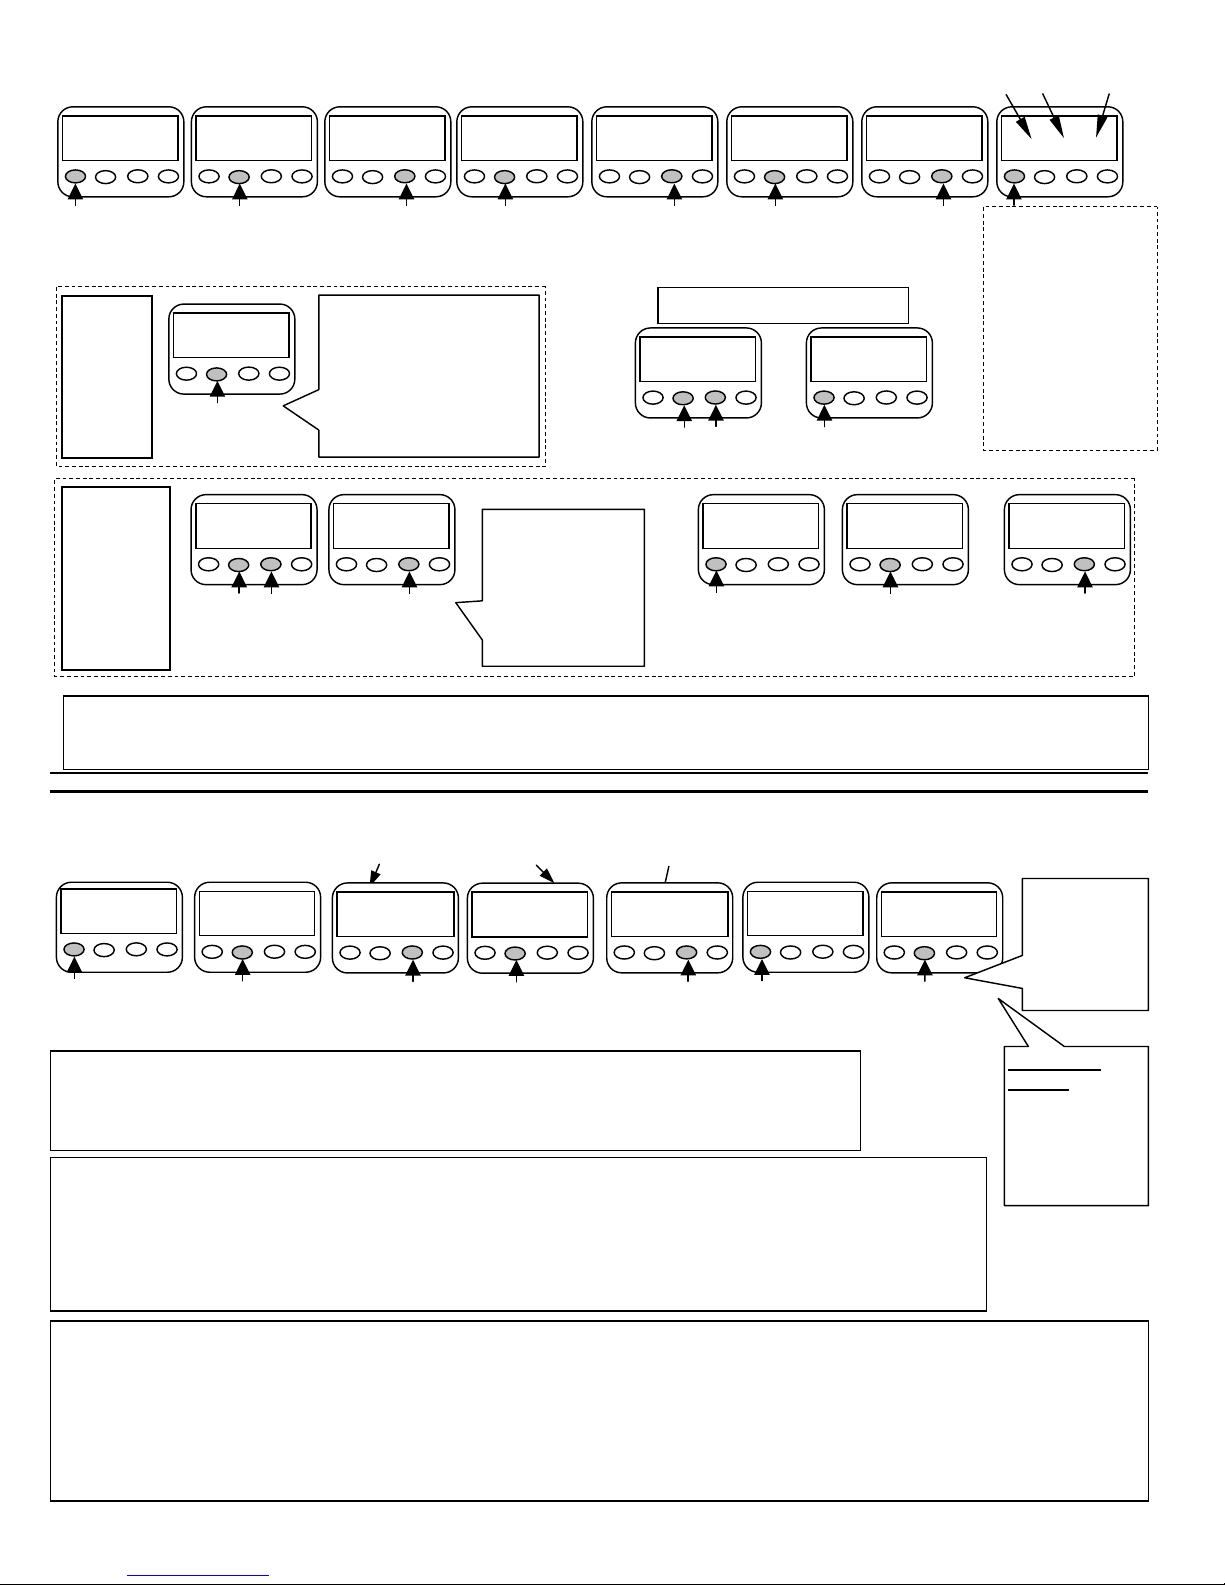
1. How to set Vibration Speed, Beep Volume and Number of Beeps. Vibration Speed (1 = low, 2 = medium, 3 = high),
Beep Volume (1-3), Number of beeps (1-6). (Factory settings are Vibration = 3; Beep volume = 3; Beep number = 3)
Time Date
VIB & BEEP
Advance to Vib
& Bee
Mode
2. How to set the Time and Date (The Invisible Clock-II will automatically adjust the time for daylight savings time; please see details
below on how to turn this feature on or off). (TIP: Hold Set button down to rapidly advance counting)
Time Date
TIME&DATE
Advance to
Time & Date
9-15
SET TIME
Adjust Day
3. How to use the Stopwatch
need the stopwatch to run while using other functions, stop it before leaving this mode.
Time SW
STOP-WATCH
Advance to
STOP-WATCH
Time Date
VIBRATE 3
Enter Adjustment
mode
pm5:12
SET TIME
Press twice,
hours will blink
Time Date
YEAR=2003
Advance to
Year
Time SW
0 : 00 : 00 : 00
Enter mode
Time Date
VIBRATE 1
Adjust
vibration
pm6:12
SET TIME
Select hour
(note AM/PM)
Time Date
YEAR=2003
Select Year (do not
push if correct year
is shown)
(TIP: You can start the Stopwatch and then leave this mode and it will continue to count. If you do not
Time Date
BEEPVOL-2
Advance to beep
volume
pm6:12
SET TIME
Advance to
minutes
TIP:
If you go past
the year you
want, continue
counting past
2040, to begin
again at 2003.
Time Date
BEEPVOL-3
Adjust beep
volume
m6:15
SET TIME
Adjust minutes
Time Date
D
AYLSAV=T?
Hold for 3 seconds
to access daylight
savings time on/off
Time SW
0 : 00 : 01 : 35
Start
Stopwatch
Time SW
0 : 00 : 24 : 32
Stop
Stopwatch
Time SW
0 : 00 : 00 : 00
Reset to zero
Time Now Corporation
U.S. patent pending
Display
Mode button
Enter button
Time Date
BEEPNO #3
Advance to
number of beeps
8-14
SET TIME
Advance to
month
Time Date
D
AYLSAV=on
Press to turn
daylight savings
time on or off
Time SW
0 : 00 : 37 : 21
Press while Stopwatch is
running to pause: Display
freezes, stopwatch still counts
TIME DATE
T I M E R S E T
Mode Enter Set Lite
To Exit from Timer and
Meeting Timer modes
push simultaneously, then
ress Mode button to exit
Time Date
BEEPNO #4
Adjust number
of beeps
9-14
SET TIME
Select month
ON = on
OFF = T?
Alarm Switch
V = vibration
O = off
B = beep
Lite: Press
once and
stays on for
12 seconds
Set button
Hold down for
rapid counting
ou only have to
Time Date
VIB & BEEP
Press to save
settings
9-14
SET TIME
Advance to
day
Time Date
TIME&DATE
Press twice to
save all settings
Time SW
0 : 00 : 43 : 28
Press to resume
display of counting
after pausing
®
t
p
4. How to use the Timer. The Timer can be set to countdown once, or set to repeat over and over.
pm2:33 8-13
TIMER SET
pm2:33 TIMER
00 : 00 : 00
pm2:33 TIMER
00 : 00 : 30
pm2:33 TIMER
00 : 00 : 30
pm2:33 TIMER
00 : 10 : 30
pm2:33 TIMER
00 : 10 : 30
pm2:33 TIMER
01 : 10 : 30
Hours Minutes Seconds
pm2:33 TIMER
01 : 10 : 29
Advance to
Timer Set
How to
set the
Timer to
Repeat
over &
over.
How to
ERASE a
countdown
time and
program a
new one
Enter Timer
mode
pm2:33 TIMER
R 00 : 10 : 30
Press until R
appears in screen
pm2:33 TIMER
01 : 10 : 13
To erase during a
countdown, press
simultaneously
Select Seconds
(press "Enter" to
skip seconds)
First set the countdown time
as shown in the above steps,
then before starting the timer,
press the "Enter" button until
R appears in the left of the
display, then press Mode
button to start the timer.
pm2:33 TIMER
00 : 00 : 00
Press to erase
countdown time
Advance to
minutes
Then to program in a
new countdown time
proceed as shown
starting with the 3rd
drawing in the very
first line at the top of
this page
Select minutes
Advance to
hours
To EXIT during a countdown
pm2:33 TIMER
01 : 10 : 13
Press simultaneously
until display blinks
pm2:33 8-13
TIMER SET
To erase countdown
time when countdown
is not running, advance
Select hours
pm2:33 8-13
TIMER SET
Exit
pm2:33 TIMER
01 : 10 : 13
Enter Timer
mode
Start countdown;
Countdown time in this
example =1hour, 10
minutes, 30 seconds.
When countdown = 0,
alarm vibrates or beeps
NOTE: Vibration
alert lasts for 20
seconds. Press any
button to turn off
vibration or beep.
pm2:33 TIMER
00 : 00 : 00
Press to erase.
NOTE: The Timer saves the last programmed time. When countdown is complete, this saved time is displayed. To use this time again, press Mode
to start the timer with this time. If you wish to use this time again but have gone to another mode, go to TIMER SET via the Mode button, press
Enter once and press Mode to start this countdown time (you can wait as long as you wish to press Mode to start the countdown).
5. How to set Alarms. Up to 12 Alarms may be set. NOTE: The Alarm auto-protect feature requires that you hold the Enter
button down for 3 seconds to enter the Alarms mode - see instructions below on how to do this.
pm2:53 8-13
ALARMS SET
pm2:53 AM -:--
ALM01-SET
Advance to
ALARMS SET
TIP 1: To set multiple alarms or to check your set alarms, use the Enter button to scroll through se
alarms. To set additional alarms go to a blank setting, then continue as in drawing #3 above.
TIP 2: Vibration alert = 20 seconds. Press any button to stop alert. If you press the Lite button, it
s the alert and engages the snooze feature - see Note 3 below about the snooze button.
sto
Note 1. A set alarm will signal in all other modes unless alarm switch (on side of unit) is set to O (off). An alarm
remains set after its time has passed, and will sound again every successive day until it is erased.
Note 2. Set alarms are automatically organized in the order of next to go off, according to the time of day. In other
words, when you check your set alarms, ALARM 01 will be the next to signal, then ALARM 02…etc.
Note 3. SNOOZE button - When an alarm signals, press the light button to turn off the alarm and engage the
snooze feature; the alarm turns back on automatically after 5 minutes. You can only do this once with each alarm.
Hold for 3
seconds to enter
mode
Time now Alarm time being set Alarm number
pm2:53 AM -:30
ALM01-SET
Adjust minutes
pm2:53 AM 0:30
ALM01-SET
Advance to hours
(Note: AM/PM)
pm2:53 AM 7:30
ALM01-SET
Adjust hours
(Note: AM/PM)
pm2:53 AM 7:30
ALM01-SET
Set this alarm
pm2:53 AM -:--
ALM02-SET
Advance to set
another alarm (to
Exit press Mode)
Continue as in
step 3 in this
line. Finish by
setting the
alarm with the
mode button
To Erase an
Alarm: Go to the
Alarm you want to
erase, then press
Enter & Set
simultaneously; to
exit press Mode.
Erasing an Alarm: To erase an existing alarm, (a) use the Mode button to advance to “ALARMS SET”; (b) use the Enter button to
select the number of the alarm that you wish to erase; (c) Press both the Enter and Set buttons simultaneously. This will erase the
alarm’s time, and therefore will erase the alarm itself.
Changing the Time of an Existing Alarm: To change the time of an existing alarm, (a) use the Mode button to advance to
“ALARMS SET”; (b) Use the Enter button to select the number of the alarm that you wish to modify; (c) Use the Set button to change
the minutes, then press the Enter button to shift to the hours, which you may change with the Set button; (d) Press the Mode button to
accept the change.
 Loading...