

Page 1

SII Products
ANALOGUE QUARTZ
TECHNICAL GUIDE
&
PARTS CATALOGUE
Cal.VK Series
Issued on : 05. Jan. 2011
Page 2
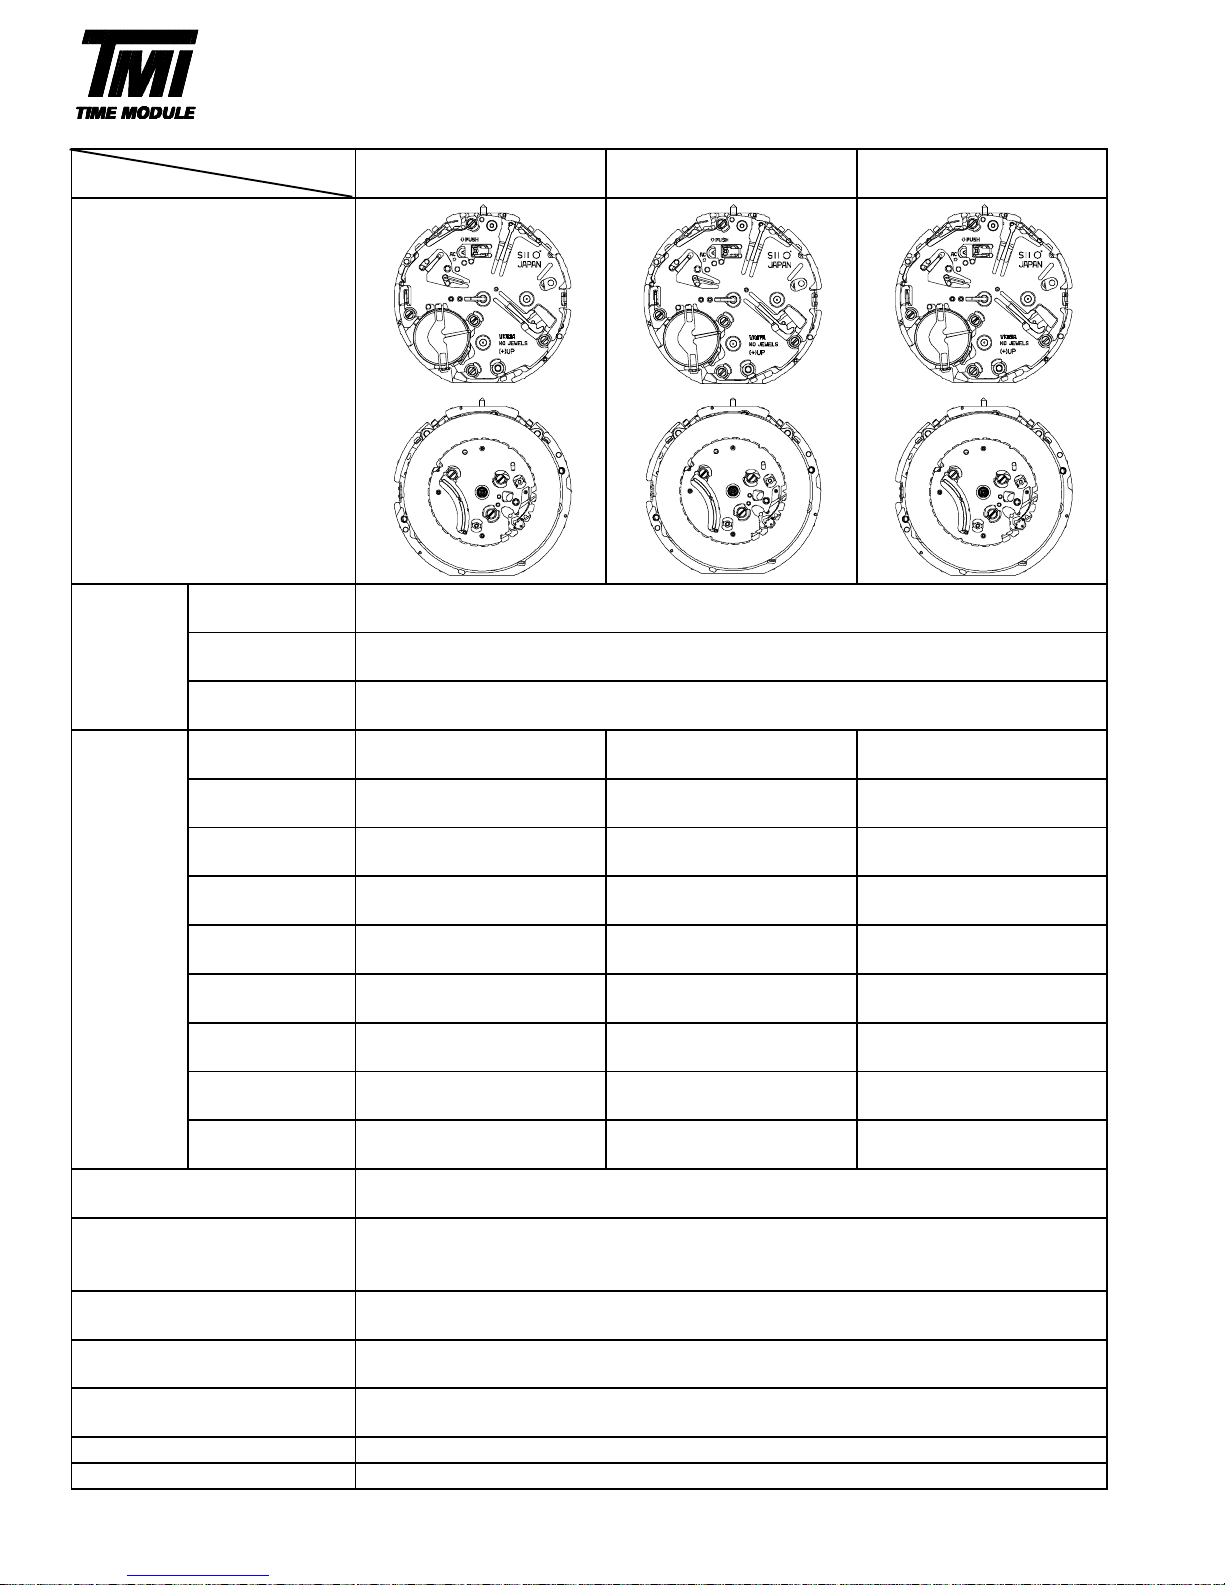
[SPECIFICATION]
Date display with quick correction
Electronic circuit reset switch
Time setting with stop-second
≧ 1600 A/m
Less than ± 20seconds : Monthly rate at normal temperature range
SR936SW (Silver oxide battery )
Battery life is approximately 3 years (60 minutes chronograph operation per day)
O - -
Two pole stepping motor
Step motor 2 pieces
- O
O --
O
- O
O O
O O
O
60 second per round
O O
-
φ 30.80 mm × 29.10 mm ( 3H - 9H )
φ 29.00 mm
5.10 mm
O
-
O
O
60 second per round
O -
O
O
60 second per round
Casing diameter
Movement
Movement
size
VK63
SII Products
PARTS CATALOGUE / TECHNICAL GUIDE
Cal. No.
Item
Cal. VK Series
VK67 VK83
Total height
Version-01
Outside diameter
Antimagnetic
12 hours counter
( 9H )
24 hour indicator
( 3H )
1
Measuring gate by quartz tester
Battery
Accuracy
Jewels
Use 10-second gate
*Set the winding stem with crown at the normal position
0 Jewel
20 minutes counter
( 9H )
Date Calendar
Time
indication
Additional mechanism
Driving System
2Hands
(hour , minute)
Small second
hand ( 6H )
Center chronograph
( 1/5 second )
60 minutes counter
( 12H )
60 minutes counter
( 9H )
Page 3
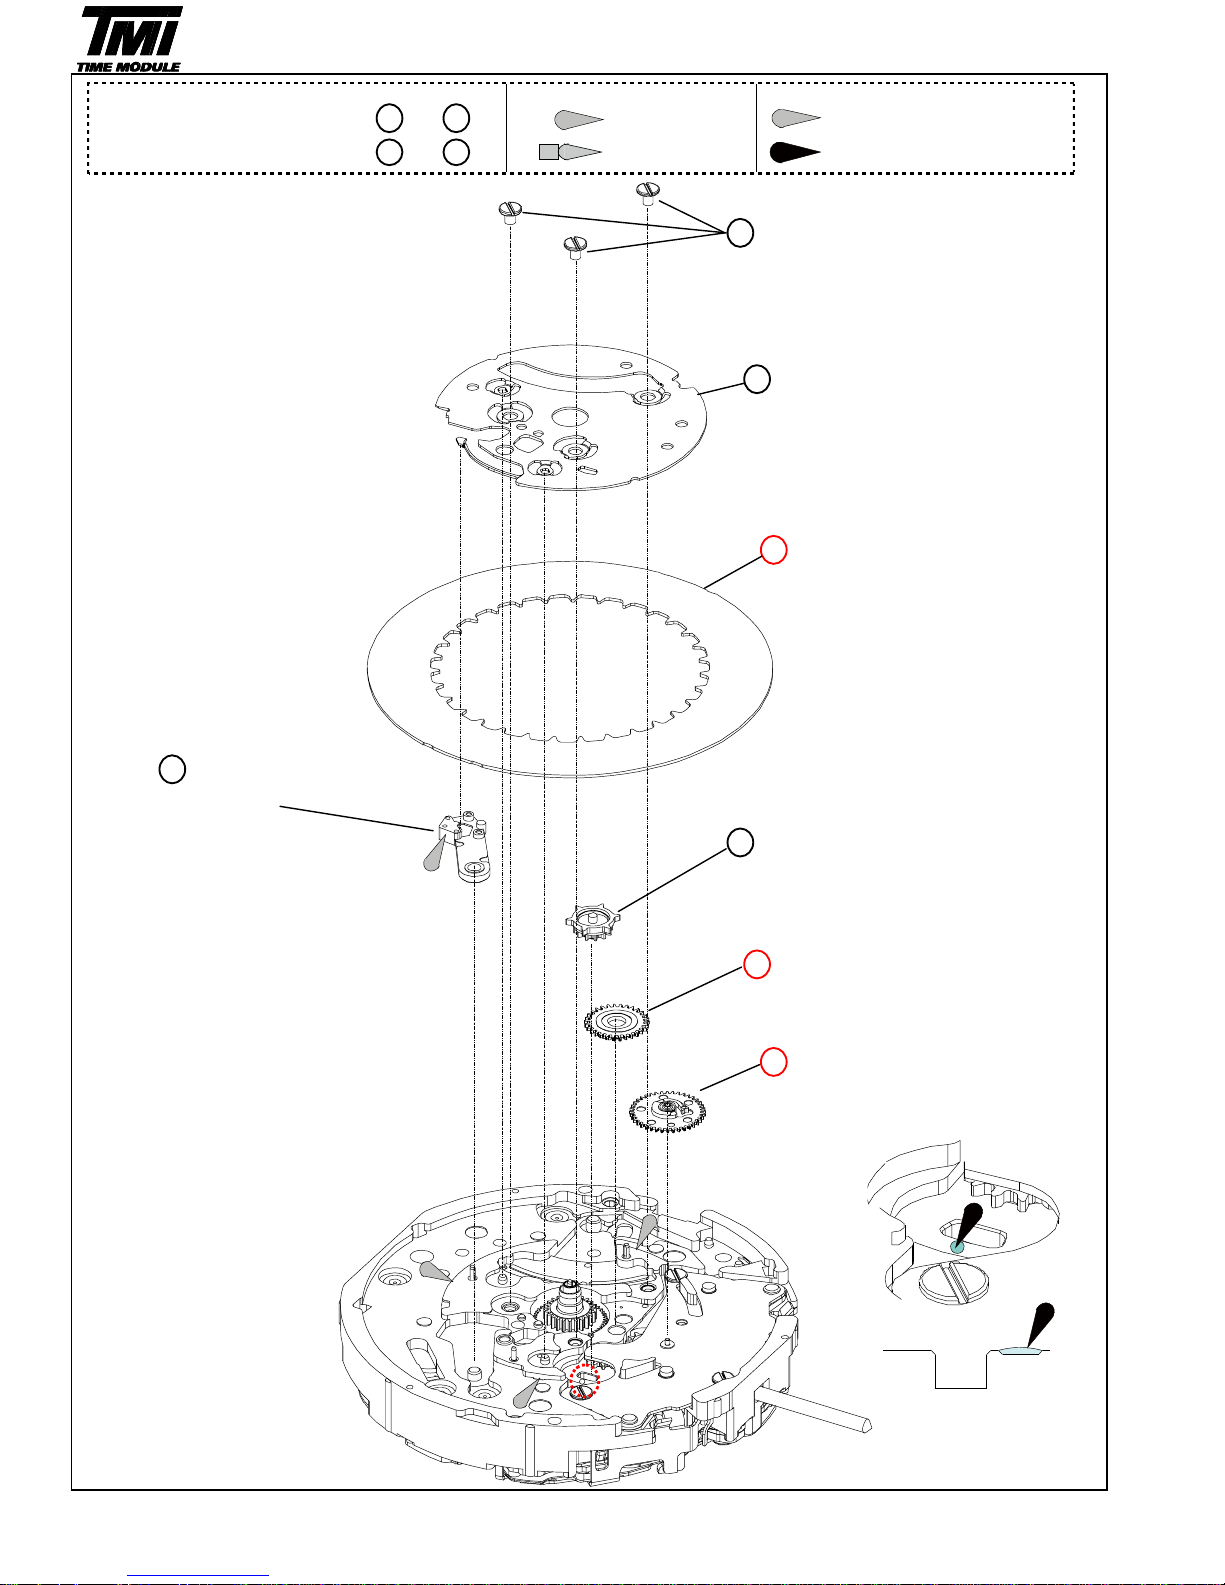
Type of oil Oil quantity mark
Moebius A NORMAL QUANTITY
Moebius F SUFFICIENT QUANTITY
0012 354
Date indicator maintaining plate screw
0808 052
Date indicator maintaining plate
Date dial
0810 019
Date jumper
0806 002
Date corrector wheel
2
1
7
2
3
[ Cross section ]
Refer to page 7 for each parts code.
Refer to page 7 for each parts code.
Refer to page 7 for each parts code.
SII Products
Disassembling procedures Figs.
1
→
62
4
5
6
Version-01
VK Series
PARTS CATALOGUE
Reassembling procedures Figs.
62
→
1
*1
*1
Page 4

0273 038
Hour wheel
0012 354
Switch lever holder screw
0837 005
Switch lever holder
4450 017
Switch lever A
4450 018
Switch lever B
0962 891
0962 013
SII Products
3
Version-01
VK Series
PARTS CATALOGUE
8
9
10
11
12
14
Date corrector setting
transmission wheel C
13
Date corrector setting
transmission wheel B
Page 5
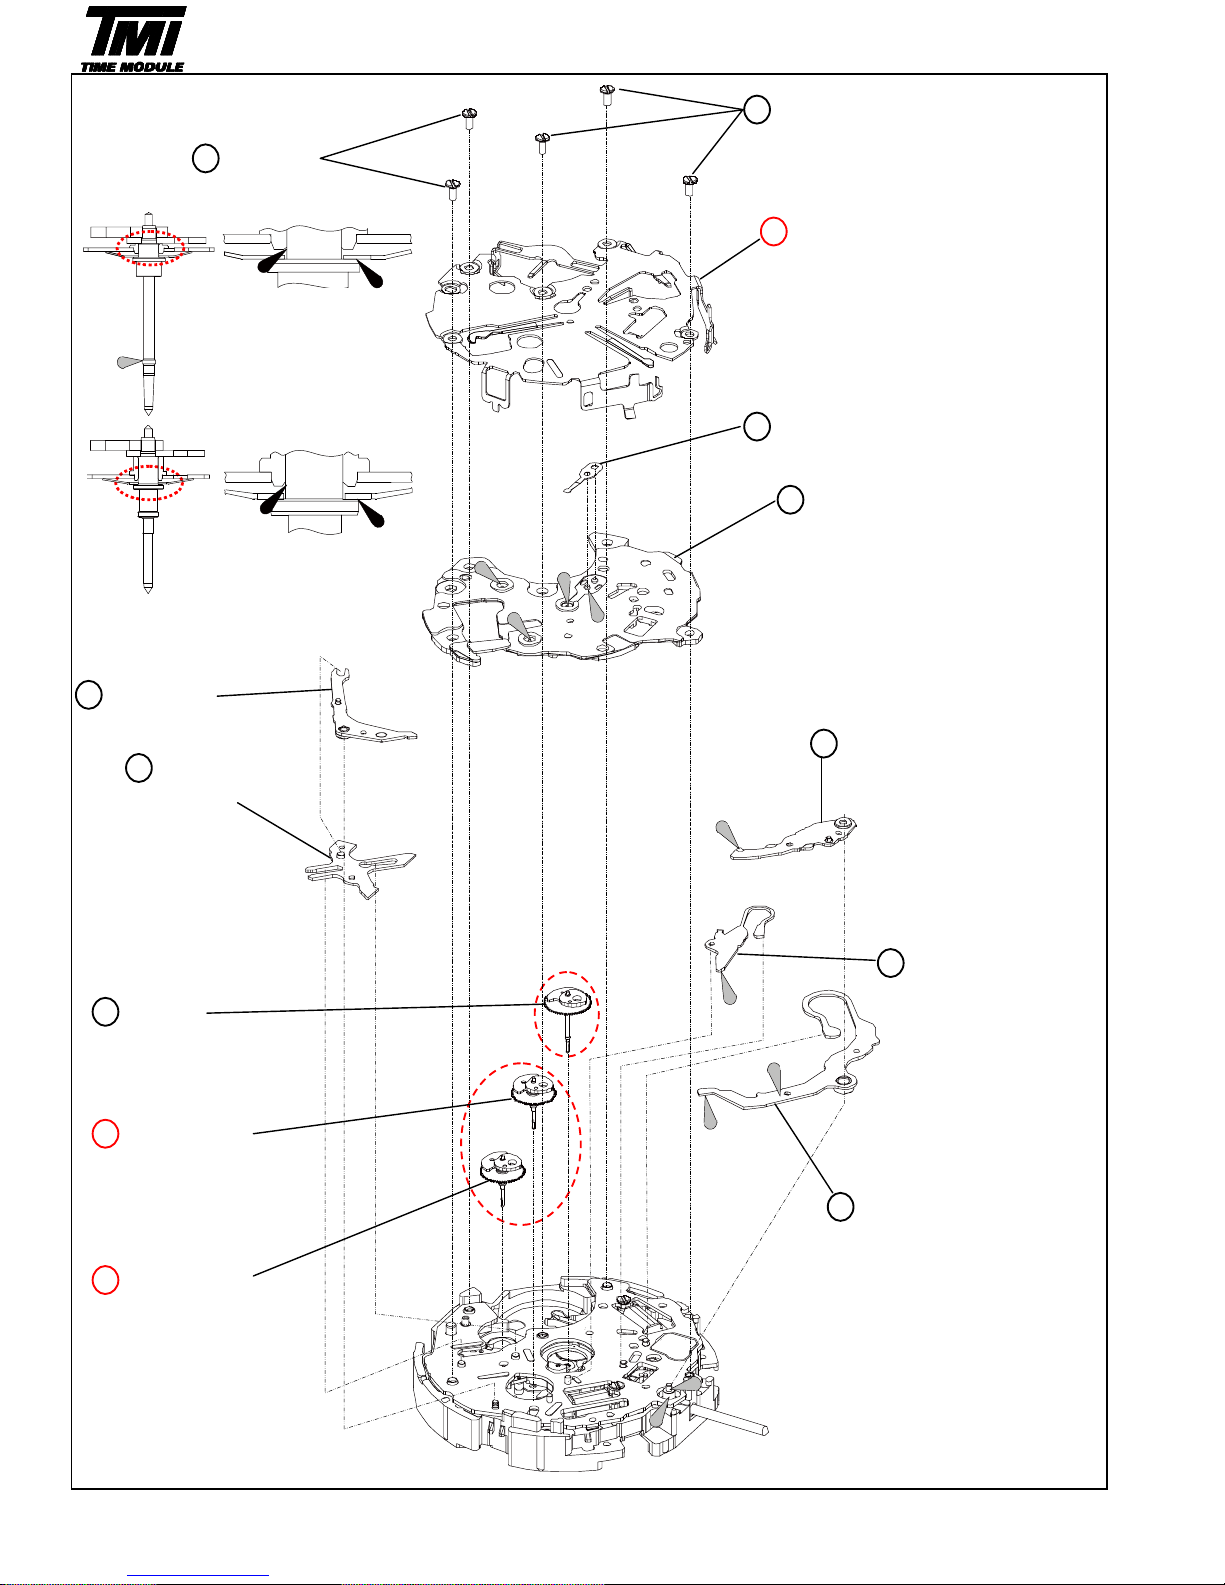
0016 121
Switch spring screw
0016 121
Switch spring screw
Switch spring
**
&
***
0353 018
Second counting wheel friction spring
0190 007
Chronograph bridge
0587 006 ***
0581 007 ***
0585 013 ** & *** Chronograph coupling lever
Hammer
0894 002 ***
Train wheel stop lever
0888 017
0587 004 ***
Hammer operating lever A
23
Hammer operation lever B
Refer to page 7 for each parts code.
20
22
25
Second counting
wheel
19
21
Refer to page 7
for each parts code
Version-01
VK Series
15
SII Products
4
26
** Refer to page 9 for
oiling spot.
*** Refer to page 10 for
spring setting position.
24
18
15
Refer to page 7
for each parts code
PARTS CATALOGUE
16
17
*1
*2
*1
*2
Page 6
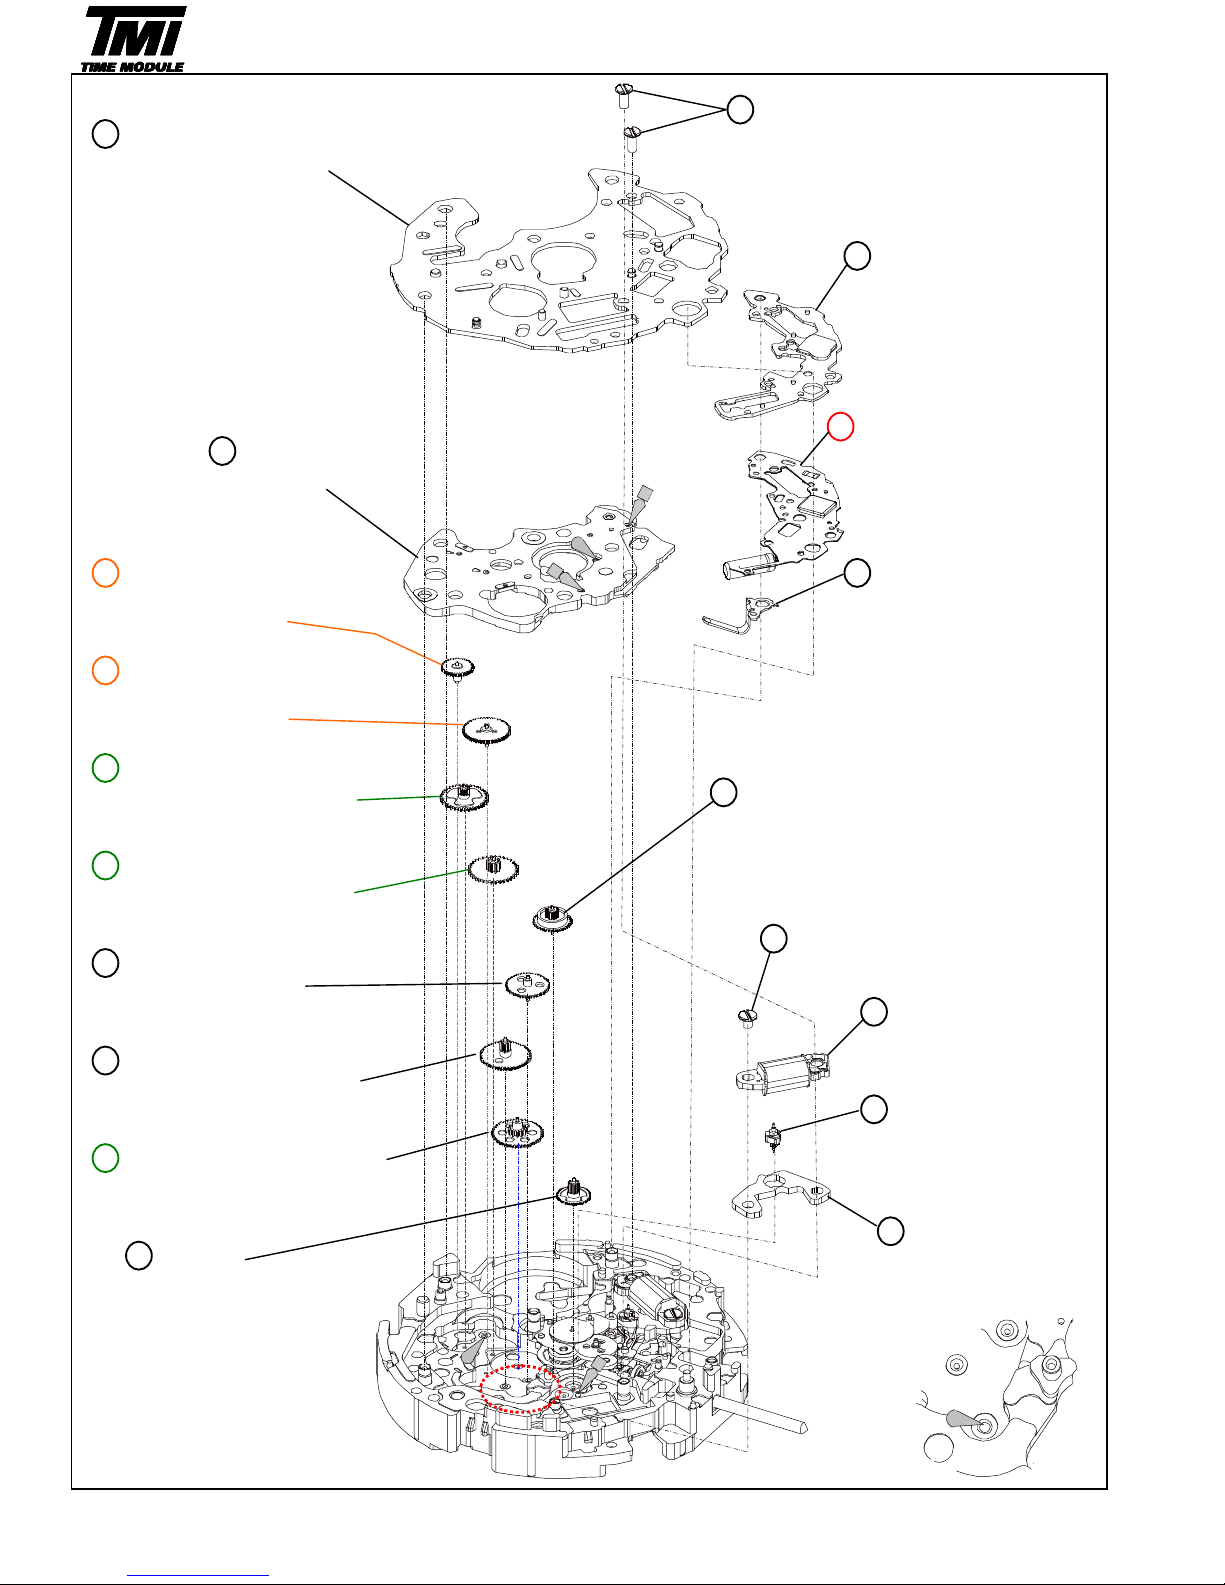
0016 121
0186 002 **
Lower plate for chronograph bridge
4408 149
Circuit block spacer
Circuit block
0125 316
Train wheel bridge
4270 336
Battery connection (-)
0885 003
0012 354
0886 004 **** Coil block screw
4002 054
Coil block A
0886 005 ****
4146 063
Step rotor
4239 063
0701 015 Stator A
Fifth wheel and pinion
5
28
29
30
Refer to page 7 for
each parts code.
31
39
40
SII Products
35
VK Series
PARTS CATALOGUE
Version-01
32
27
Lower plate for chronograph bridge screw
33
Minute counter intermediate
wheel and pinion C
34
Minute counter intermediate
wheel and pinion B
0886 007 …Cal.VK63 / VK83 ****
0886 006 …Cal.VK63 / VK83 ****
33
Hour counter intermediate
wheel and pinion C
34
Hour counter intermediate
wheel and pinion B
0885 006 …Cal.VK67 only ****
0885 005 …Cal.VK67 only ****
Second counter intermediate
wheel and pinion
42
36
Counter intermediate
wheel and pinion
37
38 0885 004 …Cal.VK67 only ****
** Refer to page 9 for
oiling spot.
**** Refer to page 8 for
assembling of
chronograph wheel.
43
Hour counter intermediate
wheel and pinion A
41
Minute counter intermediate
wheel and pinion A
*1
*1
Page 7
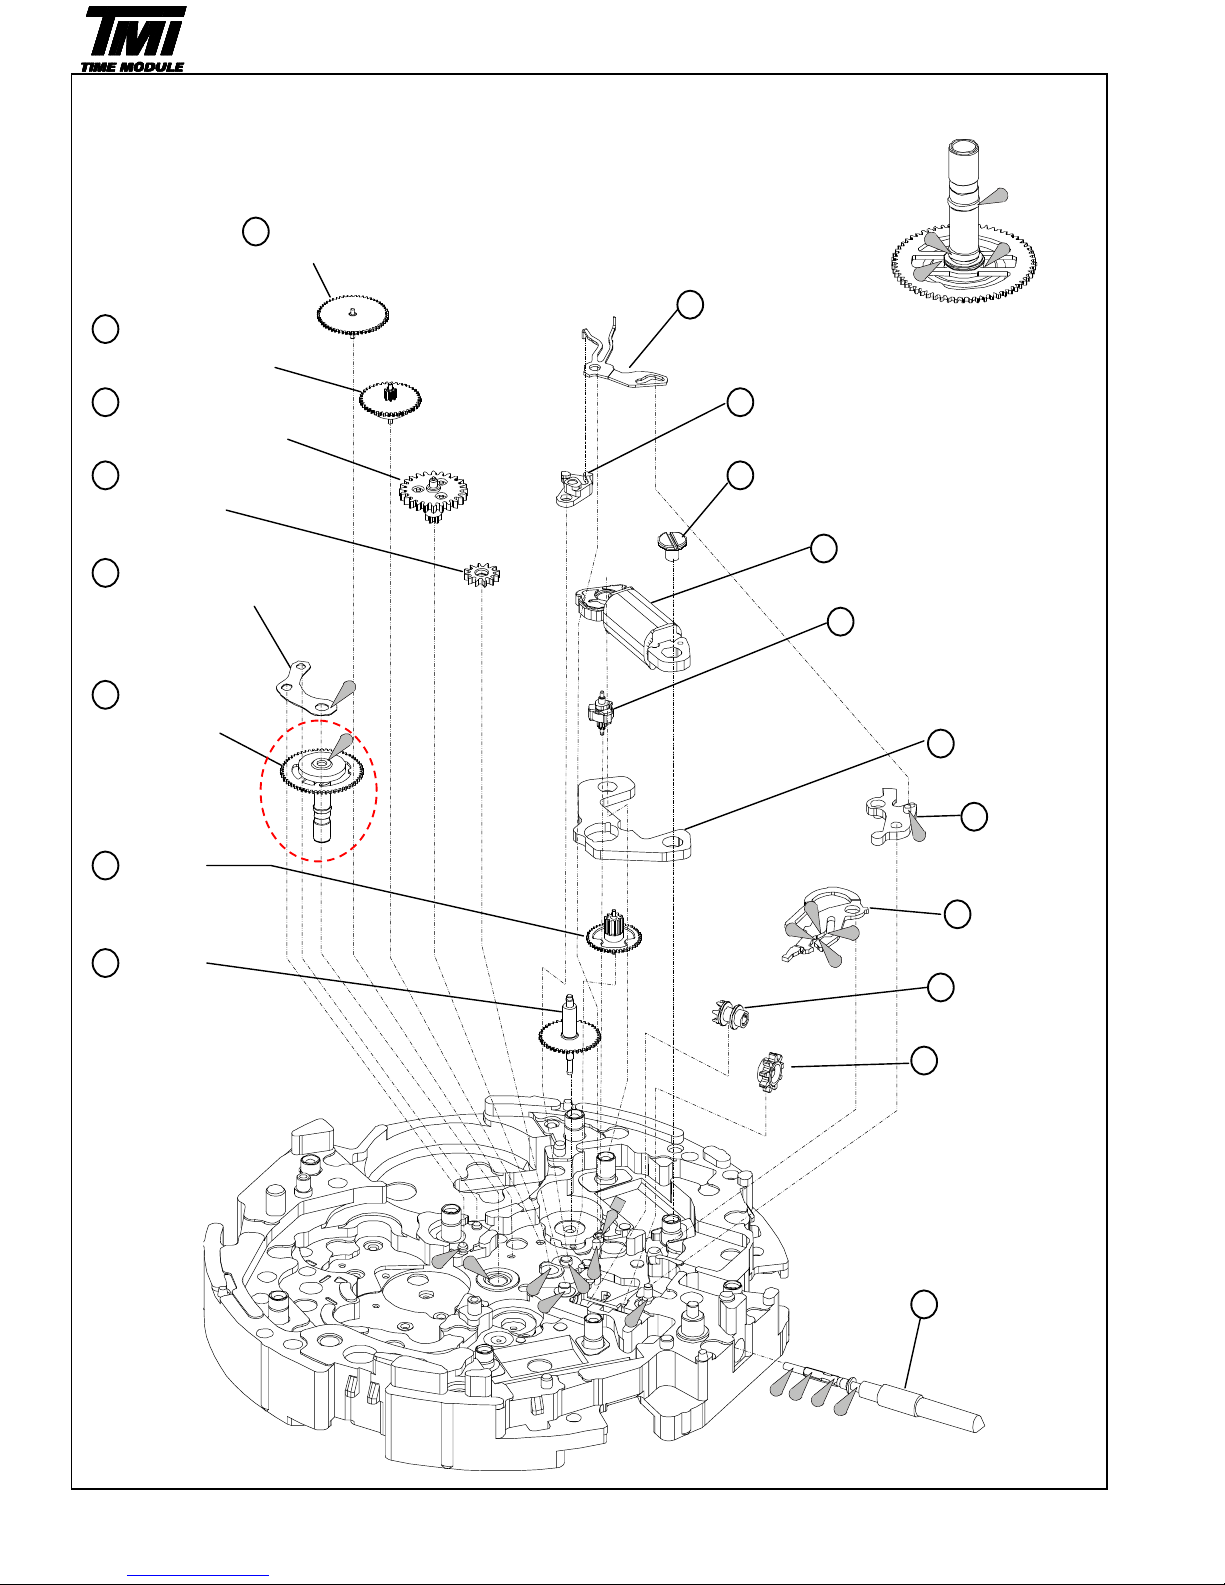
0231 043
Third wheel and pinion
4455 006
0144 002 Reset lever
Fourth wheel and pinion
0261 026 0391 028
Minute wheel and pinion Train wheel setting lever
0281 452 0012 354
Setting wheel Coil block screw
4002 055
4283 042 Coil block B
4146 063
Step rotor
0221 087
4239 064
Stator B
0383 891
0701 015
0384 024
Yoke
0240 018
Second wheel 0282 452
Clutch wheel
0962 012
0351 177
Winding stem
6
PARTS CATALOGUE
Version-01
VK Series
SII Products
61
62
Date corrector
setting transmission
wheel A
60
45
44
46
47 51
Setting lever
48 52
53
49
Center wheel and pinion bridge
54
50
55
Fifth wheel and pinion
59
57
Center wheel and pinion
58
56
*1
*1
Page 8
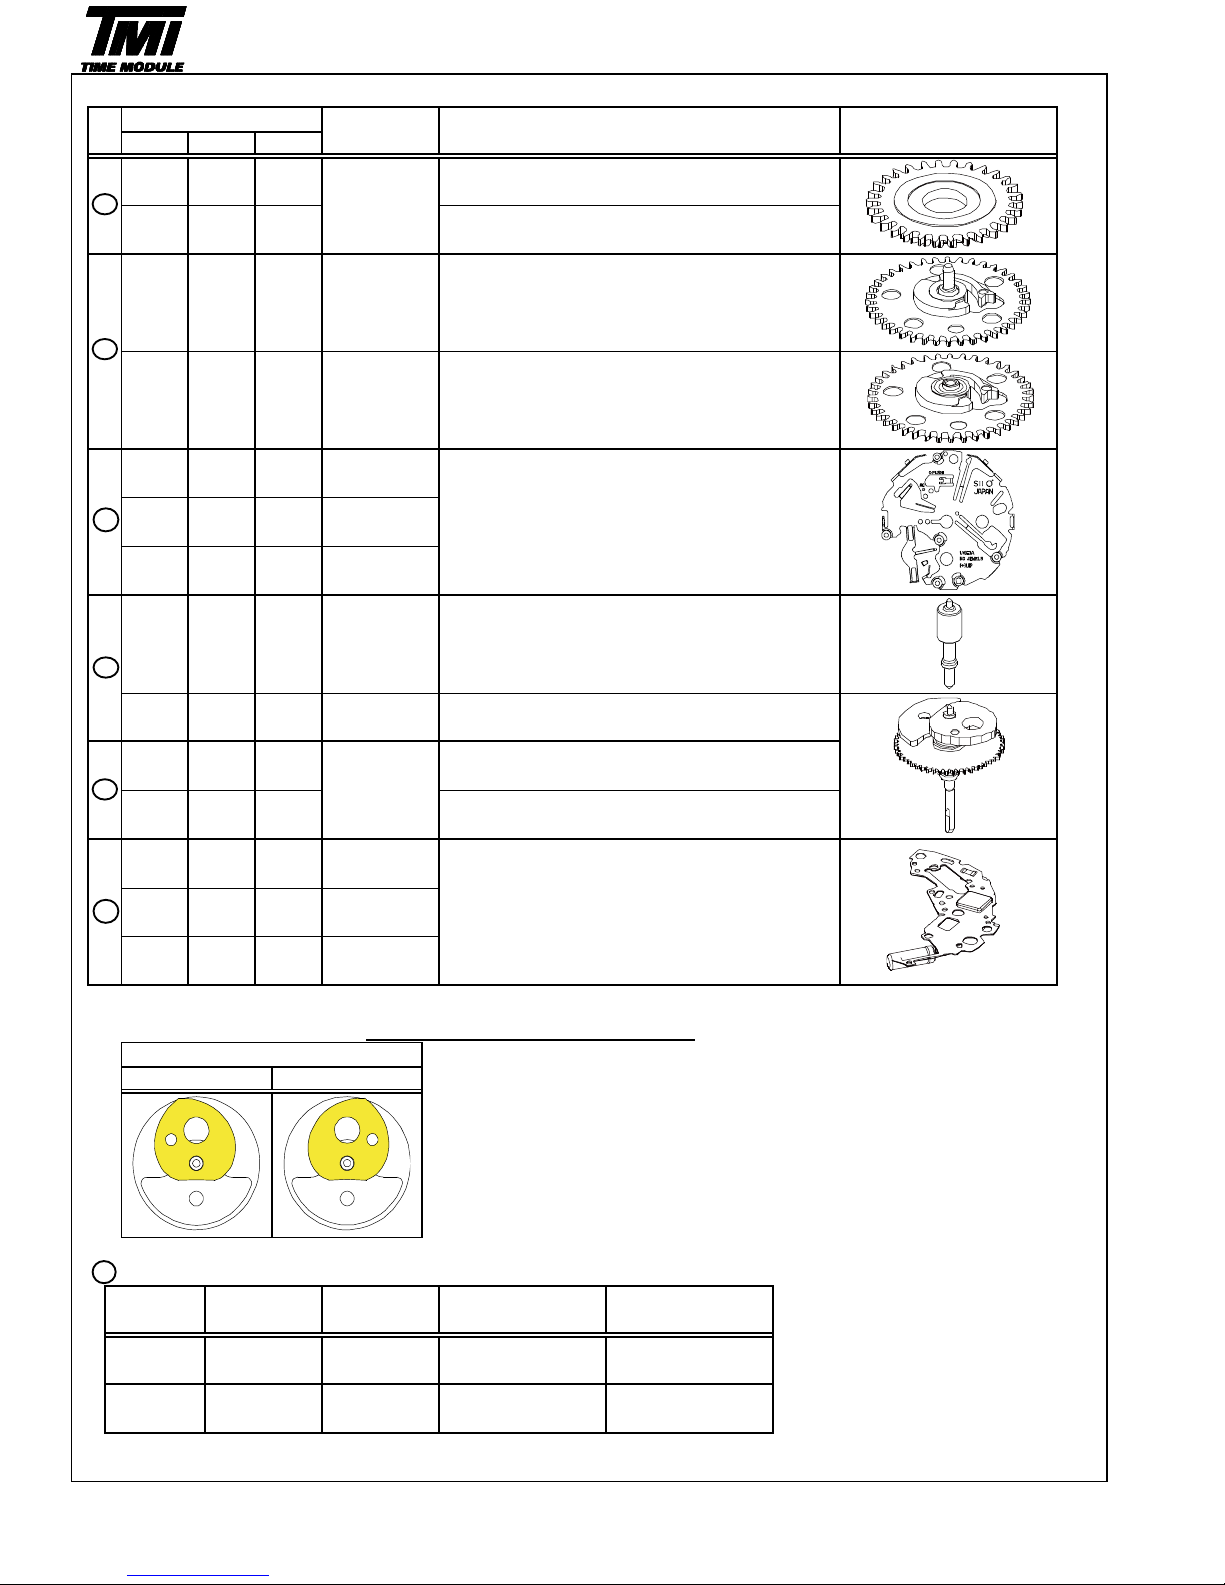
Remarks: Different parts for each CAL.
[ NOTE ]
How to distinguish between "Parts code: 0902-011 and 0740-002"
Confirm shape difference to distinguish each parts.
Date dial …Cal.VK63 / 67/ 83 common parts
PARTS CATALOGUE
Version-01
VK Series
No
Cal.
Parts code Parts name Parts form
VK63
VK67
7
SII Products
VK83
6
O - O
0817 048
Intermediate small hour hand wheel and pinion
- O -
Intermediate date wheel and pinion
7
O - O
- O -
0802 039
0685 002
0157 012 Small hour hand wheel
Date indicator driving wheel
23
O - O
Positioning arbor
- O -
0902 011
Minute counting wheel
24
O - O
- O -
4004 253
Hour counting wheel
0740 002
Minute counting wheel
Color of figure
Color of
background
0878 328 3H 3H (4.5H) Black White
3
Parts code
Crown
position
Date
position
-
-
16
O - -
--
-O
O
30
4004 277
O--
- O -
4004 252
Parts code
Circuit block
O-
Switch spring
( Differs by Cal. marking )
4250 035
4250 034
4250 047
0740 002
0902 011
Page 9
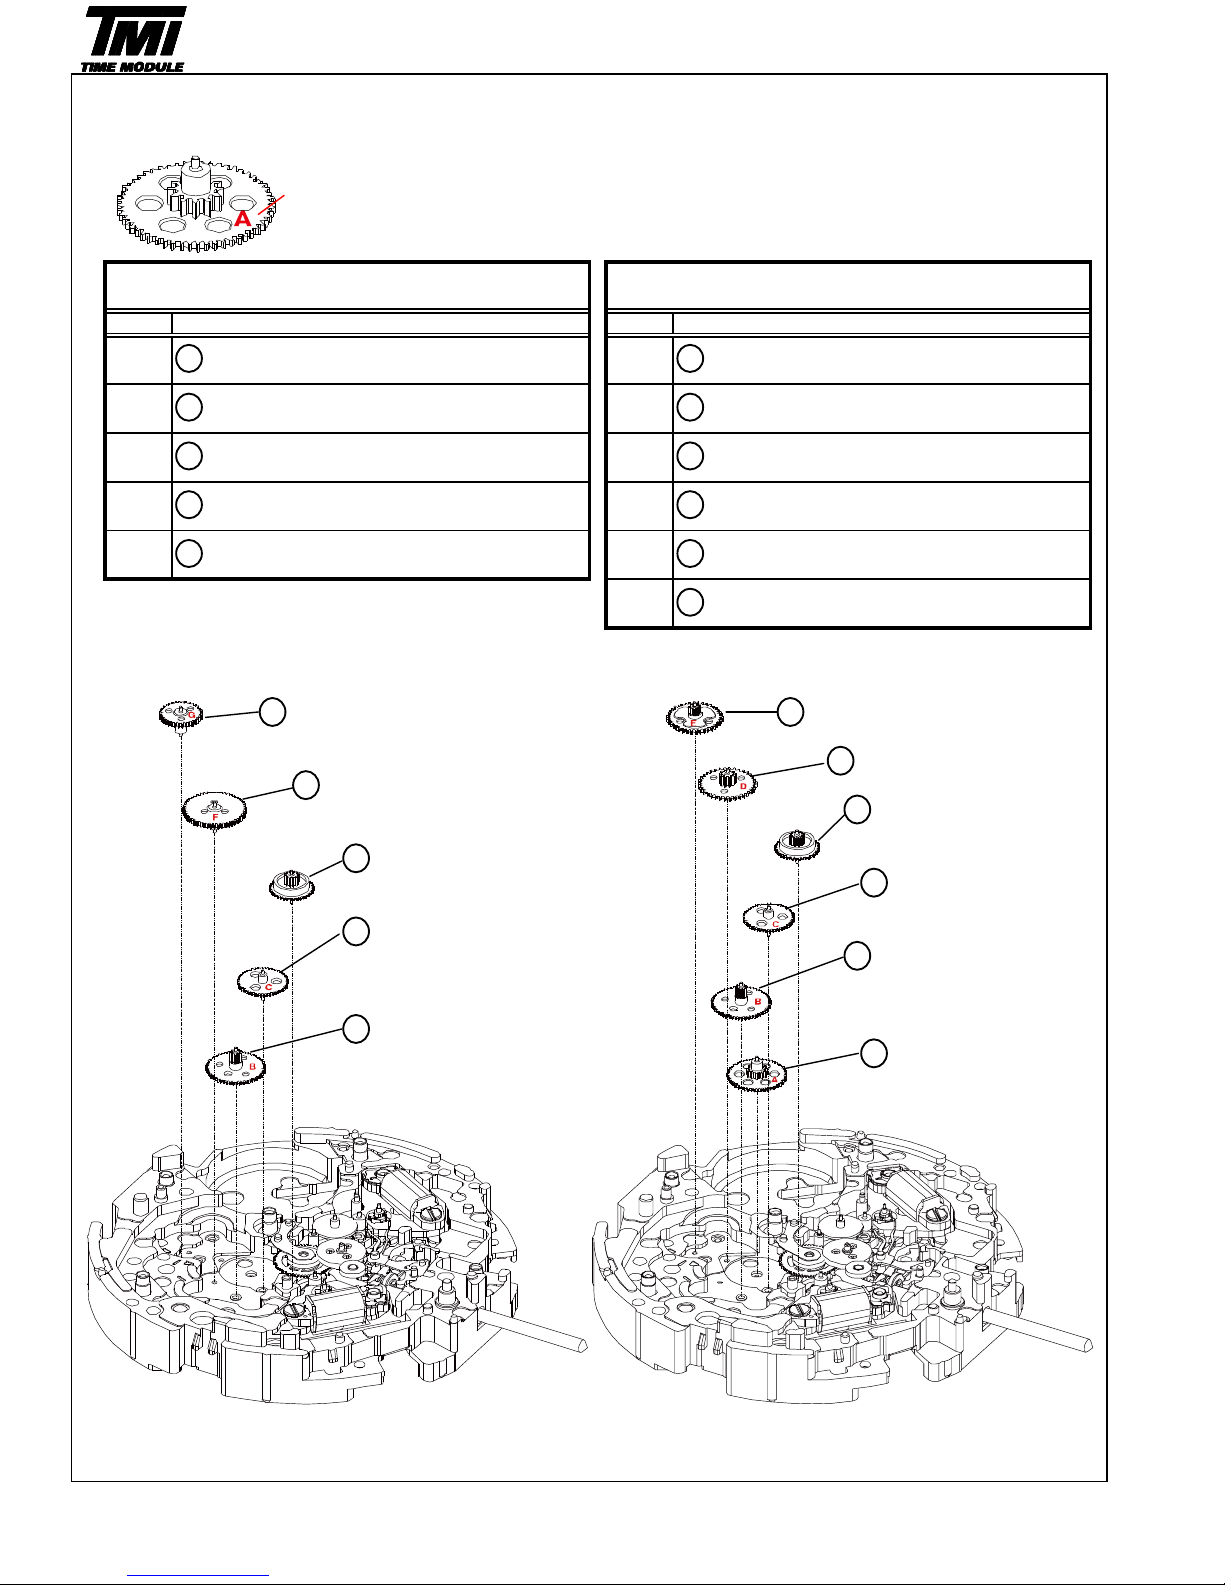
1.Detailed assembling of chronograph wheel
[ NOTE ]
There is a mark on parts. Parts are set in order of the mark as shown in the table below.
Image example of the mark
*Mark positions, and sizes, etc. are different.
[ Cal.VK63 and VK83 ] [ Cal.VK67 ]
B
37
Minute counter intermediate wheel and pinion A
C
35
Second counter intermediate wheel and pinion
Hour counter intermediate wheel and pinion B
35
Second counter intermediate
wheel and pinion
Hour counter intermediate wheel and pinion C
33
33
Hour counter intermediate
wheel and pinion C
34
Hour counter intermediate
wheel and pinion B
35
Second counter intermediate wheel and pinion
37
36
34
34
3638Counter intermediate wheel and pinion
Nil
8
SII Products
36
G
33
Nil
E
F
Hour counter intermediate wheel and pinion A
33
34
36
Counter intermediate
wheel and pinion
35
A
Minute counter intermediate wheel and pinion B
Minute counter intermediate wheel and pinion C
D
B
C
Minute counter intermediate wheel and pinion A
Counter intermediate wheel and pinion
TECHNICAL GUIDE
Version-01
VK Series
Parts name
[ Cal.VK63 and VK83 ] [ Cal.VK67 ]
Mark
Parts name
Mark
38
Hour counter
intermediate
wheel and pinion A
37
Minute counter
intermediate
wheel and pinion A
37
Minute counter
intermediate
wheel and pinion A
Minute counter intermediate
wheel and pinion C
Minute counter intermediate
wheel and pinion B
Counter intermediate
wheel and pinion
Second counter intermediate
wheel and pinion
Page 10
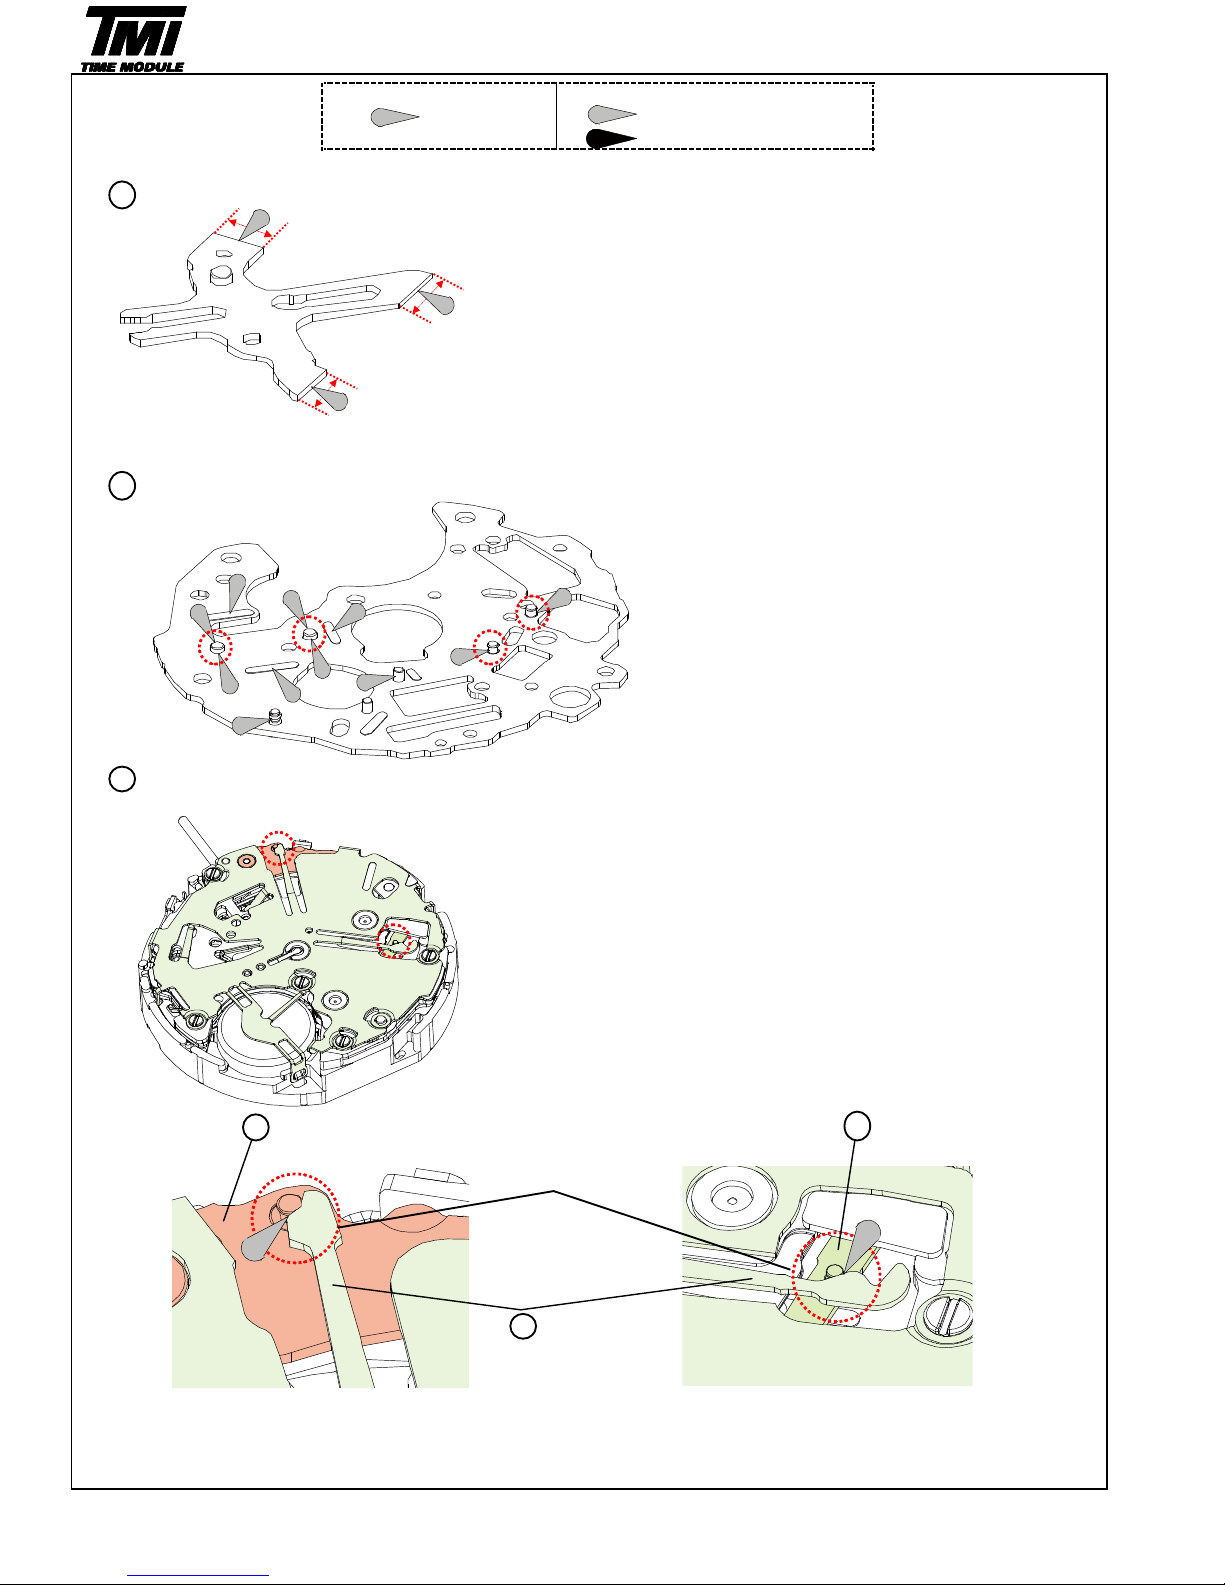
Type of oil
Oil quantity mark
Moebius A
NORMAL QUANTITY
SUFFICIENT QUANTITY
2.Oiling spot
Hammer
There must be oil within the range of the arrow.
Lower plate for chronograph bridge
Note
Switch spring
*Oiling spot and spring setting position.
Chronograph coupling lever Hammer operation lever B
Setting position
Switch spring
TECHNICAL GUIDE
Version-01
VK Series
16
*1
: Oiling should be done on the pointed
spot of marked place.
*Oiling should be done on the contact spot of the spring and the pin.
SII Products
9
21
28
16
19 20
*1
*1
*1
*1
*2
*3
*2
*3
Page 11
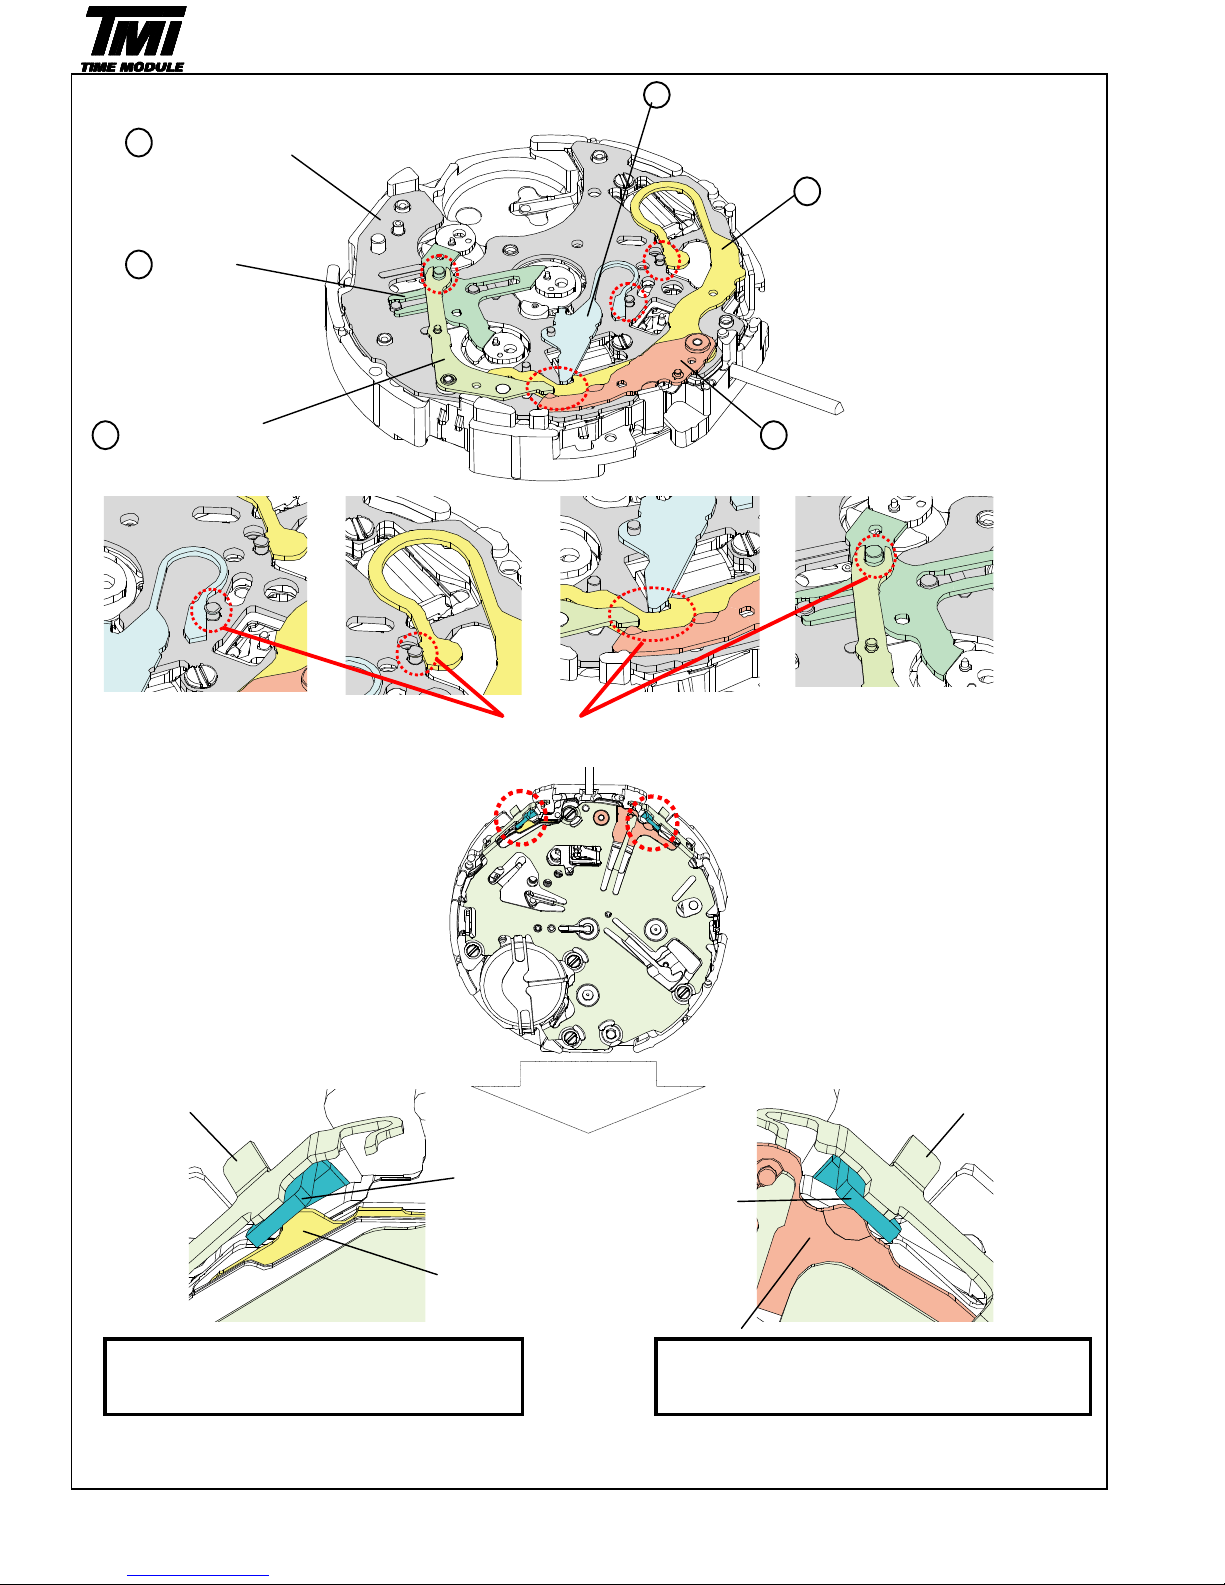
3.Spring setting position
Train wheel stop lever
Lower plate for chronograph bridge
Hammer operating lever A
Hammer
Hammer operation lever B Chronograph coupling lever
4.Switch lever A and B setting position
Switch spring Switch spring
Switch lever B
Switch lever A
Hammer operation lever A
Chronograph coupling lever
Switch lever B is set between the
switch spring and hammer operation lever A .
Switch lever A is set between the
switch spring and chronograph coupling lever.
19
Setting position
Version-01
VK Series
SII Products
10
TECHNICAL GUIDE
25
28
26
21
20
*1
*1
*2
*2
*3
*3
*4
*4
*1
*2
Enlarged view
*1
*2
Page 12
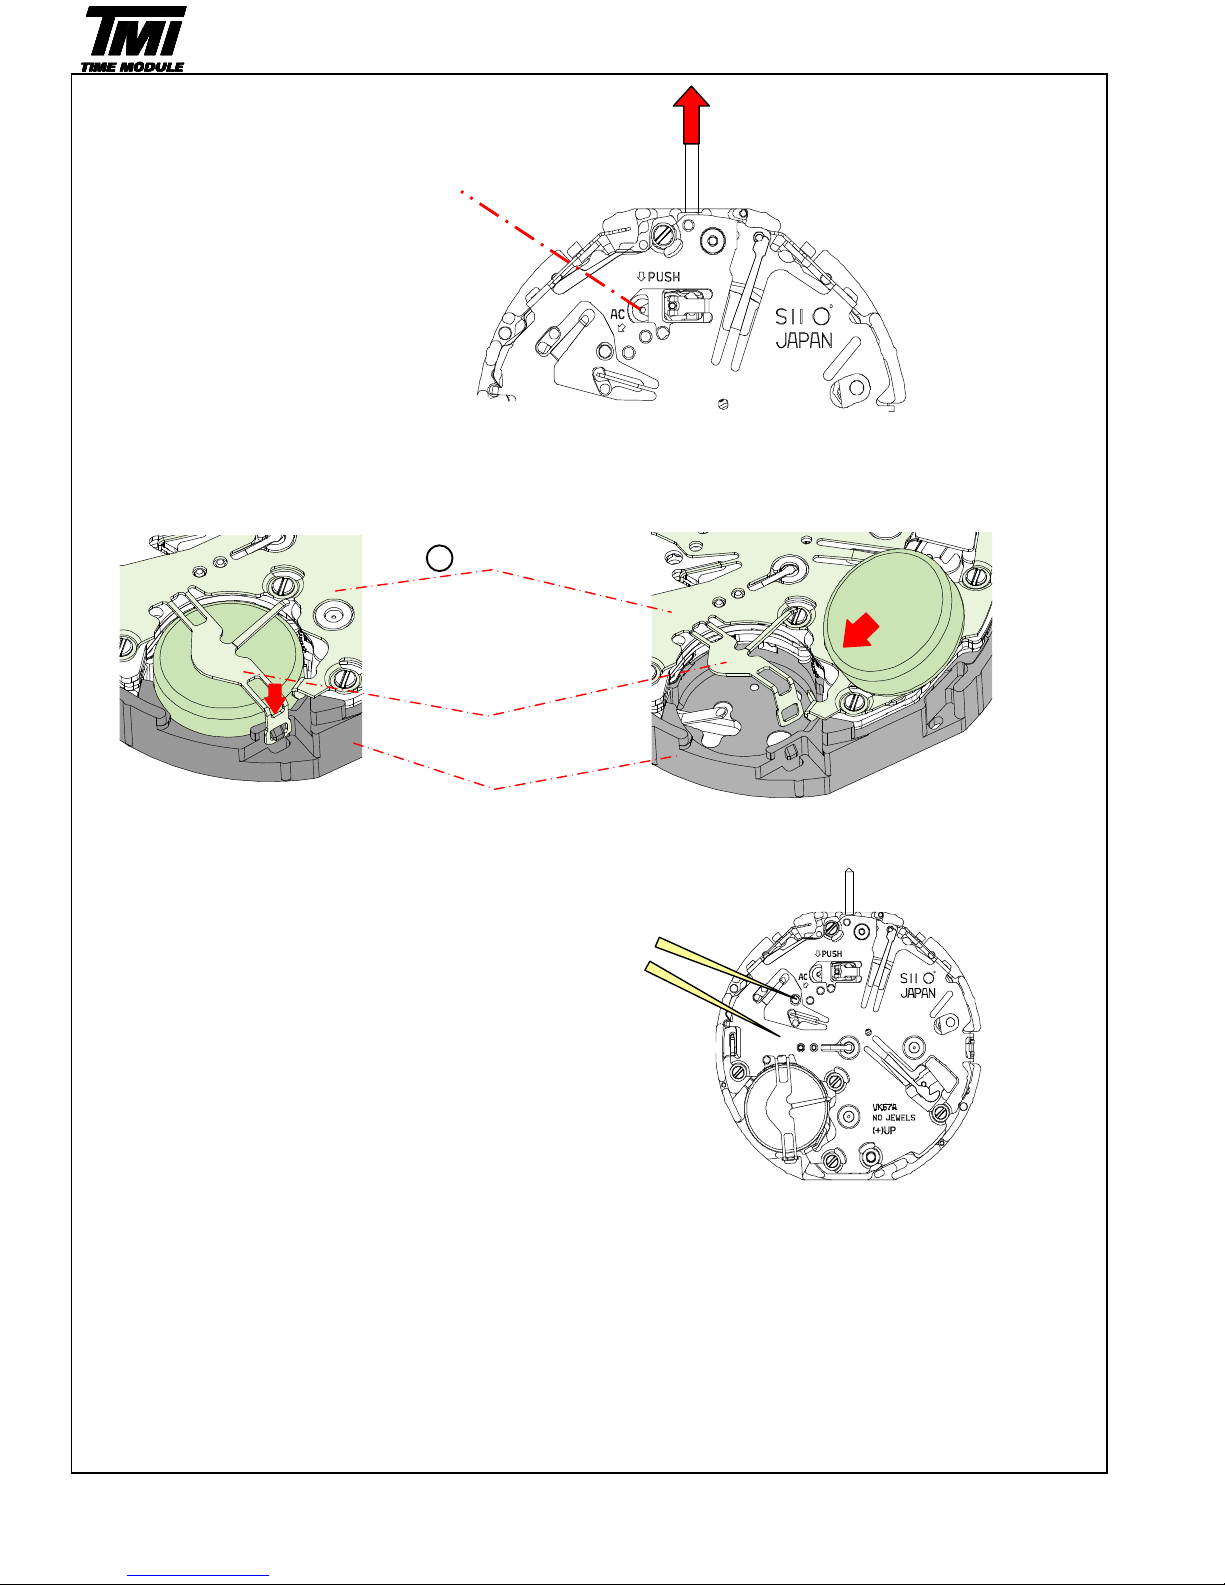
5.To remove the winding stem
1) Set the winding stem to normal position.
2) Pull out the winding stem while pushing "A".
Push "A"
6.To remove or install the battery
1) Remove the hook of the switch spring's battery clamp.
2) Insert the battery sideways, and have the hook of the switch spring's battery clamp catch the main plate.
Switch spring
Battery clamp
1) When Removing Main plate 2) When Installing
7.Remarks on installing the battery
1) After the battery is replaced with a new one, or after the
battery is reinstalled following the repairing procedures, Tweezers
be sure to touch the AC terminal of circuit block and
the switch spring with conductive tweezers to reset
the circuit as illustrated.
SII Products
11
TECHNICAL GUIDE
16
Version-01
VK Series
Page 13
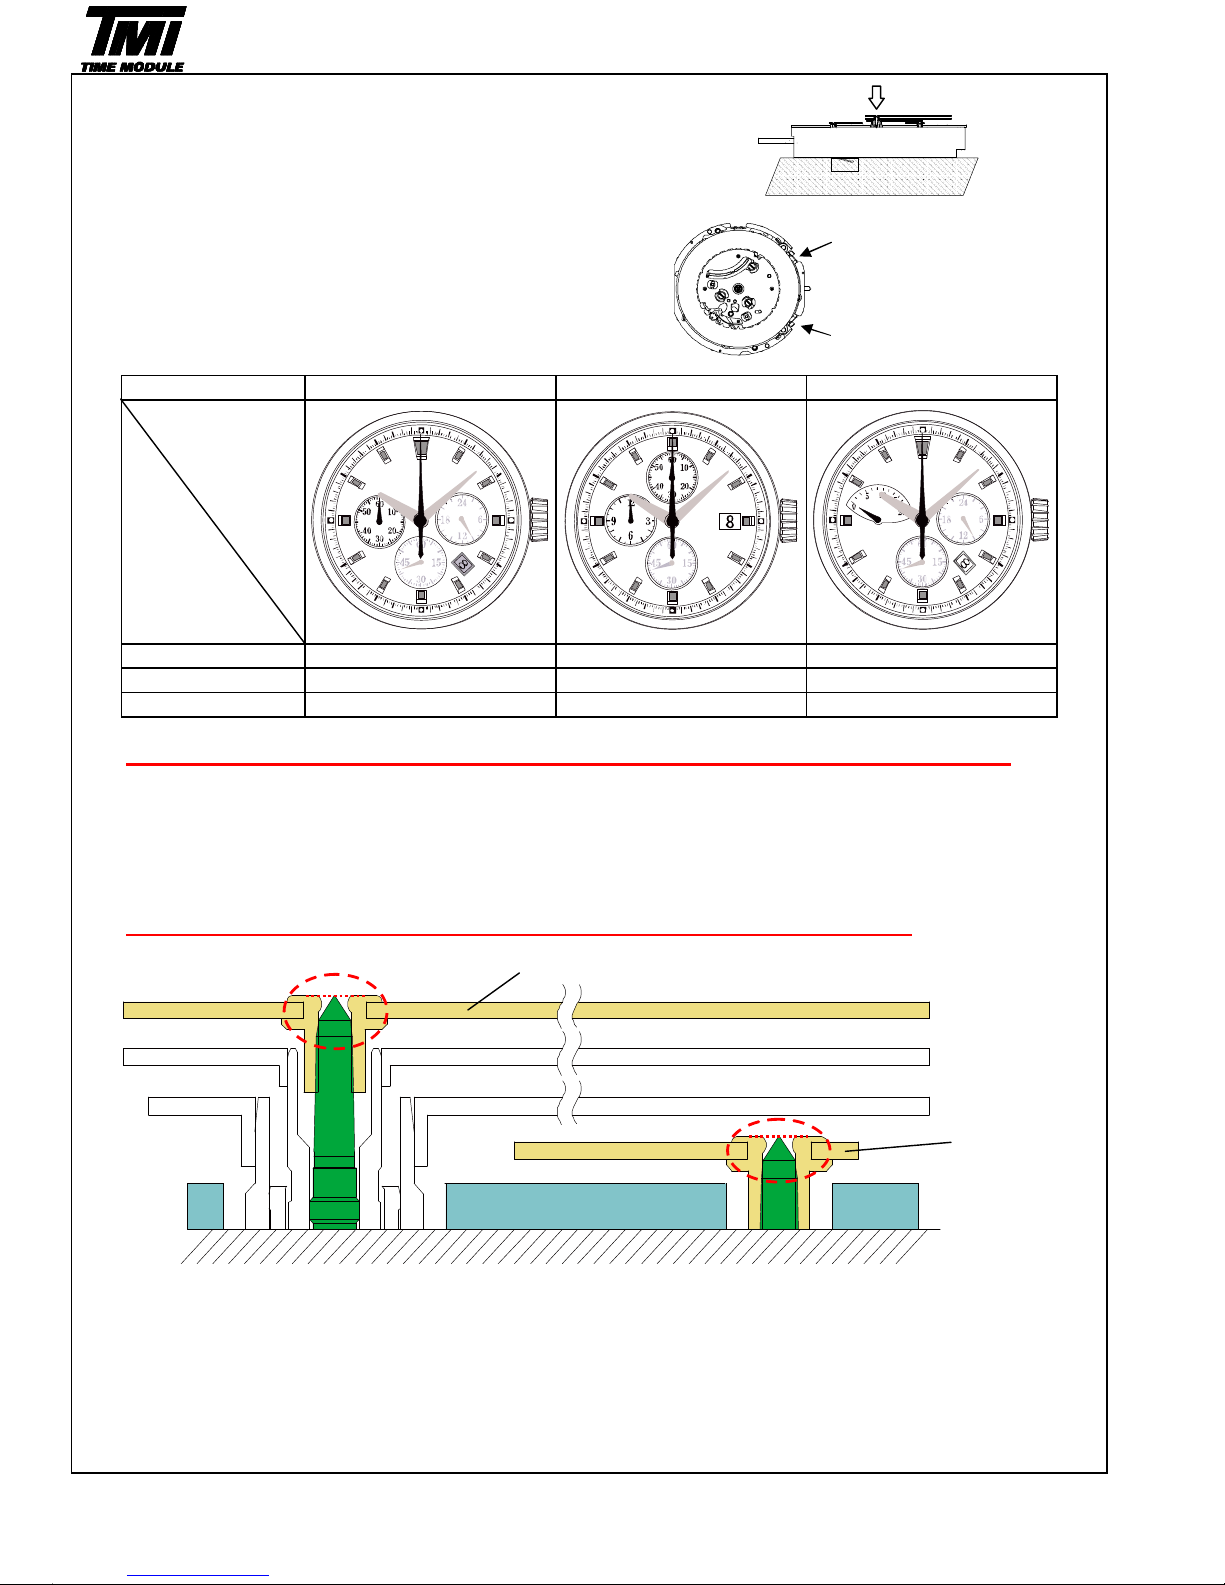
8.How to attach hands
Place the movement directly on a flat metal plate, or something alike to
install the hands.
[ Note: Second / Minute / Hour chronograph hands setting ]
(1) Push button A ( Chronograph start )
(2) Push button A ( Chronograph stop )
(3) Push button B ( Chronograph reset )
(4) After (1)-(3), Install the chronograph hands as shown
in the table below.
*Do not reuse the chronograph hands once detached. Please change and use new hands.
[ Note: To install 24 hour hand for VK63 and VK83 ]
Before installing 24 hour hand, pull out the crown to the second click position and rotate it clockwise,
until changed to the next date then install the 24 hour hand.
9.How to check correct hands attachment
The hand's top surface should be set parallel with the axis tip , as shown below.
*1
*2
Application hands
*1: Second chronograph hand
*2: Minute / Hour chronograph hands and Small second hand and 24 hour hand
Version-01
VK Series
SII Products
12
TECHNICAL GUIDE
VK63 VK67 VK83
- -
"0" minute ( 9H )"60" minute ( 9H )
"12" o'clock (center)
"12" hour ( 9H )
"12" o'clock (center) "12" o'clock (center)
"60" minute ( 12H )
Second chronograph
Minute chronograph
Hour chronograph
Cal.
Metal plate
Button A
( Chronograph start / stop )
Button B
( Chronograph reset )
Page 14
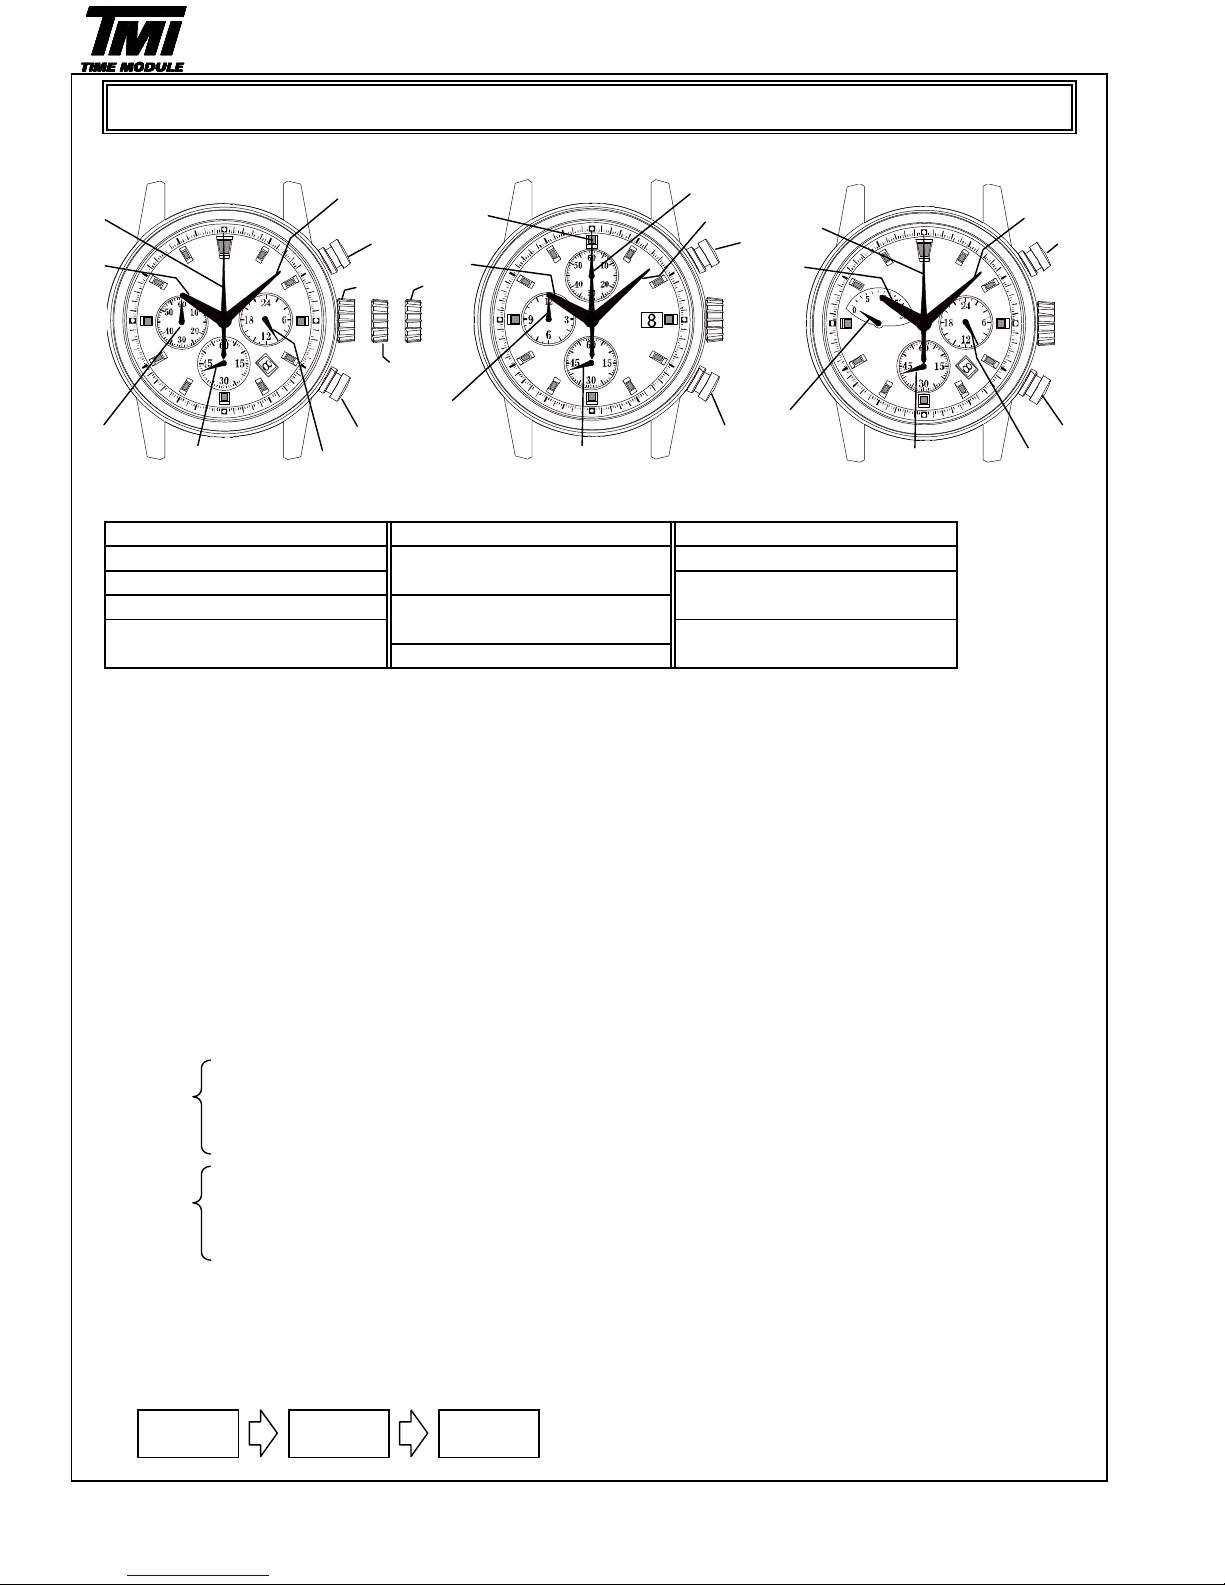
*2 *5
*3 *3 *2 *3 *2
*9 *9 *9
*1 *1 *1
*11 *13
*12
*7 *8
*5 *10 *10 *10
*4 *6 *4 *4 *6
Note
1.How to set the time
1) Pull out the crown to the second click position.
2) Turn the crown to set hour and minute hands.
(Check that AM / PM is set correctly.)
3) Push the crown back into the normal position.
[ Note ]
2.How to set the date
1) Pull out the crown to the first click position.
2) Turn the crown clockwise for date setting.
*Do not set the date between 9:00 P.M. and 3:00 A.M. as this will cause a malfunction.
3) Push the crown back into the normal position.
3.How to reset (after battery change)
It is possible to reset by the following two methods.
1) Set the crown to the normal position.
Method 1 2) Touch the AC terminal of circuit block and the switch spring with conductive tweezers
to reset the circuit.
3) The small second hand will move at two-second interval for 10 seconds.
1) Pull out the crown to the second click position.
Method 2 2) Press the button B for two seconds and release the button.
3) Push the crown back to the normal position.
4) The small second hand will move at two-second interval for 10 seconds.
* If the crown is operated within this 10 seconds, the two-second interval movement will not activate.
[ Note ]
It is not necessary to set the chronograph hands after the battery is exchanged.
If the chronograph hands position are incorrect, following below procedure all the chronograph hands
will be reset to "0" position.
*1: *6:
*5:
*4:
*3:
*2: Minute hand
Chronograph second hand
Small second hand
*9:
13
SII Products
DISPLAY AND CROWN / BUTTON OPERATION
Hour hand
Chronograph minute hand
(60 minute)
Chronograph minute hand
(20 minute)
Crown at second position
(Time setting)
*12:
Button B (RESET)
Button A (START / STOP)
Version-01
VK Series
OPERATION
<< VK63 >> << VK67 >> << VK83 >>
*11:
*10:
*13:
If the crown is pulled to the second position while the chronograph is started, the chronograph hands
will continue to move. This is not a malfunction.
Crown at first position
(Date setting)
Crown at normal position
*7:
Chronograph hour hand
(12 hour)
24 hour hand
*8:
Button B
(RESET)
Button A
(START)
Button A
(STOP)
Page 15
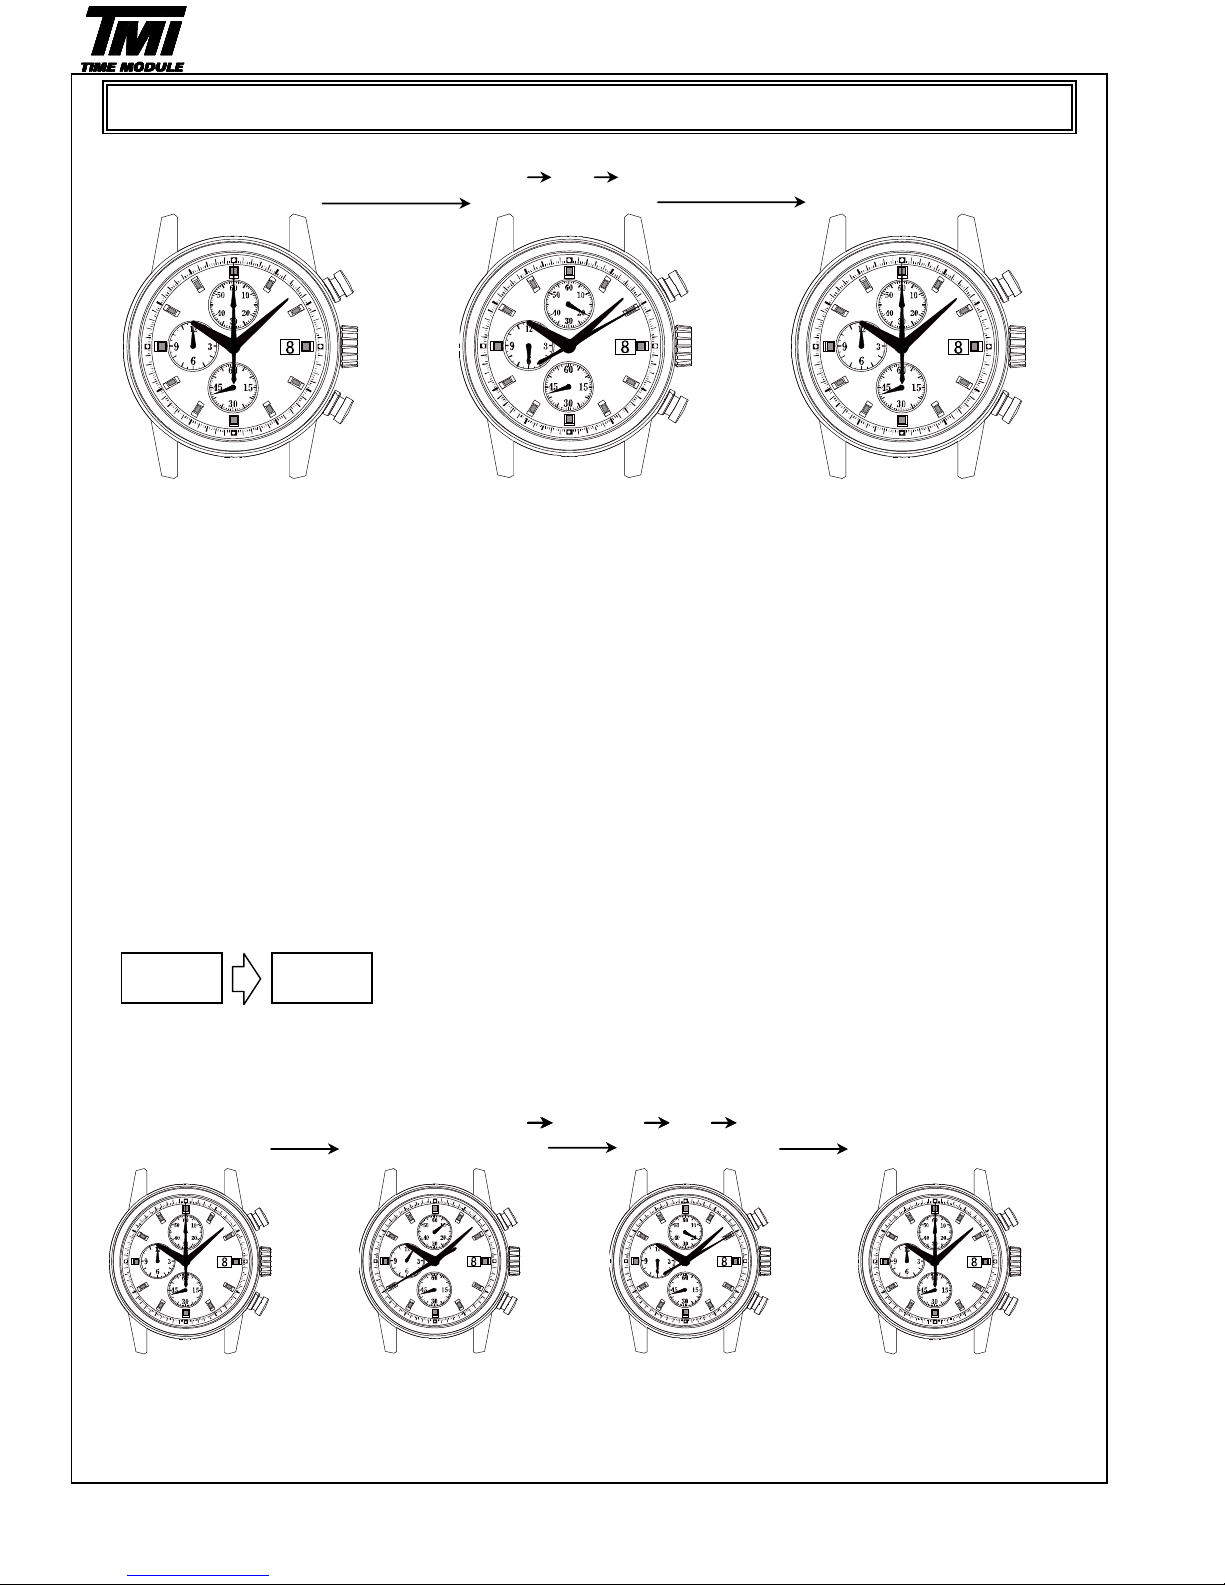
[ Standard measurement ]
・
Press button A to start the
・
Press button A again to stop the
・
Press button B to reset the
chronograph. chronograph. chronograph.
The chronograph second The chronograph hands stop to All the chronograph hands
hand will start moving.
indicate the elapsed time.
will be reset to "0" position.
Note
[ Cal.VK63 ]
The chronograph can measure up to 60 minutes.
The chronograph stops after a measurement for 60 minutes.
[ Cal.VK67 ]
The chronograph can measure up to 12 hours.
The chronograph stops after a measurement for 12 hours.
* Restart by pushing button A. …Cal.VK63 and VK67
[ Cal.VK83 ]
The chronograph can measure up to 20 minutes.
The chronograph stops after a measurement for 20 minutes.
*Restart in the following procedure.
[ Cal.VK63 / 67/ 83 in common ]
*During the chronograph operation, button B (reset) can be pushed. There is no problem with the function.
[ Accumulated elapsed time measurement ]
A / A
・・・
B
*Restart and stop of the chronograph can be repeated as many times as necessary by pressing button A
START STOP (Finish) reset
OPERATION
Version-01
VK Series
HOW TO USE THE CHRONOGRAPH
B
14
SII Products
Press the buttons in the following order : A A
( 6 hour 20 minutes 10 seconds )
Button B
(RESET)
Button A
(START)
Press the buttons in the following order : A A
START STOP / RESTART STOP RESET
( 1 hour 8 minute 40 seconds )
( 6 hour 20 minutes 10 seconds )
 Loading...