

TimeIPS PROX-USB-HID, PROX-USB-AW, PROX-USB-CR, PROX-USB-IC, PROX-USB-IM Installation Manual
...
PROX-USB
Proximity Badge Reader
PROX-USB-HID, PROX-USB-AW,
PROX-USB-CR, PROX-USB-IC,
PROX-USB-IM, PROX-USB-IO,
PROX-USB-KI, PROX-USB-PY,
PROX-USB-RFID
Installation Guide

FCC Declaration of Conformity (DoC)
Compliance Information (according to FCC 2.1077)
(1) Product: PROX-USB
The above device complies with Part 15 of the FCC Rules.
Operation is subject to the following conditions: (1) these devices may not cause harmful
interference, and (2) these devices must accept any interference received, including
interference that may cause undesired operation.
(2) The responsible party is TimeIPS, Inc. 5445 E 85th St N, Valley Center KS, 67226. Phone
316.264.1600
Notice to Users
The components in this system have been tested and found to comply with the limits for a
Class B digital device, pursuant to Part 15 of the FCC Rules. These limits are designed to
provide reasonable protection against harmful interference in a residential installation. The
device generates, uses and can radiate radio frequency energy and, if not installed and used in
accordance with the instructions, may cause harmful interference to radio communications.
However, there is no guarantee that interference will not occur in a particular installation. If this
equipment does cause harmful interference to radio or television reception, which can be
determined by turning the equipment off and on, try to correct the interference by one or more
of the following measures:
• Reorient or relocate the receiving antenna.
• Increase the separation between the equipment and receiver.
• Connect the equipment into an outlet circuit other than the one to which the receiver is
connected.
• Consult the dealer or an experienced radio/TV technician for help.
These devices have been tested to comply with the limits for a Class B computing device,
pursuant to FCC rules. In order to maintain compliance with FCC regulations, shielded cables
must be used with the equipment if not connected directly to the system. Operation with
unshielded cables is likely to result in interference to radio and television reception.
CAUTION: Changes and modifications made to the device without the approval of the
manufacturer could void the user's authority to operate this device.
Page 2 http://support.timeips.com 316.264.1600 TimeIPS

Table of Contents
Overview.....................................................................................................................3
Additional Required Equipment..................................................................................3
Mount The Proximity Reader......................................................................................4
Connect The Cable......................................................................................................5
Configure Badge Numbers..........................................................................................6
Train Employees .........................................................................................................7
Technical Support........................................................................................................8
System Specifications.................................................................................................8
Overview
TimeIPS Proximity Reader with attached cable.
● Compatible with all TimeIPS systems
● Reads proximity identification badges
● Many formats supported.
PROX-USB-HID uses HID-type 26-bit cards
PROX-USB-RFID uses 4102-type cards or tags
Other models use matching proprietary cards
● Cord terminates to a USB connector
● Plugs into a USB connector on the back of the TimeIPS LCD display or
TimeIPS system
Additional Required Equipment
● Proximity badges or tags
○ Available from TimeIPS
○ Provide your own compatible badges
TimeIPS http://support.timeips.com 316.264.1600 Page 3

Mount The Proximity Reader
Failure to mount and maintain the PROX-USB unit with the
following guidelines will void your warranty.
● Mount the unit in a dry, indoor location with controlled
temperature and humidity. Do NOT use the unit in any location
where rapid temperature changes may cause condensation.
● The rated operating temperature is between 5C and 35C (41F to
95F).
● Mount the device away from strong magnetic or electro-magnetic
fields, such as those produced by microwave ovens, two-way
radios or industrial equipment.
● Attach the proximity reader with loop-and-hook fastener, such as
Velcro brand adhesive.
Page 4 http://support.timeips.com 316.264.1600 TimeIPS

Connect The Cable
Connect the USB cable to a free USB port on the back of an LCD
display or directly to a USB port on the back of a TimeIPS system.
If needed, a USB extension cable or USB hub can be used to extend
the cable length. Never use an extension cable if the total cable
length from the PROX-USB device will exceed 10 feet.
Note that it takes 10-15 seconds before the reader will respond if
plugged into a running TimeIPS system. There is no need to
shutdown the system to attach or detach the reader.
TimeIPS http://support.timeips.com 316.264.1600 Page 5
DB-9
Connector
Parallel
Port
Connector
USB
USB
Connector
PROX-USB
appearance
varies by
model
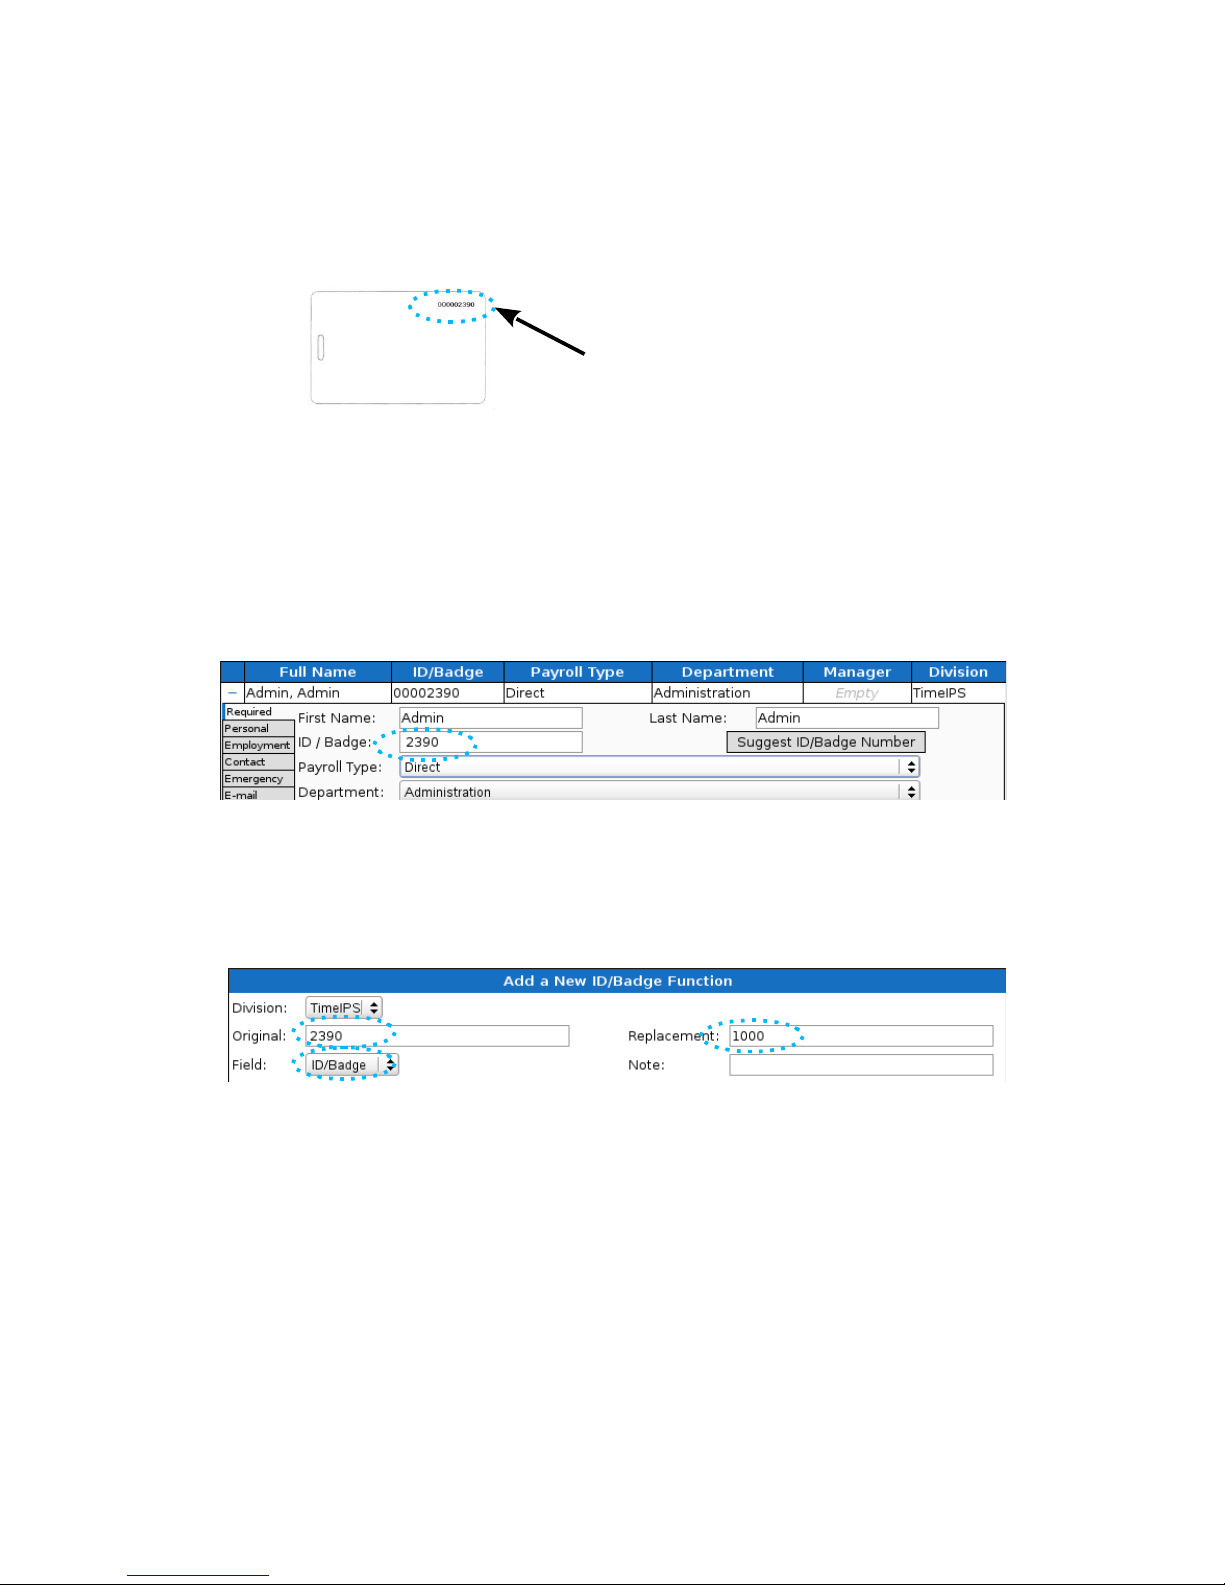
Configure Badge Numbers
Each proximity badge (card or tag) has a unique internal number. Some
styles of badges may have a number printed on them that matches the
internal number. However, many are blank or have a number that is NOT
the same as the internal number.
There are two ways to connect a badge to an employee. Open TimeIPS and
click on Administration. Then:
1) Open Employee Management → Employees. Select the employee
on the list by clicking the “+” next to their name and then enter the
badge number in the ID / Badge field. Do NOT enter any leading
zero(s).
2) Open Clocking → ID/Badge Functions, add a function where the
Original is the internal number of the card or tag and the
Replacement is the employee's ID/Badge number.
If your badges have the internal number printed, option 1 is generally the
easiest.
If your badges do not have a number printed on them, or if the number does
not match the internal number, there are two options:
1) Determine the number of the badge as follows: Connect the PROXUSB device to a personal computer. Open a word processor or
spreadsheet and present the badge to the reader. The internal number
of the badge will appear as if you typed it. If you see an asterisk (*)
at the beginning of the resulting number, it is NOT part of the badge
number.
Page 6 http://support.timeips.com 316.264.1600 TimeIPS
A Badge Number may be printed on some
badges. This may or may not match the
internal number.

To speed the process of entering multiple badges, plug the PROXUSB reader into your computer, click in the “ID/Badge” field for
your employee within TimeIPS and present the badge. After the
number appears, remove the preceding asterisk (*), if present.
2) Give employees convenient badge numbers, such as 1000, 1001,
etc., then connect the badge to the employee at the clock. To do
this, a manager will need a list of employee ID/Badge numbers and
the proximity badges to connect. At the clock:
a) Press enter to access the system menu
b) Enter a manager badge number and pin when prompted
c) Select User Admin, then Enroll Badges.
d) Enter the Employee's ID/Badge number, then present the badge
to connect them.
e) After enrolling badges, either select Update Settings from the
System Admin menu, or wait about 5 minutes for the clock to
update its settings automatically.
Train Employees
Using the badges
• Bring the badge within an inch of the reader to clock in or out
• If used with a keypad, enter clock notes, job numbers or status
codes before presenting card.
• Present the card in any orientation that is flush to the reader
If the clock is successful, an audible alert will be heard for “In” or “Out”
and the LCD display will indicate the current date and time, employee name
and the time in or out.
Troubleshooting
• If badges do not read, try unplugging and reconnecting the
proximity reader.
TimeIPS http://support.timeips.com 316.264.1600 Page 7

Technical Support
Technical Support Resources:
1. Our support web site at http://support.timeips.com offers extensive
resources including documentation and our knowledge-base. Please check
our support web site first, as it provides complete answers and instructions
on almost everything. In the "Knowledge Base Search:" box, enter a few
words describing your question. For example, if you have a question on
the badge functions, type "badge functions" and browse the articles listed.
2. If you have a question not answered on our support site, you can call or
email us. A serial number or registration number is required for this
service. Additional support can be purchased by calling TimeIPS, or by
visiting our web site at http://secure.timeips.com.
3. If you have a simple question, or need direction on how to use our support
resources, feel free to email us at support@timeips.com. If your question
is quick, we'll be happy to help. If it's not, we'll let you know that you
need to purchase additional support.
Support website http://support.timeips.com
Support e-mail support@timeips.com
Support phone number 316.264.1600
System Specifications
This manual is copyright 2004-2012 TimeIPS, Inc. TimeIPS and the TimeIPS logos are registered
trademarks of TimeIPS, Inc. All other trademarks are the property of their respective owners.
Thank you for reading this manual carefully. If you noticed errors, have any suggestions or found
typographical problems, we want to know! Please send an email with the version code below and your
feedback to documentation@timeips.com We appreciate your time.
Version: PROX-USB_1.0.3 131008
Page 8 http://support.timeips.com 316.264.1600 TimeIPS
System Specs:
Reader appearance varies by model.
Approximate dimensions:
4in (100mm ) x 2in (50mm) x .75in (18mm)
Approximate weight:
~0.2lb (~100g)
Power:
5VDC, 1W (typical)
Operating environment:
41° - 95°F (5° - 35°C) non-condensing
System Requirements:
TimeIPS IPS100, IPS200 or IPS300
class system
 Loading...