

Timeguard WP103, WP201, WP104, WP102, WP202 Installation & Operating Instructions Manual
...Page 1

INSTALLATION & OPERATING
INSTRUCTIONS
TIMEGUARD
WEATHERSAFE
®
OUTDOOR POWER
RANGE
Page 2

General
Please note that all instructions are to be left with the consumer
after installation.
The Weathersafe range is manufactured from tough, durable
thermoplastic, and is intended for use in an outdoor environment, or one
in which the protection provided by the Weathersafe range is required.
All of products in the range are rated IP66, for protection against water
and dust. All Weathersafe products need to be fitted with waterproof
cable or conduit entries to maintain their IP rating once installed.
The Weathersafe range complies with the following standards:
●
IP66 rating: BS EN 60529
●
Socket outlets: BS 1363
●
RCD Units: BS 7288
●
Fused connection units: BS 1363
●
Isolating switches: BS EN 60669
●
Switches: BS 3676
●
All products in the range comply with the low voltage directive
LV 72/23/EEC and where relevant EMC directive 89/336/EEC
Products covered by these instructions:
WP101 Weathersafe Single Gang Switched Socket
WP102 Weathersafe Single Gang Isolated Switched Socket
WP103 Weathersafe Single Gang DP Fused Connection Unit
WP104 Weathersafe Single Gang RCD Fused Connection Unit
WP201 Weathersafe Twin Gang Switched Socket
WP202 Weathersafe Twin Gang Isolated Switched Socket
WP203
Weathersafe Combined Twin Gang Isolated Timer & Socket
WP204 Weathersafe Twin Gang RCD Latching Socket
WP205 Weathersafe Twin Gang RCD Socket
WPL01 Weathersafe Single Gang 2 Way Switch (SP)
WPL02 Weathersafe Twin Gang 2 Way Switch (SP)
WPL03 Weathersafe Single Gang Switch - Bell Push
WPL04 Weathersafe Single Gang DP Switch
Page 3
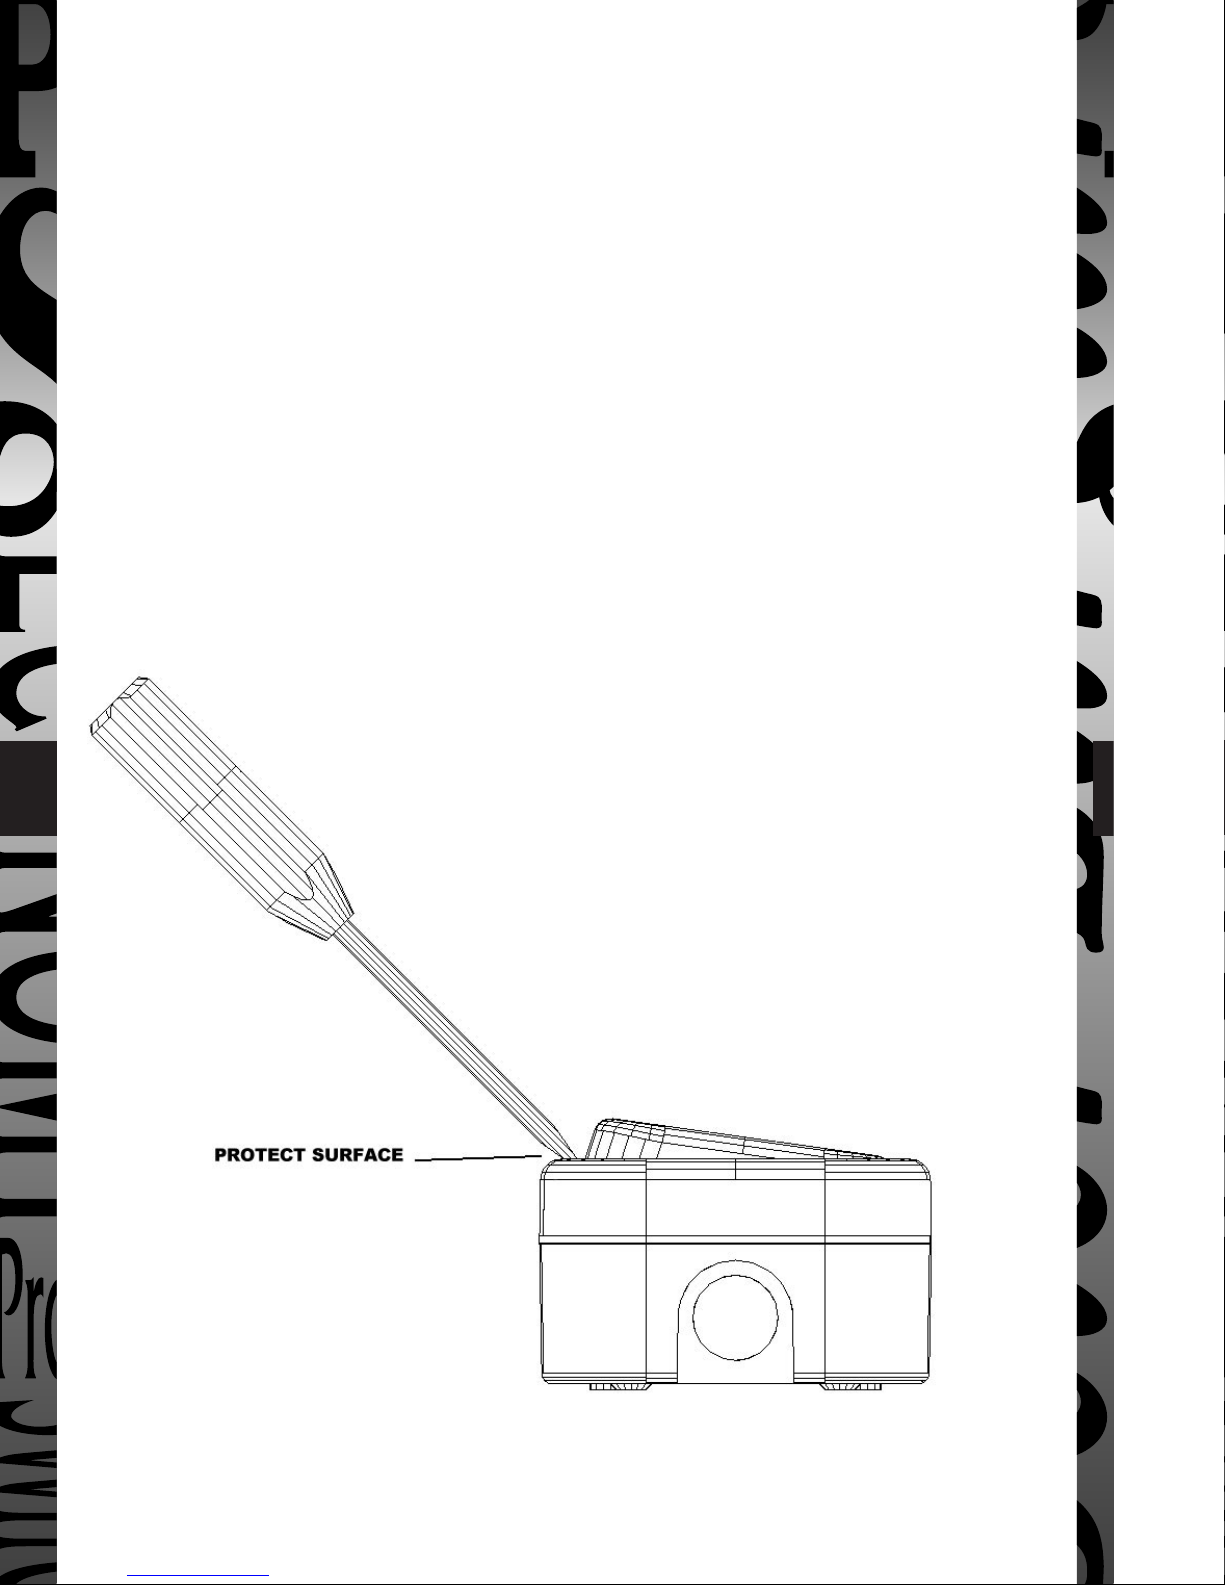
Fig 1
Installation instructions
●
These products should be installed by a competent person (eg.
qualified electrician) in accordance with these instructions and in
compliance with the appropriate clauses of the current edition of
the IEE wiring regulations. Sockets should be connected via a
suitable RCD device.
●
Disconnect the mains electricity supply.
●
The Weathersafe range is designed to be mounted on a vertical
flat surface, with socket outlets not more than 1.5 metres above
the ground (this does not apply to switches).
●
To remove rockers from WPL range prise off using a flat blade
screwdriver (figure 1). Use a piece of cloth or similar to prevent
marking the unit. This allows access to the four fixing screws.
Page 4

●
The rear box shall be mounted on the wall using four no.8 wood
screws.
●
If conduit is to be used then please follow the instructions below:
●
The drain feature must be drilled out using a 5mm drill if top
or side entry conduit is used. Opening this drain hole will
reduce the IP rating of the product.
●
If bottom entry conduit is used, there must be adequate
drainage from the lowest point of the conduit.
●
With relevant cable entry cover removed. A waterproof cable
or conduit entry must then be fitted in its place, and sealed
using the washer supplied.
●
If two cable entry positions are used with metal conduit,
then earth continuity between the conduits must be
maintained.
●
If a product is installed with a built in isolating switch, then the
live and neutral supply must be connected to the relevant
terminal on the isolating switch. The protective conductor must
be connected to the earth terminal on the product. There are
spare terminals in the rear box for connecting earth loops.
●
All WPL switch products are provided with a neon locator for
locating the product in the dark (This is the only intended use for
this neon). To enable the neon to remain lit irrespective of switch
state the neon must be wired to a permanent L and N feed.
●
Ensure that the gasket is correctly fitted, and tighten the four
screws to fix the front cover in place. Do not overtighten. Use of
an electric screw driver is not recommended.
Operating instructions
For products with built in isolator:
●
To open the box lid, wipe off excess water from top surface, turn the
isolator switch to the off position (O position) and then open lid.
●
The box is opened by depressing the tab on the front (see figure 2).
●
Once the box lid is open, the isolating lever should not be turned
back to the on position.
●
Plugs may then be inserted into the sockets, and the socket
switches turned on.
Page 5

Page 6

Cleaning
●
Care should be taken when cleaning this product.
●
Inside the lid should only be cleaned with a clean dry cloth.
●
The outside can be cleaned with a mild detergent.
●
Solvent based cleaners should not be used.
●
Advice should be sought before installing this product in an
environment where it is likely to be subjected to chemicals, oils or
solvents.
Service items
The gaskets, neons, lid seals and cable seals
are sold separately.
Replacement of the gasket on all products
except for the switches is straightforward as it
is a direct replacement.
Switch products have an integral gasket and
membrane. Should only the gasket need to be
replaced, cut into the four positions shown in figure 6.
If the membrane needs to be replaced then the switch assembly
needs to be removed from it’s mounting plate. Care should be taken
not to strip the screws and that a watertight joint is maintained
between switch assembly, membrane and mounting plate (figure 7).
Fig 6
Fig 7
REMOVE THE
TWO SCREWS
SHOWN AND
THEN THE
SWITCH
ASSEMBLY
REMOVE SCREW
AND WASHER
Page 7

Page 8

HELPLINE
020-8450-0515
For a product brochure please contact:
Timeguard Ltd.
Victory Park, 400 Edgware Road,
London NW2 6ND
020-8452-1112
or email csc@timeguard.com
Designed and manufactured in the U.K. 67-058-95 [2]
 Loading...