

Page 1

Wi-Fi Smart Switch
Model: W F10COM
Ins t allation & Oper ating Ins truct ions
Page 2

1. General Information
These instructions should be read carefully
in full before installation, and retained
for further reference and maintenance.
2. Safety
• Before installation or maintenance, ensure the
mains supply to the smart switch is switched
off and the circuit supply fuses are removed
or the circuit breaker turned off.
• It is recommended that a qualified electrician
1
is consulted or used for the installation of this
smart switch and installed in accordance with
the current IEE wiring and Building Regulations.
• Check that the total load on the circuit
including when this smart switch is fitted does
not exceed the rating of the circuit cable,
fuse or circuit breaker.
Page 3

3. Technical Specifications
• 230V AC 50 Hz
• This unit is of class II construction
• Switching capacity: 10A
• Manual ON/OFF Controls
• Fixing Hole Centres: 81.5mm
• Operating temperature: -20°C to +40°C
• Operating Humidity: ≤80%RH
• WLAN-Standard: 802.11 b/g/n
• Encryption: WEP/WPA/WPA2
2
• CE Compliant
• EC Directives: Conforms to latest directives
• Dimensions (H x W x D): 40 x 88.2 x 24.5mm
Page 4

4. System Requirements
• Smartphone/Tablet with at least iOS 8.0
or Android 5.0
• WLAN-enabled router: 2.4GHz
(Separate Band)
• Tuya Smart App
5. Installation
5.1. Ensure the mains supply is switched off
and the circuit supply fuses are removed
3
or the circuit breaker turned off.
5.2. Unscrew the 2 terminal cover screws,
on both sides of the smart switch,
and remove the terminal covers.
Page 5

5.3 If the unit is to permanently fixed
to a wall/joist or ceiling:-
a) Using the unit as a template mark
the position of the fixing holes.
b) Drill the holes for the rawl plugs ensuring
not to infringe with any gas/water pipes
or electrical cables that may be hidden
below the surface.
c) Insert the correct rawl plugs for the
drilled holes.
d) Fix the unit using the correct screws
4
for the wall plugs installed.
5.4 Connect the 230V AC 50Hz supply
and load cables to the smart switch
as per the provided diagram
(See section 6. Connection Diagram)
ensuring correct polarity is observed
and any bare conductors are sleeved.
5.5 Ensure the termi
do not overtighten the terminals screws.
nal screws are tight but
Page 6
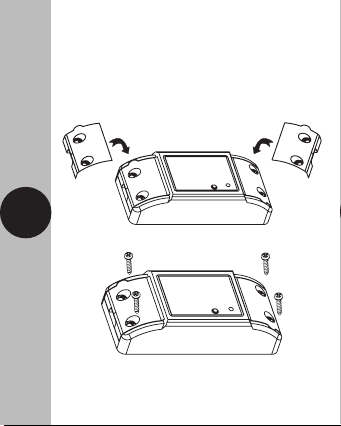
5.6 Fit the supplied cable retaining clamps,
ensuring the cables are secure.
5.7 Refit the terminal covers and secure using
the terminal cover screws. Make sure
not to over tighten.
5
5.8 Turn the mains supply back on.
Page 7

6. Connection Diagram
• Connect the 230V AC 50Hz mains supply
and load cables as per the diagram below
L Input
6
INPUT OUTPUT
N Input N Output
L Input: Live Supply (Brown or red)
N Input: Neutral Supply (Blue or Black)
L Output: Switch Live Load (Brown or Red)
N Output: Neutral Load (Blue or Black)
L Output
Page 8

7. Downloading App
and Registration
Note: the smartphone or tablet must be
connected to a 2.4GHz band on the router.
Paring on the 5GHz band will result in paring
either timing out or being unsuccessful.
Refer to your ISP (Internet Service Provider)
on separating the bands if required.
• Ensure your phone or tablet is connected
7
to your local Wi-Fi network.
• Download the Tuya Smart App onto
your phone or tablet by searching
‘Tuya Smart’ on Google Play Store
for
or the App Store. You can also scan
the applicable QR code right;
Page 9

8
Page 10

• Install the App and open it to the registration
screen. Click on the
‘Register’ button.
9
Page 11

• Tap ‘Agree’ to accept the privacy policy.
10
Page 12

• Choose your region by selecting the Country
Code. Enter your email address or phone
number and click
‘Get Verification Code’.
11
Page 13

• Enter the Verification Code sent to the email
address or phone number that you provided.
Once you have successfully entered
the code, it will automatically move
you to the Password screen.
12
Page 14

• Assign a Password (this must be between
6 to 20 characters including letters and digits)
‘Done’.
and click
13
Page 15

• You are now registered and by default will
see the App home page.
14
Page 16

8. Home Management
Note: Before adding any devices to your
account, structuring your household
(or the property) may be a consideration
if you plan on using Smart devices
in different rooms or locations.
• Select the ‘Me’ option from the home
page which will navigate you to your
personal settings. From here you can
15
setup a nickname for your profile i.e.
‘Mr Smith’s Account. After this select
‘Home Management’ option.
the
Page 17

161718
Page 18

Page 19

• Select the ‘Home Name’ option and
enter your last name or even
‘My Home’
if preferred. (This is required to allocate
devices to separate rooms later once paired).
• Next tick the rooms you wish to assign
to your account; this can be changed
at any time and custom room names
can also be added.
Page 20

19
• To navigate back to the home screen,
‘Back’ button, and then
press the
click Home.
Page 21

9. Pairing your Device(s)
• To add a new device to your account,
‘Add Device’ button (or click on
click the
the + button in the top right hand corner)
20
Page 22

• Notice the different categories of products;
it is essential that the correct product
is selected for the pairing process
to be successful. For the Wi-Fi Smart Switch,
‘Breaker (Wi-Fi)’ option from
choose the
the list.
21
Page 23

• The add device menu will be displayed.
To add the device on your account, press
and hold the
Wi-Fi light (Status LED) begins to flash.
‘On/Off/Pair button’, until the
22
Page 24

• When the Status LED is flashing press the
‘Confirm indicator rapidly blinking’
button. Enter the password for the
network and press the
to pair the product to your account
(In most cases the password should autofill).
23
‘Confirm’ button
Page 25

24
Page 26

• The App will pair the smart product
to the network. The time it takes for pairing
to complete, which will differ depending
on the network connection. Shortly into
the pairing process, the flashing Status LED
will turn OFF. This indicates that the product
has joined the network.
25
Page 27

• If the following screen is displayed, then
the product has been paired successfully.
To rename your product, select the pencil
icon. If this is not required, click on the
‘Done’ button and you will guided
to the device controls menu.
26
Page 28

27
Page 29

• To navigate back to the home screen,
press the
‘Back’ button. The newly paired
Wi-Fi Smart Switch will now be listed.
28
Note: If the pairing process was not successful,
disconnect the mains supply from the product
and re-establish power to the unit. Follow the
bullet points from ’Section 9‘ to try again.
Page 30

10. Smart Home Assistant
• To add your device to your Smart Home
Assistant services, such as Google Home
or Amazon Alexa, follow the on-board
instructions located on the TuyaSmart App.
To do this, select the
home menu, and then select
29
‘Me’ option from the
‘More Services’.
Page 31

30
• On the more services screen, you will see
support or different applications for automated
Smart Home control. Follow the instructions
on the TuyaSmart App to add the devices
to your Smart Home Assistant service.
Page 32

Note: The Smart Home Assistant services
supported by the TuyaSmart App may
change as it is a 3rd party App Service.
Any services that may be removed are
the responsibility of TuyaSmart developers
and not Timeguard.
31
Page 33

11. Support
Note: If you have any concerns that
the intended application of this product
does not meet your requirements,
please contact Timeguard directly
prior to installation.
32
Page 34

12. Guarantee &
Company Details
3 Year Guarantee
In the unlikely event of this product becoming
faulty due to defective material or manufacture,
within 3 years of the date of purchase, please
return it to your supplier in the first year with
proof of purchase and it will be replaced free
of charge. For years 2 to 3 or any difficulty
in the first year, telephone our helpline.
33
Note: a proof of purchase is required in all cases.
For all eligible replacements (where agreed by
Timeguard) the customer is responsible for all
shipping/postage charges outside of the UK.
All shipping costs are to be paid in advance
before a replacement is sent.
Page 35

If you experience problems, do not immediately
return the unit to the store.
Telephone the Timeguard Customer Helpline:
HELPLINE
020 8450 0515
or email helpline@timeguard.com
Qualified Customer Support Coordinators will be online
to assist in resolving your query.
For a product b rochure please conta ct:
Timeguard Limited.
Victory Park, 400 Edgware Road,
London NW2 6ND
Sales Office: 020 8452 1112
or email csc@timeguard.com
www.timeguard.com
67.058.671 (Issue 2)
TG50703 – December 2020
 Loading...