

Page 1

UNDERFLOOR HEATING
CONTROLLER
Cat. No TPT88
INSTALLATION & OPERATING INSTRUCTIONS
Page 2
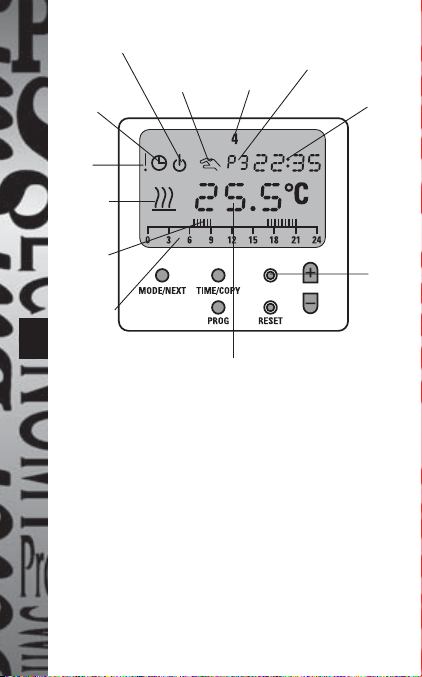
1
Continuously
OFF indicator
Normal
operating
(timed)
mode
Probe
failure
indicator
Output to
underfl oor
heating ON
Periods of
comfort
temperature
Programme
overview
display
Continuous
control of
comfort
temperature
Temperature display - shows under-fl oor temperature
(except when Comfort and Economy temperatures are being set)
Day
indicator
(day 1 =
Monday)
Programme
number
Introduction
The TPT88 is a combined temperature and time controller for
electric underfl oor heating. It is rated at 16A (3.68kW). The
unit controls to a fully adjustable comfort temperature during
programmed ON times and to a fully adjustable economy
temperature during OFF times. It does this by using the signal
from an underfl oor probe (included). Both the economy and
comfort temperatures can be set to a minimum of 7°C to give
frost protection.
The large LCD display can be back lit if required at the press
of a button. The display reverts to normal 15 seconds after the
button is fi rst pressed.
24 hour time
display (also
indicated
copy in
Programming
mode)
Push to
illuminate
display
Fig. 1
Page 3
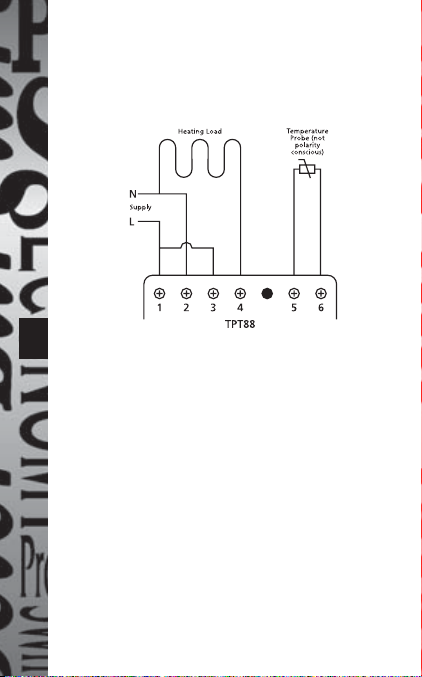
Connections
The TPT88 must be used with the temperature probe provided.
Connections are made to the unit according to the following
diagram.
2
Siting
The TPT88 should not be installed in a wet area such as a
bathroom or shower area. Further instructions are given in the
Thermolay Cable and Mat instruction leafl et.
Installation
The installation should be carried out by a competent person
following the latest I.E.E. wiring and local authority regulations
in the UK or the relevant wiring and local authority regulations
in other countries.
The TPT88 underfl oor heating controller is designed to fi t onto
either a BS4662 recessed single box or a BS5733 surface mount
single box. The minimum box depth required is 32mm. The
ideal mounting height is at eye level for the shortest person
who is likely to need to programme the unit. For details of the
installation of the temperature probe and heating cable or mat
see the Thermolay instruction leafl et.
Fig. 2
Page 4

Fig. 3 Fig. 4
Switch OFF the mains to the controller. Remove the front of the
thermostat by using a small screwdriver in the slot as shown in Figure 3.
Cut the cable tails of the temperature probe and heating mat or cables
to length and strip sleeving and insulation as required. Identify the
wires and locate according to fi gure 2. Supply cable with a minimum of
2
2.5mm
must be used. Tighten the screw terminals onto the wires and
form the cables.
Offer the back plate up to the wall box forming the cables as required,
fi nally locating and tightening up the fi xing screws supplied as shown
3
in Figure 4.
Snap the front of the thermostat back into position on the back plate.
To test the unit is operating set the temperature to 30ºC as described
in the section “Timed override for Two Hours“. After a few seconds the
Heating ON indicator will show.
Wait for a one hour for a wood underfl oor or up to 5 hours for an
uninsulated concrete fl oor (the warm-up time for uninsulated concrete
will be substantially reduced when the moisture has been driven out
of the concrete during the fi rst few heating cycles) and feel if the fl oor
starts to warm. If it does not, check the connections and carry out the
checks on the mat or cable installation instructions.
Earthing
The TPT88 itself does not require to be earthed. The screen around the
fl ying lead (cold cable) from the Thermolay mat must be earthed to the
box terminal. This also applies to the screen at each end of the Thermolay
cablee, both of which must be earthed in the same way.
Page 5

Programming
Reset
We recommend that after installation the TPT88 is reset
prior to programming.
Press and hold the PROG button, then press the RESET
(pen or pencil required) once. Finally release the PROG
button after 2 seconds.
Setting Time of Day and Date
a. Press TIME/COPY
button and release.
Yea r fl ashes – use +
button to increase or
4
– button to decrease
until year is correct.
b. Press TIME/COPY
button and release.
MO (month) is
displayed fl ashing
along with current
month (e.g. JAN)
displayed static. Use +
or – button (as before)
to get to correct month.
Page 6

c. Press TIME/COPY
button and release.
DAY is displayed
fl ashing along with
current day of month
displayed static. Use
+ or – button to get
correct day of month.
d. Press TIME/COPY
button and release.
T (time) is displayed
static along with
current hour displayed
fl lashing. Use + or
– button to get to
5
correct hour of day.
e. Press TIME/COPY
button and release.
T (time) is displayed
static along with
current minutes
displayed fl ashing.
Use + or – button to
get to correct minute.
f. Continue to press and release the TIME/COPY
button to review the above settings and make
changes if necessary before pressing PROG button
to return to normal operating mode.
Page 7

Setting Programmes
Overview
The TPT88 has three independent programmes for each
day of the week. During the ON-OFF times set the unit
will maintain the fl oor temperature at the comfort
temperature and outside these times will maintain
the fl oor at the economy temperature. Both of these
temperatures are user settable in the range 7-30°C.
After a reset a default programme becomes operational
for the following times/days.
For days 1 – 5
(Mon – Fri)
0700 to 0900 and 1700 to 2100
For days 6, 7
(Sat, Sun)
0800 to 1000, 1200 to 1300
and 1700 to 2100
6
Comfort temperature periods Comfort temperature periods
For days 1-5 only two programmes P1 and P3 are
active. This is done by making the ON and OFF times for
programme P2 the same.
The user can use this programme as it stands if
appropriate or modify it to his/her exact requirement.
It is usually considerably quicker to modify a default
programme than it is to programme from a blank sheet.
Page 8

Setting Procedure
i. Press PROG button
and release, day
indicator fl ashes.
Press + or – button
to set the day to be
programmed.
ii. Press PROG button
and release, P1
(programme 1)
ON time displayed
fl ashing.
Use the + or – buttons
to adjust this time on
7
a minute by minute basis (for fast change
hold the + or – button down).
iii. Press PROG button
and release, P1
OFF time displayed
fl ashing. As before
adjus this time using
the + or – button.
iv. Press PROG button and release, P2 (programme 2)
ON time display fl ashing. Adjust as before. Repeat
this procedure until P3 (programme 3) OFF time
is set.
Page 9

Repeating a Programme Over One
or More Days
A common requirement is to have the same programme
operating over a number of days. Having set the fi rst
days programmes continue pressing the PROG button
until the day is fl ashing. Now press the TIME/COPY
button and release, COPY will be displayed fl ashing. Use
the + or – button to select the day to be copied to and
press and release the TIME/COPY button again. COPY
is now displayed statically. Select another day using the
+ or – button and press TIME/COPY again, repeat until
all days to be copied have been covered. Finally press
MODE/NEXT to return to normal operating mode.
Reducing the Number of
Programmes in Operation
8
a. Reducing three programmes to two. Adjust the OFF
time for programme 2 (P2) to be the same as its ON
time.
b. Reducing three programmes to one. Adjust the OFF
time for programme 1 (P1) to one minute before the
ON time for programme 2 (P2), and adjust the OFF
time for programme 2 to one minute before the ON
time for programme 3 (P3).
c. Reducing two programmes to one. The technique
described in (b) can be used where there are only
two programmes operate with the ON and OFF
times for programme 2 the same.
d. Cancelling all programmes. To cancel all three
programmes make the ON and OFF for each
programme the same.
Page 10

Setting Temperatures
Press and hold PROG button, then press and release
MODE/NEXT, fi nally release PROG button. The display
shows COM (comfort temperature with its current value
fl ashing. Use the + or – button to increase or decrease
the value in 0.5°C steps as required.
Press MODE/NEXT and release. The display now shows
ECO (economy temperature) with its current value
fl ashing. Use the + or – button to increase or decrease
the value as required.
Mode Key
The TPT88 has three operating modes:-
Normal (or timed) operating mode.
9
Continuously OFF (no heating at all).
Continually controlling the comfort temperature.
It is possible to move between these modes by pressing
and releasing the MODE/NEXT button.
Timed Override for Two Hours
The unit must be in normal (or timed) mode. Press and
release the + or – buttons and the temperature display
will show the current control temperature (comfort
during ON periods, economy during OFF periods).
Adjust the temperature to be maintained for the two
hour period (starting immediately) by using the + or
– buttons. The programme indicator will fl ash indicating
a timed override.
To cancel press the PROG button and release.
Page 11

Temperature adjustment setting
If the TIME/COPY key is pressed and then MODE/NEXT key is
pressed then SU:0 or Ad:0 will display. Press the PROG button
to return to normal operation.
It is recommended that this function is not used without
consulting the Help Line.
Probe & mains Supply Check
The unit checks that the temperature probe is connected and
is not short circuit. If this is not the case then the ‘!’ symbol
shows on the display, the installer should then check the
connections. The ‘!’ symbol also indicates loss of mains supply.
Specifi cations
Operating temp: -10°C to 40°C
10
Operating voltage: 220 – 240V AC 50Hz
Switching capability: 16A resistive 3A inductive
Temp probe fl ying lead: 4m length
Temp control range: 6°C to 30°C
Temperature accuracy: ±1°C (at 20°C)
Control type: Normally open, voltage free
EC directives: Conforms to 73/23/EEC
and 89/336/EEC
Dimensions (mm): 84 (H) x 84 (W) x 27 (D)
3 Year Guarantee
In the unlikely event of this product becoming faulty due to
defective material or manufacture within 3 years of the date
of purchase, please return it to your supplier in the fi rst year
with proof of purchase and it will be replaced free of charge.
For the second and third years or any diffi culty in the fi rst year
telephone the helpline on 020 8450 0515.
Page 12

HELPLINE
020-8450-0515
For a product brochure please contact:
Timeguard Ltd.
Victory Park, 400 Edgware Road,
London NW2 6ND
020-8452-1112
or email csc@timeguard.com
67.058.215
Iss 1
 Loading...