

Page 1
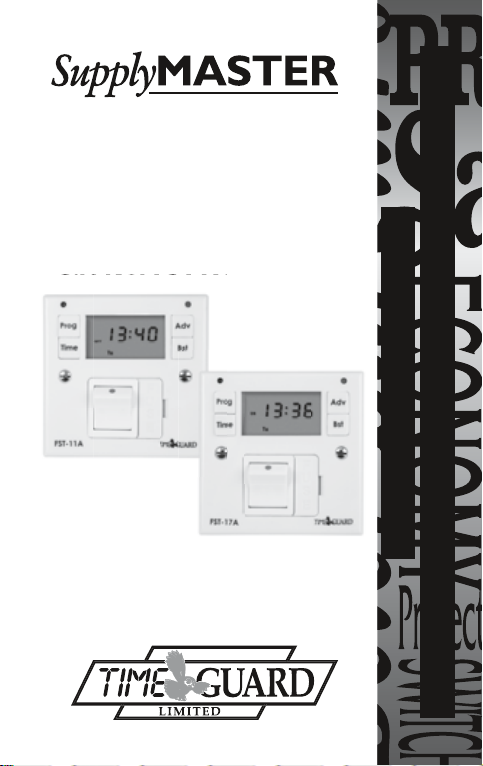
FUSED SPUR
Cat No. FST17A – 7 Day
TIMESWITCH
Cat No. FST11A – 24 Hour
Cat No. FST17A – 7 Day
Installation & Operating
Instructions
INSTALLATION & OPERATING
INSTRUCTIONS
Page 2
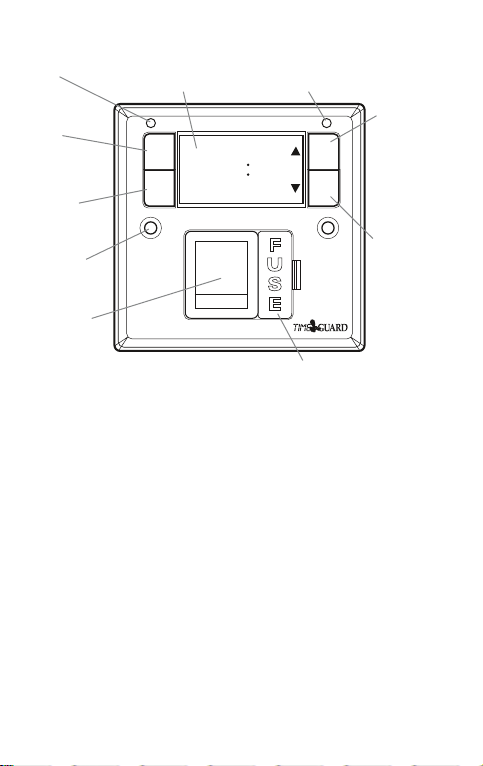
1. General Information
Status LED
Sets
programmes
Sets date
and time
Fixing hole
Double pole
switch
Display (back lit for 30 seconds
when any button is pressed)
TimeDayMonthYear
Prog Adv
Prog
ON
OFF
8
HOLDHOLD
Time Bst
MODE BOOST 12
Mo Tu We Th Fr Sa Su
FST-17A
Fig. 1
FST17A/FST11A Front Panel
Reset button
(recessed)
SET
8888
BS 1362 (1"x
1
/4") fuse
Override until
next programme
change and
increments
displayed value
during time and
programme
setting
Boost for 1 or 2
hours and
decrements
displayed value
during time and
programme
setting
Contents:
1 Supplymaster.
2 3.5mm screws.
1 Bag containing: 2 screws, cable blank and cable clamp.
1 Instruction leaflet.
The FST11A (24 hour) and FST17A (7 day) are units which mount onto a
BS 4662 flush mount single box, or a BS 5733 surface mount single box (25mm deep
in either case). There is provision for a single front exit output cable, with in-built
cable clamp.
The unit combines the facilities of a time switch and a double pole switched, fused
connection unit capable of being wired directly into a ring main. The contacts are not
volt free, and there is no provision for a permanent ON, or for earth continuity (for
which the back box termination can be used if required). The unit has automatic
daylight saving pre-programmed in.
Page 3
2. Battery
The unit has an in-built non-replaceable, rechargeable battery, which will keep the
programmed times during power down situations for up to 4 weeks. If the screen
goes blank, once power is restored and 4 hours elapsed (to give a working
battery charge) reset must be pressed, and times/programmes re-entered.
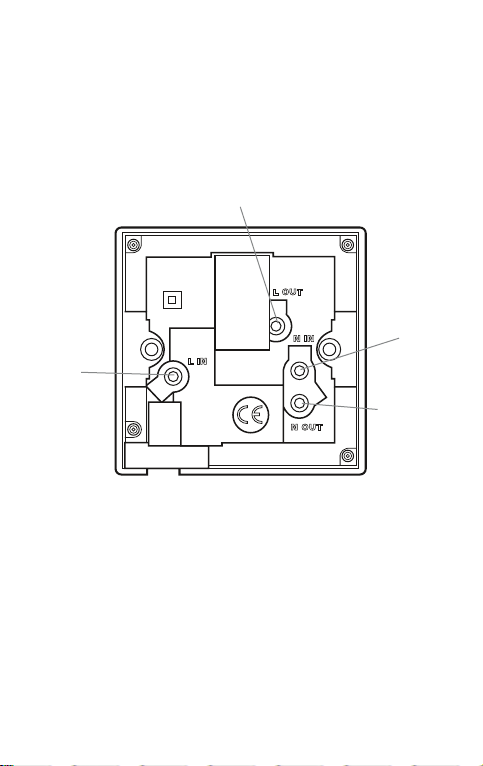
Switched live terminal
(load live connection)
230 V~
13A
Supply live
terminal
T40
Supply neutral
terminal
Switched
neutral terminal
(load neutral
connection)
Fig. 2
FST17A/FST11A Rear Connections
3. Applications
Energy consuming appliances such as immersion heaters and storage heaters up to
13A total loading can be supplied by the FST11A/FST17A enabling users to make use
of Economy 7.
If the user has other appliances which do not have a push button start such as
washing machines, dishwashers and tumble dryers these may also be controlled in
the same way. It can also be used to control lighting, if a neutral is made available.
Lighting up to 1.25kw filament can also be controlled.
Page 4
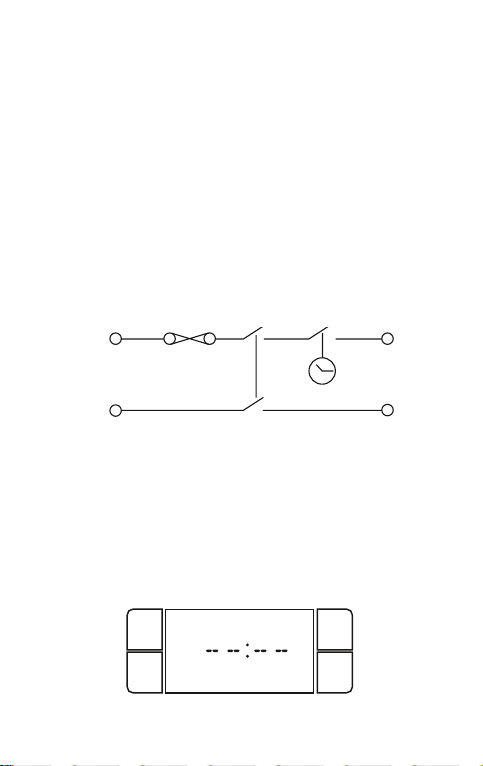
4. Installation
L IN L OUTTIME SWITCH
N OUT
BS 1362
FUSE
APPLIANCE
Prog Adv
Time Bst
Mo Tu We Th Fr
Prog
ON
The unit is designed to replace an existing single gang connection unit or fixed appliance
outlet giving timed mains output, protected by a BS 1362 fuse. The unit is capable of
forming part of a ring main (the terminals can accept 2 x 2.5mm sq. cables) or terminating
a spur off the ring main. The unit requires a minimum depth of 25mm within the box.
Ensure that the wiring is adequate for the load to be carried. Connect incoming and
outgoing cables to the relevant terminals. Secure the unit to the back box with the
3.5mm screws provided forming the cables during installation to avoid entrapment
and cable damage.
Use the earth terminal in the back box for earth continuity if required. If installed into a
metal back box, earthing of the back box is required.
There is a removable cable blank to cover the front cable exit if this feature is not required.
If front exiting cable is required, for instance to connect to a washing machine, use the
cable clamp supplied to secure the outgoing cable.
L IN
BS 1362
fuse
Time switch
L OUT
SUPPLY
SUPPLY
N IN
N IN
Fig. 3
Double pole switch
Internal Schematic of FST17A/FST11A
5. Fuse
Use the appropriate BS 1362 fuse for the load. The unit is supplied with
a suitable 13A fuse.
6. First Supply Connection and Reset
From first supply connection, press Reset with a pointed object.
The display will show the full character set, and then display:
Prog Adv
The only button which is now active is the time button. Now proceed to setting
the date/time and then programming the ON and OFF times.
Time Bst
L OUT
APPLIANCE
N OUT
Page 5

7. Setting the Date and Time of Day
Prog Adv
Time Bst
Prog Adv
Time Bst
Mo Tu We Th Fr
Prog
ON
Prog Adv
Time Bst
Mo Tu We Th Fr
Prog
OFF
Prog Adv
Time Bst
SET
Prog Adv
Time Bst
Year
Prog Adv
Time Bst
SET
Prog Adv
Time Bst
Mo Tu We Th Fr
Prog
ON
Prog Adv
Time Bst
Mo Tu We Th Fr
Prog
OFF
Prog Adv
Time Bst
Sa Su
Prog
ON
7.1 Initially Setting the Date and Time of Day
Press the ‘Time’ button and hold for approx. 2 seconds. Whilst holding, the word
‘HOLD’ will show bottom left in the display.
After 2 seconds, there will be the option of automatic daylight saving (summer/ winter time).
Press ‘Adv’ or ‘Bst’ to change from yes to no.
Prog Adv
Time Bst
Prog Adv
Time Bst
Then press ‘Time’, the default year 2009 will be displayed.
Prog Adv
Time Bst
Use ‘Adv’ (increment) or ‘Bst’ (decrement) to change the display to the correct year.
The limit calendar year is 2050.
Press the ‘Time’ button and the month digits will flash:–
Prog Adv
Month
Time Bst
Use ‘Adv’ or ‘Bst’ to set the month.
SET
SET
Year
SET
SET
Page 6

Prog Adv
Time Bst
Year
Prog Adv
Time Bst
SET
Month
Prog Adv
Time Bst
SET
Prog Adv
Time Bst
Mo Tu We Th Fr
Prog
ON
Prog Adv
Time Bst
Mo Tu We Th Fr
Prog
OFF
Prog Adv
Time Bst
Sa Su
Prog
ON
BOOST 1
Prog Adv
Time Bst
Mo
ON
Prog Adv
Time Bst
Year
Prog Adv
Time Bst
SET
Month
Prog Adv
Time Bst
SET
Day
Prog Adv
Time Bst
SET
Prog Adv
Time Bst
Mo Tu We Th Fr
Prog
ON
Prog Adv
Time Bst
Mo Tu We Th Fr
Prog
OFF
Prog Adv
Time Bst
Sa Su
Prog
ON
BOOST 1
Prog Adv
Time Bst
Mo
ON
BOOST 2
Prog Adv
Time Bst
Mo
ON
Prog Adv
Time Bst
Year
Prog Adv
Time Bst
SET
Month
Prog Adv
Time Bst
SET
Day
Prog Adv
Time Bst
SET
Time
Prog Adv
Time Bst
SET
Prog Adv
Time Bst
Mo Tu We Th Fr
Prog
ON
Prog Adv
Time Bst
Mo Tu We Th Fr
Prog
OFF
Prog Adv
Time Bst
Sa Su
Prog
ON
BOOST 1
Prog Adv
Time Bst
Mo
ON
BOOST 2
Prog Adv
Time Bst
Mo
ON
Prog Adv
Time Bst
Mo
OFF
Prog Adv
Time Bst
Year
Prog Adv
Time Bst
SET
Month
Prog Adv
Time Bst
SET
Day
Prog Adv
Time Bst
SET
Time
Prog Adv
Time Bst
SET
Time
Prog Adv
Time Bst
SET
Prog Adv
Time Bst
Mo Tu We Th Fr
Prog
ON
Prog Adv
Time Bst
Mo Tu We Th Fr
Prog
OFF
Prog Adv
Time Bst
Sa Su
Prog
ON
BOOST 1
Prog Adv
Time Bst
Mo
ON
BOOST 2
Prog Adv
Time Bst
Mo
ON
Prog Adv
Time Bst
Mo
OFF
Press the ‘Time’ button and the day digits will flash:–
Use ‘Adv’ or ‘Bst’ to set the day.
Press the ‘Time’ button and the hour digits will flash:–
Prog Adv
Time Bst
Prog Adv
Time Bst
Use ’Adv’ or ‘Bst’ to set the hour (24 hour clock).
Day
Time
SET
SET
Press the ‘Time’ button and the minute digits will flash. (14 is shown as an example
of the hours set in the previous step):–
Time
Prog Adv
SET
Time Bst
Use ‘Adv’ or ‘Bst’ to set the minutes.
Press the ‘Time’ button briefly to exit date/time entry, and return to the operating mode.
The display will now read:–
Showing correct time/day of the week, with the colon between the hours and minutes
Prog Adv
Time Bst
Mo
SET
flashing (30 is shown as an example of the minutes set in the previous step).
Note:
During time and date setting, when the ‘Adv’ or ‘Bst’ buttons are held down,
the setting under adjustment will advance or decrease rapidly.
Page 7

Year
Prog Adv
Time Bst
SET
Month
Prog Adv
Time Bst
SET
Day
Prog Adv
Time Bst
SET
Time
Prog Adv
Time Bst
SET
Time
Prog Adv
Time Bst
SET
Prog Adv
Time Bst
Mo
SET
Prog Adv
Time Bst
Mo Tu We Th Fr
Prog
OFF
Prog Adv
Time Bst
Sa Su
Prog
ON
BOOST 1
Prog Adv
Time Bst
Mo
ON
BOOST 2
Prog Adv
Time Bst
Mo
ON
Prog Adv
Time Bst
Mo
OFF
7.2 Modifying the Date and Time of Day
Normally the only change required will be to the time of day minutes, in which case
press and hold ‘Time’ for 2 seconds, during which the word ‘HOLD’ will appear in the
bottom left hand corner of the display.
Press ‘Time’ repeatedly until the minutes are shown flashing then use ‘Adv’ or ‘Bst’
to make the change.
Finally press ‘Time’ briefly to get back to operating mode.
Other changes can be made in the same way but the ‘Time’ button must be pressed
to get back to operating mode. There is no automatic exit from the date/time
setting mode.
8. Programming the ON/OFF Times –
FST17A only
8.1 Generating New Programmes
The FST17A has four independent ON/OFF periods available for programming each day.
The FST17A is a 7 day programmer, with options of 7 days the same (24 hrs),
5+2 days (where the weekdays are the same, and the 2 weekend days are the same)
and 7 individual days.
Press ‘Prog’ and hold for approx. 2 seconds. Whilst holding, the word ‘HOLD’ will show
in the top left hand corner of the display.
After 2 seconds the display will show:–
Prog Adv
Time Bst
MODE
Mo Tu We Th Fr Sa Su
SET
Use ‘Adv’ or ‘Bst’ to change the day grouping (MODE) at the bottom of the display.
This will step through the following programming options:–
24hr – Mo Tu We Th Fr Sa Su.
5 day – Mo Tu We Th Fr followed automatically in programming by 2 day – Sa Su.
Individual day – Mo followed automatically in programming by each of the other days.
Page 8

Once the desired day grouping is selected, press ‘Prog’ to move onto programming
Prog Adv
Time Bst
Mo Tu We Th Fr
Prog
ON
SET
Prog Adv
Time Bst
Mo Tu We Th Fr
Prog
ON
SET
Prog Adv
Time Bst
Mo Tu We Th Fr
Prog
OFF
SET
ON/OFF times.
Display will show prog 1 ON, and the hour digits flashing.
Prog Adv
Prog
ON
Time Bst
Mo Tu We Th Fr
SET
(Example shown is for a 5 + 2 day program, as the display shows Mo Tu We Th Fr).
Use ‘Adv’ or ‘Bst’ to set the hours and then ‘Prog’ to change between hours and
minutes. Followed by ‘Adv’ or ‘Bst’ again to set the minutes.
Press ‘Prog’ to change to program OFF time.
Prog Adv
Prog
OFF
Time Bst
Mo Tu We Th Fr
SET
Use ‘Adv’ or ‘Bst’ to set the OFF time in the same way as for Prog 1 ON time.
Press ‘Prog’ to scroll through program 2 ON, program 2 OFF, program 3 ON,
program 3 OFF, program 4 ON, program 4 OFF, adding in times as required.
If you wish to omit programmes just leave dashes in that ON/OFF location.
Press ‘Prog’ to move to the next linked day grouping (2 day grouping follows the
5 day group automatically).
Set ON/OFF times as before.
Prog Adv
Prog
ON
Time Bst
SET
Sa Su
Once program 4 OFF has been set, press ‘Prog’ to exit program mode and return
to operating mode.
If less than four programmes are required press ‘Prog’ for approx. 2 seconds after
the last programme entry to return to operating mode.
Page 9

Year
Prog Adv
Time Bst
SET
Month
Prog Adv
Time Bst
SET
Day
Prog Adv
Time Bst
SET
Time
Prog Adv
Time Bst
SET
Time
Prog Adv
Time Bst
SET
Prog Adv
Time Bst
Mo
SET
Prog Adv
Time Bst
Mo Tu We Th Fr
Prog
OFF
Prog Adv
Time Bst
Sa Su
Prog
ON
BOOST 1
Prog Adv
Time Bst
Mo
ON
BOOST 2
Prog Adv
Time Bst
Mo
ON
Prog Adv
Time Bst
Mo
OFF
The display will show the correct day and time but the ON/OFF indicator may not reflect the
current programme accurately in which case press the ‘Adv’ button to correct the indicator.
In the same way as for individual programmes, days or groups of days can be omitted either by
leaving dashes in all the locations for a day or a group of days or by leaving the programming
mode before its completion where all further entries are to be dashes.
8.2 Programming across midnight:
This can only be programmed after a reset, and not as a modification to an existing
programme, unless 3 or less ON/OFF times have been previously programmed.
To programme across midnight, enter the start time of the last period (say 20:00), and then
leave the end time blank (––:––). Start the next days ON period at 00:00 and then enter the
OFF time that you require (say 07:00).
Note: For FST11A the first ON period would be 00:00 for all 7 days.
Note: Programming the last OFF period at 00:00, and then programming the first ON period
of the next day at 00:00 will not work. The FST will not come on for the last ON period if
there is not a valid OFF time. 00:00 is not a valid OFF time.
If it is required to programme an OFF time at midnight, then it has to be 23.59, not 00:00.
8.3 Modifying or Adding Programmes
Press ‘Prog’ and hold for approx. 2 seconds. Whilst holding, the word ‘HOLD’ will appear in
the top left hand corner of the display. After 2 seconds the display will show:–
Prog Adv
Note: If the unit was programmed as a 5+2, or a 24 hour then the mode will need to be set to
Time Bst
MODE
Mo Tu We Th Fr Sa Su
this mode in order to review programmes. If previously entered times are reviewed in a different
SET
mode, programmed times may be lost.
Press ‘Adv’ or ‘Bst’ to select the day grouping which requires modifying or a new day grouping
for an additional programme, in which case proceed as in section 8.1.
For modifications press ‘Prog’ repeatedly to arrive at the programme time (flashing) requiring
modification then use ‘Adv’ or ‘Bst’ to make the change. Press ‘Prog’ again repeatedly to arrive
at a further time requiring modification and use ‘Adv’ or ‘Bst’ to make the change.
Proceed as before for further changes then press ‘Prog’ for 2 seconds to return to operating
mode unless you are at the end of the programme sequence, in which case press ‘Prog’ briefly.
There is no automatic exit to the operating mode.
The reset button can also be used whenever major changes of programmes are required.
Page 10

9. Programming the ON/OFF Times –
Prog Adv
Time Bst
Mo Tu We Th Fr
Prog
ON
SET
Prog Adv
Time Bst
Mo Tu We Th Fr
Prog
OFF
SET
Prog Adv
Time Bst
Sa Su
Prog
ON
SET
Prog Adv
Time Bst
Mo Tu We Th Fr
Prog
ON
SET
Prog Adv
Time Bst
Mo Tu We Th Fr
Prog
OFF
SET
Prog Adv
Time Bst
Sa Su
Prog
ON
SET
BOOST 1
Prog Adv
Time Bst
Mo
ON
Prog Adv
Time Bst
Mo Tu We Th Fr
Prog
ON
SET
Prog Adv
Time Bst
Mo Tu We Th Fr
Prog
OFF
SET
Prog Adv
Time Bst
Sa Su
Prog
ON
SET
BOOST 1
Prog Adv
Time Bst
Mo
ON
BOOST 2
Prog Adv
Time Bst
Mo
ON
FST11A only
The FST11A is similar to the FST17A but only has one day group mode
in programming – Mo Tu We Th Fr Sa Su giving 24 hour operation.
Up to 4 programmes can be entered (once only required) in the same way
as for the FST17A (refer to section 8).
10. Operating Mode
10.1 Override until Next Program Change
In operating mode, ‘Adv’ advances the program to the next change. If the output
is OFF, it will change the output to ON until the next programmed OFF period.
If the output is ON, it will turn it OFF until the next programmed ON period.
10.2 1 and 2 Hour Boost
In operating mode, pressing the ‘Bst’ (boost) button once will give an output
for one hour. The display will show:–
Prog Adv
ON
Time Bst
Mo
BOOST 1
If pushed twice, then there will be a 2 hour output. The display will show:–
If pushed 3 times, the boost will be cancelled, and output will return to the
programmed state.
Prog Adv
ON
Time Bst
Prog Adv
Time Bst
BOOST 2
Mo
OFF
Mo
In operating mode, the main switch is used to change between
permanent OFF, and timed. There is no permanent ON setting.
Page 11

11. Specifications
This product complies with: LVD Directive 72/23/EEC.
EMC Directive 89/336/EEC.
and relevant clauses of the
following standards: BS EN 60730-7-2:1992; Particular
requirements. Timers and time switches.
BS1363-4:1995; Specification for 13A
fused connection units.
EN61000-6-3:2001; Emission
Requirements for the RCLI Environment.
EN61000-6-1:2001; Immunity
Requirements for the RCLI Environment.
Permissible loads: 13A resistive.
5A filament lamps.
1hp motor.
For other loads refer to technical service
on 020-8450-0515
In applications such as use of economy seven electricity the full load will
not usually be switched. In the cases of a washing machine and a dish
washer the load switched on will be water valves only and the load turned
off will be negligible providing an appropriate time interval has been left
to enable the machine to complete it’s program.
Fuse protection BS 1362 as dictated by load.
700 hours (4 weeks) battery back up in case of supply failure, double pole
switch turned off, or 13A fuse blow.
Operating ambient temperature: -10 to +40ºC.
Operating voltage: 230VAC.
4 ON/OFF programmes per day (independent for each day except when
in day groups).
Page 12

5 Year
Guarantee
In the unlikely event of this product becoming faulty due to defective
material or manufacture, within 5 years of the date of purchase, please
return it to your supplier in the first year with proof of purchase
and it will be replaced free of charge. For years 2 to 5 or any difficulty
in the first year telephone our helpline on 020 8450 0515.
For assistance with the product please contact:–
HELPLINE
020-8450-0515
or email helpline@timeguard.com
For a product brochure please contact:
Timeguard Ltd.
Victory Park, 400 Edgware Road,
London NW2 6ND Tel: 020-8452-1112
or email csc@timeguard.com
A Group company
67-058-336 (Iss.5)
 Loading...