

Page 1
Compact 7 Day
Timeswitch
Model: ETU17
Installation & Operating Instructions
Page 2
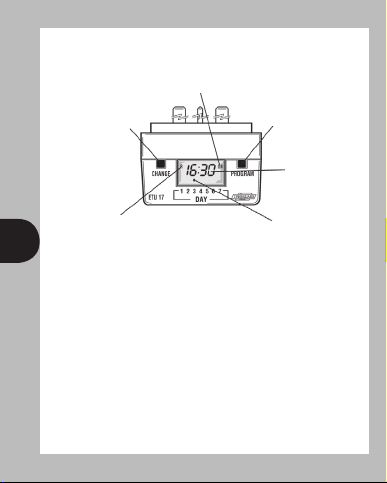
ETU17 – Compact 7 Day Timeswitch
Change Button
sets Day(s), Hours and
Minute times, selects/
cancels Random Mode
and self cancelling
override
Output Status showing
unit either ON or OFF
Programme Button
used to select the clock
time and the 6 ON/OFF
programme times and to
review them once set
Easy view 24 hour
digital clock/timer
display
Random Select
Mode switches unit ON/OFF at random intervals
between 10 & 30 minutes during programmed
1 2
ON times giving the impression that your home
or premises is always occupied
Day indicator
1 = Monday
7 = Sunday
Introduction:
The ETU17 is a compact seven day timeswitch which has six programmes,
each of which can be dedicated to 7 day, 5 day, 2 day or individual day
operation. It has a random switching capability useful for security applications.
It is also able to switch up to 500W of low energy (compact fluorescent) lamps
or linear fluorescent tubes which is particularly useful as this type of energy
efficient lighting is often used for security applications. The ETU17 is also well
suited to control washing machines, tumble driers, dish washers and other
appliances up to 13A (3kW).
Page 3

Battery:
This product has a factory fitted rechargeable battery. If the ETU17
is left out of a live socket for more than 1 month the display may go
blank. In this case plug into a live socket, wait four hours, and apply
reset – see section 1 before programming
.
Programming Overview:
This is a seven day (weekly) timeswitch which has six programmes,
each of which can be block programmed to work on all of the five
weekdays, both weekend days, or all 7 days (24 hour operation).
Programmes can also be designated to operate on individual days.
Only two setting buttons are required, <Change> and <Program>.
In normal operating mode the <Change> button is used to switch
2 3
ON or OFF, overriding the timeswitch until the next programmed OFF
or ON time. During programming the <Change> button is used to
set the hours, minutes and days. The <Program> button is used to
select the clock time and day or the 6 programmed ON/OFF times
and days and to review them once they have been set. Each time the
<Program> button is pressed in programme mode the display will
flash either the days, hours or minutes in turn, starting with the clock
time and day then the first ON time and day(s), first OFF time, second
ON time and day(s) etc. Wherever the days, hours or minutes are
flashing they may be set using the <Change> button. Once set the
<Program> button is pressed again to proceed to the next stage.
Page 4
Normal Operating Mode:
In normal operation the ETU17 will display
the correct day and its time with the colon
flashing. The output status will be shown by
either ON or OFF on the display.
1. To Reset Before Programming:
(To alter c lock time or modify programmes – see section 5)
To clear programmes from memory and reset the ETU17 press the
<Change> and <Program> buttons together until the display goes
blank (approximately 3 seconds).
Release the buttons and the display will fill
with its complete range of characters and
3 4
then clear to show clock and day 1 symbol
flashing. This procedure is essential with a
new ETU17 and is recommended if major
reprogramming is required subsequently.
You are now in the clock setting mode at the beginning
of the programme sequence.
Page 5

Programming Sequence:
Setting clock
Programme 1 ON
Programme 1 OFF
Programme 2 ON
Programme 2 OFF
Programme 3 ON
Programme 3 OFF
Note: Pauses between button presses greater than
1 minute during programming will result in automatic
return to the operating mode.
Programme 4 ON
Programme 4 OFF
Programme 5 ON
Programme 5 OFF
Programme 6 ON
Programme 6 OFF
Operation Mode
2. Setting Clock (after reset):
i. Day Set ting – Press <Change> button to advance to the day
4
required. Day 1 = Monday and Day 7 = Sunday.
ii. Hour Setting – Press the <Program> button
briefly to select the hours – display shows
clock symbol and the hours digits flashing.
Press the <Change> but ton to advance the
hour set ting. For rapid hours selection press and hold down
<Change> button. (Note: Monday shown as example of day s et.)
iii. Minute Setting - Press the <Program>
button briefly to select the minutes –
display shows clock symbol and minute
digits flashing. Press the <Change> button
Page 6

to advance the minutes setting. For rapid minute selection press
and hold down <Change> button. (Note: 16 hours shown as
example of hours set)
iv. Press <Program> button briefly – clock
is now set and display shows ready for the
first ON programme time.
3 To Set Programme ON/OFF
Times (after clock setting):
It must be remembered that the ETU17 has a total of six programmes.
i. The user is now able to set the day(s) that the first programme will
operate on. The alternatives are:
5 6
1 2 3 4 5 6 7
• • • • • = 5 days (Weekdays) Mo Tu We Th Fr
• • • • • • • = 2 days (Weekend) Sa Su
• • • • • • • = 7 days (Everyday) Mo Tu We Th Fr Sa Su
• = Individual days starting with Mo through to Su
Initially dots 1 to 5 flash indicating that if this option
were selected, the programme times about to be
entered would operate over the five weekdays.
If another option is required, the <change> button
should be pressed until the correct day(s) flash.
Page 7

ii. Once the day option has been selected
press <Program> button briefly to select
hour time – display shows hour digits and
ON flashing. Press <Change> button to
advance hour setting. (Note: 2 days (Sat & Sun) shown as
examples of days set.)
iii. Minute Setting – Press the <Program>
button briefly to select the minutes –
display shows clock symbol and minute
digits flashing. Press the <Change> button
to advance the minutes setting. For rapid minute selection press
and hold down <Change> button. (Note: 16 hours shown as
example of hours set).
6
iv. Press <Program> button briefly –
clock is now set and display shows ready
for the first ON programme time.
v. Now set the hours and minutes as before.
The day(s) selected remains the same.
vi. Repeat steps i to v to set the remainder of the 5 programme
ON/OFF times and day(s) as required. Note: Any unused ON/
OFF programmes must be left blank and should be bypassed by
pressing and holding down the <Programme> button until the
display shows normal operating mode. Do not programme ‘0’s
into unused programmes.
Page 8

IMPORTANT After setting a clock time which falls within a
programmed ON period, the unit will not switch ON. Press the
<Change> button to switch the ETU17 ON (the ON will flash
to indicate an override situation). After this the unit will operate
normally to the programmes set.
4. Programme Review:
To fast review the set programmes or for quick exit to normal
operating mode – press and hold down the <Program> button.
Normal review can be carried out by pressing the <Program> button
briefly which reviews the clock time and day with the w hole display
flashing. Further brief pressing of this button reviews the programme
ON and OFF times and day(s) in sequence again with the whole
7 8
display flashing.
5. Making Changes to
Clock Time and Programmes
(Initiating Programme Mode):
This is required when making changes to the clock time/day or
programme times/days and can be initiated any time during the
normal operating mode. Press the <Program> button briefly and
the clock symbol, day flag, hrs and minutes symbols on the display
will flash – this is programme review mode. Further brief pressing
of the <Program> button will display the ON and OFF programmes
in sequence.
Page 9

Having reached the clock time and day or programme time and day(s)
requiring change, press the <Change> button briefly to initiate
programme mode and then follow sections 2 and 3 as required.
Having completed the change press and hold down the <Program>
button until normal operating mode is reached and then release.
6. Cancelling Programmes:
Any ON/OFF programme can be cancelled by clearing its ON and OFF
time separately. Follow step 5 and when the ON programme to be
cancelled is displayed press the <Change> button briefly and the
day dot(s) will flash, press the <Program> button briefly to selec t the
hours and press the <Change> button until the hour digits show
-- --: then press the <Program> button briefly to clear the
8 9
programme time. The display will show the hour and minute dashes
and ON flashing. Repeat the procedure for the OFF time.
7. Programming Across Midnight:
This can be achieved by programming the required ON time in the
initial day and the required OFF time in the subsequent day. The
unused times in these two programmes can either be left blank (--:- -)
or used for an OFF time during the initial day and an ON time during
the subsequent day.
Page 10

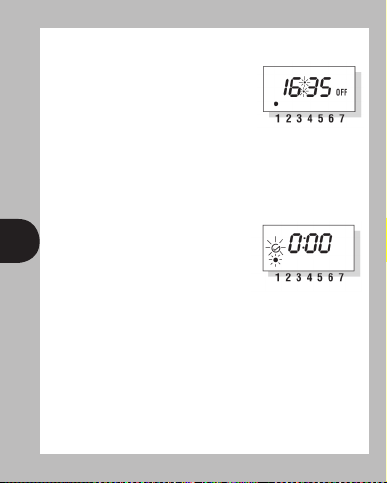
8. Self Cancelling Override:
To change the output status from ON to OFF or vice versa press the
<Change> button whilst in normal operating mode. The output
status will change and indicate override is in operation by flashing
either the ON or OFF symbol on the display. The override will end at
the next programmed change, or sooner, if the <Change> button is
pressed again.
9. Random Operation:
By pressing the <Change> for around three seconds whilst in normal
operating mode a small R appears on the display. The ETU17 will
now switch ON and OFF in a random fashion during programmed
ON periods. Both the ON and the OFF periods will vary in a random
9 10
way between 10 and 31 minutes. Normal switching can be restored
by pressing the <Change> button for around three seconds until the
R symbol reappears.
10. Operation:
Plug the ETU17 into a 13A socket and switch ON if necessary. Plug in
the appliance or lamp(s) to be controlled into the ETU17 and ensure
the appliance or lamp(s) are switched ON.
Page 11

Specifications:
i. Conforms to Directives: Conforms to the latest directives.
ii. Permissible Loads: 13A resistive (heating)
5A inductive
1hp motor
500W low energy (compact fluorescent)
and linear tube fluorescent lighting
1.5kW filament (incandescent) lighting.
iii. Battery Back-up: 1000 hour s by factory fitted
rechargeable battery.
iv. Operating Ambient
Temperature Range: -10°C to 35°C.
v. Operating Voltage: 230V AC.
10
Not suitable for discharge lighting (e.g. SON and Metal Halide).
3 Year Guarantee
In the unlikely event of this product becoming faulty,
due to defective material or manufacture, within 3 years of the date of purchase,
please return it to your supplier in the first year with proof of purchase and it will be
replaced free of charge. For the second and third years or any difficulty in the first
year telephone the helpline on 020 8450 0515.
Note: A proof of purchase is required in all cases. For all eligible replacements
(where agreed by Timeguard) the customer is responsible for all shipping/postage charges
outside the UK. All shipping costs are to be paid in advance before a replacement is sent.
Page 12

For assistance with the product please contact:
HELPLINE
020 8450 0515
or email helpline@timeguard.com
For a product brochure please contact:
Timeguard Limited.
Victory Park, 400 Edgware Road,
London NW2 6ND
Sales Offi ce: 020 8452 1112
or email csc@timeguard.com
67.058.04 (issue 3).
Zerofour – November 2013
 Loading...