

Page 1
Installation & Operating Instructions
LED PIR Carriage Lantern
CLLED44PIRB – Black
CLLED45PIRWH – White
Page 2

1
1. General Information
These instructions should be read carefully and retained for further reference
and maintenance.
2. Safety
• Before installation or maintenance, ensure the mains supply to the luminaire
is switched off and the circuit supply fuses are removed or the circuit breaker
turned off.
• It is recommended that a qualified electrician is consulted or used for the
installation of this luminaire and install in accordance with the current
IEE wiring and Building Regulations.
• Check that the total load on the circuit including when this luminaire is fitted
does not exceed the rating of the circuit cable, fuse or circuit breaker.
3. Technical Specifications
• 230V AC 50 Hz
• This Luminaire is of class II construction and must not be earthed
• Lamp Type Supplied: 4W LED
• Energy Efficiency: Class A
• Energy Usage: 4kWH/1000H (Lamp Supplied)
• Lamp Rating : 60W halogen (max.)
18W compact fluorescent (max.)
5W LED (max.)
• Lumen Output: 320-335lm
• Operating Temperature: -10° to +40°
• Colour Temperature: Warm White 2900 – 3200K
• IP44 Rated suitable for restricted external applications
• Detection Angle: 150°
• Detection range: Up To 8m
• Beam angle: 120°
• On time: 100 seconds
• Lux ON/OFF: 30/60
Page 3
2
6. Using the back plate as a template mark the position for the holes.
Note the back plate must be mounted in the correct orientation,
following the ‘UP’ arrow.
7. Drill the wall using a 6mm Ø masonry drill bit making sure not to infringe
or compromise any gas, water pipes or cables. Insert the supplied rawl plugs
into the previously drilled holes.
8. Pierce the pre-installed rubber grommet and pass through the 230V AC 50Hz
mains supply cable. Ensuring the IP rating of the fitting is maintained
(Silicon sealant may be used).
• Manual Override: Yes, Pulse
• CE Compliant
Slave Loads:
Up to 5 sets of CLLED42B and CLLED43WH can be used as a slave if additional
lanterns are required. The Master units either CLLED44PIRB or CLLED45PIRWH
will trigger all slave units simultaneously once the PIR has been activated.
4. Installation
1. IMPORTANT Switch off the electricity at the fuse box by removing the relevant
fuse or switching off the circuit breaker before proceeding
with the installation.
2. An isolating switch should be installed to switch the power to the unit
on and off. This is for maintenance purposes.
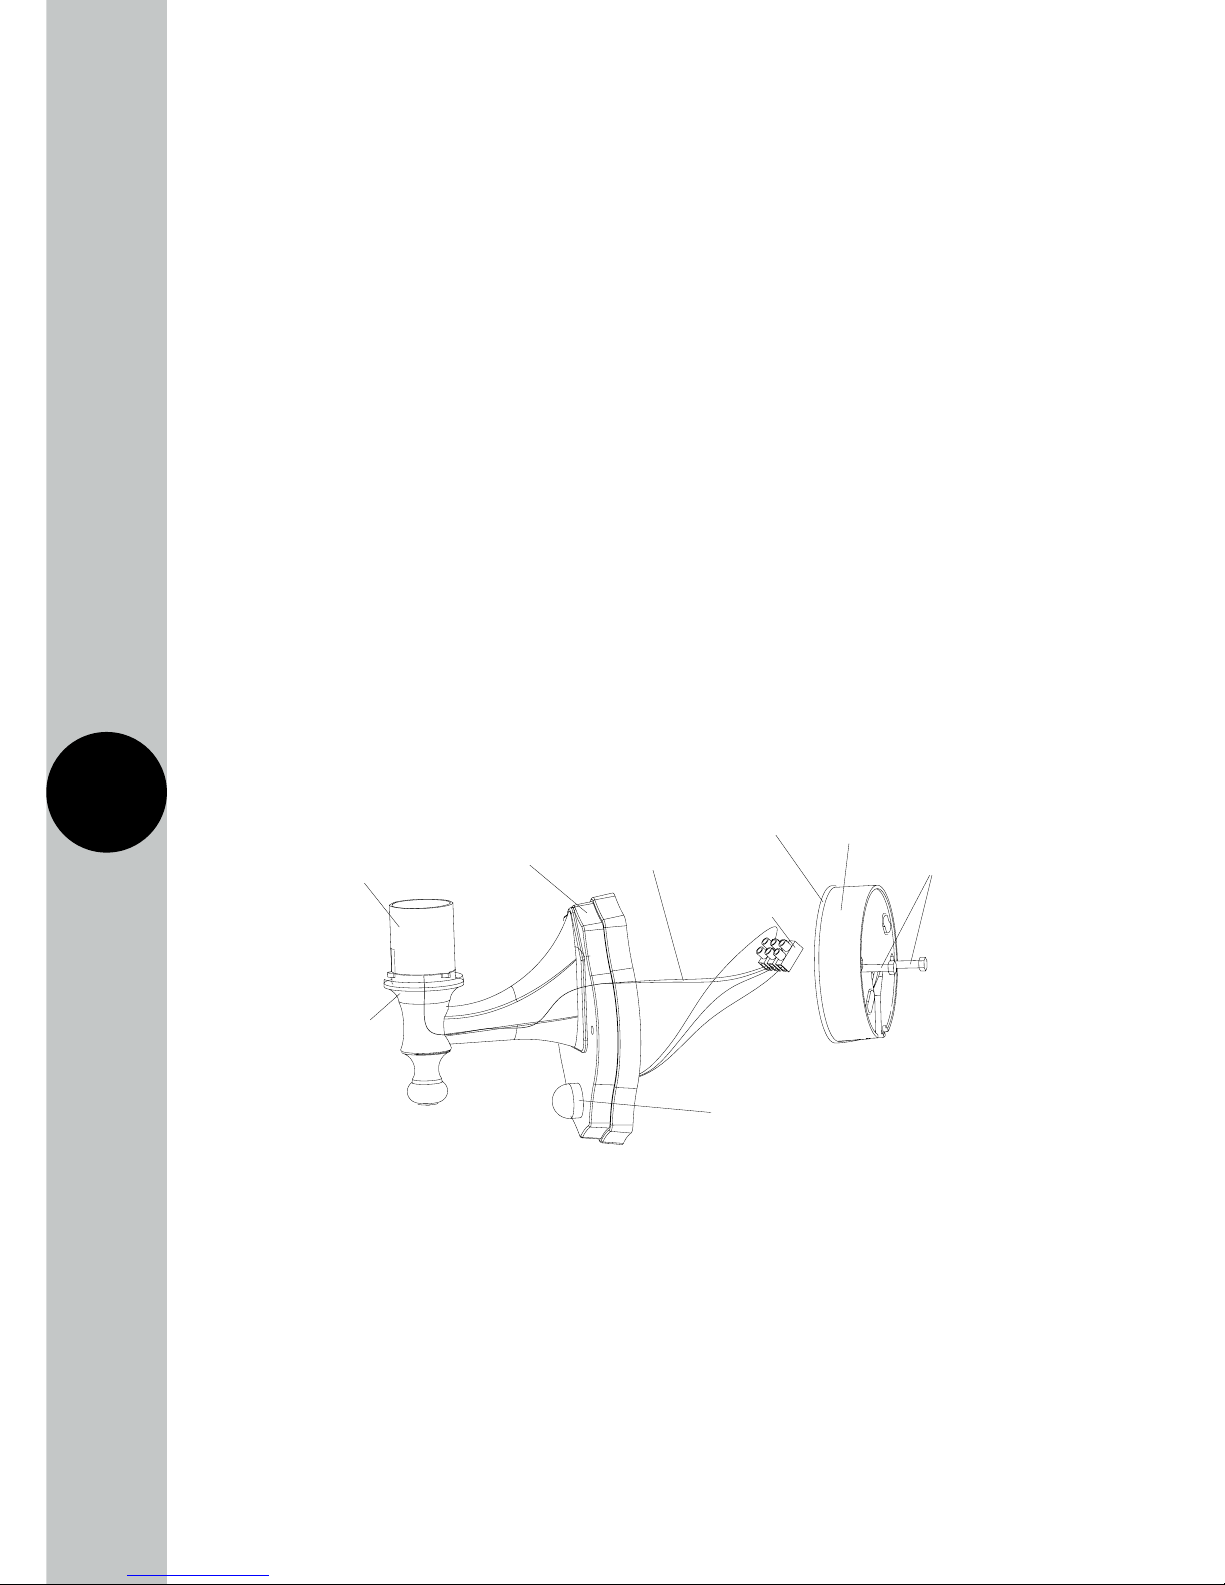
3. Unscrew the security nuts located on the front of the unit.
4. Pull away the back plate from the wall mount.
5. Separate the terminal block and back plate by using a flat head screw driver;
do not disconnect any pre-installed cables.
Lamp Holder
PIR Sensor
Seal Ring
(Gasket)
Terminal
Block
Pre-Installed
Cable
Wall Mount
Seal Ring
(Gasket)
Back Plate
Machine
Threaded Bolts
Page 4

3
9. Secure the back plate to the wall using the screws provided ensuring
that the machine threaded bolts are in place and the back plate
is correctly orientated (Arrow Up).
10. Reinstall the terminal block to the back plate ensuring it is clipped
in place securely.
11. Using the standalone connection diagram (see section 5.Connection Diagram)
connect the 230V AC 50Hz mains supply cable to the terminal block ensuring
that all bare conductors are sleeved and that correct polarity is observed.
Note: Additional slave units can be connected (see section 5.Connection
Diagram – Slave).
12. Align the holes in the lantern wall mount with the machine threaded bolts
in the back plate and push the wall mount over the back plate.
Secure with the security nuts.
13. Align the housing to the wall mount joint. (There are two rounded tabs and
one triangle tab on the wall mount to ensure the housing is correctly in place.
14. Twist the body approximately 30 degrees clockwise to lock in place.
Please note gaskets are already applied to the required parts.
15. Fit the 4 watt candle lamp supplied into the lamp holder moulded
to the wall mount.
16. Place the six pieces of glass into the housing accordingly, take great care
in fitting the glass as the edges may be sharp.
17. Mount the lid on top of the housing and twist clockwise until secure,
the rectangular tabs on both the lid and top part of the housing
will indicate where the lid fits in place.
18. Attach the end cap to the top of the lid and twist clockwise until firmly locked
into position again using the same method as the wall mount with the two
rounded tabs and one triangular tab and twist clock wise.
Terminal Block
20mm Grommet
Fixing Holes
Back Plate
Mains Supply Cable
(230V AC 50Hz)
Red
PIR
Blue (N)
Brown (L)
Blue (N)
Brown (L)
Page 5

4
Interlocking feature for
the end cap as well as
the wall mount.
5. Connection Diagram
Page 6

5
6. Operation and Testing
• Turn the power ON, the unit will illuminate for approximately 40 seconds
to indicate it has been wired correctly. It will then turn OFF automatically.
• Cover the PIR with your hand, the unit will illuminate to show it is working.
There are no adjustable features on this model. The lamp will turn ON
for 100 seconds only, once it is dark.
• Test the detection angle is adequate and the distance is met that you require
for reference see the diagram below. The detection angle is 150° across
and up to 8 metres in front of the sensor at a 2.5 metre mounting height.
Page 7

6
Manual Override
• The light can be switched on for longer time periods by use of the manual
override mode. This can be activated at night, by using the internal wall switch
or circuit breaker.
• Switch the internal wall switch/circuit breaker (OFF, ON, OFF, ON) within
3 seconds. The unit will now illuminate continuously until switched back
into Auto mode.
• To switch the unit back into Auto mode, switch the internal wall switch/circuit
breaker once (OFF, ON) within 5 seconds. The unit will return to its Auto Mode
and will operate as normal.
3 Year Guarantee
In the unlikely event of this product becoming faulty due to defective material or
manufacture within 3 years of the date of purchase, please return it to your supplier
in the first year with proof of purchase and it will be replaced free of charge.
For years 2 and 3 or any difficulty in the first year, telephone the helpline
on 020 8450 0515.
Note: A proof of purchase is required in all cases. For all eligible replacements
(where agreed by Timeguard) the customer is responsible for all shipping/postage
charges outside of the UK. All shipping costs are to be paid in advance before
a replacement is sent.
Page 8

TG43000 – May 2019
67-058-526 (Issue 3)
Timeguard Limited.
Victory Park, 400 Edgware Road,
London NW2 6ND
Sales Office: 020 8452 1112
or email csc@timeguard.com
For a product brochure please contact:
If you experience problems, do not immediately return the unit
to the store. Telephone the Timeguard Customer Helpline;
Qualified Customer Support Co-ordinators will be on-line
to assist in resolving your query.
HELPLINE
020 8450 0515
or email helpline
@
timeguard.com
www.timeguard.com
 Loading...