

Page 1

OT240M Baby Monitor
User Manual
Components
Built-in MP3+4G TF card with songs and st ories;
User-friendly menu;
Two-way talkback to comfort baby.
One User Manual
One parent unit
One rechargeable Ni-MH battery for the parent unit
One baby unit
One power adapter
One USB connected adapter
One Pulse Oximeter (including one SpO2 probe)
Two batteries for Pulse Oximeter
Settings
Step 1: Connect the baby unit to the power and
insert battery pack into parent unit with correct
polarity (+/-) as indicated.
Page 2
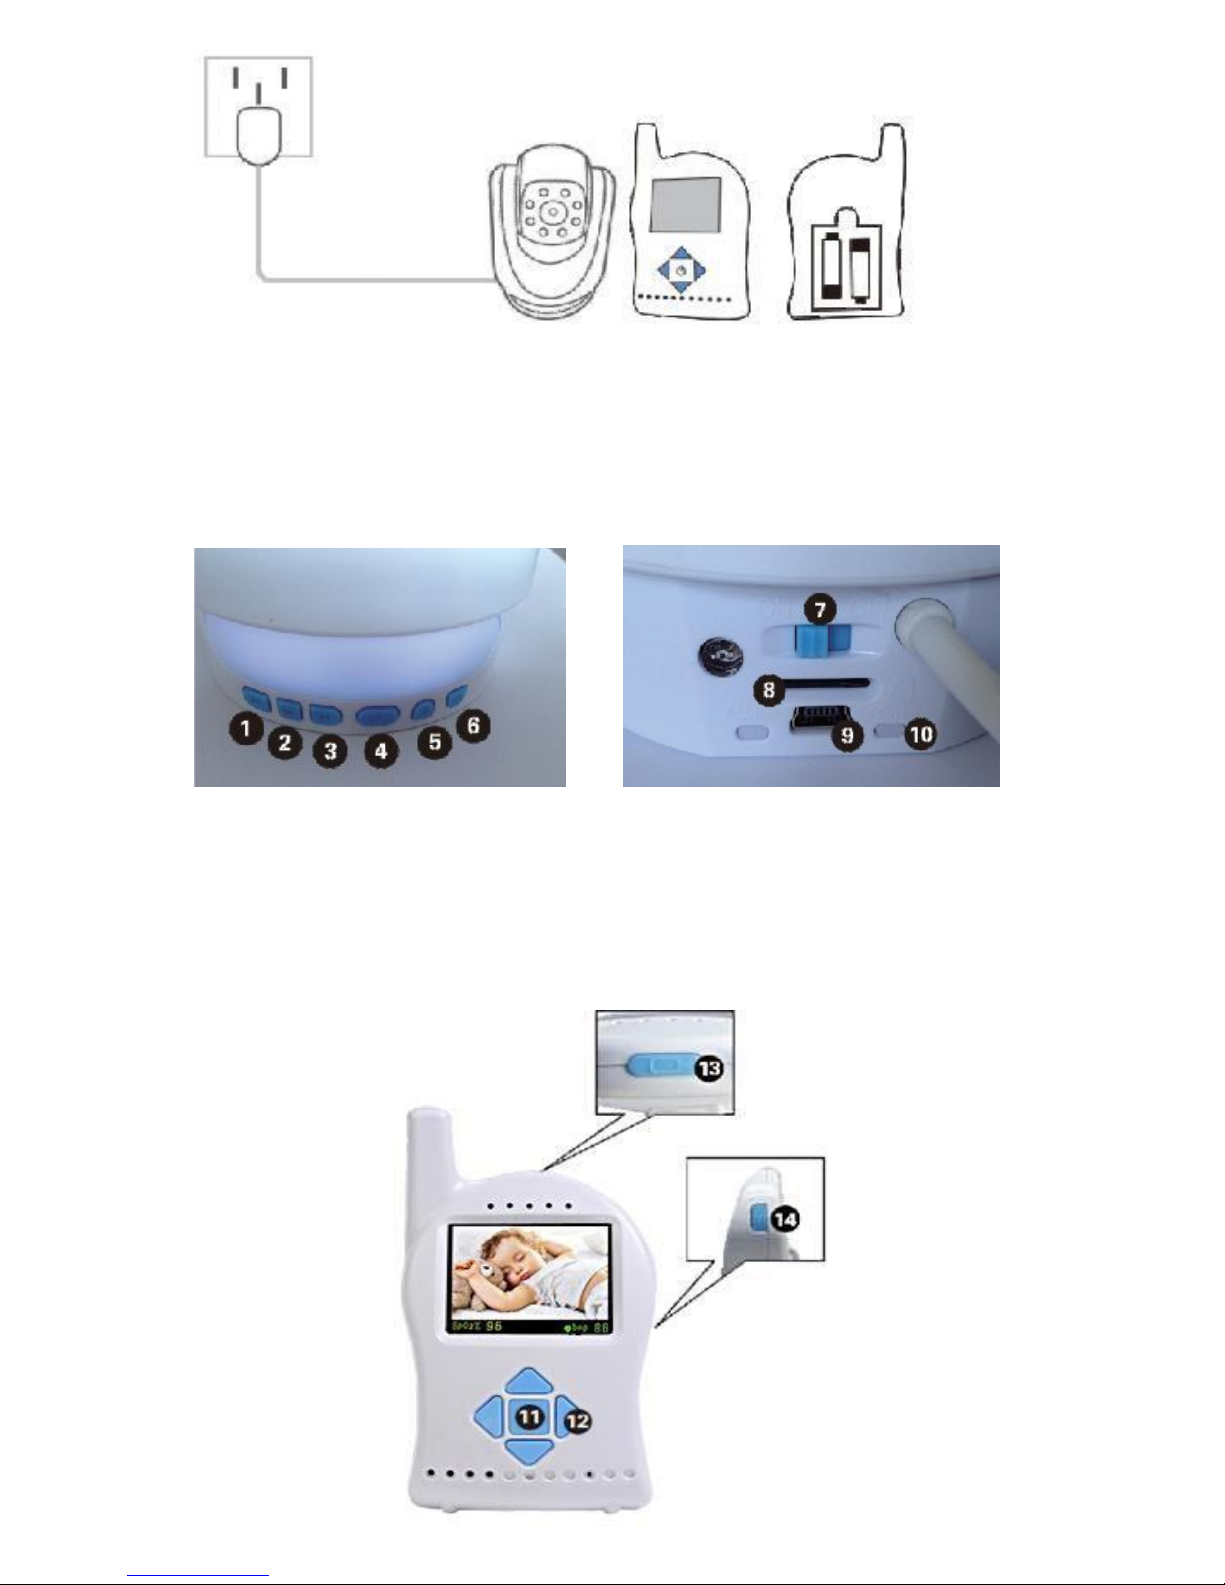
Step 2: Toggle the key on the baby unit, press and
hold the parent key until the green LED is on. The
parent unit is now powered on and the parent unit
will search for and link itself to the baby monitor.
Baby unit settings
1. Play the next lullaby 2. Pause/play
3. Play previous lullaby 4. Nightlight
5. Volume up 6. Volume down
7. Power switch 8. MP3 TF slot
9. USB power jack 10. Power indicator
Page 3
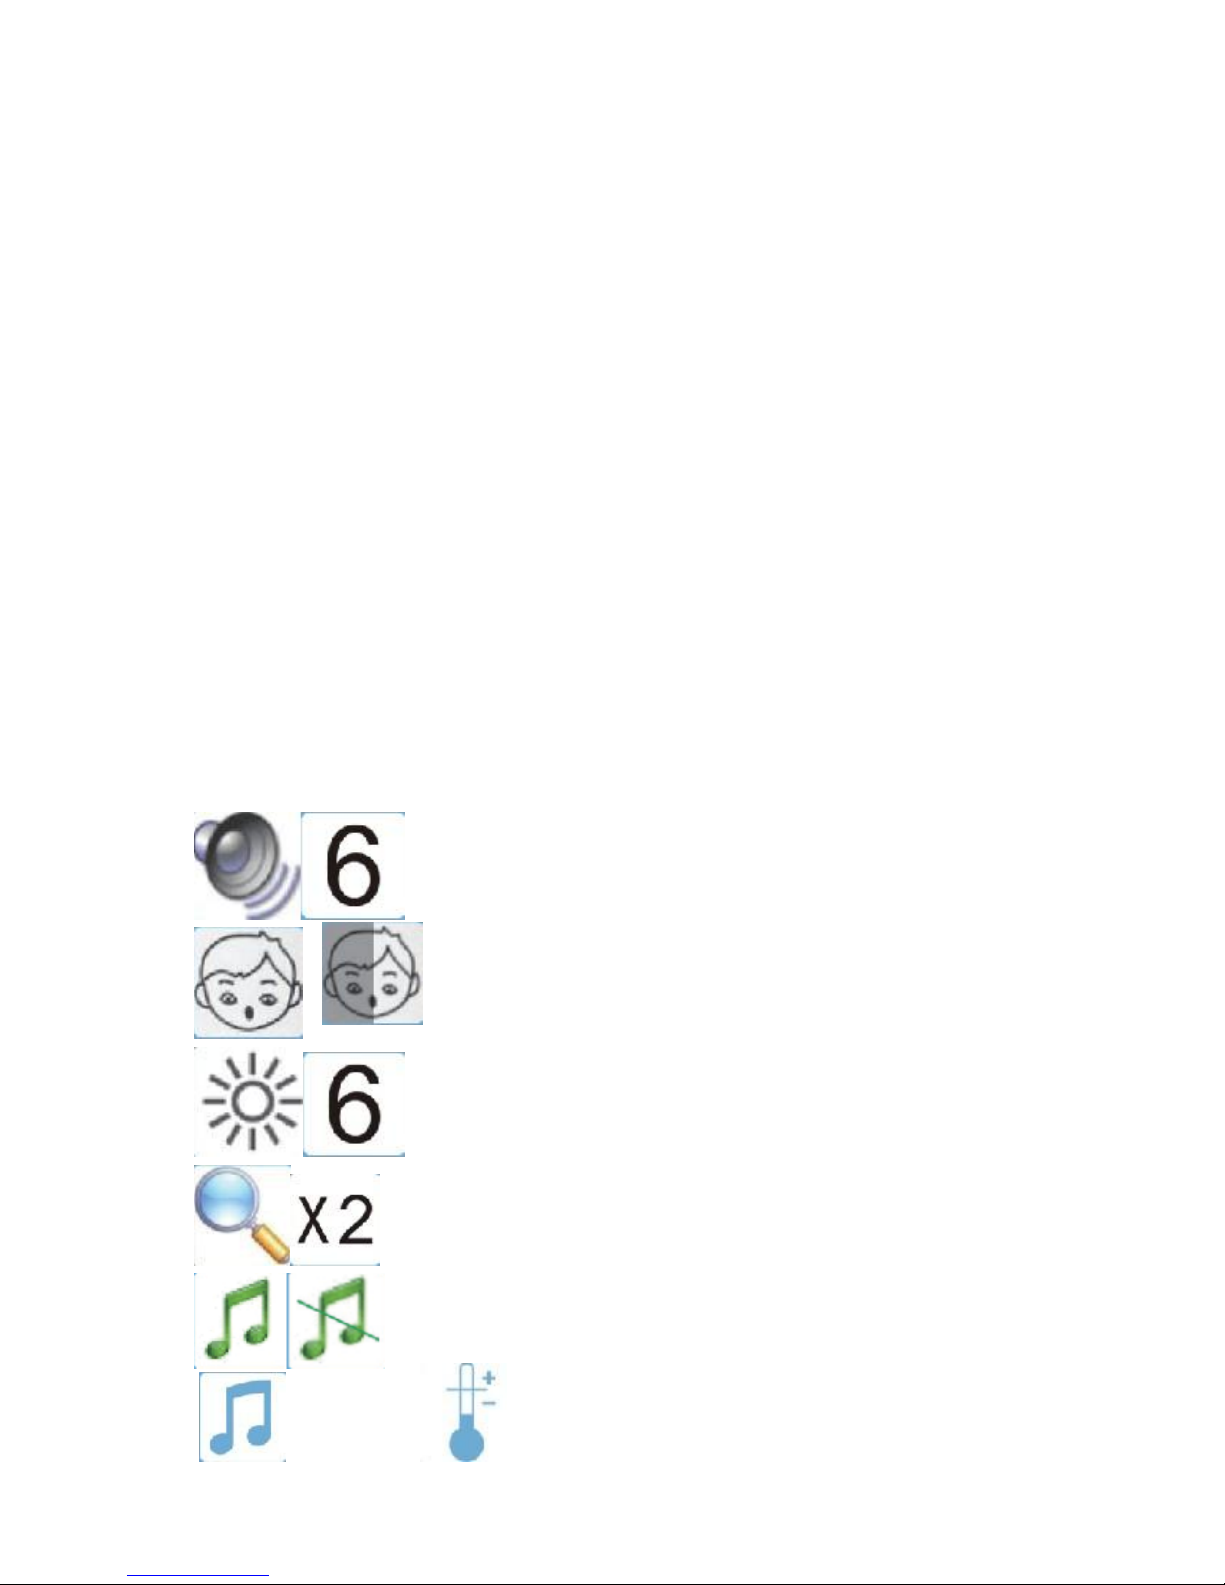
11. Press to access menu settings, press and hold to
power on/off.
12. Remote control the camera of the baby unit
(turns left/right or up/down).
13. Turn on/off LED
Press and hold to talk with your baby.
Tips:
To turn off LCD screen by pressing button 13
for power saving and more restful sleep at
night.
Talk with baby by pressing and holding the
button 14.
Press button 11 to open menu when parent unit
and baby unit turned on. Constant LCD light
mode and power saving mode are available in
second item.
Menu structure of parent unit
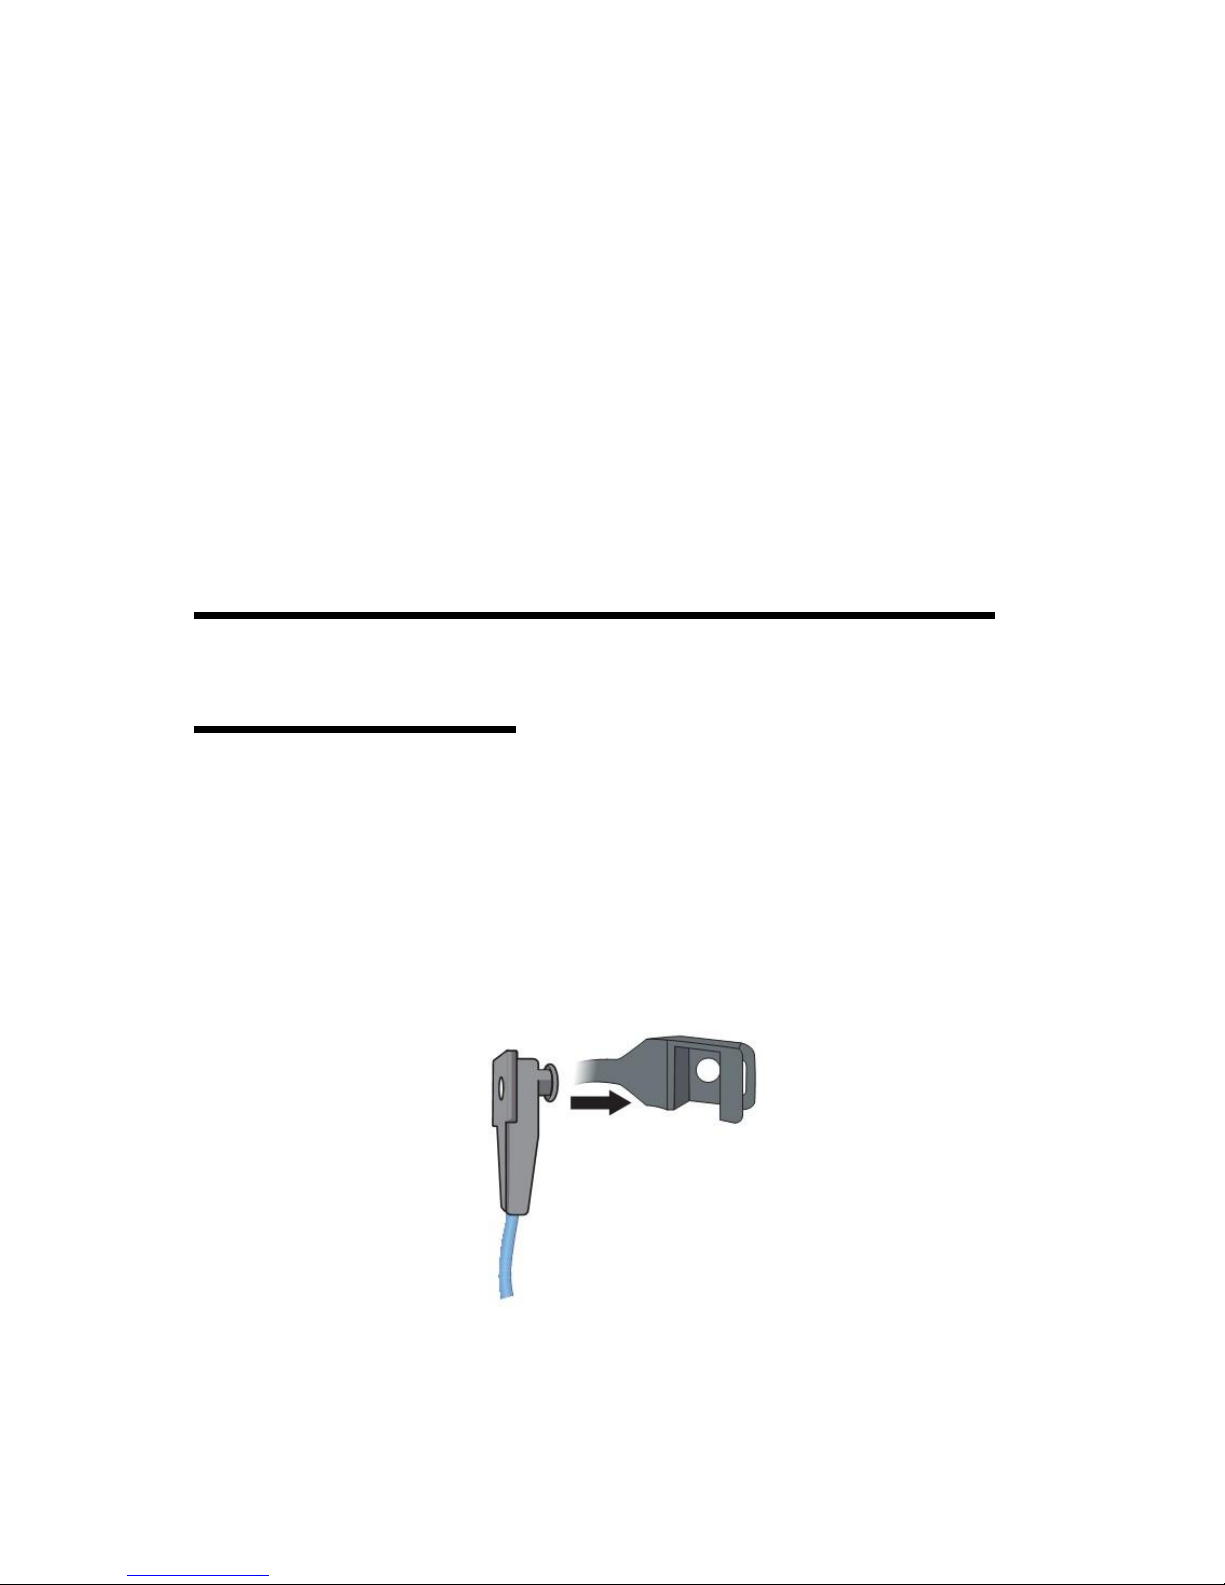
Voice & volume
Screen always on or power saving
Brightness
Zoom
MP3
MP3 Temperature
Page 4

Power Signal
SpO2 Value Pulse Rate Value
1. Volume settings
Press menu button to access main menu when parent
unit is turned on, choose this icon and then increase
or decrease the volume of parent unit pressing the
left or right direction keys. (Default is Mute)
Constant LCD light/Power saving
Press menu button to access main menu, choose this
icon to set the display mode by pressing left or right
direction keys. (The light under Power saving mode
will self-adjust according to the environmental
sounds).
2. Brightness setting
Press menu button to access main menu, choose this
icon and select the desired brightness level (from
1~6) using the left or right direction keys.
3. Zoom
Press menu button to access main menu, choose this
icon to change the zoom x1 or x2 by pressing right
direction key.
4. MP3 kid's learning
Method 1: Press menu button of parent unit to
access main menu, choose this icon and turn on/off
MP3 by pressing right direction key and select
desired lullaby left key.
Method 2: To start MP3 press the bottom key on the
baby unit.
Page 5

Technical parameters
Model
OT240M
Modulation system
FSK
Frequency
2.4G
Channel
19
Screen material
2.4” LCD
SpO2 Range
35% - 100%
SpO2 Alarm
Low limit 90%
Pulse Rate Range
30bpm – 240bpm
Pulse Rate Alarm
High limit 160bpm
Low limit 70bpm
Baby unit battery
Dc 6v/2a
Parent unit sensitivity
Aa1800mA 3.6V NI-MH
Parent unit adapter
≤85dBm
Parent unit battery
DCV / 500mA
Battery cycle life
Aa1800mA 3.6V NI-MH
Battery charging time
14 Hours
Operating
12 Hours
Temperature range
32-122F (0-50C)
Open area range
820ft(250m)
Lullaby
Mp3 +4g TF
Page 6

Technical features
Low power indication: Should battery voltage fall
below 3.5V, parent unit will alarm and will shut
off if below 3.0V.
Squelch: automatic filtering environment
background noise.
Automatic sound trigger: If the sound exceeds
50dB, the baby unit will transmit sound so as to
prevent parent from noise interference.
Alarming: A 10 second “beep-beep” alarm will
sound to alert parent when the distance between
the parent unit and baby unit has been exceeded;
When the measured SpO2 or Pulse Rate value
exceeds the preset alarm limit, then the parent
unit will activate the audible and visual alarm
indications.
Automatic channel search: the parent unit will
search the proper channel to connect to the baby
monitor.
Sweet nightlight: A nightlight switch at the
bottom of baby unit provides convenience for
baby care at night.
Infrared night vision: Detect images in the dark.
(changes to black/white).
Charging indicator: power indicator flashing.
MP3 player: built-in MP3 with lullabies and
children stories in baby unit, which can be
operated by parent unit. Additional lullabies may
be uploaded.
Cautions:
This product is intended as an aid. It is not a
Page 7

substitute for responsible and proper audit
supervision and not intended for use as a medical
monitor.
Please do not use power adapters that may not fit
this product configuration.
Please do not expose the baby monitor to extreme
cold, heat, wet or direct sunlight.
Make sure the baby unit and the adapter cord are
always out of reach of the baby, at least 3 feet/1
meter away from the baby or crib, to avoid a
possible strangulation hazard.
Never cover the baby unit or parent unit with
anything such as a towel or a blanket. Clean units
only when when powered off.
Troubleshooting
Problem: Power indicator light not working.
Possible cause: Does not switch on; Power is not
getting to the unit; Low batteries.
Solution: Turn on the units; Make sure the units are
connected to the power supply; Replace the
batteries.
Problem: Power indicator flashing.
Possible cause: Not connected well with adapter;
Low batteries.
Solution: Make sure well connected; Replace the
batteries.
Problem: Parent unit makes loud noises.
Possible cause: Units are too close together; Volume
dial on parent unit may be too high.
Solution: Move the parent unit at least 3 feet/1meter
Page 8
away from the baby unit; Turn down volume on the
parent unit.
Problem: Weak sound or mute coming from parent
unit.
Possible cause: Volume on parent unit or set too low
or muted.
Solution: Turn up the units closer to each other.
Problem: Units may be too far from each other.
Possible cause: No signals between units.
Solution: Move the units closer to each other.
Instructions for Pulse Oximeter
Connection
Insert the sensor tips into the slots on the probe
holders. Place the sensor tip labeled “LED” into the
stationary probe holder on the silicone wrap belt, and
place the sensor tip labeled “PD” into the sliding
probe holder, as illustrated in Figure 1 and Figure 2.
Figure 1 Probe tip and holder
Page 9
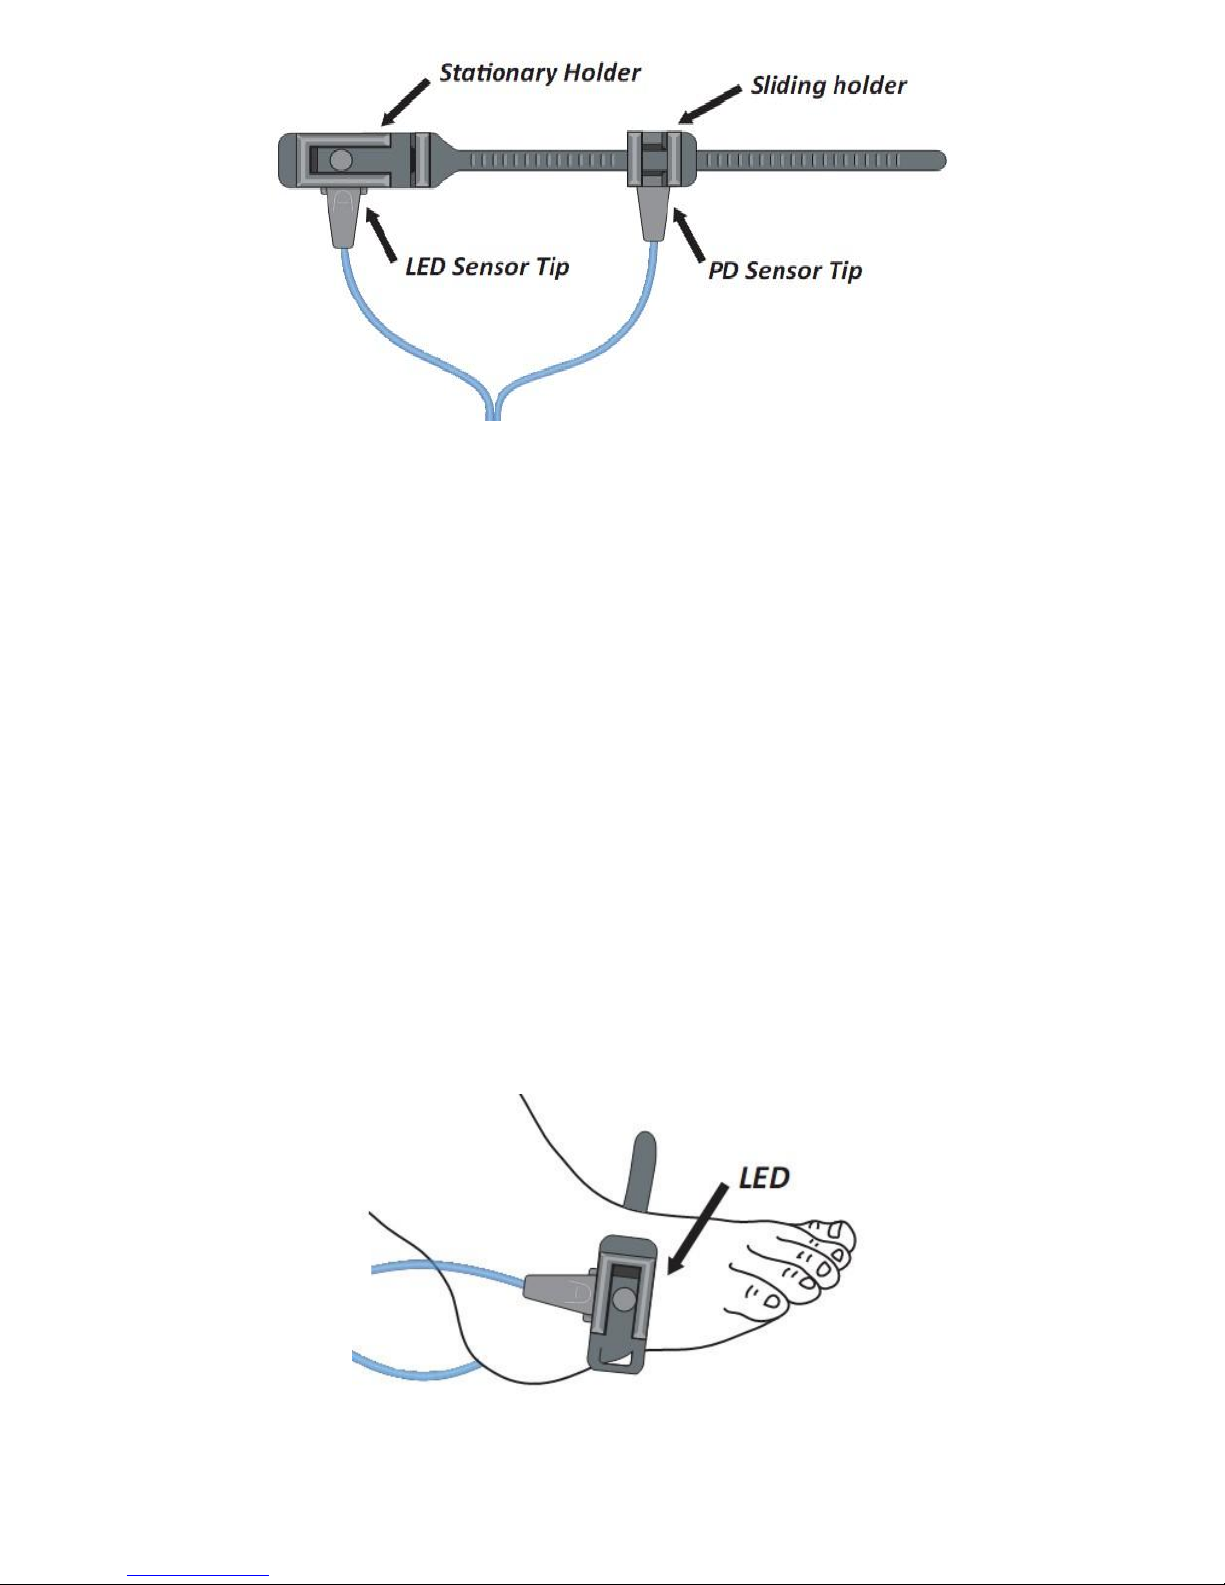
Figure 2 Y-type SpO2 Sensor with Rubber Wrap
NOTE: Make sure that the silicone button seat fully
into the hole in the back of the probe holder.
Wrap the oximeter on the leg near ankle with its
belts and position the front panel to a proper place
for convenient operation, as shown in Figure 4.
Wrap up the Y-type sensor onto the baby’s foot by
the rubber wrapper, as illustrated in Figure 3. Make
sure the alignment of the light-emitting tip (LED)
and the photo- detecting tip (PD) for aiming at each
other, then thread the end of wrap belt through the
outside slots on the probe holders and tighten the
rubber belt with proper force. The final placement is
shown in Figure 4.
Figure 3 Sensor wrapping up
Page 10
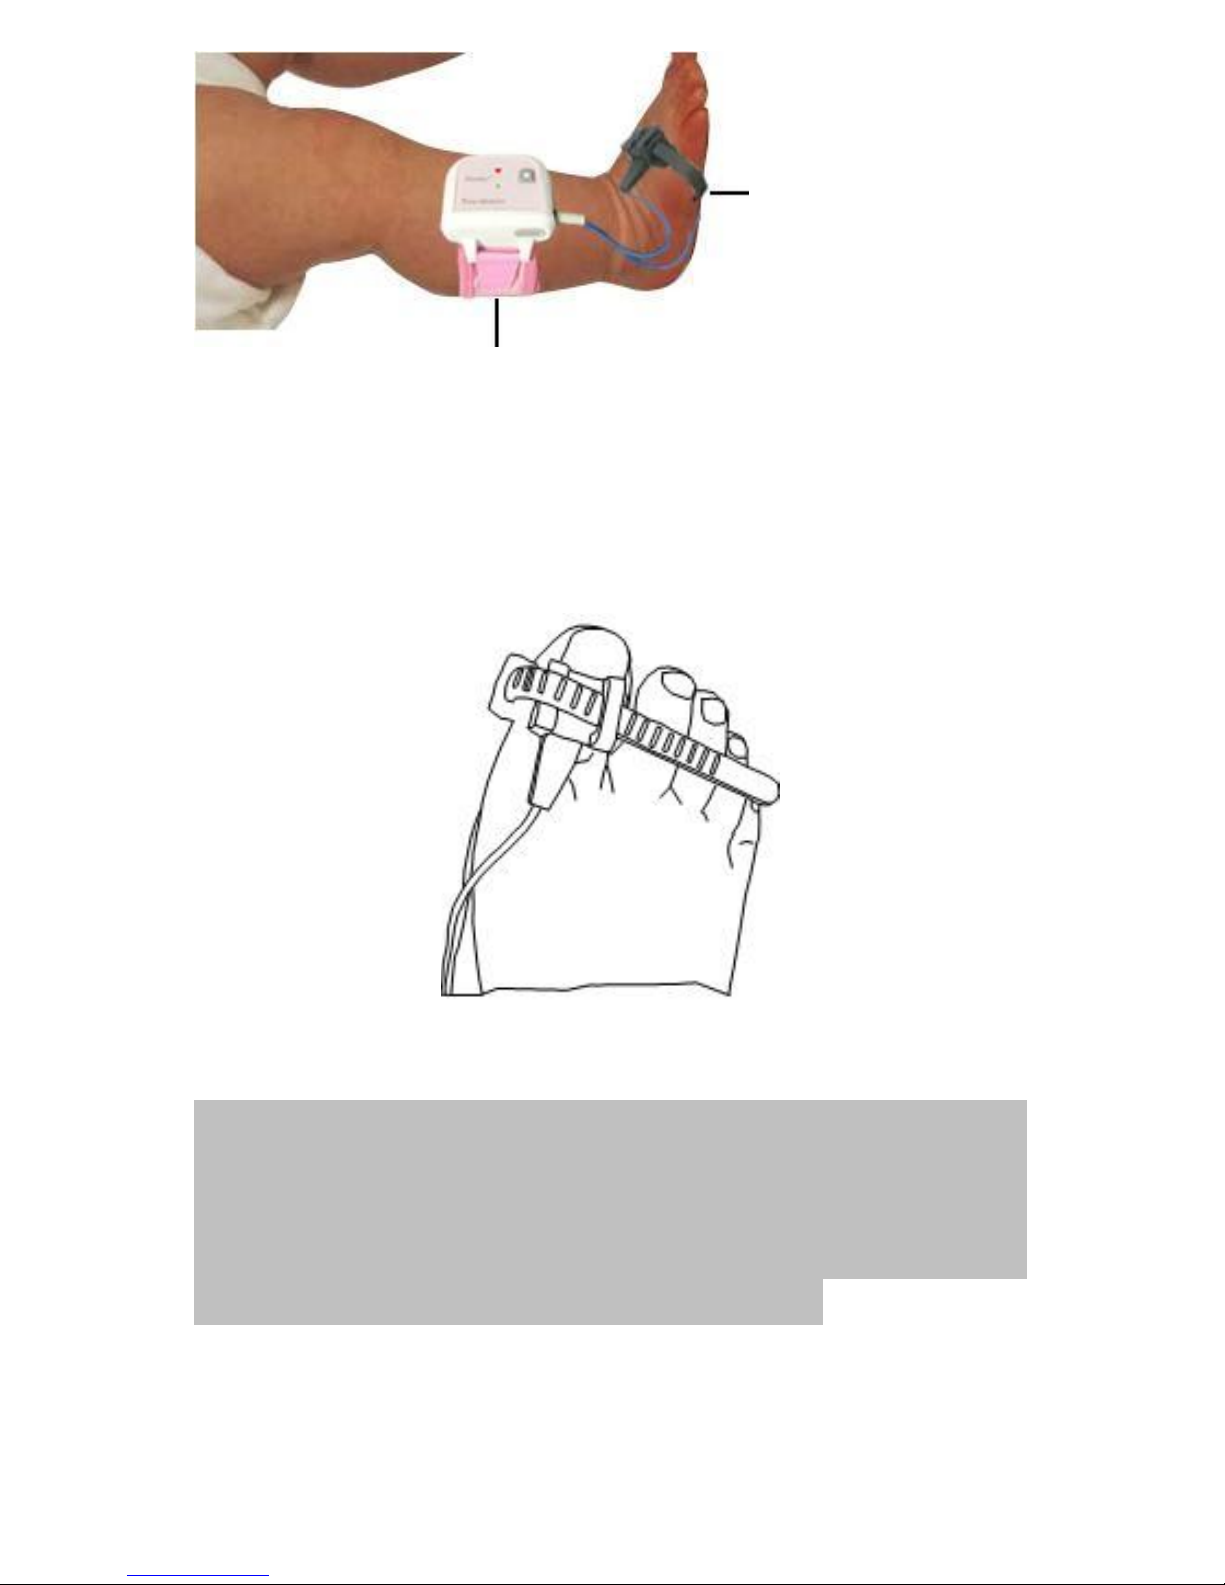
Y-type SpO
2
Sensor with
rubber wrapper
Pulse Oximeter
Figure 4 Placement of the Oximeter and the Sensor
It's recommended that wrapping up the sensor onto
the baby's first toe if the foot is too thick to be
tighten, as shown in figure 5.
Figure 5
IMPORTANT: The sensor connection is critical for
the signal strength and quality. Try to make LED and
PD facing each other in opposite side, so that the
light beam is as vertically transmitted as possible
and the light path is as short as possible.
Page 11
Instructions for Operation
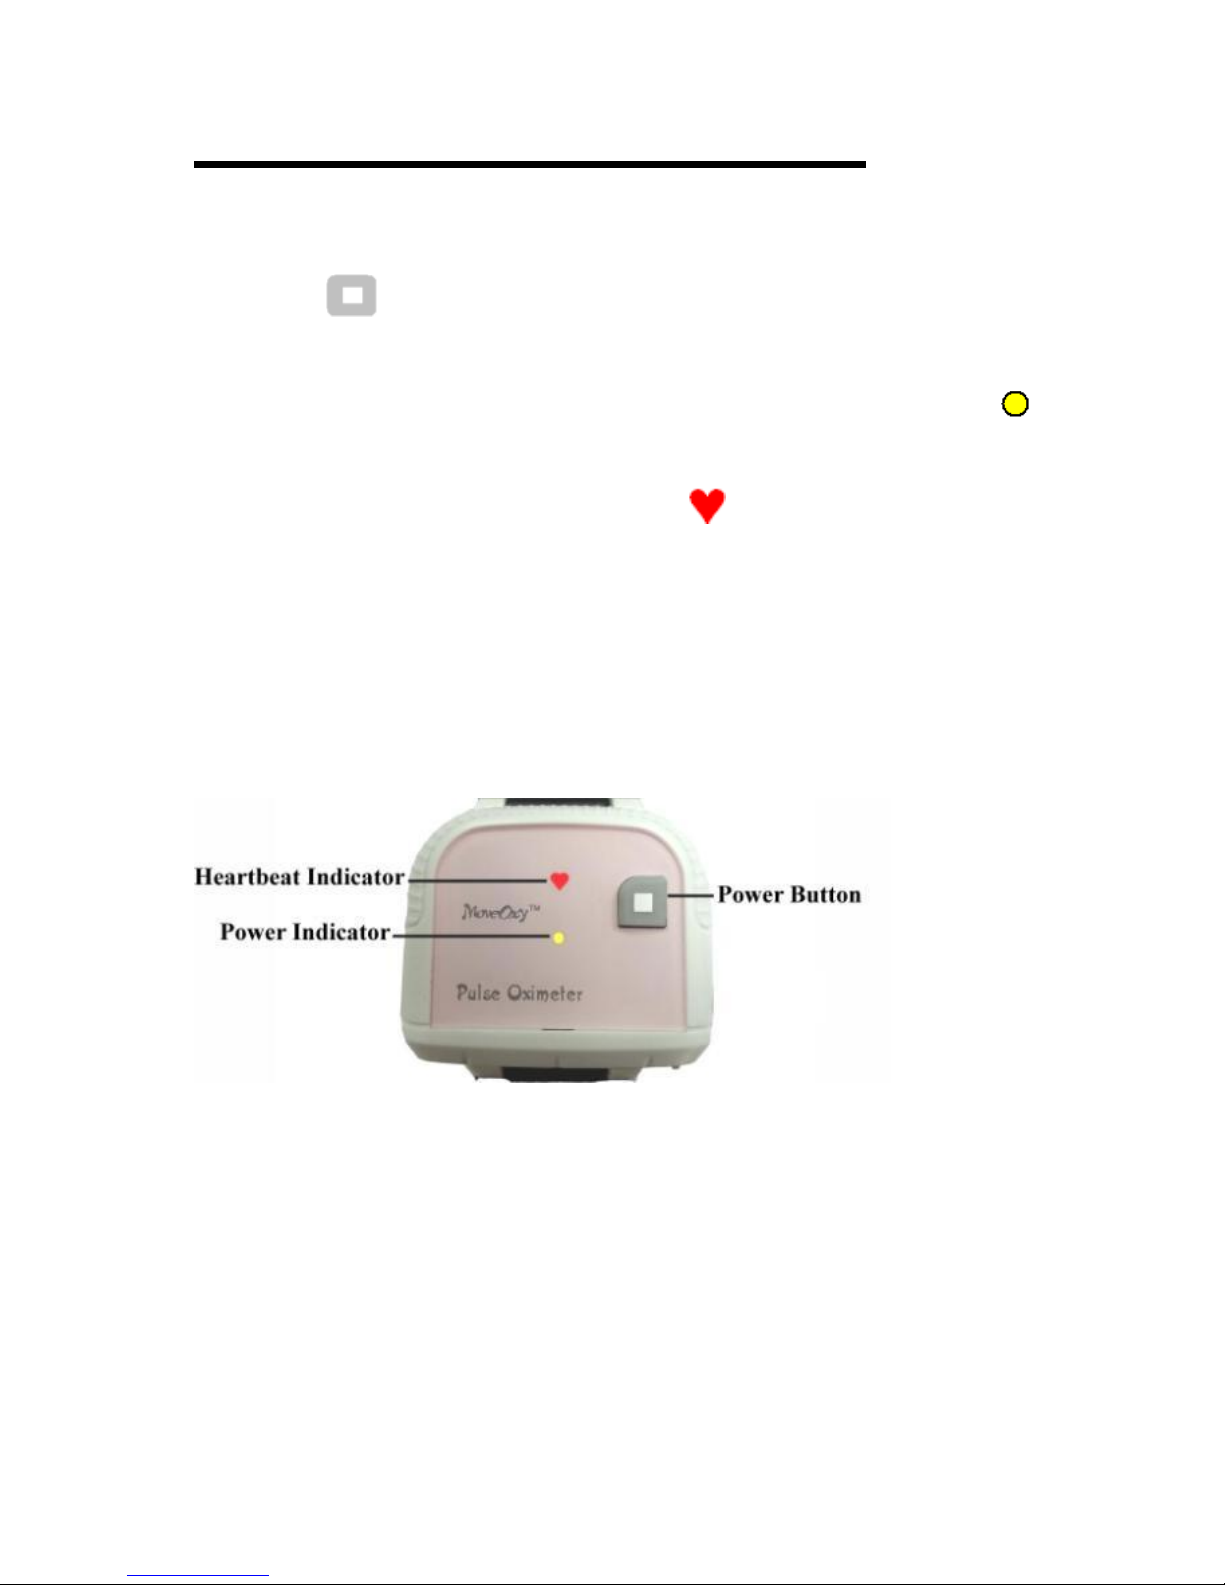
After all connection are completed, press the Power
Button ( ) for 3 seconds to power on the oximeter,
referring to below figure. When the oximeter is
powered up, the Power Indicator (yellow lamp )
will light constantly. If the heart beat is detected, the
Heartbeat Indicator (red lamp ) flashes according
with the heart rate. At the same time the oximeter
sends the measured data (SpO2 and PR) to Baby
Monitor in a given time interval via wireless
communication, and the SpO
2
and PR value will be
displayed on the terminal side of Baby Monitor.
NOTES:
Appearance of the Pulse Oximeter
1. The oximeter has no automatic power-off function.
Press the Power Button for 3 seconds to turn it off
after the end of each use.
2. If the Power Indicator flashes it means the battery
voltage is low for the oximeter, please replace the
batteries.
Page 12

Distributed by:
eH4H LLC
1200 Abernathy Road, Suite 1700, Atlanta,
GA 30328
Website: www.Dormebaby.com
Tel: 888-741-2224 ext. 2
Fax: 832-442-4000
A division of Tele-H-for H Holdings, LLC
FCC Caution.
§15.19 Labelling requirements.
This device complies with part 15 of the FCC
Rules. Operation is subject to the following
Page 13

two conditions: (1) This device may not cause
harmful interference, and (2) this device must
accept any interference received, including
interference that may cause undesired
operation.
§15.21 Information to user.
Any Changes or modifications not expressly
approved by the party responsible for
compliance could void the user's authority to
operate the equipment.
§15.105 Information to the user.
Note: This equipment has been tested and
found to comply with the limits for a Class B
digital device, pursuant to part 15 of the FCC
Rules. These limits are designed to provide
reasonable protection against harmful
interference in a residential installation. This
equipment generates uses and can radiate
radio frequency energy and, if not installed
and used in accordance with the instructions,
may cause harmful interference to radio
communications. However, there is no
guarantee that interference will not occur in a
Page 14

particular installation. If this equipment does
cause harmful interference to radio or
television reception, which can be determined
by turning the equipment off and on, the user
is encouraged to try to correct the interference
by one or more of the following measures:
-Reorient or relocate the receiving antenna.
-Increase the separation between the
equipment and receiver.
-Connect the equipment into an outlet on a
circuit different from that to which the
receiver is connected.
-Consult the dealer or an experienced
radio/TV technician for help.
*RF warning for Mobile device:
This equipment complies with FCC radiation
exposure limits set forth for an
uncontrolled environment. This equipment sh
ould be installed and operated with
minimum distance 20cm between the radiator
& your body.
 Loading...