

Page 1
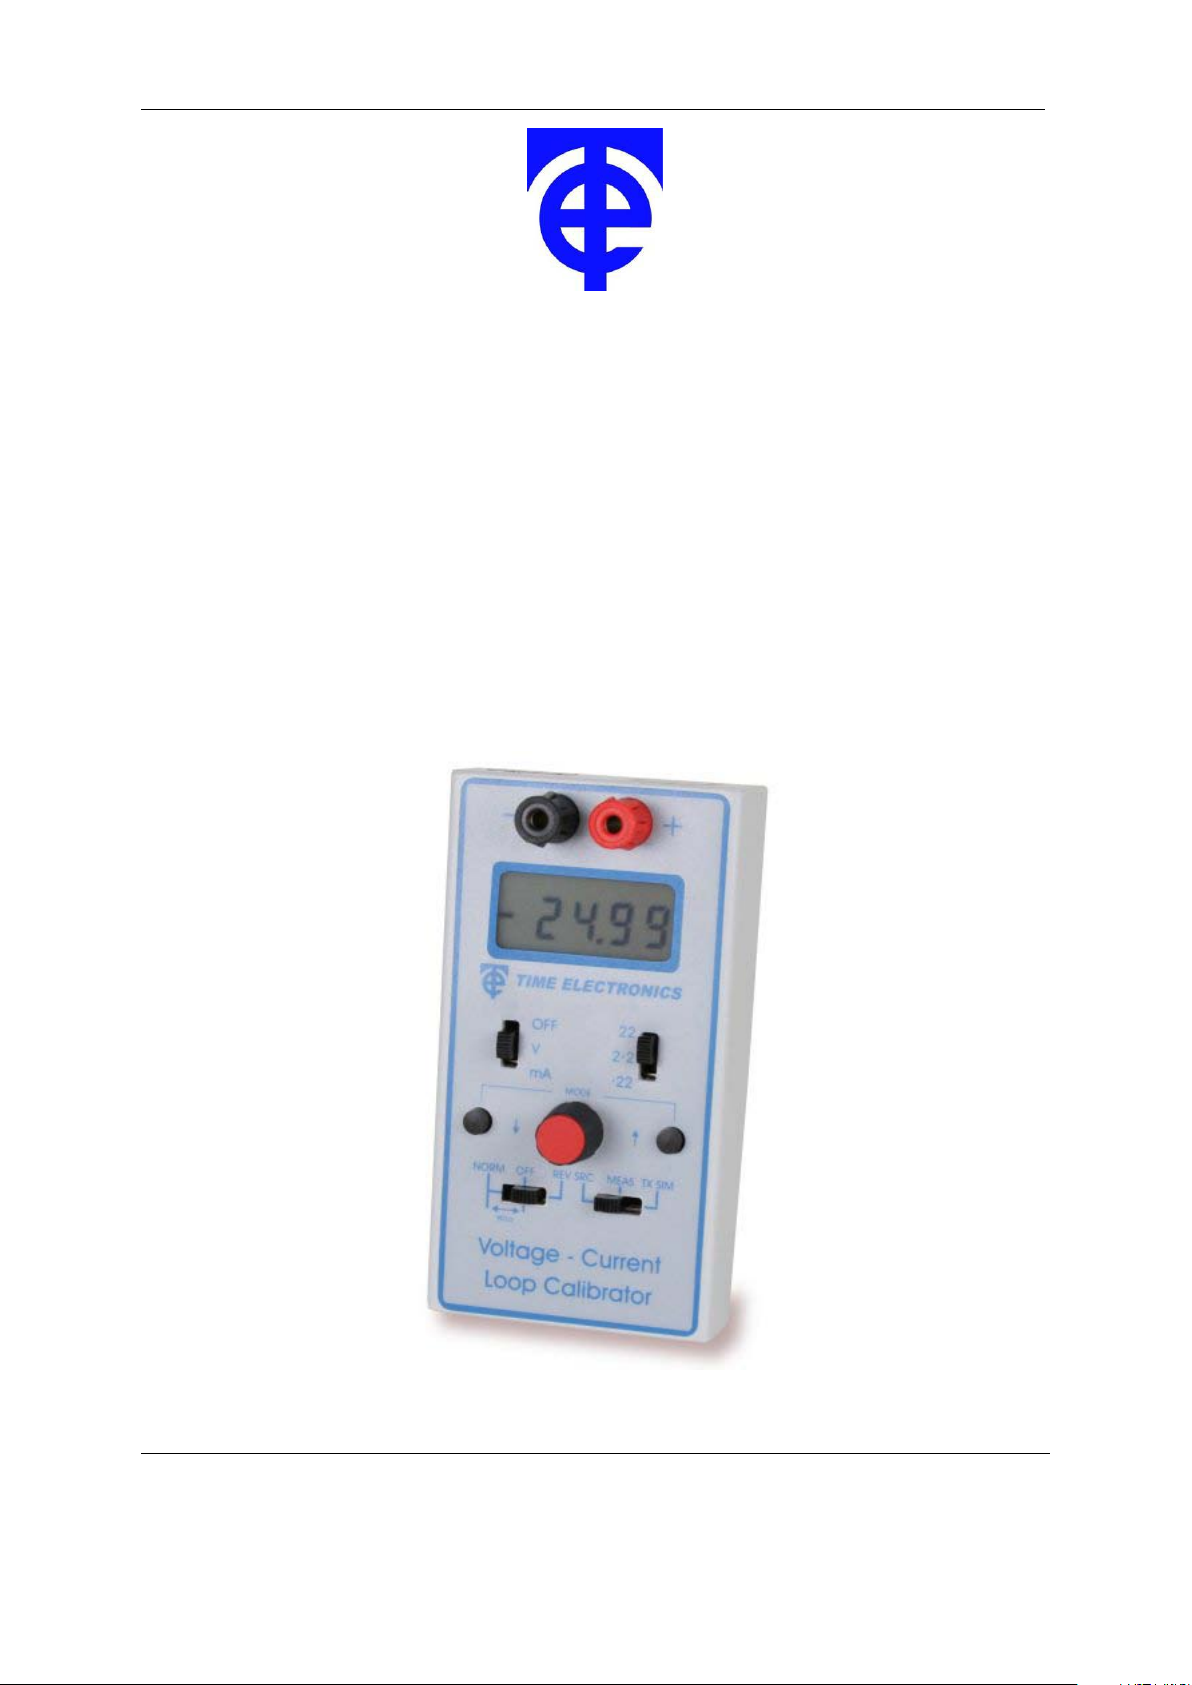
Time Electronics
1048 Current / Voltage / Loop Calibrator
Technical Manual
V1.2 30/12/10 Time Electronics Ltd
Botany Industrial Estate, Tonbridge, Kent, TN9 1RH
Tel: +44(0)1732 355993 Fax: +44(0)1732 770312
Email: mail@timeelectronics.co.uk
Web Site: www.timeelectronics.com
Page 2

2
Contents
1. Introduction .................................................................................................... 3
2. F ront panel controls and operating modes ................................................. 4
2.1. Operating Mode: NORMAL ............................................................................ 5
2.2. Operating Mode: STEP .................................................................................. 5
2.3. Operating Mode: RAMP ................................................................................. 5
3. Normal Operating Mode ................................................................................ 6
3.1.1. Resolution high/low ............................................................................................ 6
3.1.2. Output polarity switch ......................................................................................... 6
3.2. Measure – Voltage ......................................................................................... 7
3.3. Measure – Current ......................................................................................... 8
3.4. Power and calibrate - transmitters/sensors ................................................. 8
3.5. Source – Voltage............................................................................................ 9
3.6. Source – Current............................................................................................ 9
3.7. Sink - transmitter simulator (TX SIM) ..........................................................10
4. Additional Operating Modes ....................................................................... 11
4.1. STEP - Manual ...............................................................................................11
4.2. STEP – Automatic .........................................................................................12
4.3. RAMP .............................................................................................................12
5. Operating Precautions ................................................................................. 13
5.1. Display ...........................................................................................................13
5.2. Usage & Storage ...........................................................................................13
5.3. Automatic power down disable ...................................................................13
6. Power S upplies ............................................................................................ 14
6.1. Auto-power down .........................................................................................14
6.2. Battery Life ....................................................................................................14
6.3. Battery Replacement ....................................................................................14
6.4. Mains Power Supply Adapter .......................................................................14
6.5. Fuse Replacement ........................................................................................14
7. Maintenance ................................................................................................. 15
7.1. Recalibration .................................................................................................15
7.2. Dis-Assembling the Unit ..............................................................................16
7.3. Trimmer Locations .......................................................................................17
7.4. Measure Function Calibration ......................................................................18
7.5. Step Mode Calibration ..................................................................................19
7.6. Current Shunt Calibration ............................................................................19
7.7. Re-Assembling the Unit ...............................................................................20
7.8. Calibration Certificates.................................................................................20
7.9. Front Panel Keypad and Connections ........................................................20
8. S pecifications ............................................................................................... 21
9. Guarantee & S ervicing ................................................................................. 23
All Time Electronics' instruments are subject to continuous development and improvement and in
consequence may incorporate minor detail changes from the information contained herein.
V1.2 30/12/10 Page | 2 1048 Technical Manual
Page 3
3
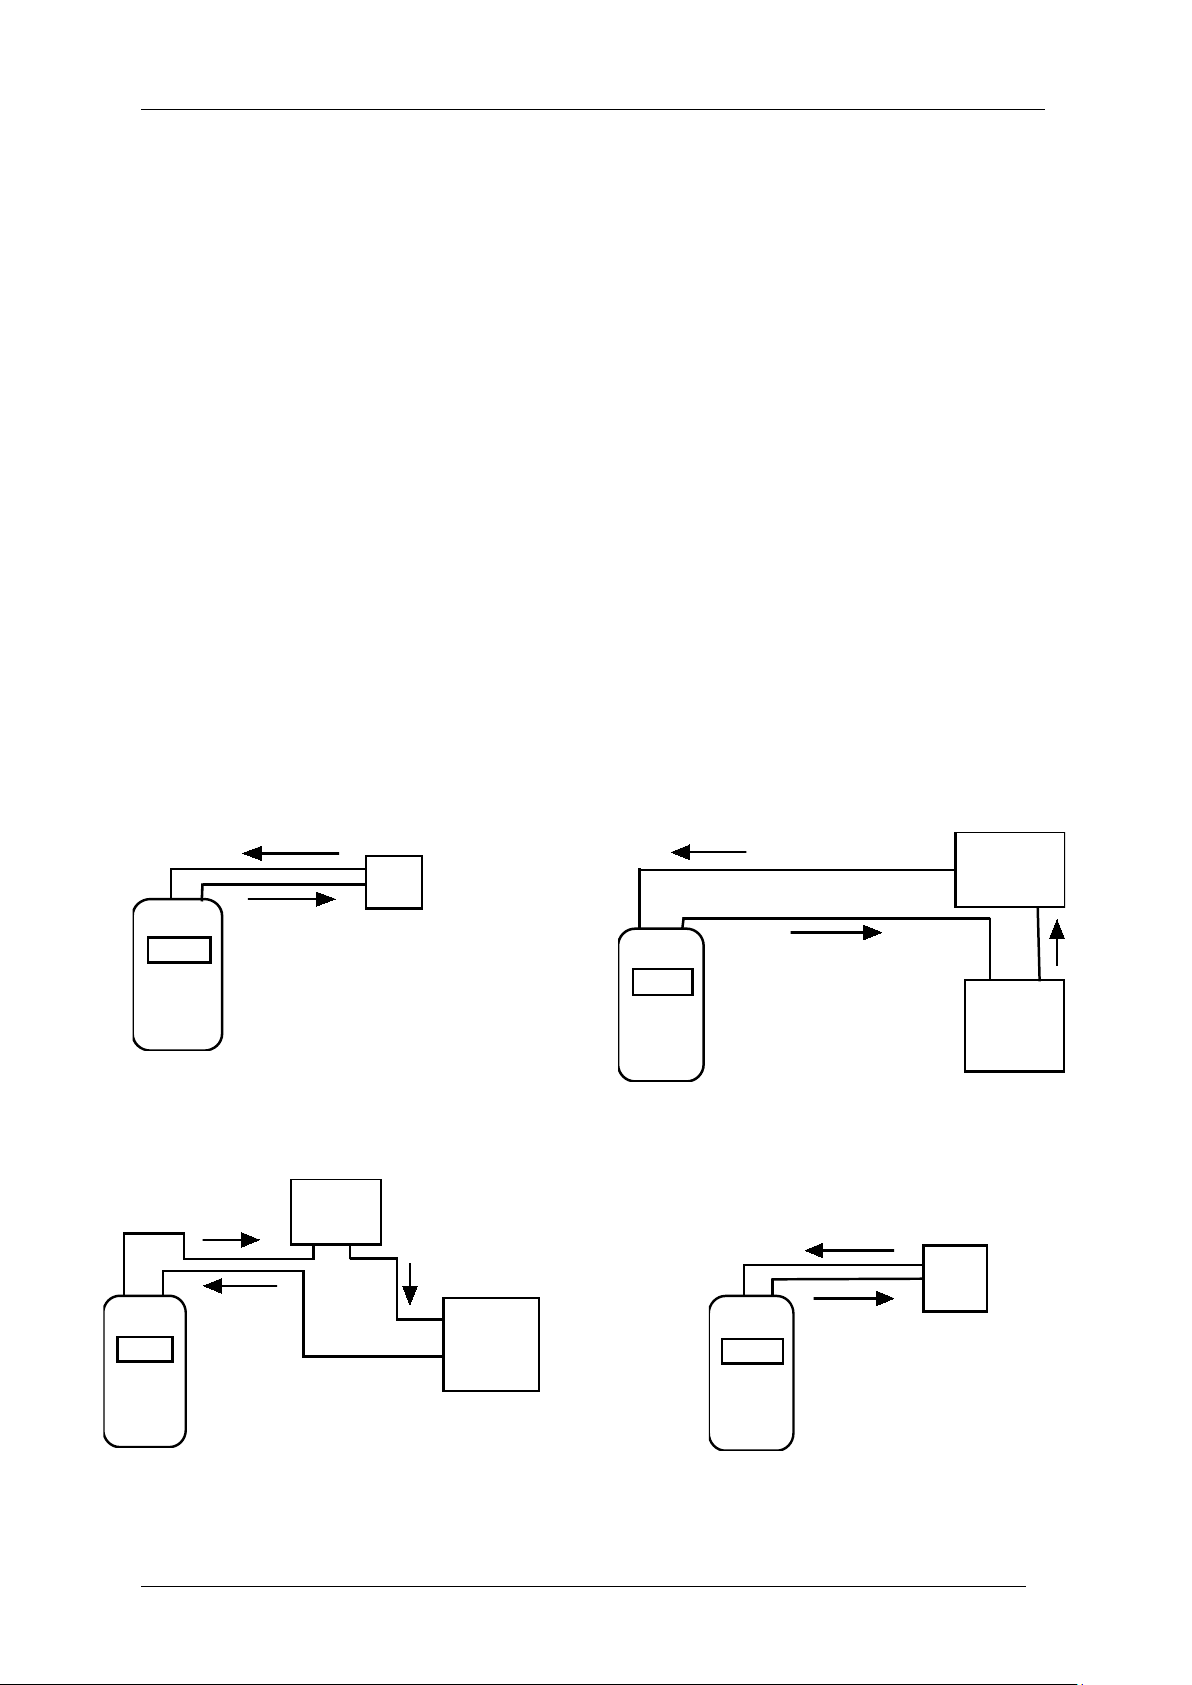
-
+
Source Mode
Receiving instrument
+
Measure Mode
-
+
Sensor
- +
- +
Pow er Suppl
y
2 wire transducer/transmitter
-
+
_
P ower
+ Supply
Sink Mode (transmi tter simulator)
Controller
+ -
-
+
+
Sensor
Measure & Power Mode
2 wire transducer/transmitter
1. Introduction
The 1048 is a current, voltage, and loop calibrator that meets the needs of R&D labs and
process control engineers. It provides source and measure functions in three current and
voltage ranges, plus a transmitter simulator/sink function. Accuracy is 0.02% of span and it
has 4.5 digit (0.005% of span) resolution.
Output m odes include steps and ramps. No menus to learn, just switches and buttons. A
multi-turn potentiometer controls coarse output adjustment while increment/decrement
buttons are provided for fine control. The source output can be reversed (+/ -) and zeroed at
the flick of a switch. The front panel features a large easy-to-read 4.5 Digit LCD display that
auto-ranges to allow the ranges to be extended by 10% above the normal 0.2/ 2.0/20 full
scale. Manual reset of the ramp function is also provided for quick restore.
The unit is powered by a PP3 (Alkaline) battery that lasts approximately 15 hours.
Continuous operation in the current mode will shorten the battery life. The unit will indicate
‘Low Battery’ when the battery needs changing.
When used as a source the output can be zeroed and reversed to enable the calibration of
centre-zero type voltage or current instruments e.g. –10V to 0 to +10V.
If the unit is not operated for approximately 15 minutes, it will automatically power down to
conserve battery life. If required this feature can be disabled in the user set-up.
The unit is constructed in a rugged pocket size hard ABS case and supplied with leatherette
carrying pouch. Leads can be stored in the pouch.
V1.2 30/12/10 Page | 3 1048 Technical Manual
Page 4

4
G. Range switch
2. Front panel controls and operating modes
A. Terminals
B. Display
C. OFF/V/mA switch
D. Decrement (DEC)
H. Increment (INC)
E. Multi-Turn
Output Control
I. Function switch
F. Output switch
A. Input/Output terminals
B. 4.5 Digit LCD Display.
C. 3 position switch for ON/OFF( OFF), Vol ts (V), Current (mA).
D. Push button for fine decreasing (DEC) of the output.
E. 10 turn control for coarse output adjustment
F. 3 position switch, normal (NORM), zero (OFF), reverse (REV) output. Also used to
restore high resolution display.
G. 3 position range switch (22, 2.2, 0.22).
H. Push button for fine increasing (INC) of the output. Also used in conjunction with the
I. 3 posit ion function switch for source (SRC), measure (MEAS), and transmitter
V1.2 30/12/10 Page | 4 1048 Technical Manual
DEC button to select the modes of operation i.e. Normal, Step, and Ramp. When in
Step mode, it initiates automatic stepping. When in Ramp mode, it re-starts the ramp.
simulation (TX SIM).
Page 5

5
The unit has three principal operating modes:
2.1. Operating Mode: NORMAL
Provides manual operation of the standard measure and source functions for both
voltage and current. A transmitter simulation/sink (TX SIM) function is also included for
loop test and calibration. The internal power supply can also be used to provide the drive
voltage to passive process control transmitters and sensors. This allows them to be
calibrated without the need for the loop power to be connected.
2.2. Operating Mode: STEP
Provides output steps of fixed value. Three options are available:
a) 5 point calibration: 4, 8 ,12, 16, 20 mA.
b) 11 point calibration: 1,2,3,4,5,6,7,8,9,10 mA or V.
c) 21 point calibration: 1,2,3,4,5…18,19,20 mA or V.
The stepping between the calibration points can be done manually (see Section 4.1), or
can be set to proceed automatically at an adjustable rate (see Section 4.2)
2.3. Operating Mode: RAMP
Provides a continuous ramp up/down with dwell periods at the top and bottom. Both
voltage and current are available for ramping (see Section 4.3)
SELECTING THE OPERATING MODE:
The above operating modes are selected by simultaneously pressing the INC and
DEC buttons.
Every time they are pressed the next mode will be selected.
The mode at power up is NORMAL.
This is followed by STEP, which is indicated by the ‘CONTINUITY’ legend
appearing in the top right section of the display.
The final mode is RAMP, which is indicated by the ‘CONTINUITY’ legend flashing
V1.2 30/12/10 Page | 5 1048 Technical Manual
Page 6

6
3. Normal Operating Mode
3.1.1. Resolution high/low
The unit has a unique method of changing the display resolution when values greater than
the conventional 19999 (4.5 digit) display are used. This feature allows the units ranges to
be extended by 10% above the commonly used 0.2/2.0/20 full scales. Calibration of values
just above these figures is now possible. This will be found particularly useful with 4 - 20mA
transducers where they are slightly over scale but are still within specification.
For both measure and source functions, high resolution (4.5 digit, e.g. 1.9999) will apply for
all values below:
• 0.20 on the 0.22 range
• 2.0 on the 2.2 range
• 20 on the 22 range
All values above those above will be displayed to 3.5 digit resolution e.g. 21.05.
The change-over from high to low resolution is automatic. However, if the value increases
and the resolution changes from high to low, it will not return to high resolution until the
value is reduced to:
• 0.1on the 0.22 range
• 1.0 on the 2.2 range
• 10 on the 22 range
To force the display back into high resolution the output polarity switch, should be operated
from Hi to Lo to Hi. There is a marking on the front panel below the switch to indicate this.
3.1.2. Output polarity switch
It is important for the user to understand the operation of the output polarity switch (‘F’ on
the front panel diagram section 2.). The switch has three positions, NORM/OFF/REV, and
its function depends on the operating mode being used.
Measure function (V & mA)
In the NORM position the unit will measure inputs connected in the same polarity as the
terminals i.e. red is positive and black negative.
The OFF (centre) position, when measuring voltage, disconnects the signal internally and
leaves the input terminals still providing 1M ohm input resistance. The display should read
zero but occasionally the last digit may show ‘1’, this is normal and is within the
specification.
The OFF position, when measuring current, disconnects the signal internally and leaves the
input terminals still providing the current shunt input resistance. The display should read
zero but occasionally the last digit may show ‘1’, this is normal and is within the
specification.
The REV position is not used since the unit’s measuring capability is bi-polar i.e. it can
accept both +ve and –ve input signals. The –ve inputs are displayed with a ’-’ sign in front of
the value.
V1.2 30/12/10 Page | 6 1048 Technical Manual
Page 7

7
-
+
Measure Mode
+
Source function (V & mA)
The NORM position outputs signals in the polarity indicated by the terminals.
The REV position reverses the polarity.
When outputting voltage or current, the OFF position disconnects the output signal and
places an open circuit on the output terminals. The display will read zero.
PS When the switch is in the REV position it should be noted that the display does not place
a – annunciator before the value.
TX SIM function
The switch is not used for this function and has no effect at all.
STEP and RAMP modes
In both these modes the function switch is in the source (SCR) position and the
NORM/OFF/REV switch performs in the same way as in the NORMAL operating mode i.e.
conventional V and I measure/source.
3.2. Measure – Voltage
The unit measures dc voltage in three selectable ranges, 0 to 0.22V (displayed in mV), 0 to
2.2V and 0 to 22V (plus over-range to 50V).
SPECIAL NOTE: Although the top range is nominally 22V it can be safely used to measure
voltages up to 50V.
• Set Function switch to MEAS
• Set OFF/V/I switch to V
• Set Range switch to the desired range
• Set Output switch to NO RM
• Connect the unit to the signal source observing correct polarity, the voltage will be
displayed with 3.5 or 4.5 resolution - see section 3.1.1.
V1.2 30/12/10 Page | 7 1048 Technical Manual
Page 8

8
Measure Mode
-
+
Sensor
- +
- +
Power Suppl
y
2 wire transducer/transmitter
-
+
+
Sensor
Measure & Power Mode
2 wire transducer/transmitter
3.3. Measure – Current
The unit measures current in three selectable ranges, 0 to 0.22mA (displayed in uA), 0 to
2.2mA and 0 to 22mA (plus over-range to 70mA).
SPECIAL NOTE: Although the top range is nominally 22mA span, it can be safely
used to measure current up to 70mA.
• Set Function switch to MEAS
• Set OFF/V/mA switch to mA
• Set Range switch to the desired range
• Set Output switch to NORM
• Connect the unit to the signal source observing correct polarity, the current will be
displayed with 3.5 or 4.5 resolution - see Section 3.1.1.
Connect the unit to the sensor or
transmitter observing the correct polarity.
The current drawn is displayed.
3.4. Power and calibrate - transmitters/sensors
If the loop’s power supply is not available it is possible to use the unit’s internal 22V supply
to power the loop. Set up the unit as described below.
• Set Function switch to SRC
• Set t he Multi-Turn Output Control fully clockwise.
• Set OFF/V/mA Switch to mA
• Set Range switch to the desired range
• Set Output switch to NORM
Connect the unit to the sensor or transmitter
observing the correct polarity.
The current drawn is displayed.
V1.2 30/12/10 Page | 8 1048 Technical Manual
Page 9

9
-
+
Source Mode
Receiving instrument
+
-
+
Source Mode
Receiving instrument
+
3.5. Source – Voltage
The unit outputs voltage from 0 to 22V in three ranges, 0 to 0.22V (displayed in mV); 0 to
2.2V and, 0 to 22V.
Set function switch to SRC
Set OFF/V/mA switch to V
Set range switch to the desired range
Set output switch to NORM
Set multi-turn output control to minimum (anticlockwise)
Connect the unit to the process instrument
observing correct polarity and adjust the
multi-turn output control for coarse control and
INC and DEC buttons for fine control.
NOTE:
1) The maximum output current is limited to approx 50mA.
2) The units output resistance is approx 2.5 ohms. Therefore the user should be aware of the loading
implications - a load of 2.5K ohms will produce a 0.1% error in the output voltage. To maintain full
accuracy the maximum load should be restricted to 1.1K ohms.
3.6. Source – Current
The unit outputs current from 0-22mA in three selectable ranges, 0 to 0.22mA (displayed in
uA), 0 to 2.2mA and 0 to 22mA.
• Set function switch to SRC
• Set OFF/V/mA switch to mA
• Set range switch to the desired range
• Set output switch to NORM
• Set multi-t urn output control to minimum (anticlockwise)
Connect the unit to the process instrument
observing correct polarity and adjust the
multi-turn output control for coarse control and
INC and DEC buttons for fine control.
V1.2 30/12/10 Page | 9 1048 Technical Manual
Page 10

10
3.7. Sink - transmitter simulator (TX SIM)
In the Sink function, the unit simulates a process field transmitter as part of a loop testing
and calibration operation. The unit takes its excitation power from the loop and acts as a
variable resistance to adjust the loop current to the value shown on the units display. The
excitation voltage must be in the range 3 to 50 volts dc.
The NORM/OFF/REV switch in not functional in the SINK mode.
• Set function switch to TX SIM
• Set OFF/V/mA switch to mA
• Se t range s wi tch to t he 22 position
• Set output switch to NORM
• Set multi-t urn output control to minimum (anticlockwise)
Connect the unit in the loop
observing correct polarity. Set the
current in the loop by adjusting the
multi-turn control (coarse) and the
INC/DEC buttons (fine)
V1.2 30/12/10 Page | 10 1048 Technical Manual
Page 11

11
4. Additional Operating Modes
These modes are designed to automate and speed up the process of testing and calibration.
The STEP mode allows simplified calibration. It provides output steps of fixed value.
Three choices are available,
a) 5 point calibration; 4, 8 ,12, 16, 20 mA
b) 11 point calibration; 1,2,3,4,5,6,7,8,9,10 V
c) 21 point calibration; 1,2,3,4,5…18,19,20 mA or V
The a) and b) choices are the defaults. The c) choice is obtained by powering up the unit
while pressing the DEC button.
The RAMP mode provides a continuous ramp up/down with dwell periods at the top and
bottom. Both voltage and current are available for ramping and the ramp limits can be
selected as shown above i.e. for 5, 11 or 21 point calibrations.
SELECTING THE OPERATING MODE:
The above operating modes are selected by simultaneously pressing the INC and DEC
buttons.
Every time they are pressed the next mode will be selected.
The mode at power up is NORMAL.
This is followed by STEP, which is indicated by the ‘CONTINUITY’ legend appearing in the
top right section of the display.
The final mode is RAMP, which is indicated by the ‘CONTINUITY’ legend flashing
.
4.1. STEP - Manual
Considerably speeds up the calibration process as a simple push of a button enables the
unit to manually step through standard calibration points, 5 points in 4-20, 11 points in 0-10,
or 21 points in 0-20.
• Set function switch to SRC
• Set OFF/V/mA switch to the desired units (V or mA)
• Set r ange switch to the desired range
• Set output switch to NORM
Simultaneously press INC and DEC buttons and the word “CONTINUITY” will appear on the
display and the reading will go to zero.
The unit is now ready to manually step through the preset values determined by the switchon mode stated in section 4.0 a), b) or c).
Press the INC to step to the next output value.
Press the DEC button to step back to the previous output value.
NOTES:
a) When choosing the 4 - 20 steps the initial value will be zero. It will move to 4 at the first press and
subsequently cycle between 4 and 20 in the regular 5 point pattern.
b)
The output switch will operate in the same way as for source (V & mA) function.
V1.2 30/12/10 Page | 11 1048 Technical Manual
Page 12

12
4.2. STEP – Automatic
This function provides a method of automatically stepping through the fixed output values.
• Set function switch to SRC
• Set OFF/V/mA switch to the desired units (V or mA)
• Set range switch to the desired range.
• Set output switch to NORM
• Simultaneously press INC and DEC buttons. The word “CONTINUITY” will appear on
the display and the reading will go to zero.
The unit is now ready to enter the Auto-Step function and automatically output the preset
values determined by the switch-on mode stated in section 4.0 a), b), or c)
• Press the INC button and hold for 1 second. The display decimal point will start to
flash and the output will cycle up and down through the fixed values. The time step
on each value may be varied from 1 to 9 seconds by adjusting the multi-turn output
control.
• To return to the Manual Step Function press the INC button. The decimal point will
stop flashing.
4.3. RAMP
When using either the Source or Sink functions, RAMP provides a method of continuously
increasing and then decreasing the output in a continuous fashion. The output ramps up
from 0% (4 in the 4-20 selection) to the full scale where it stays (dwells) for a fixed period
before ramping down again to its starting value. It dwells here again for a fixed period before
restarting the cycle. The ramp times are approx 7 secs and the dwell times approx 5 secs.
Ramp operation is available for both voltage and mA output.
• Set function switch to SRC or TX SIM
• Set OFF/V/mA switch to desired units
• Set range switch to the desired range
• Set output switch to NORM
• Simultaneously press INC and DEC buttons twice. The CONTINUITY legend will
appear flashing on the display.
The unit will now ramp up and down automatically between the range limits as determined
by the range and V/mA selected. The alternative limits can also be used and are as
determined by the switch-on conditions as stated at the start of section 4.
Note
When the unit initially enters RAMP mode the first dwell period will be shorter than 5 secs.
To reverse the direction of the ramp at any time press the INC button once. To restart the ramp
immediately when it is waiting in the dwell period, press the INC button once.
V1.2 30/12/10 Page | 12 1048 Technical Manual
Page 13

13
5. Operating Precautions
5.1. Display
The LCD display should not be exposed to strong sunlight for prolonged periods.
5.2. Usage & Storage
Temperature
Operating: -10 to +50 degC (14 to 120 degF)
Storage: -30 to +70 degC (-22 to 160 degF)
Humidity
The operating and storage relative humidity limits are 10 to 90%
non-condensing at 25 deg C (77 deg F)
5.3. Automatic power dow n disable
If the unit is not operated for 15 minutes it will automatically power down to conserve the
battery life.
This feature can be inhibited by pressing the INC button when switching on the unit. It
should be noted that the operation is indicated by flashing the decimal point at the switch on
time.
V1.2 30/12/10 Page | 13 1048 Technical Manual
Page 14

14
6. Power S upplies
6.1. Auto-power down
If the unit is not used for 15 minutes, it will automatically power down to conserve the battery
life. This feature can be disabled by holding down the INC button whilst switching on the
unit.
6.2. Battery Life
The unit is powered by a PP3 (Alkaline) battery that lasts approximately 15 hours of normal
operation. Continuous operation on current will shorten the battery life. The unit will indicate
‘Low Battery’ when the battery needs changing. A short period of operation is possible when
‘Low Battery’ is showing but no more than a few mA will be available at the output.
6.3. Battery Replacement
Slide off the back cover of the case and remove
the battery from its compartment. Unclip the
battery and replace it with a new PP3 (Alkaline).
The NiCad / NiMH rechargeable version of this
battery may be used. However it should be
noted that if the optional mains power supply
adapter (see below) is used to power the unit,
the battery will not
necessary to remove the battery and re-charge
it externally.
be re-charged. It is
6.4. Mains Power Supply Adapter
The unit can be operated from an external 12V dc
(100 mA) mains power supply unit. This is available
as an optional extra. Connection is via the small
jack plug socket on the terminal end of the unit.
6.5. Fuse Replacement
The unit is fitted with a F100 mA fuse. Switch off the unit and disconnect the battery. Slide
off the back cover to access the fuse. The fuse is located adjacent to the battery. Fuse
length 20mm x 5mm, TE code: 6107.
V1.2 30/12/10 Page | 14 1048 Technical Manual
Page 15

15
7. Maintenance
7.1. Recalibration
Calibration equipment required:
A) A precision DC voltage calibrator with an accuracy of 0.01% or better. Examples of
suitable instruments are Time Electronics’ 1017, 5018, 5025 or 5051.
B) DMM with accuracy of 0.01% or better. Examples of suitable instruments are Time
Electronics’ 5075, or 5065.
Note: It is advisable to use leads with low thermal emf connections. This will ensure that
stray thermal emfs do not cause errors when calibrating the low voltage range (.22V) which
has a setting resolution of 10uV.
The unit connected to a Time
Electronics’ 1017 Precision
0.005% DC V & I calibrator.
The unit connected to a Time
Electronics 5065 6.5 digit
Precision DMM
V1.2 30/12/10 Page | 15 1048 Technical Manual
Page 16

16
7.2. Dis-Assembling the Unit
A. Ensure that the unit is switched off before removing
the rear panel which slides out.
Note: The plastic cover retaining clip will need to be
removed prior to sliding cover off, refit when
reassembled.
B. Remove the cap on the multi-turn control knob by levering it off
with a fine bladed screwdriver or similar tool.
C. Remove the collet nut (inside the knob). Use a suitable split
head screwdriver or small long nosed pliers.
D. Remove the knob and then the hexagon nut below it, use
the correct sized spanner or pliers. Take care not to
damage the front panel label.
E. Gently press on the shaft of the multi-turn control to
release the printed circuit assembly and battery from the
case. Do not attempt to remove it completely - leave the
case sitting vertical and the assembly flat horizontal.
V1.2 30/12/10 Page | 16 1048 Technical Manual
Page 17

7.3. Trimmer Locations
P7
P5
P9
P2
P6
17
P3
P8
P4
V1.2 30/12/10 Page | 17 1048 Technical Manual
Page 18

18
7.4. Measure Function Calibration
1) a) Switch on the unit while holding down the ‘Decrement-DEC’ button (left side). Select
the ‘V’ position.
b) Select ‘MEAS’ on the Function switch.
c) Select ‘0.22’ on the Range switch.
d) Select ‘NORM’ on the Output switch.
Note: It may be necessary to check the required switch positions by looking at the markings
on the front panel.
2) Connect the precision DC voltage calibrator to the unit’s terminals and select zero
output. Check that the unit is displaying 00.00. Note that it may take a short while for
the connection leads to stabilize thermally and settle down.
3) Inject 190.00 mV from the calibrator and adjust P3 for the correct reading on the
display.
4) Select ‘2.2’ on the Range switch and inject 1.9000 V from the calibrator. Adjust P5 for
the correct reading on the display.
5) Select ‘22’ on the Range switch and inject 19.000 V from the calibrator and adjust P7
for the correct reading on the display.
6) Reduce the output from the calibrator to 1.9000 V and reading on the display. Return
to test above and re-check the 22V range. There is a small amount of interaction of P5
and P7.
7) Finally re-check the 2.2V range to ensure that it has not changed.
8) Over-Range check: The unit allows measurement up to 50V on the 22V range. This
can be checked by injecting 30, 40, 50V.
This completes the calibration of the measure function and the precision DC calibrator can
be disconnected.
V1.2 30/12/10 Page | 18 1048 Technical Manual
Page 19

19
7.5. Step Mode Calibration
1) a) Select ‘SRC’ on the Mode select switch.
b) Select 0.22 on range switch.
c) Select ‘Norm’ on output switch.
2) Enter the step mode by pressing the ‘Inc’ and ‘Dec’ buttons simultaneously. The
‘CONTINUITY’ legend will then show on the top of the right side of the display. Press the
‘DEC’ button twice. Note: Make sure that the unit was switched on with the ‘DEC’ button
held down.
3) Adjust P9 for 100.0 on the display.
4) Press ‘Inc’ 20 times until the display shows approximately 200. Adjust P2 for 200.0 on
the display.
This completes the ‘Step Mode’ calibration.
7.6. Current Shunt Calibra ti on
1) a) Select normal mode operation by pressing the ‘Increment’ and ‘Decrement’ buttons
simultaneously. The ‘CONTINUITY’ legend will then show on the top of the right side
of the display
b) Select ‘SRC’ on the Mode select switch.
c) Select .22 on range switch.
d) Select ‘Norm’ on output switch.
e) Select ‘mA’ on the OFF/V/I switch.
2) Connect a precision DMM to the output terminal and set it to 30 or
100 mA DC current range.
3) Adjust the multi-turn control until the display shows 19.000 (use the INC/DEC buttons
for fine adjustment). Make sure the unit is in high resolution mode, i.e. 5 digit display. If
it has dropped back to low resolution (4 digit), move output switch to ‘Lo’ position and
then back to ‘Hi’.
4) Adjust P8 until DMM reads exactly 19.000 mA.
5) Select ‘2.2’ on the range switch, select 3 or 10 mA range on DMM.
6) Use similar procedure to 3) and 4) to calibrate at 1.9000 mA (P6)
7) Select ‘.22’ on the range switch. Select 0.3 or 1 mA on DMM and use similar procedure
to 3) & 4) to calibrate at 190.00 uA. (P4)
This completes the calibration of the ‘current shunts’.
V1.2 30/12/10 Page | 19 1048 Technical Manual
Page 20

20
7.7. Re-Assembling the Unit
Re-assemble the unit in the reverse order as in
5) through to 1).
Please note that there is some difficulty in returning
the printed circuit board assembly to its correct
position in the case. It is important to initially
position it so that the external supply socket (the
terminal end) is adjacent to its hole in the case.
The whole assembly should then be lowered into
position as far as it will go - it is important to have
the ‘OFF/V/mA’ and range switches to the ‘OFF’ and
‘22’ positions and the ‘OUTPUT’ and ‘MODE’
switches in ‘OFF’ and ‘MEAS’ positions.
It is then necessary to lever the multi-turn shaft
(with a small screw driver) towards the terminals.
This will ease the output and mode switches forward
enough to allow them to spring into their slots. At
the same time the ‘INC/DEC’ buttons may need to
be re-positioned slightly to allow them to go back
into their holes.
7.8. Calibration Certific a t e s
It should be noted that the previously listed procedures are used to set up the adjust
trimmers that ensure that the unit will be within the manufacturer’s specification.
To produce a full set of calibration results and a ‘Certificate of Calibration’, the unit must be
checked on all its ranges. Good practice requires a minimum of 5 calibration points per
range.
Time Electronics can supply calibration certificates for the unit either NPL (National Physical
Laboratories, UK) traceable, or to UKAS standard. Equivalent certificates will be available
from calibration houses throughout the world.
Time Electronics EasyCal Calibration System
It should be noted that users who have access to the above system can obtain on request,
free of charge, a copy of the manufacturers recommended calibration procedure. Please
specify either floppy disc or e-mail for the delivery media.
7.9. Front Panel Keypad and Connecti ons
The Front Panel should be cleaned by wiping with a damp cloth. Solvents must not be used
as damage may result.
When connecting cables the screwed terminals should be hand tightened only.
V1.2 30/12/10 Page | 20 1048 Technical Manual
Page 21

21
8. Specifications
DC Current -Source and Measure
Span: 0 - 22mA (Source), 0 - 22mA and 22-70mA (Measure)
Source Accuracy: 0.02% of range
Measure Accuracy: as source 0-22mA, above 22mA 0.05%
Resolution: 1uA (0 - 19.999mA), 10uA (above 20mA)
Span: 0 - 2.2mA
Accuracy: 0.02% of range
Resolution: 0.1uA (0 - 1.9999mA), 1uA (above 2mA)
Span: 0 - 220uA
Accuracy: 0.05% of range
Resolution: 0.01uA (0 - 199.99uA), 0.1uA (above 200uA)
Max source load: 1100ohms@20mA. Max drive, 22V
Max measure load: 0.22, 2.2, 22 mA ranges are 1K, 110, 16 ohms
DC Volts - Source and Measure
Span: 0 - 22V (Source) and 0 - 22V and 22 - 50V (Measure)
Source Accuracy: 0.02% of span
Measure Accuracy: as source 0-22V, above 22V 0.05%
Resolution: 1mV (0 - 19.999V), 10mV (above 20V)
Span: 0 - 2.2V
Accuracy: 0.02% of span
Resolution: 0.1mV (0 - 1.9999V), 1mV (above 2V)
Span: 0 - 220mV
Accuracy: 0.05% of span
Resolution: 10uV (0 - 199.99mV), 0.1mV (above 200mV)
Source output resistance: Less than 2 ohms. Max current 50mA
Measure input resistance: 1M ohm on all ranges
Note: Accuracies for all measure modes are +/- 1 digit
V1.2 30/12/10 Page | 21 1048 Technical Manual
Page 22

22
Sink (TX SIM)
2 wire transmitter simulation: External excitation voltage, 3V min, 50V max. The current sink
levels are adjustable with accuracies as in the three mA source ranges shown on page 21.
Output Steps
5 fixed steps for I output 4, 8, 12, 16 & 20 mA
11 fixed steps for V output 0,1,2...10V
21 fixed steps for V & I output 0,1,2…...20
Stepping can be done manually or can be set to run automatically up and down
continuously with adjustable speed control (1-10 sec/step). Dwell time (top and bottom) 1
step period. The resolution of the display is 3.5 digits and accuracy as source specification.
Output Ramp
Current Ramp 4 to 20, or 0 to 20 on all ranges.
Voltage Ramp 0 to 10, or 0 to 20 on all ranges.
Ramp time 7 sec. Dwell (top & bottom) 5 sec. Manual restart.
Ramp operation is also available in Sink(TX SIM) function.
Source Output Adjustment
A ten turn potentiometer is provided for quick positioning with fine adjustment using up/down
incrementing buttons.
Power
A single internal 9V PP3 size battery or an optional external mains power supply. Battery
life: Typically about 15 hrs use.
A 15 minutes inactivity auto-power down feature is also included to conserve the battery,
see page 13, section 5.3.
Operating temperature: -10 to 50 degC (0 to 120 degF)
Operating Humility: 10-90% non-condensing 25 degC(77 degF)
Dimensions: 14 x 8 x 5 cm, 280 gm (5.5 x 3 x 2in, 10oz)
Housing
The 1048 is supplied in a rugged pocket size hard ABS case. It comes complete with a
leatherette carrying case. Test leads (not supplied) can be stored inside the leatherette
case.
Ordering Information
Voltage/Current/Loop Calibrator 1048
Mains power supply 230V AC 7643
Mains power supply 115V AC 7652
NPL traceable calibration certificate C176
UKAS calibration certificate C138
V1.2 30/12/10 Page | 22 1048 Technical Manual
Page 23

23
9. Guarantee & Servicing
Guarantee Period
This unit is guaranteed against defects in materials and workmanship for a period of one
year from its delivery to the customer.
We maintain comprehensive after sales facilities and the unit can, if necessary be returned
to us for servicing. During this period, Time Electronics Ltd will, at its discretion, repair or
replace the defective items. For servicing under guarantee, the instrument type and serial
number must always be quoted, together with details of any fault and the service required.
The purchaser of the instrument must prepay all shipping charges. Time Electronics Ltd will
pay return shipping charges.
This guarantee is void if servicing has been attempted by an unauthorised person or agent.
If, during the guarantee period, failure is due to misuse or abuse of the unit, the repair will
be put in hand without delay and charged unless other instructions are received.
Please note that if you require a new UKAS Certificate during the warranty period, this will
be charged at the current rate on our price list.
Service After Guarantee Period
Even after the guarantee period has expired, Time Electronics Ltd., can still service your
instrument. As the manufacturer, we have the specialised knowledge needed to keep your
instrument in peak condition and we also maintain a comprehensive spare parts service.
Please enclose details of the service required and your full company details including a
contact name when returning for servicing.
Returning Instruments
When returning instruments, please ensure that they have been adequately packed,
preferably in the original packing supplied. Time Electronics Ltd will not accept responsibility
for units returned damaged. Please ensure that all units have details of the service required
and all relevant paperwork.
Send the instrument, shipping charges paid to:-
Time Electronics Ltd
Botany Industrial Estate, Tonbridge, Kent, TN9 1RH
Tel: +44(0)1732 355993 Fax: +44(0)1732 770312
Email: mail@TimeElectronics.co.uk
Web Site : www.TimeElectronics.com
Disposal of your old equipment
1. When this crossed-out wheeled bin symbol is attached to a product it means the
product is covered by the European Directive 2002/96/EC.
2. All electrical and electronic products should be disposed of separately from the
municipal waste stream via designated collection facilities appointed by the
government or the local authorities.
3. The correct disposal of your old appliance will help prevent potential negative
consequences for the environment and human health.
4. For more detailed information about disposal of your old appliance, please contact
your city office, waste disposal service or return to Time Electronics.
V1.2 30/12/10 Page | 23 1048 Technical Manual
 Loading...