

Page 1
For the latest manual please visit:
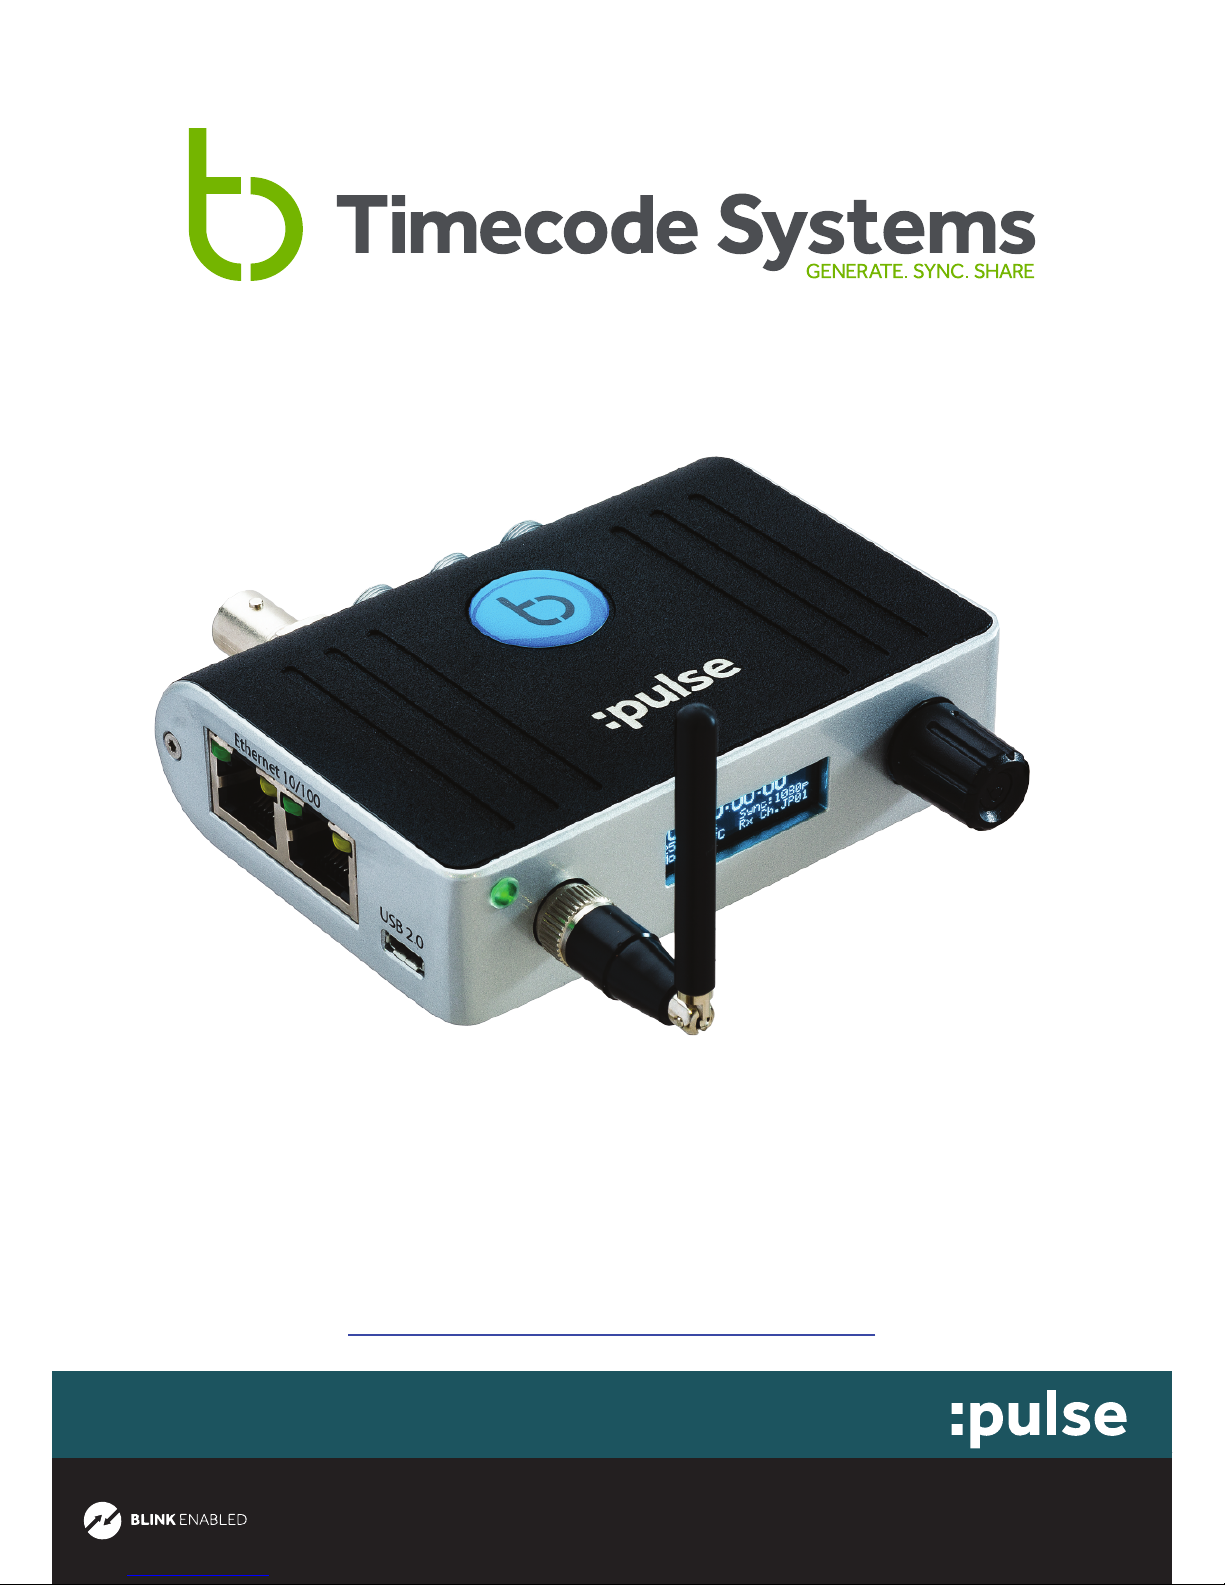
mini basestation
www.timecodesystems.com/support/product-manuals
quick start guide
Page 2
Here we give you a quick tour of your new Timecode Systems :pulse,
guiding you through its key features so you can get up and running straight
away.
What’s covered?
The basics to getting started with:
• Timecode Systems: :pulse
• Overview of the BLINK network protocol
• The Timecode Systems BLINK Hub app (free to download)
Your Timecode revolution starts here...
Copyright Notice - Timecode Systems Limited
All rights reserved. No part of this publication may be reproduced without the
expressed written permission of Timecode Systems Ltd.
Timecode Systems Ltd shall not be liable to the purchaser of this product or
third parties for damages, losses, costs, or expenses incurred by the purchaser
or third parties as a result of accident, misuse or abuse of this product or
unauthorised modifications, repairs, or alterations to this product, or failure
to strictly comply with Timecode Systems Ltd operating and installation
instructions.
Timecode Systems :pulse manual page: 1
Page 3
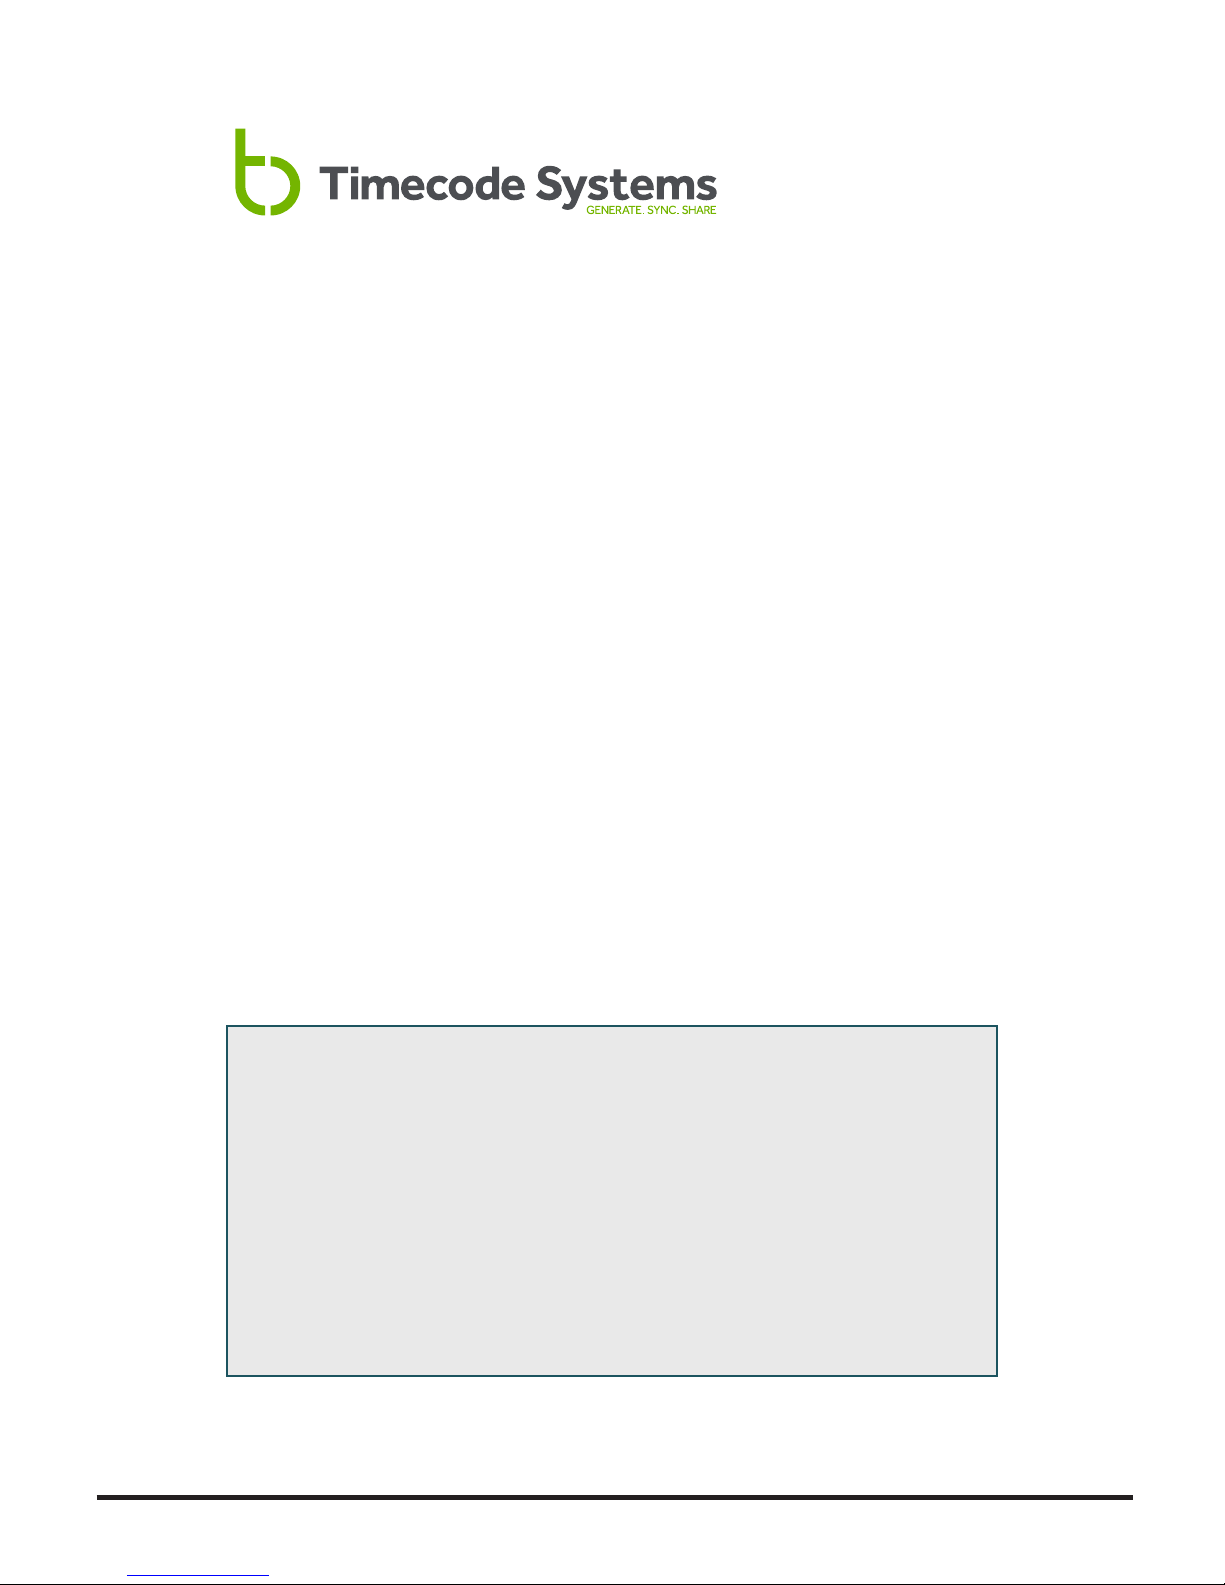
1.Antenna
For the digital transceiver module operating in 868MHz to 923MHz ISM bands.
2. LED
Glows either blue, green or red.
• Blue flash - Wi-Fi ON
• Green flash- Wi-Fi OFF
• Red flash - Warning messages
3.OLED display
Shows the unit's status and settings.
4.Control knob
Allows one finger navigation through menus.
5.Mounting threads
Choose from 3/8" UNC or 1/4" UNC mounting options.
This is a guided tour of the :pulse. Your highly accurate timecode, word clock
& genlock generator and multi-channel digital timecode transciever. Also
with simultaneous Wi-Fi or Ethernet.
Control
The Timecode Systems: :pulse settings are accessed and controlled from
the top panel. This handy position gives you full and easy control of the unit
even when it's in a sound mixer bag or sound cart.
5 Mounting threads4 Control Knob
3 OLED Display
2 LED
1 Antenna
Timecode Systems :pulse manual page: 2
Page 4
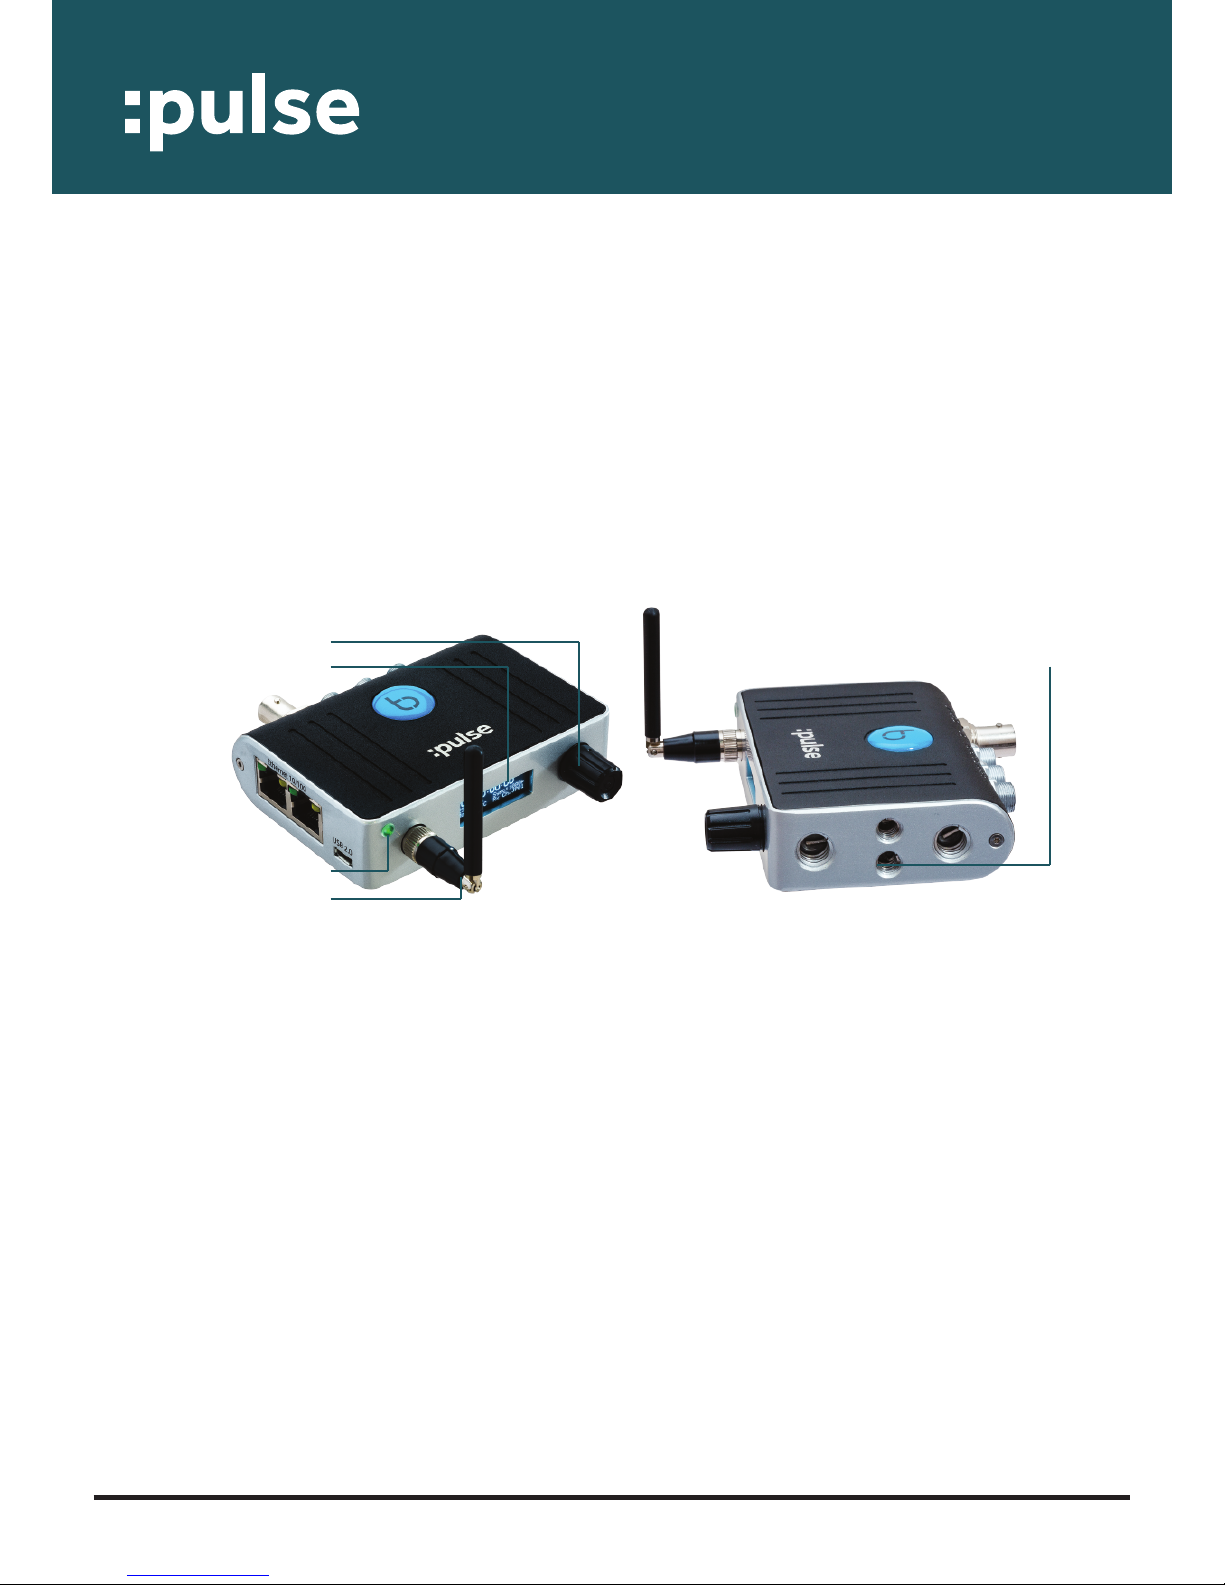
Ports
For all power and sync ports go to the back and side panels of the device.
1. 9-36V DC: LEMO2 socket. Power input.
2. DATA: LEMO9 socket. For connectivity to third party equipment.
3. TC: LEMO5 socket. TC IN and TC OUT.
4. TC/SYNC:BNC Socket (select menu for either LTC OUT, Word Clock
OUT or TV SYNC OUT)
5. Micro USB 2.0 Socket,5V power IN. Firmware Updates via the
Timecode Systems PC and Mac USB Updater Applications.
6. Two port Ethernet Hub. When connected to an ARRI Alexa camera
(via TCB-28 lead) it provides an Ethernet to Wi-Fi bridge enabling remote
control and metadata logging in conjunction with the MovieSlate 8 app
CAMERA CONTROL page. The :pulse is powered (POE) via this lead too.
Alternatively allows an Ethernet connection into a laptop PC or MacBook
to run the BLINK Hub PC or MacOS apps with a solid Ethernet connection
instead of a Wi-Fi connection.
Please visit www.timecodesystems.com/support/firmware for instructions
on how to update the firmware of your :pulse product.
1
2
3
4
5
6
Timecode Systems :pulse manual page: 3
Page 5
Timecode Systems :pulse manual page: 4
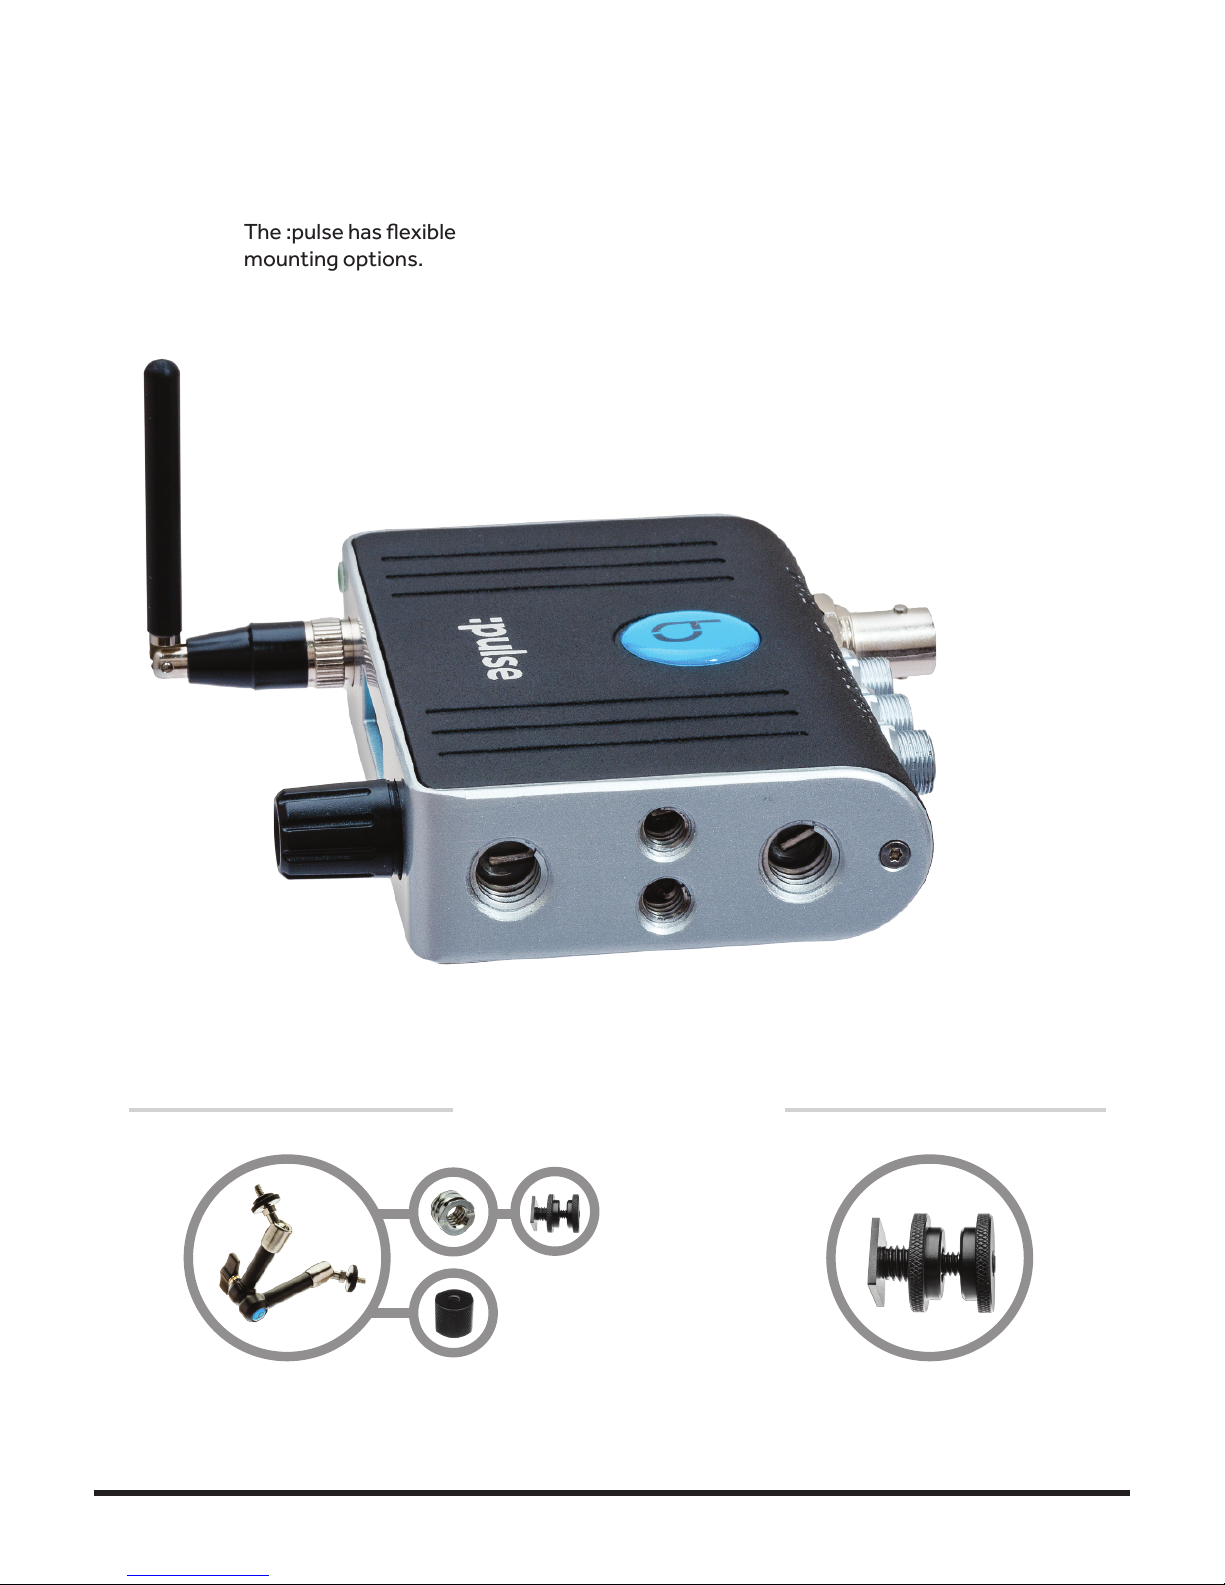
Mounting Solutions
The :pulse has flexible
mounting options.
optional extras
Timecode Systems
7" articulated mounting arm
kit TCB-32
hot shoe adaptor TCB-34
Page 6

Timecode Systems :pulse manual page: 5
Customise
On-screen menus allow you to easily customise the settings of the
Timecode Systems :pulse to meet the exact needs of your shoot.
The default display shows (on time-out also):
TC + Unit Name (if assigned by app) + MODE + RF CHANNEL+ SIGNAL
STRENGTH+BATTERY STATUS
Turning the knob on the front panel clockwise takes you to the following
information screens:
1. TC, Unit Name, Mode, RF Channel, Signal strength, Battery status
2. TC, User Bits, FPS
3. BNC Sync 0/P Mode and Level
4. Button Lock
5. Power Status and Battery Status
6. WI-FI Network Mode, Status, IP Address, SSID name
7. Ethernet Status, Fixed IP Address
8. Product name, FW version, Serial number
Button basics
Press the knob to enter the menu for:
1. TC Generator
2. SYNC Generator
3. Set RF Channel number (if in an RF mode)
4. Wi-Fi Settings
5. Ethernet Settings
6. Display Settings
7. System Settings
8. Timecode Mode
Page 7

Timecode Systems :pulse manual page: 6
More on menus
Each menu allows further customisation of your Timecode Systems :pulse
Timecode Mode. Choose from five settings:
• Free Run/Jam-Ext.This is a straightforward mode for a standard 'set
and forget' sync box. No RF Timecode modes, just set the internal
generator or jam T/C from an External source. The unit will 'Free-Run'.
• lnt-Gen TX. This is a mode where the unit is the 'master clock',
transmitting T/C to all receiving 'slave' devices. The unit acts as a BLINK
master device, collecting all status and metadata from listening BLINK
slave devices.
• Ext-TC TX. This is a mode where the unit takes its T/C from an
External source (via LEMOS connector), then transmits this T/C to all
receiving 'slave' devices. The unit acts as a BLINK master device,
collecting all status and metadata from listening BLINK slave devices.
If the External T/C is removed the T/C ouput freezes.
• Ext-TC/C TX. This is a mode where the unit takes its T/C from an
External source (via LEMOS connector), then transmits this T/C to all
receiving 'slave' devices. The unit acts as a BLINK master device.
collecting all status and metadata from listening BLINK slave devices.
If the External T/C is removed the T/C output continues using the
Internal Generator.
• Ext-RF Slave.This is a mode where the unit acts as a 'slave' receiving
unit, constantly locking to the incoming RF timecode & sync data, soft
jamming & chasing the incoming T/C from an RF master unit. This
could be Free Run or Rec-Run timecode. The units also acts as a BLINK
slave unit, sending its status and settings back to the BLINK master unit.
It can also be remotely controlled from the BLINK master unit via
the app.
TC Generator. Choose from:
• Set T/C. Turn to set flashing digits, press to enter. Repeat for
each pair.
• Set U/B. Turn to set flashing digits, press to enter. Repeat for
each pair.
• Set FPS. Set to 23.976, 24, , 25, 29.97, 29.97DF, 30 or 30DF.
SYNC Generator. Choose from:
• Set BNC O/P Mode. Choose from either Bi Level, Tri Level, Word Clock
and LTC modes from this socket.
• Set BNC O/P Level. Choose from NORMAL or HIGH levels.
LTC needs to be set to HIGH. TV Sync can be selected to
NORMAL or HIGH (3D Rigs). Word Clock is always set to HIGH.
Page 8

Timecode Systems :pulse manual page: 7
Set RF Channel Number: Select the RF channel group for Transmit or Receive
(depending on the timecode mode selected from the menu).
Wi-Fi Settings. Unlocks Wi-Fi enabled features including wireless streaming of timecode
to Timecode Systems BLINK Hub app, Adobe LiveLogger app, MovieSlate 8 logging app,
Q Take HD and Softron Movie Recorder. Also unlocks the powerful BLINK network
features (see page 7).
• Turn On/Off. When ON allows you to restart the Wi-Fi network if needed.
• Network Type. Select 'Soft AP' for normal app connection
(iOS, Android and MacOS) and viewing of the web interface.
Select 'Infrastructure' to connect to an existing known Wi-Fi
network to extend Wi-Fi range (select the network to choose
via the BLINK Hub app interface)
• Stealth Mode. Select this mode as a battery saving feature. If
External Power is removed, the :pulse will automatically shutdown the
Wi-Fi network. As soon as the External Power is re-applied then the
Wi-Fi network is automatically switched back on.
• Network ID No. Give your :pulse its own SSID name* (Choose a number
from 001 to 099). *Every :pulse on set needs to be given a different
SSID to avoid network clashes.
Ethernet Settings. Turn On/Off. When ON enables features including wired Ethernet
streaming of timecode onto a wired LAN. Allows connection of the :pulse to the
Ethernet port of a PC or MacBook to run the Timecode Systems MacOS or PC
BLINK Hub app, QTake HD and Softron Movie Recorder. When connected to an ARRI
Alexa camera (via TCB-28 lead) it provides an Ethernet to Wi-Fi bridge enabling
remote control and metadata logging in conjunction with the MovieSlate 8 app
CAMERA CONTROL page. The :pulse is powered (POE) via this lead too.
Display Settings:
• Set Brightness. Allows you to change the level of brightness from 1
through to 100. (100 being the brightest)
• Power Saver Short. Stays bright short duration, then dims.
• Power Saver Long. Stays bright longer duration, then dims.
• Screensaver. The display will switch off after a period & switch on
with a button change.
• Set Aiways ON. Stays bright at the set Brightness level.
Page 9

Timecode Systems :pulse manual page: 8
System Settings.
• Set RF country/area. Set to Europe/UK, US/CA/AU/NZ or Japan.
• Restore defaults. To remove any customisation.
• Set passcode. Choose a passcode to allow access to settings changes
from Timecode Systens BLINK Hub app or MovieSiate 8 app. Default passcode is
1111.
Page 10

Timecode Systems :pulse manual page: 9
BLINK Network Feature
The BLINK network augments the existing wirelessly shared timecode and
sync data. The proprietary BLINK RF network keeps the same incredibly
accurate wireless sync over the robust sub GHz ISM bands, but adds
enhanced two-way multiplexed status/control and metadata.
This allows for complete monitoring
and control of all connected
“BLINK enabled” Timecode Systems’ devices and is built to allow
for long-range remote control and
status monitoring of any supported
& connected third-party devices.
The :pulse and :wave can be configured either as a BLINK master or
slave, whereas the :minitrx+ and
SyncBac PRO can only be configured
as BLINK slave devices.
Page 11

Timecode Systems :pulse manual page: 10
More on BLINK
The BLINK slave devices are continually feeding back their status and
settings to the BLINK master unit. The BLINK master unit then allows the
Timecode Systems BLINK Hub app to not only display all of this information,
but allow the user to remote control certain features.
Additionally with the :pulse, if any supported 3rd party equipment is connected the Data port, then this equipment can also be remotely controlled
using the unit’s Wi-Fi or Ethernet interface to our BLINK Hub application
running on a smart device, PC or Mac or via the Wi-Fi interface for the MovieSlate 8 iOS app (Sound Dept section)
All of this BLINK functionality is multiplexed with the original timecode and
Sync information data packets. This ensures that legacy and non- BLINK
enabled Timecode Systems’ devices are still supported from a BLINK
master source.
The huge advantage of the BLINK protocol is that the Timecode Systems RF
transceiver is very long range and robust, with up to 500 metres line of sight
range. It is a very uncongested frequency band on set and in heavy RF environments.
This then allows the Wi-Fi network of the BLINK master to be used as a short
wireless hop into the apps or a solid cabled Ethernet connection between
the PC or Mac, with the long range communications to slave units being
looked after by the BLINK network.
Page 12

Timecode Systems :pulse manual page: 11
Timecode Systems BLINK Hub app
Now your Timecode Systems :pulse hardware is up and running,
it's time to download the Timecode Systems BLINK Hub app.
• Our iOS app is free to download from the Apple app store
and the Android app is free to download from the Google Play store
• Our MacOS app is free to download from our website
• Turn on the Wi-Fi of your Timecode Systems :pulse.
• Select the Wi-Fi network of the Timecode Systems :pulse – i.e. Pulse095
• Open the BLINK Hub app. This should now show the running timecode
from your Timecode Systems :pulse. The BLINK Hub data will be loaded
from the :pulse into the app.
• If you wish to connect to the :pulse via Ethernet for using the BLINK Hub app,
ensure that the Wi-Fi is switched OFF and the Ethernet is switched ON.
• The PC or Mac will get an IP address from the :pulse DHCP server.
• Launch the BLINK Hub app and you should see running timecode on the app
and the BLINK Hub status page will load.
• If you do not need the running timecode you may simply launch BLINK Hub
control from any web browser, by typing in the fixed Ethernet IP address ~
(if Ethernet connection) or Wi-Fi IP address (if Wi-Fi connection).
If you want to remotely change any of the Device settings via the app,
press settings, type in the four-digit passcode (set on the systems menu
of your Device) then make changes directly from the app (default
passcode: 1111). Without entering the password only the status on the
units can be viewed.
Page 13

Timecode Systems :pulse manual page: 12
Using the app
Overview. The app allows you to display a frame accurate Timecode Reader
of your timecode on set on the iOS or Android app via the Wi-Fi network.
It also allows full remote control of settings of the :pulse unit itself and any
connected BLINK slave unit.
1. Control Panel
This panel allows you to access all of the relevant controls for a selected
unit within the BLINK Hub. Change any of the available settings to have
it immediatley update your device.
2. Timecode Reader
A frame accurate timecode reader listing your running timecode and
both your userbits and framerate. Tap to expand into a full digital slate
view.
3. Status Panel
Live status monitoring of any units on your BLINK network, view your
master and every other individual slave at a glance. Select a tile to
access a device’s individual controls.
4. Transport Control
Use our BLINK Protocol to communicate with any supported third party
device attatched. Send transport control commands or open up a
unique settings window to handle the more advanced options available.
1
3
2
4
Page 14

Timecode Systems :pulse manual page: 13
Detailed specifications
Timecode Systems: :pulse
Wi-Fi activated features
Accurate Wi-Fi or Ethernet streaming of SMPTE timecode data to iOS, Android
and macOS apps.
Wi-Fi or Ethernet connectivity to allow setting changes to the :pulse unit or any
BLINK connected remote slave RF connected unit.
Wi-Fi or Ethernet connectivity to see all settings via any connected web browser.
Infrastructure Wi-Fi connectivity to allow for multiple units to be connected to an
external Access Point/Router (needs the BLINK Hub app to scan and join other networks)
Wi-Fi connectivity to allow 2 way communications with supported 3rd party equipment
connected to the LEMO 9 DATA PORT.
For example, if a 6 series Sound Devices audio recorder is connected via the
TCB-40 Interface cable to the keyboard USB port of the mixer then the 6-series
can be fully remote controlled by WiFi on the MovieSlate 8 iOS app and the BLINK
Hub iOS, Android and MacOS apps. If the :pulse is connected via Ethernet to a PC
or Mac the BLINK Hub can be used to control the 6 series Sound Devices recorder.
Technical specification
External dimensions: 94mm x 67mm x 23mm
OLED Display: Blue 128 x 32 pixels
Timecode generator accuracy: TCXO 0.1ppm when free running, in practice
around 0.1-0.2 frames drift in 24 hours. Zero ppm when RF locked to a master.
Supported FPS Modes: 23.976, 24. 25. 29.97, 30, 29.97DF. 30DF.
Supported SYNC Outputs : PAL, NTSC, 720p, 720p2 (double frame rate),
1080i-PSF. 1080p, 1080p2, Word Clock standards 44.1, 88.2, 48. 96 and
192KHz
Wi-Fi: 2.4 GHz IEEE std.802.11b/g, SoftAP and Infrastructure modes. DHCP
Server, Web server.
Ethernet 2 port switch. DHCP Server.
Page 15

Timecode Systems :pulse manual page: 14
Timecode Systems: :pulse
Power and timecode sources
• External power: 2 pin LEMO (9V to 36V DC).
• External power: Micro USB (5V DC).
• External power: Ethernet RJ45 POE (power over Ethernet 20-50V DC)
• Internal power: Built in Li-Polymer (3.7V battery)
• T/C input: LEMO5
• T/C outputs: LEMO5, LEM09 and BNC Socket
• SYNC output: BNC Socket (TV SYNC, Word Clock or LTC)
• Multi-channel digitaltransceiver: 865.050-868.550 MHz (CE
Approved) 915.050-918.650 MHz (FCC/ICApproved) and
920.600-923.200MHz (Japan ARIB Approved).
Page 16

Timecode Systems :pulse manual page: 15
Frequencies
Timecode Systems: :pulse RF Frequencies, FHSS
Our CE approved products are for use in UK/EU and CEPT*
countries.
*Albania, Andorra, Austria, Azerbaijan, Belarus, Belgium,
Bosnia-Herzegovina, Bulgaria, Croatia, Cyprus, Czech Republic, Denmark,
Estonia, Finland, France, Georgia, Germany, Greece, Hungary, Iceland, Ireland,
Italy, Latvia, Liechtenstein, Lithuania, Luxembourg, Malta, Moldova, Monaco,
Montenegro, Netherlands, Norway, Poland, Portugal, The Former Yugoslav
Republic of Macedonia (FYROM), Romania, Russian Federation, San Marino,
Serbia, Slovakia, Slovenia, Spain, Sweden, Switzerland, Turkey, Ukraine,
United Kingdom, Vatican.
• UK/EU 865.050 MHz to 868.550 MHz FHSS
Page 17

Timecode Systems :pulse manual page: 16
Timecode Systems: :pulse RF Frequencies, FHSS
Our FCC frequencies are for use in the USA, Canada, Australia
and New Zealand.
• USA/AU/NZ 915.050 MHz to 918.350 MHz FHSS
Page 18

Timecode Systems :pulse manual page: 17
Timecode Systems: :pulse RF Frequencies, Fixed
Our ARIB frequencies are for use in Japan.
1 JP 920.600 MHz
2 JP 920.800 MHz
3 JP 921.000 MHz
4 JP 921.200 MHz
5 JP 921.400 MHz
6 JP 921.600 MHz
7 JP 921.800 MHz
8 JP 922.000 MHz
9 JP 922.200 MHz
10 JP 922.400 MHz
11 JP 922.600 MHz
12 JP 922.800 MHz
13 JP 923.000 MHz
14 JP 923.200 MHz
Page 19

Timecode Systems :pulse manual page: 18
Quality declarations
FCC Warning Statement:
This device complies with Part 15 of the FCC Rules.
Operation is subject to the following two conditions:
(1)This device may not cause harmful interference, and
(2)This device must accept any interference received, including interference
that may cause undesired operation.
This equipment complies with FCC radiation exposure limits set forth for an
uncontrolled environment. End users must follow the specific operating
instructions for satisfying RF exposure compliance. This transmitter must not
be co-located or operating in conjunction with any other antenna or transmit-
ter.
Changes or modifications not expressly approved by the party responsible for
compliance could void the user's authority to operate the equipment.
Industry Canada Statements
This product contains radio transmitter 104271-TCB11 and AYV-TCB11. It has
been approved by Industry Canada & FCC to operate with the antenna types
listed below with the maximum permissible gain and required antenna impedance for each antenna type indicated. Antenna types not included in this list,
having a gain greater than the maximum gain indicated for that type, are
strictly prohibited for use with this device.
Name: Taoglas TG.09.0113, 2.0dBi, 50 ohm
This device complies with Industry Canada licence-exempt RSS standard(s).
Operation is subject to the following two conditions: (1) This device may not
cause interference, and (2) This device must accept any interference, including
interference that may cause undesired operation of the device.
Under Industry Canada regulations, this radio transmitter may only operate
using an antenna of a type and maximum (or lesser) gain approved for the
transmitter by Industry Canada. To reduce potential radio interference to other
users, the antenna type and its gain should be so chosen that the equivalent
isotropically radiated power (e.i.r.p.) is not more than that necessary for suc-
cessful communication.
Page 20

Timecode Systems :pulse manual page: 19
CE Conformity Statement:
Declaration of Conformity
According to 150/IEC Guide 22. is in conformity with:
-EN 60950-1:2006 + A11:2009+A1:2010+A12:2011+AC:2011
-EN 300 440-1V1.6.1
-EN 300 440-2 V1.4.1
-EN 301489-1V1.9.2
-EN 301489-3 V1.4.1
Warranty and technical support
All products sold by TIMECODE SYSTEMS LIMITED. are warranted to the
original purchaser against defects in materials and workmanship for (1) year
from the date of original purchase.
However, this warranty excludes accessories, batteries and cables. Also, this
warranty does not apply to any instrument determined by
TIMECODE SYSYTEMS LIMITED to have been subjected to customer
alteration, modification, negligence or misuse.
In the event of any defects determined to be covered by this warranty,
TIMECODE SYSTEMS LIMITED will, at its sole option, repair or replace the
defective instrument without charge. To obtain warranty service the defective
instrument must be returned within one (1) year from purchase to:
TIMECODE SYSTEMS LIMITED
ATTN: Repair Department
Unit 6, Elgar Business Centre
Moseley Road, Hallow
Worcester, WR2 6NJ, UK
Telephone +44 (0) 1700 808 600
All transportation and shipping costs are the responsibility of the purchaser.
Page 21

www.timecodesystems.com/support/product-manuals
contact@timecodesystems.com
http://www.timecodesystems.com/
Timecode Systems
Unit 6, Elgar Business Centre, Hallow
Worcester, WR2 6NJ, UK
For the latest manual please visit:
Page 22

 Loading...