

Time4Sleep Copenhagen Ottoman TV Bed Assembly Instructions Manual
110
11
12
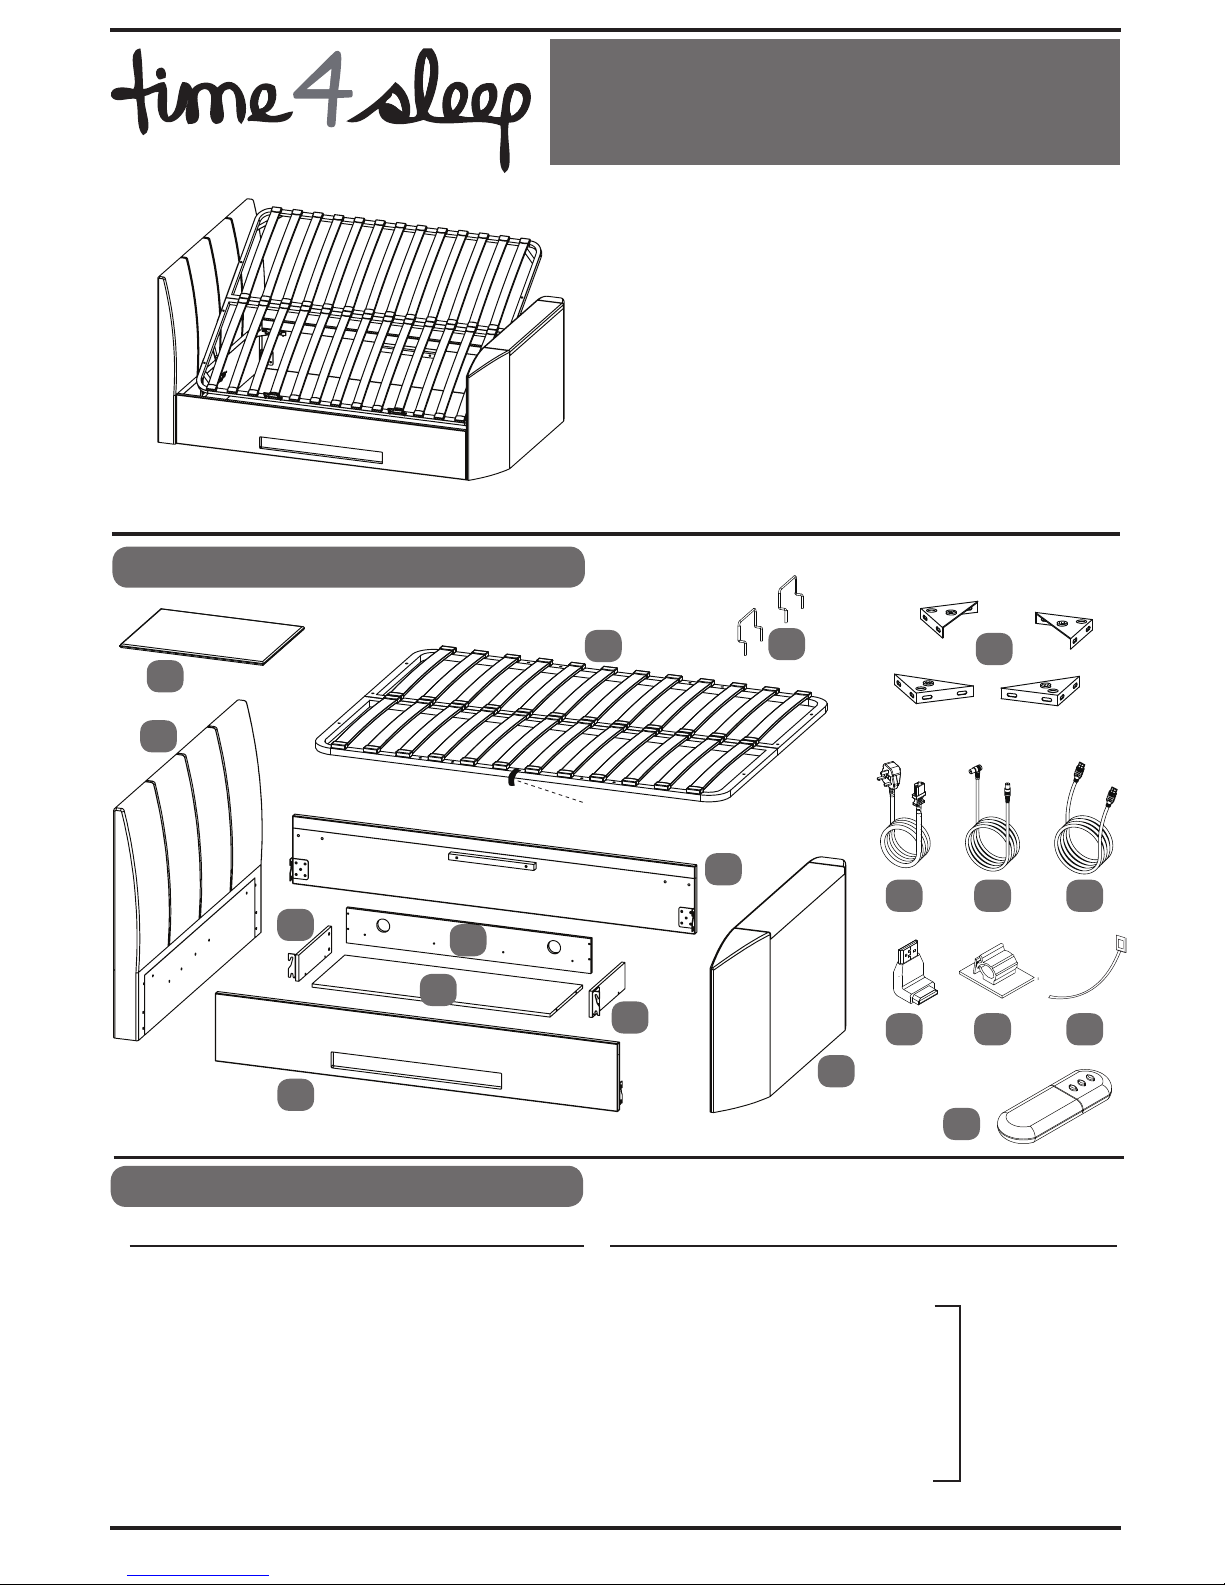
Headboard
Footboard
Side Rail - LH
Side Rail - RH
Metal Slat Frame
1
1
13
1
14
1
Ref.
Qty
Ref. Description
5
COPENHAGEN
OTTOMAN TV BED
Parts Identification
Qty
1
2
3
1
1
1
Parts Checklist
Description
4 1
Page 1 of 15
PLEASE READ
this sheet prior to assembly to familiarise
yourself with the various stages of construction. Carefully
open the pack supplied and check the contents against the
parts and fittings check list.
Do not destroy any of the packaging until you are certain
that you have all the necessary parts for the assembly.
Please ensure that the packaging is disposed of in
a safe environmentally friendly way.
CAUTION: There are small components used in the
construction of this unit. These loose items should be
diova ot ,ylbmessa gnirud nerdlihc gnuoy morf yawa tpek
the danger of choking.
IMPORTANT: BEFORE STARTING TO ASSEMBLE THE BED - PLEASE READ THESE INSTRUCTIONS CAREFULLY.
1
180921
1
7
2
3
4
5
6
FABRIC STRAP
11
10
8
9
13 14 15
16 17 18
19
15
16
Angle Brackets
2
1
17
3
18
3
9
6
7
4
1
8 2
1
Fabric
Base
Cover
Mattress Stoppers
Media Tray Side Panel - L
Media Tray Side Panel - R
Media Tray Back Panel
Media Tray Base Panel
Mains Power Lead - 3 metre
Aerial Lead - 4 metre
HDMI Leads
Cable Clips
Cable Ties
19 1
TV Lift Remote
HDMI Adaptor 90º
Inside
accessory
box
12
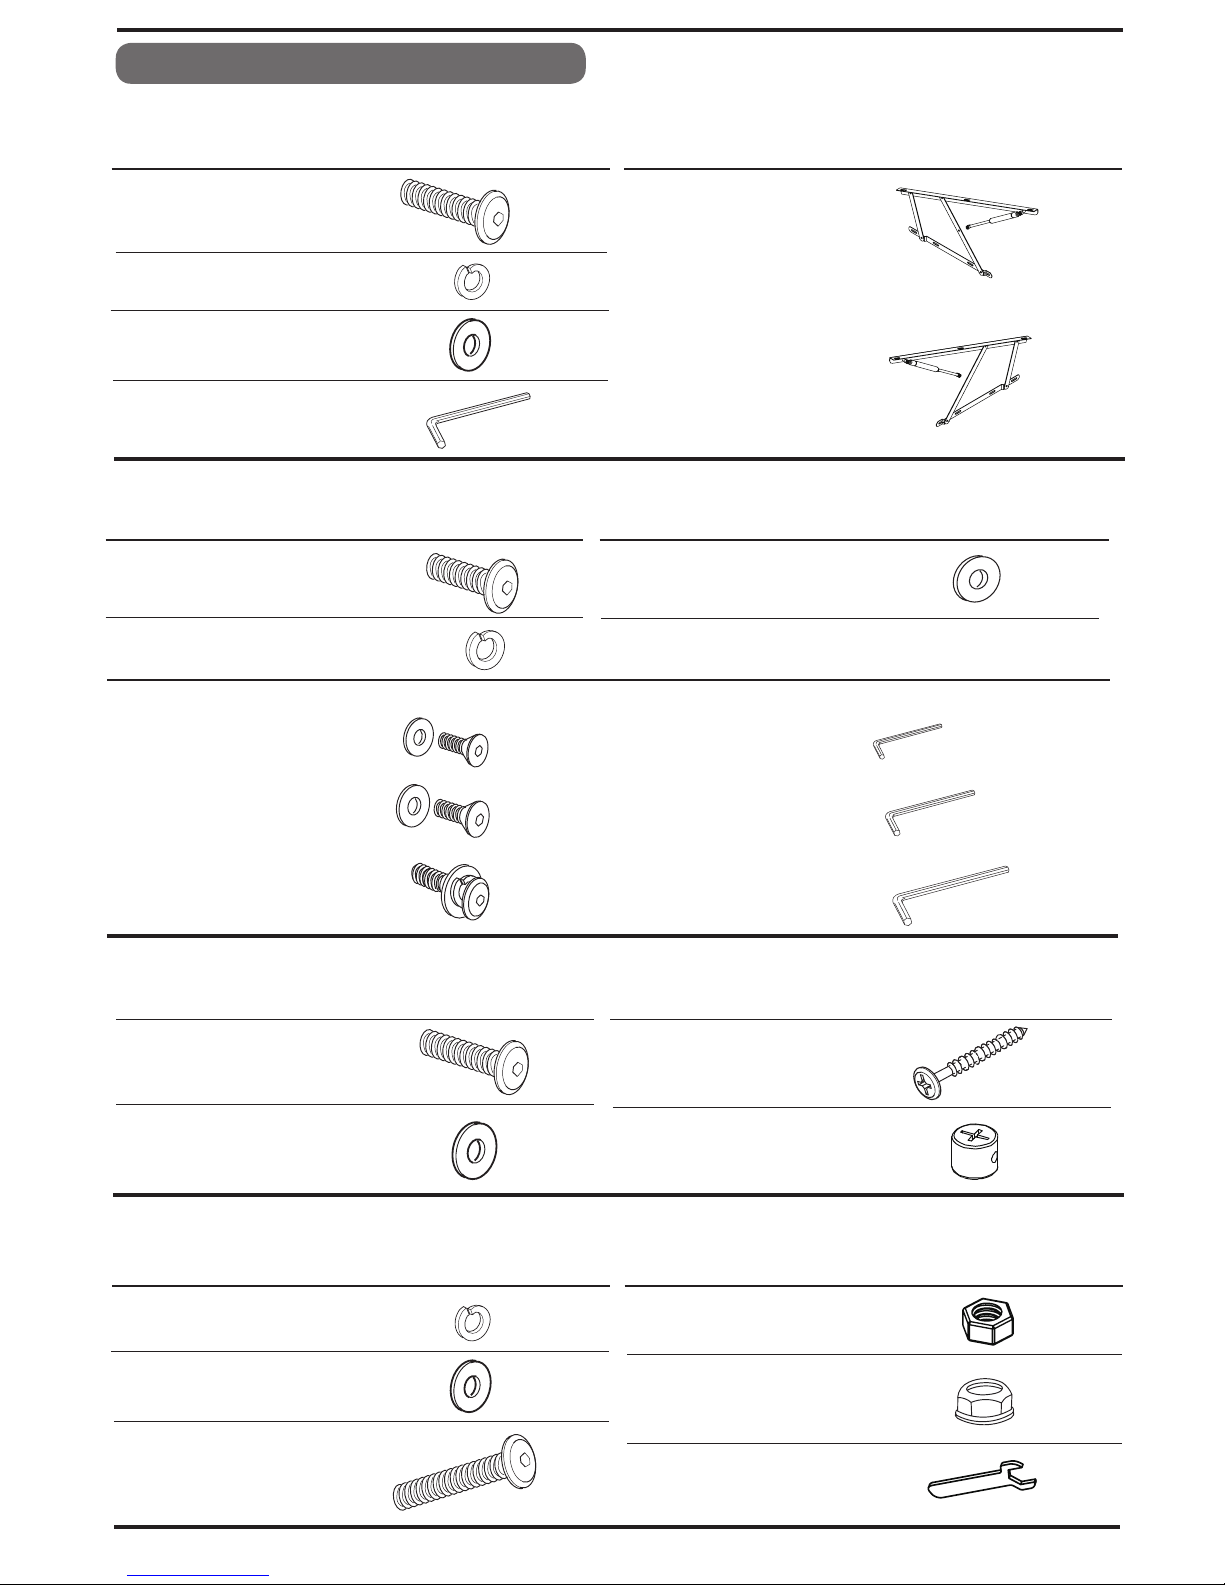
QtyCode Description
A
x24
Fittings Checklist
C
x24
Spring Washers (for M8 bolts)
Flat Washers (for M8 bolts)
Qty
Code Description
B
x2
x2
Bolts (M8x30mm) for
fitting side panels (3&4)
to headboard & footboar d (1&2)
HARDWARE NEEDED FOR BED ASSEMBLY (PACK B)
Screws (5x50mm) for
assembling media tray panels
a
x24
QtyCode Description
A
x4
G
Qty
Code Description
F
Plastic Barrel Nuts
x12
Bolts (M8x30mm) for
dna )41( sgel yart adiem gnittif
fitting media tray to side panel (4)
x12
HARDWARE NEEDED FOR MEDIA TRAY ASSEMBLY (PACK C)
C
Flat Washers (for M8 bolts)
x4
Page 2 of 15
TV INSTALLATION KIT - Inside Pack (B)
x1
x1
x1
b
x2
Bolt Sets (M8x25mm)
HARDWARE NEEDED FOR FITTING GAS-LIFT MECHANISMS (PACK A)
E (a)
Gas-Lift Mechanisms
x1
x1
E (b)
Spring Washers (for M8 bolts)
B
A
x8
Bolts (M8x30mm) for
fitting gas-lift mechanisms (J)
to headboard & footboard (1&2)
x8
C
Flat Washers (for M8 bolts) x8
QtyCode Description
Qty
Code Description
D
Allen Key (for M8 bolt)
x1
J
x6
Spring Washers (for M8 bolts)
B
L
x1
Spanner (for M8 nut)
x6
x6
H
C
Flat Washers (for M8 bolts) x12
)D KCAP( EM ARF TALS LATEM GNITTIF ROF ERAWDRAH
QtyCode Description
Qty
Code Description
x2
K
Bolts (M8x50mm) for fitting
mechanisms (J)
metal slat frame (4) to gas-lift
Nuts (for M8 slat frame bolts)
Flange Lock-Nuts
(M8) for gas-lift pistons
(M6x12mm)
Counter-Sunk Screws
Counter-Sunk Screws
(M4x12mm)
Allen Key (5mm)
Allen Key (4mm)
Allen Key (2.5mm)
Page 3 of 15
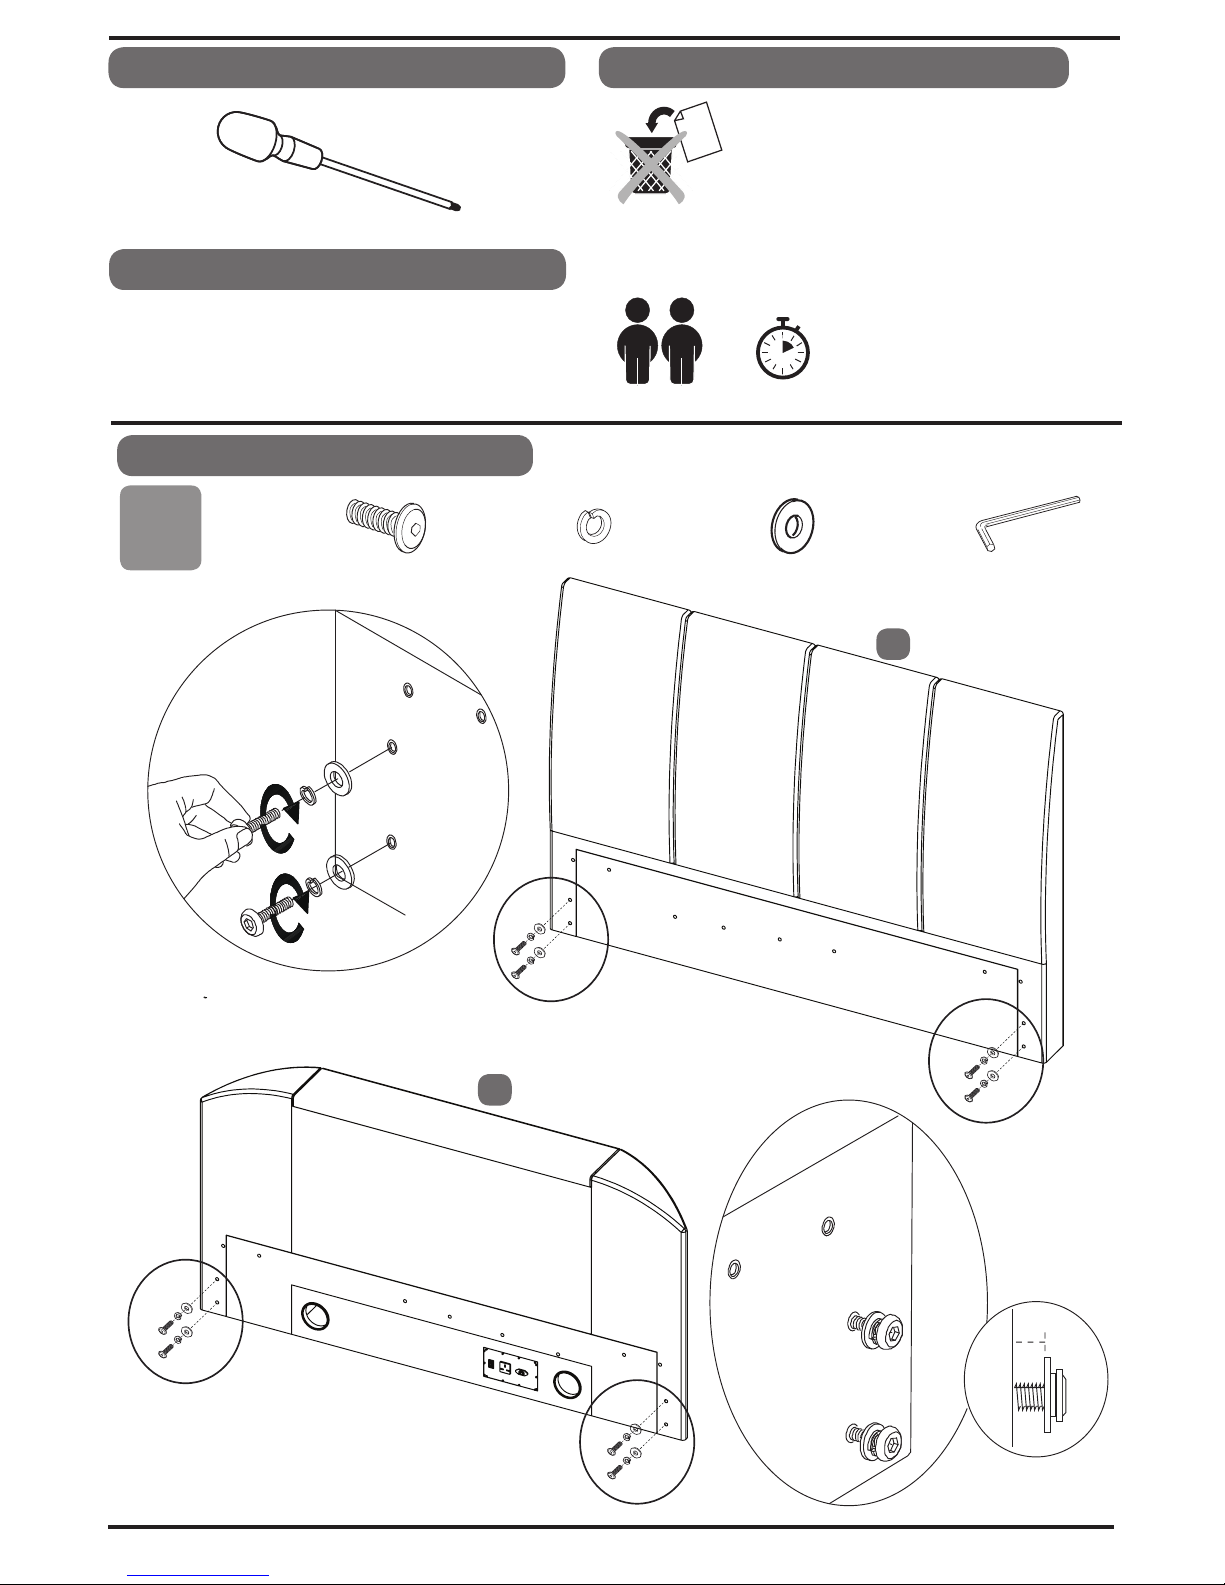
Additional Tools Required
Care & Maintenance
Please retain your assembly instruction and
tools provided for future use.
Periodically check that all bolts are still tight.
General Hints & Tips
A ssembly requires
two persons.
Approximate time to
assemble this product
2
1/2
Hrs
In the unlikely event of missing or damaged parts,
please contact your retailer. Please have this guide at
hand quoting the part code reference numbers shown
when requesting spare or replacement parts.
Cross-head Screwdriver
Stage
1
A x8
B x8
C x8
D
x1
'B' kcaP esU - ylbmessA deB
1
2
A
B
C
10mm

Page 4 of 15
A x8
B x8
C x8
D
x1
Stage
2
E (a)
x1
E (b)
x1
ALIGN WITH THE HOLES
MAKE SURE FIXING BOLTS ARE IN THE
CENTRE OF THE LONG HOLES
B
A
C
D
BOLTS SHOULD BE IN CENTRE
OF LONG HOLES
E(a)
H
H
H
E(b)
Fitting Gas-Lift Mechanisms - Use Pack 'A'
1
2
Stage
3
D
x1
'B' kcaP esU - ylbmessA deB
3&4
1&2
D
90%
1
3
4
2
Page 5 of 15
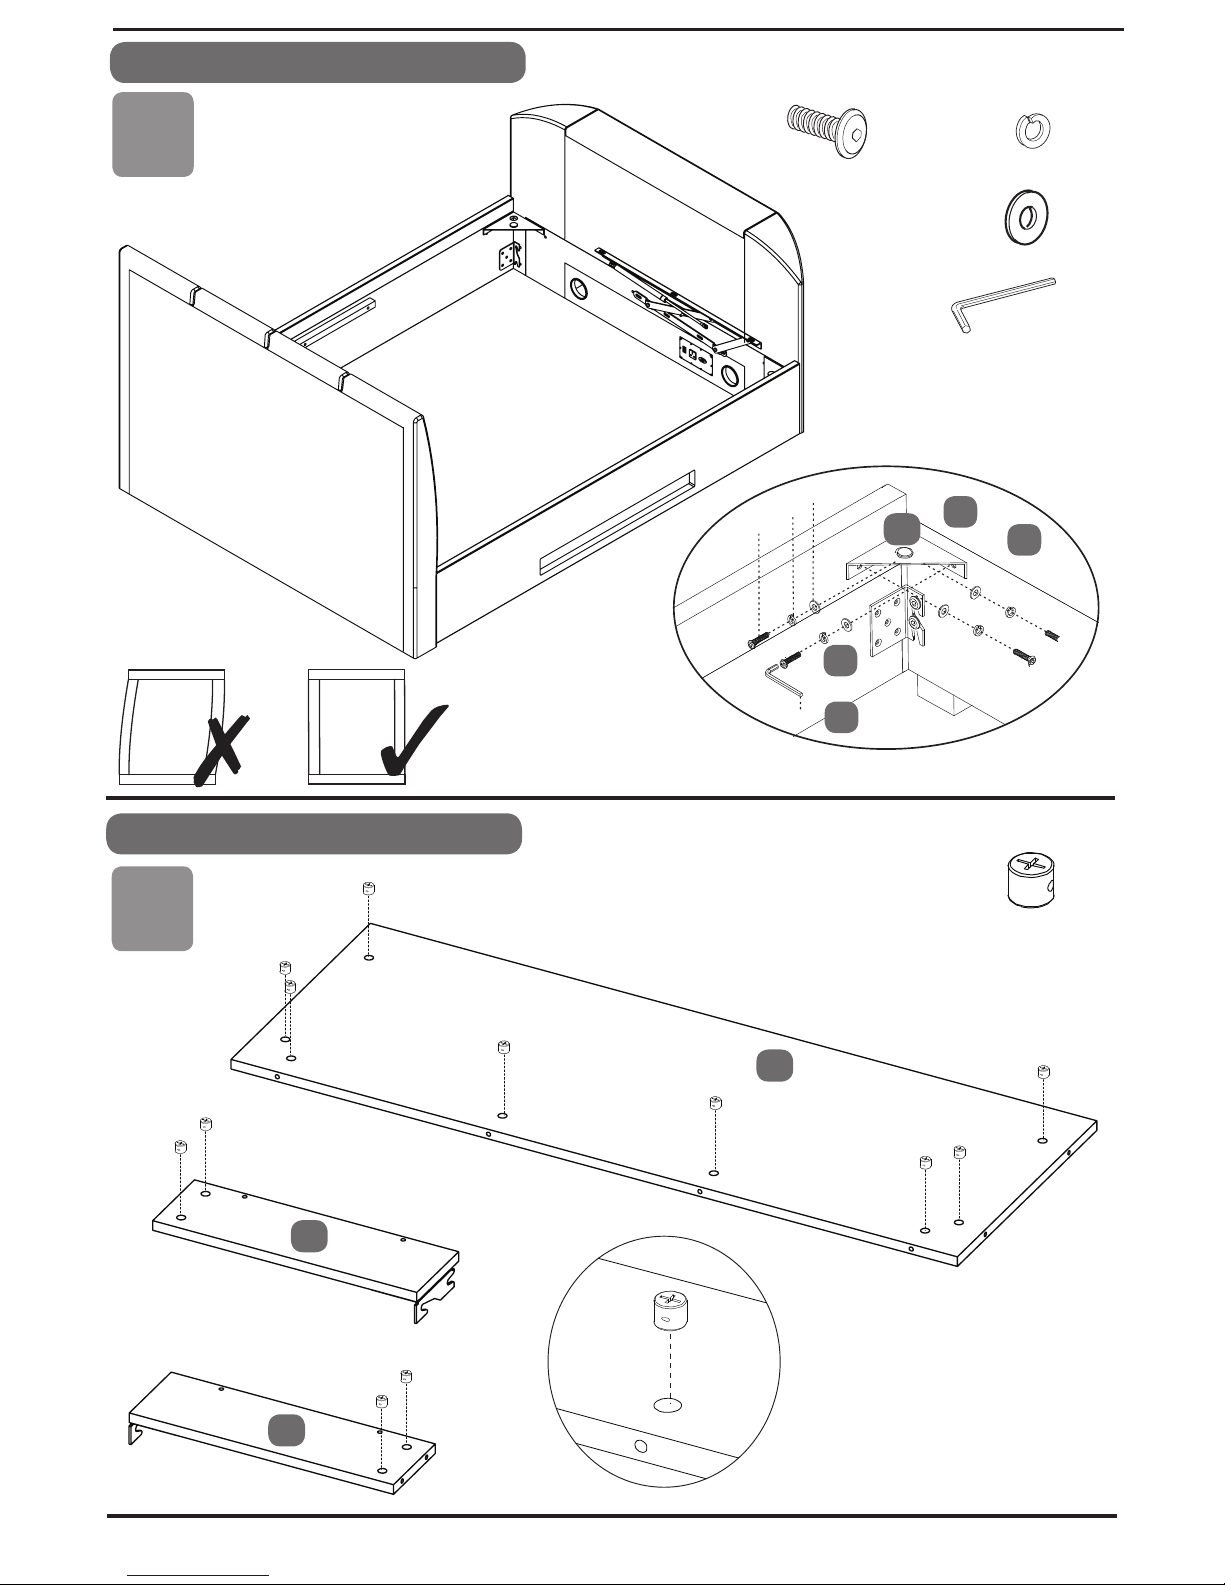
Stage
4
A
B
C
D
A x16
B x16
C x16
D
x1
Make certain the bed is squared
up as shown in the diagram then
tighten all bed assembly bolts 100%.
Bed Assembly - Use Pack 'B'
Stage
5
Bed Assembly - Use Pack 'C'
G
G
x12
IMPORTANT:
MAKE SURE WHEN FITTING
THE BARREL NUTS THAT
THE HOLE IS IN CORRECT
ALIGNMENT WITH THE
HOLE IN THE PANEL EDGE.
10
9
1
&
2
3
&
4
6
G
G
G
G
G
G
G
G
G
G
G
G
12
 Loading...