

Time2 MIP11 User Manual
User Manual
Thank you for your purchase of the
Time2 MIP11 Wireless
Surveillance Network camera
. We recommend that you
carefully read this manual before in order to use your camera
See sections:
1. Preventive measures and safety instructions.
2. Intended use.
3. Main Components.
4. Camera installation.
5. Connecting the camera to your router.
6. Downloading the required software.
7. Connecting the camera to the software.
8. Setting up the camera wirelessly.
9. Setting up motion detection.
10. Managing your camera from your PC
11. Managing your camera settings
12. How to save your recordings/images
13. Downloading software for your iPhone/Android
14. Connecting the camera to your iPhone/Android
15. Managing software from your iPhone/Android
16. Frequently asked questions (FAQS)
17. Technical Specifications
1. Preventive measures and safety instructions
1.1. Notifications
Warning!
Do not install the product outdoors or in any place where it might become wet.
Do not install the product in any place that might be exposed to extreme heat or cold.
It is not permitted to open the product yourself or to have it opened, neither is it permitted to
repair the product yourself or to have it repaired. This will void the warranties. Please let any
maintenance be carried out by certified maintenance personnel.
Only use original accessories from the manufacturer.
Keep the product out of reach of children.
Disconnect the device from all power sources before cleaning it.
Use a clean, dry cloth to clean the product.
Do not use any abrasive agents, corrosive cleaning products or any substances that
contain bleach or solvents to clean the product.
Remove the adapter from the power outlet during storms, lightning and whenever the
product will not be used for a longer period of time.
Please note!
Install the product as indicated in this manual.
The camera should be kept out of direct sunlight.
Wireless systems can be affected by interference from wireless telephones, microwave
ovens and other wireless devices that operate in the 2.4 GHz range. Keep the product at
least 3 metres away from any possible sources of interference during installation and
operation.
The camera is not able to view through glass at night. Keep this in mind when positioning it.
2. Intended use
The MIP11 is a security camera that makes it possible to view surveillance images via a local
network, an Internet connection or the "Plug2View (iOS) & p2pcamviewer (Android)" App on your
smartphone. The MIP11 can be connected either through an Ethernet cable or a Wi-Fi connection.
The camera can make video and audio recordings and is also equipped with motion detection.
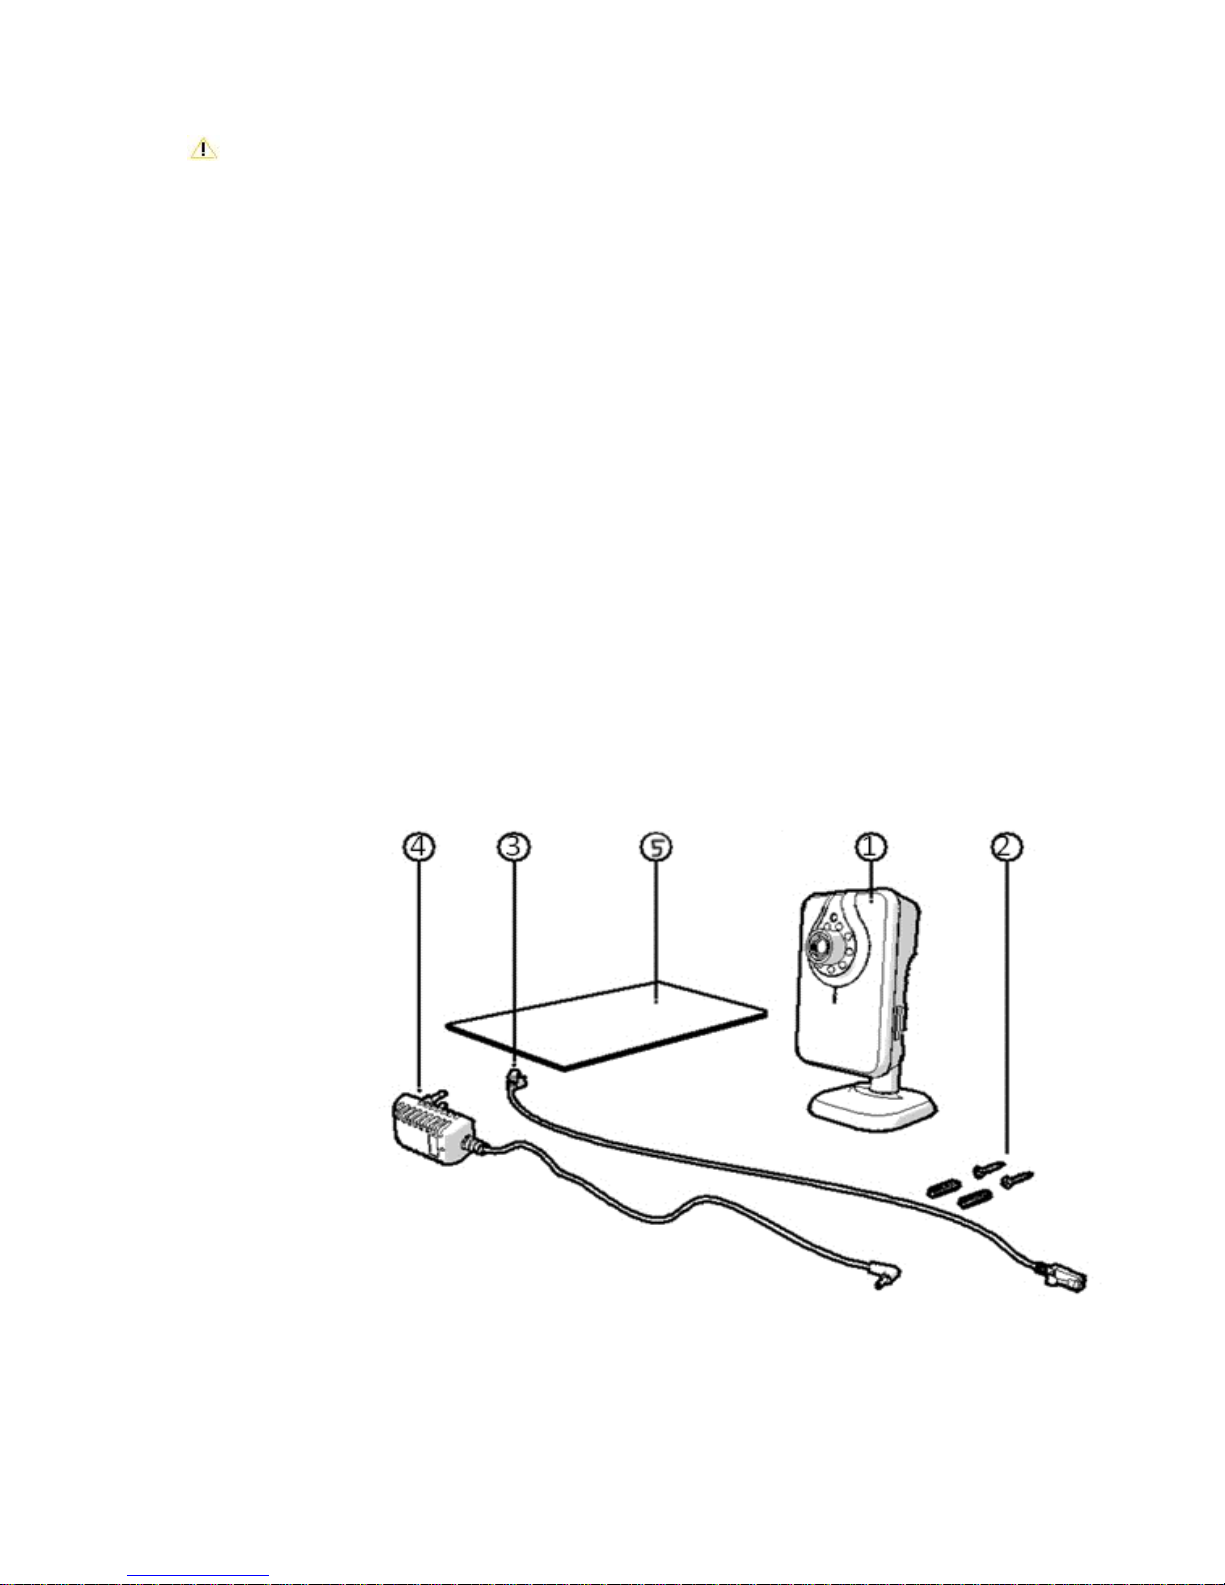
3. Main Components (What comes in the box?)
1. MIP11 Camera with base
2. 2 assembly screws and plugs
3. Ethernet (internet) cable
4. DC supply (power supply)
5. User’s manual
3.1 Connections
1. Ethernet port (Internet port)
2. DC connection (Power supply)
3. Reset opening
4. Camera Installation
Please note!
Ensure that the camera functions properly in the chosen location before
starting installation.
You can choose to place the camera on a flat surface, or to attach the camera to the location of
your choice with screws.
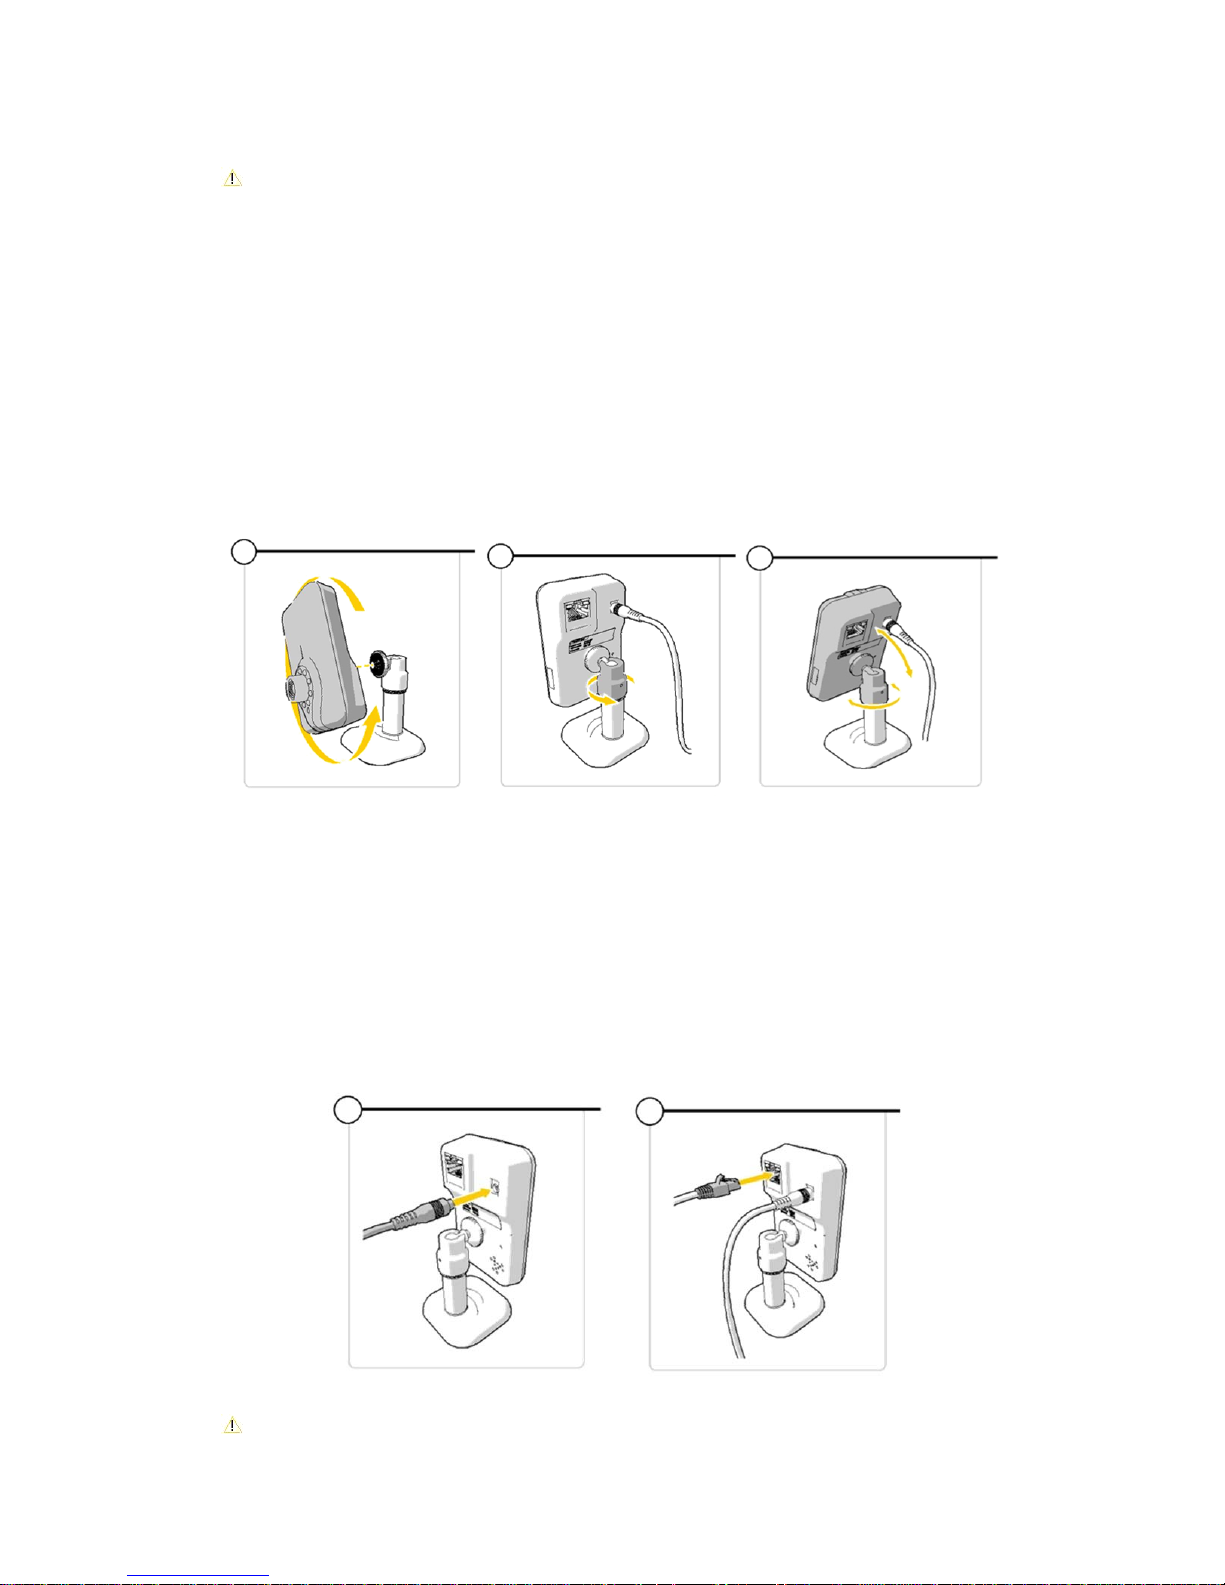
1. To mount the camera to the stand, you will need to twist the camera to the screw on
the stand. (See image 1)
2. Once you have done this, there is a screw tight plate behind to which you can screw
towards the camera to tighten this in place and hold the camera straight.
3. To twist the camera on an angle or landscape, the stand has a rotating casing
where the ball joint is. Twist this to loosen the ball. (See image 2)
This will then let you move the camera up and down or landscape or portrait.
4. Tighten the casing where the ball joint is to hold securely in place. (See image 3)
Connecting the camera
Connect the power adapter to the DC connection on the camera the plug into a power outlet.
(See image 1)
Connect one end of the Ethernet cable supplied with the product to the network port on the
camera. (See image 2)
Connect the other end of the Ethernet (internet) cable to the router. The green LED on the
Ethernet (internet) port and on the front on the camera will light up and flash when the
camera has successfully connected to a network.
You can now operate your IP Camera using your smartphone or PC.
Please note!
Make sure that the camera functions properly in the chosen location before
1 2 3
1 2
starting installation.
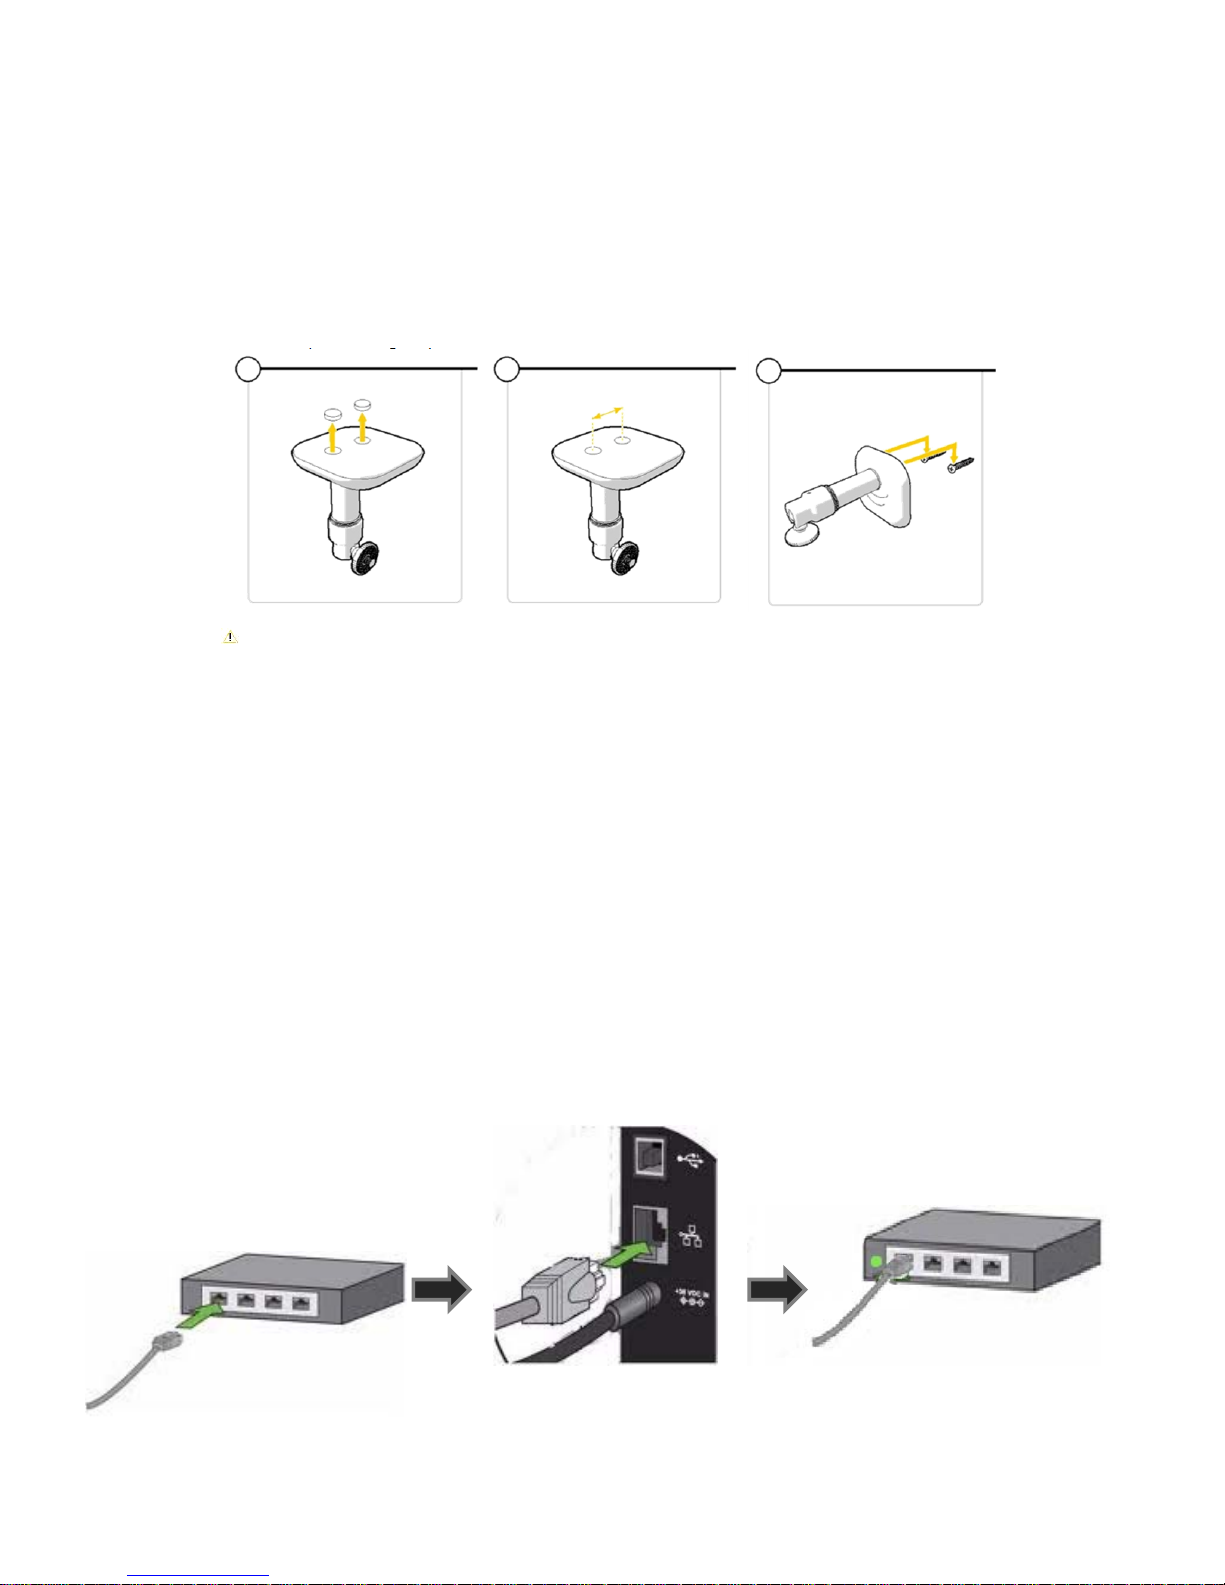
To mount the camera to a surface using the screws such as a wall, please see below:
1. On the bottom of the stand will be two holes. Remove the rubber case to make the
holes clear. (See image 1)
2. Measure the distance from the holes so the camera will fit nicely to the screws. (See
image 2)
3. Drill the screws into the wall. The base of the camera stand should now fit and slide
into this. (See image 3)
Please note!
If the surface is too hard for the screws (stone/ concrete), you will need to
drill holes and use the screw plugs which are included.
5. Connecting the camera to your router
During the setup of your camera, you will need the camera to be connected
to your router for internet access. For this you will need the internet cable
provided and access to your internet router.
Using the internet cable provided put the internet cable into the back of the
camera (as previously advised in section 4)
The other end will need to be connected to an internet port on your router.
Please see demonstration below on how to do this.
6. Downloading the software
Before you can start the set-up of your camera, you will require:
Computer
Internet access
Access to your router
Power supply
Camera (with components)
Go to www.scc21.net on your internet browser) to get the software required
from an online download.
Please Note: You will require a software that is able to unzip files (such as
Winzip) to open the download.
Winzip is software which can open files such as this download. This can be
downloaded at www.winzip.com. Most computers already have this software
preinstalled.
PLEASE NOTE: If you select Web view, you will not have downloaded the software.
This just allows you to view the camera online without downloading the program
where all the set up features will not be available.
When you visit www.scc21.net you will see the following:
1. You will need to choose the appropriate file to download (PC client is a
version of the software which runs on windows laptops or computers)
2. It will direct you to another page which will ask you to download the file. (See
image 1)
3. Click the download button for the software to start downloading.
4. Once the file has finished downloading it will automatically open/or ask you to
open the download directing you to the SYSM Monitor Setup (See image 2)
5. When you have read through the SYSM setup window, click the next button.
It will then ask where you wish to locate the download. (See image 3)
 Loading...