

Page 1

BENCH MOUNT
Item
#
CS
-
MBCJR
ELECTRIC SHARPENER F O R CH AI N S A W S
ASSEMBLY & OWNER’S MANUAL
WARNING:
Read carefully and understand all ASSEMBLY AND OPERATION
INSTRUCTIONS before operating. Failure to follow the safety rules and other
basic safety precautions may result in serious personal injury.
10172012
Page 2
Thank you very much for choosing this product! For future reference, please complete the owner’s record
below:
Model: ____CS-MBCJR________ Purchase Date: _______________
Save the receipt, warranty and these instructions. It is important that you read the entire manual to
become familiar with this product before you begin using it.
This product is designed for certain applications only. The manufacturer cannot be responsible for
issues arising from modification.We strongly recommend this product not be modifiedand/orused for
any application other than that for which it was designed. If you have any questions relative to a
particularapplication, DONOTuse theproductuntil youhave firstcontactedus to determineif it canor
should be performed on the product. For technical questions please call 1-952-938-5222.
INTENDED USE
TECHNICAL SPECIFICATIONS
Supply voltage: 110V-60Hz
Motor input power: 125 Watt
Maximum speed: 5800R/min
Weight: 4.85 lbs.
Product No.: CS-MBCJR
Max. chain pitch: 3/8 in.
WARNING: Read and understand all instructions. Failure to follow all instructions listed
below may result in serious injury.
CAUTION: Do not allow persons to operate or assemble this electric sharpener until
they have read this manual and have developed a thorough understanding of how the electric
sharpener for chainsaws works.
WARNING: The warnings, cautions, and instructions discussed in this instruction
manual cannot cover all possible conditions or situations that could occur. It must be
understood by the operator that common sense and caution are factorswhichcannotbebuiltintothis
product, but must be supplied by the operator.
SAVE THESE INSTRUCTIONS
GENERAL WARNINGS
GROUNDING INSTRUCTIONS
1. All grounded, cord-connected tools:
This electric sharpener isequipped with an electric cord having an equipment-grounding
conductor and a grounding plug. The plug must be plugged into a matching outlet that is
Page of 102
Page 3

properly installed andgrounded in accordance withalllocal codes and ordinances. Grounding
provides a path of leastresistance for electric current toreducetherisk of electric shock in the
event of a malfunction or breakdown.
DO NOT modify the plug provided. If it does not fit the outlet, have the proper outlet
installed by a qualified electrician.
Risk of electric shock will result from an improper connection of the equipment-grounding
conductor. The conductor with insulation is the equipment-grounding conductor. If repair or
replacement oftheelectric cord or plugisnecessary, do not connecttheequipment-grounding
conductor to a live terminal.
If grounding instructions are not completely understood, or if in doubt as to whether the
electric sharpener is properly grounded, consult with a qualified electrician or service
personnel.
ONLYuse 3-wire extension cords that have 3-prong grounding plugs and 3-polereceptacles
that accept the electric sharpener’s plug.
2. Grounded, cord-connected tools intend for use on a supply circuit having a nominal rating less
than 150 V:
This electric sharpener isintended for use on a circuit that has a 3-pole, grounded outlet. A
temporary adapter may be used to connect this plug to a 2-pole receptacle if a properly
grounded outlet is not available. The temporary adapter should be used only until a properly
grounded outlet can be installed by a qualified electrician.
GENERAL SAFETY WARNINGS
• KEEP GUARDS IN PLACE and in working order.
• REMOVEADJUSTING KEYS AND WRENCHES. Form a habit of checking that keys and
adjusting wrenches are removed from the electric sharpener before turning it on.
• KEEP WORKAREA CLEAN. Cluttered areas and benches invite accidents. Keep work area well
lighted.
• DO NOTUSEIN DANGEROUS ENVIRONMENT. Don’t use power toolsindamp or wet locations.
• KEEP CHILDRENAWAY. All by-standers should be keptat a safe distance from the work area.
• DO NOT FORCE THE ELECTRIC SHARPENER. This tool will perform its job better and safer at
the rate for which it was designed.
• USE RIGHT TOOL. Do not use the electric sharpener to do a job for which it was not designed.
• USE PROPEREXTENSION CORD.Ensurethat your extensioncord is in goodcondition, andthat
it is heavy enough to carry the current the electric sharpener will draw.
• WEARAPPROPRIATE APPAREL. Do not wear loose clothing, gloves, neckties, rings, bracelets,
or other jewelry.Thesemayget caught in moving parts. Nonslip footwear is also recommended.
Protective hair covering should be worn to contain long hair.
• ALWAYS USE SAFETY GLASSES.Also use face or dust mask if cutting operation is dusty.
• SECURE WORK. Use clamps or a vise to hold work when practical. This frees both hands to
operate the electric sharpener.
• DO NOT OVERREACH. Keep proper footing and balance at all times.
• MAINTAIN ELECTRIC SHARPENER WITH CARE. Keep all parts operating and clean for best
and safest performance. Follow instructions for lubricating and changing accessories.
Page of 103
Page 4

• DISCONNECTTOOLS FROM POWER SUPPLYbeforeservicing and when changing
accessories, such as blades, bits, cutters, and the like.
• REDUCE THE RISK OF UNINTENTIONAL STARTING.Ensure that the switch is off before
plugging into power source.
• USE RECOMMENDEDACCESSORIES. Consult the owner’s manual forrecommended
accessories. Use of improper accessories may cause risk of injury to persons.
• NEVER STAND ON ELECTRIC SHARPENER. Serious injury may result if the tool is tipped or if
the cutting tool is unintentionally contacted.
• CHECK DAMAGED PARTS before further use of the electric sharpener.Check for alignment of
moving parts, binding of moving parts, breakage of parts, mounting, and any other conditions that
may affect its operation. Aguard or other part that is damaged should be properly repaired or
replaced. DO NOT USE A MACHINE WITH ADEFECTIVE ON/OFF SWITCH.
• DIRECTION OFFEED. Only feed workintotheblade against the direction of rotationof the blade.
• NEVER LEAVE TOOL RUNNING OR UNATTENDED.Turn the power off and do not leave the
electric sharpener until it comes to a complete stop.
CHAINSAW SHARPENER WARNINGS
Before operationof the electric sharpener, read theinstruction manual carefully. Ifyou haveany
questions regarding the condition and operation of the tool, consult the manufacturer.
Protect the electric sharpener from moisture, rain, and dust. This tool is only for indoor use.
For the highest degree of safety, carefully read the following instructions:
• Use the electric sharpener only for its intended use.
• Never start the sharpener without the wheel guard in place.
• Never use the sharpener as a cutter for grinding objects other than chainsaws.
• The sharpener can be used continuously for no more than 15 minutes; then, turn it off for an
adequate period of time.
• ALWAYSwearhearing and eye protectionatall times. Wear adustprotection mask when needed.
The noise level in the work area can be above 85dB, and eyes can be protected from flying chips
and debris with safety goggles.
• Wear work gloves to protect fingers and hands from cutting injuries.
• Unplug the electric sharpener before doing anymaintenance work on the machine.
• Ensure that the chain issharpened and secured in place so that it doesn’t slip out.
• Keep the electric sharpener clean and check for any damage.
• ONLY use soap and water to clean plastic parts.
• Do not use the electric sharpener near any flammable liquids or vapors.
• Protect the power cord from damage by oil or acid.
• IMPORTANT: Observe all national safety regulations regarding installation, operation, and
maintenance.
• After completing a job, unplug the electric sharpener from its power source.
• Store the machine in a safe, dry, locked location out of the reach of children.
• Always use both hands to hold the machine when working. Maintain safe footing and good
posture.
• Inspect sharpening wheels before each use.
Page of 104
Page 5

• ALWAYS replace a cracked wheel immediately.
• Always use guards and eye shields at all times.
• Do not over tighten wheel nut.
• Protect yourselffrom electric shock.Avoid anybodilycontact with groundedobjects such aspipes,
radiators, stoves, and refrigerators.
• Do not overload the machine – work in a safe manner within the scope of the machine’s capacity.
• Do not use the power cordforcarryingorhanging the machine. Do not use thecordtopulloutthe
plug from the outlet.
• Check the machine cord regularly; when itis damaged, have it replaced by a skilled electrician.
Check the extension cords as well and replace them if damaged.
• Be attentive.Start ajobonly when youfeel good. Neveruse the electricsharpener when distracted
by others.
CAUTION: Abide by the essential safety measures protectingyou from electric shock,
accident, and fire. Read all instructions before using the electric sharpener for chainsaws and
follow them. Keep this manual in a safe place for future reference.
NOTE: This machine is in compliance with any respective safety provisions. Any repairs should be
done by professionally qualified technicians and only genuine spare parts should be used. If these
provisions are not observed, the user is in risk of injury.
READ ALL WARNINGS BEFORE OPERATION
ASSEMBLY:
ATTENTION: The sharpener should only be used in a place protected from dust and
dampness, well-lighted, away from children, gases, or other flammable or explosive liquids. It
should be placed near a suitable earthed outlet, and do not use dangerous extension cables.
1. Fasten the sharpener onto the bench with two M8 bolts (not provided) after having carefully
positioned it on the bench.
2. When the sharpener is fastened onto the bench, use a suitable square support, making sure that
the sharpenerisnotfastened at the level of theoperator’s eyes. Itisrecommended that youinstall
the sharpener at a maximum height of 47”-51” from ground level.
3. Slide the head of the M6x25 screw onto the sharpener as shown below, then attach handle to
M6x25 screw. Makecertainthehead of the M6x25 screw is attheend of its slot, if not, the wheel
guard cannot be installed.
Page of 105
Page 6

4. After installing the sharpener properly, assemble the wheel.
PRE-OPERATION:
Fasten the sharpener onto a work bench or any work surface where carefully positioned to be clear
from any other tools or distractions.
GRINDING WHEEL CHECK
Checkthewheel you areabout to usefordamages priortoinstallation. Toavoid injuries andaccidents,
only use grinding wheels that are free of defects.
1. Insert a pencil horizontally through the hole and allow the wheel to swing freely.
2. Carefully tap the wheeledgewith another pencil. This wheel should giveaclear,highpitch sound.
If the sound is dampened or blank, the wheel is defective and should not be used.
3. Do not force the grinding wheel onto the hub.
4. The central bore diameter should notbe changed.
5. Only use grinding wheels designed for this sharpener.
6. The smallest grinding wheel diameter should not be less than 4”.
7. Any adjustments should not be done unless the machine is switched off and unplugged.
A dull or dampened sound indicates damage by cracks in the wheel. NO DAMAGED WHEELS
SHOULD EVER BE USED!
GRINDING WHEEL ASSEMBLY
1. To avoid damage to the wheel, Do not over tighten screws.
2. The grinding wheel guard should be tightened securely.
3. After installing the wheel, run the machine to ensure that the wheel is not vibrating or spinning
incorrectly. If it is, quickly turn off the machine and unplug the power cord before attempting to
correct the default.
*The machine has a zero voltage circuit breaker which is disabled during an outage and will
prevent any unexpected restarting of the machine after the power supply is restored.
4. Using the sharpening stone and shape the wheel to obtain the required profile. Always be careful
while working.
Page of 106
Page 7
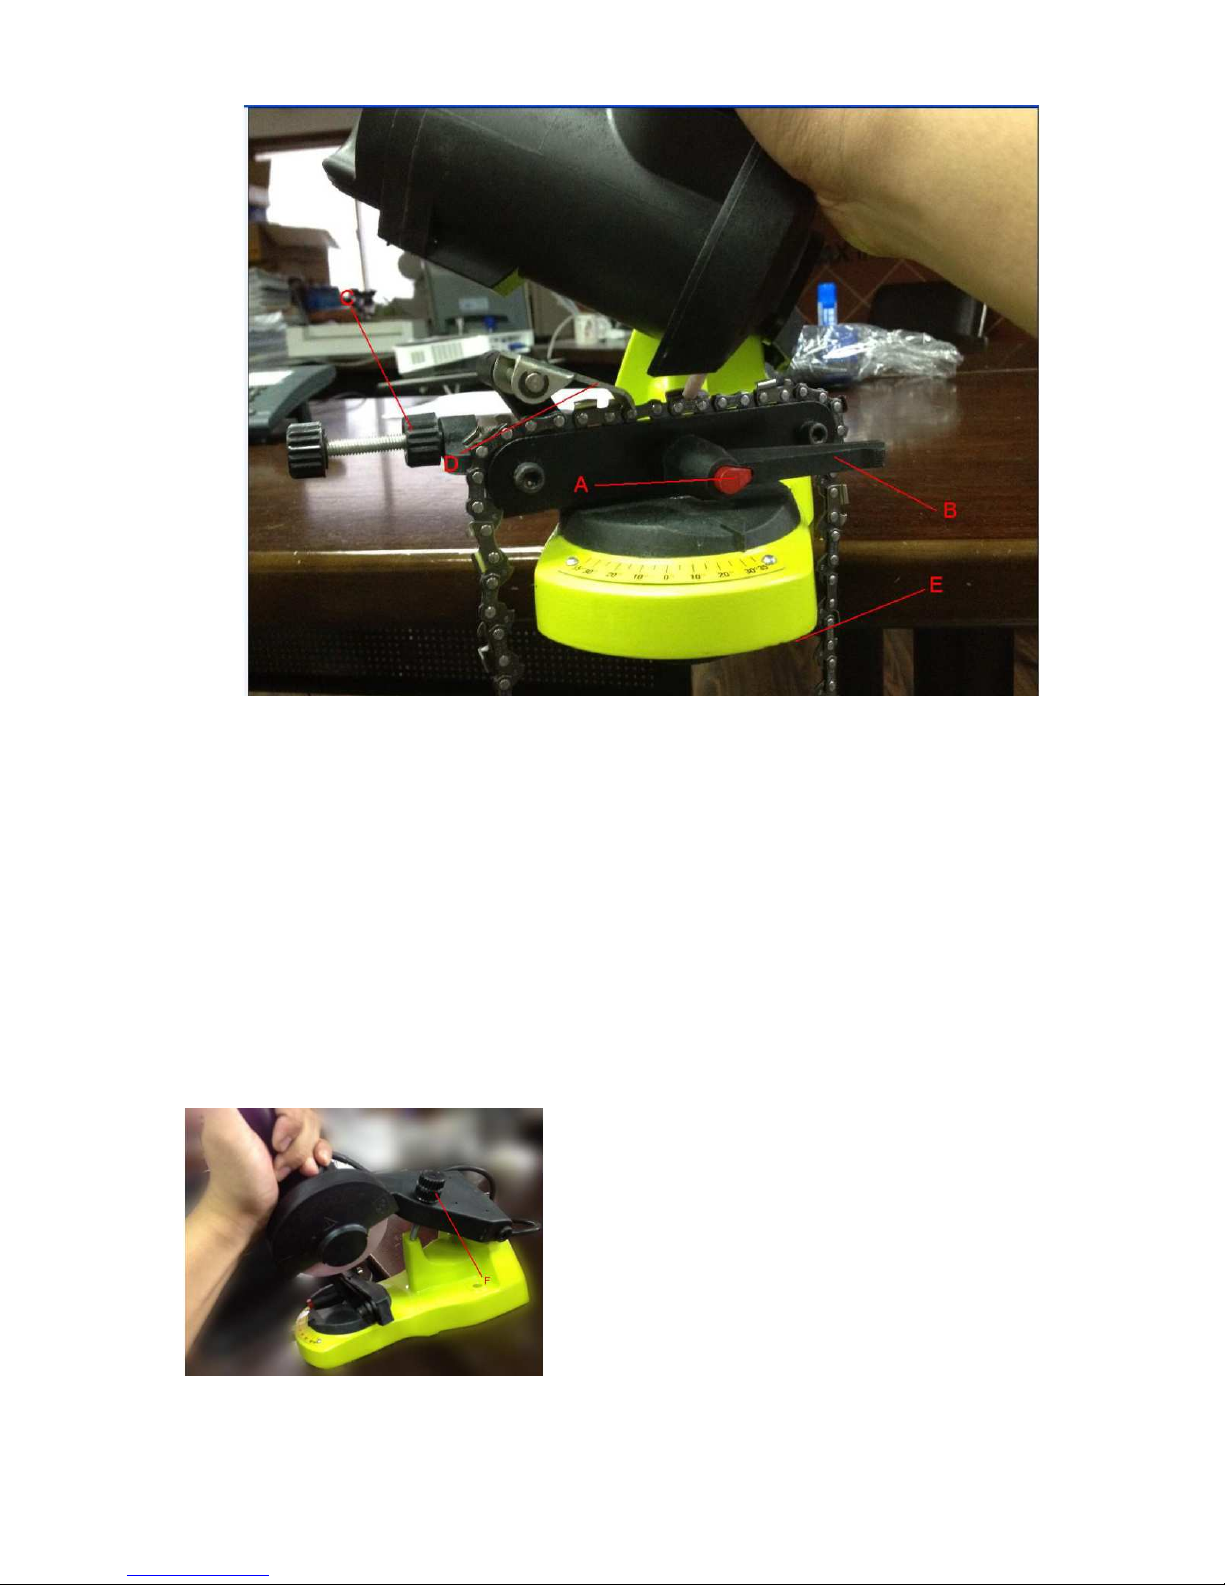
CLAMPING THE SCREW SET UP
1. Before grinding begins, the chain should be secured between the guides. The tooth to be
sharpenedfirstshould beplacedagainst thestop.Watchthatthe sharpeninganglecorresponds to
the guide position.
2. Set the guidestothe chain width using the setscrew(A) so that it is firmlyfixedin the clamp screw
by rotating the lever control. (B)
3. Set the backstop by adjusting the set screw.(D)
4. Set the top plate angle by adjusting the set screw corresponding to the readout scale. The top
angle should be set up by adjusting the set screw. (E)
OPERATION :
1. With all adjustments set, lower the grinding wheel to the tooth. The grinding depth may be set by
set screw (F).
2. With lever controlloose(B), adjust the set screwuntilthe grinding wheel touchesthetooth. During
the procedure, pull the chain through the guide (C) carefully.
Page of 107
Page 8
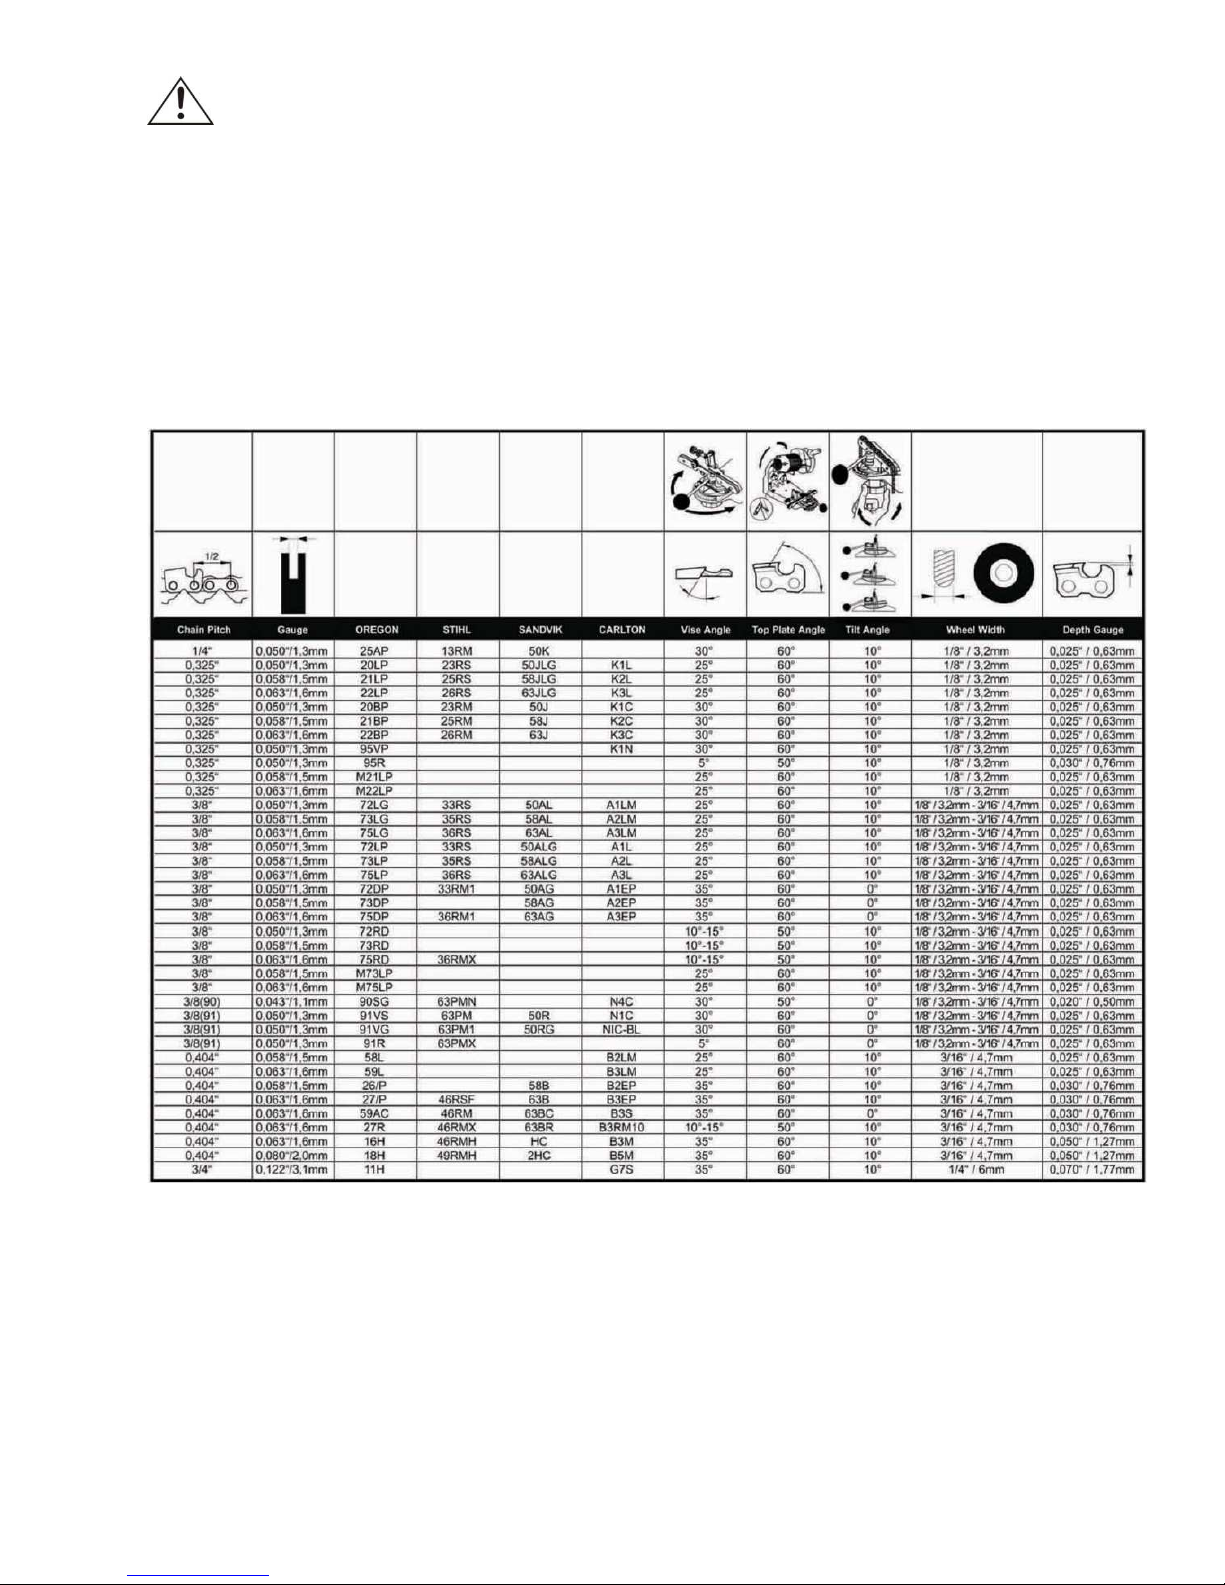
CAUTION: Always wear gloves and use caution while performing this task.
3. The machinemaynowbe switched on and thechain sharpening maybeginby gently touching the
wheel on the chain. Adjust the pressure as necessary.
4. Mark the start of sharpening (withapieceofchalk)and sharpen all the teeth in one direction, then
turn the clamping screw and sharpen the teeth in the opposite direction.
5. With worn chains, the lateral guide position should be set so the grinding wheel doesn’t touch the
guide.
NOTE: Do not use a lot of pressure when sharpening the teeth or run the grinding wheel on the teeth
for too long as the chain can be damaged.
6. Sharpen all depth gauges:
MAINTENANCE
Maintain your electric sharpener for chainsaws. It is recommended that the general condition of
the electric sharpener be examined before each use.Always disconnect the plug from the socket
before carrying out any maintenance,lubrication, or cleaning operations. The sharpener must be kept
clean, inorderto make safetyinstructions and plates clearlylegible.Clean it using a ragora swab. Do
not use compressed air which islikely to bring the metal dust in positions where they cannot be
reached. This would damage essential components of the sharpener.
Page of 108
Page 9
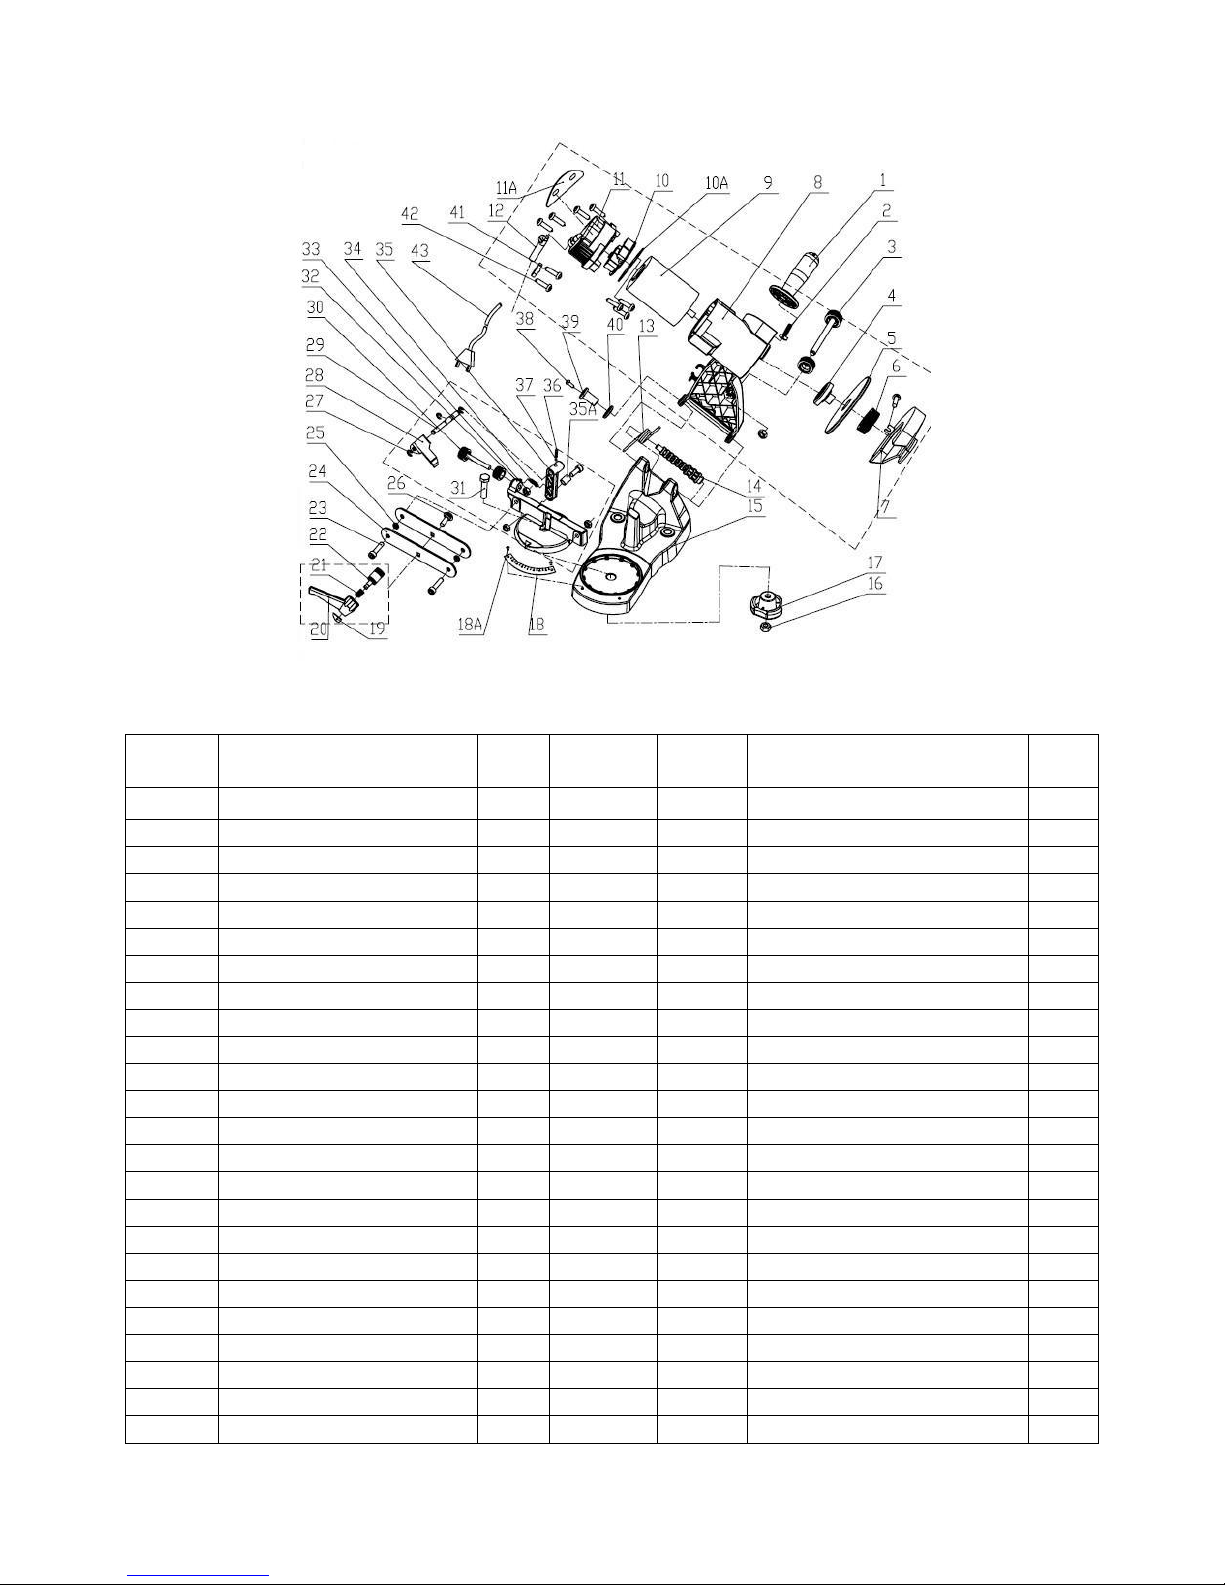
DIAGRAM & PARTS LIST
For replacement parts and technical questions, please call 1-952-938-5222.
Part
No.
Description Qty
Part
No.
Description Qty
1 Handle 1 22 Intermediate shaft 1
2 Coach bolt M6*20 1 23 ScrewM6 x 22 3
3 Adjustment screw M8*80 1 24 Clip chain plate 2
4 Arbor flange 1 25 Spacerbush 2
5 Grinding wheel 1 26 Step bolt 1
6 Grinding wheel platen 1 27 Ring M5 3
7 Wheel cover 1 28 Limit board 1
8 Top Bracket 1 29 Limit lever 1
9 120V 80W DC machine 1 30 Adjustment screw M8 x 60 1
10 Circuit Board 1 31 Bolt M8 x 25 1
10A Motor distance piece 1 32 Top turntable 1
11 Switch cover 1 33 Nut M6 3
11A Label 1 34 Limit frame tension spring 11
12 Wire sheath 1 35 Limit frame 1
13 Torsional spring 1 35A Limit frame spacer bush 1
14 Middle bearing 1 36 Limit frame pressure spring 1
15 Bottom base 1 37 Steel ball 1
16 M8 nut 2 38 Screw M4 x 12 1
17 M8 hand wheel 1 39 Middle bearing Long sleeve 1
18 Angle labeling 1 40 Middle bearing short sleeve 1
18A Rivet 2 41 Wire clamp 1
19 Unlock button 1 42 Screw M3 x 10 10
20 Wrench 1 43 Plug 1
21 Compressed spring 1
Page of 109
Page 10

WARRANTY
One-year limited warranty
BAC
PO BOX 5236
Hopkins, MN 55343
Made in CHINA
Page of 1010
 Loading...