

Page 1
2022-Frameless Single cabinet Installation Instructions Page 1 of 5
2022 Installation Instructions
for In-the wall Frameless
Single Cabinets
Tools Needed:
Stud Finder, Tape Measure, Pencil, Hammer, drill, 1/2” Drill Bit, Phillips Screwdriver,
Phillips Tip, and Drywall Saw
Your cabinet comes to you with the cabinet box already assembled and pre-finished in
white. Depending on product ordered, your door may be unfinished, primed or already
pre-finished in a color. If your door is unfinished or primed, remove the hinges and store
them in a safe place with the screws. Then paint or stain the door as desired. Primed
doors can only be painted, not stained. If you want to add hardware to your door after
painting or staining, it will be easier to drill for the necessary holes with the door off of
the cabinet.
Use a stud finder to locate where the studs are in your wall. If possible, you’ll want your
product to go between the studs so that you do not have to cut through a stud.
Measure the back of your unit and cut a template from scrap newspaper to those
measurements, it is easier than trying to hold the cabinet up and keep it level. Place the
template/product on the wall and trace around it with a pencil. Cut the hole in the drywall
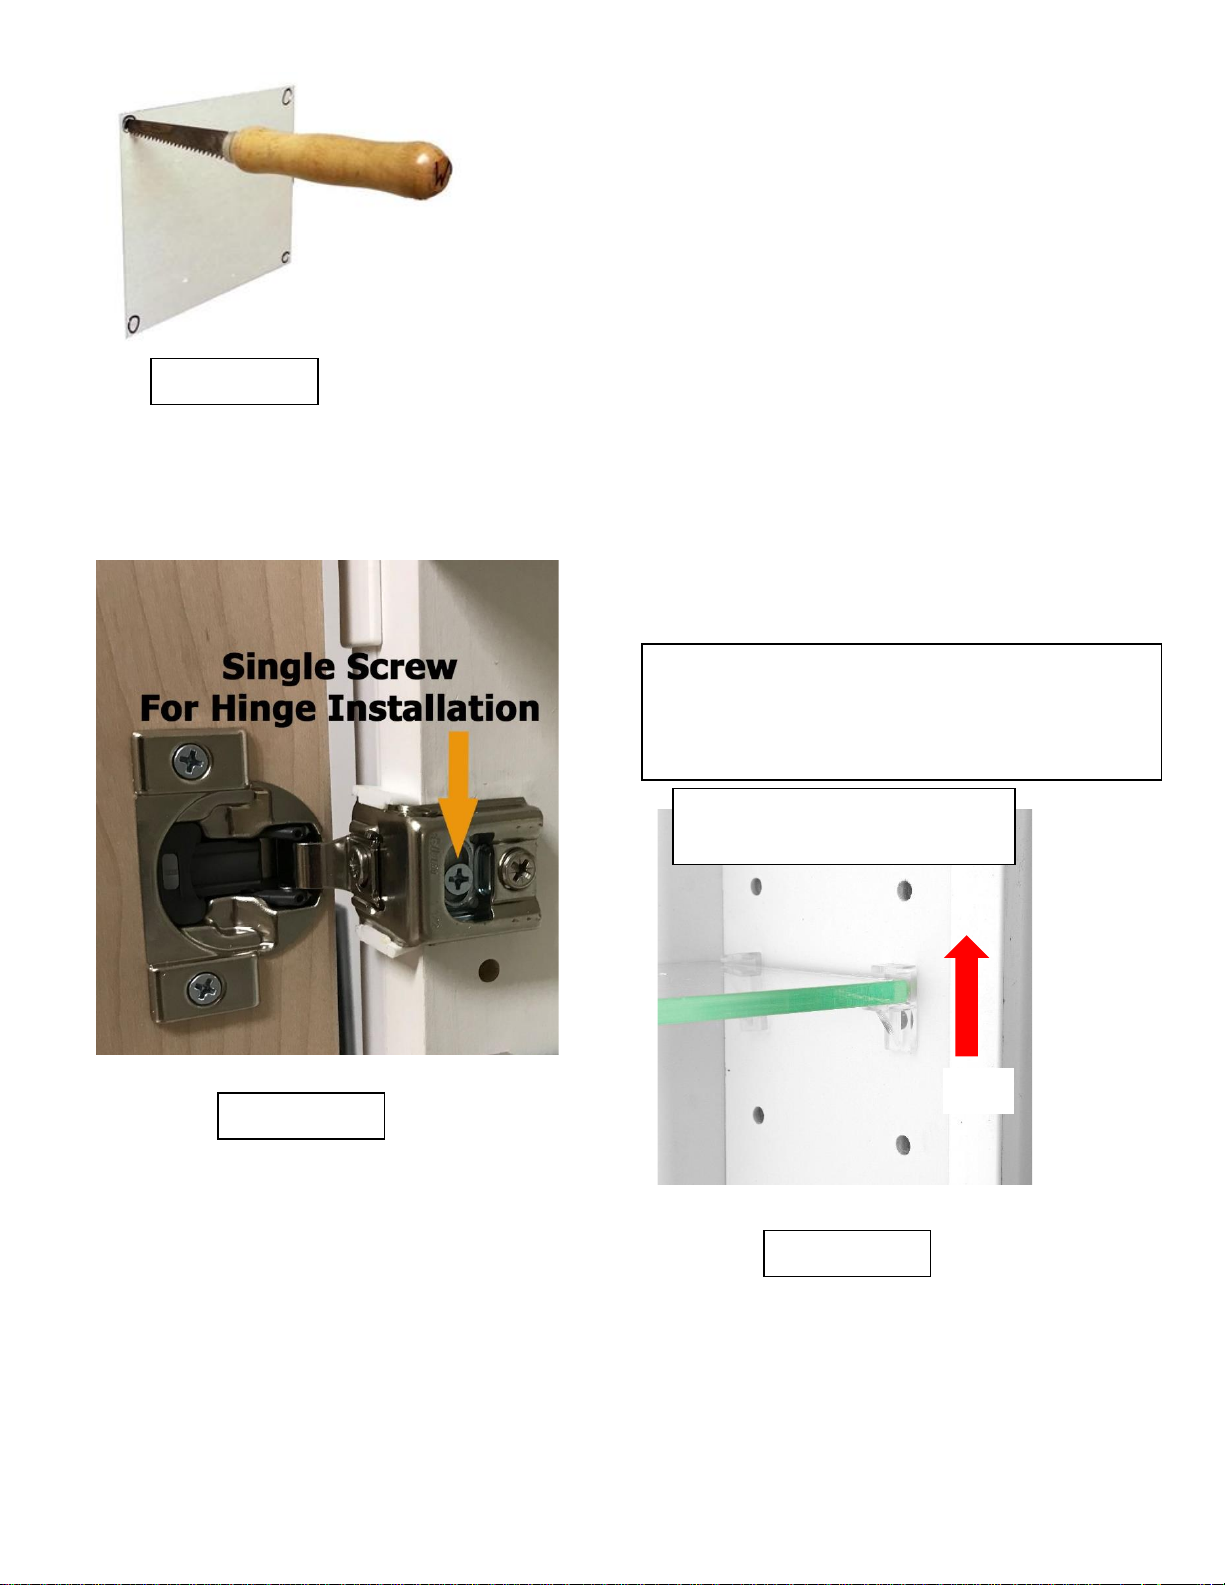
using a drill and drywall saw. Use a drill to drill a hole in each corner of the rectangle,
then insert a drywall saw into each drilled hole and cut to the next one. (see figure A) Do
not frame the top and bottom of the cabinet with 2x4 wall bracing. It is not needed and
will be in the way if you have a powered cabinet.
Insert the cabinet into the wall and press it into place. Do not FORCE the cabinet into
the wall by pressing on the back panel or you will void your warranty and damage the
cabinet. If your opening is not large enough, see if you can enlarge it slightly so that the
cabinet fits, or STOP and contact us for help. Use the long 3” screws (Pre-Installed
Mounting Screws) to screw through the two mounting holes on each side of the cabinet
into the studs on either side.
Hinge mounting holes have been pre-drilled on either side of the cabinet so that it
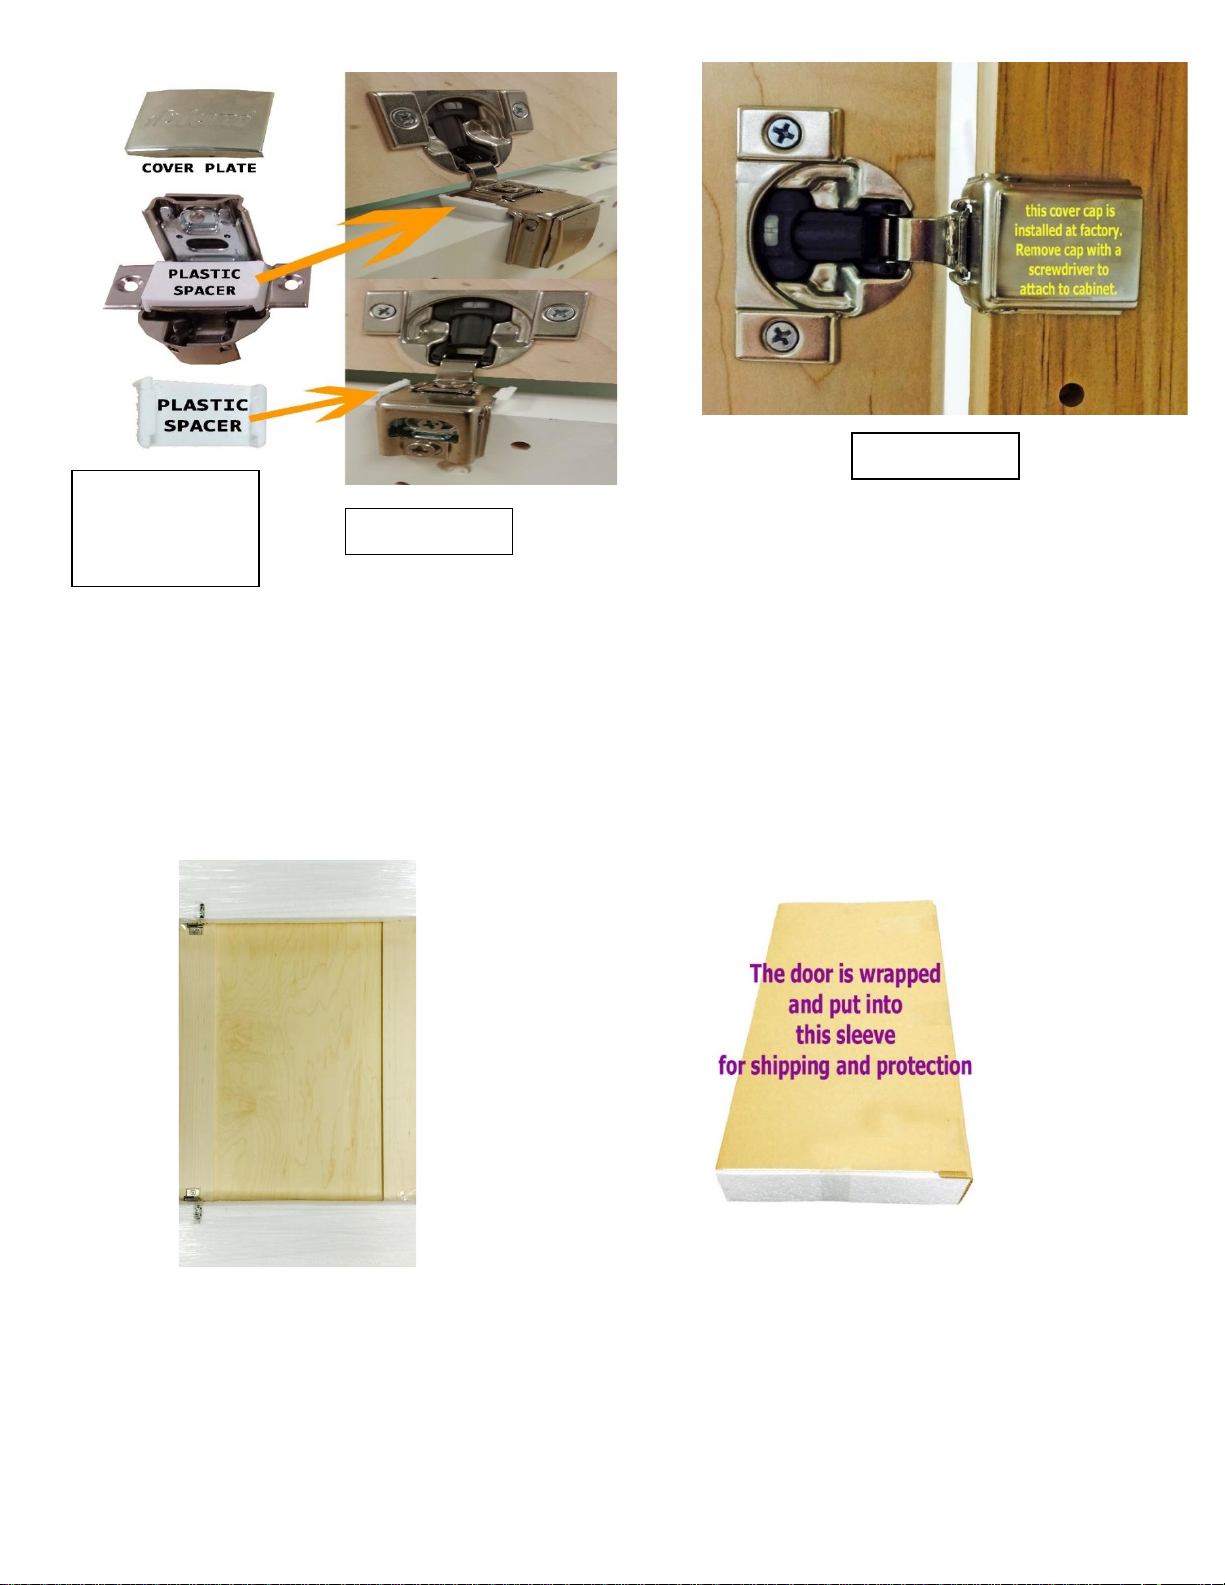
is reversible. Mount the door on whichever side you desire. Remove the cover
cap on each hinge. (See figure F) Re-attach your hinges if you have taken them off
of the door.
WHITE PLASTIC SPACERS MUST REMAIN ON THE HINGE TO AVOID
THE DOOR RUBBING ON THE PLASTIC TRIM SURROUND WHEN OPENING AND
CLOSING.
(See Figure E) Have a partner help you by holding the door into place
while you do the installation, it’s easier! Place the door on the side of the cabinet
and line up the hinges with the hinge holes marked on that side of the cabinet
box. Screw the ¾” screws (Hardware Bag labeled “Hinge screws”) into the hinge
hole (see figure C). The hinge should be resting right on the FRONT edge of the
cabinet box itself.
Install your plastic shelf supports (Hardware package labeled - Shelf supports) at the
desired locations (See figure D) and insert the shelves into place. Replace hinge
cover caps.
Page 2
2022-Frameless Single cabinet Installation Instructions Page 2 of 5
Figure A.
Figure C.
Orient your shelf supports
UP as shown here
UP
Figure D.
Our custom designed shelf supports keep the
shelves in place and do not allow the shelves
to rock or come off the supports. Simply
slide your shelves in and out of them.
Page 3
2022-Frameless Single cabinet Installation Instructions Page 3 of 5
Hints and Tips for a Great Installation
We use a one piece Blum concealed hinge with a built in Blumotion soft close option.
The hinges are installed in all the doors. Due to various sizes of cabinets and doors we
may ship the door separately from the cabinet to insure the door and hinges will arrive
intact and undamaged.
(Exception: Cabinets with slab MDF Doors which must be painted) If this is the cabinet
style you purchased the hinges are located in the hardware bag labeled “MDF Door”.
They only mount one way in the door. Then follow the mounting procedures above.
Figure E.
Figure F.
This white spacer
must remain on
the hinge for
door clearance.
Page 4
2022-Frameless Single cabinet Installation Instructions Page 4 of 5
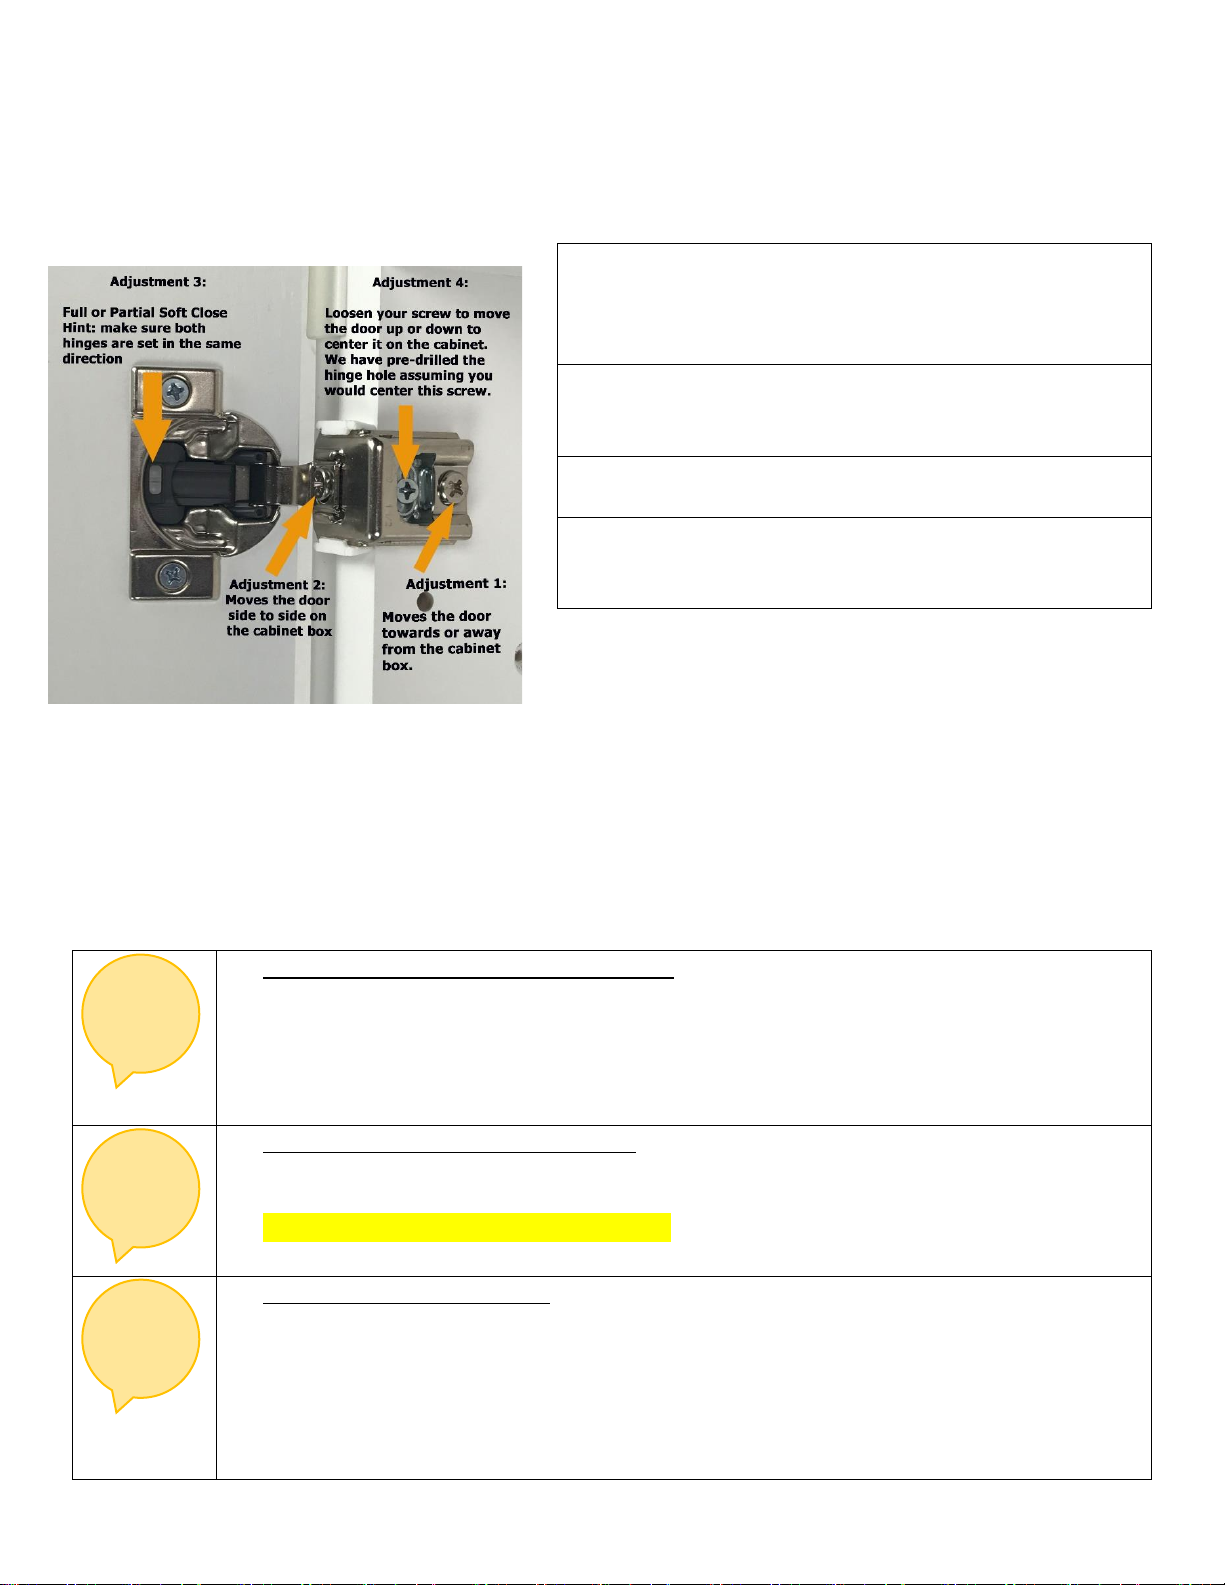
Hinge Adjustments
There are 4 adjustments on this hinge. See image below
Troubleshooting Tips
Occasionally, we have received customer concerns over doors that do not close properly or do not
close all the way. There are usually only about five reasons for a door to not close properly and we
have covered each one below.
Soft close hinges are incorrectly setup: There is a gray selector switch in the cup
of the hinge as illustrated in the picture above. This switch needs to be in the
same direction on both hinges. The switch is a mechanism for 75% closure speed
or 25% closure speed meaning it slows the door down when closing at 75% open
or 25% open. That is the point where the internal mechanism catches the doors
and slows down its closing process.
Hinge spacers have been removed: We use a white plastic hinge spacer on our
frameless cabinets. This spacer ensures that the hinges have enough clearance so
the edge of the door does not rub on the plastic trim surround of the cabinet box.
DO NOT REMOVE THESE SPACERS, they are there for a reason.
Walls are not perfectly flat: In most remodeling projects the beginning surface is
not perfectly flat or square despite how it may look. Thus, once the screws are
tightened into the side studs it can cause the cabinet box to be bowed or tweaked
that can also cause the door to not close properly. Check for plum(level) or square
of the installed cabinet. If either of these seem out of line Re-adjust the tension of
the mounting screws on the cabinet and or shim around the box to eliminate the
binding of the cabinet door.
Adjustment #1 - Use this screw to move the door
towards or away from the front of the cabinet box (to
close the gap between the door and the box). It will
only turn about ¼ turn either way.
Adjustment #2 – Use this screw to move the door
side to side. It will only turn about ¼ turn either
way.
Adjustment #3 – This switch is for full soft close or
partial soft close. See tips on last page.
Adjustment #4 – You can loosen your hinge
mounting screw and adjust the door slightly up or
down, then re-tighten the screw.
1
2
3
Page 5
2022-Frameless Single cabinet Installation Instructions Page 5 of 5
The door is warped: Solid wood doors do occasionally warp due to final drying of
the wood. There is a simple test you can perform to ensure that your door is not
warped. Remove the hinges by taking out the four screws holding them in. The
hinges will then just pull out (though they do fit in the holes tightly). Now lay the
door down face up on a flat surface such as a table or counter. If the door can
rock from corner to corner, it may be warped. 98% of doors will lay perfectly
flat. Push down on each corner. If the door rocks, check to see how much it is
coming up off the counter. Anything more than 1/8” is a warped door. Anything
less than 1/8” is within tolerances and is NOT warped.
Hinge manufacturing defects: All Blum hinges are manufactured to the highest
quality standard, and are the leader in the industry. However, occasionally we
have run across a hinge that something just wasn’t quite right on it. In these
instances, replacing the hinge took care of the problem. It is extremely rare to
have a defective hinge, but it can happen. If nothing else solves the problem, the
hinges could be at fault. Please call us for a replacement hinge.
Still have questions or need help?
Installation videos are on our website:
WGWoodProducts.com
Enter the link into your browser:
https://www.wgwoodproducts.com/store/agora.cgi?cartlink=Installation_Videos.htm
Or you can call us at 913-829-6000, enter 2 for installation help/assistance.
4
5
 Loading...