

Page 1
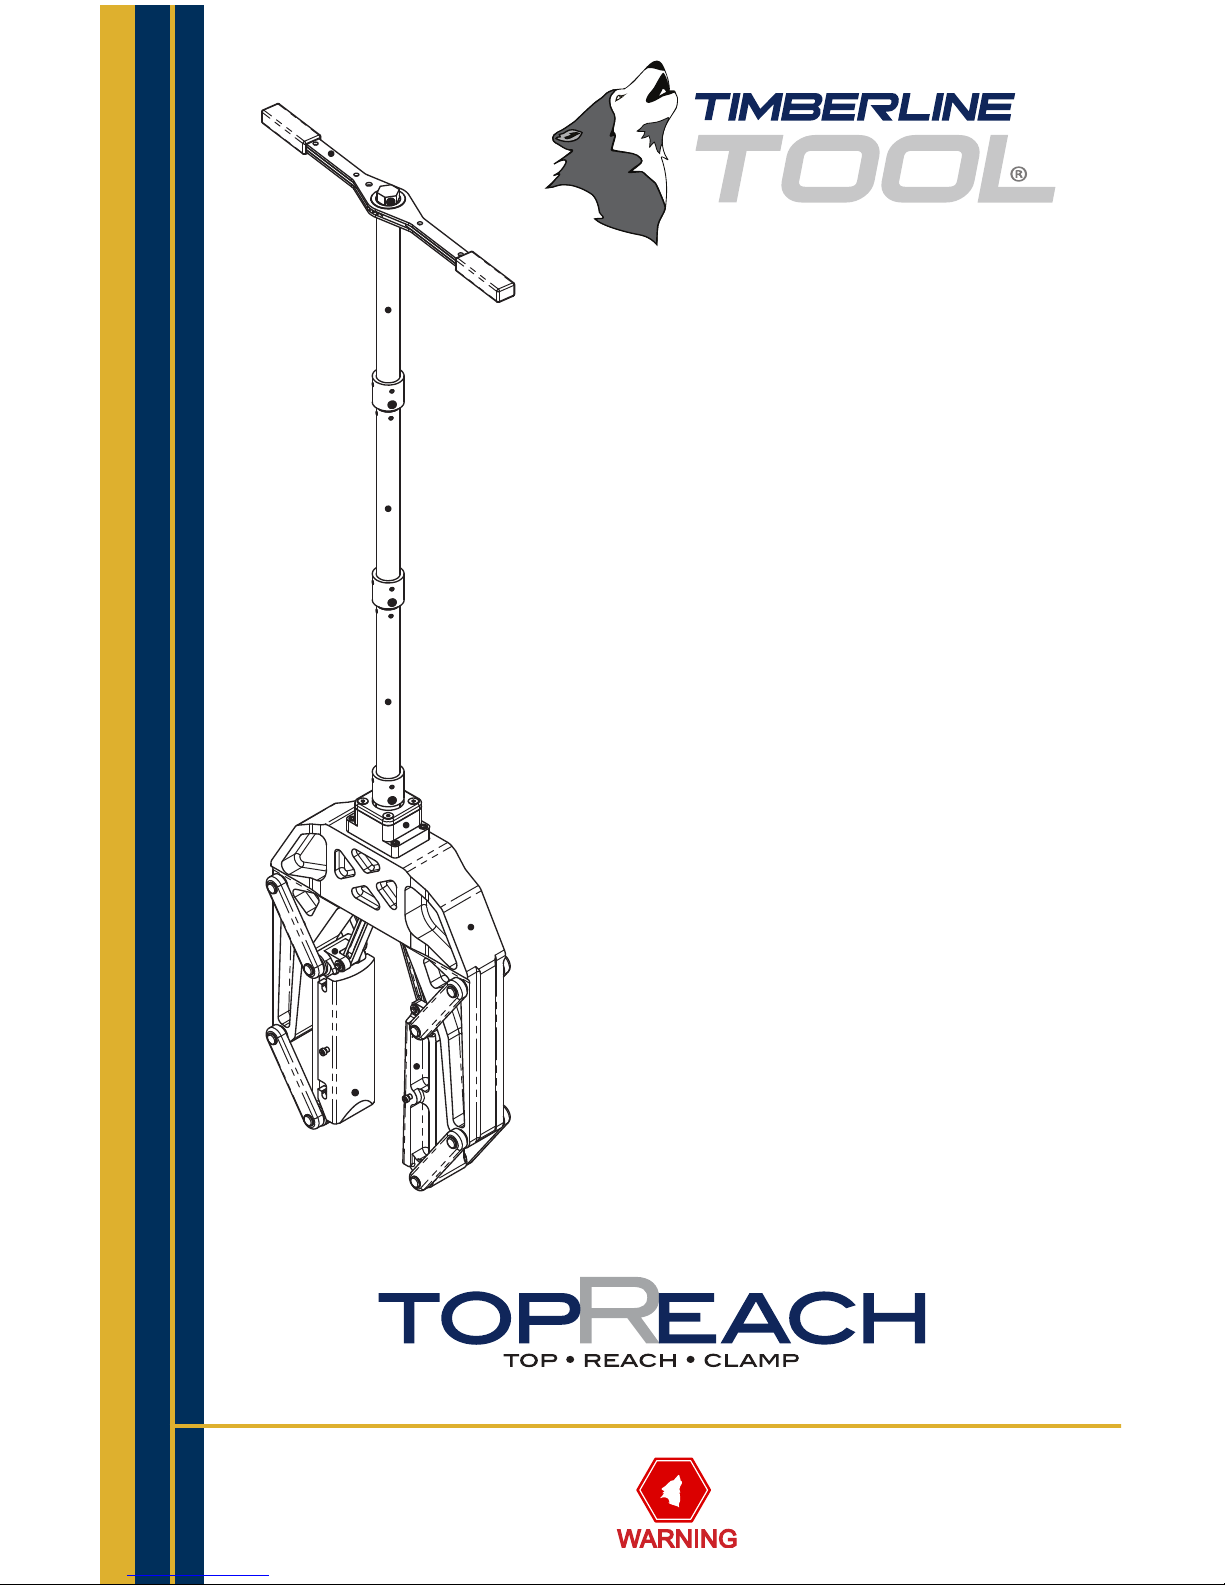
Instruction
Manual
Model TR650
TopReach Clamp
SAVE these instructions
for future reference.
For your personal safety
READ and UNDERSTAND
instructions before using tools.
Page 2
© 2008 Timberline Tool All Rights Reserved.
2
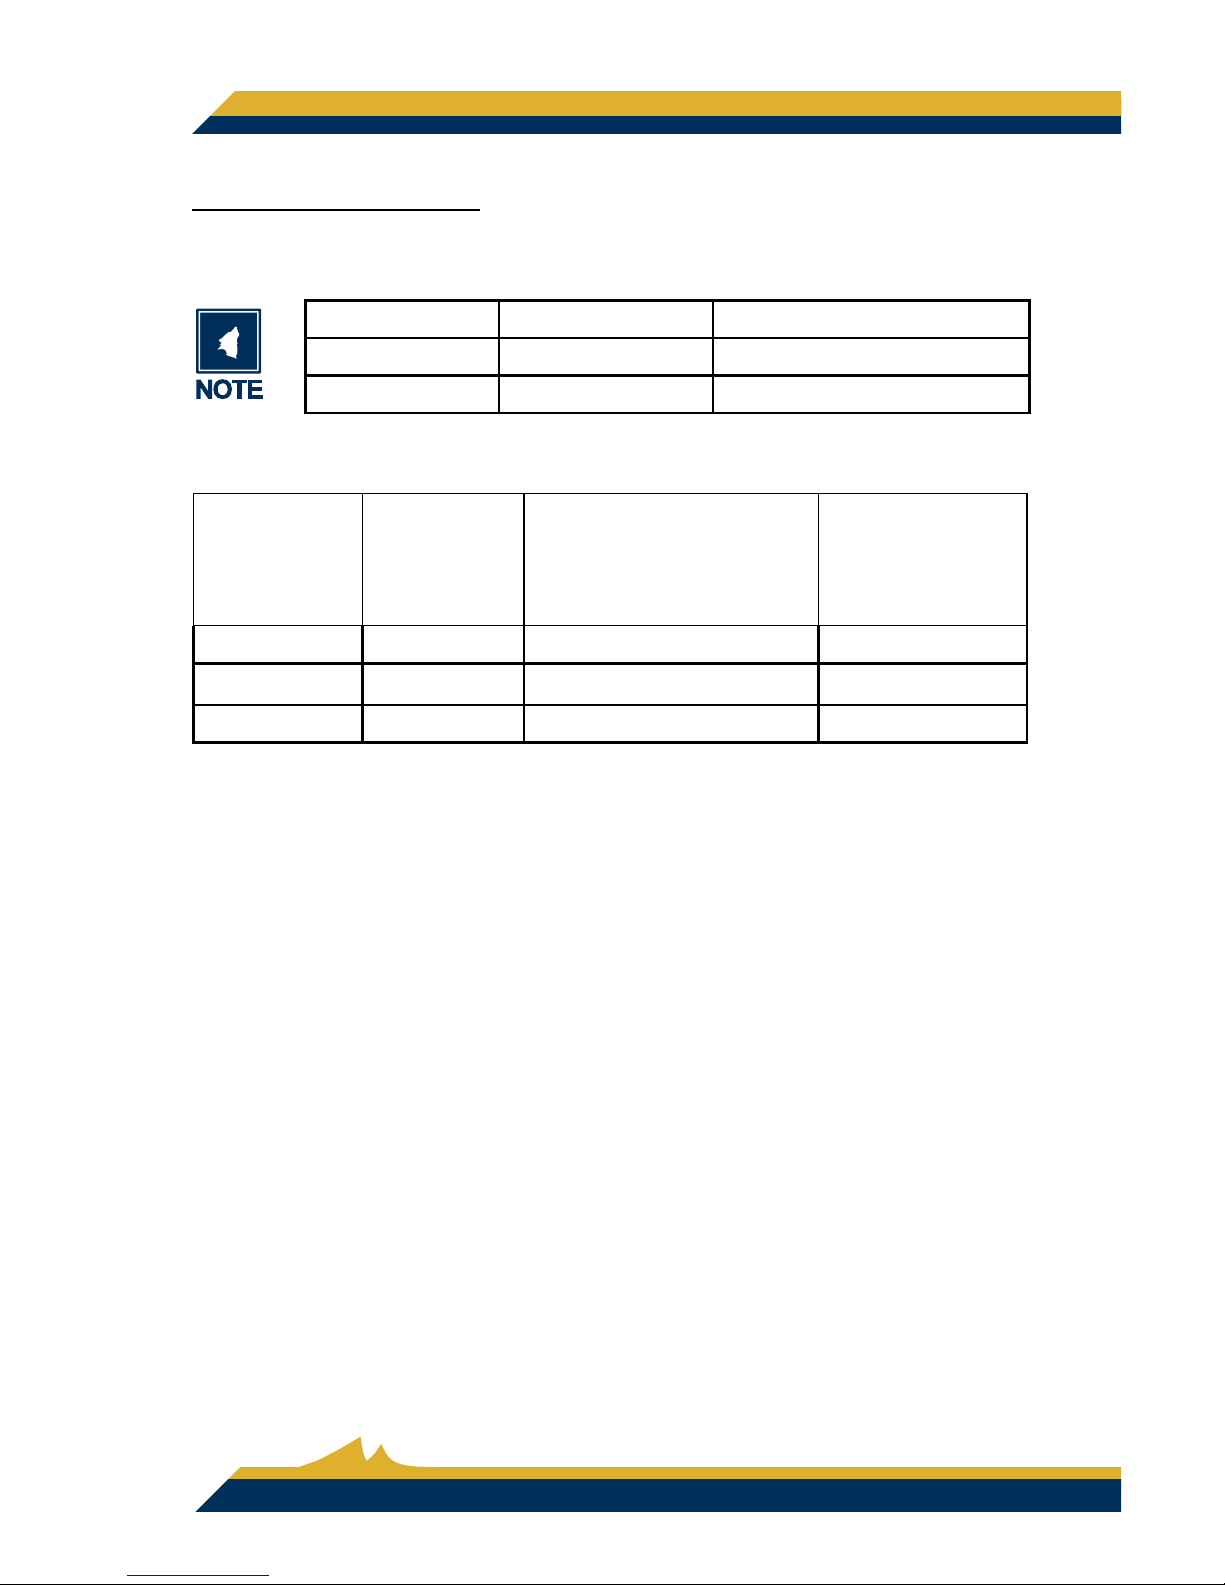
SPECIFICATIONS
Table 1 : Squeeze-o Tool for 2” to 4” (63mm - 126mm) PE Pipe *
Length: 6.5 ft ** 2.0 m **
Width: 17.8 in 45.1 cm
Weight: 60.0 lb 27.3 kg
Table 2 : Rate of Closure
Pipe Size
# of Revo-
lutions to
Close
Maximum # of
Revolutions per
minute to Close per
ASTM Specifi cations
Minimum Rev-
olution Period
in Seconds
3-Inch 34 11.0 5.5
4-Inch 39 9.5 6.4
6-Inch 48 8.0 7.5
* Manufacturer reserves the right to change specifi cations without notice
** Additional handle extensions may be added to increase the reach of the tool.
Page 3

GENERAL SAFETY RULES
For all Tools
READ and UNDERSTAND all instructions. Failure to follow all instructions listed
below may result in serious personal injury and/or damage to the tool.
The following ASTM standards provide guidance and requirements for squeeze-off
tools, operating procedures, and qualifi cation procedures.
• ASTM F1041, “Standard Guide for Squeeze-off of Polyolefi n Gas Pressure
Pipe and Tubing”
• ASTM F1563, “Standard Specifi cation for Tools to Squeeze-Off Polyethylene
(PE) Gas Pipe or Tubing”
• ASTM F1734, “Standard Practice for Qualifi cation of a Combination of Squeeze
Tool, Pipe, and Squeeze-Off Procedures to Avoid Long-Term Damage in Polyethylene (PE) Gas Pipe”
* The SDR is the ratio of pipe diameter to wall thickness. SDR can be be expressed
as SDR = D/s where D = pipe outside diameter and s = pipe wall thickness.
TIMBERLINE TR650
3
INTRODUCTION
Timberline squeeze-off tools are designed to temporarily stop the pressurized fl ow of
liquid or gas in polyethylene (PE) pipe.
Squeeze-off is a technique used to control the fl ow of gas or liquid in polyethylene
pipe by compressing the pipe between parallel bars until the inside surfaces make
contact. The fl exibility and toughness of most polyethylene pipes allow the pipe to
recover from a properly made squeeze-off without a measurable loss in service life.
Squeeze-off is useful for making installation tie-ins and emergency repairs.
Timberline squeeze-off tools are made from high strength aluminum for superior
durability and will not bend or break under normal use. However, care must be taken
to ensure that the pipe is free of foreign material and the slap on jaw matches the
diameter and wall thickness / SDR of the pipe to be squeezed. *
Please read the following suggested procedure for squeezing off polyethylene plastic
pipe using Timberline Squeeze-off Tools.
Page 4
© 2008 Timberline Tool All Rights Reserved.
4
SAFETY INSTRUCTIONS
SAVE THESE FOR FUTURE REFERENCE
Static Electricity Safety
Use a proper grounding rod at all times to insure personal safety.
PE pipe is a relatively low conductor of electricity. As a result PE
pipe does build up a static charge when it is in gas service due to
the gas fl ow on the inside of the pipe. During squeeze-off a larger amount of static
charge builds up.
In addition to the potential for pipe damage due to static discharge, the build up
of a static charge represents an ignition source. Timberline Tool recommends
that you follow all of your company grounding techniques and that all personnel
involved in squeeze-off operations receive training on those grounding procedures
so that they understand the hazards involved.
Wor kp la ce Safe ty
Prior to using any squeeze-off tool, consult ASTM Standards F104102, F1563-01 and F1734-03.
Always follow applicable company and OSHA safety procedures.
Observe pipe manufacturers’ recommendations and precautions for squeeze-off of
polyethylene pipe, exercising particular caution when leaking gas is present.
Safety fi rst. Timberline squeeze-off tools must be used by qualifi ed, trained per-
sonnel only and must never be left on the pipe unattended. Refer to pipe manufacturers’ recommendations for locating squeeze-off distances from fi ttings and joints.
Personal Safety
Stay Alert, watch what you are doing, and do not use tools while
tired or under the infl uence of narcotics, alcohol, or medication.
Use proper clothing, eye protection, and safety equipment when
using squeeze-tools.
A moment of inattention while operating squeeze-off tools may result in personal injury.
Store idle tools out of reach of children and other untrained persons.
Page 5

TIMBERLINE TR650
5
Speci c Tool Safety
If you have used other Timberline products please be aware that the
operation of this tool may differ from others and that you may need
to follow different rules. Always consult the manual to insure you are
following the correct safety instructions to avoid personal injury.
Tool Usage Safety
Do not force the tool to perform a squeeze-off. The tool will operate safer and better if the rate of squeeze in these instructions is followed.
Maintain the tool with care. A properly maintained tool will be less likely to cause
damage and is easier to control.
Check for misalignment, binding of parts, breakage of parts, and other conditions
that might affect the operation of the tool. Accidents may be caused by improperly
maintained tools.
Always use the Timberline TR650 with the grounding rod inserted in the ground
when working with natural gas, or any other fl ammable substance.
Use only the accessories, slap-on jaws, or extension handles that correspond to
your product. Accessories specifi c for one tool may be hazardous if used on a dif-
ferent tool.
Failure to use the TR650 in the manner specifi ed in this manual may result in injury
and/or permanent damage to the tool.
This tool complies with ASTM F1563-01.
Always make sure to use the slap-on jaw that corresponds to the
pipe size and SDR or wall thickness of the pipe to be squeezed-off.
Tool Service Safety
Tool service must only be performed by qualifi ed repair personnel.
Service or maintenance performed by unqualifi ed personnel could
result in a risk of injury.
Page 6
© 2008 Timberline Tool All Rights Reserved.
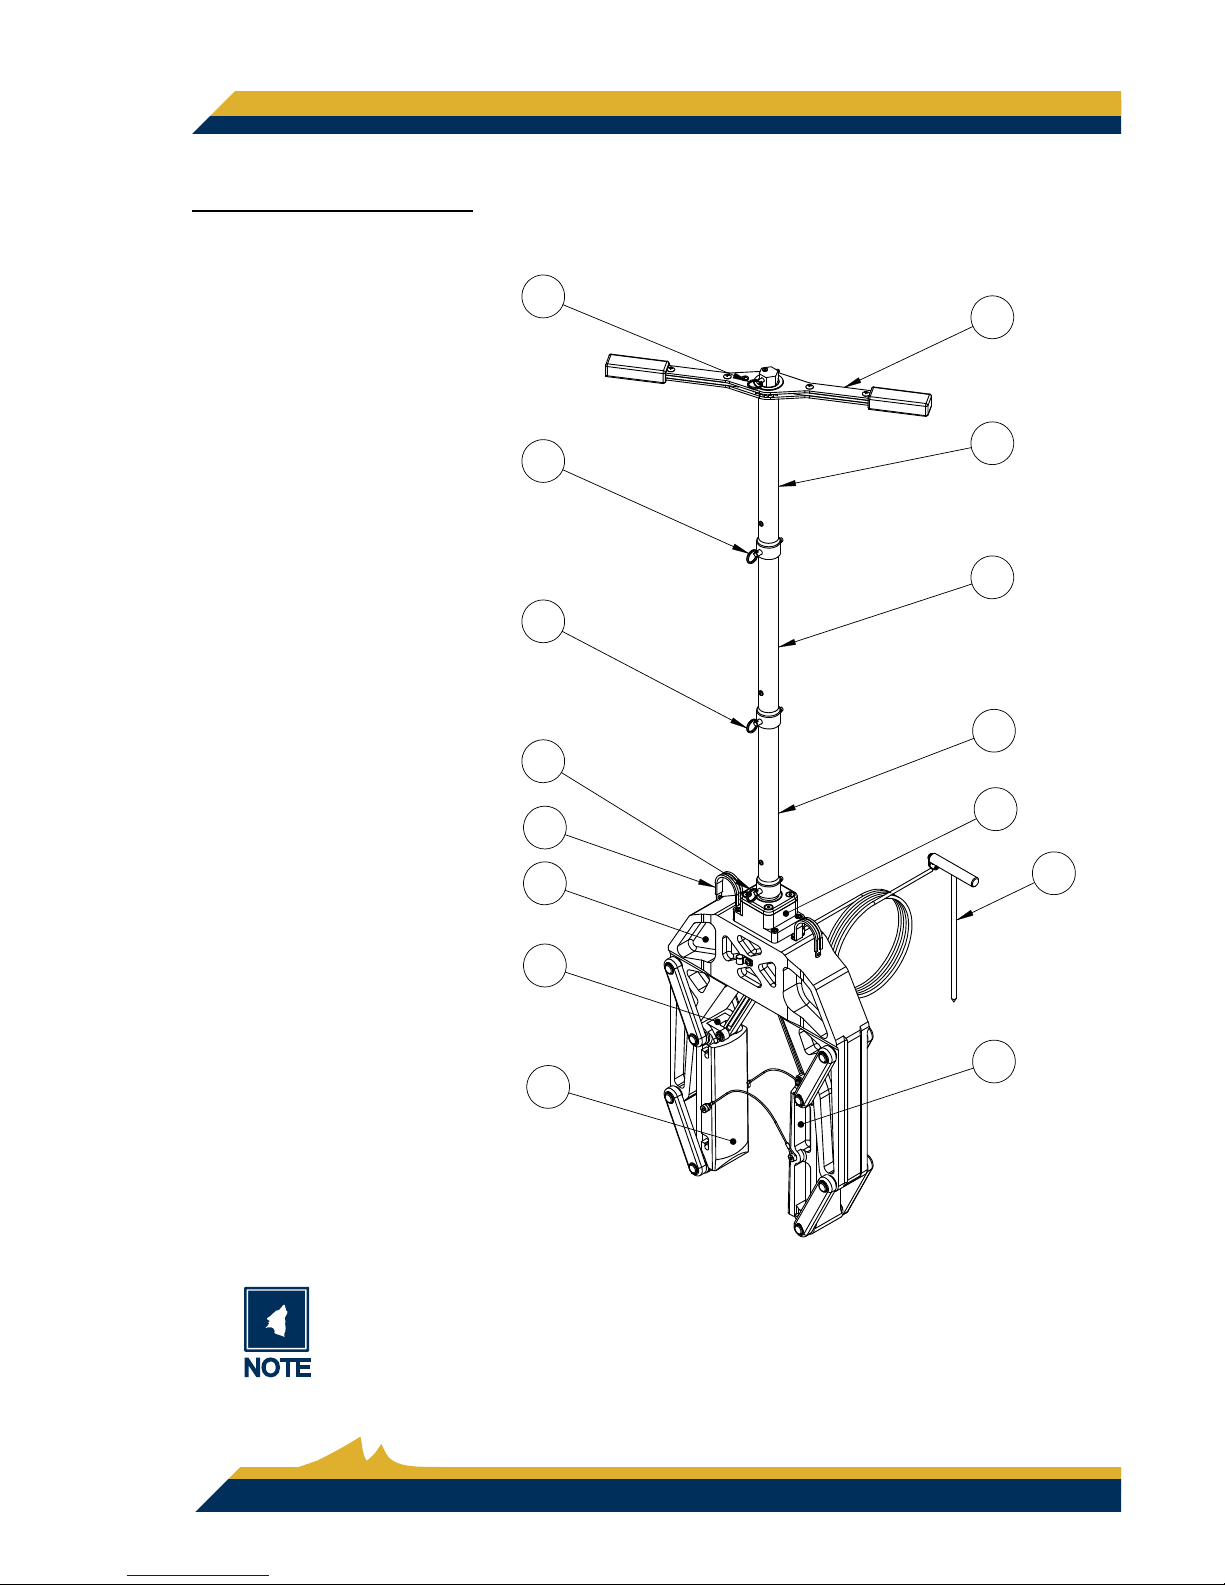
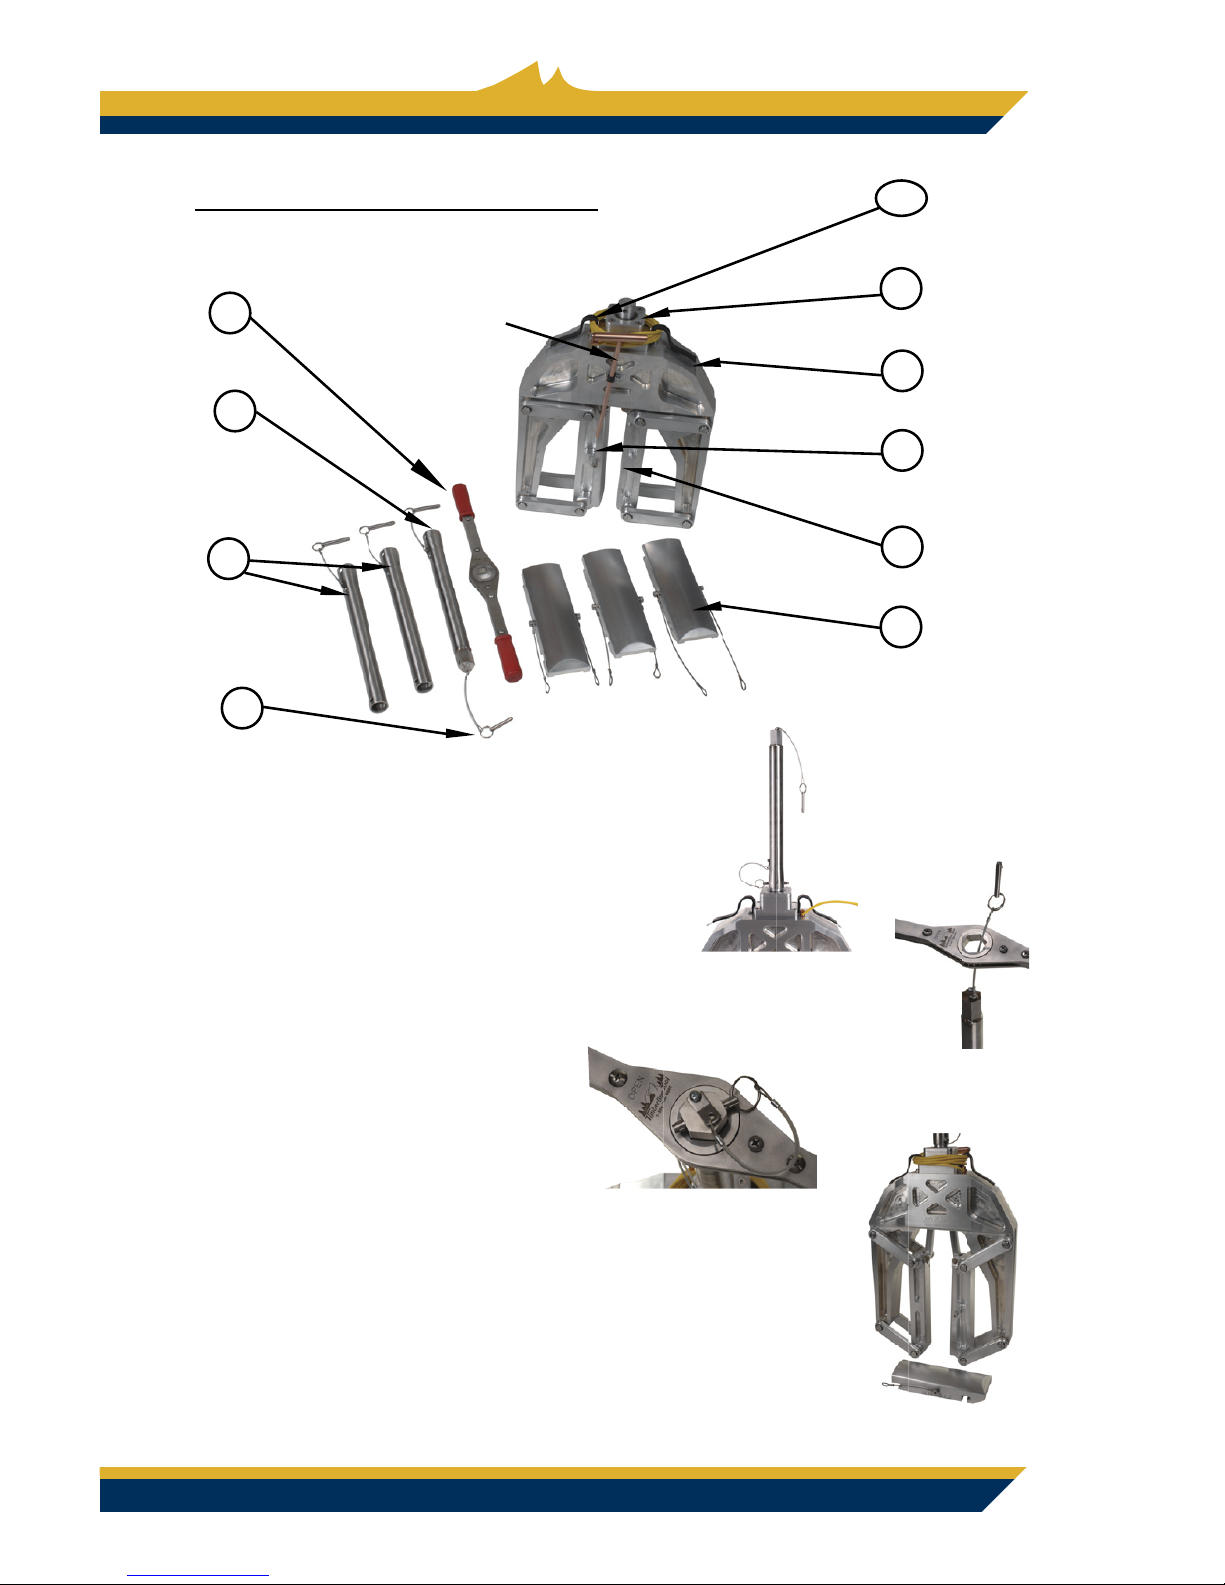
TR650 DIAGRAM
A1 – Ratchet Handle
A2 – Top Extension
A3 – Bottom Extensions
A4 – Quick Release Pins on Lanyards
(lanyards not shown)
B5 – Bearing House
B6 – Yoke
B7 – Slap-On Jaw Post
B8 – Fixed Jaw Post
B9 – Slap-On Jaw (2 cables attached)
B10 – Ground Rod Strap Holder
Familiarize yourself with all parts, names, and numbers. Refer to this
diagram for the assembly and operation procedures that follow.
&
$
$
$
%
$
$
$
%
$
%
$
%
%
%
6
Page 7
ASSEMBLY PROCEDURE
Remove parts A1-A4, B6, and B9 from the case.
1. Attach the Top Hex Head Extension with the
Quick Release Pin.
(Fig 1)
2. Thread the Quick Release Pin through the
Ratchet Handle, making sure “OPEN” is up.
(Fig 2)
3. The Quick Release Pin secures
the Ratchet Handle.
(Fig 3)
4. Turn the Ratchet Handle counterclockwise
until the tool is halfway open (approximately
three inches).
(Fig 4)
TIMBERLINE TR650
7
e
Fig 1
Fig 3
Fig 2
Fig 4
A1
A2
A3
A4
B5
B6
B7
B8
B9
B10
Handle
Bearing House
Yoke
Slap-On Jaw
Post
Fixed Jaw
Slap-On Jaw
Ground Rod
Strap Holder
Grounding
Rod
To p
Extension
Bottom
Extensions
Quick Release
Pins on Lanyards
Page 8
© 2008 Timberline Tool All Rights Reserved.
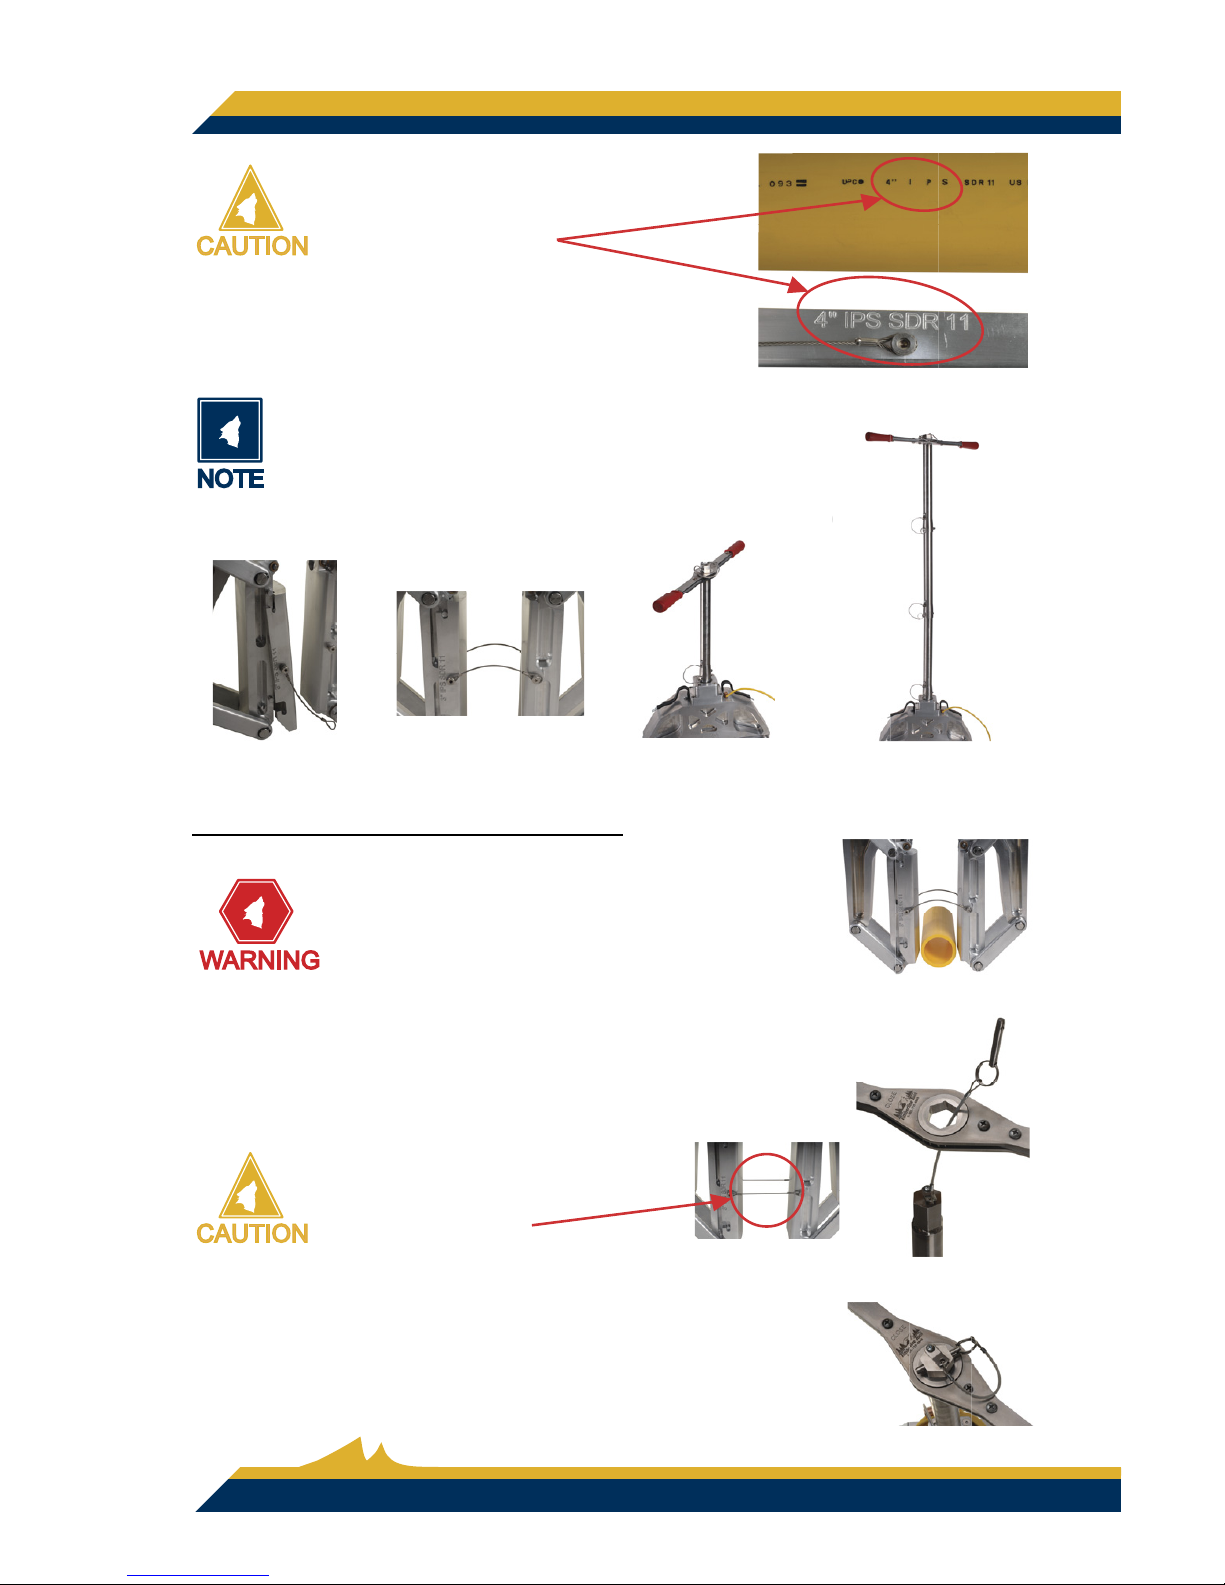
Make sure the Slap-On Jaw matches
the diameter and SDR of the pipe to be
squeezed-off.
(Fig 5)
5. Attach the Slap-On Jaw. (Fig 6)
6. Attach both cables to the Fixed Jaw. (Fig 7)
The tool can be operated with the Ratchet Handle
and Top Hex Head Extension only.
(Fig 8)
7. If you need more length add the Bottom Extensions. (Fig 9)
OPERATING PROCEDURE
Remember this is only a recommended procedure for a safe and effective squeeze-off.
Always follow your specifi c company safety
rules when working around natural gas.
1. Ground the tool with the grounding rod.
2. Open the TR650 just enough to fi t over the pipe. The
cables will not be tight.
(Fig 10)
If the cables are tightened and the
clamp is dropped on the pipe the
cables will break.
3. Make sure the pipe clear of any debris (rock, dirt, etc).
4. Remove the Ratchet Handle - turn it over so that “CLOSE” is up.
(Fig 11)
5. Reattach the Ratchet Handle with the pin. (Fig 12).
8
Fig 8
Extension
s
Fig 5
Fig 6 Fig 7
Fig 9
Fig 10
Fig 11
Fig 12
Page 9
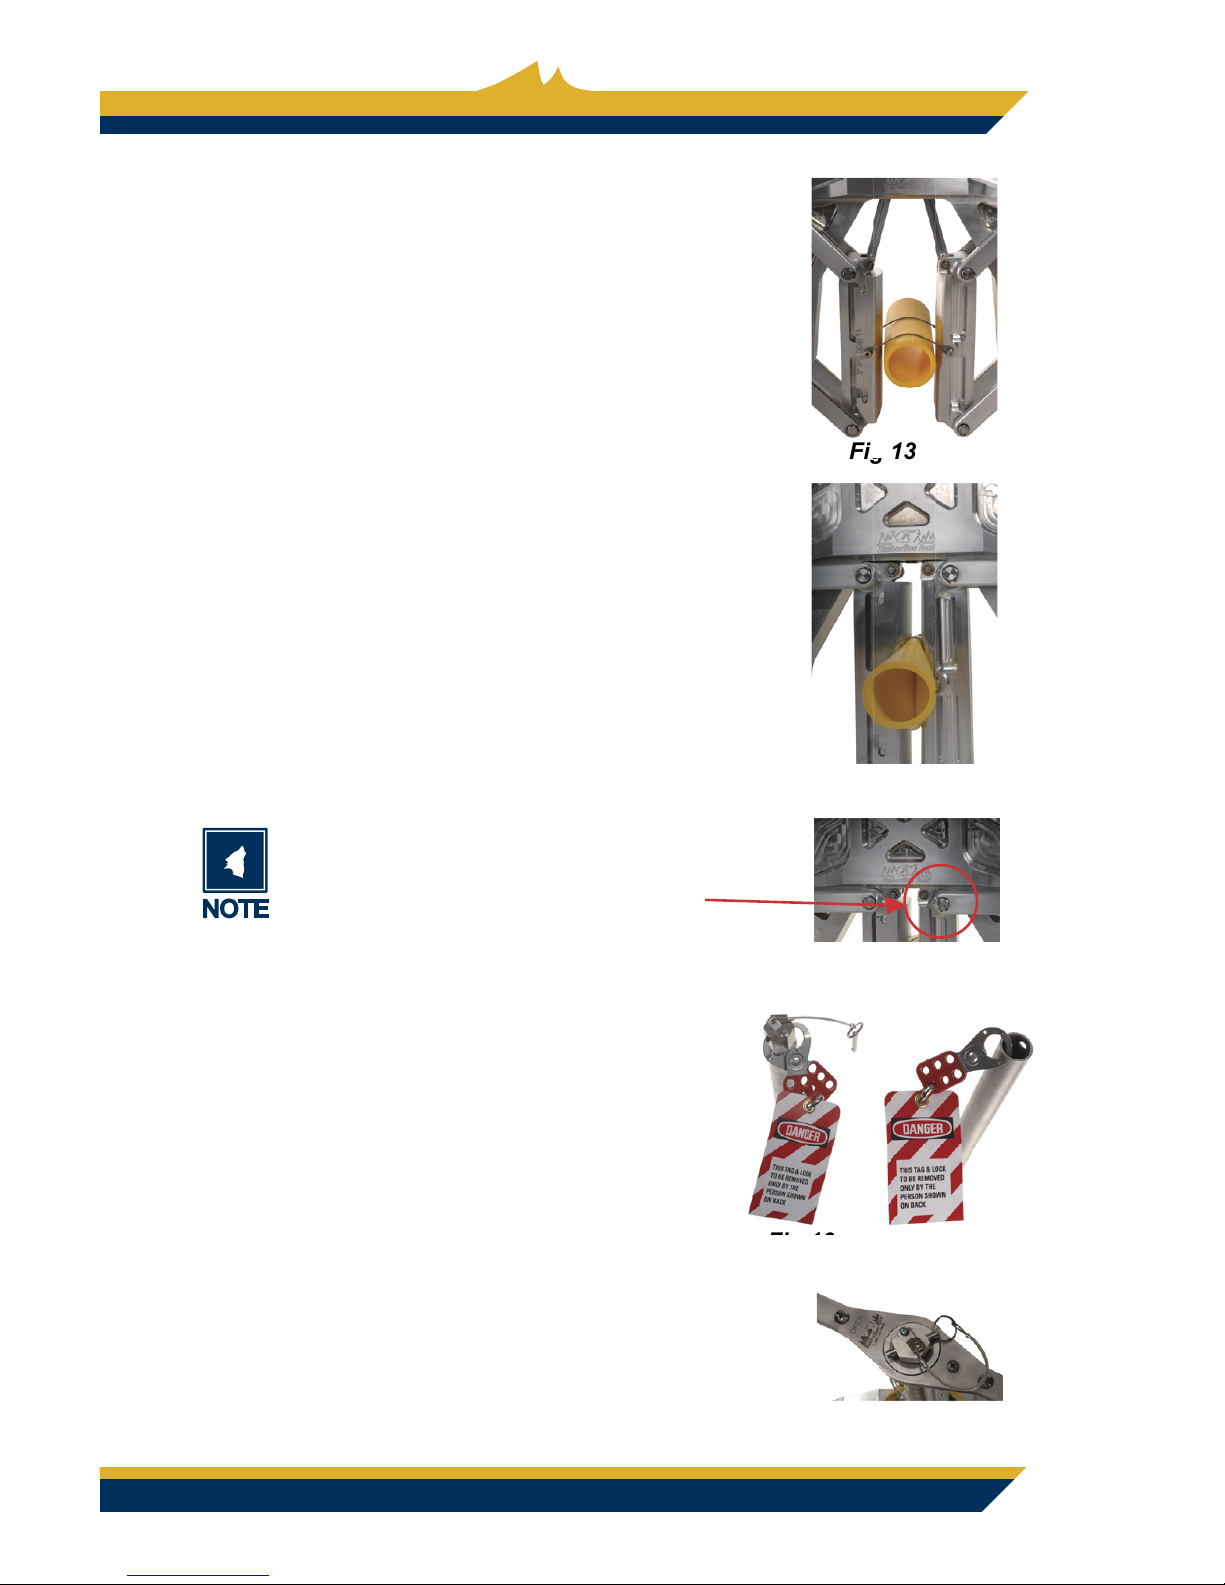
6. Lower the TR650 onto the pipe until both cables
are resting on the pipe. Keep the tool perpendicular to the pipe during squeeze off.
(Fig 13)
7. Turn the Ratchet Handle clockwise until the pipe
is squeezed-off. The table on page 2 shows
the rate of closure and number of revolutions to
complete the squeeze-off procedure per ASTM
specifi cations.
(Fig 14)
Complete squeeze-off will be evident when you
will feel the tool hit its mechanical stops and the
top of the posts contact the yoke.
(Fig 15)
8. To prevent accidental release of the tool during
service operations on the pipe, remove the
Ratchet Handle. A padlock or lock-out/tag-out
may be placed through the Top Hex Head to
further prevent accidental release.
(Fig 16)
9. A padlock or lock-out/tag-out may be placed
through the Bottom Extensions.
(Fig 17)
10. When removing the tool from the pipe, attach the
Ratchet Handle making sure “OPEN” is up. Turn
the Ratchet Handle counterclockwise at half the
closing rate per ATSM Specifi cations.
(Fig 18)
Fig 13
TIMBERLINE TR650
9
Fig 14
Fig 15
Fig 16
Fig 17
Fig 18
Page 10
© 2008 Timberline Tool All Rights Reserved.
10
ACCESSORIES
Any accessories or attachments recommended for use with your
Timberline Tool are specifi ed in this manual. The use of any other
accessories or attachments might present a risk of injury. Only
use accessories or attachments for the stated purpose.
SERVICE
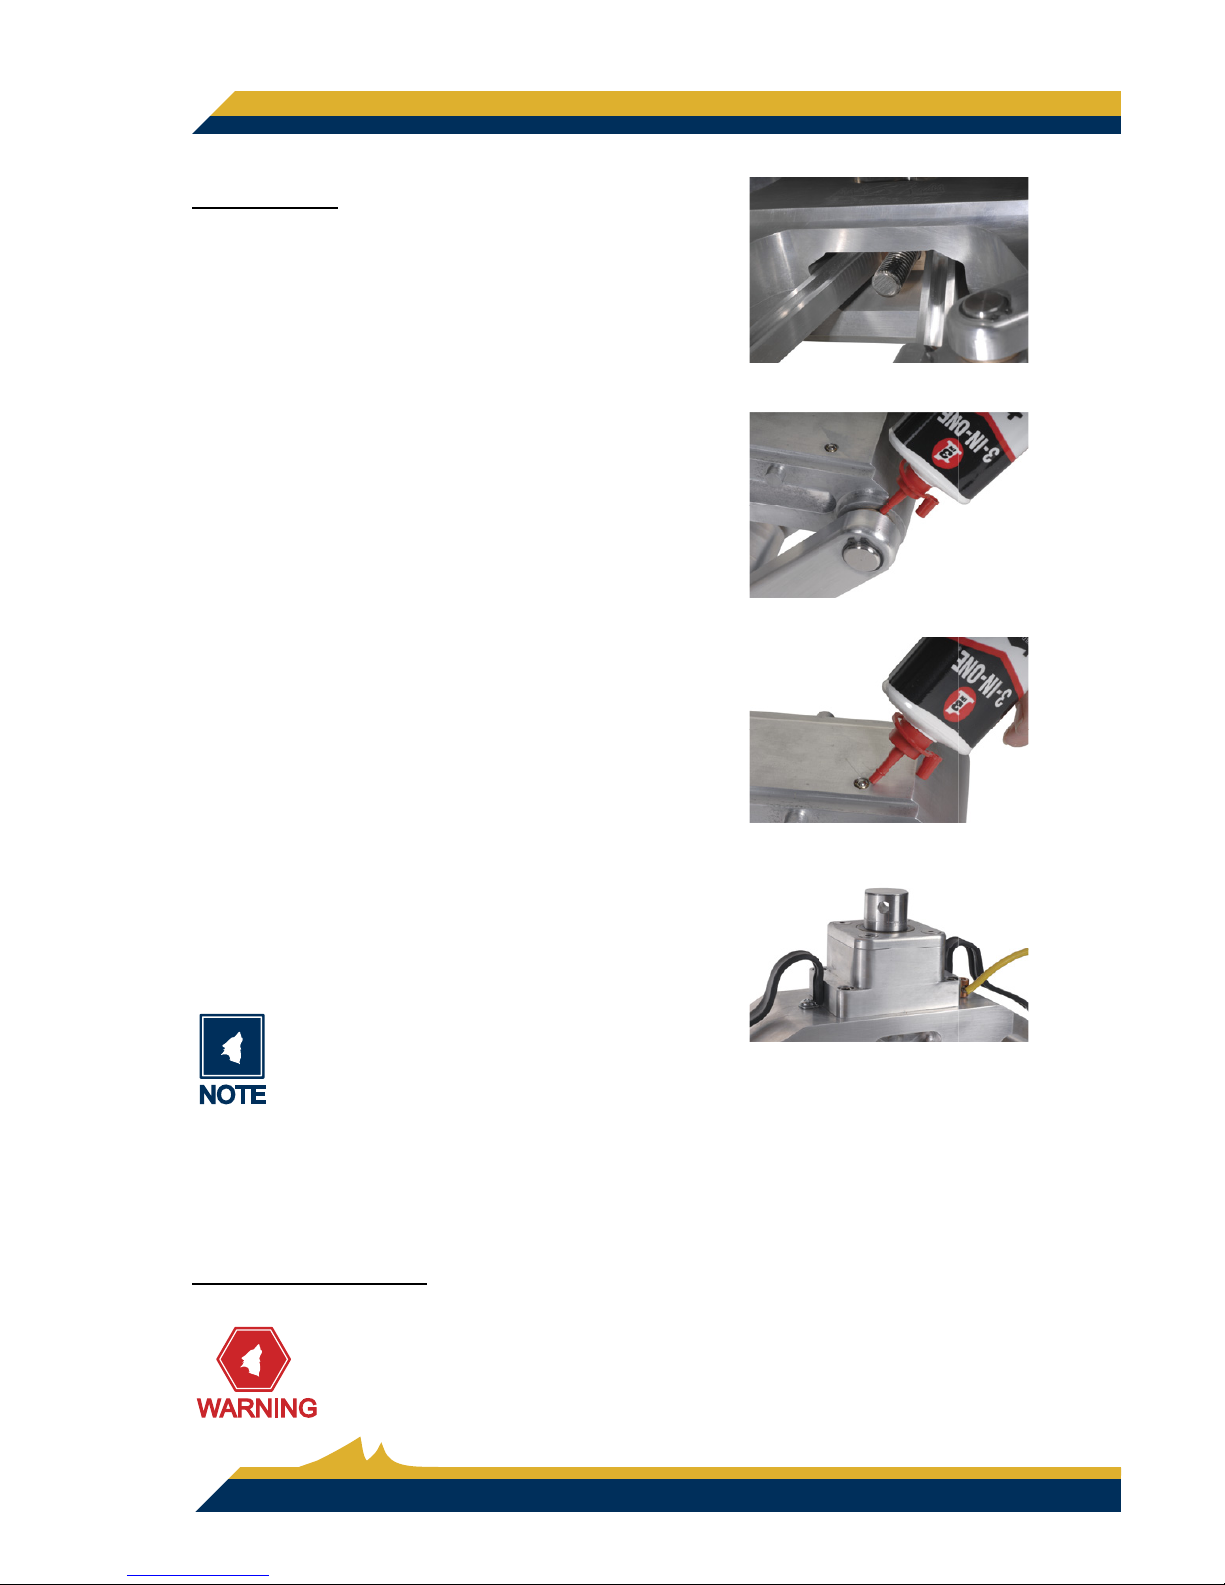
After every ten uses:
1. Apply a small amount of grease to the ACME
thread.
(Fig 19)
2. Lubricate the pins and bushings with light oil if
it is diffi cult to open and close the tool.
(Fig 20)
3. Use a small amount of light lubricating oil in the
ball-nose spring plungers located on the slapon jaw post.
(Fig 21)
4. The bearing house is sealed and additional
lubrication is not necessary.
(Fig 22)
If you have questions, please feel free to
contact our customer service representatives at 1-800-735-6845 or by email at
[email protected].
Fig 19
Fig 20
Fig 21
Fig 22
Page 11

TIMBERLINE TR650
11
TIMBERLINE LIMITED WARRANTY
War ra nt y Poli cy
Every product manufactured by Timberline Tool is thoroughly inspected and tested before
leaving the factory. Our products are warranted to be free of defects from workmanship
and materials for the period of ONE YEAR from the date of original purchase. Should any
trouble develop with our tools, handles, or accessories during this one-year period please
call 800.735.6845 to obtain return authorization for repair. If inspection shows the trouble
is caused by defective workmanship or material, Timberline Tool will repair or, at our option,
replace the product without charge.
This Warranty does not apply where:
• repairs have been made or attempted by others.
• repairs are required because of normal wear and tear.
• the tool has been abused, misused, or improperly maintained.
• alterations have been made to the tool.
IN NO EVENT SHALL TIMBERLINE TOOL BE LIABLE FOR ANY INDIRECT, INCIDENTAL
OR CONSEQUENTIAL DAMAGES FROM THE SALE OR USE OF THE PRODUCT. THIS
DISCLAIMER APPLIES BOTH DURING AND AFTER THE TERM OF THIS WARRANTY.
TIMBERLINE TOOL DISCLAIMS LIABILITY FOR ANY IMPLIED WARRANTIES, INCLUDING IMPLIED WARRANTIES OF “MERCHANTABILITY” AND “FITNESS FOR A SPECIFIC
PURPOSE,” AFTER THE ONE-YEAR TERM OF THIS WARRANTY.
This Warranty gives you specifi c legal rights, and you may also have other rights which
vary from state to state. Some states do not allow the exclusion or limitation of incidental or
consequential damages, so the above limitation or exclusion may not apply to you. Some
states do not allow limitation on how long an implied warranty lasts, so the above limitation
may not apply to you.
Page 12

(406)755-4258
(406)257-2711
www.timberlinetool.com
90 Conesto
g
a Ct. Kalispell, MT 59901 USA
 Loading...