

Timberline archery NO-PEEP User Manual
OWNER'S
MANUAL
The No-Peep will improve form and accuracy because it
points out bow torque, change in hand placement, and
tension in your body that causes target panic and punching a release.
NO-PEEP
TIMBERLINE
ARCHERY
PRODUCTS
OWNER'S MANUAL
Congratulations on your purchase of Timberline Archery
Product's No-Peep. The No-Peep is an eye alignment
device. Align the dot inside the circle and your eye will be
in the exact same position every time. Your eye becomes
the rear sight instead of needing something like a peep
sight. You will find the No-Peep will improve your accuracy under a number of conditions.
SHOOTING IN LOW LIGHT CONDITIONS
A peep sight reduces the amount of light that reaches
your eye. Less light means less visibility of the target and
reduced accuracy. The No-Peep makes it easy to shoot
with both eyes open. That improves your vision so you
can see the line of the heart shot on a target or pick a spot
on an animal in low light. The better you can see the
target the more accurate you will shoot.
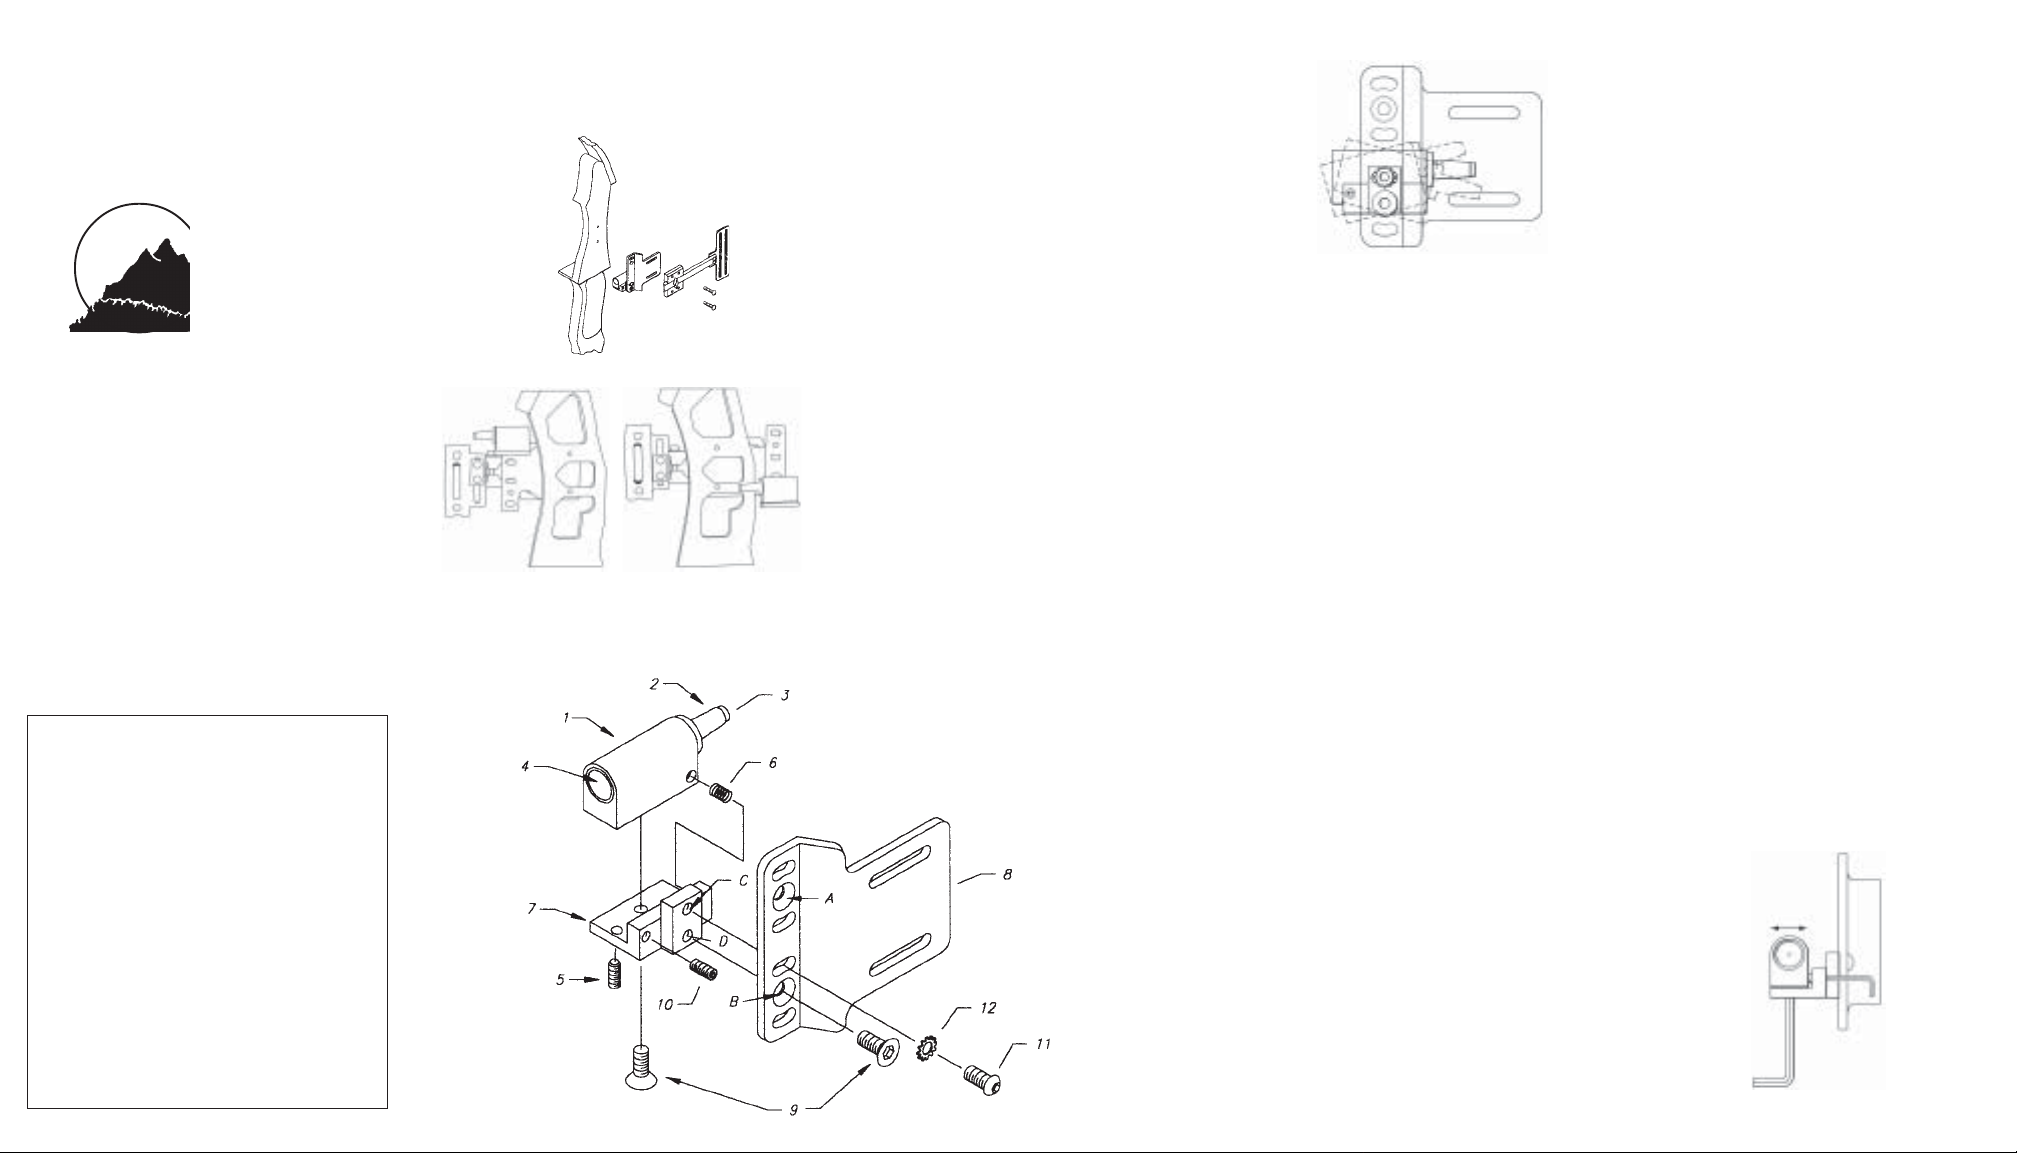
NO-PEEP PARTS LIST
1. Body
2. Fiber Holder
3. Fiber
4. Lens
5. 10-32 x 3/16” set screw
6. Tension Spring
7. Mounting Bracket
8. Angle Bracket
9. 8-32 x 5/16” Flat Head Cap Screw
10. 6-40 x 1/4” Set Screw
11. 8-32 x 3/8” Button Head Cap Screw
12. #8 External Tooth Washer
NOTE - Screw #9 can go through hole A or B and
then into either holes C or D of the mounting
bracket. Screw #11 can go through the slot on
either side of hole A or B.
12345
Fig. 2
The No-Peep may be mounted either above or below your
sight pins. It may be mounted between you and the riser or
the sight and riser.
IMPROVE YOUR FORM
Fig. 1
Fig. 3
INSTALLING THE NO-PEEP
1. We recommend removing your peep sight before
you install the No-Peep. You can keep it on and try to
align the No-Peep so your anchor will be the same.
There will be some changes though because you will
be looking to the side of your string instead of through
your string. In addition, we have found that a lot of
people have their anchor point based on peep sight
location rather than a consistent point they can feel on
their face. You can reduce the string tension in a bow
press to remove the peep. If you do not have a bow
press, you can take an object, like a pen, and force it
between the strands of the string separated by the
peep. That will take the pressure off the peep so you
can slip it out of the string. Then pull the pen out of the
string. You may need to back out your limb bolts to
reduce string tension.
2. Mount the No-Peep angle bracket under your sight
(fig. 1). The 10-24 thread screws that attached your
sight to your bow may not be long enough with the
addition of the No-Peep angle bracket. There are
extra long 10-24 flat head screws included with your
No-Peep angle bracket. Use these if necessary. You
may also mount the No-Peep out the side of the bow
away from you. (fig 2) Sometimes you have to mount
it out that side because of the location of your cable
guard or other accessories. Some people like it out
this side because it puts it closer to the sight pins so
it is easier to focus on both at the same time. The angle
bracket has slots to adjust how far the No-Peep is from
your bow. Secure it close to the bow. You should leave
about 1/16” - 1/8” between the angle bracket and the
bow riser or you may get vibrations between them.
Tip - The No-Peep angle bracket may slip between the
sight and riser on high vibration bows. Put some
contact cement on the angle bracket where it contacts
the bow. Not only will that keep it from moving, but you
can remove your sight to get at the No-Peep adjusting
screws if necessary.
3. Left hand assembly - You just flip the No-Peep
over and reverse the instructions. It may look different, but functions the same.
4. Attaching the No-Peep to the angle bracket There are 4 mounting locations for the No-Peep on the
angle bracket (fig 3). You can mount the No-Peep
either above or below your sight pins. If you have a low
anchor point, like under your chin, your sight pins will
be high in your sight window so you have to mount the
No-Peep under your pins. If you have a high anchor
point, like the corner of your mouth, your sight pins will
be low in the sight window so you have to mount the
No-Peep above your sight pins. Attach the No-Peep
mounting bracket to the angle bracket with the 8-32 x
5/16” flat head and 8-32 x 3/8” button head screws.
The external tooth washer goes on the button head
screw (fig 3). The flat head screw goes through either
the A or B countersunk hole and into either hole C or
D of the mounting bracket. The button head screw
goes through any of the 4 slotted holes and into either
C or D holes of the mounting bracket (fig 3). Make sure
you mount the No-Peep so it does not block your
longer distance sight pins or you will have to move it
when you sight in.
Tip - Mounting the No-Peep so the light gathering
fiber is close to the riser or accessories may reduce
the brightness because the skylight can’t reach the
fiber. It is best to mount the No-Peep out the side of
the bow away from the shooter if it is mounted in the
upper position. (fig 2)
Fig. 4
ADJUSTING THE NO-PEEP
There are 2 adjustments for the No-Peep. The NoPeep rotates up and down on the angle and mounting
brackets for the vertical adjustment (fig 4) and rotates
left and right on the mounting bracket for horizontal
adjustment. (fig 5) The No-Peep does not have to align
with your sight pins, arrow, or anything else. It rotates
until the dot is inside the green circle.
1. Rough Adjustment You need to get the No-Peep
close before you do the final small adjustments. It will
take several small adjustments to get you close to the
final adjustments. You will get a feel for how sensitive
the No-Peep is and how far you need to move it. Adjust
the No-Peep vertically first. Slightly loosen the flat
head and button head screws that attach the mounting
bracket to the angle bracket. Loosen them so you can
rotate the No-Peep but it will not move on its own.( Fig.
4) Draw your bow to your anchor point. Then move
your head until the dot is in the green circle. Move
your head, not the bow. Then go back to your anchor
point. You will have to rotate the No-Peep vertically
the same direction that you had to move your head to
get back to your anchor point. For example, if you had
to move your head up to get back to your anchor point
you will have to rotate the No-Peep up. Picture a line
from the No-Peep to your eye. Picture the direction
that line will move when you rotate the No-Peep. That
will help you to remember which way to move it. Adjust
the No-Peep so the dot will be slightly below or in the
bottom of the green circle. You will use the bottom set
screw in the final adjustment to move the dot up into
the center of the green circle. The No-Peep is very
sensitive. Raising the front of the No-Peep by only
1/32” or rotating it 2 degrees will change your anchor
by about 3/4”. You may have to also rough in the
Fig. 5

No-Peep horizontally to be able to tell the dot is below
the center of the green circle. Slightly loosen the flat
head screw on the bottom of the mounting bracket.
Then turn the set screw on the side of the mounting
bracket to rotate the No-Peep left or right. (Fig. 5)
Rotate the No-Peep the direction you have to move
your head to get back to your anchor. Tighten the
screws that attach the No-Peep to the angle bracket
after you have the dot below the center of the green
circle. Tighten the button head with the tooth washer
first. The No-Peep might rotate if you tighten the flat
head screw first. To keep the No-Peep from rotating
NOTE: It makes no difference if you look to the left or
right of the string. It all depends on your anchor point
and what makes you comfortable.
The correct adjustment should have the dot centered
in the green circle when you are at your anchor point
and you should have the string close to your sight
pins or No-Peep in your peripheral vision. Your string
will give you another alignment or reference. You
should be able to draw your bow with your eyes close
and the dot should be inside the green circle when
you open your eyes. Adjust the No-Peep until the dot
is in the circle when you open your eyes.
snug up the button head screw. Then snug up the flat
head screws. Then go back and tighten them the rest
of the way.
Tip - Make sure your allen wrench is not rounded.
That will round the sides of the sockets on the screws
so you can’t loosen or tighten them. Grind down the
end of your allen wrench if the edges aren’t flat.
2. Final Adjustment First adjust the No-Peep horizontally. Loosen the flat head screw on the bottom of
the No-Peep mounting bracket. Make sure the set
screw on the bottom of the mounting bracket is backed
out so it is not pushing against the No-Peep body.
The No-Peep will be hard to adjust horizontally if the
bottom set screw is digging into the body. Adjust the
No-Peep horizontally by turning the side set
screw.(Fig. 5) NOTE: There is a certain amount of
tolerance in the screw hole and threads of the flat
head locking screw. The No-Peep will change slightly
when you tighten the flat head screw. The more you
loosen it while adjusting the more it will change when
you tighten it.
Now you will move the dot up into the center of the
green circle with the bottom set screw. You might want
to put some standard strength thread lock on the bottom set screw if you shoot a high vibration bow. Do
not put thread lock on the flat head locking screw or
you will not be able to loosen it again. Screwing the
set screw in will move the dot up. Turning the set
screw 1/3 turn will change your anchor point by about
3/16”. Tighten the bottom locking flat head screw
after the dot is centered in the green circle. It might
angle bracket has moved your sight out 1/8” and you
are no longer looking through the string. You may be
anchoring differently also. Start very close to your
target so you don’t miss. Shoot a couple of arrows.
Move your sight the direction you are hitting from
where you are aiming. If you hit low left, you move the
sight down and to the left.
TIP - You are anchoring too far from your eye and face
if your sight is adjusted all the way to the left and you
are still shooting left (right handed shooter). Rotate
the No-Peep to the right. That will move your eye to the
right. Then your arrows will hit to the right so you move
your sight to the right. Check which eye you are
sighting with if your sight is a long way to the left. Draw
your bow and aim at a target. Then close your right
eye. You are aiming with your left eye if the No-Peep
images disappear.
HOW TO USE THE NO-PEEP WHEN SIGHTING
1. Draw your bow looking at the target and your sight
pins. Glance at the No-Peep after you have your sight
pin lined up with the target. Move your head for any
final adjustment. The dot will be close to the center of
the circle in the No-Peep when you draw your bow if
it is adjusted correctly. It may take a little practice for
you to get consistent with your anchor point.
2. Once the dot of the No-Peep is centered in the
circle, only look at the target and sight pin. Your anchor
should not change. You will notice any change in your
peripheral vision.
change slightly when you tighten the locking screw
because of the tolerances as well as the set screw
will dig into the No-Peep body.
Only read these if you want to save time and frustration
1. Do not keep looking back and forth between the NoPeep and your sight. Your anchor point should not
change unless you are at full draw for a long time or
torqueing your bow.
2. We recommend every once in a while you cover your
No-Peep and shoot at 20 yards. You will be surprised
how well you can shoot once the No-Peep trains you to
use a consistent anchor. That will give you the confidence to not have to look at the No-Peep and you will
HOW TO SIGHT
You will need to sight your bow in because the
only see it in your peripheral vision while you are
sighting.
3. The No-Peep is very sensitive. The dot does not have
to be perfectly centered in the circle to shoot good
groups. You can shoot 1” groups at 20 yards if the dot
is anywhere inside the green circle.
4. The No-Peep in the rain - A few drops on the NoPeep will not affect accuracy. You can still see enough
of the circle to find the center. In addition you hopefully
have practiced with the No-Peep covered so you can
shoot without it if you have to. Wipe the No-Peep clean
with a cotton cloth or tissue to remove drops. Make sure
you wipe the lens completely dry or it will smear the
water and then you will not be able to see anything. You
need to either look through the drops or wipe the lens
completely dry. Be careful not to scratch the No-Peep
lens when wiping it. (See section, “How to Care For
Your No-Peep”) An application of “Rain-X” with a Q-tip
will cause rain to run off the lens.
5. The No-Peep appears to move - It is more than likely
you or the bow. The No-Peep has double locking on all
the adjustments and it is highly unlikely it has moved.
You can confirm this by making marks with a pencil on
the brackets. You should be able to see that it has
physically moved. There is nothing inside that can
move. Horizontal movement is usually the result of bow
torque or changing your grip on the bow. Bow torque
rotates the bow. Picture a straight line coming from the
No-Peep to your eye. Now picture what happens if the
bow rotates. The line no longer points at your eye and
your arrow no longer points at the target. That is why
controlling torque is so important (see section on form
below). Your string in your peripheral vision is a double
check. You should always have the string in the same
relationship to your sight pins or No-Peep when the
SOME USEFUL TIPS
No-Peep is aligned. You are doing something different if
these alignments change. Vertical change is usually caused
by a change in your nocking point. The nocking point on a
one cam bow is not in the center of the string. You have at
least twice as much string above as below the nocking
point. The result is the nocking point moves as the string
stretches. That makes it appear that the No-Peep has
moved. An out of time 2 cam bow also causes the nocking
point to move as one cam takes in string faster than the
other. Your nocking point or serving might also slip. Check
your equipment if the No-Peep appears to have moved.
Equipment changes, like adding a bow quiver, can change
the balance of the bow and the way you grip it. That may
make the No-Peep alignment change slightly.
THE NO-PEEP AND YOUR FORM
One of the biggest advantages of the No-Peep is it reveals
1. The lens is plastic and can be scratched. Blow dirt off
the lens and clean with a moist soft cloth or tissue. A Q-Tip
works really well to get around the edges. Do not use a
paper towel. It will scratch the lens. The images in the NoPeep will get fuzzy or the No-Peep will lose brightness if the
lens is dirty or scratched.
2. Do not place your bow so the sun can shine directly into
the lens of the No-Peep. It is a magnifying lens and will
condense the sun’s rays. That can generate enough heat
to damage it.
3. Do not get oil, adhesives, thread lock, insect repellent,
or solvents on the lens, light gathering fiber or fiber holder.
4. Do not store your bow with the No-Peep in the sun for
long periods of time. The sun and high temperature will age
the plastic parts.
bad form. Many people who start using the No-Peep find
they have several problems in their form that keeps them
from shooting to their potential. Common problems that
the No-Peep will tell you are:
Bow Torque - Your bow will rotate in your hand if you grip
it too tight. You will notice the dot in the No-Peep will move
horizontally or the relationship between the bowstring in
your peripheral vision and sight pins will change. Tension
in your bow arm will do the same thing. Relax your bow
hand or use a bow sling to solve the problem.
Hand Placement - Changing the location or pressure of
your hand on the bow grip will cause the arrow to change
point of impact left and right. Change your grip and you will
notice the relationship between the sight pins and bowstring in your peripheral vision will change when the NoPeep is aligned. Some professional shooters draw a line
on their hand between the thumb and index finger and align
it with a line on the center of the grip of their bow to make
sure they grip it the same every time.
Tension in your body - Tension in your body makes it
difficult to hold steady on the target and causes target
panic. You will notice the No-Peep moving around if you
have tension. A common cause of tension is too long of
draw length. You can’t shoot relaxed with too long of draw
Timberline Archery Products, Inc. warrants to
the original purchaser that the No-Peep is free from
defects in materials or workmanship. The warranty
does not cover damage due to normal wear, accident, abuse, alteration, misuse, or improper care.
Damage due to abuse or improper care includes
but is not limited to: damage to plastic parts caused
by chemicals or heat, scratches on the lens, or
threads stripped due to being overtightened.
If the No-Peep is defective, contact Timberline
Archery Products for a return authorization number. If, after inspection, we find that the No-Peep
was defective in material or workmanship, we shall,
at our option, either repair or replace it without
charge.
There are no other express warranties beyond
the terms of this limited warranty. In no event shall
Timberline Archery Products be liable for incidental
or consequential damages.
Some states do not allow limitations on the
exclusion or limitation of incidental or consequential damages, so the above limitations or exclusions
may not apply to you.
This warranty gives you specific legal rights, and
you may have other rights which vary from state to
state.
length. Most coaches say 80% of archers have too long of
draw length. Your draw length is probably too long if you
anchor at the back of your jaw or near your ear. Another
common cause is a locked bow arm. Relax your bow arm
and grip if you see the No-Peep moving while at full draw.
HOW TO CARE FOR YOUR NO-PEEP
WARRANTY
For returns contact:
Timberline Archery Products, Inc.
P.O. Box 333 • Lewiston, ID 83501
Phone (208) 746-2708
www.timberline-archery.com
678 9 10
 Loading...