

Page 1

Size: 170 x 55mm
Color: PMS 497c
Size: 170 x 55mm
TBL14260
INSTRUCTION MANUAL
Page 2

Size: 170 x 55mm
Color: Blk
Size: 85 x 55mm
Color: Blk
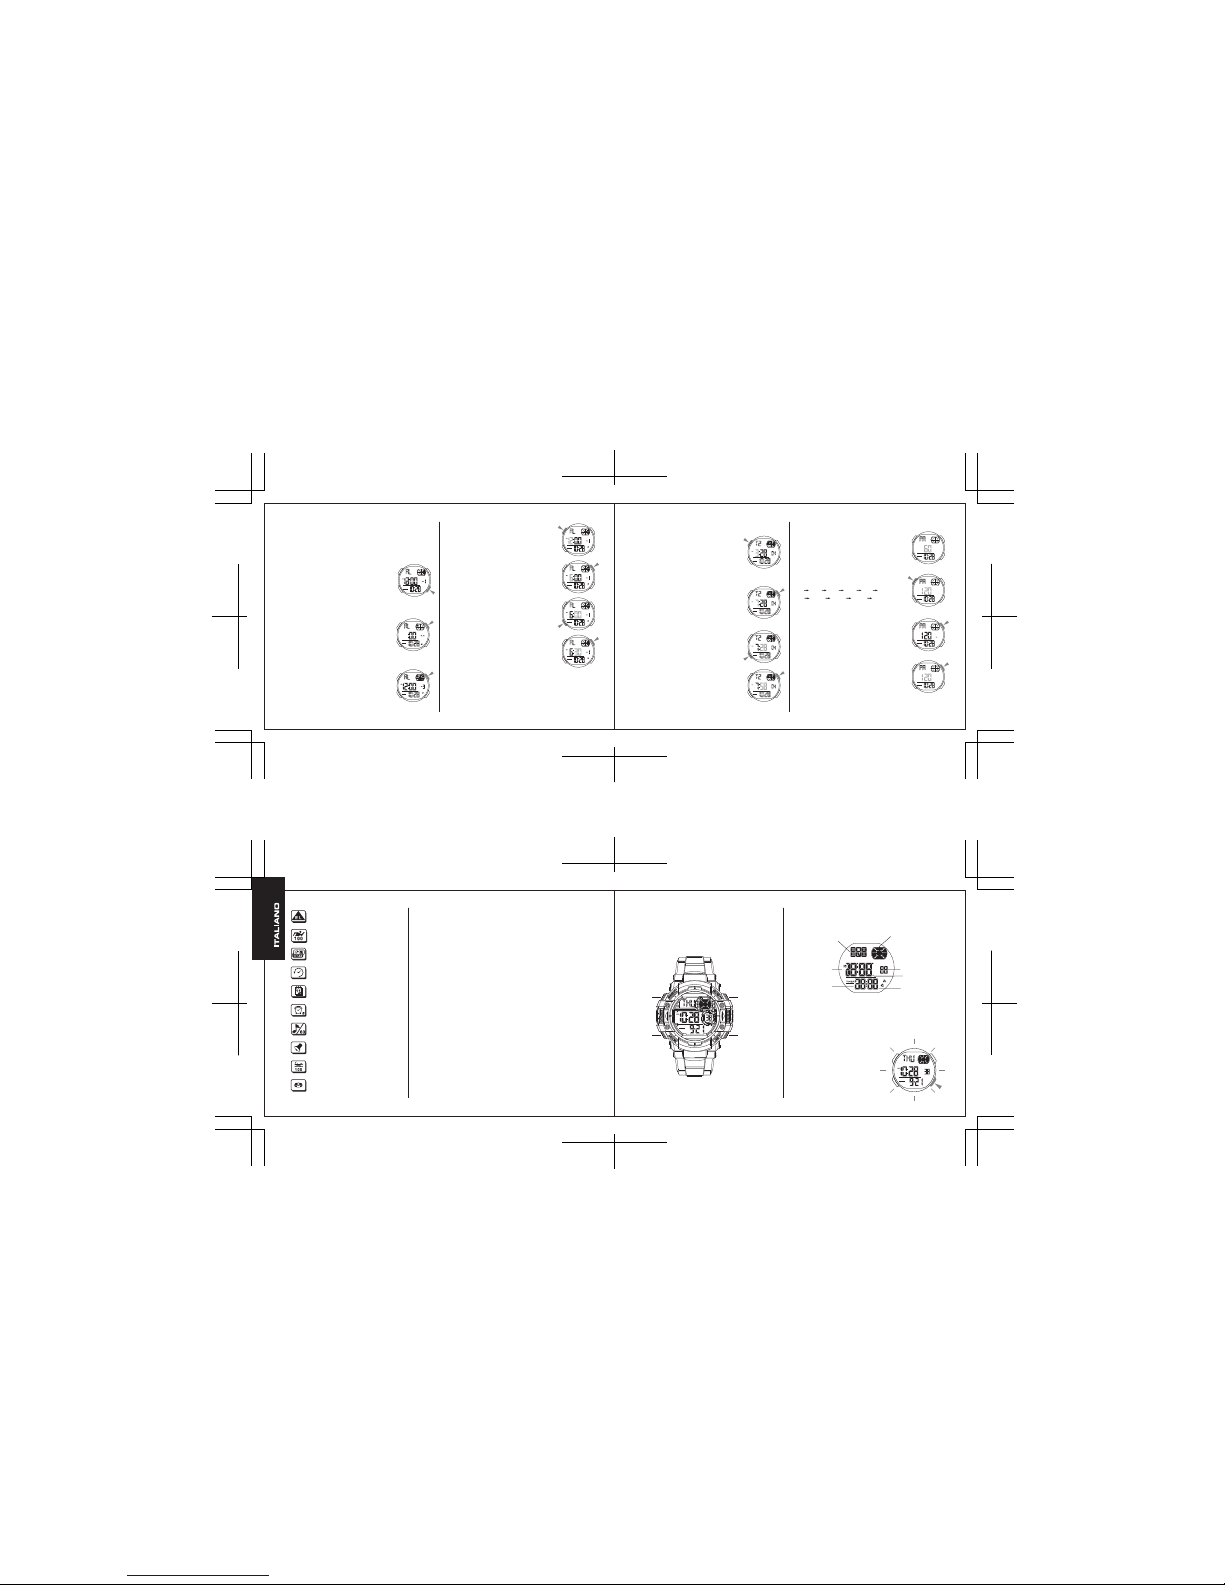
Date
Seconds
Minutes
Day of week
Hour
Month
(Cartoon)
MODE SELECTION
a. TIMEKEEPING
• Press “B” to change mode to mode in the following sequence:
Timekeeping Mode Stopwatch Mode Countdown Mode Alarm Mode
Dual Time Mode Pacer Mode.
BUTTONS
• Button operation are indicated using
the letters shown in the illustration.
DISPLAY
• The screen shown in below:
BACKLIGHT
• The backlight that uses an EL (electroluminescent)
cause the display to glow for easy reading in the dark.
• 12/24H Format
• Hour, Minutes, Seconds, Day of week, Month, Date
• 100 years Calendar (2000 ~ 2099)
b. STOPWATCH
• 1/100 second unit
• Measuring range: 00’00”00 ~ 23:59’59”
c. COUNTDOWN
• Countdown range: 23:59’59” ~ 0’00”00
ATTENTION
1. Never try to open the case or remove its back cover.
2. Do not operate buttons underwater.
3. Should moisture appear inside the watch, have it
checked immediately by your dealer. Otherwise it can
cause erosion of the metal parts of the watch.
4. Though the watch is designed to withstand normal
use, you should avoid rough use or dropping the watch.
5. Avoid exposing the watch to temperature extremes.
6. Wipe the watch with dry, soft cloth only. Avoid allowing
it to come into direct contact with chemical materials,
which can cause deterioration of the plastic parts of
the watch.
7. Avoid to wear the watch in electromagnetic, static
conditions.
Countdown Timer
EL Backlight
Dual Time
100 Years Calendar
100M Water Resistant
5 Alarms
Chime
Battery (CR2025)
Stopwatch
Pacer
Start / Stop
EL backlightMode
Reset
Use EL Backlight
• In the timekeeping mode,
press “C” to illuminate the
display about 3 seconds.
Page 3
Size: 170 x 55mm
Color: Blk
Size: 170 x 55mm
Color: Blk
a. TIMEKEEPING
12/24H Format
• In the timekeeping mode, press “D”
to switch between 12/24H formats.
Time Setting
1. In the timekeeping mode, press
“A” the seconds to flash (flashing
indicated in set mode).
2. Press “D” to reset the
seconds.
3. Press “B” change to the next
selection.
4. Press “D” to increase the number,
press and hold to change at high
speed.
5. Repeat step 3 and 4, the selection in the
following sequence:
Seconds Hour Minutes Year Month
Date.
6. Press “A” to exit the set state, after you set
(The day of week is auto displayed in accordance
with year, month and date setting).
c. COUNTDOWN
• When the countdown reaches zero, the alarm
sounds for about 60 seconds and press any button
to break it.
Countdown Timer Setting
1. In the countdown mode, press
“A” the hour to flash (flashing
indicated in set mode).
2. Press “D” to increase the hour,
press and hold to increase at high
speed.
3. Press “B” change to the next
selection.
Use Countdown Timer
1. Press “D” to start the
countdown.
2. To pause the countdown by
pressing “D” again.
4. Press “D” to increase the
number, press and hold to
change at high speed.
5. Repeat step 3 and 4, the selection in the
following sequence:
Hour Minutes Seconds.
6. Press “A” to exit the set
state, after you set.
d. ALARM
• 5 Alarms
• Hourly time signal
• The alarm sounds at the preset time each day
e. DUAL TIME
• The time for other time zone
f. PACER
• 10 tempo
b. STOPWATCH Split Time
A Lap Time
1. In the stopwatch mode,
press “D” to start the stopwatch.
2. To stop the stopwatch by
pressing “D” again.
3. Press “A” to reset the stopwatch.
1. In the stopwatch mode,
press “D” to start the stopwatch.
2. Press “A” to display the split time,
stopwatch timing continute internally.
3. Press “A” to clear the split time and
to continute time measurement.
4. Repeat step 2 and 3, you can measure the multi
split time.
5. Press “D” to stop the stopwatch.
Page 4
Size: 170 x 55mm
Color: Blk
Size: 170 x 55mm
Color: Blk
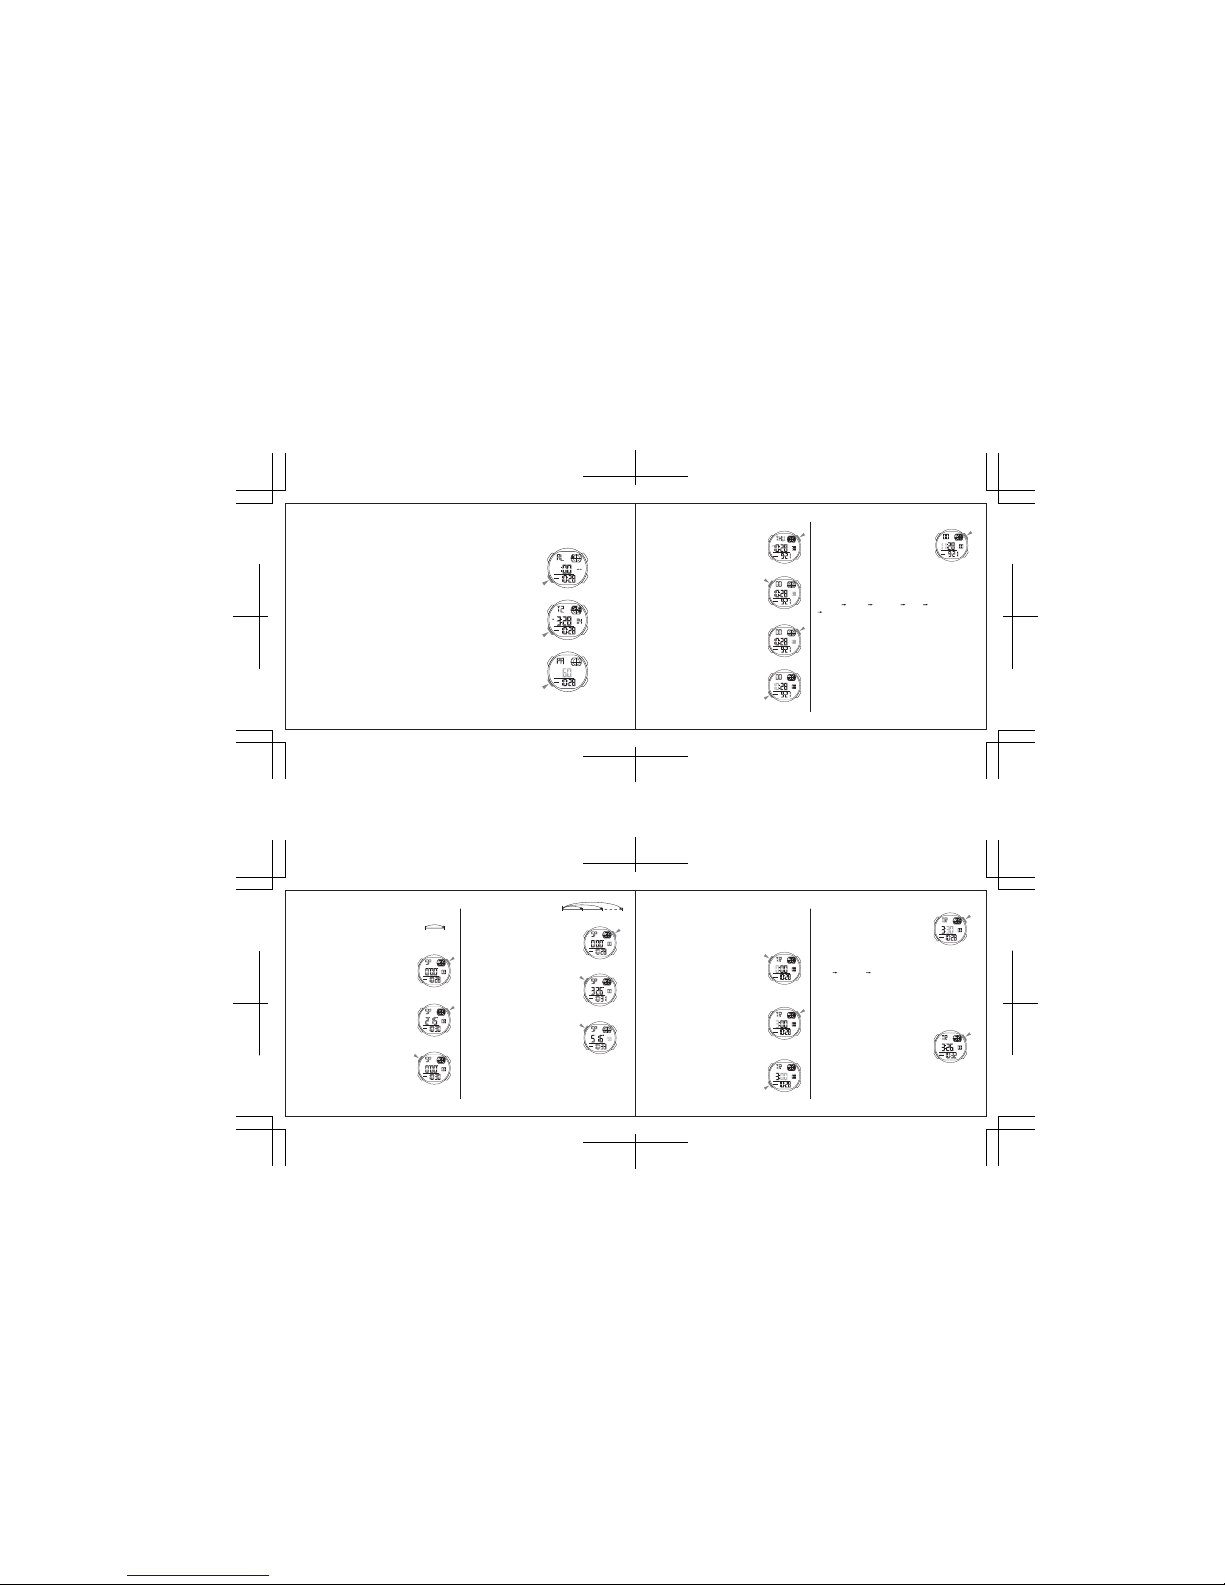
Use The Pacer
1. In the pacer mode, the tempo
number flash.
2. Press “A” select the tempo in
the following sequence:
10 20 30 40 60
80 120 160 240 320.
3. Press “D” to start.
4. To stop it press “D” again.
d. ALARM
• The alarm sounds at the preset time each day for
about 60 seconds, press any button to break it.
Alarm and Chime
• In the alarm mode, press “C”
to select chime, Alarm1 ~ Alarm5.
• In the chime state, press “D”
to on/off the chime.
• In the Alarm1 ~ Alarm5 state,
press “D” to on/off the alarm.
f. PACER
Alarm1 Setting
1. In the alarm mode, press “A” the
hour to flash (flashing indicated in
set mode).
2. Press “D” to increase the hour,
press and hold to increase at high
speed.
3. Press “B” to select the minutes.
4. Press “D” to increase the
minutes, press and hold to
increase at high speed.
5. Press “A” to exit the set state, after you set.
• Setting and operation of the Alarm1 ~ Alarm5
are the same.
e. DUAL TIME
Dual Time Setting
1. In the dual time mode, press
“A” the hour to flash
(flashing indicated in set mode).
2. Press “D” to increase the hour,
press and hold to increase at high
speed.
3. Press “B” to select the minutes.
4. Press “D” to change the minutes
(press once change 30 minutes).
5. Press “A” to exit the set state, after you set.
AVVISO
1. Non tentare mai di aprire l'involucro, o di rimuovere il
coperchio posteriore.
2. Non fare funzionare i tasti sott'acqua.
3. Se dovesse apparire dell'umidità all'interno dell'orologio,
fatelo controllare immediatamente dal vostro
concessionario, poiché l'umidità potrebbe rompere le
parti metalliche dell'orologio.
4. Anche se l'orologio progettato per sopportare gli usi
normali di tutti i giorni, evitare di maltrattarlo o di farlo
cadere.
5. Evitare di esporre l'orologio a condizioni di temperatura
estrema.
6. Pulire l'orologio solamente con un panno asciutto e
soffice. Evitare di far entrare l'orologio in contatto diretto
con materiali chimici, che possono causare deterioramenti
alle parti plastiche dell'orologio.
7. Evitare di indossare l'orologio in presenza di elettricità
statica.
Timer per conto alla rovescia
Retroilluminazione EL
Ora duale
Calendario valido per 100 anni
Impermeabilità fino a 100M
5 allarmi
Suoneria oraria
Batteria (CR2025)
Cronometro
Pacer
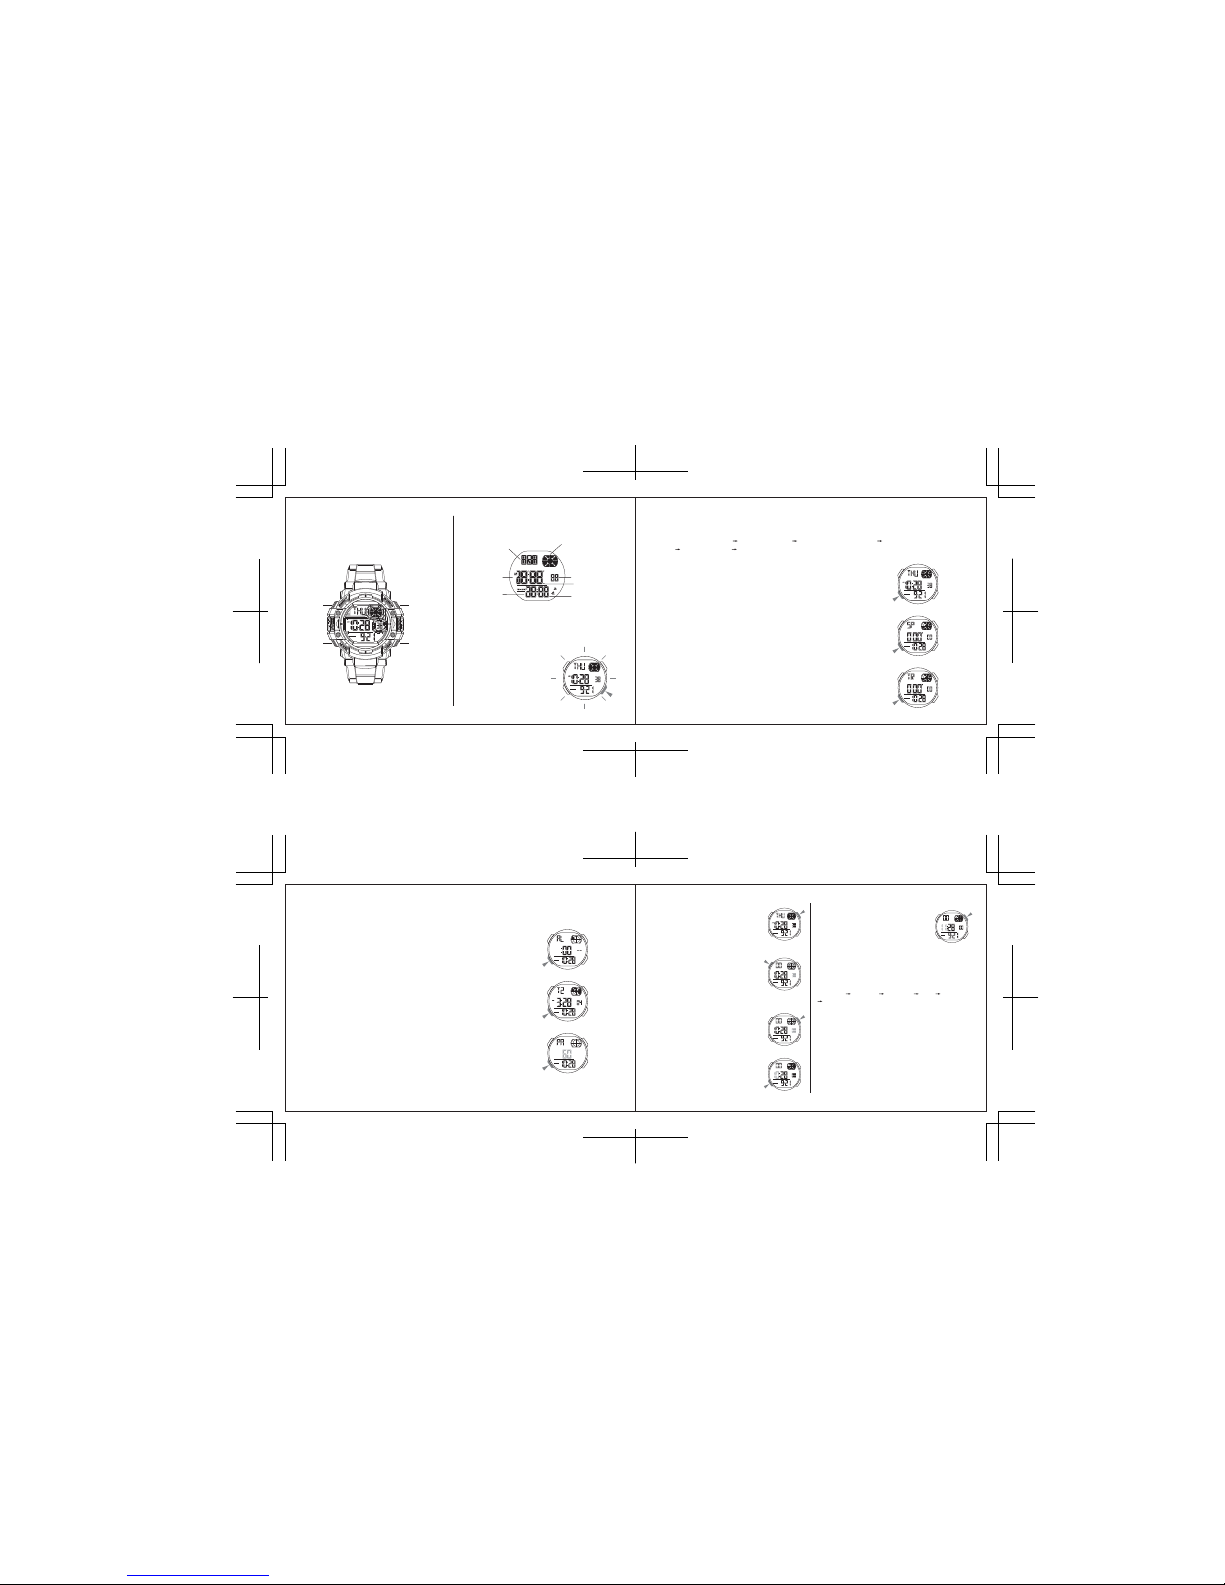
Data
Secondi
Minuti
Giorno della settimana
Ore
Mese
(cartone animato)
TASTI
• Il funzionamento dei tasti è indicato
usando le lettere visualizzate
nell'illustrazione.
DISPLAY
• Lo schermo mostra i dati elencati qui di seguito:
RETROILLUMINAZIONE
• La retroilluminazione usa EL (elettroluminescenza),
e permette che il display s'illumini, per facilitare la
lettura in condizioni di luce scarsa.
Avvio /
Interruzione
Retroilluminazione EL
Modo
Resettaggio
Uso della retroilluminazione EL
• In un modo qualsiasi, premere
il tasto “C” per fare illuminare
il display per circa 3 secondi.
Page 5

Size: 170 x 55mm
Color: Blk
Size: 170 x 55mm
Color: Blk
a. PRECISIONE
Formato 12/24H
• Nel modo precisione, premere il
tasto “D” per commutare tra i
formati 12/24H.
Impostazione dell'ora
1. Nel modo precisione, tenere
premuto il tasto “A” fino a che
i secondi non lampeggiano
(intermittenza indicata nel modo Impostazione).
2. Premere il tasto “D” per resettare i
secondi.
3. Premere il tasto “B” per andare sulla
selezione successiva.
4. Premere il tasto “D” per incrementare
i numeri, e tenere premuto per
l'avanzamento veloce.
5. Ripetere i passaggi 3 e 4, e la selezione nella
sequenza che segue:
Secondi Ora Minuti Anno Mese
Data.
6. Premere il tasto “A” per uscire dal modo
impostazione, dopo che avete impostato i
parametri (il giorno della settimana si visualizza
automaticamente in accordo con le impostazioni
dell'anno, del mese e della data).
b. CRONOMETRO Tempo intermedio
Tempo sul giro
1. Nel modo cronometro, premere il
tasto “D” per avviare il cronometro.
2. Per fermare il cronometro, premere
il tasto “D” di nuovo.
3. Premere il tasto “A” per resettare
il cronometro.
1. Nel modo cronometro, premere il
tasto “D” per avviare il cronometro.
2. Premere il tasto “A” per visualizzare
il tempo intermedio; il conteggio del
cronometro continua sullo sfondo.
3. Premere il tasto “A” Per cancellare
il tempo intermedio e continuare la
misurazione del tempo.
4. Ripetere i passaggi 2 e 3, per misurare il tempo
intermedio multiplo.
5. Premere il tasto “D” per fermare il cronometro.
SELEZIONE DEL MODO
a. PRECISIONE
• Premere il tasto “B” per cambiare il modo nella sequenza che segue:
Modo precisione Modo cronometro Modo conto alla rovescia Modo allarme
Modo ora duale Modo Pacer.
• Formato 12/24H
• Ora, minuti, secondi, giorno della settimana, mese, data
• Calendario di 100 anni (2000 ~ 2099)
b. CRONOMETRO
• Unità dei secondi 1/100
• Gamma di misurazione: 00’00”00 ~ 23:59’59”
c. CONTO ALLA ROVESCIA
• Gamma del conto a rovescia: 23:59’59” ~ 0’00”00
d. ALLARME
• 5 allarmi
• Segnale dell'ora orario
• L'allarme suona ogni giorno all'ora prestabilita
e. ORA DUALE
• Ora per l'altro fuso orario
f. PACER
• 10 tempo
Page 6
Size: 170 x 55mm
Color: Blk
Size: 170 x 55mm
Color: Blk
VORSICHT
1. Versuchen Sie niemals das Gehäuse zu öffnen oder die
rückseitige Abdeckung abzunehmen.
2. Betätigen Sie die Bedientasten niemals unter Wasser.
3. Falls Feuchtigkeit in der Uhr auftritt sollten Sie diese
sofort von einem Fachhändler überprüfen lassen.
Andernfalls könnten die Metallteile der Uhr durch
Korrosion beschädigt werden.
4. Obwohl die Uhr für den täglichen Einsatz geschaffen
ist, sollten Sie diese nicht bei harten Arbeiten tragen
und die Uhr nicht herunterfallen lassen.
5. Setzen Sie die Uhr niemals extremen Temperaturen aus.
6. Trocknen Sie die Uhr nur mittels eines trockenen,
weichen Tuchs. Vermeiden Sie den direkten Kontakt mit
scharfen Chemikalien, da dadurch die Plastikteile der
Uhr schwer beschädigt werden können.
7. Vermeiden Sie das Tragen der Uhr an Orten, wo diese
starken elektromagnetischen Wechselfeldern oder statischer
Elektrizität ausgesetzt sein könnte.
Countdown-Timer
EL Anzeigebeleuchtung
Dualzeit-Anzeige
100-jähriger Kalender
100m Wasserbeständigkeit
5 Alarmzeiten
Stundenläuten
Batterie (CR2025)
Stoppuhr
Schrittmacher
c. CONTO ALLA ROVESCIA
• Quando il conto alla rovescia raggiunge lo 0,
l'allarme suona per circa 60 secondi; premere un
tasto qualsiasi per interromperlo.
Impostazioni del Timer per
il conto alla rovescia
1. Nel modo conto alla rovescia,
tenere premuto il tasto “A” fino a
che le digitazioni dell'ora non
lampeggiano (intermittenza indicata
nel modo Impostazione).
2. Premere il tasto “D” per
incrementare l'ora, e tenere premuto
per l'avanzamento veloce.
3. Premere il tasto “B” per andare
sulla selezione successiva.
Usare il timer per il conto alla rovescia
1. Premere il tasto “D” per avviare il
timer del conto alla rovescia.
2. Per mettere in pausa il conto alla
rovescia, premere il tasto “D” di nuovo.
4. Premere il tasto “D” per
incrementare i numeri, e tenere
premuto per l'avanzamento veloce.
5. Ripetere i passaggi 3 e 4, e la selezione nella
sequenza che segue:
Ora Minuti Secondi.
6. Premere il tasto “A” per uscire dal modo
impostazione, dopo avere impostato.
d. ALLARME
• L'allarme suona all'ora prestabilita ogni giorno, per
circa 60 secondi; premere un tasto qualsiasi per
tinterromperlo.
Allarme e suoneria oraria
• Nel modo allarme, premere il tasto
“C” per selezionare la suoneria,
Alarm1 ~ Alarm5.
• Nel modo suoneria, premere il
tasto “D” per attivare/disattivare
(on/off) la suoneria.t
• Nel modo Alarm1 ~ Alarm5,
premere il tasto “D” per attivare /
disattivare (on/off) l'allarme.
Impostazioni di Alarm 1
1. Nel modo conto alla rovescia, tenere
premuto il tasto “A” fino a che le
digitazioni dell'ora non lampeggiano
(intermittenza indicata nel modo Impostazione).
2. Premere il tasto “D” per incrementare
l'ora, e tenere premuto per
l'avanzamento veloce.
3. Premere il tasto “B” per selezionare
i minuti.
4. Premere il tasto “D” per incrementare
i minuti, e tenere premuto per
l'avanzamento veloce.
5. Premere il tasto “A” per uscire dal modo
impostazione, dopo avere impostato.
• Le impostazioni e il funzionamento di Alarm1 ~
Alarm5 sono gli stessi.
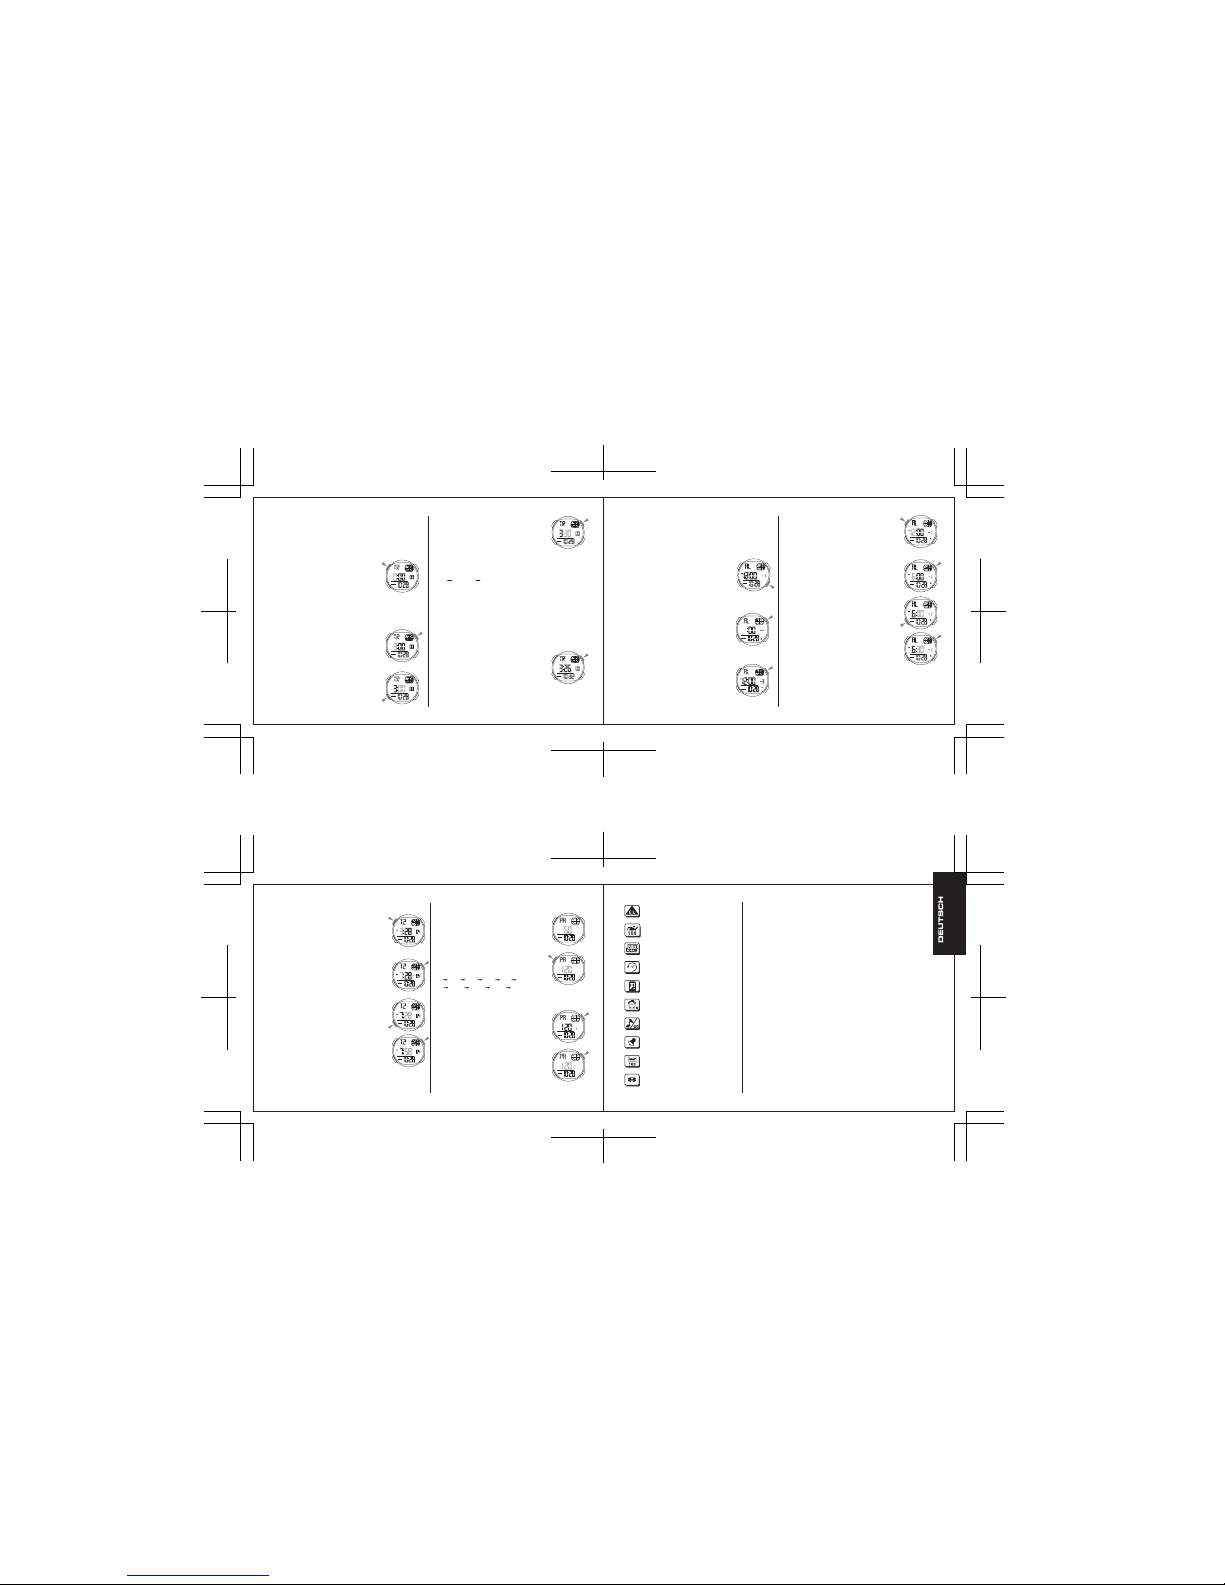
Uso del Pacer
1. Nel modo pacer, il numero del
tempo lampeggia.
2. Premere il tasto “A” per selezionare
il tempo nella sequenza indicata qui di
seguito:
10 20 30 40 60
80 120 160 240 320.
3. Premere “D” per avviare.
4. Per interrompere, premere “D”
di nuovo.
f. PACERe. ORA DUALE
Impostazioni dell'ora duale
1. Nel modo ora duale, tenere premuto
il tasto “A” fino a che le digitazioni
dell'ora non lampeggiano (intermittenza
indicata nel modo Impostazione).
2. Premere il tasto “D” per incrementare
l'ora, e tenere premuto per l'avanzamento
veloce.
3. Premere il tasto “B” per selezionare i
minuti.
4. Premere il tasto “D” per cambiare i
minuti (premendo una volta si cambia
di 30 minuti).
5. Premere il tasto “A” per uscire dal modo
impostazione, dopo avere impostato.
Page 7
Size: 170 x 55mm
Color: Blk
Size: 170 x 55mm
Color: Blk
Datum
Sekunden
Minuten
Wochentag
Stunde
Monat
(Animation)
MODUS-AUSWAHL
a. ZEITANZEIGE-MODUS
• Betätigen Sie Taste "B", um zwischen den Betriebsmodi wie folgt weiterzuschalten:
Zeitanzeige-Modus Stoppuhr-Modus Countdown-Timermodus Alarmmodus
Dualzeit-Modus Schrittmacher-Modus.
BEDIENTASTEN
• Die Tastenfunktionen werden wie folgt
mittels der angegebenen Buchstaben in
der Abbildung beschreiben.
ANZEIGE
• Die Anzeige erscheint wie nachfolgend dargestellt:
ANZEIGEBELEUCHTUNG
• Die EL Anzeigebeleuchtung (Elektrolumineszenz)
ermöglicht das Ablesen der Anzeige im Dunkeln.
• 12/24H Stundenanzeigeformat
• Stunde, Minute, Sekunde, Wochentag, Monat, Datum
• 100 Jahre Kalender (2000 ~ 2099)
b. STOPPUHR
• 1/100 Sekunden
• Reichweite: 00’00”00 ~ 23:59’59”
c. COUNTDOWN
• Countdown Reichweite: 23:59’59” ~ 0’00”00
Start /
Stopp
ELAnzeigebeleuchtung
Modus
Rücksetzung
Der Einsatz der EL
Anzeigebeleuchtung
• Betätigen Sie Taste "C"
im Zeitanzeigemodus, um
die Anzeige ca. 3 Sekunden
lang zu beleuchten.
a. ZEITANZEIGE-MODUS
12/24H Stundenanzeigeformat
• Betätigen Sie Taste "D" im
Zeitanzeigemodus, um zwischen den
12/24H Zeitanzeigeformaten umzuschalten.
Zeit Einstellung
1. Halten Sie Taste "A" im
Zeitanzeigemodus gedrückt, bis die
Sekundenanzeige blinkt (die blinkende
Anzeige weist darauf hin, dass die
Anzeige eingestellt werden kann).
2. Betätigen Sie Taste "D", um eine
Rücksetzung der Sekundenanzeige auf
Null durchzuführen.
3. Betätigen Sie Taste "B", um das
nächste Anzeigesegment zur
Einstellung auszuwählen.
4. Betätigen Sie Taste "D", um die
Anzeige aufwärts einzustellen, und
halten Sie die Taste gedrückt, um die
Einstellung schnell aufwärts auszuführen.
5. Wiederholen Sie die Schritte 3 und 4, um die
Einstellungen für die Anzeige in der folgenden
Sequenz auszuführen:
Sekunden Stunden Minuten Jahr Monat
Datum.
6. Betätigen Sie Taste "A", um den Einstellmodus
nach Abschluss der Einstellungen zu verlassen
(Der Wochentag wird automatisch korrekt
entsprechend der Kalendereinstellung für Jahr,
Monat und Datum eingestellt).
d. ALARM
• 5 Alarmzeiten einstellbar
• Stundenläuten-Signal
• Der Alarm ertönt täglich zur eingestellten Alarmzeit
e. DUALZEIT-ANZEIGE
• Zeitanzeige für eine andere Zeitzone
f. SCHRITTMACHER
• 10 Tempi
Page 8

Size: 170 x 55mm
Color: Blk
Size: 170 x 55mm
Color: Blk
c. COUNTDOWN
• Der Alarmton ertönt ca. 60 Sekunden lang, wenn
der Countdown auf Null herunter gezählt hat;
betätigen Sie eine beliebige Taste, um den Alarmton
jederzeit abzuschalten.
Countdown-Timer - Einstellung
1. Halten Sie Taste "A" im CountdownModus gedrückt, und die
Stundenanzeige beginnt zu blinken
(die blinkende Anzeige weist darauf hin,
dass die Uhr im Einstellmodus funktioniert).
2. Betätigen Sie Taste "D", um die
Stundenanzeige aufwärts einzustellen,
und halten Sie die Taste gedrückt, um
die Einstellung schnell aufwärts aufzuführen.
3. Betätigen Sie Taste "B", um die nächste
Anzeigestelle zur Einstellung aufzurufen.
Der Einsatz des Countdown-Timers
1. Betätigen Sie Taste "D", um den
Countdown-Timer zustarten.
2. Betätigen Sie Taste "D" nochmals,
um den Countdown-Timer zu
pausieren.
4. Betätigen Sie Taste "D", um die
Anzeige aufwärts einzustellen, und
halten Sie die Taste gedrückt, um die
Einstellung schnell aufwärts auszuführen.
5. Wiederholen Sie die Schritte 3 und 4, um die
Anzeigestellen in der folgenden Sequenz einzustellen:
Stunden Minuten Sekunden.
6. Betätigen Sie Taste "A" um den Einstellmodus zu
verlassen, nachdem Sie die Einstellung ausgeführt
haben.
b. STOPPUHR Zwischenzeit
Rundenzeit ermitteln
1. Betätigen Sie Taste "D" im
Stoppuhrmodus, um die Stoppuhr
zu starten.
2. Betätigen Sie Taste "D" nochmals,
um die Stoppuhr anzuhalten.
3. Betätigen Sie Taste "A", um eine
Rücksetzung der Stoppuhr
auszuführen.
1. Betätigen Sie Taste "D" im
Stoppuhrmodus, um die Stoppuhr
zu starten.
2. Betätigen Sie Taste "A", um die
Zwischenzeit anzuzeigen; die
Stoppuhr läuft im Hintergrund weiter.
3. Betätigen Sie Taste "A", um die
Anzeige der Zwischenzeit zu
verlassen, und die laufende Zeitmessung
wird wieder angezeigt.
4. Wiederholen Sie die Schritte 2 und 3, um mehrere
Zwischenzeiten aufeinanderfolgend zu ermitteln.
5. Betätigen Sie Taste "D", um die Stoppuhr
anzuhalten.
Der Einsatz des Schrittmachers
1. Im Schrittmacher-Modus blinkt die
Taktfrequenz für das Tempo.
2. Betätigen Sie Taste "A", um die
Tempi in der nachfolgenden
Auswahlsequenz auszuwählen:
10 20 30 40 60
80 120 160 240 320.
3. Betätigen Sie Taste "D", um den
Schrittmacher zu starten.
4. Betätigen Sie Taste "D" nochmals,
um den Schrittmacher wieder
anzuhalten.
d. ALARM-FUNKTION
• Der Alarm ertönt zur eingestellten Zeit täglich ca.
60 Sekunden lang; betätigen Sie eine beliebige Taste,
um den Alarm abzuschalten.
Alarm und Stundenläuten
• Betätigen Sie Taste "C" im AlarmModus, um die Einstellungen für
Stundenläuten, Alarm1 ~ Alarm5
anzuzeigen.
• Betätigen Sie Taste "D" während die
Einstellung für die Stundenläutenfunktion
angezeigt wird, um die
Stundenläutenfunktion "ein/aus" zu schalten.
• Betätigen Sie Taste "D" während die
Einstellung für Alarm1 ~ Alarm5
Angezeigt werden, um die Alarmfunktion
für den entsprechenden Alarm "ein/aus"
zu schalten.
f. SCHRITTMACHERAlarm I – Einstellung
1. Halten Sie Taste "A" im Alarmmodus
gedrückt, und die Stundenanzeige
blinkt nun (der blinkende Indikator
zeigt den Einstellmodus an).
2. Betätigen Sie Taste "D", um die
Stundenanzeige aufwärts einzustellen;
halten Sie die Taste gedrückt, um die
Einstellung schnell aufwärts auszuführen.
3. Betätigen Sie Taste "B", um die
Minutenanzeige auszuwählen.
4. Betätigen Sie Taste "D", um die
Minutenanzeige schnell aufwärts
einzustellen; halten Sie die Taste
gedrückt, um die Einstellung schnell
aufwärts auszuführen.
5. Press “A” to exit the set state, after you set.
• Setting and operation of the Alarm1 ~ Alarm5
are the same.
e. Dualzeit-Anzeige
Dualzeit-Anzeige – Einstellung
1. Halten Sie Taste "A" im DualzeitModus gedrückt, und die
Stundenanzeige blinkt nun (der blinkende
Indikator zeigt den Einstellmodus an).
2. Betätigen Sie Taste "D", um die
Stundenanzeige aufwärts einzustellen;
halten Sie die Taste gedrückt, um die
Einstellung schnell aufwärts auszuführen.
3. Betätigen Sie Taste "B", um die
Minutenanzeige auszuwählen.
4. Betätigen Sie Taste "D", um die
Minutenanzeige einzustellen (einmal
betätigen stellt die Uhr 30 Minuten
aufwärts ein).
5. Betätigen Sie Taste "A", um den Einstellmodus
nach Abschluss der Einstellungen zu verlassen.
Page 9

Size: 170 x 55mm
Color: Blk
Size: 170 x 55mm
Color: Blk
ATTENTION
1. Ne tentez jamais d’ouvrir le boîtier ou de retirer le fond.
2. N’appuyez pas sur les boutons lorsque la montre est
sous l’eau.
3. En cas d’humidité à l’intérieur de la montre, faites-la
vérifier par votre revendeur. L’humidité peut provoquer
la corrosion des parties métalliques de la montre.
4. La montre est conçue pour un usage normal; évitez
tout traitement brutal et de la faire tomber par terre.
5. Evitez d’exposer la montre à des extrêmes de
température.
6. Nettoyez la montre à l’aide d’un chiffon doux sec
uniquement. Evitez tout contact avec des produits
chimiques qui peuvent endommager les parties en
plastique de la montre.
7. Evitez de porter la montre dans des endroits exposés à
des décharges électromagnétiques et/ou statiques.
Minuteur
Rétroéclairage EL
2e fuseau horaire
Calendrier 100 ans
Etanche jusqu’à 100 m
5 alarmes
Carillon
Pile (CR2025)
Chronographe
Métronome
Jour
Secondes
Minutes
Jour de la semaine
Heures
Mois
(Animation)
BOUTONS
• Pour le fonctionnement des boutons,
référez-vous aux lettres indiquées dans
le schéma.
AFFICHAGE
• L’écran affiche les informations suivantes:
RETROECLAIRAGE
• La montre dispose d’un rétroéclairage de l’écran de
type EL (électroluminescent) facilitant la lecture dans
l’obscurité.
Démarrer /
Arrêter
Rétroéclairage
EL
Mode
RAZ
Utilisation du
rétroéclairage EL
• En mode Heure, appuyez
sur C pour éclairer l’écran
pendant environ 3 secondes.
SELECTION DU MODE
a. HEURE
• Appuyez sur B pour sélectionner le mode dans la séquence suivante:
Mode Heure mode Chronographe mode Minuteur mode Alarme
mode 2e fuseau horaire mode Métronome.
• Format d’affichage 12/24H
• Heures, minutes, secondes, jour de la semaine, mois, jour
• Calendrier 100 ans (2000 ~ 2099)
b. CHRONOGRAPHE
• Précision 1/100e de s.
• Plage de chronométrage: 00’00”00 ~ 23:59’59”
c. MINUTEUR
• Plage de décomptage: 23:59’59” ~ 0’00”00
d. ALARME
• 5 alarmes
• Carillon
• Alarme quotidienne programmable
e. 2e FUSEAU HORAIRE
• Heure du deuxième fuseau horaire
f. METRONOME
• 10 tempos
Page 10

Size: 170 x 55mm
Color: Blk
Size: 170 x 55mm
Color: Blk
a. HEURE
Format d’affichage 12/24H
• En mode Heure, appuyez sur D
pour basculer entre les formats
12H et 24H.
Réglage de l’heure
1. En mode Heure, appuyez sur A
jusqu’à ce que le chiffre des secondes
clignote (indiquant le basculement en
mode Réglage).
2. Appuyez sur D pour remettre les
secondes à zéro.
3. Appuyez sur B pour passer au
champ suivant.
4. Appuyez sur D pour augmenter le
chiffre; maintenez le bouton enfoncé
pour accélérer le défilement.
5. Répétez les étapes 3 et 4 pour les champs suivants
et dans la séquence:
secondes heures minutes année mois
jour.
6. Une fois les réglages terminés, appuyez sur A pour
quitter le mode Réglage (le jour de la semaine est
calculé est affiché automatiquement en fonction de
la date).
b. CHRONOGRAPHE Temps intermédiaire
Chronométrage d’un tour
1. En mode Chronographe, appuyez sur
D pour démarrer le chronométrage.
2. Appuyez de nouveau sur D pour
arrêter le chronométrage.
3. Appuyez sur A pour remettre le
chronographe à zéro.
1. En mode Chronographe, appuyez
sur D pour démarrer le chronométrage.
2. Appuyez sur A pour afficher le temps
intermédiaire; le chronométrage
continue en arrière-plan.
3. Appuyez de nouveau sur A pour
revenir au chronométrage.
4. Répétez les étapes 2 et 3 pour
chronométrer les temps intermédiaires
successifs.
5. Appuyez sur D pour arrêter le chronométrage.
c. MINUTEUR
• Lorsque le compte à rebours atteint zéro, la
sonnerie sonne pendant 60 secondes environ.
Appuyez sur un bouton quelconque pour l’arrêter.
Réglage du minuteur
1. En mode Minuteur, appuyez sur A
jusqu’à ce que le chiffre des heures
clignote (indiquant le basculement en
mode Réglage).
2. Appuyez sur D pour augmenter le
chiffre; maintenez le bouton enfoncé
pour accélérer le défilement.
3. Appuyez sur B pour passer au
champ suivant.
Fonctionnement du minuteur
1. Appuyez sur D pour démarrer le
compte à rebours.
2. Appuyez de nouveau sur D pour
interrompre le compte à rebours.
4. Appuyez sur D pour augmenter le
chiffre; maintenez le bouton enfoncé
pour accélérer le défilement.
5. Répétez les étapes 3 et 4 pour les champs suivants
et dans la séquence:
heures minutes secondes.
6. Une fois les réglages terminés, appuyez sur A pour
quitter le mode Réglage.
d. ALARME
• L’alarme se déclenche tous les jours à l’heure
programmée, la sonnerie durant environ 60
secondes. Appuyez sur un bouton quelconque
pour l’arrêter.
Alarme et carillon
• En mode Alarme, appuyez sur C
pour sélectionner entre le carillon
et les alarmes 1 à 5.
• Lorsque le carillon est sélectionné,
appuyez sur D pour activer/désactiver
le carillon.
• Lorsque l’une des alarmes 1 à 5 est
sélectionnée, appuyez sur D pour
activer/désactiver l’alarme.
Réglage de l’alarme 1
1. En mode Alarme, appuyez sur A
jusqu’à ce que le chiffre des heures
clignote (indiquant le basculement
en mode Réglage).
2. Appuyez sur D pour augmenter le
chiffre; maintenez le bouton enfoncé
pour accélérer le défilement.
3. Appuyez sur B pour passer au
réglage des minutes.
4. Appuyez sur D pour augmenter le
chiffre; maintenez le bouton enfoncé
pour accélérer le défilement.
5. Une fois les réglages terminés, appuyez sur A
pour quitter le mode Réglage.
• Le réglage des autres alarmes 2 à 5 s’effectue de la
même manière.
Page 11

Size: 170 x 55mm
Color: Blk
Size: 170 x 55mm
Color: Blk
Fecha
Segundos
Minutos
Día de la semana
Hora
Mes
(Animación)
SELECCION DEL MODO
a. HORA
• Presione “B” para cambiar de un modo a otro en la siguiente secuencia:
Modo de Hora Modo de Cronómetro Modo de Cuenta Regresiva Modo de Alarma
Modo de Hora Dual Modo de Marca Paso.
BOTONES
• El funcionamiento de los botones está
indicado mediante las letras que se
muestran en la ilustración.
PANTALLA
• La pantalla que se muestra a continuación:
ILUMINACION DE FONDO
• La iluminación de fondo usa un EL
(electroluminiscencia), el cual causa que la pantalla
brille para fácil lectura en la oscuridad.
• Formato de 12/24 horas
• Hora, Minutos, Segundos, Día de la semana, mes, fecha
• Calendario de 100 años (2000 ~ 2099)
b. CRONOMETRO
• Unidad de 1/100 segundo
• Rango de medición: 00’00”00 ~ 23:59’59”
c. CUENTA REGRESIVA
• Rango de cuenta regresiva: 23:59’59” ~ 0’00”00
Inicio /
Detención
Iluminación
de fondo EL
Modo
Reajuste
Uso de la iluminación de
fondo EL
• En el modo de hora,
presione “C” para iluminar
la pantalla por unos 3 segundos.
ATENCION
1. Jamás trate de abrir la caja o remover su cubierta
trasera.
2. No hacer funcionar ningún botón bajo el agua.
3. Si apareciera humedad dentro del reloj, hágalo ver
inmediatamente por su vendedor. De otro modo, podría
causar erosión en las partes metálicas del reloj.
4. Aunque el reloj ha sido diseñado para soportar uso
normal, debería evitar su maltrato dejarlo caer.
5. Evite exponer el reloj a temperaturas extremas.
6. Repase el reloj solamente con un paño seco y suave.
Evite que tome contacto directo con materiales químicos,
los que podrían causar deterioro de las partes plásticas
del reloj.
7. Evite usar el reloj bajo condiciones de estática y
electromagnetismo.
Temporizador de Cuenta Regresiva
Iluminación de Fondo EL
Hora Dual
Calendario de 100 Años
Resistente al Agua a 100 mts.
5 Alarmas
Campana
Pila (CR2025)
Cronómetro
Marca Paso
Fonctionnement du métronome
1. En mode Métronome, le chiffre
clignote pour indiquer le tempo.
2. Appuyez sur A pour sélectionner le
tempo dans la séquence suivante:
10 20 30 40 60
80 120 160 240 320.
3. Appuyez sur D pour démarrer le
métronome.
4. Appuyez de nouveau sur D pour
l’arrêter.
f. METRONOMEe. 2e FUSEAU HORAIRE
Réglage de l’heure du 2e
fuseau horaire
1. En mode 2e fuseau horaire, appuyez
sur A jusqu’à ce que le chiffre des
heures clignote (indiquant le
basculement en mode Réglage).
2. Appuyez sur D pour augmenter le
chiffre; maintenez le bouton enfoncé
pour accélérer le défilement.
3. Appuyez sur B pour passer au
réglage des minutes.
4. Appuyez sur C ou D pour modifier
le chiffre (chaque pression ajoute ou
retire 30 minutes).
5. Une fois les réglages terminés, appuyez sur A pour
quitter le mode Réglage.
Page 12

Size: 170 x 55mm
Color: Blk
Size: 170 x 55mm
Color: Blk
a. HORA
Formato de 12/24 horas
• En el modo de hora, presione “D”
para alternar entre los formatos de
12 ó 24 horas.
Ajuste de la Hora
1. En el modo de hora, presione “A”
para que titilen los segundos (el
parpadeo indica el modo de ajuste).
2. Presione “D” para reajustar los
segundos.
3. Presione “B” para cambiar la
siguiente selección.
4. Presione “D” para incrementar el
número, presione y sostenga para
incrementar en alta velocidad.
5. Repita los pasos 3 y 4 para la selección en la
siguiente secuencia:
Segundos Hora Minutos Año Mes
Fecha.
6. Presione “A” para salir del modo de ajuste, una
vez efectuados los ajustes deseados (el día de la
semana será mostrado automáticamente en
concordancia con el año, mes y fecha ajustados).
d. ALARMA
• 5 alarmas
• Señal horaria
• La alarma suena todos los días a la hora prefijada
e. HORA DUAL
• Hora para otra zona horaria
f. MARCA PASO
• 10 tempos
c. CUENTA REGRESIVA
• Cuando la cuenta regresiva llegue a cero, la alarma
sonará durante unos 60 segundos; presione cualquier
botón para detenerla.
Ajustes de la Cuenta Regresiva
1. En el modo de cuenta regresiva,
presione “A” para que titile la hora
(el parpadeo indica el modo de ajuste).
2. Presione “D” para incrementar la
hora y presione y sostenga para
incrementar en alta velocidad.
3. Presione “B” para cambiar a la
siguiente selección.
Uso del Temporizador de
Cuenta Regresiva
1. Presione “D” para iniciar la cuenta
regresiva.
2. Para pausar la cuenta regresiva
presione nuevamente “D”.
4. Presione “D” para incrementar el
número y presione y sostenga para
incrementar en alta velocidad.
5. Repita los pasos 3 y 4 para ver la selección en la
siguiente secuencia:
Hora Minutos Segundos.
6. Presione “A” para salir el modo e ajuste una vez
efectuados los ajustes deseados.
b. CRONOMETRO Tiempo Dividido
Tiempo de Vuelta
1. En el modo de cronómetro, presione
“D” para iniciar el cronómetro.
2. Para detener el cronómetro,
presione nuevamente “D”.
3. Presione “A” para reajustar el
cronómetro.
1. En el modo de cronómetro,
presione “D” para iniciar esta función.
2. Presione “A” para mostrar el
tiempo dividido, el conteo del
cronómetro continuará internamente.
3. Presione “A” para borrar el
tiempo dividido y continuar la
medición del tiempo.
4. Repita los pasos 2 y 3 para medir los tiempos
divididos múltiples.
5. Presione “D” para detener el cronómetro.
Page 13

Size: 170 x 55mm
Color: Blk
Size: 170 x 55mm
Color: Blk
注意
1. 不要打开表盖或后表盖。
2. 在水中不要按动任何按钮。
3. 一旦发现表内有潮湿现象,立即拿给检修师
检查。否则会腐蚀表内的金属部件。
4. 虽然腕表设计可抵受正常使用,但仍应小心
使用, 不要摔打腕表。
5. 不要将腕表置于极端温度环境中。
6. 只能用柔软的干布擦拭腕表,不要将腕表与
化学材料直接接触,否则会腐蚀腕表的塑料材料。
7. 不要将腕表置于电磁或静电的环境中。
倒计时器
EL背光
双时
百年日历
百米防水
5个闹钟
点钟报时
电池 (CR2025)
秒表
步测器
日期
秒
分
星期
时
月
(卡通)
按钮
• 按钮操作如插图所示。
显示
• 表盘显示如下:
背光
• 背光是利用EL(电致发光)发光,这样在
黑暗中就很容易看到腕表上的数字。
开始 / 停止
EL背光模式
重置
启动EL背光功能
• 在时间模式中,按“C”
可使背光亮3秒。
Uso del Marca Paso
1. En el modo de marca paso, el
número de tempo titilará.
2. Presione “A” para seleccionar el
tempo en la siguiente secuencia:
10 20 30 40 60
80 120 160 240 320.
3. Presione “D” para iniciar.
4. Para detener, presione
nuevamente “D”.
d. ALARMA
• La alarma sonará todos los días a la hora prefijada
durante unos 60 segundos; presione cualquier
botón para detenerla.
Alarma y Campana
• En el modo de alarma, presione “C”
para seleccionar campana, Alarma1 ~
Alarma 5.
• En el modo de campana, presione
“D” para activarla / desactivarla.
• En el modo Alarma1 ~ Alarma 5,
presione “D” para activar /
desactivar la alarma.
f. MARCA PASO
Ajuste de la Alarma 1
1. En el modo de alarma, presione “A”
para que titile la hora (el parpadeo
indica el modo de ajuste).
2. Presione “D” para incrementar la
hora, presione y sostenga para
incrementar en alta velocidad.
3. Presione “B” para seleccionar
los minutos.
4. Presione “D” para incrementar los
minutos, presione y sostenga para
incrementar en alta velocidad.
5. Presione “A” para salir del modo de ajuste una
vez efectuados los ajustes deseados.
• Ajustes y manejo de Alarma1 ~ Alarma 5 son iguales.
e. HORA DUAL
Ajuste de Hora Dual
1. En el modo de hora dual, presione
“A” para que titile la hora (el
parpadeo indica el modo de ajuste).
2. Presione “D” para incrementar la
hora, presione y sostenga para
incrementar en alta velocidad.
3. Presione “B” para seleccionar
los minutos.
4. Presione “D” para cambiar los
minutos (presione una vez para
cambiar de a 30 minutos).
5. Presione “A” para salir del modo de ajuste una
vez efectuados los ajustes deseados.
Page 14

Size: 170 x 55mm
Color: Blk
Size: 170 x 55mm
Color: Blk
a. 时间
12/24小时格式
• 在时间模式中,按“D”
可转换12/24小时格式。
时间设置
1. 在时间模式中,按“A”,
秒数位闪动(数位闪动表示
已进入设置模式)。
2. 按“D” 重置秒钟。
3. 按“B”切换到下一个选项。
4. 按“D” 增加数值,长按可
加快数值增加速度。
5. 重复步骤3和4,将按以下顺序设置选项:
秒 时 分 年 月 日
6. 设置完毕后,按“A”退出设置状
(随着年月日设置的改变,星期会自动调整)。
b. 秒表 分段计时
一圈的时间
1. 在秒表模式中,按“D”
启动秒表计时。
2. 再按“D”停止秒表计时。
3. 按“A”重置秒表。
1. 在秒表模式中,按“D”
启动秒表计时。
2. 按“A”显示分段计时时间,
秒表仍继续计时。
3. 按“A”清除分段计时时间,
并继续时间测量。
4. 重复步骤2和3,可测量多个分段时间。
5. 按“D ”停止秒表计时。
模式选择
a. 时间
• 按“B”可按以下顺序转换模式:
时间模式 秒表模式 倒计时模式 闹钟模式
双时模式 步测器模式
• 12/24小时格式
• 时、分、秒、星期、月份、日期
• 百年日历 (2000 ~ 2099)
b. 秒表
• 以1/100 秒为量度单位
• 计时范围: 00’00”00 ~ 23:59’59”
c. 倒计时
• 倒计时范围: 23:59’59” ~ 0’00”00
d. 闹钟
• 5个闹钟
• 点钟报时信号
• 每天闹钟会在预设时间响铃
e. 双时
• 其他时区的时间
f. 步测器
• 10 个速度
Page 15

Size: 170 x 55mm
Color: Blk
Size: 170 x 55mm
Color: Blk
c. 倒计时
• 如果倒计时的时间到达0,闹钟会响60秒,
按任意键可暂停。
倒计时器设置
1. 在倒计时模式中,按“A”,
小时数位闪动(表示已进入设
置模式)。
2. 按“D”增加小时数值,长
按可加快增加速度。
3. 按“B”转换到下一个选项。
倒计时器的使用
1. 按“D”启动倒计时器。
2. 按“D”暂停倒计时器。
4. 按“D”增加数值,长按可加
快增加速度。
5. 重复步骤3和4,按以下顺序设置选项:
时 分 秒
6. 设置完毕后,按“A”退出设置状态。
d. 闹钟
• 每天到达预设时间,闹钟会响60秒,按任
意键可暂停。
闹钟和点钟报时
• 在闹钟模式中,按“C”选择
点钟报时、闹钟1 - 闹钟5.
• 在点钟报时状态,按“D”可
开/关点钟报时功能。
• 在闹钟1 - 闹钟5状态中,按
“D” 可开/关闹钟功能。
闹钟1设置
1. 在闹钟模式中,按“A”,
小时数位闪动 (表示已进入设
置模式)。
2. 按“D”增加小时数值,长
按可加快增加速度。
3. 按“B”转换到分钟选项。
4. 按“D”增加分钟数值,长
按可加快增加速度。
5. 设置完毕后,按“A”退出设置状态。
• 闹钟1 - 闹钟5的设置及操作步骤相同。
ATENÇÃO
1. Nunca tente abrir a caixa ou retirar a tampa de trás.
2. Não pressione as teclas dentro d´água.
3. Se aparecer umidade dentro do relógio, leve-o
imediatamente para um representante. Caso contrário,
pode haver danos nas partes de metal do relógio.
4. Apesar de ser desenhado para suportar um uso normal,
deve-se evitar um uso indevido e as quedas.
5. Evite expor o relógio à temperaturas extremas.
6. Seque o relógio com um pano seco e macio somente.
Evite o contato com materiais químicos, que podem
provocar danos às partes de plástico do relógio.
7. Evite utilizar o relógio em condições elétromagneticas
e de estática.
Cronógrafo de Contagem Regressiva
Luz de fundo EL
Tempo Dual
Calendário de 100 Anos
À Prova D´água até 100 mts
5 Alarmes
Som do alarme
Bateria (CR2025)
Cornômetro
Medidor do Tempo
使用步测器
1. 在步测器模式中,速度数位
闪动。
2. 按“A”选择以下顺序的速度:
10 20 30 40 60
80 120 160 240 320.
3. 按“D”启动。
4. 再按“D”停止。
f. 步测器e. 双时
双时设置
1. 在双时模式中,按“A”,
小时数位闪动(表示已进入
设置模式)。
2. 按“D”增加小时数值,
长按可加快增加速度。
3. 按“B”转换到分钟选项。
4. 按“D”改变分钟数值
(每按一次改变30分钟)。
5. 设置完毕后,按“A”退出设置状态。
Page 16

Size: 170 x 55mm
Color: Blk
Size: 170 x 55mm
Color: Blk
Data
Segundos
Minutos
Dia da semana
Hora
Mês
(Desenho)
SELEÇÃO DO MODO
a. REGISTRO DO TEMPO
• Pressione “B” para mudar de modo em modo na seguinte seqüência:
Modo registro do tempo Modo Cronômetro Modo Contagem Regressiva
Modo Alarme Modo Tempo Dual Modo Medidor do Tempo.
TECLAS
• O fucionamento das teclas utiliza as
letras indicadas na ilustração.
DISPLAY
• A tela se explica abaixo:
LUZ DE FUNDO
• A luz de fundo utilizada é EL (elétroluminiscente)
o que faz que o display brilhe na escuridão para
facilitar a leitura.
• Formato 12/24 horas
• Hora, Minutos, Segundos, Dia da semana, Mês, Data
• Calendário de 100 anos (2000 ~ 2099)
b. CRONÔMETRO
• Unidade de 1/100 segundos
• Extesnão da medição: 00’00”00 ~ 23:59’59”
c. CONTAGEM REGRESSIVA
• Extensão da contagem: 23:59’59” ~ 0’00”00
Começar /
Parar
Luz de
Fundo EL
Modo
Reajustar
Utilize a Luz de Fundo EL
• No modo de registro do
tempo, pressione “C” para
iluminar o display por uns
3 segundos.
a. REGISTRO DO TEMPO
Formato 12/24 hrs
• No modo registro do tempo,
pressione “D” para mudar entre
os formatos 12/24 horas.
Registro do Tempo
1. No modo registro do tempo,
pressione “A” e os segundos
piscarão (piscar indicar estar
no modo de ajuste).
2. Pressione “D” para reajustar
os segundos.
3. Pressione “B” para mudar à
seguinte seleção.
4. Pressione “D” para aumentar o
número, mantenha pressionada para
aumentar rápidamente.
5. Repita os passos 3 e 4, faça a seleção na
seguinte seqüência:
Segundos Hora Minutos Ano Mês
Data.
6. Pressione “A” para sair do modo de ajuste, após
ter ajustado (O dia da semana se ajusta
automáticamente de acordo com o ano, mês e
data do ajuste.)
d. ALARME
• 5 Alarmes
• Sinal horário de tempo
• O alarme soa na mesma hora cada dia
e. TEMPO DUAL
• O tempo para outro fuso horário
f. MEDIDOR DO TEMPO
• 10 tempos
Page 17

Size: 170 x 55mm
Color: Blk
Size: 170 x 55mm
Color: Blk
c. Contagem Regressiva
• Quando a contagem regressiva chega à zero, o
alarme soará por uns 60 segundos. Pressione
qualquer tecla para pará-lo.
Ajuste da Contagem Regressiva
1. No modo de contagem regressiva,
pressione “A” e a hora piscará (piscar
indica estar no modo de ajuste).
2. Pressione “D” para aumentar a hora,
mantenha pressionada para aumentar
rápidamente.
3. Pressione “B” para mudar para a
seguinte seleção.
Utilize o Timer da Contagem Regressiva
1. Pressione “D” para começar a
contagem regressiva.
2. Para fazer uma pausa na contagem,
pressione “D” novamente.
4. Pressione “D” para aumentar o
número, mantenha pressionada para
aumentar rápidamente.
5. Repita os passos 3 e 4 faça a seleção na seguinte
seqüência:
Hora Minutos Segundos.
6. Pressione “A” para sair do modo de ajuste, após
ter ajustado.
b. CRONÔMETRO Tempo Compartilhado
Tempo da Volta
1. No modo cronômetro, pressione
“D” para começar o cronômetro.
2. Para parar o cronômetro, pressione
“D” novamente.
3. Pressione “A” para reajustar o
cronômetro.
1. No modo cronômetro, pressione
“D” para começar o cronômetro.
2. Pressione “A” para mostrar o
tempo compartilhado, a contagem
do cronômetro continua internamente.
3. Pressione “A” para apagar o
tempo compartilhado e continuar
com a contagem do tempo.
4. Repita os passos 2 e 3 para medir varios tempos
compartilhados.
5. Pressione “D” para parar o cronômetro.
Uso do Medidor do Tempo
1. No modo medidor do tempo, o
número do tempo piscará.
2. Pressione “A” para selecionar a
seqüência do tempo na seguinte
seqüência:
10 20 30 40 60
80 120 160 240 320.
3. Pressione “D” para começar.
4. Para parar, pressione “D”
novamente.
d. ALARME
• O alarme soará na mesma hora cada dia por uns
60 sgundos, pressione qualquer tecla para pará-lo.
Alarme e Som do Alarme
• No modo alarme, pressione “C”
para selecionar o som, Alarme 1 ~
Alarme 5.
• No estado do som do alarme,
pressione “D” para ligar/desligar
o som.
• No estado do Alarme 1 ~ Alarme 5,
pressione “D” para ligar/desligar o
alarme.
f. MEDIDOR DO TEMPO
Ajuste do Alarme 1
1. No modo alarme, pressione “A”
e a hora piscará (piscar indica estar
no modo de ajuste).
2. Pressione “D” para aumentar a
hora, mantenha pressionada para
aumentar rápidamente.
3. Pressione “B” para selecionar os
minutos.
4. Pressione “D” para aumentar os
minutos, mantenha pressionada para
aumentar rápidamente.
5. Pressione “A” para sair do modo de ajuste, após
ter ajustado.
• O ajuste e o funcionamento dos Alarme 1 ~
Alarme 5 é o mesmo.
e. TEMPO DUAL
Ajuste do Tempo Dual
1. No modo de tempo dual, pressione
“A” e a hora piscará (piscar indica
estar no modo de ajuste).
2. Pressione “D” para aumentar a
hora, mantenha pressionada para
aumentar rápidamente.
3. Pressione “B” para selecionar os
minutos.
4. Pressione “D” para mudar os
minutos (pressionar uma vez muda
30 minutos).
5. Pressione “A” para sair do modo de ajuste, após
ter ajustado.
Page 18

Size: 170 x 55mm
Color: Blk
Size: 170 x 55mm
Color: Blk
ご注意
1.時計のケースを開いたり、裏のカバーをはずした
りしな いでくださ い 。
2.ボタン操作は、水中ではおこなわないでください。
3.時計の内側に水分が生じたときは、すぐに販売店
で点検をご相談ください。時計の金属部分が腐食す
る恐 れが あります。
4.この時計は日常の使用に耐えるよう設計されてい
ますが、乱暴な取扱いは避け、落下させないようご
注意 くださ い。
5.時計は、極端な高温や低温にさらさないでくださ
い。
6.時計のお手入れは、乾いた柔らかい布のみでふ
いてください。化学薬品が直接触れないようにして
ください。化学薬品は、時計のプラスチック部品を劣
化させ ます。
7.時計は、電磁気、静電気の発生する場所での使用
は避 け てくださ い。
カウントダウンタイマー
バックラ イト
デュア ルタ イム
100年カレンダー
100M防水
5アラーム
時報
バッテリー(CR2025)
ストップウォッチ
ペースメ ーカ ー
日付
秒
分
曜日
時
月
(動画)
ボタン
•ボタン操作は、図内の文字で表示さ
れていま す。
表示
•画面の表示は次の通りです:
バックラ イト
•ELを使用したバックライトが点灯し、暗いところ
でも 表示 を 読む ことが でき ます。
スタート/
ストップ
バックラ イトモード
リセット
バックラ イトの 使用 方 法
•時刻モードでCを押すと、
表示盤にライトが約3秒間
点灯 します。
モードの選択
a.時刻
•Bを押すと、次の順序でモードが変ります:
時刻モードストップウォッチモードカウントダウンモードアラームモード
デュアルタイムモードペースメーカーモード
•12/24時表示
•時、分、秒、曜日、月、日付
•100年カレンダー(2000~2099)
b.ストップウォッチ
•1/100秒単位
•測定範囲:00ʼ00”00~23:59ʼ59”
c. カウントダウン
•カウントダウン範囲:23:59ʼ59”~0ʼ00”00
d.アラーム
•5アラーム
•時報
•アラームは、毎日設定時刻に鳴ります
e.デュアルタイム
•海外の時刻が設定できます
f.ペースメーカー
•10テンポ
Page 19

Size: 170 x 55mm
Color: Blk
Size: 170 x 55mm
Color: Blk
a.時刻
12/24時表示
•時刻モードでDを押すと、12/24時
表示 が 切り替 わります。
時刻設定
1.時刻モードでAを押すと、秒が点
滅します(点滅は、設定モードを表
し ま す )。
2.Dを押して秒をリセットします。
3.Bを押すと次の設定箇所に移り
ます。
4.Dを押すと、数字が進みます。長押
し す る と 、早 送 り し ま す 。t
5.上の3と4を繰返します。設定の順序は次の通り:
秒時分年月日付
6.設定が終了したら、Aを押して設定モードを終
了します(曜日は、年、月、日の設定に従い自動的
に 表 示 さ れ ま す )。
b.ストップウォッチ スプリットタイム
ラップタ イム
1. ストップウォッチモードで Dを 押
すと、ストップウォッチがスタ ート
します。
2.Dをもう一度押すと、ストップウ
ォッチ が スト ップし ます 。
3.Aを押すと、ストップウォッチを
リセットします。
1. ストップウォッチモードで Dを 押
すと、ストップウォッチがスタ ートし
ます。
2.Aを押すと、スプリットタイムを
表示しま す。ストップウォッチは、
計測 を続 けます。
3.Aを押すと、スプリットタイムをク
リ ア し 、タ イ ム の 計 測 を 続 け ま す 。
4.上の2と3のステップを繰返すと、スプリットタイ
ムが複数回測定できます。
5.Dを押すと、ストップウォッチがストップします。
c. カウントダウン
•カウントダウンが0になると、アラームが約60秒
間鳴 ります。どれでもボタン を押 すと止まり ます。
カウントダウンタイマー の設 定
1. カウントダ ウンモ ードでA を押 す
と、時が点滅します(点滅は、設定モ
ー ド を 表 し ま す )。
2.Dを押すと、時が進みます。長押
しすると、早送りします。
3.Bを押すと次の設定箇所に移り
ます。
カウントダウンタイマー の使 用方 法
1.Dを押すと、カウントダウンがスタ
ートします 。
2.Dをもう一度押すと、カウントダウ
ンタイマーが一時停止します。
4.Dを押すと、数字が進みます。長押
しすると、早送りします。
5.上の3と4を繰返します。設定の順序は次の通り:
時分秒
6.設定が終了したら、Aを押して設定モードを終
了します。
d.アラーム
•アラームは、毎日設定時刻に約60秒間鳴ります。
どれで もボタ ンを押 すと 止まりま す。
アラームと時 報
•アラームモードでCを押して、時報、
アラーム1〜アラーム5からどれか
選択 します。
•時報でDを押すと、時報のオン/オ
フが切 り替 わります。
•アラ ーム1 〜アラーム5 でD を押す
と、アラームのオン/オフが切り替 わ
ります。
アラーム1の 設定
1.アラームモードでAを押すと、時
が点滅します(点滅は、設定モード
を 表 し ま す )。
2.Dを押すと、時が進みます。長押
しすると、早送りします。
3.Bを押すと、分に移ります。
4.Dを押すと、分が進みます。長押
しすると、早送りします。
5.設定が終了したら、Aを押して設定モードを終
了します。
•アラーム1〜5の設定と操作は同様に行います。
Page 20

Size: 170 x 55mm
Color: Blk
Size: 170 x 55mm
Color: Blk
• When the watch is underwater or wet, never use the pushers/ bezels, or set the time. Watch cases and
metal bracelets should be rinsed throughly in fresh water after being in salt water.
• Non utilizzare mai pulsanti/ corone né impostare l’ora quando l’orologio è sott’acqua a bagnato. Si
consiglia di sciacquare con acqua di rubinetto cassa e bracciale dell’orologio nel caso in cui siano stati
immersi in acqua salata
• Betätigen Sie niemals die Druckknöpfe/ Einstellringe und stellen Sie niemals die Zeit ein, wenn sich die
Uhr unter Wasser befindet oder naß ist. Uhrengehäuse und Metallambänder sollten, nachdem sie
Salzwasser ausgesetzt waren, gründlich abgespült werden.
• Quand la montre est sous l’eau ou qu’elle est mouillée, n’actionnez jamais les boutons ou la couronne, ne
réglez pas l’heure. Il est recommandé de rincer abondamment la montre á l’eau courante si les boîtiers et
les bracelets métalliques ont été au contact de l’eau de mer.
• Cuando el reloj esté bajo el agua o se encuentre mojado, nunca oprima los botones ni ajuste la hora. Los
relojes y brazaletes de metal deberán enjuagarse con abundante agua del grifo después de usarse en agua
salada.
• Quando o relógio estiver submergido ou molhado, nunca utilize os puxadores / biséis, nem ajuste a hora.
As caixas dos relógios e as correias de metal devem ser enxaguadas completamente em agua doce depois
de terem estado em agua salgada.
•
•
當手表在水中或沾濕時,切勿使用按的或表圈,或設定時間。表殼和金屬表帶接觸海水後,應用清水徹底洗干淨。
without any
water resistant
marking
• Always set the crown in the normal position /
Tighten screw-lock crown completely.
• Riposizionare sempre la corona in posisizione
normale / Stringere completamente la corona a vite
• Die Krone nach Handhabungen immer auf die
Normalposition zurückdrücken und niemals unter
Wasser herausziehen. Schraubkronen: nach jeder
Handhabung die Krone unbedingt wieder
festschrauben.
• La couronne doit toujours ètre en position normale
/ Serrer à fond la vis de blocage de la couronne
• Coloque la corona en su posicion habitual / Apriete
por completo el cierre de la corona
• Sempre ajuste a coroa na posição normal / Aperte a
rosca da coroa completamente.
•
•
務必把表把設定在正常位置/完全扭緊螺絲鎖入式表把。
ペースメ ーカ ーの 使い 方
1.ペースメーカーモードでは、テ
ンポ 数が 光ります。
2.Aを押してテンポを選びます。
表示順序は次の通りです:
1020304060
80120160240320.
3.Dを押すとスタートします。
4.もう一度Dを押すとストップし
ます。
f.ペースメーカーe.デュアルタイム
デュア ルタ イムの 設 定
1. デュアルタイムモードでA を押
すと、時が点滅します(点滅は、設
定 モ ー ド を 表 し ま す )。
2.Dを押すと、時が進みます。長押
しすると、早送りします。
3.Bを押すと、分に移ります。
4.Dを押して分を変更します(1回
押すと30分変更します)。
5.設定が終了したら、Aを押して設定モードを終了
します。
Page 21

Size: 85 x 55mm
 Loading...