

Page 1
BJ
INSTRUCTIONMANUAL
Size: 170 x 55mm
Color: PMS 448c + PMS 406c
Size: 170 x 55mm
Color: PMS 448c
and are trademarks of TBL Licensing LLC.
2016 © TBL Licensing LLC. All rights reserved.
Page 2
Size: 170 x 55mm
Color: Blk
Size: 85 x 55mm
Color: Blk
A. Features
- LCD screen displays hour, minute, second, year, month, date and week.
- Auto calendar: from year 2000 to year 2099.
- 3 daily alarms.
- Hourly time signal.
- Stopwatch: the maximum display range of stopwatch is 99 hours, 59 minutes, 59 seconds.
- Countdown timer: the maximum display range of countdown timer is 99:59:59.
- Electronic compass.
- 12-hour/24-hour format.
- World time, time for 48 cities.
- Daylight saving time.
- Button tone.
- EL backlight for 3 seconds.
SET/LIGHT (Button A)
MODE (Button B)
(Button E) UP
(Button D) COMP
(Button C) DOWN
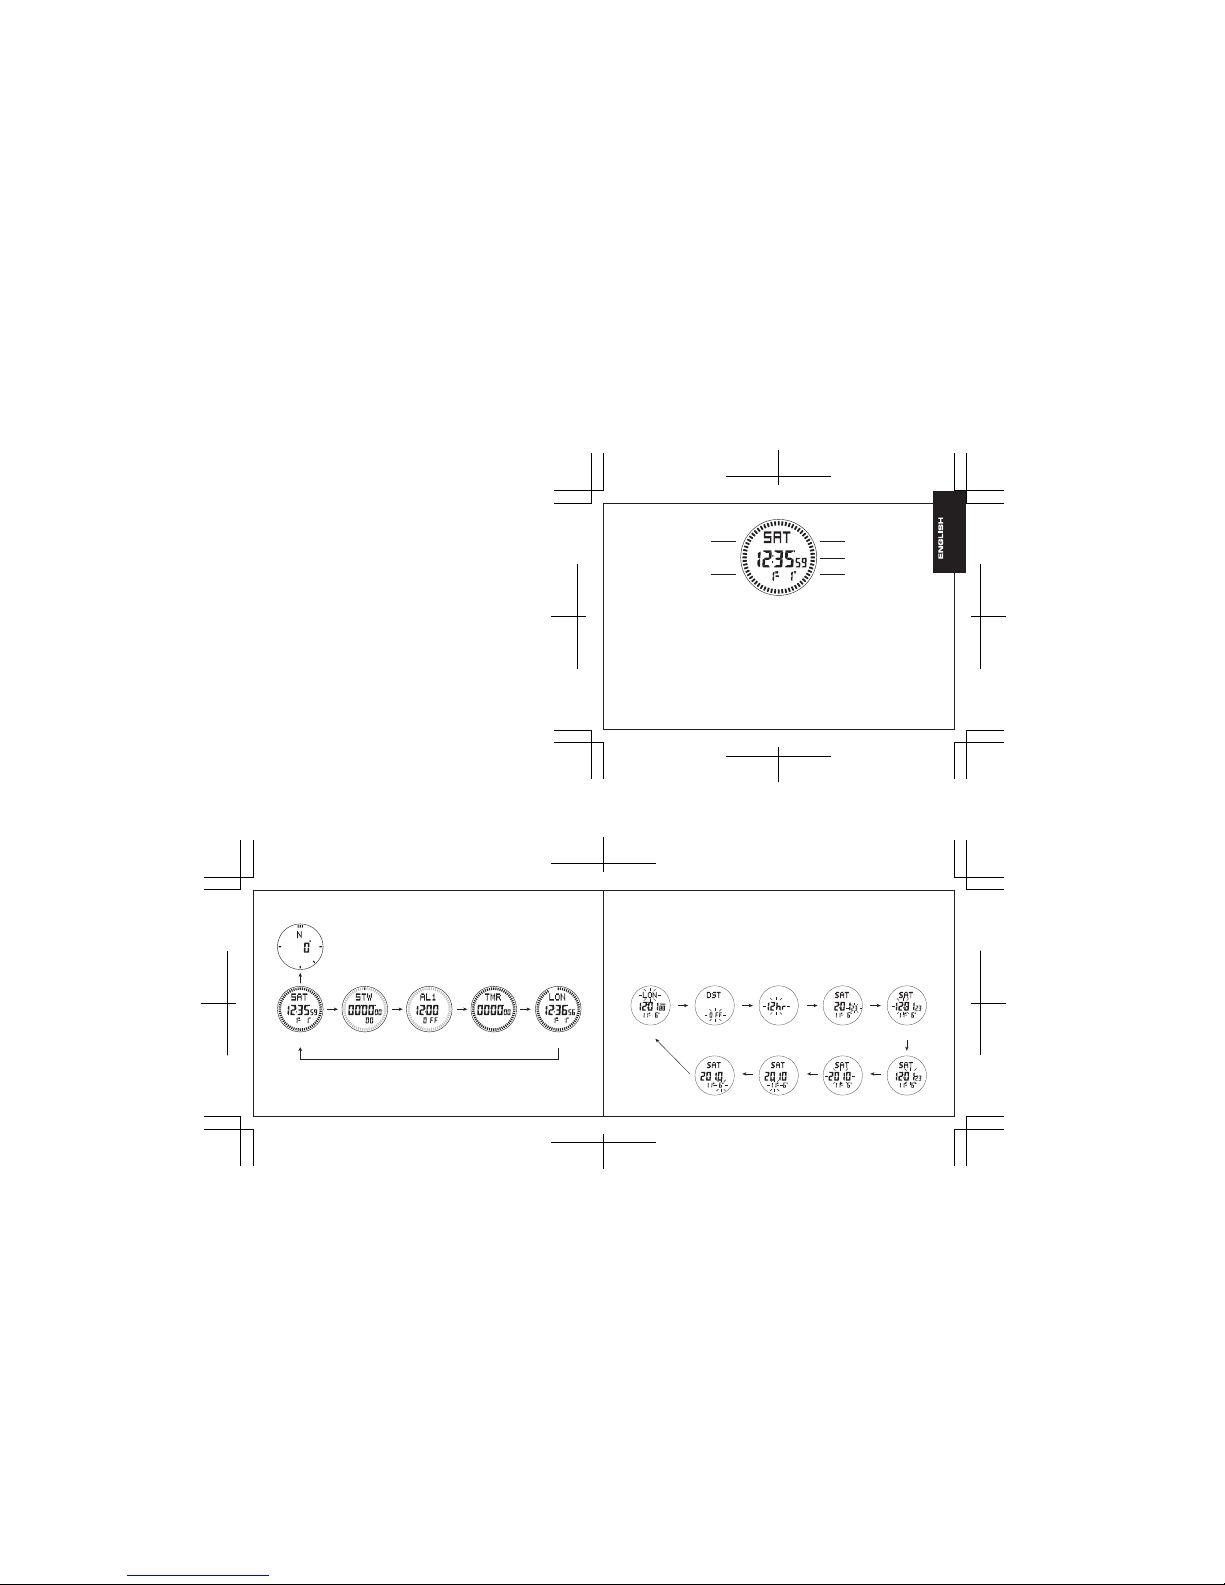
2. Normal time mode
- Press A once, EL illuminates for 3 seconds. Hold down A for 2 seconds to enter setting mode.
- Press B to select operating mode.
- Press C to switch the format between “date---month” and “month---date”.
- Press D to enter compass measurement mode.
- Press E to switch the mode between “world time” and “normal time”.
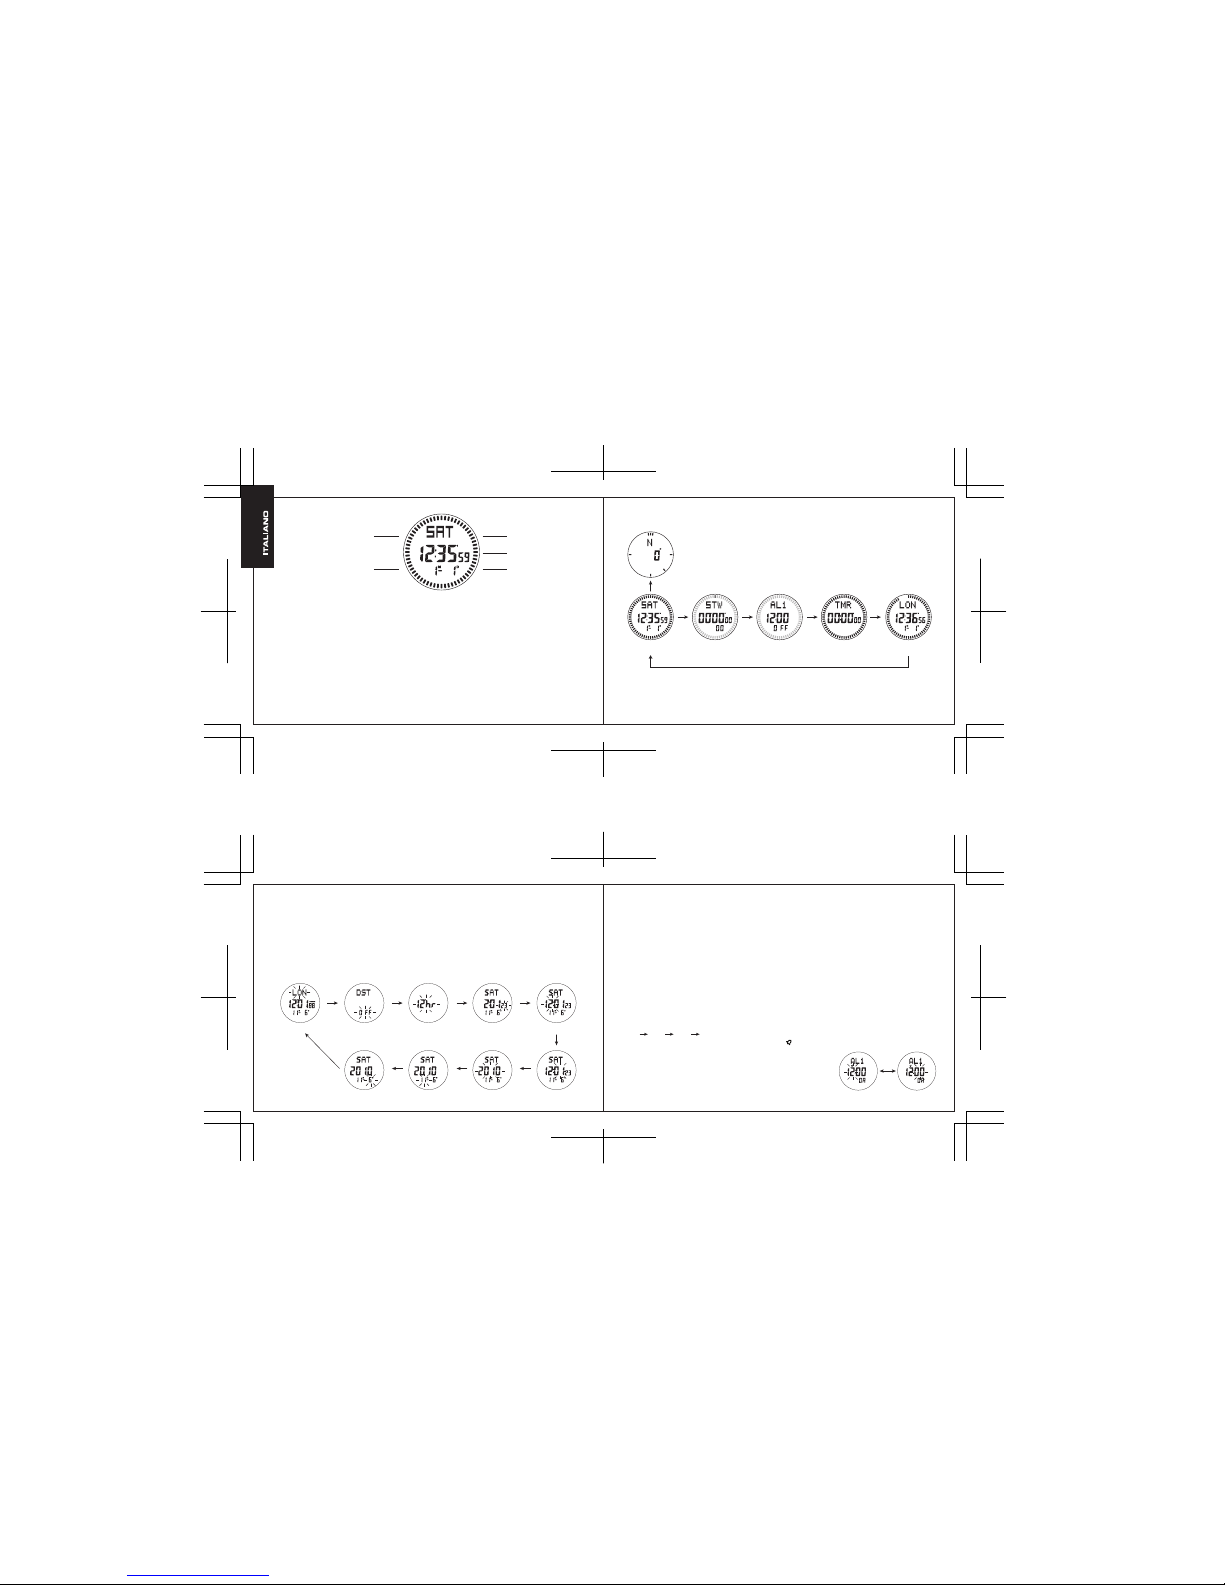
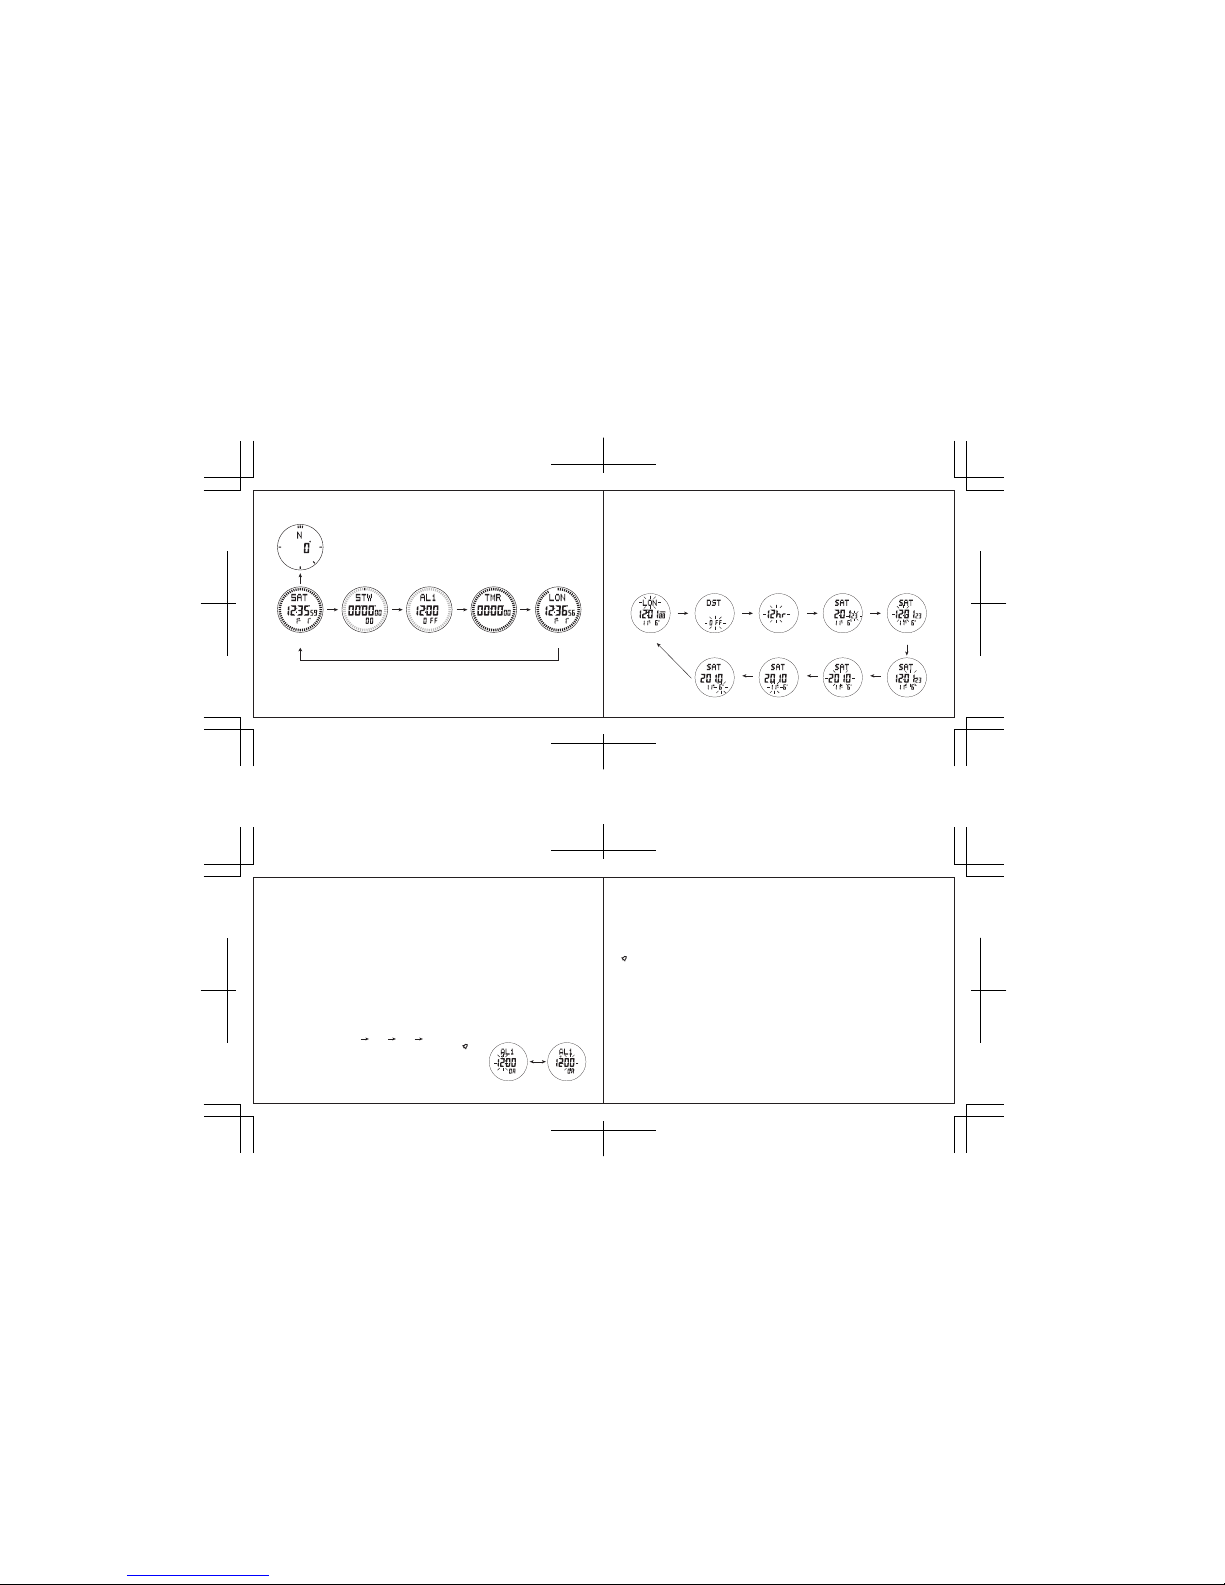
3. To set time and date
- In normal time mode, hold down A for 2 seconds, “Time zone” starts to flash, which indicates setting
mode, then press B to select other setting items(flash) in sequence as below:
B. Product Functional Mode
1. In any mode, EL illuminates for 3 seconds by pressing (Button) A once.
Normal time mode Stopwatch mode Alarm mode Countdown timer mode World time mode
Button B
Button D
Button B Button B
Button B
Button B
Time zone DST 12H/24H format Second Hour
Button B
Button B Button B Button B
Button B
Button BButton B Button B Button B
Date Month Year Minute
Measurement mode for compass
Page 3
Size: 170 x 55mm
Color: Blk
Size: 170 x 55mm
Color: Blk
- Press E to increase time zone, hold down E to increase time zone quickly.
- Press C to decrease time zone, hold down C to decrease time zone quickly.
- Press E or C to turn on / off daylight saving time. Indicator of “DST”will appear on the screen when
daylight saving time is turned on.
- Press E or C to switch 12-hour / 24-hour format.
- Press E to increase the values, hold down E to increase the values quickly.
- Press C to decrease the values, hold down C to decrease the values quickly.
- Press E or C to clear “seconds” to zero.
- Press A to confirm and exit from setting, then return to normal time mode.
- In setting mode, if you do not perform any button within one minute, the watch will automatically exit
from setting, and then return to normal time mode.
- Press E to increase the values, hold down E to increase the values quickly.
- Press C to decrease the values, hold down C to decrease the values quickly.
- Press A to confirm and exit from setting, then return to normal time mode.
- In setting mode, if you do not perform any button within one minute, the watch will automatically exit
from setting, and then return to normal time mode.
- When alarm time is reached, alarm tone will sounds for 60 seconds, and alarm indicator “ ” will flash.
- To stop the alarm tone after it starts to sound, press any button.
- Note: The setting method of “AL2 and AL3” is same as AL1’s.
5. Stopwatch mode
- The maximum display range of stopwatch is: 99 hours, 59 minutes and 59 seconds.
- In stopwatch mode, press E to start / stop counting. Press C to reset to zero when stopwatch stopped.
- When stopwatch is counting, press C to enter SPL time (split time), indicator of “SPL” will display on the
screen.
- Press C to exit from SPL(split time), stopwatch countinue to run.
- The stopwatch will restart to count from 00 when reach its maximum limit.
- If you don’t stop the stopwatch, the stopwatch will contunue to run at the background after pressing B
to exit from stopwatch mode.
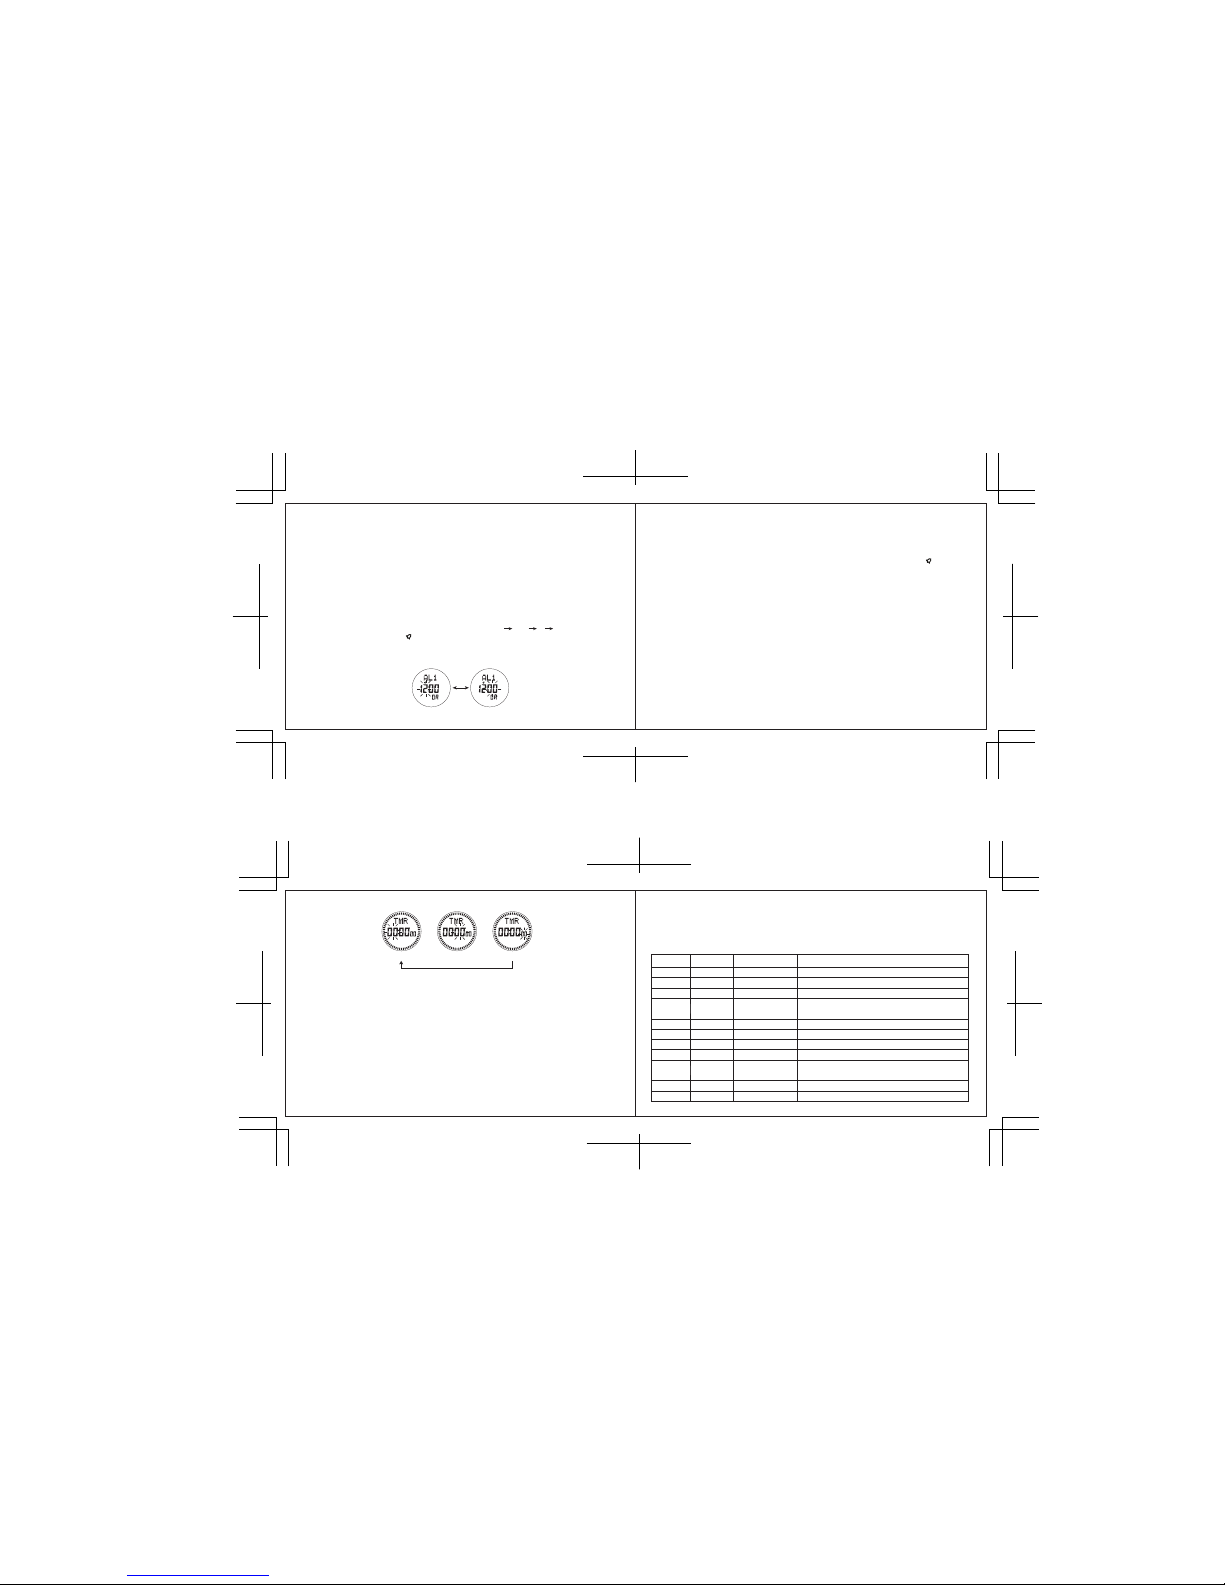
4. Alarm mode
a) Turn on / off alarm
- In alarm mode, press C to toggle 3 daily alarms in sequence: AL1 AL2 L SIG.
- Press D to turn on / off alarm “ ”. Press D to turn on / off hourly time signal (CHI).
b) To set alarm
- In the first alarm (AL1) mode, hold down A for 2 seconds, “Hour” starts to flash, “minute” flashes by
pressing B, please as following:
Button B
MinuteHour
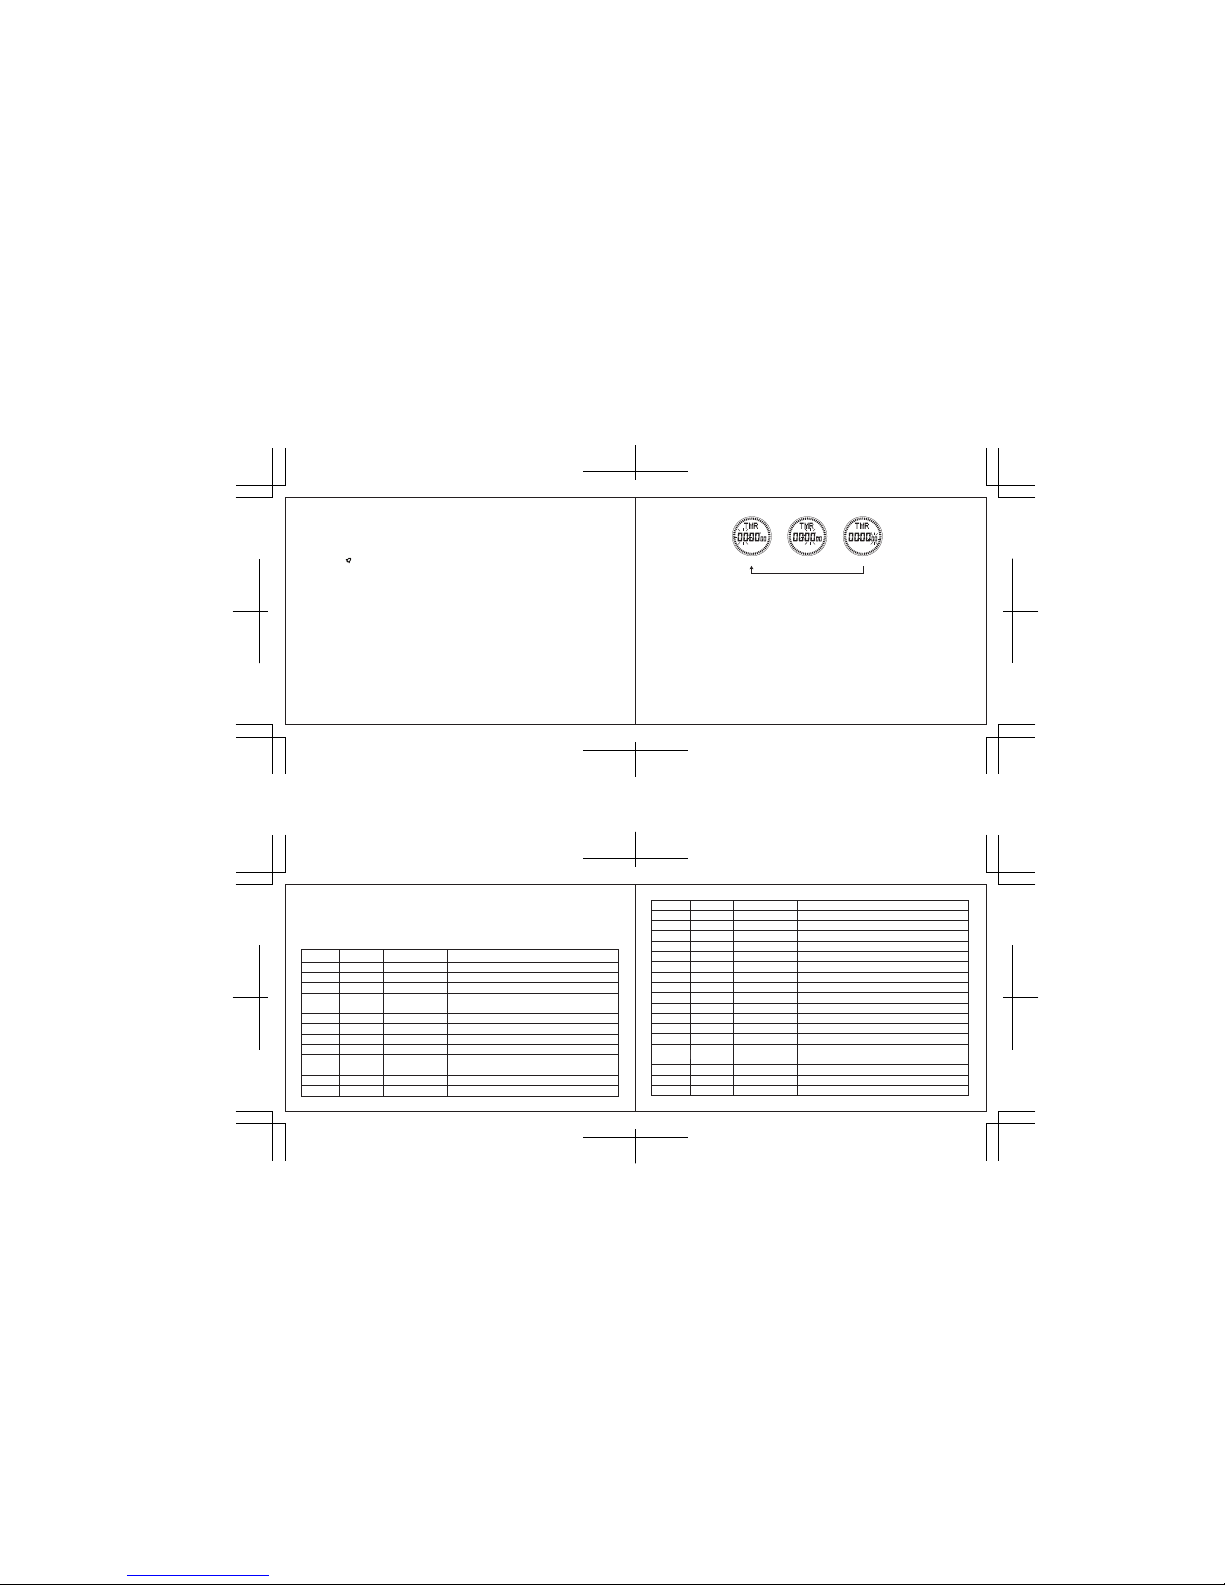
Hour Minute Second
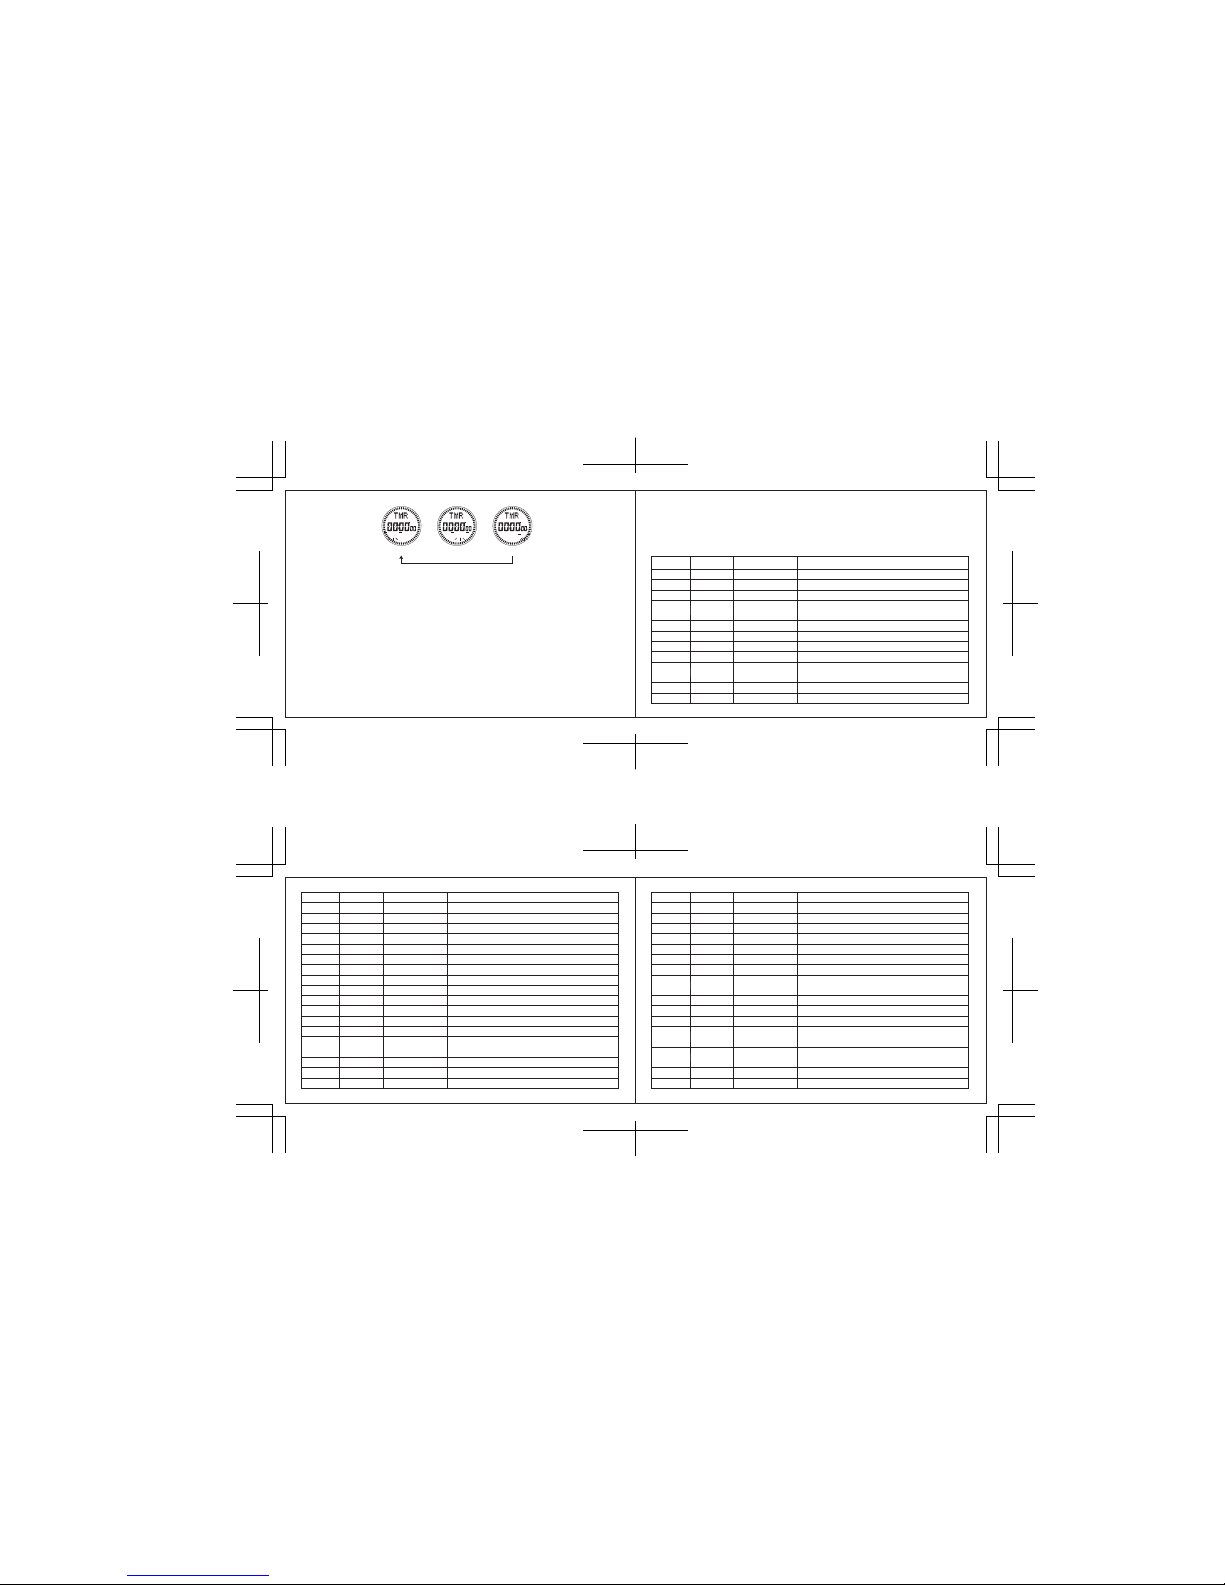
6. Countdown timer mode
- The maximum display range of countdown timer is: 99 hours, 59 minutes and 59 seconds.
a) To set countdown time
- In countdown time mode, hold down A for 2 seconds, “Hour” starts to flash, which indicates countdown
time setting, then press B to select other setting items (flash) in sequence as below:
- Press E to increase the values, hold down E to increase the values quickly.
- Press C to decrease the values, hold down C to decrease the values quickly.
- Press A to confirm and exit from setting, then return to normal time mode.
- In setting mode, if you do not perform any button within one minute, the watch will automatically exit
from setting, and then reutrn to normal time mode.
b) To use countdown timer
- Press E to start counting down.
- When countdown timer is running, press E to pause, then press E once more to go on running.
- If you want to cancel countdown time, after pressing E to pause, then countdown time will return to the
original value by pressing C.
- When countdown time is reached to 00:00:00, the watch will sound for one minute. Press any button to
stop it.
- If you don’t stop countdown timer, the countdown timer will continue to run at the background after
pressing B to exit from countdown timer mode.
7. World time
- In world time mode, press A to turn on / off daylight saving time. When “DST” is displayed, it indicates
that the DST function is turned on. If no “DST” displayed, it indicates that the DST function is turned off.
- Press E to view the time zone& time upward, hold down E to fast view the time zone & time upward.
- Press C to view the time zone & time downward, hold down C to fast view the time zone & time
downward.
City Code City GMT Differential Other major cities in same time zone
UCT Gatwick 00.0
LIS Lisbon
LON London 00.0 Dublin,Lisbon Casablanca, Dakar, Abidjan
MAD Madrid +01.0 Milan Rome, Madrid, Amsterdam, Algiers. Hamburg,
Frankfurt, Vienna, Stockhoim, Berlin.
PAR Paris
ROM Roma Roma
BER Berlin +01.0
SOT Stockholm
ATH Athens +02.0 Helsinki,Istanbul, Beirut Damascus Cape town, Frankfurt,
Vienna, Madrid, Stockholm
CAI Cairo +02.0 Athens Helsinki, Istanbul, Beirut Damascus Cape town
JRS Jerusalem +02.0
Page 4
Size: 170 x 55mm
Color: Blk
Size: 170 x 55mm
Color: Blk
Button B
Manual
Correction Mode
Digital
Correction Mode
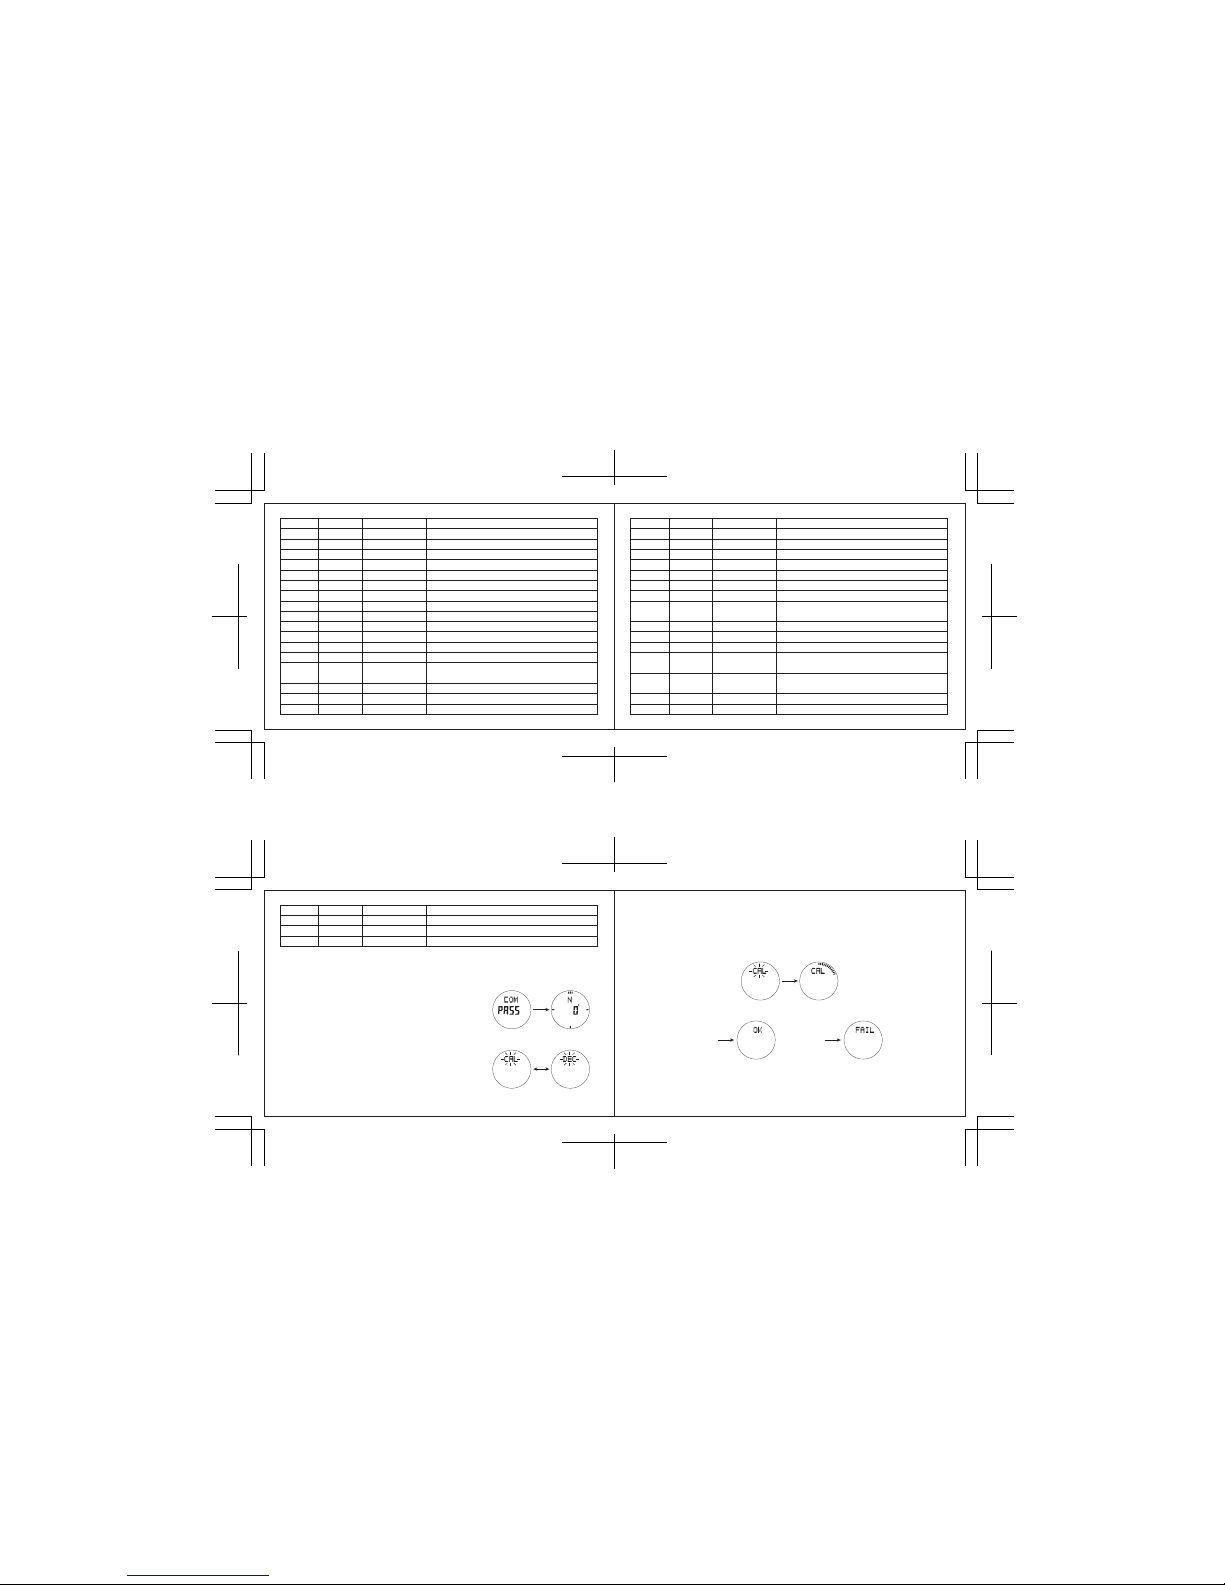
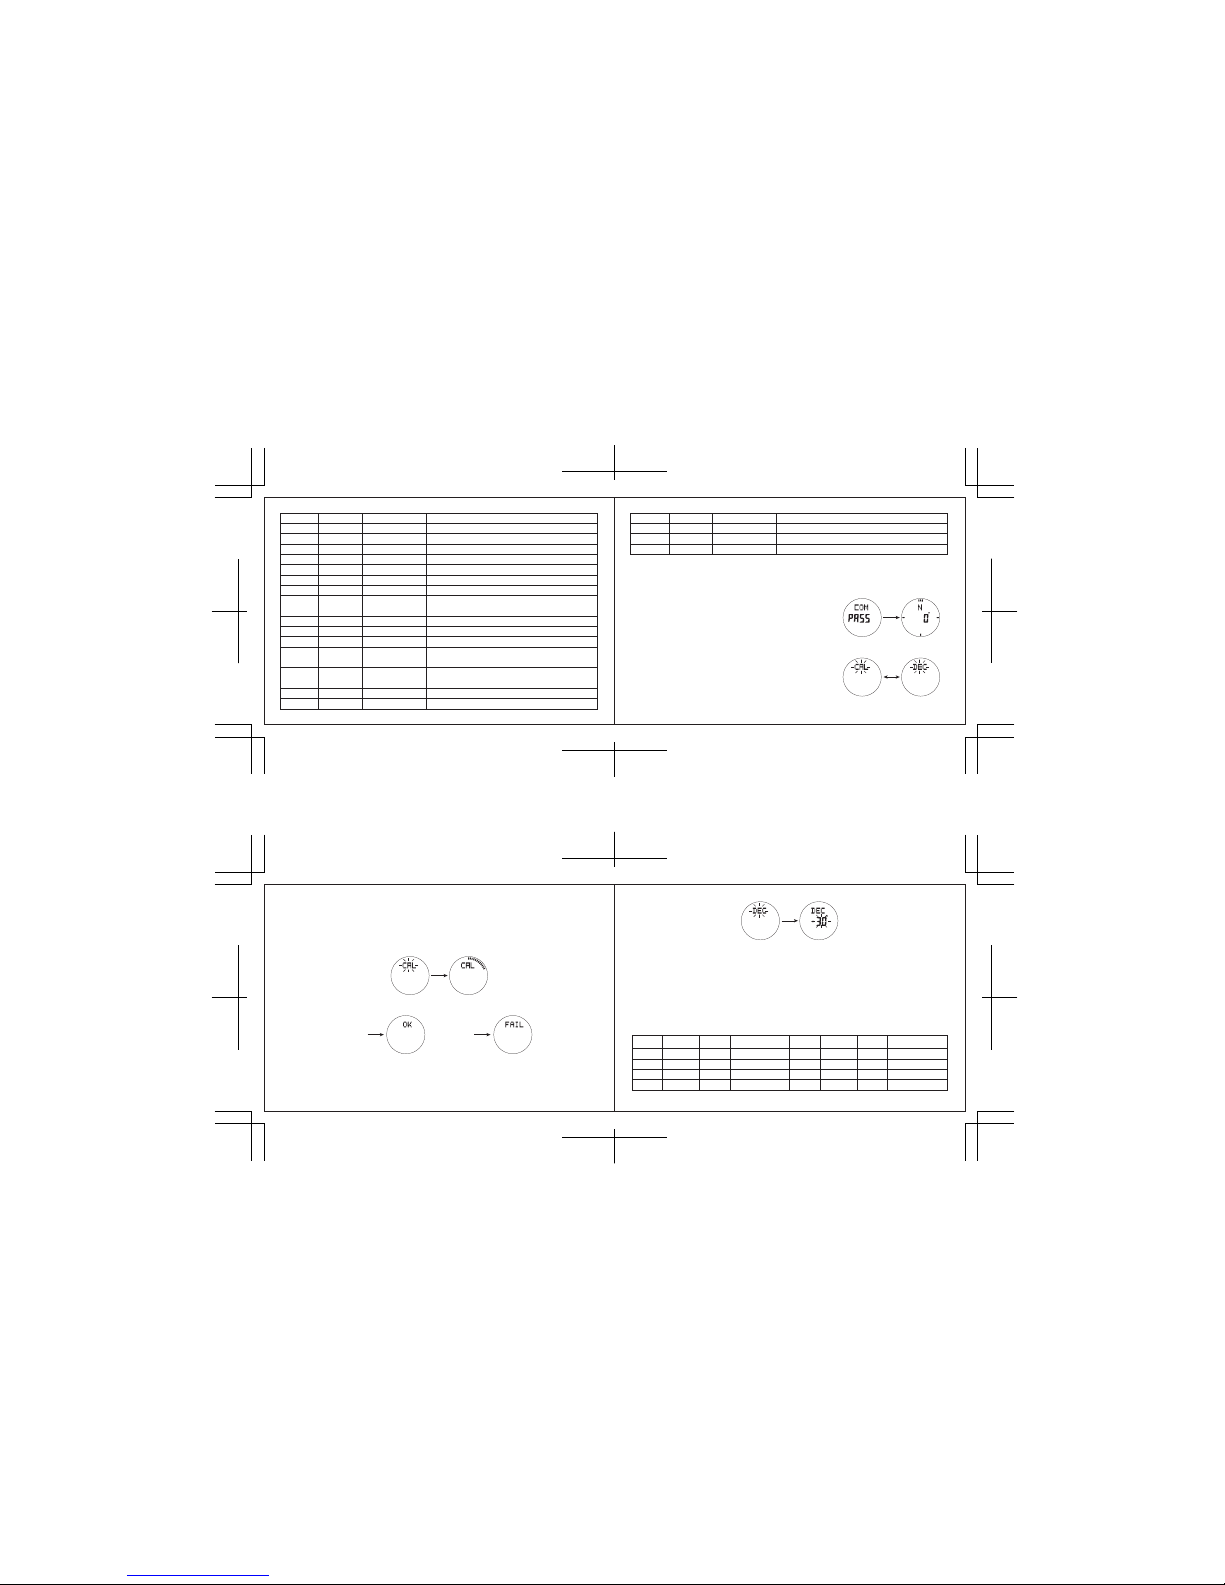
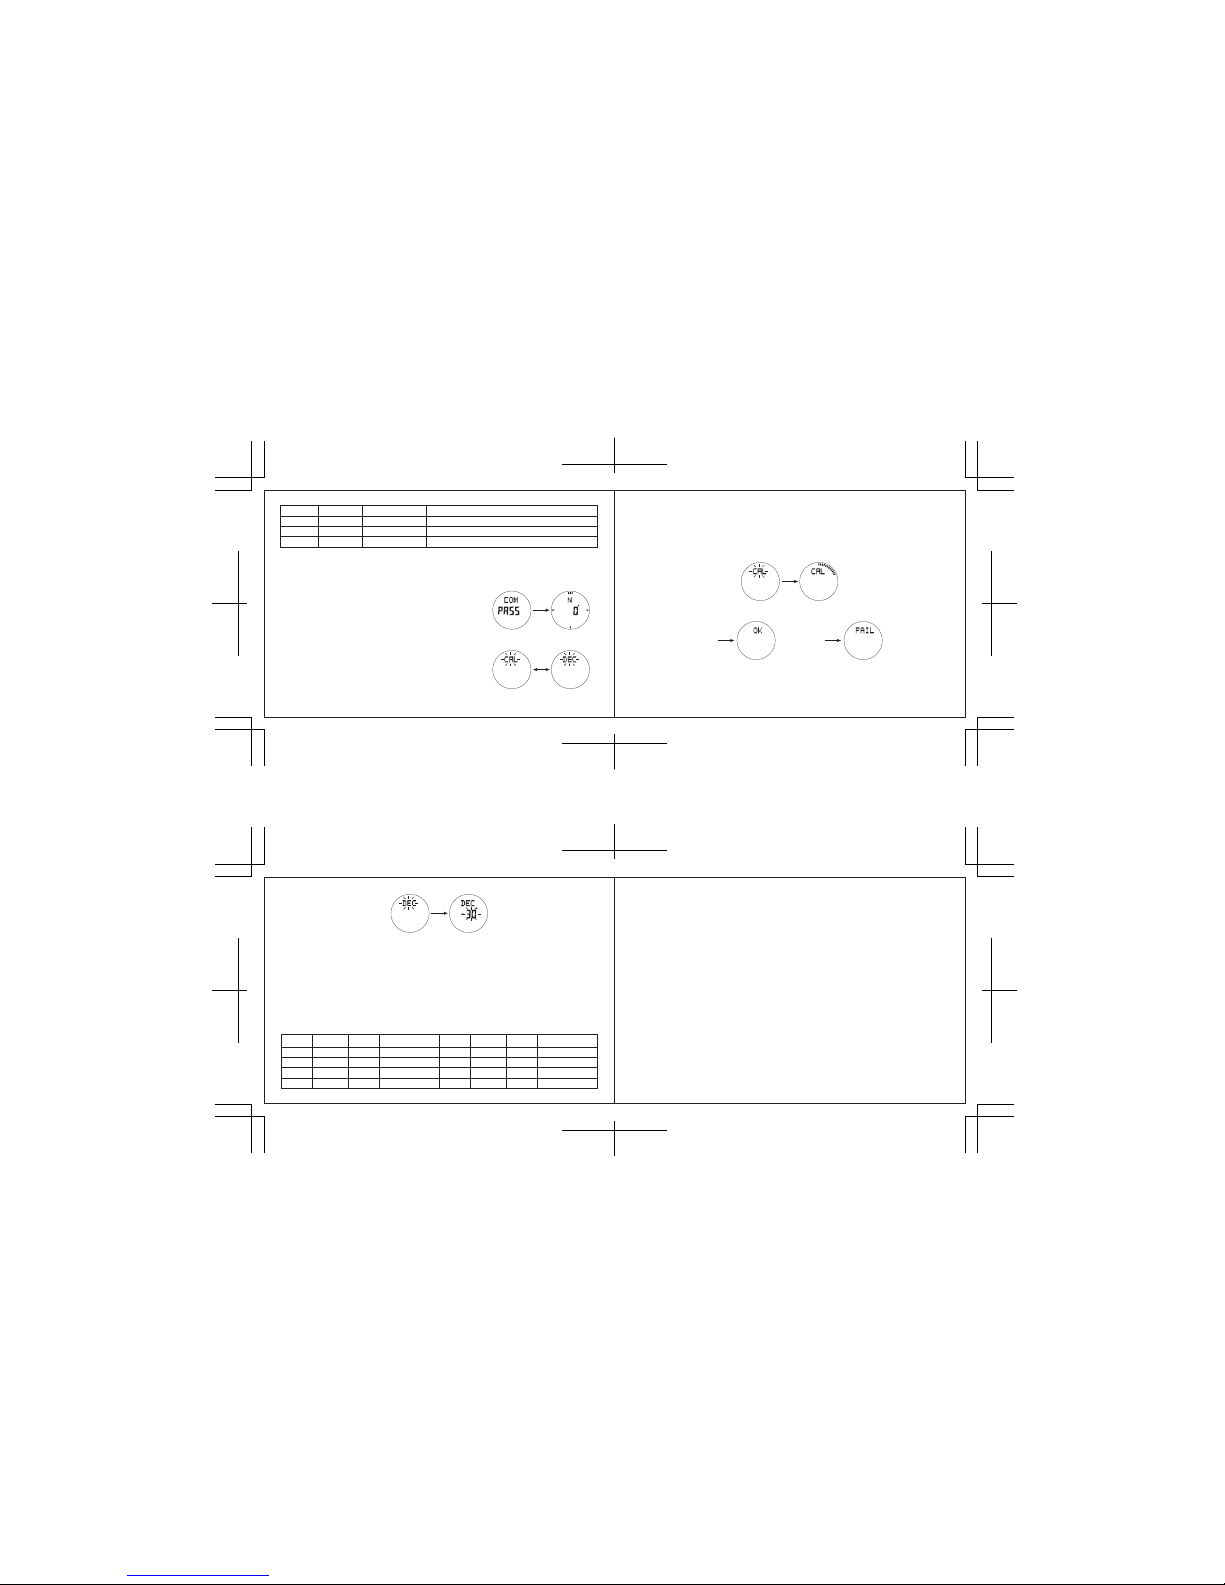
8.Compass measurement mode
- In normal time or measurement mode, press D key to enter compass measurement mode. With
COMPASS displayed, electronic needle will sweep a circle clockwise and then enter the compass
measurement mode. It will return to clock mode automatically if you do not perform any button
within 60 seconds.
- In compass mode, hold down A for 2 seconds to enter correction mode, press B to select Manual
Correction or Digital Correction. As following:
a) Manual correction mode
- In manual correction mode, press E or C button, then turn the watch slowly, both clockwise direction and
anti-clockwise direction are ok. The watch will automatically confirm correction and return to compass
measurement mode as long as turning two circles in the same direction. Note: (After replacing the battery,
this watch will enter auto correction mode firstly by using the compass first time. In order to correct the
compass conveniently, please turning two circles according to the above method.)
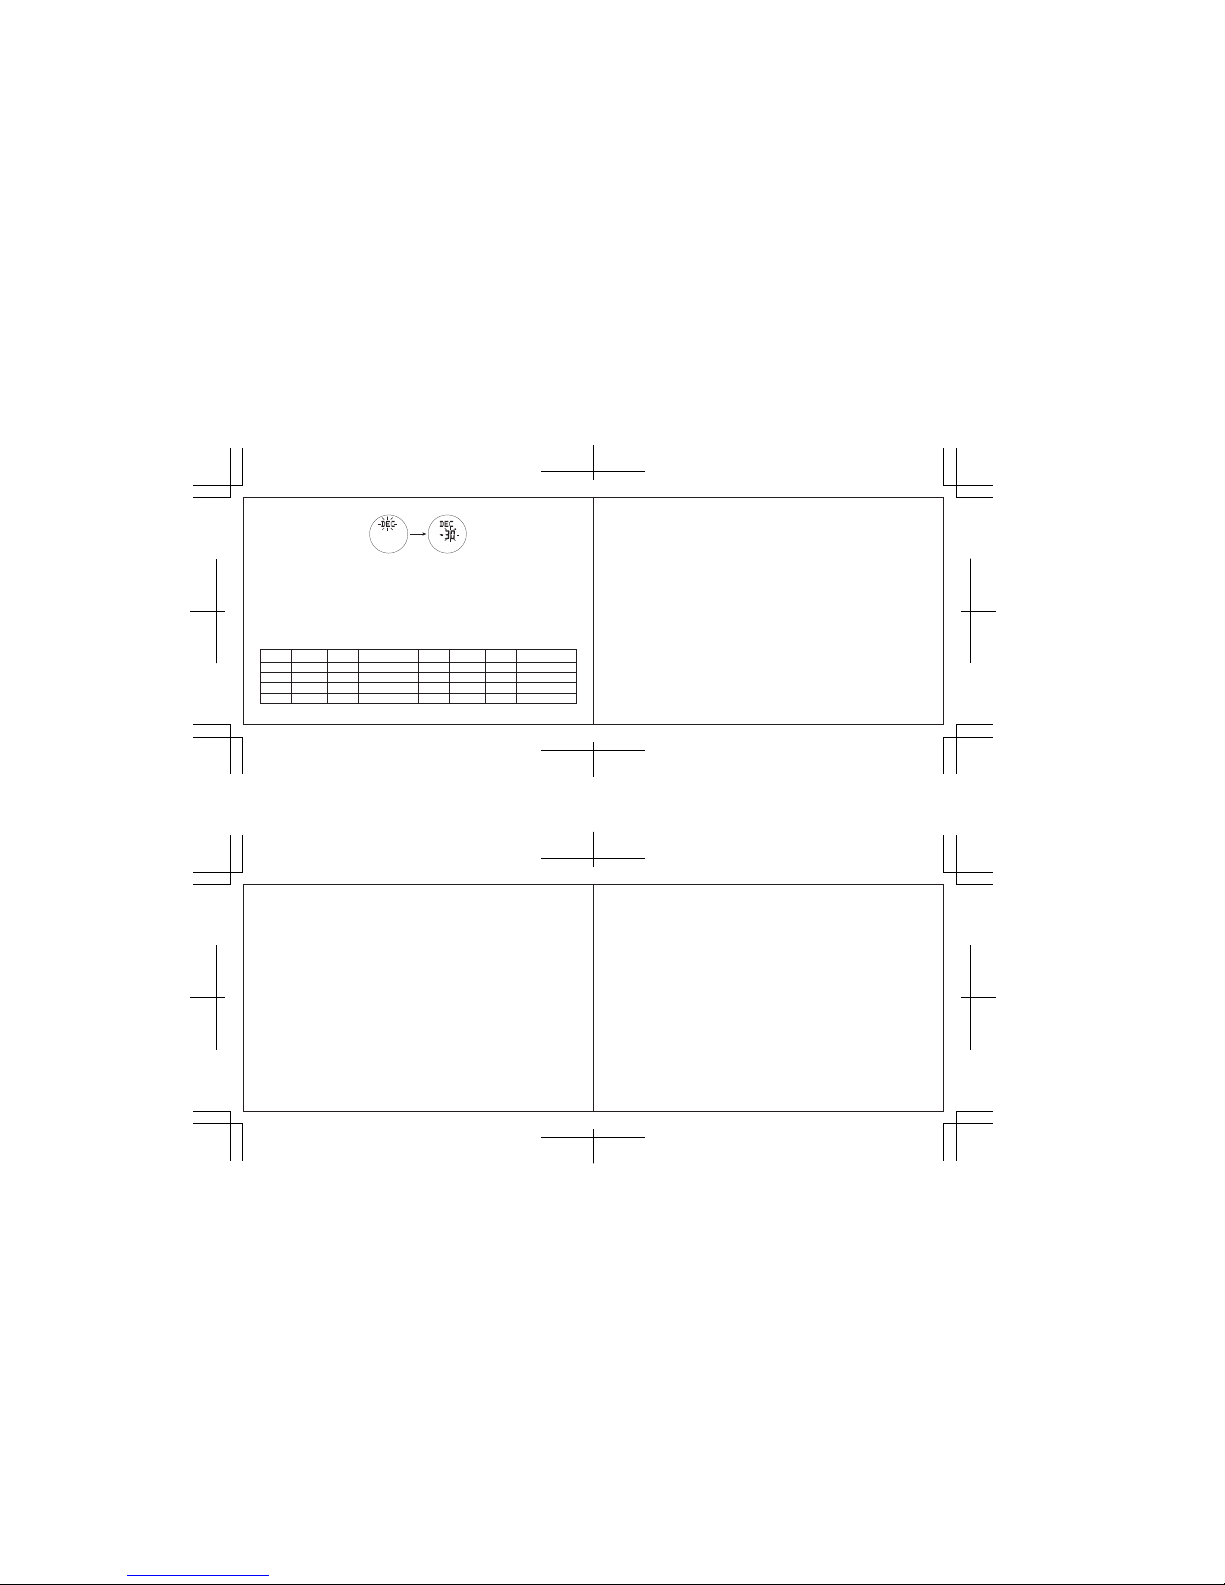
b) Digital correction mode
In digital correction mode, it is northern direction correction 1~ 45° by pressing E, which indicates to
increase the correction angle range (the maximum correction angle range is 45° ). Press C to decrease
the correction angle range (the minimum correction angle range is -45°), please as following figures:
- After turning two circles, the result of auto correction is as below:
MOW Moscow
JED Jeddah +03.0 Kuwait Riyad, Aden Addis Ababa Nairobi Moscow Shiraz
THR Teheran +03.5 Teheran
DXB Dubai +04.0 Abu Dhabi Muscat
YYT Caracas
RIO Rio de Janeiro -3.0 Sao Paulo, Buenos Aires, Brasilia, Montevideo
-4.0 Lapaz, Santiago, Port of Spain
FEN Brazil -2.0
RAI PRAIA -1.0
KBL Kabul +04.5
KHI Karachi +05.0 MV Maldives
DEL Delhi +05.5 Mumbai Kolkata, New Delhi
KMT Cambodia
DAC Dacca +06.0 Colombo
RGN Rangoon +06.5 Rangoon
BKK Bangkok +07.0 Jakarta,Phnom Penh,Hanoi Vientiane
SIN Singapore
HKG Hongkong +08.0 Singapore Kuala Lumpur Beijing Taipei Manlla Perth Ulaanbaatar
BJS Beijing
TEP Papua New
Guinea
SEL Seoul +09.0 Seoul Pyongyang(SEL)
TYO Tokyo +09.0
ADL Adelaide +09.5 Darwin
GUM GU Guam
SYD Sydney +10.0 Melboume Guam Rabaul
NOU Noumea +11.0 Port Vila
WLG* Wellington +12.0
-11.0
Honolulu -10.0 Papeete
Los Angeles -8.0 San Francisco, Las Vegas, Vancouver, Seattle / Tacoma,
Dawson City
Edmonton
Denver -7.0 Edmonton
Mexico
CHI
New York Montreal, Detroit, Miami, Boston, Panam a City, Havana,
Lima, Bogota
San Diego
Halifax
PPG
HNL
ANC
YVR
LAX
YEA
DEN
MEX
Pago Pago
Nome-9.0Anchorage
Vancouver
NYC
YHZ
SCL
Chicago -6.0 Houston, Dallas / Ft, worth, New Orleans, Mexico City,
Winnipeg
-5.0
Normal Un-normal
Page 5
Size: 170 x 55mm
Color: Blk
Size: 170 x 55mm
Color: Blk
- Press A to confirm the corrected value, and return to normal measurement mode.
For example: If you find the direction which is measured by the watch is not correct, please use other
compass to measure out the northern direction first, then use “12 hour” of the watch to align the
northern direction, press D key to measure compass, if the arrow point direction is 30° of west, you
should input -30°according to above operation method, to measure compass after press A key to confirm,
in the meanwhile, the arrow will point at northern direction, which means correction is complete. If you
do not find any other compass to measure out northern direction, please use manual correction to
measure out northern direction automatically within +/-11°, but please notice that the value must be set
as “00” when you select in the “DEC” digital correction mode.
- The following table indicated the meaning of each acronym for each direction.
- Notice for Digital compass
This watch has a magnetic direction sensor, which can detect geomagnetism. That means the north indicated
by this watch is the magnetic north pole, it is a little different from the real North Pole. The magnetic north
pole is located in the north of Canada, and the magnetic South Pole is located in the south of Australia.
Please note that, when measure using magnetic compass, the more close to the magnetic pole of the earth,
the bigger difference between the magnetic north pole and real North Pole. In addition, some maps marked
with real North Pole (not the magnetic north pole). Thus when using that kind of maps with this watch,
proper adjustment is needed.
- Location measurement
When measure direction near a strong magnetic field, a huge error will be created. Thus the following objects
shall be avoided when measuring direction: eternal magnet (magnetic necklace), metal block (iron door, metal
store ark, etc.), high voltage electrical wire, antenna, home electrical appliance (TV set, personnel computer,
washing machine, refrigerator, etc.).
When in the train, ship or plane, etc. the direction can not be measured correctly.
When in doors, especially in a building made up of many metals, the direction can not be measured correctly.
This is because the metal structure within the building will absorb the magnetic force from the electrical
appliance.
- Preservation
If this watch is magnetized, the definition of the direction sensor will be reduced. Thus please don’t put this
watch in a place near a magnet or any object which gives off strong magnetic force. These objects include:
eternal magnet (magnetic necklace, etc.) and home electrical appliance (TV set, computer, washing machine,
refrigerator, etc.).
If you doubt that your watch may have been magnetized, please conduct digital correction and manual
correction in the “Direction sensor correction”.
- The reason why the direction measured is incorrect
If the direction is incorrect, please conduct direction correction. If measure direction near strong magnetic
field, such as home electrical appliance, large iron bridge, steel pillar, overhead cable, etc. or measured the
direction in a train or ship, it will result in error. Please move away from the large metal object and measure
the direction once again. Please note that the digital compass can not be used in train or ship.
- Why different results will be produced when measure direction in a same place?
The magnetic force from high voltage cable nearby give interference to the geomagnetic detection by this
watch. Please move away from high voltage cable and do detection once again.
- Why problem occurs when measure direction indoor?
TV set, personnel computer, speaker or other objects will interfere in the geomagnetic detection by this
watch. Please keep away from interferential objects or do detection outdoor. It will be more difficult when
do direction detection within a building made of reinforced concrete. Please note that the direction
detection can not be conducted in train or plane.
C. Specifications
According these standards to calculate the battery life: Digital compass operation thrice per day for 30
seconds each time. EL backlight operation 4 times (12 seconds) per day. Alarm tone sounds once (60
seconds) per day.
Button C
DirectionNMeaning
North
Direction
NNE
Meaning
North-north-east
DirectionNEMeaning
North-east
Direction
ENE
Meaning
East-north-east
E East ESE East-south-east SE South-east SSW South-south-east
S South SSW South-south-west SW South-west WSW West-south-west
W West WNW West-north-west NW North-west NNW North-north-west
- Module dimension
- Module thickness (not including buzzer)
- Working temperature range
- Working voltage
- Time accuracy
- Digital compass precision
- Battery type
- Static average driving current
- Alarm average current
- Average current of EL illumination
- Average current for digital compass operation
- Battery life
: 40.2mm
: 8.0 mm
: -10˚C ~ +60˚C
: 3.0V
: ±60 sec/month (T=25˚C)
: ±11° (-10˚C) ~ 40˚C
: CR2025 (220mAh)
: ≤6 uA (Static maximum driving current: 13uA)
: ≤1.5 mA (Alarm maximum current: 4.5 mA)
: ≤10 mA (Maximum current of LED illumination: 12mA)
: ≤0.3 mA (Maximum current for digital compass
operation: 0.8mA
: 18 months (Japan lithium)
Page 6
Size: 170 x 55mm
Color: Blk
Size: 170 x 55mm
Color: Blk
- Premere il tasto E per aumentare il valore del fuso orario, o tenerlo premuto per far avanzare il valore
del fuso orario velocemente.
- Premere il tasto C per aumentare il valore del fuso orario, o tenerlo premuto per far avanzare il valore
del fuso orario velocemente.
- Premere i tasti E o C per attivare/disattivare l'ora solare. L'indicatore “DST” appare sullo schermo
quando l'ora solare è attivata.
- Premere il tasto E o C per computare tra formato 12/24 ore.
- Premere il tasto E per aumentare i valori o tenerlo premuto per aumentarli velocemente.
- Premere il tasto C per diminuire valori, o tenerlo premuto per aumentare i valori velocemente.
- Premere i tasti E o C per resettare "i secondi" a zero.
- Premere il tasto A per confermare ed uscire dall'impostazione, poi tornare a modo ora normale.
- Nel modo impostazione, se non si preme un tasto entro minuto, l'orologio esce automaticamente dalle
impostazioni e torna a modo ora normale.
Tasto B
MinutiOra
A. Caratteristiche:
- Lo schermo a cristalli liquidi LCD visualizza l'ora, i minuti, i secondi, l'anno, il mese, la data e la settimana.
- Calendario automatico: dall'anno 2000 fino all'anno 2099.
- 3 allarmi giornalieri.
- Segnale della suoneria oraria.
- Cronometro: la gamma massima di visualizzazione del cronometro è 99 ore, 59 minuti, 59 secondi.
- Timer per il controllo alla rovescia: gamma massima di visualizzazione del popolo rovescia è 99:59:59.
- Bussola elettronica.
- Formato 12/24 ore
- Fusi orari di 48 città diverse.
- Ora solare.
- Tasto per il tono.
- Retroilluminazione EL attiva per tre secondi.
IMPOSTA/ILLUMINAZIONE
(Tasto A)
MODO (Tasto B)
(Tasto E) SU
(Tasto D) BUSSOLA
(Tasto C) GIÙ
2. Modo ora normale
- Premere il tasto A una volta, e la EL s'illumina per tre secondi. Tenere premuto il tasto A per due secondi
per entrare nel modo impostazione.
- Tenere premuto il tasto B per selezionare il modo di funzionamento.
- Tenere premuto il tasto C per commutare tra “data --- mese” e “mese --- data”.
- Tenere premuto il tasto D per entrare in modalità bussola.
- Tenere premuto il tasto E per commutare fra le modalità “fusi orari” e “Ora normale”.
3. Per impostare l'ora e la data
- In modo ora normale, tenere premuto il tasto A per due secondi, “Fuso orario” comincia a lampeggiare,
che indica il modo di impostazione, poi premere il tasto B per selezionare altre impostazioni (display
lampeggiante) nella sequenza che segue:
B. Modo funzionale del prodotto
1. In qualsiasi modalità, e la EL (elettroilluminazione) s'illumina per tre secondi premendo
il Tasto A una volta.
Normal time mode Stopwatch mode Alarm mode Countdown timer mode World time mode
Tasto B
Tasto D
Tasto B Tasto B
Tasto B
Tasto B
Fuso orario DST Formato 12/24 ore Secondi Ora
Tasto B
Tasto B Tasto B Tasto B
Tasto B
Tasto BTasto B Tasto B Tasto B
Data Mese Anno Minuti
Modo bussola
4. Modo allarme
a) Attivare/disattivare l'allarme (on/off)
- In modo allarme, premere il tasto C per commutare in sequenza tre allarmi giornalieri:
AL1 AL2 AL3 SIG.
- Premere il tasto D per attivare/disattivare l'allarme “ ”. Premere il tasto D per attivare/disattivare
il segnale dell'ora (CHI).
b) Impostazione dell'allarme
- In modalità primo allarme (AL1), tenere premuto il tasto A per due
secondi, “Hour” comincia a lampeggiare , “minute” lampeggia quando
si preme il tasto B, come segue:
Page 7
Size: 170 x 55mm
Color: Blk
Size: 170 x 55mm
Color: Blk
5. Modo cronometro
- La gamma massima di visualizzazione del cronometro è 99 ore, 59 minuti, 59 secondi.
- In modo cronometro, premere il tasto E per iniziare/interrompere il conteggio. Premere il tasto C per
resettare a zero quando il cronometro si ferma.
- Quando il cronometro è in funzione, premere il tasto C per entrare nell'ora SPL (tempo intermedio),
e l'indicatore “SPL” si visualizza sullo schermo.
- Premere il tasto C per uscire da SPL (tempo intermedio), anche se il cronometro continua ad avanzare.
- E cronometro ricomincia ad avanzare da 00 quando raggiunge il limite massimo.
- Se non si interrompe il cronometro, questo continua ad avanzare in sottofondo dopo aver premuto il
tasto B per uscire dal modo cronometro.
- Premere il tasto E per aumentare i valori o tenerlo premuto per aumentarli velocemente.
- Premere il tasto C per diminuire valori, o tenerlo premuto per aumentare i valori velocemente.
- Premere il tasto A per confermare ed uscire dall'impostazione, poi tornare a modo ora normale.
- Nel modo impostazione, se non si preme un tasto entro minuto, l'orologio esce automaticamente dalle
impostazioni e torna a modo ora normale.
- Quando l'ora l'ora dell'allarme è raggiunta, il tono dell'allarme suona per 60 secondi, e l'indicatore
dell'allarme “ ” lampeggia.
- Premere un tasto qualsiasi per interrompere il tono dell'allarme, dopo che si attiva.
- Nota: il metodo d'impostazione di “AL2” e di “AL3” è lo stesso di “AL1”.
Ora Minuti Secondi
6. Modo timer conto alla rovescia
- La gamma massima di visualizzazione del cronometro è 99 ore, 59 minuti, 59 secondi.
a) Per impostare il conto alla rovescia
- In modo ora normale, tenere premuto il tasto A per due secondi, “Ora” comincia a lampeggiare, che
indica il modo di impostazione, poi premere il tasto B per selezionare altre impostazioni (display
lampeggiante) nella sequenza che segue:
- Premere il tasto E per aumentare i valori o tenerlo premuto per aumentarli velocemente.
- Premere il tasto C per diminuire i valori, o tenerlo premuto per aumentare i valori velocemente.
- Premere il tasto A per confermare ed uscire dall'impostazione, poi tornare a modo ora normale.
- Nel modo impostazione, se non si preme un tasto entro minuto, l'orologio esce automaticamente
dalle impostazioni e torna a modo ora normale.
b) Per usare il timer del contro alla rovescia
- Premere E per iniziare il conto alla rovescia.
- Quando il timer del conto rovescia sta avanzando, premere il tasto E per entrare in pausa, puoi premere
il tasto E di nuovo per riattivare il conteggio.
- Se si desidera disattivare il controllo rovescia, premere il tasto E per mettere in pausa, e il conteggio del
conto alla rovescia torna al valore originale premendo il tasto C.
- Quando il conteggio del conto alla rovescia ha raggiunto 00:00:00, l'orologio emette un suono per un
minuto. Premere un tasto qualsiasi per interrompere.
- Se non si interrompe il cronometro, il timer del condono rovescia continua ad avanzare in sottofondo
dopo aver premuto il tasto B per uscire dal modo cronometro.
7. Fuso orario
- In modalità fuso orario, premere il tasto A per attivare/disattivare ) l'ora solare. Si visualizza “DST” per indicare
che la funzione di DST è attivata. Se non si visualizza “DST”, questo indica che la funzione di DST è disattivata.
- Premere il tasto E per visualizzare il fuso orario di lezione ascendente, o tenere premuto il tasto E per avanzare
velocemente.
- Premere il tasto C per visualizzare il fuso orario di lezione discendente, o tenere premuto il tasto C per avanzare
velocemente.
Codice
della città
Città Differenziale GMT Altre città importanti nello stesso fuso orario
UCT Gatwick 00.0
LIS Lisbona
LON Londra 00.0 Dublino, Lisbona, Casablanca, Dakar, Abidjan
MAD Madrid +01.0 Milano, Roma, Madrid, Amsterdam, Algeri, Amburgo,
Francoforte, Vienna, Stoccolma, Berlino
PAR Parigi
ROM Roma Roma
BER Berlino +01.0
SOT Stoccolma
ATH Atene +02.0 Helsinki, Istanbul, Beirut, Damascus, Città del capo
CAI Cairo +02.0 Atene, Helsinki, Istanbul, Beirut, Damascus, Città del capo
JRS Gerusalemme +02.0
MOW Moscow
JED Jeddah +03.0 Kuwait Riyad, Aden Addis Ababa Nairobi Moscow Shiraz
THR Teheran +03.5 Teheran
DXB Dubai +04.0 Abu Dhabi Muscat
KBL Kabul +04.5
KHI Karachi +05.0 MV Maldives
DEL Delhi +05.5 Mumbai Kolkata, New Delhi
KMT Cambodia
DAC Dacca +06.0 Colombo
RGN Rangoon +06.5 Rangoon
BKK Bangkok +07.0 Jakarta,Phnom Penh,Hanoi Vientiane
SIN Singapore
HKG Hongkong +08.0 Singapore Kuala Lumpur Beijing Taipei Manlla Perth Ulaanbaatar
BJS Beijing
TEP Papua New
Guinea
SEL Seoul +09.0 Seoul Pyongyang(SEL)
TYO Tokyo +09.0
ADL Adelaide +09.5 Darwin
Page 8
Size: 170 x 55mm
Color: Blk
Size: 170 x 55mm
Color: Blk
Tasto B
Modalità
correzione manuale
Modalità
correzione digitale
8. Modo bussola
- In modalità normale o misurazioni, premere il tasto D per entrare nella modalità bussola. Quando si
visualizza COMPASS, l'ago elettronico disegna un circolo in senso orario, e poi entra nel modo bussola.
L'apparecchio torna a modo visualizzazione ora automaticamente se non si preme nessun tasto per
60 secondi.
- In modo bussola, tenere premuto il tasto A per due secondi per entrare nel mondo di regolazione,
e premere il tasto B per selezionare modalità regolazione
manuale o digitale. Modalità regolazione:
a) Modalità correzione manuale
- In modalità correzione manuale, premere il tasto E o C, poi girare l'orologio lentamente in direzione
oraria o antioraria. Quando si eseguono due cerchi nella stessa direzione, l'orologio automaticamente
conferma la correzione e torna a modalità bussola. Nota: dopo aver sostituito la batteria, l'orologio entra
nella modalità di autocorrezione quando si usa la bussola per la prima volta, eseguire due cerchi nella
stessa direzione secondo le istruzioni descritte sopra:
b) Modalità correzione digitale
In modalità correzione digitale, premere il tasto E per aumentare l'angolo di correzione da 1 ~ 45° (la
massima correzione della gamma dell'angolo è 45°) per la direzione nord. Premere il tasto C per diminuire
la gamma dell'angolo di correzione (La minima correzione della gamma dell'angolo è -45°) descritta qui di
seguito:
- Dopo aver eseguito due cerchi, il risultato dell'auto correzione viene visualizzato come qui sotto:
YYT Caracas
RIO Rio de Janeiro -3.0 Sao Paulo, Buenos Aires, Brasilia, Montevideo
-4.0 Lapaz, Santiago, Port of Spain
FEN Brazil -2.0
RAI Praia -1.0
GUM GU Guam
SYD Sydney +10.0 Melbourne, Guam, Rabaul
NOU Noumea +11.0 Port Vila
WLG* Wellington +12.0
-11.0
Honolulu -10.0 Papeete
Los Angeles -8.0 San Francisco, Las Vegas, Vancouver, Seattle/Tacoma,
Dawson City
Edmonton
Denver -7.0 Edmonton
Mexico
CHI
New York Montreal, Detroit, Miami, Boston, Panama City, Havana,
Lima, Bogota
San Diego
Halifax
PPG
HNL
ANC
YVR
LAX
YEA
DEN
MEX
Pago Pago
Nome-9.0Anchorage
Vancouver
NYC
YHZ
SCL
Chicago -6.0 Houston, Dallas/Ft, Worth, Nuova Orleans, Mexico City,
Winnipeg
-5.0
Normale Non normale
- Premere il tasto A per confermare il valore corretto, e tornare a modo misurazione normale.
Ad esempio: se vedete che la direzione misurata dall'orologio non è corretta, usare l'altra bussola per
misurare la direzione Nord prima, puoi usare il formato “12 ore” dell'orologio per allineare la direzione
Nord, e premere il tasto D per misurare. Se la direzione della punta della freccia è 30° ovest, bisogna
inserire -30° secondo la modalità descritta sopra, poi premere il tasto A per confermare. Nel frattempo, la
freccia punta verso nord, che significa che il processo di correzione è stato completato. Se non trovate
nessun'altra bussola per misurare la direzione Nord, usare la correzione manuale per misurare il Nord
automaticamente con un'approssimazione di +/-11°; ad ogni modo notare che il valore deve essere
impostato su “00” quando selezionate il modo di correzione digitale “DEC”.
- La tabella che segue indica il significato di ogni acronimo per ciascuna direzione.
Tasto C
DirezioneNSignificato
Nord
Direzione
NNE
Significato
Nord-nord-est
DirezioneNESignificato
Nord-est
Direzione
ENE
Significato
Est-nord-est
E Est ESE Est-sud-est SE Sud-est SSW Sud-sud-est
S Sud SSW Sud-sud-ovest SW Sud-ovest WSW Ovest-sud-ovest
W Ovest WNW Ovest-nord-ovest NW Nord-ovest NNW Nord-nord-ovest
Page 9

Size: 170 x 55mm
Color: Blk
Size: 170 x 55mm
Color: Blk
- Nota per bussola digitale
Questo orologio dispone di un sensore di direzione magnetico che può rilevare il geomagnetismo. Questo
significa che il Nord indicato da quest'orologio e il Polo Nord magnetico, e questo è leggermente diverso
dal Polo Nord reale. Il polo magnetico è situato nella parte Nord del Canada, e il Polo Sud magnetico è
situato nella parte sud dell'Australia. Notare che quando si usa bussola magnetica per effettuare misurazioni,
quanto più vicino siete situati al polo magnetico della terra, quanto più la misurazione presenterà una
maggiore differenza fra il Polo Nord magnetico è il Polo Nord reale. Alcune cartine mostrano il Polo Nord
reale (non il Polo Nord magnetico). in questo modo quando si usa quel tipo di cartine con l'orologio, è
necessaria una regolazione appropriata.
- Misurazione della posizione
Quando si esegue una misurazione vicino ad un campo magnetico molto forte, la misurazione risulterà
molto erronea. Per questo motivo gli oggetti elencati qui di seguito non devono essere avvicinati durante
la misurazione della direzione: calamita eterna (collana magnetica), ostacoli di metallo (porta di metallo,
archi di negozi di metallo ecc.), tardi, antenne, elettrodomestici ad alto voltaggio (televisioni, personal
computer, lavatrici, frigoriferi ecc.).
Quando si sta salendo su un treno, una nave ecc., la direzione non può essere misurata correttamente.
Quando si è all'interno, specialmente all'interno di un palazzo che presenta molte parti di metallo, la
direzione non può essere misurata correttamente. Questo succede perché la struttura di metallo del
palazzo assorbe la forza magnetica dagli elettrodomestici.
- Conservazione
Se l'orologio è magnetizzato, la definizione del sensore di direzione sarà ridotta. Per questo motivo è
necessario evitare sistemare l'orologio in un luogo vicino ad una calamita o oggetti che emanano una grande
forza magnetica. Tra questi oggetti si possono includere: calamita eterna (collane magnetiche, ecc.)
e elettrodomestici (televisioni, lavatrici, frigoriferi ecc.).
Se avete qualche dubbio sul fatto che l'orologio possa essere stato magnetizzato, dovete eseguire una
correzione digitale o manuale come descritto nel paragrafo precedente.
- Ragioni per le quali la misurazione della direzione potrebbe risultare scorretta
Se la misurazione della direzione non è corretta, è necessario eseguire una correzione della direzione. Se la
misurazione è condotta vicino a un forte campo magnetico, quale ad esempio un elettrodomestico, un ponte
di ferro di grandi dimensioni, un pilastro in acciaio, cavi, ecc. o quando siete a bordo di un treno o di una
nave, la misurazione risulterà errata. Sarà quindi necessario spostarsi dall'oggetto in metallo di grandi
dimensioni e misurare la direzione di nuovo. Notare che la bussola digitale non può essere usata a bordo
di un treno o di una nave.
- Perché si ottengono risultati diversi quando le direzioni sono misurate nella stessa posizione?
La forza magnetica proveniente da cave ad alto voltaggio nelle vicinanze interferisce con la rilevazione
magnetica dell'orologio Allontanarsi dal cavo ad alto voltaggio e misurare di nuovo.
- Perché sopravvengono dei problemi quando si misurano le direzioni all'interno?
Televisioni, personal computer, altoparlanti o oggetti simili interferiscono nella rilevazione geomagnetica
dell'orologio Tenerlo lontano da oggetti che possono interferire o astenersi da fare rilevazioni all'interno.
È molto complesso misurare la direzione all'interno di un palazzo che è costruito in cemento armato
notare che la relazione della direzione non può essere fatta a bordo di un treno o di un aereo.
C. Specifiche tecniche
La durata delle batterie è calcolata secondo gli standard seguenti: funzionamento attivato della bussola
digitale tre volte al giorno, per 30 secondi alla volta. Funzionamento della retroilluminazione EL per quattro
volte al giorno (per 12 secondi). Una attivazione dell'allarme (60 secondi) al giorno.
- Dimensioni del modulo
- Spessore del modulo
(senza includere l'indicatore acustico)
- Gamma della temperatura di funzionamento
- Voltaggio di funzionamento
- Precisione dell'ora
- Precisione della bussola digitale
- Tipo di batteria
- Corrente di pilotaggio media statica
- Corrente media dell'allarme
- Corrente media dell'illuminazione
elettromagnetica (EL)
- Corrente media per il funzionamento della
bussola digitale
- Durata delle batterie
: 40,2mm
: 8,0mm
: -10°C ~ +60°C
: 3,0V
: ±60 sec/mese (T=25°C)
: ±11° (-10°C) ~ 40°C
: CR2025 (220mAh)
: 6 uA (corrente di pilotaggio media statica: 13uA)
: ≤1,5mA (corrente massima dell'allarme: 4,5mA)
: ≤10mA (corrente massima dell'illuminazione a LED:
12mA)
: ≤0,3mA (corrente massima per il funzionamento della
bussola digitale: 0,8mA)
: 18 mesi (batterie giapponesi al litio)
A. Funktionsmerkmale
- LCD-Anzeige für Stunde, Minute, Sekunde, Jahr, Monat, Datum und Wochentag.
- Automatischer Kalender: Jahr 2000 bis 2099.
- 3 Tägliche Alarme.
- Stundenläuten-Signal.
- Stoppuhr: die maximale Reichweite der Stoppuhranzeige beträgt 99 Stunden, 59 Minuten, 59 Sekunden.
- Countdown-Timer: die maximale Reichweite der Anzeige des Countdown-Timers beträgt 99:59:59.
- Elektronischer Kompass.
- 12/24-Stundenformat.
- Weltzeit, Zeitzonen für 48 Städte.
- Sommerzeit.
- Tastentöne.
- EL Anzeigebeleuchtung für 3 Sekunden.
SET/LICHT (Taste A)
MODUS (Taste B)
(Taste E) AUF
(Taste D) KOMP
(Taste C) AB
Page 10
Size: 170 x 55mm
Color: Blk
Size: 170 x 55mm
Color: Blk
2. Normalzeit-Modus
- Betätigen Sie Taste A einmal; die EL-Anzeigebeleuchtung leuchtet 3 Sekunden lang auf. Halten Sie Taste A ca. 2
Sekunden lang gedrückt, um den Einstellmodus aufzurufen.
- Betätigen Sie Taste B, um den gewünschten Betriebsmodus auszuwählen.
- Betätigen Sie Taste C, um das Zeitanzeigeformat zwischen “Datum --- Monat” und “Monat --- Datum”
umzuschalten.
- Betätigen Sie Taste D, um den Kompass-Modus zu aktivieren.
- Betätigen Sie Taste E, um zwischen dem “Weltzeitmodus“ und dem “Normalzeitmodus” umzuschalten.
3. Zeit und Datum einstellen
- Halten Sie Taste A im Normalzeit-Modus 2 Sekunden lang gedrückt, und die Meldung “Zeitzone” blinkt nun,
wodurch der Einstellmodus angezeigt wird; betätigen Sie anschließend Taste B, um andere (blinkende)
Einstellungen aufeinanderfolgend auszuwählen, wie unten dargestellt:
B. Gerät Betriebsmodi
1. In jedem Modus leuchtet die EL-Anzeigebeleuchtung 3 Sekunden lang bei einmaliger
Betätigung der Taste A auf.
Normalzeitmodus Stoppuhrmodus Alarmmodus Countdown-Timermodus Weltzeitmodus
Taste B
Taste D
Taste B Taste B
Taste B
Taste B
Zeitzone Sommerzeit (DST) 12H/24H
Stundenanzeigeformat
Sekunde Stunde
Taste B
Taste B Taste B Taste B
Taste B
Taste BTaste B Taste B Taste B
Datum Monat Jahr Minute
Kompass-Anzeigemodus
- Betätigen Sie Taste E, um die Anzeige für die Zeitzone aufwärts einzustellen; halten Sie Taste E gedrückt, um die
Anzeige für die Zeitzone schnell aufwärts einzustellen.
- Betätigen Sie Taste C , um die Anzeige für die Zeitzone abwärts einzustellen; halten Sie Taste E gedrückt, um die
Anzeige für die Zeitzone schnell abwärts einzustellen.
- Betätigen Sie Taste E oder C, um die Sommerzeit-Funktion Ein/Aus zu schalten. Der “DST” Sommerzeit-Indikator
erscheint, wenn die Sommerzeit-Funktion aktiviert ist.
- Betätigen Sie Taste E oder C, um zwischen dem 12/24-Stunden Anzeigeformat umzuschalten.
- Betätigen Sie Taste E, um die Anzeige aufwärts einzustellen, und halten Sie Taste E gedrückt, um die Anzeige
schnell aufwärts einzustellen.
- Betätigen Sie Taste C, um die Anzeige abwärts einzustellen; halten Sie Taste C gedrückt, um die Anzeige schnell
abwärts einzustellen.
- Betätigen Sie Taste E oder C, um eine Rücksetzung der “Sekunden” auf Null auszuführen.
- Betätigen Sie Taste A, um zu bestätigen, und um den Einstellmodus zu verlassen; anschließend schaltet das
Gerät wieder in den Normalzeitanzeige-Modus.
- Wenn im Einstellmodus ca. 1 Minute lang keine Taste betätigt wird, dann verlässt die Uhr automatisch den
Einstellmodus und schaltet wieder in den Normalzeitmodus zurück, ohne die bis dahin ausgeführten Einstellungen
zu speichern.
5. Stoppuhrmodus
- Die maximale Anzeigereichweite der Stoppuhr beträgt: 99 Stunden, 59 Minuten und 59 Sekunden.
- Betätigen Sie Taste E im Stoppuhrmodus, für Start/Stopp der Stoppuhr. Betätigen Sie Taste C während diese
angehalten ist, um eine Rücksetzung der Stoppuhr auf Null auszuführen.
- Betätigen Sie Taste C während die Stoppuhr läuft, um eine Zwischenzeit (SPL- Zwischenzeit) zu ermitteln; der
Indikator “SPL” erscheint nun in der Anzeige.
- Betätigen Sie Taste C, um die Zwischenzeitanzeige (SPL – Zwischenzeit) zu verlassen; die Stoppuhr läuft nun
wieder weiter.
- Die Anzeige der Stoppuhr läuft erneut von “00“ aufwärts, sobald die maximale Anzeigereichweite überschritten wird.
- Wenn Sie die Stoppuhr nicht anhalten, dann läuft diese im Hintergrund weiter nachdem Sie Taste B gedrückt haben,
um den Stoppuhranzeigemodus zu verlassen.
4. Alarmmodus
a) Alarm Ein/Aus schalten
- Betätigen Sie Taste C im Alarmmodus, um zwischen den 3 täglichen Alarmfunktionen in der nachfolgenden
Sequenz weiter zu schalten: AL1 AL2 AL3 SIG.
- Betätigen Sie Taste D, um den gewünschten Alarm jeweils Ein/Aus “ ”
zu schalten. Betätigen Sie Taste D, um das Stundenläuten-Signal (CHI)
Ein/Aus zu schalten.
b) Alarm Einstellung
- Im ersten Alarm-Modus (AL1) halten Sie Taste A ca. 2 Sekunden gedrückt,
und “Stunde” blinkt; “Minute” blinkt, indem Sie Taste B betätigen, wie folgt:
Taste B
MinuteStunde
6. Countdown-Timermodus
- Die maximale Anzeigereichweite für den Countdown-Timer beträgt: 99 Stunden, 59 Minuten und 59 Sekunden.
a) Countdown-Zeitintervall einstellen
- Halten Sie Taste A ca. 2 Sekundenlang im Countdown-Timermodus gedrückt und die “Stunde” beginnt nun zu
blinken, wodurch der Einstellmodus für den Countdown-Timer angezeigt wird; betätigen Sie anschließend Taste B,
um die nächste Anzeigestelle (blinkend) für die Einstellung wie nachfolgend angegeben auszuwählen:
- Betätigen Sie Taste E wiederholt, um den Anzeigewert aufwärts einzustellen; halten Sie Taste E gedrückt, um den
Anzeigewert schnell aufwärts einzustellen.
- Betätigen Sie Taste C wiederholt, um den Anzeigewert abwärts einzustellen; halten Sie Taste C gedrückt, um den
Anzeigewert schnell abwärts einzustellen.
- Betätigen Sie Taste A, um die Einstellungen zu bestätigen, und um den Einstellmodus zu verlassen; der
Normalzeitmodus wird nun wieder aktiviert.
- Wenn im Einstellmodus ca. 1 Minute lang keine Taste betätigt wird, dann verlässt die Uhr automatisch den
Einstellmodus und schaltet wieder in den Normalzeitmodus zurück, ohne die bis dahin ausgeführten Einstellungen
zu speichern.
- Sobald die eingestellte Alarmzeit erreicht ist, ertönt der Alarmton ca. 60 Sekunden lang, und der Alarm-Indikator
“ ” blinkt.
- Betätigen Sie eine beliebige Taste, um den Alarm abzuschalten, sobald dieser Ausgelöst wird.
- Hinweis: Die Einstellung der Alarmfunktionen “AL2” und “AL3” werden analog wie für “AL1” ausgeführt.
Page 11
Size: 170 x 55mm
Color: Blk
Size: 170 x 55mm
Color: Blk
Stunde Minute Sekunde
- Betätigen Sie Taste E, um die Anzeige aufwärts einzustellen; halten Sie Taste E gedrückt, um die Anzeige schnell
aufwärts einzustellen.
- Betätigen Sie Taste C, um die Anzeige aufwärts einzustellen; halten Sie Taste C gedrückt, um die Anzeige schnell
aufwärts einzustellen.
- Bestätigen Sie mit Taste A u den Einstellmodus zu verlassen; die Uhr schaltet nun wieder zur Normalzeitanzeige
zurück.
- Wenn im Einstellmodus ca. 1 Minute lang keine Taste betätigt wird, dann verlässt die Uhr automatisch den
Einstellmodus und schaltet wieder in den Normalzeitmodus zurück, ohne die bis dahin ausgeführte Einstellungen
zu speichern.
b) Einsatz des Countdown-Timers
- Betätigen Sie Taste E, um den Countdown zu starten.
- Betätigen Sie Taste E während der Countdown-Timer läuft, um diesen zu pausieren, und betätigen Sie Taste E
nochmals, um mit dem Countdown fortzufahren.
- Zur Beendigung des Countdowns betätigen Sie Taste E, um den Countdown zuerst zu pausieren, und das
ursprünglich eingestellte Countdown-Intervall wird anschließend wieder eingestellt, indem Sie Taste C betätigen.
- Sobald der Countdown auf 00:00:00 herunter gezählt hat ertönt eine (1) Minute lang ein Alarmton. Betätigen Sie
eine beliebige Taste, um den Countdown und Alarmton abzuschalten.
- Wenn Sie den Countdown nicht anhalten, dann läuft der Countdown-Timer im Hintergrund weiter nachdem Sie
Taste B gedrückt haben, um den Countdown-Timermodus zu verlassen.
7. Weltzeit
- Betätigen Sie Taste A im Weltzeit-Modus, um die Sommerzeitfunktion (DST) Ein/Aus zu schalten. Wenn der “DST”
-Indiaktor erschient, zeigt dieser an, dass die DST Sommerzeitfunktion aktiviert ist. Wenn der “DST”-Indikator nicht
erscheint, zeigt dies an, dass die DST Sommerzeitfunktion nicht aktiviert ist.
- Betätigen Sie Taste E, um die Zeitzonen in aufsteigender Reihenfolge anzuzeigen; halten Sie Taste E gedrückt, um die
Anzeige schnell aufwärts durchlaufen zu lassen.
- Betätigen Sie Taste C, um die Zeitzonen in absteigender Reihenfolge anzuzeigen; halten Sie Taste C gedrückt, um die
Anzeige schnell abwärts durchlaufen zu lassen.
Stadt Kode
Stadt GMT Differenz Andere Großstädte in der Zeitzone
UCT Gatwick 00.0
LIS Lisbon
LON London 00.0 Dublin, Lissabon, Casablanca, Dakar, Abidjan
MAD Madrid +01.0 Mailand, Rom, Madrid, Amsterdam, Algiers, Hamburg,
Frankfurt, Wien, Stockholm, Berlin.
PAR Paris
ROM Rom Rom
BER Berlin +01.0
SOT Stockholm
ATH Athen +02.0 Helsinki, Istanbul, Beirut, Damaskus, Kapstadt
CAI Kairo +02.0 Athens, Helsinki, Istanbul, Beirut, Damaskus, Cape Town
JRS Jerusalem +02.0
MOW Moscow
JED Jeddah +03.0 Kuwait, Riad, Aden, Addis Abeba, Nairobi, Moskau, Shiraz
THR Teheran +03.5 Teheran
DXB Dubai +04.0 Abu Dhabi, Muscat
KBL Kabul +04.5
KHI Karachi +05.0 MV Malediven
DEL Neu Delhi +05.5 Mumbai, Kalkutta, New Delhi
KMT Kambodscha
DAC Dhaka +06.0 Colombo
RGN Rangoon +06.5 Rangoon
BKK Bangkok +07.0 Jakarta, Phnom Penh, Hanoi, Vientiane
SIN Singapur
HKG Hong Kong +08.0 Singapur, Kuala Lumpur, Beijing, Taipeh, Manila, Perth, Ulan Bator
BJS Peking
TEP Papua Neu
Guinea
SEL Seoul +09.0 Pyongyang
TYO Tokio +09.0
ADL Adelaide +09.5 Darwin
GUM GU Guam
SYD Sydney +10.0 Melbourne, Guam, Rabaul
NOU Noumea +11.0 Port Vila
WLG* Wellington +12.0
-11.0
Honolulu -10.0 Papeete
Los Angeles -8.0 San Francisco, Las Vegas, Vancouver, Seattle/Tacoma,
Dawson City
Edmonton
Denver -7.0 Edmonton
Mexiko
CHI
New York Montreal, Detroit, Miami, Boston, Panama City, Havanna,
Lima, Bogota
San Diego
Halifax
PPG
HNL
ANC
YVR
LAX
YEA
DEN
MEX
Pago Pago
Nome-9.0Anchorage
Vancouver
NYC
YHZ
SCL
Chicago -6.0 Houston, Dallas/Ft. Worth, New Orleans, Mexiko Stadt,
Winnipeg
-5.0
Page 12
Size: 170 x 55mm
Color: Blk
Size: 170 x 55mm
Color: Blk
Taste B
Manueller
Korrekturmodus
Digitaler
Korrekturmodus
8.Kompass-Anzeigemodus
- Betätigen Sie Taste D im Normalzeitmodus, um den Kompass-Anzeigemodus aufzurufen. Sobald der KOMPASS
angezeigt wird, dreht sich die elektronische Kompassnadel einmal vollständig im Uhrzeigersinn im Kreis und
anschließend funktioniert das Gerät im Kompass-Anzeigemodus. Die Normalzeitanzeige erscheint wieder, wenn
60 Sekunden lang keine Taste betätigt wird.
- Halten Sie Taste A ca. 2 Sekunden lang im Kompass-Anzeigemodus gedrückt, um den Einstellmodus für die
Kompassfunktion zu aktivieren; Betätigen Sie Taste B, um den manuellen,
oder digitalen Korrekturmodus zu aktivieren. Gehen Sie wie folgt vor:
a) Manueller Korrekturmodus
- Betätigen Sie Taste E oder C im manuellen Korrekturmodus, und drehen Sie die Uhr anschließend langsam
entweder im oder gegen den Uhrzeigersinn. Nachdem zwei vollständige Drehungen in gleicher Richtung
ausgeführt wurden, bestätigt die Uhr automatisch die Korrektur und schaltet anschließend wieder in den
Kompass-Anzeigemodus. Hinweis: Nach einem Batteriewechsel schaltet die Uhr erneut in den automatischen
Korrekturmodus, wenn Sie die Kompassfunktion anschließend erstmals wieder aufrufen; bitte lassen Sie die
Kompassfunktion nochmals zwei Drehungen in gleicher Drehrichtung ausführen, wie hierin oben beschrieben:
b) Digitaler Korrekturmodus
Betätigen Sie Taste E im digitalen Korrekturmodus, um den Korrekturwinkel aufwärts zwischen 1 ~ 45°
(der maximal aufwärts einstellbare Korrekturwinkel ist 45°) zur Korrektur der angezeigten Nordrichtung
einzustellen. Betätigen Sie Taste C, um den Korrekturwinkel (der maximal abwärts einstellbare Korrekturwinkel
ist -45°) wie nachfolgend dargestellt:
- Nach zwei Drehungen wird das Ergebnis der automatischen Korrekturmessung wie folgt angezeigt:
YYT Caracas
RIO Rio de Janeiro -3.0 Sao Paulo, Buenos Aires, Brasilia, Montevideo
-4.0 Lapaz, Santiago, Port of Spain
FEN Brasilien -2.0
RAI Praia -1.0
Normal Abweichend
- Betätigen Sie Taste A, um den korrigierten Wert zu bestätigen, und um wieder in den normalen KompassAnzeigemodus zurück zu schalten.
Zum Beispiel: Falls Sie feststellen, dass die von der Uhr angezeigte Richtung nicht korrekt ist, dann verwenden Sie
bitte einen anderen Kompass, um die Nordrichtung zuerst zu ermitteln, und verwenden Sie richten Sie
anschließend die 12-Uhr-Markierung der Uhr mit der Nordrichtung aus; betätigen Sie nun D, um die Kompassanzeige
zu aktivieren. Wenn die Zeigerrichtung 30° West ist, dann geben Sie einen Korrekturwert von -30° ein, wie oben
beschrieben, und bestätigen Sie die Eingabe mittels Taste A. Wenn die Kompassnadel nun nach Norden zeigt, bedeutet
dies, dass der Korrekturvorgang abgeschlossen ist. Wenn Sie keinen anderen Kompass finden, um die Nordrichtung
zu ermitteln, dann verwenden Sie bitte die manuelle Korrekturfunktion, um die Nordrichtung automatisch zu
ermitteln, wobei bei dieser Methode jedoch zu beachten ist, dass dabei eine Toleranz von +/-11° auftreten kann;
bitte beachten Sie jedoch, dass der Wert “00” eingestellt werden muss, wenn Sie den digitalen Korrekturmodus
auswählen.
- Die folgende Tabelle gibt die Bedeutung der einzelnen Abkürzungen für die Richtungsanzeige an:
- Hinweise zum digitalen Kompass
Diese Uhr ist mit einem magnetischen Richtungssensor ausgestattet, der in der Lage ist den Erdmagnetismus zu
erkennen. Dies bedeutet, dass der magnetische Nordpol der Erde, dessen Lage etwas vom geographischen Nordpol
der Erde abweicht, von der Uhr angezeigt wird,. Der magnetische Nordpol liegt im nördlichen Teil Kanadas, und der
magnetische Südpol liegt im südlichen Teil Australiens. Bitte beachten Sie bei der Richtungsbestimmung mittels eines
magnetischen Kompasses, dass die gemessene Abweichung vom geographischen Nordpol um so größer ist, je näher
Sie sich auf der Erde am magnetischen Nordpol befinden. Einige Karten zeigen die Lage des geographischen
Nordpols (d.h. nicht des magnetischen Nordpols) an. Deshalb müssen Sie beim Einsatz solcher Karten in Verbindung
mit dieser Uhr eine korrekte Einstellung der Richtungskorrektur vornehmen.
- Ortsbestimmung
Wenn Sie die Himmelsrichtung in der Nähe eines Objektes mit einem starken Magnetfeldes bestimmen möchten,
wird ein großer Abweichungsfehler auftreten. Sie sollten die Nähe zu solchen Objekten deshalb meiden, während
Sie die Himmelsrichtung bestimmen: Permanentmagnete (magnetische Halsketten), Metallmassen (schwere
Eisentüren, Metalleingangstore, usw.), Hochspannungsleitungen, Antennen, elektrische Heimgeräte, (TV-Gerät, PCs,
Waschmaschinen, Kühlschränke, usw.).
Während Sie sich in einem Zug, auf einem Schiff, oder in einem Flugzeug befinden, kann die Richtung nicht korrekt
bestimmt werden.
Während Sie sich in geschlossenen Räumen in einem Gebäude befinden, in dessen Struktur beim Bau viel Metall
verwendet wurde, kann die Himmelsrichtung ebenfalls nicht korrekt bestimmt werden. Dies ist deshalb der Fall,
weil die Metallstruktur die magnetischen Kräfte der elektrischen Geräte absorbiert.
Taste C
RichtungNBedeutung
Norden
Richtung
NNE
Bedeutung
Nord-Nord-Ost
RichtungNEBedeutung
Nord-Ost
Richtung
ENE
Bedeutung
Ost-Nord-Ost
E Osten ESE Ost-Süd-Ost SE Süd-Ost SSW Süd-Süd-Ost
S Süden SSW Süd-Sud-West SW Süd-West WSW West-Süd-West
W Westen WNW West-Nord-West NW Nord-West NNW Nord-Nord-West
Page 13

Size: 170 x 55mm
Color: Blk
Size: 170 x 55mm
Color: Blk
- Schutzmaßnahmen
Falls diese Uhr magnetisiert wird, dann ist die Genauigkeit des Richtungssensors beeinträchtigt. Sie sollten es deshalb
vermeiden, die Uhr an einem Ort in der Nähe eines Magneten, oder eines anderen Gegenstandes abzulegen, der ein
starkes Magnetfeld erzeugt. Solche Objekte sind: Permanentmagneten (magnetische Halsbänder, usw.) elektrische
Heimgeräte, (TV-Geräte, PCs, Waschmaschinen, Kühlschränke, usw.).
Falls Sie vermuten, dass die Uhr durch ein magnetisches Feld beeinflusst wurde, dann führen Sie bitte eine digitale
oder manuelle Korrektur aus, wie diese im obigen Abschnitt beschreiben wurde.
- Der Grund, warum Richtungsmessungen nicht korrekt sind
Bitte führen Sie eine Richtungskorrektur durch, falls die Messung nicht korrekt ist. Wenn Sie eine
Richtungsbestimmung in der Nähe eines starken Magnetfeldes, wie z.B. elektrischen Heimgeräten, einer großen
Eisenbrücke, Stahlsäulen, Hochspannungskabeln, usw. Ausführen, oder während Sie sich an Bord eines Zuges oder
eines Schiffs befinden, dann treten Fehler auf. Bitte entfernen Sie sich, wenn möglich, von dem großen Metallobjekt
und führen Sie die Bestimmung der Himmelsrichtung erneut aus. Bitte beachten Sie, dass der digitale Kompass
nicht in einem Zug oder auf einem Schiff verwendet werden kann.
- Warum erhalte ich unterschiedliche Richtungsangaben bei der Messung am gleichen Ort?
Das Magnetfeld von nahegelegenen Hochspannungsleitungen stört die Messung des Erdmagnetfeldes durch diese
Uhr. Bitte entfernen Sie sich von Hochspannungsleitungen und führen Sie erneut eine Richtungsbestimmung durch.
- Warum treten Störungen bei der Richtungsbestimmung in geschlossenen Räumen auf?
TV-Geräte, PCs, Lautsprecher oder ähnliche Objekte stören die Messung des Erdmagnetfeldes durch diese Uhr.
Bitte halten Sie sich von solchen Gegenständen fern, die Störeinflüsse erzeugen, oder führen Sie die
Richtungsbestimmung im Freien durch. In einem Gebäude aus Stahlbeton ist es schwierig eine korrekte
Richtungsbestimmung durchzuführen. Bitte beachten Sie, dass die Richtungsbestimmung in einem Zug oder auf
einem Flugzeug nicht erfolgreich ausgeführt werden kann.
C. Technische Daten
Die Batterielebensdauer wird auf der Basis der folgenden Richtwerte berechnet: Digitaler Kompass Verwendung dreimal täglich für jeweils 30 Sekunden. EL Anzeigebeleuchtung – viermal täglich
(jeweils 12 Sekunden). Alarmton – einmal täglich (60 Sekunden).
- Modul Abmessungen
- Modul Stärke (Summer nicht eingeschlossen)
- Betriebstemperaturbereich
- Betriebsspannung
- Zeit Genauigkeit
- Digitaler Kompass – Präzision
- Batterietyp
- Durchschnittswert des statischen Steuerstroms
- Durchschnittliche Stromaufnahme bei Alarm
- Durchschnittliche Stromaufnahme der EL-Beleuchtung
- Durchschnittliche Stromaufnahme des digitalen Kompass
- Batterielebensdauer
: 40,2mm
: 8,0mm
: -10°C ~ +60°C
: 3,0V
: ±60 Sek./Monat (T=25°C)
: ±11° (-10°C) ~ 40°C
: CR2025 (220mAh)
: ≤6 µA (Maximaler statischer Steuerstrom: 13µA)
: ≤1,5mA (Alarm maximale Stromaufnahme: 4,5mA)
: ≤10mA (LED-Beleuchtung maximale Stromaufnahme:
12mA)
: ≤0,3mA (Maximale Stromaufnahme des digitalen
Kompass: 0,8mA)
: 18 Monate (Lithiumbatterie; hergestellt in Japan)
A. Caractéristiques
- Écran LCD affichant les heures, les minutes, les secondes, l’année, le mois, le jour du mois et le
jour de la semaine.
- Calendrier automatique depuis l’année 2000 jusqu’à l’année 2099.
- 3 réglages de réveil par jour.
- Indicateur sonore du passage des heures.
- Chronomètre jusqu’à 99 heures, 59 minutes et 59 secondes.
- Minuterie jusqu’à 99:59:59.
- Boussole électronique.
- Format d’affichage 12heures/24heures.
- Heure dans le monde, pour 48 villes.
- Passage automatique à l’heure d’été.
- Indicateur sonore d’appui sur un bouton.
- Éclairage de l’écran pendant 3 secondes.
RÉGLAGE /ÉCLAIRAGE
(bouton A)
MODE (bouton B)
(Bouton E) HAUT
(Bouton D) BOUSSOLE
(Bouton C) BAS
B. Modes de la montre
1. Depuis un mode quelconque, appuyez une fois sur le bouton A pour allumer l’écran.
L’éclairage s’arrête après 3 secondes.
Mode affichage de l’heure Mode chronomètre Mode réveil Mode minuterie Mode heure dans le monde
Bouton B
Bouton D
Bouton B Bouton B
Bouton B
Bouton B
Mode boussole
Page 14

Size: 170 x 55mm
Color: Blk
Size: 170 x 55mm
Color: Blk
- Appuyez sur E pour augmenter le décalage horaire; maintenez E enfoncé pour accélérer l’incrément du
décalage horaire.
- Appuyez sur C pour diminuer le décalage horaire; maintenez C enfoncé pour accélérer le décrément du
décalage horaire.
- Appuyez sur E ou C pour activer/désactiver le passage automatique àl’heure d’été. L’indication “DST”
apparaît sur l’écran lorsque le passage automatique àl’heure d’été est actif.
- Appuyez sur E ou C pour basculer entre les formats d’affichage 12heures et 24heures.
- Appuyez sur E pour augmenter une valeur; maintenez E enfoncé pour accélérer l’incrément.
- Appuyez sur C pour diminuer une valeur; maintenez C enfoncé pour accélérer le décrément.
- Appuyez sur E ou C pour remettre à zéro les “secondes”.
- Appuyez sur A pour confirmer et quitter le mode réglages. La montre revient en mode affichage de l’heure.
- En mode réglages, sans appui sur aucun bouton pendant une minute, la montre quitte automatiquement le
mode réglages et revient en mode affichage de l’heure.
Bouton B
MinuteHeure
2. Mode affichage de l’heure
- Appuyez une fois sur A. L’écran s’allume et reste allumé pendant 3 secondes. Maintenez A enfoncé pendant
2 secondes pour passer en mode Réglages.
- Appuyez sur B pour sélectionner un mode d’opération.
- Appuyez sur C pour basculer l’affichage du format “date --- mois” au format “mois --- date” et
réciproquement.
- Appuyez sur D pour passer en mode boussole.
- Appuyez sur E pour basculer du mode “heure dans le monde” au mode “affichage de l’heure” et
réciproquement.
3. Réglage de l’heure et de la date
- En mode affichage de l’heure, maintenez A enfoncé pendant 2 secondes. Le “fuseau horaire” clignote,
indiquant que vous vous trouvez en mode réglages. Appuyez sur B pour sélectionner l’un des réglages
disponibles (il clignote), selon la séquence suivante:
Fuseau horaire Heure d’été Format 12H/24H Seconde Heure
Bouton B
Bouton B Bouton B Bouton B
Tasto B
Bouton B
Bouton B
Bouton B Bouton B
Jour Mois Année Minute
4. Mode réveil
a) Activation/désactivation de la fonction réveil
- En mode réveil, appuyez sur C pour régler les 3 heures de réveil, selon la séquence:
AL1 AL2 AL3 SIG.
- Appuyez sur D pour activer/désactiver la fonction réveil “ ”. Appuyez sur D pour activer/désactiver
l’indication sonore de passage des heures (CHI).
b) Réglage d’une heure de réveil
- En mode de réveil AL1, maintenez A enfoncé pendant 2 secondes.
Les chiffres des “heures” clignotent sur l’écran. Appuyez sur B pour
régler les minutes; les chiffres correspondants clignotent sur l’écran.
La séquence de pression sur le bouton B est la suivante:
5. Mode chronomètre
- Le chronomètre peut compter le temps jusqu’à 99 heures, 59 minutes et 59 secondes.
- En mode chronomètre, appuyez sur E pour démarrer/arrêter le comptage. Lorsque le chronomètre est
arrêté, appuyez sur C pour le remettre à zéro.
- Pendant que le chronomètre fonctionne, appuyez sur C marquer un temps SPL (temps intermédiaire).
L’indication “SPL” s’affiche sur l’écran.
- Appuyez sur C pour quitter le mode SPL (temps intermédiaire). Le chronomètre continue sa course.
- Lorsque le chronomètre atteint sa valeur maximale, il remet automatiquement son compteur à zéro et
continue depuis cette valeur.
- Si vous appuyez sur B pour quitter le mode chronomètre, sans arrêter auparavant le chronomètre, celui-ci
continue de fonctionner en arrière-plan.
- Appuyez sur E pour augmenter une valeur; maintenez E enfoncé pour accélérer l’incrément.
- Appuyez sur C pour diminuer une valeur; maintenez C enfoncé pour accélérer le décrément.
- Appuyez sur A pour confirmer et quitter le réglage. La montre revient en mode affichage de l’heure.
- En mode réglages, sans appui sur aucun bouton pendant une minute, la montre quitte automatiquement
le mode réglages et revient en mode affichage de l’heure.
- Lorsque le réveil se déclenche, une sonnerie retentit pendant 60 secondes et l’icône “ ” clignote sur
l’écran.
- Pour arrêter la sonnerie du réveil une fois qu’elle a retenti, appuyez sur l’un quelconque des boutons.
- Remarque: utilisez cette même procédure pour régler les deux autres heures de réveil, “AL2” et “AL3”.
Heure Minute Seconde
6. Mode minuterie
- La fonction minuterie peut décompter le temps jusqu’à 99 heures, 59 minutes et 59 secondes.
a) Réglage de la durée du compte à rebours
- En mode minuterie, maintenez A enfoncé pendant 2 secondes, jusqu’à ce que les chiffres des “heures”
clignotent sur l’écran. Modifiez cette valeur puis appuyez sur B pour sélectionner un autre élément (il
clignote alors sur l’écran), selon la séquence suivante:
- Appuyez sur E pour augmenter une valeur; maintenez E enfoncé pour accélérer l’incrément de la valeur.
- Appuyez sur C pour diminuer une valeur; maintenez C enfoncé pour accélérer le décrément de la valeur.
- Appuyez sur A pour confirmer et quitter le réglage. La montre revient en mode affichage de l’heure.
- En mode réglages, sans appui sur aucun bouton pendant une minute, la montre quitte automatiquement le
mode réglages et revient en mode affichage de l’heure.
b) Instructions d’utilisation de la minuterie
- Appuyez sur E pour démarrer la minuterie.
- Appuyez sur E pour marquer une pause dans le compte à rebours; réappuyez sur E pour reprendre le
compte à rebours.
- Pour arrêter complètement le compte à rebours, appuyez sur E pour marquer une pause, puis sur C. La
minuterie revient à sa valeur initiale.
- Lorsque la durée restante atteint 00:00:00, une sonnerie retentit pendant une minute. Appuyez sur l’un
quelconque des boutons pour l’arrêter.
- Si vous appuyez sur B pour quitter le mode minuterie, sans arrêter auparavant la minuterie, celle-ci
continue de fonctionner en arrière-plan.
Page 15

Size: 170 x 55mm
Color: Blk
Size: 170 x 55mm
Color: Blk
7. Heure dans le monde
- En mode heure dans le monde, appuyez sur A pour activer/désactiver le passage automatique à l’heure d’été.
Cette fonction est active lorsque l’indication “DST” est affichée sur l’écran; elle est désactivée lorsque “DST”
n’apparaît pas sur l’écran.
- Appuyez sur E pour modifier le fuseau horaire dans le sens croissant; maintenez E enfoncé pour accélérer
l’incrémentation.
- Appuyez sur C pour afficher le fuseau horaire dans le sens décroissant; maintenez C enfoncé pour accélérer la
décrémentation.
Code ville Ville Écar t GMT Autres grandes villes dans le même fuseau horaire
UCT Gatwick 00.0
LIS Lisbonne
LON Londres 00.0 Dublin, Lisbonne, Casablanca, Dakar, Abidjan
MAD Madrid +01.0 Milan, Rome, Madrid, Amsterdam, Alger, Hambourg,
Francfort, Vienne, Stockholm, Berlin.
PAR Paris
ROM Rome Rome
BER Berlin +01.0
SOT Stockholm
ATH Athènes +02.0 Helsinki, Istanbul, Beyrouth, Damas, Cape Town
CAI Caire +02.0 Athènes, Helsinki, Istanbul, Beyrouth, Damas, Cape Town
JRS Jérusalem +02.0
MOW Moscow
JED Jeddah +03.0 Kowaït, Riyad, Aden, Addis, Ababa, Nairobi, Moscou, Shiraz
THR Téhéran +03.5 Téhéran
DXB Dubaï +04.0 Abu Dhabi, Muscat
KBL Kaboul +04.5
KHI Karachi +05.0 Les Maldives
DEL Delhi +05.5 Mumbai, Kolkata, New Delhi
KMT Cambodge
DAC Dacca +06.0 Colombo
RGN Rangoon +06.5 Rangoon
BKK Bangkok +07.0 Jakarta, Phnom Penh, Hanoï, Vientiane
SIN Singapour
HKG Hong Kong +08.0
Singapour, Kuala Lumpur, Pékin, Taïpei, Manille, Perth, Ulaanbaatar
BJS Pékin
TEP
PapouasieNouvelle-Guinée
SEL Séoul +09.0 Pyongyang
TYO Tokyo +09.0
ADL Adélaïde +09.5 Darwin
Bouton B
Mode de
correction manuelle
Mode de
correction numérique
8. Mode boussole
- En mode affichage de l’heure ou mesure, appuyez sur D pour activer le mode boussole. L’indication
COMPASS s’affiche sur l’écran et une aiguille électronique balaie un cercle vers la droite. Sélectionnez
un mode de mesure. En l’absence de toute pression sur un bouton pendant 60 secondes, la montre
revient automatiquement en mode affichage de l’heure.
- En mode boussole, maintenez A enfoncé pendant 2 secondes pour passer en mode réglage. Appuyez
sur B pour sélectionner le mode de correction,
selon la séquence suivante:
YYT Caracas
RIO Rio de Janeiro -3.0 Sao Paulo, Buenos Aires, Brasilia, Montevideo
-4.0 Lapaz, Santiago, Port of Spain
FEN Brésil -2.0
RAI Praia -1.0
GUM GU Guam
SYD Sydney +10.0 Melbourne, Guam, Rabaul
NOU Nouméa +11.0 Port Vila
WLG* Wellington +12.0
-11.0
Honolulu -10.0 Papeete
Los Angeles -8.0 San Francisco, Las Vegas, Vancouver, Seattle/Tacoma,
Dawson Ville
Edmonton
Denver -7.0 Edmonton
Mexico
CHI
New York Montréal, Détroit, Miami, Boston, Panama Ville, Havana,
Lima, Bogota
San Diego
Halifax
PPG
HNL
ANC
YVR
LAX
YEA
DEN
MEX
Pago Pago
Nome-9.0Anchorage
Vancouver
NYC
YHZ
SCL
Chicago -6.0 Houston, Dallas/Ft, Worth, Nouvelle-Orléans, Mexico Ville,
Winnipeg
-5.0
Page 16

Size: 170 x 55mm
Color: Blk
Size: 170 x 55mm
Color: Blk
a) Mode correction manuelle
- En mode correction manuelle, appuyez sur E ou C et tournez la montre doucement vers la droite ou vers
la gauche. Dès que vous avez dessiné deux cercles dans la même direction, la montre confirme
automatiquement la correction et revient en mode mesure. Remarque: après que vous avez remplacé la
pile, la première fois que vous utilisez ensuite la boussole, la montre passe en mode correction automatique.
Dessinez alors deux cercles avec la montre, dans la même direction, ainsi que nous l’avons décrit ci-dessus.
b) Mode de correction numérique
En mode correction numérique, appuyez sur E pour augmenter l’angle de correction, entre 1 et 45°
(la valeur maximale est de 45°) du nord. Appuyez sur C pour diminuer l’angle de correction (la valeur
minimale est de -45°), comme illustré ci-dessous:
- Les deux cercles dessinés, la montre affiche le résultat de la correction automatique:
Normal Anormal
- Appuyez sur A pour confirmer la nouvelle valeur et revenir en mode mesure.
Exemple: si vous estimez que la direction déterminée par la montre est incorrecte, repérez le nord avec une
autre boussole, alignez le “12 heures” de la montre dans cette direction et appuyez sur D. Si la flèche pointe
sur 30° ouest, entrez la valeur -30° selon les instructions rapportées ci-dessus et appuyez sur A pour
confirmer. La flèche doit maintenant pointer vers le nord. La correction est alors terminée. Si vous ne
disposez pas d’une autre boussole pour repérer le nord, vous pouvez utiliser votre montre en mode
correction manuelle, mais la possibilité d’erreur sera alors de +/-11°. Notez que la valeur devra être définie
comme étant le “00” lors de la sélection du mode correction numérique “DEC”.
- Le tableau ci-dessous résume les indications de direction affichées par votre montre.
Bouton C
DirectionNSignification
Nord
Direction
NNE
Signification
Nord-nord est
DirectionNESignification
Nord-est
Direction
ENE
Signification
Est-nord-est
E Est ESE Est-sud-est SE Sud-est SSW Sud-sud-est
S Sud SSW Sud-sud-ouest SW Sud-ouest WSW Ouest-sud-ouest
W Ouest WNW Ouest-nord-ouest NW Nord-ouest NNW Nord-nord-ouest
- Informations concernant la boussole numérique
Cette montre utilise un détecteur de direction magnétique pour repérer le géomagnétisme. Le nord indiqué
correspond donc au pôle Nord magnétique qui est légèrement différent du vrai pôle Nord. Le pôle Nord
magnétique se trouve dans la partie nord du Canada et le pôle Sud magnétique dans la partie sud de
l'Australie. Avec une boussole magnétique, plus vous vous rapprochez du pôle magnétique de la Terre et plus
la différence entre le pôle Nord magnétique et le vrai pôle Nord devient grande. Certaines cartes repèrent
le vrai pôle Nord et non le pôle Nord magnétique. Si vous utilisez l’une d’elles avec la fonction boussole de
votre montre, un ajustement est nécessaire.
- Problèmes d’emplacement
La proximité d’un fort champ magnétique peut altérer de façon très significative le repérage de direction.
Aussi, avant d’utiliser votre boussole, éloignez-vous le plus possible des sources d’interférence suivantes:
aimant perpétuel (collier magnétique), objet en métal (porte en fer, rideau métallique de magasin, etc.), fil
électrique à haute tension, antenne, appareil électrique domestique (poste de télévision, ordinateur, machine
à laver le linge, réfrigérateur, etc.).
Évitez d’utiliser la boussole dans un train, sur un bateau, en avion, etc., car la mesure de direction risque fort
de ne pas être exacte.
Pour cette même raison, évitez d’utiliser la boussole en intérieur, notamment à l’intérieur d’une construction
contenant de nombreux matériaux métalliques, car la structure métallique de la construction absorbe la force
magnétique des appareils électriques.
- Précaution
La précision du détecteur de direction se trouve réduite lorsque votre montre est magnétisée. Pour éviter
cette magnétisation, éloignez la montre de tout aimant et de toute source émettant un puissant champ
magnétique. De telles sources incluent les aimants permanents (collier magnétique, etc.) et les appareils
électriques domestiques (poste de télévision, machine à laver le linge, réfrigérateur, etc.).
Si vous suspectez une magnétisation de votre montre, vérifiez-le en procédant à une correction numérique
ou manuelle, selon les instructions que nous vous avons fournies.
- Poursquoi la mesure de direction est-elle incorrecte?
Si la mesure de la direction est incorrecte, procédez à une correction de direction. L’erreur peut provenir
d’un fort champ magnétique proche du point de mesure, par exemple un appareil électrique domestique,
un grand pont en fer, un pilier en fer, un câble aérien, etc., ou d’une mesure prise dans un train ou sur un
bateau. Le cas échéant, éloignez-vous de l’objet métallique et effectuez une nouvelle mesure. Notez que la
boussole ne fonctionne pas dans un train ou sur un bateau.
- Pourquoi plusieurs mesures de direction au même endroit produisent-elles des résultats
différents?
La force magnétique créée par des câbles à haute tension situés à proximité perturbe la détection
géomagnétique de votre montre. Éloignez-vous de tels câbles et recommencez la mesure.
- Pourquoi la mesure de la direction à l’intérieur est-elle problématique?
Les appareils électriques domestiques (poste de télévision, ordinateur, haut-parleur, etc.) interfèrent avec la
détection géomagnétique de votre montre. Pour utiliser votre boussole en intérieur, éloignez-là de ces
sources d’interférence ou sortez de votre maison. Il est encore plus difficile d’utiliser la boussole à l’intérieur
d’une construction en béton armé. Notez que la boussole ne fonctionne pas dans un train ou en avion.
Page 17

Size: 170 x 55mm
Color: Blk
Size: 170 x 55mm
Color: Blk
A. Funciones
- Pantalla LCD muestra hora, minutos, segundos, año, mes, fecha y semana.
- Auto calendario: del año 2000 al año 2099.
- 3 alarmas diarias.
- Señal de campana horaria.
- Cronómetro: el rango máximo que muestra el cronómetro es de 99 horas, 59 minutos, 59 segundos.
- Temporizador de cuenta regresiva: el rango máximo que muestra el temporizador de cuenta regresiva
es de 99:59:59.
- Brújula electrónica.
- Formato de 12 /24 horas.
- Hora mundial, hora para 48 ciudades.
- Horario de verano (DST).
- Botón de tono.
- Luz de fondo EL por 3 segundos.
AJUSTAR/LUZ (Botón A)
MODO (Botón B)
(Botón E) ARRIBA
(Botón D) BRUJULA
(Botón C) ABAJO
2. Modo de hora normal
- Presione una vez A, EL iluminará por 3 segundos. Mantenga presionado A por 2 segundos para entrar al
modo de ajuste.
- Presione B para seleccionar el modo de operación.
- Presione C para cambiar el formato entre “fecha --- mes” y “mes --- fecha”.
- Presione D para entrar al modo de medición con brújula.
- Presione E para cambiar el modo entre “hora mundial” y “hora normal”.
3. Para ajustar la hora y la fecha
- En el modo de hora normal, mantenga presionado A por 2 segundos, “Huso horario” comenzará a titilar,
indicando el modo de ajuste, luego presione B para seleccionar otros elementos para ajustar (titilan) en la
siguiente secuencia:
B. Modo Funcional del Producto
1. En cualquier modo, EL iluminará por 3 segundos presionando una vez el Botón A.
Modo de hora normal Modo de cronómetro Modo de alarma Modo de temporizador
de cuenta regresiva
Modo de hora mundial
Botón B
Botón D
Botón B Botón B
Botón B
Botón B
Huso horario DST Formato 12H/24H Segundos Hora
Botón B
Botón B Botón B Botón B
Button B
Botón BBotón B Botón B Botón B
Fecha Mes Año Minutos
Modo de medición con brújula
C. Spécifications
La durée de vie de la pile a été établie avec les suppositions suivantes: utilisation de la boussole numérique
deux fois par jour pendant 30 secondes à chaque fois; éclairage de l’écran 4 fois (12 secondes) par jour;
déclenchement du réveil une fois (60 secondes) par jour.
- Dimension
- Épaisseur (avertisseur exclu)
- Plage de températures en fonctionnement
- Tension en fonctionnement
- Précision de l’heure
- Précision de la boussole numérique
- Type de pile
- Courant moyen statique
- Courant moyen du réveil
- Courant moyen d’éclairage de l’écran
- Courant moyen pour la boussole
- Durée de vie de la pile
: 40,2mm
: 8,0mm
: -10°C ~ +60°C
: 3,0V
: ±60 s/mois (T=25°C)
: ±11° (-10°C) ~ 40°C
: CR2025 (220mAh)
: ≤6uA (courant statique maximal: 13uA)
: ≤1,5mA (courant maximal 4,5mA)
: ≤10mA (courant maximum 12mA)
: ≤0,3mA (courant maximal : 0,8mA)
: 18 mois (pile au lithium, Japon)
Page 18

Size: 170 x 55mm
Color: Blk
Size: 170 x 55mm
Color: Blk
- Presione E para incrementar el valor del huso horario, mantenga presionado E para incrementar
rápidamente el valor del huso horario.
- Presione C para disminuir el valor del huso horario, mantenga presionado C para disminuir rápidamente
el valor del huso horario.
- Presione E o C para activar/desactivar el horario de verano. Aparecerá en pantalla el indicador “DST”
cuando haya sido activado el horario de verano.
- Presione E o C para cambiar entre los formatos de 12 y 24 horas.
- Presione E para aumentar los valores, mantenga presionado E para aumentar rápidamente los valores.
- Presione C para disminuir los valores, mantenga presionado C para disminuir rápidamente los valores.
- Presione E o C para reajustar a cero los “segundos”.
- Presione A para confirmar y salir de los ajustes y luego retornar al modo de hora normal.
- En el modo de ajuste, se ningún botón es presionado dentro del minuto, e reloj automáticamente saldrá
del modo de ajuste y retornará al modo de hora normal.
5. Modo de Cronómetro
- El rango máximo que muestra el cronómetro es: 99 horas, 59 minutos, 59 segundos.
- En el modo cronómetro, presione E iniciar/detener la cuenta. Presione C para reajustar a cero cuando
detenga el cronómetro.
- Cuando el cronómetro está contando, presione C para entrar al tiempo SPL (tiempo dividido), el
indicador de “SPL” aparecerá en pantalla.
- Presione C para salir de SPL (tiempo dividido), el cronómetro continuará funcionando.
- El cronómetro reiniciará su cuenta desde 00 cuando alcance el límite máximo.
- Si no detiene el cronómetro, éste continuará funcionando en el fondo al presionar B para salir del modo.
4. Modo de alarma
a) Activar/desactivar la alarma
- En el modo alarma, presione C para alternar entre las 3 alarmas diarias, en secuencia:
AL1 AL2 AL3 SIG.
- Presione D para activar/desactivar la alarma “ ”. Presione D para
activar/desactivar la señal de campana horaria (CHI).
b) Configurar la alarma
- En el modo de la primera alarma (AL1), mantenga presionado A
por 2 segundos, “Hora” comenzará a titilar, “minutos” titilará al
presionar B, de la siguiente manera:
- Presione E para aumentar los valores, mantenga presionado E para aumentar rápidamente los valores.
- Presione C para disminuir los valores, mantenga presionado C para disminuir rápidamente los valores.
- Presione A para confirmar y salir de los ajustes y luego retornar al modo de hora normal.
- En el modo de ajuste, se ningún botón es presionado dentro del minuto, e reloj automáticamente saldrá
del modo de ajuste y retornará al modo de hora normal.
- Cuando llegue la hora de alarma, su tono sonará por 60 segundos a la vez que titilará el indicador “ ”.
- Para detener el tono de alarma cuando empiece a sonar, presione cualquier botón.
- Nota: El modo de configuración de “AL2” y “AL3” es idéntico al de “AL1”.
Botón B
MinutosHora
6. Modo de temporizador de cuenta regresiva
- el rango máximo que muestra el temporizador de cuenta regresiva es: 99:59:59.
a) Configurar el temporizador de cuenta regresiva
- En el modo de temporizador de cuenta regresiva, mantenga presionado A por 2 segundos, “Hora”
comenzará a titilar indicando el modo de ajuste de temporizador de cuenta regresiva, luego presione B
para seleccionar otros elementos para ajustar (titilan) en la siguiente secuencia:
Hora Minutos Segundos
- Presione E para aumentar los valores, mantenga presionado E para aumentar rápidamente los valores.
- Presione C para disminuir los valores, mantenga presionado C para disminuir rápidamente los valores.
- Presione A para confirmar y salir de los ajustes y luego retornar al modo de hora normal.
- En el modo de ajuste, se ningún botón es presionado dentro del minuto, e reloj automáticamente saldrá
del modo de ajuste y retornará al modo de hora normal.
b) Uso del temporizador de cuenta regresiva
- Presione E para iniciar una cuenta regresiva.
- Cuando el temporizador de cuenta regresiva está funcionando, presione E para pausar, luego presione E
nuevamente para continuar contando.
- Si desea cancelar la cuenta regresiva, presione E para pausar y el temporizador de cuenta regresiva volverá
a su valor original al presionar C.
- Cuando el temporizador de cuenta regresiva haya alcanzado 00:00:00, el reloj sonará por un minuto.
Presione cualquier botón para detener.
- Si no detiene la cuenta regresiva, el temporizador de cuenta regresiva continuará funcionando en el fondo
al presionar B para salir del modo temporizador.
7. Hora mundial
- En el modo hora mundial, presione A activar/desactivar el horario de verano. Cuando aparezca “DST”,
indicará que está activado el horario de verano. Si no aparece “DST”, indicará que está función está desactivada.
- Presione E para ver el huso horario en dirección hacia arriba, mantenga presionado E para mover rápidamente.
- Presione C para ver el huso horario en dirección hacia abajo, mantenga presionado C para mover rápidamente.
Código de
Ciudad
Ciudad Diferencia de GMT Otras ciudades importantes en la misma zona
UCT Gatwick 00.0
LIS Lisboa
LON Londres 00.0 Dublín, Lisboa, Casablanca, Dakar, Abidjan
MAD Madrid +01.0 Milán, Roma, Madrid, Amsterdam, Argel, Hamburgo,
Frankfurt, Viena, Estocolmo, Berlín.
PAR París
ROM Roma Roma
BER Berlín +01.0
SOT Estocolmo
ATH Atenas +02.0 Helsinki, Estambul, Beirut, Damasco, Ciudad del Cabo
CAI El Cairo +02.0 Atenas, Helsinki, Estambul, Beirut, Damasco,
Ciudad del Cabo
JRS Jerusalén +02.0
Page 19

Size: 170 x 55mm
Color: Blk
Size: 170 x 55mm
Color: Blk
MOW Moscow
JED Jiddah +03.0 Kuwait, Riad, Adén, Addis Ababa, Nairobi, Moscú, Siras
THR Teherán +03.5 Teherán
DXB Dubai +04.0 Abu Dabi, Muscat
KBL Kabul +04.5
KHI Karachi +05.0 MV Maldivas
DEL Delhi +05.5 Mumbai, Calcuta, Nueva Delhi
KMT Camboya
DAC Dacca +06.0 Colombo
RGN Rangún +06.5 Rangún
BKK Bangkok +07.0 Yakarta, Phnom Penh, Hanoi, Vientián
SIN Singapur
HKG Hong Kong +08.0 Singapur, Kuala Lumpur, Beijing, Taipei, Manila, Perth, Ulán Bator
BJS Beijing
TEP Papúa Nueva
Guinea
SEL Seúl +09.0 Pyongyang
TYO Tokio +09.0
ADL Adelaida +09.5 Darwin
GUM GU Guam
SYD Sídney +10.0 Melbourne, Guam, Rabaul
NOU Numea +11.0 Port Vila
WLG* Wellington +12.0
-11.0
Honolulu -10.0 Papeete
Los Angeles -8.0 San Francisco, Las Vegas, Vancouver, Seattle/Tacoma,
Dawson City
Edmonton
Denver -7.0 Edmonton
México
CHI
Nueva York Montreal, Detroit, Miami, Boston, Ciudad de Panamá,
Habana, Lima, Bogotá
San Diego
Halifax
PPG
HNL
ANC
YVR
LAX
YEA
DEN
MEX
Pago Pago
Nome-9.0Anchorage
Vancouver
NYC
YHZ
SCL
Chicago -6.0 Houston, Dallas/Ft, Worth, Nueva Orleans,
Ciudad de México, Winnipeg
-5.0
Botón B
Modo de
Corrección Manual
Modo de
Corrección Digital
8.Modo de medición con brújula
- En el modo de hora normal, presione la tecla D para entrar al modo de medición con brújula. Con
BRÚJULA en pantalla, una aguja electrónica hará un círculo en sentido horario y luego entrará al modo
de medición con brújula. Volverá automáticamente al modo de reloj si no se presiona ningún botón
por 60 segundos.
- En el modo de brújula, mantenga presionado A por 2 segundos para entrar al modo de ajuste, presione B
para seleccionar modo de Corrección Manual o Corrección Digital.
Del siguiente modo:
a) Modo de Corrección Manual
- En el modo de corrección manual, presione el botón E o C, y gire el reloj lentamente en dirección horaria
o anti horaria. Cuando dos círculos hayan girado en el mismo sentido, el reloj automáticamente confirmará
la corrección y retornará al modo de medición con brújula. Nota: tras reemplazar la pila, el reloj entrará en
el modo de auto corrección cuando use por primera vez la brújula; haga girar dos círculos en igual sentido
siguiendo el método descripto más arriba:
b) Modo de corrección digital
En el modo de corrección digital, presione E para aumentar el rango de ángulo de corrección desde 1 ~ 45°
(el ángulo máximo de corrección es 45°) para corrección de dirección norte. Presione C para disminuir el
rango de ángulo de corrección (el ángulo mínimo de corrección es -45°) del modo siguiente:
- Tras hacer girar dos círculos, el resultado de la auto corrección se mostrará así:
YYT Caracas
RIO Río de Janeiro -3.0 San Pablo, Buenos Aires, Brasilia, Montevideo
-4.0 La Paz, Santiago, Puerto de España
FEN Brasil -2.0
RAI Praia -1.0
Normal Anormal
Page 20

Size: 170 x 55mm
Color: Blk
Size: 170 x 55mm
Color: Blk
- Presione A para confirmar el valor corregido y retornar al modo de medición normal.
Por ejemplo: Si encuentra que la medición de la dirección medida no es correcta, use otra brújula para
medir primero la orientación del norte, luego use las “12 horas” del reloj para alinear con la orientación
norte; presione D para medir. Si la dirección de la punta de la fecha está a 30° del oeste, deberá ingresar
-30° según el método anterior, luego presione A para confirmar. Entretanto, la flecha apuntará al norte, lo
que significa que el proceso de corrección está completo. Si no encuentra otra brújula para medir la
dirección del norte, use la corrección manual para medir automáticamente la dirección del norte dentro
de +/-11°; sin embargo, tenga en cuenta que el valor debe ser configurado como “00” cuando seleccione
el modo de corrección digital “DEC”.
- La tabla siguiente indica el significado de cada acrónimo para cada sentido.
- Aviso sobre la brújula digital
Este reloj posee un sensor magnético de dirección que puede detectar geomagnetismo. Esto significa que el
norte indicado por este reloj Polo Norte magnético, lo cual es algo diferente al verdadero Polo Norte. El
Polo Norte magnético está ubicado en la parte norte de Canadá, mientras que el Polo Sur magnético está
ubicado en la parte sur de Australia. Por favor note que cuando use la brújula magnética para medir, mientras
más cerca se encuentre de un polo magnético de la Tierra, la medida tendrá una diferencia mayor el Polo
Norte magnético y el real Polo Norte. Algunos mapas están marcados con el Polo Norte Real (no el
magnético). De este modo cuando use ese tipo de mapas junto a este reloj, se requerirá el ajuste
correspondiente.
- Medición de locación
Cuando mida un sentido cerca de un fuerte campo magnético, se producirá un error grande. Por ello, los
siguientes objetos deben ser evitados al medir una dirección: imán eterno (collar magnético), bloque de
metal (puerta de hierro, arcadas metálicas, etc.), cables eléctricos de alto voltaje, antenas, artefactos
eléctricos del hogar (TV, computadora personal, lavarropas, heladera, etc.).
Cuando se encuentre a bordo de un tren, barco o avión, etc., el sentido no podrá ser medido correctamente.
Cuando se encuentre en interiores, especialmente en un edificio de construcción metálica, el sentido no
podrá ser medido correctamente. Esto se debe a que la estructura metálica del edificio absorberá la fuerza
magnética de los artefactos eléctricos.
Botón C
DirecciónNSignificado
Norte
Dirección
NNE
Significado
Nor noreste
DirecciónNESignificado
Noreste
Dirección
ENE
Significado
Este noreste
E Este ESE Este sudeste SE Sudeste SSW Sud sudeste
S Sur SSW Sur suroeste SW Suroeste WSW Oeste suroeste
W Oeste WNW Oeste noroeste NW Noroeste NNW Nor noroeste
- Preservación
Si este reloj es magnetizado, se reducirá la definición de dirección del sensor. Por lo tanto debe evitar colocar
este reloj cerca de un imán o cualquier objeto que emite una fuerza magnética. Estos objetos incluyen: imán
eterno (collar magnético, etc.) y artefactos eléctricos del hogar (TV, lavarropas, heladera, etc.).
Si está en duda si su reloj puede haber sido magnetizado, proceda con la corrección digital o manual, según se
describe en la sección anterior.
- Razón por la que la medición de dirección es incorrecta
Si la medición de dirección es incorrecta, proceda con la corrección. Si la medición se efectúa cerca de un
fuerte campo magnético, tal como un artefacto eléctrico del hogar, puente metálico, pilar de acero, cables
metálicos, etc., o cuando se encuentre a bordo de un tren o barco, resultará en error. En ese caso, aléjese
del objeto metálico y mida nuevamente la dirección. Note que la brújula digital no puede ser usada en un
tren o en un barco.
- Por qué se obtiene diferentes resultados cuando las direcciones son medidas en el
mismo lugar?
La fuerza magnética de los cables de alto voltaje en la zona interfieren en la detección geomagnética de este
reloj. Apártese de los cables de alto voltaje y mida nuevamente.
- Por qué se producen problemas cuando se mide una dirección en interiores?
El TV, la computadora personal, parlantes u objetos similares interfieren en la detección geomagnética de este
reloj. Apártese de los objetos que interfieren o realice la medición afuera. Será más difícil medir una dirección
dentro de un edificio de concreto. Note que la brújula digital no puede ser usada en un tren o en un barco.
C. Especificaciones
La duración de la pila está calculada de acuerdo a los siguientes estándares: Funcionamiento de la brújula
digital tres veces por día de 30 segundos por vez. Iluminación EL 4 veces (12 segundos) por día. Tono de
alarma suena una vez (60 segundos) por día.
- Dimensión del módulo
- Grosor del módulo (sin incluir timbre)
- Rango de temperaturas de medición
- Voltaje de funcionamiento
- Precisión de hora
- Precisión de la brújula digital
- Tipo de pila
- Corriente estática promedio
- Corriente promedio de la alarma
- Corriente promedio de iluminación EL
- Corriente promedio de funcionamiento
de brújula digital
- Duración de la pila
: 40.2mm
: 8.0 mm
: -10°C ~ +60°C
: 3.0V
: ±60 seg/mes (T=25°C)
: ±11° (-10°C) ~ 40°C
: CR2025 (220mAh)
: ≤6 uA (máxima corriente estática promedio: 13uA)
: ≤1.5mA (Corriente máxima de la alarma: 4.5mA)
: ≤10mA (Corriente máxima de iluminación LED: 12mA)
: ≤0.3mA (Corriente máxima de brújula digital: 0.8mA)
: 18 meses (de litio japonesa)
Page 21

Size: 170 x 55mm
Color: Blk
Size: 170 x 55mm
Color: Blk
SET/LIGHT (A 键)
MODE (B 键)
(E 键) UP
(D 键) COMP
(C 键) DOWN
1. 在任意模式,按A键一次亮EL 3秒。
B 键
D 键
B 键 B 键
B 键
B 键
时区 夏令时
12/24小时制 秒
B 键 B 键 B 键 B 键
B 键
B 键B 键 B 键 B 键
日
月 年
分钟
小时
B 键
分钟小时
A . 功能简介
- 时、分、秒、年、月、日及星期显示
- 2000 ~ 2099年全自动日历
- 3组响闹功能
- 整点报时功能
- 秒表功能,最大计时99小时59分59秒
- 倒计时功能,最大倒计时99:59:59秒
- 电子指南针功能
- 12/24小时制
- 世界时间功能,可显示48个城市的时间
- 夏令时功能
- 按键音
- 3秒EL背光
B . 产品功能模式
指南针测量模式
正常时间模式 秒表模式 闹钟模式 倒计时模式 世界时间模式
2. 正常时间模式
- 按A键一次亮EL亮3秒;按住A键2秒进入设置模式。
- 按B键选择操作模式。
- 按C键日期转换日-月或月-日显示格式。
- 按D键进入指南针测量模式。
- 按E键转换世界标准时间或正常时间模式。
3. 时间及日期设置
- 在正常时间模式,按住A键2秒时区闪动,表示进入设置状态,按B键顺序选择要设定的项目。
- 按E键往上调整时区,按住E键往上快速调整。
- 按C键往上下调整时区,按住C键往下快速调整。
- 按E或C键开或关闭(OFF、ON),夏令时开启有“DST”显示。
- 按E或C键切换12/24时制。
- 按E键调整数值递增,按住E键快速递增。
- 按C键调整数值递减,按住C键快速递减。
- 按E或C键秒钟清零。
- 按A键确认,退出设置返回正常时间模式。
- 在设置模式1分钟无按键操作自动退出设置返回正常时间模式。
4. 闹钟模式
a) 闹铃开启与关闭
- 在闹钟模式下,按C键,顺序切换3组闹钟:AL1→AL2→AL3→SIG。
- 按D键可开启或关闭闹铃“ALM1~ALM3 ”如果是在“SIG”整点报时开关模式,按D键可开启或
关闭整点报时“CHI”,开启“ALM”或“CHI”在其它任何模式都会有显示。
b)闹钟设置
- 在(AL1)第一组闹铃下,按住A键2秒“时”闪动,按B键“分”闪动如下:
Page 22

Size: 170 x 55mm
Color: Blk
Size: 170 x 55mm
Color: Blk
City Code City GMT Differential Other major cities in same time zone
UCT 格林威治 00.0
LIS
里斯本
LON 伦敦 00.0 都柏林, 里斯本, 卡萨布兰卡, 达喀尔, 阿比让
MAD 马德里 +01.0 阿姆斯特丹, 阿尔及尔, 汉堡, 法兰克福, 维也纳, 米兰
PAR 巴黎
ROM 罗马 罗马
BER 柏林 +01.0
SOT
斯德哥尔摩
ATH 雅典城 +02.0 赫尔辛基, 贝鲁特, 大马士革, 法兰克福, 维也纳,
马德里, 斯德哥尔摩
CAI 开罗 +02.0 雅典城, 赫尔辛基, 伊斯坦布尔, 贝鲁特, 大马士革, 开普敦
JRS 耶路撒冷 +02.0
小时 分钟 秒
MOW
JED +03.0 科威特, 利雅得, 亚丁, 亚的斯亚贝巴, 内罗毕, 莫斯科
THR +03.5
德黑兰
DXB +04.0 阿布扎比, 马斯喀特
KBL +04.5
KHI +05.0 马尔地夫
DEL +05.5
孟买,柯尔喀塔,新德里
KMT
DAC +06.0 科伦坡
RGN +06.5 仰光
BKK +07.0
雅加达, 金边, 河内, 万象
SIN
HKG +08.0 新加坡, 吉隆坡, 北京, 台北, 马尼拉, 珀斯, 乌兰巴托
BJS
TEP
SEL +09.0 首尔, 平壤
TYO +09.0
ADL +09.5
达尔文
- 按E键调整数值递增,按住E键快速递增。
- 按C键调整数值递减,按住C键快速递减。
- 按A键确认,退出设置返回正常时间模式。
- 在设置模式1分钟无按键操作自动退出设置返回正常时间模式。
- 当闹钟达到所设置的时间时,会响闹60秒并且闹钟符号“ ALM1 ”闪动。
- 正在响闹时按任一键停止。
- 注:第2及第3组闹钟(AL2~AL3)设置方法同(AL1)。
5. 秒表模式
- 秒表最大计时范围99小时59分59秒停止。
- 秒表模式下,按E键开始或停止跑秒;秒表停止时按C键归零。
- 秒表运行时,按C键进入SPL分段计时,屏幕会有“SPL”显示。
- 在按C键退出分段计时,继续运行秒表。
- 到达最大计时限度,秒表会从0重新开始计时。
- 若不停止秒表,按B键退出秒表模式,进入到其它模式时秒表也会继续运行。
6. 倒计时模式
- 最大倒计时范围:99小时、59分、59秒。
a) 倒计时设定
- 在倒计时模式,按住A键2秒“小时”闪动,表示进入倒计时设置状态,按B键顺序选择要设定的
项目(闪动)如下:
- 按E键调整数值递增,按住E键快速递增。
- 按C键调整数值递减,按住C键快速递减。
- 按A键确认,退出设置返回正常时间模式。
- 在设置模式1分钟无按键操作自动退出设置返回正常时间模式。
b)倒计时的使用
- 按E键开始倒计时。
- 倒计时正在进行时,按E键可暂停,再按E键继续倒计时。
- 如果要取消此次倒计时,按E键暂停后,按C键倒计时会返回最初设定值。
- 当计时到00:00 00时,会响闹1分钟,正在响闹时按任一键停止。
- 若不停止倒计时,按B键退出倒计时模式,进入到其它模式时倒计时也会继续运行。
7. 世界时间功能
- 世界时间模式下,按住A键开启或关闭夏令时;有“DST”显示表示夏令时开启;没有“DST”
显示表示复令时已关闭。
- 按E键,向上查看时区、时间,按住E键快速查看。
- 按C键,向下查看时区、时间,按住C键快速查看。
莫斯科
吉达
德黑兰
迪拜
喀布尔
卡拉奇
德里
柬埔寨
达卡
仰光
曼谷
新加坡
香港
北京
巴布亚
新几内亚
汉城
东京
亚德莱德
Page 23

Size: 170 x 55mm
Color: Blk
Size: 170 x 55mm
Color: Blk
正常情况 不正常
GUM
SYD +10.0 墨尔本, 关岛, 腊包尔港
NOU +11.0 维拉港
WLG* +12.0
-11.0
-10.0 帕皮提
-8.0
-7.0 艾德蒙顿
CHI
蒙特利尔, 底特律, 迈阿密, 波士顿, 哈瓦那, 利马, 波哥大
PPG
HNL
ANC
YVR
LAX
YEA
DEN
MEX
诺姆-9.0
NYC
YHZ
SCL
-6.0
休斯敦, 达拉斯, 沃斯堡, 新奥尔良, 墨西哥城, 温尼伯
-5.0
B 键
手动校正模式 数字校正模式
8. 指南针测量模式
- 在正常时间或测量模式下,按D键,进入指南针测量模式,在显示COMPASS模式下电子锣盘顺时针
扫描一圈后进入指南针测量模式,如果60秒无按键操作自动返回时钟模式。
- 在指南针模式,按住A键2秒进入校正模式,按B键选择手动校正或数字校正如下:
YYT
RIO -3.0 圣保罗, 布宜诺斯艾利斯, 巴西利亚, 蒙特维的亚
-4.0 拉帕兹, 圣地亚哥, 西班牙港
FEN -2.0
RAI -1.0
C 键
DirectionNMeaning Direction
NNE
Meaning DirectionNEMeaning Direction
ENE
Meaning
E ESE SE SSW
S SSW SW WSW
W WNW NW NNW
关岛
悉尼
努美阿
惠灵顿
檀香山
洛杉矶
埃德蒙顿
丹佛
墨西哥
纽约
圣地哥
哈利法克斯
帕果
安克雷奇
温哥华
芝加哥
旧金山, 拉斯韦加斯, 温哥华, 西雅图 / 塔科马港市
加拉加斯
里约热内卢
巴西
普拉亚
a)手动校正
- 在手动校正模式下,按E键或C键,然后缓慢转动手表,不分顺转和逆转;只要同一方向转动两圈后,
本表会自动完成北向校正,并返回指南针测量模式。注意: (更换电池第一次使用指南针会首先进入自
动校正模式,请按以上方法转动手表两圈以上便于校准指南针)
- 转动两圈后自动校正结果显示如下:
b)数字校正
- 在数字校正模式下,按E键为北向校正1~45˚,表示调整数字增加 (最大可调整+45˚)。按C键调整数字
减少 (最大可调整-45˚)。如下图:
- 按A键确认校正值,并反回正常测量模式。
例如:您发现本表所测定的方响不正确,先使用其它锣盘测出北方,将本表12时对准北方,按D键测量
指南针,读取3点箭头指的方向是偏向西方30˚,就应该按以上操作方法选择输入向输入-30˚,按A键
确认后再进行测量指南针,此时3点箭头会指向正北方,数字校正完成。如果没有找到其它锣盘测出
北方,只能用手动校正方法,手表会自动找出北方(±11˚)之内,但是要注意必需在“DEC”数字
校正模式选择数字都必须设置为“00”。
- 下表说明各方向的缩写字母的含义;
北 北北东 东北 东北东
东 东南东 东南 南南东
南 南南西 西南 西南西
西 西北西 西北 北北西
Page 24

Size: 170 x 55mm
Color: Blk
Size: 170 x 55mm
Color: Blk
D. 质量标准
- 使用数码罗盘须知
本表设有一个磁力定向传传感器,可探测地磁。这也就是说本表所示的北方是磁北极,其与真北极略
有不同。磁北极位于加拿大的北部,磁南极则位于澳洲的南部。注意使用所有磁力罗盘测量时,越靠
近地球的磁极,磁北极与真北极的之间的差越大。此外亦须注意部分地图是以真北极作表示 (而非磁
北极),因此在使用此类地图及本表时,务须适当的调整。
- 测定位置
在强烈磁场附近测定方向会产生极大的误差,因此须避免在下述物体附近测定方向:永久性的磁石
(磁性项链等)、金属块 (铁门、金属储物柜等)、高压电线、天线、家庭电器 (电视机、个人计算机、
洗衣机、电冰箱等)
乘坐列车、船舶、飞机等时,方向值无法正确测定。
在室内,特别是在带有诸多金属所构成的建筑物中,方向值无法正确测定。此是因为此类建筑中的
金属结构会吸取电器等中的磁力。
- 存放
若本表受到磁化,定向传感器的精确度会降低。因此务须将本表存放在远离磁石及任何发出强烈磁
力的物体的附近,其包括有:永久性的磁石 (磁性项链等) 及家庭电器 (电视机、计算机、洗衣机、
电冰箱等)。
若您怀疑手表可能被磁化时,请进行“定向传感器的校准”数字校正和手动校正的校准操作。
- 方向的测定不准确的原因是
方向校准不正确;请进行方向校准。在诸如家庭电器、大型铁桥、钢柱、高架电缆等强烈磁场的附近,
或在列车、输船等中进行方向的测定都会导致误差。请远离大型金属物体,并再次进行测定操作。注
意数码罗盘无法在列车、船舶等内操作。
- 为何在同一位置进行方向测定时会产生不同的结果:
附近的高压电缆所产生的磁力干扰了手表对地磁的探测,请远离高压电线,并再次进行测定。
- 为何在室内测定方向时会产生问题:
电视、个人计算机、扬声器或其它物体会干扰手表对地磁的探测,请远离干扰物体或在室外进行测定。
在钢筋混凝土建筑物进行方向测定更为困难。注意方向的测定无法在列车、飞机等中进行。
C. 配壳须注意事项:
1. 使用胶壳配钢底盖指南针精度较高,误差±2˚
2. 使用钢壳或合金壳配钢底盖指南针精度较差,误差误差±5˚
3. 使用合金壳或钢壳不能含有磁性材料!
(每天使用:数码指南针3次每次30秒,EL背光4次每次亮3秒,响闹1次60秒计算。)
- 机芯尺寸
- 厚 度 (不包括蜂鸣片)
- 工作温度
- 工作电压
- 时间准确精度
- 数码指南针精确度
- 电池型号
- 静态平均驱动电流
- 响闹平均电流
- 亮光平均电流
- 使用数码指南针平均电流
- 电池寿命
:Ф40.2mm
:8.0 mm
:-10℃~60℃
:3V
:±60秒/月 (T=25℃)
:±11˚ (-10℃~40℃)
:CR2025 (电池容量:170mAh)
:≤6 u A (静态最大驱动电流:13u A)
:≤1.5 m A (响闹最大电流:4.5 m A)
:≤10 m A (亮光最大电流:12m A)
:≤0.3 m A (使用数码指南针最大电流:0.8m A)
:18个月 (日本电)
A. Características
- Tela LCD mostra hora, minutos, segundos, ano, mês, data e semana.
- Calendário automático: do ano 2000 ao ano 2099.
- 3 alarmes diários
- Sinal de alarme a cada hora
- Cronômetro: a capacidade máxima do display do cronômetro é de 99 horas, 59 minutos, 59 segundos.
- Contagem regressiva: a capacidade máxima da contagem regressiva é de 99:59:59.
- Bússola eletrônica
- Formato 12 horas / 24 horas
- Hora mundial, hora para 48 cidades.
- Horário de verão
- Som nas teclas
- Luz de fundo EL por 3 segundos
AJUSTE/LUZ (Tecla A)
MODO (Tecla B)
(Tecla E) PARA CIMA
(Tecla D) COMP
(Tecla C) PARA BAIXO
Page 25

Size: 170 x 55mm
Color: Blk
Size: 170 x 55mm
Color: Blk
B. Modo Produto Funcional
1. Em qualquer modo, EL acenderá por 3 segundos pressionando uma vez a Tecla A.
Modo hora normal Modo Cronômetro Modo alarme Modo contagem regressiva Modo hora mundial
Tecla B
Tecla D
Tecla B Tecla B
Tecla B
Tecla B
Modo de medição da bússola
2. Modo hora normal
- Pressione A uma vez, acenderá por 3 segundos. Pressione A por 2 segundos para entrar no modo ajuste.
- Pressione B para selecionar o modo operação.
- Pressione C para mudar o formato entre “data – mês” e “mês – data”.
- Pressione D para entrar no modo de medição da bússola.
- Pressione E para mudar entre “hora mundial” e “hora normal”.
3. Para ajustar a hora e a data
- No modo de hora normal, pressione A por 2 segundos. “Fuso horário” começará a piscar, o que indica o
modo ajuste. Depois pressione B para selecionar outro item do ajuste (flash) na seguinte sequencia:
Fuso Horário DST Formato 12Hr/24Hr Segundo Hora
Tecla B
Tecla B Tecla B Tecla B
Tecla B
Tecla BTecla B Tecla B Tecla B
Data Mês Ano Minuto
- Pressione E para aumentar o valor do fuso horário. Mantenha E pressionada para aumentar o valor
rapidamente.
- Pressione C para diminuir o valor do fuso horário. Mantenha C pressionada para diminuir o valor
rapidamente.
- Pressione E ou C para Ligar/Desligar o horário de verão. O indicador “DST” aparecerá na tela quando
o horário de verão estiver ativado.
- Pressione E ou C para mudar entre os formatos 12 hrs / 24 hrs.
- Pressione E para aumentar os valores. Mantenha E pressionada para aumentar os valores rapidamente.
- Pressione C para diminuir os valores. Mantenha C pressionada para diminuir os valores rapidamente.
- Pressione E ou C para reajustar os “segundos” a zero.
- Pressione A para confirmar e sair do ajuste. Depois volte ao modo de hora normal.
- No modo ajuste, se nenhuma tecla for pressionada por um minuto, o relógio sairá automaticamente
do ajuste e voltará ao modo de hora normal.
4. Modo alarme
a) Ligar/Desligar alarme
- No modo alarme, pressione C para alternar entre 3 alarmes diários em sequencia:
AL1 AL2 AL3 SIG.
- Pressione D para Ligar/Desligar alarme “ ”. Pressione D para Ligar/Desligar o som do alarme (CHI).
b) Para ajustar o alarme
- No modo do primeiro alarme (AL1), mantenha A pressionada
por 2 segundos. A “Hora” começará a piscar. Os “minutos”
piscarão pressionando B da seguinte maneira:
Tecla B
MinutoHora
5. Modo cronômetro
- A capacidade máxima de display do cronômetro é de: 99 horas, 59 minutos e 59 segundos
- No modo cronômetro, pressione E para começar/parar a contagem. Pressione C para reajustar a zero
quando o cronômetro tiver parado.
- Quando o cronômetro estiver contando, pressione C para entrar na hora SPL (hora compartilhada).
O indicador “SPL” aparecerá na tela.
- Pressione C para sair do SPL (tempo compartilhado). O cronômetro continuará a contagem.
- O cronômetro recomeçará a contagem de 00 quando chegar ao seu limite máximo.
- Se o cronômetro não for detido, ele continuará a contar no fundo após pressionar B para sair do modo
cronômetro.
- Pressione E para aumentar os valores. Mantenha E pressionada para aumentar os valores rapidamente.
- Pressione C para diminuir os valores. Mantenha C pressionada para diminuir os valores rapidamente.
- Pressione A para confirmar e sair do ajuste. Depois volte ao modo de hora normal.
- No modo ajuste, se nenhuma tecla for pressionada por um minuto, o relógio sairá automaticamente do
ajuste e voltará ao modo de hora normal.
- Quando for a hora do alarme, este soará por 60 segundos e o indicador do alarme “ ” piscará.
- Para parar o som do alarme quando este começa, pressione qualquer tecla.
- Nota: O método de ajuste do “AL2” e do “AL3” são os mesmos que o do “AL1”.
6. Modo Contagem Regressiva
- A capacidade máxima do display para a contagem regressiva é de: 99 horas, 59 minutos e 59 segundos.
a) Para ajustar a contagem regressiva
- No modo de contagem regressiva, pressione A por 2 segundos. A “Hora” começará a piscar, o que indica
o ajuste da contagem regressiva. Depois pressione B para selecionar outro item de ajuste (flash) na seguinte
sequencia:
Page 26

Size: 170 x 55mm
Color: Blk
Size: 170 x 55mm
Color: Blk
Hora Minuto Segundo
- Pressione E para aumentar os valores. Mantenha E pressionada para aumentar os valores rapidamente.
- Pressione C para diminuir os valores. Mantenha C pressionada para diminuir os valores rapidamente.
- Pressione A para confirmar e sair do ajuste. Depois volte ao modo de hora normal.
- No modo ajuste, se nenhuma tecla for pressionada por um minuto, o relógio sairá automaticamente do
ajuste e voltará ao modo de hora normal.
b) Para utilizar a contagem regressiva
- Pressione E para começar a contagem regressiva.
- Quando estiver na contagem regressiva, pressione E para uma pausa. Depois pressione E novamente para
recomeçar a contagem regressiva.
- Se quiser cancelar a contagem regressiva, pressione E para uma pausa, e a contagem regressiva voltará ao
valor original pressionando a tecla C.
- Quando o tempo da contagem regressiva tiver chegado a 00:00:00, o relógio soará por um minuto.
Pressione qualquer tecla para parar.
- Se a contagem regressiva não for detida, continuará a contar no fundo após pressionar B para sair do
modo cronômetro.
7. Hora Mundial
- No modo de Hora Mundial, pressione A para ligar/desligar o horário de verão. Quando aparecer “DST”,
isto indica que a função DST está ativada. Se não aparecer “DST”, significa que está desligada.
- Pressione E para ver o fuso horário na direção ascendente. Mantenha E pressionada para passar para
cima rapidamente.
- Pressione C para ver o fuso horário na direção descendente. Mantenha C pressionada para passar para
baixo rapidamente.
Código da
Cidade
Cidade Diferença GMT Outras cidades grandes no mesmo fuso horário
UCT Gatwick 00.0
LIS Lisboa
LON Londres 00.0 Dublim, Lisboa, Casablanca, Dakar, Abidjan
MAD Madrid +01.0 Milano, Roma, Madrid, Amsterdam, Argel, Hamburgo,
Frankfurt, Viena, Estocolmo, Berlim
PAR Paris
ROM Roma Roma
BER Berlim +01.0
SOT Estocolmo
ATH Atenas +02.0 Helsinki, Istambul, Beirute, Damasco, Cidade do Cabo
CAI Cairo +02.0 Atenas, Helsinque, Istambul, Beirute, Damasco,
Cidade do Cabo
JRS Jerusalem +02.0
MOW Moscou
JED Jeddah +03.0 Kuweit, Riad, Aden, Addis, Ababa, Nairobi, Moscou, Shiraz
THR Teerã +03.5 Teerã
DXB Dubai +04.0 Abu Dhabi, Muscat
KBL Cabul +04.5
KHI Carachi +05.0 Maldivas
DEL Delhi +05.5 Mumbai Kolkata, Nova Delhi
KMT Camboja
DAC Dacca +06.0 Colombo
RGN Rangoon +06.5 Rangoon
BKK Bangkok +07.0 Jacarta, Phnom Penh, Hanói, Vientiane
SIN Cingapura
HKG Hong Kong +08.0
Cingapura, Kuala Lumpur, Pequim, Taipei, Manila, Perth, Ulaanbaatar
BJS Pequim
TEP Papua Nova
Guiné
SEL Seul +09.0 Pyongyang
TYO Tóquio +09.0
ADL Adelaide +09.5 Darwin
GUM Guam
SYD Sydney +10.0 Melbourne, Guam, Rabal
NOU Noumea +11.0 Port Vila
WLG* Wellington +12.0
-11.0
Honolulu -10.0 Papeete
Los Angeles -8.0 São Francisco, Las Vegas, Vancouver, Seattle/Tacoma,
Cidade Dawson
Edmonton
Denver -7.0 Edmonton
México
CHI
Nova Iorque Montreal, Detroit, Miami, Boston, Cidade do Panama,
Havana, Lima, Bogotá
São Diego
Halifax
PPG
HNL
ANC
YVR
LAX
YEA
DEN
MEX
Pago Pago
Nome-9.0Ancoragem
Vancouver
NYC
YHZ
SCL
Chicago -6.0 Houston, Dallas/Ft, Worth, Nova Orleans, Cidade do
México, Winnipeg
-5.0
Page 27

Size: 170 x 55mm
Color: Blk
Size: 170 x 55mm
Color: Blk
Tecla B
Modo de
Correção Manual
Modo de
Correção Digital
8.Modo de medição da bússola
- No modo normal de hora ou medição, pressione a tecla D para entrar no modo de medição da bússola.
Com BUSSOLA no display, a agulha eletrônica dará uma volta no sentido horário e depois entrará no modo
medição da bússola. Voltará ao modo relógio automaticamente se nenhuma tecla for pressionada antes dos
60 segundos.
- No modo bússola, mantenha a tecal A pressionada por 2 segundos para entrar no modo de ajuste.
Pressione a tecla B para selecionar o modo Correção Manual ou
Correção Digital. Da seguinte maneira:
YYT Caracas
RIO Rio de janeiro -3.0 São Paulo, Buenos Aires, Brasília, Montevidéu
-4.0 La Paz, Santiago, Porto da Espanha
FEN Brasil -2.0
RAI Praia -1.0
a) Modo de Correção Manual
- No modo de correção manual, pressione E ou C, depois gire os ponteiros lentamente no sentido horário
ou anti-horário. Quando forem feitas duas voltas na mesma direção, o relógio confirmará a correção
automaticamente e voltará ao modo de medição de bússola. Nota: Depois de trocar a bateria, o relógio
entrará no modo auto correção ao se utilizar a bússola pela primeira vez. Por favor gire os ponteiros duas
vezes na mesma direção de acordo com o método mencionado acima.
b) Modo de Correção Digital
No modo de correção digital, pressione a tecla E para aumentar o alcance de correção do ângulo de 1 – 45˚
(o alcance máximo de correção do ângulo é de 45˚) para a correção norte. Pressione C para diminuir o
alcance do ângulo ( o alcance mínimo de correção do ângulo é de -45˚) como abaixo:
- Após ter feito as duas voltas, o resultado da auto correção se mostra a seguir:
Normal Anormal
- Pressione A para confirmar o valor corregido, depois volte ao modo de medição normal.
Por exemplo: Se perceber que a direção medida pelo relógio não estiver correta, utilize outra bússola para
medir a direção norte primeiro, depois utilize o modo “12 horas” do relógio para ajustar com a direção
norte. Pressione D para medir. Se a flecha apontar na direção 30˚ ao oeste, você deverá entrar -30˚ de
acordo com o método de operação acima, e depois pressionar A para confirmar. Enquanto isso, a flecha
apontará ao norte, o que significa que o processo de correção foi completado. Se não encontrar outra
bússola para medir o norte, por favor utilize a correção manual para medir o norte automaticamente
até +/- 11˚, no entanto, note que o valor deve ser ajustado como “00” ao selecionar o modo de correção
digital “DEC”.
- A seguinte tabela indica o significado de cada acrônimo para cada direção.
Tecla C
DireçãoNSignificado
Norte
Direção
NNE
Significado
Norte-Nordeste
DireçãoNESignificado
Nordeste
Direção
ENE
Significado
Este-Nordeste
E Este ESE Este-Sudeste SE Sudeste SSW Sul-Sudoeste
S Sul SSW Sul-Sudeste SW Sudoeste WSW Oeste-Sudoeste
W Oeste WNW Oeste-Noroeste NW Noroeste NNW Norte-Noroeste
- Notificação para bússola digital
Este relógio tem um sensor magnético de direção que pode detectar o geomagnetismo. Isto significa que o
norte indicado por este relógio é o Polo Norte magnético, que é um pouco diferente do Polo Norte real. O
Polo Norte magnético está localizado na parte norte do Canadá, e o Polo Sul magnético está na parte sul da
Austrália. Quando utilizar a bússola magnética para medir, quanto mais perto estiver do polo magnético da
Terra, a diferença da medição entre o Polo Norte magnético e o Polo Norte real vai ser maior. Alguns mapas
marcam o Polo Norte real (não o Polo Norte magnético). Por isso, ao utilizar esse tipo de mapa com este
relógio, ajustes são necessários.
- Medição da localização
Quando medir uma direção perto de um campo magnético forte, um erro grande vai ocorrer. Por isso, evite
este objetos ao fazer uma medição: ímã eterno (colar magnético), bloque de metal (porta de ferro, arcos de
metal, etc.), cabos de alta voltagem, antena, aparelhos eletrodomésticos (TV, computadores, máquinas de lavar,
geladeiras, etc.)
Quando estiver num trem, navio ou avião, etc., a direção não poderá ser medida corretamente.
Quando estiver dentro de casa, especialmente num edifício feito de muitos metais, a direção não poderá ser
medida corretamente. Isto é porque a estrutura de metal do edifício absorve a força magnética dos aparelhos
eletrodomésticos.
Page 28

Size: 170 x 55mm
Color: Blk
Size: 170 x 55mm
Color: Blk
A.特徴
-液晶画面が時、分、秒、年、月、日付と曜日を表示。
-自動カレンダー:2000年から2099年まで。
-3つのデイリーアラーム
-時報チャイム
-ストップウォッチ:ストップウォッチの最大表示範囲は、99時間59分59秒。
-カウントダウンタイマー:カウントダウンタイマーの最大表示範囲は、99:59:59。
-電子コンパス
-12時間/24時間の表示形式
-世界時間、48都市の時間
-夏時間
- ボタン音
-ELバックライト3秒間点灯
設定/ライト(ボタンA)
モ ー ド( ボ タ ン B )
( ボ タ ン E )上 へ
( ボ タ ン D )コ ン パ ス
( ボ タ ン C )下 へ
B.製品の機能モード
1.どのモードでも、ボタンAを1回押すことでバックライトが3秒間点灯します。
時刻 モード ストップ ウォッチ モー ド アラームモ ード カウントダウンタイマーモ ード 世界時間モード
ボタンB
ボタンD
ボタンB ボタンB
ボタンB
ボタンB
コンパス測 定モード
- Preservação
Se o relógio for magnetizado, a definição do sensor de direção será reduzida. Por isso deve-se evitar colocar
este relógio perto de um ímã ou de qualquer objeto que emita forças magnéticas fortes. Este objetos
incluem: ímã eterno (colar magnético) e aparelhos eletrodomésticos (TV, máquinas de lavar, geladeiras, etc.)
Se tiver dúvidas se o relógio foi magnetizado, faça a correção digital ou manual explicada na seção anterior.
- Motivo para a medição de direção estar incorreta
Se a medição de direção estiver errada, faça a correção da direção. Se a medição for feita perto de um
campo magnético forte, como eletrodomésticos, uma ponte de metal, colunas de aço, cabos de metal, etc.,
ou quando estiver num trem ou navio, vai dar erro. Afaste-se da estrutura de metal e meça a direção
novamente. A bússola não pode ser utilizada num trem ou navio.
- Porque se obtêm diferentes resultados ao medir direções no mesmo lugar?
A força de cabos de alta voltagem que estejam perto interferem com a detecção geomagnética deste
relógio. Afaste-se de cabos de alta voltagem e meça novamente.
- Porque ocorrem problemas ao medir a direção no interior?
TVs, computadores, alto-falantes ou objetos similares interferem na detecção geomagnética pelo relógio.
Mantenha-se longe de objetos que interfiram ou faça a detecção ao ar livre. Será mais difícil medir a
direção dentro de um prédio feito de concreto. A direção não pode ser medida num trem ou avião.
C. Especificações
A vida útil da bateria se calcula de acordo com o seguinte padrão: Funcionamento da bússola digital tres vezes
por dia por 30 segundos cada vez. Funcionamento da luz de fundo EL 4 vezes por dia (12 segundos). Som do
alarme uma vez por dia (60 segundos).
- Dimensão do módulo
- Espessura do módulo (sem a campainha)
- Variação da temperatura de funcionamento
- Voltagem para funcionamento
- Precisão da hora
- Precisão da bússola digital
- Tipo de bateria
- Corrente de condução estática media
- Corrente media do alarme
- Corrente media da iluminação EL
- Corrente media para o funcionamento da
bússola digital
- Vida útil da bateria
: 40.2mm
: 8.0 mm
: -10˚C ~ +60˚C
: 3.0 V
: ±60 seg/mês (T=25˚C)
: ±11° (-10˚C) ~ 40˚C
: CR2025 (220mAh)
: ≤6 uA (Corrente de condução estática máxima: 13uA)
: ≤1.5 mA (Corrente máxima do alarme: 4.5mA)
: ≤10 mA (Corrente máxima da iluminação LED: 12mA)
: ≤0.3 mA (Corrente máxima para o funcionamento da
bússola digital: 0.8mA)
: 18 meses (lítio Japonês)
Page 29

Size: 170 x 55mm
Color: Blk
Size: 170 x 55mm
Color: Blk
2.時刻モード
-ボタンAを1回押すと、バックライトが3秒間点灯します。Aを2秒間長押しすると、設定モードに入ります。
-Bを押して、操作モードを選択します。
-Cを押すと、「日付―月」と「月―日付」の間で表示形式が切り替わります。
-Dを押すと、コンパス測定モードに入ります。
-Eを押すと、「世界時間」と「時刻」の間でモードが切り替わります。
3.時刻と日付の設定
-時刻モードでAを2秒間長押しすると、「タイムゾーン」が点滅を始め、設定モードになったことを示します。
次にBを押して、下のような順序で他の設定箇所(点滅)を選択します。
DST 12時間/24時間の表示形式 秒 時
ボタンB
ボタンB ボタンB ボ タンB
ボタンB
ボタンBボタン B ボタンB ボタン B
日付 月 年 分
タイムゾー ン
-Eを押すとタイムゾーンの数値が進み、Eを長押しするとタイムゾーンの数値が急速に進みます。
-Cを押すとタイムゾーンの数値が戻り、Cを長押しするとタイムゾーンの数値が急速に戻ります。
-EかCを押すと夏時間(DST)がオン/オフになります。夏時間がオンになると「DST」の表示が画面に現
れます。
-EかCを押すと12時間/24時間の表示形式が切り替わります。
-Eを押すと数値が進み、Eを長押しすると数値が急速に進みます。
-Cを押すと数値が戻り、Cを長押しすると数値が急速に戻ります。
-EかCを押すと「秒」がゼロにリセットされます。
-Aを押すと設定を確定して終了し、時刻モードに戻ります。
-設定モードでボタンが押されないまま1分が経過すると、自動的に設定を終了して時刻モードに戻ります。
ボタンB
分時
5. ストップウォッチモ ード
-ストップウォッチの最大表示範囲は、99時間59分59秒です。
-ストップウォッチモードでは、Eを押すと計測をスタート/ストップします。ストップウォッチの停止時にCを押
す と 、ゼ ロ に リ セ ッ ト さ れ ま す 。
-ストップウォッチの計測中にCを押すとSPLタイム(スプリットタイム)に入り、「SPL」の表示が画面上に現れ
ます。
-Cを押すとSPL(スプリットタイム)を終了し、ストップウォッチは、走行を続けます。
-ストップウォッチは、最大限になると00から計測を再開します。
- Bを 押して ストップ ウォッチ モ ードを 終 了した 後 でも 、ストッ プウォ ッチを ストップし ない 限 り、ストップ ウォッ
チは背後で走行を続けます。
-Eを押すと数値が進み、Eを長押しすると数値が急速に進みます。
-Cを押すと数値が戻り、Cを長押しすると数値が急速に戻ります。
-Aを押すと設定を確定して終了し、時刻モードに戻ります。
-設定モードでボタンが押されないまま1分が経過すると、自動的に設定を終了して時刻モードに戻ります。
-アラーム時刻になると、アラーム音が60秒間鳴り、アラーム表示「」が点滅します。
- 鳴って いるアラーム 音をストップするには 、どれ かボタンを 押します。
-注記:「AL2」と「AL3」の設定方法は、「AL1」と同じです。
6. カウントダ ウンタイマーモード
-カウントダウンタイマーの最大表示範囲は、99時間59分59秒です。
a)カウントダウン時間の設定
-カウントダウンタイマーモードでAを2秒間長押しすると、「時」が点滅を始め、カウントダウンタイマーの設
定モードになったことを示します。次にBを押して、下のような順序で他の設定箇所(点滅)を選択します。
時 分 秒
-Eを押すと数値が進み、Eを長押しすると数値が急速に進みます。
-Cを押すと数値が戻り、Cを長押しすると数値が急速に戻ります。
-Aを押すと設定を確定して終了し、時刻モードに戻ります。
-設定モードでボタンが押されないまま1分が経過すると、自動的に設定を終了して時刻モードに戻ります。
b) カウントダウンタイマー の使 用
- Eを 押すとカウントダウン がスタートします。
-カウントダウンタイマーの走行中にEを押すと一旦停止し、再度Eを押すと計測を再開します。
-カウントダウンを中止するには、Eを押して一旦停止し、次にCを押すとカウントダウン時間が最初の数値
に戻 ります。
-カウントダウン時間が00:00:00になると、ウォッチが1分間鳴ります。どれかボタンを押すとストップします。
- Bを 押してカウントダウンタイマーモ ードを終 了した後 でも、カウントダ ウンをストップしない限り 、カウント
ダウンは背後で走行を続けます。
4.アラームモード
a)アラームのオン/オフ
-アラームモードでCを押すと、3つのデイリーアラームがAL1AL2AL3SIGの順序
で切 り替 わります。
-Dを押すとアラーム「」がオン/オフになります。Dを押すと時報チャイム音(CHI)がオン/オフになります。
b)アラームの設定
-第1アラーム(AL1)モードでAを2秒間長押しすると「時刻」が点滅
を始め、Bを押すと「分」が点滅します。次のとおり。
Page 30

Size: 170 x 55mm
Color: Blk
Size: 170 x 55mm
Color: Blk
7.世界時間
-世界時間モードでは、Aを押すと夏時間がオン/オフになります。「DST」が表示されていれば、DST
(夏時間)機能がオンであることを示します。「DST」が表示されていなければ、DST(夏時間)機能がオフで
あることを 示し ます。
-Eを押すとタイムゾーンを上向きに表示していき、Eを長押しすると急速に上へスクロールします。
-Cを押すとタイムゾーンを下向きに表示していき、Cを長押しすると急速に下へスクロールします。
都市 コード 都市 GMTとの差 同一タイムゾーン内の主要都市
UCT ガト ウィック 00.0
LIS
リスボン
LON ロンドン 00.0 ダ ブリン、リスボン、カサブ ランカ、ダカー ル、ア ビジャン
MAD マドリ ード +01.0 ミラノ、ロ ーマ、マドリード、アムステルダム、アルジェ 、
ハンブル グ、フランクフルト 、ウィーン、ストックホル ム、ベルリン
PAR パリ
ROM ローマ ローマ
BER ベル リン +01.0
SOT
ストックホ ルム
ATH アテネ +02.0
ヘルシ ンキ、イスタンブ ール、ベイルート、ダマスカス 、ケープタウン
CAI カイロ +02.0 アテネ、ヘルシンキ、イスタンブール、ベ イルート、ダ マスカス、
ケープタウン
JRS エル サレム +02.0
MOW モスクワ
JED
ジェッダ +03.0
ク ウ ェ ー ト 、リ ヤ ド 、ア デ ン 、ア ジ ス ア ベ バ 、ナ イ ロ ビ 、モ ス ク ワ 、シ ラ ー ズ
THR
テヘラン +03.5 テ ヘラン
DXB ドバイ +04.0 ア ブ ダ ビ 、マ ス カ ッ ト
KBL カブ ール +04.5
KHI カラチ +05.0 M Vモ ルディブ
DEL デリー +05.5 ムンバイ、コルカタ、ニューデリー
KMT カンボ ジア
DAC ダッカ +06.0 コロン ボ
RGN
ラングーン +06.5 ラングーン
BKK
バンコク +07.0 ジ ャ カ ル タ 、プ ノ ン ペ ン 、 ハ ノ イ 、ビ エ ン チ ャ ン
SIN シンガ ポール
HKG 香港 +08.0
シンガポール、クアラルンプール、北京、台北、マニラ、パース、ウランバートル
BJS 北京
TEP パプアニュ
ーギニア
SEL ソウル +09.0 平壌
TYO
東京 +09.0
ADL
アデレード +09.5 ダ ーウィン
GUM G Uグ アム
SYD
シドニー +10.0 メ ル ボ ル ン 、グ ア ム 、ラ バ ウ ル
NOU
ヌメア +11.0 ポ ートビラ
WLG* ウ エリントン +12.0
-11.0
ホノルル -10.0 パペーテ
ロサンゼルス -8.0 サンフランシスコ、ラスベガス、バンクーバー、シアトル/タコマ、
ドーソ ンシティ
エドモ ントン
デンバ ー -7.0 エド モントン
メキシコ
CHI
ニューヨーク モ ントリオール、デトロイト、マイアミ、ボストン、パナマ シティ、
ハ バ ナ 、リ マ 、ボ ゴ タ
サンディ エゴ
ハリファックス
PPG
HNL
ANC
YVR
LAX
YEA
DEN
MEX
パゴパゴ
ノウム
-9.0アンカレッジ
バンクー バー
NYC
YHZ
SCL
シカゴ -6.0 ヒューストン、ダ ラス/フォートワース、ニューオリンズ 、
メ キ シ コ シ テ ィ ー 、ウ ィ ニ ペ グ
-5.0
8.コンパス測定モード
-時刻モードまたは測定モードでDを押すと、コンパス測定モードに入ります。コンパスが現れて、電子針
が時計回りに円を描いた後でコンパス測定モードに入ります。ボタンが押されないまま60秒が経過する
と、自動 的に時計モードに戻ります。
-コンパスモードでは、Aを2秒間長押しすると調整モードに入ります。Bを押して手動補正またはデジタル
補正 モードを 選択 します。次 のとおり。
YYT カラカス
RIO
リオデ ジャネイロ
-3.0 サ ン パ ウ ロ 、ブ エ ノ ス ア イ レ ス 、ブ ラ ジ リ ア 、モ ン テ ビ デ オ
-4.0 ラ パ ス 、サ ン チ ァ ゴ 、ポ ー ト オ ブ ス ペ イ ン
FEN
ブラジル -2.0
RAI プラ イア -1.0
ボタンB
手動補正モード デ ジタル補 正モード
Page 31

Size: 170 x 55mm
Color: Blk
Size: 170 x 55mm
Color: Blk
a)手動補正モード
-手動補正モードで、EまたはCボタンを押し、続いて、時計回りまたは反時計回りの方向に、ゆっくりとウォッ
チを回します。2つの円が同じ方向に回転すると、ウォッチは自動的に補正を確定してコンパス測定モードに
戻ります。注記:電池交換後に初めてコンパスを使う時、ウォッチは自動補正モードに入ります。上述の方法
に よ っ て 、2 つ の 円 を 同 じ 方 向 に 回 転 さ せ て く だ さ い 。
b)デジタル補正モード
デジタル補正モードで、Eを押すと北方向補正の補正角度範囲が1~45(最大補正角度範囲は45)から
増加します。Cを押すと下記のように補正角度範囲(最小補正角度範囲は-45)が減少します。次のとおり。
-2つの円を回転させた後、自動補正の結果が下のように示されます。
正常 異常
-Aを押すと、補正数値を確定して通常の測定モードに戻ります。
例:ウォッチの測定する方向が正しくない場合、まず他のコンパスを使って北方向を測定し、次にウォッチ
の「12時」を使って北方向に合わせ、Dを押して測定します。矢印の先の方向が西に30の場合、上記の操
作方法によって-30を入力し、次にAを押して確定します。同時に、矢印は北を示し、補正プロセスが終了
したことを示します。北方向を測定する他のコンパスがない場合、手動補正を使って+/-11以内で自動的
に北方向を測定してください。ただし、「DEC」デジタル補正モードの選択時に、数値は必ず「00」にあわせ
るようご 注 意くださ い。
-以下の表は、各方向の略称の意味を表示しています。
ボタンC
方向N意味北方向
NNE
意味
北北東
方向NE意味北東方向
ENE
意味
東北東
E 東 ESE 東南東 SE 南東 SSW 南南東
S 南 SSW 南南西 SW 南西 WSW 西南西
W 西 WNW 西北西 NW 北西 NNW 北北西
-デジタルコンパスについて
このウォッチには、地磁気を検出できる磁気方向センサーがあります。したがって、このウォッチで表示され
る北は磁北極であり、これは実際の北極とは多少異なります。磁北極はカナダの北部に位置し、磁南極は
オーストラリアの南部に位置します。地球の磁極に近ければ近いほど、磁北極の測定値と実際の北極との
差異は大きくなります、磁気コンパスを使って測定する場合はこのことにご注意ください。地図には、実際
の北極(磁北極ではない)が記されているものがあります。したがって、そのような地図をこのウォッチと共
に使う場合は、正確な調整が必要です。
-測定場所
強い磁場の近くで方向を測定すると、大きなエラーが発生します。したがって、方向を測定するときは、以
下の物:永久磁石(磁気ネックレス)、金属ブロック(鉄扉、金属格納庫など)、高圧電線、アンテナ、家電
製品(テレビ、パソコン、洗濯機、冷蔵庫など)は避けてください。
電車、船または飛行機などの上では、方向は正しく測定できません。
屋内、特に大量の金属でできたビルの中では、方向は正しく測定できません。これは、ビル内の金属構造
が電化製品からの磁力を吸収するからです。
-保管
このウォッチは、磁力の影響を受けると方向センサーの精度が落ちます。したがって、このウォッチは、磁石
や強い磁力を放つ物の近くには置かないでください。避けるべき物には、永久磁石(磁気ネックレスなど)
と家電製品(テレビ、洗濯機、冷蔵庫など)が含まれます。
ウォッチが磁力の影響を受けた疑いのある場合、上で説明したデジタル補正または手動補正を行ってく
ださい。
-方向測定が不正確な理由
方向測定が不正確な場合には、方向補正を行ってください。家電製品、大きな鉄橋、鋼鉄柱、ケーブルの
下など強い磁場の近くで、または電車、船や飛行機などの上で測定を行うと、エラーが起こります。大きな
金属の物体から離れて、もう一度方向を測定してください。デジタルコンパスは電車や船の中では使用で
き ま せ ん の で 、ご 注 意 く だ さ い 。
-同じ場所で方向を測定しても、結果が異なるのはなぜですか?
高圧ケーブルからの磁力は、このウォッチが近くで地磁気を検知するのを妨害します。高圧ケーブルから
離れて、もう一度測定してください。
-屋内で方向を測定すると問題が起こるのはなぜですか?
テレビ、パソコン、スピーカーなどの製品は、このウォッチが地磁気を検知するのを妨害します。妨害する物
から離れるかまたは屋外で測定してください。鉄筋コンクリートのビル内で方向を測定するのは、より困難
となります。方向検知は、電車や飛行機の中ではできませんので、ご注意ください。
Page 32

Size: 170 x 55mm
Color: Blk
Size: 170 x 55mm
Color: Blk
УСТАНОВКИ/ПОДСВЕТКА
(Кнопка «A»)
РЕЖИМ (Кнопка «B»)
(Кнопка «E») ВВЕРХ
(Кнопка «D») КОМПАС
(Кнопка «C») ВНИЗ
2. Режим основного времени
- Нажмите «A» один раз для включения электролюминесцентной подсветки на 3 секунды, или
удерживайте «A» в течение 2 секунд для входа в режим установок.
- Нажмите «B» для выбора режима работы.
- Нажмите «С» для переключения форматов между «день-месяц» и «месяц-день».
- Нажмите «D» для входа в режим компаса.
- Нажмите «Е» для переключения режимов между мировым временем и основным временем.
3. Установка времени и даты
- В режиме основного времени удерживайте кнопку «A» в течение 2 секунд. «Часовой пояс»
начнёт мигать, сигнализируя о переходе в режим установок, после чего нажимайте «В» для
выбора установок (выбранная установка будет мигать) в такой последовательности:
Б. Режимы работы
1. В любом режиме при однократном нажатии на кнопку «А» электролюминесцентная
подсветка загорается на 3 секунды.
Режим
основного времени
Режим секундомера Режим будильника Режим
обратного отсчёта
Режим
мирового времени
Кнопка «B»
Кнопка «D»
Кнопка «B» Кнопка «B»
Кнопка «B»
Кнопка «B»
Часовой пояс Летнее время 12ч/24ч формат Секунда Час
Кнопка «B»
Кнопка «B» Кнопка «B» Кнопка «B»
Кнопка «B»
Кнопка «B»Кнопка «B» Кнопка «B» Кнопка «B»
День Месяц Год Минута
Режим компаса
A. Свойства
- ЖК-дисплей отображает часы, минуты, секунды, а так же год, месяц, день и неделю.
- Автоматический календарь: с 2000 по 2099 год.
- 3 ежедневных будильника.
- Почасовой сигнал.
- Секундомер: максимальный отображаемый диапазон секундомера 99 часов, 59 минут и 59 секунд.
- Таймер обратного отсчёта: максимальный отображаемый диапазон таймера 99:59:59.
- Электронный компас.
- 12/24 часовой формат времени.
- Мировое время, время для 48 городов.
- Переход на летнее время.
- Тональный сигнал кнопок.
- 3-х секундная электролюминесцентная подсветка.
C.仕様
電池寿命は、以下の標準的な使用に従い計算しています:デジタルコンパス操作は、1回30秒間を1日に3回。
ELバックライト操作は、1日に4回(12秒間)。アラーム音の鳴動は、1日に1回(60秒間)。
- モジュー ルサイズ
- モ ジ ュ ー ル 厚( ブ ザ ー を 除 く )
-動作温度範囲
-動作電圧
-時間精度
-デジタルコンパス精度
-使用電池
-静的平均駆動電流
-アラーム平均電流
-バックライト照明の平均電流
-デジタルコンパス操作の平均電流
-電池の寿命
:40.2mm
:8.0mm
:-10C~+60C
:3.0V
:60秒/月(T=25C)
:11(-10C)~40C
:CR2025(220mAh)
:≤6uA(静的最大駆動電流:13uA)
:≤1.5mA(アラーム最大電流:4.5mA)
:≤10mA(LED照明の最大電流:12mA)
:≤0.3mA(デジタルコンパス操作の最大電流:0.8mA)
:18か月(日本リチウム)
Page 33

Size: 170 x 55mm
Color: Blk
Size: 170 x 55mm
Color: Blk
- Нажмите «Е» для увеличения значения часового пояса. Удерживайте «Е» для быстрого увеличения
значения.
- Нажмите «С» для уменьшения значения часового пояса. Удерживайте «С» для быстрого
уменьшения значения.
- Нажмите «Е» или «С» для включения/выключения летнего времени. При включённом летнем
времени на дисплее появится индикатор «DST».
- Нажмите «Е» или «С» для переключения между 12-ти часовым и 24-х часовым форматами.
- Нажмите «Е» для увеличения значений, удерживайте «Е» для быстрого увеличения значений.
- Нажмите «С» для уменьшения значений, удерживайте «С» для быстрого уменьшения значений.
- Нажмите «Е» или «С» для обнуления секунд.
- Нажмите «А» для подтверждения и выхода из режима установок, и возврата к режиму основного
времени.
- Если в течение одной минуты ни одна кнопка не нажимается, то часы автоматически выйдут из
режима установок и перейдут в режим основного времени.
5. Режим секундомера
- Максимальный отображаемый диапазон секундомера: 99 часов, 59 минут и 59 секунд.
- Для начала/остановки отсчёта нажмите «Е» в режиме секундомера. Для обнуления показаний
нажмите «С» при остановленном секундомере.
- Когда секундомер отсчитывает время, нажмите «С» для входа в режим «SPL» (измерение отрезков
времени). При этом на дисплее появится индикатор «SPL».
- Нажмите «С» для выхода из режима «SPL» (измерение отрезков времени). При этом секундомер
продолжит отсчёт.
- Если показания достигнут максимальных значений, то секундомер начнёт новый отсчёт со значения 00.
- Если вы не остановите секундомер, то после нажатия кнопки «В» для выхода из режима секундомера
он продолжит отсчёт в фоновом режиме.
4. Режим будильника
а) Включение/выключение будильника
- В режиме будильника нажмите «С» для переключения между 3 ежедневными будильниками в
такой последовательности: AL1 AL2 AL3 SIG.
- Нажмите «D» для включения/выключения будильника « ». Нажмите «D» для
включения/выключения почасового сигнала (CHI).
б) Установка будильника
- В режиме первого будильника (AL1) удерживайте кнопку «А»
в течение 2 секунд, пока не начнёт мигать параметр «часы».
Чтобы задать минуты, нажмите «В», как показано ниже:
- Нажмите «Е» для увеличения значений. Удерживайте «Е» для быстрого увеличения значений.
- Нажмите «С» для уменьшения значений. Удерживайте «С» для быстрого уменьшения значений.
- Нажмите «А» для подтверждения и выхода из режима установок, и возврата к режиму основного времени.
- Если в течение одной минуты ни одна кнопка не нажимается, то часы автоматически выйдут из режима
установок и перейдут в режим основного времени.
- В заданное время сработает звуковой сигнал будильника продолжительностью в 60 секунд, при этом
будет мигать индикатор « ».
- Для остановки сигнала будильника нажмите любую кнопку.
- Примечание: способ установки будильников «AL2» и «AL3» аналогичен «AL1».
Кнопка «B»
МинутыЧасы
6. Режим обратного отсчёта
- Максимальный отображаемый диапазон таймера обратного отсчёта: 99 часов, 59 минут и 59 секунд.
а) Установка таймера обратного отсчёта
- В режиме таймера обратного отсчёта удерживайте кнопку «А» в течение 2 секунд, пока не начнёт мигать
параметр «часы», что свидетельствует о входе в режим установки параметров отсчёта. Чтобы задать
минуты и секунды, нажмите «В» для выбора нужного параметра (выбранный параметр будет мигать), как
показано ниже:
Часы Минуты Секунды
- Нажмите «Е» для увеличения значений. Удерживайте «Е» для быстрого увеличения значений.
- Нажмите «С» для уменьшения значений. Удерживайте «С» для быстрого уменьшения значений.
- Нажмите «А» для подтверждения и выхода из режима установок, и возврата к режиму основного
времени.
- Если в течение одной минуты ни одна кнопка не нажимается, то часы автоматически выйдут из
режима установок и перейдут в режим основного времени.
б) Использование таймера обратного отсчёта
- Нажмите «Е» для начала обратного отсчёта.
- Когда идёт обратный отсчёт, последовательное нажатие «Е» приостанавливает или продолжает
отсч ёт.
- Если вы хотите отменить обратный отсчёт, нажмите «Е» для приостановки, а затем «С» для возврата
к первоначальному значению.
- Когда обратный отсчёт достигнет 00:00:00, сработает звуковой сигнал продолжительностью в одну
минуту. Для остановки сигнала нажмите любую кнопку.
- Если вы не остановите обратный отсчёт, то после нажатия кнопки «В» для выхода из режима таймер
продолжит работу в фоновом режиме.
7. Мировое время
- В режиме мирового времени нажмите «А» для включения/выключения летнего времени. Появление
индикатора «DST» на дисплее означает, что функция летнего времени включена. Если индикатор «DST»
отсутствует, то функция летнего времени отключена.
- Нажмите «Е» для просмотра часовых поясов в возрастающем направлении. Удерживайте «Е» для быстрой
прокрутки.
- Нажмите «С» для просмотра часовых поясов в убывающем направлении. Удерживайте «С» для быстрой
прокрутки.
Код города Город Разница с GMT Другие крупные города в часовом поясе
UCT Гатвик 00.0
LIS
Лиссабон
LON Лондон 00.0 Дублин, Лиссабон, Касабланка, Дакар, Абиджан
MAD Мадрид +01.0 Милан, Рим, Мадрид, Амстердам, Алжир, Гамбург,
Франкфурт, Вена, Стокгольм, Берлин
PAR Париж
ROM Рим Рим
BER Берлин +01.0
SOT
Стокгольм
ATH Афины +02.0 Хельсинки, Стамбул, Бейрут, Дамаск, Кейптаун
CAI Каир +02.0
Афины, Хельсинки, Стамбул, Бейрут, Дамаск, Кейптаун
JRS Иерусалим +02.0
Page 34

Size: 170 x 55mm
Color: Blk
Size: 170 x 55mm
Color: Blk
MOW
Москва
JED Джид да +03.0
Кувейт, Эр-Рияд, Аден, Аддис-Абеба, Найроби, Москва, Шираз
THR Тегеран +03.5 Тегеран
DXB Дубай +04.0 Абу-Даби, Маскат
KBL
Кабул +04.5
KHI Карачи +05.0 Мальдивы
DEL Де ли +05.5 Мумбай, Калькутта, Нью-Дели
KMT Камбоджа
DAC
Дакка +06.0 Коломбо
RGN Рангун +06.5 Рангун
BKK Бангкок +07.0 Джакарта, Пномпень, Ханой, Вьентьян
SIN Singapore
HKG
Гонконг +08.0
Сингапур, Куала-Лумпур, Пекин, Тайбэй, Манила, Перт, Улан-Батор
BJS Пекин
TEP
Папуа Новая Гвинея
SEL
Сеул +09.0 Пхеньян
TYO Токио +09.0
ADL Аделаида +09.5 Дарвин
GUM
Гуам
SYD Сидней +10.0 Мельбурн, Гуам, Рабаул
NOU Нумеа +11.0 Порт-Вила
WLG* Веллингтон +12.0
-11.0
Гонолулу -10.0 Папеэте
ЛосАнджелес
-8.0 Сан-Франциско, Лас-Вегас, Ванкувер,
Сиэтл/Такома, Доусон
Эдмонтон
Денвер -7.0 Эдмонтон
Мехико
CHI
Нью-Йорк Монреаль, Детройт, Майами, Бостон, Панама,
Гавана, Лима, Богота
Сан-Диего
Галифакс
PPG
HNL
ANC
YVR
LAX
YEA
DEN
MEX
Паго-Паго
Ном
-9.0Анкоридж
Ванкувер
NYC
YHZ
SCL
Чикаго -6.0 Хьюстон, Даллас/Форт-Уэрт, Новый Орлеан,
Мехико, Виннипег
-5.0
8. Режим компаса
- Находясь в режиме основного времени или режиме измерений нажмите кнопку «D» для перехода в
режим компаса. На дисплее появится изображение компаса, а электронная стрелка совершит оборот
по часовой стрелке и перейдет в режим компаса. Возврат в режим
часов произойдёт автоматически, если по истечении 60 секунд не
будет нажата ни одна кнопка.
- В режиме компаса удерживайте кнопку «А» в течение 2 секунд для входа в режим калибровки.
Нажмите «В» для выбора режима ручной корректировки или
цифровой корректировки, как показано ниже:
а) Режим ручной корректировки
- В режиме ручной корректировки нажмите кнопку «Е» или «С», а затем медленно поверните часы по
часовой или против часовой стрелки. После совершения двух оборотов в одном направлении часы
автоматически установят поправку и вернутся в режим компаса. Примечание: после замены батареи
часы войдут в режим автоматической корректировки при первом запуске компаса. Совершите часами
два полных оборота в одном направлении в соответствии с описанным выше способом.
б) Режим цифровой корректировки
В режиме цифровой корректировки нажмите «Е» для увеличения угла поправки в диапазоне от 1 до 45°
(максимальный угол поправки 45°) для корректировки северных направлений. Нажмите «С» для
уменьшения угла поправки (минимальный угол поправки -45°), как показано ниже:
- После совершения двух оборотов результаты автоматической корректировки будут представлены
следующим образом:
YYT Каракас
RIO
Рио-де-Жанейро
-3.0 Сан-Паулу, Буэнос-Айрес, Бразилиа, Монтевидео
-4.0 Ла-Пас, Сантьяго, Порт-оф-Спейн
FEN Фернанду-
ди-Норонья
-2.0
RAI
Прая -1.0
Кнопка «B»
Режим
ручной корректировки
Режим
цифровой корректировки
Правильно Не правильно
Page 35

Size: 170 x 55mm
Color: Blk
Size: 170 x 55mm
Color: Blk
- Нажмите «А» для подтверждения значения поправки и возврата в нормальный режим компаса.
Например: если вы обнаружили, что часы неправильно измеряют направление, то сначала используйте
другой компас для определения севера, а затем совместите 12-ти часовую отметку на часах с севером и
нажмите «D» для измерения. Если стрелка отклоняется на 30° на запад, введите -30° в соответствии с
вышеописанным методом, а затем нажмите «А» для подтверждения. Стрелка станет показывать на север,
что свидетельствует об окончании процесса корректировки. Если вы не нашли другого компаса для
определения севера, воспользуйтесь ручной корректировкой для автоматического определения севера
с точностью +/-11°. При этом значение должно быть установлено на «00», если вы выбираете режим
цифровой корректировки («DEC»).
- Данная таблица расшифровывает значения аббревиатур для каждого направления.
- Примечание к цифровому компасу
Данные часы оснащены магнитным датчиком направления, который реагирует на земной магнетизм. Это
значит, что часы указывают на магнитный северный полюс, который несколько отличается от истинного
северного полюса. Магнитный северный полюс находится на севере Канады, а магнитный южный полюс –
на юге Австралии. При использовании магнитного компаса следует помнить, что чем ближе вы находитесь
к магнитному полюсу Земли, тем большей будет разница между измерениями магнитного северного полюса
и истинного северного полюса. Некоторые карты ориентированы на истинный северный полюс, а не
магнитный северный полюс. Таким образом, при работе с подобными картами часам требуется
соответствующая корректировка.
- Определение положения
При измерении направления вблизи сильных магнитных полей возникает значительная погрешность.
Таким образом, при измерении направления следует избегать близости со следующими объектами:
постоянные источники магнитных полей (напр. ожерелье из магнитов), металлические массивы (напр.
стальная дверь, металлическая вывеска магазина и т.п.), высоковольтные линии, антены, бытовые
электроприборы (ТВ, ПК, стиральная машина, холодильник и т.п.).
Кроме того, вы не сможете правильно определить направление в поезде, на корабле или самолете, а также
внутри зданий, особенно построенных с использованием значительного количества металла. Это
связано с тем, что металлические конструкции поглощают магнитное излучение от электроприборов.
Кнопка «C»
Направл.NЗнач.
Север
Направл.
NNE
Знач.
Северо-северо-восток
Направл.NEЗнач.
Северо-восток
Направл.
ENE
Знач.
Востоко-северо-восток
E Восток ESE Востоко-юго-восток SE Юго-восток SSW Юго-юго-восток
S Юг SSW Юго-юго-запад SW Юго-запад WSW Западо-юго-запад
W Запад WNW
Западо-северо-западNWСеверо-запад
NNW
Северо-северо-запад
- Меры предосторожности
Если часы намагнитятся, то точность датчика направления будет снижена. Поэтому избегайте нахождения
часов рядом с магнитом или любыми другими предметами с сильным магнитным полем, такими как
постоянные источники магнитного поля (напр. ожерелье из магнитов) и бытовые электроприборы (ТВ,
стиральная машина, холодильник и т.п.).
Если вы не уверены, намагничены ли ваши часы, проведите цифровую или ручную корректировку в
соответствии с инструкцией в предыдущем разделе.
- Причина неправильного измерения направления
Если направление измеряется неправильно, проведите корректировку направления. Если измерение
производится вблизи сильного магнитного поля, источником которого может являться бытовой
электроприбор, металлический мост, металлическая опора, подвесной кабель и т.п., либо вы находитесь
в поезде или на корабле, то это повлечет за собой возникновение ошибки. В таком случае следует отойти
от металлического объекта и повторить измерение направления. Помните, что цифровой компас не может
быть использован в поезде или на борту корабля.
- Почему измерение направления в одном месте дает разные результаты?
Магнитное поле близлежащего высоковольтного кабеля создает помехи геомагнитному датчику часов.
Отойдите от высоковольтного кабеля и повторите измерения.
- Почему возникает проблема при измерении направления в помещении?
ТВ, ПК, колонки и подобные объекты создают помехи геомагнитному датчику часов. Держитесь на
расстоянии от источников помех, либо проводите измерения на открытом пространстве. Находясь в
здании из железобетона измерить направление будет еще сложнее. Помните, что находясь в поезде или
самолёте невозможно произвести измерение направления.
C. Технические характеристики
Срок службы батареи рассчитывается по следующим нормам: цифровой компас запускается три раза в
день по 30 секунд; электролюминесцентная подсветка включается 4 раза в день по 12 секунд; будильник
срабатывает один раз в день на 60 секунд.
- Размер корпуса
- Толщина корпуса (без зуммера)
- Диапазон рабочих температур
- Рабочее напряжение
- Точность измерения времени
- Точность цифрового компаса
- Тип батареи
- Средний рабочий ток в режиме ожидания
- Средний ток будильника
- Средний ток ЭЛ подсветки
- Средний ток цифрового компаса
- Срок службы батареи
: 40.2 мм
: 8.0 мм
: -10°C ~ +60°C
: 3.0 В
: ±60 сек/месяц (T=25°C)
: ±11° (-10°C) ~ 40°C
: CR2025 (220 мА·ч)
: ≤6 мкА (Макс. рабочий ток в режиме ожидания:
13 мкА)
: ≤1.5 мА (Макс. ток будильника: 4.5 мА)
: ≤10 мА (Макс. ток ЭЛ подсветки: 12 мА)
: ≤0.3 мА (Макс. ток цифрового компаса: 0.8 мА)
: 18 месяцев (литиевая, производства Японии)
Page 36

Size: 170 x 55mm
Color: Blk
Size: 170 x 55mm
Color: Blk
Page 37

Size: 85 x 55mm
 Loading...